Cerbera V8 Power Steering Pump - How difficult to change?
Discussion


Cheers Guys,
I really appreciate your hints and guides
BUT
If I can try and illustrate here.....
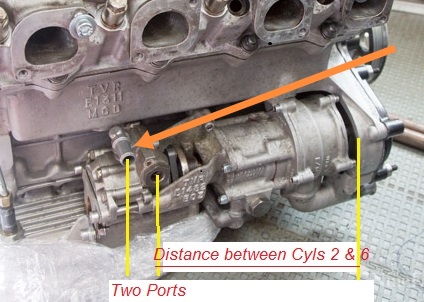
This is the 'Front Point' illustrated in your Fab Photo, William

However.. THIS.. is the distance back to the PAS Ports
and is the reason that I am having such a problem

Fortunately, your enthusiasm has renewed by batteries so I'm going down with a fight

I really appreciate your hints and guides
BUT
If I can try and illustrate here.....
This is the 'Front Point' illustrated in your Fab Photo, William
However.. THIS.. is the distance back to the PAS Ports
and is the reason that I am having such a problem
Fortunately, your enthusiasm has renewed by batteries so I'm going down with a fight


Mr Cerbera said:
Miniscule progress......
Managed to get the Socket Head on the Banjo Hex Bolt

BUT
Couldn't get the Rachet on the back of it coz of the Chassis struts.
Gonna need a 7/8 Rachet Ring Spanner with canted head and a 38cm shaft
(My favourite Bust size)
Anybody know a source ?
That's quite a long socket you've got there Managed to get the Socket Head on the Banjo Hex Bolt
BUT
Couldn't get the Rachet on the back of it coz of the Chassis struts.
Gonna need a 7/8 Rachet Ring Spanner with canted head and a 38cm shaft
(My favourite Bust size)
Anybody know a source ?

A normal ring spanner with a bat over the top? I use an old metal curtain pole, perfect for leverage as it slips over ratchets/spanners.
My socket is shorter and fatter - ooh err Mrs!
Sometimes tools have to be modified for specific jobs eg cut, ground, bent, welded. Not suggesting you do that with a brand new Snap-Off one, but that's when you're glad you kept that rusty old first socket set rather than binning it (and why engineers throw nothing away.
Try shortening the socket so that the hex part is only just deep enough for the bolt head. You may be able to shorten the drive end too.
Try shortening the socket so that the hex part is only just deep enough for the bolt head. You may be able to shorten the drive end too.
TwinKam said:
.... (and why engineers throw nothing away.
Thanks Rik, I have shown Mrs. Cerbera your statement with pride 
She just gave me a big "Haaruummph !"
TwinKam said:
Try shortening the socket so that the hex part is only just deep enough for the bolt head. You may be able to shorten the drive end too.
How on earth do you saw through a socket ?Will a hacksaw do it?
Thanks for the tip, though
DuncanM said:
My socket is definitely shorter, from a good old Halfords Professional set.
Yes, Dunc, I'm still using my original Drapers (some of which are well over 40 years old now)DuncanM said:
I back Paul to get this done now that he's familiar with getting the socket on 
Thanks for your combined enthusiasms Someday, somehow, The Beers / Wines will be on Me, I promise


Cutting-down a socket: they're not that hard, Paul, perfectly do-able with basic tools, you may be able to hacksaw it esp if the chrome plating has flaked off (that's why we never throw away tatty rusty sockets, they're easier to cut ) or use a cutting disc in an angle grinder, square it up on a bench grinder.
'Here's one I prepared earlier' (and one I didn't).

And, our wives must never meet...
) or use a cutting disc in an angle grinder, square it up on a bench grinder.'Here's one I prepared earlier' (and one I didn't).
And, our wives must never meet...
IIRC that one was for the turbo oil-feed banjo-bolt on a MINI (inacessible hateful 1.6 Peugeot engine).
Things like this then get lobbed in a 'special tools' drawer with cut down/bent spanners until the next time, whilst the shiny current-favourite sockets remain uncut and complete... their time of sacrifice will come eventually
Things like this then get lobbed in a 'special tools' drawer with cut down/bent spanners until the next time, whilst the shiny current-favourite sockets remain uncut and complete... their time of sacrifice will come eventually
TwinKam said:
IIRC that one was for the turbo oil-feed banjo-bolt on a MINI (inacessible hateful 1.6 Peugeot engine).
Things like this then get lobbed in a 'special tools' drawer with cut down/bent spanners until the next time, whilst the shiny current-favourite sockets remain uncut and complete... their time of sacrifice will come eventually
I need a like button for this post Things like this then get lobbed in a 'special tools' drawer with cut down/bent spanners until the next time, whilst the shiny current-favourite sockets remain uncut and complete... their time of sacrifice will come eventually
Mr Cerbera said:
TwinKam said:
.... (and why engineers throw nothing away.
Thanks Rik, I have shown Mrs. Cerbera your statement with pride She just gave me a big "Haaruummph !"
TwinKam said:
Try shortening the socket so that the hex part is only just deep enough for the bolt head. You may be able to shorten the drive end too.
How on earth do you saw through a socket ?Will a hacksaw do it?
Thanks for the tip, though
DuncanM said:
My socket is definitely shorter, from a good old Halfords Professional set.
Yes, Dunc, I'm still using my original Drapers (some of which are well over 40 years old now)DuncanM said:
I back Paul to get this done now that he's familiar with getting the socket on
Thanks for your combined enthusiasms Someday, somehow, The Beers / Wines will be on Me, I promise

TwinKam said:
....
And, our wives must never meet...
IIRC that one was for the turbo oil-feed banjo-bolt on a MINI (inacessible hateful 1.6 Peugeot engine).
Things like this then get lobbed in a 'special tools' drawer with cut down/bent spanners until the next time, whilst the shiny current-favourite sockets remain uncut and complete... their time of sacrifice will come eventually
DuncanM said:
I need a like button for this post
Bloody Brilliant, Lads Gladers01 said:
Well done for persevering with such dogged determination on these mechanical challenges, an inspiration to us all, if all else fails follow the path of least resistance and go with the 'dinner' option
Cheers Glad, Thanks for the advice.
I have, in fact, decided to follow that little snippet - but to an extreme -
and am going to hacksaw ALL the pipes off, move the Oil Cooler to the other side of the 'Mouthpiece' and move the Hydraulic Reservoir for the Steering Fluid much closer to the Pump, which will also give me a convenient place to mount a Windscreen Washer Header reservoir

Wish me Luck
(I can only think that whoever decided on the construction process must have had a relative in the hosing supply business
)Edited by Mr Cerbera on Monday 4th July 15:50
Good Grief !
The Job that almost beat me.
I realise that TVR's build history has consistency problems so my fix may not help others with the same prob (Just as other oweners' suggestions have not been applicable to my 2001 4.5)
BUT
I write my solution in an attempt to save any future owner from almost cutting his own throat.
The Hydraulic Bolt, which retains the PAS High-pressure Pipe on the 3rd Pump on the AJP's Pump shaft, could not be reached from above or the front. In the end I had to jack her up and go in from underneath.
The output pipe from the Oil Pump (situated slightly further forward) moves backwards between the Sump and the Chassis and, therefore, blocked access to the Banjo Bolt.
Unfortunately, the retaining Nut and Adapter at the Pump junction are recessed into the engine / chassis at that point.

In the end I had to jigsaw the neck of the pipe off.
The Pump Pipe could then be moved away, after cutting the tiewraps and unbolting the Pipe retainer, behind the Sump.
I finished sawing, by cutting through the (several) Tie-wraps that locate the braided Clutch bleed pipe.
With the area free, I still had problems reaching the Bolt, as there was too little space to put the head of a ratchet with socket between the Engine and the diagonal Chassis Brace Bar.
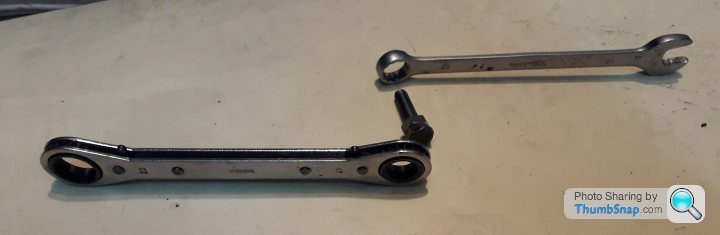
I had been told that the Bolt was 7/8 AF (impossible to buy in the shops on the Continent) so I offered up a 22 mm ratchet spanner which had 17 mm on the other end. Then, by slotting in a 17 mm bolt and nut which had been cranked closed, I managed to get another 17 mm ring on the end of the 'free' nut which gave me, more space under the chassis tube, and leverage.
After several calls out to my Old Man (deceased 13/11/94), the Bolt seal cracked and she was undone.
I will be rerouting all the appallingly laid-out Oil Pipes and replacing with Aeroquip.
Apologies for making you suffer
BUT
I'm just trying to save peeps who follow in my steps.
Thanks for everyone's help and comments. Always appreciated
The Job that almost beat me.
I realise that TVR's build history has consistency problems so my fix may not help others with the same prob (Just as other oweners' suggestions have not been applicable to my 2001 4.5)
BUT
I write my solution in an attempt to save any future owner from almost cutting his own throat.
The Hydraulic Bolt, which retains the PAS High-pressure Pipe on the 3rd Pump on the AJP's Pump shaft, could not be reached from above or the front. In the end I had to jack her up and go in from underneath.
The output pipe from the Oil Pump (situated slightly further forward) moves backwards between the Sump and the Chassis and, therefore, blocked access to the Banjo Bolt.
Unfortunately, the retaining Nut and Adapter at the Pump junction are recessed into the engine / chassis at that point.
In the end I had to jigsaw the neck of the pipe off.
The Pump Pipe could then be moved away, after cutting the tiewraps and unbolting the Pipe retainer, behind the Sump.
I finished sawing, by cutting through the (several) Tie-wraps that locate the braided Clutch bleed pipe.
With the area free, I still had problems reaching the Bolt, as there was too little space to put the head of a ratchet with socket between the Engine and the diagonal Chassis Brace Bar.
I had been told that the Bolt was 7/8 AF (impossible to buy in the shops on the Continent) so I offered up a 22 mm ratchet spanner which had 17 mm on the other end. Then, by slotting in a 17 mm bolt and nut which had been cranked closed, I managed to get another 17 mm ring on the end of the 'free' nut which gave me, more space under the chassis tube, and leverage.
After several calls out to my Old Man (deceased 13/11/94), the Bolt seal cracked and she was undone.
I will be rerouting all the appallingly laid-out Oil Pipes and replacing with Aeroquip.
Apologies for making you suffer
BUT
I'm just trying to save peeps who follow in my steps.
Thanks for everyone's help and comments. Always appreciated
Edited by Mr Cerbera on Sunday 17th July 16:53

Gassing Station | Cerbera | Top of Page | What's New | My Stuff