So what have you done with your Aston today?
Discussion


abh said:
I love this forum!! Thank you for sharing. Have just emailed a few dealers to quote for the upgrade. Can I ask, did you do the work yourself (is it DIYable other than AMDS?) or did you leave it to an Aston dealer to supply and fit?
Thx!
Andrew
It is all diy-able apart from the recoding of the car config that will require access to and use of AMDS. I fitted the parts myself, all the wiring and fixing holes are already in, just a case of being methodical really. Thx!
Andrew
Edited by yellow_tang on Saturday 20th April 17:39


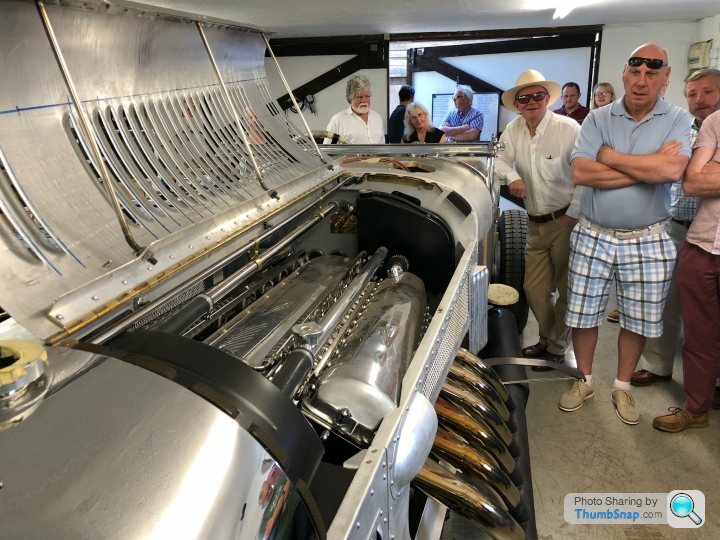
Went out with AMOC Area 20 to visit a fantastic engineering business in the depths of the Devon countryside. They build Bentley Blowers and the like - including this 27l merlin engined beast for a Middle East client. Only has a 220l fuel tank 

Oh, and this was parked in the garden

And then off to Lewtrenchard Manor for lunch. Thanks to Bonhams for their generous support of the event

Oh, and this was parked in the garden
And then off to Lewtrenchard Manor for lunch. Thanks to Bonhams for their generous support of the event


IanV12VSRs said:
Went out with AMOC Area 20 to visit a fantastic engineering business in the depths of the Devon countryside. They build Bentley Blowers and the like - including this 27l merlin engined beast for a Middle East client. Only has a 220l fuel tank
Is that a pair of red trousers sneaking into the photo Ian? 


Following delightful weather on Friday and Saturday, I could resist no more and paid the road tax on the DB9 Volante and took her out yesterday evening for the first time since the middle of last year
(I'm convinced Aston Martin Works did more miles in her than I did last year !)
But with the roof down along the M4 it was such a beautiful cruise along to Newbury....forgot how much I actually love this car
(I'm convinced Aston Martin Works did more miles in her than I did last year !)
But with the roof down along the M4 it was such a beautiful cruise along to Newbury....forgot how much I actually love this car
yellow_tang said:
Depends what vehicle you have, you may or may not need a new Sub.
The Vantage uses the same wiring loom for standard and premium, hence why all the wiring is already in place. Looking at part manuals for V8, there is a standard sub 6G33-18808-HC, and premium sub 6G33-18808-GC for non B&O. On V12 and V12 S there is only the premium sub for standard and premium 9G33-18808-GA.
2x 9G43-18808-JB SIDE SPEAKER
1x 701157-PK SCREW&WSHR 4.2x16(10
1x 9G43-18808-FA CENTRE SPEAKER
4x 703736 SCREW-4.2x19 WSH HD
4x 702084 SCREW M5x12
4x 6G33-12B579-AA M6 AMP TIE BAR
1x 4G43-16C694-AB-PK WASHER-NYLON(PACK 10
1x 9G43-18C999-AA SUB 5 AMP BRKT
10x 703025 SCREW M6x1.0x25 HEX
4x 6G33-115723-AA M6 AMP SPACER
1x 4G43-37-10985 PREMIUM SUB AMP
1x 6G33-18C808-CD PREMIUM AMPLIFIER
1x 9G33-9137-EB ALPINE LINK LEAD
As an option in 2015 it was a £1495 option.
To buy all the parts only, retail today would cost £1636.87 plus a bit of dealer/specialist time to update the car config in AMDS.
Thank you, I really appreciate it!The Vantage uses the same wiring loom for standard and premium, hence why all the wiring is already in place. Looking at part manuals for V8, there is a standard sub 6G33-18808-HC, and premium sub 6G33-18808-GC for non B&O. On V12 and V12 S there is only the premium sub for standard and premium 9G33-18808-GA.
2x 9G43-18808-JB SIDE SPEAKER
1x 701157-PK SCREW&WSHR 4.2x16(10
1x 9G43-18808-FA CENTRE SPEAKER
4x 703736 SCREW-4.2x19 WSH HD
4x 702084 SCREW M5x12
4x 6G33-12B579-AA M6 AMP TIE BAR
1x 4G43-16C694-AB-PK WASHER-NYLON(PACK 10
1x 9G43-18C999-AA SUB 5 AMP BRKT
10x 703025 SCREW M6x1.0x25 HEX
4x 6G33-115723-AA M6 AMP SPACER
1x 4G43-37-10985 PREMIUM SUB AMP
1x 6G33-18C808-CD PREMIUM AMPLIFIER
1x 9G33-9137-EB ALPINE LINK LEAD
As an option in 2015 it was a £1495 option.
To buy all the parts only, retail today would cost £1636.87 plus a bit of dealer/specialist time to update the car config in AMDS.
Edited by yellow_tang on Wednesday 17th April 11:30
Made and fitted a remote control for the exhaust bypass - bits from internet auction site cost a couple of quid. Not got the aesthetic quality of the items available from CC Charger but the challenge of making it amused me. Set up to default to 'factory' operation (relay closed) but with remote control to open it at will (giving effect of pulling fuse 22).
Rear light cluster removed, hole drilled and vacuum dried to remove slight condensation on the lens. Then slightly pressurised via the same hole and outside edges tested with leak detection fluid to find the tiny leaks that were letting moisture get in. Sealed and refitted.
Now need to drive it for a proper test.

Rear light cluster removed, hole drilled and vacuum dried to remove slight condensation on the lens. Then slightly pressurised via the same hole and outside edges tested with leak detection fluid to find the tiny leaks that were letting moisture get in. Sealed and refitted.
What kit did you use to sort your light out, may I ask?
What kit did you use to sort your light out, may I ask?
Hi Rob, I didn't have a kit as such for doing the light. There was condensation in one unit so I followed service bulletin 0286 - basically drill a hole in the bottom of the unit. The SB says to insert a narrow tube on an air line to blow out the moisture - I did it the other way and used a vacuum line to lift the condensation and pull in dry air. It took about 20 mins. I then used an air line to put a light positive pressure in the unit and used LDF (effectively soapy water) to find the leaks.
I made up a patch to reseal the hole and fixed it with an automotive grade polyurethane sealant. The couple of tiny leaks on the edge seal were also wiped over with the PU - it stays flexible so I trust will be ok. Patch over the drilled hole, unit back on the car with new neoprene washers for the fixing bolts, job done. About an hour in total.
So the impromptu kit - 1/2" drill, short length of flexible tube, polyurethane sealant, small piece of plastic to patch the hole, new neoprene washers - (are available via PH classified ad or e-bay).
Eric

Gassing Station | Aston Martin | Top of Page | What's New | My Stuff