So what have you done with your Aston today? (Vol. 2)
Discussion


Hi
Decided to replace my 06 Vantage side indicator housing units and bulbs today, so I purchased some Ford Puma / Transit Connect versions
As you can see, the original ones have yellowed quite badly over time.
The old ones basically fell apart as I removed them, they had become quite brittle.
So, removing the front housing is relatively easy, but you have to get your hand behind them to detach the connector. This can be done by simply removing one of the fasteners for the wheel arch lining (the one roughly level with the indicator) if you have smallish hands/arms like I do.
So, that's all pretty simply really. The difficult part (I found) is getting the unit to twist anti-clockwise back into it's 'tight' position.
I seem to remember someone mentioning that the Ford Puma/Transit Connect units - need a bit of plastic trimming from them to allow the correct re-fitment to take place. I can't for the life of me work out which part to trim, to get them to tighten into place. Can anyone advise?
Nice, I love those little projects: (somewhat) small effort and cost, big satisfaction and result.
As for your question, try to read this thread, they talk about common parts, the side blinker being one.
https://www.pistonheads.com/gassing/topic.asp?h=0&...
As for your question, try to read this thread, they talk about common parts, the side blinker being one.
https://www.pistonheads.com/gassing/topic.asp?h=0&...

JonnyCJ said:
Can't help with the installation I'm afraid, but if you have a link to the supplier that would be appreciated !
Sure thing, I bought the following two items (the bulbs are so that you don't have an orange looking lense, plus my bulbs might have been in there for a very long time, so makes sense to change whilst your're doing the work.https://ebay.us/OeEYub
https://www.amazon.co.uk/dp/B007P5UIFK/ref=cm_sw_e...
Thanks
rancid
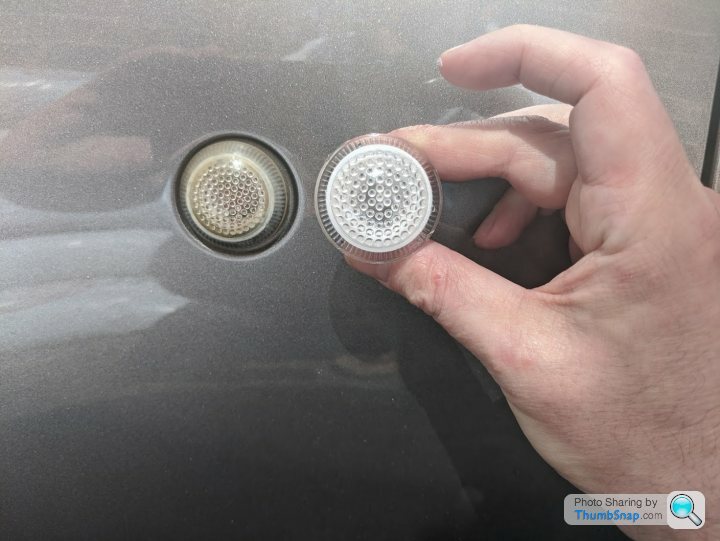
[quote=rancidswan]In case anyone is inspired by photos, here's side by side of old (left) and new (right)
If anyone can advise what needs trimming, I'd be gratefull
Thanks
I purchased the genuine AM side repeater in Nov 2018 (part number 4G43-13K376-AA) and it was priced at £17.07 + VAT.
The genuine side repeater is marked Aston Martin and the AM part number is marked on it as well, which would indicate that it is a different part.
I did not think the bulbs were changeable, the lens cover is held on by 3 x small plastic tabs which look easily broken to remove the lens cover.

paulrog1 said:
The white plastic part which needs trimming off is at the wider side, its the horizontal bit, with the lens pointing up. after it will fit.
Make sure you use the rubber o ring .
Huge thanks to Paulrog1 for the advice by email.Make sure you use the rubber o ring .
Once I realised what you were suggesting, it made sense, the plastic needs to be trimmed so that there's clearance between the lense and the housing for the car bodywork.
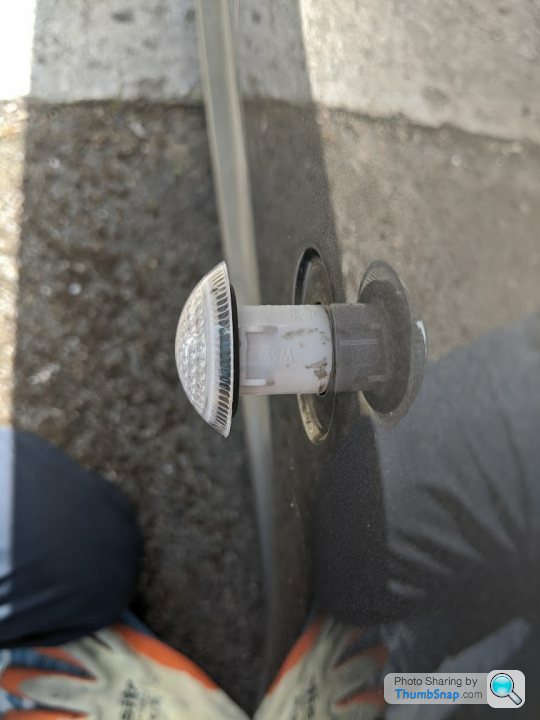
For anyone struggling with spatial awareness like I was, this is (roughly) what your units should be trimmed like, to allow the re-fitment and for the units to be able to be tightened (anti-clockwise from the outside in this case) I used a small hacksaw, stanley knife and metal files to fo the job
Edited by rancidswan on Thursday 22 April 16:25
paulrog1 said:
The white plastic part which needs trimming off is at the wider side, its the horizontal bit, with the lens pointing up. after it will fit.
Make sure you use the rubber o ring .
Nope - still not getting it !Make sure you use the rubber o ring .
Is the white plastic barrel being trimmed or the more creamy but at the bottom, or even the lense ?
Apologies for being dense....

Straightened out the misaligned fuel filler cap on my V12VS. That it had not been closing central to the hole had been annoying me for a while. After some needless mucking about trying to loosen and adjust it, the solution turned out to be far more simple. A gentle twist of the metal itself. Job done.
Felonious said:
Straightened out the misaligned fuel filler cap on my V12VS. That it had not been closing central to the hole had been annoying me for a while. After some needless mucking about trying to loosen and adjust it, the solution turned out to be far more simple. A gentle twist of the metal itself. Job done.
I bet you fit the cap onto the metal cover when filling up, need somebody to hold it instead.lolThe V12 Way said:
Felonious said:
Straightened out the misaligned fuel filler cap on my V12VS. That it had not been closing central to the hole had been annoying me for a while. After some needless mucking about trying to loosen and adjust it, the solution turned out to be far more simple. A gentle twist of the metal itself. Job done.
I bet you fit the cap onto the metal cover when filling up, need somebody to hold it instead.lolYes, you're absolutely right. Duff idea to make it from bendesium. To be honest, I was never fully confident that the cap wouldn't just fall out of its tiny hole on the hinged arm anyway. Probably safest to just let it dangle or, as you say, bring along an obliging assistant.
Gassing Station | Aston Martin | Top of Page | What's New | My Stuff