3-Way Exhaust Switch
Discussion


Thanks to everyone who has contributed to this thread. I've been looking at it as my wife gets upset when I leave early and wake her up  so I would like a quieter start. I have a 4.7 with the secondary cats removed.
I've tried to find a video of how much difference having the flaps closed would make to the start up volume but have drawn a blank. Can anyone point me in the right direction please? Or, alternatively, anyone who has installed a three way switch, could you do a quick phone video please?
Failing that, a brief description would help! Is it night and day? Subtly quieter?
so I would like a quieter start. I have a 4.7 with the secondary cats removed.I've tried to find a video of how much difference having the flaps closed would make to the start up volume but have drawn a blank. Can anyone point me in the right direction please? Or, alternatively, anyone who has installed a three way switch, could you do a quick phone video please?
Failing that, a brief description would help! Is it night and day? Subtly quieter?
IainWhy said:
I did it on my uk car, covered here:
https://www.pistonheads.com/gassing/topic.asp?h=0&...
Great posthttps://www.pistonheads.com/gassing/topic.asp?h=0&...
What gauge wire did you use? Think i'm finally going to have a crack at this myself
Also, has anyone tried this? https://asr-component.de/gb/begin/177-4602-flap-co...
An expensive way to avoid splicing any wires!
An expensive way to avoid splicing any wires!
dclxvi said:
Also, has anyone tried this? https://asr-component.de/gb/begin/177-4602-flap-co...
An expensive way to avoid splicing any wires!
Yup a very expensive version of a cccharger…. Just go for the original and best…An expensive way to avoid splicing any wires!
AdamV12V said:
dclxvi said:
Also, has anyone tried this? https://asr-component.de/gb/begin/177-4602-flap-co...
An expensive way to avoid splicing any wires!
Yup a very expensive version of a cccharger…. Just go for the original and best…An expensive way to avoid splicing any wires!
Certainly, £250 is way over priced for what it does.
Ref CC Charger remote. I don't thnk it can close valves at all engine revs.
Mine only offered 1. Always open; 2. OEM.
A wired switch is needed, if you want option 3. Always Closed.
I have a CC charger remote for DB9/DBS/V12V/Virage.
A good alternative to simply removing the infamous fuse 15/22 as it allows the stock exhaust setting or permanently loud but I went for the 3 way switch as permanently quiet can be a very useful option.
(If anyone wants the cc charger remote pm me with a reasonable offer!)
A good alternative to simply removing the infamous fuse 15/22 as it allows the stock exhaust setting or permanently loud but I went for the 3 way switch as permanently quiet can be a very useful option.
(If anyone wants the cc charger remote pm me with a reasonable offer!)
got the 3-way done, but oh boy is it a real pain to reach, you better be a nimble acrobat!
the wires look very thin (though solid wires, not strands) not sure what gauge, previously used 12awg when running direct from booth fuse box, quite thick.
I also used a wire connector to simplify joinng the wires, but I think they may be rated at 15amps only, may change out the fuse in the booth to a 15amp fuse from 20amp currently.
dclxvi said:
Thanks to everyone who has contributed to this thread. I've been looking at it as my wife gets upset when I leave early and wake her up so I would like a quieter start. I have a 4.7 with the secondary cats removed.
I've tried to find a video of how much difference having the flaps closed would make to the start up volume but have drawn a blank. Can anyone point me in the right direction please? Or, alternatively, anyone who has installed a three way switch, could you do a quick phone video please?
Failing that, a brief description would help! Is it night and day? Subtly quieter?
same as when you have the valves closed while driving up to 3.5k rpm. so I would like a quieter start. I have a 4.7 with the secondary cats removed.I've tried to find a video of how much difference having the flaps closed would make to the start up volume but have drawn a blank. Can anyone point me in the right direction please? Or, alternatively, anyone who has installed a three way switch, could you do a quick phone video please?
Failing that, a brief description would help! Is it night and day? Subtly quieter?
try to imagine that without the road noise while driving.
startup is very muted, if you still have the original mufflers, imagine starting up a mercedes or bmw.
of course, if you already straight piped it then there would be no valves.
It makes a huge difference trust me, in your case it would be major, even with mine both primary and secondaries removed, without its just crazy loud but oh so epic, with the flaps closed, even in my setup its a huge difference. Though won't help with the smell so the 200cell works.
Edited by edwin83 on Monday 1st May 16:44
edwin83 said:
got the 3-way done, but oh boy is it a real pain to reach, you better be a nimble acrobat!
Where has your switch been fitted? Is the location not suitable for you?
Mine is out of sight (a minor aspect, but I do like originality) and also easy to reach and operate. Quite happy with that.
edwin83 said:
It makes a huge difference trust me, in your case it would be major, even with mine both primary and secondaries removed ...
Perhaps I have misunderstood, but if you are in the UK, how does your car pass an MoT, when both primaries and secondary cats have been removed?
I am picturing a car without any catalytic converters.
Needs to be older than about 1995 for that.
dclxvi said:
Thanks @edwin83 that's very helpful. Now I need to summon the bravery to rip apart my Aston's interior. I wonder if Aston Installations would be up for it as they're quite local to me...
you don't need to rip it out actually, just pull back the side carpeting and it can be reached.Dewi 2 said:
Where has your switch been fitted? Is the location not suitable for you?
Mine is out of sight (a minor aspect, but I do like originality) and also easy to reach and operate. Quite happy with that.
very easy to reach, especially while driving and is out of sight, plus didn't need to drill unwanted holes.
what I mean is that to get to the wire to splice it, that is quite a job, especially since you cannot really pull the wire much and there are many other looms around making the space really tight to work.
Dewi 2 said:
Perhaps I have misunderstood, but if you are in the UK, how does your car pass an MoT, when both primaries and secondary cats have been removed?
I am picturing a car without any catalytic converters.
Needs to be older than about 1995 for that.
mine has the 200cell now, but I tested it without primary or secondary to hear how loud it sounded.
Edited by edwin83 on Tuesday 2nd May 04:49
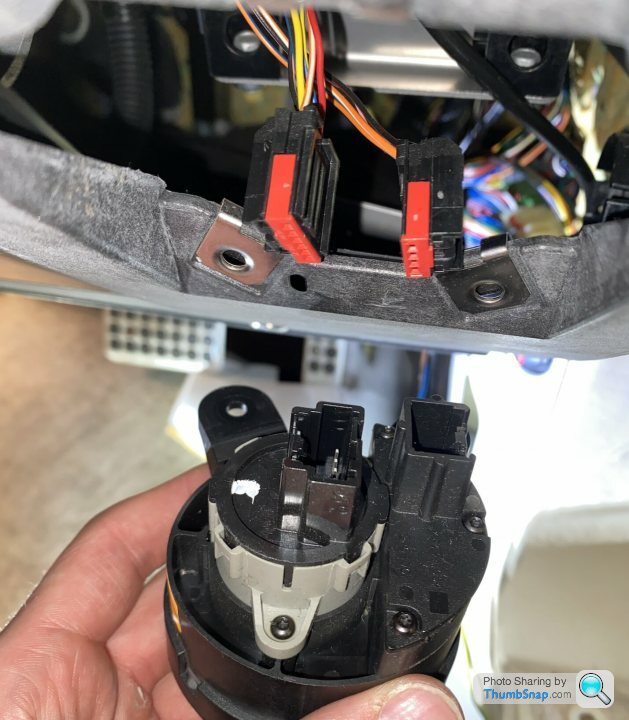
My MY14 DB9.2 looks to have different wiring looms to the photographs i've seen on guides (photo attached). I had my 3-way switch wired up ready to fit and then see that my connector is grey (not black) and lower row does not have a white wire 4 from the right.
Fuse 15 in rear fusebox (inside boot) is the one linked to the valve (i.e. not fuse 22 like earlier models)
Please can anyone assist?
Fuse 15 in rear fusebox (inside boot) is the one linked to the valve (i.e. not fuse 22 like earlier models)
Please can anyone assist?
edwin83 said:
...I do not see a similar connector with a white wire and my connectors are grey not black, though there is a green one...
Exact same issue hereamv12 said:
I installed one a few years back. I decided to splice into the valve control wire in the drivers footwell.
Awkward to get at, but saved running a cable to the rear fuse box.
 [url]
[url]
 |https://thumbsnap.com/bMvsitkP[/url]
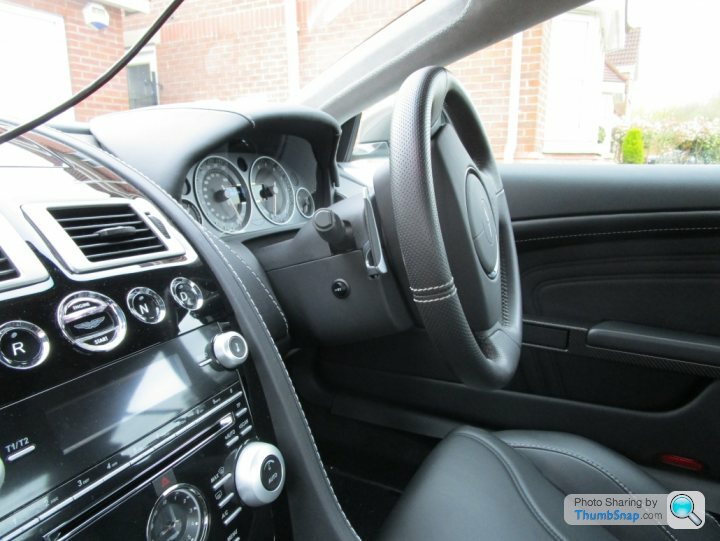
Three way switch fitted into the steering column cowl.
Where did you get the fuse diagram from to work out it's pin 19 in that connector? would like to find out the right wire for my MY14 DB9.2Awkward to get at, but saved running a cable to the rear fuse box.
[url]|https://thumbsnap.com/bMvsitkP[/url]Three way switch fitted into the steering column cowl.
Steering column mounting looks great, though I think below the light control is my favourite
I've got the wiring diagram for the 14MY DB9
I see the white wire going from ECU to bypass valve and that it goes through Fw (forward engine bay), Ca (cabin) then L-br (link bumper, rear).
What I’m still not clear on is how I find the right white wire. There are 3 harnesses (white, green and grey) and quite a few white wires (photo attached)
In the wiring diagram, I see that the engine bay wire meets Cabin wire at C78R1-8. Is this the harness connector? If so, is there a way to identify it that I’m not understanding?
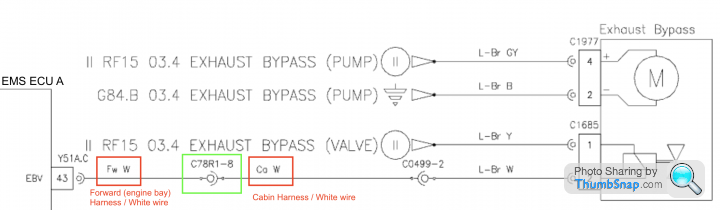
Complete guide to install 3-Way Switch on DB9.2
This guide is to install a 3-way switch on a MY14 DB9 by splicing a wire in the driver's footwell. There is an alternative which is to splice a wire closer to the exhaust valve, then run the switch to desired location.
The exhaust valve is open (loud) when no power received.
The exhaust valve is closed (quiet) when power is received.
The exhaust valve has power supplied by Fuse 15 in rear (boot) fuse box
By default, exhaust valve behaviour is governed by the ECU. When a signal from the ECU powers the exhaust bypass, the exhaust valve shuts.
The signal is carried along the wire marked in the circuit diagram below.
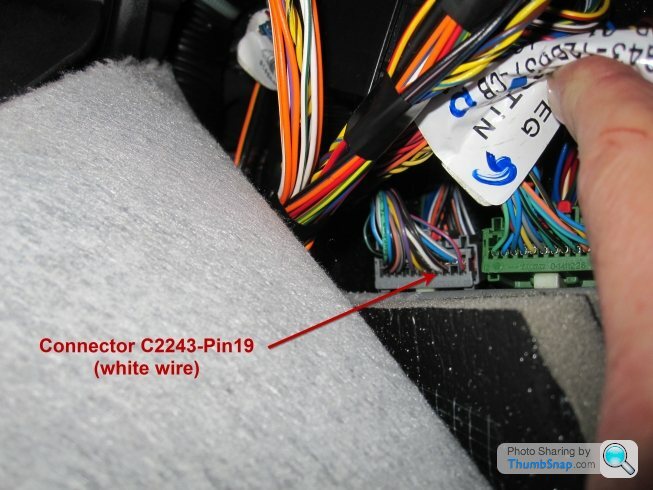
WARNING: circuit diagram does not apply to earlier vehicles which may use different wire numbers. Known pin locations:
DB9 MY14 (DB9.2): pin 8 (grey connector) - covered explicitly in this guide
DBS 2010: pin 19 (black connector)
V8 Vantage 2006: pin 19 (black connector)
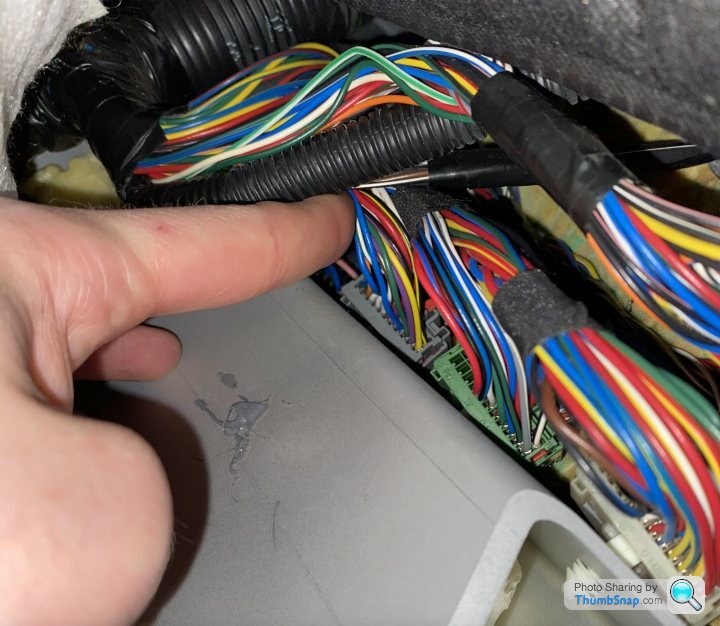
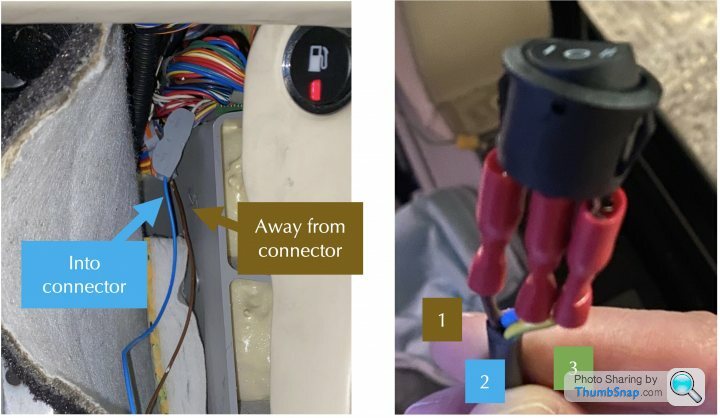
There are three connectors (grey, green & white, from left to right) in the driver footwell, all located to the right of the pedals underneath the carpet roll.

Connector C78R1 is the grey connector. Connection 8 (a white wire, 8 spaces along from left to right) on C78R1 is cut to splice in the 3-way switch. The length of accessible white wire is short, so cut it to leave sufficient length on each side.
The rocker switch connects wire on opposite side to centre wire when pressed down.
The 3-way switch is a SPDT (single pole, double throw) is wired as follows:
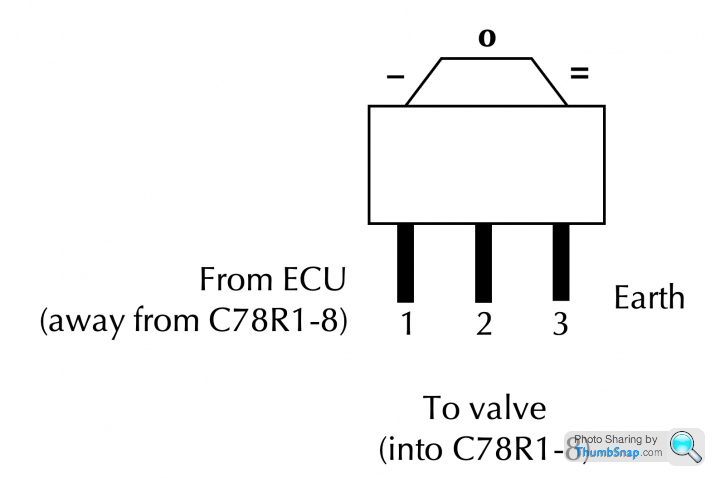
When = is selected, 1 & 2 are linked (ECU connected to valve, standard operation, valves controlled by driving mode)
When o is selected, no wires are linked (valve disconnected from ECU and earth, valve always open)
When – is selected, 2 & 3 are linked (valve connected to earth, always quiet, since valve is switched by the earth line). This can be tested by switching the ignition without starting the vehicle’s engine.
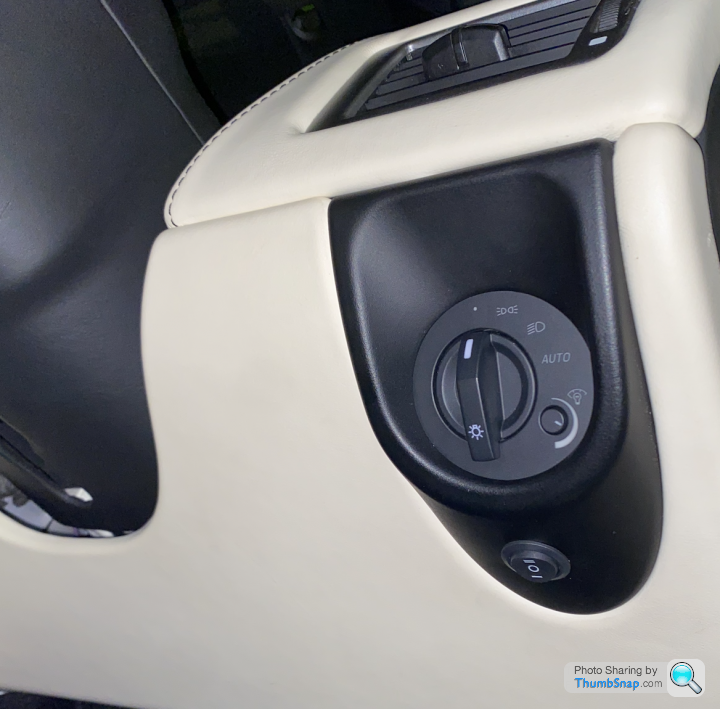
Installing 3-way switch under headlight control knob
Switch can be installed in your choice of location. To install under the headlight control knob, the drivers knee roll can be pulle off as a single piece (no screws). Note, there is an air temperature sensor to the left side, on the underside of the plastic grill. This clips in and out fairly easily. Drill a small pilot hole, followed by a hole saw of the right dimensions (20mm in my case), then fit the switch.
 |https://thumbsnap.com/gXg3Zgs1[/url]
Note the fit is tight on underside of the knee role, so position your hole accordingly in relation to the headlight control knob (which is best removed via 3 screws and 2 clip on/off connectors to install the switch without risk of damage)
This guide is to install a 3-way switch on a MY14 DB9 by splicing a wire in the driver's footwell. There is an alternative which is to splice a wire closer to the exhaust valve, then run the switch to desired location.
The exhaust valve is open (loud) when no power received.
The exhaust valve is closed (quiet) when power is received.
The exhaust valve has power supplied by Fuse 15 in rear (boot) fuse box
By default, exhaust valve behaviour is governed by the ECU. When a signal from the ECU powers the exhaust bypass, the exhaust valve shuts.
The signal is carried along the wire marked in the circuit diagram below.
WARNING: circuit diagram does not apply to earlier vehicles which may use different wire numbers. Known pin locations:
DB9 MY14 (DB9.2): pin 8 (grey connector) - covered explicitly in this guide
DBS 2010: pin 19 (black connector)
V8 Vantage 2006: pin 19 (black connector)
There are three connectors (grey, green & white, from left to right) in the driver footwell, all located to the right of the pedals underneath the carpet roll.
Connector C78R1 is the grey connector. Connection 8 (a white wire, 8 spaces along from left to right) on C78R1 is cut to splice in the 3-way switch. The length of accessible white wire is short, so cut it to leave sufficient length on each side.
The rocker switch connects wire on opposite side to centre wire when pressed down.
The 3-way switch is a SPDT (single pole, double throw) is wired as follows:
When = is selected, 1 & 2 are linked (ECU connected to valve, standard operation, valves controlled by driving mode)
When o is selected, no wires are linked (valve disconnected from ECU and earth, valve always open)
When – is selected, 2 & 3 are linked (valve connected to earth, always quiet, since valve is switched by the earth line). This can be tested by switching the ignition without starting the vehicle’s engine.
Installing 3-way switch under headlight control knob
Switch can be installed in your choice of location. To install under the headlight control knob, the drivers knee roll can be pulle off as a single piece (no screws). Note, there is an air temperature sensor to the left side, on the underside of the plastic grill. This clips in and out fairly easily. Drill a small pilot hole, followed by a hole saw of the right dimensions (20mm in my case), then fit the switch.
|https://thumbsnap.com/gXg3Zgs1[/url]Note the fit is tight on underside of the knee role, so position your hole accordingly in relation to the headlight control knob (which is best removed via 3 screws and 2 clip on/off connectors to install the switch without risk of damage)
Edited by magycks on Wednesday 17th May 15:16
Gassing Station | Aston Martin | Top of Page | What's New | My Stuff