DB9 Rear Subframe Refurbishment Project.
Discussion


LTP said:
DB9VolanteDriver said:
I feel for you guys in the UK, the undersides of your cars look like 30 year old beaters. I am really surprised by how bad these look. I guess the cold, damp, salty atmosphere really does a number. Here in the USA, most buyers would walk after seeing those pictures, even though it appears mostly cosmetic.
Don't they sell Astons in the Salt Belt? Or is it just in sunny California?DB9VolanteDriver said:
They sure do, but they don’t look like those photos. Most probably because virtually no one drives them during winter months once de-icing starts. My 18 year old Vanquish looks almost new underneath. I think if I was in your shoes, I’d be painting everything with POR 15. It would look a lot better than all that rust.
Might be worth reading the title of the thread...JonnyCJ said:
DB9VolanteDriver said:
They sure do, but they don’t look like those photos. Most probably because virtually no one drives them during winter months once de-icing starts. My 18 year old Vanquish looks almost new underneath. I think if I was in your shoes, I’d be painting everything with POR 15. It would look a lot better than all that rust.
Might be worth reading the title of the thread...DB9VolanteDriver said:
JonnyCJ said:
DB9VolanteDriver said:
They sure do, but they don’t look like those photos. Most probably because virtually no one drives them during winter months once de-icing starts. My 18 year old Vanquish looks almost new underneath. I think if I was in your shoes, I’d be painting everything with POR 15. It would look a lot better than all that rust.
Might be worth reading the title of the thread...I love doing jobs properly so it's the only way. The owners who just paint the bits you see without complete removal will see the untreated bits corrode excessively so eventually a replacement will need to be fitted, but currently most owners aren't worried as they just sell the car on after a few years, this problem will be huge in the years to come, but mines a keeper so I need to maintain it correctly.
This guide is to help owners who want to do this job at home.
More work completed this afternoon,
N/S suspension removed, the bolt at the tie rod to subframe was seized so I tried the advice from NoGrip and it came out a treat, great stuff.
I removed the wiring loom going through the subframe, there was a difficult plug going into the ZF gearbox, you need to rotate the outside of the plug anticlockwise about 90 degress and it comes out.
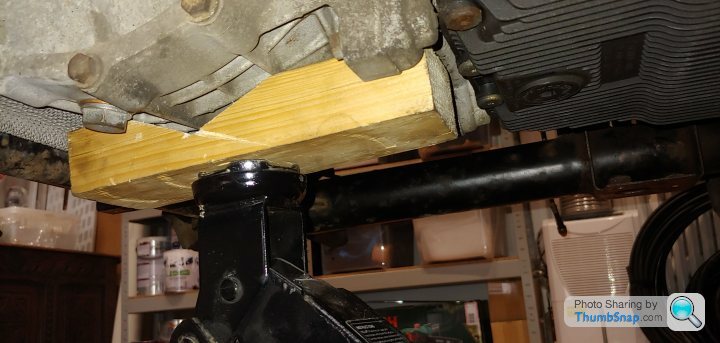
I supported the gearbox and diff under the diff with some wood and trolley jack as the gearbox has a plastic underside so I didn't want to crack it, I then removed the support mounts either side, The long bolt through the subframe to the support mounts needs a deep 15mm socket to remove, and the 4 bolts either side fixing them to the gearbox were extremely tight, but with time, patience and penetrating spray they eventually came out.
I also put another trolley jack under the front undertray under the engine just in case the car tilts forward as i'm taking away some of the weight from the back end.
Difference from V8V is no cooler pipes to remove and no wiring underneath the drivers seat. I have cut and removed the old handbrake cable as I will be installing a new one and the brake lines are close to the subframe but they don't need to be removed so that's another job not required.
So next stage is the actual subframe removal.
It's all going ok, no major issues so far.
Front of the car under the engine to prevent the car tilting

O/S Suspension removed

N/S Suspension Removed
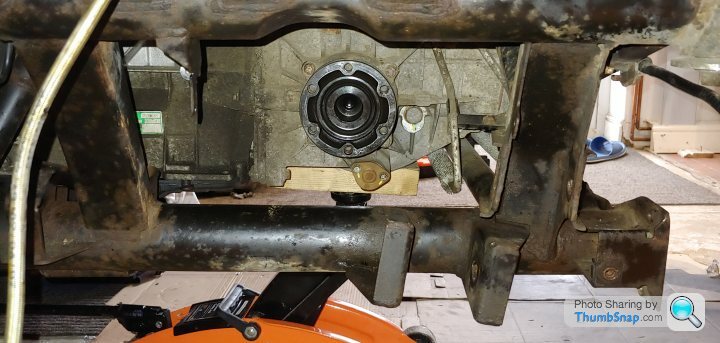
Supported under the diff, I cut a V in the wood as the bottom is round
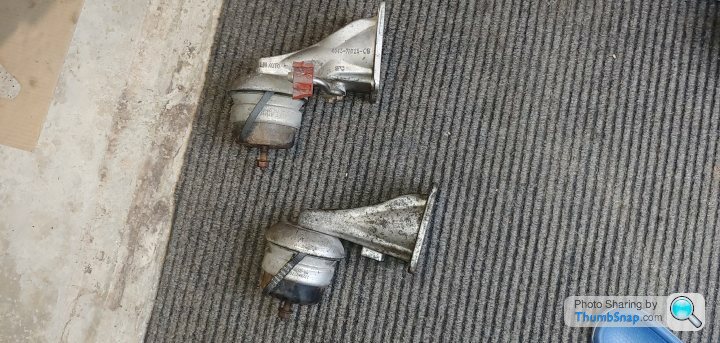
Gearbox/Diff mounts
N/S suspension removed, the bolt at the tie rod to subframe was seized so I tried the advice from NoGrip and it came out a treat, great stuff.
I removed the wiring loom going through the subframe, there was a difficult plug going into the ZF gearbox, you need to rotate the outside of the plug anticlockwise about 90 degress and it comes out.
I supported the gearbox and diff under the diff with some wood and trolley jack as the gearbox has a plastic underside so I didn't want to crack it, I then removed the support mounts either side, The long bolt through the subframe to the support mounts needs a deep 15mm socket to remove, and the 4 bolts either side fixing them to the gearbox were extremely tight, but with time, patience and penetrating spray they eventually came out.
I also put another trolley jack under the front undertray under the engine just in case the car tilts forward as i'm taking away some of the weight from the back end.
Difference from V8V is no cooler pipes to remove and no wiring underneath the drivers seat. I have cut and removed the old handbrake cable as I will be installing a new one and the brake lines are close to the subframe but they don't need to be removed so that's another job not required.
So next stage is the actual subframe removal.
It's all going ok, no major issues so far.
Front of the car under the engine to prevent the car tilting
O/S Suspension removed
N/S Suspension Removed
Supported under the diff, I cut a V in the wood as the bottom is round
Gearbox/Diff mounts
Edited by paulrog1 on Monday 28th September 09:12
Edited by paulrog1 on Tuesday 29th September 04:20
Hi Paul - when you lift the subframe over the transaxle, having dropped the transaxle a bit, use a bit of thick card between the frame and the transaxle. There are a few sticky up bits which the frame will snag on and the card helps smooth the ride.
Similarly, when putting it back on, use car to protect the fresh paint.
I'll refresh your memory on re-installing the subframe when you get there. It's very simple using my patented bench press technique !
My gearbox mounts were fine and I cleaned and re-painted them before re-fitting to get rid of some surface rust, but may be worth changing over now that we know the Jag part equivalent ?
Keep the pics coming.
Cheers
Jonny
Update, so yesterday I dropped the halfshafts/knuckles and wheel bearing assembly to Mike at Bamford Rose to press the driveshaft from the bearing assembly, I didn't want to take them to a local garage just in case they damage it and I trust BR 100%, hopefully the driveshafts will come out as sometimes they don't, I'll update when I talk to him.
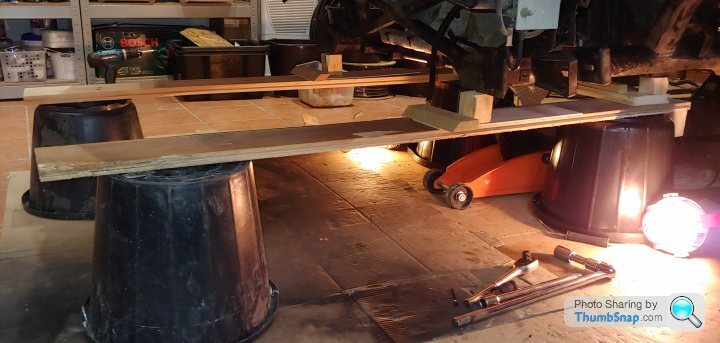
So..........the subframe is now out, quite straight forward, I know JonnyCJ has a benchpress method which I'm sure is ok but I wanted a slightly more controlled way of removing it so I made a basic wooden frame underneath the car supported by buckets.
I worked out that the rear of the frame needs to come down by 2.5 inches and front by 1.5 inches and coupled with lowering the transmission unit by a couple of inches using the trolley jack now supporting it's weight you can slide the subframe rearwards and down, so I built the basic wooden frame with 4 wooden spacers to prevent the frame suddenly dropping down when the bolts were removed.
For the DB9 there are diff oil cooler pipe fins very close to the subframe and a small plastic vent tube at the top which I didn't want to break so I wrapped some bubblewrap over to protect them.
I removed the bolts from the 2 front support brackets and the 2 long bolts at the rear, removed the wooden spacers and the subframe came down onto the wooden frame gently as expected, I then lowered the diff/gearbox unit buy a couple of inches and I started moving the subframe rearwards and down away from the car.
As soon as the subframe was free from the car I raised the transmission back up to it's correct height as not to strain anything.
Glad it's finally out, off to the refurbishers soon.........
Bubblewrap over the diff oil cooler fins

Wooden frame with buckets
Subframe rear mount

Subframe off the car

So..........the subframe is now out, quite straight forward, I know JonnyCJ has a benchpress method which I'm sure is ok but I wanted a slightly more controlled way of removing it so I made a basic wooden frame underneath the car supported by buckets.
I worked out that the rear of the frame needs to come down by 2.5 inches and front by 1.5 inches and coupled with lowering the transmission unit by a couple of inches using the trolley jack now supporting it's weight you can slide the subframe rearwards and down, so I built the basic wooden frame with 4 wooden spacers to prevent the frame suddenly dropping down when the bolts were removed.
For the DB9 there are diff oil cooler pipe fins very close to the subframe and a small plastic vent tube at the top which I didn't want to break so I wrapped some bubblewrap over to protect them.
I removed the bolts from the 2 front support brackets and the 2 long bolts at the rear, removed the wooden spacers and the subframe came down onto the wooden frame gently as expected, I then lowered the diff/gearbox unit buy a couple of inches and I started moving the subframe rearwards and down away from the car.
As soon as the subframe was free from the car I raised the transmission back up to it's correct height as not to strain anything.
Glad it's finally out, off to the refurbishers soon.........
Bubblewrap over the diff oil cooler fins
Wooden frame with buckets
Subframe rear mount
Subframe off the car
Edited by paulrog1 on Thursday 1st October 22:11
It's funny how the worst areas for the rust are on the welds. Almost as if they had painted everything before welding it all together, or failing the clean the slag off the welds properly before painting.
It really should not be that bad on a £120K+ motor car. That is penny pinching, or assuming the Aston Martin owner will never look under the car.
It really should not be that bad on a £120K+ motor car. That is penny pinching, or assuming the Aston Martin owner will never look under the car.
8Tech said:
It really should not be that bad on a £120K+ motor car. That is penny pinching, or assuming the Aston Martin owner will never look under the car.
The VH cars were designed and built to Ford standards, so would have passed the Ford corrosion and durability specs, which were probably 100k miles/10 year or 120k miles/12 year equivalents, using an accelerated test cycle. On a chassis component they would not allow structural corrosion but surface corrosion would probably be acceptable, if within limits. Obviously the quality of the actual parts supplied and their adherence to the specification on the drawing would depend on the supplier's quality control processes.You can always argue that "for a £120k+ car they should have..." but AML were (and are) making cars to a budget, and cars have to have a design life. Would they have sold more DB9's had they powder-coated the rear subframe? Would they have reduced their margins if they had?
Just offering an alternative view - nobody likes to find corrosion on their pride and joy. And pointing out that this car is 16 years old - you should have seen the underside of my 12-yo Volvo V70
Edited by LTP on Thursday 1st October 18:52
I can't comment on the V8V subframe but with the DB9 subframe there is clear separation between the steel subframe and the aluminium chassis with the rubber bushes.
After 16 years with the dissimilar metals no galvanic corrosion at all.
Tell you the truth yeah it would of been nice if the subframe was painted better when produced but it's currently just surface corrosion and Aston designed it well so it's not too bad.
After 16 years with the dissimilar metals no galvanic corrosion at all.
Tell you the truth yeah it would of been nice if the subframe was painted better when produced but it's currently just surface corrosion and Aston designed it well so it's not too bad.
8Tech said:
It's funny how the worst areas for the rust are on the welds. Almost as if they had painted everything before welding it all together, or failing the clean the slag off the welds properly before painting.
It really should not be that bad on a £120K+ motor car. That is penny pinching, or assuming the Aston Martin owner will never look under the car.
Welds rust more quickly due the extra oxygen entering the material during the welding process. To shotblast and galvanise isn’t the norm on car components. It adds excess weight for starters and Aston would not agree with that. If the component was a true Ford design it would have been stamped out rather than box section welded together. Tooling costs money so to be cost effective minimum cars have to be made. Clearly Aston don’t sell enough to warrant such tooling. So the next best thing cost wise is to use box section. Cheap to buy, cheap to cut, takes a bit longer to complete a useable component but no tooling costs. Building by hand is very difficult to maintain tolerance on every component though. I bet most Aston body panels require a fair bit of remedial work before paint. That costs money and man hours. So any reasonable cost to sell has now become a niche price. Rusty welds after 16 years is the least of Astons worries lol It really should not be that bad on a £120K+ motor car. That is penny pinching, or assuming the Aston Martin owner will never look under the car.

BigMig said:
Interesting to see that there’s some token rubber isolation bushes on the mounting points. The Vantage ones are just hard points, metal to metal.
The difference between GT and Sports. For the Sports you want the maximum stiffness so you solidly mount the subframe, even if it gives an increase in structure-bourne noise. For the GT you want a little more compliance for improved ride and noise. I'm betting you'll find the same compromise between DB11 and New Vantagepaulrog1 said:
More work completed this afternoon,
N/S suspension removed, the bolt at the tie rod to subframe was seized so I tried the advice from NoGrip and it came out a treat, great stuff.
I removed the wiring loom going through the subframe, there was a difficult plug going into the ZF gearbox, you need to rotate the outside of the plug anticlockwise about 90 degress and it comes out.
I supported the gearbox and diff under the diff with some wood and trolley jack as the gearbox has a plastic underside so I didn't want to crack it, I then removed the support mounts either side, The long bolt through the subframe to the support mounts needs a deep 15mm socket to remove, and the 4 bolts either side fixing them to the gearbox were extremely tight, but with time, patience and penetrating spray they eventually came out.
I also put another trolley jack under the front undertray under the engine just in case the car tilts forward as i'm taking away some of the weight from the back end.
Difference from V8V is no cooler pipes to remove and no wiring underneath the drivers seat. I have cut and removed the old handbrake cable as I will be installing a new one and the brake lines are close to the subframe but they don't need to be removed so that's another job not required.
So next stage is the actual subframe removal.
It's all going ok, no major issues so far.
Front of the car under the engine to prevent the car tilting
O/S Suspension removed
N/S Suspension Removed
Supported under the diff, I cut a V in the wood as the bottom is round
Gearbox/Diff mounts
Great thread!N/S suspension removed, the bolt at the tie rod to subframe was seized so I tried the advice from NoGrip and it came out a treat, great stuff.
I removed the wiring loom going through the subframe, there was a difficult plug going into the ZF gearbox, you need to rotate the outside of the plug anticlockwise about 90 degress and it comes out.
I supported the gearbox and diff under the diff with some wood and trolley jack as the gearbox has a plastic underside so I didn't want to crack it, I then removed the support mounts either side, The long bolt through the subframe to the support mounts needs a deep 15mm socket to remove, and the 4 bolts either side fixing them to the gearbox were extremely tight, but with time, patience and penetrating spray they eventually came out.
I also put another trolley jack under the front undertray under the engine just in case the car tilts forward as i'm taking away some of the weight from the back end.
Difference from V8V is no cooler pipes to remove and no wiring underneath the drivers seat. I have cut and removed the old handbrake cable as I will be installing a new one and the brake lines are close to the subframe but they don't need to be removed so that's another job not required.
So next stage is the actual subframe removal.
It's all going ok, no major issues so far.
Front of the car under the engine to prevent the car tilting
O/S Suspension removed
N/S Suspension Removed
Supported under the diff, I cut a V in the wood as the bottom is round
Gearbox/Diff mounts
Edited by paulrog1 on Monday 28th September 09:12
Edited by paulrog1 on Tuesday 29th September 04:20
Quick question - what does the rear subframe weigh?
Gassing Station | Aston Martin | Top of Page | What's New | My Stuff