DB9 Rear Subframe Refurbishment Project.
Discussion


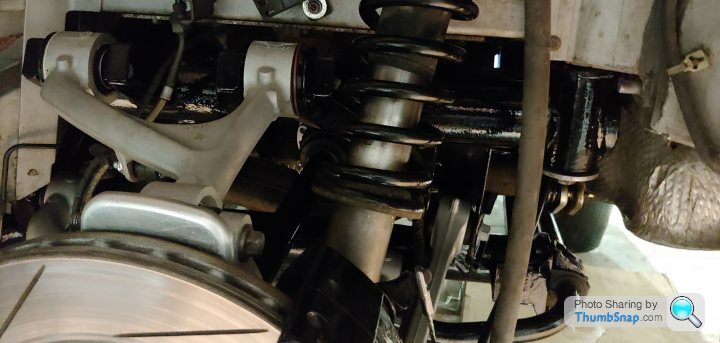
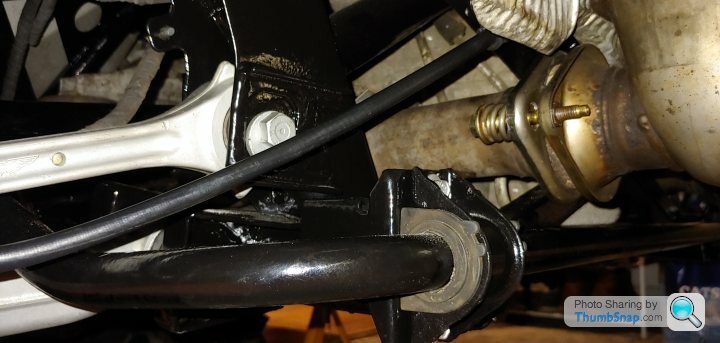
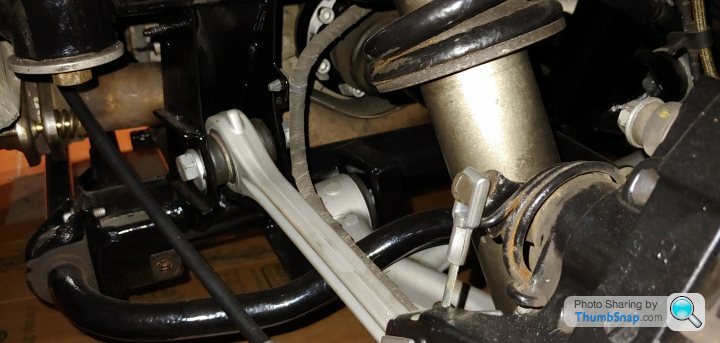
Suspension components now back on with new nuts and bolts, antiroll bar back on with new bushes and new drop links.
I used a long hex socket to torque up the 6 bolts each side for the half shafts to differential, always use new bolts and blue loctite thread sealer.
https://www.ebay.co.uk/itm/BERGEN-H8-Impact-Hex-Bi...
After everything was assembled i raised each side with wood and a trolley jack to normal ride height and torqued up all the bolts to the correct torque.
There are 2 eccentric bolts either side for wheel alignment, before i removed the old bolts i took some photos of their positions and today on reassembly the new ones are exactly in the correct positions, although once the car is back on the road in the spring i will take the car to a 4 wheel alignment center.


Next is ABS sensors then exhaust system back on.
I used a long hex socket to torque up the 6 bolts each side for the half shafts to differential, always use new bolts and blue loctite thread sealer.
https://www.ebay.co.uk/itm/BERGEN-H8-Impact-Hex-Bi...
After everything was assembled i raised each side with wood and a trolley jack to normal ride height and torqued up all the bolts to the correct torque.
There are 2 eccentric bolts either side for wheel alignment, before i removed the old bolts i took some photos of their positions and today on reassembly the new ones are exactly in the correct positions, although once the car is back on the road in the spring i will take the car to a 4 wheel alignment center.
Next is ABS sensors then exhaust system back on.
Job progressing well,
Brake disc's back on with brake calipers and handbrake calipers, I used new bolts and pads for the handbrake calipers and adjusted them correctly. The handbrake cable was new as the old one the adjusters had seized so I applied nickel anti-seize grease to stop that happening again.
Went round all 4 brake calipers bleeding the system, bleed the inboard nipple first.
Exhaust is back on, middle section, then rear pipes, then rear silencer, with new clamps and 6 rubber hangers, make sure everything is back in place before you tighten all the clamps to avoid any excessive strain.
Next is rear bumper and lights, oil service, rear wheel liners, rear undertray, wheels back on, then off the axle stands, torque the main hub bearings to 300Nm, then back on the road.......
See the light at the end of the tunnel now, i'm happy with how it's going.
Edited by paulrog1 on Sunday 20th December 19:34
A great write up. I have a couple of questions?
1) Does the transaxle mount to the subframe or direct to the car? If it mounts to the subframe the subframe did you leave it behind to save weight or to avoid undoing the prop shaft?
2) I have not come across nickel anti-seize grease before. Is this a new improved alternative to copper anti-seize grease or is it for different purposes?
A quick comment on subframes. On other makes of car I have had to refurbish scabby subframes on otherwise good cars. If people want to use a cheaper but affective alternative to sending it away for blasting etc, I suggest a) strip the paint with wire wheel in angle grinder or good paint stripper. b) leave in a big bath of citric acid warmed by a fish tank heater, c) after rinsing scrub with phosphoric acid, d) waxoil or ACF50 of similar inside the tubes, e) clean with panel wipe, f) prime with 3 coats of epoxy primer and g) top coat with 2 coats of Upol Raptor. If you used a wire wheel in (a) the surface will need to be keyed. I have citric acid dipped large items one half at a time.
MGDavid said:
A great write up. I have a couple of questions?
1) Does the transaxle mount to the subframe or direct to the car? If it mounts to the subframe the subframe did you leave it behind to save weight or to avoid undoing the prop shaft?
.
The gearbox and diff unit is mounted on the subframe using 2 hydromounts, before removing the hydromounts i placed a trolley jack with a piece of wood to support it, i did not remove it, its not necessary.1) Does the transaxle mount to the subframe or direct to the car? If it mounts to the subframe the subframe did you leave it behind to save weight or to avoid undoing the prop shaft?
.
I've been using the nickel grease on all the exhaust bolts and silicon grease on everything else, nothing on the suspension bolt threads for correct torque.
Yeah taking the subframe to a proper paintshop is the way to go.
Edited by paulrog1 on Tuesday 29th December 20:13
Have a read of this thread as well - some info on dropping the transaxle and taking the subframe out and re-installing https://www.pistonheads.com/gassing/topic.asp?h=0&...
I was going to put the rear bumper back on the car last week until I found this on the 2 metal support plates -
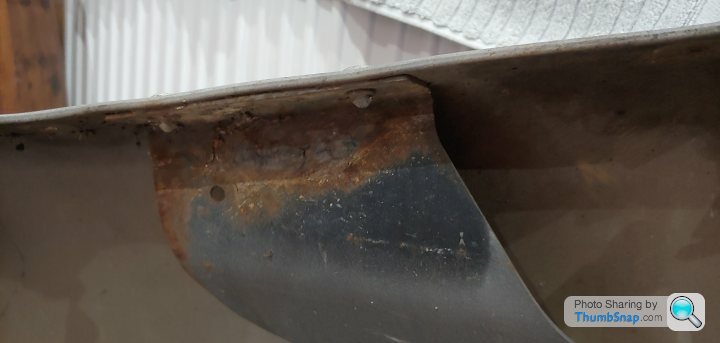
So I tried to remove them to have them painted and I found they are fixed on by 3 rivets per side -

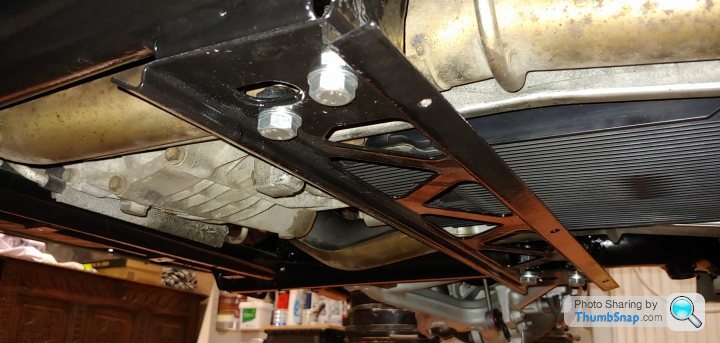
I drilled the rivets out easily and now they are off the bumper, I rubbed down the metal and removed most of the rust, then painted them using the POR-15 4 stage rust inhibitor/paint process, I found suitable bolts to use when I put them back on the bumper -
They are BZP and a very shallow head so ideal for the bumper - https://www.screwfix.com/p/joint-connector-bolts-b...
So the process is
1- Rub down the metal and try to remove most of the rust
2- Use POR-15 Cleaner/Degreaser to clean the metal.
3- Use POR-15 Rust Inhibitor to neutralise the rust
4- 2 coats of POR-15 black paint
5- 2 coats of top coat paint, I use a black enamel paint.


They should now last for years, to buy new your looking at around £100 each.
Next winter I'll remove the front bumper and do the same.
So I tried to remove them to have them painted and I found they are fixed on by 3 rivets per side -
I drilled the rivets out easily and now they are off the bumper, I rubbed down the metal and removed most of the rust, then painted them using the POR-15 4 stage rust inhibitor/paint process, I found suitable bolts to use when I put them back on the bumper -
They are BZP and a very shallow head so ideal for the bumper - https://www.screwfix.com/p/joint-connector-bolts-b...
So the process is
1- Rub down the metal and try to remove most of the rust
2- Use POR-15 Cleaner/Degreaser to clean the metal.
3- Use POR-15 Rust Inhibitor to neutralise the rust
4- 2 coats of POR-15 black paint
5- 2 coats of top coat paint, I use a black enamel paint.
They should now last for years, to buy new your looking at around £100 each.
Next winter I'll remove the front bumper and do the same.
Edited by paulrog1 on Friday 1st January 15:06
Edited by paulrog1 on Friday 1st January 15:08
paulrog1 said:
They are aluminum rivets but they don't fix to any aluminium.
They go through a plastic bumper and steel bracket so using a BZP M6 bolt would be suitable.
Plastic right. The zinc plate won’t last long in that area but much better than an aluminium pop rivet. Personally I would have used a stainless steel fixing with a dab of wax before and after fitting. They go through a plastic bumper and steel bracket so using a BZP M6 bolt would be suitable.

Job is almost complete, the rear bumper and lights are back on.
Slight problem with the exhaust, found leaks from a couple of clamps so I decided to remove the sections again and clean all the joints and apply abit of exhaust assembly paste,
Just rear wheel liners and rear undertray to put on, wheels on, off the axle stands and rear hub nuts torqued.
I noticed that almost all nuts and bolts at the rear needed replacing, some genuine AM bolts, some normal zinc plated bolts and some stainless bolts, ensure you dont have dissimilar metals in contact as you will have more corrosion issues.
A few photos now -
Edited by paulrog1 on Friday 22 January 19:53
Job's done now, all covers back on, off the axle stands, wheel nuts torqued up.
It's been quite a job but really happy it's now complete, it's taken most Sundays between last September and now, I really took my time on everything to get it right, I haven't road tested it yet or have the tracking done but that's getting done in March once the weather gets better.
So the parts I've replaced are -
Both rear wheel bearings
Wheel bearing nuts (Jag Part)
All suspension nuts and bolts with genuine AM parts
Both rear drop links
Both rear splash guards
Handbrake Cable
Handbrake Pads
Handbrake caliper bolts
Halfshaft bolts to diff (you have to replace these)
All 6 exhaust rubber mounts
All 7 exhaust clamps, (4 are elliptical and 3 are straight clamps)
Anti-roll bar bushes.
Alarm unit (mine had severe corrosion)
With loads of zinc plated and stainless nuts and bolts where required, every nut and bolt at the rear has been replaced.
Things to think about -
Get a couple of male and female brake pipe blanks so when you remove the rear brake calliper's you can stop all the fluid dripping onto the floor.
You will find some corroded bolts that will probably sheer off so you need to learn how to drill them out without any damage to the thread, I found the bolts on the exhaust were the worst, I used Wurst Rost off Ice for really corroded bolts.
You will probably need to go to a garage to press out the halfshafts from the wheel bearing/knuckle to replace the wheel bearing, I took mine to Bamford Rose, The main bearing nuts were Extremely tight to remove.
The suspension bolts can be very tight in the suspension arms, read this topic for a way to remove the bolts using a hammer drill.
After the subframe had a zinc primer coat and 2 coats of black paint all the threaded holes needed cleaning out with M6 or M12 taps.
I used Dynax S50 inside the subframe tubes to protect against corrosion and AFC Rustblocker on the suspension arms, knuckles & wheel bearings.
The halfshafts were corroded and using POR15 they came up a treat, just mask off the rubber gaitors.
Remember to support the diff/gearbox under the diff unit whilst the hydromounts are out using a trolley jack, do not support it under the gearbox as the bottom of the gearbox is plastic and will crack, plus make sure you put blocks of wood underneath just in case the jack sags, the jack will be in place for weeks, I found after a week or 2 my jack started sagging so the diff rested on the wood.
Once the subframe is out you'll realise alot of the weight has been removed from the rear so I placed another trolley jack under the front subframe/undertray just in case the car might tilt forward.
I used the AM DB9 workshop manual for torque figures, follow these precisely. I used a little bit of silicon grease on most threads, NOT on any threads on suspension bolts, and nickel anti-seize grease on exhaust bolts,
When you get to torque the suspension bolts you will need to jack up each side to normal ride height, (that's in the workshop manual) and then torque to the correct settings.
I also used a Foxwell NT530 to clear all the fault codes generated.
One thing I should of done that I'll probably do next year is to powdercoat the suspension springs, that stops any corrosion and corrosion related cracks)
Good luck to anyone who wants to do this, great project to do and keeps the car rear end in tip top condition.
Next Winter will be the front end refresh.
Edited by paulrog1 on Sunday 7th February 09:54
Gassing Station | Aston Martin | Top of Page | What's New | My Stuff