E61 V8 Bearding
Discussion


Jules Sunley said:
ATM said:
I had a jap import e39. The bottom of the car was cleaner than the top. So yes there are benefits. But there are also downsides which are not necessarily obvious. My e39 had paint lacquer damage from the sun. It also had faded interior parts again from the sun. It also had perished rubbers on all windows again.....from the sun. So I would suspect suspension bushes can get all dried up and nasty too. Just imagine keeping your car in a hot oven for 15 years and you can imagine the damage that might be caused.
Also no real way to check the history even if there is a folder with it unless you speak Japanese...ATM said:
Naldrett said:
ATM said:
Naldrett said:
https://www.autotrader.co.uk/car-details/202012167...
Another '07 carbon black e61 550i but this time a pre-facelift. One owner and only 47k miles though. Probably a fair price for that provenance / mileage?
In the description Another '07 carbon black e61 550i but this time a pre-facelift. One owner and only 47k miles though. Probably a fair price for that provenance / mileage?
IMPORTED FROM JAPAN - FRESH IMPORT FROM JAPAN.
Suspension needed replacing no matter what; it was the original and was well overdue; the only paintwork issues I had was a very flat/dulled bonnet and front end, which have just been sorted

Other than that; no other real issues to be fair.
It is all down to where the car was in Japan too
But agree; even a Jap import needs to be checked over thoroughly


ATM said:
So I've decided to buy a new radiator. And a new thermostat housing and whatever it is that this mounts to. And probably the rubber hoses which attach to the radiator as well. Does anyone have any recommendations for suppliers and parts diagrams?
C3BMW and BMWmotormec are my go to suppliers; both on eBay and C3BMW have their own website too.I wouldn't recommend Autodoc personally; I've had numerous issues with them; their shipping is nigh on useless (tracking is crap until the day it's due to be delivered, which is anyones guess) and I've had the wrong parts sent to me and it's been a nightmare to get it sent back and sort a refund. Twice I've had to force chargebacks via my credit card!
I usually got Meyle, Gates, Febi Bilstein and Nissens/Behr for cooling system parts; but that's obviously on my E39. But I'm sure that they'll do E60 parts too
Zero issues with any of those brands; they've all lasted without any issues and they're still going in the cars I've sold previously
http://www.ebaystores.co.uk/BMW-MOTORMEC?_rdc=1
https://www.c3bmw.co.uk/
JakeT said:
Get yourself on RealOEM for parts diagrams, and good, well known brands, like Hella, Meyle, Gates (for rubber bits) and Febi should do the job for you.
ThanksI tried RealOEM and ended up here - link below. I don't see the actual rad. Am I doing it wrong?
https://www.realoem.com/bmw/enUS/partgrp?id=NH52-E...
N62 alternator bracket replacement guide for RHD E60/63/64
Having just done this job on the wife’s 650, I thought I would do a brief walk through for anyone faced with this prospect. Tbh if you are remotely handy with the spanner’s it’s quite doable for an average DIY’er with basic tools on axles stands in a day.
You will need a socket set, T20-T45 torx bits, an E12 socket and various 3/8ths extensions. Apart from that there were no special tools required.
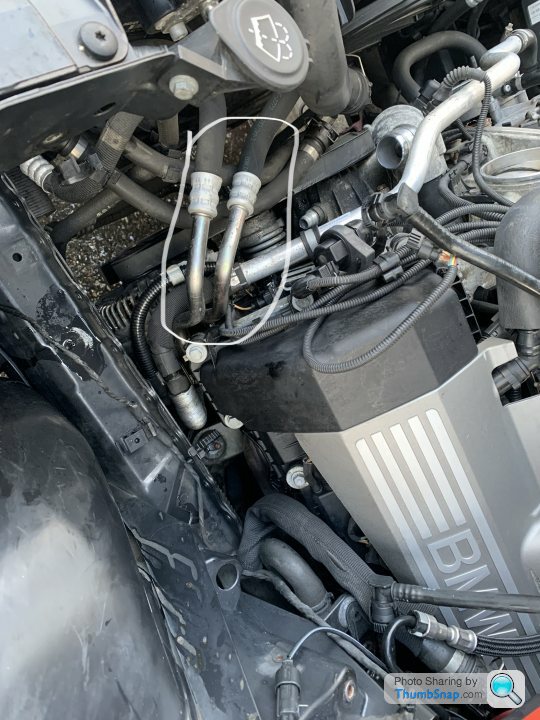
The alternator bracket seal required depends on if your car has an oil cooler fitted or not. If you have these big pipes circled in the pics below, you have an oil cooler. Personally the non oil cooled gasket is £2.44 and the oil cooler version is £6.85, just buy both and be done with ! You will also need 2x o rings for the oil cooler pipes which are £2.25 each, all direct from BMW. See part numbers below
12317507807 non cooler gasket
12317507808 oil cooler gasket
11421702917 O rings x2 required
Total time was 7 hours on axle stands with basic tools and experienced DIY’er but never done this job before. That included cleaning all the under trays and engine from oil and packing up tools
A brief run down is Jack car up enough for you to get under but not silly high like they tell you in most guides. 90% is done from above so if car is too high you wreck your back and knees. You shouldn’t need to remove radiator , fan, slam panel, drain PAS or disconnect pas pipes like most guides say either as I did it perfectly fine with all these in situ and no struggle for space.
rough order below
Remove intake, air box and engine cover.
Drain coolant from rad drain off cock.
You do NOT have to drain the engine oil. Some will come out oil cooler pipes when you disconnect them but just what’s in the pipes.
Remove all coolant hoses from top of rad to thermostat housing and down to auxiliary pump in NSF wing. Pull aux pump back and hook up near battery jump point
Remove alternator belt and alternator spring loaded tensioner.
Disconnect battery jump point by removing 13mm bolt and sliding cable out. Tape up lose cable end.
There is a big metal pas pipe that runs across the front of the engine held on each bank with a P clip bracket, remove the clips and when you remove pas pump later this will allow you to move the pas pump out the way with pissing fluid everywhere
Undo 16mm engine mount nut on passenger side
Remove nut and bolt holding pas pump, pump needs to swing away from block first before trying to pull it off the stud.
Remove 2x 16mm bolts holding alternator on. Remove alternator from bracket and unclip wiring and 13mm nut holding power cable on.
Now alternator is loose you can start lowering it and move the pas pipe that runs over the top of it out the way. This is where removing the big metal pas pipe helps as you can now push the pas pump right out your way. Make sure you don’t break the leccy plug in the top of thermostat housing.
Drop alternator out the bottom of car.
Now is a good time to degrease the block and everything with brake cleaner or something . I actually did this before even starting so everything wasn’t dripping in oil while trying to work on it.
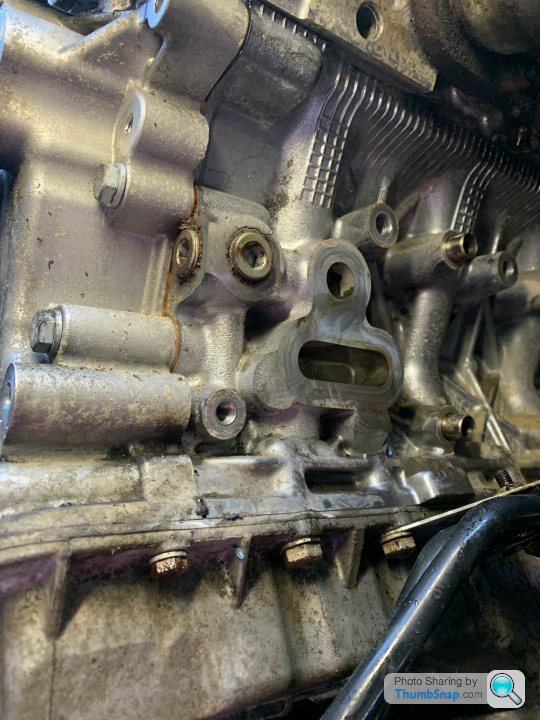
On the side of the head above the alternator is a black metal bracket that holds two ridged metal hard pipes to it. These are the oil cooler pipes if you have one, and go to the top Ns of the rad. Undo the bracket with a T25 bit
Now you head under car and remove the metal engine mount bracket so Jack engine up enough to take the weight and slide bracket off when loosened . There are 4x E12 bolts holding the engine mount bracket to the block , you MUST use the right socket or you will round the bolts and be buggered. You will need a host of extensions and wobbly socket too reach all 4 bolts
If you have an oil cooler fitted you need to undo the two 5mm Allen keys on the pipes sticking out of the alternator bracket. These pipes are very tight in the bracket as they are under a twisting tension.
You should now be left with just the alt bracket to remove. There is a T40 bolt hidden in the front facing forwards and a 13mm . Then there is a 16mm and another 13mm on the side where oil cooler pipes went.
Alternator bracket should now pry off with a little help (it’s on dowels ).
Clean everything up while stripped down , replace bracket gasket and oil cooler O rings.
Refit as per reverse.
One massive tip regarding getting alternator back on. One of the bolts goes into a brass bush in the back of alternator housing . Support the alternator on some wood, put the bolt back in the alternator threaded into the bush and give the bolt a few gentle taps with a hammer. Basically you want to push the bush backwards a fraction so it doesn’t snag on the block when trying to refit it. Bush will pull forwards when tightening bolt agin. Don’t go mad or you will break off the mounting leg !
It really is all self explanatory when doing it tbh but the above should get you 99% of the way there.
Pipes circled below determine oil cooler or not
Hidden T40 torx bolt in alternator bracket circled (top hole)
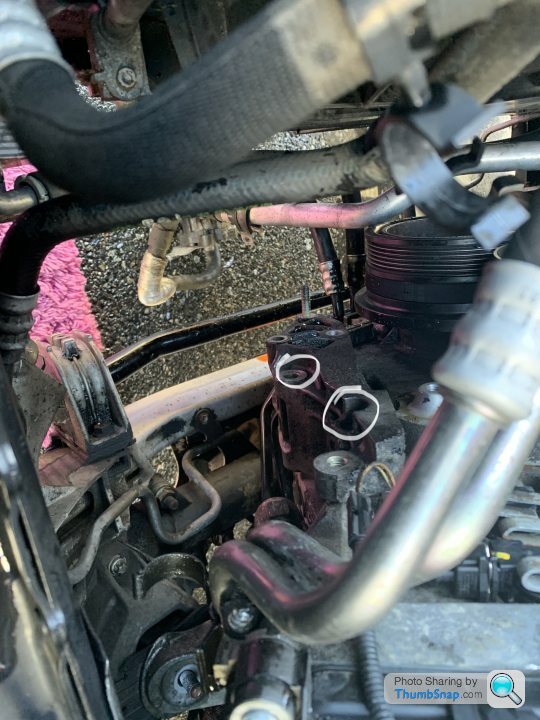
Better view of it hidden in all the grease !
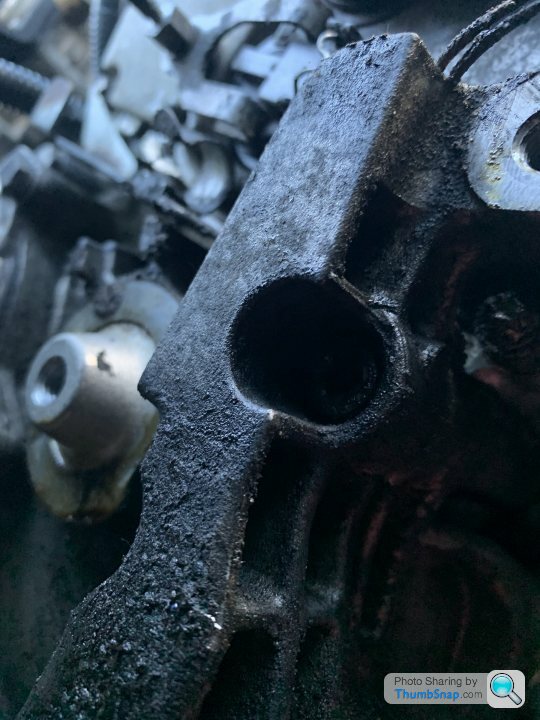
Alternator bracket removed
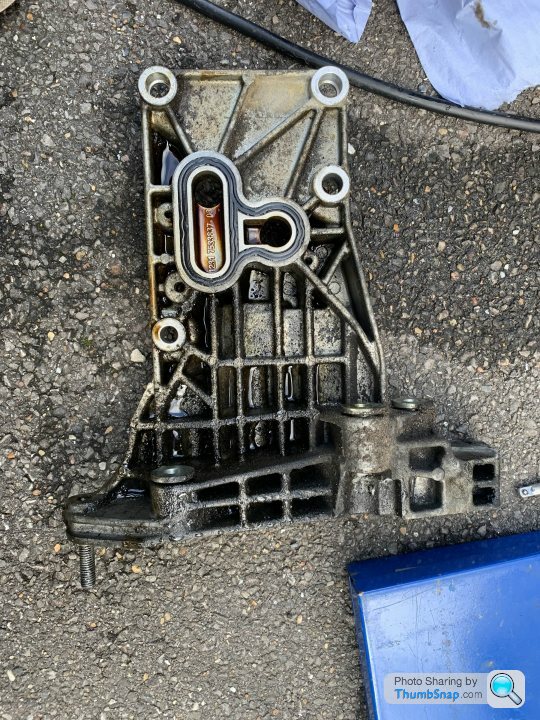
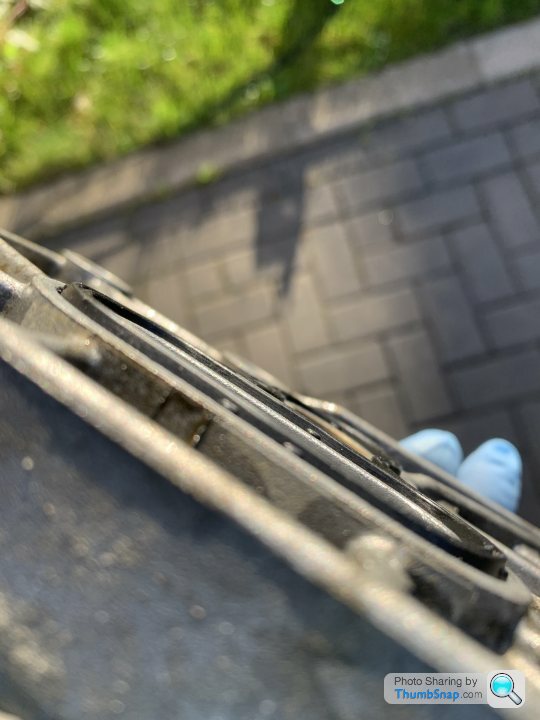
And although gasket was not broken, it was flat to the point it was flush with the cover of not lower in places !
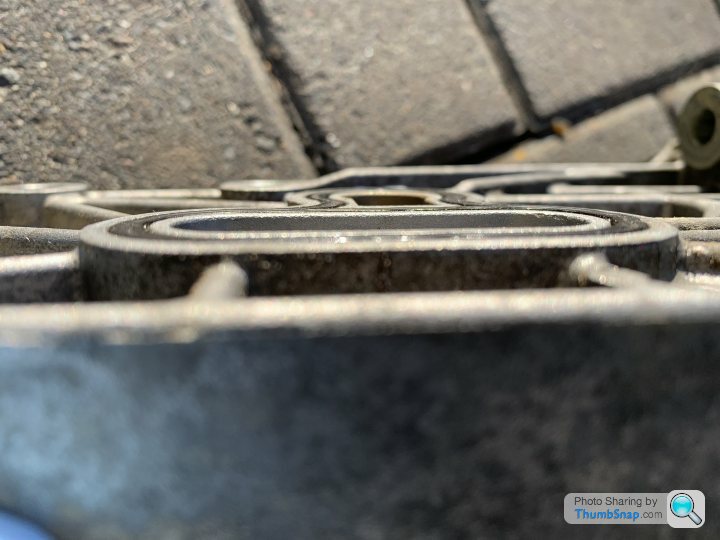
New gasket sits a little more proud
Having just done this job on the wife’s 650, I thought I would do a brief walk through for anyone faced with this prospect. Tbh if you are remotely handy with the spanner’s it’s quite doable for an average DIY’er with basic tools on axles stands in a day.
You will need a socket set, T20-T45 torx bits, an E12 socket and various 3/8ths extensions. Apart from that there were no special tools required.
The alternator bracket seal required depends on if your car has an oil cooler fitted or not. If you have these big pipes circled in the pics below, you have an oil cooler. Personally the non oil cooled gasket is £2.44 and the oil cooler version is £6.85, just buy both and be done with ! You will also need 2x o rings for the oil cooler pipes which are £2.25 each, all direct from BMW. See part numbers below
12317507807 non cooler gasket
12317507808 oil cooler gasket
11421702917 O rings x2 required
Total time was 7 hours on axle stands with basic tools and experienced DIY’er but never done this job before. That included cleaning all the under trays and engine from oil and packing up tools
A brief run down is Jack car up enough for you to get under but not silly high like they tell you in most guides. 90% is done from above so if car is too high you wreck your back and knees. You shouldn’t need to remove radiator , fan, slam panel, drain PAS or disconnect pas pipes like most guides say either as I did it perfectly fine with all these in situ and no struggle for space.
rough order below
Remove intake, air box and engine cover.
Drain coolant from rad drain off cock.
You do NOT have to drain the engine oil. Some will come out oil cooler pipes when you disconnect them but just what’s in the pipes.
Remove all coolant hoses from top of rad to thermostat housing and down to auxiliary pump in NSF wing. Pull aux pump back and hook up near battery jump point
Remove alternator belt and alternator spring loaded tensioner.
Disconnect battery jump point by removing 13mm bolt and sliding cable out. Tape up lose cable end.
There is a big metal pas pipe that runs across the front of the engine held on each bank with a P clip bracket, remove the clips and when you remove pas pump later this will allow you to move the pas pump out the way with pissing fluid everywhere
Undo 16mm engine mount nut on passenger side
Remove nut and bolt holding pas pump, pump needs to swing away from block first before trying to pull it off the stud.
Remove 2x 16mm bolts holding alternator on. Remove alternator from bracket and unclip wiring and 13mm nut holding power cable on.
Now alternator is loose you can start lowering it and move the pas pipe that runs over the top of it out the way. This is where removing the big metal pas pipe helps as you can now push the pas pump right out your way. Make sure you don’t break the leccy plug in the top of thermostat housing.
Drop alternator out the bottom of car.
Now is a good time to degrease the block and everything with brake cleaner or something . I actually did this before even starting so everything wasn’t dripping in oil while trying to work on it.
On the side of the head above the alternator is a black metal bracket that holds two ridged metal hard pipes to it. These are the oil cooler pipes if you have one, and go to the top Ns of the rad. Undo the bracket with a T25 bit
Now you head under car and remove the metal engine mount bracket so Jack engine up enough to take the weight and slide bracket off when loosened . There are 4x E12 bolts holding the engine mount bracket to the block , you MUST use the right socket or you will round the bolts and be buggered. You will need a host of extensions and wobbly socket too reach all 4 bolts
If you have an oil cooler fitted you need to undo the two 5mm Allen keys on the pipes sticking out of the alternator bracket. These pipes are very tight in the bracket as they are under a twisting tension.
You should now be left with just the alt bracket to remove. There is a T40 bolt hidden in the front facing forwards and a 13mm . Then there is a 16mm and another 13mm on the side where oil cooler pipes went.
Alternator bracket should now pry off with a little help (it’s on dowels ).
Clean everything up while stripped down , replace bracket gasket and oil cooler O rings.
Refit as per reverse.
One massive tip regarding getting alternator back on. One of the bolts goes into a brass bush in the back of alternator housing . Support the alternator on some wood, put the bolt back in the alternator threaded into the bush and give the bolt a few gentle taps with a hammer. Basically you want to push the bush backwards a fraction so it doesn’t snag on the block when trying to refit it. Bush will pull forwards when tightening bolt agin. Don’t go mad or you will break off the mounting leg !
It really is all self explanatory when doing it tbh but the above should get you 99% of the way there.
Pipes circled below determine oil cooler or not
Hidden T40 torx bolt in alternator bracket circled (top hole)
Better view of it hidden in all the grease !
Alternator bracket removed
And although gasket was not broken, it was flat to the point it was flush with the cover of not lower in places !
New gasket sits a little more proud
ATM said:
JakeT said:
Get yourself on RealOEM for parts diagrams, and good, well known brands, like Hella, Meyle, Gates (for rubber bits) and Febi should do the job for you.
ThanksI tried RealOEM and ended up here - link below. I don't see the actual rad. Am I doing it wrong?
https://www.realoem.com/bmw/enUS/partgrp?id=NH52-E...
JakeT said:
ATM said:
JakeT said:
Get yourself on RealOEM for parts diagrams, and good, well known brands, like Hella, Meyle, Gates (for rubber bits) and Febi should do the job for you.
ThanksI tried RealOEM and ended up here - link below. I don't see the actual rad. Am I doing it wrong?
https://www.realoem.com/bmw/enUS/partgrp?id=NH52-E...
ATM said:
JakeT said:
ATM said:
JakeT said:
Get yourself on RealOEM for parts diagrams, and good, well known brands, like Hella, Meyle, Gates (for rubber bits) and Febi should do the job for you.
ThanksI tried RealOEM and ended up here - link below. I don't see the actual rad. Am I doing it wrong?
https://www.realoem.com/bmw/enUS/partgrp?id=NH52-E...
fastbikes76 said:
N62 alternator bracket replacement guide for RHD E60/63/64
Having just done this job on the wife’s 650, I thought I would do a brief walk through for anyone faced with this prospect. Tbh if you are remotely handy with the spanner’s it’s quite doable for an average DIY’er with basic tools on axles stands in a day.
You will need a socket set, T20-T45 torx bits, an E12 socket and various 3/8ths extensions. Apart from that there were no special tools required.
The alternator bracket seal required depends on if your car has an oil cooler fitted or not. If you have these big pipes circled in the pics below, you have an oil cooler. Personally the non oil cooled gasket is £2.44 and the oil cooler version is £6.85, just buy both and be done with ! You will also need 2x o rings for the oil cooler pipes which are £2.25 each, all direct from BMW. See part numbers below
12317507807 non cooler gasket
12317507808 oil cooler gasket
11421702917 O rings x2 required
Total time was 7 hours on axle stands with basic tools and experienced DIY’er but never done this job before. That included cleaning all the under trays and engine from oil and packing up tools
A brief run down is Jack car up enough for you to get under but not silly high like they tell you in most guides. 90% is done from above so if car is too high you wreck your back and knees. You shouldn’t need to remove radiator , fan, slam panel, drain PAS or disconnect pas pipes like most guides say either as I did it perfectly fine with all these in situ and no struggle for space.
rough order below
Remove intake, air box and engine cover.
Drain coolant from rad drain off cock.
You do NOT have to drain the engine oil. Some will come out oil cooler pipes when you disconnect them but just what’s in the pipes.
Remove all coolant hoses from top of rad to thermostat housing and down to auxiliary pump in NSF wing. Pull aux pump back and hook up near battery jump point
Remove alternator belt and alternator spring loaded tensioner.
Disconnect battery jump point by removing 13mm bolt and sliding cable out. Tape up lose cable end.
There is a big metal pas pipe that runs across the front of the engine held on each bank with a P clip bracket, remove the clips and when you remove pas pump later this will allow you to move the pas pump out the way with pissing fluid everywhere
Undo 16mm engine mount nut on passenger side
Remove nut and bolt holding pas pump, pump needs to swing away from block first before trying to pull it off the stud.
Remove 2x 16mm bolts holding alternator on. Remove alternator from bracket and unclip wiring and 13mm nut holding power cable on.
Now alternator is loose you can start lowering it and move the pas pipe that runs over the top of it out the way. This is where removing the big metal pas pipe helps as you can now push the pas pump right out your way. Make sure you don’t break the leccy plug in the top of thermostat housing.
Drop alternator out the bottom of car.
Now is a good time to degrease the block and everything with brake cleaner or something . I actually did this before even starting so everything wasn’t dripping in oil while trying to work on it.
On the side of the head above the alternator is a black metal bracket that holds two ridged metal hard pipes to it. These are the oil cooler pipes if you have one, and go to the top Ns of the rad. Undo the bracket with a T25 bit
Now you head under car and remove the metal engine mount bracket so Jack engine up enough to take the weight and slide bracket off when loosened . There are 4x E12 bolts holding the engine mount bracket to the block , you MUST use the right socket or you will round the bolts and be buggered. You will need a host of extensions and wobbly socket too reach all 4 bolts
If you have an oil cooler fitted you need to undo the two 5mm Allen keys on the pipes sticking out of the alternator bracket. These pipes are very tight in the bracket as they are under a twisting tension.
You should now be left with just the alt bracket to remove. There is a T40 bolt hidden in the front facing forwards and a 13mm . Then there is a 16mm and another 13mm on the side where oil cooler pipes went.
Alternator bracket should now pry off with a little help (it’s on dowels ).
Clean everything up while stripped down , replace bracket gasket and oil cooler O rings.
Refit as per reverse.
One massive tip regarding getting alternator back on. One of the bolts goes into a brass bush in the back of alternator housing . Support the alternator on some wood, put the bolt back in the alternator threaded into the bush and give the bolt a few gentle taps with a hammer. Basically you want to push the bush backwards a fraction so it doesn’t snag on the block when trying to refit it. Bush will pull forwards when tightening bolt agin. Don’t go mad or you will break off the mounting leg !
It really is all self explanatory when doing it tbh but the above should get you 99% of the way there.
Pipes circled below determine oil cooler or not
Hidden T40 torx bolt in alternator bracket circled (top hole)
Better view of it hidden in all the grease !
Alternator bracket removed
And although gasket was not broken, it was flat to the point it was flush with the cover of not lower in places !
New gasket sits a little more proud
Superb write up and necessary pics Having just done this job on the wife’s 650, I thought I would do a brief walk through for anyone faced with this prospect. Tbh if you are remotely handy with the spanner’s it’s quite doable for an average DIY’er with basic tools on axles stands in a day.
You will need a socket set, T20-T45 torx bits, an E12 socket and various 3/8ths extensions. Apart from that there were no special tools required.
The alternator bracket seal required depends on if your car has an oil cooler fitted or not. If you have these big pipes circled in the pics below, you have an oil cooler. Personally the non oil cooled gasket is £2.44 and the oil cooler version is £6.85, just buy both and be done with ! You will also need 2x o rings for the oil cooler pipes which are £2.25 each, all direct from BMW. See part numbers below
12317507807 non cooler gasket
12317507808 oil cooler gasket
11421702917 O rings x2 required
Total time was 7 hours on axle stands with basic tools and experienced DIY’er but never done this job before. That included cleaning all the under trays and engine from oil and packing up tools
A brief run down is Jack car up enough for you to get under but not silly high like they tell you in most guides. 90% is done from above so if car is too high you wreck your back and knees. You shouldn’t need to remove radiator , fan, slam panel, drain PAS or disconnect pas pipes like most guides say either as I did it perfectly fine with all these in situ and no struggle for space.
rough order below
Remove intake, air box and engine cover.
Drain coolant from rad drain off cock.
You do NOT have to drain the engine oil. Some will come out oil cooler pipes when you disconnect them but just what’s in the pipes.
Remove all coolant hoses from top of rad to thermostat housing and down to auxiliary pump in NSF wing. Pull aux pump back and hook up near battery jump point
Remove alternator belt and alternator spring loaded tensioner.
Disconnect battery jump point by removing 13mm bolt and sliding cable out. Tape up lose cable end.
There is a big metal pas pipe that runs across the front of the engine held on each bank with a P clip bracket, remove the clips and when you remove pas pump later this will allow you to move the pas pump out the way with pissing fluid everywhere
Undo 16mm engine mount nut on passenger side
Remove nut and bolt holding pas pump, pump needs to swing away from block first before trying to pull it off the stud.
Remove 2x 16mm bolts holding alternator on. Remove alternator from bracket and unclip wiring and 13mm nut holding power cable on.
Now alternator is loose you can start lowering it and move the pas pipe that runs over the top of it out the way. This is where removing the big metal pas pipe helps as you can now push the pas pump right out your way. Make sure you don’t break the leccy plug in the top of thermostat housing.
Drop alternator out the bottom of car.
Now is a good time to degrease the block and everything with brake cleaner or something . I actually did this before even starting so everything wasn’t dripping in oil while trying to work on it.
On the side of the head above the alternator is a black metal bracket that holds two ridged metal hard pipes to it. These are the oil cooler pipes if you have one, and go to the top Ns of the rad. Undo the bracket with a T25 bit
Now you head under car and remove the metal engine mount bracket so Jack engine up enough to take the weight and slide bracket off when loosened . There are 4x E12 bolts holding the engine mount bracket to the block , you MUST use the right socket or you will round the bolts and be buggered. You will need a host of extensions and wobbly socket too reach all 4 bolts
If you have an oil cooler fitted you need to undo the two 5mm Allen keys on the pipes sticking out of the alternator bracket. These pipes are very tight in the bracket as they are under a twisting tension.
You should now be left with just the alt bracket to remove. There is a T40 bolt hidden in the front facing forwards and a 13mm . Then there is a 16mm and another 13mm on the side where oil cooler pipes went.
Alternator bracket should now pry off with a little help (it’s on dowels ).
Clean everything up while stripped down , replace bracket gasket and oil cooler O rings.
Refit as per reverse.
One massive tip regarding getting alternator back on. One of the bolts goes into a brass bush in the back of alternator housing . Support the alternator on some wood, put the bolt back in the alternator threaded into the bush and give the bolt a few gentle taps with a hammer. Basically you want to push the bush backwards a fraction so it doesn’t snag on the block when trying to refit it. Bush will pull forwards when tightening bolt agin. Don’t go mad or you will break off the mounting leg !
It really is all self explanatory when doing it tbh but the above should get you 99% of the way there.
Pipes circled below determine oil cooler or not
Hidden T40 torx bolt in alternator bracket circled (top hole)
Better view of it hidden in all the grease !
Alternator bracket removed
And although gasket was not broken, it was flat to the point it was flush with the cover of not lower in places !
New gasket sits a little more proud

fastbikes76 said:
Remove intake, air box and engine cover.
Drain coolant from rad drain off cock.
Remove all coolant hoses from top of rad to thermostat housing
This is as far as I got with my simple coolant flush.Drain coolant from rad drain off cock.
Remove all coolant hoses from top of rad to thermostat housing
Drain off cock - is it called a cock? - snapped off.
Then I tried to remove top hose from rad to thermostat housing but the pipe is some how welded on - sealed tight - cant move it - won't budge.
Then I tried removing the 3 little bolts with hose still attached. I got it off but it's fiddly and not much coolant even came out. So this was a total waste of time, money and unnecessary drama. Then I tried bolting this back up and threaded the first bolt. Its harder with the hose still attached as it doesnt want to sit nicely as the hose is pulling it about.
So now I'm just going to replace the rad with new and the hose or hoses. I'll need to cut off old hose from thermostat housing and clean up. Then hopefully I can get it back together. I will probably need to retap threaded bolt mount as it looks like a big expensive part to replace. I think its the water pump itself.
d_a_n1979 said:
ATM said:
JakeT said:
ATM said:
JakeT said:
Get yourself on RealOEM for parts diagrams, and good, well known brands, like Hella, Meyle, Gates (for rubber bits) and Febi should do the job for you.
ThanksI tried RealOEM and ended up here - link below. I don't see the actual rad. Am I doing it wrong?
https://www.realoem.com/bmw/enUS/partgrp?id=NH52-E...
I searched for the part number 17117519210
Found this
https://www.ebay.co.uk/itm/291580022680
d_a_n1979 said:
Superb write up and necessary pics
No worries, it’s the one bit I was dreading but having done it now it’s really simple. There wasn’t a single but that was a real struggle or exceptionally difficult, it just took time . Don’t let a leaking alt gasket put you off an N62, it’s under £20 and a few hours of your time. If anything it’s a great bargaining tool when looking at one.

Gassing Station | BMW General | Top of Page | What's New | My Stuff