New bike(s) incoming - first ever 2 stroke(s)!
Discussion


You may be interested in these photos which used Corgis
On Facebook - may need to join group to view but basically Donald Houston et al promoting their film.
https://m.facebook.com/groups/cardiffnowandthen/pe...
On Facebook - may need to join group to view but basically Donald Houston et al promoting their film.
https://m.facebook.com/groups/cardiffnowandthen/pe...
Time for another update I guess. Maybe not as exciting as some of the other restoration tales, but it’s starting to keep me busy again. If you’re interested in the continuing saga of Frankie, sit down with a large coffee (or booze, it’s Xmas/New Year after all) and read on.
I didn’t do any work on the Corgis over the summer, but I did potter about a few times on Lydia, now it’s complete. I did a VMCC Tiddler run on it (and not everyone that turned up was on a tiddler). I think the route was around 40 miles, but in the afternoon on a particularly long uphill stretch it slowed and eventually stopped. No spark diagnosed, so recovered by the van of shame The good news it was easy to lift in and out – and once it cooled right down there was a feeble spark back again. So I put in a new coil in the magneto, and while I was at it 2 new lighting coils as well. They’d never worked, but the Lucas ‘headlamp’ switches between internal battery or generator, and I’d just run it off a (rechargeable) battery. But now I have lights off the generator. But I’d put in LED bulbs and with no regulator or rectifier the bulbs flash based on engine speed – maybe no bad thing as they’re really for visibility – they sure as hell ain’t going to light the road up!

So with the nights starting to draw in, it was back into the garage. First task was to put electronic ignition on the ’47 Indian Chief (still retains its manual advance/retard), but I digress…

Starting the disassembly I got the bike on the lift – just lifted it on, rather than having to pump it up!

With everything off and the paint stripped from the frame, and surprisingly no horrors found (for once!) I wanted to see if I could get the motor running before going any further. Easiest way to hold the motor down to try to get it going is in the frame…but the bottom engine brackets were missing. New ones duly fitted.
It originally had the wrong carb on it, some Villiers thing with the float bowl on the right so some clown had fitted it way out the side on the long tube. Luckily they hadn’t messed with the manifold. I managed to get the correct carb (at least the body) off eBay, from an outboard motor I gather. And with new jets and needle and other bits it should be ready to go. And I couldn’t resist polishing it!

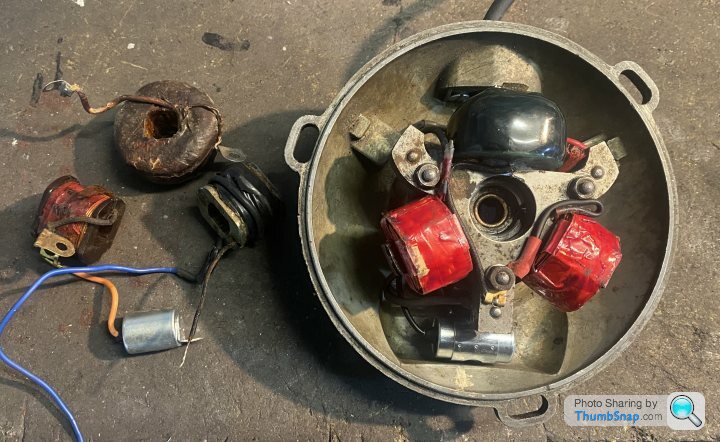
No spark, maybe not surprisingly, and inside the mag it just smelt of buring and damp. New ignition coil duly fitted, and while I was at it put in new lighting coils too as they looked and smelled buggered, and someone had been messing with them before me. New stuff now fitted, and junk removed on the left.
There’s no kick start on a Mk1 Corgi, so it’s push-to-go. But with the help of a cordless drill (in reverse) and a socket on the engine sprocket and jerry-rigged fuel and throttle it fired up!

The back wheel annoyed me, or at least the ham-fistedness of whatever monkey had this in the past. Rather than fit an inner tube with a 90 degree valve, they fitted a regular tube and then cut/chopped/bashed hell out of the wheel to get an airline in. Cretins.

OK, maybe not the best welding (and it was bloody difficult at my skill level as the wheel was so thin in places is kept burning through), but solid again. And not helped by the fact they'd welded the damned sprocket on! But with a wee bit of body filler and it will look fine again.

Attention now comes to the forks. On this bike they’re sprung, but everything totally jammed up with paint (and corrosion). And the mechanism to fold the bars down and in was also totally jammed.


What a bugger to get them apart – loads of heat and a lump hammer, not helped by the cross tube that lets the forks fold having a bloody great bash in it so difficult to get out the mounts. It needed to be round again so it’s a sliding fit, so solution was to get a hardened steel bearing of exactly the right inner diameter of the tube, and bash the hell out of it down the tube a few times.
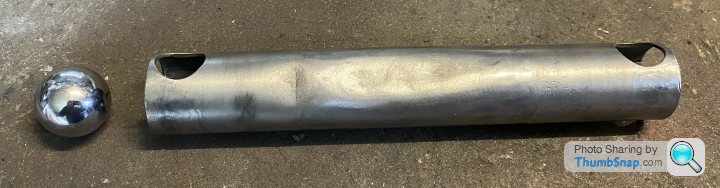

I then ran it down the lathe to take some of the high spots off, but some of the tube wall remains a bit marked, but it does now fit properly again.
Then there’s meant to be a long bolt affair to lock the bars – the bike with the solid forks has a far better arrangement with sprung clips, but the bars on that do wobble a bit, and so maybe they swapped to the bolt to make it more solid. Anyway, I had nothing to go on other than a picture from the parts list (and obviously parts haven’t been available for 70-odd years). So I’m missing parts 15, 16 and 17 in this instance.

I had a big steel rod in my bin of ‘useful bits of metal’ that I turned down and threaded. I don’t have a centre support thingy for the lathe so with the length of the rod as it got thinner it wobbled a bit, so not the best bit if turning…but it will do. Then a spacer and the basis of the ‘nut’ thingy. I also made up the thumbscrew/handle thing – I think the ball on the end should probably be round, but I don’t have the ball-making tool holder for the lathe so just did it by eye. I’d planned just to thread the thumbscrew and the ‘nut’, but I couldn’t get enough depth of threads to get a really solid purchase to I ended up welding it.


so my 'reproduction' is kind of like the picture.
…and here’s the forks, less paint, but all working/folding with my new thumbscrew clamp thingy etc.

Next I need to weld on a footrest bracket to the frame, that inexplicably someone’s chopped of – I’ve made the bracket already. And then with a bit of further clean-up the frame and forks will be ready for paint. But I think I also might strip down the wee motor first, as having managed to get it fired-up it’s now dribbling oil. Anyway…onwards and upwards.
I didn’t do any work on the Corgis over the summer, but I did potter about a few times on Lydia, now it’s complete. I did a VMCC Tiddler run on it (and not everyone that turned up was on a tiddler). I think the route was around 40 miles, but in the afternoon on a particularly long uphill stretch it slowed and eventually stopped. No spark diagnosed, so recovered by the van of shame
The good news it was easy to lift in and out – and once it cooled right down there was a feeble spark back again. So I put in a new coil in the magneto, and while I was at it 2 new lighting coils as well. They’d never worked, but the Lucas ‘headlamp’ switches between internal battery or generator, and I’d just run it off a (rechargeable) battery. But now I have lights off the generator. But I’d put in LED bulbs and with no regulator or rectifier the bulbs flash based on engine speed – maybe no bad thing as they’re really for visibility – they sure as hell ain’t going to light the road up!So with the nights starting to draw in, it was back into the garage. First task was to put electronic ignition on the ’47 Indian Chief (still retains its manual advance/retard), but I digress…
Starting the disassembly I got the bike on the lift – just lifted it on, rather than having to pump it up!
With everything off and the paint stripped from the frame, and surprisingly no horrors found (for once!) I wanted to see if I could get the motor running before going any further. Easiest way to hold the motor down to try to get it going is in the frame…but the bottom engine brackets were missing. New ones duly fitted.
It originally had the wrong carb on it, some Villiers thing with the float bowl on the right so some clown had fitted it way out the side on the long tube. Luckily they hadn’t messed with the manifold. I managed to get the correct carb (at least the body) off eBay, from an outboard motor I gather. And with new jets and needle and other bits it should be ready to go. And I couldn’t resist polishing it!
No spark, maybe not surprisingly, and inside the mag it just smelt of buring and damp. New ignition coil duly fitted, and while I was at it put in new lighting coils too as they looked and smelled buggered, and someone had been messing with them before me. New stuff now fitted, and junk removed on the left.
There’s no kick start on a Mk1 Corgi, so it’s push-to-go. But with the help of a cordless drill (in reverse) and a socket on the engine sprocket and jerry-rigged fuel and throttle it fired up!
The back wheel annoyed me, or at least the ham-fistedness of whatever monkey had this in the past. Rather than fit an inner tube with a 90 degree valve, they fitted a regular tube and then cut/chopped/bashed hell out of the wheel to get an airline in. Cretins.
OK, maybe not the best welding (and it was bloody difficult at my skill level as the wheel was so thin in places is kept burning through), but solid again. And not helped by the fact they'd welded the damned sprocket on! But with a wee bit of body filler and it will look fine again.
Attention now comes to the forks. On this bike they’re sprung, but everything totally jammed up with paint (and corrosion). And the mechanism to fold the bars down and in was also totally jammed.
What a bugger to get them apart – loads of heat and a lump hammer, not helped by the cross tube that lets the forks fold having a bloody great bash in it so difficult to get out the mounts. It needed to be round again so it’s a sliding fit, so solution was to get a hardened steel bearing of exactly the right inner diameter of the tube, and bash the hell out of it down the tube a few times.
I then ran it down the lathe to take some of the high spots off, but some of the tube wall remains a bit marked, but it does now fit properly again.
Then there’s meant to be a long bolt affair to lock the bars – the bike with the solid forks has a far better arrangement with sprung clips, but the bars on that do wobble a bit, and so maybe they swapped to the bolt to make it more solid. Anyway, I had nothing to go on other than a picture from the parts list (and obviously parts haven’t been available for 70-odd years). So I’m missing parts 15, 16 and 17 in this instance.
I had a big steel rod in my bin of ‘useful bits of metal’ that I turned down and threaded. I don’t have a centre support thingy for the lathe so with the length of the rod as it got thinner it wobbled a bit, so not the best bit if turning…but it will do. Then a spacer and the basis of the ‘nut’ thingy. I also made up the thumbscrew/handle thing – I think the ball on the end should probably be round, but I don’t have the ball-making tool holder for the lathe so just did it by eye. I’d planned just to thread the thumbscrew and the ‘nut’, but I couldn’t get enough depth of threads to get a really solid purchase to I ended up welding it.
so my 'reproduction' is kind of like the picture.
…and here’s the forks, less paint, but all working/folding with my new thumbscrew clamp thingy etc.
Next I need to weld on a footrest bracket to the frame, that inexplicably someone’s chopped of – I’ve made the bracket already. And then with a bit of further clean-up the frame and forks will be ready for paint. But I think I also might strip down the wee motor first, as having managed to get it fired-up it’s now dribbling oil. Anyway…onwards and upwards.
Edited by tvrolet on Friday 30th December 17:05

Dunno how many folks are interested in this, but I started documenting the rebuilds so I’ll continue.
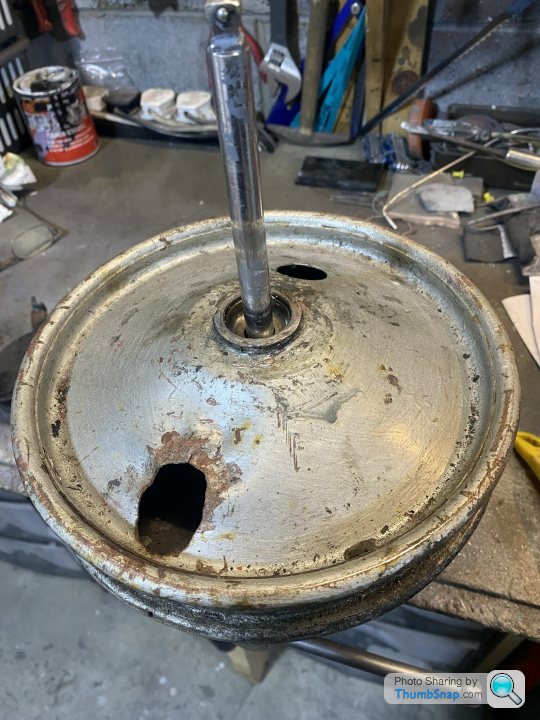
I’ll start with the saga of the mullered wheels. As in a previous episode the rear wheel had been badly butchered; but the front hadn’t escaped whoever the gorilla was either. At least this didn’t have bits chopped out, just bashed-in; this is after I managed to get the worst of the dents out with a DIY dent-basher-outer that went in through the air valve hole.
I also replaced the standard old and worn cup and cone bearings with modern sealed bearings, making a spacer to allow them to be bolted-up on the axles. Ready to roll…

I fancied a change from spannering and making stuff, so turned my attention to the rear mudguard. It wasn’t in great shape with a big bash in one side (that 'crease' shouldn't be there), a wee bit chopped out and loads of holes where holes shouldn’t be...and rust.

This was the first time I started getting the paint off the tinware, and while my paint removal was quite gentle, the a gorilla before me had obviously used a coarse sanding disk on a previous re-paint, so it had loads of really deep scores. Anyway, chopped-out bit replaced and holes that shouldn't be there welded up. My panel beating and welding skills on 75-year-old thin metal are getting better!

 [url]
[url]
Primed and ready to go (lots of coats and wet and dry!). These are the holes it’s meant to have.

I got a rod for the rear brake and got a die to put on the proper ¼” x 26tpi threads…assuming a clevis with a 3/8” pin and these threads would be easy to get. They weren’t – doh – I should have put threads on to match the clevis that were available. Anyway, the clevis used on Corgis are unusually long, so I decided to just make them. Started with a square bar, and a bolt to make up the actual pins.
 [url]
[url]
Work in progress before I cut the slots and tapped/threaded the holes. I ordered a cutter of the right size (3/8") from eBay, and unbeknownst to me it came from China and took ages to arrive. Then the cutting edges snapped in minutes and much cursing ensued . Eventually got them slotted but not such a neat job - note to self, always check country of origin and don't buy Chinese tools.
 [url]
[url]
And slotted and on the brake rod ready to go.

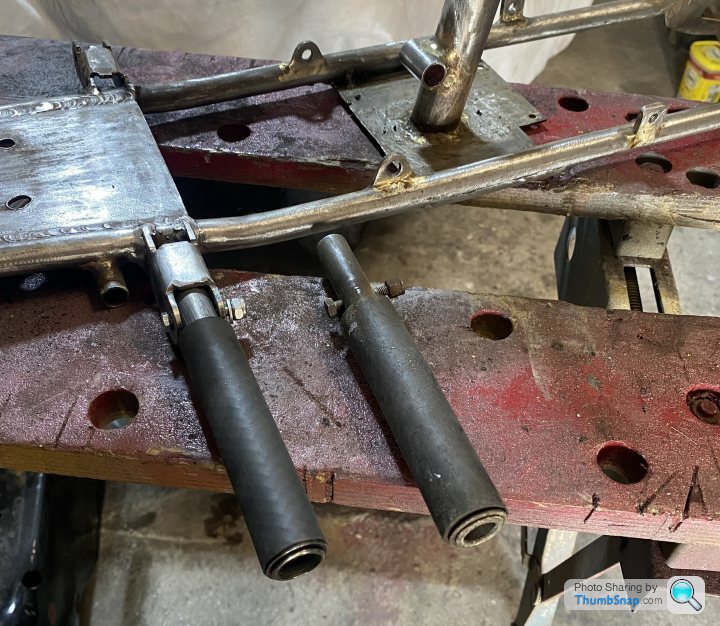
Someone had chopped the left hand footrest bracket off the frame and instead put a bar through the brake pedal pivot (losing the rear brake pedal and mechanism in the process!). To make up a matching footrest to the right one I had I used a bit of bar, a washer and a length of hose. As standard they’d flared out the end of the tube to be a tight fit on the washer…which I managed to replicate on the lathe with the help of a tyre lever.

New footrest bracket made and welded to frame, and new footrest made – a decent match to the original on the right side.
Don’t really have an in-progress or ‘after’, but I refurbed the brakes so here's a 'before' pic of the front brake backing plate. Pretty solid under the grime/surface rust, but the bracket that holds the brake cable had been snapped off previously and brazed back on - it just came way again in my hands to I had to re-make and weld-on a replacement.

Started work on the frame – the same gorilla with the coarse sanding disk had got there before me at some point on the past too. The tubes were all solid and straight, but like extruded thruppenny bits with loads of flats . This is half way through the filler primer/sanding stage to make them look round again for paint.

Got that all done and painted frame – just a rattle-can job as it's too much hassle to set the spray gun up and cover absolutely everything in the garage from paint dust. I'll do a proper job on the tank and tinware, but cans are fine for the frame. And the tubes all look round!

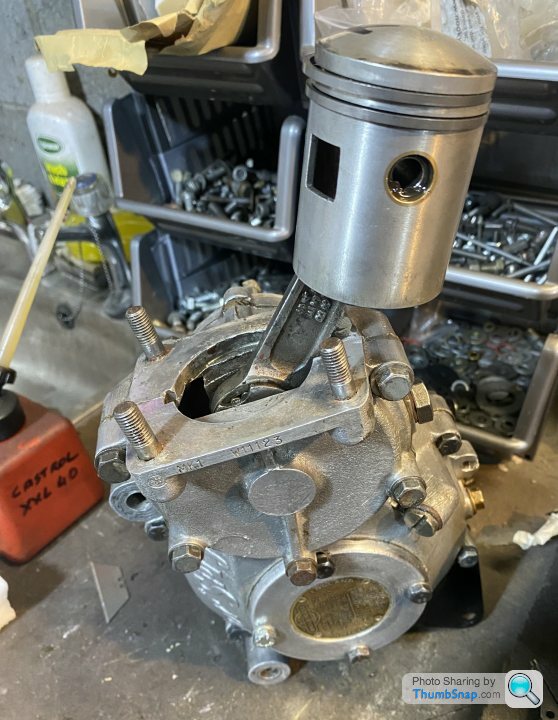
Engine next, and I got carried away with the work and forgot to take pics. But I knew it ran as I'd built a new carb for it and put on a new ignition coil and points before I took it out the chassis - keep up at the back Spare parts spare pretty much non-existent, which is why I had to make up so much from scratch, but I did manage to get hold of a (much used) replacement barrel. The original had fins missing and the base flange was broken too so it would have been a fair bit of cast-iron welding which is beyond my skill set. Cleaned up and ready for a bit of paint.

Clutch was down to the rivets, so got that recorked…mmmmm, cork.

Going back together with new DIY gaskets. Forgot to take any pics with the cases split and a pile of parts
 [url]
[url]
Looking good…
 |https://thumbsnap.com/XgTDSoGU[/url]
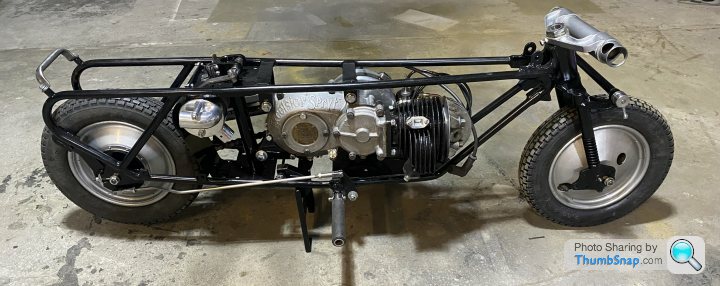
…and a big step forward over the past week with motor all back together, refurbed wheels on, refurbed forks and head races back on, and my home-made head nuts. I’d managed to pick-up a used silencer body with an intact right hand casting…which would have been a bugger to make otherwise, so I polished it within an inch of its life - the purists would weep. Left end was broken but it’s just a simple disk made up on the lathe. The rear brake pedal, rod & clevis I’d made earlier fitted and on; likewise the stand and stand toggle affair. New engine mounts and various other refurbed and re-made bits and pieces, but starting to look like a (small) bike!
I cant help thinking that with a set of clip-ons and rear-sets this would make a great café-racer for a short person.
I’ll start with the saga of the mullered wheels. As in a previous episode the rear wheel had been badly butchered; but the front hadn’t escaped whoever the gorilla was either. At least this didn’t have bits chopped out, just bashed-in; this is after I managed to get the worst of the dents out with a DIY dent-basher-outer that went in through the air valve hole.
I also replaced the standard old and worn cup and cone bearings with modern sealed bearings, making a spacer to allow them to be bolted-up on the axles. Ready to roll…
I fancied a change from spannering and making stuff, so turned my attention to the rear mudguard. It wasn’t in great shape with a big bash in one side (that 'crease' shouldn't be there), a wee bit chopped out and loads of holes where holes shouldn’t be...and rust.
This was the first time I started getting the paint off the tinware, and while my paint removal was quite gentle, the a gorilla before me had obviously used a coarse sanding disk on a previous re-paint, so it had loads of really deep scores. Anyway, chopped-out bit replaced and holes that shouldn't be there welded up. My panel beating and welding skills on 75-year-old thin metal are getting better!
[url]Primed and ready to go (lots of coats and wet and dry!). These are the holes it’s meant to have.
I got a rod for the rear brake and got a die to put on the proper ¼” x 26tpi threads…assuming a clevis with a 3/8” pin and these threads would be easy to get. They weren’t – doh
– I should have put threads on to match the clevis that were available. Anyway, the clevis used on Corgis are unusually long, so I decided to just make them. Started with a square bar, and a bolt to make up the actual pins.[url]Work in progress before I cut the slots and tapped/threaded the holes. I ordered a cutter of the right size (3/8") from eBay, and unbeknownst to me it came from China and took ages to arrive. Then the cutting edges snapped in minutes and much cursing ensued
. Eventually got them slotted but not such a neat job - note to self, always check country of origin and don't buy Chinese tools.[url]And slotted and on the brake rod ready to go.
Someone had chopped the left hand footrest bracket off the frame and instead put a bar through the brake pedal pivot (losing the rear brake pedal and mechanism in the process!). To make up a matching footrest to the right one I had I used a bit of bar, a washer and a length of hose. As standard they’d flared out the end of the tube to be a tight fit on the washer…which I managed to replicate on the lathe with the help of a tyre lever.
New footrest bracket made and welded to frame, and new footrest made – a decent match to the original on the right side.
Don’t really have an in-progress or ‘after’, but I refurbed the brakes so here's a 'before' pic of the front brake backing plate. Pretty solid under the grime/surface rust, but the bracket that holds the brake cable had been snapped off previously and brazed back on - it just came way again in my hands to I had to re-make and weld-on a replacement.
Started work on the frame – the same gorilla with the coarse sanding disk had got there before me at some point on the past too. The tubes were all solid and straight, but like extruded thruppenny bits with loads of flats
. This is half way through the filler primer/sanding stage to make them look round again for paint.Got that all done and painted frame – just a rattle-can job as it's too much hassle to set the spray gun up and cover absolutely everything in the garage from paint dust. I'll do a proper job on the tank and tinware, but cans are fine for the frame. And the tubes all look round!
Engine next, and I got carried away with the work and forgot to take pics. But I knew it ran as I'd built a new carb for it and put on a new ignition coil and points before I took it out the chassis - keep up at the back
Spare parts spare pretty much non-existent, which is why I had to make up so much from scratch, but I did manage to get hold of a (much used) replacement barrel. The original had fins missing and the base flange was broken too so it would have been a fair bit of cast-iron welding which is beyond my skill set. Cleaned up and ready for a bit of paint.Clutch was down to the rivets, so got that recorked…mmmmm, cork.
Going back together with new DIY gaskets. Forgot to take any pics with the cases split and a pile of parts
[url]Looking good…
|https://thumbsnap.com/XgTDSoGU[/url]…and a big step forward over the past week with motor all back together, refurbed wheels on, refurbed forks and head races back on, and my home-made head nuts. I’d managed to pick-up a used silencer body with an intact right hand casting…which would have been a bugger to make otherwise, so I polished it within an inch of its life - the purists would weep. Left end was broken but it’s just a simple disk made up on the lathe. The rear brake pedal, rod & clevis I’d made earlier fitted and on; likewise the stand and stand toggle affair. New engine mounts and various other refurbed and re-made bits and pieces, but starting to look like a (small) bike!
I cant help thinking that with a set of clip-ons and rear-sets this would make a great café-racer for a short person.
Where did we get to? Seems a long time since I fell out of love with Frankie and did nothing for a couple of months. Anyway, now all done and dusted, but let’s continue.
Back to March then – finishing off some of the tinware repairs, the rear of the front mudguard was eaten away with rust, so a new section added.
This bike came with a ‘regular’ Amal-style twistgrip, but that’s not right. One of the few shared parts with the Welbike was the throttle, which has a fitting welded on to the handlebars for the cable. I could see where it had had one originally and was ground off, so remade/reinstated it. Pic as how it should be from Lydia, and the replacement on Frankie.

I felt Frankie’s fuel tank was beyond saving…well OK, nothing’s really beyond saving but I’d have had to cut the bottom out, remake it, and do some panel-beating on the rest, and I could get a replica relatively cheaply from India (after a bit of haggling). There’s quite a good video on PH somewhere of them bashing out tanks with very rudimentary tools, but I digress. Claimed to be primed ready to paint, but a finish like a choppy sea, so a lot of prep work required. But the fittings were the wrong size and/or so poorly threaded it needed a bit of attention too, and I had to make up a new cross-pipe to suit the Indian-made threads.

Think seat, and you typically think seat pan and a but of foam. Not so on olde-worlde saddles. Cleaned-up and ready for paint, but just how many parts for a seat!

Ready for the cover; I got an upholsterer to make a new cover based on the old one; I think the only thing on the restoration/rebuild I didn’t do myself.

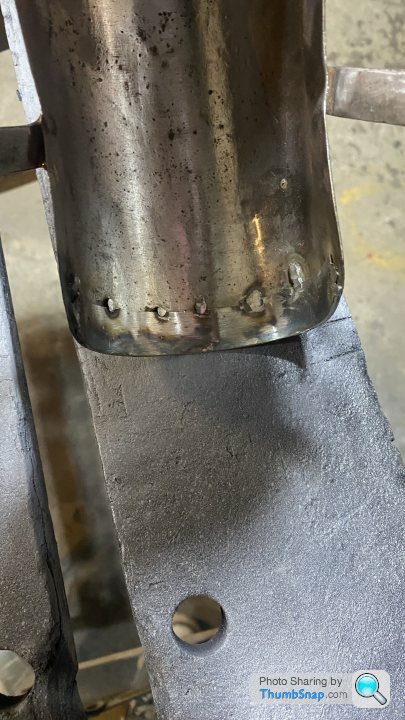
Then on to the exhaust and tail pipe. Luckily I’d managed to pick up the silencer can thingy, but I couldn’t get the alloy manifold that should bolt to the barrel that the pipe should go into so I had to make the pipe with the flange as part of it. I did try bending the pipe first, but even filled with sand I only ever managed to crimp it so got hold of some bends, and with a bit of chopping and welding we have a pipe that fits.
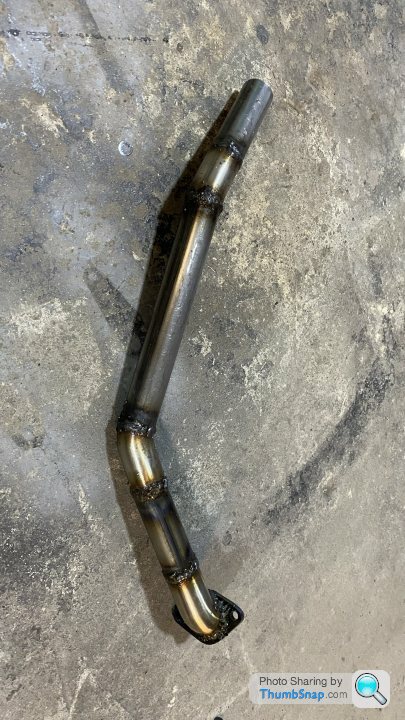
And this will be the tail pipe.

And so a complete system that’s a reasonable approximation of the factory system.

I’ve been trying since I got it to get the correct small levers for it – front brake and clutch. I’ve looked at various auto jumbles and on line, but all I can come up with is standard motorcycle sized levers. So in the end I gave up and looked for levers that were all alloy and not chromed so I could cut them down and polish them. So ended up with a pair of big Docherty levers – as per the top lever. Bottom lever is what it should be off Lydia, and the middle is my best effort cutting, filing and polishing the big lever. Not exactly correct, but of the right scale.

Made up new control cables and various other bits and pieces and was all bright-eyed and bushy-tailed to get it fired-up. Only it didn’t bloody run. Eventually I did get it fired-up, but only off a cordless drill on the engine sprocket bolt, and it would only run at high revs/wide-open throttle. Grrrr. I diagnosed probably the crankshaft oil seal so it would be motor out and apart again. It looked fine when I had the motor apart and so being a cheapskate I had left it. Toys duly thrown out of toybox and Frankie consigned to a corner of the garage, maybe until next winter.
But the weather of late hasn’t been great, so I decided to get back on the case a couple of weeks back. The good news with these wee bikes is it only takes a couple of house to get the motor out and strip it down, and a couple of hours to put it back together and back in the frame. And this time I replaced every seal and bearing, hopefully to save future tear-downs.
…and the bloody thing still didn’t start; exactly the same as before. I’d put new coils in the mag and it was getting a great spark, so suspicion fell on the carb. The Mk1 motor (like this one) should have an Amal 259 carb, but I just could not get one. But the Mk4 motor uses an Amal 359, and I managed to pick up a used 359 body. Showing my lack of Amal knowledge, they look identical so I assumed the 359 superseded the 259. I got and put in the correct jets, needle and slide for the 259 and all seemed well. But the benefit of having another running Corgi was I was able to swap the carbs, and sure enough Frankie sprang into life immediately and sweetly. But the 2 carbs had identical jets, needle and slide and it was only after measuring the bores, I found the 359 has a bigger bore than the 259. Looks the same, but isn’t. Doh. That explained why it would only run at full throttle. With a bit more investigation I found that the 359 has different jets (but same needle and slide), so new jets acquired and fitted. And lo and behold it runs. 
But during this period of strip-down, rebuild and frigging about with carbs I was sufficiently pissed of to not take any pics.
But with a running bike, the last thing to do was spray the now-primed tank in my makeshift spray booth. …and I buggered that up slightly too. The finish came out really well, except for quite a few pock-marks. I only have the rudimentary standard water trap on my compressor and so I’m thinking either some water or compressor oil came down the line…that’s my theory anyway. It’ll need rubbed down and repainted at some point, but good enough for the time being. But a winter task lined-up.

So that’s it then…tank on and complete. Just got to see if I can get it registered with the DVLA so I can ride it.


Frankie and Lydia looking rather better than when I got them

...th...th...th...thats all folks.
Back to March then – finishing off some of the tinware repairs, the rear of the front mudguard was eaten away with rust, so a new section added.
This bike came with a ‘regular’ Amal-style twistgrip, but that’s not right. One of the few shared parts with the Welbike was the throttle, which has a fitting welded on to the handlebars for the cable. I could see where it had had one originally and was ground off, so remade/reinstated it. Pic as how it should be from Lydia, and the replacement on Frankie.
I felt Frankie’s fuel tank was beyond saving…well OK, nothing’s really beyond saving but I’d have had to cut the bottom out, remake it, and do some panel-beating on the rest, and I could get a replica relatively cheaply from India (after a bit of haggling). There’s quite a good video on PH somewhere of them bashing out tanks with very rudimentary tools, but I digress. Claimed to be primed ready to paint, but a finish like a choppy sea, so a lot of prep work required. But the fittings were the wrong size and/or so poorly threaded it needed a bit of attention too, and I had to make up a new cross-pipe to suit the Indian-made threads.
Think seat, and you typically think seat pan and a but of foam. Not so on olde-worlde saddles. Cleaned-up and ready for paint, but just how many parts for a seat!
Ready for the cover; I got an upholsterer to make a new cover based on the old one; I think the only thing on the restoration/rebuild I didn’t do myself.
Then on to the exhaust and tail pipe. Luckily I’d managed to pick up the silencer can thingy, but I couldn’t get the alloy manifold that should bolt to the barrel that the pipe should go into so I had to make the pipe with the flange as part of it. I did try bending the pipe first, but even filled with sand I only ever managed to crimp it so got hold of some bends, and with a bit of chopping and welding we have a pipe that fits.
And this will be the tail pipe.
And so a complete system that’s a reasonable approximation of the factory system.
I’ve been trying since I got it to get the correct small levers for it – front brake and clutch. I’ve looked at various auto jumbles and on line, but all I can come up with is standard motorcycle sized levers. So in the end I gave up and looked for levers that were all alloy and not chromed so I could cut them down and polish them. So ended up with a pair of big Docherty levers – as per the top lever. Bottom lever is what it should be off Lydia, and the middle is my best effort cutting, filing and polishing the big lever. Not exactly correct, but of the right scale.
Made up new control cables and various other bits and pieces and was all bright-eyed and bushy-tailed to get it fired-up. Only it didn’t bloody run. Eventually I did get it fired-up, but only off a cordless drill on the engine sprocket bolt, and it would only run at high revs/wide-open throttle. Grrrr.
I diagnosed probably the crankshaft oil seal so it would be motor out and apart again. It looked fine when I had the motor apart and so being a cheapskate I had left it. Toys duly thrown out of toybox and Frankie consigned to a corner of the garage, maybe until next winter. But the weather of late hasn’t been great, so I decided to get back on the case a couple of weeks back. The good news with these wee bikes is it only takes a couple of house to get the motor out and strip it down, and a couple of hours to put it back together and back in the frame. And this time I replaced every seal and bearing, hopefully to save future tear-downs.
…and the bloody thing still didn’t start; exactly the same as before.
I’d put new coils in the mag and it was getting a great spark, so suspicion fell on the carb. The Mk1 motor (like this one) should have an Amal 259 carb, but I just could not get one. But the Mk4 motor uses an Amal 359, and I managed to pick up a used 359 body. Showing my lack of Amal knowledge, they look identical so I assumed the 359 superseded the 259. I got and put in the correct jets, needle and slide for the 259 and all seemed well. But the benefit of having another running Corgi was I was able to swap the carbs, and sure enough Frankie sprang into life immediately and sweetly. But the 2 carbs had identical jets, needle and slide and it was only after measuring the bores, I found the 359 has a bigger bore than the 259. Looks the same, but isn’t. Doh. That explained why it would only run at full throttle. With a bit more investigation I found that the 359 has different jets (but same needle and slide), so new jets acquired and fitted. And lo and behold it runs. But during this period of strip-down, rebuild and frigging about with carbs I was sufficiently pissed of to not take any pics.
But with a running bike, the last thing to do was spray the now-primed tank in my makeshift spray booth. …and I buggered that up slightly too. The finish came out really well, except for quite a few pock-marks. I only have the rudimentary standard water trap on my compressor and so I’m thinking either some water or compressor oil came down the line…that’s my theory anyway. It’ll need rubbed down and repainted at some point, but good enough for the time being. But a winter task lined-up.
So that’s it then…tank on and complete. Just got to see if I can get it registered with the DVLA so I can ride it.
Frankie and Lydia looking rather better than when I got them
...th...th...th...thats all folks.

Gassing Station | Biker Banter | Top of Page | What's New | My Stuff