Big single custom bike project
Discussion


KTMsm said:
Excellent work as always
I like the tips too - I've used washing up liquid in the past... that might explain the resulting poor paint job
If you want more tips on painting take a look at my blog page on painting at homeI like the tips too - I've used washing up liquid in the past... that might explain the resulting poor paint job

https://jtccc.wordpress.com/projects-2/
TT1138 said:
Always pleased to see updates. Enjoy these builds.
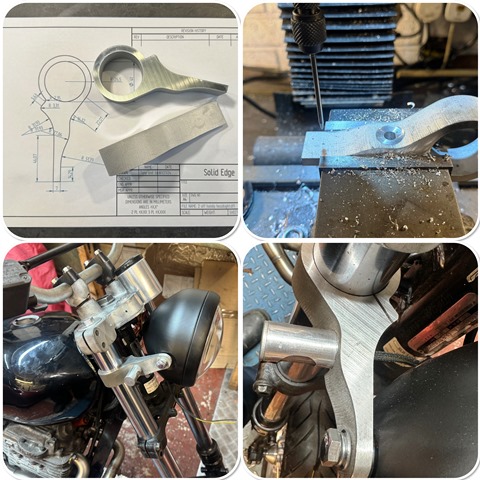
Thanks!headlight brackets took some thinking about, but I had plenty of time to do it lying in the sun! thank goodness for the Ipad and Ipencil!. I sent the drawing off to the water jet cutters and they cut them out of some nice 25mm plate, they came out well. I also designed them so i could mount the custom made indicators. it will all be polished later as I like to do all the polishing over a few days, horrible and filthy job!
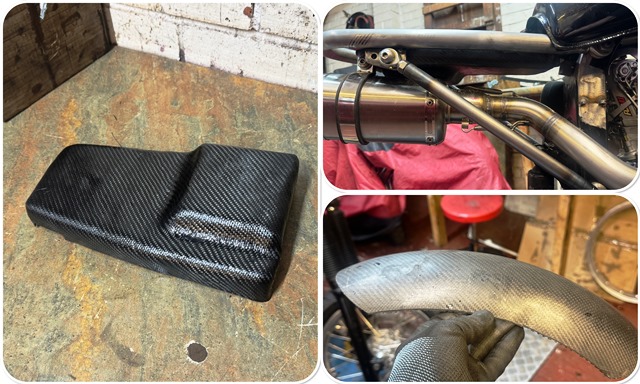
the carbon battery tray came out OK, I initially made an alloy one, but it hung down too low and spoiled the lines, so I made the carbon one stepped so the battery can sit in a recess to the side. its going to be tight with the electrics!
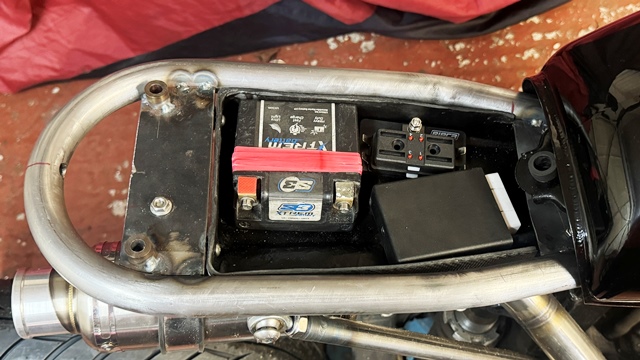
Here it is in profile, not long before i can take it all apart for painting! At this stage its really important to try to mount everything... you don't want to get it all painted/ powder coated and then find you are missing a bracket for say a horn! I also wheeled it around and found that the forks hit the tank... the lock stops are not adjustable on this so I am gong to have to extend them before painting...
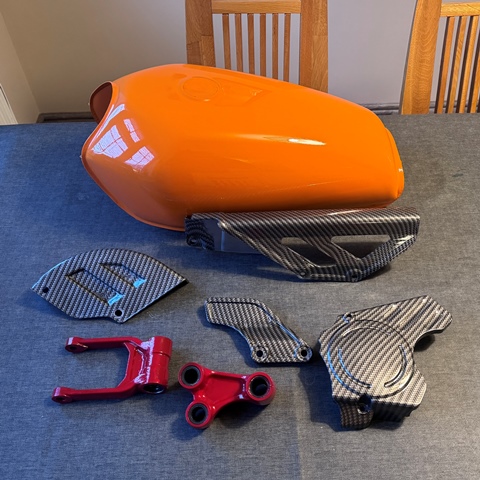
I played around for hours on photoshop trying to decide on high, low, beak type mudguard, but decided in the end to go low with a carbon one... with the advantage of a nice fork brace as well. Just ordered some orange fork gaiters, will see what that looks like!
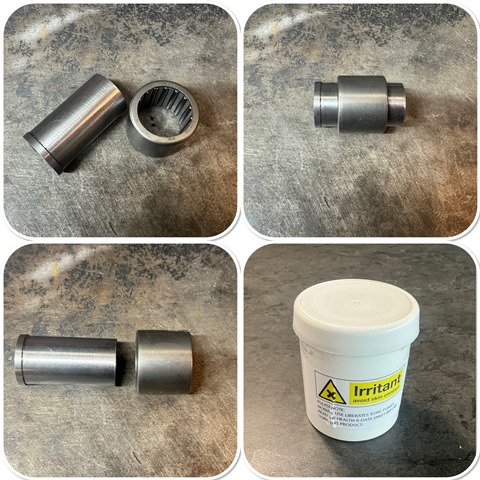
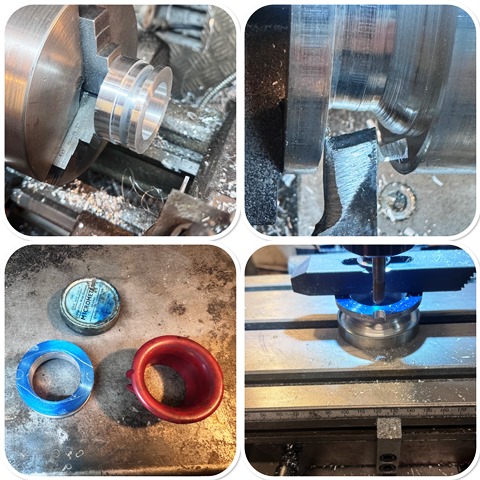
one of the few items on the bike that needed real attention was the swinging arm bush and needle roller bearing. it was badly rusted and seized… I checked and the bush is no longer available. I made one out of good quality steel, and case hardened it several times to build up the depth of the hardened layer. I also did a test piece and was pleased that I could not touch it with a file! I have not done case hardening for a LONG time!
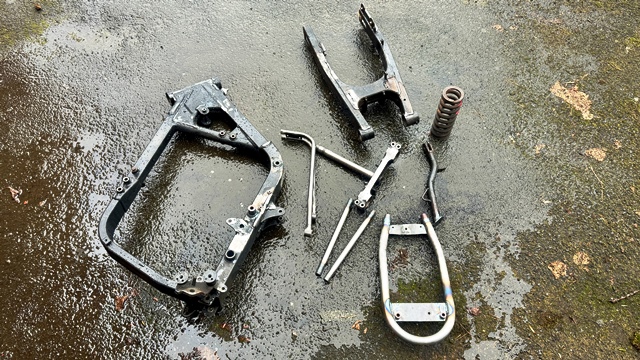
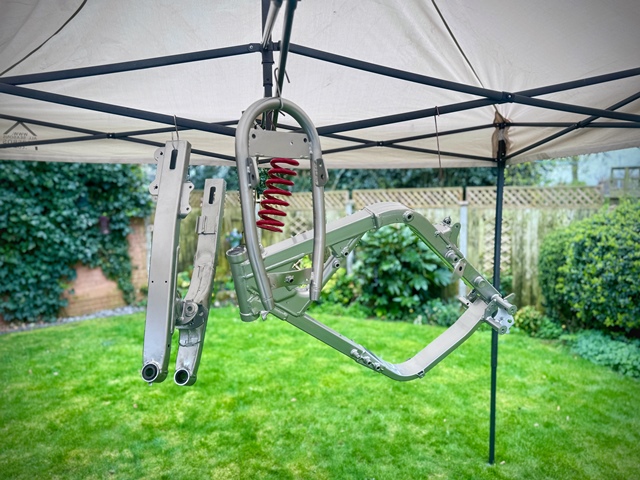
I finished welding up the frame and parts. Where I had modified the frame tubes I put an internal tube so it didn’t crush it when I tightened the bolts, then I welded the support bushes on. Then it was off to the powder coaters, along with a big box pf parts to be plated.
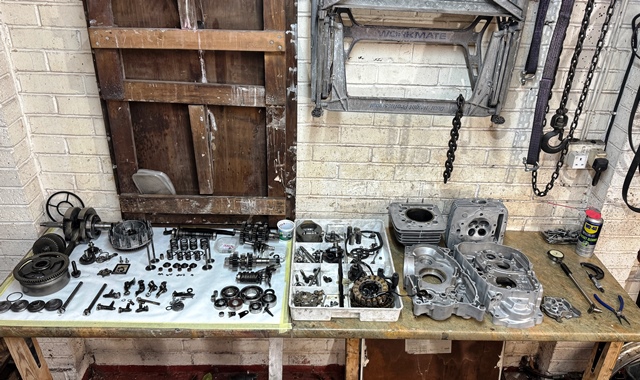
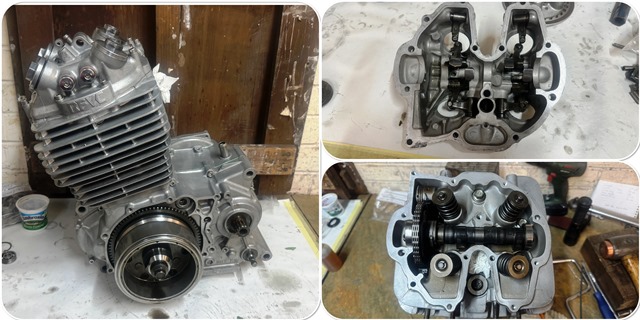
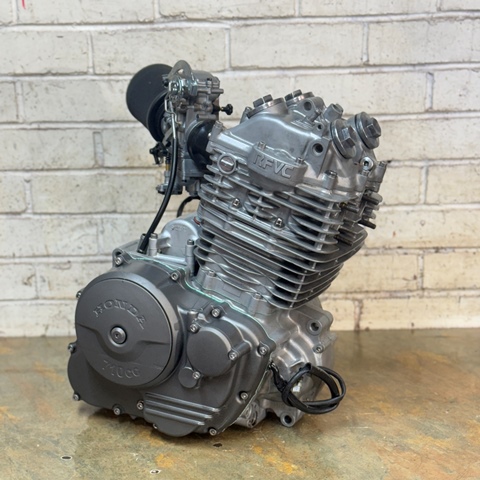
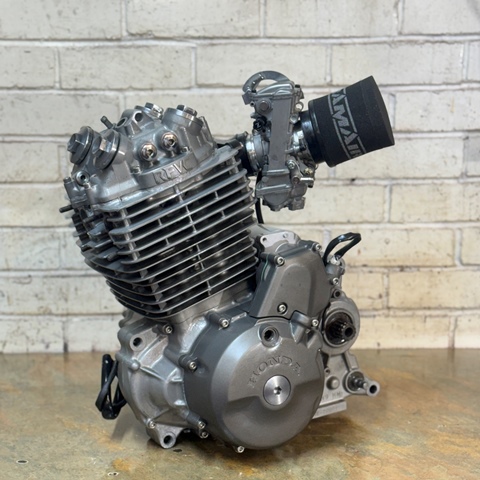
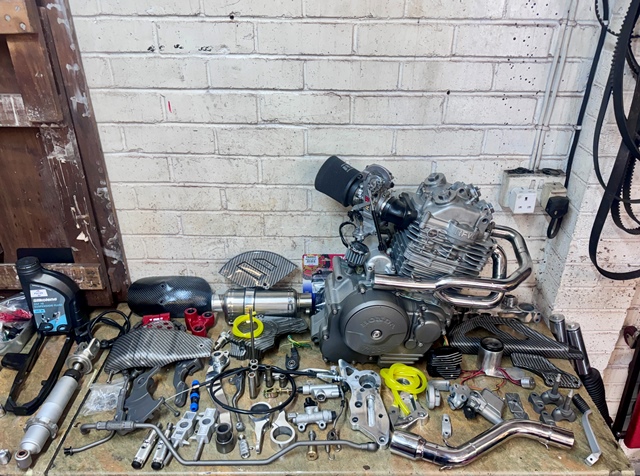
Its always stressful pulling an engine apart… you never know what you are going to find! I was really pleased as it came apart. there is no discernable wear on the bore, all bearings are nice and smooth, so its just gaskets, seals, and a new cam chain. I can see why these engines do mega miles, it’s VERY well built!
I finished welding up the frame and parts. Where I had modified the frame tubes I put an internal tube so it didn’t crush it when I tightened the bolts, then I welded the support bushes on. Then it was off to the powder coaters, along with a big box pf parts to be plated.
Its always stressful pulling an engine apart… you never know what you are going to find! I was really pleased as it came apart. there is no discernable wear on the bore, all bearings are nice and smooth, so its just gaskets, seals, and a new cam chain. I can see why these engines do mega miles, it’s VERY well built!
Great work (as stated earlier) and great tips. But as someone who's just spent an afternoon with the wet-and-dry I recall you comment of don't use washing up liquid in the water. That's always been my go-to. What do you use instead?
...and yes, I probably should have asked before I embarked on my Fairy Liquid-powered session
...and yes, I probably should have asked before I embarked on my Fairy Liquid-powered session
tvrolet said:
Great work (as stated earlier) and great tips. But as someone who's just spent an afternoon with the wet-and-dry I recall you comment of don't use washing up liquid in the water. That's always been my go-to. What do you use instead?
...and yes, I probably should have asked before I embarked on my Fairy Liquid-powered session
Karcher RM756 is the one I use... about £10 a bottle. its a strong detergent. you know when you wash the car with car shampoo and after the water beads off? well if you use this it doesn't ...and yes, I probably should have asked before I embarked on my Fairy Liquid-powered session

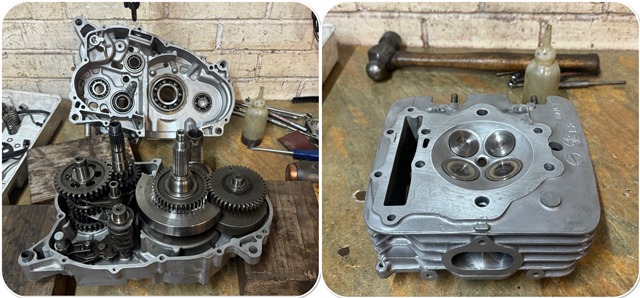
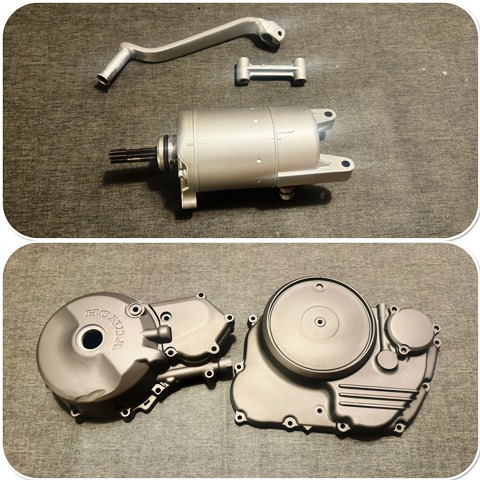
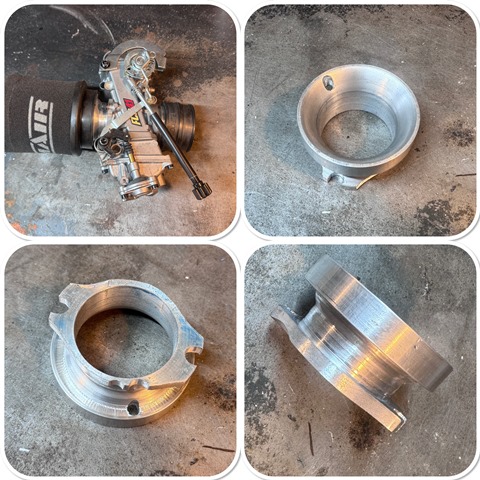
the engine build is well underway…its a nice and simple engine to build, I do like the way honda gets all the tolerances spot on! While I was on I polished the ports, and matched the inlet manifold to the head. I also did a bit more Cerakote, and I have to say its easy to apply, and gives a superb finish, I would say that its easily up to factory standard! I have used the air dry titanium colour on the side case for a bit of contrast and will also be using this on the oil lines.
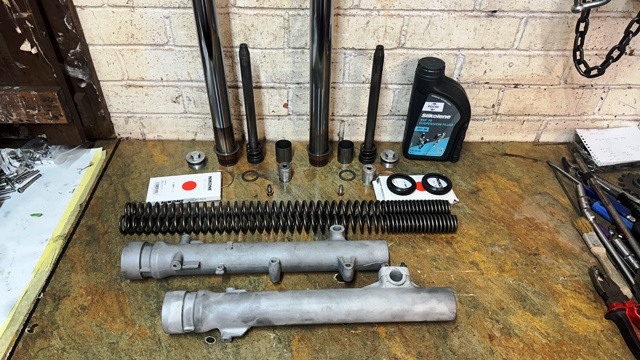
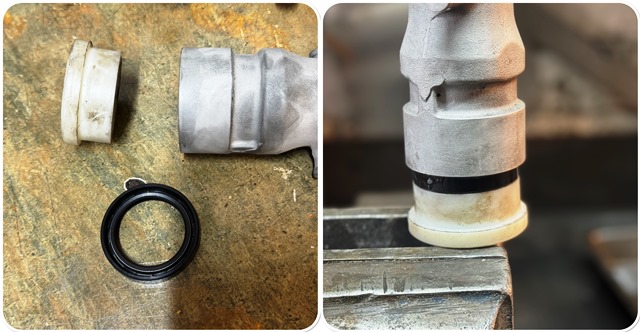
Onto rebuilding the forks, boy the oil was black in there! they were all OK though so new seals and dust covers, and some new oil. I often hear of people replacing fork seals and still having them leak afterwards…. This is often because people install the seals by tapping them in with a punch! this invariably damages the seal lip, hence they leak. the best way to install them is with a nylon collar supported in the vice… that way you can tap them in nice and square and get then seated on the bottom of the land.
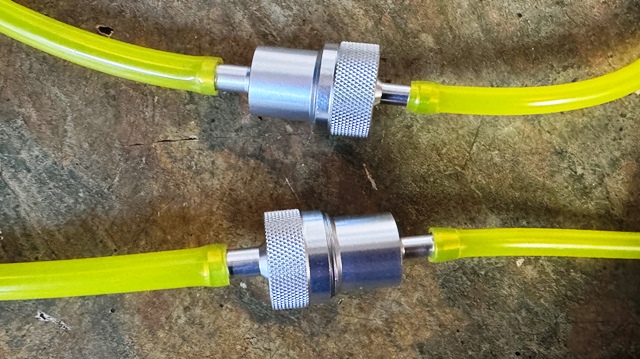
painting day… I debated on painting some of the parts satin black, but I actually like the fake carbon, plus its very durable. The fuel filters came as well.. I bought an 8mm and a 6mm one and swapped the parts over to compensate for the fact the fuel tap is a smaller pipe than the carb!
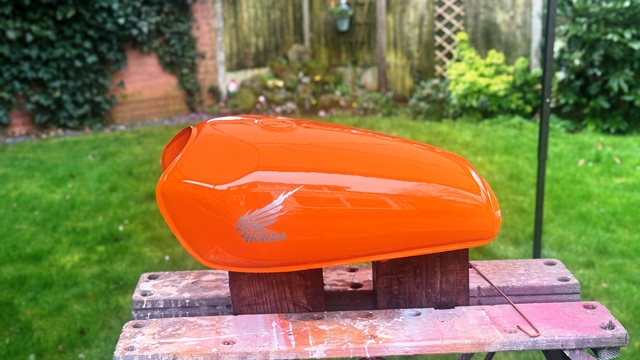
I was going to put a standard Honda decal on the tank, but then I saw these and liked them… not from the usual supplier, but the seller also sent me some samples so i could test the compatibility with the laquer. It was fine thank goodness. When painting over decals there are a few tips… first off I always do a first coat of laquer and let it dry, i never put them on the base coat. then I wet sand with 1000 wet and dry and then stick the decals in place. Now the important bits… Always wipe the area with panel wipe… this is for two reasons. Firstly, there is always some adhesive on the edge of the decal, and secondly they often have silicon on them and that makes the paint cess. I always give a mist coat over the decal and let it tack off, the reason for this is if you hit it with a full coat first you end up with runs off the horizontal edges of the decal.
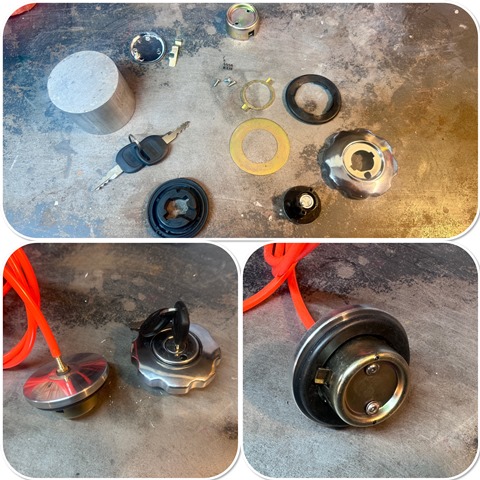
I looked at the filler cap that came new with the tank and decided it looked crap, so I took it apart and made a new on incorporating a breather.
I was going to put a standard Honda decal on the tank, but then I saw these and liked them… not from the usual supplier, but the seller also sent me some samples so i could test the compatibility with the laquer. It was fine thank goodness. When painting over decals there are a few tips… first off I always do a first coat of laquer and let it dry, i never put them on the base coat. then I wet sand with 1000 wet and dry and then stick the decals in place. Now the important bits… Always wipe the area with panel wipe… this is for two reasons. Firstly, there is always some adhesive on the edge of the decal, and secondly they often have silicon on them and that makes the paint cess. I always give a mist coat over the decal and let it tack off, the reason for this is if you hit it with a full coat first you end up with runs off the horizontal edges of the decal.
I looked at the filler cap that came new with the tank and decided it looked crap, so I took it apart and made a new on incorporating a breather.
Well it looks like there will be another delay. The company I have used for many years for powder coating has messed me around for a month now, lots of broken promises, which resulted in me going over this morning and fetching it all back. Some of it is done, but not up to the usual standard, and the frame has just been blasted. Still charged me the price as if it was all done. Didn’t argue, just walked away.
I have recommended this guy so many times, but not in the future, plus he has lost me as a customer for good
So, I managed to match the paint colour and will do the frame in 2K which in many ways will be better.
I have recommended this guy so many times, but not in the future, plus he has lost me as a customer for good
So, I managed to match the paint colour and will do the frame in 2K which in many ways will be better.

for years I have had frames powder coated... the main reason was I hated the amount of overspray painting tubes makes in the garage...
However, powder coating does come with a few disadvantages... Firstly finding someone who will do a good job! I have had some terrible jobs done in the past... the other disadvantage is if there are any rust pits, you cant cover them with anything due to the powder coat process involving heat. With a sprayed finish you can use a 2K primer filler which does a brilliant job of covering them imperfections up. the other advantage is it's much easier to touch up in the future, plus and unlimited range of colours.
So after the powder coater messed me around again, I decided to paint the frame with 2K. here is the results.
I started with a thin coat of etch primer (or adhesion promoter as I prefer to call it!) followed by two coats of 2K primer filler. After a bit of a flat off with 800 I gave it two coats of silver base coat, followed by two of 2K lacquer.
I did this in the garden, under the Gazebo, which was brilliant! I am really pleased with the results and probably won't go back to powder coating again.
buzzer said:
lazybike said:
Interesting project and thanks for sharing. Come the apocalypse I'm coming to your place
I wont be here! I have a plan... my mate bough a house a few years ago with a nuclear fallout shelter in the garden... we are off there 
You can't just drop that little nugget, more information is required! Vastly more...

Megaflow said:
Hold the phone!
You can't just drop that little nugget, more information is required! Vastly more...
it was installed in the early 90's... there is about 6 feet ot earth on top of it, its accessed via a metal ladder underneath what looks like a substantial man hole cover. its the real thing and must have cost an absolute fortune! it has air filtration, mains, battery (long disposed of) and also manually operated via a handle. it has a main room, with bunk beds for 8 people, a store room, (with a water tank!) and a toilet. You can't just drop that little nugget, more information is required! Vastly more...
The guy that built it was a bit (!) eccentric my mate was told by the people who live close... \The house was his country holiday home! he worked for the MOD apparently in a senior capacity.
We have had the odd dinner party down there, its spookily quiet!
Gassing Station | Biker Banter | Top of Page | What's New | My Stuff