280mm Rear Brake upgrade (with pics)
Discussion


Following on from the 300mm front brake upgrade I did previously: http://www.pistonheads.com/gassing/topic.asp?h=0&a... this is my rear brake conversion.
This conversion is to replace the standard early discs which are 253mm. Remember the rear wheels are 16" which means they look very small. There is no benefit doing this if you already have the 273mm rears. Also, this rear disc is solid, not vented, so not ideal for track-day use either.
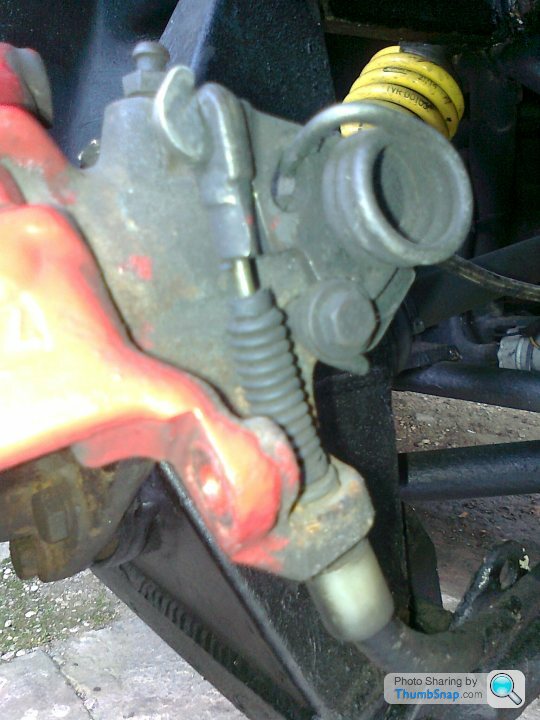
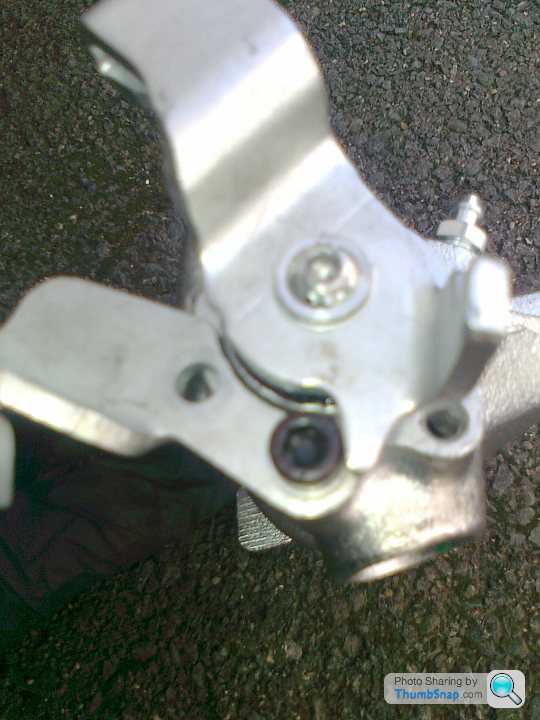
Before:
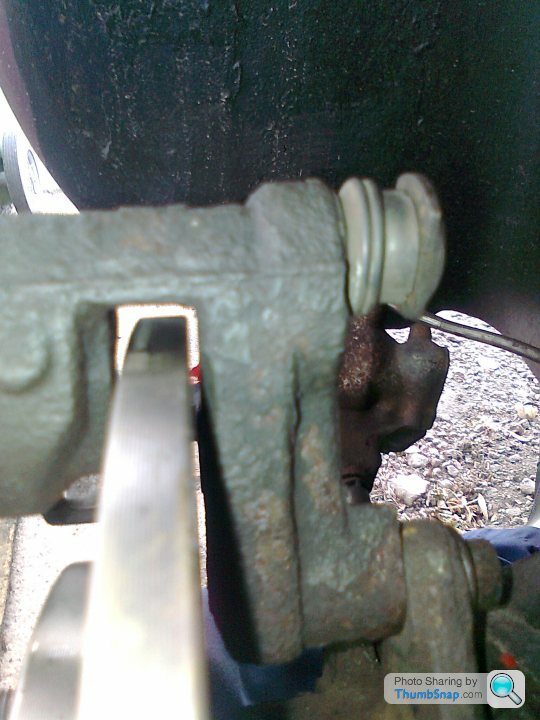
Note that the handbrake cable is fitted vertically at the rear coming up from the bottom.
To remove the cable from the caliper you will need to slacken the handbrake adjuster on the cable by quite a long way. Long arms help with this. Unscrew the rear part which is the locking ring then unscrew the front part for around 6 to 8 inches. The cable will now be slack enough to lift off the hook.
Remove the caliper 13mm bolts and lift it clear and park it on top of the upper suspension arm. Now unscrew the 2 caliper bracket mounting bolts (13mm spanner/socket) from the hub.

Note: the top bolt cannot be removed from the bearing carrier as it is too long.
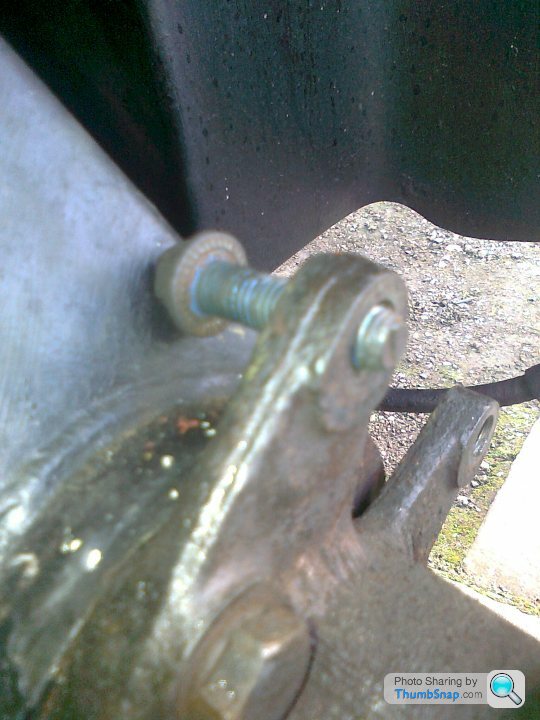
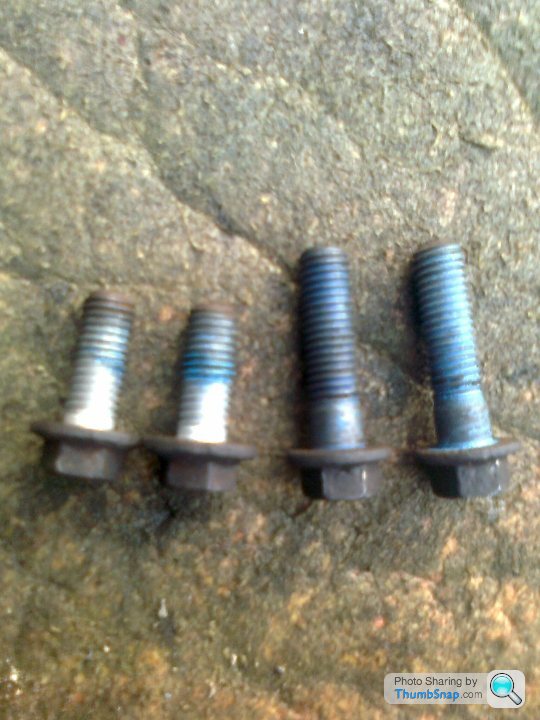
So, slacken the 4 x 17mm bolts that hold the hub a couple of turns then knock the bearing carrier forward. You can now remove the bolt and then tighten the 17mm bolts up again. The bolts that hold the new Mondeo mounting brackets are shorter - as seen here on the left.
The ST170 discs are 5mm too high so to get around this I fitted 5mm spacers on the hub then fitted the disc on top.
This centralises the disc in the caliper mounting bracket.
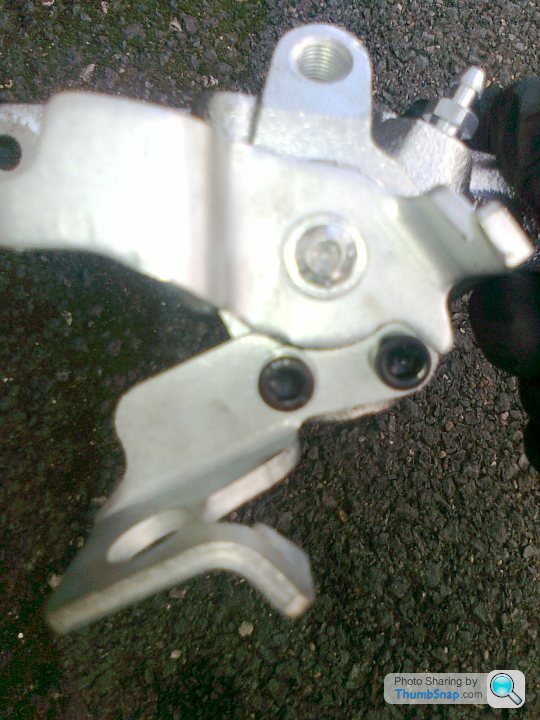
Before fitting the calipers they need some adjustment to the handbrake mechanism. Mondeo calipers have the handbrake levers facing the front so they need to be moved to face the rear and vertically to line up like the TVR originals. This is quite simple and needs no special tools.
This is a new caliper showing the handbrake set up for a Mondeo.
Firstly, slacken the 2 black socket headed screws in the above picture. You must ensure the lever on the caliper does not move at any time or the self adjusting mechanism inside the caliper may become unserviceable so take care to hold it steady. Note the lever stop is resting against the black screw on the right - remember this!
Now remove the screws and move the bracket round the housing - on this side clockwise - until the rearmost hole fits the front one. Fit one screw to hold it. The second screw is no longer necessary. The bracket cannot move when applying the handbrake as it presses against the caliper housing.
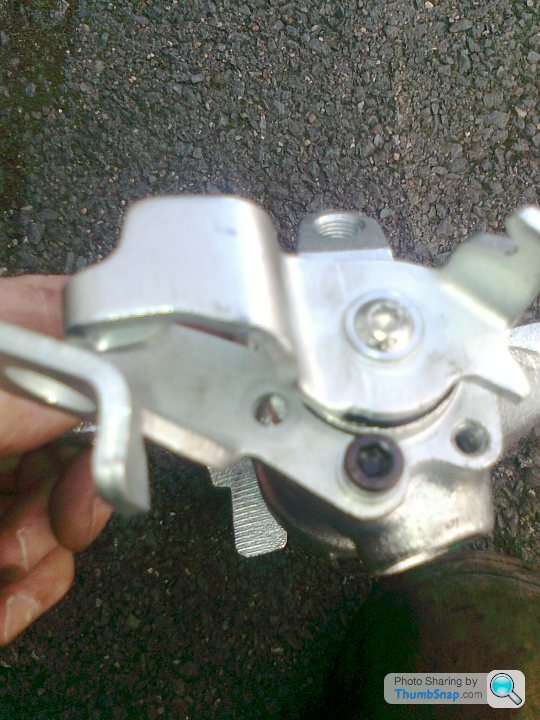
Now, holding the lever mechanism steady so it cannot move or turn - I used a screwdriver - unscrew the torx screw in the centre of the mechanism. Gently prise the lever off the spindle - it is splined - then refit with the stop lever lined up against the black socket headed screw you undid earlier. Holding the lever to prevent rotation, tighten the torx screw.
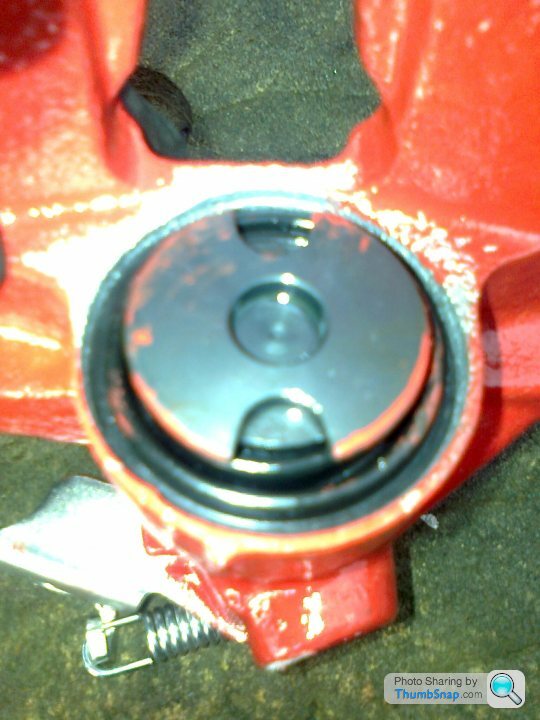
Now you are all set to fit the caliper with new brake pads. I used standard Mondeo ones from Euro Car Parts. The piston has 2 cut outs which must be as the picture so that they engage with the lug on the back of the inner pads.
 |http://thumbsnap.com/yw0VVelW[/url]
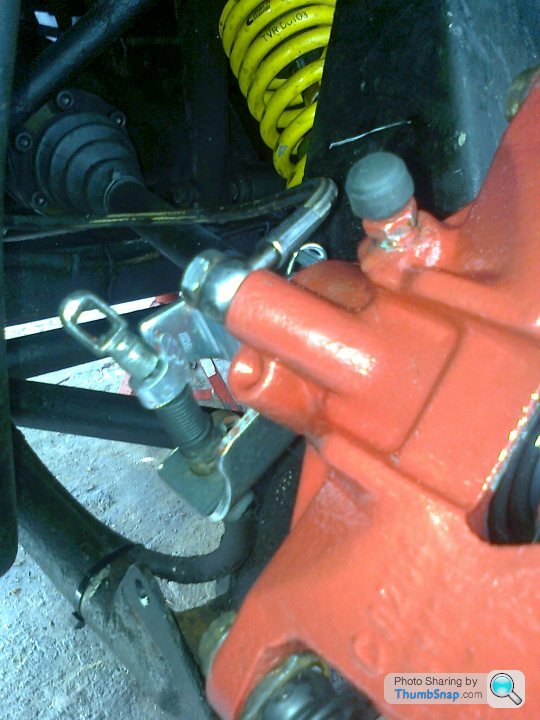
Once fitted in place, fit the handbrake cable to the caliper. The end fitting is different so simply slide the cable into the slot - it will not fit the new caliper using the hook and eye arrangement - so this is what it looks like. I nipped the hook together using grips to stop the cable coming out of the fitting. Once the cable is finally adjusted this step is not really necessary. For neatness you may wish to cut the 'eye' off the cable end.
 [url]
[url]
Transfer the flexy brake pipe (or stainless one like mine) to the new calipers. To get the correct orientation, you can slacken the pipe at the inner end where it meets the metal pipe and rotate to get the best alignment without twisting. In my picture the flexy looks like it is near the driveshaft but it is nowhere near it.
Do NOT at any time operate the handbrake until the brakes have been fully bled or the self adjuster may not work. After bleeding the brakes, press the brake pedal hard down several times.
Only now adjust the handbrake cable. Turn the plastic screw on the cable above the diff until the cable is just starting to press the levers down. There should be no slack at the cable ends.
Operate the handbrake inside the car. Ideally no more than 5 clicks. If more, then adjust the screw a bit more and check again. Once you are happy, screw up the locking ring to lock to the adjuster.
Take the car for a test drive and press the brakes firmly a number of times. Check the handbrake travel and adjust as required.
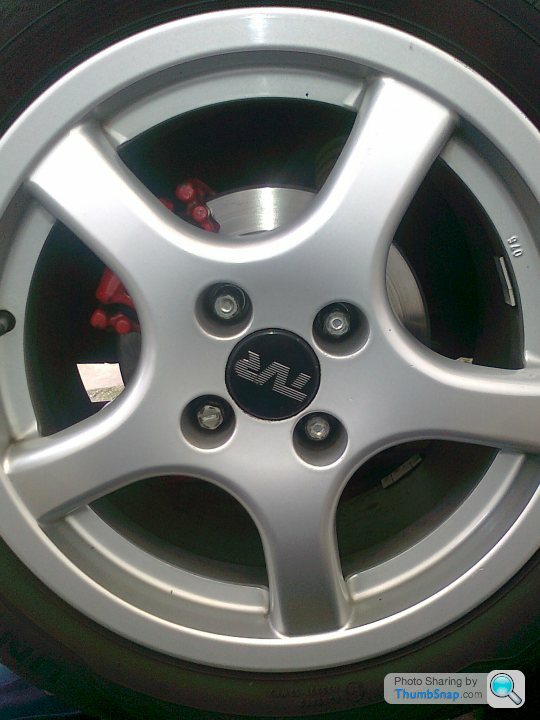
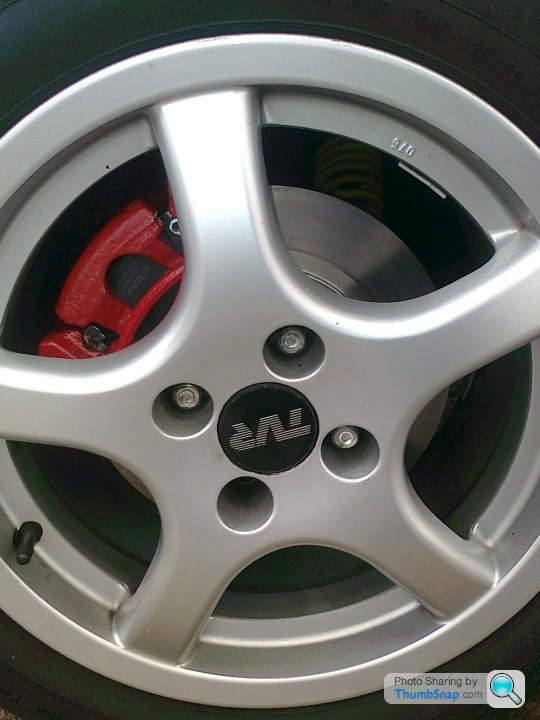
The final look:
For the discs: Focus ST 170 - registration number MF03 GUD
http://www.eurocarparts.com/ecp/c/Ford_Focus_2.0_2...
Calipers: Mondeo Mk3 - registration number LL03 TVP
http://www.eurocarparts.com/ecp/c/Ford_Mondeo_2.0_...
http://www.eurocarparts.com/ecp/c/Ford_Mondeo_2.0_...
There is an exchange surcharge on calipers from Euro Car Parts so I got 2 old units from the scrapyard (£10 each) and used them as the surcharge is £35 each.
Caliper mounting brackets are from a scrapyard as they are around £100 each new. Also the fitting bolts as you need the shorter ones.
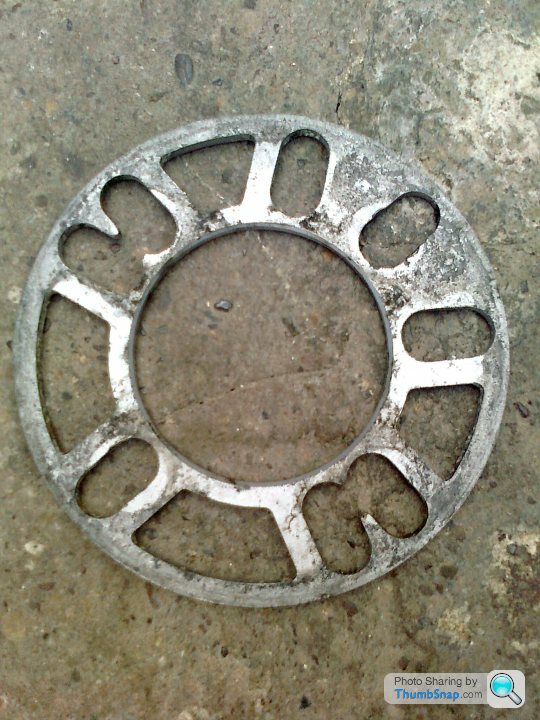
The 5mm spacer details are in the 300mm thread.
The paint is Hammerite smooth.

This conversion is to replace the standard early discs which are 253mm. Remember the rear wheels are 16" which means they look very small. There is no benefit doing this if you already have the 273mm rears. Also, this rear disc is solid, not vented, so not ideal for track-day use either.
Before:
Note that the handbrake cable is fitted vertically at the rear coming up from the bottom.
To remove the cable from the caliper you will need to slacken the handbrake adjuster on the cable by quite a long way. Long arms help with this. Unscrew the rear part which is the locking ring then unscrew the front part for around 6 to 8 inches. The cable will now be slack enough to lift off the hook.
Remove the caliper 13mm bolts and lift it clear and park it on top of the upper suspension arm. Now unscrew the 2 caliper bracket mounting bolts (13mm spanner/socket) from the hub.
Note: the top bolt cannot be removed from the bearing carrier as it is too long.
So, slacken the 4 x 17mm bolts that hold the hub a couple of turns then knock the bearing carrier forward. You can now remove the bolt and then tighten the 17mm bolts up again. The bolts that hold the new Mondeo mounting brackets are shorter - as seen here on the left.
The ST170 discs are 5mm too high so to get around this I fitted 5mm spacers on the hub then fitted the disc on top.
This centralises the disc in the caliper mounting bracket.
Before fitting the calipers they need some adjustment to the handbrake mechanism. Mondeo calipers have the handbrake levers facing the front so they need to be moved to face the rear and vertically to line up like the TVR originals. This is quite simple and needs no special tools.
This is a new caliper showing the handbrake set up for a Mondeo.
Firstly, slacken the 2 black socket headed screws in the above picture. You must ensure the lever on the caliper does not move at any time or the self adjusting mechanism inside the caliper may become unserviceable so take care to hold it steady. Note the lever stop is resting against the black screw on the right - remember this!
Now remove the screws and move the bracket round the housing - on this side clockwise - until the rearmost hole fits the front one. Fit one screw to hold it. The second screw is no longer necessary. The bracket cannot move when applying the handbrake as it presses against the caliper housing.
Now, holding the lever mechanism steady so it cannot move or turn - I used a screwdriver - unscrew the torx screw in the centre of the mechanism. Gently prise the lever off the spindle - it is splined - then refit with the stop lever lined up against the black socket headed screw you undid earlier. Holding the lever to prevent rotation, tighten the torx screw.
Now you are all set to fit the caliper with new brake pads. I used standard Mondeo ones from Euro Car Parts. The piston has 2 cut outs which must be as the picture so that they engage with the lug on the back of the inner pads.
|http://thumbsnap.com/yw0VVelW[/url]Once fitted in place, fit the handbrake cable to the caliper. The end fitting is different so simply slide the cable into the slot - it will not fit the new caliper using the hook and eye arrangement - so this is what it looks like. I nipped the hook together using grips to stop the cable coming out of the fitting. Once the cable is finally adjusted this step is not really necessary. For neatness you may wish to cut the 'eye' off the cable end.
[url]Transfer the flexy brake pipe (or stainless one like mine) to the new calipers. To get the correct orientation, you can slacken the pipe at the inner end where it meets the metal pipe and rotate to get the best alignment without twisting. In my picture the flexy looks like it is near the driveshaft but it is nowhere near it.
Do NOT at any time operate the handbrake until the brakes have been fully bled or the self adjuster may not work. After bleeding the brakes, press the brake pedal hard down several times.
Only now adjust the handbrake cable. Turn the plastic screw on the cable above the diff until the cable is just starting to press the levers down. There should be no slack at the cable ends.
Operate the handbrake inside the car. Ideally no more than 5 clicks. If more, then adjust the screw a bit more and check again. Once you are happy, screw up the locking ring to lock to the adjuster.
Take the car for a test drive and press the brakes firmly a number of times. Check the handbrake travel and adjust as required.
The final look:
For the discs: Focus ST 170 - registration number MF03 GUD
http://www.eurocarparts.com/ecp/c/Ford_Focus_2.0_2...
Calipers: Mondeo Mk3 - registration number LL03 TVP
http://www.eurocarparts.com/ecp/c/Ford_Mondeo_2.0_...
http://www.eurocarparts.com/ecp/c/Ford_Mondeo_2.0_...
There is an exchange surcharge on calipers from Euro Car Parts so I got 2 old units from the scrapyard (£10 each) and used them as the surcharge is £35 each.
Caliper mounting brackets are from a scrapyard as they are around £100 each new. Also the fitting bolts as you need the shorter ones.
The 5mm spacer details are in the 300mm thread.
The paint is Hammerite smooth.
Gassing Station | Chimaera | Top of Page | What's New | My Stuff