Top end tappety type noise
Discussion


OK looks like we can go for refitting everything.
I have a brand new genuine Land Rover woodruff key, supplied by Andy at Powers. Have test fitted and it appears much tighter and will need taping into final position so could well suit.
If that doesn't work then Mike Luck will make one for me 1.2 mm higher than standard from a piece of 3/16" woodruff key steel plate.
Sardonicus said:
blaze_away said:
RPI just sent me a photo shows depth of keyway is 6.66mm
Mine is 7.8mm
EUREKA now need to get a custom made key cut
Sweeping statement from someone I value opinion of little Mine is 7.8mm
EUREKA now need to get a custom made key cut
 brand new crank 7.10 mm at deepest/centre an area the key does not bottom out anyway it is located in the milled profile as a whole they should know that (machine tolerance's) should be but isn't
  in other words the key is not an exact copy/form of the crank groove , and that key you have is it genuine? or made to manufacturers spec/size or just some old universal or crudely machined up knockout? Peter had my last new keyway and I am not attempting removal of the one in pictured crank
Edited by Sardonicus on Friday 14th June 11:24
I am even more hopeful the genuine Land Rover part will do the trick
Making progress, had Alun here most of the day and we have fitted a genuine Land Rover woodruff key and it is indeed a tight fit sticks up about 1.6mm is the right length and engages with crank sprocket, oil sprocket and front pulley.
Just need to a vacuum unit for the distributor some genuine spark plugs and a few hours more and we can run it up see if cylinder 7 runs and if we still have the original top end tappety noise.
New woodruff key

Just need to a vacuum unit for the distributor some genuine spark plugs and a few hours more and we can run it up see if cylinder 7 runs and if we still have the original top end tappety noise.
New woodruff key
He might not be worth 500 but I wouldn't quibble at 50p hell if I was feeling in a really good mood I'd pay him 75p bit rash I know but he is worth it.
Nice job on the gaskets and his tippy tappy fine hammer work getting that woodruff key millimicrons perfect was a thing of beauty. Tapped ith the precision and timing of Phil Collins
Nice job on the gaskets and his tippy tappy fine hammer work getting that woodruff key millimicrons perfect was a thing of beauty. Tapped ith the precision and timing of Phil Collins
Sardonicus said:
Nope  soaked in cam lube or oil etc will prime soon enough, if its not a rebuild fill the filter with as much oil as you can and fire the beast straight up the oil light will go out after a couple seconds
Thank you soaked in cam lube or oil etc will prime soon enough, if its not a rebuild fill the filter with as much oil as you can and fire the beast straight up the oil light will go out after a couple seconds Edited by Sardonicus on Sunday 16th June 10:40
Right answer.....phew
Just read this.....in that manual Lancepar provided link to, I did not do 2. aligning reference marks, to be fair I did look but didn't see any so carried on. Does it need to come off for checking ?
Oil pump reassembly instructions
1. Lubricate rotors, oil pump drive gear, cover
plate and housing with engine oil.
2. Assemble rotors in housing ensuring that
reference marks are aligned.

Got the front cover off to check for reference marks and make sure the chamfer is facing forward,
Of the 3 rotors the only one wit an alignment mark is the middle sized one. Cant find any marks on the outer ring or pump housing to align to and no references other than that vague instruction in previous post.
There is some very light scoring on the flat surfaces (like an LP record) but not enough for even the thinnest of feeler gauges.
Before dismantling

Inside base plate

Rotors in place

Inside housing

Side A
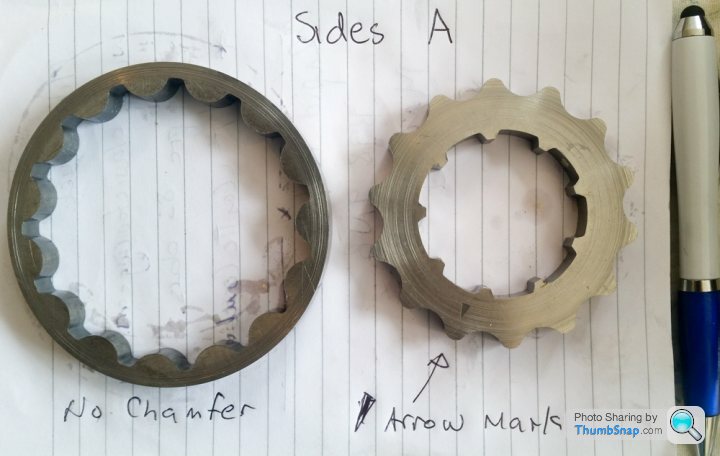
Side B

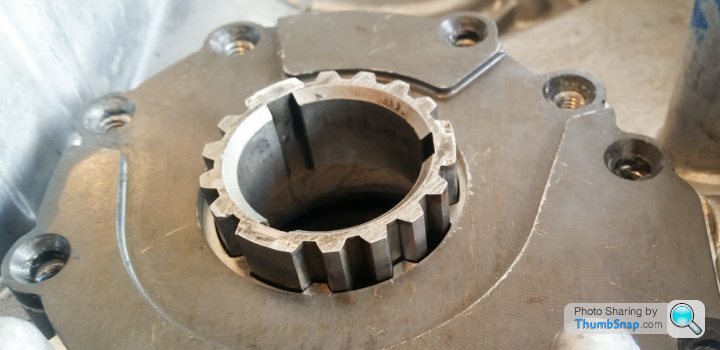
Reassembled with main drive sprocket

ditto
I cant really see much more to do other than assemble with chamfer forward, lube up with oil and stick it all back in.
Of the 3 rotors the only one wit an alignment mark is the middle sized one. Cant find any marks on the outer ring or pump housing to align to and no references other than that vague instruction in previous post.
There is some very light scoring on the flat surfaces (like an LP record) but not enough for even the thinnest of feeler gauges.
Before dismantling
Inside base plate
Rotors in place
Inside housing
Side A
Side B
Reassembled with main drive sprocket
ditto
I cant really see much more to do other than assemble with chamfer forward, lube up with oil and stick it all back in.
Brief update....
Front end all back together genuine LR woodruff key did the job.
Got the distributor back in (Anthony's spare) as a small piece of metal fell from mine whilst fitting the new vacuum unit, so now need a distributor.
Found TDC by rotating the engine with Depth Gage inserted through plug hole and set rough timing and again find that the Crankshaft Pulley is a problem as its still showing 45 degrees out (retarded) with the pulley fully engaged on the new woodruff key.
ie When engine is at TDC the TDC mark on the pulley is 45 degrees further round from the engine casing pointer. As you look at it from the front if the TDC is at 12 o'clock the TDC on the pulley is at 1:30

Powers has one and they balance them on site so off there to get it.
Front end all back together genuine LR woodruff key did the job.
Got the distributor back in (Anthony's spare) as a small piece of metal fell from mine whilst fitting the new vacuum unit, so now need a distributor.
Found TDC by rotating the engine with Depth Gage inserted through plug hole and set rough timing and again find that the Crankshaft Pulley is a problem as its still showing 45 degrees out (retarded) with the pulley fully engaged on the new woodruff key.
ie When engine is at TDC the TDC mark on the pulley is 45 degrees further round from the engine casing pointer. As you look at it from the front if the TDC is at 12 o'clock the TDC on the pulley is at 1:30
Powers has one and they balance them on site so off there to get it.
Edited by blaze_away on Thursday 20th June 11:17


Good and bad news
All fitted back together correctly timed with the timing marks now aligning perfectly with real TDC. Ignition timing set at 10 degrees vac off at 950 rpm.
Good used distributor fitted with new vac advance unit installed as the diaphragm was leaking. Vac advance confirmed operational wirh timing light.
New plugs cap leads fitted.
Some suspect electrical connectors repaired for good measure. Harmonic balance pulley installed. So all in all good work done.
HOWEVER
Cylinder 5 and 7 still cold tapping noise at 3100rpm still there.
Back to the drawing board.......
I'm thinking
1. Recheck with dti actual valve lift height on each cylinder
2 If consistent then head off 1,3,5,7 side to see if head gasket is leaking between cylinders 5 and 7
3 Do other side as might as well do both
BTW I have straight through exhaust manifolds no cats so will take heads off with manifolds attached to avoid the difficulty of exhaust bolts access, is that sensible ?
Also whilst off remove manifolds and fit new gaskets and bolts.
Is this plan rational or what ?
My straight through SS manifolds
Edited by blaze_away on Saturday 22 June 15:12
Edited by blaze_away on Saturday 22 June 15:14
Steve_D said:
blaze_away said:
............HOWEVER
Cylinder 5 and 7 still cold tapping noise at 3100rpm still there.
Back to the drawing board.......
I'm thinking
1. Recheck with dti actual valve lift height on each cylinder
2 If consistent then head off 1,3,5,7 side to see if head gasket is leaking between cylinders 5 and 7
3 Do other side as might as well do both
Have I missed a stage somewhere.Cylinder 5 and 7 still cold tapping noise at 3100rpm still there.
Back to the drawing board.......
I'm thinking
1. Recheck with dti actual valve lift height on each cylinder
2 If consistent then head off 1,3,5,7 side to see if head gasket is leaking between cylinders 5 and 7
3 Do other side as might as well do both
Have you tested the injectors or moved them to different cylinders?
If not then you have to do that before anything else.
From your list above.
1. When you say 5&7 are cold how cold are they? A (very) worn cam would reduce power but would still burn fuel and produce heat but perhaps not as much heat. If you want to measure lift you will have to remove the rockers as the lifters will bleed down under pressure from the valve springs and give a false reading. Remove rockers and measure against the pushrods alone. You don't need a TDI a steel rule will do as you are looking for millimetres of difference .
2. Again a blow between cylinders will still have the heat as each cylinder fires. Compression or leakdown test first.
Steve
Thanks for the reply.
Yes have swapped injectors around and the ones that were on 5 and 7 perform as expected on the cylinders they were moved too. Had stethoscope on inj 5 n 7 and they sound like all the others.
Have swapped leads around too and fitted the spark testers no issues seen.
2 4 6 and 8 300 degrees plus
1 and 3 300 degrees plus
5 is 120
7 is 90
When I turned engine over with rocker covers off I could see valves opening/closing similar amounts to others but didnt measure. So will repeat this as you suggested with rockers off.
Its baffling me, I cant rationalise whats happening with the evidence before me.
Fwiw ...if I start the after a couple of hours I get a clatter on start up for a couple of seconds, leaky lifter maybe ?
QBee said:
This suggests no combustion in both 5 & 7.
5 is a tad warmer than 7 because 3 is closer to it, whereas 7 is on the end (no s t, Sherlock?)
So either fuel is not there at the relevant time, or neither has a spark at the correct time.
Frank, are you ABSOLUTELY sure that the leads to 5&7 haven't been reversed?
Have you simply tried swapping the plug caps over and seeing what happens?
Don't think I've done that, firing order checked by both me and Alun........will go check it again.5 is a tad warmer than 7 because 3 is closer to it, whereas 7 is on the end (no s
t, Sherlock?)So either fuel is not there at the relevant time, or neither has a spark at the correct time.
Frank, are you ABSOLUTELY sure that the leads to 5&7 haven't been reversed?
Have you simply tried swapping the plug caps over and seeing what happens?
1-8-4-3-6-5-7-2
Yep that's what we've got.
QBee sent me some spare leads I will fit those ........
Agree with your two conclusions too
"So either fuel is not there at the relevant time, or neither has a spark at the correct time"
So swapped ECU's for "fuel" just for good measure, no change.
Ooohh your post just triggered a memory of a thought I had a few days back......
I will get the injector rail off and put a small sample vial (urine test type) on each injector and crank engine see if they all deliver similar amounts of fuel. (Coil disabled of course)
Gassing Station | Chimaera | Top of Page | What's New | My Stuff