Another body off thread.
Discussion


I’ve decided Steve’s tall axle stands idea to rest body on is my preferred way, the tall stands making it easier on my back when getting underneath after partial lift to see if anything’s snagging,,, nice 
My only concern here is,,, will the floor support the body weight ok.
Steve if I understand this correctly do I use chocks of wood on stands to spread the load, placing chocks / stands so weight is being applied on edges of floor where they go vertical as in picture.
This idea on all 4 corners.
My only concern here is,,, will the floor support the body weight ok.
Steve if I understand this correctly do I use chocks of wood on stands to spread the load, placing chocks / stands so weight is being applied on edges of floor where they go vertical as in picture.
This idea on all 4 corners.
Other important notes for consideration.
Lift body with doors shut and roof on.
Support rear of body when resting it on trolley just under the boot. (The rear of the car is heavy and can open up gaps at the top of the doors if not supported properly ) reliably informed, thanks Jay. Try and keep doors closed.
Lift body with doors shut and roof on.
Support rear of body when resting it on trolley just under the boot. (The rear of the car is heavy and can open up gaps at the top of the doors if not supported properly ) reliably informed, thanks Jay. Try and keep doors closed.
Thanks Steve, I’ve got all that. I know it’s sunday.
Your advice has helped tremendously as has everyone who’s offered support.
Thanks Dave, will do re pictures
TJC very impressive given its on your drive way and again Thankyou.
I’ve often looked at your profile and wondered if your a bit sadistic as it says you enjoyed every minute of your body off experience
I totally get you now
Who mentioned sleepless nights,,,, yep that too, I’m knackered from lying there trying to photo frame everything so I remember what the hell i’m doing putting it back together down the line, this is the easy bit.
For me I’ve separated it into various categories.
Basically disconnect
Front end
Rear end
Interior
Engine bay
Etc so broken down into smaller segments making it easier to remember. We’ll see.
I’m nervous now. Here goes. TTFN.
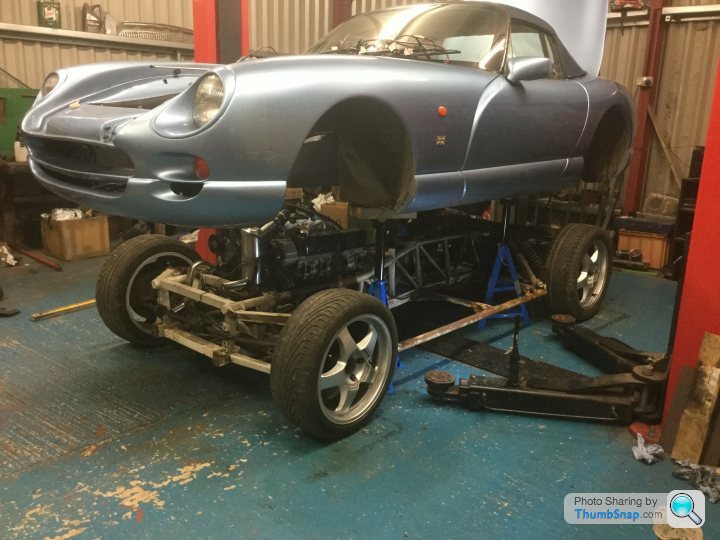
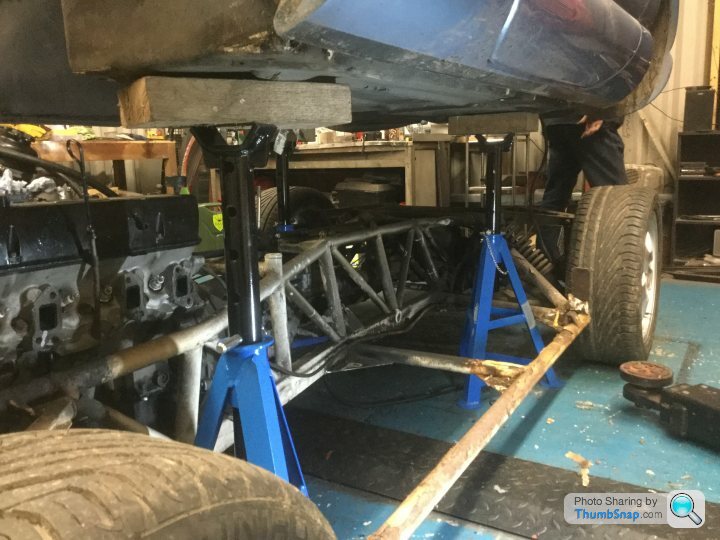
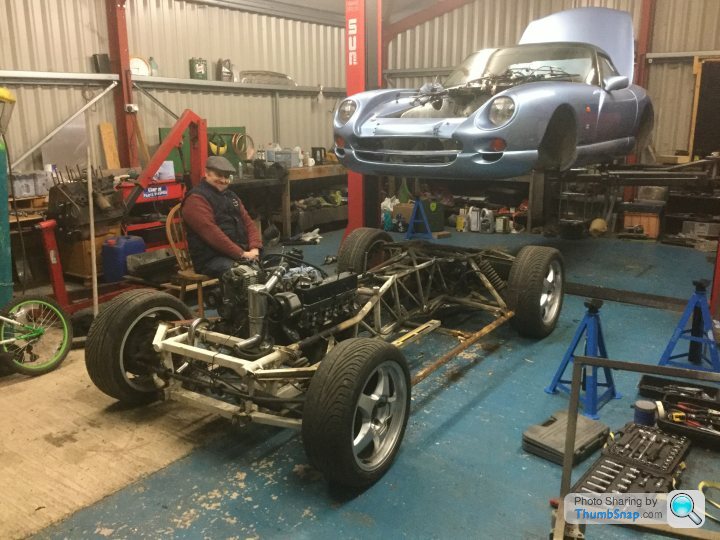
Steve D from Southways Tvr idea with axle stands is spot on. This is easy as a one man operation but used my friend who knows a thing or two to operate lift as I checked everything was free.
Other than rear section carbon canister hose that still had cable ties attaching it to chassis,, der which took seconds to remove nothing caught at all.
The most stressful bit was well not very stressful. Thanks again the tips and advice have saved a lot of headaches.
Body came free very easily using the stands to support body and using the ramp to lower chassis away.
Then simply re position ramp arms to lift body clear and roll chassis away.
Edited by Classic Chim on Sunday 8th December 21:23
Edited by Classic Chim on Monday 9th December 00:26
 Now the fun really starts.
 Sardonicus said:
Well done Alun  look at those nice tidy mechanical's
look at those nice tidy mechanical's I especially like my exhaust ports, well the nice clean heads anyway Yeah a good base to start with.
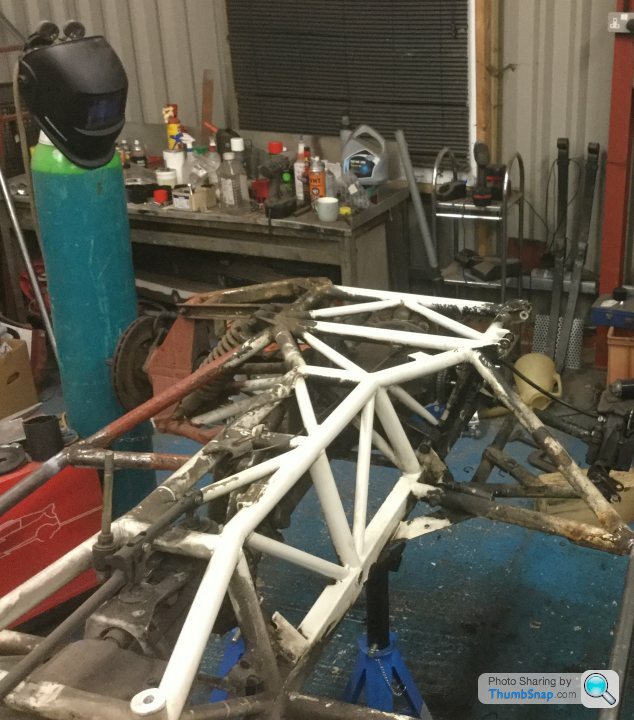
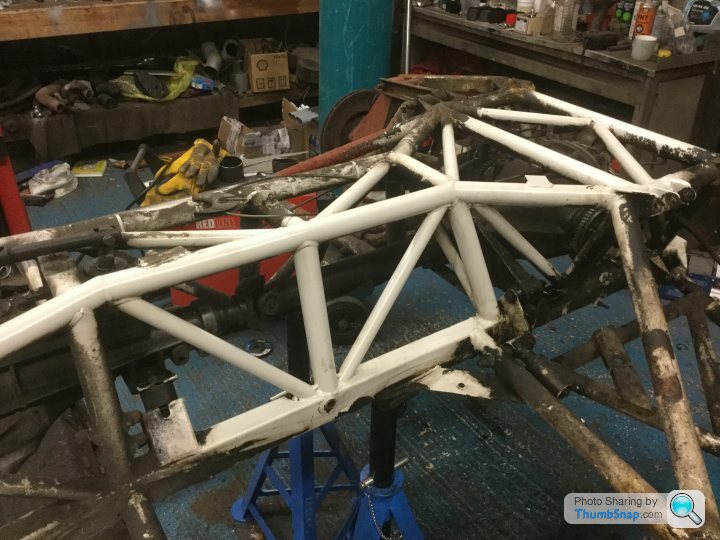
It’s not the late basket case I’ve always believed it to be
Top tube powder coat like new over most of it
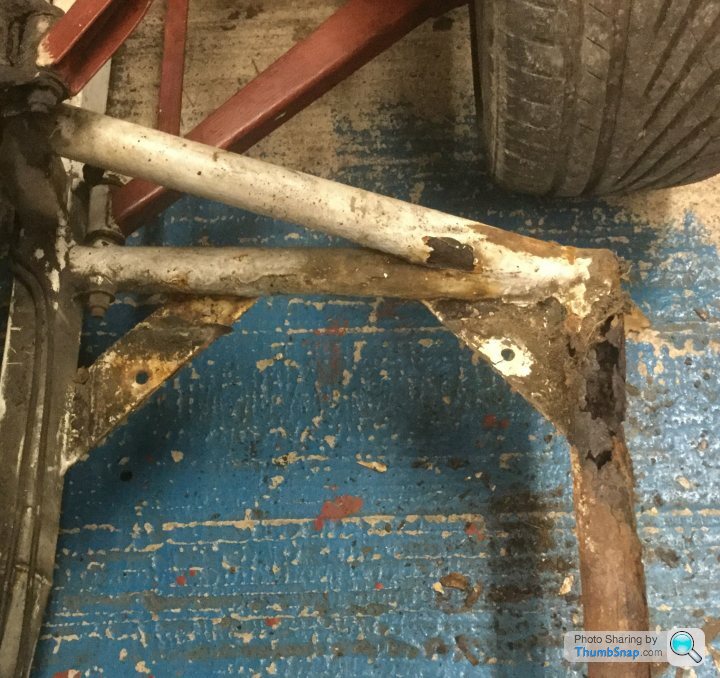
Riggers are rot city though.
Pictures won’t load, maybe PH has a max capacity per day ?
Dave85chim said:
Good going Alun!
What a difference some space makes!
Are you painting the chassis?
Thanks mate What a difference some space makes!
Are you painting the chassis?

Makes a huge difference.
Body is now moved over and out the way in the corner. It’s a big space alright.
I’ve not taken a pic yet but two things come to mind, ok three
Door gaps only increased about 2-3mm if that using the axle stands,
Trolley we’ve used with a few bits of wood have supported it also keeping gaps minimal. Well chuffed there.
Oh and it’s not very heavy.
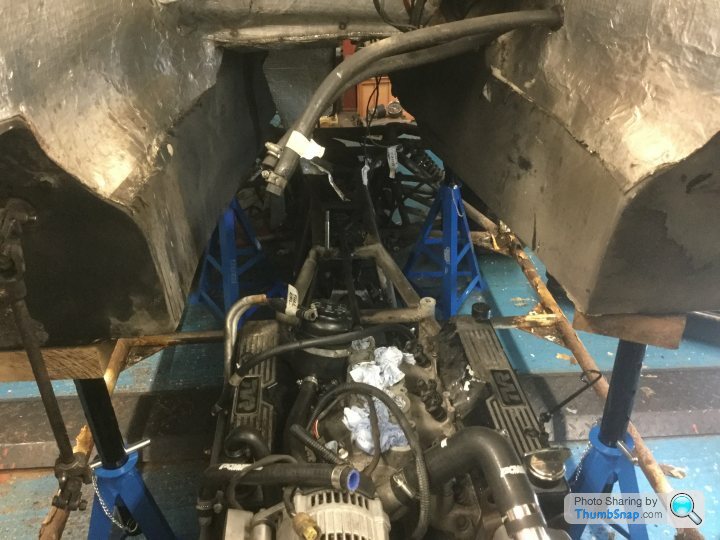
Yes paint chassis but by a pro most likely, taking engine and gearbox out first after a proper evaluation of the frame first. Tuesday will be informative.
That’s it I’m done.
25/28 hrs working time maybe, double that without the facilities.
Frank helping and Garry Townsend my great friend offering his garage and time when I needed it.
I’m glad he let me just get on with it because I could concentrate really well just buzzing around the car from job to job on my list.
I have to stress, my car has had a lot of work done in the past, the front half especially has been totally renewed other than my Mexico labelled gearbox
even the dif has been in and out so almost everything I've touched has come free really nicely. Rotten bolts being the exception but that’s no buggy really.
Steve_D said:
Well done Alun.
Sat here waiting for the next questions.
Steve
Hahahah Sat here waiting for the next questions.
Steve
 and Thankyou Steve.
 Mt friend builds stockcars, brand new stands unopened
What a crack that was.
I told my mate to leave me alone for a few hours while I cut wood and finished off separating handbrake and 4 way union on body for hydraulics.
I only asked him back in when everything was in place and I’d already dropped chassis a few inches, I’m so glad you mentioned the spread of the axle stand legs,,,,, I got that spot on with a level
Get that wrong and your lowering the chassis onto them so that is really the only consideration,
My fears of body weight was unfounded, the floor easily supports it with big chocks of wood, the front with no bonnet is very light.
I’m sure there will be plenty of questions
I love my Chassis, I think they look chunky as hell. Looks good with the 17’s and bigger than standard tyres.
Steve_D said:
ERW mild steel tube 38.1 x 1.62 or back in the day 1.5" x 16SWG
You can go seamless and increase the wall thickness but if you apply a decent finish it will last you another 20 years by which time you will not be worrying about rusty riggers you will be wondering if you can get out of the chair and make it to the loo in time.
If you can't find it local Metals4u will deliver next day as standard and are reasonably priced.
Steve
I think you told me last time Steve! I’ve lost my scrap of paper,,, duly noted down. Thanks You can go seamless and increase the wall thickness but if you apply a decent finish it will last you another 20 years by which time you will not be worrying about rusty riggers you will be wondering if you can get out of the chair and make it to the loo in time.
If you can't find it local Metals4u will deliver next day as standard and are reasonably priced.
Steve
ChimpOnGas said:
Any rusty outrotter shots yet Alun? 
We all love a good set of rotton chassis photos
I'll be sharing mine soon... I bet it's worse than yours
I still can’t get any of them to load up! We all love a good set of rotton chassis photos
I'll be sharing mine soon... I bet it's worse than yours
Tried what others have said but I’m going via photo’s I took with iPad so straight from files, don’t get any message relating to photo size other than when emailing Them?
Weird as others taken moments before load ok. Hmm.
Rotton o/s front mostly. N/s surprisingly intact but well gone really. Main section ok ish but I’ve not had chance to look closer yet. Engine out so what will be will be.
It’s rather sad the only bit that needed to be coated properly wasn't or these cars would be perfect to this day. Hey ho Dave.
Anyway where the pics from your body off,,, it’s all interesting stuff.
Edited by Classic Chim on Wednesday 11th December 19:52
I’ve had a closer look.
Mines not so bad.
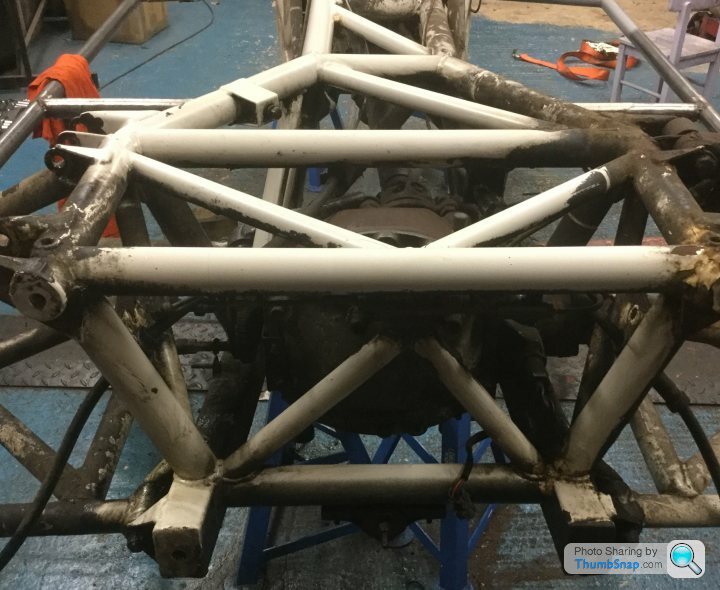
It just needs outriggers, I’ve looked at top chassis rails and it’s surface rust only thank god.
Proper rub down before I decide but I’m moving towards riggers and decent paint.
Tomorrow I’m going to clean off all the chassis and have an experienced metal worker/ welder help me decide.
He already thinks chassis is 80% ok, I’ve already rubbed main bottom rails down before so not expecting anything to bad there.
Wishbones etc will all want doing, main section has no rust above bottom rails other than a few bits around Dif area, considering it’s a late chassis the powder coat is good, clean the muck off it’s shiny
If anyone’s interested there are chassis pics on Facebook.
Mines not so bad.
It just needs outriggers, I’ve looked at top chassis rails and it’s surface rust only thank god.
Proper rub down before I decide but I’m moving towards riggers and decent paint.
Tomorrow I’m going to clean off all the chassis and have an experienced metal worker/ welder help me decide.
He already thinks chassis is 80% ok, I’ve already rubbed main bottom rails down before so not expecting anything to bad there.
Wishbones etc will all want doing, main section has no rust above bottom rails other than a few bits around Dif area, considering it’s a late chassis the powder coat is good, clean the muck off it’s shiny
If anyone’s interested there are chassis pics on Facebook.
I’m still in thinking mode over chassis covering, I see what people are saying but I’m also mindful of what the cars really worth. Repainting an already really clean Centre section seems over the top if it’s perfectly intact.
haven’t jet washed it yet as other crash damaged car in the way so both front corners are off.
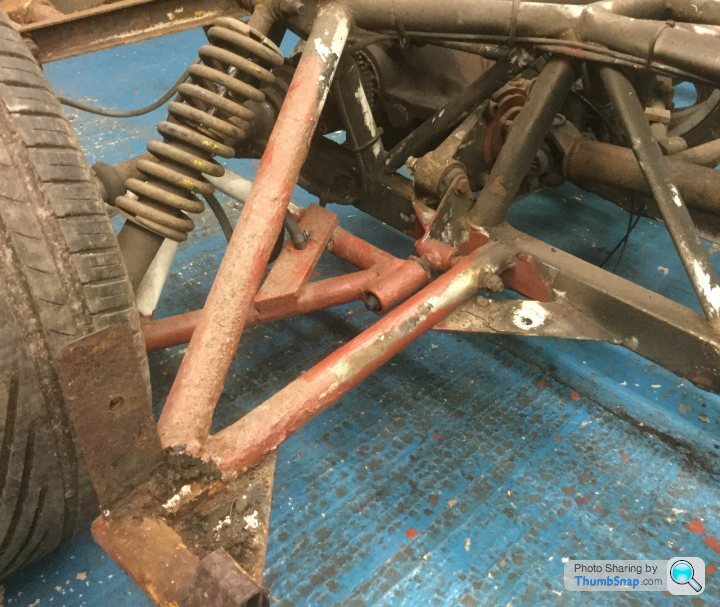
O/s outrigger has already been fabricated and replaced including new suspension pick up point at front, all tacked into place. Looks great. Rear pick up point ready to be cut off and replaced.
It’s moving along at pace, 3 of us on it today measuring the hell out of everything, luckily two know what their doing
Rear end corners strip down tomorrow ( makes it easier lining up bottom wishbone bolt) with weight off it.
If things go well tomorrow all wishbones and sundries will be off for powdercoat next week sometime.
Forgot pics, tomorrow if I can compress the bloody things.
haven’t jet washed it yet as other crash damaged car in the way so both front corners are off.
O/s outrigger has already been fabricated and replaced including new suspension pick up point at front, all tacked into place. Looks great. Rear pick up point ready to be cut off and replaced.
It’s moving along at pace, 3 of us on it today measuring the hell out of everything, luckily two know what their doing
Rear end corners strip down tomorrow ( makes it easier lining up bottom wishbone bolt) with weight off it.
If things go well tomorrow all wishbones and sundries will be off for powdercoat next week sometime.
Forgot pics, tomorrow if I can compress the bloody things.
phazed said:
Installing, thanks Peter, dunno where I’d be without you Let’s see if I can work the darn stuff, bloody palava. I’m allergic to computers
I’ve tried cropping mine but still no joy.
In today’s environment with camera using high res etc this limit is a hinderance to say the least.
They load on other platforms easy enough.
I remember a thread talking about this a few years ago and reading Heymarket were not going to invest any money updating this platform.
Other media are ok but historically this platform offers the best advice and past threads used to be easy to find.
Sad really as it will be a huge loss to Tvr owners if it dies away.
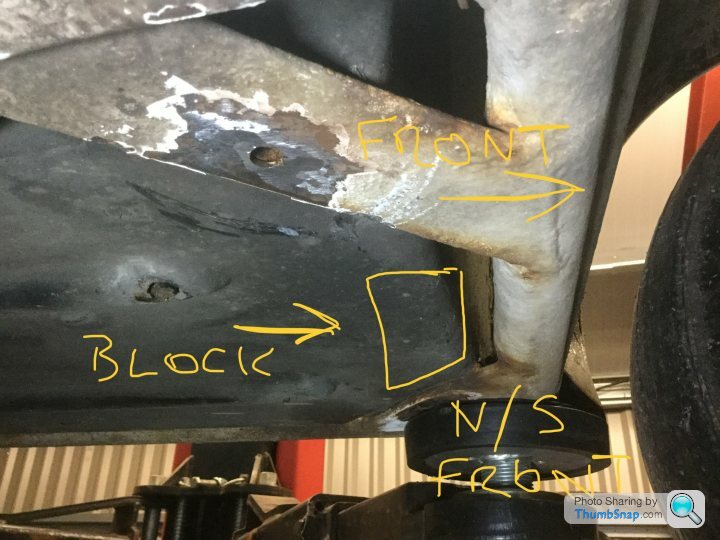
Any advice on how you disconnect handbrake cable from rear callipers would be appreciated.
Never touched them before so I’m a newby on this too.
I can’t work out how you take each end off the arm it’s hooked over.
I’ve searched for threads but not come up with anything that details this part yet. N/S rear calliper is off the car bar cable as is rear hub, drive shaft, shock absorber and top wishbone.
Bottom wishbone left in place for lining up purposes.
O/S bolts all loosened so a bit more work tomorrow evening should see both rear corners disassembled. Slowly taking it apart.
motul1974 said:
I didn't take and pics, but from memory the cable simply hooks on to the handbrake mechanism.
I've only had to re-connect mine, not dismantle, but gotta be just opposite.
I think I used pliers to grip the hook on the cable.
You've also got the tensioning wheel on the central chassis you can slacken off.
Thanks, I’ll slacken it off a bit more. I've only had to re-connect mine, not dismantle, but gotta be just opposite.
I think I used pliers to grip the hook on the cable.
You've also got the tensioning wheel on the central chassis you can slacken off.
Fiddly business
Once it’s off the hook do I just prise out the plastic sections that trap it to calliper,, I forgot to take pictures too, busy.
Rear end is all original and never been apart I believe so it’s rusty bolt city. But loads of penetrating oil every time I go round it has helped today.
Next up will be rear hub assembly and how I take it apart?
How does drive shaft detach from hub. 6 Allen head bolts hold CV to hub from rear. I’ve removed hub and shaft as one piece from the Dif.
I’m hoping I don’t have to disturb wheel bearings ( new about 5 years ago ) less it was after my French trip
Sadly many old threads no longer show photos which is a real shame although I have not looked at hub threads yet. More homework
Edited by Classic Chim on Sunday 15th December 20:37

motul1974 said:
Unbolt the shafts from the upright/hub and slide out.
If your taking the hubs out of the uprights theres a one a left handed thread and other a right (that blood great nut)
The hub assembly to the upright are attached hex bolts. You may need to cut an Allen key down to get one of them out.
I’ve unbolted 6 in total the shaft from upright/hub but it seems stuck, I assumed it should just slide out but seems very firm, so left it. I’ll tap around it and pull harder. If your taking the hubs out of the uprights theres a one a left handed thread and other a right (that blood great nut)
The hub assembly to the upright are attached hex bolts. You may need to cut an Allen key down to get one of them out.
Thanks for the info very useful,,
Oh my hub face the road wheel bolts to has a hole in it, just large enough to put a socket Allen head through so just make sure it’s in neutral so you can spin it to each position. I’ve loosened those 4 hub/ upright bolts.
Gassing Station | Chimaera | Top of Page | What's New | My Stuff