Another body off thread.
Discussion


lancepar said:
..............I needed to replace the hex' bolts with domed headed bolts at the top chassis fixings behind the fuel tank...........
The Factory also covered those dome bolts with RTV sealant and left it to go off before fitting the tank. This gives a second level of protection against the tank rubbing.Steve

Interesting as my car had no mastic over the top domed bolts. I’ll check my petrol tank for witness marks.
Update.
Wiring has been connected up underneath car and engine harness routed and cable tied up and fully connected to engine bar starter motor wiring, heater hoses and fuel lines connected. fuel rail and coil packs installed.
You think you know your car until you take it apart then leave it a darn year,,, fuel rail on and off twice or was it three times until I got wiring laying how I wanted it which also includes pulling off coil packs to facilitate fuel rail removal. A right faff.
Also all brake lines and clutch slave line connected to 4 point union on the body so they are ready to bleed.
My blood and tears are on this car, I had to wipe it down it was that splattered
Edited by Classic Chim on Wednesday 17th March 19:05

Classic Chim said:
Talking about gravity fed, all brake bleed screws opened including clutch slave cyl and draining away nicely.
Steering column disconnected from rack.
Handbrake cable detached from handle.
Speed sensor disconnected and wiring un cable tied from chassis and tucked up where it feeds through body.
Wiring coming from front o/s headlight loom fed back and tucked up by radiator opening. This is actually carbon canister charge wire and oil pressure switch wire. Carbon canister hose disconnected. Decided going into wing was unnecessary, cut pipe and will use a two way connector in future.
All other wiring disconnected and tucked up around wipers for now.
I’ve been around whole car, it’s all free and ready to lift bar 4 way hydraulic connectors on o/s body, handbrake and that’s it far as I can tell
I’ve learnt the hard way not to tempt fate,,, maybe tomorrow I try and separate chassis from body. Wish me luck.
A few photo’s
Question
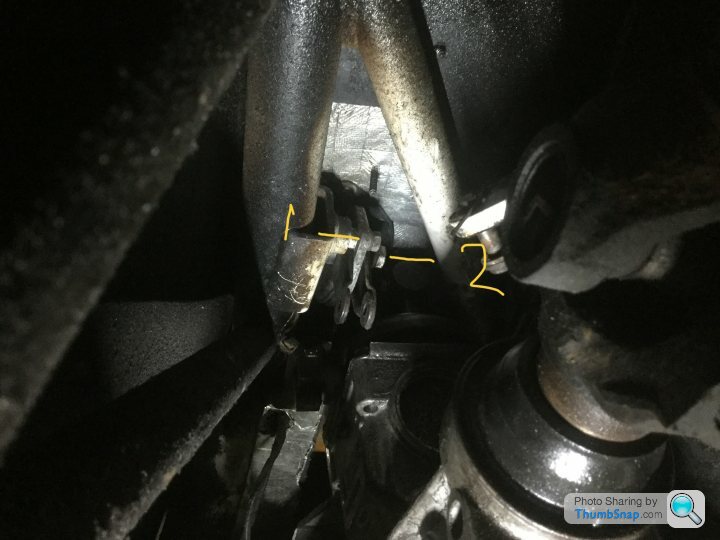
1 handbrake has what looks like two retaining bolts to chassis, both marked in my picture, do both of these have to come out?
Hi Alun, I’m stillSteering column disconnected from rack.
Handbrake cable detached from handle.
Speed sensor disconnected and wiring un cable tied from chassis and tucked up where it feeds through body.
Wiring coming from front o/s headlight loom fed back and tucked up by radiator opening. This is actually carbon canister charge wire and oil pressure switch wire. Carbon canister hose disconnected. Decided going into wing was unnecessary, cut pipe and will use a two way connector in future.
All other wiring disconnected and tucked up around wipers for now.
I’ve been around whole car, it’s all free and ready to lift bar 4 way hydraulic connectors on o/s body, handbrake and that’s it far as I can tell
I’ve learnt the hard way not to tempt fate,,, maybe tomorrow I try and separate chassis from body. Wish me luck.
A few photo’s
Question
1 handbrake has what looks like two retaining bolts to chassis, both marked in my picture, do both of these have to come out?
Following your brilliant thread and it’s been very helpful. I’m nearly ready to lift my body off but I’m scratching head over handbrake. It looks like it will snag on the body even though it’s disconnected and as vertical as it gets (unless I cut a little bit off the back of the hole which I’m not going to do). I have an inspection hatch (99 car) but it’s stuck on with elephant glue I 🤔) did you manage to undo those bolts from below? Were there only 2 or did you have 3?
Thanks
Paul
Hi Paul. I’m glad the thread is useful.
Handbrake handle.
I removed both bolts retaining handbrake to chassis from below. I removed Clevis pin so removing cable out the way first I think!
One of those bolts retains the linkage arm to cable so when you take that bolt out from chassis this arm comes away. Hand brake itself now should be free to pull into car a little. This is all from memory of doing it once over a year ago!
I have done a huge amount of work on the car today to the point I’m close to fitting petrol tank and after a few more tweaks and one manifold/ steering arm she’s nearly ready to install radiator.
I will update this post with photos and some detail tomorrow evening.
I have been thinking about the handbrake mechanism this evening as I’m dreading it but aim to tackle it tomorrow so I’ll update those details too.
Hope that helps
Handbrake handle.
I removed both bolts retaining handbrake to chassis from below. I removed Clevis pin so removing cable out the way first I think!
One of those bolts retains the linkage arm to cable so when you take that bolt out from chassis this arm comes away. Hand brake itself now should be free to pull into car a little. This is all from memory of doing it once over a year ago!
I have done a huge amount of work on the car today to the point I’m close to fitting petrol tank and after a few more tweaks and one manifold/ steering arm she’s nearly ready to install radiator.
I will update this post with photos and some detail tomorrow evening.
I have been thinking about the handbrake mechanism this evening as I’m dreading it
but aim to tackle it tomorrow so I’ll update those details too. Hope that helps


Good work Alun, getting closer...
I got underneath and it was surprisingly easy to reach and ratchet off the handbrake securing bolts tbf. The 13mm one looks like it might be a bit tight to get back in from underneath - did you look to see if you have the inspection hatch?
While I was there i checked the fuel lines and snipped a few more cable ties :-)
The brake lines and clutch pipe into the block were a challenge for my sausage fingers.
Door gaps.
A rather critical element.
I noticed gaps between rear chassis lower bolt points and the body, 2 mm maybe stretched to 3 mm by pulling the boot upwards so used some home made metal packers painted and sized to fit the rear box section and tapped into place.
I then lifted rear boot by about 1 mm in reality and starting with top rear chassis bolts nipped them up then the lower ones.
I’ve bounced tested the rear of the car a lot.
No movement or change of door gaps detected.
It’s bang on at last.
Paul Goldstar said:
Good work Alun, getting closer...
I got underneath and it was surprisingly easy to reach and ratchet off the handbrake securing bolts tbf. The 13mm one looks like it might be a bit tight to get back in from underneath - did you look to see if you have the inspection hatch?
While I was there i checked the fuel lines and snipped a few more cable ties :-)
The brake lines and clutch pipe into the block were a challenge for my sausage fingers.
Yes I found it less difficult than expected to take off. I got underneath and it was surprisingly easy to reach and ratchet off the handbrake securing bolts tbf. The 13mm one looks like it might be a bit tight to get back in from underneath - did you look to see if you have the inspection hatch?
While I was there i checked the fuel lines and snipped a few more cable ties :-)
The brake lines and clutch pipe into the block were a challenge for my sausage fingers.
It’s not so much fun putting it back on I fear
It’s almost the last thing I’m going to do it seems and no I didn’t look at hatch. I’ll take a photo from inside tomorrow.
The last piece of a very long jigsaw puzzle.
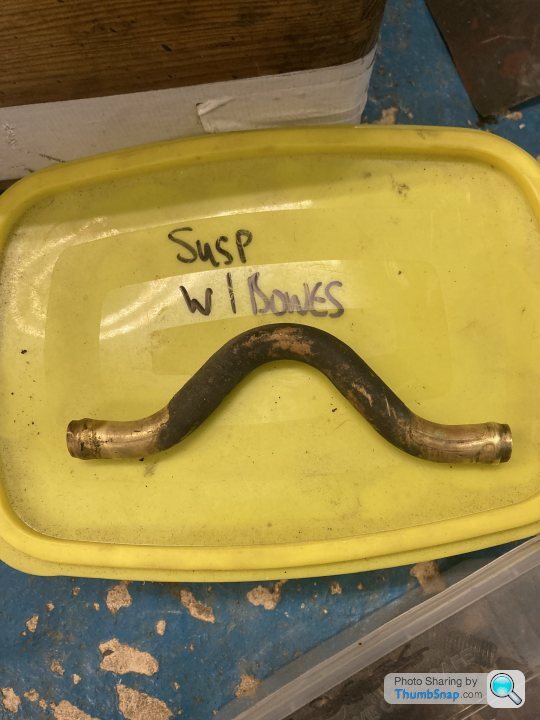
I’m about to fit my Petrol tank and this little beauty is almost the last piece in my box of Tvr bits to be fitted.
I can’t remember where this fits.
Is this between tank and pump and bridges through the large hole in the boot.
Or is it after that hole and helps clear suspension lug or similar.
16 months ago I took this off
Thanks in advance.
Edited by Classic Chim on Tuesday 23 March 21:51
It joins the tank to the pump.

Instead of a big dollop of sealant I made a thin gasket to finish where the pipework goes through the rear bulkhead which I thought would look tidy.


Further reading.
http://www.bertram-hill.com/replacing-the-fuel-lin...
Instead of a big dollop of sealant I made a thin gasket to finish where the pipework goes through the rear bulkhead which I thought would look tidy.
Further reading.
http://www.bertram-hill.com/replacing-the-fuel-lin...
Edited by lancepar on Tuesday 23 March 22:28
lancepar said:
It joins the tank to the pump.
Instead of a big dollop of sealant I made a thin gasket to finish where the pipework goes through the rear bulkhead which I thought would look tidy.
Further reading.
http://www.bertram-hill.com/replacing-the-fuel-lin...
Thanks that’s really helpful and I was just looking at your post from probably a year ago now with your really nice gasket. Instead of a big dollop of sealant I made a thin gasket to finish where the pipework goes through the rear bulkhead which I thought would look tidy.
Further reading.
http://www.bertram-hill.com/replacing-the-fuel-lin...
Edited by lancepar on Tuesday 23 March 22:28
I have suitable material so will make one tomorrow


Gassing Station | Chimaera | Top of Page | What's New | My Stuff