Body Off - The Naked Truth
Discussion


Ah I see the old Pistonheads negativity 'we want to see you fail' attitude returns with a vengence 
And in typical Pistonheads fashion those trying to do down others are the same people who offer nothing constructive to the community themselves.
This post is about my chassis restoration so if you're interested in that then you're in the right place, if however you want to introduce a completely unrelated subject such as engine management may I suggest you start a new topic.
As always I will continue to give ballanced feedback both good and bad, where issues arrise I will always explain how I fixed them, this to help others who may suffer a similar predicament and is often after I gave the installers many chances to fix the issue on their own work.... but had failed to do so!
To draw a line under this and bring things back on topic I'll end by saying when I dropped the car off with Alex in early December he used it for a good week or so, he has a very sensible policy of getting to know each car fully apraising it and listing any faults, rattles and noises before he pulls it apart.
This way there can be no argument when the car is returned to the customer, the result of this appraisal on my TVR being high praise for the way the car drives, and given the man has driven litrally hundreds of Chimaeras in his capacity as mechanic for Str8Six and rumning his own TVR repair business thats praise indeed. It should also be noted 90% of the appraisal was conducted on LPG as we wanted to burn off the gas before removing the tanks, so it's always nice to have one's work validated by an independent expert as this is the very best endorsement you've got it right.
Pleasingly having gone to great lengths to develop a nicer driving and rattle free TVR only one slight knock was pinpointed and brought to my attention by Alex, I myself knew about this knock but had failed to locate its source by the time the car was dropped off for the work. To my surprise Alex identified a collapsed Bilstein bush which are only three years young, still its a cheap fix and well found by Alex so I'm happy he was able to track it down.
When I get the car back with the stronger rot free outriggers and that collapsed Bilstein bush renewed I fully expect the car to be even better in the NHV department than it was when I dropped it off, I also expect the drivability, throttle response and idle quality to be exactly as it was.
As part of the chassis restoration earthing points will be cleaned up and improved, so there may actually be other benefits to come from the work such as a louder horn, stronger radiator fans and brighter headlights ect.

Classic Chim said:
magpies said:
as anyone seen a TVR chassis with failed welds?
Not likely, the tubes disintegrate long before that. The 1.5 mm tubes are a tenth the strength of the welds in any case.
Much like TVR's reputation for poor reliability, the fame our cars have for chassis corrosion is a mixture of truth and inaccurate scaremongering from the pub experts who've typically never owned a TVR, these types love nothing better than taking a grain of truth and embellishing it with their own teeth sucking doom sayer misinformation.
What I hope my & Alun's posts are demonstrating is just like the TVR unreliability reputation the truth about chassis corrosion on these cars really isn't anywhere near as bad as all the negative pub experts will have you believe, I'm also trying to show there's more than one way to address the issue. Choice is always a good thing but logically which option people choose should really be driven by how long they're planning on keeping their TVR before selling it on, for example when a TVR dealer puts new outriggers on a Chimaera I'll put money on him doing the cheapest body on way. This is because all he's looking to do is make the highest margin and turn a difficult to sell car he bought cheaply from a private seller into something he can move on quickly and at a good profit.
| Option | Process | Pros | Cons |
| 1 | Body on outrigger replacement | Chepest Option, ideal for car dealers and those looking to sell their TVR on in the next year or two | Good quality 360* outrigger welds are impossible without cutting holes in the fiberglass floor and all the other known areas of chassis corrosion are left completely untreated |
| 2 | 6" body lift outrigger replacement | Good value better option | 360* outrigger welds now possible without cutting holes in the fiberglass floor but all the other known areas of chassis corrosion left completely untreated |
| 3 | Body off restoration with a complete nut & bolt chassis strip | Best option if you can afford it offering unrivaled access for quality welds, no holes cut in the fiberglass floor, the entire chassis taken back to bare metal, all corroded (and non corroded) areas treated | Very expensive to the extent it is not economically viable given the current market value of Chimaeras unless you're doing the work yourself or planning on keeping the car for the next 30 years!!! |
| 4 | Body off restoration without the complete chassis strip | Best value option offering unrivaled access for quality welds, no holes cut in the fiberglass floor, all other chassis corrosion treated, option to address any mechanical issues that are hard to reach with the body left on the chassis | It's not a full bare metal chassis strip zero hours nut & bolt chassis/drivetrain restoration but is this really needed? |
There's no question option 3 is the most comprehensive approach but given how well the central spine is proven to last a lot of this process is invested in restoring a significant percentage of the chassis that would have continued to last indefinitely if the factory finish was left completely untouched. Spending money restoring areas that really don't need restoring seems wasteful to me, while its nice to take the whole structure back to bare metal and the end result makes for great photos and bragging rights on PH is it really necessary? I'd argue not!
My chassis lasted 23 years before the body needed to come off with TVR's finish protecting it, if I'd just gone for a body on or partial lift outrigger job I suspect it would have given the chassis another 5 years before all the other areas of corrosion left untreated would start to become a real problem and so requiring a body off job anyway. Options 1 & 2 would definitely make best sense if I was planning on selling the car in the next year or two but ultimately were rejected this on the grounds I plan on keeping the car for another 10 years.
Option 3 was certainly tempting but there's no getting away from it it's a very costly approach, throwing £8k or more on a car that's market value is only ever going to be in the order of £15k at best even after such a full bare metal chassis restoration isn't the smartest use of my hard earned money when there are so many other expenses in life. I'd also wager after the full Monty option 3 approach my chassis would be good for 50 years, but with option 4 predicted to extend chassis life by almost as many years for a third of the cost it soon became the no-brainer choice.
I'm just grateful there are talented automotive engineers out there who offer a quality long lasting chassis restoration option that's affordable and in proportion to the current Chimaera market value, in doing so they're helping to keep these fantastic but undervalued cars on the road which as TVR enthusiasts we should all be grateful for

ray von said:
FWIW I think CoG approach to his job is correct, this is from someone who had a powder coated rebuilt chassis, the paint will outlast powder coating no matter how well it's done.
Rest assured it is being done well, very well, and the photos I'm sharing here will prove that.For the record I chose the Jotunmastic 90 epoxy mastic aluminum and paid for it myself, as such it represented an additional cost to the work. That's not to say the paint used by Alex was a poor choice its just after much research and having seen similar epoxy mastic paint systems in action many years ago, and more recently seeing just how well those same painted steel surfaces have lasted in very hostile environments, I wanted Jotunmastic 90 epoxy mastic aluminum used on my chassis.
The only downsides of these high viscosity epoxy mastic paints can be how well they lay out when stripe coating, you can't thin an epoxy mastic beyond 10% without seriously slowing the cure rate so it's self leveling performance will never match say a polyurethane top coat, this is where Jotun's range of 'Hard Top' glossy polyurethane top coats come in. However, if sprayed out carefully the cosmetic finish delivered by an epoxy mastic it very acceptable, saying that there's nothing wrong with stripe coating either and in many cases it provides a greater film thickness that can be forced better into hard to access areas, this is why its a process still used within in the marine maintenance industry today.
There's no doubting powder coat looks great after it's first applied, and unlike a wet paint system it can also can be applied by an operator with limited skills, best of all the powder coating equipment is cheap and rather than investing in a very expensive paint booth all you need is an old shipping container and hey presto suddenly you're a professional powder coating specialist. But powder coating does not fully bond with the substrate on the same molecular level as a quality and correctly applied wet paint system will, the best way to describe it is powder coating is a wrapping where as a paint will properly bite into the steel tube your looking to protect.
Water creep is another real issue with powder coat which can be very brittle especially when it's been aged or subjected to heat, once powder coat is breached by even the smallest impact damage related chip or heat related blister water will get between it and the substrate which creates the perfect environment for corrosion to set in. It's this surface breaching & water creep issue that is the reason you can often peel the TVR applied powder coat off chassis tubes in great sheets, at this point the writing is on the wall and it's obvious to anyone the powder coat was only ever a wrapping from new.
I challenge anyone to paint a steel tube with two pack epoxy mastic and then try to remove it after letting it cure correctly, for the record while these paints can be second coated within 12 hours and put into service within 24 hours if applied at the correct temperature, they actually take 3 months before they're considered 100% chemically cured. However, by day two after application an epoxy mastic paint is already massively better than powder coat but the 3 month full cure period is another reason why I'm fitting outrigger protectors before my car turns a wheel on the road after it's chassis restoration.
Now take a three month old powder coated tube and go at it with a welders chipping hammer, then do the same with a similar steel tube that was painted correctly three months ago in a decent 2K epoxy mastic paint and you'll soon reveal the truth. The powder coated tube will chip easily revealing the vulnerable steel beneath it, while the tube coated in the super tough yet flexible impact resistant and somewhat self healing epoxy mastic will more or less resist anything you can throw at it.
ray von said:
Bit surprised with the Bilstein bush, I recommended he get them 
Me too, until I reminded myself there are mitigating circumstances that explain the failure. For the record I chose a custom valve and sprung set of Mk4 Bilsteins after a long study of the many suspension options available to me, I ended up working with former TVR chief chassis designer Ben Lang to deliver the very best balance between handling and ride quality in a cost effective package designed specifically for the requirements of my LPG TVR. The car has actually proved itself to have a better weight distribution split than a standard TVR, it just needed the correctly spring rating and associated valving setup to get the best from it.
The results of working with Ben Lang back in 2016 were absolutely superb ride and handling, the collapsed three year old bush was on the front so no more stressed than in a standard Chimaera but I now believe was the result of hitting a pot hole that buckled my near side front rim that happened in 2017 and a year after fitting the my Bilsteins.
https://www.pistonheads.com/gassing/topic.asp?t=16...
Fortunately the rim was skillfully massaged back to true round by a local alloy wheel specialist but it seems the bush didn't come out of the incident quite at well. I don't blame Bilstein, I blame the condition of UK roads, and I expect if I'd fallen into that same pot hole running my old rose jointed Gaz Gold Pro's the damage to my wheel would have been considerably worse.
The thing is like every restoration its all about how far you go and when do you stop, ie how much you renew or replace and how much you consider can be left alone. I've listed four options but the truth is there a many shades in between of each, and no doubt many other options I've faiiled to list too.
When you restore a car you can go for anything from a quick respray to a full zero hours concourse job so its a long way off being a black & white picture. Its the same with a TVR chassis restoration, there's no right or wrong, everyone has different expectations and everyone must decide what they consider the best value sweet spot for them depending on their individual means.
For me it's important to respect the market value of the car, but ballance it with a quality long lasting job, that's my personal sweet spot but I'd never criticise someone for doing a quick body on outrigger job or the guy who spends £25k on a full restoration even though when its finished the car may only be wort £18k.
We're all different with different motivations for restoring our cars, what's the best option for one is the wrong approach for another. Choice is a wonderful thing, and only you can choose your own best option for yourself.
Paulprior said:
In my experience the 6 inch plus lift is only possible if you also remove the exhaust manifolds as well as all the chassis to body bolts, at this level you are extremely close to lifting the body completely, I found that without going that far then 2 to 3 inches was achievable and gives enough access to do most checks / clean / recoat
Good information that will help others when choosing their method, thanks 

More photos expected tomorrow folks, but by way of a quick interim update I can confirm in the last few days there's been a lot more degreasing going on, and the derusting is well progressed too.
The good news is my original rear wishbones have responded extremely well, as weve already seen my front wishbones are more or less mint as they were replaced with new at the previous owner's cost some 11 years ago just before I bought the car and had been Waxoyled immediately after fitting.
Three years later I had all the Waxoyl steam cleaned off all the wishbones and the entire chassis, once dry the wishbones and chassis was protected with a two stage Dinitrol treatment which seems to have worked remarkably well.
The painting of the prepared wishbones and chassis starts tomorrow and continues through Thursday and Friday, this leaves the weekend for a nice 48 hour curing period.
Alex is saying its possible the car will be ready by the end of next week but allowing an extra week for the shakedown seems sensible to me, this would mean collection on Saturday 22nd is a reasonable target to shoot for.
Further updates with supporting photos to follow tomorrow
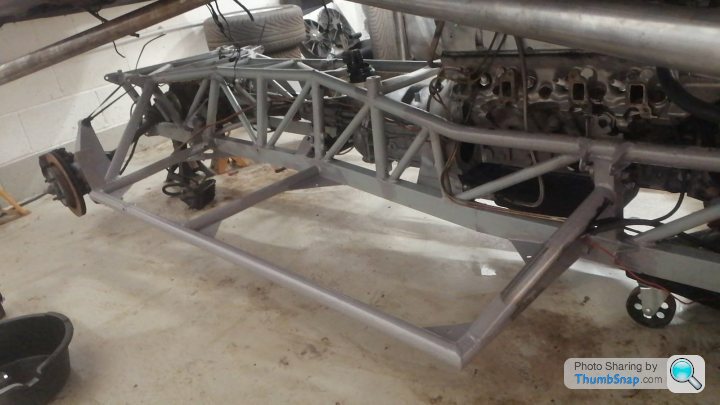
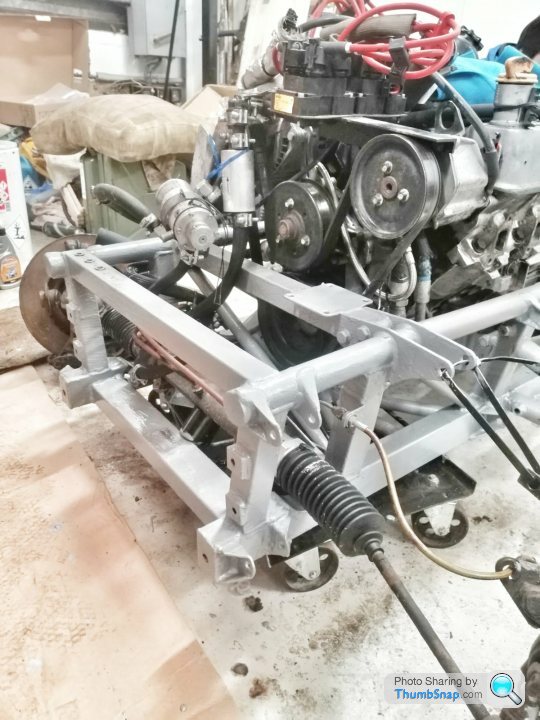
Getting there, new outriggers in place and marvel at how well most of the chassis has lasted!
The Dinitrol sticks like ship to a blanket, more de-greasing and de-rusting work tomorrow but it's getting closer to paint every day.
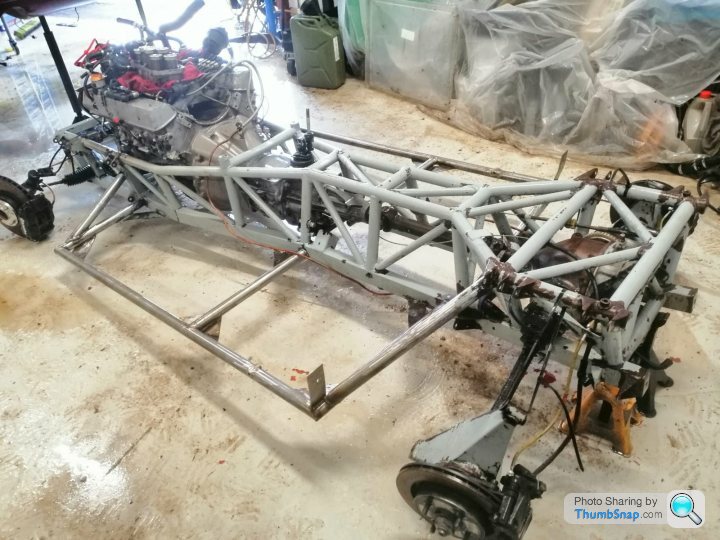
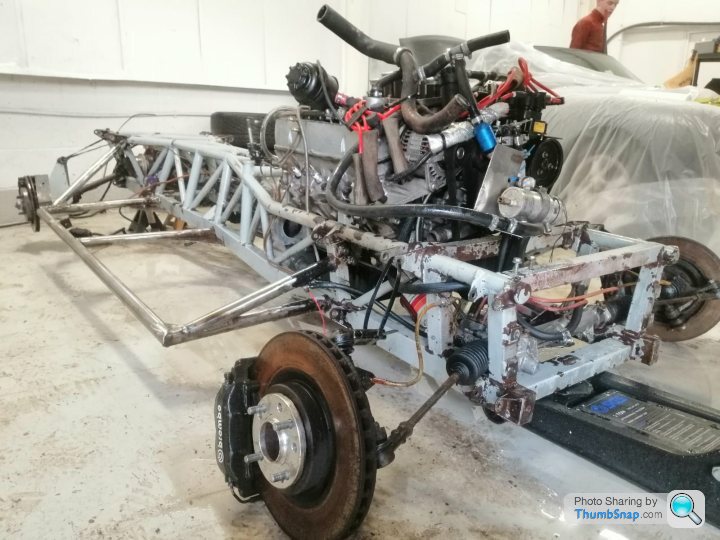
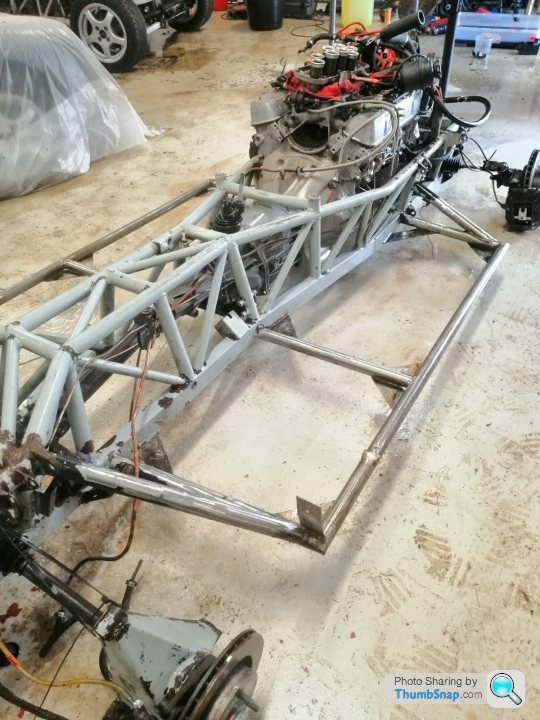
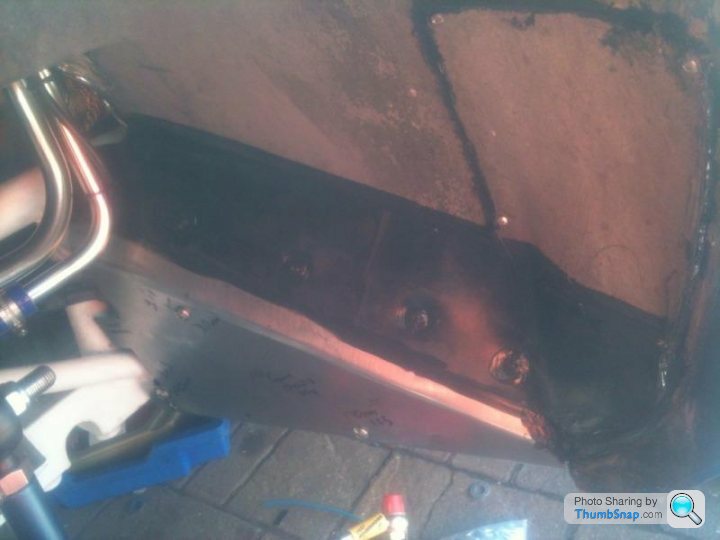
The area over the diff seems to have suffered the most and I would speculate that's due to the close proximity of so many welds, TVR clearly failed to prep the welds correctly before shooting the chassis in the siver/grey paint finish.
The Dinitrol sticks like ship to a blanket, more de-greasing and de-rusting work tomorrow but it's getting closer to paint every day.
The area over the diff seems to have suffered the most and I would speculate that's due to the close proximity of so many welds, TVR clearly failed to prep the welds correctly before shooting the chassis in the siver/grey paint finish.
900T-R said:
Is that an S10 tailhousing I spot? 
Yes mate, here's my post on the S10 tail housing mod I started back in 2015.....https://www.pistonheads.com/gassing/topic.asp?h=0&...
I do not miss the TVR linkage!
Don't get me wrong the TVR linkage works well enough if it's in perfect condition, but....
1. Those super thin and very expensive (for what they are) nylon bushes do wear out, and in my opinion they wear out way faster than is acceptable.
2. Its also quite common for the TVR linkage to get bent if care is not taken when fitting a clutch
My TVR linkage was both worn out and bent, and because I needed a new clutch it made sense to upgrade to the the S10 tail housing which at the end of the day TVR used themselves on the last run of Chimaers, by this time Tuscan production was in full swing and TVR were only buying in one T5 gear box variant from Borg Warner which had the gear stick in the right place.
I'm very happy with the way it all worked out, but it only makes sense to implement the S10 tail housing mod if you're replacing your clutch.
JPW231 said:
What Brembo Brakes do you have COG? Any modifications required to fit?
Yes, wheel spacers and a set of 16" matching rear Imola wheels fitted on the front, do a Google search on 'B-b-ber BREMBOS!' and you'll find my post explaining everything you need to buy, the Brembo brake upgrade excluding the 16" wheels should cost around £500 to complete.dhutch said:
What Dinitrol product was used, do you know? The 'ML' brown waxy oil based spray, '1000' which is buff/clear of the same. Or the paint like Dinitrol 4941 underbody coating?
Looking back I believe the Dinitrol system was applied to my chassis in January 2010, I don't know if they're still in business but I used a company called 'Chassis Clean'. My memory is not what it was but it must have been 10 years ago because here I am in November 2011 talking about it being done 'last winter' and when my PH name was Chimpabollics 
https://www.pistonheads.com/gassing/topic.asp?h=0&...
Chassis Clean's very comprehensive process was quite expensive at the time, £360 I believe, but as it lasted 10 years that's just £36 a year on rustproofing which is actually very reasonable, and I now feel £360 to delay needing to take the body off for 10 years was a great investment.
Chassis Clean exclusively used Dinitrol products following this very thorough process....
1. Steam clean entire chassis and wishbones removing existing Waxoil.
3. Drying using hot air and 24 hours sat in a heated workshop before anything else happened
2. Mechanical de-rusting
3. Dinitrol RC 900 specialist rust converter
4. Dinitrol 3125 non dripping solvent based dark brown underbody coating rust preventative specially formulated with a high dry matter content
5. Dinitrol 4941 Black solvent based vehicle underbody coating
My silver/grey painted late 1996 chassis was regularly Waxoiled from new, I know this as I still have all the invoices from the previous owners, this meant back in 2010 we were Dinitrol treating a 14 year old 30,000 mile chassis that had enjoyed some form or rustproofing all its life. In January 2010 the old Waxoil was steam cleaned off revealing a well preserved chassis and wishbones, I still retain the photos to this day if you're interested in seeing them? This steam cleaning and drying process was followed by the above Dintrol system, I'm not sure if 'Chassis Clean' are still going but they did an excellent job.
My belief is if outrigger protectors had been fitted from new and TVR had cleaned up the welds better before spraying in the silver/grey paint finish my chassis would have lasted another 10 years. Now it's important not to lose sight of the fact my chassis still survived over 23 years before the body was lifted a few weeks ago, yes all four outrigger corners were found to be holed but the truth is the structure was/still is essentially structurally sound. This time around we are using a far superior paint system than TVR applied back in 1996, the welds will be properly de-rusted and laser cut stainless steel outrigger protectors fitted over new outriggers that themselves have been constructed by Alex Wheatley from far better quality and thicker wall cold drawn seamless steel tube.
Because the car had always been rustproofed from new, and because I benefited from the earlier silver/grey paint finish we find ourselves 23 years after the car was first built restoring a chassis that's actually survived remarkably well. I fully expect as we are doing a better job this time using better tube and far superior epoxy mastic paint the end result (with outrigger protectors) will be at least another 30 years of chassis life for my TVR..... at which point its not been lost on me that I'll be celebrating my 80th birthday

Edited by ChimpOnGas on Thursday 6th February 16:07
dhutch said:
ChimpOnGas said:
Looking back I believe the Dinitrol system was applied to my chassis in January 2010, I don't know if they're still in business but I used a company called 'Chassis Clean'. ....
1. Steam clean entire chassis and wishbones removing existing Waxoil.
3. Drying using hot air and 24 hours sat in a heated workshop before anything else happened
2. Mechanical de-rusting
3. Dinitrol RC 900 specialist rust converter
4. Dinitrol 3125 non dripping solvent based dark brown underbody coating rust preventative specially formulated with a high dry matter content
5. Dinitrol 4941 Black solvent based vehicle underbody coating
Ok, thats interesting.1. Steam clean entire chassis and wishbones removing existing Waxoil.
3. Drying using hot air and 24 hours sat in a heated workshop before anything else happened
2. Mechanical de-rusting
3. Dinitrol RC 900 specialist rust converter
4. Dinitrol 3125 non dripping solvent based dark brown underbody coating rust preventative specially formulated with a high dry matter content
5. Dinitrol 4941 Black solvent based vehicle underbody coating
So they are the 'hydrocarbon solvent' coatings rather than the 'white spirit removable' ones, but sounds good and like it has worked well got your car.
I can get to a lot of the chassis on the westfield and have painted that well, but am looking at the option the bits fully encapsulated in the bodywork/trim predominantly withing the cockpit area. i suspect and expect it is find, but wonder if I should do any more here, in the odd bits the paint isnt perfect and or the cavities of the tubes themselves.
Looks like chassis clean might have disappeared, found a thread saying their site was down in 2015 and not a lot else, although likely I will just get the aerosols and do it myself.
Thanks again.
Moving forward rightly or wrongly I've decided to solely rely on the Jotunmastic 90 Aluminum two pack epoxy mastic paint and outrigger protectors, I will not be using rustproofing wax of any type this time around.
Look out for my long term review of this decision in 10 years time
crosseyedlion said:
JPW231 said:
Thanks CoG.
Do you know if you can still buy the outrigger protectors? My car is with Alex at the moment too.
I should start distributing for Mr essling! Do you know if you can still buy the outrigger protectors? My car is with Alex at the moment too.
To answer your question JPW231.... Peter Essling can be found on Facebook.
He's in the process of making up rear sets too as he currently only has templates for front outrigger protectors.
I believe he'll have the rear templates drawn up by the end of this weekend as he's just located a local Chimaera to do the measuring up on.
Hung out to dry....


Today my wishbones received their first coat of epoxy mastic with a slight red tint added to the paint, this tint will help ensure full coverage when the second un-tinted coat is applied, at which point we'll see just how well Jotunmastic 90 Aluminum matches the original TVR silver/grey
Application notes from Alex are this Jotun epoxy mastic paint covers really well, however he found the mix needs to be 4:1 with a little thinners as at the recommended 3.5:1 ratio pot life is very short. This short 15 minute pot life at the prescribed 3.5:1 mix ratio will only be because we went with winter grade which you can apply down to -5c, this and the fact that Alex clearly likes a nice warm workshop
As predicted its goopy old stuff, our primary focus being achieving the ultimate in durability and longevity performance.
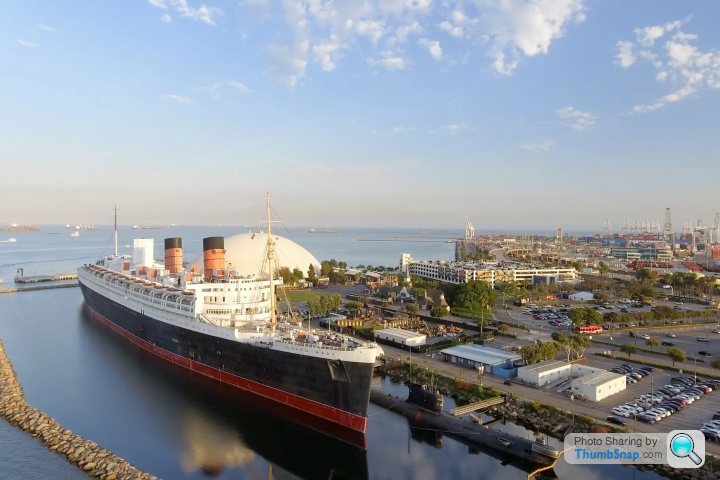
Well heres proof of how well Jotun paints perform in the super harsh salt laded corrosion promoting marine environments they were designed for, back in 2003 the ancient steel hull of the 1936 built Queen Mary was protected with Jotamastic 87 Aluminium epoxy mastic, the Jotamastic 90 Aluminium we're using on my car is Jotun's new improved formula of the 87.
https://www.boatingbusiness.com/news101/boatbuildi...
At the time the Jotun paint was applied it was coating 67 year old steel and for the next 14 years the ship sat stationary in salt water in Long Beach California serving as a hotel, fast forward to 2017 and a report on the ship's condition was issued which noted the hull was just starting to corrode. Not surprising really as such old steel sat without moving while submerged in brine is the absolute perfect recipe for rapid and aggressive corrosion, the 14 years the ship sat in this environment is likely equal to what a car would see over 50 years of all year round road use.
In the same heavy saline marine environment powder coat would have probably lasted 3 weeks at best
At the end of the day I'm not applying the stuff Alex Wheatley is, and its all happening 160 miles away so I'm really just passing on Alex's words and images sent to me daily via WhatsApp, saying that having used epoxy mastic paints in the past I do know it can be pretty goopy old stuff (technical term ).
I'm pretty confident a 4:1 mix will be fine, like you say there a tolerance built in and a small ratio adjustment is certainly preferable to pot life that's too short as it becomes a pain to work with if it starts turning solid too soon and you'll certainly struggle to lay it out smooth. Even under optimal conditions you'll never get a silky smooth finish with epoxy mastic like you see with all the powder coated chassis restorations, I did warn Alex of this but as I've said many times my primary focus is durability and longevity.
Last night I suggested to Alex that perhaps along with the 4:1 mix ratio it's possible being a bit more ambitions with thinners will help, it'll slow the reaction extending the pot life further and make the paint easier to lay out for a smoother result. Anyway I have to stop myself micromanaging Alex, he knows what he's doing and is doing a superb job, on Wednesday he removed the body from another Chimaera start to finish in just 6 hours which is truly remarkable!
).I'm pretty confident a 4:1 mix will be fine, like you say there a tolerance built in and a small ratio adjustment is certainly preferable to pot life that's too short as it becomes a pain to work with if it starts turning solid too soon and you'll certainly struggle to lay it out smooth. Even under optimal conditions you'll never get a silky smooth finish with epoxy mastic like you see with all the powder coated chassis restorations, I did warn Alex of this but as I've said many times my primary focus is durability and longevity.
Last night I suggested to Alex that perhaps along with the 4:1 mix ratio it's possible being a bit more ambitions with thinners will help, it'll slow the reaction extending the pot life further and make the paint easier to lay out for a smoother result. Anyway I have to stop myself micromanaging Alex, he knows what he's doing and is doing a superb job, on Wednesday he removed the body from another Chimaera start to finish in just 6 hours which is truly remarkable!

First coat down, and again with that red tint applied so when the second and final top coat goes on perfect coverage can be achieved.


Alex and Ben are doing an amazing job with the Jotun 90 as I've always conceded epoxy mastic is not the easiest paint to work with and achieve a factory smooth finish, they're applying in a cooler workshop environment today which apparently helps a lot.
I'm being told its very labour intensive but the coverage is incredible, small batches are also the secret to success which no doubt adds to the job time, according to Alex... and in his words, "its the ultimate"
For the fronts there was this excellent suggestion from Mark (portz)
For the rears I'm waiting for Peter Esling to take his patterns from a local chimaera which I understand has been arranged for this weekend, I've spoken with Peter and his plan is to use the existing bolt in the upright plate as shown here...
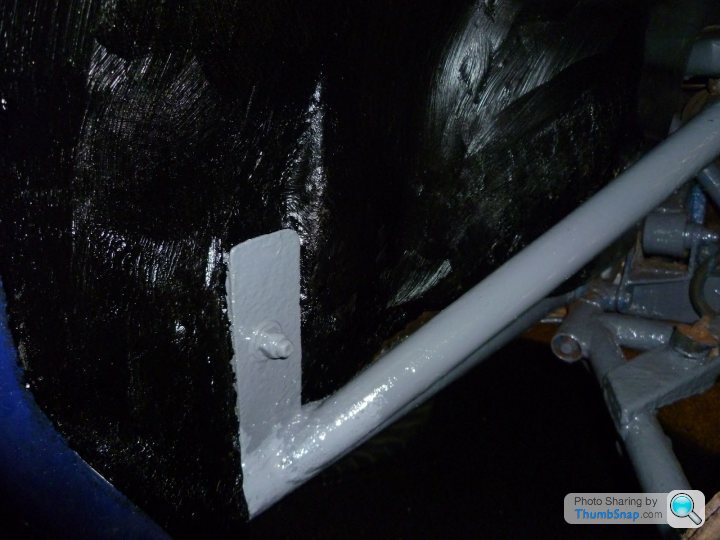
To be clear the above image is not my car or Alex's work, it's just a photo I found online to show the bolt Peter plans to make use of, lets see what he comes up with but if they're as good as his font outrigger protectors I don't think I'll be disappointed.
I'm a firm believer in shielding the vulnerable outriggers from impact damage and all the road muck that gets thrown up by the wheels, it represents the vast majority of the problem so if you can stop it at source you're going to massively extend the life of the new outriggers.
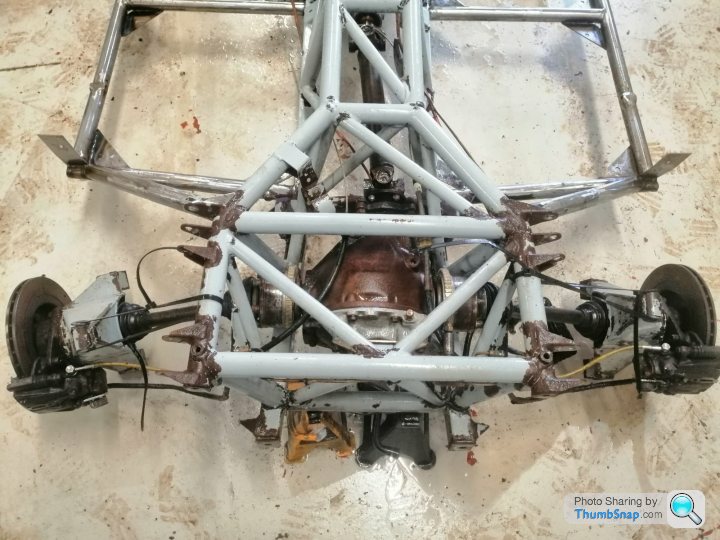
This next image of one of my rear outriggers and clearly shows what needs protecting, as we can see the tyre is only going to be covering the outer end of the outrigger tubes with spray, obviously the corner fillet corner is the most critical area to shield as it acts as a platform for road muck and the truth is it's the collection of this damp debris sat on the fillet/platform that rots the corners out .
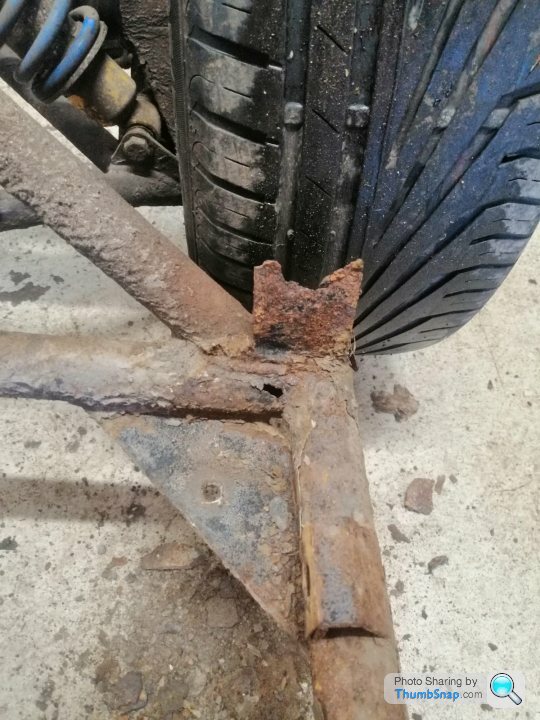
The rear situation isn't actually that different from the front, here's how the front tyre sits in relation to the front outrigger and again its really just the outer end and corner that gets peppered.
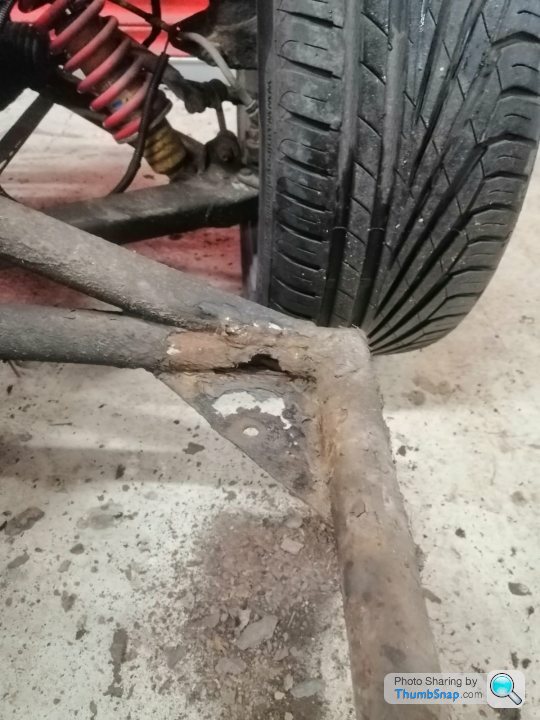
But for completeness the rear protectors should go further up the outrigger just like Peter's front ones do.
portzi said:
Hello Dave, whilst it's in the welding stage get some brackets welded onto the chassis so the outrigger protectors bolt on and off, on the front and back of the car.
Alex then popped up to say...crosseyedlion said:
Dave. You don't need to ask, this is a great idea. Will be doing it on yours
So I'd guess the areas of front outriggers Alex has left unpainted is for the outrigger brackets he's planning to weld in place For the rears I'm waiting for Peter Esling to take his patterns from a local chimaera which I understand has been arranged for this weekend, I've spoken with Peter and his plan is to use the existing bolt in the upright plate as shown here...
To be clear the above image is not my car or Alex's work, it's just a photo I found online to show the bolt Peter plans to make use of, lets see what he comes up with but if they're as good as his font outrigger protectors I don't think I'll be disappointed.
I'm a firm believer in shielding the vulnerable outriggers from impact damage and all the road muck that gets thrown up by the wheels, it represents the vast majority of the problem so if you can stop it at source you're going to massively extend the life of the new outriggers.
This next image of one of my rear outriggers and clearly shows what needs protecting, as we can see the tyre is only going to be covering the outer end of the outrigger tubes with spray, obviously the corner fillet corner is the most critical area to shield as it acts as a platform for road muck and the truth is it's the collection of this damp debris sat on the fillet/platform that rots the corners out .
The rear situation isn't actually that different from the front, here's how the front tyre sits in relation to the front outrigger and again its really just the outer end and corner that gets peppered.
But for completeness the rear protectors should go further up the outrigger just like Peter's front ones do.


Gassing Station | Chimaera | Top of Page | What's New | My Stuff