Body Off - The Naked Truth
Discussion


ray von said:
FWIW I think CoG approach to his job is correct, this is from someone who had a powder coated rebuilt chassis, the paint will outlast powder coating no matter how well it's done.
Rest assured it is being done well, very well, and the photos I'm sharing here will prove that.For the record I chose the Jotunmastic 90 epoxy mastic aluminum and paid for it myself, as such it represented an additional cost to the work. That's not to say the paint used by Alex was a poor choice its just after much research and having seen similar epoxy mastic paint systems in action many years ago, and more recently seeing just how well those same painted steel surfaces have lasted in very hostile environments, I wanted Jotunmastic 90 epoxy mastic aluminum used on my chassis.
The only downsides of these high viscosity epoxy mastic paints can be how well they lay out when stripe coating, you can't thin an epoxy mastic beyond 10% without seriously slowing the cure rate so it's self leveling performance will never match say a polyurethane top coat, this is where Jotun's range of 'Hard Top' glossy polyurethane top coats come in. However, if sprayed out carefully the cosmetic finish delivered by an epoxy mastic it very acceptable, saying that there's nothing wrong with stripe coating either and in many cases it provides a greater film thickness that can be forced better into hard to access areas, this is why its a process still used within in the marine maintenance industry today.
There's no doubting powder coat looks great after it's first applied, and unlike a wet paint system it can also can be applied by an operator with limited skills, best of all the powder coating equipment is cheap and rather than investing in a very expensive paint booth all you need is an old shipping container and hey presto suddenly you're a professional powder coating specialist. But powder coating does not fully bond with the substrate on the same molecular level as a quality and correctly applied wet paint system will, the best way to describe it is powder coating is a wrapping where as a paint will properly bite into the steel tube your looking to protect.
Water creep is another real issue with powder coat which can be very brittle especially when it's been aged or subjected to heat, once powder coat is breached by even the smallest impact damage related chip or heat related blister water will get between it and the substrate which creates the perfect environment for corrosion to set in. It's this surface breaching & water creep issue that is the reason you can often peel the TVR applied powder coat off chassis tubes in great sheets, at this point the writing is on the wall and it's obvious to anyone the powder coat was only ever a wrapping from new.
I challenge anyone to paint a steel tube with two pack epoxy mastic and then try to remove it after letting it cure correctly, for the record while these paints can be second coated within 12 hours and put into service within 24 hours if applied at the correct temperature, they actually take 3 months before they're considered 100% chemically cured. However, by day two after application an epoxy mastic paint is already massively better than powder coat but the 3 month full cure period is another reason why I'm fitting outrigger protectors before my car turns a wheel on the road after it's chassis restoration.
Now take a three month old powder coated tube and go at it with a welders chipping hammer, then do the same with a similar steel tube that was painted correctly three months ago in a decent 2K epoxy mastic paint and you'll soon reveal the truth. The powder coated tube will chip easily revealing the vulnerable steel beneath it, while the tube coated in the super tough yet flexible impact resistant and somewhat self healing epoxy mastic will more or less resist anything you can throw at it.
ray von said:
Bit surprised with the Bilstein bush, I recommended he get them 
Me too, until I reminded myself there are mitigating circumstances that explain the failure. For the record I chose a custom valve and sprung set of Mk4 Bilsteins after a long study of the many suspension options available to me, I ended up working with former TVR chief chassis designer Ben Lang to deliver the very best balance between handling and ride quality in a cost effective package designed specifically for the requirements of my LPG TVR. The car has actually proved itself to have a better weight distribution split than a standard TVR, it just needed the correctly spring rating and associated valving setup to get the best from it.
The results of working with Ben Lang back in 2016 were absolutely superb ride and handling, the collapsed three year old bush was on the front so no more stressed than in a standard Chimaera but I now believe was the result of hitting a pot hole that buckled my near side front rim that happened in 2017 and a year after fitting the my Bilsteins.
https://www.pistonheads.com/gassing/topic.asp?t=16...
Fortunately the rim was skillfully massaged back to true round by a local alloy wheel specialist but it seems the bush didn't come out of the incident quite at well. I don't blame Bilstein, I blame the condition of UK roads, and I expect if I'd fallen into that same pot hole running my old rose jointed Gaz Gold Pro's the damage to my wheel would have been considerably worse.
I've been watching with some interest and as far as I can see, like Alun, you appear to be doing a sensible and high quality job, full support from me.
I don't have a TVR myself yet, but would like to, and have a 1991 westfield which I have being restoring/maintaining for the last ten years, and reasonable experience with using two part paints on steel boats. There is a time and a place for PC and done well its better than done badly, but almost always if you see paint coming off in sheets with rust behind, its pc! That and its love of shying away from hard edges.
What preparation are you doing the main chassis spine, and the areas and each end you photographed? Obviously high pressure jet washing, degreasing, and them presulable the best mechanical prep you can manage with a wire wheel/brush, maybe a bit of scratching the surface up with paper or course 3m pad? If it survives that, its well stuck, going to be well covered, and presumably wasn't in a sensitive area to start with.
In terms of 6 inch lift vs full chassis strip, presumably a reasonable amount can move/reach a bit, so its therefore easier to lift the body 6 inches that all the way off, due to things which can be left attached? Wiring loom connections, handbrake/clutch/throttle/speedo cables, that sort of thing? Presumably there is still a fair bit which comes off, exhaust manifold, inlet, coolant hoses, obviously mounting bolts and like seats out?
In terms of not doing a full chassis strip, you save removing the engine and driveline, diff, rigid brake lines, oil cooler. but because you are doing the wishbones at the same time, you are stripping them off the chassis, shocks, brakes/flexis, rear propshafts, etc.
Just trying to get a feel of the job.
Daniel
The thing is like every restoration its all about how far you go and when do you stop, ie how much you renew or replace and how much you consider can be left alone. I've listed four options but the truth is there a many shades in between of each, and no doubt many other options I've faiiled to list too.
When you restore a car you can go for anything from a quick respray to a full zero hours concourse job so its a long way off being a black & white picture. Its the same with a TVR chassis restoration, there's no right or wrong, everyone has different expectations and everyone must decide what they consider the best value sweet spot for them depending on their individual means.
For me it's important to respect the market value of the car, but ballance it with a quality long lasting job, that's my personal sweet spot but I'd never criticise someone for doing a quick body on outrigger job or the guy who spends £25k on a full restoration even though when its finished the car may only be wort £18k.
We're all different with different motivations for restoring our cars, what's the best option for one is the wrong approach for another. Choice is a wonderful thing, and only you can choose your own best option for yourself.
dhutch said:
I've been watching with some interest and as far as I can see, like Alun, you appear to be doing a sensible and high quality job, full support from me.
I don't have a TVR myself yet, but would like to, and have a 1991 westfield which I have being restoring/maintaining for the last ten years, and reasonable experience with using two part paints on steel boats. There is a time and a place for PC and done well its better than done badly, but almost always if you see paint coming off in sheets with rust behind, its pc! That and its love of shying away from hard edges.
What preparation are you doing the main chassis spine, and the areas and each end you photographed? Obviously high pressure jet washing, degreasing, and them presulable the best mechanical prep you can manage with a wire wheel/brush, maybe a bit of scratching the surface up with paper or course 3m pad? If it survives that, its well stuck, going to be well covered, and presumably wasn't in a sensitive area to start with.
In terms of 6 inch lift vs full chassis strip, presumably a reasonable amount can move/reach a bit, so its therefore easier to lift the body 6 inches that all the way off, due to things which can be left attached? Wiring loom connections, handbrake/clutch/throttle/speedo cables, that sort of thing? Presumably there is still a fair bit which comes off, exhaust manifold, inlet, coolant hoses, obviously mounting bolts and like seats out?
In terms of not doing a full chassis strip, you save removing the engine and driveline, diff, rigid brake lines, oil cooler. but because you are doing the wishbones at the same time, you are stripping them off the chassis, shocks, brakes/flexis, rear propshafts, etc.
Just trying to get a feel of the job.
Daniel
I’m slightly reluctant to remove the o/e powdercoat as so much of it is perfect and glorious clean steel below. It even has a shine! I don't have a TVR myself yet, but would like to, and have a 1991 westfield which I have being restoring/maintaining for the last ten years, and reasonable experience with using two part paints on steel boats. There is a time and a place for PC and done well its better than done badly, but almost always if you see paint coming off in sheets with rust behind, its pc! That and its love of shying away from hard edges.
What preparation are you doing the main chassis spine, and the areas and each end you photographed? Obviously high pressure jet washing, degreasing, and them presulable the best mechanical prep you can manage with a wire wheel/brush, maybe a bit of scratching the surface up with paper or course 3m pad? If it survives that, its well stuck, going to be well covered, and presumably wasn't in a sensitive area to start with.
In terms of 6 inch lift vs full chassis strip, presumably a reasonable amount can move/reach a bit, so its therefore easier to lift the body 6 inches that all the way off, due to things which can be left attached? Wiring loom connections, handbrake/clutch/throttle/speedo cables, that sort of thing? Presumably there is still a fair bit which comes off, exhaust manifold, inlet, coolant hoses, obviously mounting bolts and like seats out?
In terms of not doing a full chassis strip, you save removing the engine and driveline, diff, rigid brake lines, oil cooler. but because you are doing the wishbones at the same time, you are stripping them off the chassis, shocks, brakes/flexis, rear propshafts, etc.
Just trying to get a feel of the job.
Daniel
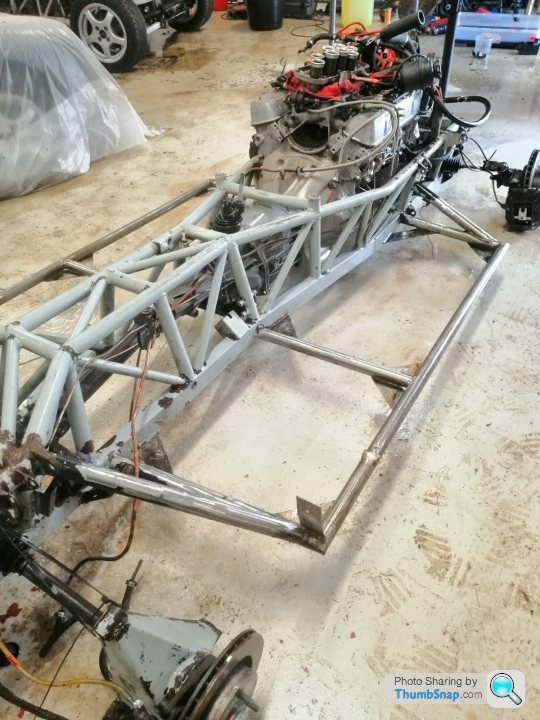
Obviously the reason for stripping my chassis is to allow it to be blasted then fully painted which is a bit of work to say the least, my powder coat will be removed so a clean surface for going to paint man.
Not strictly necessary as much of the damage to chassis is low down so mainly on bottom box section chassis rails that run the length of the car and riggers are welded too.
The other reason why I had to firstly remove body then strip chassis was because my top chassis rails, which are tubular had lost powdercoat and corroded, nothing like as bad as I thought but it was my reasoning for doing all of it.
This is a big deciding factor.
If those top rails are good there’s no reason why you can’t do say a 6 or maybe 8 inch body lift using RT Racing pre made out rigger set.
It takes a talented welder for sure but it’s possible to do these riggers without taking body fully off.
I’ve not done this but you will have to remove manifolds,, to do that takes patience great skill
 and hours if your really unlucky, after that removing body seems child’s play
In my experience the 6 inch plus lift is only possible if you also remove the exhaust manifolds as well as all the chassis to body bolts, at this level you are extremely close to lifting the body completely, I found that without going that far then 2 to 3 inches was achievable and gives enough access to do most checks / clean / recoat
Paulprior said:
In my experience the 6 inch plus lift is only possible if you also remove the exhaust manifolds as well as all the chassis to body bolts, at this level you are extremely close to lifting the body completely, I found that without going that far then 2 to 3 inches was achievable and gives enough access to do most checks / clean / recoat
Good information that will help others when choosing their method, thanks 

More photos expected tomorrow folks, but by way of a quick interim update I can confirm in the last few days there's been a lot more degreasing going on, and the derusting is well progressed too.
The good news is my original rear wishbones have responded extremely well, as weve already seen my front wishbones are more or less mint as they were replaced with new at the previous owner's cost some 11 years ago just before I bought the car and had been Waxoyled immediately after fitting.
Three years later I had all the Waxoyl steam cleaned off all the wishbones and the entire chassis, once dry the wishbones and chassis was protected with a two stage Dinitrol treatment which seems to have worked remarkably well.
The painting of the prepared wishbones and chassis starts tomorrow and continues through Thursday and Friday, this leaves the weekend for a nice 48 hour curing period.
Alex is saying its possible the car will be ready by the end of next week but allowing an extra week for the shakedown seems sensible to me, this would mean collection on Saturday 22nd is a reasonable target to shoot for.
Further updates with supporting photos to follow tomorrow
Getting there, new outriggers in place and marvel at how well most of the chassis has lasted!
The Dinitrol sticks like ship to a blanket, more de-greasing and de-rusting work tomorrow but it's getting closer to paint every day.
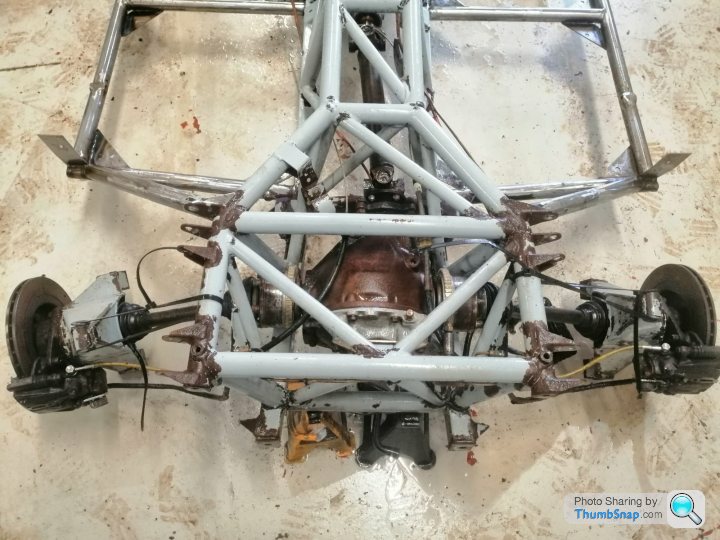
The area over the diff seems to have suffered the most and I would speculate that's due to the close proximity of so many welds, TVR clearly failed to prep the welds correctly before shooting the chassis in the siver/grey paint finish.
The Dinitrol sticks like ship to a blanket, more de-greasing and de-rusting work tomorrow but it's getting closer to paint every day.
The area over the diff seems to have suffered the most and I would speculate that's due to the close proximity of so many welds, TVR clearly failed to prep the welds correctly before shooting the chassis in the siver/grey paint finish.
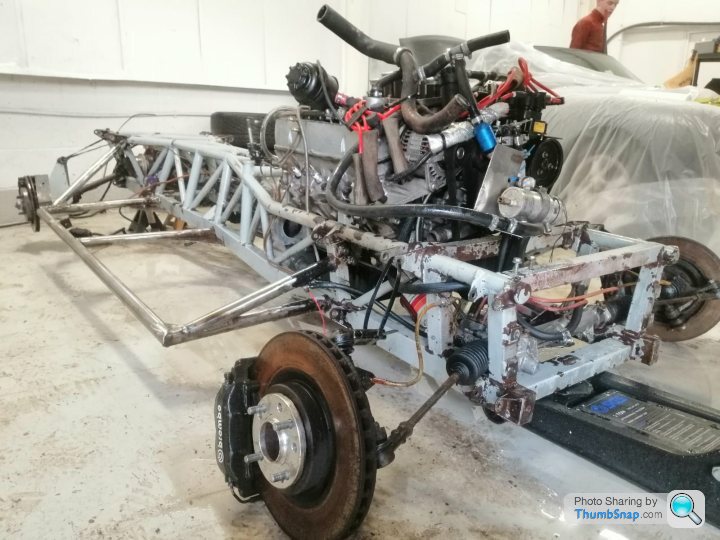
900T-R said:
Is that an S10 tailhousing I spot? 
Yes mate, here's my post on the S10 tail housing mod I started back in 2015.....https://www.pistonheads.com/gassing/topic.asp?h=0&...
I do not miss the TVR linkage!
Don't get me wrong the TVR linkage works well enough if it's in perfect condition, but....
1. Those super thin and very expensive (for what they are) nylon bushes do wear out, and in my opinion they wear out way faster than is acceptable.
2. Its also quite common for the TVR linkage to get bent if care is not taken when fitting a clutch
My TVR linkage was both worn out and bent, and because I needed a new clutch it made sense to upgrade to the the S10 tail housing which at the end of the day TVR used themselves on the last run of Chimaers, by this time Tuscan production was in full swing and TVR were only buying in one T5 gear box variant from Borg Warner which had the gear stick in the right place.
I'm very happy with the way it all worked out, but it only makes sense to implement the S10 tail housing mod if you're replacing your clutch.
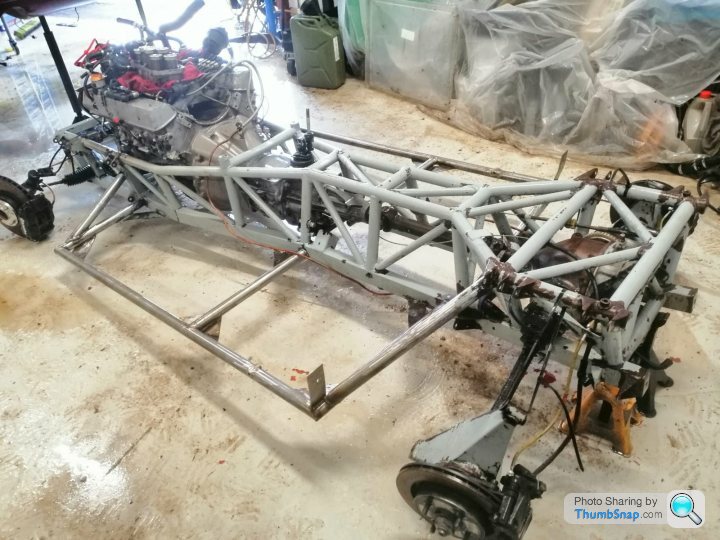
Well what makes this interesting for me is that the 'box uses the same bracket mounting points on the sides of a pair of the vertical main chassis tubes as my LT77, and not the two diagonal U-shaped ones on the lower chassis rails that my early chassis doesn't have (y)
I suppose that bracket is custom/modified? Would it be rude for me to ask about a template/measurements?
I am in the process of dropping the 'box for two reasons:
I suppose that bracket is custom/modified? Would it be rude for me to ask about a template/measurements?
I am in the process of dropping the 'box for two reasons:
- I want to replace the rear crank seal (and at the same time swap my lightened std flywheel for the 6.5 kg TVR Parts one)
- Getting the gearbox out of the way makes it a lot easier for me to install the carbon/aluminium honeycomb sandwich structural rigidity kit that I'm developing. Normally I would recommend doing this in the course of a body-off resto, but I reckon it can be done from under the car if you want it badly enough

Looks great. I'm not surprised that in the busy areas the welded areas are worse, easy not to clean up the welds well enough, and also had to prep busy areas with tubes everywhere regardless of method used. Even if shot blasting in a production environment you can get shadows, if hand blasted, depending on the mood of the day!
What Dinitrol product was used, do you know? The 'ML' brown waxy oil based spray, '1000' which is buff/clear of the same. Or the paint like Dinitrol 4941 underbody coating?
I've used none of them but considering applying some to my chassis which has been touched up with paint well but has imperfections where access etc is less good. To improve protection, but also be removable should further painting be done.
Cheers


JPW231 said:
What Brembo Brakes do you have COG? Any modifications required to fit?
Yes, wheel spacers and a set of 16" matching rear Imola wheels fitted on the front, do a Google search on 'B-b-ber BREMBOS!' and you'll find my post explaining everything you need to buy, the Brembo brake upgrade excluding the 16" wheels should cost around £500 to complete.dhutch said:
What Dinitrol product was used, do you know? The 'ML' brown waxy oil based spray, '1000' which is buff/clear of the same. Or the paint like Dinitrol 4941 underbody coating?
Looking back I believe the Dinitrol system was applied to my chassis in January 2010, I don't know if they're still in business but I used a company called 'Chassis Clean'. My memory is not what it was but it must have been 10 years ago because here I am in November 2011 talking about it being done 'last winter' and when my PH name was Chimpabollics 
https://www.pistonheads.com/gassing/topic.asp?h=0&...
Chassis Clean's very comprehensive process was quite expensive at the time, £360 I believe, but as it lasted 10 years that's just £36 a year on rustproofing which is actually very reasonable, and I now feel £360 to delay needing to take the body off for 10 years was a great investment.
Chassis Clean exclusively used Dinitrol products following this very thorough process....
1. Steam clean entire chassis and wishbones removing existing Waxoil.
3. Drying using hot air and 24 hours sat in a heated workshop before anything else happened
2. Mechanical de-rusting
3. Dinitrol RC 900 specialist rust converter
4. Dinitrol 3125 non dripping solvent based dark brown underbody coating rust preventative specially formulated with a high dry matter content
5. Dinitrol 4941 Black solvent based vehicle underbody coating
My silver/grey painted late 1996 chassis was regularly Waxoiled from new, I know this as I still have all the invoices from the previous owners, this meant back in 2010 we were Dinitrol treating a 14 year old 30,000 mile chassis that had enjoyed some form or rustproofing all its life. In January 2010 the old Waxoil was steam cleaned off revealing a well preserved chassis and wishbones, I still retain the photos to this day if you're interested in seeing them? This steam cleaning and drying process was followed by the above Dintrol system, I'm not sure if 'Chassis Clean' are still going but they did an excellent job.
My belief is if outrigger protectors had been fitted from new and TVR had cleaned up the welds better before spraying in the silver/grey paint finish my chassis would have lasted another 10 years. Now it's important not to lose sight of the fact my chassis still survived over 23 years before the body was lifted a few weeks ago, yes all four outrigger corners were found to be holed but the truth is the structure was/still is essentially structurally sound. This time around we are using a far superior paint system than TVR applied back in 1996, the welds will be properly de-rusted and laser cut stainless steel outrigger protectors fitted over new outriggers that themselves have been constructed by Alex Wheatley from far better quality and thicker wall cold drawn seamless steel tube.
Because the car had always been rustproofed from new, and because I benefited from the earlier silver/grey paint finish we find ourselves 23 years after the car was first built restoring a chassis that's actually survived remarkably well. I fully expect as we are doing a better job this time using better tube and far superior epoxy mastic paint the end result (with outrigger protectors) will be at least another 30 years of chassis life for my TVR..... at which point its not been lost on me that I'll be celebrating my 80th birthday

Edited by ChimpOnGas on Thursday 6th February 16:07
ChimpOnGas said:
Looking back I believe the Dinitrol system was applied to my chassis in January 2010, I don't know if they're still in business but I used a company called 'Chassis Clean'. ....
1. Steam clean entire chassis and wishbones removing existing Waxoil.
3. Drying using hot air and 24 hours sat in a heated workshop before anything else happened
2. Mechanical de-rusting
3. Dinitrol RC 900 specialist rust converter
4. Dinitrol 3125 non dripping solvent based dark brown underbody coating rust preventative specially formulated with a high dry matter content
5. Dinitrol 4941 Black solvent based vehicle underbody coating
Ok, thats interesting.1. Steam clean entire chassis and wishbones removing existing Waxoil.
3. Drying using hot air and 24 hours sat in a heated workshop before anything else happened
2. Mechanical de-rusting
3. Dinitrol RC 900 specialist rust converter
4. Dinitrol 3125 non dripping solvent based dark brown underbody coating rust preventative specially formulated with a high dry matter content
5. Dinitrol 4941 Black solvent based vehicle underbody coating
So they are the 'hydrocarbon solvent' coatings rather than the 'white spirit removable' ones, but sounds good and like it has worked well got your car.
I can get to a lot of the chassis on the westfield and have painted that well, but am looking at the option the bits fully encapsulated in the bodywork/trim predominantly withing the cockpit area. i suspect and expect it is find, but wonder if I should do any more here, in the odd bits the paint isnt perfect and or the cavities of the tubes themselves.
Looks like chassis clean might have disappeared, found a thread saying their site was down in 2015 and not a lot else, although likely I will just get the aerosols and do it myself.
Thanks again.
dhutch said:
ChimpOnGas said:
Looking back I believe the Dinitrol system was applied to my chassis in January 2010, I don't know if they're still in business but I used a company called 'Chassis Clean'. ....
1. Steam clean entire chassis and wishbones removing existing Waxoil.
3. Drying using hot air and 24 hours sat in a heated workshop before anything else happened
2. Mechanical de-rusting
3. Dinitrol RC 900 specialist rust converter
4. Dinitrol 3125 non dripping solvent based dark brown underbody coating rust preventative specially formulated with a high dry matter content
5. Dinitrol 4941 Black solvent based vehicle underbody coating
Ok, thats interesting.1. Steam clean entire chassis and wishbones removing existing Waxoil.
3. Drying using hot air and 24 hours sat in a heated workshop before anything else happened
2. Mechanical de-rusting
3. Dinitrol RC 900 specialist rust converter
4. Dinitrol 3125 non dripping solvent based dark brown underbody coating rust preventative specially formulated with a high dry matter content
5. Dinitrol 4941 Black solvent based vehicle underbody coating
So they are the 'hydrocarbon solvent' coatings rather than the 'white spirit removable' ones, but sounds good and like it has worked well got your car.
I can get to a lot of the chassis on the westfield and have painted that well, but am looking at the option the bits fully encapsulated in the bodywork/trim predominantly withing the cockpit area. i suspect and expect it is find, but wonder if I should do any more here, in the odd bits the paint isnt perfect and or the cavities of the tubes themselves.
Looks like chassis clean might have disappeared, found a thread saying their site was down in 2015 and not a lot else, although likely I will just get the aerosols and do it myself.
Thanks again.
Moving forward rightly or wrongly I've decided to solely rely on the Jotunmastic 90 Aluminum two pack epoxy mastic paint and outrigger protectors, I will not be using rustproofing wax of any type this time around.
Look out for my long term review of this decision in 10 years time
Gassing Station | Chimaera | Top of Page | What's New | My Stuff