What have you done in your garage...?
Discussion


andy43 said:
Explain! In detail! That looks brilliant - I thought the only option to restore the badges was £100-odd professional jobs 
Cheers Andy,First off, metal finshers Vernon Moss did a re chrome for 20 odd a piece.
The hard work was paint, cleaned with spirit.
Chose Rustoleum matte black spray, 4-5 light coats. (put the badges on a box so they can sit flat to avoids runs)
Left them for 24 hours, then used old credit card to carefully scrape the highest points back to chrome (easy on tvr badge, but very difficult for 500 badge)
What really helped me was then rubbing gently with spirit to clean chrome and this tidied the edges up.
Final thing I did was put them in the oven at roughly 150 for half hour, then let them sit in there for a few hours.
Drops of something on drive and garage floor signalled something. Something ONE was a weep from the steel pipe at goes over the front chassis rail joint to the hose (near left as you open the bonnet). I reseated the Jubilee clip and so far so good, but how much water lost? I put a couple of litres in the swirl pot, will need an anti-freeze top up and I think some insulation to stop any metal to metal contact between pipe and chassis rail.
But ... as I was rooting around I found a drip of petrol out of the (what on my car is) a braided hose near driver's foot area. That was something TWO (so that wasn't my imagine that I could smell petrol recently). Ian at TrackVRoad sorted me out some non braided high spec hose, but how the heck do you get to the clip to remove it, let alone tighten a new one???
Every combo of socket, handle, extension, flex drive and its on now, but think I shall have another check down there before going too far!
John
V8Bart said:
Cheers Andy,
First off, metal finshers Vernon Moss did a re chrome for 20 odd a piece.
The hard work was paint, cleaned with spirit.
Chose Rustoleum matte black spray, 4-5 light coats. (put the badges on a box so they can sit flat to avoids runs)
Left them for 24 hours, then used old credit card to carefully scrape the highest points back to chrome (easy on tvr badge, but very difficult for 500 badge)
What really helped me was then rubbing gently with spirit to clean chrome and this tidied the edges up.
Final thing I did was put them in the oven at roughly 150 for half hour, then let them sit in there for a few hours.
You've got me thinking about finding a chrome plating place now - my rear badge 'needs work'. Ta First off, metal finshers Vernon Moss did a re chrome for 20 odd a piece.
The hard work was paint, cleaned with spirit.
Chose Rustoleum matte black spray, 4-5 light coats. (put the badges on a box so they can sit flat to avoids runs)
Left them for 24 hours, then used old credit card to carefully scrape the highest points back to chrome (easy on tvr badge, but very difficult for 500 badge)
What really helped me was then rubbing gently with spirit to clean chrome and this tidied the edges up.
Final thing I did was put them in the oven at roughly 150 for half hour, then let them sit in there for a few hours.
johnzo said:
But ... as I was rooting around I found a drip of petrol out of the (what on my car is) a braided hose near driver's foot area. That was something TWO (so that wasn't my imagine that I could smell petrol recently). Ian at TrackVRoad sorted me out some non braided high spec hose, but how the heck do you get to the clip to remove it, let alone tighten a new one???
Every combo of socket, handle, extension, flex drive and its on now, but think I shall have another check down there before going too far!
John
This is worth a read - I won't be fitting braided fuel hoses! : http://www.pistonheads.com/gassing/topic.asp?h=0&a...Every combo of socket, handle, extension, flex drive and its on now, but think I shall have another check down there before going too far!
John
andy43 said:
You've got me thinking about finding a chrome plating place now - my rear badge 'needs work'. Ta
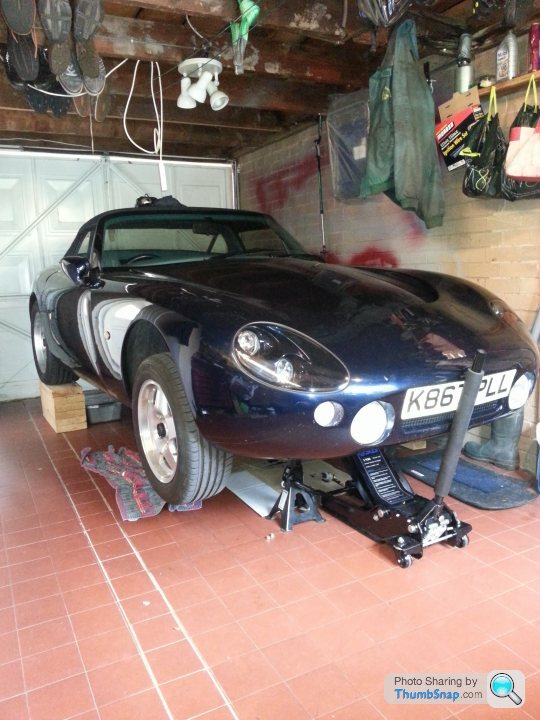
Let me know if you find one. I have powder coating facilities so I could powder coat in black, brushing off the powder from the raised bits. Worth an experiment I reckon. I've got plenty of black powder. PeteSump gasket is leaking so got to use my new trolley jack. Its a belter. Goes straight under the nose of the Griff onto the main chassis rail without the need to drive onto blocks of wood or whatever first to raise the car a few inches. For a change it made getting the whole car up in the air a piece of cake.
carsy said:
Got to use my new trolley jack. Its a belter. Goes straight under the nose of the Griff onto the main chassis rail without the need to drive onto blocks of wood or whatever first to raise the car a few inches. For a change it made getting the whole car up in the air a piece of cake.
And!Don't leave us in suspenders man.
What is it?
Where from?
How much?

A good jack makes a huge difference to access - with my old jack I couldn't get the jack under the car, then couldn't get me under either. I'm blaming old age rather than a waist diameter issue...
I got this one very soon after getting the Griff https://www.machinemart.co.uk/shop/product/details... and these stands https://www.machinemart.co.uk/shop/product/details...
I can get it up no problem - to a maximum of two feet now
I got this one very soon after getting the Griff https://www.machinemart.co.uk/shop/product/details... and these stands https://www.machinemart.co.uk/shop/product/details...
I can get it up no problem - to a maximum of two feet now
Pete Mac said:
andy43 said:
You've got me thinking about finding a chrome plating place now - my rear badge 'needs work'. Ta
Let me know if you find one. I have powder coating facilities so I could powder coat in black, brushing off the powder from the raised bits. Worth an experiment I reckon. I've got plenty of black powder. PeteBarreti said:
And!
Don't leave us in suspenders man.
What is it?
Where from?
How much?
http://www.sgs-engineering.com/garage-equipment/trolley-jacks/tj3lp-low-profile-garage-trolley-jackDon't leave us in suspenders man.
What is it?
Where from?
How much?
Sorry doesnt look like the link has worked. Not sure how to make it work. Bloody computers.
http://www.sgs-engineering.com/garage-equipment/tr...
Edited by carsy on Friday 4th September 17:47
Edited by carsy on Friday 4th September 18:22
Not so much what I've done in the garage, more what I've done to the garage really.
Been in my current single garage set up for the last 15 years, perfectly adequate when I moved in as it was just to house bike's, but since I've had the Griff, its been plainly a struggle.

So first thing off, demolition time.

Then lay some base, in sections due to size.


Then erect a 20ft by 18ft extra high garage, 7ft6 to the eves, highest I could go to.


Then paint the walls white to brighten things up.

Add some plastic sectional flooring, all clips together and the one I choose which is plasfloor, is a lot better value than other one's on the market.

Had electrics fitted and then fill it with car and bike stuff.


To say I'm chuffed is an understatement, so much more room now, though pretty sure ill fill it with crap soon enough.

Alan461 said:
16mm starter cable for a 5l V8?
Nice one TVR, they saved at least a fiver with that.
I put some 35mm in instead, it might start more often (I hope)
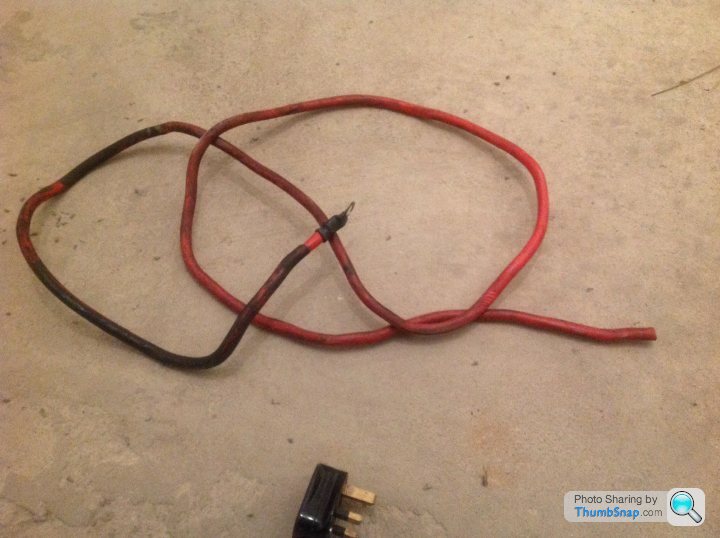
I've been meaning to do this for some time and replace that whole 100A fuse holder, which looks like the original and is starting to crack. Approximately how much cable do you need and from a score of 1 to 10, how impossible was it to pull the new cable through? PeteNice one TVR, they saved at least a fiver with that.
I put some 35mm in instead, it might start more often (I hope)
Pete Mac said:
Alan461 said:
16mm starter cable for a 5l V8?
Nice one TVR, they saved at least a fiver with that.
I put some 35mm in instead, it might start more often (I hope)
I've been meaning to do this for some time and replace that whole 100A fuse holder, which looks like the original and is starting to crack. Approximately how much cable do you need and from a score of 1 to 10, how impossible was it to pull the new cable through? PeteNice one TVR, they saved at least a fiver with that.
I put some 35mm in instead, it might start more often (I hope)
The old cable went behind the dash and disappeared through the bulkhead somwhere above the bellhousing.
Difficult enough to remove so hauling one through more than twice the size would be 8+ without removing the dash.
I didn't have the time so took it through the transmission tunnel adjacent to the heater hoses, across and down to the starter with cable ties to the chassis and avoiding the manifold.
The earth cable was also upgraded to 35mm to the block
The way I fed the cable through was to cut off the battery connection and attached some bell wire to the old cable. then I pulled the cable out from underneath car puling the bell wire with it. Then I attached the bell wire to the new cable and pulled it back into the footwell from underneath the car. I did try to feed it from the footwell first of all and could not get it through.
You have to really securely attach the bell wire to the new cable because it is a tight route,
You have to really securely attach the bell wire to the new cable because it is a tight route,
I previously moved the Fuse/relay panel to the glove box but have now tidied up the mess in the footwell:
www.bertram-hill.com
Life is so much easier now checking fuses or removing relays
www.bertram-hill.com
Life is so much easier now checking fuses or removing relays
Gassing Station | Griffith | Top of Page | What's New | My Stuff