Discussion


Has anyone got any experience of 3D printers?
I have been playing about with an Anet A8 this week and its a massive pain in the backside to re-level the bed every few prints.
Can anyone recommend one that comes with a self levelling bed or even one with a frame built around it as the Anet is pretty flimsy. We use it to rebuild broken frames on computers or laptops and the test prints on the anet were pretty decent for the quality we need.
You need a printer with some element of automatic leveling. https://www.simplify3d.com/support/articles/beginn...
Its called a Pinda probe on Prusas whilst other printers tap the bed with the nozzle to get the level. I only considered buying a 3d printer once this was sorted out. Its sort of like the difference between a car with manual spark advance and a choke versus a modern engine management system. I believe that even the really cheap Anet printers have some sort of probe on them now.
Its called a Pinda probe on Prusas whilst other printers tap the bed with the nozzle to get the level. I only considered buying a 3d printer once this was sorted out. Its sort of like the difference between a car with manual spark advance and a choke versus a modern engine management system. I believe that even the really cheap Anet printers have some sort of probe on them now.


I bought an A8 and have had excellent results from it.
Couple of things I did;
Replaced the belts with fibre reinforced, the stock ones stretch and cause the head to resonate when ramping up and down.
Got a set of feeler gauges and use the 0.15mm to aid bed levelling and set nozzle height. This is much more repeatable than the paper method. It also gives really effective first layer adhesion.
Replaced the screws for bed levelling with knurled knobs from eBay, loctited the head of the screws to the bed, this makes bed adjustment much quicker.
I also printed belt adjusters and the belt clamps available on Thingiverse.
One thing to bear in mind, it's pointless levelling the bed if the X axis isn't trammed in. I used a digital vernier measured from the motor brackets to the top of the Y axis bearing housings to set each side to be the same, adjusting by turning the motor, once they have been turned off in the options.
Repeat the bed levelling a couple of times after homing and check your X axis height.
Also if your not already doing so either get the 3M bluetape 50mm wide for the heated bed or a piece of glass and either hair spray or PCB Lacquer works.
For temps and filament I've had excellent results using Rigid Ink PLA and 210°c first layer, 200°c subsequent layers and 60°c bed temp.
I tend to print now with no part cooling fan, unless doing large bridges so that may be worth trying on yours.
If you can it might be worth screwing the printer down to a piece of MDF or Ply, I noticed some slight twisting front to back that affected bed levelling.
Some good advice in the above reply.
I have had my Anet A8 for just over a week now and to start with was a pain in the arse!
Had my first nozzle blockage today and found an easy way to clear it:- remove nozzle and heat it (hold it with thin nosed pliers) then poke some PLA inside and rapidly cool it down in water, remove from water and gently pull the PLA out hopefully removing the blockage, repeat until it's cleared. Seems to work best with a 1 second dip in water so the core is still semi hot.
I'm just at this moment printer a filament guide and will place some foam ontop of it with a slit to feed the filament through to clean any dust, FOD or grit before it enters the extruder.
So far I'm loving it, so much fun for £140!
I've been using 3D builder that comes with Windows 10 or some prebuilt prints from thingiverse and using Cura to set prints then placing them on Micro SDcard into the printer.
The timing on this thread is impeccable! I've just built a Geetech I3 (Prusa clone), and this weekend will be rebuilding it trying to knock out all the inaccuracies that it seems to plague it, so I'll be following the thread with interest.
I've got a list of replacement parts already to print for it as upgrades from thread guides to bed locks (to get rid of the wing nuts)
I've got a list of replacement parts already to print for it as upgrades from thread guides to bed locks (to get rid of the wing nuts)
I shelved the Anet a8 and moved onto the creality CR10.
We have now a small library of parts for broken laptops that we can knock out a print in around 20mins. Has saved us a hell of a lot of time in having to strip machines.
Downsides to it would be the time it takes to heat the bed sufficiently but it's a hell of a lot easier to level as and when needed.
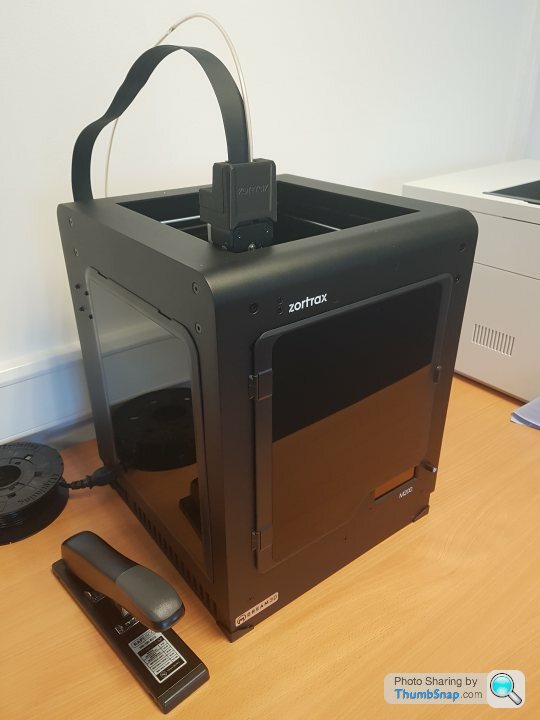
Here's my bad boy!
Worth its weight in gold. The money I used to spend on getting prototype parts made was nobodies business. This paid for itself in the first month.
I did have a few issues with the prints not sticking to the bed at first but making a solution of acetone and ABS up and painting the bed to make it more sticky worked.
Fantastic bit of kit!
welshjon81 said:
I did have a few issues with the prints not sticking to the bed at first but making a solution of acetone and ABS up and painting the bed to make it more sticky worked.
Fantastic bit of kit!
I use the cheapest hairspray I can buy Fantastic bit of kit!
 seems to work really well at sticking
I've placed a piece of glass ontop of the Anet A8 and held it down using some clips.
What I've found it once everything is perfectly level (Especially the X axis) then bed levelling is a lot easier and stays in place, got home from work early, currently on print number 4 without levelling bed since lastnights print
Green painter's masking tape has worked a treat for me - used to have all sorts of adhesion problems with my old RepRapPro Huxley and Mendel on a glass bed with and without Kapton tape - tried hairspray, ABS juice, etc. The RepRapPro units were getting fairly tired anyway, bought a Malyan I3 clone, which isn't perfect but is pretty good for the price, and very few adhesion problems printing on painter's tape.
Also try using a raft or brim to help with adhesion.
For PLA I use cheap hair spray and glue stick for ABS (although I don't have an enclosure so can't print large ABS parts without warping so don't!).
I have a £140 Geetech Prusa style clone I purchased from Ebay and it works well. I did have to do a bit of work on Z wobble but with a bit of finessing it works very well considering the price. I have had mine over a year and probably have a few hundred hours on it. I have replaced the nozzle once and fitted some better quality linear bearings when the old ones started getting a bit grumbly.
I did have an issue with mine which I believe is an issue with many of the cheaper units and that is that the main power connector on the board struggles to deliver enough current without getting hot. Over time I started to get some arcing and brownouts as a result. Luckily I spotted it before it caused any major problems (like a fire). I removed the plug and socket from the board and soldered the four main power wires directly to the board which works well.
Celtic Dragon - I would STRONGLY suggest that you do this mod ASAP as it is likely to be an issue at some point in the future and you don't want to take the risk. The heated bed and nozzle pull well over 10amps when both on and the standard connector struggles to deliver that over an extended period of time.
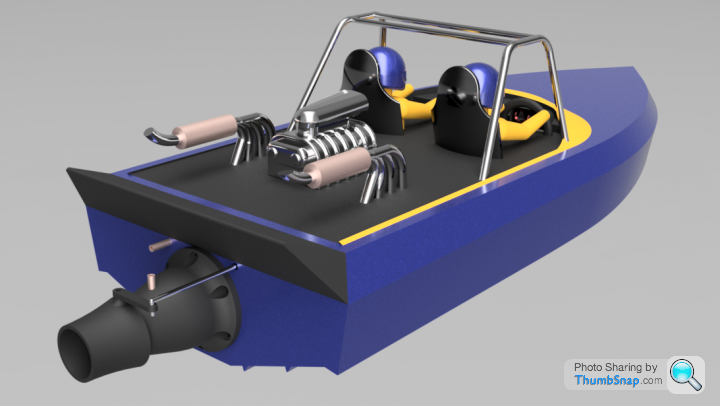
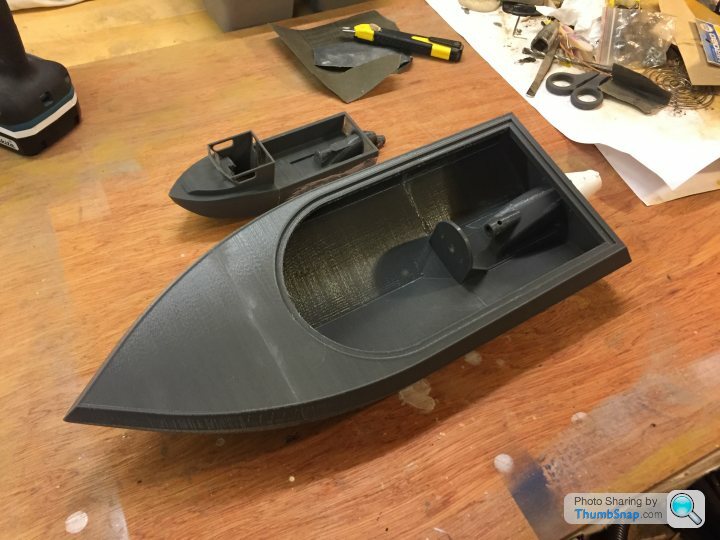
I love my 3d printer and use it regularly to print parts for model making and am currently designing a 3d printed RC jet sprint boat....
I have a £140 Geetech Prusa style clone I purchased from Ebay and it works well. I did have to do a bit of work on Z wobble but with a bit of finessing it works very well considering the price. I have had mine over a year and probably have a few hundred hours on it. I have replaced the nozzle once and fitted some better quality linear bearings when the old ones started getting a bit grumbly.
I did have an issue with mine which I believe is an issue with many of the cheaper units and that is that the main power connector on the board struggles to deliver enough current without getting hot. Over time I started to get some arcing and brownouts as a result. Luckily I spotted it before it caused any major problems (like a fire). I removed the plug and socket from the board and soldered the four main power wires directly to the board which works well.
Celtic Dragon - I would STRONGLY suggest that you do this mod ASAP as it is likely to be an issue at some point in the future and you don't want to take the risk. The heated bed and nozzle pull well over 10amps when both on and the standard connector struggles to deliver that over an extended period of time.
I love my 3d printer and use it regularly to print parts for model making and am currently designing a 3d printed RC jet sprint boat....
Dead_Donkey said:
I did have an issue with mine which I believe is an issue with many of the cheaper units and that is that the main power connector on the board struggles to deliver enough current without getting hot. Over time I started to get some arcing and brownouts as a result. Luckily I spotted it before it caused any major problems (like a fire). I removed the plug and socket from the board and soldered the four main power wires directly to the board which works well.
Celtic Dragon - I would STRONGLY suggest that you do this mod ASAP as it is likely to be an issue at some point in the future and you don't want to take the risk. The heated bed and nozzle pull well over 10amps when both on and the standard connector struggles to deliver that over an extended period of time.
Duly noted, I’ll do it when I rebuild it after the upgrades and knocking out the engineering inaccuracies. It’s cheap, but not very well engineered.Celtic Dragon - I would STRONGLY suggest that you do this mod ASAP as it is likely to be an issue at some point in the future and you don't want to take the risk. The heated bed and nozzle pull well over 10amps when both on and the standard connector struggles to deliver that over an extended period of time.
I’ve got to tidy up the wiring anyway now I’ve just undone it all after making it the first time.
I think the engineering is adequate! I have the Geetech version with mainly metal parts and acrylic main frame. If you build it well then it appears to work fine as supplied. Mine only required z wobble brackets printing and fitting as well as some light oil on roller bearings and some lithium grease on the linear bearings and that was it.
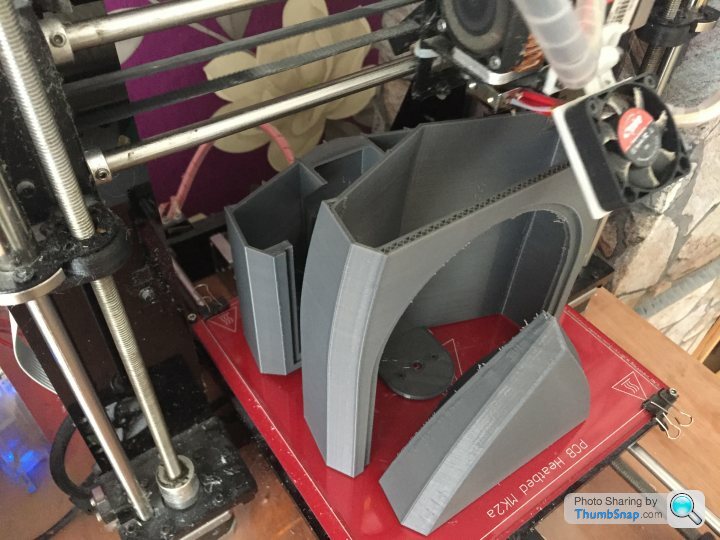
I also printed some part cooling fan holders. I tend to use part cooling on smaller detailed parts and no cooling on larger more 'structural' parts.
What inaccuracies do you have with it? FDM will never be perfect and there will always be some artefacts like ringing and layer lines. I find reasonable quality and DRY pla helps a lot to reduce artefacts. Acetone smoothing of ABS is also a cool way to get rid of the FDM loo, but the open frame of the Geetech printers means that you can only print small ABS parts (otherwise shrinkage and warping occurs).
Dead Donkey, inhave the same model as you, and do far I have found:
Z axis couplers have been turned off centre.
Z axis mounting brackets aren’t correctly stamped, the holes for the phosphor bronze threads are out of alignment by 0.75 mm.
This throws out the top plates.
X axis guide holes aren’t aligned, out by 0.25 to 0.5mm
Wing nuts rotate on the platern, need to be captive nuts, also the 2 rear ones stop the platern hitting the limit stop if left parallel with the runners.
The belts under tension bend both axis, even under light load.
Hmm, sounds a bit rough! The only issue I had was that the threaded rods for the z axis were not straight and so induced some z wobble on the layers.
To be honest, if you print out the Geetech z wobble brackets you can find on thingiverse (you can also see them in my pictures above) then both the z issues should be solved.
I am not sure what you mean by the x axis guide holes - do the mean the ones in the metal brackets? I found mine were very tight and so needed to be filed just a fraction to get the two x rails to fit (mine did come with a file so I am guessing that they expect some finessing to be required).
My wing nuts on the bed also spin the bolts, but not a big deal really. I just hold the bolt head with my thumb while setting bed level. I find my bed stays fairly level most of the time so I only need to re-level if it I am switching to glue stick for ABS or about every 10 - 20 prints so the inconvenience of spinning bolts is minor.
I have not found the belt tension to be an issue. On the X axis there are machined collates that are supposed to be installed on the guide rails and then nipped up tight to stop the Z axis guide rails being pulled when the belt is tightened. The Y axis is pretty strong so I am not sure what that issue is. Belts should still have a little slack and should be in no way 'tight'. If I press my belts down I get about 5mm or so of deflection before they start really pulling tight.
Does any of that help at all? Pics if the issues might help, or I can show you some pics of mine!
Cheers, Lewis
Celtic Dragon said:
Dead Donkey, inhave the same model as you, and do far I have found:
Z axis couplers have been turned off centre.
Z axis mounting brackets aren’t correctly stamped, the holes for the phosphor bronze threads are out of alignment by 0.75 mm.
This throws out the top plates.
X axis guide holes aren’t aligned, out by 0.25 to 0.5mm
Wing nuts rotate on the players, need to be captive nuts, also the 2 rear ones stop the platers hitting the limit stop if left parallel with the runners.
The belts under tension bend both axis, even under light load.
Edited by anonymous-user on Saturday 17th March 23:44
It’s a play thing so I’ve enjoyed rectifying it!
The collets on the x axis are now on the inside of the stampings to reduce the flex.
I took a reamer to the holes in the z axis stampings so they now align for the x axis.
The holes for the z axis threaded rods are buggered, I’ve drilled them out but they’re still out, so I’ll design some new ones depending on how badly they behave.
I’ve got plans to print captive nuts for the heat bed and the z axis wobble fix, a filament guide, maybe a cooling fan setup, and the z axis collets.
Dead Donkey
I've just looked at your pics of the boat on a big screen, mine now looks almost the same as yours (collets in te same places etc)
What slicer software do you use and what settings? I've been recommended Cura, which I've installed and it does look good, but its default values look a little high at a print speed of 60mm/s.
Gassing Station | Computers, Gadgets & Stuff | Top of Page | What's New | My Stuff