Discussion


Cura is pants! IMO! Too basic.
I use a combination of Slic3r and IdeaMaker.
I use Slic3r nearly all of the time as it works well and has a good amount of options for settings. It can also send files directly to the printer if you are running an octoprint server (which I am). I also use IdeaMaker on harder to print stuff as it allows the generation of fully custom support structures. I would start with Slic3r first, then move on from there if you need to.
My standard print settings in slicer for PLA are:
General Speed 60mm/s
Outer shell perimeters 50% speed (i.e. 30mm/s)
Infill 60mm/s
top and bottom solid fill 30mm/s
first layer 15mm/s
support 60mm/s
travel speed 80mm/s
3 priming loops, no brim or raft normally
support as needed (if needed)
First layer temp 200, subsequent layers 190, 100% part cooling all the time for smaller or detailed parts or where strength is secondary to appearance.
Bed first layer 70, then 50 from then on.
Layer heights 0.2 for normal stuff.
If I have a really detailed print i will half all of the speed figures and drop layer height to 0.1m
If you are printing some benchies, then set up a fast medium and slow profile with 0.1 and 0.2 layers. Print a few and see what looks good.
One final thing - if you download and install slic3r, as default it only shows simple setups options. Select the expert option and restart it. I started off by using a standard prusa i3 profile (it works well for retraction etc) with a Mk8 extruder, then tweeked the speed and other settings from there.
Thanks, Im now sure I have a Friday machine.
Its all set up, pre heat it, then the hot end thermister keeps bouncing between min and Max temp errors. Board etc checks out, and if you move the wires for the Thermistor the temp values rise or fall. Thankfully I had the foresight to buy a complete spare hotend so can do a swap over.
This is really getting rather tiresome!
With regards bed leveling I think this is where the CEL stuff really shines, certainly in our experience. Pre-Print the head does a 16 point touch across the print area with the level detected via a limit switch on the top of the print head carrier. It then adjusts the G-Code on the fly internally to compensate for the bed level which we have found to be extremely accurate, literally just chuck the print platform back in it and press go with no other work required.
It will also run bed temps of up to 150 degrees C so prints ABS without warping and in probably 2000 prints across three of them we've never had anything come off the bed.
They're expensive for consumer stuff but cheap when compared to pro stuff and we definitely wouldn't change them for anything else having tried all combinations of delta design, makerbot & clones, Zoltrax and a few no names about two years ago. We've got a Robox-Pro on the way shortly which I'm looking forward to putting through its paces as we should be able to do complete steering wheel mockups on that in one piece!
Celtic Dragon said:
2x normal paper would be about 0.12mm, temp wise is;
First layer 200c 195 for everything else, 65c for the bed. First 4 layers are at 15mm/s for print and travel speed.
2x paper works most of the time. You can run 1x paper which helps with sticking to the bed, however you can also end up with elephant footing - that is where the first few layers squish too much and become wider. Not a massive issue, but if you are printing parts to fit together that squishing can screw up fitment tolerances. First layer 200c 195 for everything else, 65c for the bed. First 4 layers are at 15mm/s for print and travel speed.
Edited by anonymous-user on Sunday 18th March 19:39
Keep travel speed up around 80 or so otherwise you can end up with stringing issues. Faster travel speed helps to separate the filament flow when moving between parts and reduce stringing.
How did your print turn out? Well worth while 'wasting' some filament printing some benchies and other torture tests to help tune the printer. Loads of vids on youtube to help sort out issues.
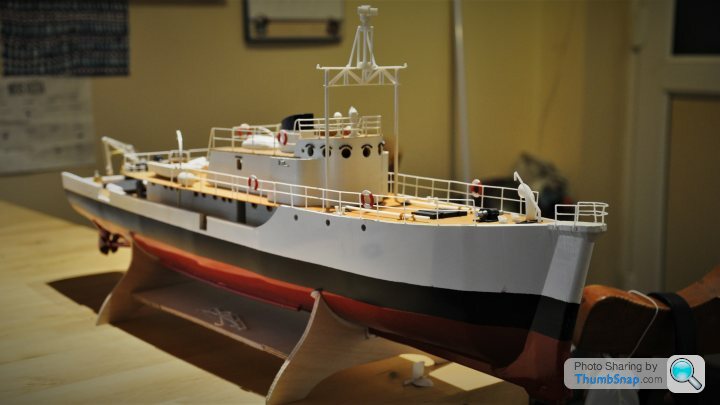
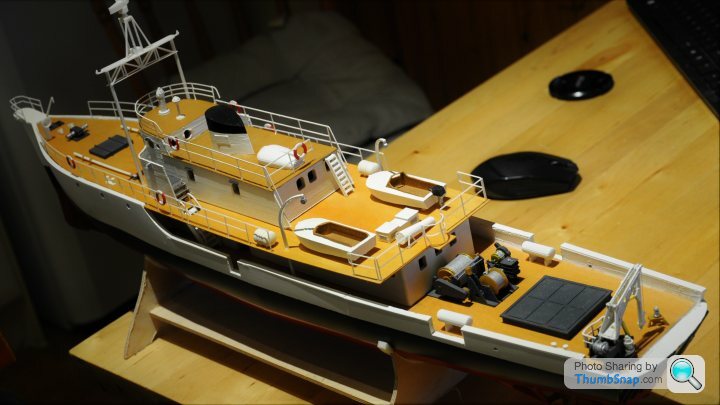
Just to give you some more motivation/inspiration, I have just finished printing this on my cheep Geetech printer. Files from thingiverse and it is 100% 3D printed other than some 0.8mm plywood for the decks and brass tube for the prop shafts and stuffing tubes. RC using two brushed 370 motors, 3d printed belt drive gearboxes, 3d printed propellers etc.
Print quality on some parts is not great as I had nozzle issues part way though printing the parts (I mentioned that I had so far replaced one nozzle which was during this project). Also some of the parts are very small and required a compromise between support material (and ease of removal of the support material) VS drooping and overall print quality. I.e. there is no point using a lot of support and getting a great print if the support material is almost impossible to remove cleanly.
Print quality on some parts is not great as I had nozzle issues part way though printing the parts (I mentioned that I had so far replaced one nozzle which was during this project). Also some of the parts are very small and required a compromise between support material (and ease of removal of the support material) VS drooping and overall print quality. I.e. there is no point using a lot of support and getting a great print if the support material is almost impossible to remove cleanly.
The first calibration cube was awful! Found 2 issues, first was extruder grip on the filament, there wasn’t enough! That was solved with finger pressure applied to the filament feed lever whilst printing. Rectified by 3 washers under the spring. 2nd was bed adhesion.
2nd Cube was much better once it had stuck itself down.
3rd was the z axis mod after I covered the glass in masking tape. They’re a bit stringy, but functional, also one is a bit warped. Maybe 1.5mm overall.
4th was a tardis key, the fine detail has been lost, some of the infill is stringy and again it’s warped. I’ll try to post pictures tomorrow but I need to sign up to a host site.
I’ll try dropping the bed temp to 60 and see how I get on but I think it’s got a hot spot in the centre and bugger all heat on the outer 2/3rds.
Just happy to get this far, so far. The electrical gremlins and mechanical tolerances were my aim today and they should be 90% banished now.
On the z axis fix, if you look at it from the back (with the prongs pointing away from you) the bottom edge is curved upwards and it looks like the layers are compressed. One side is worse than the other.
Looking at the Tardis key, it could have also squidged the layers together with my limited head height. Next set of prints I'll increase the head height to 0.12 - 0.15mm depending on the feeler gauges I have to hand.
Looking at the Tardis key, it could have also squidged the layers together with my limited head height. Next set of prints I'll increase the head height to 0.12 - 0.15mm depending on the feeler gauges I have to hand.
Edited by Celtic Dragon on Monday 19th March 10:31
As promised, some photos, but tonights run seems more successfull overall. Yesterday the flat was at 18C and today its 23C, and everything is much better, including bed adhesion, so much so that they actualy require effort to get them off the bed!!
1st test cube

2nd test cube

z axis, showing warp

z axis

Tardis key reverse

Tardis front side

Tardis warp

1st test cube
2nd test cube
z axis, showing warp
z axis
Tardis key reverse
Tardis front side
Tardis warp
Few examples from ours:

Brake bells, Steering wheel rear switch gear cover, spline test pieces, clutch basket carrier, pedal box lower mount and hyds cooler carrier. All printed to check fit before being machined from the relevant material, bar the steering wheel rear switch gear cover, we just flock those and use them as is.

Brake bells, Steering wheel rear switch gear cover, spline test pieces, clutch basket carrier, pedal box lower mount and hyds cooler carrier. All printed to check fit before being machined from the relevant material, bar the steering wheel rear switch gear cover, we just flock those and use them as is.
The second test cube is definitely showing z axis wobble - If you compare the banding on the cube to your z axis screws you will find that the pitch is the same.
As for the other issues - try heating the nozzle up to about 230 and poke a pin in the end to try and clear any blockages, then force through some filament by hand. You should get a nice laminar flow of filament in a straight line. If it curls up around and back to the nozzle then you have a blockage that needs clearing.
The general print quality looks like the temp is too low. What filament are you using? Is it definitely PLA?
Well it’s advertised as pla, it’s from amazon and badged as Surreal, it’s cheap and will do as I learn. Who’s pla do you use?
Tonight’s prints are much better than the 2 black ones shown above. I’ve got the lines on the infil from the nozzle, but next to no strings. I’ll try it at 210 and see what happens.
Think the ambient temp was a major factor in yesterday’s problems.
Tonight’s prints are much better than the 2 black ones shown above. I’ve got the lines on the infil from the nozzle, but next to no strings. I’ll try it at 210 and see what happens.
Think the ambient temp was a major factor in yesterday’s problems.
WolfieBot said:
0.06 sounds very low. I think I use a 0.015 inch gauge which is 0.38mm but I'll double check next time I'm near it.
Sorry I was wrong, I use a 0.0015 inch guage, inset it so it just touches but still moves freely underneath the tip so it's probably around 0.1mm in reality. I'm also having problems lately though, I seem to constantly get extruder 'stalling' or clicking and it stops extruding. I took it apart last night and found the gear on the motor was loose so tightened that back up but the problem came back again.
My printer doesn't have any method for adjusting preload on the extruder so I'll try and print one that does. Failing that I might end up replacing the whole extruder assembly as I'm getting a bit fed up with it now.
Gassing Station | Computers, Gadgets & Stuff | Top of Page | What's New | My Stuff