The 3D Printer Thread
Discussion


Bullett said:
Show us a picture of the dodgy print.
Filament that has absorbed some moisture is another possibility.
I binned them in disgust. I ran some cleaning filament though and changed the nozzle.Filament that has absorbed some moisture is another possibility.
I've got some other odd problems now. Nothing is sticking to the plate. I was used PETG. I tried PLA and that was even worse. The PETG has been opened for a while so maybe moisture is problem.
When printing its missing patches of infil, but the bigger problem is the piece is lifting off the bed after about an hour.
I'm using the same method and temps as before. Using 3d printer glue. Could it be a problem with the plate? I've wiped it with water. Does it need a deeper clean maybe?
Scabutz said:
I binned them in disgust. I ran some cleaning filament though and changed the nozzle.
I've got some other odd problems now. Nothing is sticking to the plate. I was used PETG. I tried PLA and that was even worse. The PETG has been opened for a while so maybe moisture is problem.
When printing its missing patches of infil, but the bigger problem is the piece is lifting off the bed after about an hour.
I'm using the same method and temps as before. Using 3d printer glue. Could it be a problem with the plate? I've wiped it with water. Does it need a deeper clean maybe?
I've found boiling water and fairy liquid is best for cleaning plates. You need to remove the oils you put on the plate when you handle it, thats what causes bad adhesion. I've got some other odd problems now. Nothing is sticking to the plate. I was used PETG. I tried PLA and that was even worse. The PETG has been opened for a while so maybe moisture is problem.
When printing its missing patches of infil, but the bigger problem is the piece is lifting off the bed after about an hour.
I'm using the same method and temps as before. Using 3d printer glue. Could it be a problem with the plate? I've wiped it with water. Does it need a deeper clean maybe?
Has the ambient temperature changed where you print too, or is the room draughty? That can cause warping as well.
Merry said:
I've found boiling water and fairy liquid is best for cleaning plates. You need to remove the oils you put on the plate when you handle it, thats what causes bad adhesion.
Has the ambient temperature changed where you print too, or is the room draughty? That can cause warping as well.
Thanks will try that. I don't think the temperature has changed massively. It's in the same room. I've know about drafts so always make sure to close windows etc. I probably should buy an enclosure for it.Has the ambient temperature changed where you print too, or is the room draughty? That can cause warping as well.
Ambleton said:
Eh? All the CAD work is mine. I haven't ripped off anyone elses CAD. If you compare my model to photos if the cartoon you will see that they're totally different.
In any case, if there was a decent RC car that was an official licensed product I would have happily bought it. As it happens, there wasn't, so I created something similar for my neice.
I'm a design engineer by trade. If I gave away all my CAD design time then what would i live on and pay my mortgage with?
If people are prepared to give stuff away for free then that's up to them. Doesn't make good business sense to me but there we go.
Did you use Siemens NX to model it?In any case, if there was a decent RC car that was an official licensed product I would have happily bought it. As it happens, there wasn't, so I created something similar for my neice.
I'm a design engineer by trade. If I gave away all my CAD design time then what would i live on and pay my mortgage with?
If people are prepared to give stuff away for free then that's up to them. Doesn't make good business sense to me but there we go.
Edited by Ambleton on Monday 21st June 20:10
Is there a way you can import images and trace around them to get the shapes correct? Or is it a case of measuring off something and modeling
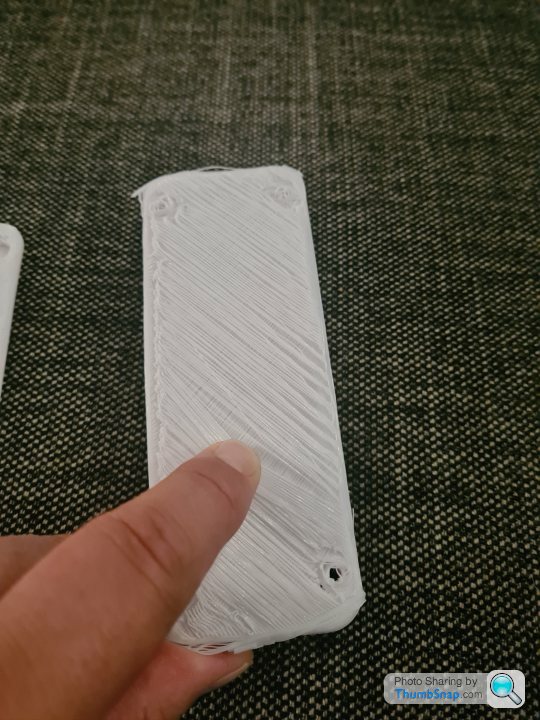
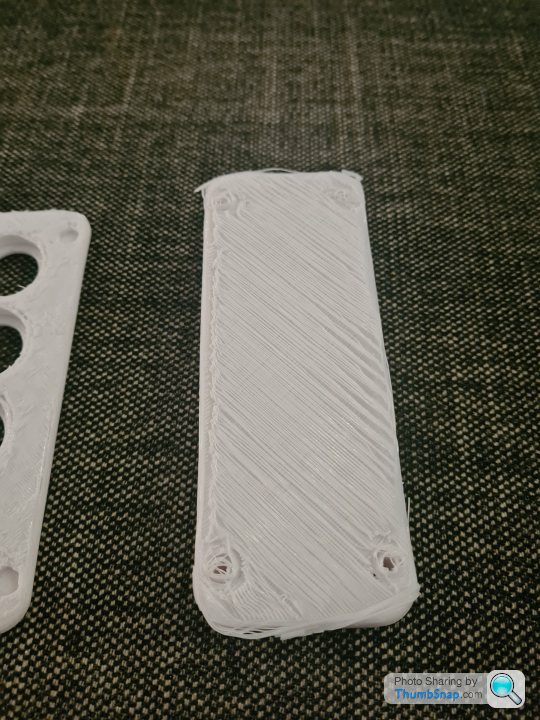
Everything has been cleaned and gor new filament. I'm getting OK results, but the bottom layer here is a right mess. I printed it with a brim which doesn't go under the print. This first layer peels off fairly easily. The bigger concern is in the corners there are hexagons for captive nuts. The walls are poorly defined and the nuts don't fit. Also the corners seemed to have sagged. The hole thing should be 7mm, but in the corner it's 6.5
I'm guessing this is a settings issue rather mechanical print problem?
is that "upsidedown" ie that's the face that was on the bed? if so lower your first layer Z height. a LOT! I'm fairly new to the 3D printing game (but not to 3D modeling, that's my job!) and the one thing that seems to come up time and time again is check your first layer Z height! it must be the root of all evil... 

Does your machine have a plastic extruder? If it has check that the filament hasn't worn a bigger hole in the entry point.
Have you accidently changed something with-in the slicer profile that you use. Maybe down load somebody else profiles. CHEP on youtube used to make his ender 3 profiles freely available.
Have you accidently changed something with-in the slicer profile that you use. Maybe down load somebody else profiles. CHEP on youtube used to make his ender 3 profiles freely available.
Yeah that was face down, the top face where I had ironing enabled is very smooth. Itd not perfect but I can live with. The bottom face is s te.
te.
Will look at the z settings for the first layer and see what I can change there.
Its definitely not a clog as I have replaced the nozzle and run cleaning filament through. Extruder gears being worn. I dont think so. I would be surprised as I think I only have probably 20-30 print hours. The rest has printed quite well.
ETA - Layer height and initial layer height are both set to 0.2mm
te.Will look at the z settings for the first layer and see what I can change there.
Its definitely not a clog as I have replaced the nozzle and run cleaning filament through. Extruder gears being worn. I dont think so. I would be surprised as I think I only have probably 20-30 print hours. The rest has printed quite well.
ETA - Layer height and initial layer height are both set to 0.2mm
Edited by Scabutz on Tuesday 28th September 18:51
Scabutz said:
Everything has been cleaned and gor new filament. I'm getting OK results, but the bottom layer here is a right mess. I printed it with a brim which doesn't go under the print. This first layer peels off fairly easily. The bigger concern is in the corners there are hexagons for captive nuts. The walls are poorly defined and the nuts don't fit. Also the corners seemed to have sagged. The hole thing should be 7mm, but in the corner it's 6.5
I'm guessing this is a settings issue rather mechanical print problem?
I'm not sure what your setup is, but I would typically look at the following.
- Bed levelling and height. The main one for me, it really has to be flat. I tend to aim for a moderate amount of drag when trying to pull a sheet of paper from under the nozzle. Not enough to gauge a line in the paper but something a decent amount of resistance.
- Clean bed. I have a flexible magnetic bed and find cleaning it with an alcohol wipe often helps, particularly if I haven't used it for a while or have handled the bed a bit
- Dry filament. I've mainly printed with PLA, and have found that even if stored in a box with a dehumidifier bag they still take on a bit of moisture and benefit from a dry.
- Decent quality filament. I've never used the expensive brands, but have done ok with mid range stuff. The cheaper stuff I bought has been really hit and miss and variable spool to spool.
- Print settings. I often print with a raft, partially to get a larger adhesion area on smaller parts, and partially as I can check how the first layers go down and if there are only minor issues there I can let it run and perhaps have a better chance of the part itself being ok, limiting any small issues to the disposable raft. For PLA I tend to find myself with temps towards the higher end of the suggested ranges, but this might vary with your machine/material. I have also slowed the initial layers down by about a third, which seems to help those first passes stick a bit better
Scabutz said:
ETA - Layer height and initial layer height are both set to 0.2mm
How are you setting the actual print head distance? the paper method?Edited by Scabutz on Tuesday 28th September 18:51
Run this - https://www.thingiverse.com/thing:2987803
Use the gcode not the stl.
I ran through this article when I got mine, pretty helpful to get it dialled in properly.
https://www.instructables.com/Ender-3-Pro-Initial-...
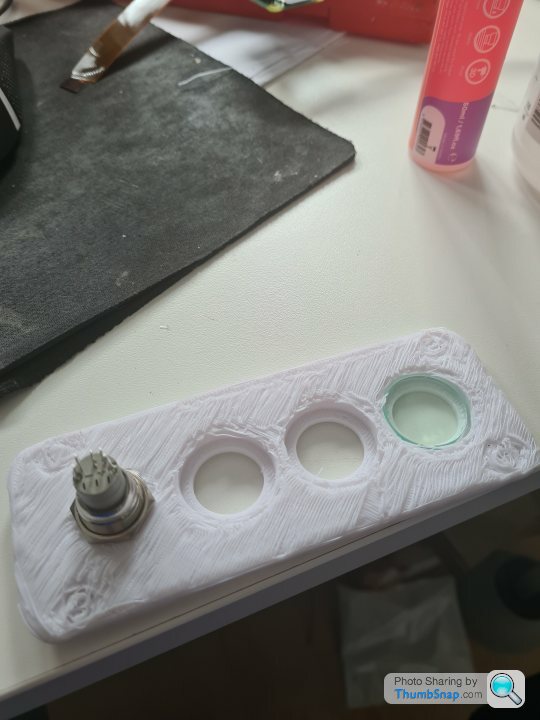
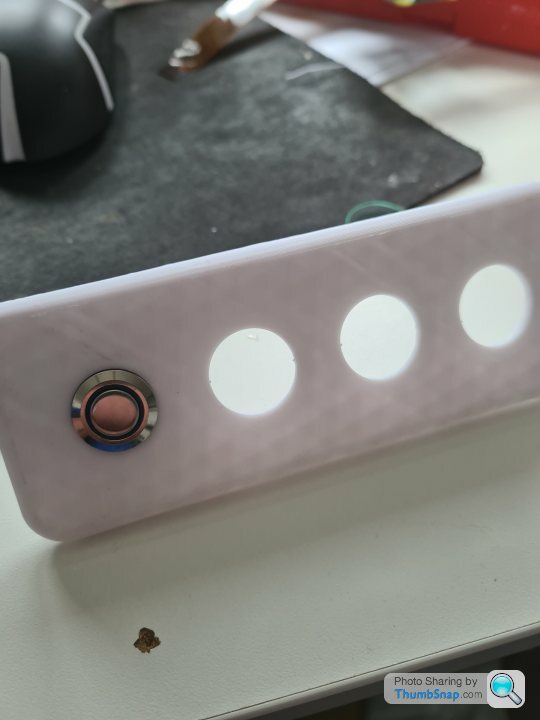
I printed the other half of my box.
Same problem. What's odd, as you can see in the pictures, is the first layer is single string attached at each end. It came off very easily. Still doesn't look good though. You can see how the warping on the front plate means it won't be waterproof, and looks ste.
As an aside I've now noticed two massive problems with my design so will need to fix those. Give me time to sort the printer.
I'm going to upgrade the plate leveller wheels as there still the st plastic ones and also going to get the auto levelling upgrade.


Same problem. What's odd, as you can see in the pictures, is the first layer is single string attached at each end. It came off very easily. Still doesn't look good though. You can see how the warping on the front plate means it won't be waterproof, and looks s
te.As an aside I've now noticed two massive problems with my design so will need to fix those. Give me time to sort the printer.
I'm going to upgrade the plate leveller wheels as there still the s
t plastic ones and also going to get the auto levelling upgrade. The auto levelling won't help much if at all, it still needs to be levelled manually and dialled in first.
Get the yellow springs, the wheels themselves it doesn't matter much. I hardly ever need to level anymore since I got the yellows. The other mod that I found useful was the all metal extruder.
Maybe print one of the improved hot end cooler designs, although you will need it a bit more dialled in for that.
I agree with the post above. You don't need fancy wheels or auto levelling to sort this. I've also bought springs but never got around to fitting them.
Your issues are adhesion related - I've had the same "single string" issues myself in the past. I'm confident you can get a decent print by going through the list I posted without buying any new bits
Your issues are adhesion related - I've had the same "single string" issues myself in the past. I'm confident you can get a decent print by going through the list I posted without buying any new bits
egomeister said:
I agree with the post above. You don't need fancy wheels or auto levelling to sort this. I've also bought springs but never got around to fitting them.
Your issues are adhesion related - I've had the same "single string" issues myself in the past. I'm confident you can get a decent print by going through the list I posted without buying any new bits
OK thanks. I'll work through your suggestions. Will get a simple design so I can fiddle with the settings and restart quickly. Your issues are adhesion related - I've had the same "single string" issues myself in the past. I'm confident you can get a decent print by going through the list I posted without buying any new bits
Scabutz said:
egomeister said:
I agree with the post above. You don't need fancy wheels or auto levelling to sort this. I've also bought springs but never got around to fitting them.
Your issues are adhesion related - I've had the same "single string" issues myself in the past. I'm confident you can get a decent print by going through the list I posted without buying any new bits
OK thanks. I'll work through your suggestions. Will get a simple design so I can fiddle with the settings and restart quickly. Your issues are adhesion related - I've had the same "single string" issues myself in the past. I'm confident you can get a decent print by going through the list I posted without buying any new bits

This is one I where I was suffering similar issues (but not so bad). The part layers had next to no adhesion to the raft - you could just brush it off with your fingers.
I think on this one I re-levelled the bed, and dried the filament and then got a decent print. I was quite surprised how much the PLA was affected by moisture despite being carefully stored.
Bullett said:
An XYZ calibration cube is a good shout.
Even just split it in the slicer and repeat the bottom 2mm until you get a proper first layer.To me it looks like it's almost printing in mid air to begin with.
Can't mind now what controls you have for moving the z axis on that printer, but also make sure that going to z = 0 is repeatable... literally move it up 100mm, then back, you shouldn't really be able to get a sheet of A4 under it too freely. You want to rule out a physical issue too.
Gassing Station | Computers, Gadgets & Stuff | Top of Page | What's New | My Stuff