The 3D Printer Thread
Discussion


egomeister said:

This is one I where I was suffering similar issues (but not so bad). The part layers had next to no adhesion to the raft - you could just brush it off with your fingers.
I think on this one I re-levelled the bed, and dried the filament and then got a decent print. I was quite surprised how much the PLA was affected by moisture despite being carefully stored.
Merry said:
egomeister said:
This is one I where I was suffering similar issues (but not so bad). The part layers had next to no adhesion to the raft - you could just brush it off with your fingers.
I think on this one I re-levelled the bed, and dried the filament and then got a decent print. I was quite surprised how much the PLA was affected by moisture despite being carefully stored.
Thanks or the help so far chaps. I am getting somewhere.
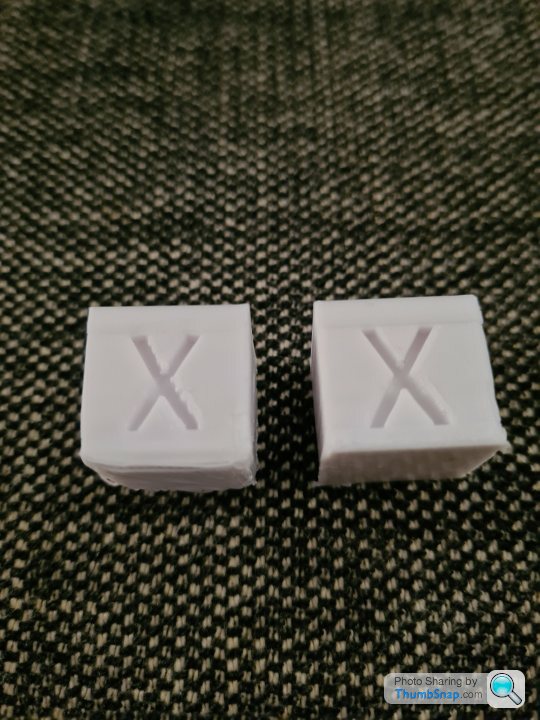
I printed a 20x20x20 XYZ cube. In the photos below one on the left was printed as is, no changes. As you can see same stringyness problem and also the edges curling upwards, and the letters are a little jagged.
First thing I did was check the bed levelling. I did this twice recently before I started. Turns out it's way off, I don't understand it all. It's like someone had purposely fiddled with it. Anyway a few attempts at that and lowering the bed temp 5 degrees and I've go the one on the right. The first layer is obviously much better, and the letters are clearer. Only problem I have is the the X and Y sides are precisely 20mm, measured with a micrometer. But the z axis is nearly a mm shirt. It was also an absolute b h to remove from the bed.
Have I gone a bit too far with the plate levelling and need to back off a little?
I printed a 20x20x20 XYZ cube. In the photos below one on the left was printed as is, no changes. As you can see same stringyness problem and also the edges curling upwards, and the letters are a little jagged.
First thing I did was check the bed levelling. I did this twice recently before I started. Turns out it's way off, I don't understand it all. It's like someone had purposely fiddled with it. Anyway a few attempts at that and lowering the bed temp 5 degrees and I've go the one on the right. The first layer is obviously much better, and the letters are clearer. Only problem I have is the the X and Y sides are precisely 20mm, measured with a micrometer. But the z axis is nearly a mm shirt. It was also an absolute b
h to remove from the bed.Have I gone a bit too far with the plate levelling and need to back off a little?

Looks much improved.
Try printing a leveling test, I posted one a while back.
The yellow springs and metal wheels helped me, I only level once in a blue moon now.
What surface do you have, glass? let it cool completely before attempting removal you can sometimes hear it cracking as it cools and it often just pops off.
It's not supposed to just come off, so what you have now sounds right to me.
Scabutz said:
Thanks or the help so far chaps. I am getting somewhere.
I printed a 20x20x20 XYZ cube. In the photos below one on the left was printed as is, no changes. As you can see same stringyness problem and also the edges curling upwards, and the letters are a little jagged.
First thing I did was check the bed levelling. I did this twice recently before I started. Turns out it's way off, I don't understand it all. It's like someone had purposely fiddled with it. Anyway a few attempts at that and lowering the bed temp 5 degrees and I've go the one on the right. The first layer is obviously much better, and the letters are clearer. Only problem I have is the the X and Y sides are precisely 20mm, measured with a micrometer. But the z axis is nearly a mm shirt. It was also an absolute bh to remove from the bed.
Have I gone a bit too far with the plate levelling and need to back off a little?
It looks like you have something to work with now, which is good.I printed a 20x20x20 XYZ cube. In the photos below one on the left was printed as is, no changes. As you can see same stringyness problem and also the edges curling upwards, and the letters are a little jagged.
First thing I did was check the bed levelling. I did this twice recently before I started. Turns out it's way off, I don't understand it all. It's like someone had purposely fiddled with it. Anyway a few attempts at that and lowering the bed temp 5 degrees and I've go the one on the right. The first layer is obviously much better, and the letters are clearer. Only problem I have is the the X and Y sides are precisely 20mm, measured with a micrometer. But the z axis is nearly a mm shirt. It was also an absolute b
h to remove from the bed.Have I gone a bit too far with the plate levelling and need to back off a little?
Bed levelling can drift over time, but I think stronger springs should help minimise that. It's not something I've bothered with so far as periodically checking it and re-levelling is probably not a bad idea anyway. One thing I noticed with my bed is that it was bowed slightly, so I packed it out a bit with tin foil in the middle, but I don't think that's a problem for you at the moment.
How much force does it take to pull a sheet of paper from under the nozzle at the moment?
It looks like you have a bit of an elephant foot on the early layers? (if you measure across those layers rather than the middle of the cube you'd get a slightly larger value). This could be an indication that the bed is too close to the nozzle (ie, the first layers are becoming too squished) or bed temp might be too high.
You could try printing on a raft and measure the cube from that. That would allow you to eliminate any problems that are affecting the initial layers only, and give you some idea what to look at to improve things.
Bullett said:
Looks much improved.
Try printing a leveling test, I posted one a while back.
The yellow springs and metal wheels helped me, I only level once in a blue moon now.
What surface do you have, glass? let it cool completely before attempting removal you can sometimes hear it cracking as it cools and it often just pops off.
It's not supposed to just come off, so what you have now sounds right to me.
Thanks. Yes it's glass. I use Magigo printer glue which is supposed to release at it cools. Usually works well, but this I had to use some serious force to get it off after it had cooled for an hour.Try printing a leveling test, I posted one a while back.
The yellow springs and metal wheels helped me, I only level once in a blue moon now.
What surface do you have, glass? let it cool completely before attempting removal you can sometimes hear it cracking as it cools and it often just pops off.
It's not supposed to just come off, so what you have now sounds right to me.
egomeister said:
Scabutz said:
Thanks or the help so far chaps. I am getting somewhere.
I printed a 20x20x20 XYZ cube. In the photos below one on the left was printed as is, no changes. As you can see same stringyness problem and also the edges curling upwards, and the letters are a little jagged.
First thing I did was check the bed levelling. I did this twice recently before I started. Turns out it's way off, I don't understand it all. It's like someone had purposely fiddled with it. Anyway a few attempts at that and lowering the bed temp 5 degrees and I've go the one on the right. The first layer is obviously much better, and the letters are clearer. Only problem I have is the the X and Y sides are precisely 20mm, measured with a micrometer. But the z axis is nearly a mm shirt. It was also an absolute bh to remove from the bed.
Have I gone a bit too far with the plate levelling and need to back off a little?
It looks like you have something to work with now, which is good.I printed a 20x20x20 XYZ cube. In the photos below one on the left was printed as is, no changes. As you can see same stringyness problem and also the edges curling upwards, and the letters are a little jagged.
First thing I did was check the bed levelling. I did this twice recently before I started. Turns out it's way off, I don't understand it all. It's like someone had purposely fiddled with it. Anyway a few attempts at that and lowering the bed temp 5 degrees and I've go the one on the right. The first layer is obviously much better, and the letters are clearer. Only problem I have is the the X and Y sides are precisely 20mm, measured with a micrometer. But the z axis is nearly a mm shirt. It was also an absolute b
h to remove from the bed.Have I gone a bit too far with the plate levelling and need to back off a little?
Bed levelling can drift over time, but I think stronger springs should help minimise that. It's not something I've bothered with so far as periodically checking it and re-levelling is probably not a bad idea anyway. One thing I noticed with my bed is that it was bowed slightly, so I packed it out a bit with tin foil in the middle, but I don't think that's a problem for you at the moment.
How much force does it take to pull a sheet of paper from under the nozzle at the moment?
It looks like you have a bit of an elephant foot on the early layers? (if you measure across those layers rather than the middle of the cube you'd get a slightly larger value). This could be an indication that the bed is too close to the nozzle (ie, the first layers are becoming too squished) or bed temp might be too high.
You could try printing on a raft and measure the cube from that. That would allow you to eliminate any problems that are affecting the initial layers only, and give you some idea what to look at to improve things.
Yes the early layers are slighter over 20mm so looks like they have been squished a bit. Will try backing the plate away slightly, and then the bed temp
Scabutz said:
Paper under the nozzle has a little bit of tension. Not loads though. One thing I noticed is I levelled all the corners and then checked the middle and it was much tighter in the middle. So I moved all corners away until the center felt better..
Yes the early layers are slighter over 20mm so looks like they have been squished a bit. Will try backing the plate away slightly, and then the bed temp
You could try moving it away slightly, but it sounds like you have a similar amount of friction on the paper to me. My printer has magnetic bed so I don't know what tweaks you might need different for glass.Yes the early layers are slighter over 20mm so looks like they have been squished a bit. Will try backing the plate away slightly, and then the bed temp
I think you will always get a bit of elephant foot effect, after all you are pushing molten plastic onto the bed. They key is how much is too much...
Sounds like you are in the ballpark now though, so have a bit of an experiment with some of the factors mentioned and you should get some more improvements.
egomeister said:
You could try moving it away slightly, but it sounds like you have a similar amount of friction on the paper to me. My printer has magnetic bed so I don't know what tweaks you might need different for glass.
I think you will always get a bit of elephant foot effect, after all you are pushing molten plastic onto the bed. They key is how much is too much...
Sounds like you are in the ballpark now though, so have a bit of an experiment with some of the factors mentioned and you should get some more improvements.
Yeah I think a bit of fiddling might give some better results. I'm not too bothered as the bottom plate is flat. My main concern is water tightness. The main body will have a grove for some o ring material and the face plate will compress that. If its not flat it won't work.I think you will always get a bit of elephant foot effect, after all you are pushing molten plastic onto the bed. They key is how much is too much...
Sounds like you are in the ballpark now though, so have a bit of an experiment with some of the factors mentioned and you should get some more improvements.
I try a few different things and see how i get on.
Thanks for the help
bobski1 said:
Did you use Siemens NX to model it?
Is there a way you can import images and trace around them to get the shapes correct? Or is it a case of measuring off something and modeling
Yes I did use NX. Is there a way you can import images and trace around them to get the shapes correct? Or is it a case of measuring off something and modeling
You can import images onto planes yes, but I didn't. I "just" modelled it from my head as to what I thought looked right.
Initially I modelled up the mounting points of the RC car, wheels etc so I knew I was in the right ballpark. Then as the design matured I kept measuring back to what I had IRL and I was confident it would all go together OK.

My 3d printer has gone from being a hobby thing to actually very useful. We have a glass shower door on pivot hinges. The hinges snapped and the door fell off. Luckily didnt break.
Anyway couldn't find replacement hinges anywhere. Looks like the manufacturer no longer exists.
Got the broken pieces, measured it up, quick knock up in Fusion 360 and two replacement hinges printed and fitted and door working again. Cost 40p in filament costs
Anyway couldn't find replacement hinges anywhere. Looks like the manufacturer no longer exists.
Got the broken pieces, measured it up, quick knock up in Fusion 360 and two replacement hinges printed and fitted and door working again. Cost 40p in filament costs
Am expecting delivery of my Elegoon Saturn and Mercury combo within the next 2 weeks (fingers crossed)
I know it seems a bit excessive for a first timer but have justified it to help nephew with his business making models
Am looking forward to having a play
Trying to get my head around fusion as wife has ideas to keep me busy

I know it seems a bit excessive for a first timer but have justified it to help nephew with his business making models
Am looking forward to having a play
Trying to get my head around fusion as wife has ideas to keep me busy
I've had an Ender3pro for three years. Absolute doddle.
Bought a second hand OG Photon - absolutely nothing wrong with it, but I had an absolute nightmare. Essentially nothing printed - and every failure ended up puncturing the FEP film, pissing resin all over the screen. In the end, rage set in...
I signed up for Grimdark Terrain's patreon at the beginning of the year - just to support the awesome work he was doing. Its so good, I caved and bought a new Mono X. Already had the (smaller) wash and cure.
Using paid for, fully supported files. The new machine (which is so far ahead of the OG Photon it's unreal). A proper workspace and some thought to the work flow. Plus a useful 'trick' now in the software to clean the VAT really safely - and I bloody love it!
Still terrified of spending the hours supporting free files and having the massively increased risks of failures...
It really does need a dedicated, heated and ventilated workspace separated from any form of 'living space'. Eco resin is great as no VOCs, but still damned nasty. Do not underestimate the HSE elements - it's virtually asbestos like in it's potential nastiness, and incredibly stupidly mentally crap for the environment if not handled properly.
Gassing Station | Computers, Gadgets & Stuff | Top of Page | What's New | My Stuff