Sublime Pandamonium II
Discussion


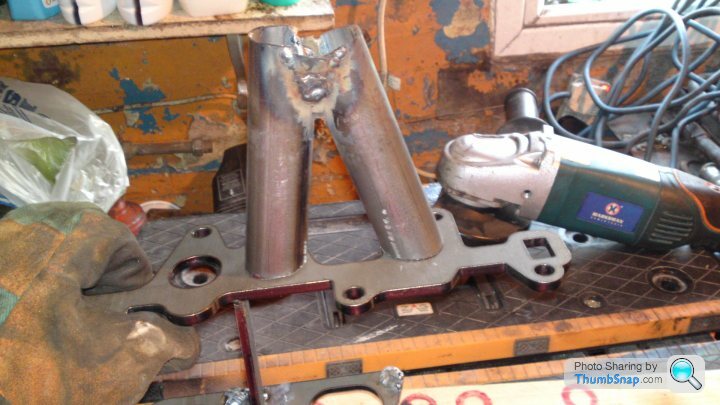
A very big thank you to Optima Stainless Steel today for the Laser cut base plates for my inlet manifold. 
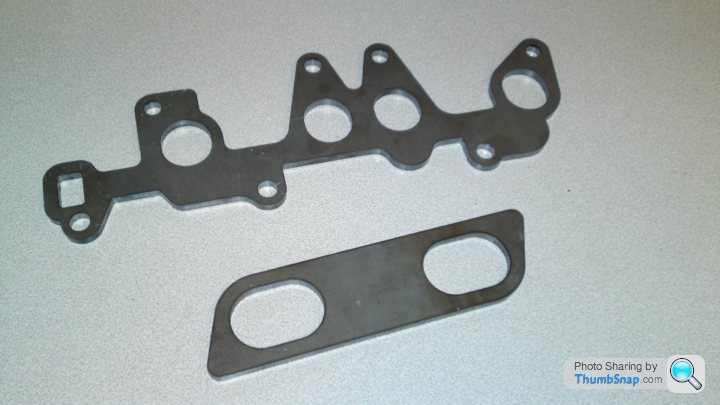
A quick spine plate to make the two plates into a mold.

But first I had to visit Kev' (van of death) to borrow his pillar drill...

...because the carb' plate didn't have mounting holes (Rob in using right tool for the job shocker).

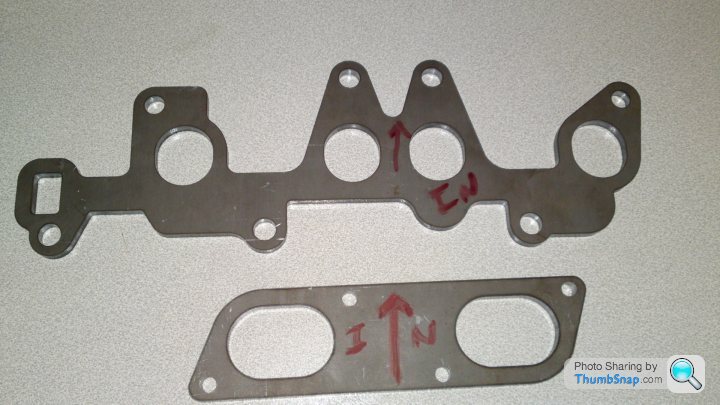
With the base plates ready I tack welded the spine in place.

The eagle eyed of you will have noticed the spine isn't straight this is because the carb's sit at an angle on the bike and so the float chambers fill properly they need to sit at an angle in the car as well. I used to race a TDM powered streetfighter in the Straightliner series...

...this is one of the reasons I chose the TDM carb's for this project as unlike a quartet of carb's the larger twin carb's should make the engine less highly strung. I'll sacrifice top end but should have plenty or torque throughout the rev' range (if the engine works at all that is). Also the 3LD carb's have a manual choke making them better suited for normal road use (I'll have to use the car once a fortnight or so to keep the brakes and things healthy). As a bonus most TDM's are either being exported or taken off the road now the newer models use fuel injection and there is a plethora of competition from most manufacturers so carb's and other parts are cheap (a lot cheaper than the quartet carb's now breakers know the kit car boys want them). At the time I was the only one using the TDM in anything other than Paris Dakar pretensions (this was way before Supermoto took off).
So with the spine in place it's just a matter of cutting and shaping the pipes to make two "Y" pieces to eventually weld in place.
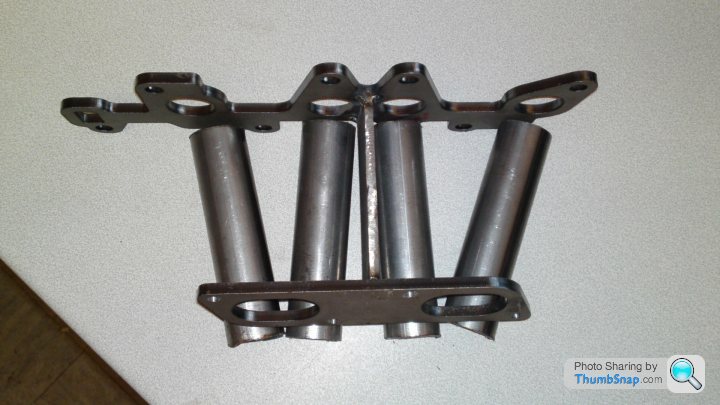
Before I even contemplate doing any of that I need to make sure my measurements are all correct and the carb's fit the newly drilled and spot welded plate...

..and trial fit the carb's and manifold mold to the engine.

Removing the heater matrix wasn't just for the weight saving you'd think I had a plan...
...but know better.
All that was left to do today was tack weld the bolts in place...

...and the manifold mold is ready.
I am really looking forward to my next day off now.
A quick spine plate to make the two plates into a mold.
But first I had to visit Kev' (van of death) to borrow his pillar drill...
...because the carb' plate didn't have mounting holes (Rob in using right tool for the job shocker).
With the base plates ready I tack welded the spine in place.
The eagle eyed of you will have noticed the spine isn't straight this is because the carb's sit at an angle on the bike and so the float chambers fill properly they need to sit at an angle in the car as well. I used to race a TDM powered streetfighter in the Straightliner series...
...this is one of the reasons I chose the TDM carb's for this project as unlike a quartet of carb's the larger twin carb's should make the engine less highly strung. I'll sacrifice top end but should have plenty or torque throughout the rev' range (if the engine works at all that is). Also the 3LD carb's have a manual choke making them better suited for normal road use (I'll have to use the car once a fortnight or so to keep the brakes and things healthy). As a bonus most TDM's are either being exported or taken off the road now the newer models use fuel injection and there is a plethora of competition from most manufacturers so carb's and other parts are cheap (a lot cheaper than the quartet carb's now breakers know the kit car boys want them). At the time I was the only one using the TDM in anything other than Paris Dakar pretensions (this was way before Supermoto took off).
So with the spine in place it's just a matter of cutting and shaping the pipes to make two "Y" pieces to eventually weld in place.
Before I even contemplate doing any of that I need to make sure my measurements are all correct and the carb's fit the newly drilled and spot welded plate...
..and trial fit the carb's and manifold mold to the engine.
Removing the heater matrix wasn't just for the weight saving you'd think I had a plan...
...but know better.
All that was left to do today was tack weld the bolts in place...
...and the manifold mold is ready.
I am really looking forward to my next day off now.
Edited by Liquid Knight on Thursday 29th November 17:03
I couldn't wait for my next day off. Today is my transition day from day to night shift so as I was up and about I thought I'd put my time to good use.
Used a bit of scrap wood as a template...

...and cut two of the pieces of pipe to make the "Y".
Once tacked into place I filled the gaps with small plates and weld and test fitted it to the under side of the base plate to ensure it hadn't distorted.
Trimmed the top edge to meet the carb' plate and welded the "Y" piece in place...
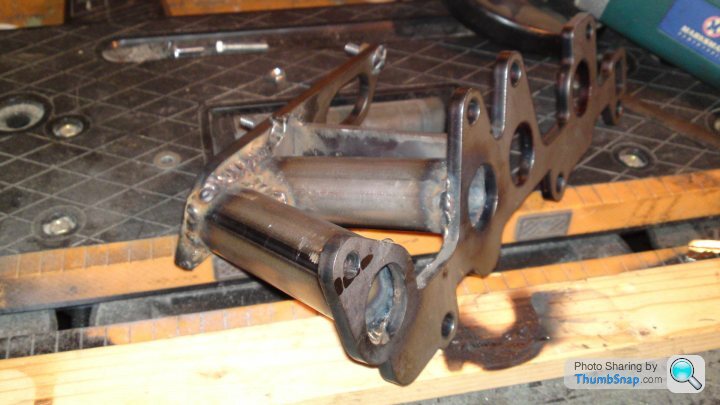
...not my best work to date but I'm going for function rather than form.
Used a bit of scrap wood as a template...
...and cut two of the pieces of pipe to make the "Y".
Once tacked into place I filled the gaps with small plates and weld and test fitted it to the under side of the base plate to ensure it hadn't distorted.
Trimmed the top edge to meet the carb' plate and welded the "Y" piece in place...
...not my best work to date but I'm going for function rather than form.

Yep. He's a popular chap...
http://compare.ebay.co.uk/like/330838553595?var=lv...
...I was hoping for the Meerkat Cannonball version so he could copilot the red Panda (if) when it's finished.
http://compare.ebay.co.uk/like/330838553595?var=lv...
...I was hoping for the Meerkat Cannonball version so he could copilot the red Panda (if) when it's finished.
Against all odds (probably best I leave that statement there) The manifold is finished.

I did a run of weld around a smaller pipe for the water channel and fitted a longer bolt to the left bank lower mount while I was at it.
Trial fitted to the engine again...
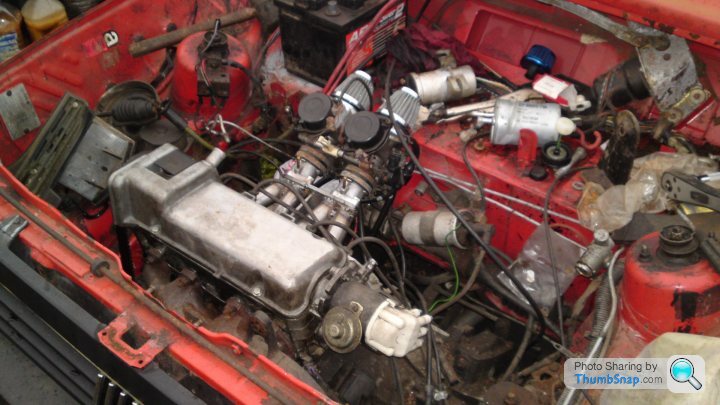
...looks pretty good to me...

...the standard Panda choke cable is a near perfect fit (while the dash is out, should be even better retrofitted) and the longer bolt?

Is there to mount the adjuster screw in a convenient accessible place.
Just plumbing in the radiator, fuel lines, HT circuit, fuel pump (wired to the coils switched live) and a few other things before we will finally see if the engine works.
I did a run of weld around a smaller pipe for the water channel and fitted a longer bolt to the left bank lower mount while I was at it.
Trial fitted to the engine again...
...looks pretty good to me...
...the standard Panda choke cable is a near perfect fit (while the dash is out, should be even better retrofitted) and the longer bolt?
Is there to mount the adjuster screw in a convenient accessible place.
Just plumbing in the radiator, fuel lines, HT circuit, fuel pump (wired to the coils switched live) and a few other things before we will finally see if the engine works.
The Payday Fairies don't visit until next week and I had £4.79 on my Paypal account so I've just bought this...
http://www.ebay.co.uk/itm/RAMAIR-Silicone-3mm-x-2m...
...and one of these...
http://www.ebay.co.uk/itm/3mm-T-Piece-Pipe-Connect...
...so I can do this...

...should work-ish if the rest of it does.
http://www.ebay.co.uk/itm/RAMAIR-Silicone-3mm-x-2m...
...and one of these...
http://www.ebay.co.uk/itm/3mm-T-Piece-Pipe-Connect...
...so I can do this...
...should work-ish if the rest of it does.
Some moderate Pandaing today. The plan was to finish the horn fitting job by refitting the inner arch trims I ran out of light to do before.
Then this happened...
...bugger.
So I checked the bulb; it was fine, opened the light to check the terminals; they were fine, looked under the bonnet to check the relay; it was fine, used a multimeter to test the circuit from the relay to the bulb; "Beeeeep" for the live and "B-b-b-b-b-beeep-b-b-b-b-beeep" for the earth. I think it was Morse Code for you've pulled a wire out hanging the bumper you pillock. So the horn trumpets were undone and removed so I could get to the bumper mounts, undid all of those (just as well I hadn't put the inner arch trims back), removed the bumper, cut away the seal around the terminal block and it looked perfectly fine.
I tested it with the meter again and it was a constant "Beeeeeep". I turned the lights on and they both worked.
Take it apart, look at it and put it back together again. If only everything in life were so simple.
Given my recent brush with ill health I decided to clean all the moss and stuff from under the bonnet and heater matrix. Knowing my luck I'd contract Legionnaires disease and my French isn't that good.

While I was at it washed the rest of the car for the first time in three months...

...just as well I'm planning a respray next year the grinding sparks and moss have taken their toll on the original paint.
Just needed to check once more before I called it a day...

...I'll put the inner arch trims back on next time.
In Guff II news I retrofitted the original radiator to see how I am going to plum the hoses in place...

...looks fairly straight forward as effectively all I'm doing is bypassing the absent heater matrix. So the pip from the radiator to the matrix can go straight to the engine instead. The car will need two and a half fewer liters of coolant so that's another 2.5 Kg weight saved.
Then this happened...
...bugger.
So I checked the bulb; it was fine, opened the light to check the terminals; they were fine, looked under the bonnet to check the relay; it was fine, used a multimeter to test the circuit from the relay to the bulb; "Beeeeep" for the live and "B-b-b-b-b-beeep-b-b-b-b-beeep" for the earth. I think it was Morse Code for you've pulled a wire out hanging the bumper you pillock. So the horn trumpets were undone and removed so I could get to the bumper mounts, undid all of those (just as well I hadn't put the inner arch trims back), removed the bumper, cut away the seal around the terminal block and it looked perfectly fine.
I tested it with the meter again and it was a constant "Beeeeeep". I turned the lights on and they both worked.
Take it apart, look at it and put it back together again. If only everything in life were so simple.
Given my recent brush with ill health I decided to clean all the moss and stuff from under the bonnet and heater matrix. Knowing my luck I'd contract Legionnaires disease and my French isn't that good.
While I was at it washed the rest of the car for the first time in three months...
...just as well I'm planning a respray next year the grinding sparks and moss have taken their toll on the original paint.
Just needed to check once more before I called it a day...
...I'll put the inner arch trims back on next time.
In Guff II news I retrofitted the original radiator to see how I am going to plum the hoses in place...
...looks fairly straight forward as effectively all I'm doing is bypassing the absent heater matrix. So the pip from the radiator to the matrix can go straight to the engine instead. The car will need two and a half fewer liters of coolant so that's another 2.5 Kg weight saved.
Like this...

...again I see no reason why it shouldn't work. The same way I see no reason when an engine made with the block from one car with the head from another, cam' from a different car and timing gear from three different cars won't work either.
I like to be pessimistic that way I can be either right or pleasantly surprised.
In Fantasia news the final parts (I can think of) are on their way for the M.O.T...
http://www.ebay.co.uk/itm/230865444690?ssPageName=...
...it's open season on brake pipes round here nearly every car I've been told about failing the test has been due to this. The copper pipe on the Panda were replaced a couple of years ago and I'll clean the rubber hoses and connections when I put the inner arch trims back and do the steering rack gaiters.
You know that point where you stop being an owner of a car and become mildly obsessed?
I cleaned the inner arches of my Fantasia today.

Thumbsnap is down at the moment so I'm trying Facebook. Sorry if it doesn't work.
The advantage of having two Pandas came into its own today as the red Panda now has a complete HT circuit. I'll wire up the fuel pump tomorrow but I've been called into work tonight. This has limited my Pandaing as well have having to put the garden fence back up after the storms earlier this month. Pity you can't weld wood.
Metal fence?
I cleaned the inner arches of my Fantasia today.
Thumbsnap is down at the moment so I'm trying Facebook. Sorry if it doesn't work.
The advantage of having two Pandas came into its own today as the red Panda now has a complete HT circuit. I'll wire up the fuel pump tomorrow but I've been called into work tonight. This has limited my Pandaing as well have having to put the garden fence back up after the storms earlier this month. Pity you can't weld wood.
Metal fence?
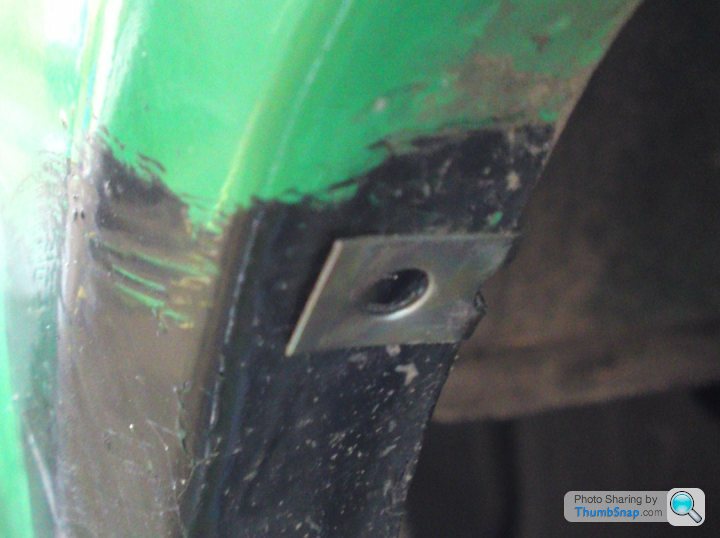
Some more pandaing today. The new steering rack boots arrived in the post so I set about fitting them. Upon inspection I discovered that the ones on the car were fine but leaking due to being fitted hamfistedly with old cable ties. Probably the same six toed doltish divhead who fitted a pair of brake pads and various other bodges I've discovered on this poor car. The sad thing is the husband and wife owners from new either used a Fiat garage (Desira Norwich) or the same local garage that keeps failing cars for £300+ brake pipes.
So the inner arches are finally back on as are the rear trims. Now, because the plastic clips has perished over the years I needed an alternative way of fitting them.
Whenever I buy a set of car speakers I put the cables, screws and mounting thingies in a corner of my shed. There are two reasons for this first; most opportunist thieves carry screw drivers so using the cross headed screws provided would make their lives too easy (any delay increases the chance of kicking the merde out of them) and second if you have a decent stereo and half way decent speakers not having decent cable is like spending thousands of Pounds on a tailor made suit and wearing a Poundland theme tie.
Anyway to get to the point I used some of the mounting thingies...
...screws and some plastic washers.

As far as I can tell the Fantasia is ready for M.O.T and I'll get the old girl booked in for one of my next days off.
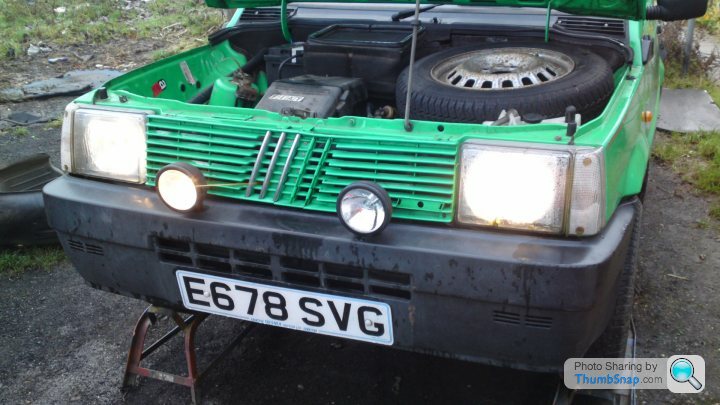
The red Panda is starting to look rude...
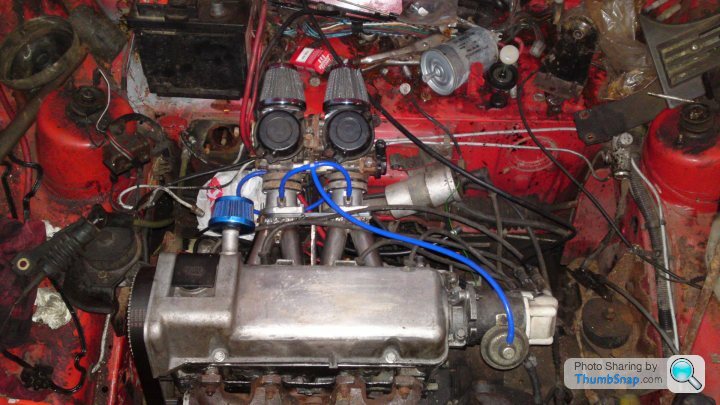
...I'm looking forward to seeing if it blows up.
So the inner arches are finally back on as are the rear trims. Now, because the plastic clips has perished over the years I needed an alternative way of fitting them.
Whenever I buy a set of car speakers I put the cables, screws and mounting thingies in a corner of my shed. There are two reasons for this first; most opportunist thieves carry screw drivers so using the cross headed screws provided would make their lives too easy (any delay increases the chance of kicking the merde out of them) and second if you have a decent stereo and half way decent speakers not having decent cable is like spending thousands of Pounds on a tailor made suit and wearing a Poundland theme tie.
Anyway to get to the point I used some of the mounting thingies...
...screws and some plastic washers.
As far as I can tell the Fantasia is ready for M.O.T and I'll get the old girl booked in for one of my next days off.
The red Panda is starting to look rude...
...I'm looking forward to seeing if it blows up.

Anyone hoping for a Christmas miracle?
I was thinking the Fire Service would be less busy so...
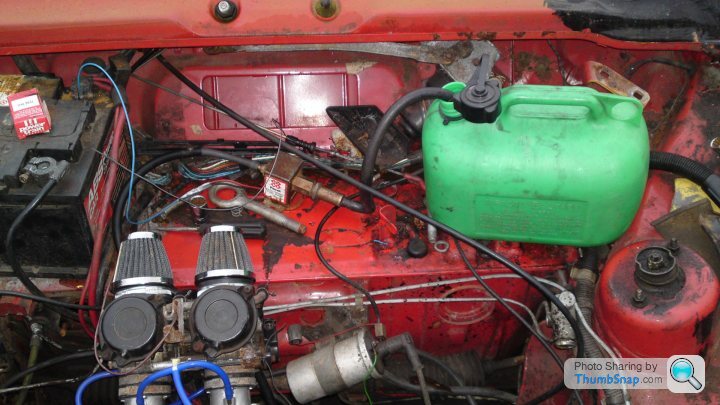
...tank and pump installed temporarily.
Primed and there was a bit of leakage from the carb's. In a urinating out of the float chambers kind of way. So either the floats are porous or the seals are gone.

A minor set back, fuel going in means the carb's should at least work-ish so I continued. I locked the choke open and the starter motor couldn't turn the engine quick enough for the engine to run. Then this happened...
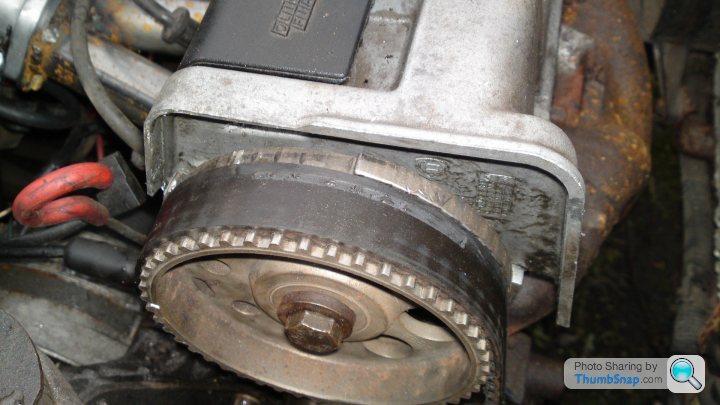
...the timing belt skipped off the adjuster and wedged itself between the cam' pulley and...
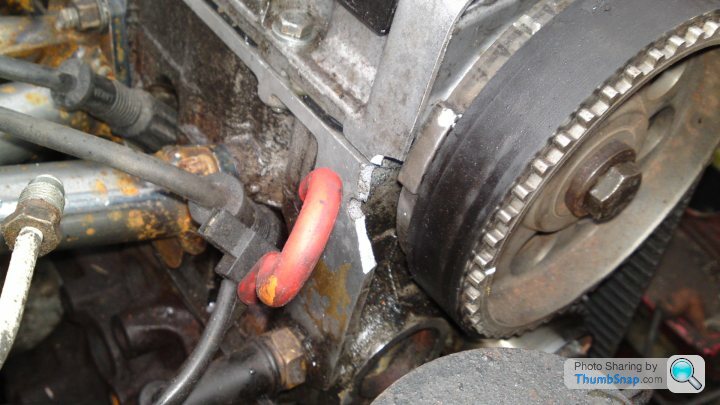
...block.
I re-aligned the timing and tried again with a booster battery to speed the cranking over up. Still nothing. The engine doesn't turn over quick enough and I don't think the engine is making enough of a vacuum for the fuel to reach the cylinders properly.
Back to the drawing board.
I was thinking the Fire Service would be less busy so...
...tank and pump installed temporarily.
Primed and there was a bit of leakage from the carb's. In a urinating out of the float chambers kind of way. So either the floats are porous or the seals are gone.
A minor set back, fuel going in means the carb's should at least work-ish so I continued. I locked the choke open and the starter motor couldn't turn the engine quick enough for the engine to run. Then this happened...
...the timing belt skipped off the adjuster and wedged itself between the cam' pulley and...
...block.
I re-aligned the timing and tried again with a booster battery to speed the cranking over up. Still nothing. The engine doesn't turn over quick enough and I don't think the engine is making enough of a vacuum for the fuel to reach the cylinders properly.
Back to the drawing board.
Okay I got bored. Ben Hur must be seven hours bloody long. Anyway I wanted to get to the carb' issue as whatever FIRE engine is going in the car they will be part of it.
So I clamped to opened the float chambers will a little trepidation. Justifiably so when I discovered this...
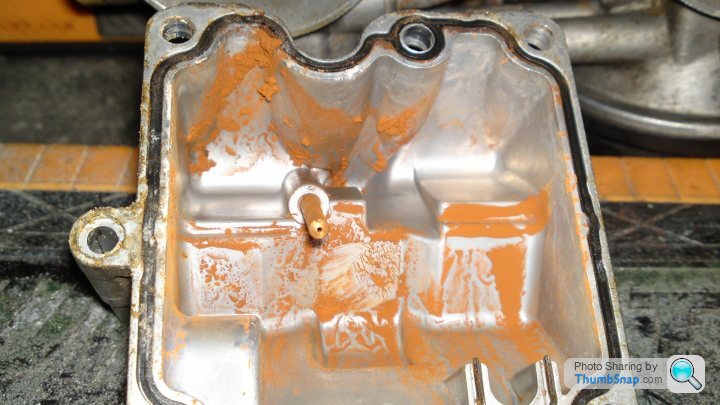
...it looks like Radweld but it actually rust from the inside of the bikes tank. The pillock who owned the bike must have ran the poor thing without a fuel filter.
Okay to test the floats is basically the same as any ballcock. You simply immerse it in water...

...and check for bubbles. At the same time soak the old gasket so it's easier to clean any oxide off it before reassembly. I will replace them when the payday fairies allow it.
Now to test the float valve. Gently blow into the inlet...
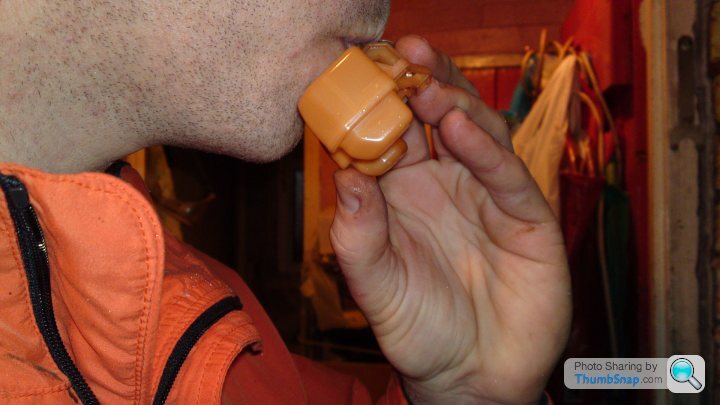
...and wiggle the float up and down to check it seals airtight. No problems with either so I just needed to clean the rust and crap out.
I recommend one of these...
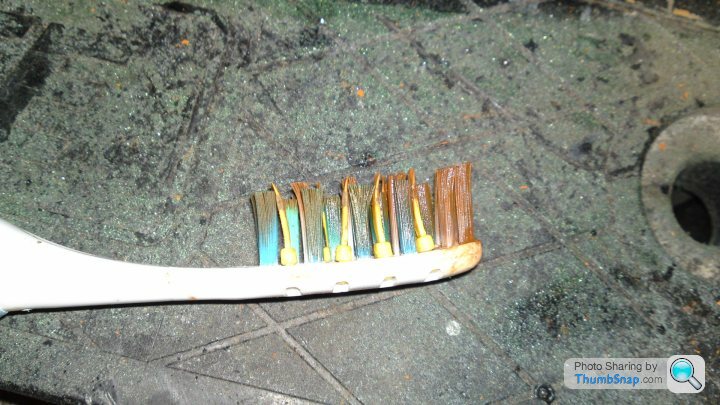
...an old Oral B Plaque remover. The different length bristles get into places you can't with a conventional flat brush and the flaps make light work of heavy deposits.

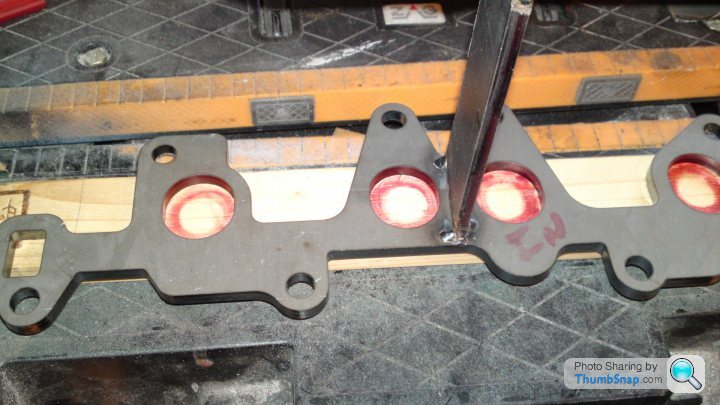
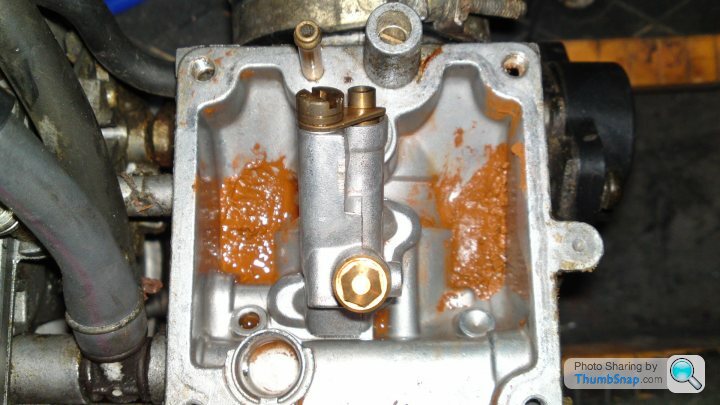
That's better. I also blew through the main pick and jets to make sure they weren't blocked. The butterflies and diaphragm valves are all happy as well.
Now the other side...

...bugger! It's always the last screw.
Drilled the head off...

...went through the same process as the other side and replaced the knackered screw with an Allen bolt.

That's one issue eliminated.
So I clamped to opened the float chambers will a little trepidation. Justifiably so when I discovered this...
...it looks like Radweld but it actually rust from the inside of the bikes tank. The pillock who owned the bike must have ran the poor thing without a fuel filter.
Okay to test the floats is basically the same as any ballcock. You simply immerse it in water...
...and check for bubbles. At the same time soak the old gasket so it's easier to clean any oxide off it before reassembly. I will replace them when the payday fairies allow it.
Now to test the float valve. Gently blow into the inlet...
...and wiggle the float up and down to check it seals airtight. No problems with either so I just needed to clean the rust and crap out.
I recommend one of these...
...an old Oral B Plaque remover. The different length bristles get into places you can't with a conventional flat brush and the flaps make light work of heavy deposits.
That's better. I also blew through the main pick and jets to make sure they weren't blocked. The butterflies and diaphragm valves are all happy as well.
Now the other side...
...bugger! It's always the last screw.
Drilled the head off...
...went through the same process as the other side and replaced the knackered screw with an Allen bolt.
That's one issue eliminated.
The lack of vacuum in the manifold is because I'm using a 16V block with an 8V head. I did this to drop the compression ratio as I was going to supercharge the engine initially. Now I'm running bike carb's instead I need the vacuum created by an engine running standard compression.
Apart from being indecisive I think my main problem is I procrastinate.
Apart from being indecisive I think my main problem is I procrastinate.
Gassing Station | Alfa Romeo, Fiat & Lancia | Top of Page | What's New | My Stuff