Bolt head sheared off and spinning rivnut - advice?
Discussion


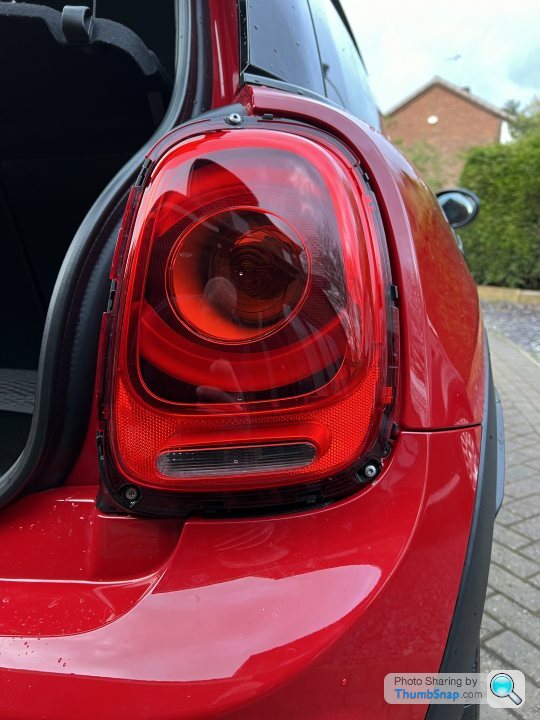
F56 Mini 2016
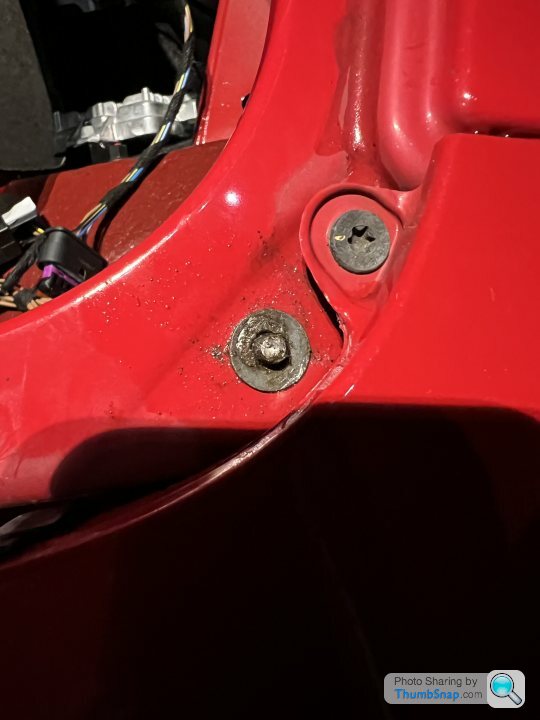
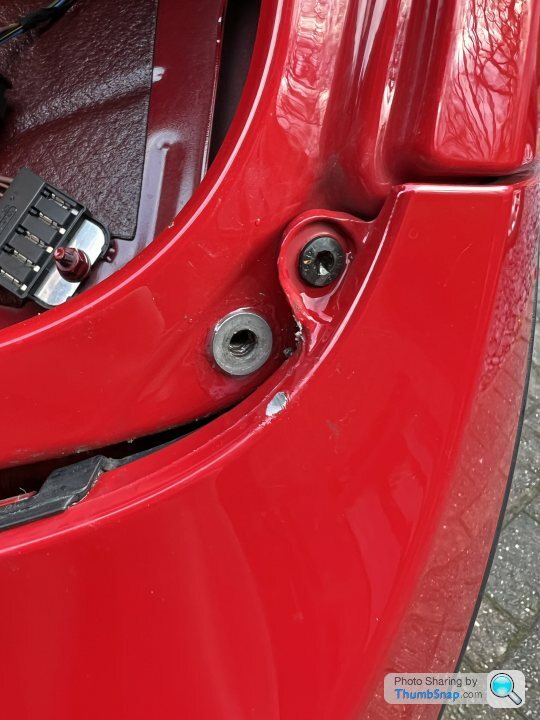
Bulb change turned into a nightmare - lack of access in boot resulting in removing rear light which resulted in one of the bolt heads sheering off.
It’s seized in solid - attempted a socket on the rear of the bolt assembly before realising it’s a rivnut.
The result is a free spinning rivnut that lets water through along with water through both the gasket on the rear of the assembly due to lack of compression along with through the rivnut area itself.
Meaning a swimming pool in the boot - *** 🤦🏼
Tried penetrating oil in the thread plus vice grips on the thread and a socket on the rivnut - resulting in a rivnut with no compression to the panel and a partially exposed bolt shaft with all the threads chewed up. It’s on a thin painted section near the bumper so can’t heat it up.
Any thoughts from PHers fountain of knowledge to help would be most appreciated at this stage. Either on suggestions to DIY or garages to reach out to who can replace/ repair.
Can you get mole grips on the rear of the riv nut or needle nosed pliers on the front to stop the riv nut spinning? Don’t go mad with the mole grips and crush to the point the thread won’t turn.
Roughly where are you based? I have a riv nut tool to set a new one in there.
You may be able to jam a flat head screw driver under it and lift to lock it off enough to stop it turning, then use grips on the broken thread.
Roughly where are you based? I have a riv nut tool to set a new one in there.
You may be able to jam a flat head screw driver under it and lift to lock it off enough to stop it turning, then use grips on the broken thread.
Edited by Caddyshack on Saturday 16th March 08:25
Caddyshack said:
Can you get mole grips on the rear of the riv nut or needle nosed pliers on the front to stop the riv nut spinning? Don’t go mad with the mole grips and crush to the point the thread won’t turn.
Roughly where are you based? I have a riv nut tool to set a new one in there.
You may be able to jam a flat head screw driver under it and lift to lock it off enough to stop it turning, then use grips on the broken thread.
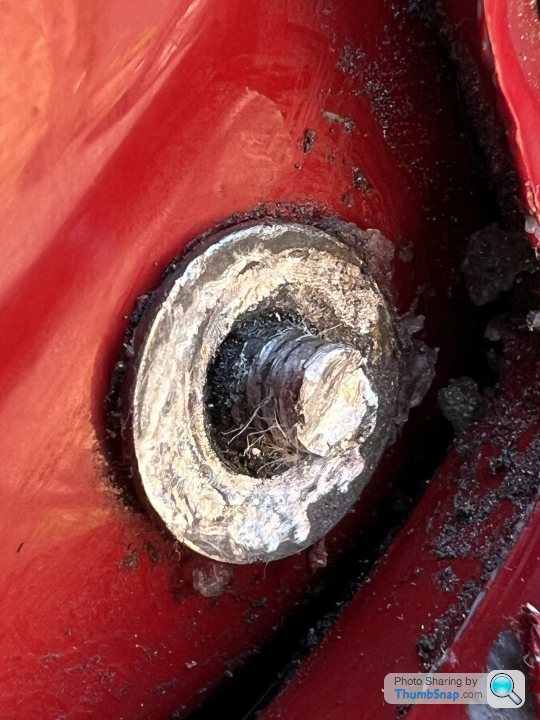
A socket fits over the rivnut itself but the bolt shaft is so seized that it refuses to loosen at all. In effect the whole thing spins and can be moved by hand so very loose.Roughly where are you based? I have a riv nut tool to set a new one in there.
You may be able to jam a flat head screw driver under it and lift to lock it off enough to stop it turning, then use grips on the broken thread.
Edited by Caddyshack on Saturday 16th March 08:25
Pretty chewed up now from various attempts to grip.
I’m in Derby but willing to travel of course - very generous of you

normalbloke said:
If you’re any good with a powerfile, you could remove that with no damage to the paint, I’ve done similar before. It’d mean putting in a new rivnut of course. Oh, and access to a powerfile.
I do wonder if a dremel carefully used would be successful.The problem being of course, even through some miracle I was able to remove it, there will be a gaping hole there, and the rivets I’ve seen seem to be open ended rather than sealed meaning water ingress through the thread?
Feel like it’s a lost cause at the minute and dreading the next rain shower - all over a damned rivet and seized bolt!
Drill a small hole through the rivnut as close to the outer edge as you can without breaking through. Put a screw or nail through it. This will stop the rivnut spinning freely as long as you don't go overboard on it.
File the exposed end of the snapped-off bolt flat. Gently center punch and then drill a small hole down the center of it as straight as you can. Work up to successively bigger drills until you have drilled through the side of the rivnut. Then remove the rivnut.
You will need to replace the rivnut in any case. If you can access the back of it, you could use an ordinary nut and bolt with washers temporarily to seal things while you organise that.
Or drive it to a local back street garage and pay £20 cash for somebody to do it while you wait.
gex23 said:
normalbloke said:
If you’re any good with a powerfile, you could remove that with no damage to the paint, I’ve done similar before. It’d mean putting in a new rivnut of course. Oh, and access to a powerfile.
I do wonder if a dremel carefully used would be successful.The problem being of course, even through some miracle I was able to remove it, there will be a gaping hole there, and the rivets I’ve seen seem to be open ended rather than sealed meaning water ingress through the thread?
Feel like it’s a lost cause at the minute and dreading the next rain shower - all over a damned rivet and seized bolt!
Edited by normalbloke on Saturday 16th March 20:56
Edited by normalbloke on Saturday 16th March 20:56
gex23 said:
The problem being of course, even through some miracle I was able to remove it, there will be a gaping hole there, and the rivets I’ve seen seem to be open ended rather than sealed meaning water ingress through the thread?
You are definitely over-thinking this.Try any of the methods suggested or some variation and you will get the old one out.
A standard rivnut put in with epoxy/silicone around the bodywork under the rivnut head will take car of sealing external to the thread, when you fit the bolt/screw back in use some grease on the thread & that will stop it seizing & waterproof the thread.
An update on this.
I ordered OE capped rivet nuts and lens screws, somewhat deluding myself into sorting this myself.
Part numbers for reference in case anyone else requires this in the future:
- Blindrivet nut - 07147411141
- Lens screw - 07146977741
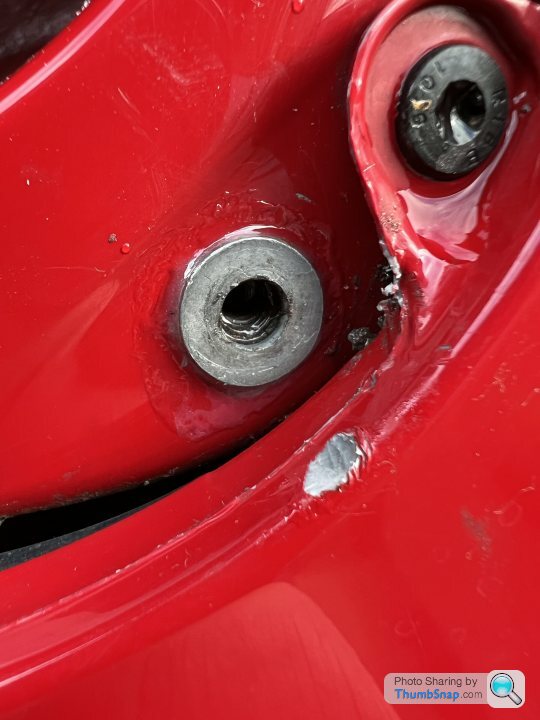
Waiting for a bit of dry weather, yesterday had a brief dry morning - proceeded to use a Dremel and tungsten carbide but to slowly file the collar away - until the bottom half dropped off - siezed bolt and all.
A little damage to paint surface directly under rivet collar (covered by a new rivet and epoxy) and a little to the bumper.
Attempted to install the new rivet using a rivnut tool - but the mandrel was too wide for the install location - fouling on the bumper.
A DIY tool was made using an 80mm M5 bolt, M5 coupler and some M6 washers.
Cue two idiots (me and my Dad), holding the rivet in place, a socket, spanner and a few choice curse words - the rivet looked like it was somewhat secured (the surface was a little less then flat due to what I assume was compression from the initial rivet installation).
This was covered in a little epoxy using a fine art paintbrush and left to cure followed by the light cluster being reinstalled with three new OE screws.
Today a water test and a lot of anxiety later, I can’t see any water ingress so far so that’s a positive.
I ordered OE capped rivet nuts and lens screws, somewhat deluding myself into sorting this myself.
Part numbers for reference in case anyone else requires this in the future:
- Blindrivet nut - 07147411141
- Lens screw - 07146977741
Waiting for a bit of dry weather, yesterday had a brief dry morning - proceeded to use a Dremel and tungsten carbide but to slowly file the collar away - until the bottom half dropped off - siezed bolt and all.
A little damage to paint surface directly under rivet collar (covered by a new rivet and epoxy) and a little to the bumper.
Attempted to install the new rivet using a rivnut tool - but the mandrel was too wide for the install location - fouling on the bumper.
A DIY tool was made using an 80mm M5 bolt, M5 coupler and some M6 washers.
Cue two idiots (me and my Dad), holding the rivet in place, a socket, spanner and a few choice curse words - the rivet looked like it was somewhat secured (the surface was a little less then flat due to what I assume was compression from the initial rivet installation).
This was covered in a little epoxy using a fine art paintbrush and left to cure followed by the light cluster being reinstalled with three new OE screws.
Today a water test and a lot of anxiety later, I can’t see any water ingress so far so that’s a positive.
Gassing Station | Home Mechanics | Top of Page | What's New | My Stuff