The big bike stripdown
Discussion


So after months of just putting up with my bike jumping out of second gear I've finally got my arse in gear (ah-ha!) and have begun the big task to strip it down and hopefully resolve the problem. I spent most of yesterday in the garage at my parents' with my trusty old dad & and Haynes manual. I took some photos as I went along as it's the first time I've attempted anything like this and I found it all quite interesting, and thought maybe some of you guys would too if you've never seen what goes into stripping a bike down, or what a gutted bike looks like!
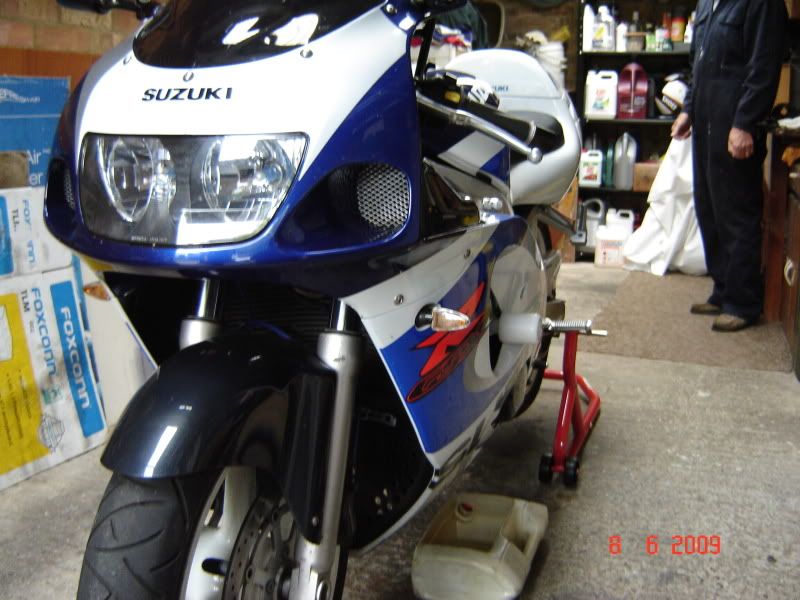
So here's the bike at the start, up on the paddock stand with oil-collecting-tub at the ready (I apologise for crappy photos by the way, I'm no photographer!)
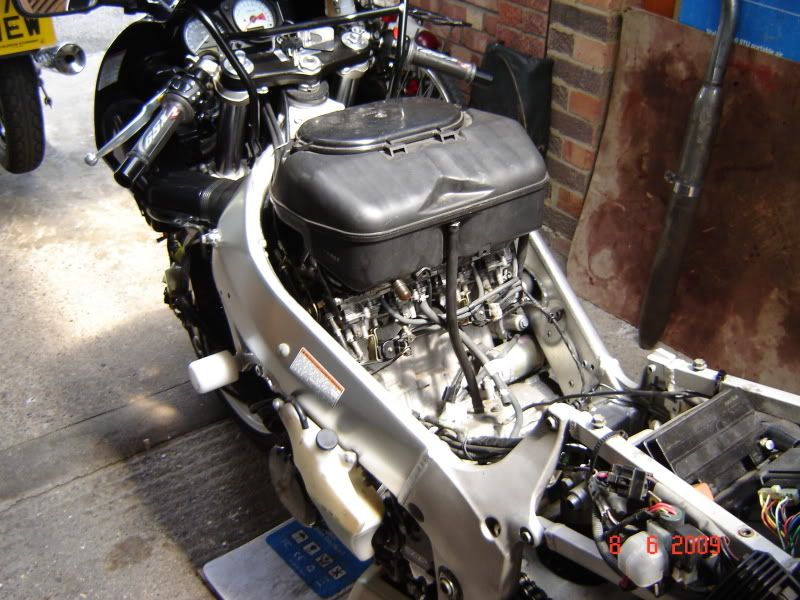
First job was to drain the oil out and take off the fairings and tank leaving it like this:
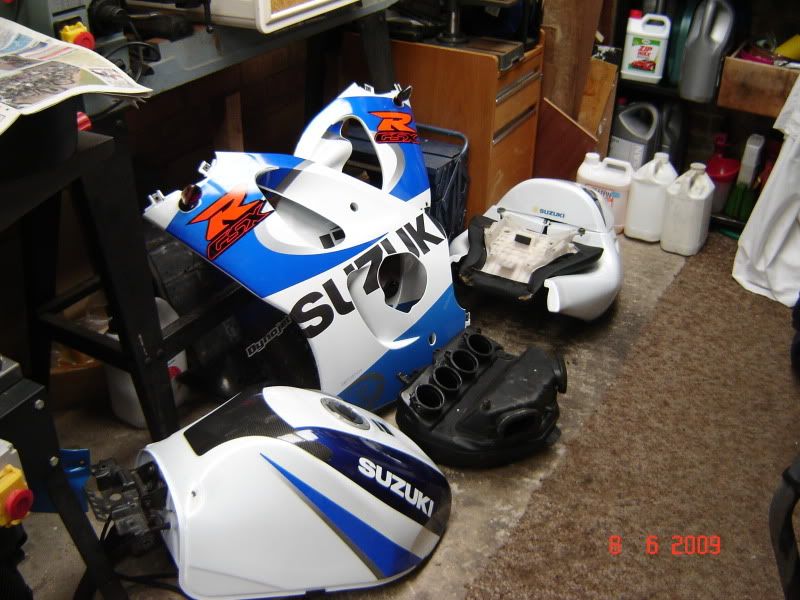
Nice pile of stuff:
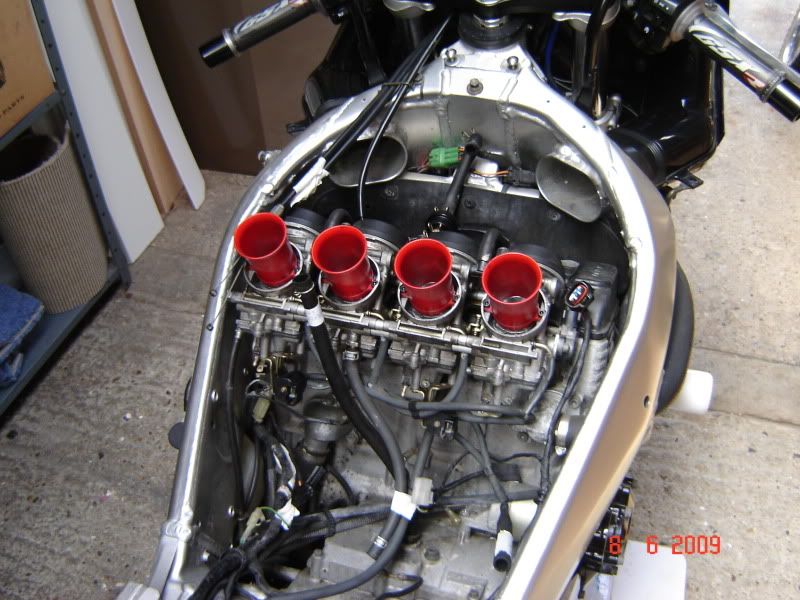
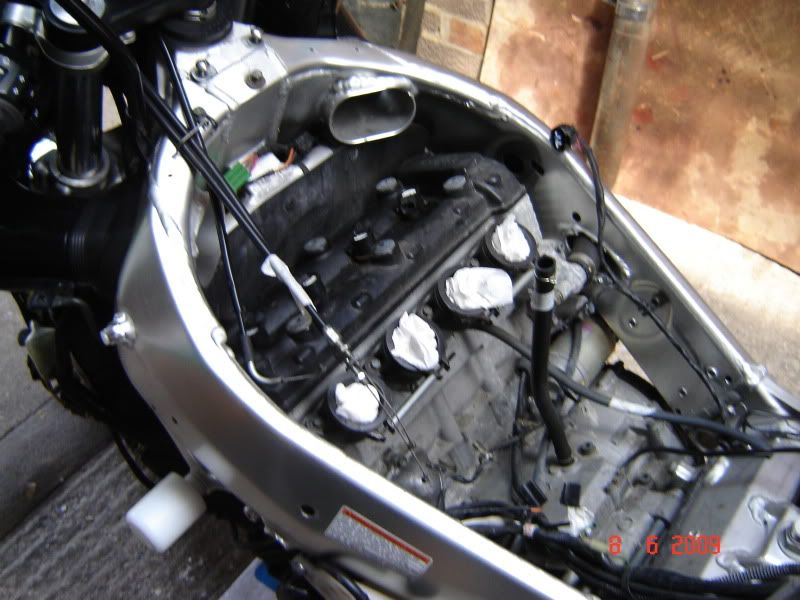
All good so far, bit of fiddling around figuring out how to get everything off, but nothing too taxing. Then the airbox came off revealing the carbs/trumpets/throttle bodies. Getting a bit scary now, a few technical bits which I don't fully understand! I played around with the twist grip and saw how it all worked with the butterfly valves and all that jazz, pretty intersting, quite clever how the carbs work really:
Then the carbs came off, which was a bit of a task. There's quite a lot of electrical stuff involved, which I didn't realise, carb heaters and things. So we unplugged all that (and labelled it all as I guarantee I'd not have a clue where they'd go again otherwise!). Then had to undo clips around the inlet manifold which was a bit strange - I finally found out what the holes in the frame on the side of the bike with the rubber plugs in are for (which you can see in the pic a couple above just in front of the white & orange sticker) - they're they to allow you to stick a screwdriver through to undo the clips! The manifold was pretty interesting too, 4 holes, but they split into 2 each, one for each valve (which you can see down the holes), so that was pretty cool. Jammed them up with some paper towel to stop stuff falling inside the cylinders:
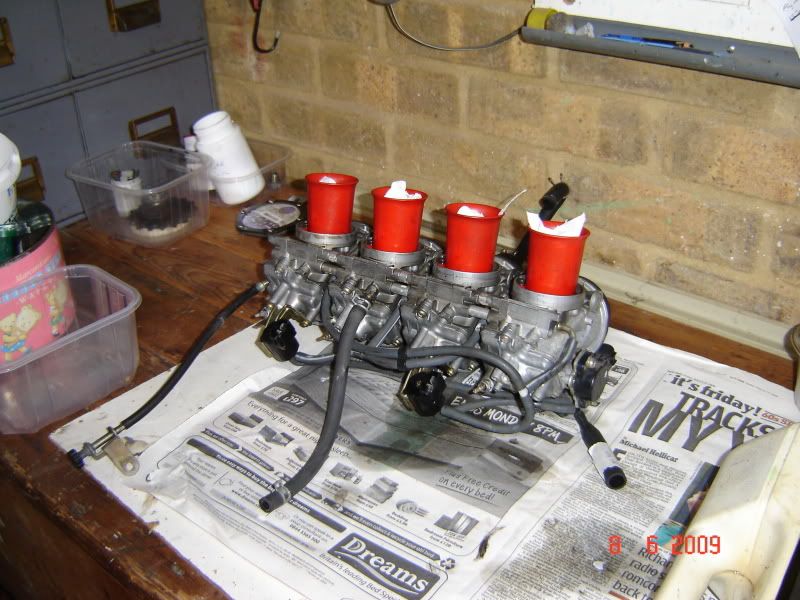
The carbs on the bench:
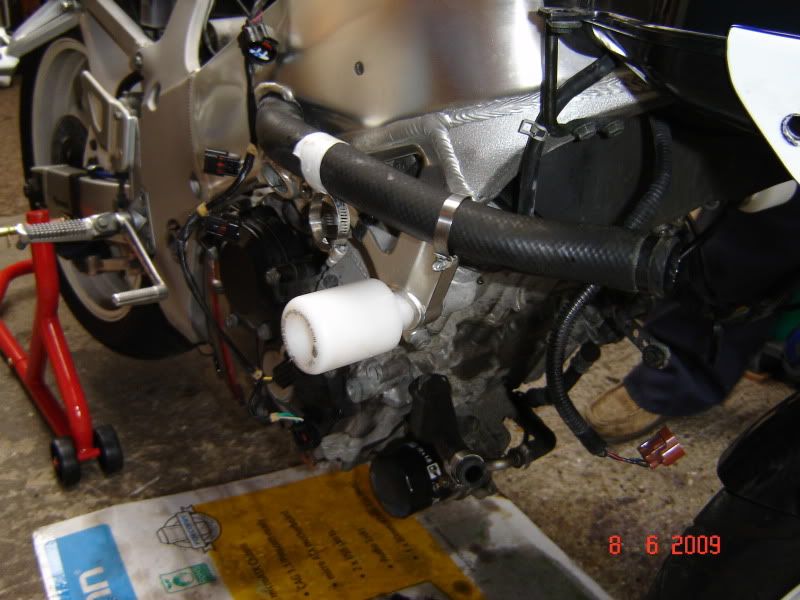
Next job was to get the exhaust off, so we had a look at the downpipes before realising that the bolts were a bit rusted into the block
(they're pretty exposed to the elements there). So we gave them a good dousing with WD40 and left it for a bit whilst we had a go at taking off the radiator. This largely involved spilling antifreezey water all over the garage floor. You undo one hose clip, with a tub underneath, and then it would all pee out of the hose you'd just drained a minute ago! Had to undo a lot of electrical stuff again (fans and thermostats etc) and then had a go at undoing the downpipe bolts. For some reason (anyone know?!) they were of the type you undo with an allen key, so it was a bit fiddly and we had to put a tube over the end of the key to get more leverage, which was pretty difficult really as there's not much space down there! Anyway, this is what it was like after the radiator and exhaust was off:
Then we had to start undoing all the bits of wiring that were still attached to the engine. This was a massive pain in the arse! I bloody hate undoing electrical clips, they always kill my thumbs! You have to push down on little plastic clips with one hand, but you need two more hands to pull the two bits apart, which isn't easy even if you have 3 hands, cos the clips are too bloody small to get a grip on! So we spent 10 minutes of breaking finger nails and swearing, then contemplating just avoiding the connectors and cutting the wires, before finally a screwdriver aided us in detaching them. Forgot to get a photo of all the electrics, but you can see some of the wires in the other photos.
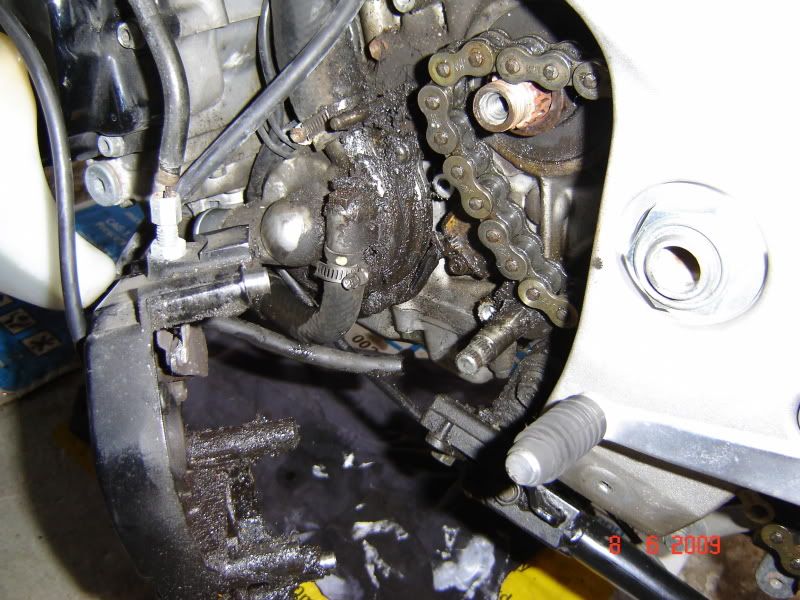
Then we had to get the front sprocket off, so the cover came off to reveal a mass of oily crap, which was nice. We cleaned this up a bit, then set upon the task of undoing the sprocket (hint: use the rear brake to hold it still whilst undoing). Then we discovered there wasn't enough room to get the bloody thing off! We had to adjust the chain tension to loosen it and then take the chain off the rear sprocket, which allowed us to then take it off the front sprocket, and take the sprocket off comme ca:
We called it a day at this point, next step is to drop the engine, which I'll hopefully be attempting on Friday.
Hope this was at least slightly interesting to a couple of people, it seems a bit longer than I'd intended!
So here's the bike at the start, up on the paddock stand with oil-collecting-tub at the ready (I apologise for crappy photos by the way, I'm no photographer!)
First job was to drain the oil out and take off the fairings and tank leaving it like this:
Nice pile of stuff:
All good so far, bit of fiddling around figuring out how to get everything off, but nothing too taxing. Then the airbox came off revealing the carbs/trumpets/throttle bodies. Getting a bit scary now, a few technical bits which I don't fully understand! I played around with the twist grip and saw how it all worked with the butterfly valves and all that jazz, pretty intersting, quite clever how the carbs work really:
Then the carbs came off, which was a bit of a task. There's quite a lot of electrical stuff involved, which I didn't realise, carb heaters and things. So we unplugged all that (and labelled it all as I guarantee I'd not have a clue where they'd go again otherwise!). Then had to undo clips around the inlet manifold which was a bit strange - I finally found out what the holes in the frame on the side of the bike with the rubber plugs in are for (which you can see in the pic a couple above just in front of the white & orange sticker) - they're they to allow you to stick a screwdriver through to undo the clips! The manifold was pretty interesting too, 4 holes, but they split into 2 each, one for each valve (which you can see down the holes), so that was pretty cool. Jammed them up with some paper towel to stop stuff falling inside the cylinders:
The carbs on the bench:
Next job was to get the exhaust off, so we had a look at the downpipes before realising that the bolts were a bit rusted into the block
(they're pretty exposed to the elements there). So we gave them a good dousing with WD40 and left it for a bit whilst we had a go at taking off the radiator. This largely involved spilling antifreezey water all over the garage floor. You undo one hose clip, with a tub underneath, and then it would all pee out of the hose you'd just drained a minute ago! Had to undo a lot of electrical stuff again (fans and thermostats etc) and then had a go at undoing the downpipe bolts. For some reason (anyone know?!) they were of the type you undo with an allen key, so it was a bit fiddly and we had to put a tube over the end of the key to get more leverage, which was pretty difficult really as there's not much space down there! Anyway, this is what it was like after the radiator and exhaust was off:
Then we had to start undoing all the bits of wiring that were still attached to the engine. This was a massive pain in the arse! I bloody hate undoing electrical clips, they always kill my thumbs! You have to push down on little plastic clips with one hand, but you need two more hands to pull the two bits apart, which isn't easy even if you have 3 hands, cos the clips are too bloody small to get a grip on! So we spent 10 minutes of breaking finger nails and swearing, then contemplating just avoiding the connectors and cutting the wires, before finally a screwdriver aided us in detaching them. Forgot to get a photo of all the electrics, but you can see some of the wires in the other photos.
Then we had to get the front sprocket off, so the cover came off to reveal a mass of oily crap, which was nice. We cleaned this up a bit, then set upon the task of undoing the sprocket (hint: use the rear brake to hold it still whilst undoing). Then we discovered there wasn't enough room to get the bloody thing off! We had to adjust the chain tension to loosen it and then take the chain off the rear sprocket, which allowed us to then take it off the front sprocket, and take the sprocket off comme ca:
We called it a day at this point, next step is to drop the engine, which I'll hopefully be attempting on Friday.
Hope this was at least slightly interesting to a couple of people, it seems a bit longer than I'd intended!
Chilli said:
Erm, jumoing out of gear right? I guess the goal is to get to the gearbox and you have to do all this first?!
normal way into the gearbox is engine out & turn it upside down. gearbox is accessed via the sump.good luck & keep track of all the nuts n bolts & where they came from. damn good feeling of achivement when its back together & working.
Cheers guys (and gal), I've only ever really done a couple of small jobs before, so this is a bit of a leap! Having said that though, I reckon so far pretty much anyone could have done it if they had a Haynes manual! A couple of bits I'd possibly have struggled with without my Dad, but most of it so far was just undoing stuff!
And yep, all this just to change a couple of small components in the gearbox! I got a couple of quotes from some places to see how much they'd charge to do it, and they came back with £6-700 so I thought I'd give it a go instead as most of the charge is labour apparently. I think we might need to take the actual gearbox to a mechanic when we've separated it, depends how brave we feel!
I'll take some more piccies on Friday and we can see how far we progress...
And yep, all this just to change a couple of small components in the gearbox! I got a couple of quotes from some places to see how much they'd charge to do it, and they came back with £6-700
so I thought I'd give it a go instead as most of the charge is labour apparently. I think we might need to take the actual gearbox to a mechanic when we've separated it, depends how brave we feel!I'll take some more piccies on Friday and we can see how far we progress...


Hooli said:
Chilli said:
Erm, jumoing out of gear right? I guess the goal is to get to the gearbox and you have to do all this first?!
normal way into the gearbox is engine out & turn it upside down. gearbox is accessed via the sump.good luck & keep track of all the nuts n bolts & where they came from. damn good feeling of achivement when its back together & working.
we've got lots of little tubs on the workbench with "left fairing", "right fairing", "carbs" etc written on them, but I know we'll end up with either too many or not enough bolts at the end!Nice job - going to enjoy this thread!
- HINT* - WD40 is not that effective compared to proper Penetrating spray oil (such as that made by 3 in 1 and available from Halfords)at freeing seized bolts. I read somewhere that penetrating oil is up to 3 x as effective as WD40 and I've certainly had good results with it.
Chilli said:
mitzy said:
Chilli said:
mitzy said:
Want the next installment.
love looking at pics of dirty men.
Oh, for God's sake!love looking at pics of dirty men.

Op would love to se pics of the gearbox and where it sits etc...
Maybe I'll get some pics of my dirty hands in the next lot too if you're lucky.


Gassing Station | Biker Banter | Top of Page | What's New | My Stuff