Russian brig Mercury - new kit
Discussion


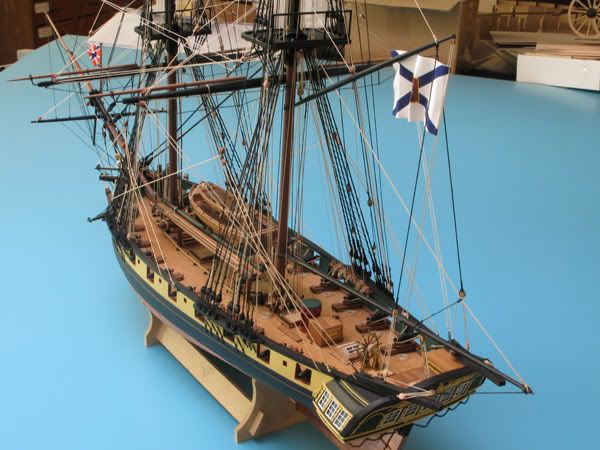
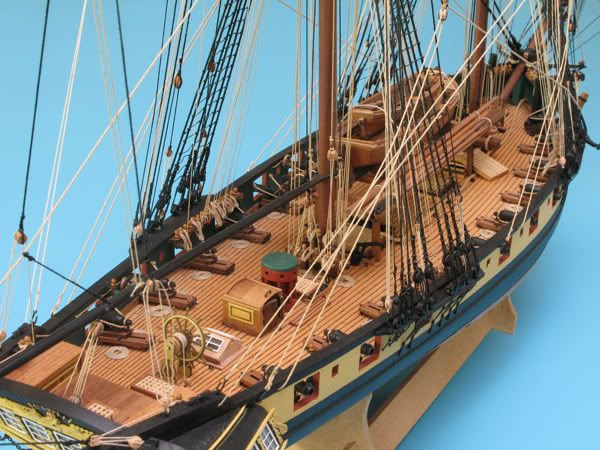
Just thought I'd show you a model I have just finished developing - I am so happy I can now move onto another project!
A little about the subject;
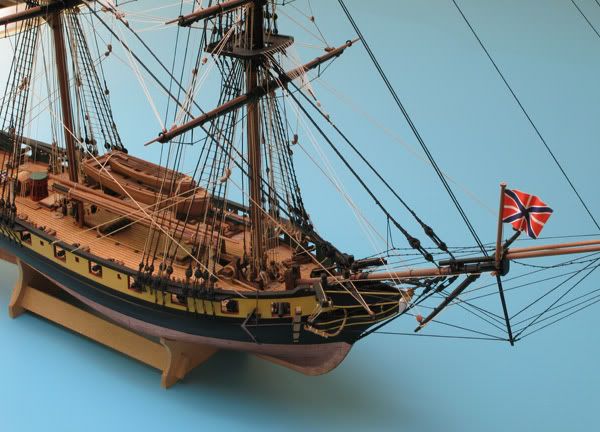
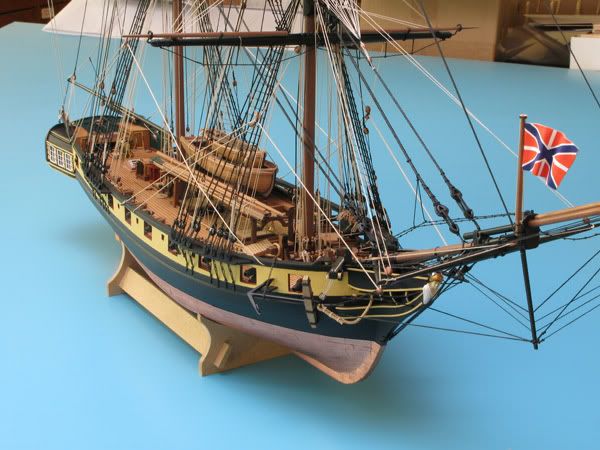
The Russian 20 gun brig Mercury was laid down in Sevastopol on January 28, 1819. She was designed as a patrol ship to guard the Northern Caucasus coast. Built of Crimean oak, with a shallow draught and equipped with oars, the Mercury was launched on 7 May 1820 and broken up on November 9, 1857.
The Mercury fought in many important naval battles during her career; the most notable being a battle between the Mercury (commanded by lieutenant A. Kazarsky) and two other brigs against a whole fleet fourteen Turkish ships, who were returning from the shores of Anatolia. The Turkish fleet were in no doubt who would be the victors in this mis-matched battle, but they did not take into account the sheer heroism and determination of the smaller Russian fleet, The Mercury was able to escape after a final and very powerful assault by the three brigs, ending the conflict.
It is recorded that after the battle, a navigator of one the Turkish ships made a comment praising Mercury for her gallantry and strength, and the captain for his bravery;
“If in the great deeds of ancient or our times there are the feats of bravery, so this act put the others in the shade and the name of a hero should be wrote by the gold letter in the shrine of glory: the captain was Kazarsky, and the name of this brig was “Mercury””
Scale – 1:64
Length overall – 860mm
Height overall – 654mm

Chris
A little about the subject;
The Russian 20 gun brig Mercury was laid down in Sevastopol on January 28, 1819. She was designed as a patrol ship to guard the Northern Caucasus coast. Built of Crimean oak, with a shallow draught and equipped with oars, the Mercury was launched on 7 May 1820 and broken up on November 9, 1857.
The Mercury fought in many important naval battles during her career; the most notable being a battle between the Mercury (commanded by lieutenant A. Kazarsky) and two other brigs against a whole fleet fourteen Turkish ships, who were returning from the shores of Anatolia. The Turkish fleet were in no doubt who would be the victors in this mis-matched battle, but they did not take into account the sheer heroism and determination of the smaller Russian fleet, The Mercury was able to escape after a final and very powerful assault by the three brigs, ending the conflict.
It is recorded that after the battle, a navigator of one the Turkish ships made a comment praising Mercury for her gallantry and strength, and the captain for his bravery;
“If in the great deeds of ancient or our times there are the feats of bravery, so this act put the others in the shade and the name of a hero should be wrote by the gold letter in the shrine of glory: the captain was Kazarsky, and the name of this brig was “Mercury””
Scale – 1:64
Length overall – 860mm
Height overall – 654mm
Chris
Cheers 
I must emphasize that I didn't post the pics to show off, after all, it's my job, and there are others who do equally well in their line of work - I just thought I'd share the pics..
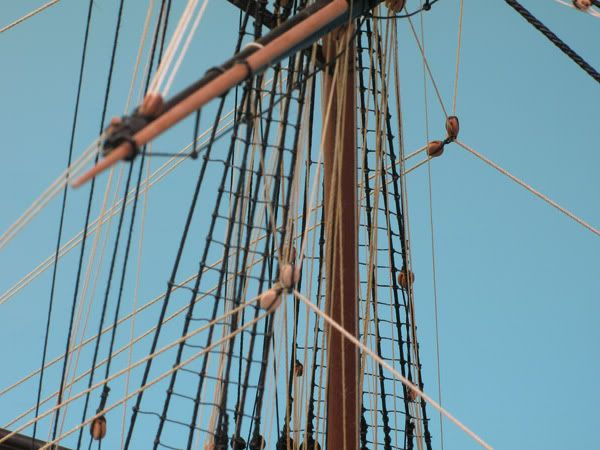
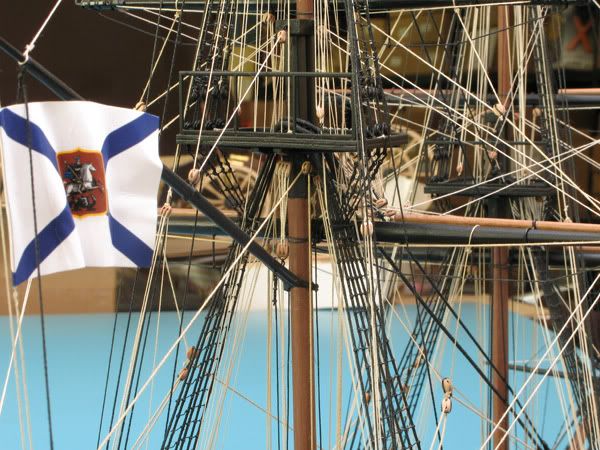
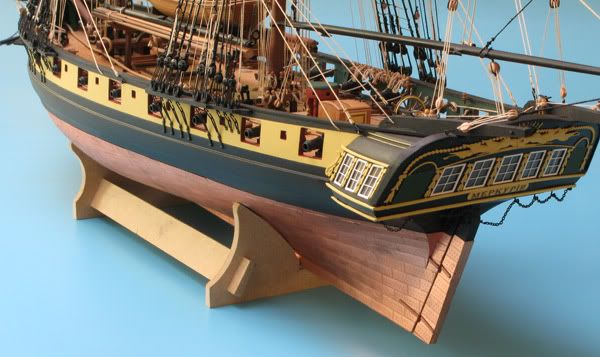
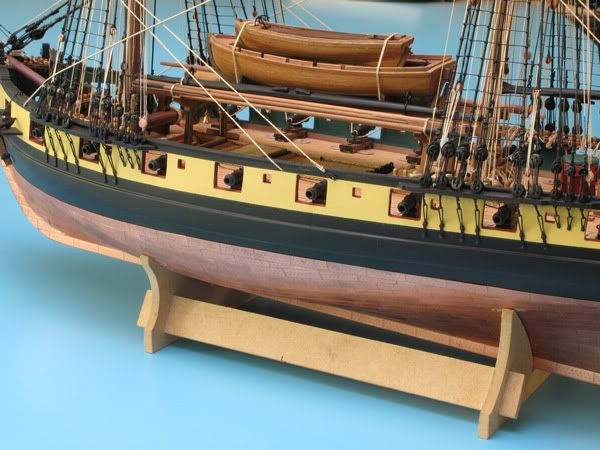
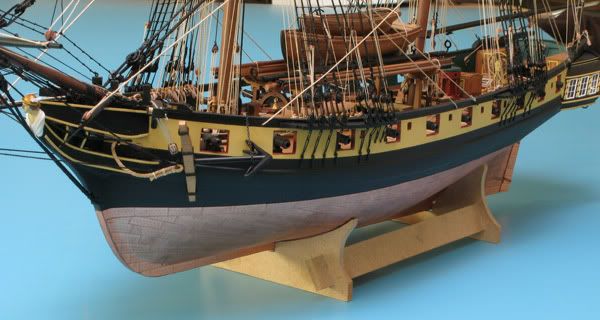
The copper bottom is actually photo etched parts, individual scale copper plates, complete with etched nail detail (500 per side - larger ships can have up to 1500 per side..) The hull is made up of laser cut keel and frames, and is double planked, forst with lime wood, followed by walnut planking strips. The details, sand stern decoration are photo etched (The decoration is triple layered, and took ages to design!) There are 12 sizes of rigging thread and a lot of CNC cut real pear wood blocks. The longest job is actually drawings all the construction steps, so the modeller can build it without much problem..
I must emphasize that I didn't post the pics to show off, after all, it's my job, and there are others who do equally well in their line of work - I just thought I'd share the pics..
The copper bottom is actually photo etched parts, individual scale copper plates, complete with etched nail detail (500 per side - larger ships can have up to 1500 per side..) The hull is made up of laser cut keel and frames, and is double planked, forst with lime wood, followed by walnut planking strips. The details, sand stern decoration are photo etched (The decoration is triple layered, and took ages to design!) There are 12 sizes of rigging thread and a lot of CNC cut real pear wood blocks. The longest job is actually drawings all the construction steps, so the modeller can build it without much problem..
chris watton said:
Cheers
I must emphasize that I didn't post the pics to show off, after all, it's my job, and there are others who do equally well in their line of work - I just thought I'd share the pics..
The copper bottom is actually photo etched parts, individual scale copper plates, complete with etched nail detail (500 per side - larger ships can have up to 1500 per side..) The hull is made up of laser cut keel and frames, and is double planked, forst with lime wood, followed by walnut planking strips. The details, sand stern decoration are photo etched (The decoration is triple layered, and took ages to design!) There are 12 sizes of rigging thread and a lot of CNC cut real pear wood blocks. The longest job is actually drawings all the construction steps, so the modeller can build it without much problem..
Chris,I must emphasize that I didn't post the pics to show off, after all, it's my job, and there are others who do equally well in their line of work - I just thought I'd share the pics..
The copper bottom is actually photo etched parts, individual scale copper plates, complete with etched nail detail (500 per side - larger ships can have up to 1500 per side..) The hull is made up of laser cut keel and frames, and is double planked, forst with lime wood, followed by walnut planking strips. The details, sand stern decoration are photo etched (The decoration is triple layered, and took ages to design!) There are 12 sizes of rigging thread and a lot of CNC cut real pear wood blocks. The longest job is actually drawings all the construction steps, so the modeller can build it without much problem..
It looks a beautiful model. Must take a lot of skill not only to build to that standard, but to actually make the kit!
After visiting the Hamburg Maritime Museum a couple of times and talking to the guys in the model department (have you ever been? It's incredible!), I decided to finish my old Airfix Victory. It's plastic, and took ages to finish due the usual rubbish Airfix quality. I would love to build a wooden kit like yours - but there are so many to choose from. I like the tall ships like Cutty Sark and Gorch Foch, but I realise these models would represent a huge investment in time. Any suggestions?


Cheers
Great job on your Victory - the stern looks really good! it was the Airfix model of Victory that started me model making again, in the early 90's. Once I made that (I cut the bottom off, sculpted a sea from Polyfilla and painted it, and put it on a B&Q shelf to act as a baseboard!), I was hooked.
If you want to start a wooden model, they are a lot easier to make than they were when all you had was Billings (IIRC, the Billings Bounty had a block of balsa that you had to carve yourself for the ships boat!). Now, virtually all componants are pre cut, the only wood working you need to do is planking and tapering the dowel for the masts and yards. For a first timer, something like this;
http://www.amatimodel.com/index.php?option=com_con...
Would be perfect. The only tools I use are a Stanley Knife, razor saw,needle files, tweezers, small plane, steel rule and small electric drill!
chris watton said:
Great job on your Victory - the stern looks really good! it was the Airfix model of Victory that started me model making again, in the early 90's. Once I made that (I cut the bottom off, sculpted a sea from Polyfilla and painted it, and put it on a B&Q shelf to act as a baseboard!), I was hooked.
If you want to start a wooden model, they are a lot easier to make than they were when all you had was Billings (IIRC, the Billings Bounty had a block of balsa that you had to carve yourself for the ships boat!). Now, virtually all componants are pre cut, the only wood working you need to do is planking and tapering the dowel for the masts and yards. For a first timer, something like this;
http://www.amatimodel.com/index.php?option=com_con...
Would be perfect. The only tools I use are a Stanley Knife, razor saw,needle files, tweezers, small plane, steel rule and small electric drill!
Chris: it's now on my Christmas list!If you want to start a wooden model, they are a lot easier to make than they were when all you had was Billings (IIRC, the Billings Bounty had a block of balsa that you had to carve yourself for the ships boat!). Now, virtually all componants are pre cut, the only wood working you need to do is planking and tapering the dowel for the masts and yards. For a first timer, something like this;
http://www.amatimodel.com/index.php?option=com_con...
Would be perfect. The only tools I use are a Stanley Knife, razor saw,needle files, tweezers, small plane, steel rule and small electric drill!
Cheers.
Gassing Station | Scale Models | Top of Page | What's New | My Stuff