Honda CBR600 RR by Maisto, 1/12 scale
Discussion


I recently bought a pair of figures, made by the Japanese Kaiyodo Revoltech Corporation, who have come up with a revolutionary new way of reproducing human movement on a model. Their system, which they call E.L.F.5, allows the model to be placed into any pose, with all joints being internal, therefore invisible. This makes it particularly useful for any model featuring tight clothing, or little or no clothing (although of course we aren’t really interested in those last two).
This is what they say about it (and I swear I haven’t changed a word of this):
“1: The collaboration parts of the shoulder were buried in the body. An elegant silhouette is secured without exposing the joint parts outside.
2: The arm root was swung before and behind the top and bottom, and the movement in a current figure without became possible. It is possible to strike a pose as the chest is for instance natural in the both arms … holding …
3: An original, movable mechanism was taken to the leg putting sleep. Retentivity has been improved without burying the revolver collaboration internally, and exposing the joint of the globe type.
4: Because the leg is cut by "Pants line", it is possible to make it to the silhouette that suppresses unnatural to the minimum by even forming the bikini and the nude.
5: The joint has retentivity to be able to enjoy a moderate comfortable click feeling and beautiful Porgeng.”
(I’ve yet to meet a real human being with a beautiful Porgeng, so they seem to have improved on the original here.)
I thought - "A motorbike would go well with these." Measuring them I decided they were 1/12 scale so I looked around for a 1/12 scale motorcycle kit. Discovered that Maisto - the diecast people - actually do a few. The model shop owner who ordered this for me didn't even know they existed!
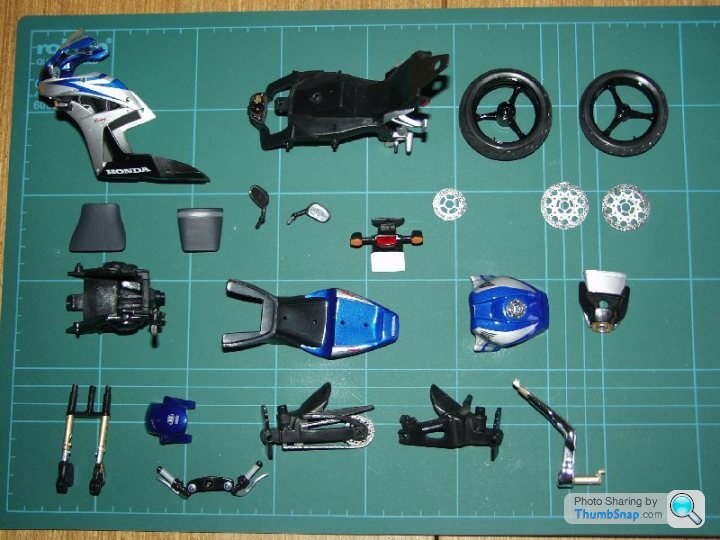
First photo shows the kit as supplied with instructions, second is the parts all lined up for inspection on my cutting mat. No glue is required, it's all held together with six little Philips screws, the rest clips together. As you can see, they even give you the screwdriver.
The kit is supposed not to need painting but I found one for sale (a real one I mean) on eBay and noticed that some of the colours were wrong, so corrected this as I went.

As it arrived

Parts after unpacking ...
Detail painting included:
All gloss body parts given 2 coats of Tamiya gloss clear (as they were not shiny enough). Also the lights, and instrument faces.
Silver frame parts were given a black wash, sealed in with matt clear. Spaces between the mounting struts for the pedals were filled in so I painted them matt black (a quick alternative to actually cutting them out!)
Front shocks were black but needed to be gold.
Seats were too shiny and too dark so were removed and painted a very dark grey.
Handlebar grips painted light grey.
Rear brake disc centre painted silver.
Front brake disc centres painted light gold.
Chain painted light gold.
Number plate painted white, in preparation for the decal.
Any other paint blemishes, touched in/tidied up as neccesary.
Chain sprocket holes, and brake disc holes, were not very good so I re-drilled them (that's 48 holes on the rear disc and 64 on each front disk!).
Tyre treads looked a bit glossy so were roughed up with some emery paper.
Photo shows all the parts awaiting assembly - and I've just realised I forgot to include the brake discs in the previous pic!
... and after detail painting.

Patience ladies ... you will have it soon.
Well after spending an entire day on the painting, and waiting all the next day to make sure it was dry, the bike went together in about half an hour!
Still one or two little details to take care of, I had designed and printed the number plate but had yet to apply it.

Note the extra ones in case of mishaps!
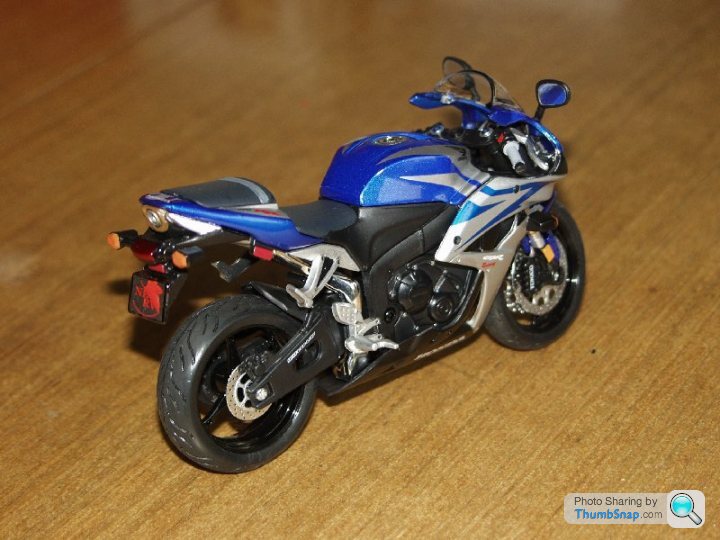
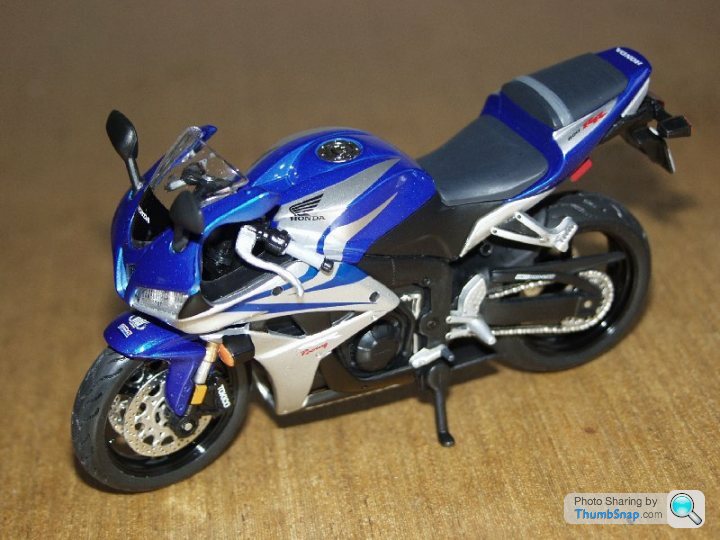
And here is the finished article.
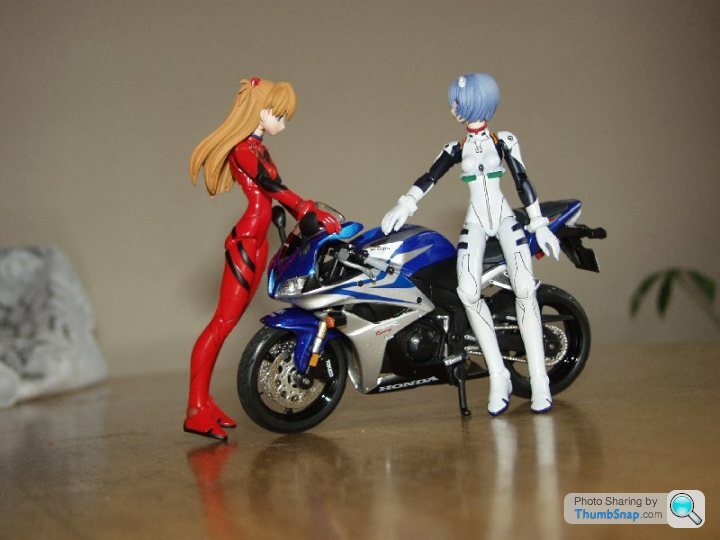
"Hey, nice bike, can I take it for a hoon? Go on, please!"
Right view ...
... and left view.

"Now she's out of the way, I can show you the instruments."
The decal for the number plate didn't turn out too well as the black is slightly translucent, and when filling the gap round the outside I made the paint too dense. So I'll probably do that part again sometime. (Although the flash makes it look slightly worse than it is.)

Yes, thank you dear, I think they can see it.
I'm actually quite proud of the result here, as what I know about motorbikes can fit on a postage stamp and I hardly ever build them. Having said that I have two figure kits to do which include the bikes, these are 1/6 scale and in RESIN!
(And if anyone on here can identify the bikes I would be most grateful.)


This is what they say about it (and I swear I haven’t changed a word of this):
“1: The collaboration parts of the shoulder were buried in the body. An elegant silhouette is secured without exposing the joint parts outside.
2: The arm root was swung before and behind the top and bottom, and the movement in a current figure without became possible. It is possible to strike a pose as the chest is for instance natural in the both arms … holding …
3: An original, movable mechanism was taken to the leg putting sleep. Retentivity has been improved without burying the revolver collaboration internally, and exposing the joint of the globe type.
4: Because the leg is cut by "Pants line", it is possible to make it to the silhouette that suppresses unnatural to the minimum by even forming the bikini and the nude.
5: The joint has retentivity to be able to enjoy a moderate comfortable click feeling and beautiful Porgeng.”
(I’ve yet to meet a real human being with a beautiful Porgeng, so they seem to have improved on the original here.)
I thought - "A motorbike would go well with these." Measuring them I decided they were 1/12 scale so I looked around for a 1/12 scale motorcycle kit. Discovered that Maisto - the diecast people - actually do a few. The model shop owner who ordered this for me didn't even know they existed!
First photo shows the kit as supplied with instructions, second is the parts all lined up for inspection on my cutting mat. No glue is required, it's all held together with six little Philips screws, the rest clips together. As you can see, they even give you the screwdriver.
The kit is supposed not to need painting but I found one for sale (a real one I mean) on eBay and noticed that some of the colours were wrong, so corrected this as I went.

As it arrived

Parts after unpacking ...
Detail painting included:
All gloss body parts given 2 coats of Tamiya gloss clear (as they were not shiny enough). Also the lights, and instrument faces.
Silver frame parts were given a black wash, sealed in with matt clear. Spaces between the mounting struts for the pedals were filled in so I painted them matt black (a quick alternative to actually cutting them out!)
Front shocks were black but needed to be gold.
Seats were too shiny and too dark so were removed and painted a very dark grey.
Handlebar grips painted light grey.
Rear brake disc centre painted silver.
Front brake disc centres painted light gold.
Chain painted light gold.
Number plate painted white, in preparation for the decal.
Any other paint blemishes, touched in/tidied up as neccesary.
Chain sprocket holes, and brake disc holes, were not very good so I re-drilled them (that's 48 holes on the rear disc and 64 on each front disk!).
Tyre treads looked a bit glossy so were roughed up with some emery paper.
Photo shows all the parts awaiting assembly - and I've just realised I forgot to include the brake discs in the previous pic!

... and after detail painting.

Patience ladies ... you will have it soon.
Well after spending an entire day on the painting, and waiting all the next day to make sure it was dry, the bike went together in about half an hour!
Still one or two little details to take care of, I had designed and printed the number plate but had yet to apply it.

Note the extra ones in case of mishaps!
And here is the finished article.

"Hey, nice bike, can I take it for a hoon? Go on, please!"

Right view ...

... and left view.

"Now she's out of the way, I can show you the instruments."
The decal for the number plate didn't turn out too well as the black is slightly translucent, and when filling the gap round the outside I made the paint too dense. So I'll probably do that part again sometime. (Although the flash makes it look slightly worse than it is.)

Yes, thank you dear, I think they can see it.
I'm actually quite proud of the result here, as what I know about motorbikes can fit on a postage stamp and I hardly ever build them. Having said that I have two figure kits to do which include the bikes, these are 1/6 scale and in RESIN!
(And if anyone on here can identify the bikes I would be most grateful.)


Gassing Station | Scale Models | Top of Page | What's New | My Stuff