Covering targa panels.
Discussion


I am going to have a go at re-covering my targa panels. I have found some black mohair hooding on line at £35-90 a metre x 1.5 metres and It looks as though a metre should be enough for both panels
This must be fairly common job but I can’t find much information on line (except for a write up by a gentleman called GJR on Griffith / Chimaera roof re-covering which is helpful, thank you..)
Can anybody point me to any other information on the subject, or give me any advice.
In particular;-
Is the fabric glued down to the whole surface of the panel or just stretched tight and glued at the edges? (mine just seems to be attached to the edges but maybe the glue on the panel surface has just failed.)
Should the fabric be applied wet to enable it to shrink tight as it dries, as you would do for canvas, (My existing covering wrinkles when it gets wet)
Any information and advice will be very very gratefully received.
(Sorry the post title came out in bold - not sure why)
Edited by lewdon on Wednesday 19th July 13:16
glenrobbo said:
The fabric on the underside of the target panels ( PVC on mine ) should be firmly stuck down to the whole surface including the dished areas.
The reason it all comes unstuck and saggy is because modern water-based adhesive is absolute *@¥#$%* crap and just won't stick properly like the good old solvent-based stuff I loved to use back in my glue-sniffing days.
If you're doing your own trimming, try and get a decent solvent based adhesive. But open a window for ventilation ( and lock the door to keep the H&S inspectors out whilst you're merrily sniffing away! )
The vinyl on the underside of my panels appears to be in good nick and still stuck. I am hoping to leave it in place and just loosen it round the edges to get at the mohair.The reason it all comes unstuck and saggy is because modern water-based adhesive is absolute *@¥#$%* crap and just won't stick properly like the good old solvent-based stuff I loved to use back in my glue-sniffing days.
If you're doing your own trimming, try and get a decent solvent based adhesive. But open a window for ventilation ( and lock the door to keep the H&S inspectors out whilst you're merrily sniffing away! )
Edited by glenrobbo on Wednesday 19th July 14:45
Is evostick still solvent based , it certainly smells like it?
TVRees said:
I can't remember where I originally found these on the webinternet, but here are my saved PDF versions ........
HTH
Targa Panel Retrim
Soft Top Installation
Thanks, they help a lot, very much appreciated..HTH
Targa Panel Retrim
Soft Top Installation
greymrj said:
I would agree that dealing with some details of the black cotton duck looks tricky, especially the sewn side. Have you priced it up with a trimmer? Doing the loose targa panels is an easy job for them and surprisingly cheap. A poor job will be with you a long time!
I am pretty good at making and mending but that was one job I didnt think it was worth doing myself.
A local hood company told me it would take a whole mornings work at £50 per hour plus materials plus VAT. That’s too expensive for me. (my time is free so I can make 5 unsuccessful attempts for that price, I hope I can get 1 out of 5 good enough to be good enough.)I am pretty good at making and mending but that was one job I didnt think it was worth doing myself.
Though if I could find anyone local at a significantly lower cost I would be delighted to have them do it. I am beginning to find the idea a bit daunting now.
I agree with Griffinr and Phillpot that Thixofix is good stuff, but I like the idea of the “time” part of evo-stik timebond, (which I believe is also solvent based and thixotropic).
I think I will need all the time I can get before the glue sets solid.
Bert68 said:
Is near Cambridge any good, as I have just had a quote from a trimmer local to me to do the rear section and the 2 panel's for 650 + vat. I still need to confirm exactly what I require as I don't think it included the under side of the panels. That was for materials and labour. All other places were quoting at least 1000 + vat..
Thanks Bert68, Cambridge is a bit far for me as I live in Eastbourne right on the South coast. But it would be interesting to know what your trimmer would charge for just the panels to give me an indication whether local hood specialists are.quoting a fair price.After putting the job off for very long time I finally got round to recovering my targa panels.. It proved much more straightforward than I expected so I thought I would close out this thread with a few notes, others may (or not) find useful, that are not mentioned in the other howto articles noted above and on line.
1 metre of 1.5 metre wide fabric is ample for the two panels. Mark a direction arrow on the back of both halves before you cut them (I used chalk) so you can get them facing the same way. (If the pile on each panel faces a different direction it will show in some lights).
Scraping the old glue off the panels is a pain particularly on the inside., I used Evostick adhesive cleaner (but I have been told subsequently that cellulose thinners or acetone would have done) and a paint scraper with the corners rounded off. Wear rubber gloves and change them when they split. If the solvent gets on your skin it takes all the oils out and you get painful splits particularly on your thumbs. (they hurt!, I won’t make that mistake again).
I used Evostick time bond adhesive, I found I used much more than I expected, total of almost a litre on the two panels.
To get the curve over the window I used the old covering as a pattern to make a template using a piece of 3 mm ply I had on hand. (The curve on mine was only 4 – 5 mm from the chord to the arc). I tacked the ply down to the bench and pushed the fold into the curve, marked the line with chalk and then applied adhesive along the line. Then folded the cloth down while pressing it into the curve of the ply. I then stuck the edge down with masking tape and turned it over to sew from the top side..
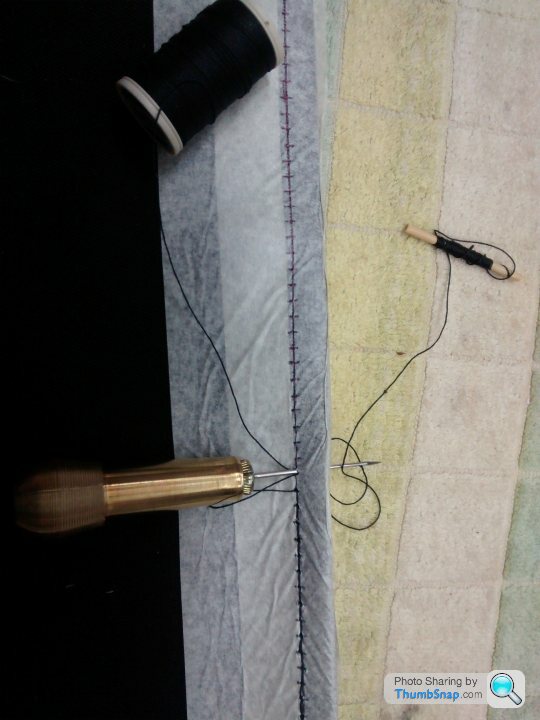
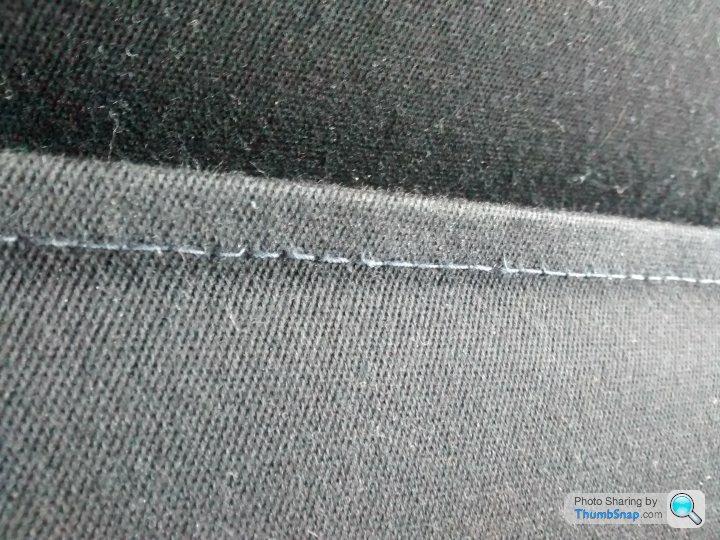
As I didn’t know anyone who would risk their sewing machine on this material I used a sailmakers awl/needle (£2.50 on ebay). I covered the edge of the material with wide masking tape, used the ply template to mark the curved line of stitching parallel with the curved edge, and then marked the line every 5mm. Using the needle push the thread through from the top side on the first mark (I worked from right to left) pull about a metre of thread through to the back. Put the needle through at the next mark and then pull it back a little to create a loop, slip the thread on the reverse side through the loop and pull the needle back and repeat on the next 5mm mark giving both threads a tug to tighten them, (this may be clearer if I add a photo). It took just over half an hour to sew each panel and with black thread on black fabric it looked acceptably neat.
Take your time gluing the stitched edge to the roof panel, it aligns the rest of the cover, and allow it to dry thoroughly before you pull the fabric tight to glue it over the rest of the panel. If you don’t it can creep. When you get to the tangs pull the fabric down to them and cut along the angle between the fibreglass and the top of the tang, a 3mm nick down each side of the tang makes a slit you can then stretch over the tang and then trim along the underside angle
Before you start on the vinyl make a paper template to locate the holes for the clip, I didn’t and it is surprisingly difficult to find the holes again when it is covered.
I used stretch vinyl, and on the first panel I worked from one edge across to the other and found it took some time and effort to get the concave corners to stick with the aid of a hairdryer. On the second panel I glued the centre section first and then worked outwards pushing the vinyl into the corners, as it was under compression rather than tension it stuck easily, but you have to be careful in moulding it to shape to avoid wrinkles. If I had to do it again I would do it as per the second panel.
I left about 25mm round the edge to trim to shape after sticking most of the vinyl down but leaving the final edges unstuck. I covered the outer 50 mm of the edge with masking tape. It makes it easier to mark the line you want to cut, and stops the vinyl stretching as you cut it (without the tape it stretches as you cut giving a wavy line.) I first tried trimming with a Stanley knife with a ruler behind the vinyl to prevent cutting the mohair, but eventually found scissors much more successful.
Otherwise i followed the method shown in the on-line articles.
Good luck
1 metre of 1.5 metre wide fabric is ample for the two panels. Mark a direction arrow on the back of both halves before you cut them (I used chalk) so you can get them facing the same way. (If the pile on each panel faces a different direction it will show in some lights).
Scraping the old glue off the panels is a pain particularly on the inside., I used Evostick adhesive cleaner (but I have been told subsequently that cellulose thinners or acetone would have done) and a paint scraper with the corners rounded off. Wear rubber gloves and change them when they split. If the solvent gets on your skin it takes all the oils out and you get painful splits particularly on your thumbs. (they hurt!, I won’t make that mistake again).
I used Evostick time bond adhesive, I found I used much more than I expected, total of almost a litre on the two panels.
To get the curve over the window I used the old covering as a pattern to make a template using a piece of 3 mm ply I had on hand. (The curve on mine was only 4 – 5 mm from the chord to the arc). I tacked the ply down to the bench and pushed the fold into the curve, marked the line with chalk and then applied adhesive along the line. Then folded the cloth down while pressing it into the curve of the ply. I then stuck the edge down with masking tape and turned it over to sew from the top side..
As I didn’t know anyone who would risk their sewing machine on this material I used a sailmakers awl/needle (£2.50 on ebay). I covered the edge of the material with wide masking tape, used the ply template to mark the curved line of stitching parallel with the curved edge, and then marked the line every 5mm. Using the needle push the thread through from the top side on the first mark (I worked from right to left) pull about a metre of thread through to the back. Put the needle through at the next mark and then pull it back a little to create a loop, slip the thread on the reverse side through the loop and pull the needle back and repeat on the next 5mm mark giving both threads a tug to tighten them, (this may be clearer if I add a photo). It took just over half an hour to sew each panel and with black thread on black fabric it looked acceptably neat.
Take your time gluing the stitched edge to the roof panel, it aligns the rest of the cover, and allow it to dry thoroughly before you pull the fabric tight to glue it over the rest of the panel. If you don’t it can creep. When you get to the tangs pull the fabric down to them and cut along the angle between the fibreglass and the top of the tang, a 3mm nick down each side of the tang makes a slit you can then stretch over the tang and then trim along the underside angle
Before you start on the vinyl make a paper template to locate the holes for the clip, I didn’t and it is surprisingly difficult to find the holes again when it is covered.
I used stretch vinyl, and on the first panel I worked from one edge across to the other and found it took some time and effort to get the concave corners to stick with the aid of a hairdryer. On the second panel I glued the centre section first and then worked outwards pushing the vinyl into the corners, as it was under compression rather than tension it stuck easily, but you have to be careful in moulding it to shape to avoid wrinkles. If I had to do it again I would do it as per the second panel.
I left about 25mm round the edge to trim to shape after sticking most of the vinyl down but leaving the final edges unstuck. I covered the outer 50 mm of the edge with masking tape. It makes it easier to mark the line you want to cut, and stops the vinyl stretching as you cut it (without the tape it stretches as you cut giving a wavy line.) I first tried trimming with a Stanley knife with a ruler behind the vinyl to prevent cutting the mohair, but eventually found scissors much more successful.
Otherwise i followed the method shown in the on-line articles.
Good luck
Edited by lewdon on Sunday 25th October 17:50


Gassing Station | S Series | Top of Page | What's New | My Stuff