Discussion


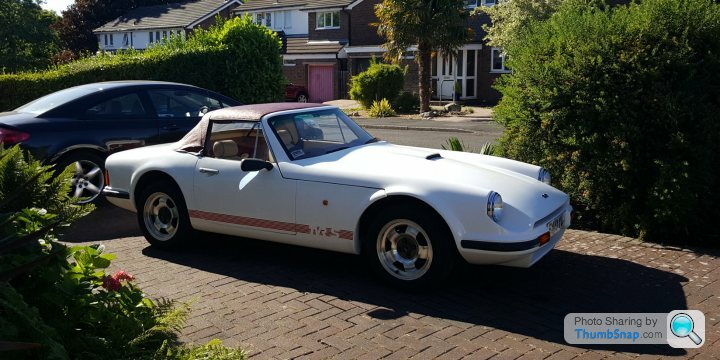
Car number 68 is my first TVR and my first car with a GRP body. I strongly suspect that my learning curve may be steep, as my last 6 classic sports cars have been MG Midgets (one of which I still have, for now). I have done a full resto on a couple of MGs but never touched fuel injection systems.
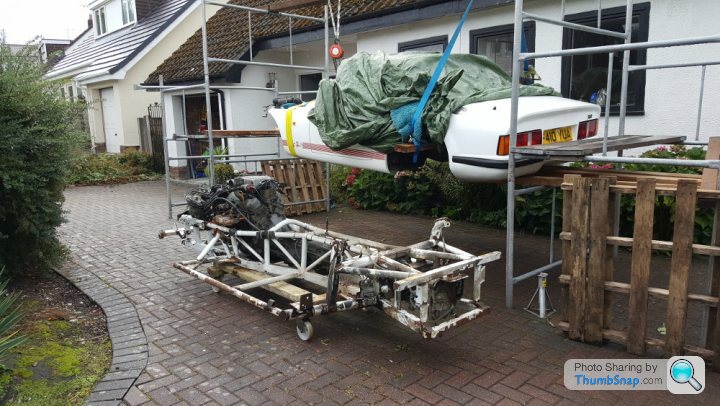
I'm posting because having dragged the car from a garage, where it had been laid up for 12 years, I need some advice about where to start on the recommissioning. I am reading Steve Heaths excellent S bible before I start.
The car rolls, the engine can be turned (by hand) and the handbrake works, clutch pedal can be depressed (no idea if the clutch plate is stuck) and there are no obvious leaks. The tank contains some stale fuel and the car was driven into the garage when the previous owner bought a Chim.
The bores were oiled when laid up and the car had a 50% coolant mix in the system. Mileage is a genuine 38k, two owners and full history.
My plan is to change water pump, all hoses, thermostat, fan belt, flush heater core, block and radiator then refill the system. Change oil, filter, replace gearbox and axle oil. Remove the stale petrol and introduce some fresh stuff.
Then its the startup, plugs out, new battery, spin it over, check oil pressure, plugs in and go for it. If it starts, on to phase two.
Change the brake servo, replace seals in the master cylinder and calipers, fit new rear brake cylinders and shoes, new discs and pads up front. Replace all associated hoses and servo pipes, new seals on the brake fluid reservoir.
Whilst the brakes are apart, fit new suspension bushes, arb bushes and replace or paint any suspension parts.
Yes, I'm ignoring the elephant in the room - the chassis, which appears solid outrigger wise, but has some flaky areas and there is some surface rust. Accessible rust will be dealt with using POR15 then a two pack chassis paint for now.
At this point I can go through the electrics, remove the ancient alarm and immobiliser and then submit it for MOT.
If it passes I'll run it for a few months, then either next winter or the winter after I plan to do a body off resto on the chassis and get that blasted, repaired and then painted in two pack chassis paint.
Phew! So the question is, if you were rescuing a laid up TVR S, what else would you do?
Guys, thank you all, great info and I'd completely forgotten the fuel hoses!
I've priced up a set of Dunlops (very reasonable) and I'm itching to get a spanner on it next weekend. Thanks for all the advice and I shall of course post updates and ask more questions.
Just reading Steve Heath's fabulous tome and compiling lists of part numbers.
I'm in Cheshire (Knutsford) surrounded by similar minded car nuts.
Super advice, thanks, much appreciated and I think you are 100% correct regards chassis rot, there is bound to be some. The tank is coming out at the weekend and the chassis is going to get a good going over in line with your tips.
I'm looking forward to taking it all apart and I'm pretty much expecting to need to lift the body at some point - if I can find out what else is needed (engine, trans etc.) I can save some extra pain when I put the jigsaw back together.
I'm looking forward to taking it all apart and I'm pretty much expecting to need to lift the body at some point - if I can find out what else is needed (engine, trans etc.) I can save some extra pain when I put the jigsaw back together.
Quick update, made a start on the car and so far so good. Up onto axle stands, wheels off, good poke about with a wire brush and then some PlusGas on all the nuts and bolts I'll be undoing next weekend.
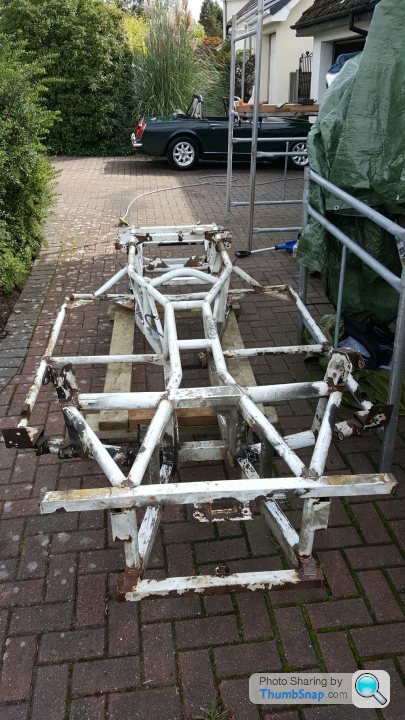
The next job was the dreaded hammer to the chassis and the trailing arms. I started fairly gently but ended up beating hell out it as everything rang like a bell, no dull thuds. Wrapped my fingers round all the outrigger tubes and found only surface rust, no crunchy bits or holes.
Mostly the chassis still has it's powder coating in tact, but in a few places it has peeled and there is surface corrosion. No holes detected yet, partial body lift planned for next weekend. Clean up, POR 15 on the rusty bits, then Rustoleum gloss white, unless it needs welding of course. If I can put off the full chassis restoration for a few years that works for me. I want to have a go at driving it before the winter.
I also did some fun stuff like ripping out the old alarm and tidying up the spaghetti factory wiring.
Other items of note - fuel hoses are shocking (Gates Barricade and quality clamps ordered, glad I didn't try to start it) and the radiator is doing a great impression of a sieve (new Subaru WRX alloy rad on its way with a dual fans). As expected all of the coolant hoses are toast, but I'm going to make up a set using stock hose.
The clutch still operates as do the brakes, although the entire braking system is coming off for complete replacement with new bits. Rear axle back plates are solid and still in factory paint. The stainless exhaust is completely free of corrosion and has only minor dents.
The observable bits of the shell look good with no gel coat cracks. The hood is knackered, split, as are the seats and gear lever gaiter, but the carpets came up nice and the rest of the vinyl trim looks fine. There is no corrosion on the gauges but of course I have no idea if they work!
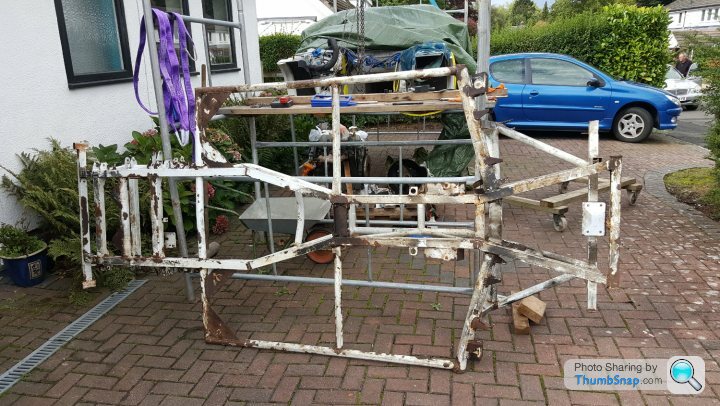
Quick update, and thanks for all the info here and across PH. The body is now six inches off the chassis, suspension and front end stripped, and on removing the rubber pads (drum roll) some very minor surface corrosion, no holes, no flaking shards of rust.
Every bit of rubber needs to be replaced of course and the entire braking system is being replaced with new parts from pedal to pads and shoes, apart from the calipers which have been restored by a brake specialist. Servo looked brand new on top, toast underneath and full of holes. Fortunately TVR Parts had direct replacements for that and the master cylinder.
The front bushes were really quite good, with only minor deterioration, but I'm poly-bushing the lot anyway. The tank has surface corrosion but is clean as a whistle inside, just needs a new gauze filter.
Everything came apart really easily after two weeks soaking in my home brew (ATF and acetone) and the surface rust is going to be wire brushed and treated to POR15 (Marine Clean, Metal Prep and POR15 undercoat) topped off with a nice white coat of Rustoleum. I know I should really take it all apart and have it blasted and painted properly but I can do that when I retire in ten years time!
I love working on this thing. It is like a big Meccano kit and being able to unbolt the body is cool. Anyway, should be done before Christmas, if I can keep sneaking the odd hour away from work that is. I'm 30 hours into it so far and I'm hoping another 100 puts it on the road.
Well, 2lb lump hammer has found some rot (at last!) in one trailing arm (three pin holes one tube, surgery required) and the tank cradle (needs a new piece bar welding in) so not too bad.
Fuel tank, front suspension and most other bits painted - chassis gets it this weekend. Modded the ARB to have bolt on, rose jointed, adjustable drop links with £25 of bits from a racing shop and I've ordered some base model GAZ boingy things for each corner.
All in all I'm surprised how small the scrap pile is. It only fills a 10 litre plastic box. I may get to drive it one day after all.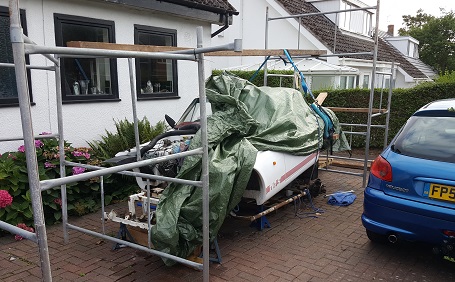
After a couple of hours of scraping and prodding with a variety of implements I decided that the only sensible way to do this is as you suggest - body off, strip it down and off to the shotblaster. At least 80% of the bits required to make it a car again are now painted or purchased new.
It will be interesting to see what the blaster exposes over my hammer and chisel approach.
I'm planning to change the clutch whilst the engine is removed, but are there any other seals, bearings, gaskets etc that should be replaced while access is easy?
My engine experience is really MG based and those are more simple lumps of iron.
Edited by Bercilac on Tuesday 28th August 05:27
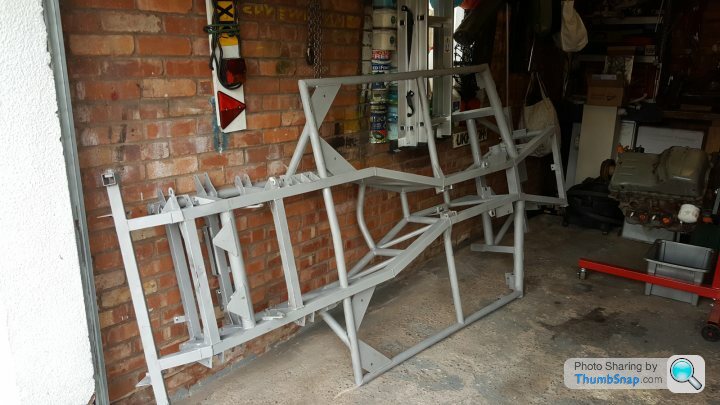
I'm planning to get it primed or zinc coated by the blaster, then painted using epoxy and I'll finish that off with stone guard on the vulnerable areas with plenty of Dynax S50 in all the tricky nooks and crannies.
The tank and other components have had POR15 in black, over painted in black Hammerite, which I'll go over with stone guard in white, same as the chassis. The idea being that if I get a chip in the stone guard the black paint beneath will make the chipped area easy to spot (I hope).
The tank and other components have had POR15 in black, over painted in black Hammerite, which I'll go over with stone guard in white, same as the chassis. The idea being that if I get a chip in the stone guard the black paint beneath will make the chipped area easy to spot (I hope).
Bit further on, going the whole nine yards. I was surprised how light the body and chassis are when separated. All of these big chunks are easy to shove about single handed.
Technique was to ratchet strap the back up about three feet, then push the chassis forward 20cm on its dolly (thanks Tom!) then lift the front with the block and tackle.
Engine, transmission and diff out tomorrow, when it stops raining, then off for some repairs, blasting, zinc primer and two pack epoxy.
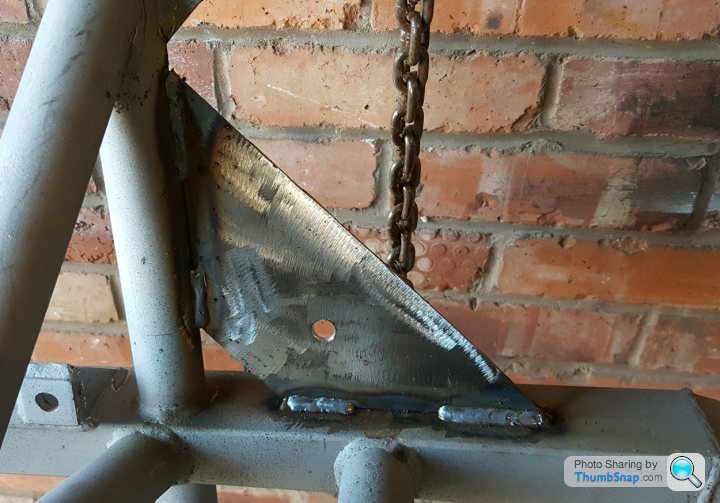
The repairs are just to cut the pathetic outrigger seat belt mounts off and weld on something that has a little more heft to it.
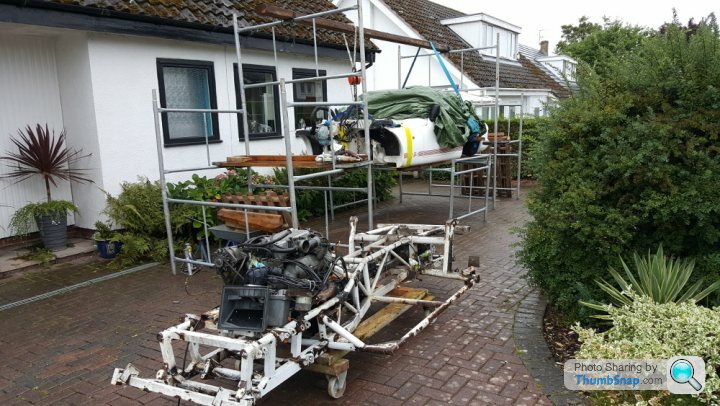
Technique was to ratchet strap the back up about three feet, then push the chassis forward 20cm on its dolly (thanks Tom!) then lift the front with the block and tackle.
Engine, transmission and diff out tomorrow, when it stops raining, then off for some repairs, blasting, zinc primer and two pack epoxy.
The repairs are just to cut the pathetic outrigger seat belt mounts off and weld on something that has a little more heft to it.
Chassis liberated. Everything played nice apart from the diff which is round at my local garage (Paradise Garage, Toft Road, Knutsford classic friendly and top guys) getting the busted bits drilled out.
Clutch was hardly worn and nothing was seized, front and rear gearbox oil seals gone though. Core plugs fine but will be replaced anyway along with all the gaskets etc.
Off to the blaster/painter in the next couple of weeks.
Clutch was hardly worn and nothing was seized, front and rear gearbox oil seals gone though. Core plugs fine but will be replaced anyway along with all the gaskets etc.
Off to the blaster/painter in the next couple of weeks.
Chassis back from first blast and all is good. Replacing the outrigger seat belt mounts and one mounting plate as half a millimetre of corrosion on both, daft not to do it, then blasting and painting. The painter specialises in coatings for North Sea oil rig and mining equipment so it should last a bit.
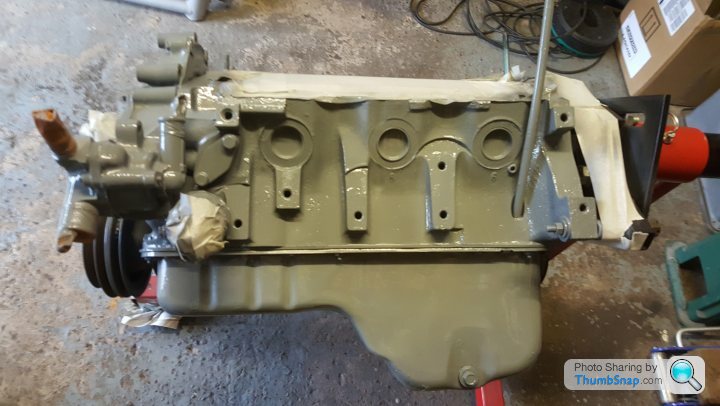
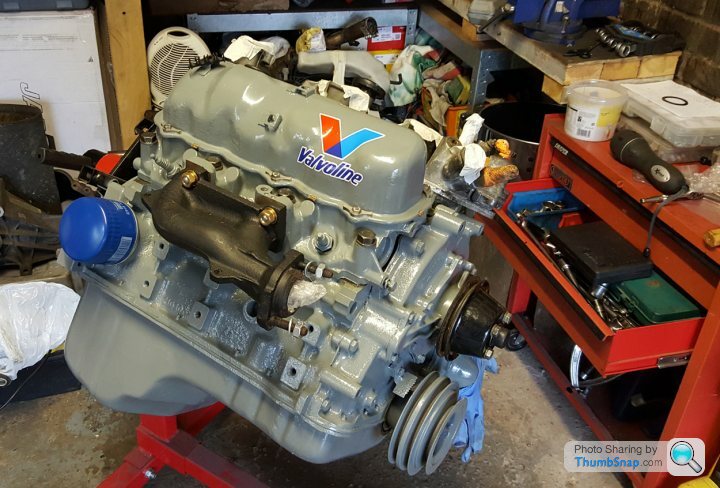
Block painted Ford Gray VHT, unleaded heads acquired and I found a supplier for the rocker cover stickers.
Should be on the road by Spring 2019 at this rate :-)
Block painted Ford Gray VHT, unleaded heads acquired and I found a supplier for the rocker cover stickers.
Should be on the road by Spring 2019 at this rate :-)
Oh yes, it's all the fiddly bits - a couple of spring clips for the handbrake cables, nuts bolts and washers throughout, gasket sets, but even with the purchase price it's still coming in at under £4.5k, without the retrim costs.
There have been good bargains in there though. I found a nice pair of seats from a Griff for £100 the pair (plus another £100 to get them delivered). I had to paint the frames but the leather responded to a good clean and feed.

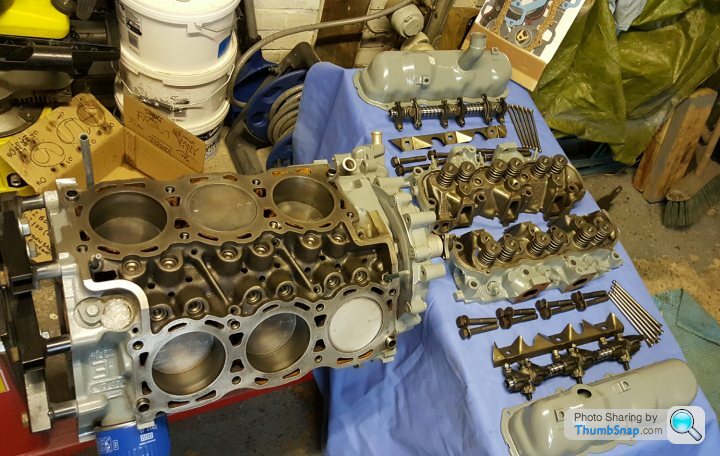
And a pair of reconditioned heads with unleaded valve seats and new rockers, valves, springs and pushrods came off Fleabay for £126 (I'm busy cleaning and painting them ready for fitting next week). Even a new 3 part LUK clutch was only £40 and £35 for disks and pads, what's not to like - way cheaper than my moderns.
Apart from the cheap Ford parts, what I really like is how easy it is to work on compared to the MGs I've had. I know these are not fast but I think it'll feel quick coming from a 1275cc Midget, so I'm happy to keep it stock and I'm far too old to Hoon it about.
There have been good bargains in there though. I found a nice pair of seats from a Griff for £100 the pair (plus another £100 to get them delivered). I had to paint the frames but the leather responded to a good clean and feed.
And a pair of reconditioned heads with unleaded valve seats and new rockers, valves, springs and pushrods came off Fleabay for £126 (I'm busy cleaning and painting them ready for fitting next week). Even a new 3 part LUK clutch was only £40 and £35 for disks and pads, what's not to like - way cheaper than my moderns.
Apart from the cheap Ford parts, what I really like is how easy it is to work on compared to the MGs I've had. I know these are not fast but I think it'll feel quick coming from a 1275cc Midget, so I'm happy to keep it stock and I'm far too old to Hoon it about.
Getting close to build time as the chassis is off this week for final blast and paint, two new outrigger seat belt mounts welded in along with two corner plates. Neither was strictly necessary according to Chris Dickinson who did the welding, plenty of meat on them still apparently, but I wanted to be sure the job doesn't need doing for another 30 years.
 |https://thumbsnap.com/81B8Kg8v[/url]
New tube on one trailing arm and a new section on the tank cradle completes the fabrication process.
The engine is ready and gearbox titivated with new seals and gaskets, internals were unmarked and no nasty swarf in there.
 [url]
[url]
|https://thumbsnap.com/81B8Kg8v[/url]New tube on one trailing arm and a new section on the tank cradle completes the fabrication process.
The engine is ready and gearbox titivated with new seals and gaskets, internals were unmarked and no nasty swarf in there.
[url]Gassing Station | S Series | Top of Page | What's New | My Stuff