Fiesta Mk4/5 Trailing Arm Bush Replacement
Discussion


The Mk4/5 Fiesta is the 1995-2002 model.
I started this replacement job a few weeks ago, but because the bushes were well and truly seized in, I only had time to do one side. I tackled the other side today and decided to take a few pictures and do this "how to" write up in case anyone else might find it useful.
I am a DIY mechanic. According to the Haynes manual this is a three spanner job. It wasn't very difficult in itself except getting the actual bushes out.
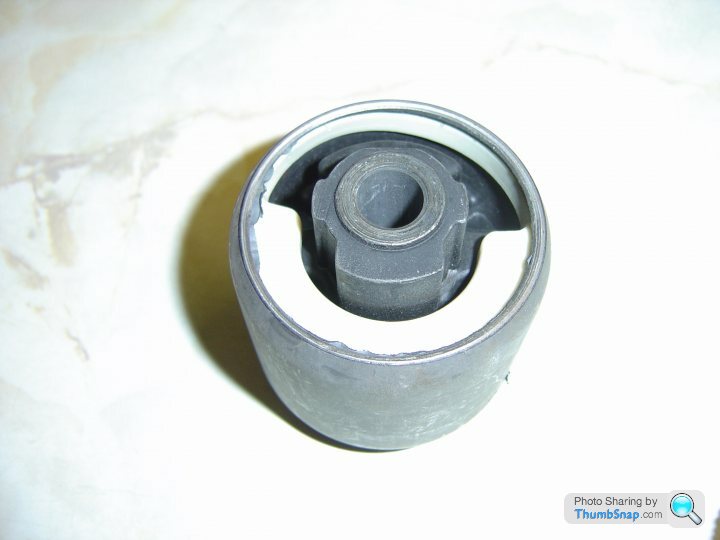
Firstly here is a brand new shiny bush. You can get these via the internet or your local motor factor. I prefer the local motor factor because they are just down the road and if you find you have the wrong part it's easy to pop back down there and change it.
To start
1) Slacken the wheel nuts on both rear wheels
2) Put the car in gear
3) Chock the front wheels
4) Jack up the rear of the car and support on stands. Don't put the stands under the rear beam, arms or any other part of the suspension, as this needs to be lowered. I used the rear jacking points.
5) Once up on the stands remove the wheels.
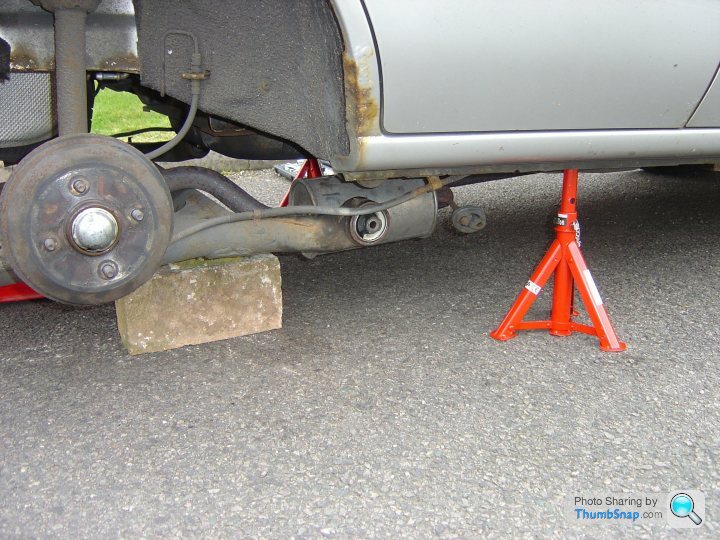
You can see the car on the stands here. I have already unbolted the arms and lowered the rear beam. It is supported on two large blocks/bricks. You could use another pair of stands if you have them. This is the side I have already done so the bush you can see is a new one.
To disconnect the arms and rear beam.
1) from the rear of the car slide your jack under the car until it's under the rear beam. Raise the jack until it's just touching the beam.
2) Place blocks or stands under the beam to support it when you lower the jack in a short while. Remember that it has to come down enough for the ends of the arms where the bushes are to be accessible, so it will need to drop about 6 inches. Set the stands or select blocks accordingly.
3) Undo the clips holding the handbrake cable to the sill. This is the same on both sides of the car. This will allow you to move the cable around and give you better access to the bolts passing through the arm and mounting bracket. This is a 10mm socket.
Here is a closer view of the car with the beam and arms already down. You can see the clip that holds the handbrake cable.

Next you need to remove the bolts that pass through the mounting bracket and the arms/bushes.
The nut is 19mm and the head of bolt is 15mm. The bolts come in from the center of the car and the nut is between the bracket and sill.
On the drivers side you can get better access if you disconnect the exhaust and slide it out of the way. It will rest on the rear beam so don't worry about it dropping. There are four rubbers to remove. These just slide over mounting hooks.
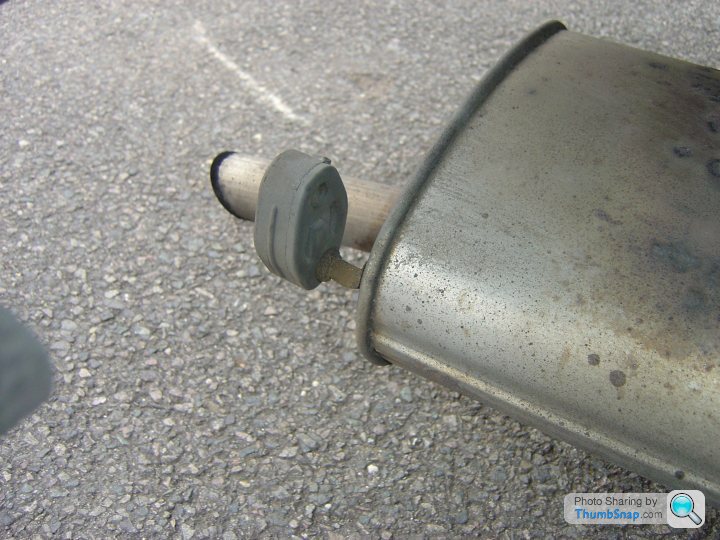
Here you can see one of the rubbers at the rear of the exhaust.
Here you can see the bracket that the arm fits into. You can also see two more of the exhaust mounting hooks - one behind the center of the bracket and one to the right of it. The fourth is just out of shot in front of the bracket. You can just see the exhaust resting on the beam in the right of the photo.

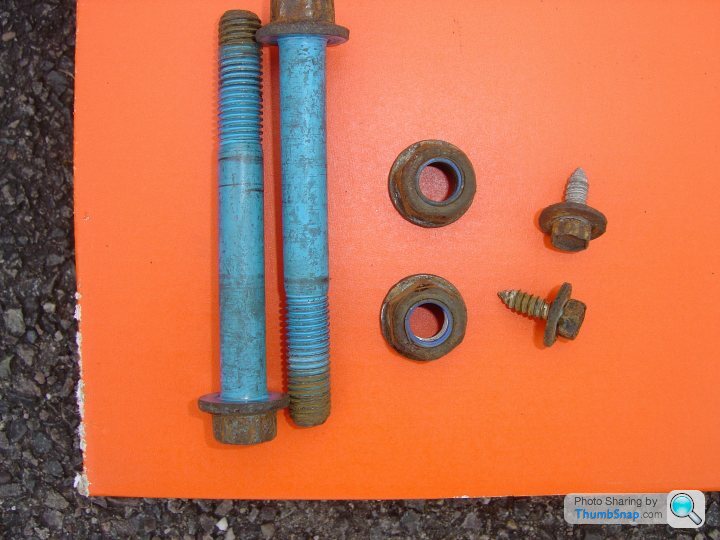
Here are the nuts, bolts and two small bolts holding the handbrake cable clips.
Once the bolts have been removed lower the jack so that the rear beam and arms lower down and come to rest on you stands or bricks.
Congratulations - it's time for a cup of coffee.
So suitably charged up with caffeine, let's resume.
Here is a close up of the new bush on the side I have already done

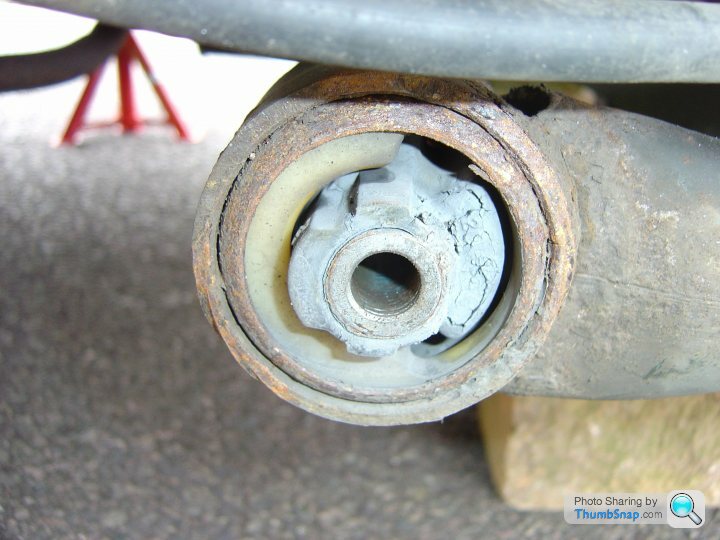
And just for comparison here is the other side - the one I am about to replace.
Now I do have a bush puller but these bushes are well and truly seized in and will not budge so I had to resort to old fashioned brute force. (The pullers can be found quite cheaply on a well known internet auction site).
Note - before removing the bush make sure you see how it is aligned as the new one needs to go in the same way. A photo or quick sketch will help, or refer to the other side of the car.
The brute force method with hand tools
1) Using a junior hacksaw (a large hacksaw blade will not fit yet) pass the blade through the centre of the bush and cut the through the inner metal collar. This may take a while. In the picture above aim for the gap between the rubber and white plastic between 4 and 5 o'clock.
2) Once through the inner collar you should be able to insert a larger hacksaw blade and switch to a larger saw. Cutting through the rubber really drags on the blade so give the blade regular squirts of WD40 or other lubricant to keep it running free. Keep going and cut through the outer metal sleeve, being careful not to go too far and cut into the actual arm. If space is tight you can mount the hacksaw blade pointing into the saw and do a pull cut.
3) At this point I took a hammer and metal chisel and smacked the outer sleeve in towards the center of the bush on both sides of the cut.
4) Then is used the puller. The combination of the above had freed it and released enough pressure for the puller to pop out the bush
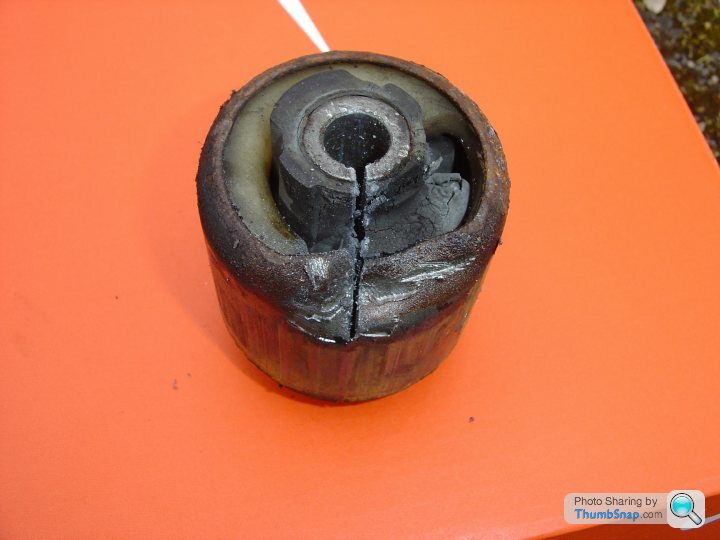
Here is the removed bush suitably savaged. You can clearly see the cuts and my chisel work.
Nearly there but probably a good time to stop for another cup of coffee.
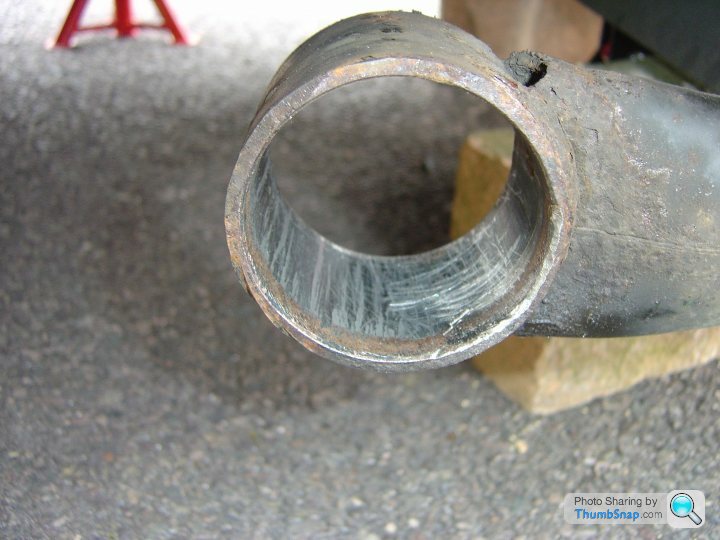
Next I lightly ran a file around the inside of the arm and gave it a good going over with a wire brush to remove any rust or other crud. Then I slapped a good splash of grease all around the inside of the hole.
The puller then came into its own as in reverse it's also an inserter. I wound in the new bush (still surprisingly tight) into place.
Now it's time for reassembly. An extra pair of hands on the jack might be helpful for a few minutes.
Slowly raise the jack so the rear beam and arms start to lift. A bit of lateral adjustment (a light shove to you and me) might be needed to get the arms to align with the brackets. Keep raising the jack so the arms move back into the bracket. While you are under the car the other person needs to make fine adjustments on the jack so you can line up the holes and get the bolts back through.
If you are on your own there is a bit of getting up and down as you have to do both jobs yourself.
Once the bolts are through on both sides refit the nuts and tighten up.
Reposition the handbrake cable and refit the fixing brackets to the sill.
Refit the exhaust by pushing all four rubbers back over the mounting hooks.
Refit the wheels.
Raise car to remove stands, lower and fully tighten the wheel nuts.
And that's it.
I started this replacement job a few weeks ago, but because the bushes were well and truly seized in, I only had time to do one side. I tackled the other side today and decided to take a few pictures and do this "how to" write up in case anyone else might find it useful.
I am a DIY mechanic. According to the Haynes manual this is a three spanner job. It wasn't very difficult in itself except getting the actual bushes out.
Firstly here is a brand new shiny bush. You can get these via the internet or your local motor factor. I prefer the local motor factor because they are just down the road and if you find you have the wrong part it's easy to pop back down there and change it.
To start
1) Slacken the wheel nuts on both rear wheels
2) Put the car in gear
3) Chock the front wheels
4) Jack up the rear of the car and support on stands. Don't put the stands under the rear beam, arms or any other part of the suspension, as this needs to be lowered. I used the rear jacking points.
5) Once up on the stands remove the wheels.
You can see the car on the stands here. I have already unbolted the arms and lowered the rear beam. It is supported on two large blocks/bricks. You could use another pair of stands if you have them. This is the side I have already done so the bush you can see is a new one.
To disconnect the arms and rear beam.
1) from the rear of the car slide your jack under the car until it's under the rear beam. Raise the jack until it's just touching the beam.
2) Place blocks or stands under the beam to support it when you lower the jack in a short while. Remember that it has to come down enough for the ends of the arms where the bushes are to be accessible, so it will need to drop about 6 inches. Set the stands or select blocks accordingly.
3) Undo the clips holding the handbrake cable to the sill. This is the same on both sides of the car. This will allow you to move the cable around and give you better access to the bolts passing through the arm and mounting bracket. This is a 10mm socket.
Here is a closer view of the car with the beam and arms already down. You can see the clip that holds the handbrake cable.
Next you need to remove the bolts that pass through the mounting bracket and the arms/bushes.
The nut is 19mm and the head of bolt is 15mm. The bolts come in from the center of the car and the nut is between the bracket and sill.
On the drivers side you can get better access if you disconnect the exhaust and slide it out of the way. It will rest on the rear beam so don't worry about it dropping. There are four rubbers to remove. These just slide over mounting hooks.
Here you can see one of the rubbers at the rear of the exhaust.
Here you can see the bracket that the arm fits into. You can also see two more of the exhaust mounting hooks - one behind the center of the bracket and one to the right of it. The fourth is just out of shot in front of the bracket. You can just see the exhaust resting on the beam in the right of the photo.
Here are the nuts, bolts and two small bolts holding the handbrake cable clips.
Once the bolts have been removed lower the jack so that the rear beam and arms lower down and come to rest on you stands or bricks.
Congratulations - it's time for a cup of coffee.
So suitably charged up with caffeine, let's resume.
Here is a close up of the new bush on the side I have already done
And just for comparison here is the other side - the one I am about to replace.
Now I do have a bush puller but these bushes are well and truly seized in and will not budge so I had to resort to old fashioned brute force. (The pullers can be found quite cheaply on a well known internet auction site).
Note - before removing the bush make sure you see how it is aligned as the new one needs to go in the same way. A photo or quick sketch will help, or refer to the other side of the car.
The brute force method with hand tools
1) Using a junior hacksaw (a large hacksaw blade will not fit yet) pass the blade through the centre of the bush and cut the through the inner metal collar. This may take a while. In the picture above aim for the gap between the rubber and white plastic between 4 and 5 o'clock.
2) Once through the inner collar you should be able to insert a larger hacksaw blade and switch to a larger saw. Cutting through the rubber really drags on the blade so give the blade regular squirts of WD40 or other lubricant to keep it running free. Keep going and cut through the outer metal sleeve, being careful not to go too far and cut into the actual arm. If space is tight you can mount the hacksaw blade pointing into the saw and do a pull cut.
3) At this point I took a hammer and metal chisel and smacked the outer sleeve in towards the center of the bush on both sides of the cut.
4) Then is used the puller. The combination of the above had freed it and released enough pressure for the puller to pop out the bush
Here is the removed bush suitably savaged. You can clearly see the cuts and my chisel work.
Nearly there but probably a good time to stop for another cup of coffee.
Next I lightly ran a file around the inside of the arm and gave it a good going over with a wire brush to remove any rust or other crud. Then I slapped a good splash of grease all around the inside of the hole.
The puller then came into its own as in reverse it's also an inserter. I wound in the new bush (still surprisingly tight) into place.
Now it's time for reassembly. An extra pair of hands on the jack might be helpful for a few minutes.
Slowly raise the jack so the rear beam and arms start to lift. A bit of lateral adjustment (a light shove to you and me) might be needed to get the arms to align with the brackets. Keep raising the jack so the arms move back into the bracket. While you are under the car the other person needs to make fine adjustments on the jack so you can line up the holes and get the bolts back through.
If you are on your own there is a bit of getting up and down as you have to do both jobs yourself.
Once the bolts are through on both sides refit the nuts and tighten up.
Reposition the handbrake cable and refit the fixing brackets to the sill.
Refit the exhaust by pushing all four rubbers back over the mounting hooks.
Refit the wheels.
Raise car to remove stands, lower and fully tighten the wheel nuts.
And that's it.
Edited by over_the_hill on Friday 6th April 22:21
Gassing Station | Ford | Top of Page | What's New | My Stuff