Sauber Petronas C22: 1/24 Revell G.B
Discussion


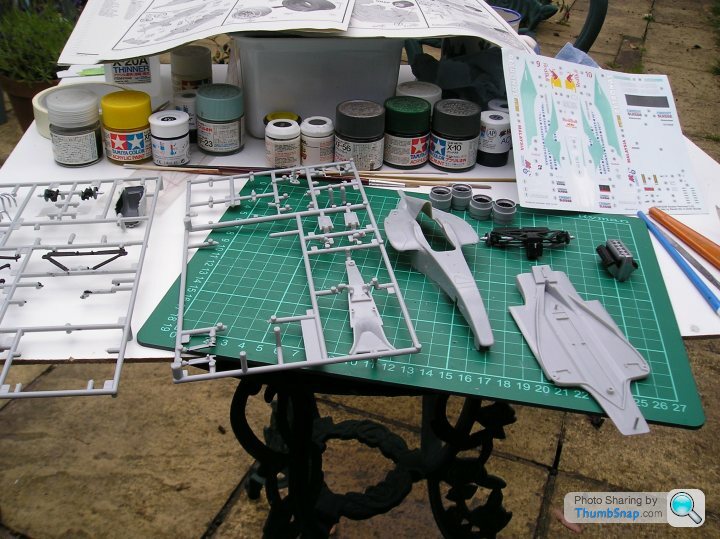
Well today I made a start on this (after washing the sprues with soapy water yesterday)
And I have already come to several conclusions
1 This isn't a kit I would have bought but as it was a gift I feel duty bound to do me very bestest.
2 And me very bestest isnt going to help a lot, 'cos I don't have all the colours I need to do this version and even the offer of assistance from Red Firecracker to source the colour has a bad feel to it.
{The turquoise paint has a silvery element to it on the versions of it on the decal sheet, I may still have to mix and meld paints to get a close match.}
3 I really hate acrylic paints, they don't seem to "paint" as much as slurp colour thickly over the plastic.
4 Modern enamels just don't "work" like the old Humbrol, Gloy and Airfix favourites used to.
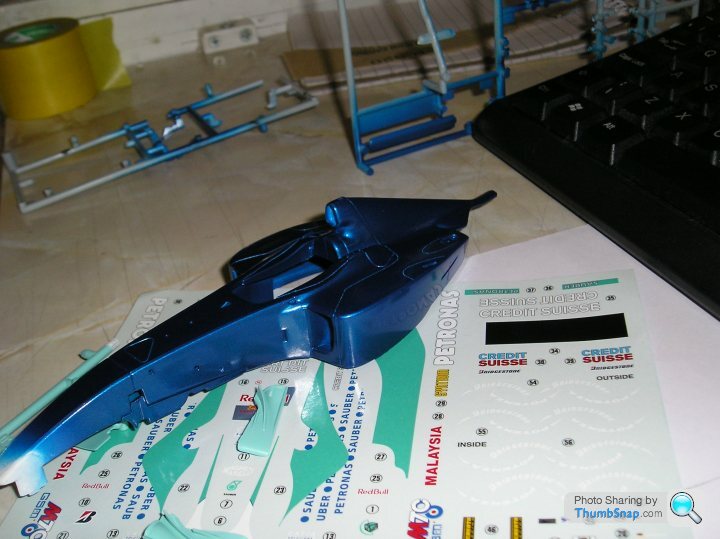
Anyway, today I began with the suspension parts and the engine, no point actually building yet without the colours for the main body components but at last I have parts off the sprue and can get the basic feel of the kit.
Blinking acrylic thick sh***y crap paint but at last some parts glued together and arranged for fit, I will be dealing with the not very silky looking black next.
I had considered a wiring job on the engine but there is bugger all to see anyway so that has been ditched as plan A
A few pictures for fun:
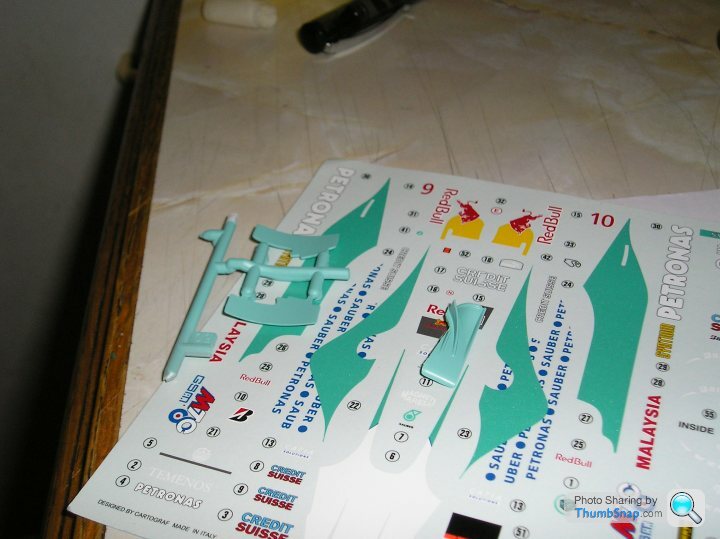
the elusive turquoise colour, you can just make out its metallicness on this pic

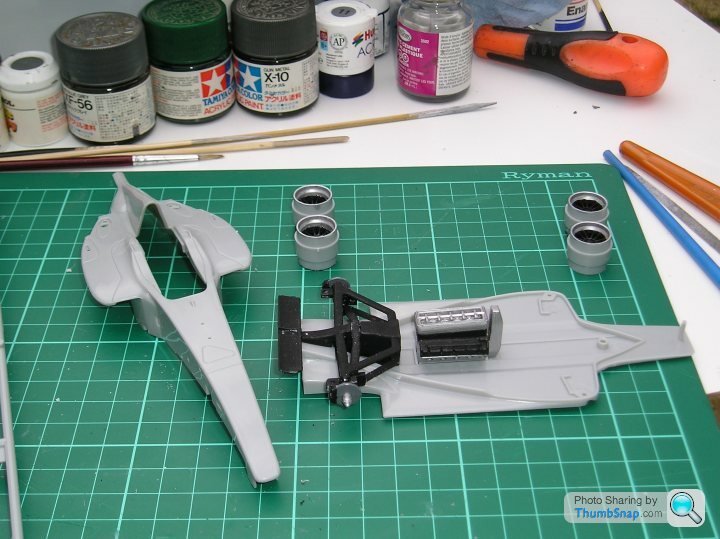
An alarming lack of transmissibility between Ferarri based pwoer plant and the gearbox, maybe I should work on it a bit.
Not yet sure how interested in "betterness" I am with this model, it is unlikely to be my best ever model. That was a diorama of Nantucket whaleboatmen hunting the great white Moby.
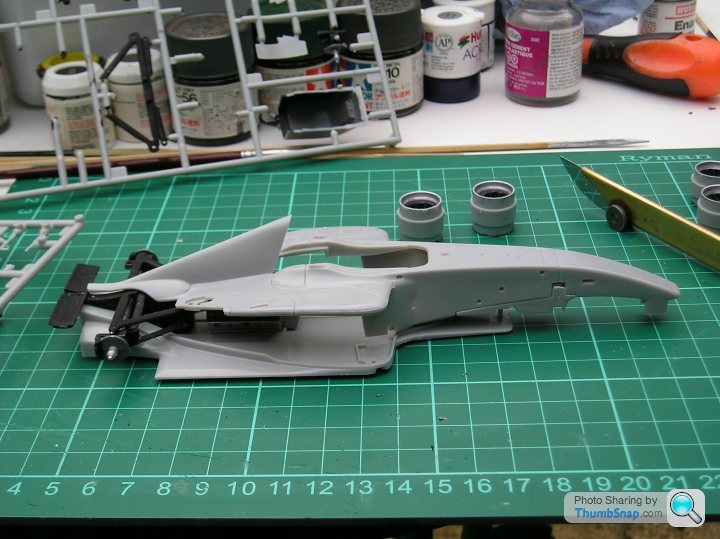
With the side pod panels in place there will not be a lot to see, so we'll have to see.
Not a lot to tear into yet chaps but please feel free to advise, criticise and give me hell…
And I have already come to several conclusions
1 This isn't a kit I would have bought but as it was a gift I feel duty bound to do me very bestest.
2 And me very bestest isnt going to help a lot, 'cos I don't have all the colours I need to do this version and even the offer of assistance from Red Firecracker to source the colour has a bad feel to it.
{The turquoise paint has a silvery element to it on the versions of it on the decal sheet, I may still have to mix and meld paints to get a close match.}
3 I really hate acrylic paints, they don't seem to "paint" as much as slurp colour thickly over the plastic.
4 Modern enamels just don't "work" like the old Humbrol, Gloy and Airfix favourites used to.
Anyway, today I began with the suspension parts and the engine, no point actually building yet without the colours for the main body components but at last I have parts off the sprue and can get the basic feel of the kit.
Blinking acrylic thick sh***y crap paint but at last some parts glued together and arranged for fit, I will be dealing with the not very silky looking black next.
I had considered a wiring job on the engine but there is bugger all to see anyway so that has been ditched as plan A
A few pictures for fun:
the elusive turquoise colour, you can just make out its metallicness on this pic
An alarming lack of transmissibility between Ferarri based pwoer plant and the gearbox, maybe I should work on it a bit.
Not yet sure how interested in "betterness" I am with this model, it is unlikely to be my best ever model. That was a diorama of Nantucket whaleboatmen hunting the great white Moby.
With the side pod panels in place there will not be a lot to see, so we'll have to see.
Not a lot to tear into yet chaps but please feel free to advise, criticise and give me hell…
dr_gn said:
Perdu,
Remind me why you aren't just mixing what Revell sugguest for the decal colour? It will probably be spot on.
Acryilcs? You can't brush paint them, they need airbrushing really. Then again I find I'm airbrushing everything these days - even the smallest components, because a brush painted finish always seems so inconsistent. I think you're right about modern enamels. I bought a stack of them for the WW SE5a, and having tested a few they take days to dry - even the matt ones. this wasn't the case 20 years ago.
If I'm going to criticise anything it's the wheels. The silver isn't neat enough! When I built the Tamiya Honda RA272 I got the silver wheel rims pretty much perfect by first painting black, then spinning the wheels up in a drill clamped in a bench vice, then touching a brush loaded with silver on the rims.
Cheers!
Bang on with the wheelsRemind me why you aren't just mixing what Revell sugguest for the decal colour? It will probably be spot on.
Acryilcs? You can't brush paint them, they need airbrushing really. Then again I find I'm airbrushing everything these days - even the smallest components, because a brush painted finish always seems so inconsistent. I think you're right about modern enamels. I bought a stack of them for the WW SE5a, and having tested a few they take days to dry - even the matt ones. this wasn't the case 20 years ago.
If I'm going to criticise anything it's the wheels. The silver isn't neat enough! When I built the Tamiya Honda RA272 I got the silver wheel rims pretty much perfect by first painting black, then spinning the wheels up in a drill clamped in a bench vice, then touching a brush loaded with silver on the rims.
Cheers!
obviously
I have an old Humbrol Metal Cote "very scary shiny silvery chromey" colour under restoration as we ponder, try that again tomorrow. A little Humbrol old school thinners to de-thicken the remainder. New style Humbrol is nowhere near as chromey.
The buggeration factor with the wheels is that stupid black paint
I expect I am going to strip most of it off everything
Supposed to be semi silky (used to be, honest guv!) but has simply dried like a thick coat of diung every where I looked, noot sure if I even painted everything it has tainted
A coat of Klear will give it a realistic sheen but I expect I'm going to try again with another brand'
I bought a few tins of Extraclour for the Wessex and they do take a hell of a time to stop being tacky, bloody good colour match to my photos of the Cosford Wessex. Maybe a call to them for a decent few acrylics will ensue.
I somehow doubt this will finish in time for the "end date" of the GB
Still it's fun painting outdoors
 Mrs P has decided (FFS do NOT tell Eric or he will have a real Oirish belly laugh) THAT THE SMELL OF MODELLING IS MAKING HER ILL
 I expect the Revell mix WILL work
but trying the same amounts with Humbrol's old style paints just doesn't.
One worry with the Revell mix is that the decals (yup I still want to call the bloody things transfers but time marches onwards inexorably) are definately metallic on the turquoise bit, you can see the particles reflect differently in the sun, but the colour recipé doesn't have a silver or any other component.
I wonder if a call to Peter Sauber would help
Red Firecracker said:
Don't discount that that the decals may be poor quality. I wouldn't mind betting that there is a silver layer in there to boost the top colour and it could be the case that the top colour layers are thin/poor so the silver is showing through.
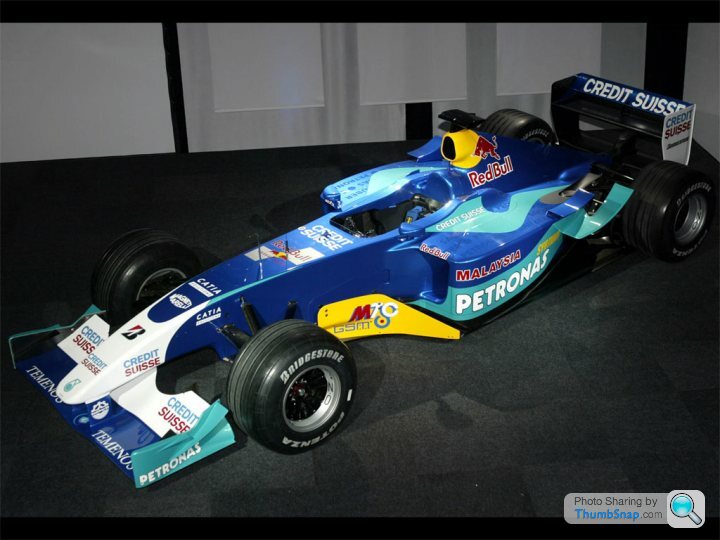
I've seen the real car and from memory it is a solid non-metallic colour. It's Petrobras' corporate colour so may be worthwhile looking at other applications of it to check, such as the current Mercedes.
Aha that is good news maybe the RAL colour will work then after all.I've seen the real car and from memory it is a solid non-metallic colour. It's Petrobras' corporate colour so may be worthwhile looking at other applications of it to check, such as the current Mercedes.
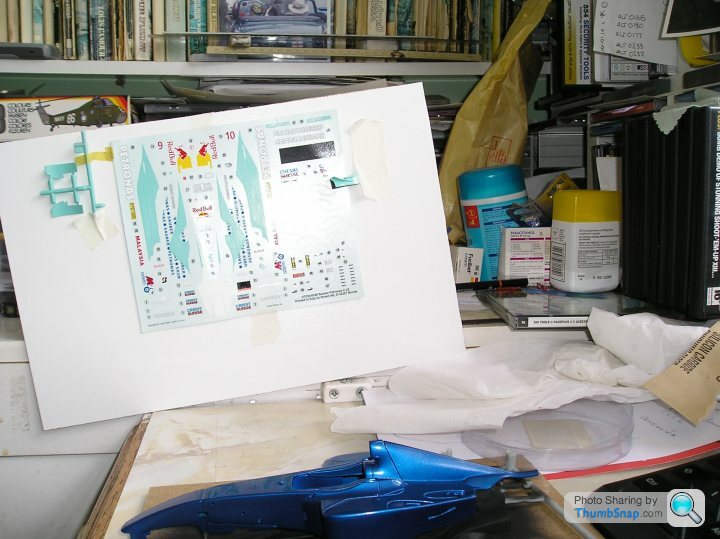
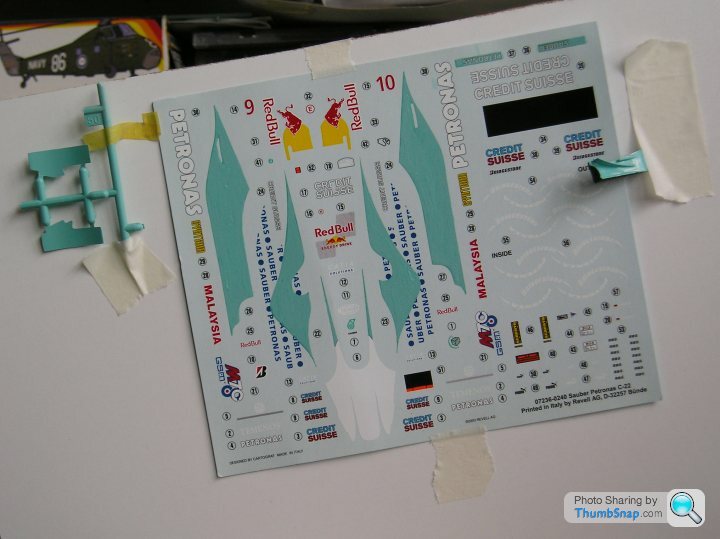
The rest of the decal sheet is confusing too, tells me use number 58s on the wheels but doesn't print those items and has a set of wheel transfers that arent marked instead
Doh
Having just taken a look at "petronas sauber" images on Google I see what you mean about the colour
And Eureka, a Revell decal sheet identical to mine except in one very subtle differencence, the items I can't find on my sheet are clearly visible on the one depicted
Its turquoise looks a little bit "oddly metallic" in tone too
Weird huh
I think I am going to rub off the acrylic paint with a wooden stick where it has gone thick and manky and try to rescue it with the Paasche airbrush, and some thinning out, then fix the chrome on the wheel outers
More to show in a day or so I hope
RF I will email tonight
bill
Busy again today 'cos it didnt hardly rain  , so no progress yet...
I do fancy trying decanting the Tamiya paints but am a bit worried about what to use as a carrier.
Will Tamiya X-20A thinners do it or will I need to get something "better"?
Should I risk adding celly thinners or even white spirits and treat it like "old school Humbrol" when I have a jar full of colour?
, so no progress yet...I do fancy trying decanting the Tamiya paints but am a bit worried about what to use as a carrier.
Will Tamiya X-20A thinners do it or will I need to get something "better"?
Should I risk adding celly thinners or even white spirits and treat it like "old school Humbrol" when I have a jar full of colour?
What a poor model I am making here
Must be me, bad workman etc, the side pod panels which I am trying to fit so I can spray the body blue soon has awful panel joints where the real Sauber has a very smooth face.
So now instead of getting ready to spray soon I am involved in a joint removing session with Mr Surfacer 1000…
Which reminds me, I bought my little bottle at Cosford during the Modellers Show in spring.
The guy demonstrating it was filling joints and then wiping it off the surface with a wet cloth, which removed the surface spare filler and left the cracks and crevices smoothly filled and needing no further action.
The guy was using Iso Propyil wotsit (alcohol?) on his tissue, maybe that would do the trick if I could remember where you folks get it from.
My local Lloyds Chemist says I wont be able to buy the stuff anywhere, on this I'm sure I can call it Bull-shine.
Has anyone ever tried using IPA with decanted paint?
RF, I havent tried a Googling yet, will do this evening though
Cheers
Aha
I happen to have a fairly convenient branch of RS handily over there in Brum, so if the pharmacist gets shirty I can pop over...
Thanks dr_gn
Funnily enough I have their mega catalogue inna big box, just never thought to check it out in there
I take it you think that IPA should work the oracle for me then
Cheers
Ok now I have the IPA, Maplins on the shelf £15 ish RS Components £12.35 inc VAT for a litre, so RS it was for a heavy bulgy litre can, guy said he thinks it may be overfull 
I will be decanting tomorrow and attempting to spray the Mica Blue after cleaning up the side pods which look horrid at present.
Has anyone attempted spraying Xtracolour enamels with IPA or should I just thin with white spirits as with old school Humbrol enamels? All this chemistry makes me wish I'd paid attention fifty years ago at St Phil's
Red Firecracker thanks for all the useful links to the Sauber photos, having them about makes it far easier to get the feel for the car. Have you had my email yet? Sent a couple of days ago.
Thanks everyone for the advice so far, I feel a lot better about the model now I have the IPA (and I have a proper sized mandrel for the wheels on my minidrill at very low speed which will soon sort the rims doc)
Red Firecracker said:
Yep, did reply but I'll send again. Paint was posted today, should be with you tomorrow.
oh bugger cue embarassing noises "off"no emails come through here, not sure which email PH uses so I will scroll through the other less used ones
I am looking forward to trying the new paint, could be a great new horizon for me thanks
Red Firecracker's turquoise came in on the Saturday post
Today I had several almost fun hours with the airbrush, the IPA and the Mica blue aerosol paint and the turquoise...
First I sprayed all over the receiving parts with Tamiya Gloss white thinned with IPA, beautiful
When dry I had my first "go" at decanting aerosol paint into a glass jar. Remind me to wear latex gloves next time, thank God I wasn't painting in red. The neighbours might have thought I had been setting about Mrs P with a hacksaw. I had blue paint all over my hand and arm, next time I won't.
About ¼" of paint in the bottom of the jar which I thinned with IPA, not sure it was the right stuff, it was hell to clean the brush out afterwards
Anyway, I sprayed most of the "blue to be" areas lightly with a few coats, mixing up more paint as the jar emptied.
As the coats built up very nicely I kept this up for ages, then I decided to spray some of the loose components with the rattle can just to see what happened on spraying
It actually looked pretty good so I decided to cover all the blue bits wth the can for today and will be giving it a finishing coat tomorrow (with the airbrush)
Then I moved on to the main event, turquoise bits to compare with the decal sheet colour. I decided not to thin the Solo paint as it claims to be airbrush ready
It sprayed with a fine cloud of colour and gave good cover in use
My problem is that as I expected the turquoise on the decal sheet is a rather less pleasing colour and looks less like the Petronas Colour than the Solo paint colour does. Holding the pieces I painted today against the box art they look near enough perfect match, I wish I could say the same about the decal sheet
A couple more pictures showing the lovely Mica Blue in action

and
and to compare
IPA certainly doesn't act as a cleaning thinners for the Tamiya Aerosol paint, better get some celly thinners tomorrow, buggerit…
Today I had several almost fun hours with the airbrush, the IPA and the Mica blue aerosol paint and the turquoise...
First I sprayed all over the receiving parts with Tamiya Gloss white thinned with IPA, beautiful
When dry I had my first "go" at decanting aerosol paint into a glass jar. Remind me to wear latex gloves next time, thank God I wasn't painting in red. The neighbours might have thought I had been setting about Mrs P with a hacksaw. I had blue paint all over my hand and arm, next time I won't.
About ¼" of paint in the bottom of the jar which I thinned with IPA, not sure it was the right stuff, it was hell to clean the brush out afterwards
Anyway, I sprayed most of the "blue to be" areas lightly with a few coats, mixing up more paint as the jar emptied.
As the coats built up very nicely I kept this up for ages, then I decided to spray some of the loose components with the rattle can just to see what happened on spraying
It actually looked pretty good so I decided to cover all the blue bits wth the can for today and will be giving it a finishing coat tomorrow (with the airbrush)
Then I moved on to the main event, turquoise bits to compare with the decal sheet colour. I decided not to thin the Solo paint as it claims to be airbrush ready
It sprayed with a fine cloud of colour and gave good cover in use
My problem is that as I expected the turquoise on the decal sheet is a rather less pleasing colour and looks less like the Petronas Colour than the Solo paint colour does. Holding the pieces I painted today against the box art they look near enough perfect match, I wish I could say the same about the decal sheet
A couple more pictures showing the lovely Mica Blue in action
and
and to compare
IPA certainly doesn't act as a cleaning thinners for the Tamiya Aerosol paint, better get some celly thinners tomorrow, buggerit…
I did consider repainting the decal sheet's turquoisey bits by masking it off and using RF's colour because it is so very close to the proper colour that the annoying "wrong" colour is beginning to rankle.
Has anyone tried cutting the Tamiya tape with a razor blade on the decal sheet? Will it be sticky enough to damage the rest of the decals?
It certainly looks thin enough to enable accurate cutting of the masked area away.
I spent a whole morning the other day trying to get a mix of light blue and green to come even close, which was a dampener 'cos I usually get very close when mixing colours. I have been painting in watercolour and gouache for centuries (feels like...), that was a colossal fail for me.
After a lot of dithering I made a decision
Solo paints DO brush but grudgingly
After reading your advice, including trying to match the colour I decided to grasp it firmly by the 000 brush and the number 2.5 reading glasses. I had a little of RF's Solo decanted (word of the week this week for me!) in an airbrush glass jar, ready for a second coat when necessary.
I had a little ride around the edge of one of the lower panels and as it seemed reasonable, kept at it.
It didnt like being brushed and will need a couple of extra coats when in place to tidy the levels before a shiney varnish coat, for this model I've decided to go silky-gloss in finish
^^^^^
With flash
^^^^^
Without flash, the wing fence on the right has been treated with Klear and hasn't significantly changed from the "plain unvarnished truth"
Some of the rear wing decals will need a tad of fettling but on the whole I think it will do
Running out of GB time aren't we?
I knew there was a O in it someplace and I have yours packed back in it's box so that bar emergencies it can come home soon, so I didn't read the label

I could have done with not being in this GB but nothing ventured…
I still have loads to do on my Wessex, canopy and side canopy win-doors to mould and fit and a coat of Extracolours Lichen Green to get it going.
And sort which HC2 it will be, kinda expeting to make it the Cosford Wessex, but that one doesn't even have a rescue winch any more
And it's "Club" on Sunday, maybe the Sauber will be ready, but not if I can't get better pics of the seat belts.
OK
Enough for one evening!
I know what Red Bull gives you
Bloody nightmares to attach that one dimensional shape all around a triple curvatured moulding
No problem, a dab or two of "lovely" yellow will soon sort that out (we really do need some kind of irony smiley, or maybe there's one I haven't noticed)
I am rather pleased with the look of the painted decals, very close to the colour on the box lid as well as the real thing picture shown further up t'thread.
Tomorrow I will sort out the seat belts that I need, there are two decals said to represent the belts but I think I want just a little more. With the belts sorted I can then finish off the cockpit pod and pop it in from below along with the miniscule screen.
I have to say here and now, in general the "fit" of parts has been excellent but that is spoilt in places by the over thick moulding tags, which I know are needed to pump polystyrene through the moulding gates but make extra work after parts are de-sprued after painting.
I dont think this scale needs much in the way of extra detailing, the monocoque hides almost everything but maybe… Another day another model.
Anyway, nuff said, more later in the week
edit 'acos some clot forgot to post the picture
Edited by perdu on Tuesday 12th July 22:18
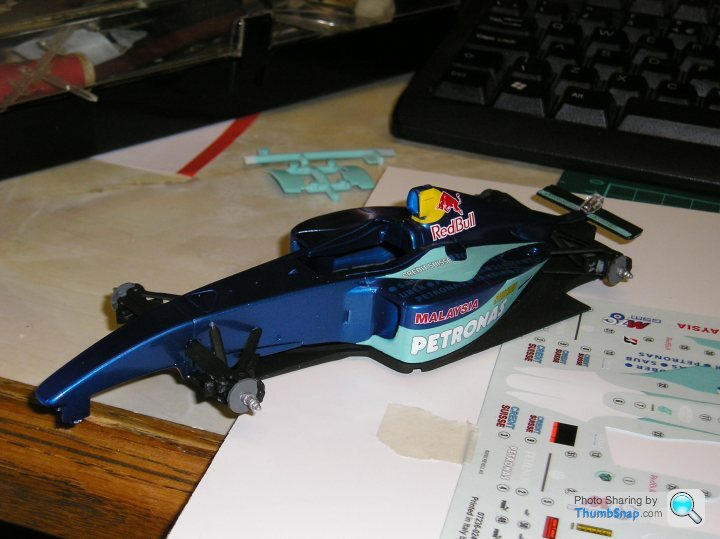
I intend taking this horrible racing car to "club" on Sunday
finished
This was the state of play this evening before I finished the body decals at long last
Last night I spent hours working out ways of fitting the seat belts that are not provided in the kit. Looking at doc's fabulous belts for his model I got awfully jealous and began by twisting copper wire around several mandrels and soldering the resultant twisted loops then flattening them out.
Didn't look very good but in a deep dark hole maybe no-one would notice
Then I went to beddy-byes wondering which material to make the belts from, A J-cloth seemed like a decent proposition last night.
This morning I woke up and blessed Demon Tweeks, a quick skim through my old 2007 catalogue brought me home happy.
Sauber use Schroth seat belts in the F1 cars and guess what was available for motorsport use in the catalogue
Yup

Stuck to a length of wide Tamiya tape for strength, then the outlines cut out ready to poke through the holes I made in the seat moulding to suit
By an amazing co-incidence the manufacturers logo in the picture was within a few thousandths (of an inch) of the logo printed on the decal sheet and intended to be stuck to the seat moulding to vaguely represent the actual belts
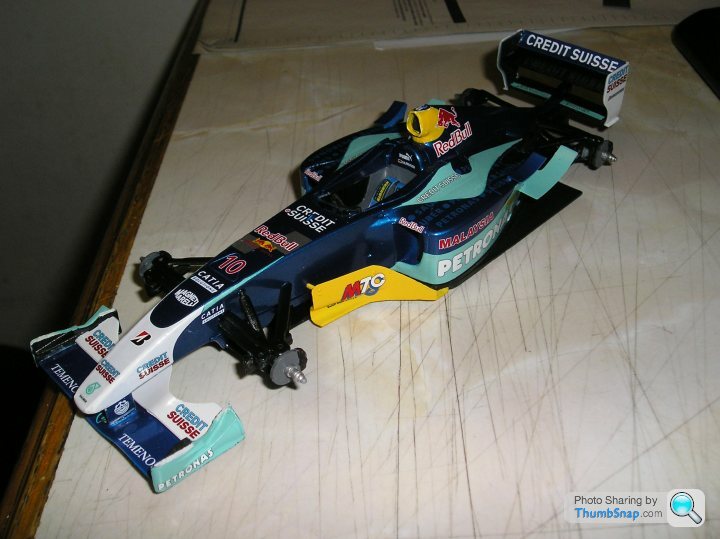
Now we have a car

The wheels and tyres are all that need fixing now after tonight, front spoiler now on and rear spoiler built and awaiting fitting to the tail end tomorrow after the Contacta has set hard
Wheels and tyres need about fifty blooming decals sticking on them before they can go on the car and the tyres need distressing on the surface that runs on the road
Suddenly the Mrs has decided she likes it and "perhaps we should buy a display case to show it in the lounge"
funny old game, innit
edit
I know there are blinking great trenches all over it including joint areas, not fussed. If I fix one lot I ought to fix the bally lot and with THIS paintjob, sod that!
finished
This was the state of play this evening before I finished the body decals at long last
Last night I spent hours working out ways of fitting the seat belts that are not provided in the kit. Looking at doc's fabulous belts for his model I got awfully jealous and began by twisting copper wire around several mandrels and soldering the resultant twisted loops then flattening them out.
Didn't look very good but in a deep dark hole maybe no-one would notice
Then I went to beddy-byes wondering which material to make the belts from, A J-cloth seemed like a decent proposition last night.
This morning I woke up and blessed Demon Tweeks, a quick skim through my old 2007 catalogue brought me home happy.
Sauber use Schroth seat belts in the F1 cars and guess what was available for motorsport use in the catalogue
Yup
Stuck to a length of wide Tamiya tape for strength, then the outlines cut out ready to poke through the holes I made in the seat moulding to suit
By an amazing co-incidence the manufacturers logo in the picture was within a few thousandths (of an inch) of the logo printed on the decal sheet and intended to be stuck to the seat moulding to vaguely represent the actual belts
Now we have a car
The wheels and tyres are all that need fixing now after tonight, front spoiler now on and rear spoiler built and awaiting fitting to the tail end tomorrow after the Contacta has set hard
Wheels and tyres need about fifty blooming decals sticking on them before they can go on the car and the tyres need distressing on the surface that runs on the road
Suddenly the Mrs has decided she likes it and "perhaps we should buy a display case to show it in the lounge"
funny old game, innit
edit
I know there are blinking great trenches all over it including joint areas, not fussed. If I fix one lot I ought to fix the bally lot and with THIS paintjob, sod that!
Edited by perdu on Friday 15th July 23:06
dr_gn said:
Looks great I reckon. Nothing wrong with using photographs for cockpit detail - I did the same for the instrument panel on my Spitfire rebuild and it looks fine.
What's the score with the white paint on the airbox opening? It's yellow in one photo and white on the others.
Ah that would be because I just did it in yellow after white background painting to prevent the yellow going "yucky" as it can if painted on dark backgroundsWhat's the score with the white paint on the airbox opening? It's yellow in one photo and white on the others.
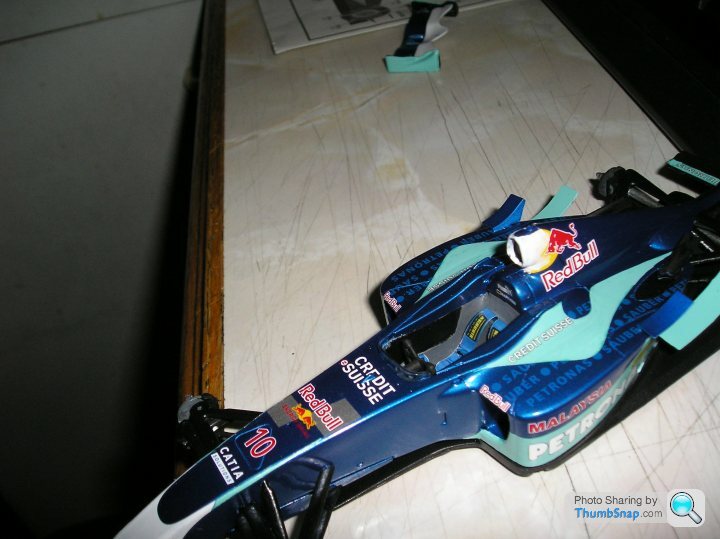
rear spoiler in situ and all decals finished ('cept wheel ones)
I will be touching in the turquoise paint tomorrow so it looks a lot ragged for now
On its (wrong) wheels [apparently Revell have given me BBS wheels which the C22 didn't race on in 2003
]Having studied the SABELT in my car in the garage I decided that there should be a sheen on the material so rather than risk losing it I left it alone (Sorry RF
)I have given it an all over coat of Klear after finishing those interminable transfers
BBS in three places on each wheel, along the slopey face too, talk about overkill. Nearly killed me they did.
Fortunately the slight misalignment on the Tremenos decal on the left front wing isn't apparent on eyeballing the model
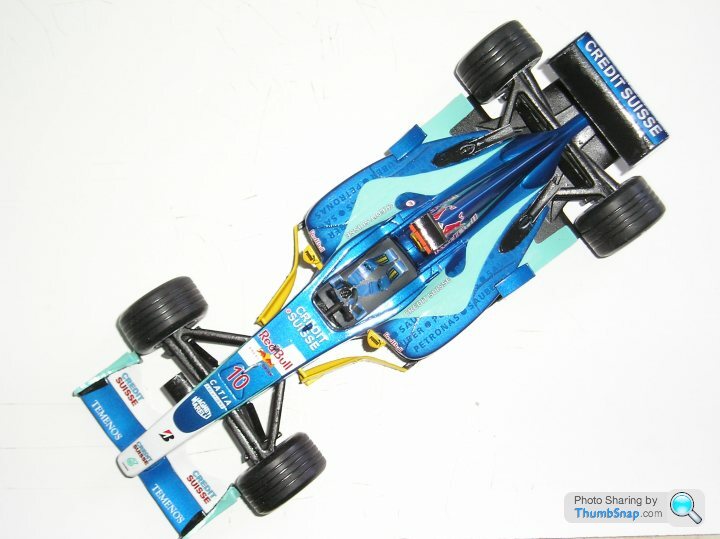
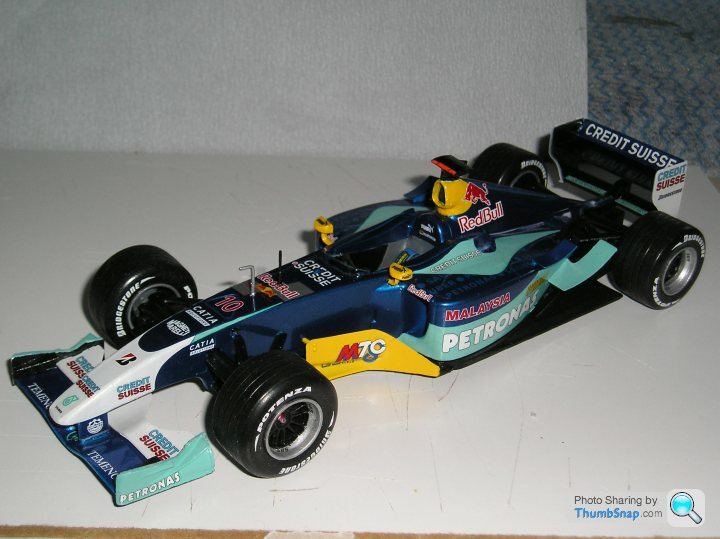
I am grateful to Red Firecracker for finding me the turquoise paint, all coated in Klear it looks the business to me. Cheers
And very grateful for the comments and conferences we've all had which helped me to this conclusion, cheers all!
I tried to make proper use of the guidances from you but at the end it looks as if I haven't quite done the trick, f'ristance the shiney wheels didn't quite cut it but that was as good as I could get.
I doubt if I will join another racing car build though, this just didn't grab me where I need grabbing
maybe I'd have been happier if I chose the car, but with this one staring me in the face for three or four years it needed building or trashing. Missus likes it so it stays
Edited by perdu on Saturday 16th July 18:00
On its (wrong) wheels [apparently Revell have given me BBS wheels which the C22 didn't race on in 2003
]Having studied the SABELT in my car in the garage I decided that there should be a sheen on the material so rather than risk losing it I left it alone (Sorry RF
)I have given it an all over coat of Klear after finishing those interminable transfers
BBS in three places on each wheel, along the slopey face too, talk about overkill. Nearly killed me they did.
Fortunately the slight misalignment on the Tremenos decal on the left front wing isn't apparent on eyeballing the model
I am grateful to Red Firecracker for finding me the turquoise paint, all coated in Klear it looks the business to me. Cheers
And very grateful for the comments and conferences we've all had which helped me to this conclusion, cheers all!
I tried to make proper use of the guidances from you but at the end it looks as if I haven't quite done the trick, f'ristance the shiney wheels didn't quite cut it but that was as good as I could get.
I doubt if I will join another racing car build though, this just didn't grab me where I need grabbing
maybe I'd have been happier if I chose the car, but with this one staring me in the face for three or four years it needed building or trashing. Missus likes it so it stays
Edited by perdu on Saturday 16th July 18:04
jpringle819 said:
It looks good, I am sure I would have given up if I had all the problems you had.
Thank youI didn't mention that I broke the front left suspension off this afternoon when I fitted the wheel did I?
ho hum
I love the detail work on the GTO chassis, looks very god too.
I just don't see myself as a race car modeller, I got very brassed off with this model.
Funny isn't it
Gassing Station | Scale Models | Top of Page | What's New | My Stuff