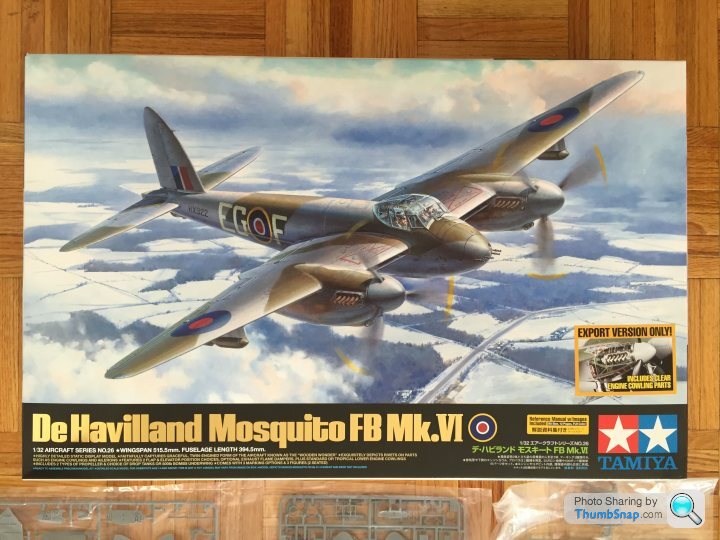
Tamiya 1/32nd Mosquito FBIV - build!
Discussion


Ok - I'm going for it, if people are interested!
I've started building this amazing kit. I haven't built a plastic plane kit for probably 30 years - and anything I built then was probably set alight and thrown from a window...
I know there are some very very talented aircraft/military model makers on here - so bear with me, and happy for any advice! Not going to do a 'how to...'!
I've got a cupboard full of F1 kits to build, as well as finishing my Caterhams - but I thought this would be a nice 'starter' to get used to small bits again!
I've always liked the Mosquito plane - something about the pure lines, speed etc - and the old films. I'm going to make the version which was used in Operation Jericho - the low-level bombing raid to knock a prison wall down, allowing resistance fighters to escape...the kit contains parts to show a variety of different configurations.
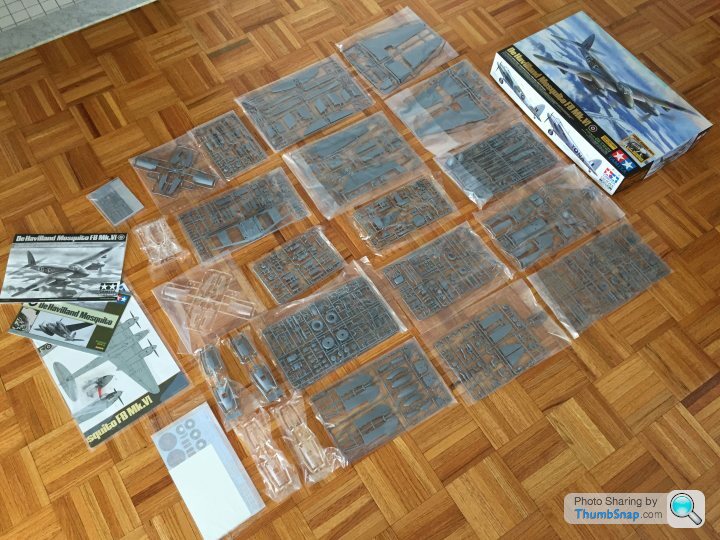
Open the box and it is STUFFED with packets of parts - some are double packed, and there are 2x of some sprue (2 engines etc etc) - pretty daunting number of parts, including PE and decals - nice little history booklet with some photo reference images and even some basic tools and magnets (to hold panels on)

I have also bought a 'how to...' book from here....
http://adhpublishing.com/shop/store/products/new-h...
...for some additional tips.
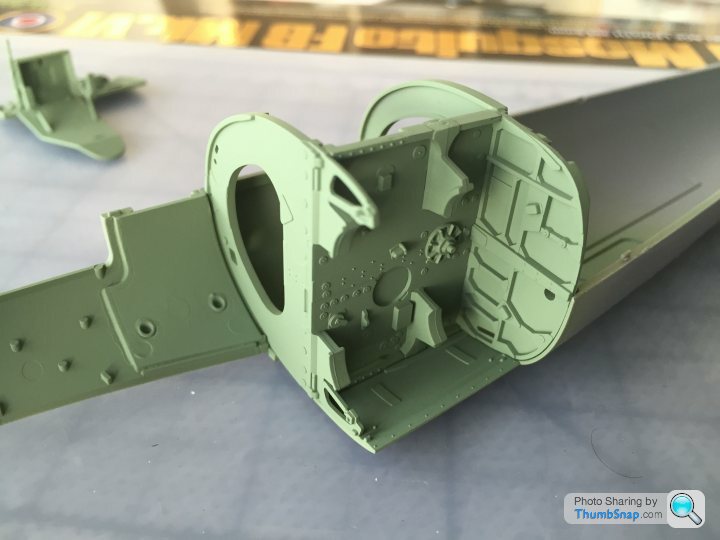
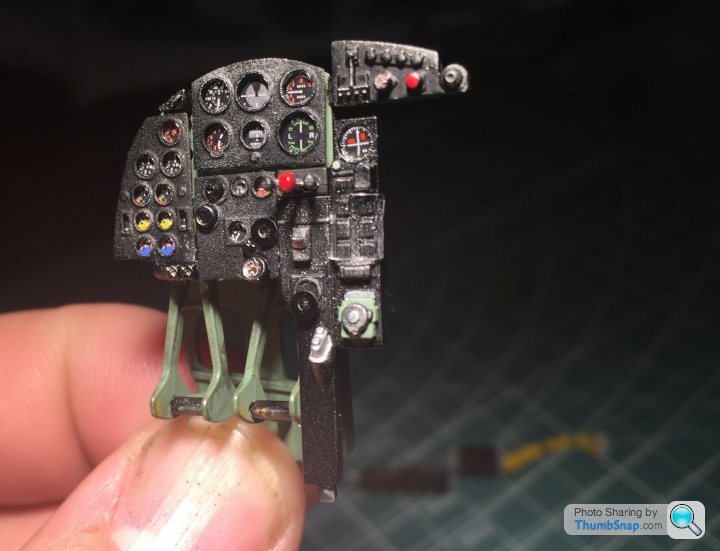
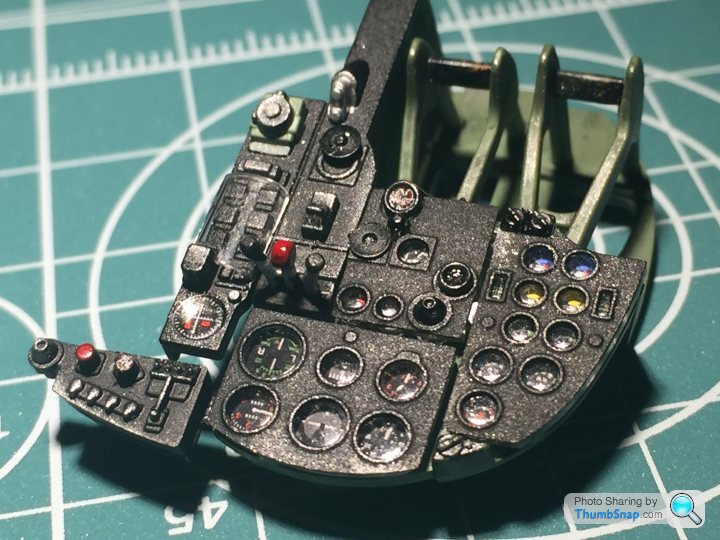
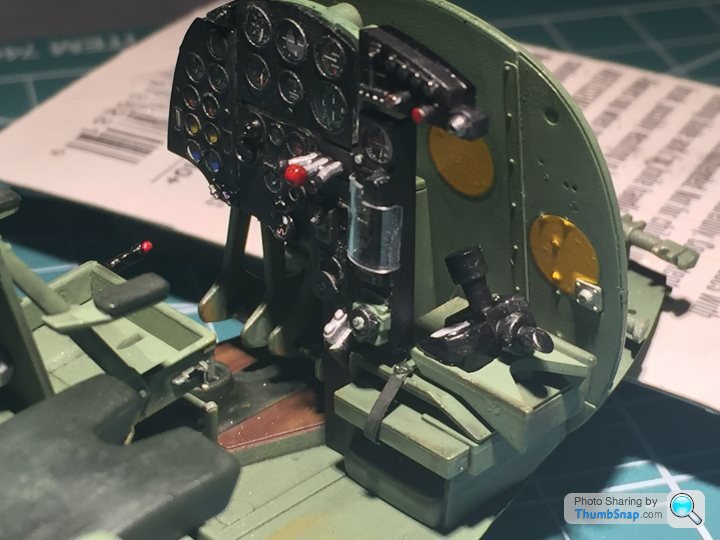
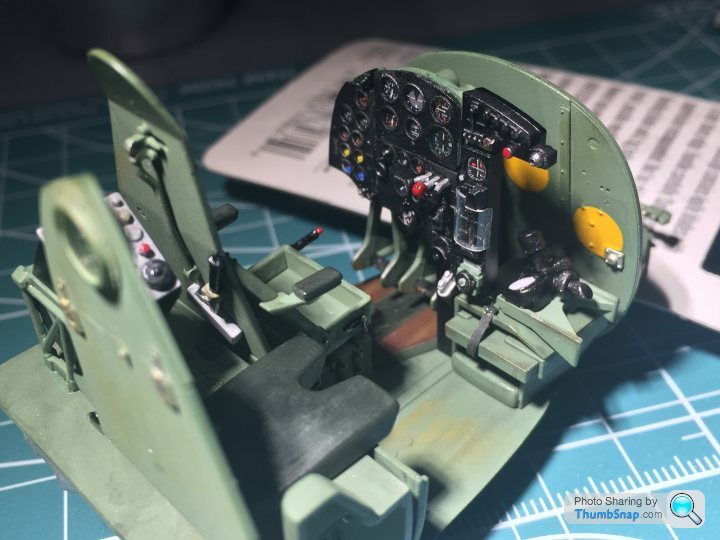
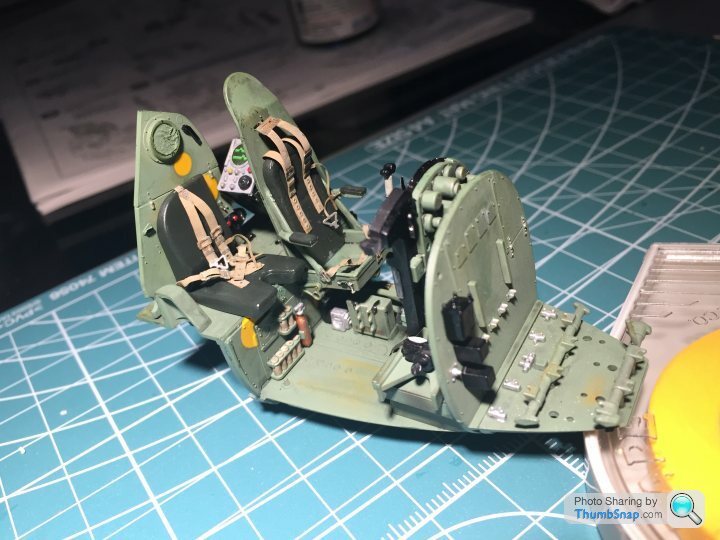
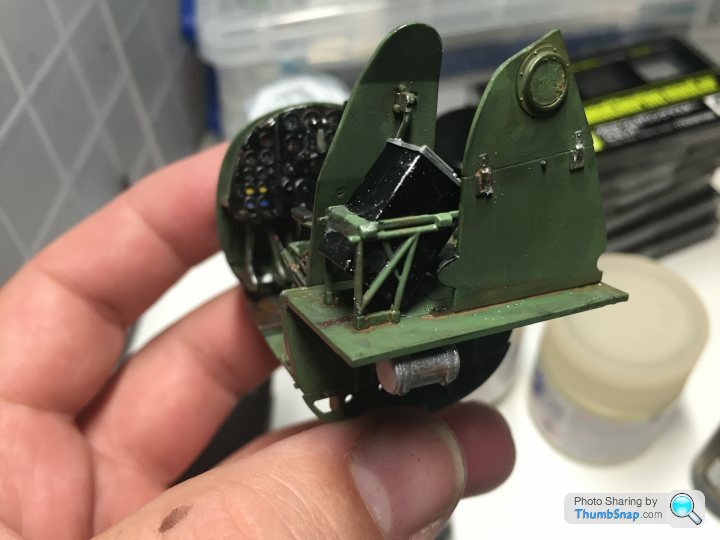
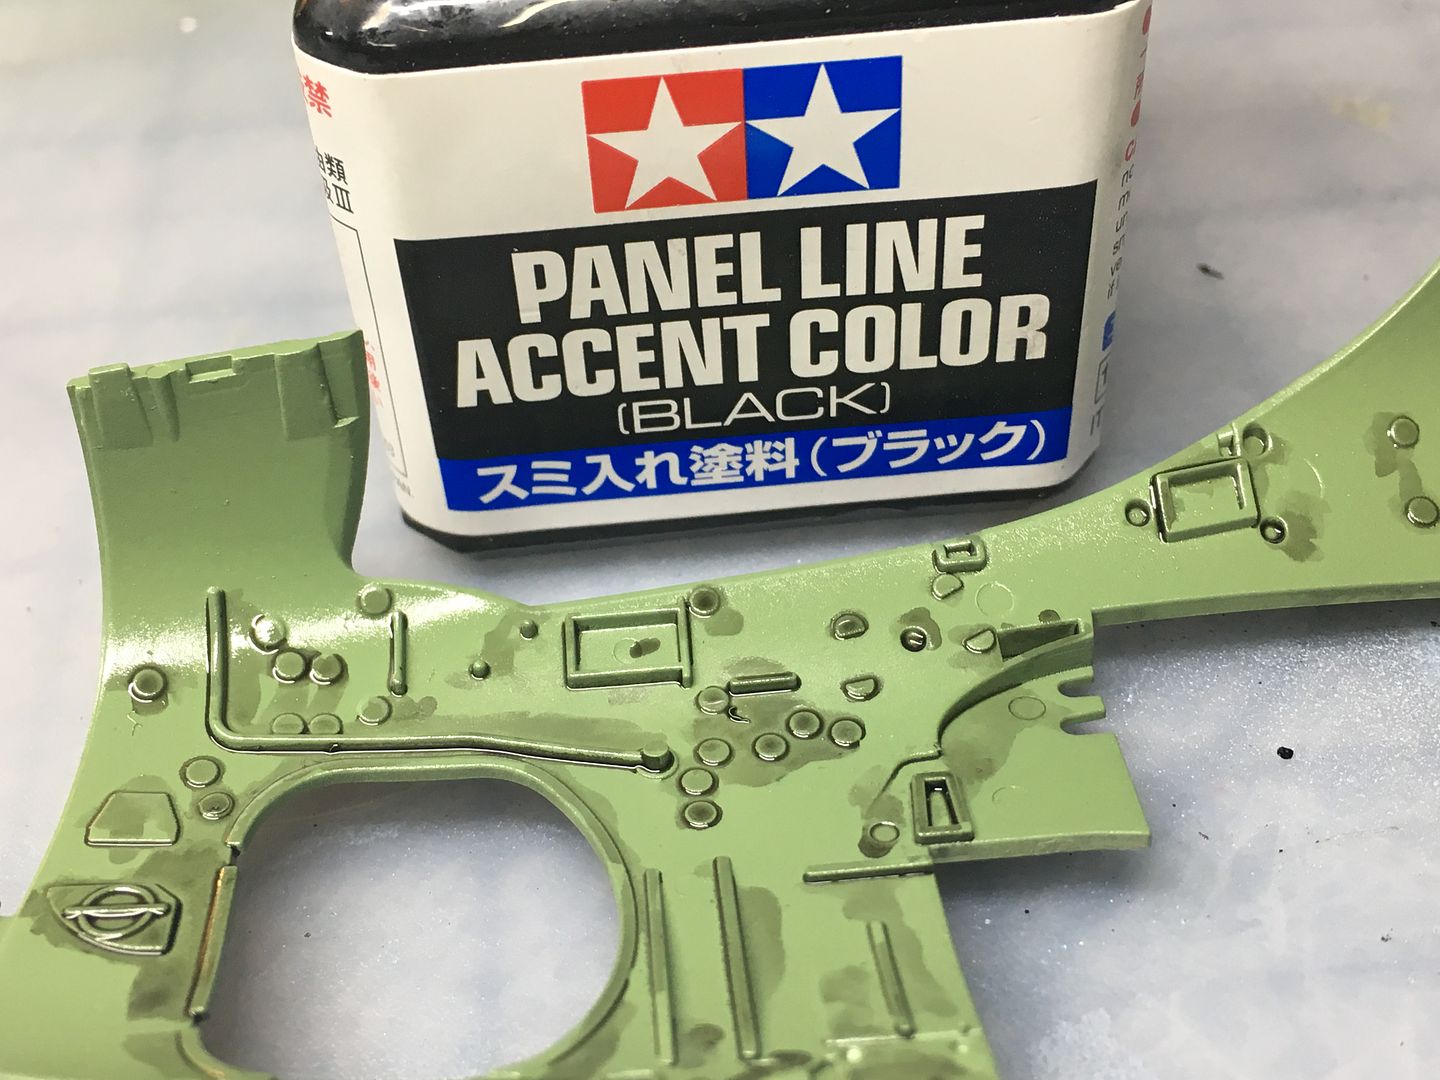
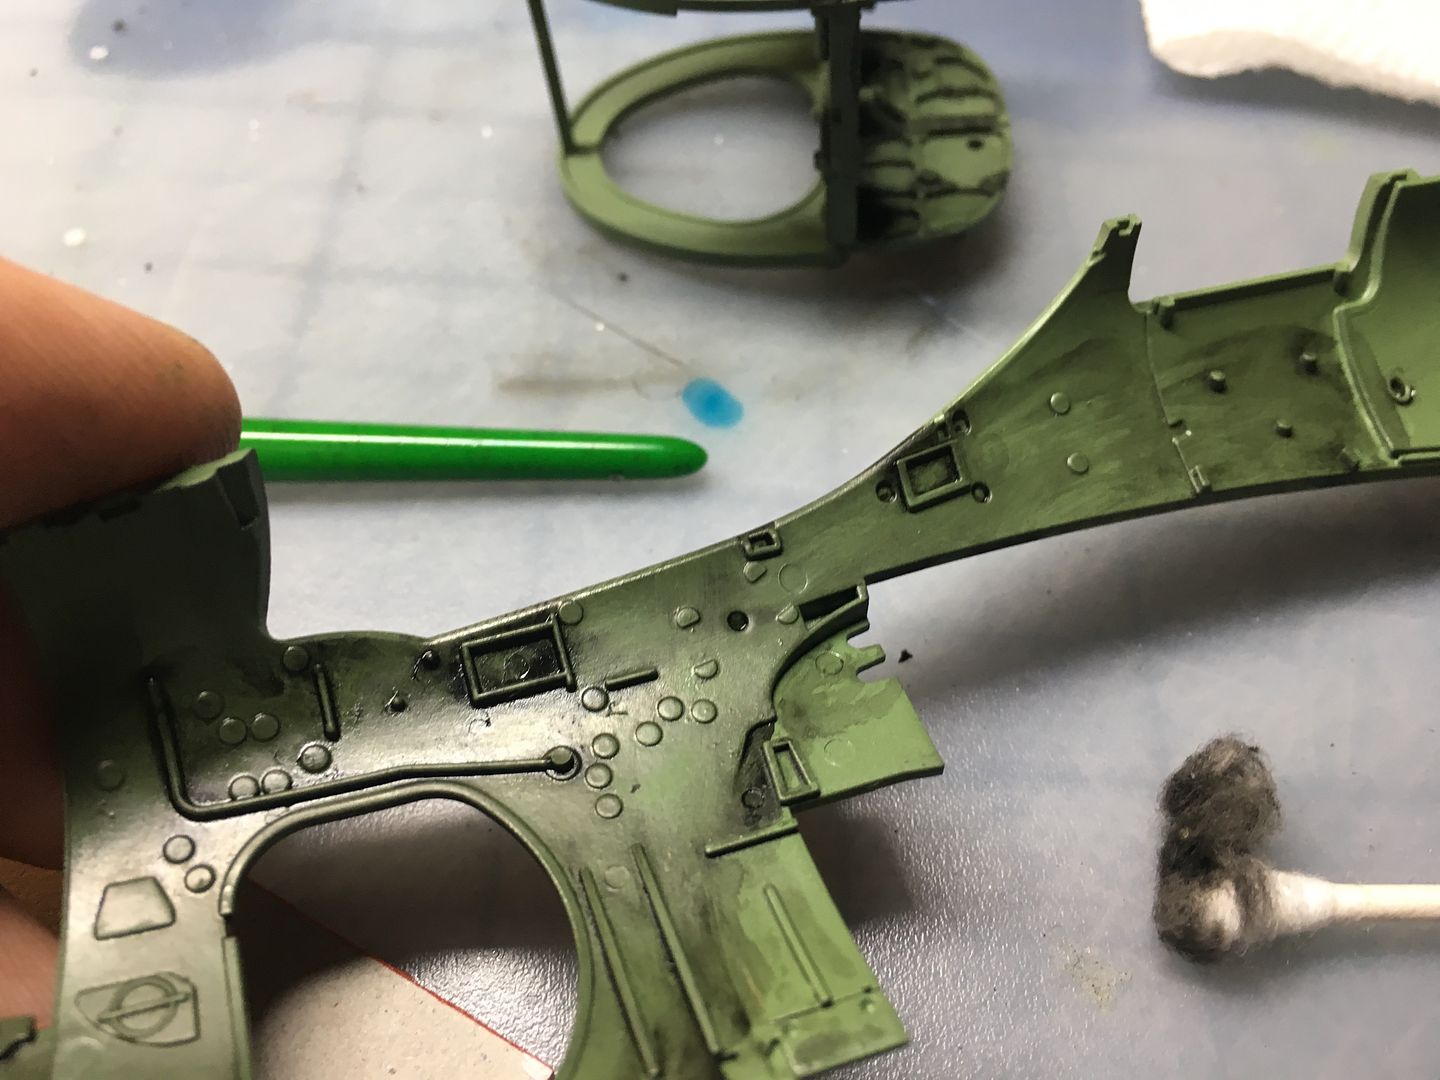
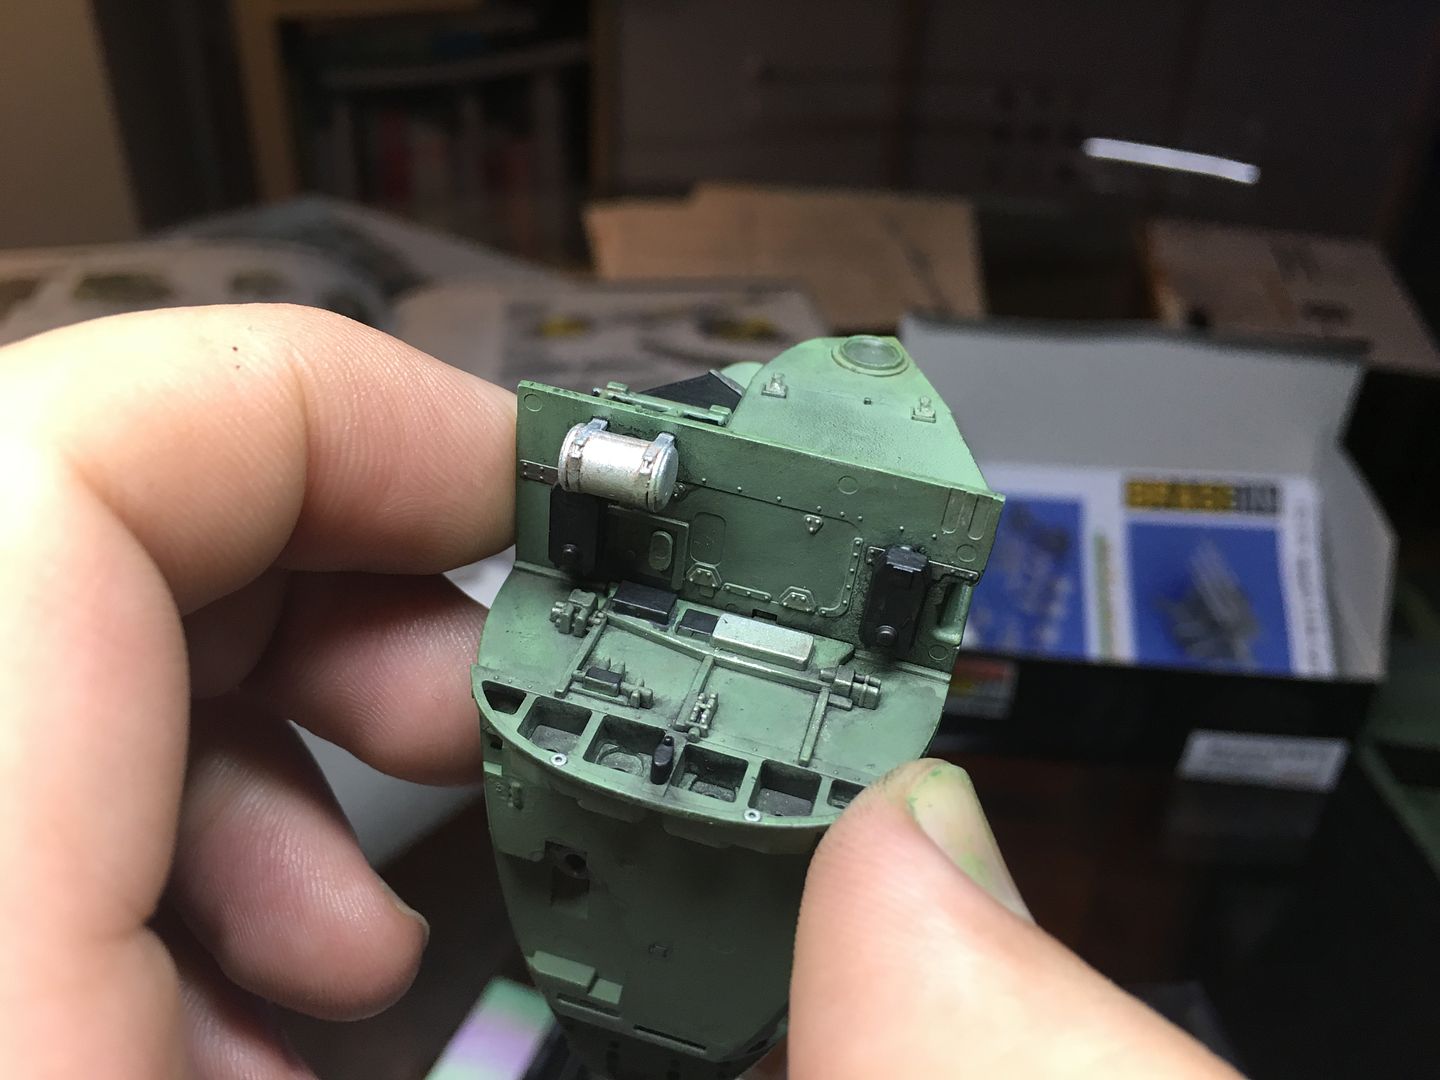
So last yesterday I got right in there and started, assembling the cockpit area. The detail is staggering, and every part goes together with amazing accuracy. Everything just fits. I followed advice from the how-to book and have assembled sub-assemblies to paint - rather than paint every separate part. All these parts are painted a green colour (XF-71) for cockpit interiors. I'm using Tamiya acrylics and an airbrush. I've painted everything below, will post pics later. The green looks superb.
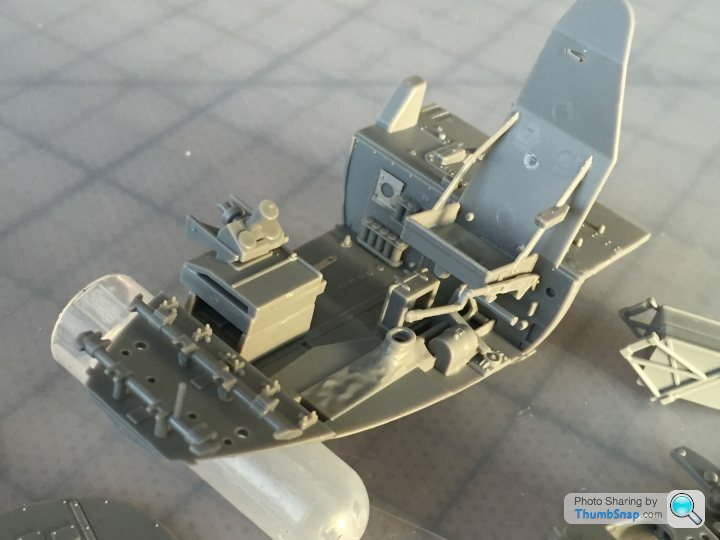
Having airbrushed the green, I shall brush paint details. I'm deciding if I do weathering effects or not. Done properly they always look great, so I think I shall give it a go - but it will be a learning process as I have not done this before!
More later....
I've started building this amazing kit. I haven't built a plastic plane kit for probably 30 years - and anything I built then was probably set alight and thrown from a window...
I know there are some very very talented aircraft/military model makers on here - so bear with me, and happy for any advice! Not going to do a 'how to...'!
I've got a cupboard full of F1 kits to build, as well as finishing my Caterhams - but I thought this would be a nice 'starter' to get used to small bits again!
I've always liked the Mosquito plane - something about the pure lines, speed etc - and the old films. I'm going to make the version which was used in Operation Jericho - the low-level bombing raid to knock a prison wall down, allowing resistance fighters to escape...the kit contains parts to show a variety of different configurations.
Open the box and it is STUFFED with packets of parts - some are double packed, and there are 2x of some sprue (2 engines etc etc) - pretty daunting number of parts, including PE and decals - nice little history booklet with some photo reference images and even some basic tools and magnets (to hold panels on)
I have also bought a 'how to...' book from here....
http://adhpublishing.com/shop/store/products/new-h...
...for some additional tips.
So last yesterday I got right in there and started, assembling the cockpit area. The detail is staggering, and every part goes together with amazing accuracy. Everything just fits. I followed advice from the how-to book and have assembled sub-assemblies to paint - rather than paint every separate part. All these parts are painted a green colour (XF-71) for cockpit interiors. I'm using Tamiya acrylics and an airbrush. I've painted everything below, will post pics later. The green looks superb.
Having airbrushed the green, I shall brush paint details. I'm deciding if I do weathering effects or not. Done properly they always look great, so I think I shall give it a go - but it will be a learning process as I have not done this before!
More later....
Thanks doc, value your opinion greatly having seen your stuff!
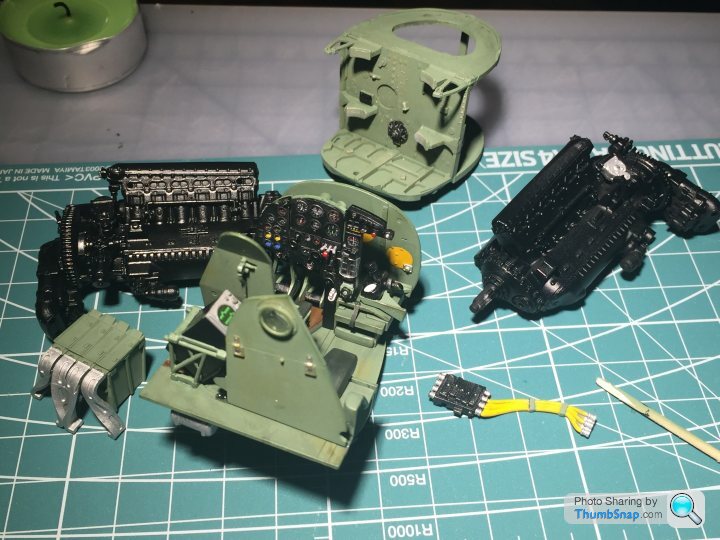
In terms of spraying - what you are looking at there are a few assemblies 'balanced' for the photo, so they are smaller than that...but you may be right about the weathering bit!
I have some of the Tamiya make-up
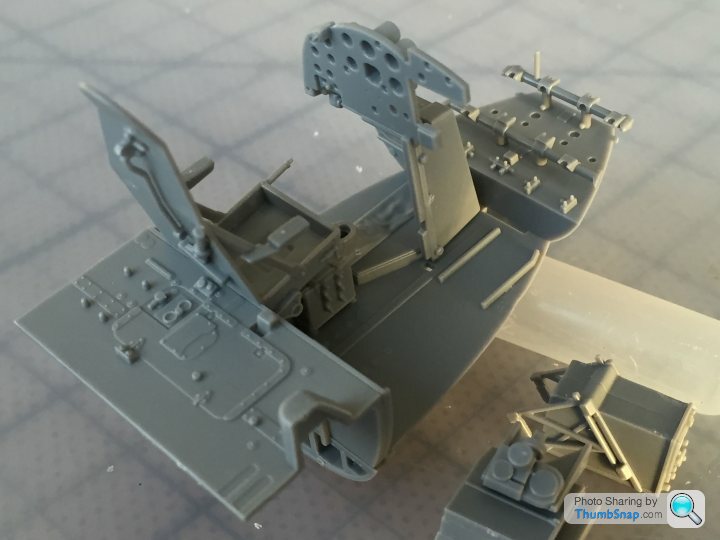
The kit goes together amazingly. I have had to do minimum sanding or removing of any lines - almost every spruce joint is somewhere that gets glued/hidden - superbly done.
Agree about Tamiya....
In terms of spraying - what you are looking at there are a few assemblies 'balanced' for the photo, so they are smaller than that...but you may be right about the weathering bit!
I have some of the Tamiya make-up
The kit goes together amazingly. I have had to do minimum sanding or removing of any lines - almost every spruce joint is somewhere that gets glued/hidden - superbly done.
Agree about Tamiya....


Thank you sir!
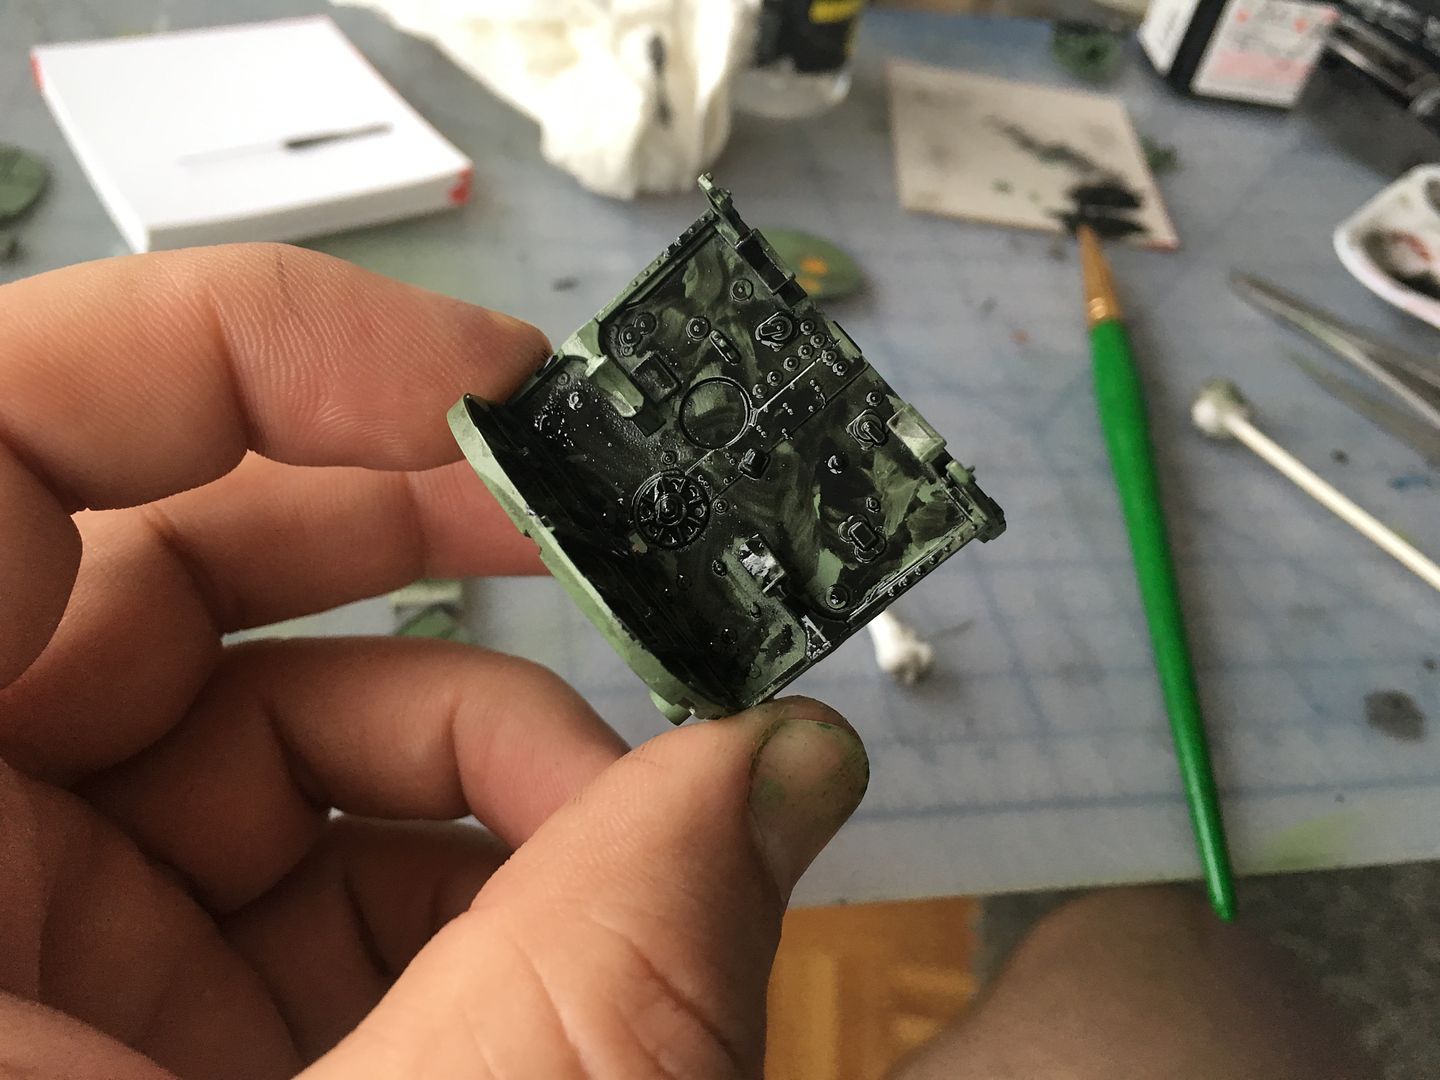
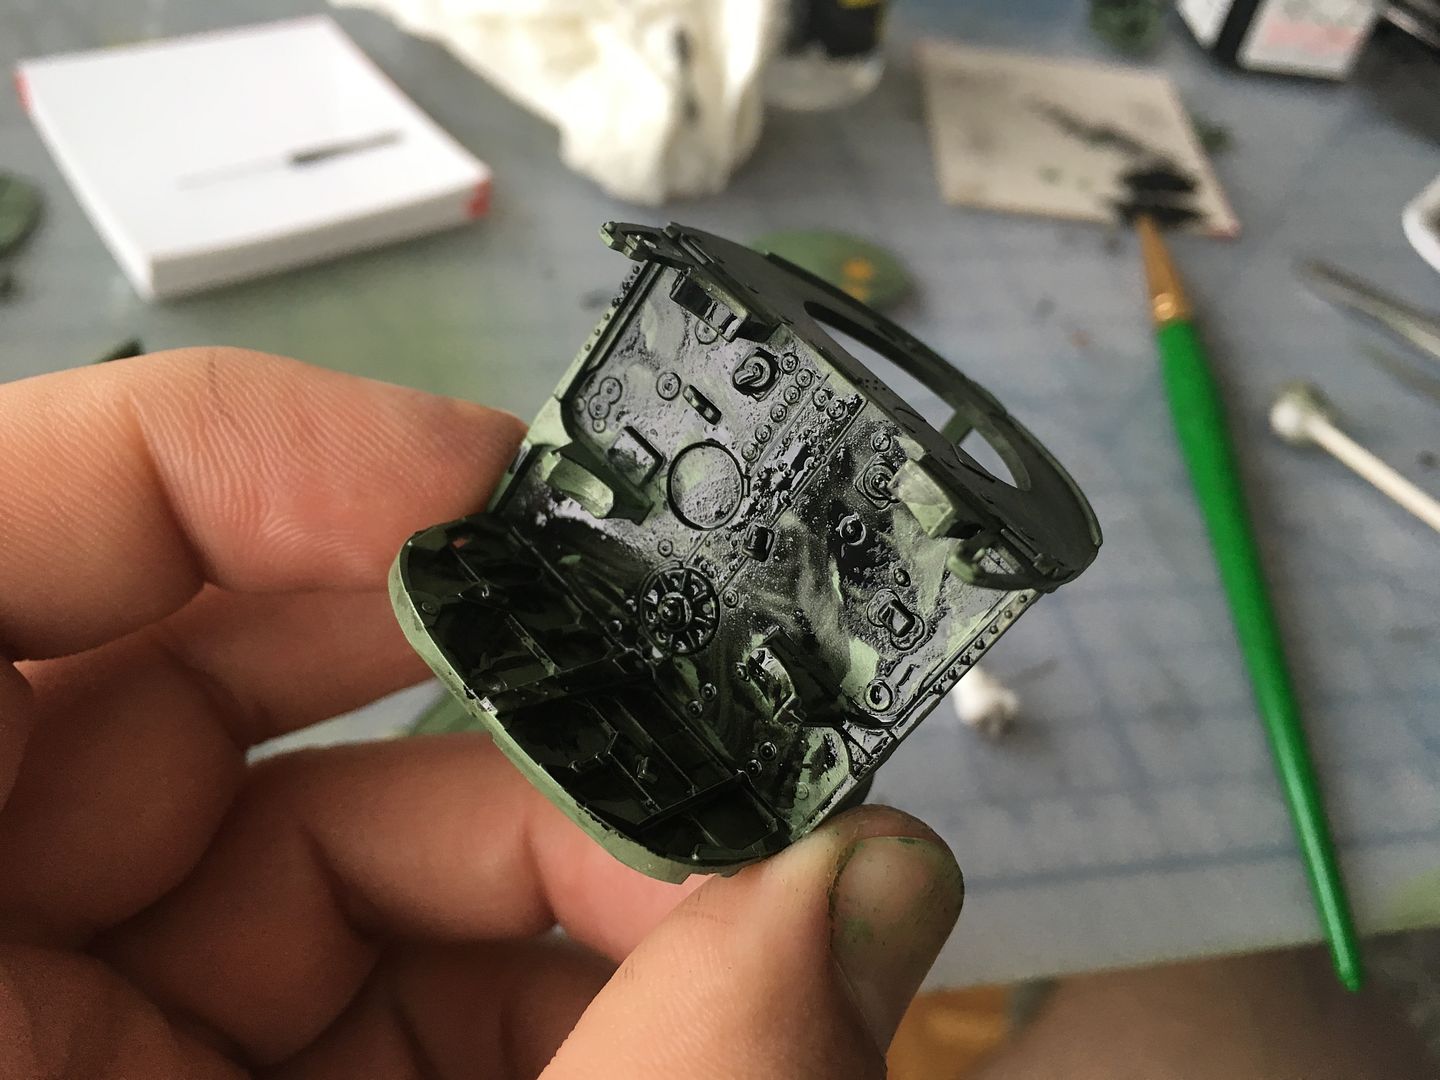
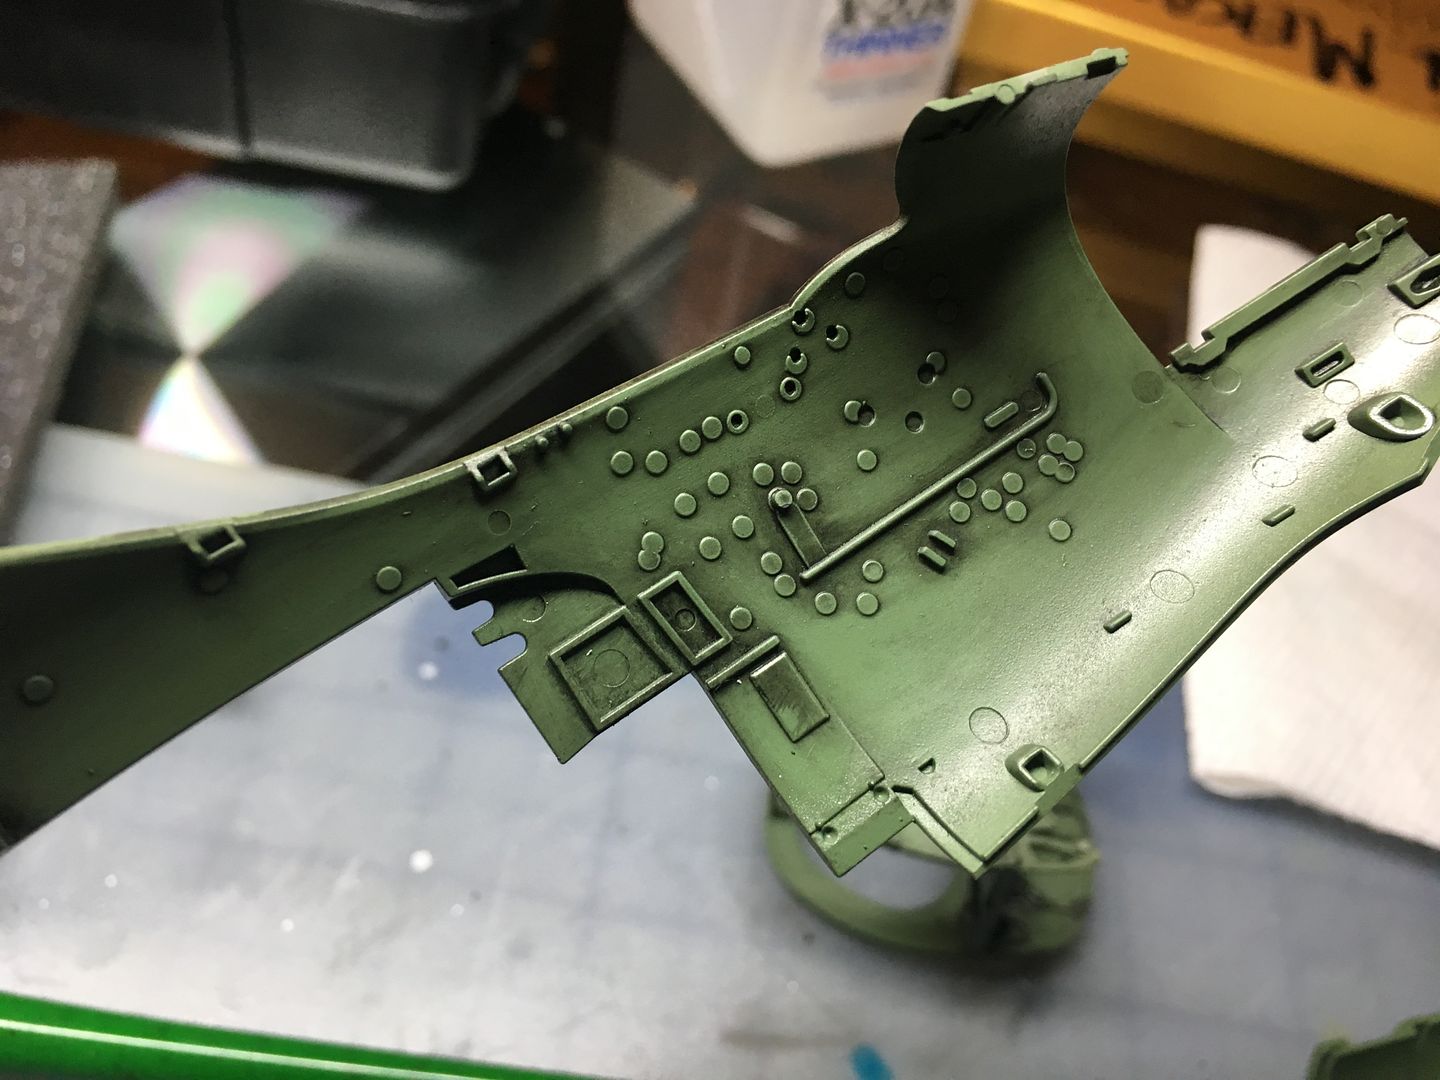
I was impatient to try the wash - got a few more coloured areas to pick out, a few decals etc - should have done those first really...
Good point/tip about applying the wash to a shinier surface so it gives you more time to play with it and remove etc...I shall have to try that next time.
I was also using an acrylic wash over acrylic - so another thing I've learnt!!
cheers!
I was impatient to try the wash
- got a few more coloured areas to pick out, a few decals etc - should have done those first really...Good point/tip about applying the wash to a shinier surface so it gives you more time to play with it and remove etc...I shall have to try that next time.
I was also using an acrylic wash over acrylic - so another thing I've learnt!!
cheers!
Edited by caterhamnut on Tuesday 29th September 00:09
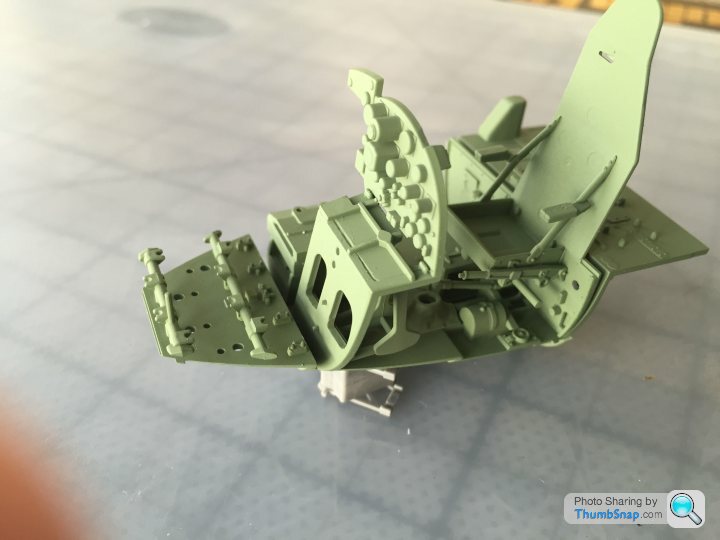
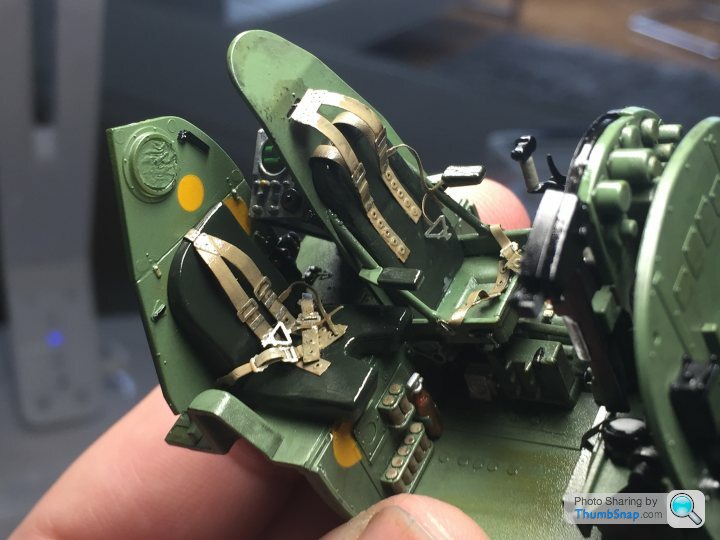
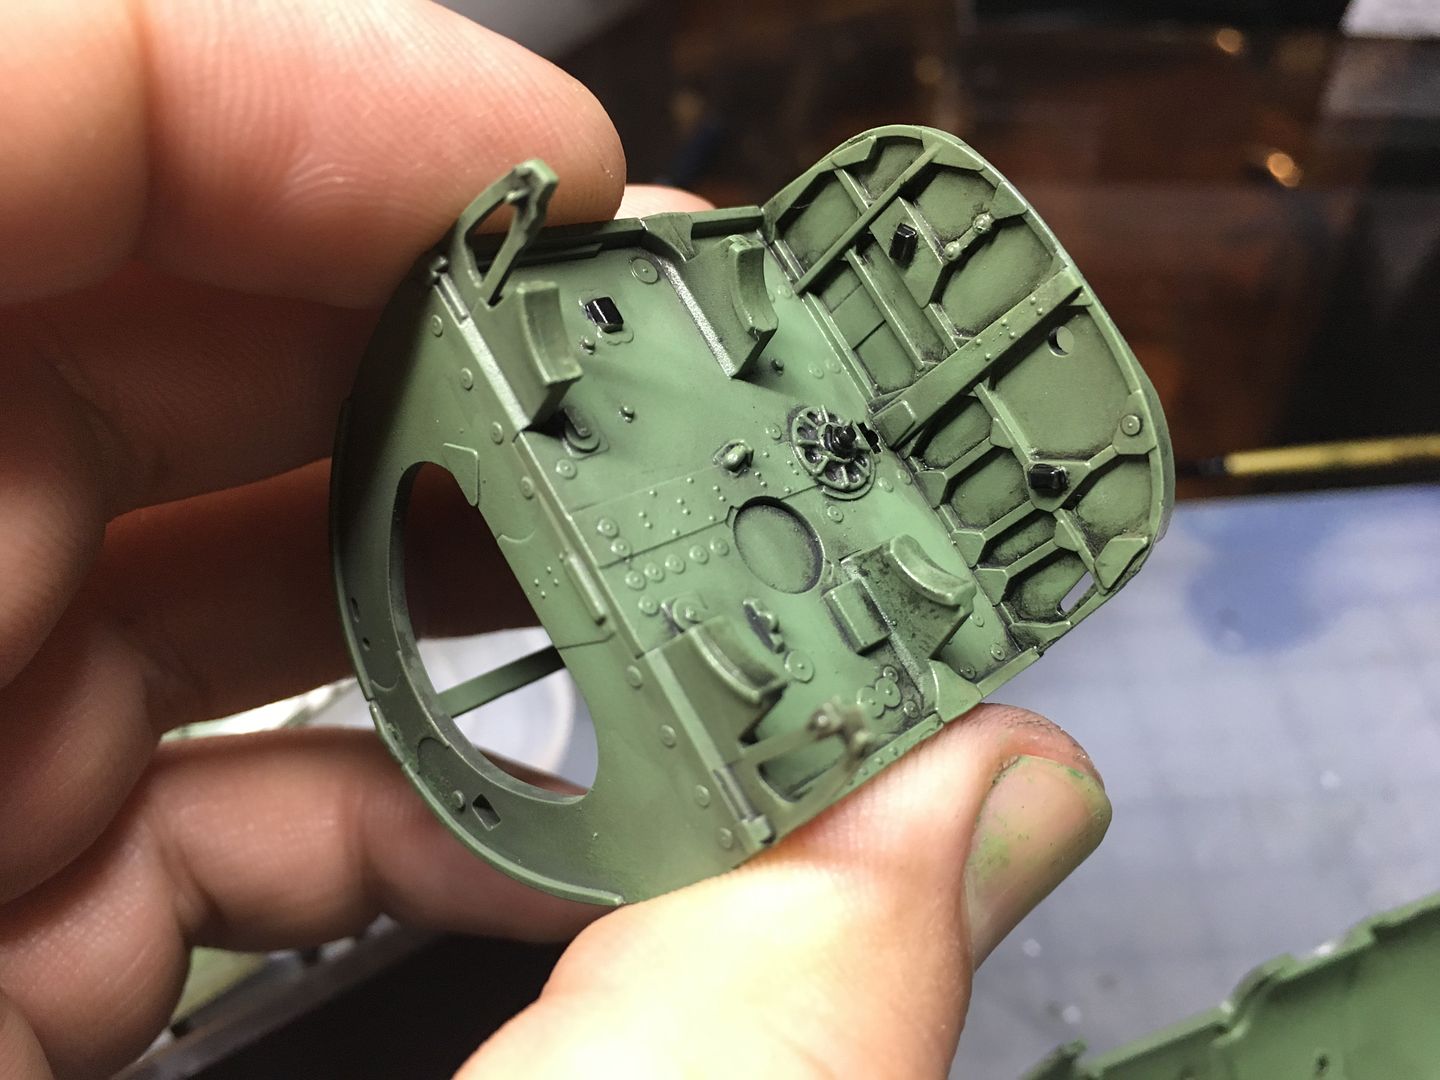
More progress...took the weathering back a bit with some light green over-spraying.
I'll re-do a dark wash when I have finished assembly of the interior.
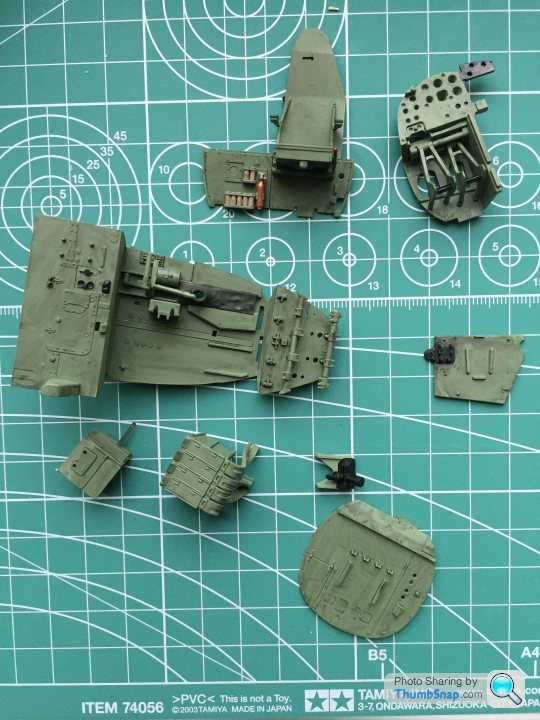
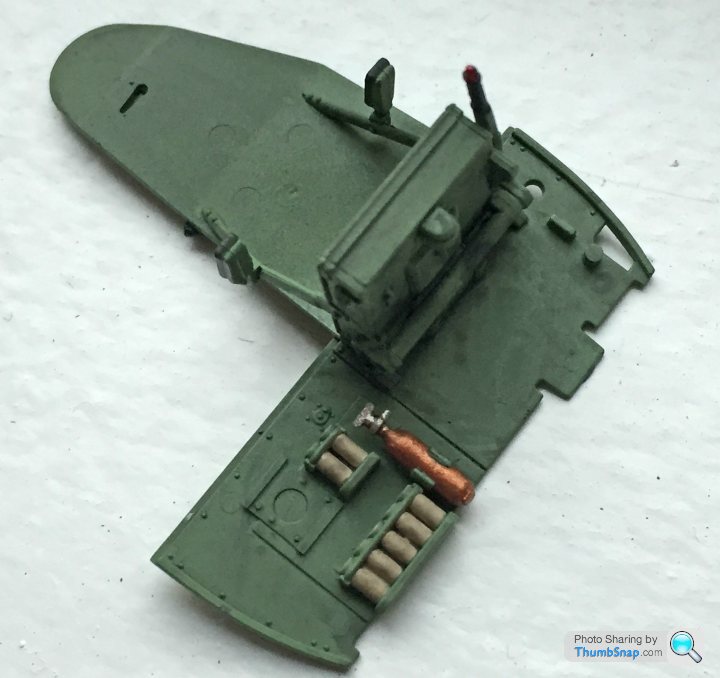
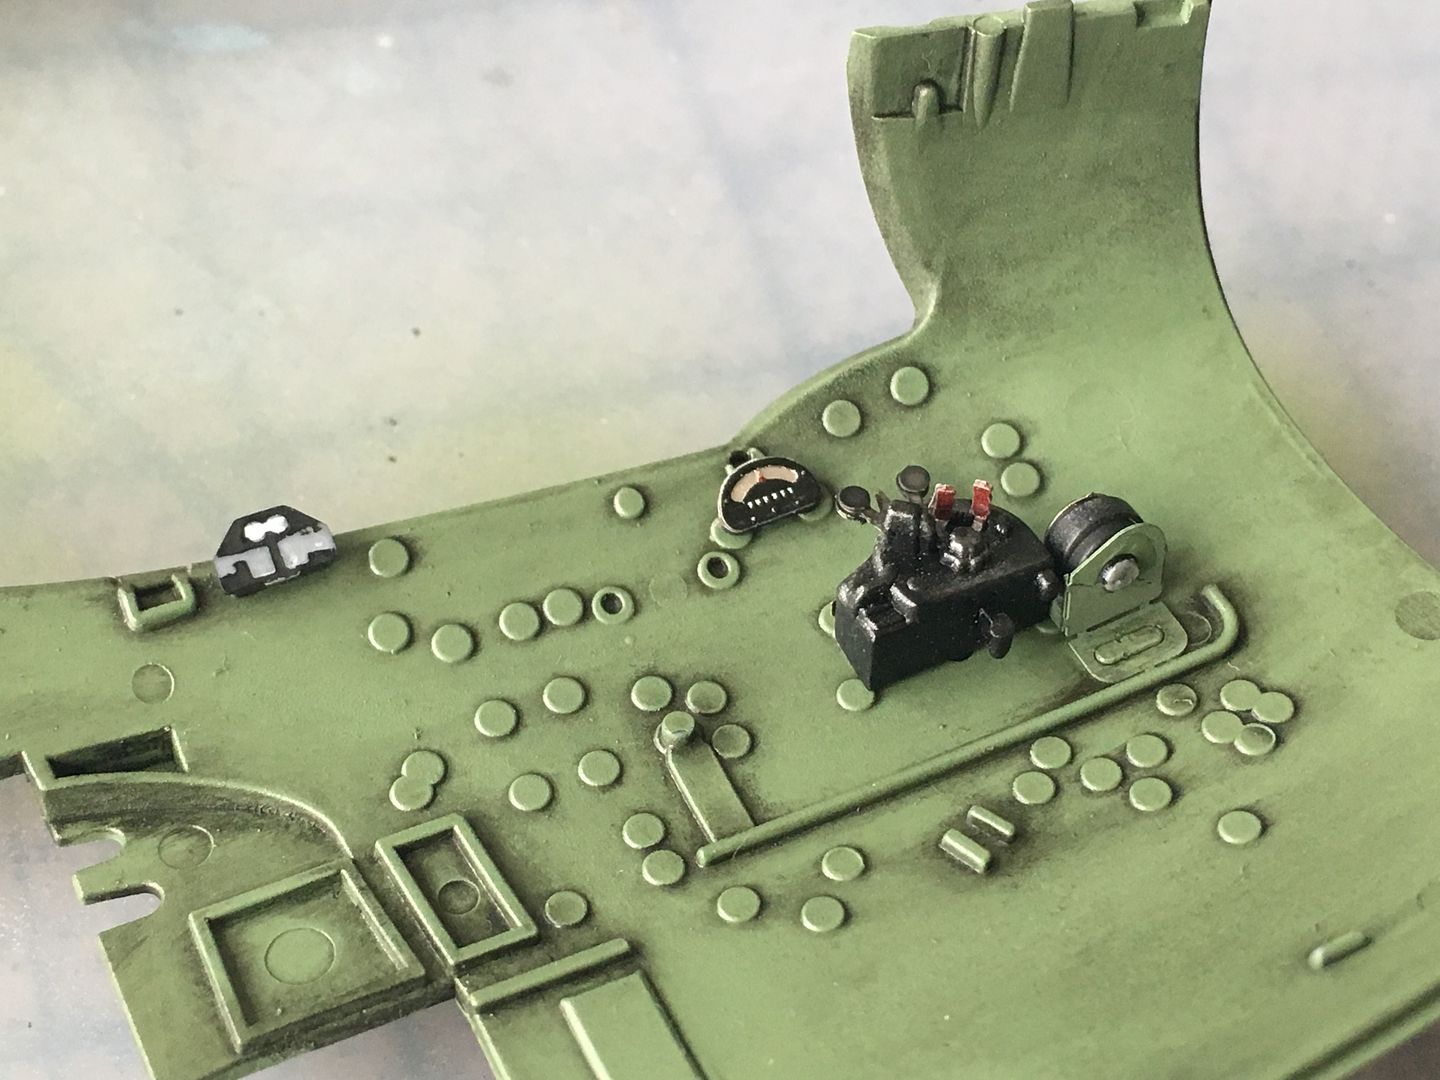
I got an Eduard seatbelt set - not convinced if I will use it, or stick to the Tamiya PE parts...
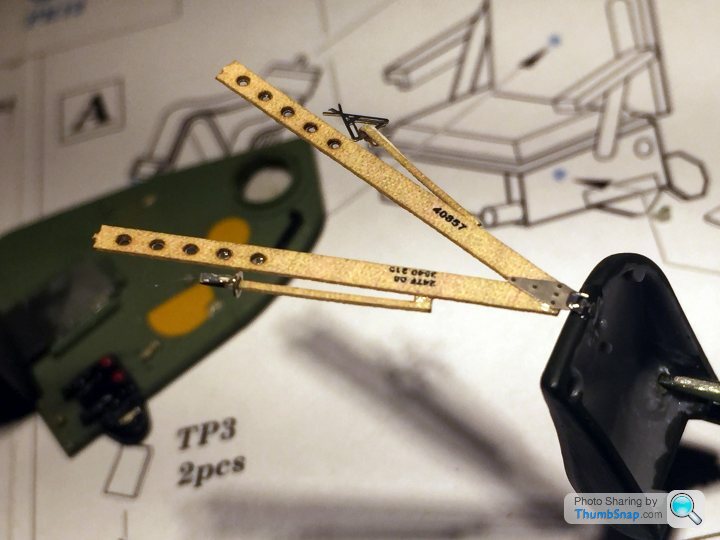
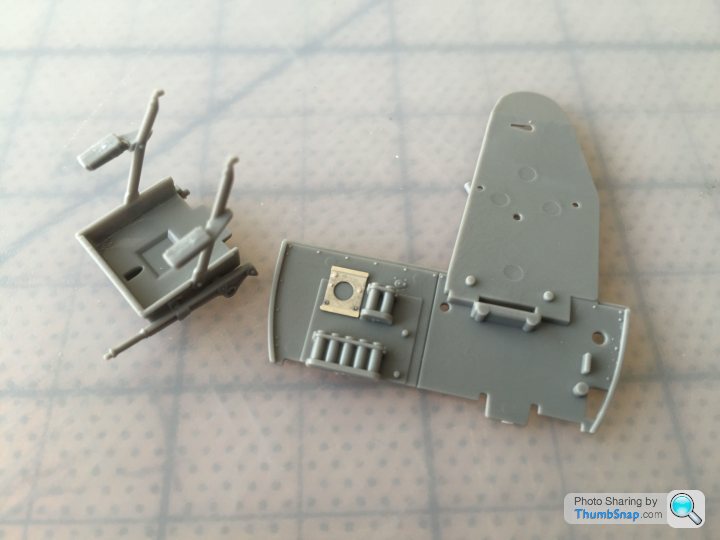
Tiny parts!! Grain of rice and cocktail stick for scale!
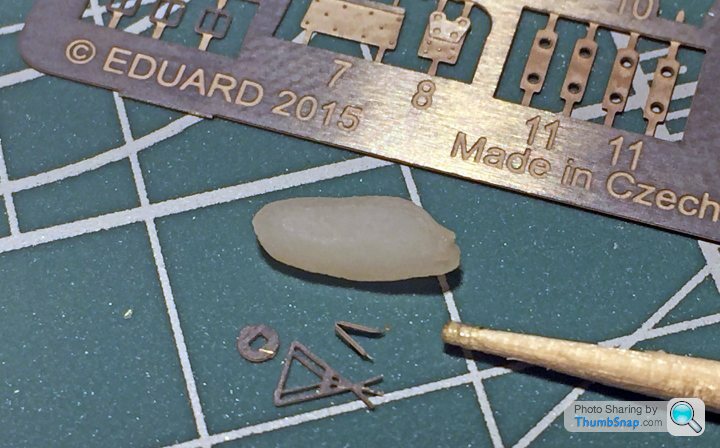
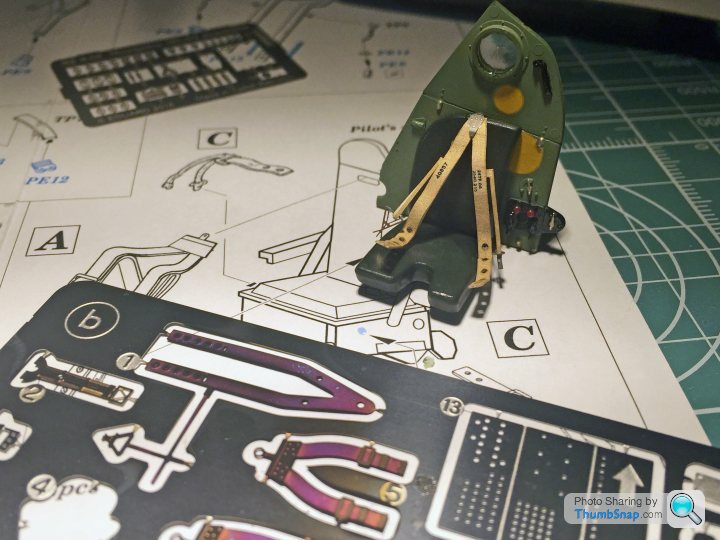
Tamiya PE


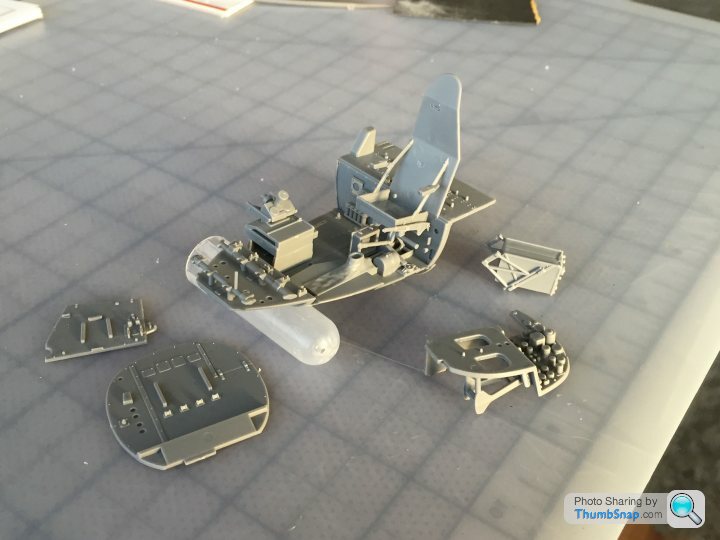
Not finished yet, still sub-assemblies to add to the interior.
I'll re-do a dark wash when I have finished assembly of the interior.
I got an Eduard seatbelt set - not convinced if I will use it, or stick to the Tamiya PE parts...
Tiny parts!! Grain of rice and cocktail stick for scale!
Tamiya PE
Not finished yet, still sub-assemblies to add to the interior.
Thanks guys - all great advice.
I also read that with washes - as I think 'Doc' mentioned above - it is better to clear-coat (ie: spray a clear gloss over) so that the wash will 'flow' better and come off where required - I assume then you re-matte with a matte spray?
Can I use 'Pledge' for this stage? I also have the Tamiya 'clear' acrylic spray as an option.
I got some rust etc colour enamels to thin down and wash with, as well as some of those oils...similarly, I also got some silver pencils etc for the 'chips'.
I'm reasonably confident about weathering the 'interior' parts, and engine etc - the outside of the aircraft, camo etc - that seems like a whole other set of skills!
Thanks - the kit goes together amazingly well, the fit of each part is very precise.
I fancied something different from the Caterham scratch build I should be doing (see http://www.pistonheads.com/gassing/topic.asp?h=0&a... and I love this plane.
I know what it will lead to - I want to do the 1/32nd Spitfire and hopefully a 1/32 Lancaster which I believe someone is developing....
Then it is back to 1/12 F1
ok - don't feel quite as stupid - no where on the packaging of my fabric seatbelts did it say 'take off the paper..'
Having said that, I didn't get on with them so reverted to the PE versions in the kit...
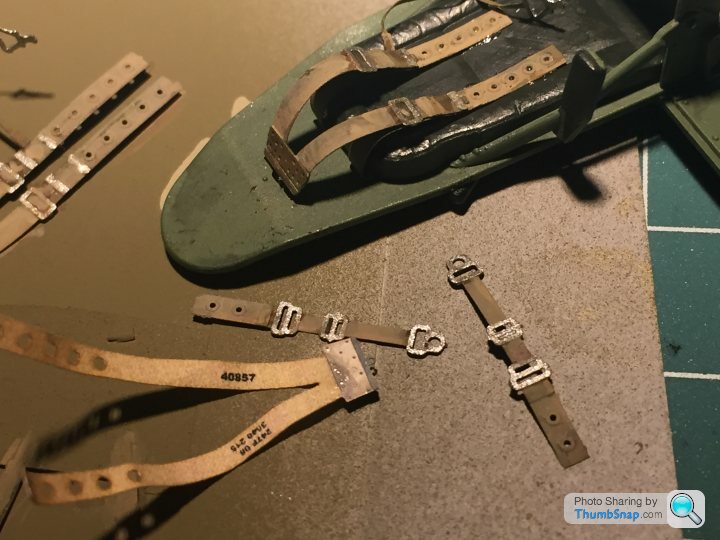
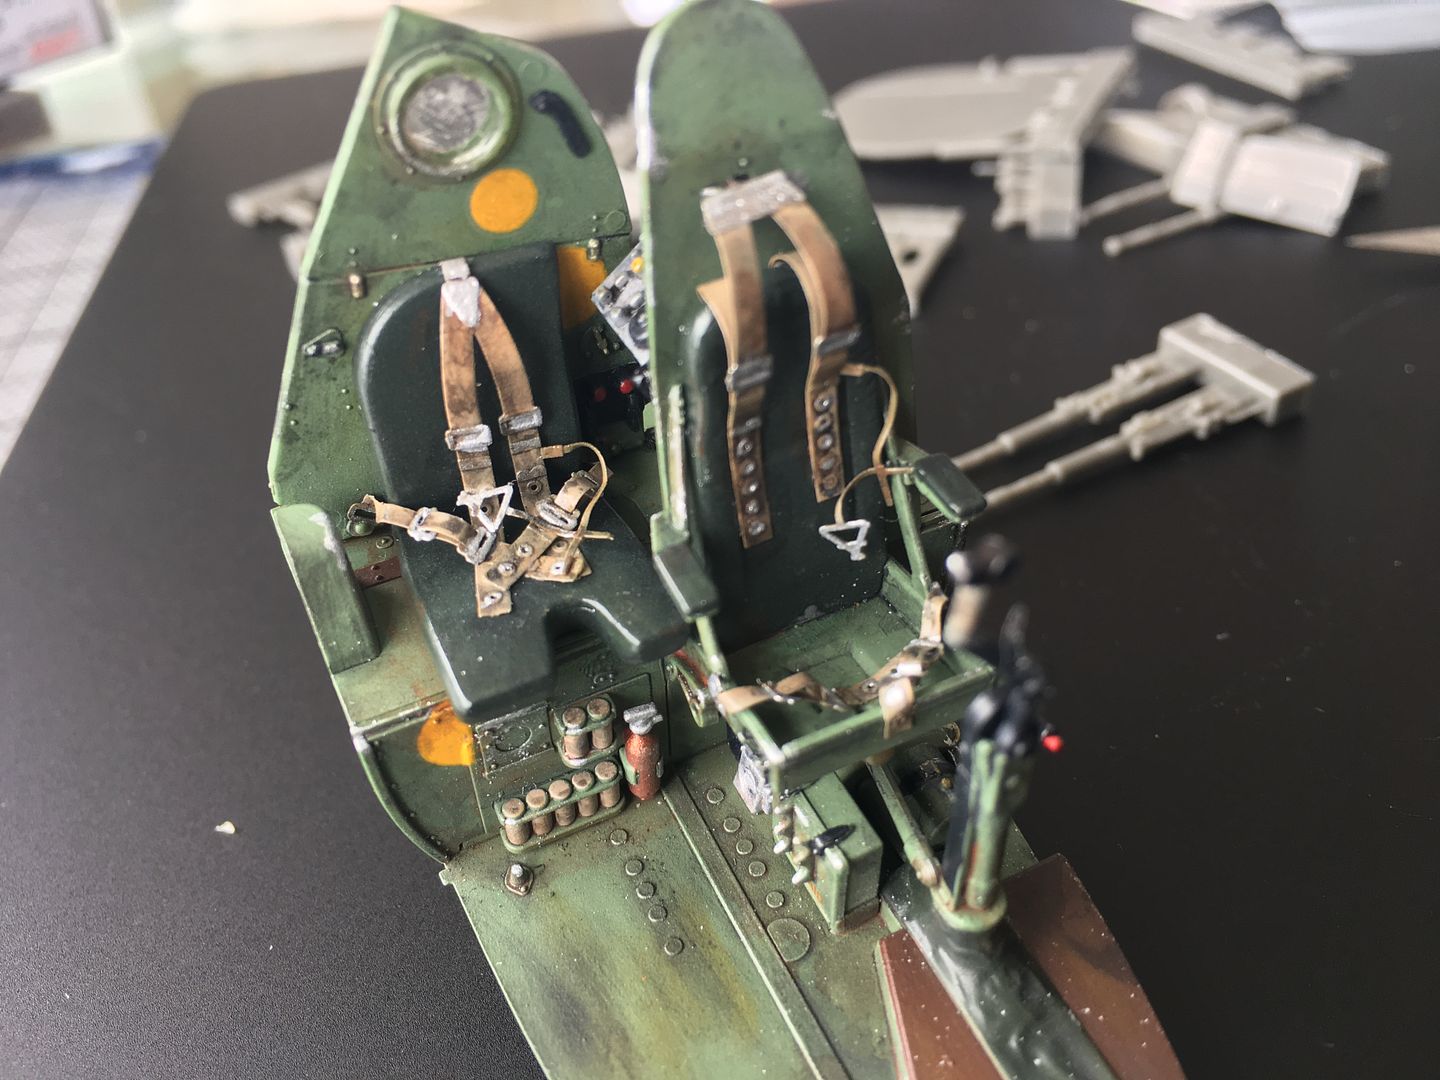
Real easy to form, and after painting and weathering, I'm pretty pleased with the way they can be easily 'posed' and set in place...(next photo is before final painting)
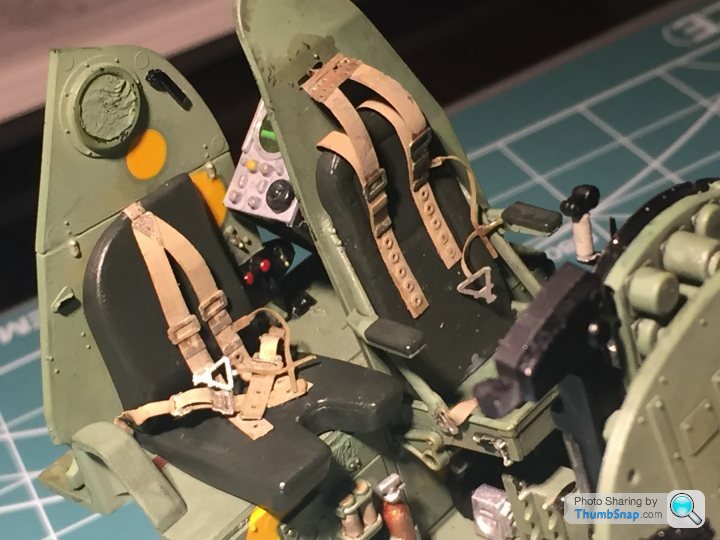
So - having finally fitted the belts, I could finish off the weathering...first I used a tamiya Clear coat to give some shine, as recommended in order to allow any wash to flow better. Was a bit nervous about all that shine, but it worked ok...
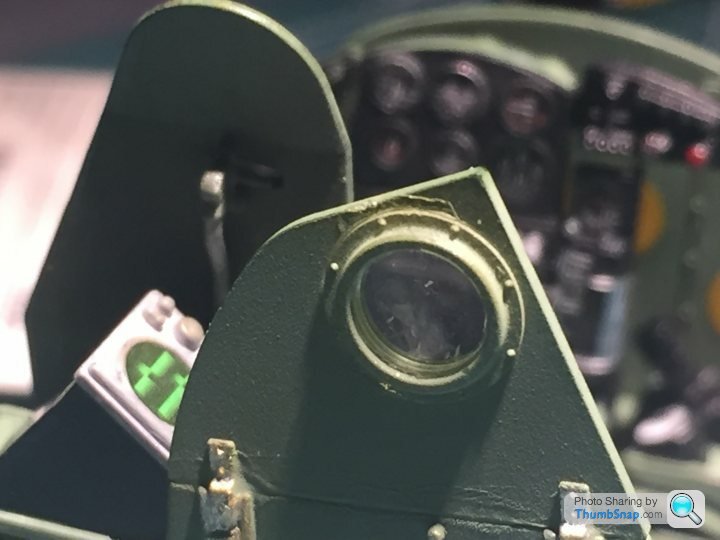
(In all these pics, there is a little piece of masking tape that needs to be removed from a bulkhead window)
Having said that, I didn't get on with them so reverted to the PE versions in the kit...
Real easy to form, and after painting and weathering, I'm pretty pleased with the way they can be easily 'posed' and set in place...(next photo is before final painting)
So - having finally fitted the belts, I could finish off the weathering...first I used a tamiya Clear coat to give some shine, as recommended in order to allow any wash to flow better. Was a bit nervous about all that shine, but it worked ok...
(In all these pics, there is a little piece of masking tape that needs to be removed from a bulkhead window)
Edited by caterhamnut on Sunday 4th October 04:47
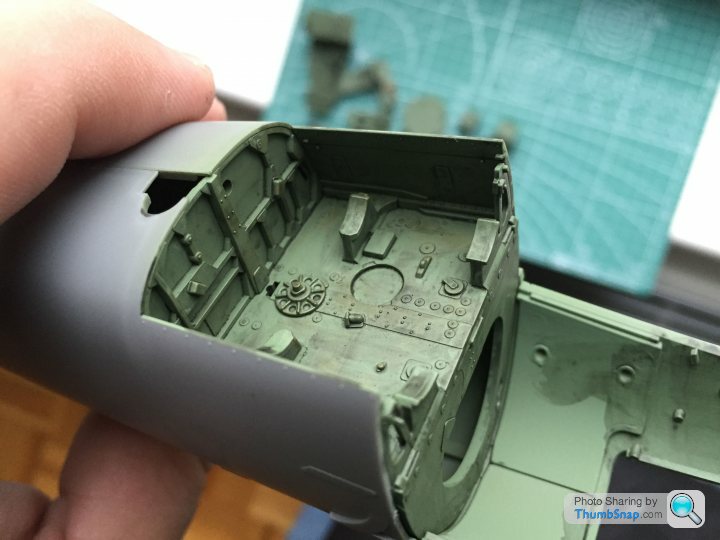
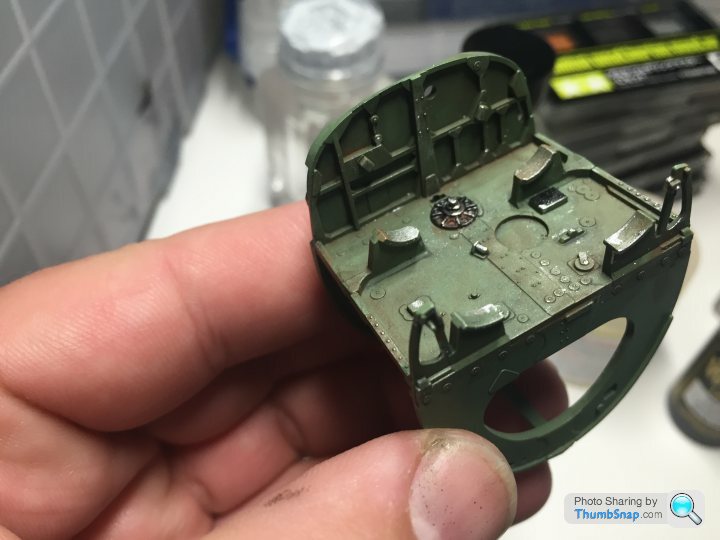
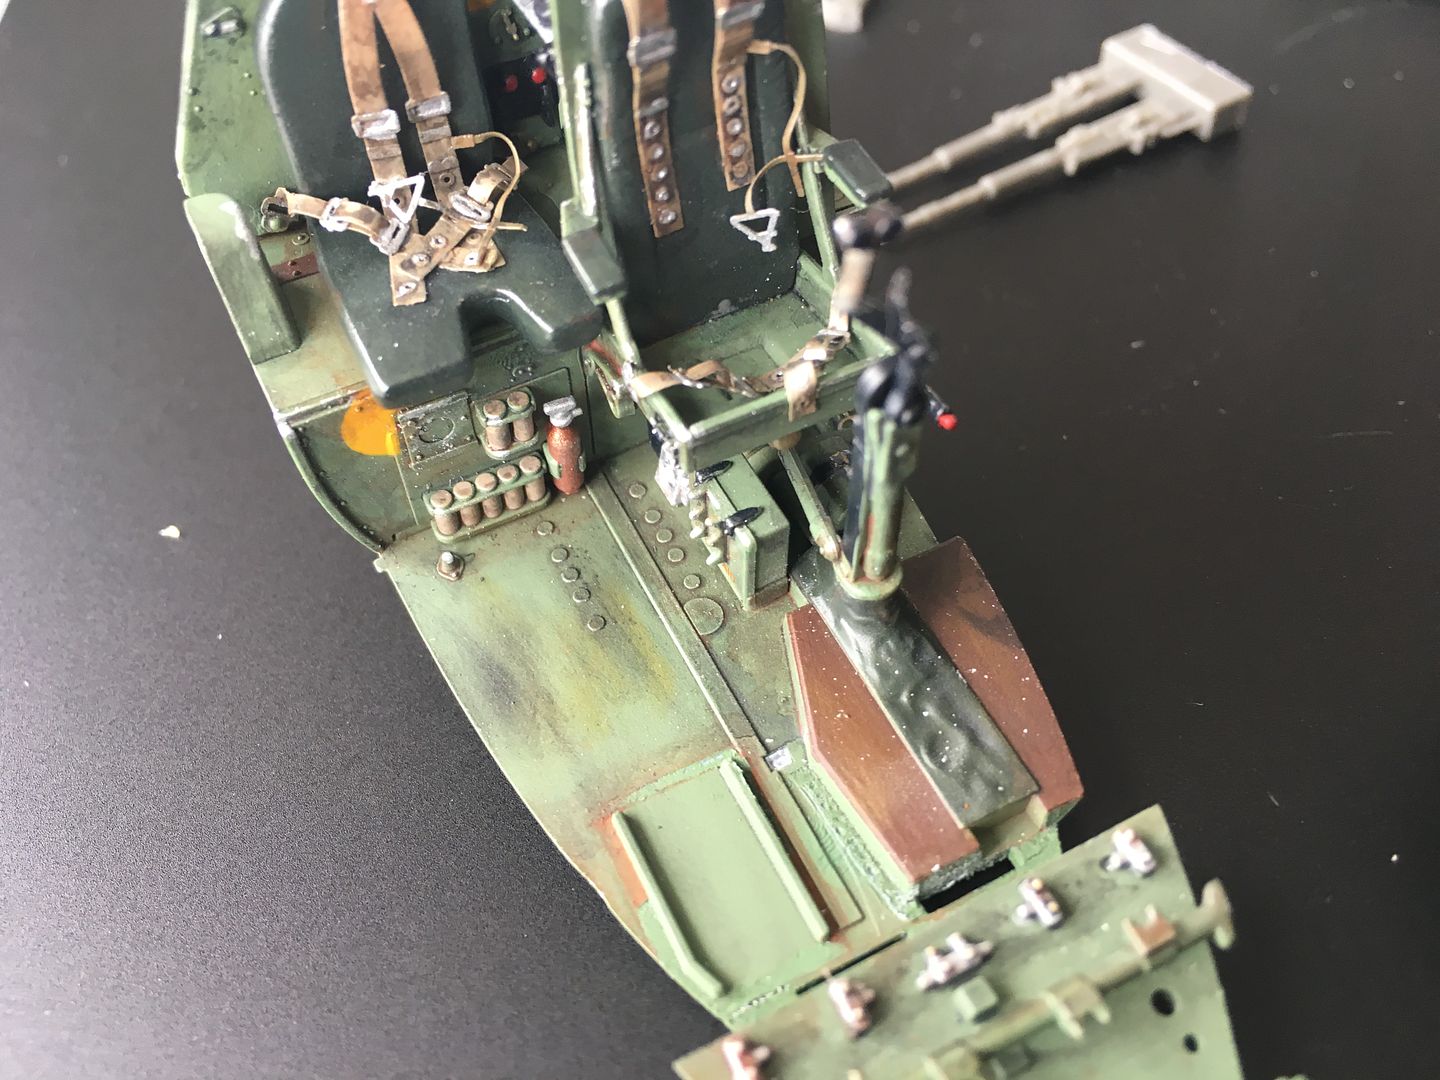
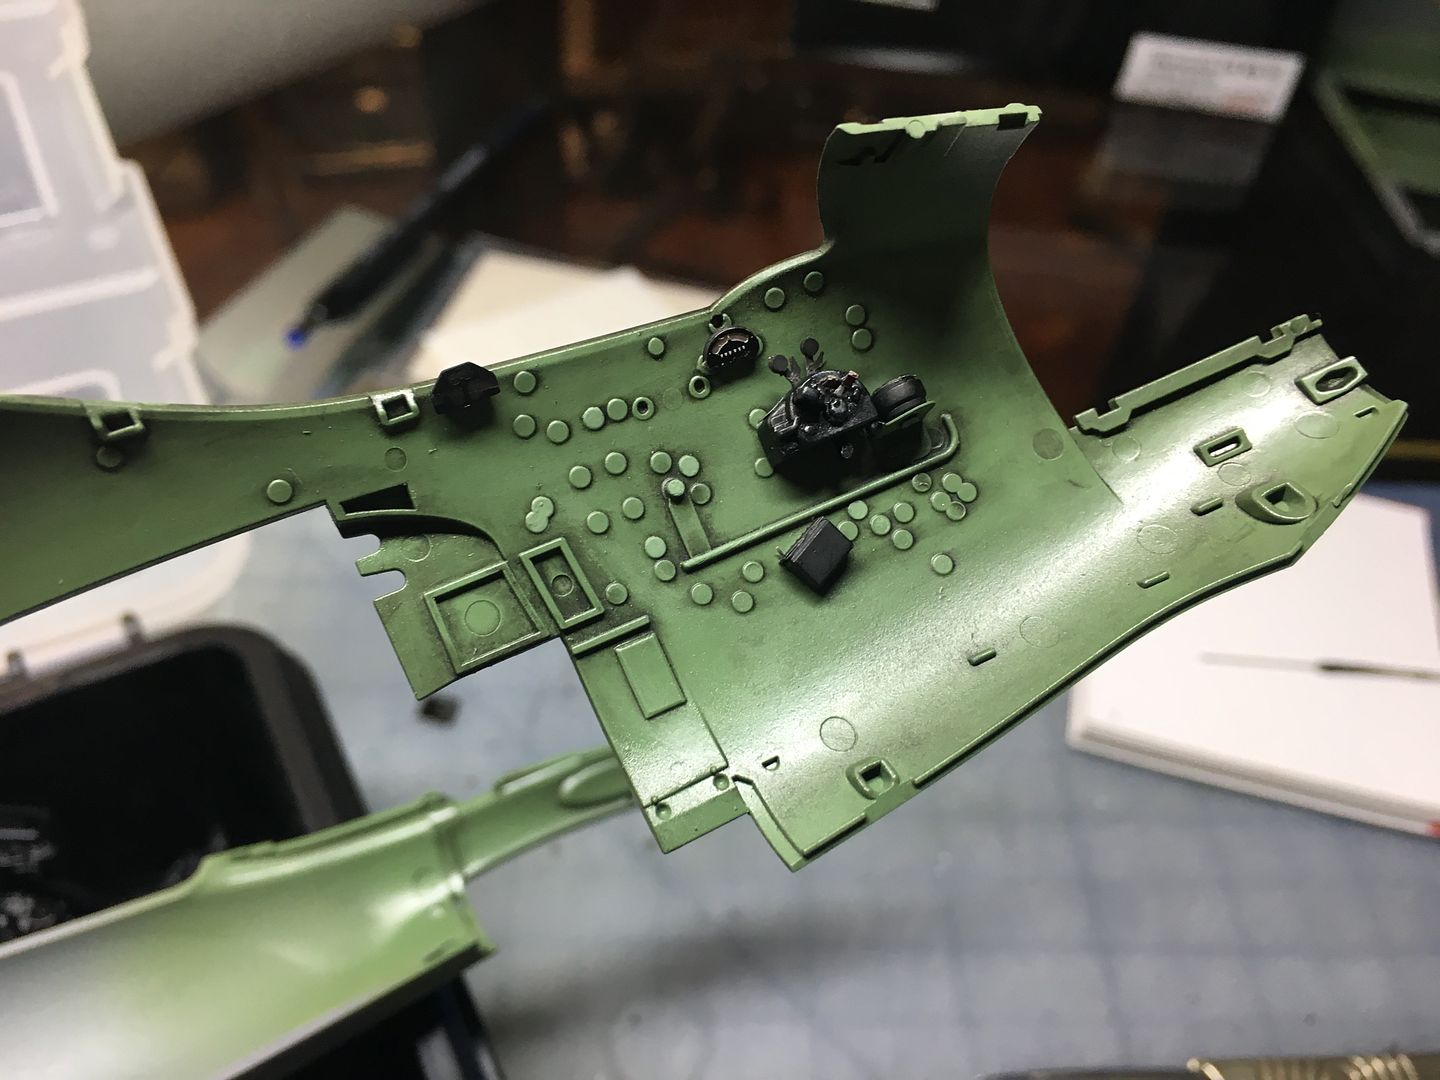
So now the final layer of weathering - used some dark wash, to pick out detail, and also some 'rust' wash - not so much for rust, rather dirt alonng edges and the floor. I think it worked ok.
Also added a small amount of wear showing metal through the paint - but just on certain edges, like the metal bulkheads, pedals, seat edge etc.
Matte layer had not been applied yet..
I'm quite pleased with the results so far - first time I have tried anything like this. Maybe a bit dark, but I think I have JUST managed to avoid going 'to far' - challenge will be making rest of model match!
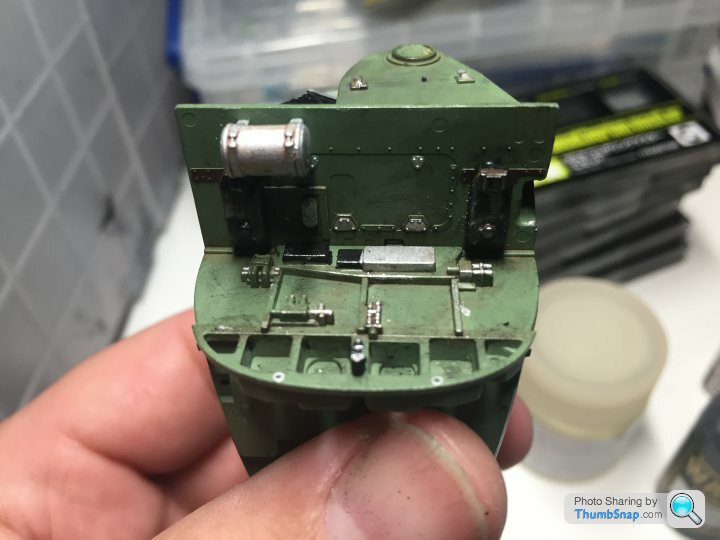
Underside of cockpit, where bombs will mount...
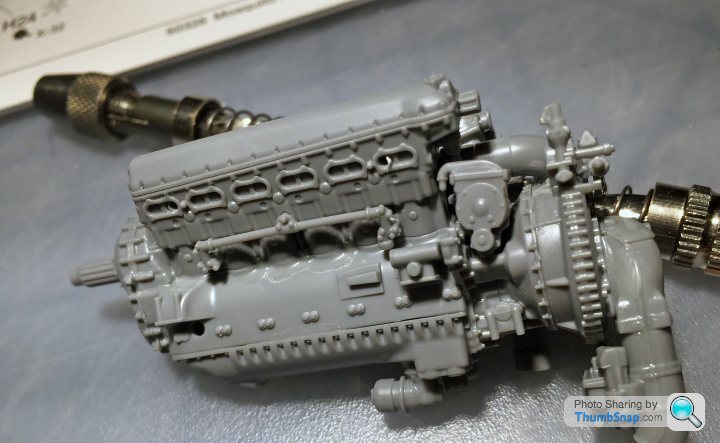
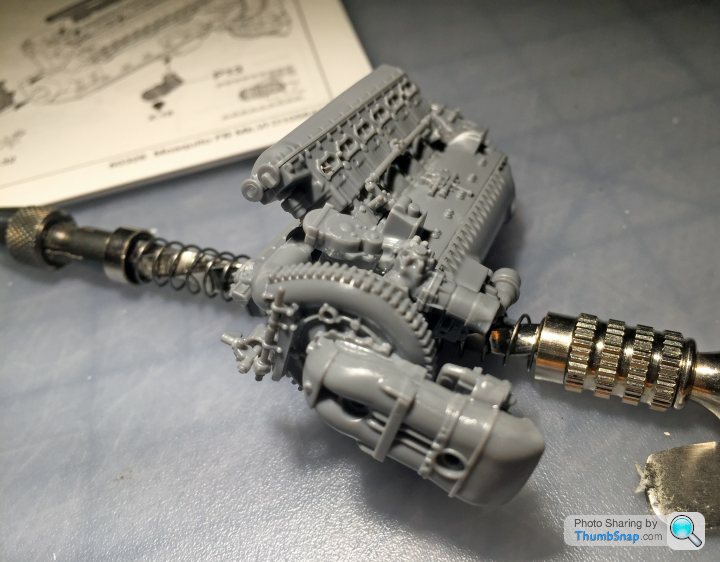
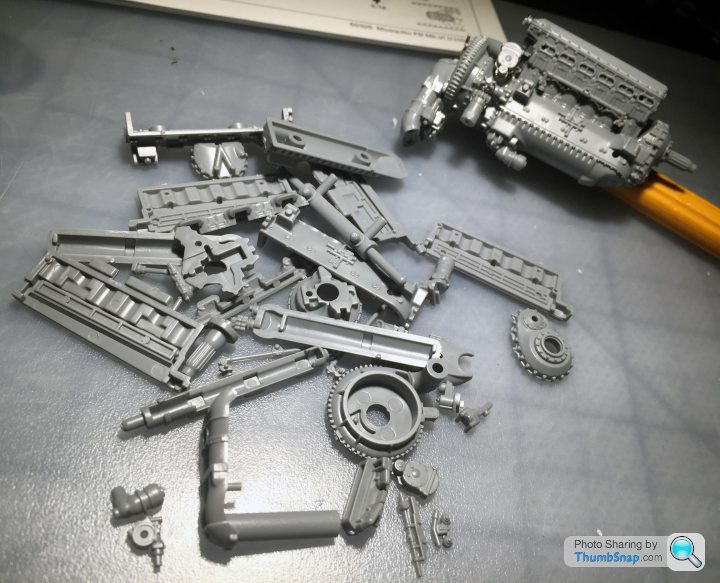
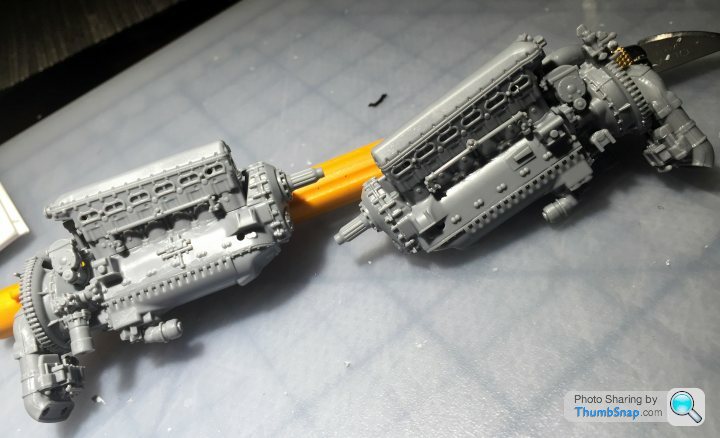
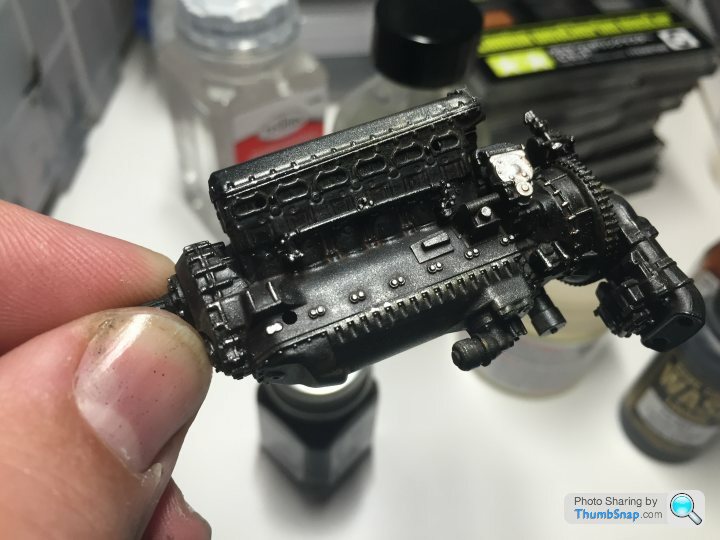
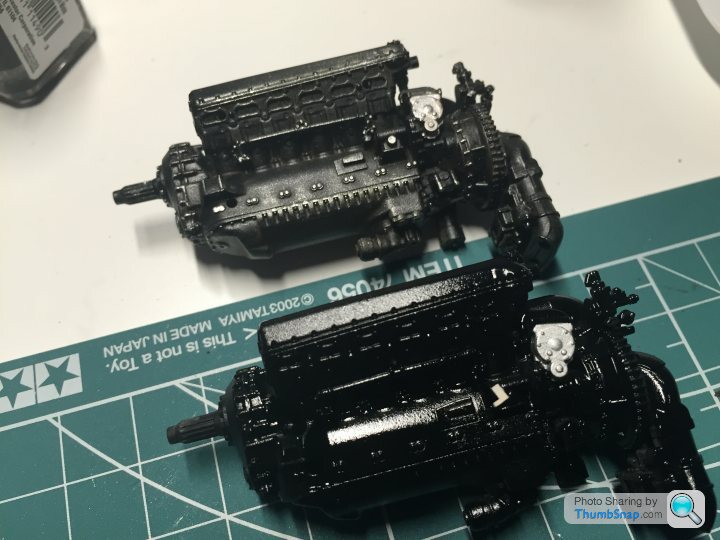
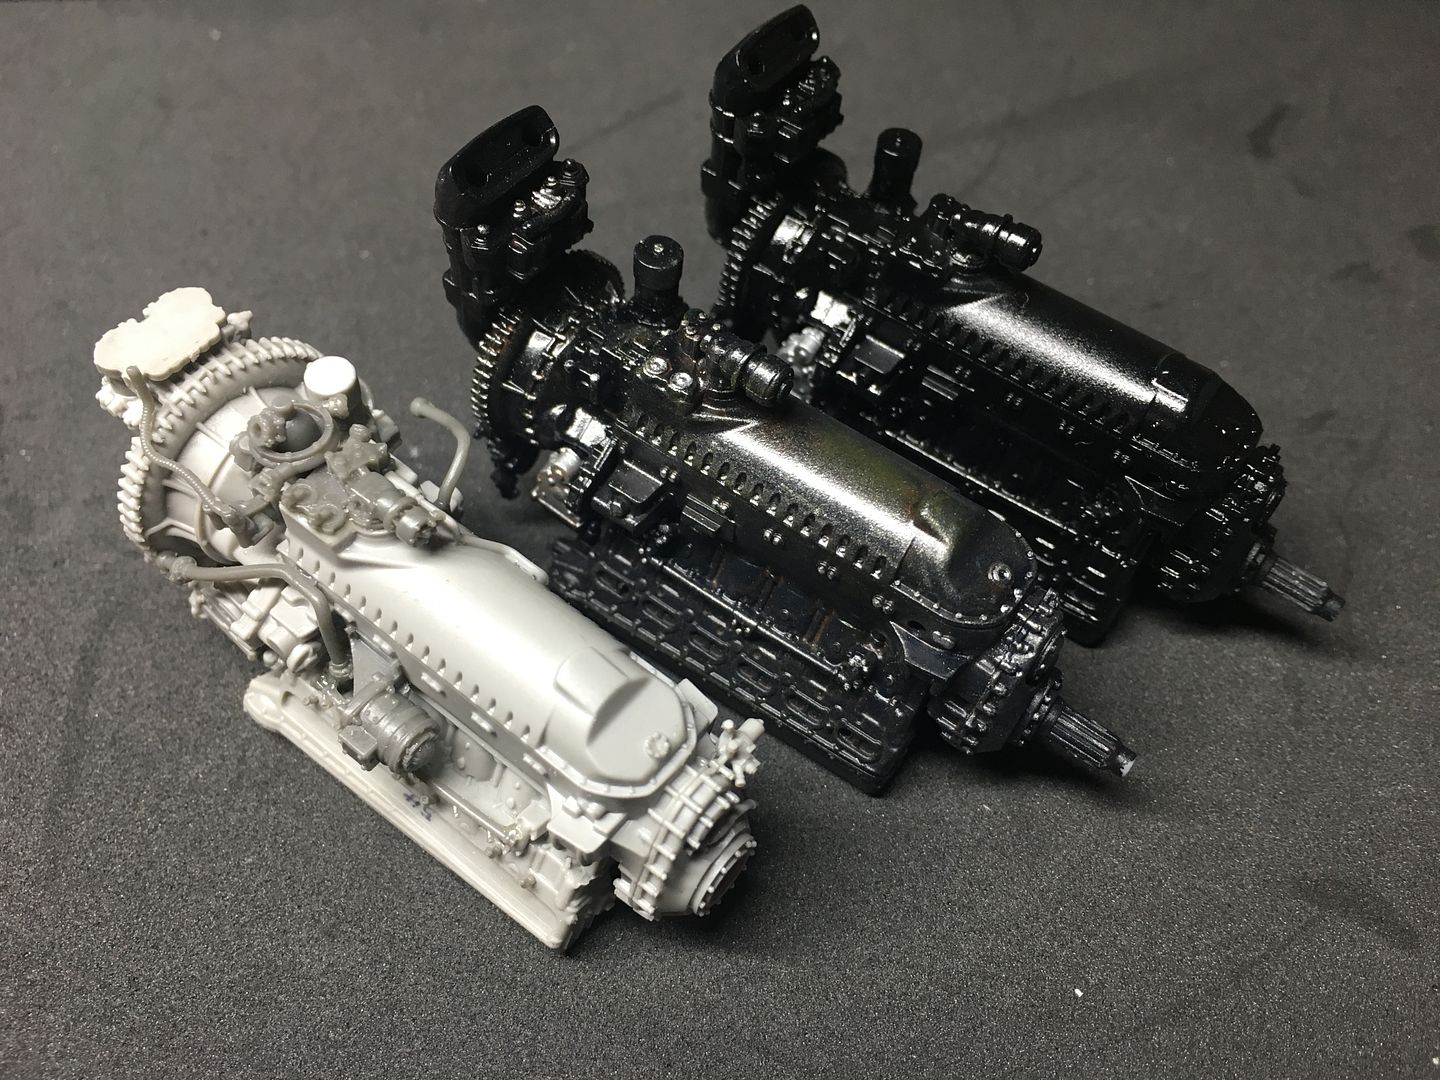
So started on one engine next - need to get rid of the 'glitter' on the cam covers, but coming on ok. Untouched engine for comparison...
All iphone pics - I'll take some proper shots later...
Also added a small amount of wear showing metal through the paint - but just on certain edges, like the metal bulkheads, pedals, seat edge etc.
Matte layer had not been applied yet..
I'm quite pleased with the results so far - first time I have tried anything like this. Maybe a bit dark, but I think I have JUST managed to avoid going 'to far' - challenge will be making rest of model match!
Underside of cockpit, where bombs will mount...
So started on one engine next - need to get rid of the 'glitter' on the cam covers, but coming on ok. Untouched engine for comparison...
All iphone pics - I'll take some proper shots later...
ok - last update was a looooooong time ago, so this may be a big chunk! Since starting this, I have done a bit more, learned a bit more - so I think I am going to weather this kit a bit more than I might have done - but still my first plane, so very much learning...
I also want to learn about weathering, and the F1 cars don't really have much of this!
The military models tend to, and the skills you see here and elsewhere are staggering - I've also got a tractor to work on for 'mud'!
I want to learn about and start using oils - as I will need these skills on the older F1 car models - chassis of Alfa 159 for example...
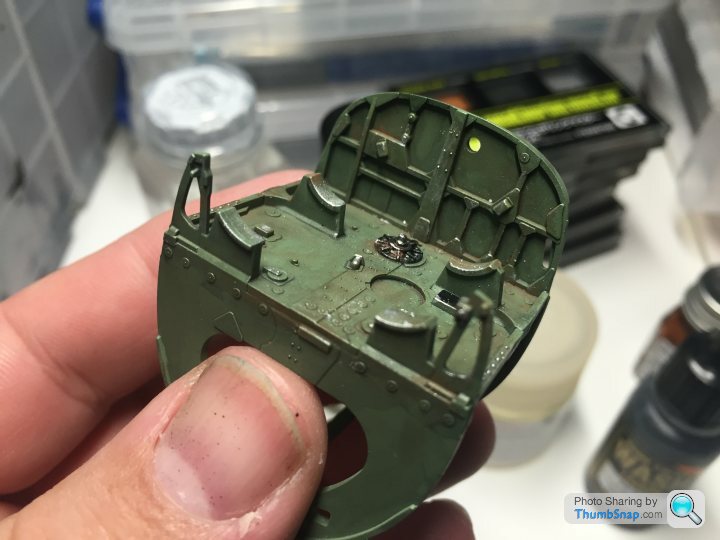
So over a year ago when I started this, I had done some weathering on the cockpit - as a first attempt I was pretty pleased, but you learn a lot in a year and I want to improve...
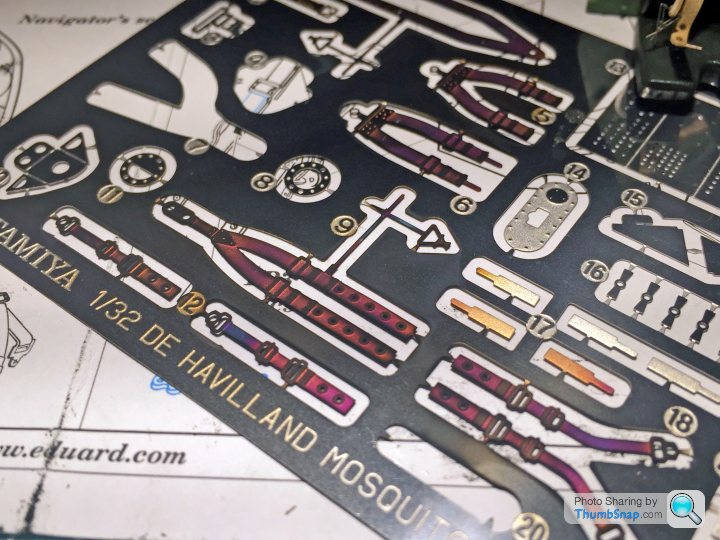
I have also purchased the Eduard detail kits - front guns, belly guns, interior and exterior PE sheets and some engines are on there way. The Tamiya kit detail is still stunning - but I want to try stuff, and go even more detailed. That being said, I will also do some very basic scratch building - TBH mainly just with wiring etc.
So, I got back on this kit at the weekend. I cant use all the Eduard PE stuff in the cockpit without starting again, but I have used selectively. This has involved a little bit of a dismantle, but it came apart easily enough. I also need to try and 'match' what I have already done. In hindsight I think what I had done a year ago turned out a bit dark and messy - I want to tidy that up a bit, and managed to over-spray a little green over some grubby bits so I could start again...
I'm going for the used look though - so I am committing to weathering the exterior of the plane, which will certainly be a challenge - a lot of surface area.
I'm confident I can do the engines and engineering stuff nicely, having done a few F1 engines...
So - with all that said, on to the photos.
I started by breaking the main elements apart.
I'm happy with the basic weathering here - but I got annoying silver sparkles from using some tamiya weathering stuff - that is basically eye make-up! I'll be getting rid of that with careful touching up.

Some of the 'old' stuff looks a bit 'muddy' so will also tone that down.
Of course, almost none of this will be visible once closed up - but when you have fitted a head gasket and moving pistons into an MFH Mp4/4 Honda engine, and then sealed it all up in a stationary model, that doesn't matter - the detail is still there !
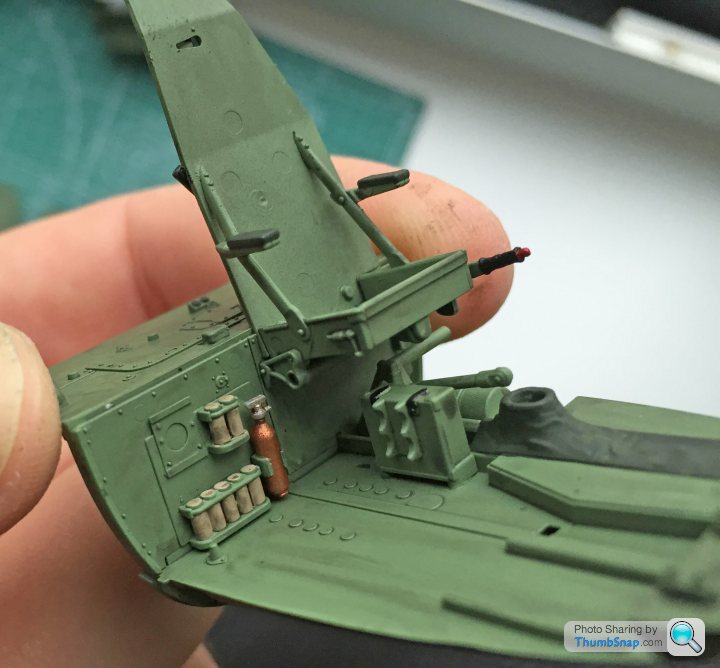
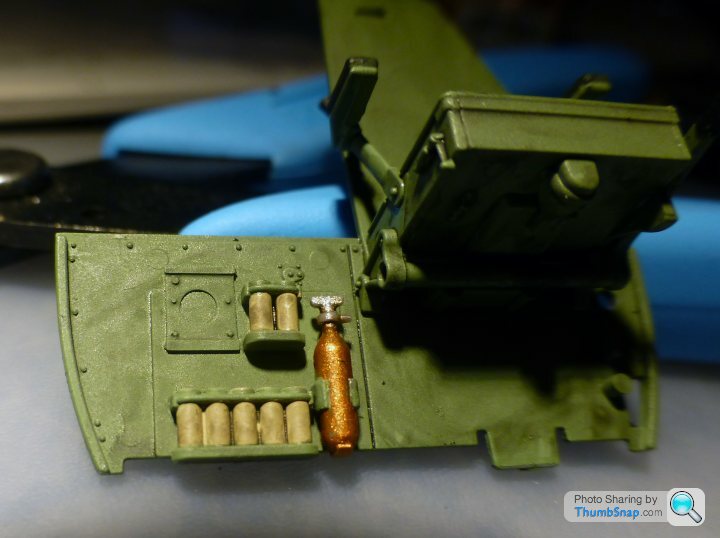
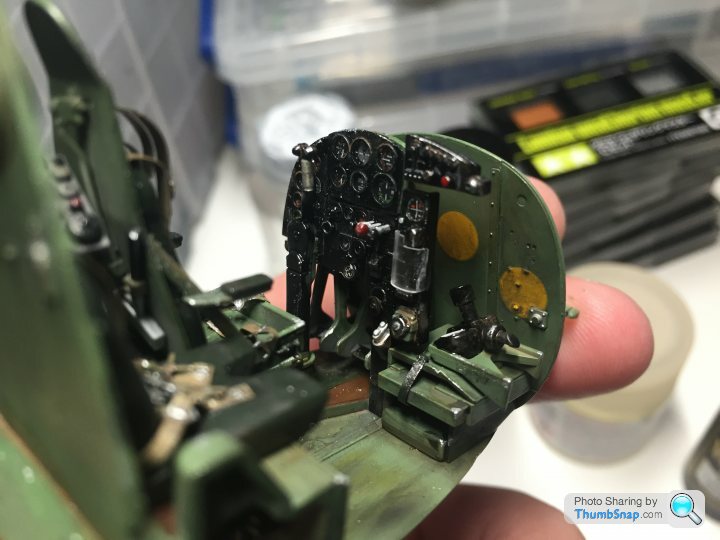
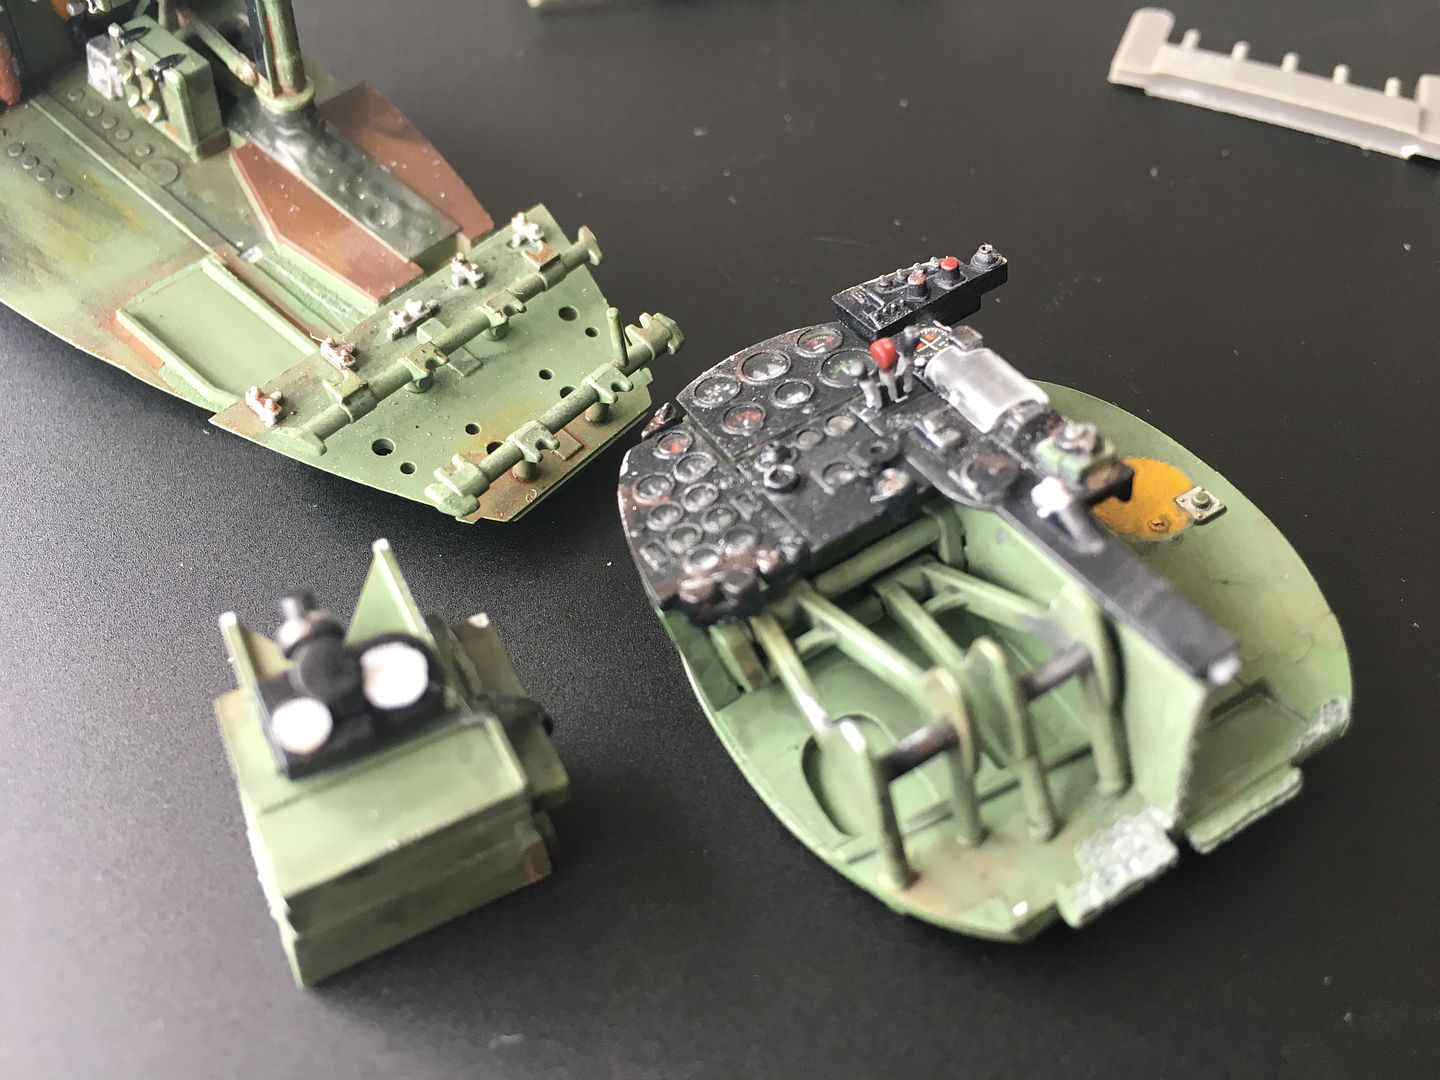
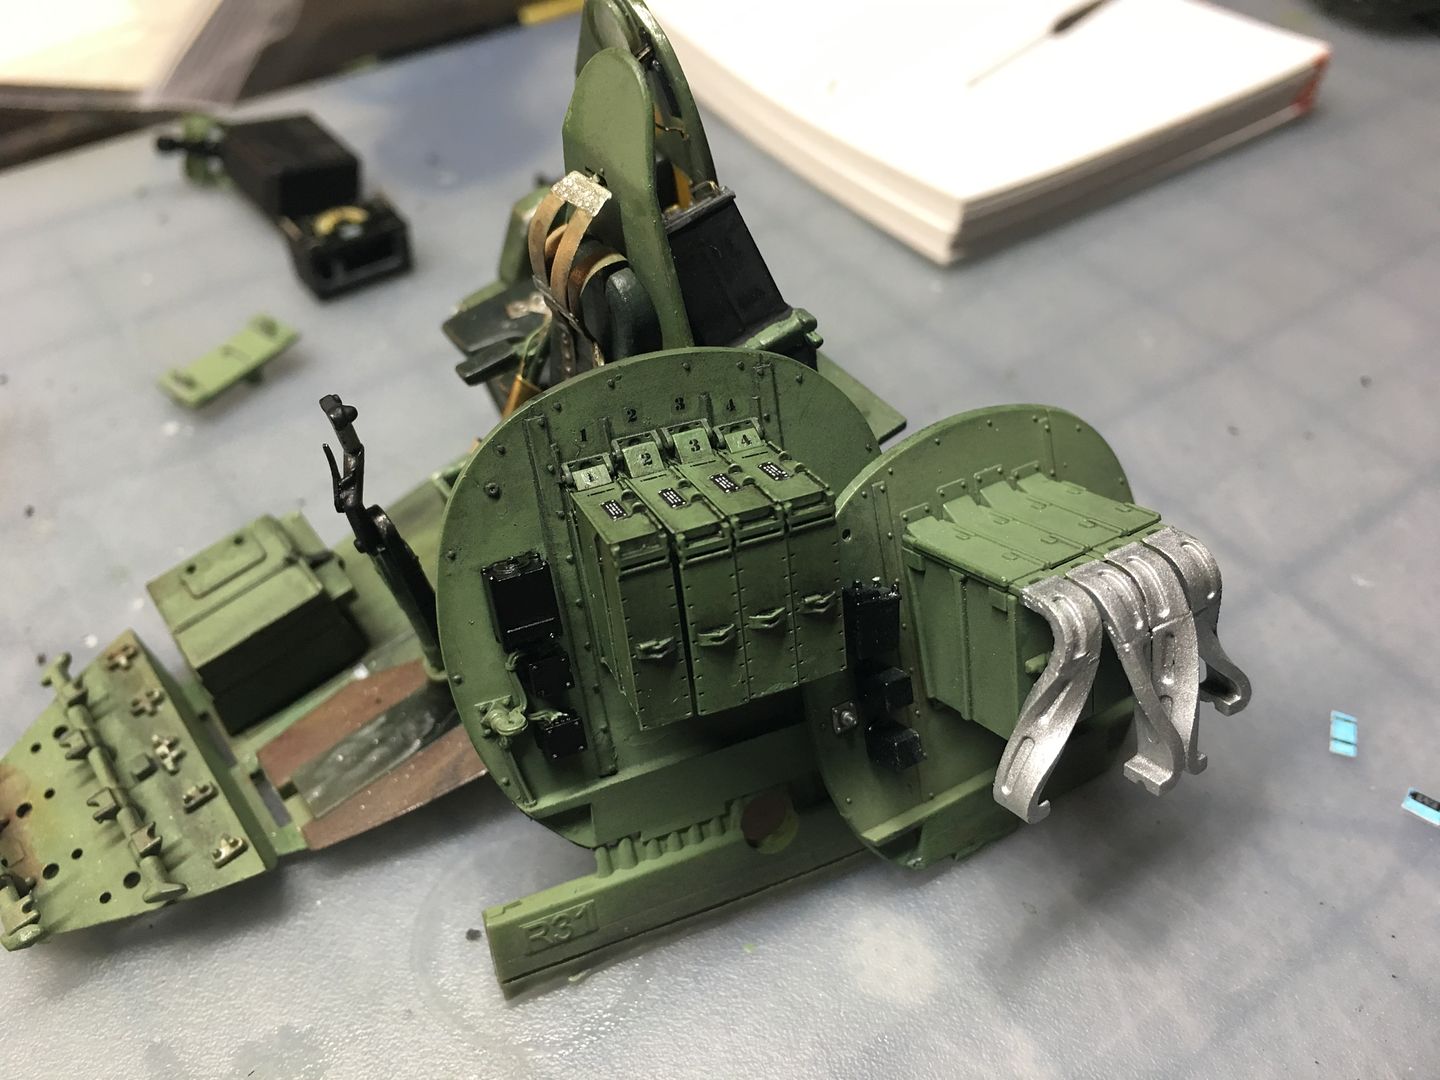
So - this bulkhead is a major swap out - the grey one is from the Eduard nose gun kit - it has a bit more detail, and the upper fitttings for the ammo-boxes molded in, so I will use this. Only real pain is 2 yellow decals on the other side - I'll have to mask and paint these on the 'new' bit - don;t have a circle cutter so will come back to those with some fine scalpel work!
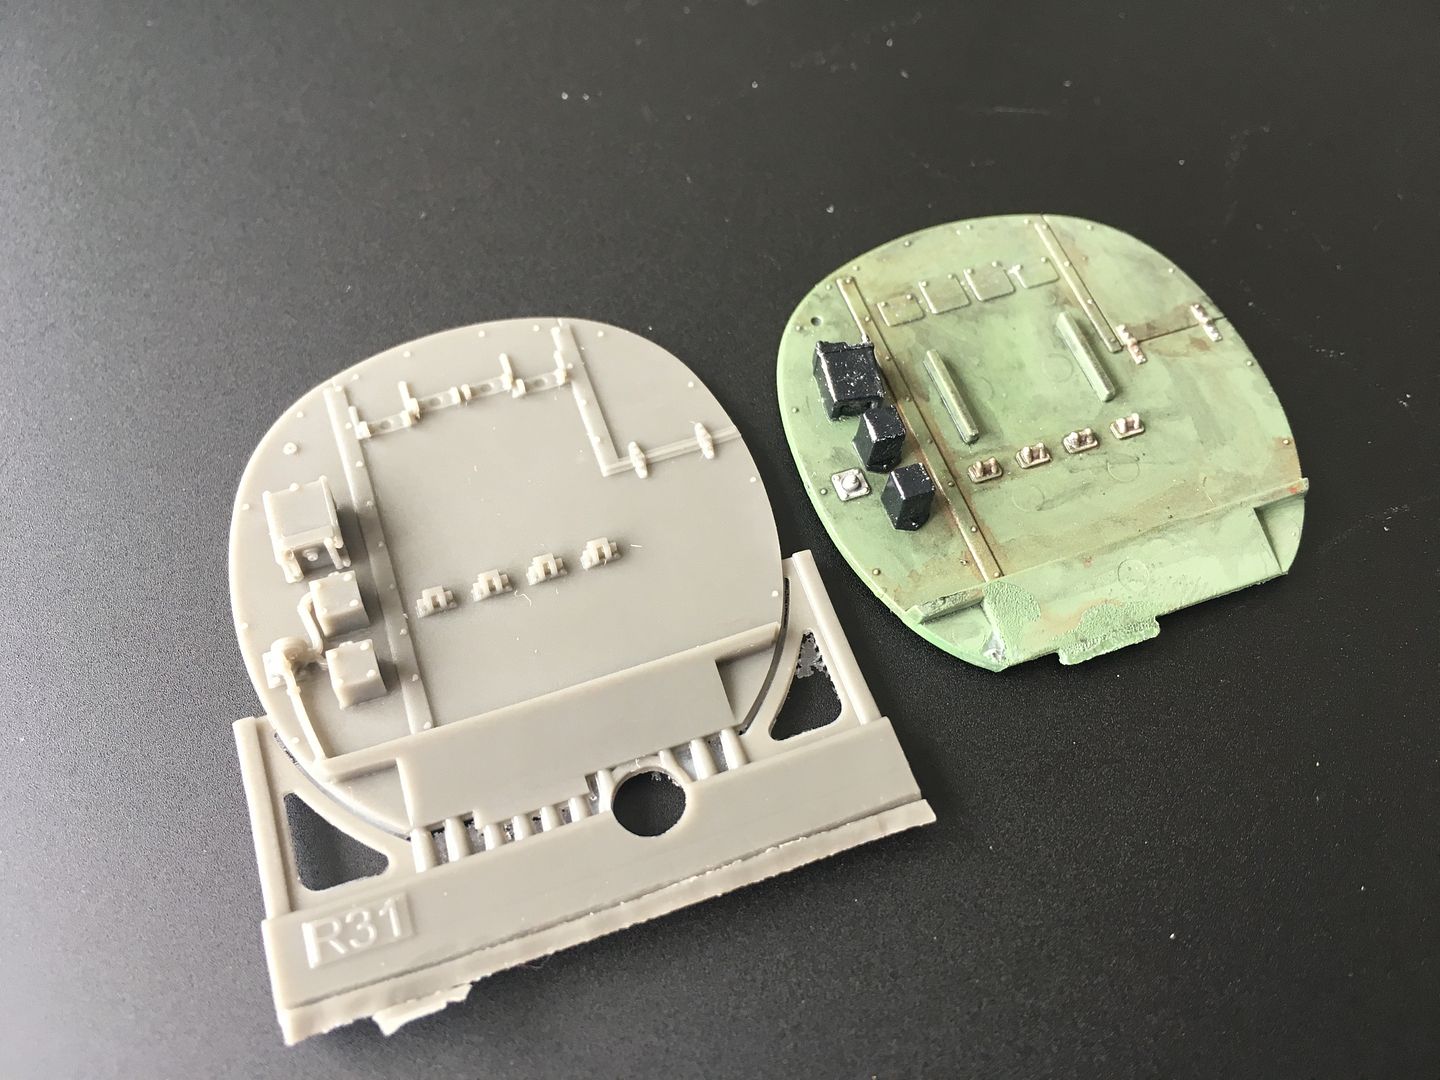
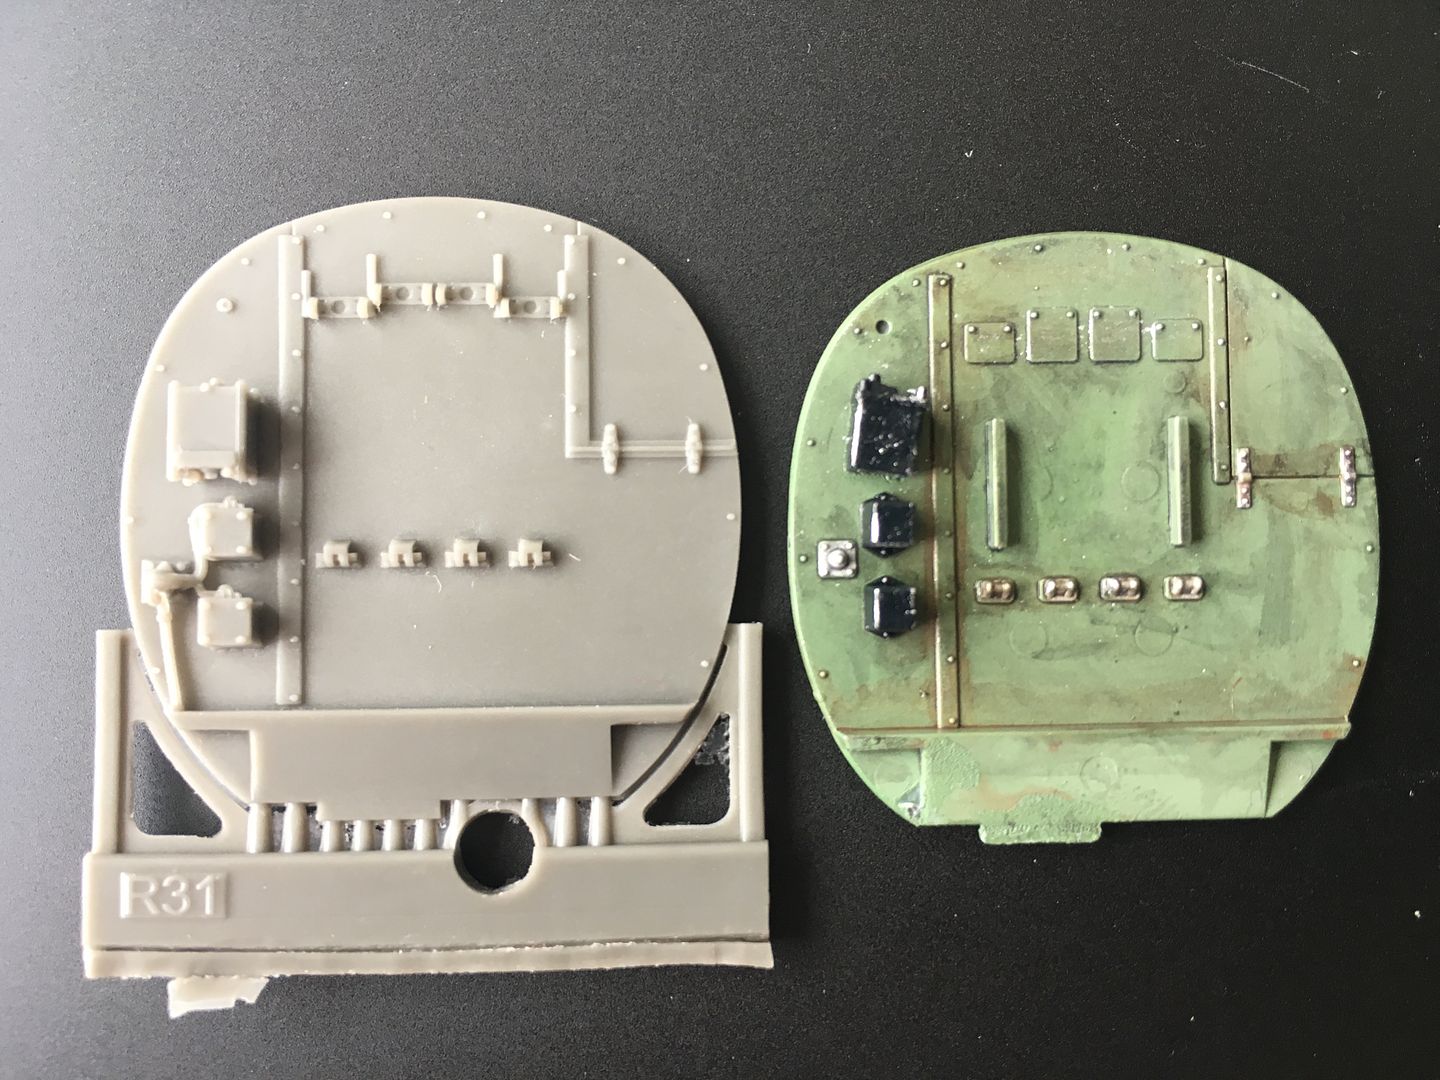
Location of bulkhead...
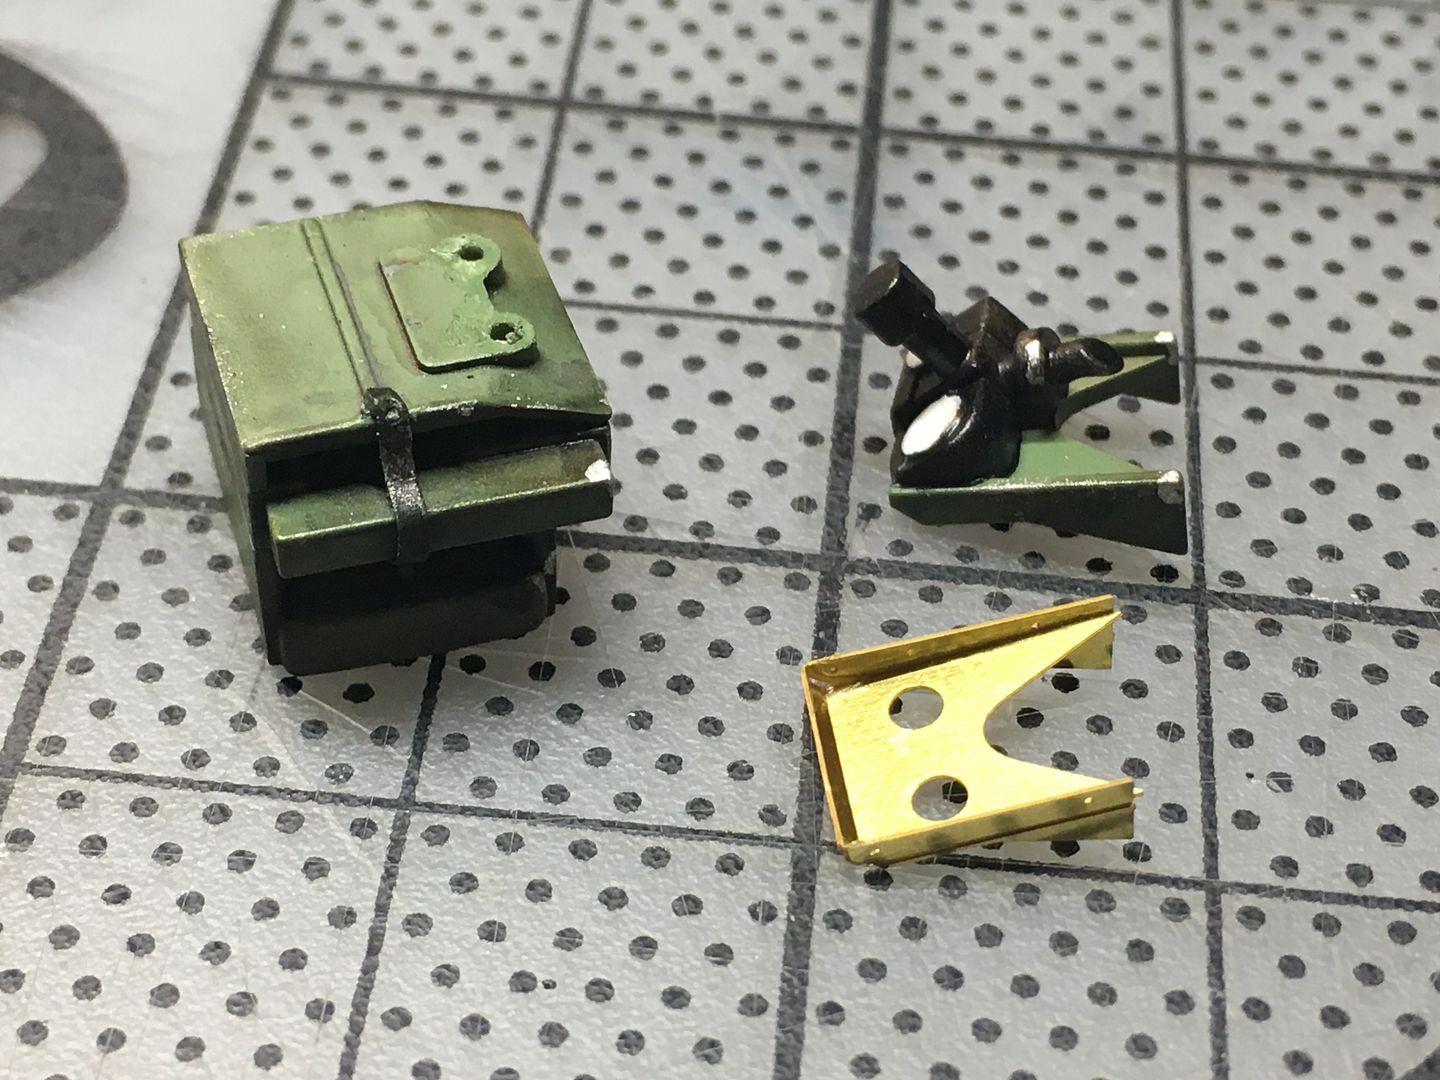
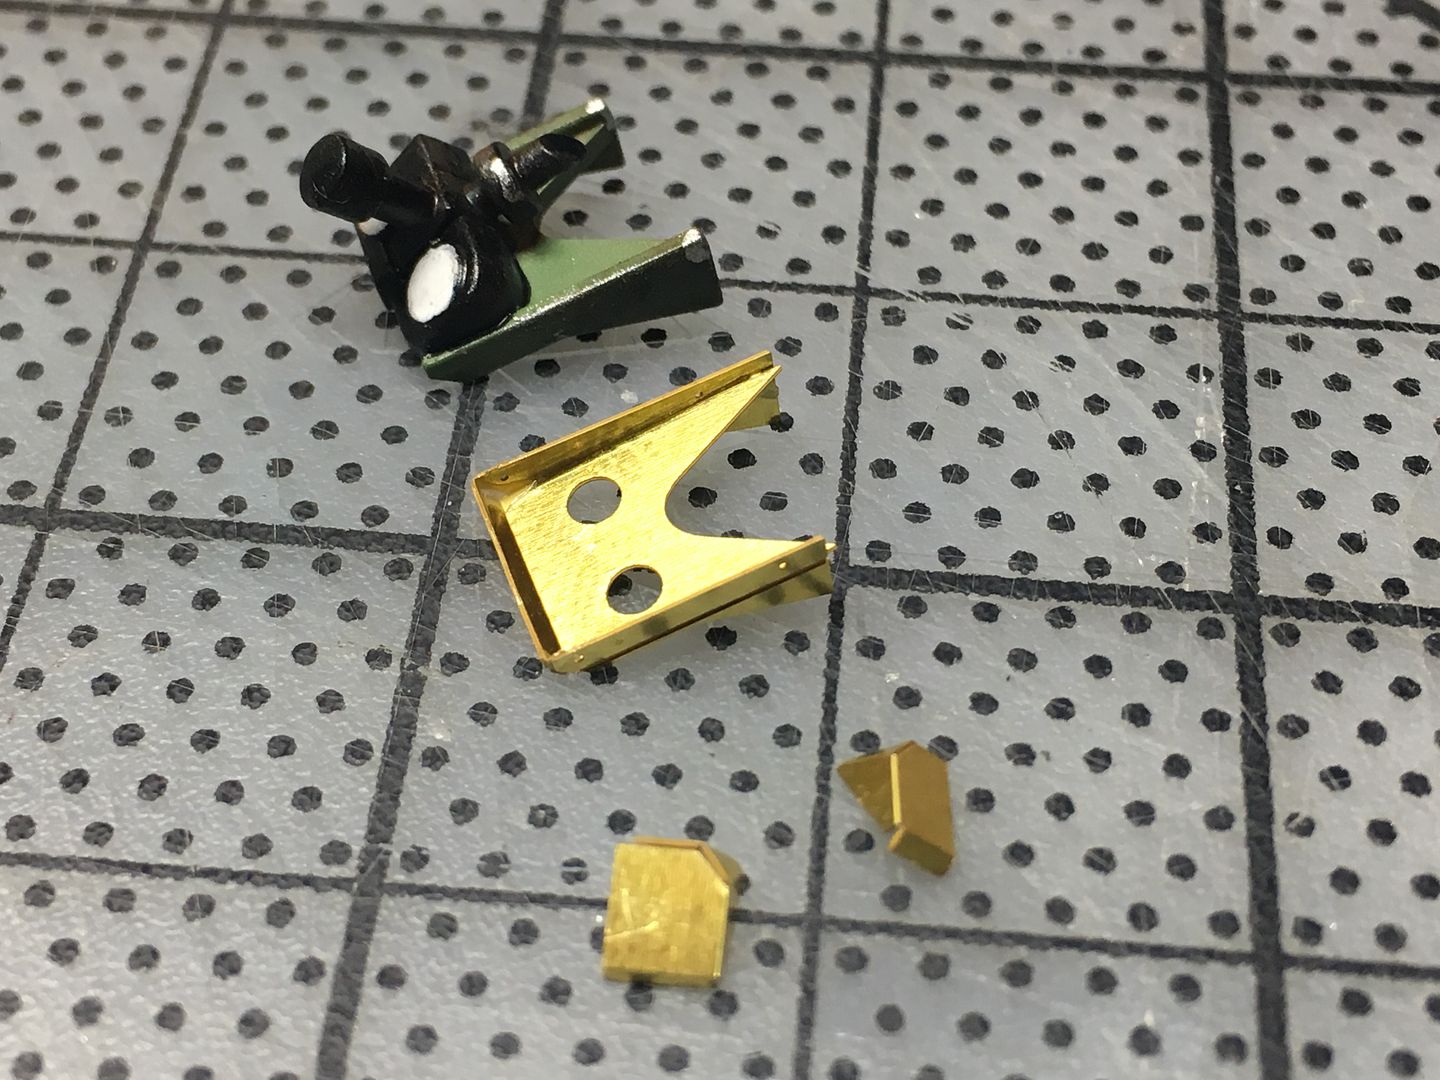
There are 4 ammo boxes in the nose - one molding in the Tamiya kit. These are separate in the Eduard kit. I painted these and picked out the detail with oil paint - thinned and painted on, wiped off with cotton buds and thinners - early days but I am liking it - more detail later.
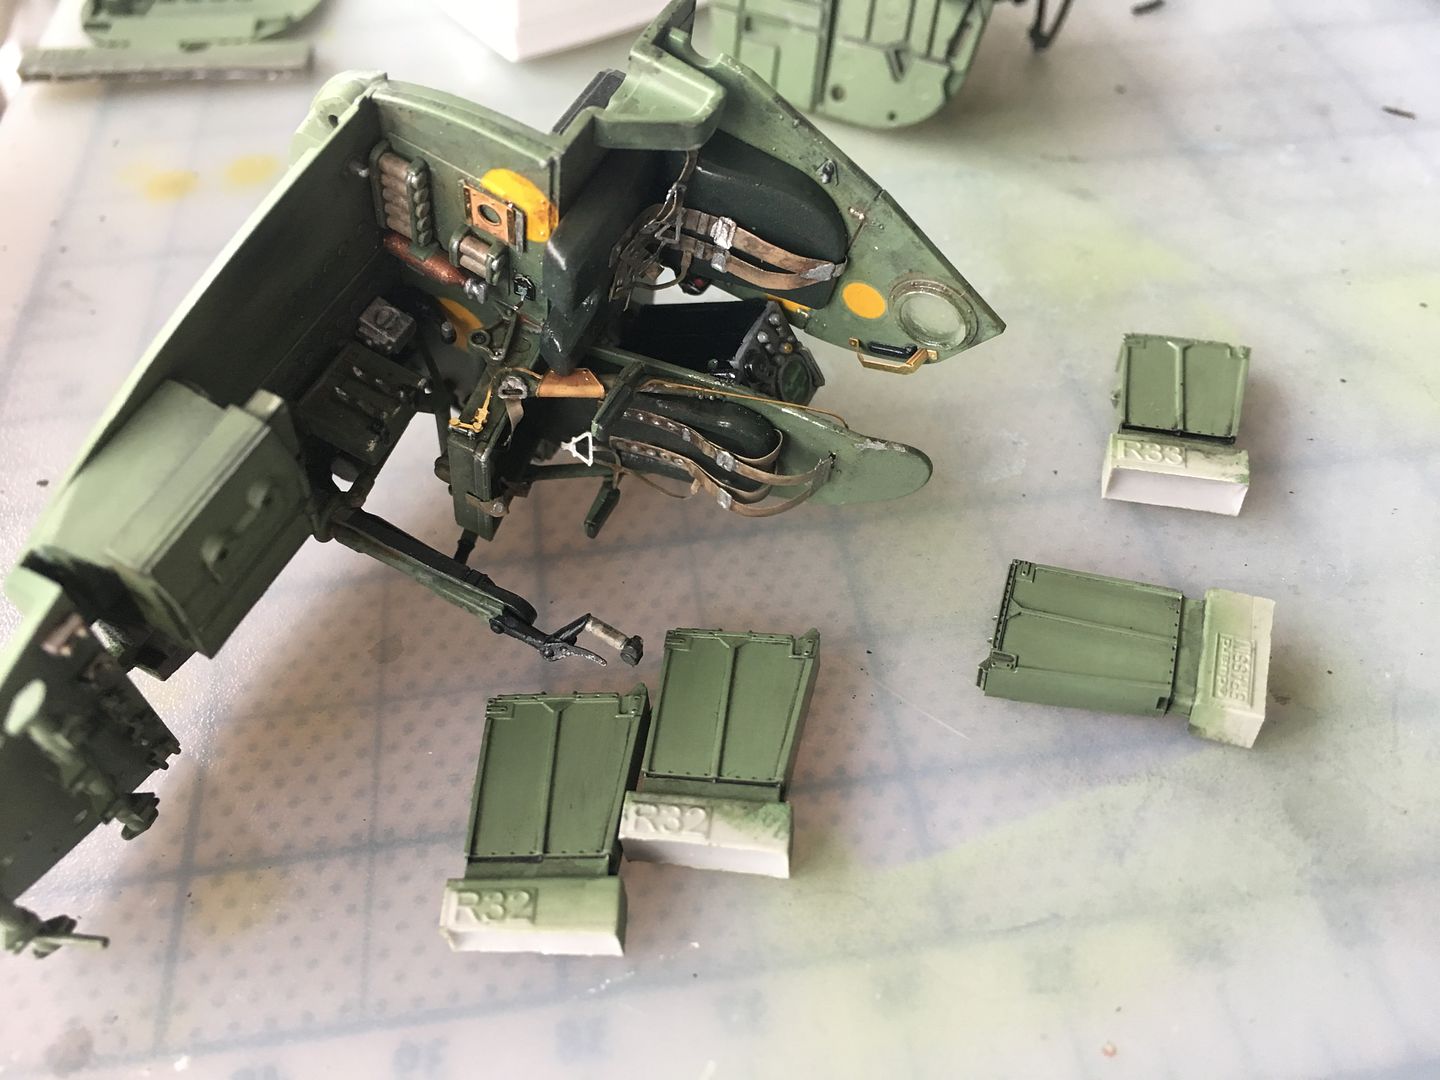
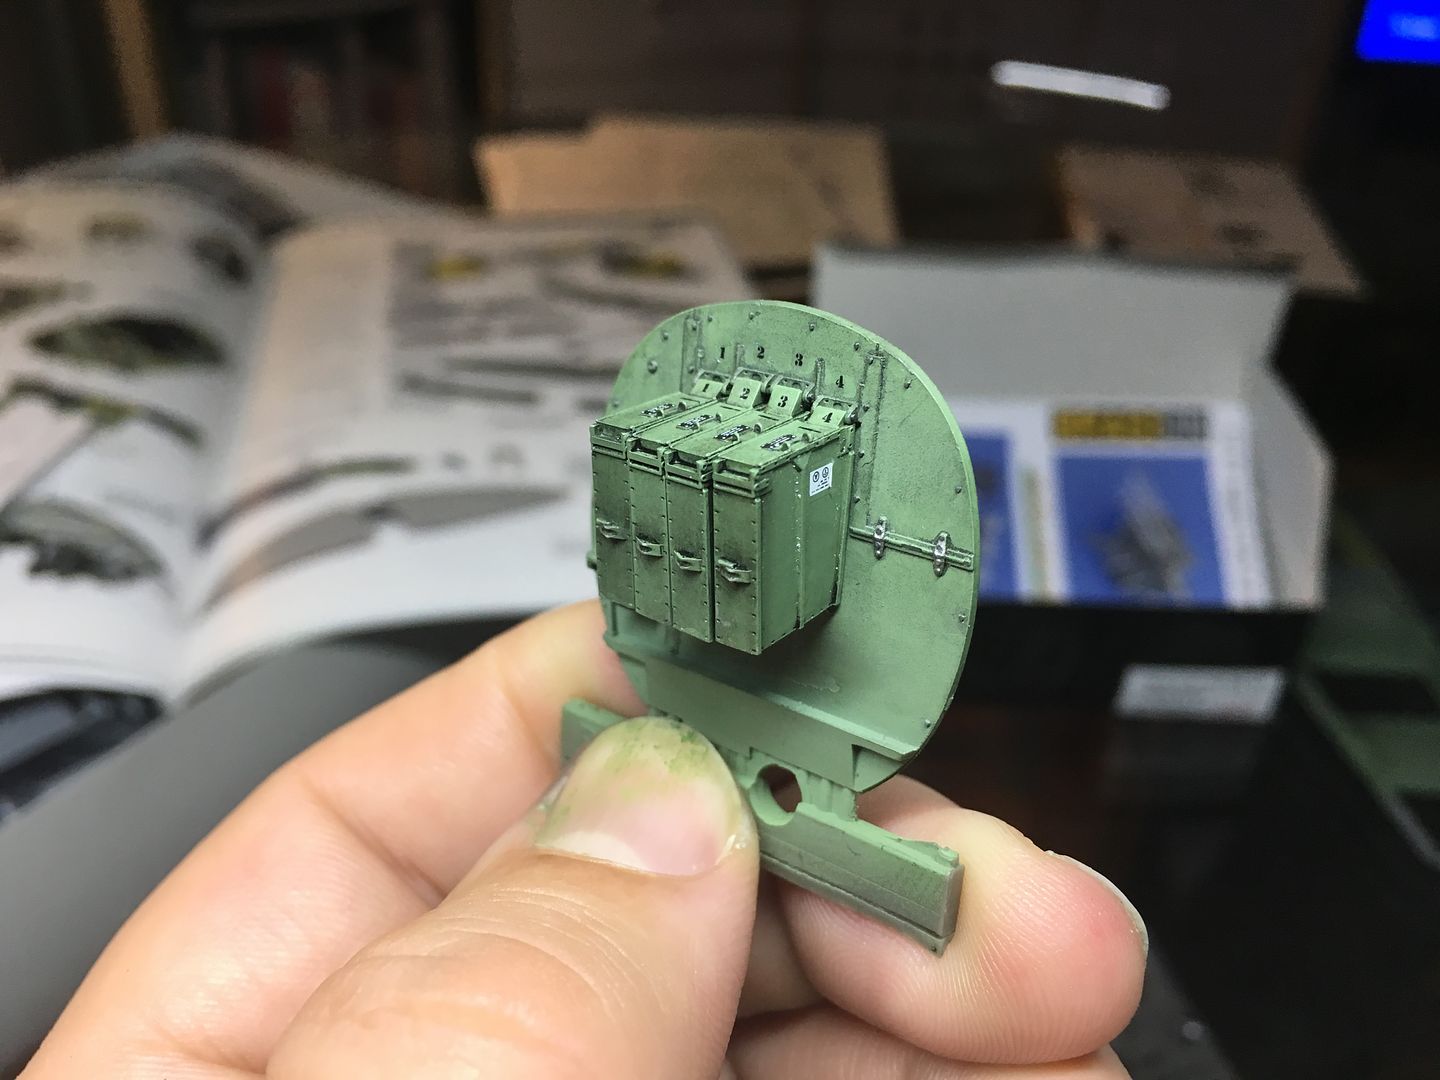
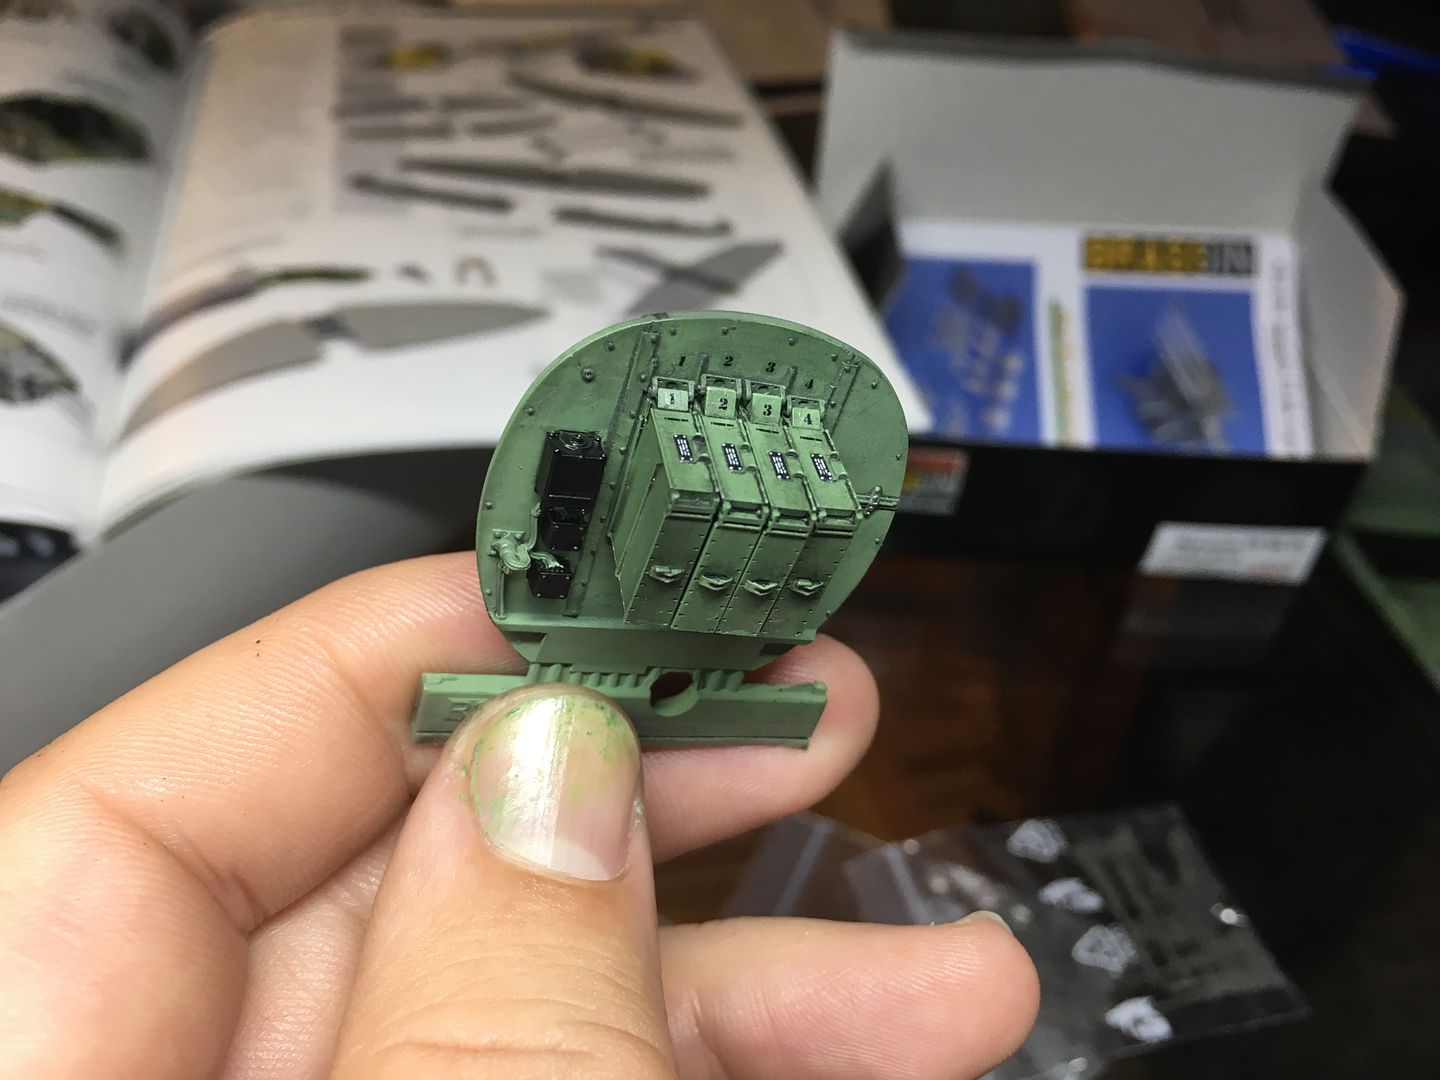
These are just 'clipped' (very precise this Eduard stuff) into place - lots of PE straps and chains to add to each one...
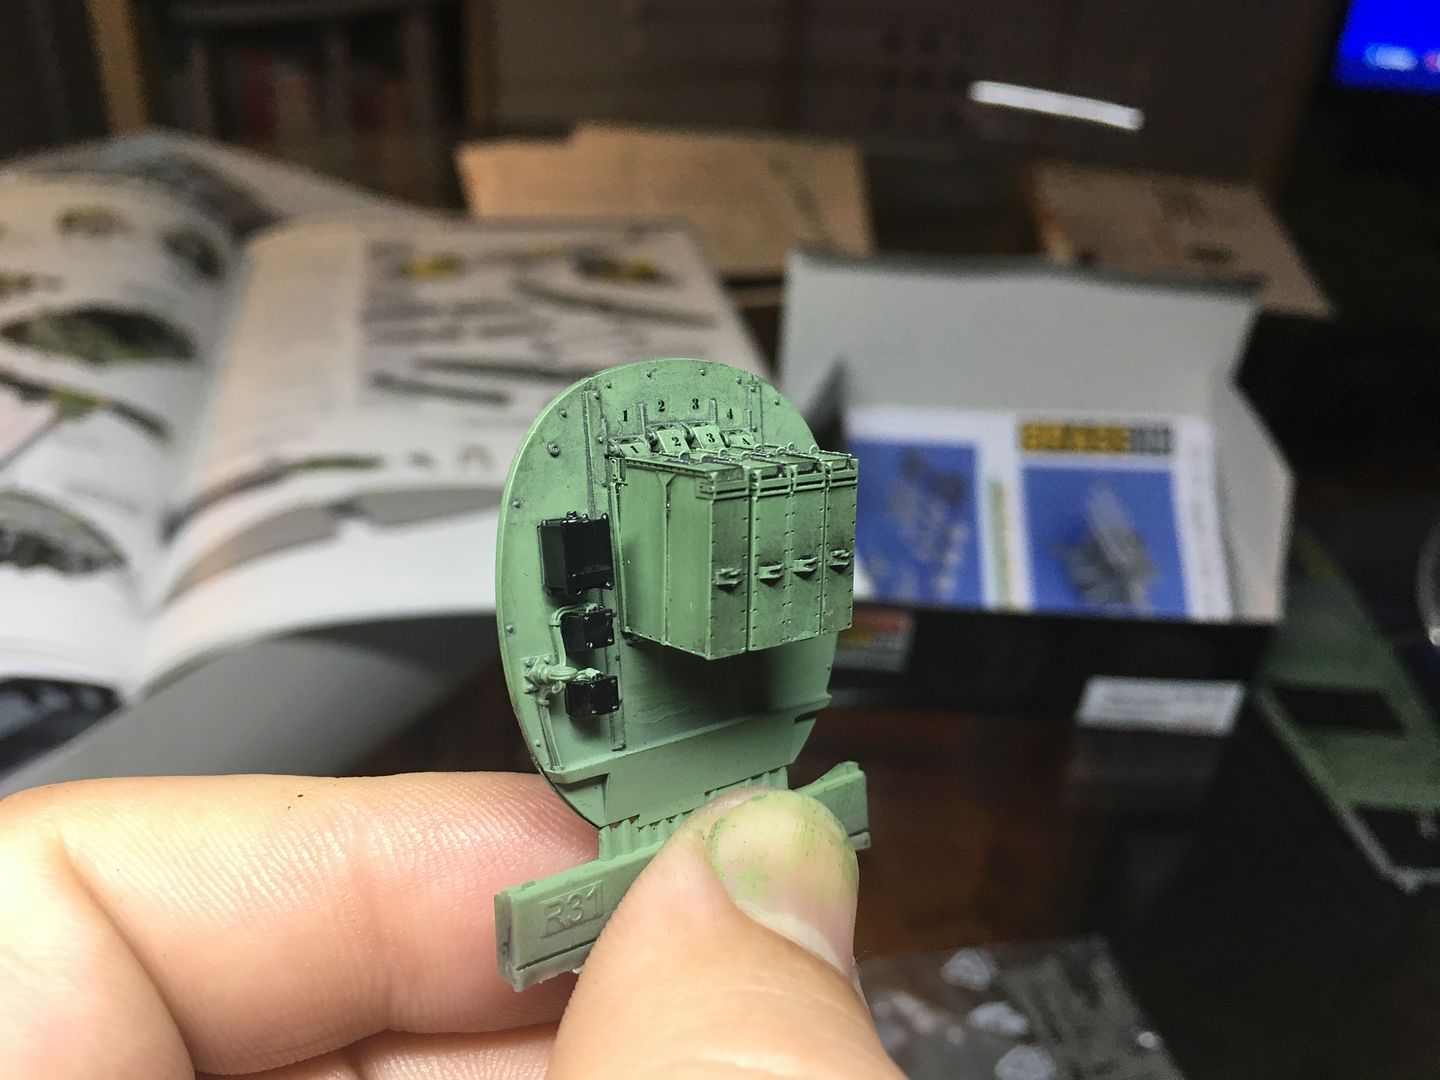
Comparison shot with the Tamiya part...
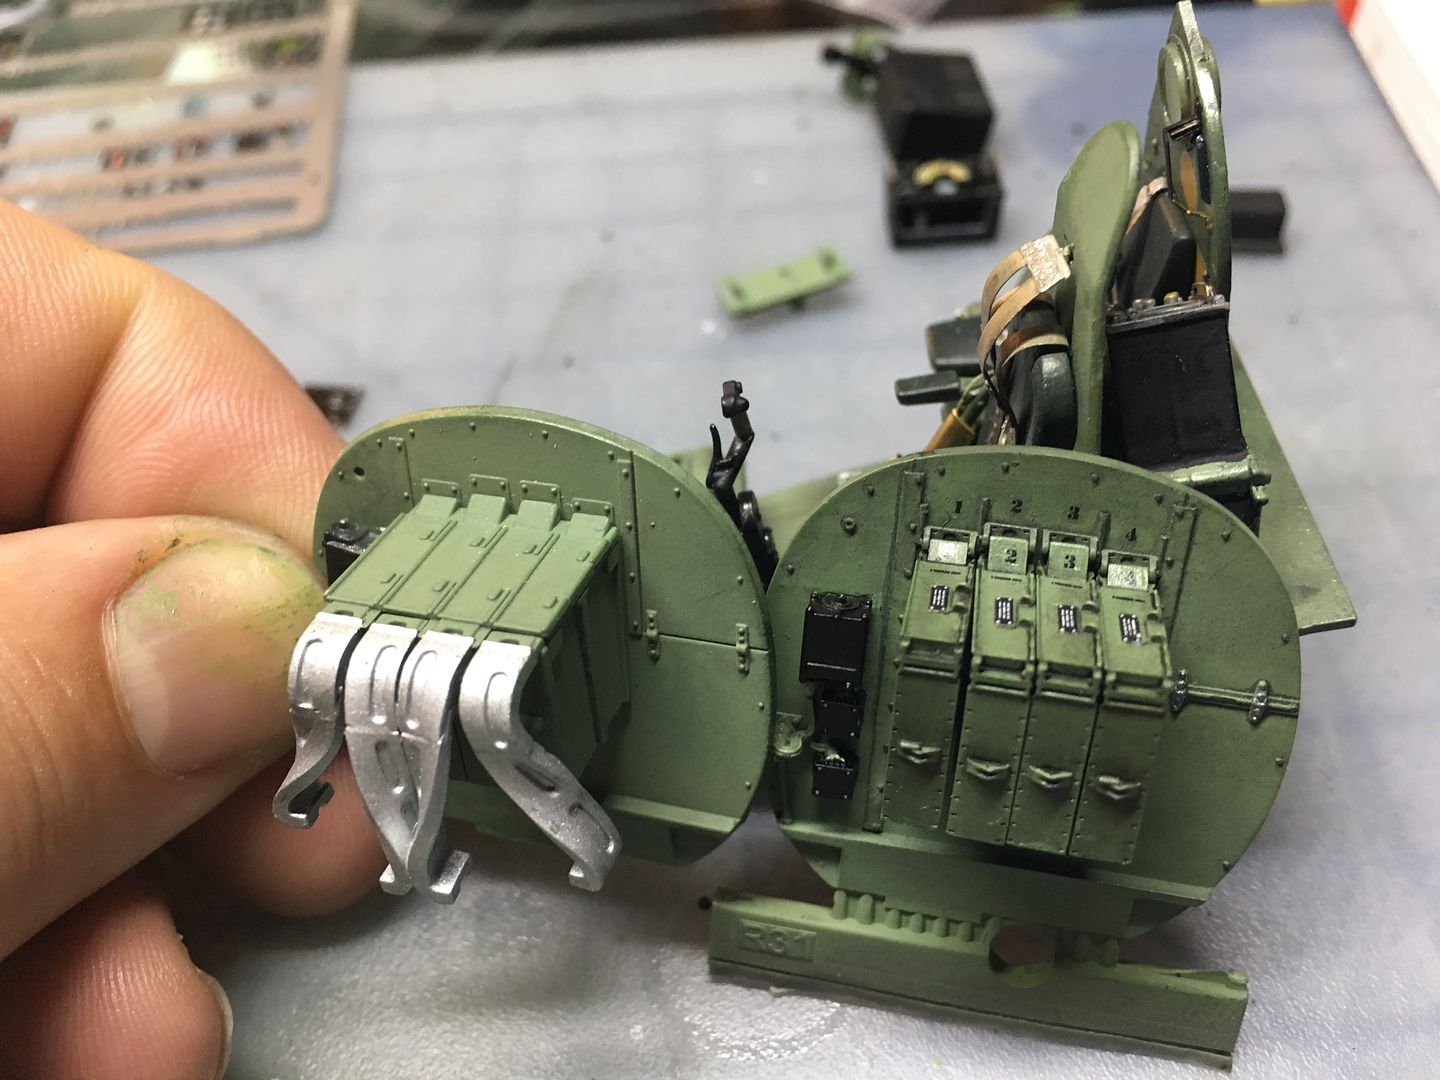
Whilst there are some decals and detail missing on the Tamiya bits, you can clearly see the difference in the Eduard versions...
One of the biggest improvements in using the Eduard internal PE set are the foot pedals - old shot below shows the Tamiya version...
New versions - obviously much finer, but a bugger to make straight...

You can see the updated versions below...
On the older pictures earlier on this WIP, you can see where I had used Tamiya panel line colour to bring out detail - but inexperience meant I had not used a gloss layer first, and it all looked a bit messy...now I have watched a few vids (highly recommend PLASTO on youtube) I feel I can try oils with a bit more confidence.
I tried the panel gap first, but concluded this is great for fine detail, but not flatter areas - when I wiped the excess off using thinners, it wiped it all off on this sort of smoother detail.
So I took the step into oils - thinned down loads, painted on, then taken off with cotton buds - I'm a convert. It will take time and practice, but I can see the potential.

...for sure this commits me to the grubby used look, but that's cool....
Mid-rub...
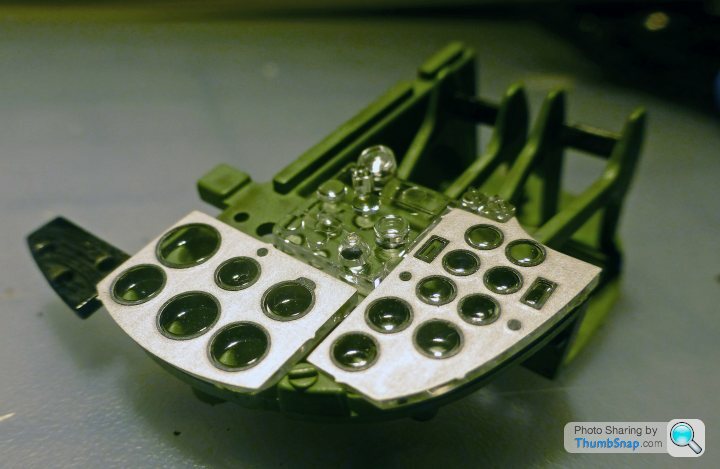
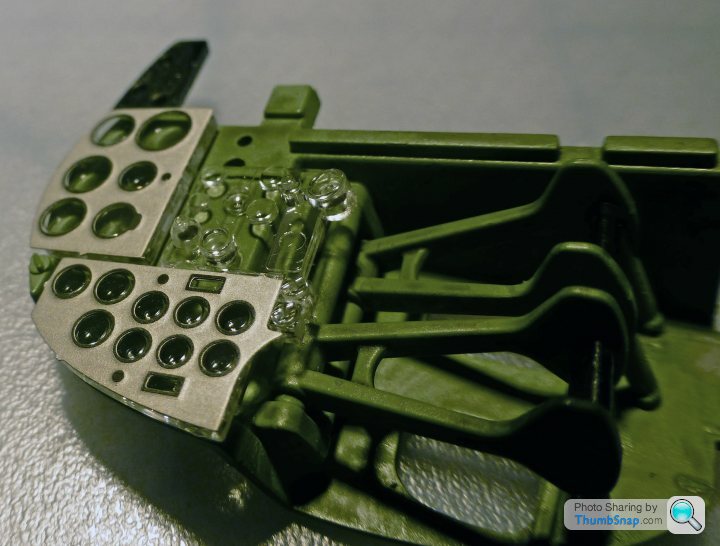
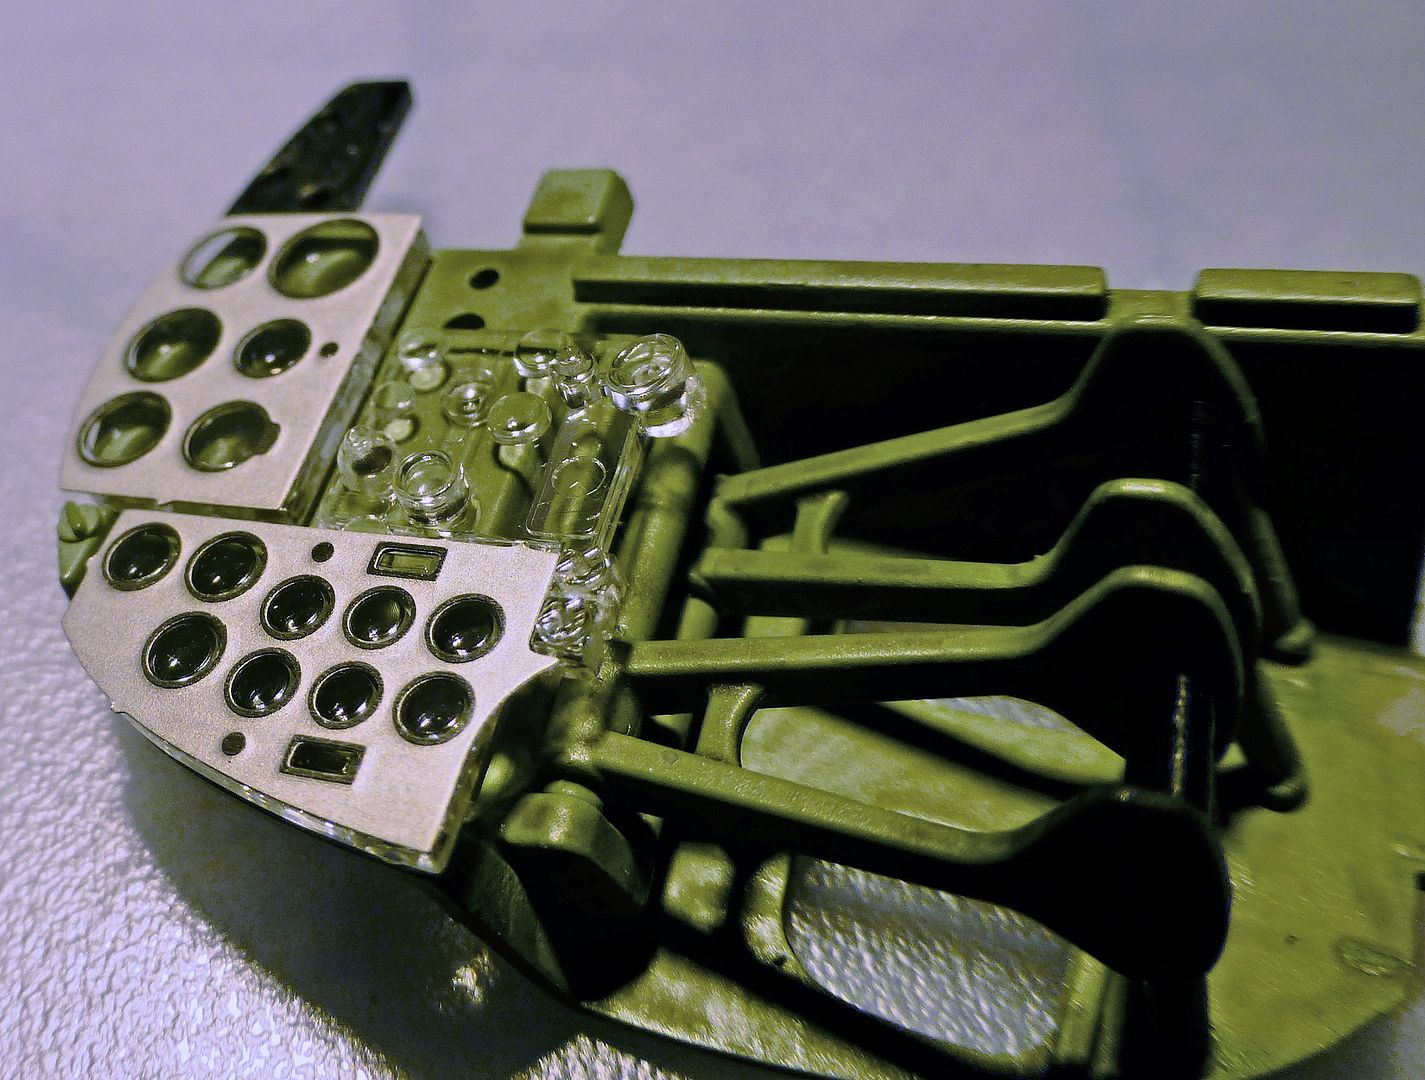
Here you can see some of the Eduard PE parts fitted to the front of Tamiya components...
In the shot below you can see where I have painted some of the round discs again to vary the tone (tip from someone elses WIP) - I believe that these are wooden discs that were fixed to the frame/skin and provided mounting points for fixing instruments and fittings too...
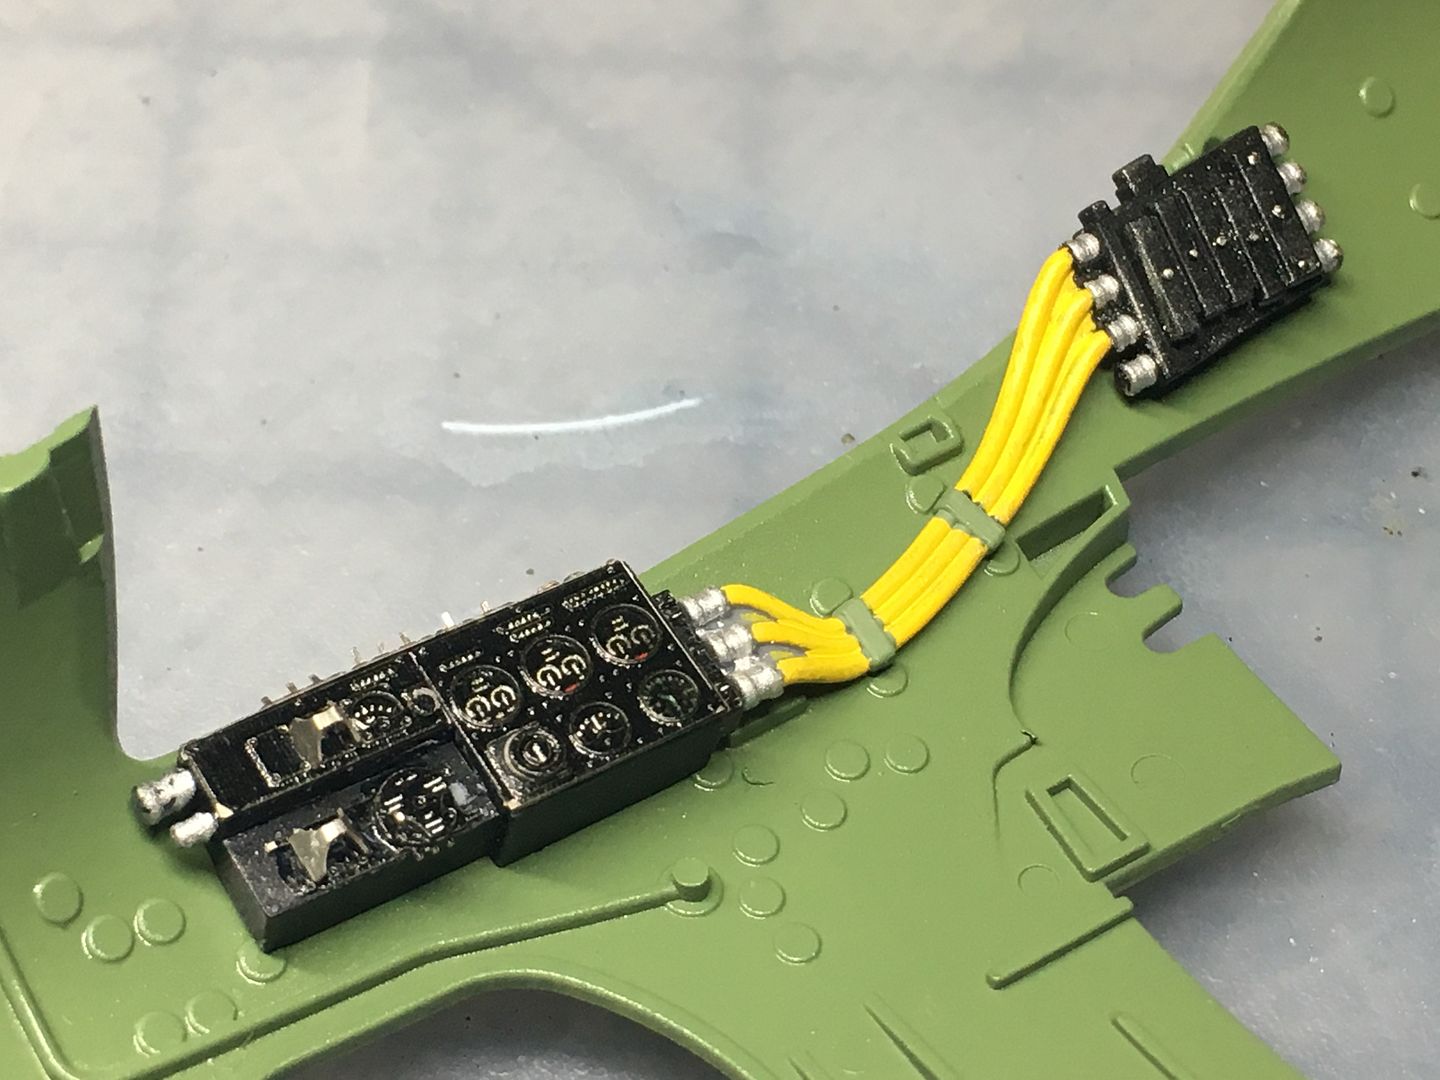
This is a similar part pre-oil. The fittings and instruments are Eduard - more later. Yellow wire is Tamiya molding - I may replace with 'real' cable...

Some more Eduard parts (the PE) with the Tamiya part also shown...
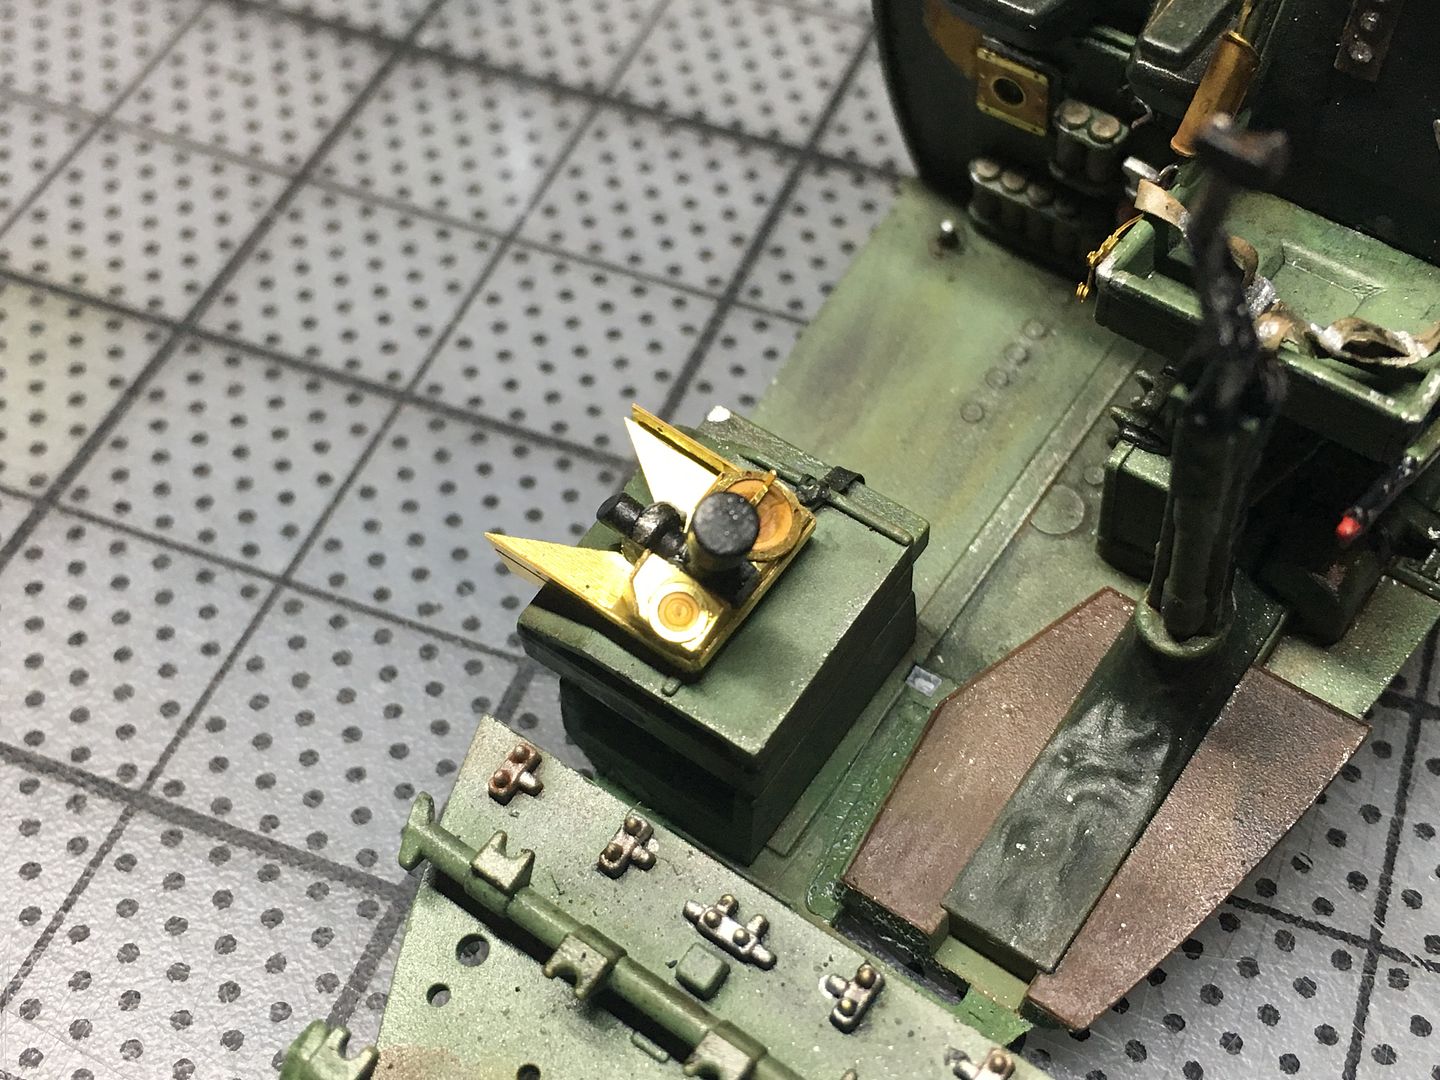
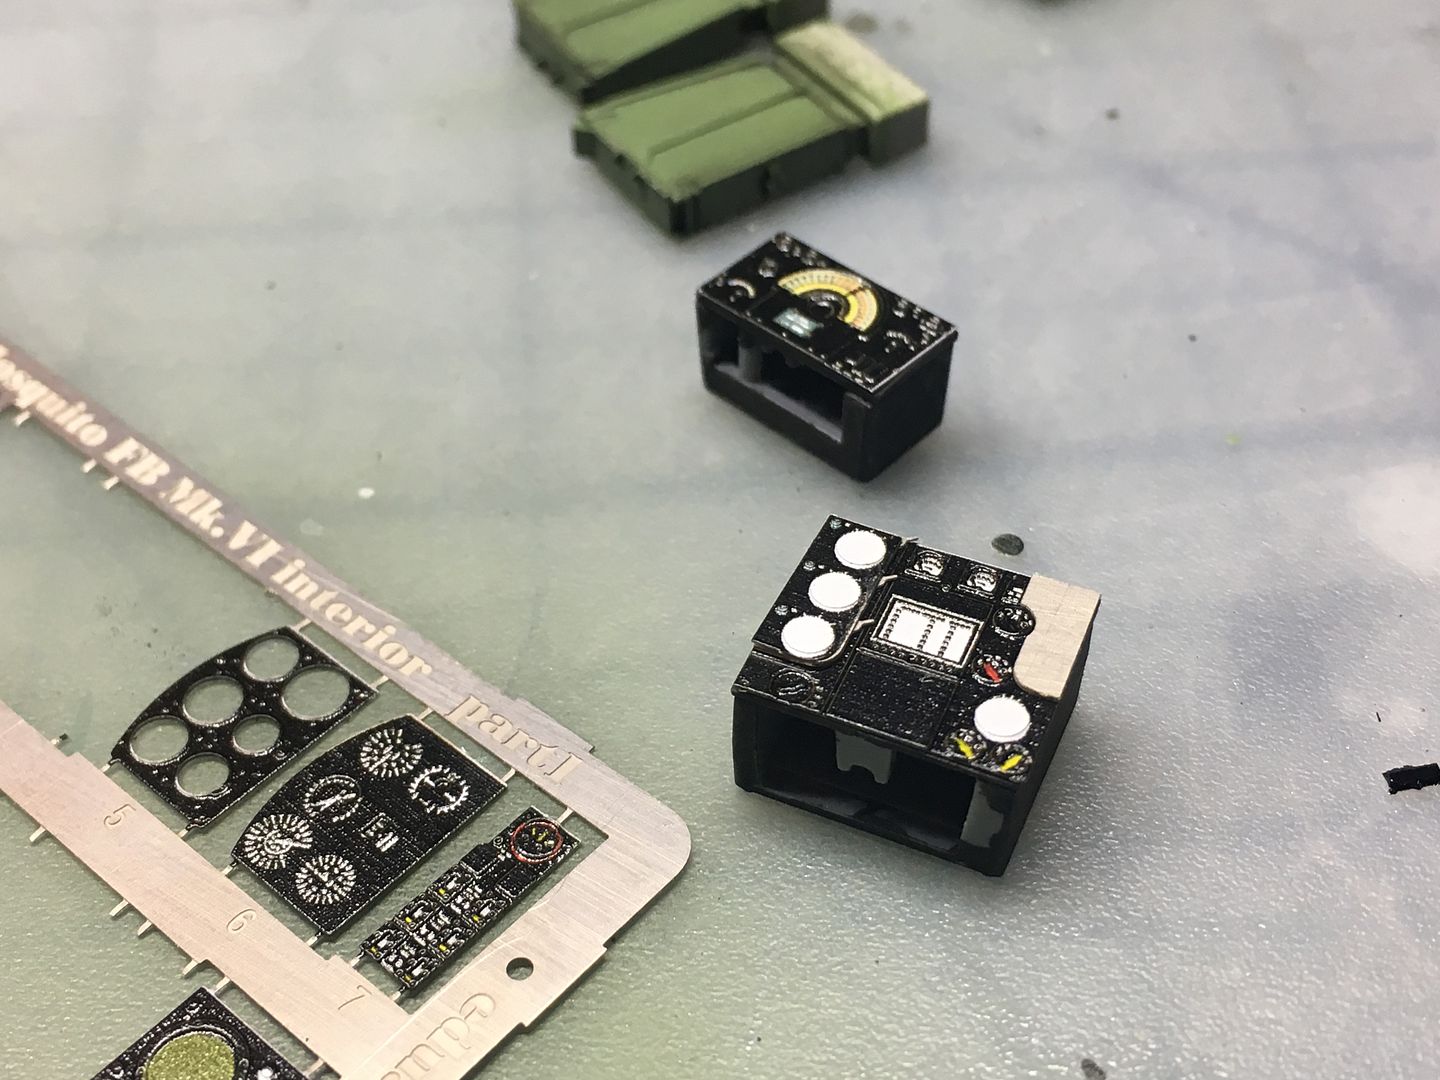
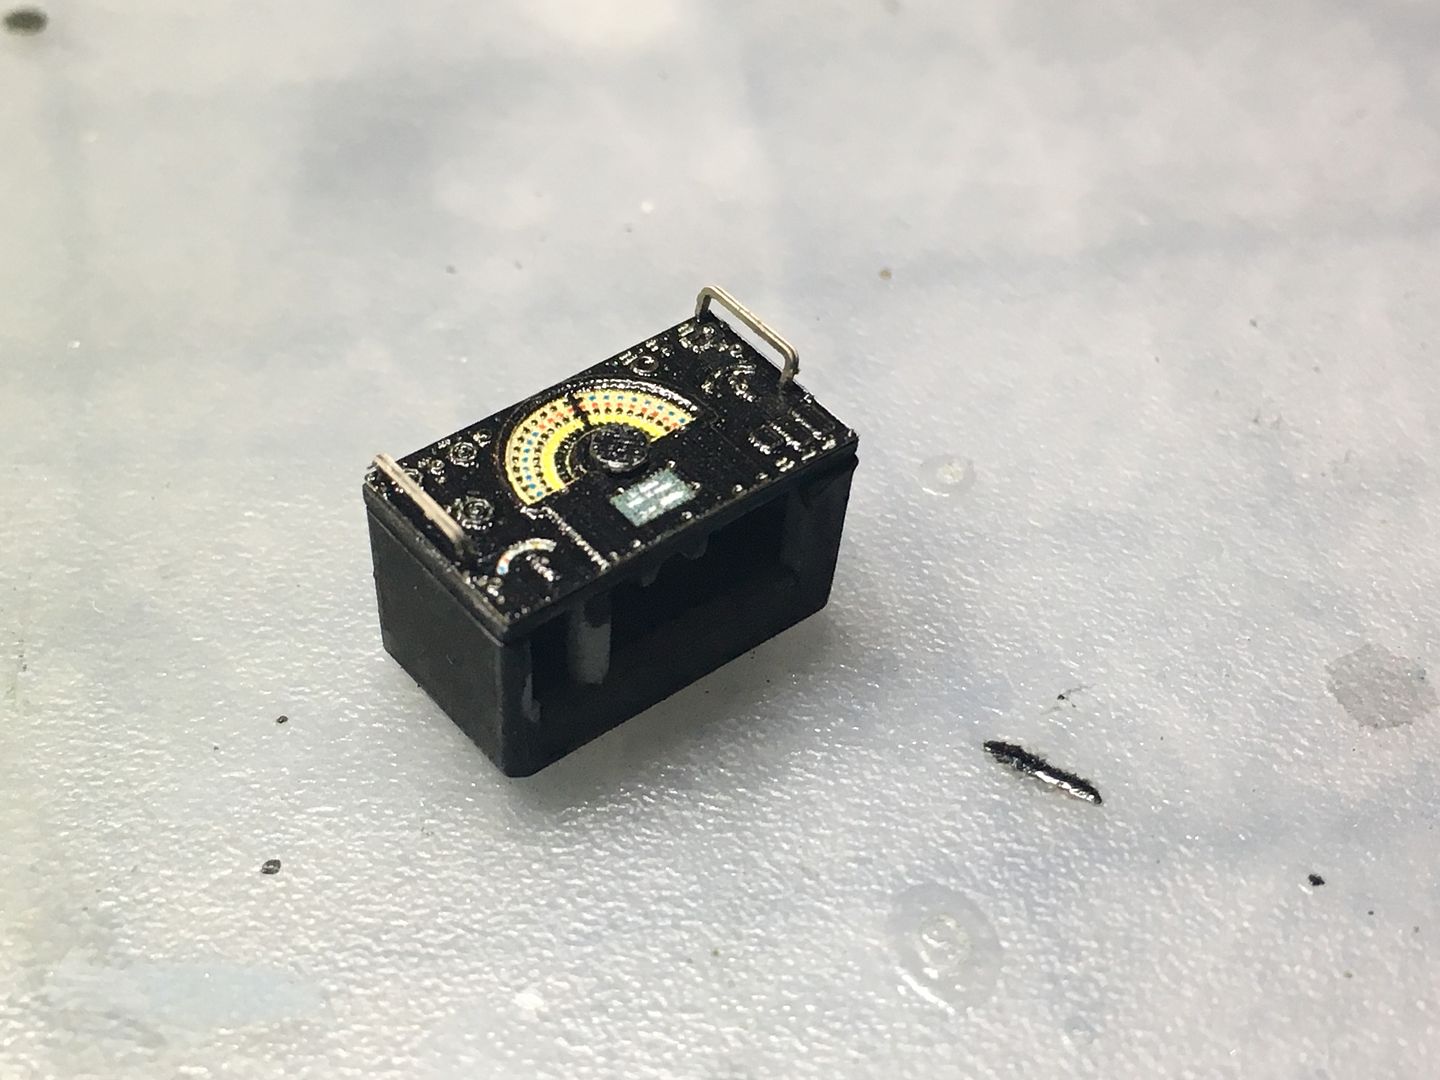
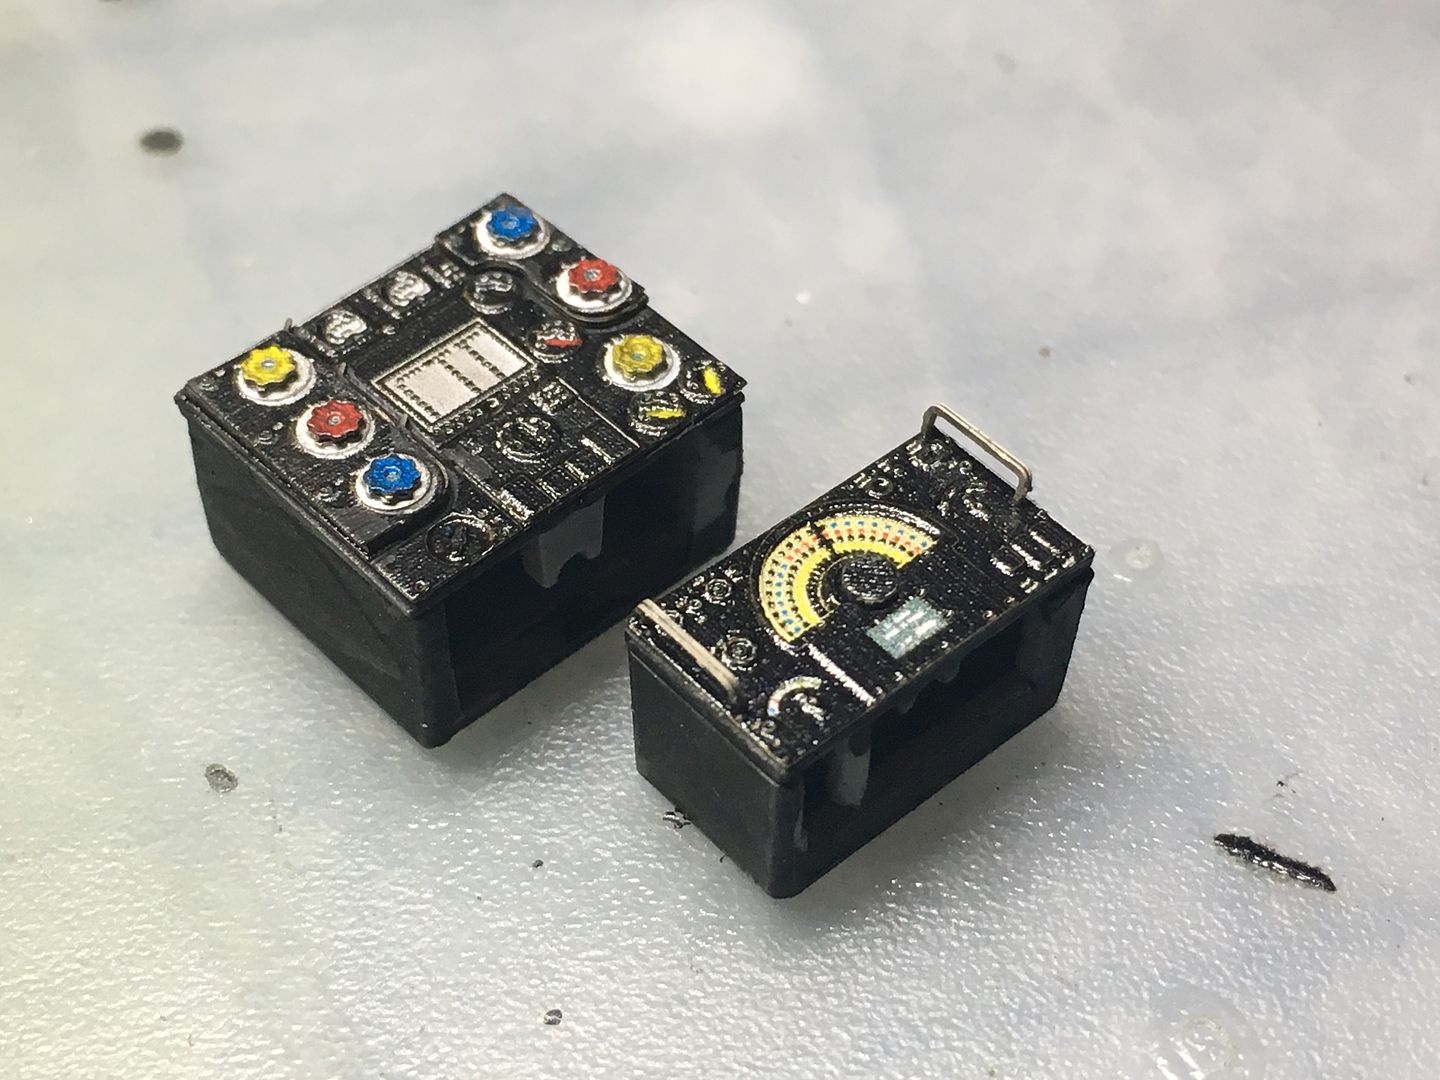
Most of the internal detail kit from Eduard is instrument panel - you cut the molded detail off the front of the tamiya parts and glue the PE on - I'll leave the main instrument panel, as it is not bad and hard to replace - but there are lots of ancillary radios, boxes, batteries etc that I can upgrade. Many of the panels use multiple layers of PE to make them more '3D'...
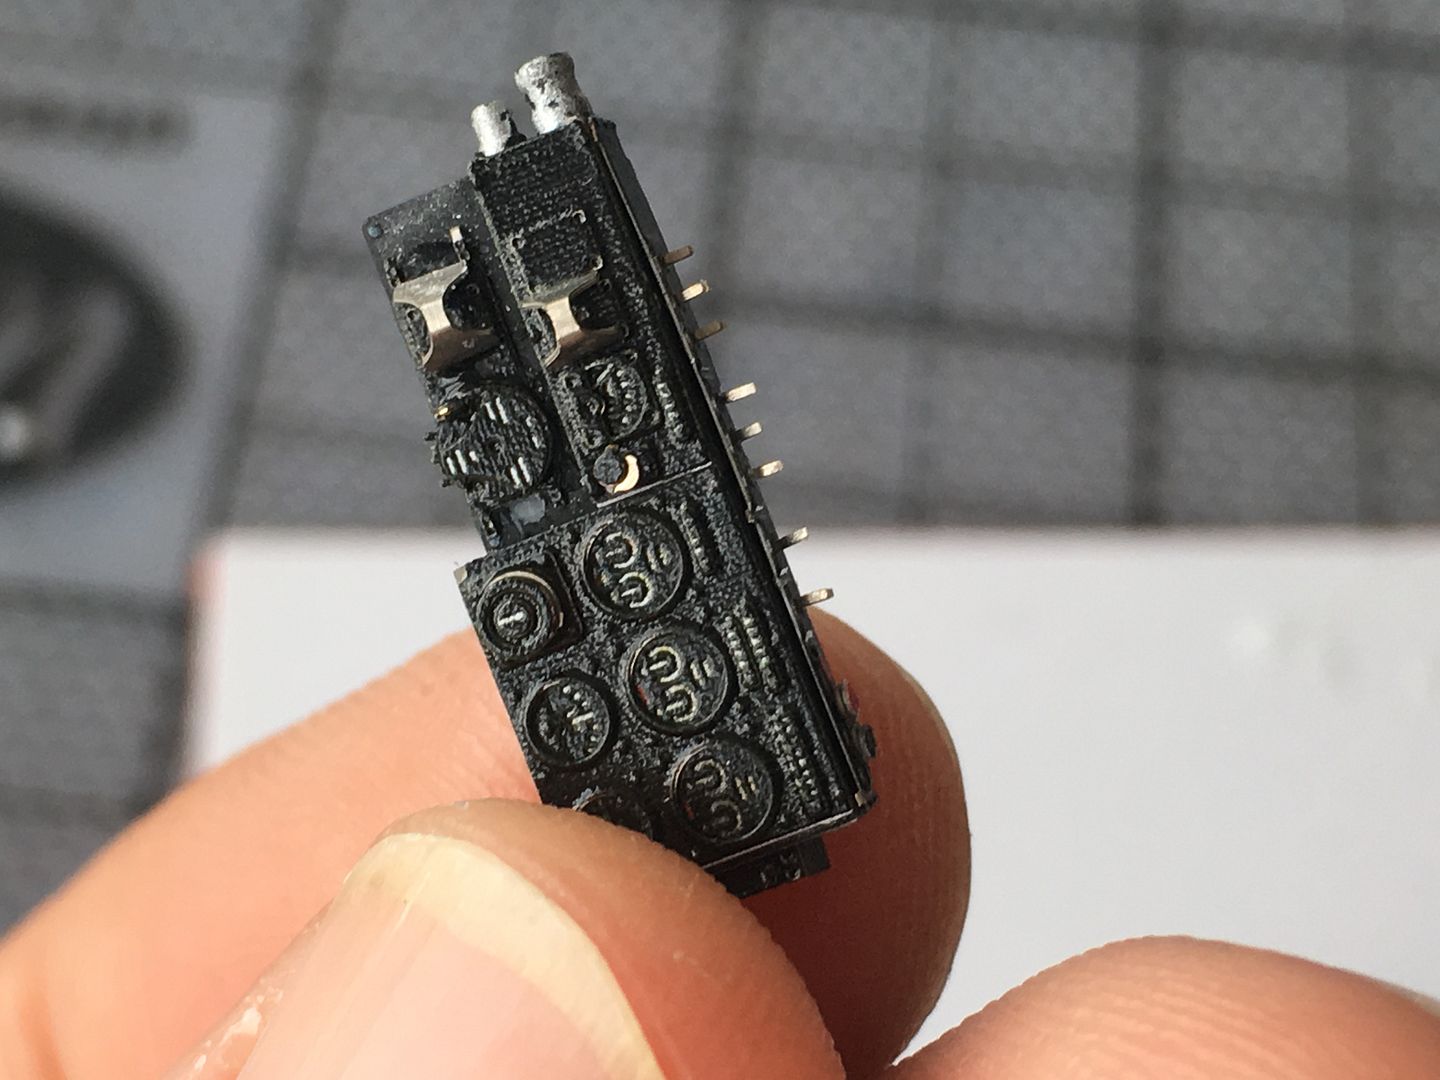
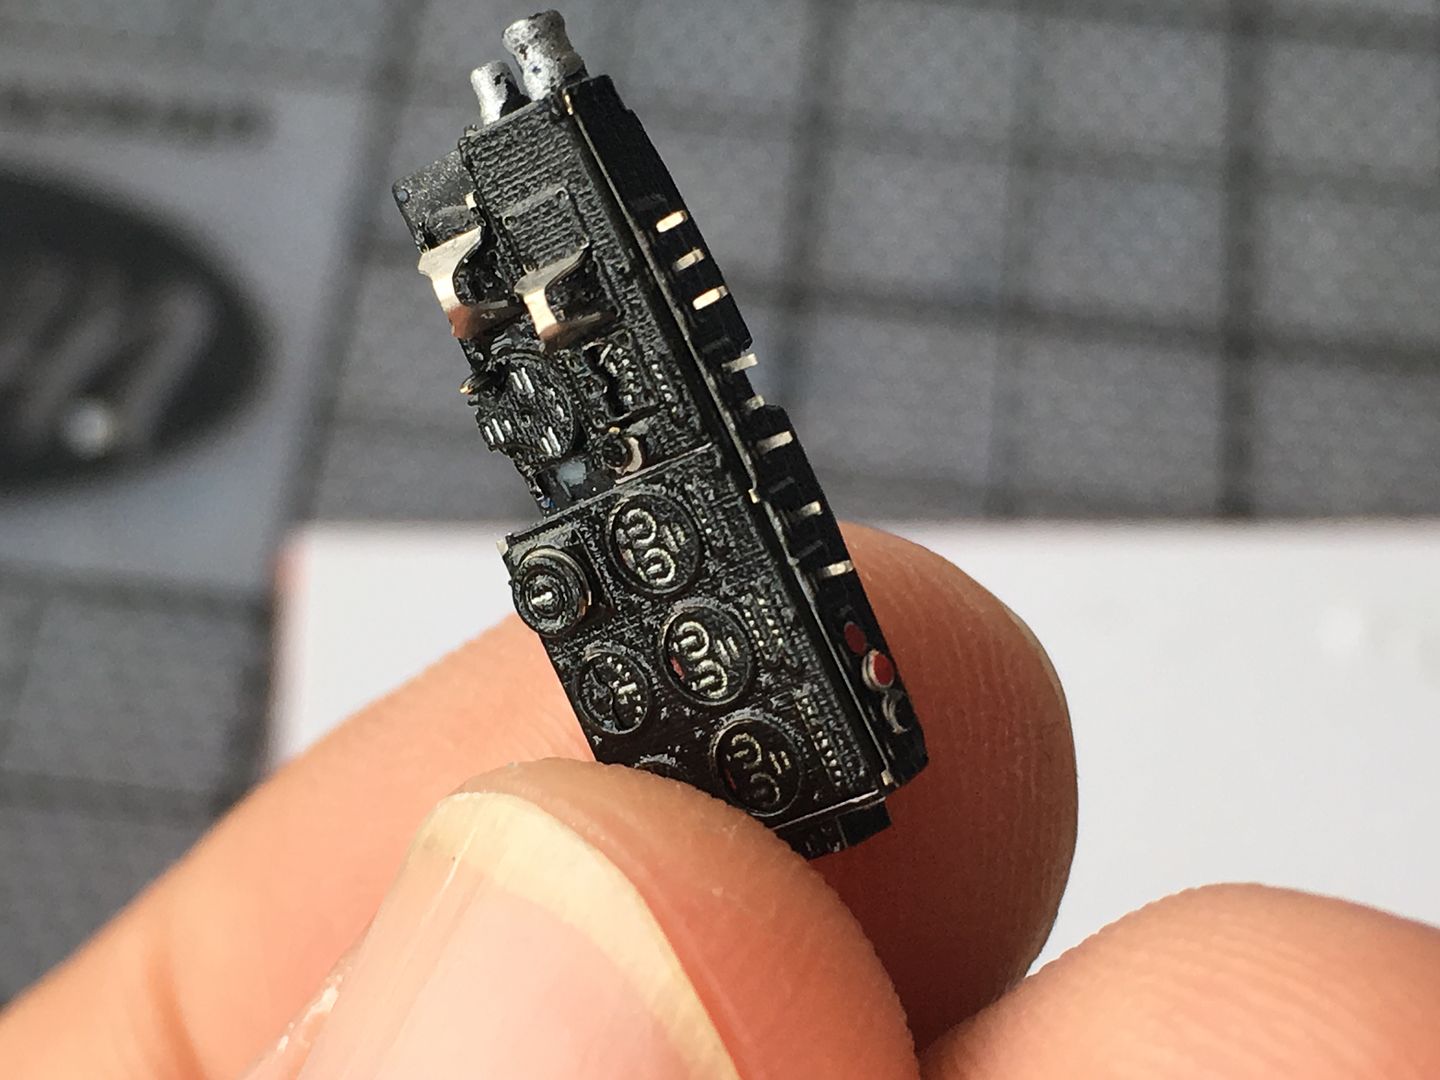
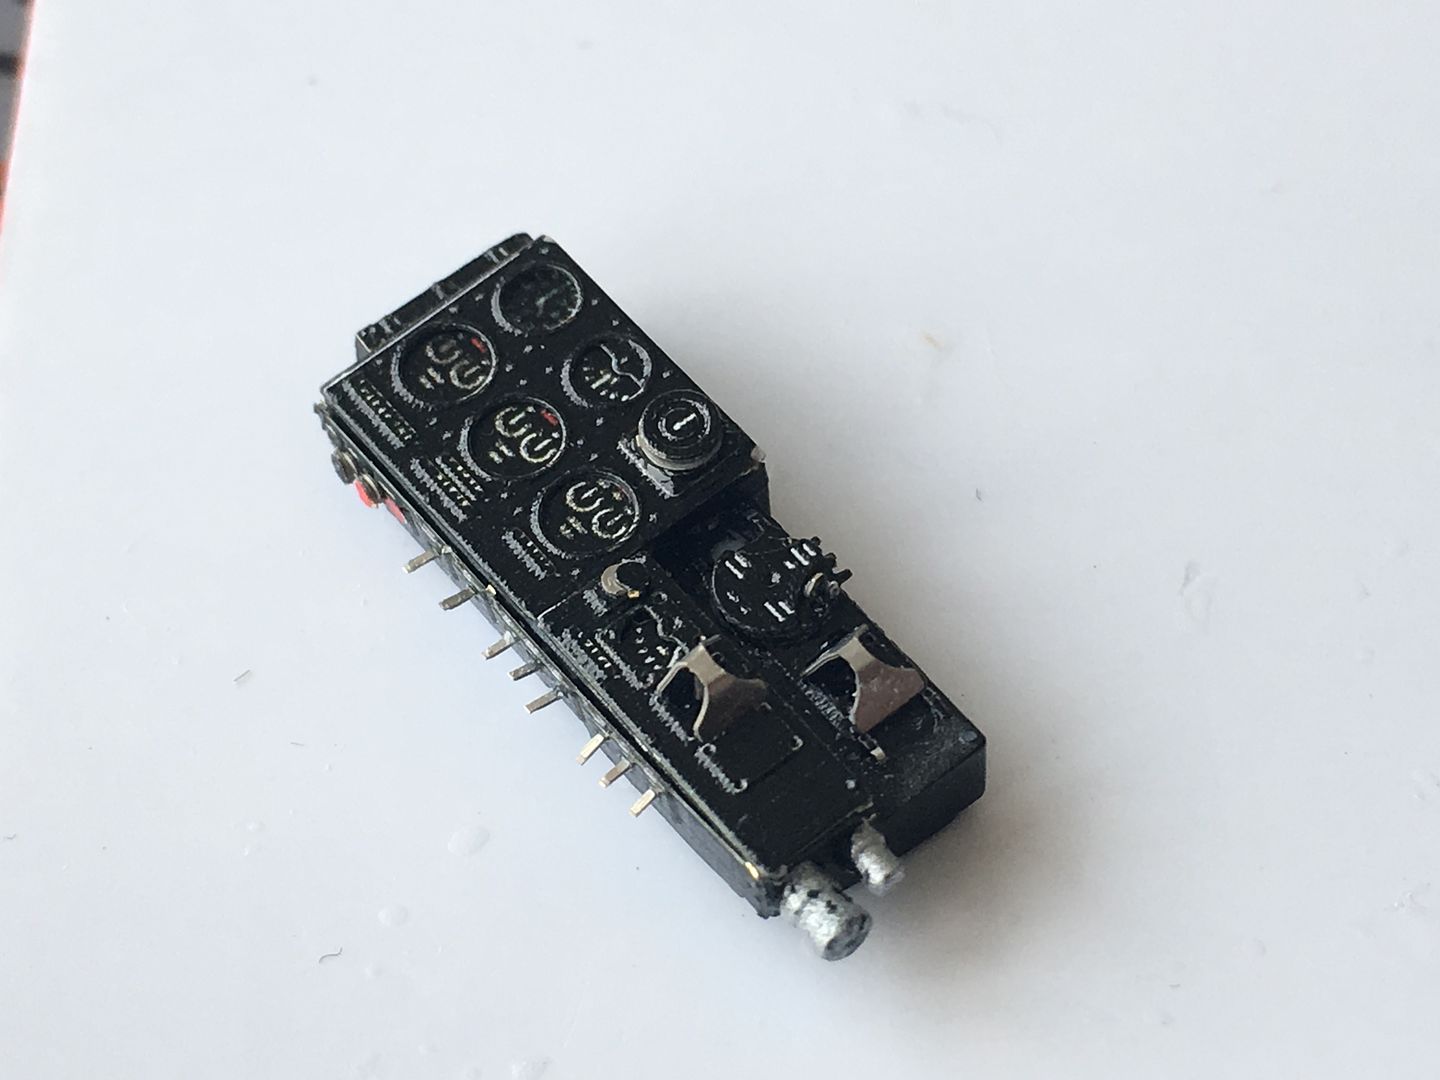


In this shot you can see the rear of the instrument panel. It will be hidden...but damn it I am tempted to add some wiring...grrr!
So that is where I am now - I 'oiled' a few more green bits and hope to carry on a little bit quicker now!
As mentioned, I discovered and decided to try the Eduard accessories - don't think these were out when I originally bought the kit at launch...so I have the gun detail kits and the engine sets...
Although I had started the engines from the kit, I wanted to try these.
Super sharp detail, so I am going to max these out with wires and cables etc etc...
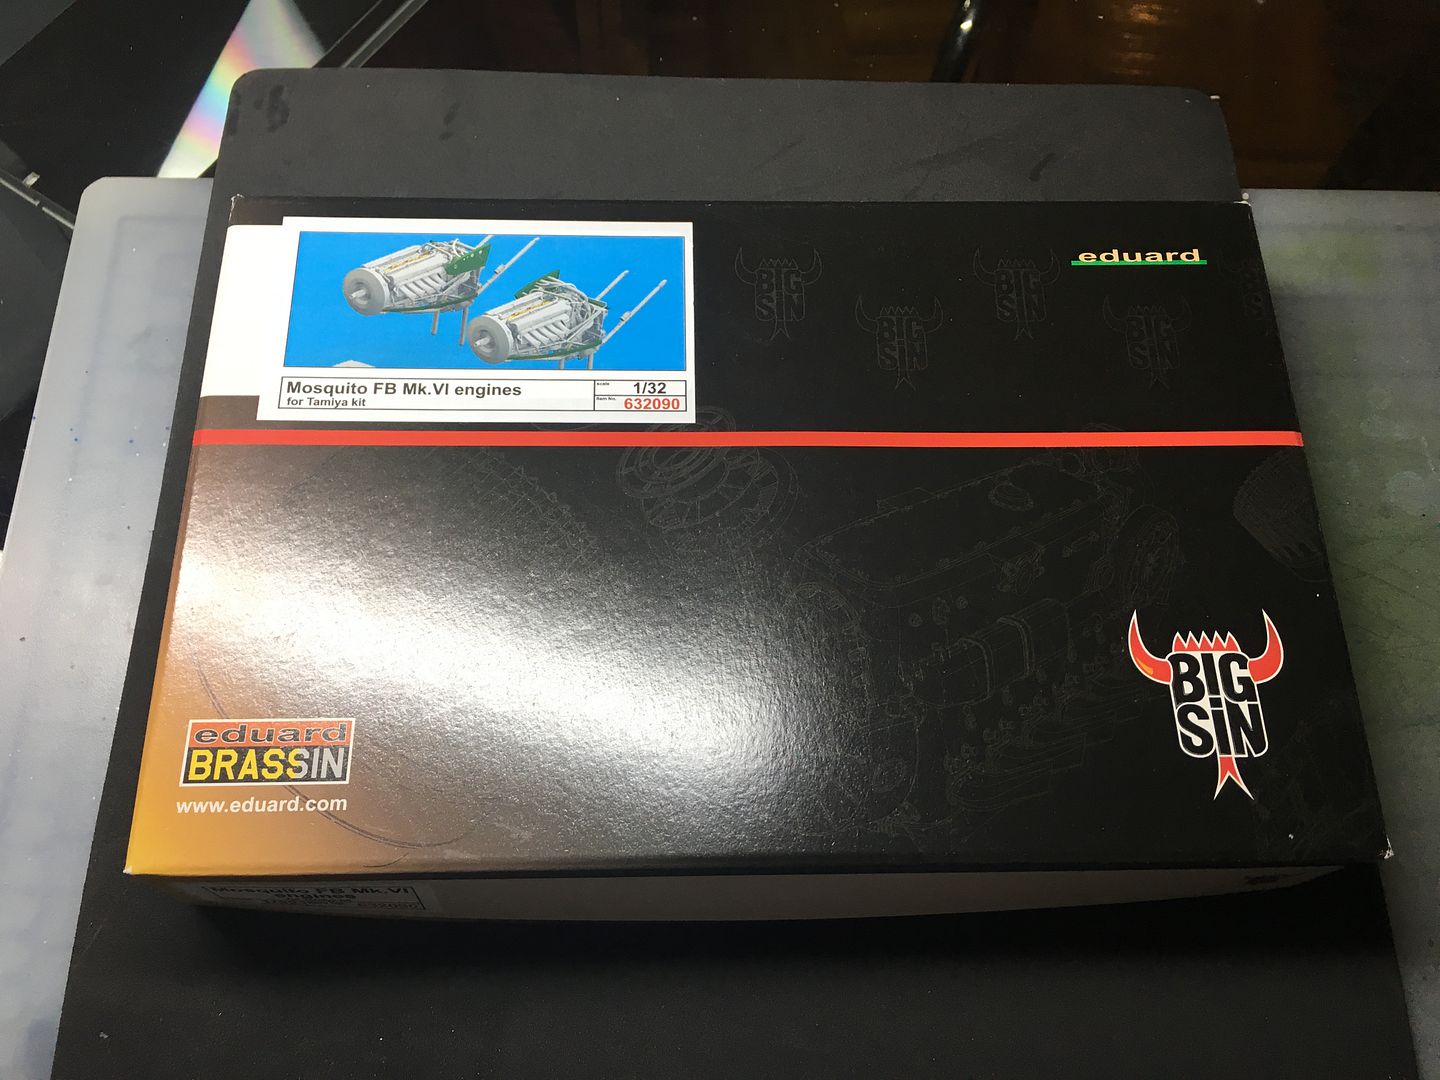
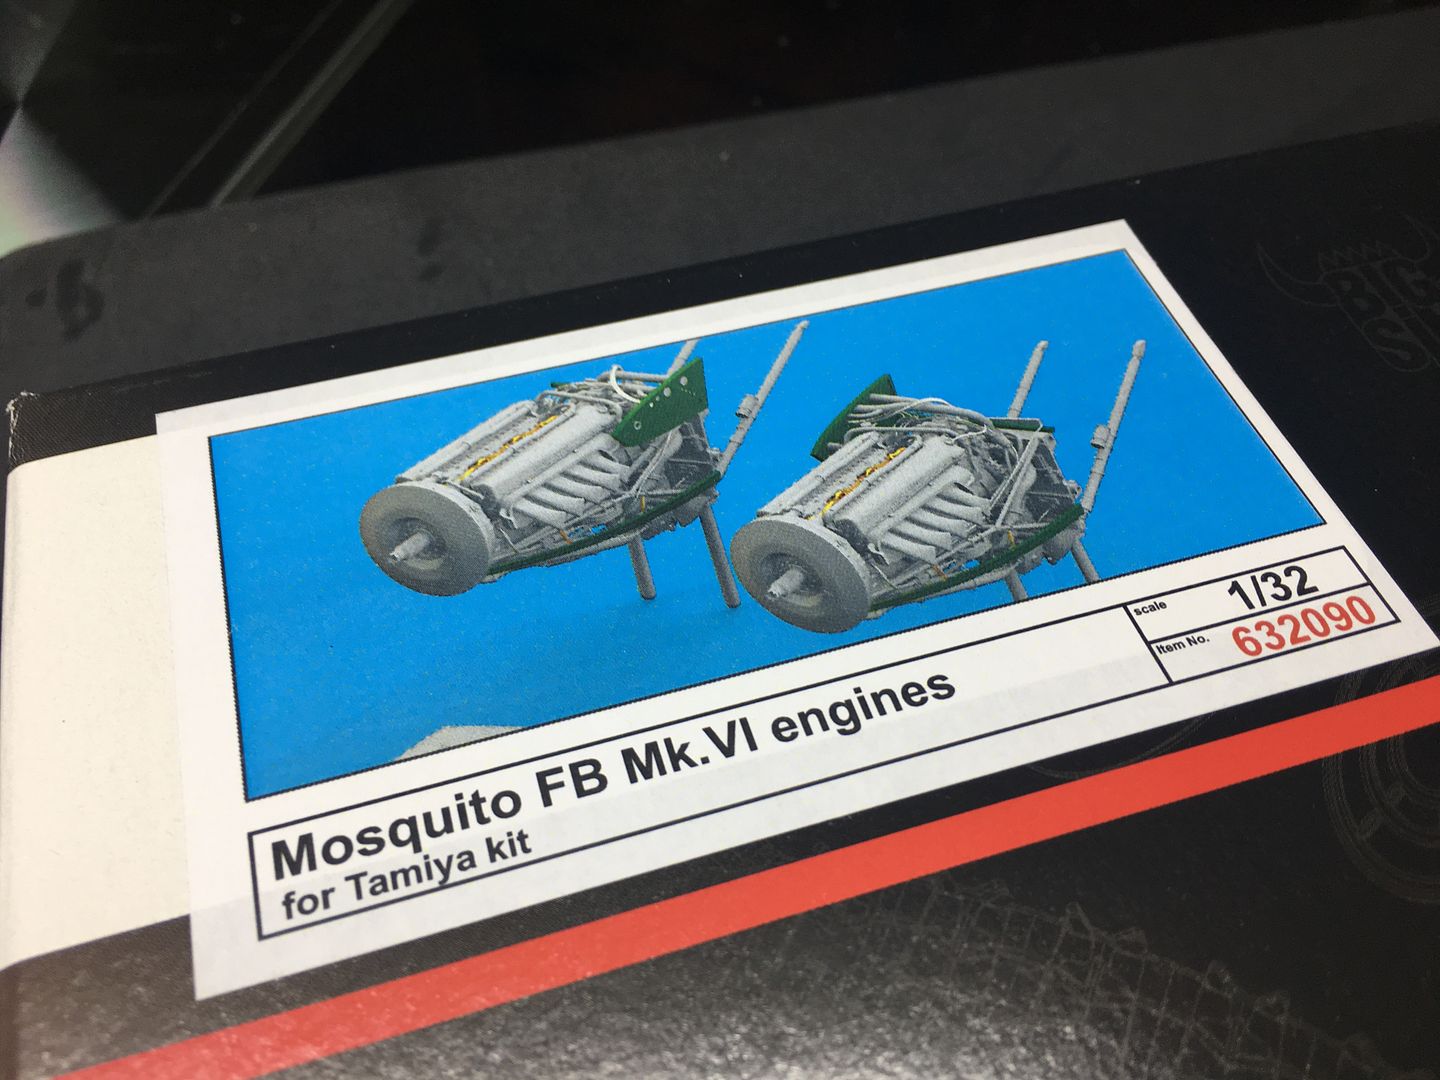

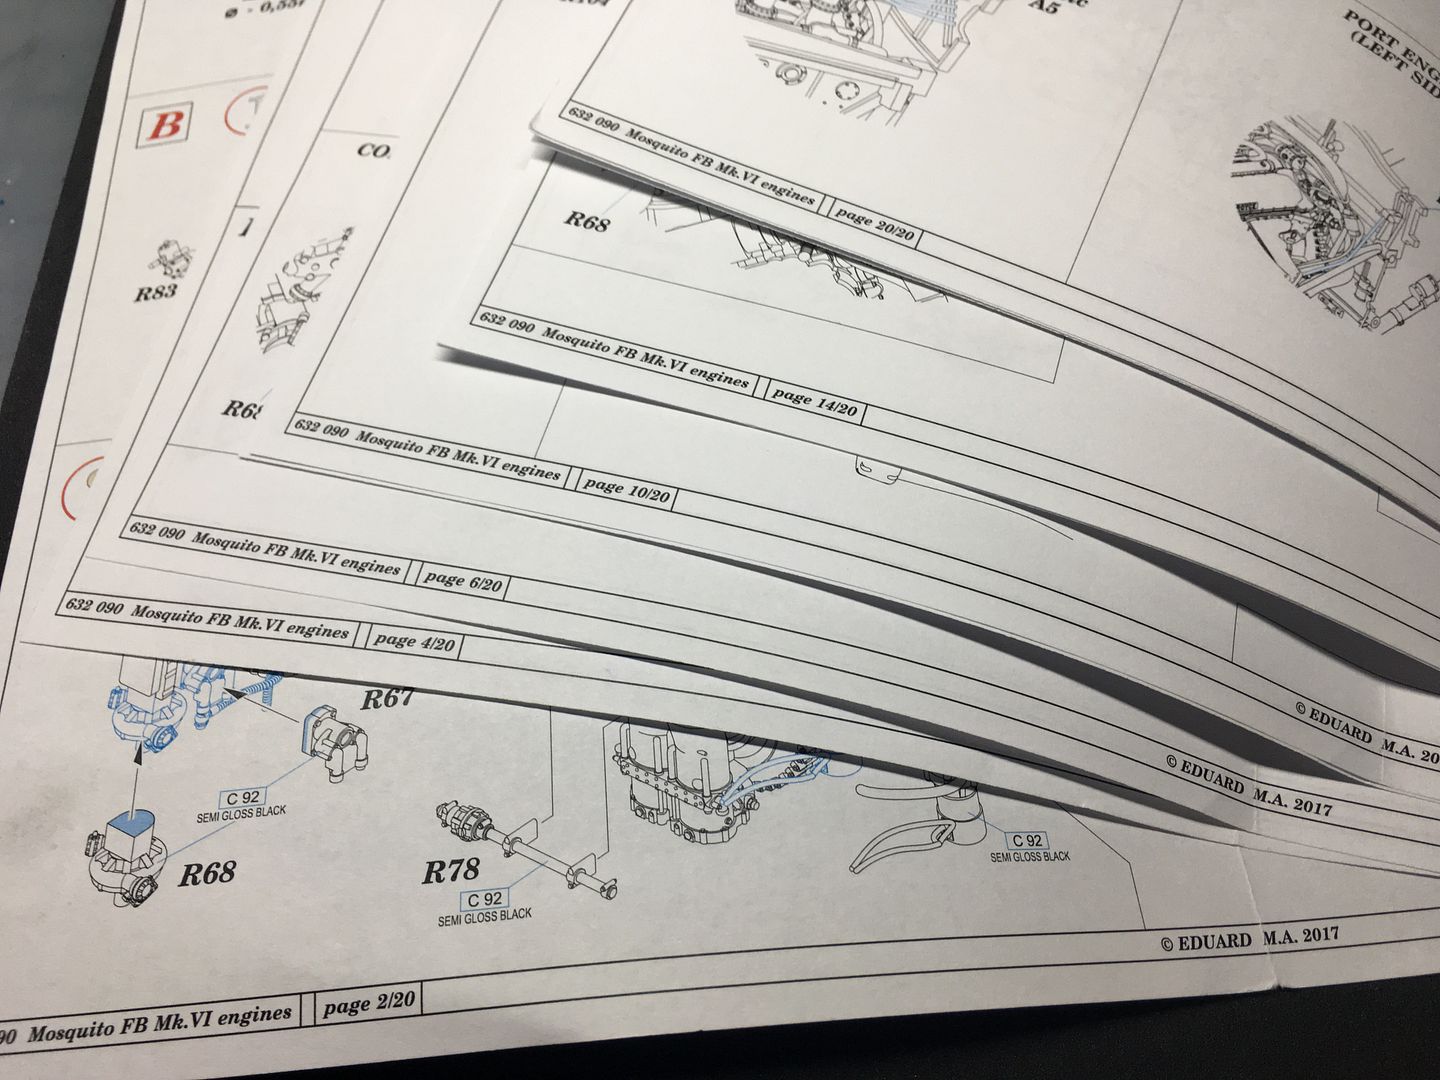
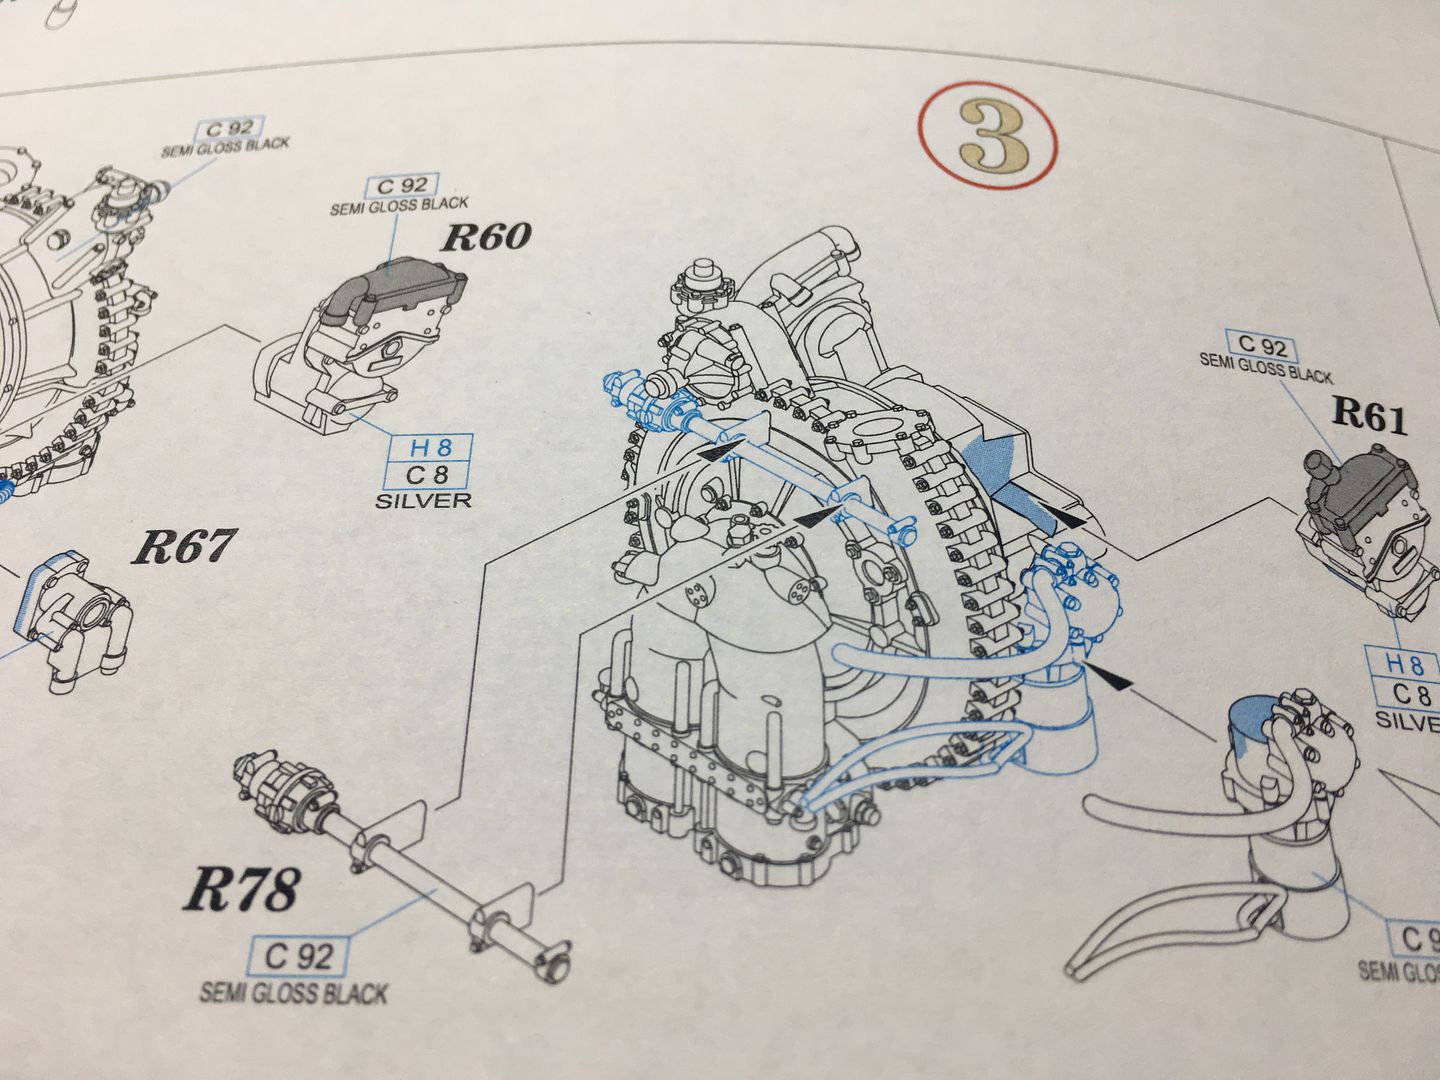

Many pages in the instruction booklet - covers each engine separately as they are slightly different, hence double the sheets.
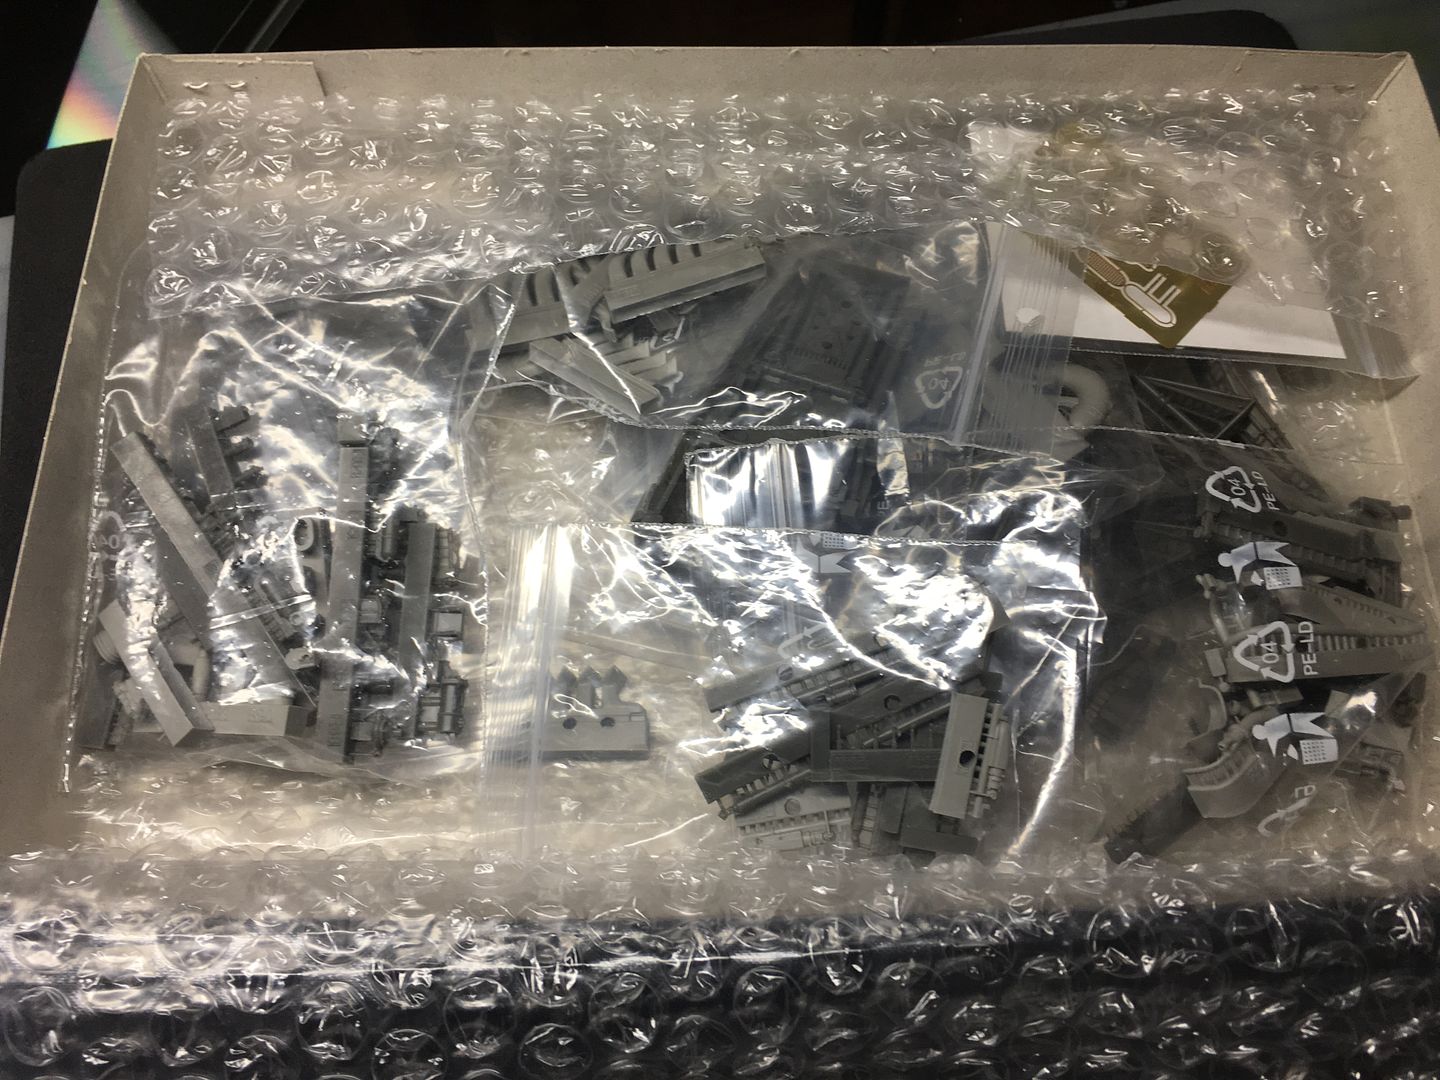
Like many 3D printed kits, the pipes in this are well supported - so lots of very careful cutting out and trimming required. The plastic is hard enough that this is not too big a deal - not like the plastic and tiny parts on the D7 'dozer kit I have started, that break if you look at them.

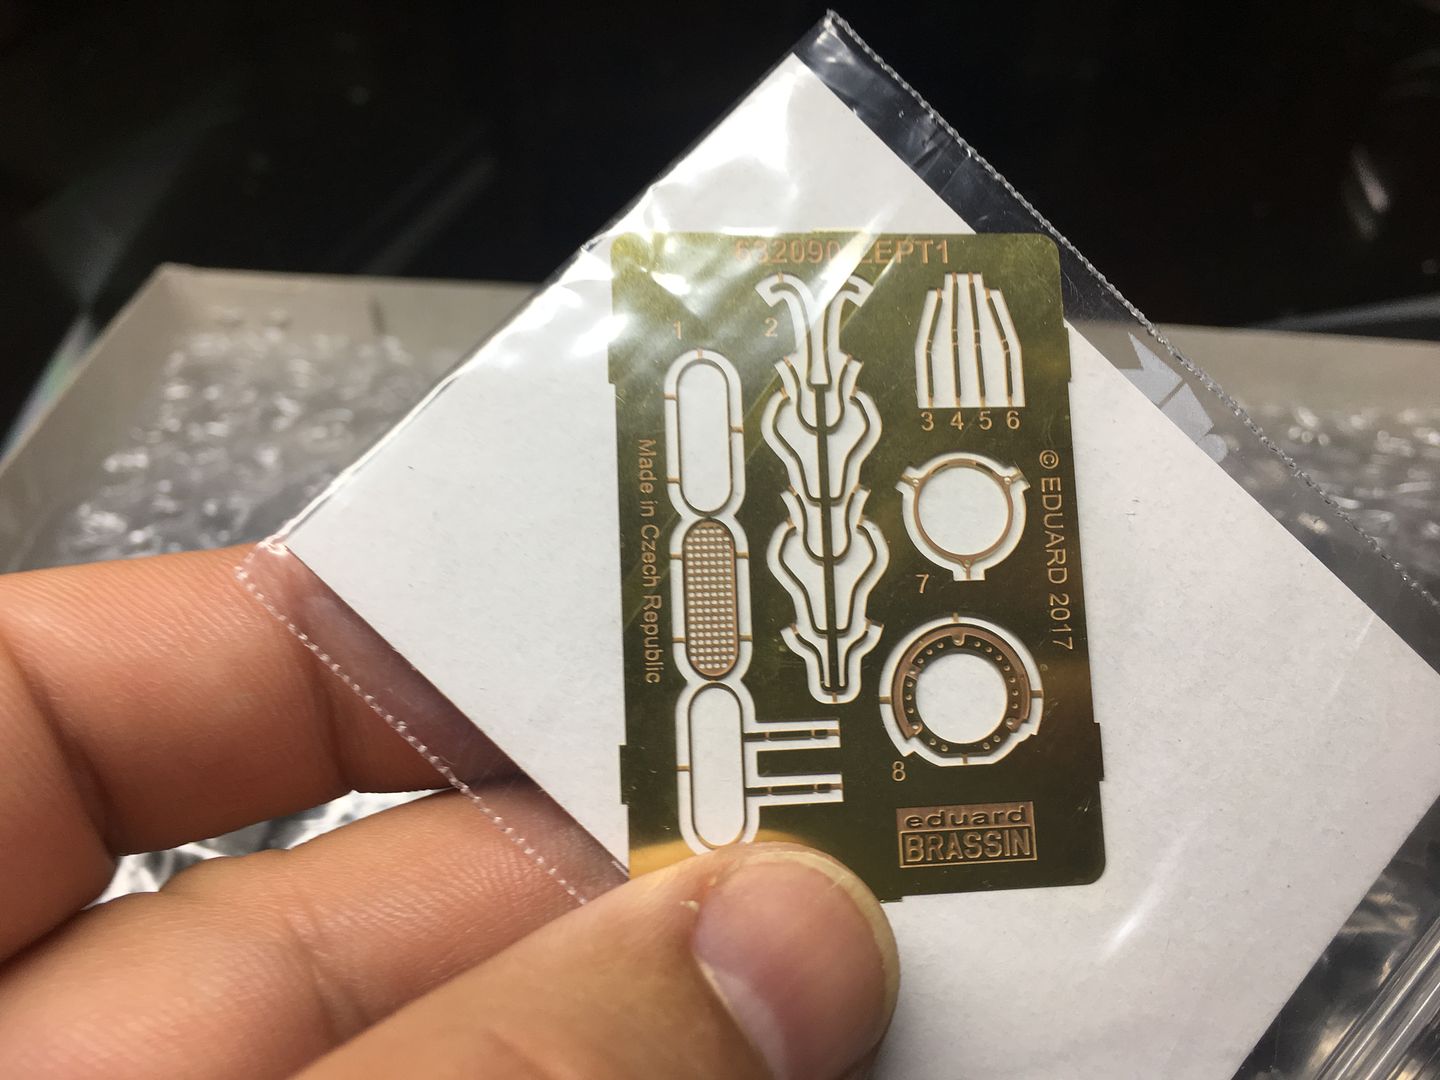
Lots of bags of bits, a small PE sheet (x2)
The kit includes the engine pod panels as well - these are very thin and nicely detailed...

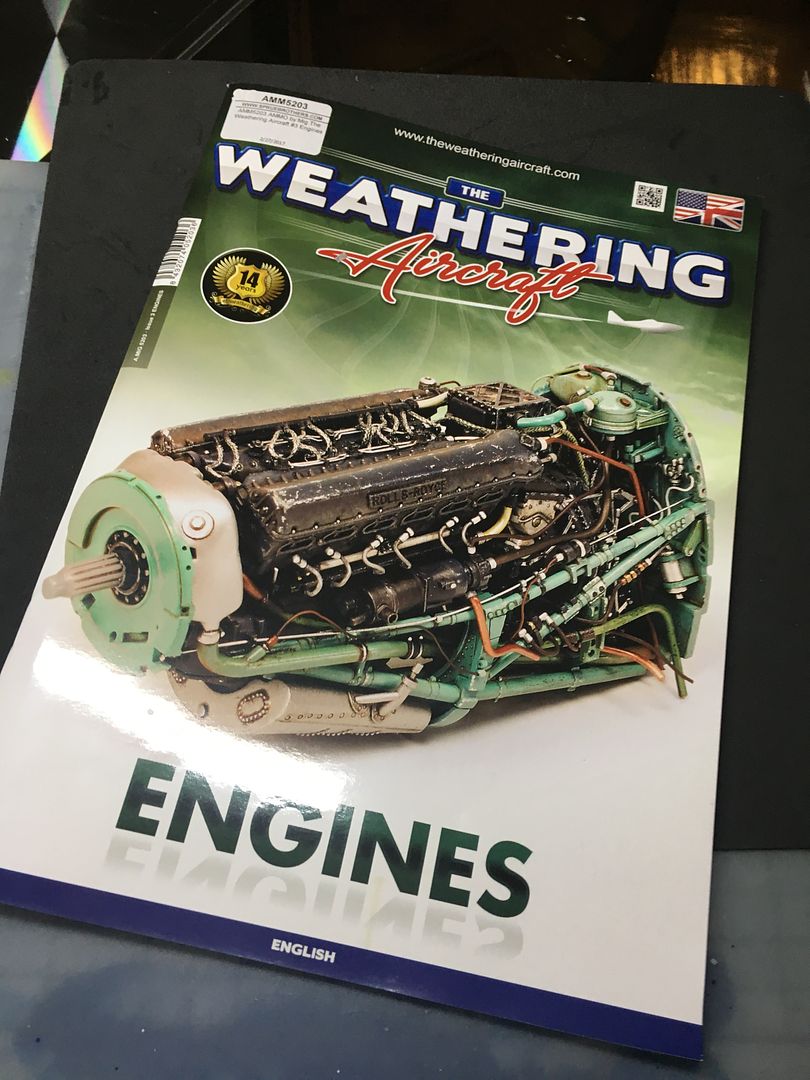
I also bought this magazine, which actually features a Merlin engine (Spitfire) amongst others, so is a great source.
So made a start on the first engine (I think I will do one at a time and learn!)
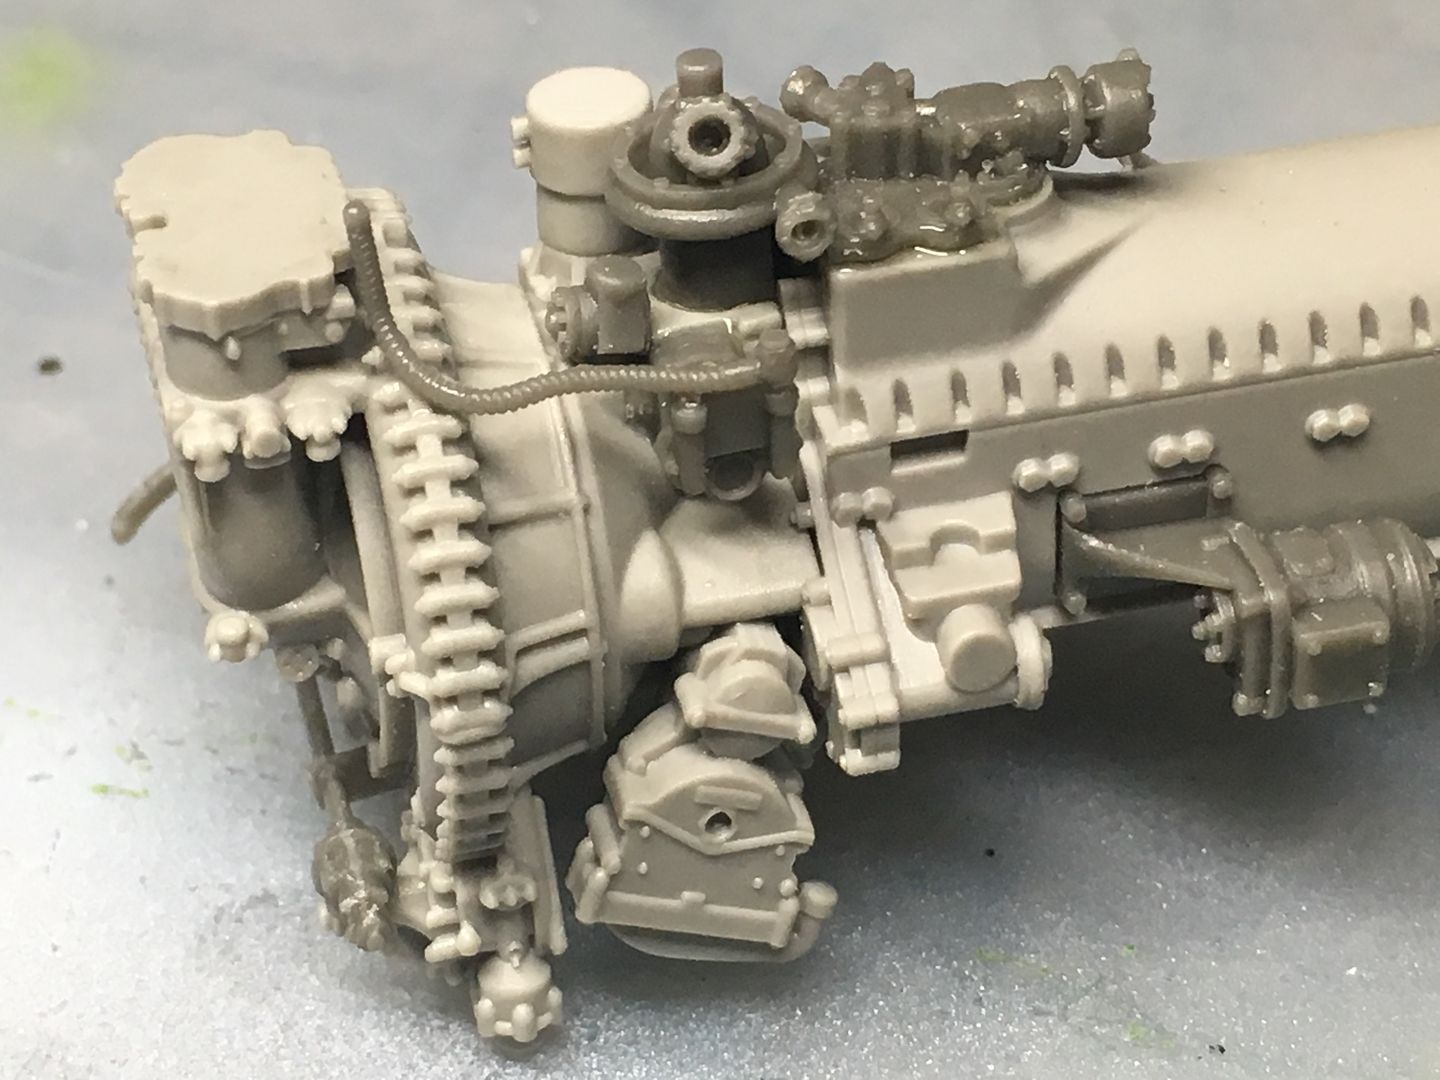
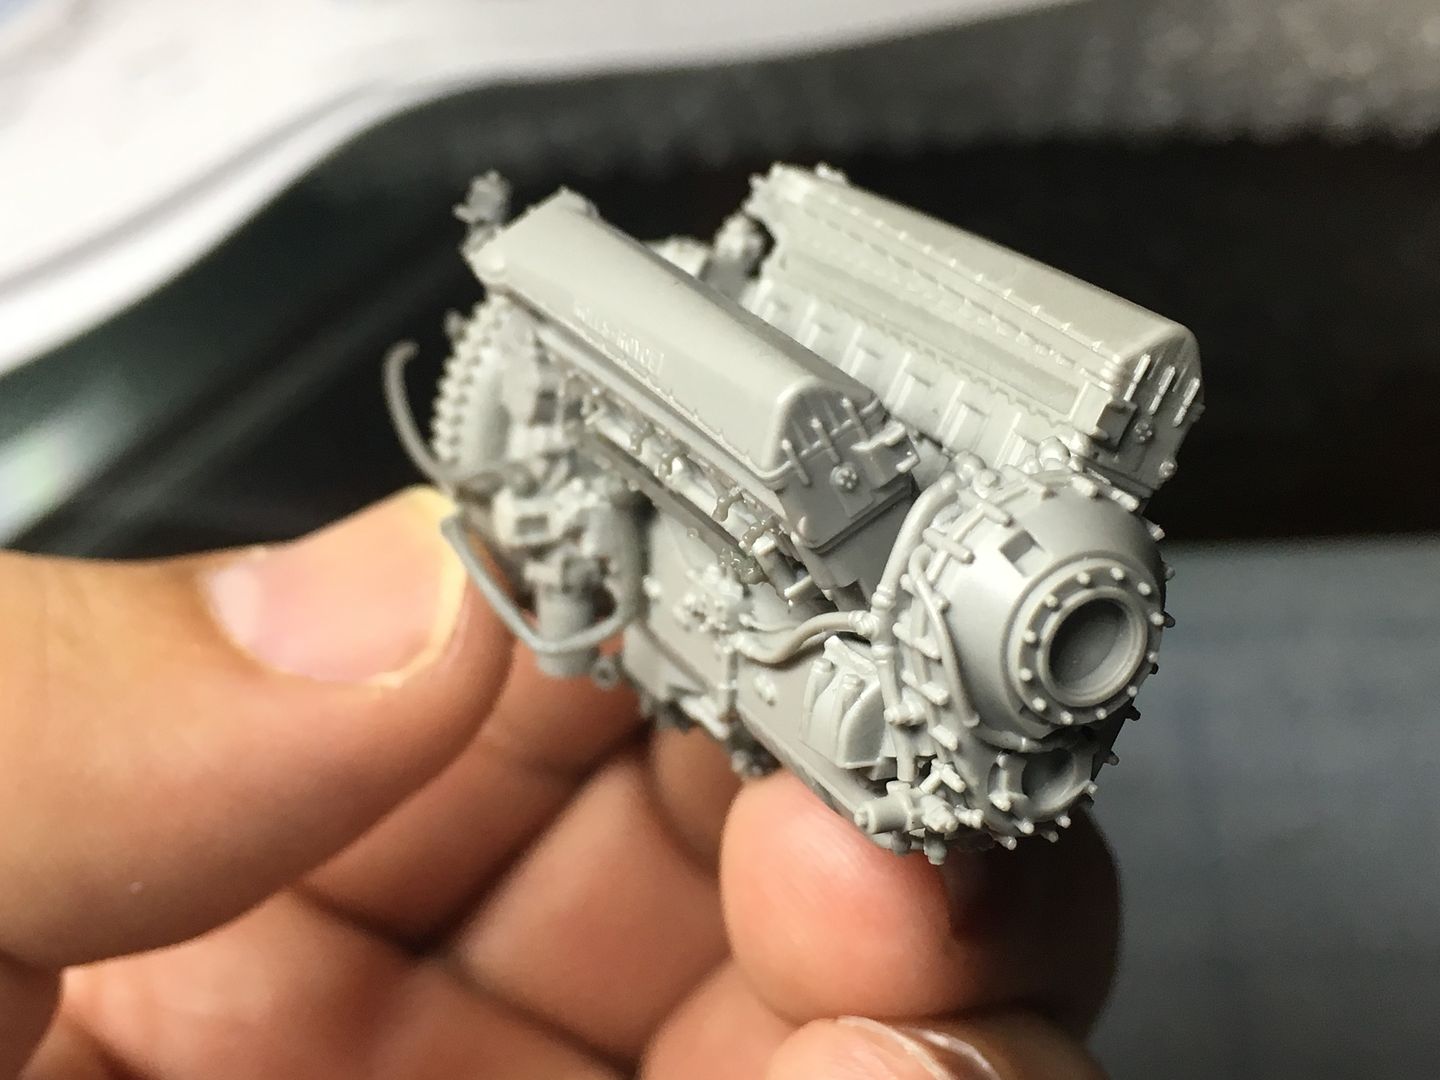
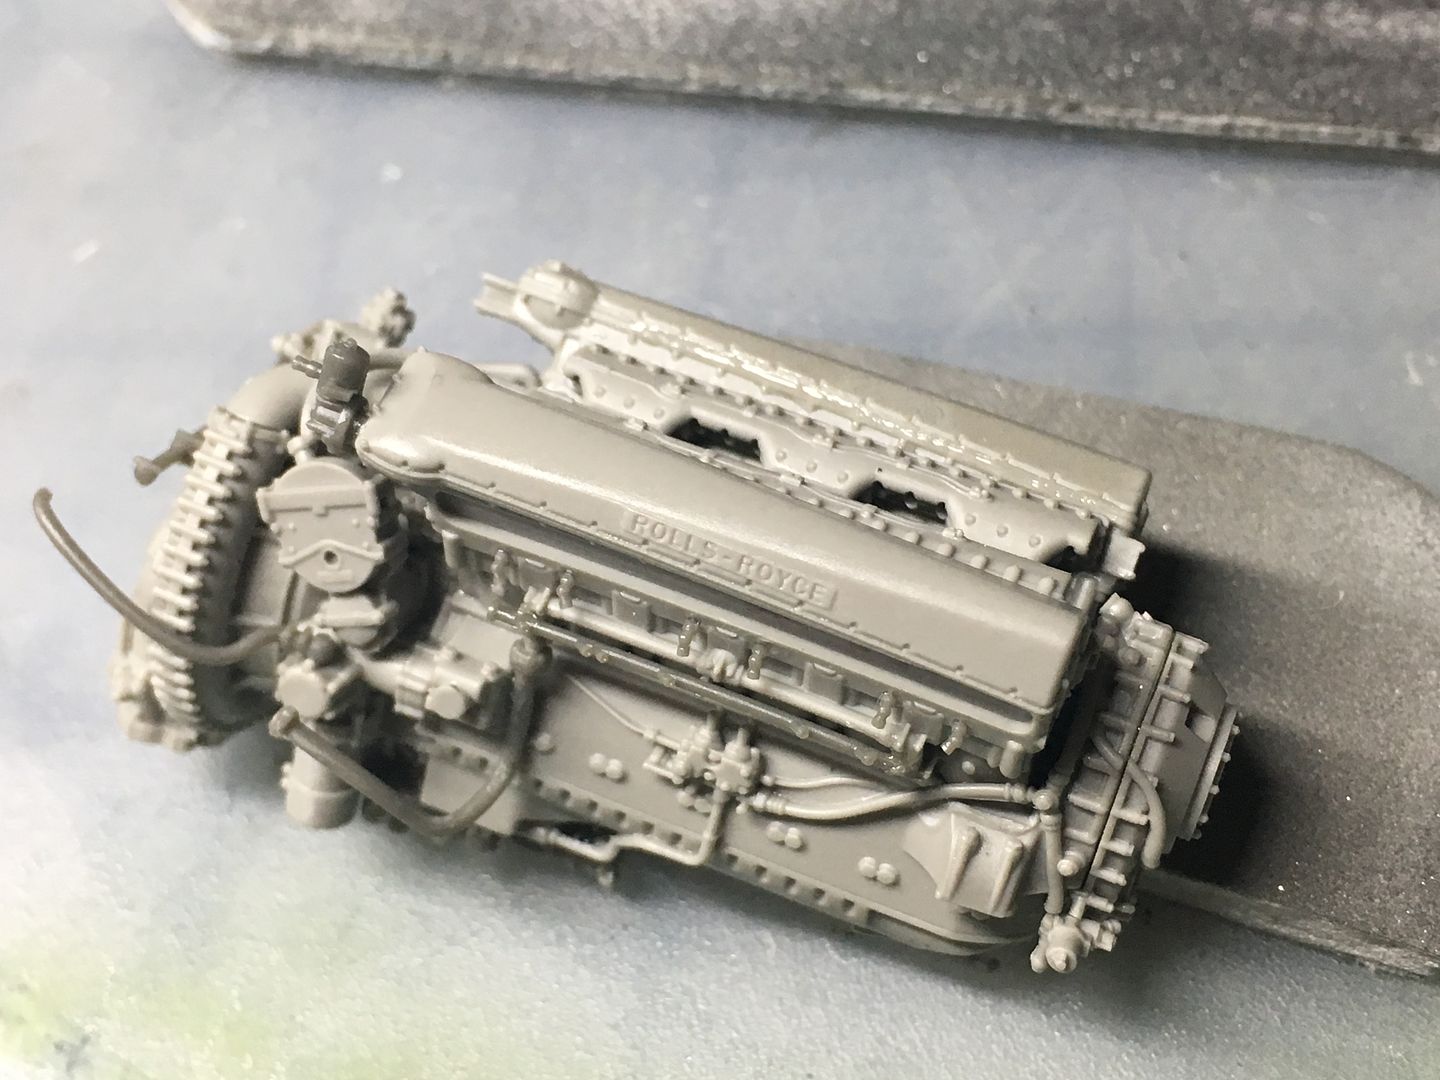
Detail really is nice - I have some shots comparing the ones from the kit that I had started, and you can see the clear difference (there should be - this engine kit is not cheap!) - a bit hard to make out detail on the gloss black engine (it was ready to be weathered)


I also want to learn about weathering, and the F1 cars don't really have much of this!
The military models tend to, and the skills you see here and elsewhere are staggering - I've also got a tractor to work on for 'mud'!
I want to learn about and start using oils - as I will need these skills on the older F1 car models - chassis of Alfa 159 for example...
So over a year ago when I started this, I had done some weathering on the cockpit - as a first attempt I was pretty pleased, but you learn a lot in a year and I want to improve...
I have also purchased the Eduard detail kits - front guns, belly guns, interior and exterior PE sheets and some engines are on there way. The Tamiya kit detail is still stunning - but I want to try stuff, and go even more detailed. That being said, I will also do some very basic scratch building - TBH mainly just with wiring etc.
So, I got back on this kit at the weekend. I cant use all the Eduard PE stuff in the cockpit without starting again, but I have used selectively. This has involved a little bit of a dismantle, but it came apart easily enough. I also need to try and 'match' what I have already done. In hindsight I think what I had done a year ago turned out a bit dark and messy - I want to tidy that up a bit, and managed to over-spray a little green over some grubby bits so I could start again...
I'm going for the used look though - so I am committing to weathering the exterior of the plane, which will certainly be a challenge - a lot of surface area.
I'm confident I can do the engines and engineering stuff nicely, having done a few F1 engines...
So - with all that said, on to the photos.
I started by breaking the main elements apart.
I'm happy with the basic weathering here - but I got annoying silver sparkles from using some tamiya weathering stuff - that is basically eye make-up! I'll be getting rid of that with careful touching up.
Some of the 'old' stuff looks a bit 'muddy' so will also tone that down.
Of course, almost none of this will be visible once closed up - but when you have fitted a head gasket and moving pistons into an MFH Mp4/4 Honda engine, and then sealed it all up in a stationary model, that doesn't matter - the detail is still there !
So - this bulkhead is a major swap out - the grey one is from the Eduard nose gun kit - it has a bit more detail, and the upper fitttings for the ammo-boxes molded in, so I will use this. Only real pain is 2 yellow decals on the other side - I'll have to mask and paint these on the 'new' bit - don;t have a circle cutter so will come back to those with some fine scalpel work!
Location of bulkhead...
There are 4 ammo boxes in the nose - one molding in the Tamiya kit. These are separate in the Eduard kit. I painted these and picked out the detail with oil paint - thinned and painted on, wiped off with cotton buds and thinners - early days but I am liking it - more detail later.
These are just 'clipped' (very precise this Eduard stuff) into place - lots of PE straps and chains to add to each one...
Comparison shot with the Tamiya part...
Whilst there are some decals and detail missing on the Tamiya bits, you can clearly see the difference in the Eduard versions...
One of the biggest improvements in using the Eduard internal PE set are the foot pedals - old shot below shows the Tamiya version...
New versions - obviously much finer, but a bugger to make straight...
You can see the updated versions below...
On the older pictures earlier on this WIP, you can see where I had used Tamiya panel line colour to bring out detail - but inexperience meant I had not used a gloss layer first, and it all looked a bit messy...now I have watched a few vids (highly recommend PLASTO on youtube) I feel I can try oils with a bit more confidence.
I tried the panel gap first, but concluded this is great for fine detail, but not flatter areas - when I wiped the excess off using thinners, it wiped it all off on this sort of smoother detail.
So I took the step into oils - thinned down loads, painted on, then taken off with cotton buds - I'm a convert. It will take time and practice, but I can see the potential.
...for sure this commits me to the grubby used look, but that's cool....
Mid-rub...
Here you can see some of the Eduard PE parts fitted to the front of Tamiya components...
In the shot below you can see where I have painted some of the round discs again to vary the tone (tip from someone elses WIP) - I believe that these are wooden discs that were fixed to the frame/skin and provided mounting points for fixing instruments and fittings too...
This is a similar part pre-oil. The fittings and instruments are Eduard - more later. Yellow wire is Tamiya molding - I may replace with 'real' cable...
Some more Eduard parts (the PE) with the Tamiya part also shown...
Most of the internal detail kit from Eduard is instrument panel - you cut the molded detail off the front of the tamiya parts and glue the PE on - I'll leave the main instrument panel, as it is not bad and hard to replace - but there are lots of ancillary radios, boxes, batteries etc that I can upgrade. Many of the panels use multiple layers of PE to make them more '3D'...
In this shot you can see the rear of the instrument panel. It will be hidden...but damn it I am tempted to add some wiring...grrr!
So that is where I am now - I 'oiled' a few more green bits and hope to carry on a little bit quicker now!
As mentioned, I discovered and decided to try the Eduard accessories - don't think these were out when I originally bought the kit at launch...so I have the gun detail kits and the engine sets...
Although I had started the engines from the kit, I wanted to try these.
Super sharp detail, so I am going to max these out with wires and cables etc etc...
Many pages in the instruction booklet - covers each engine separately as they are slightly different, hence double the sheets.
Like many 3D printed kits, the pipes in this are well supported - so lots of very careful cutting out and trimming required. The plastic is hard enough that this is not too big a deal - not like the plastic and tiny parts on the D7 'dozer kit I have started, that break if you look at them.
Lots of bags of bits, a small PE sheet (x2)
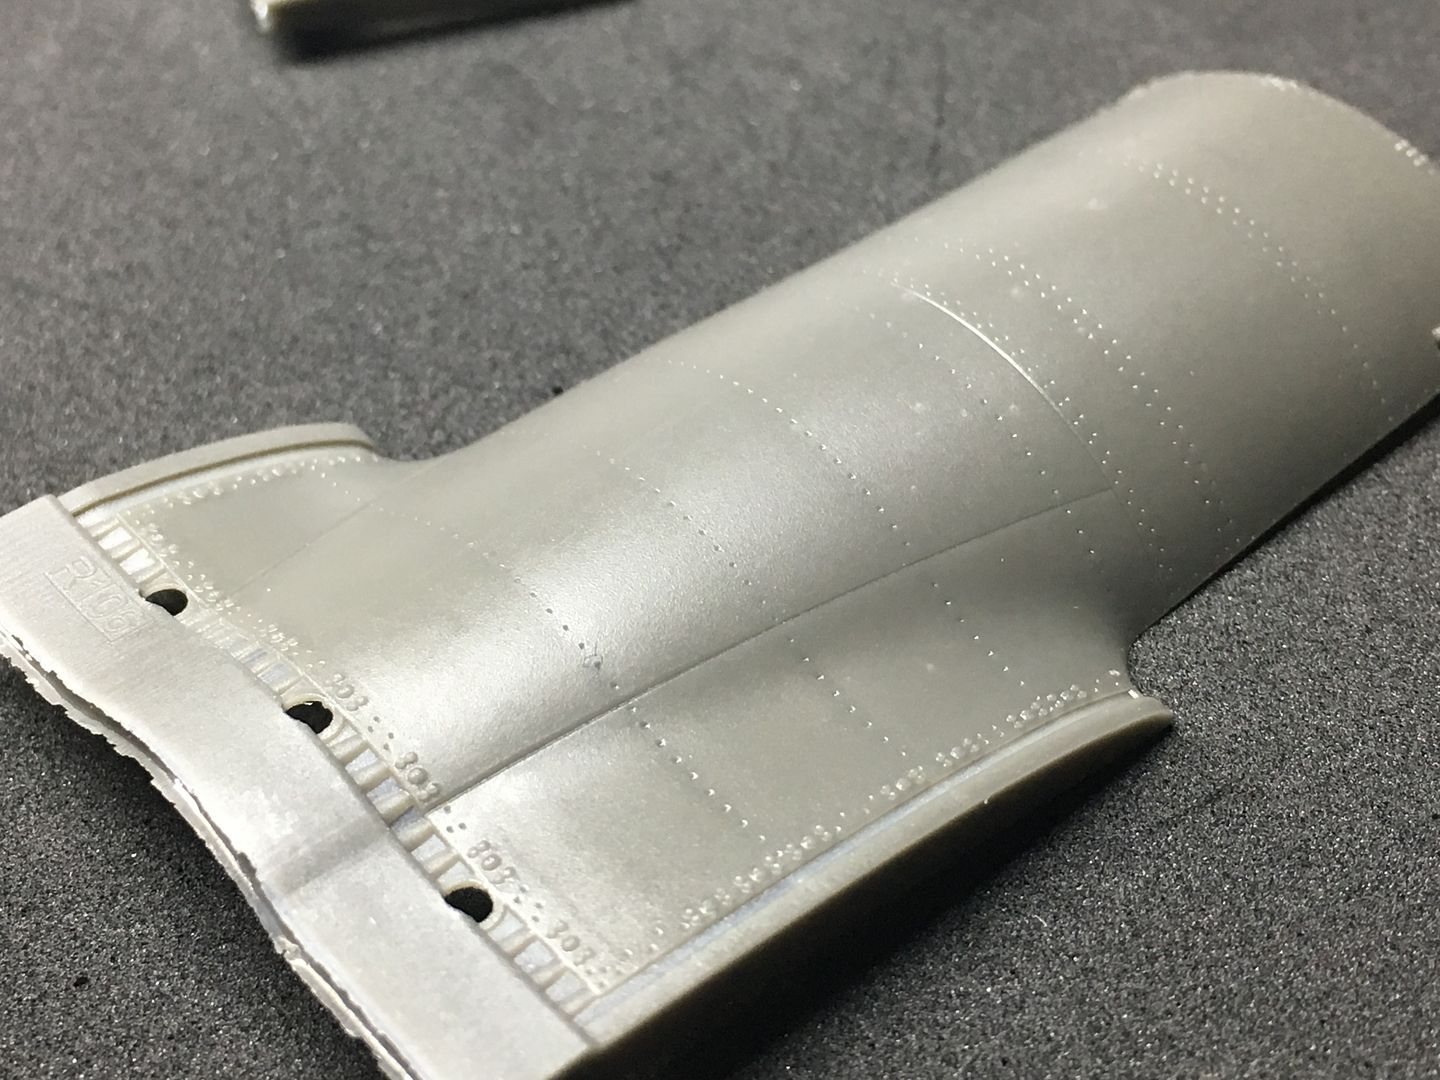
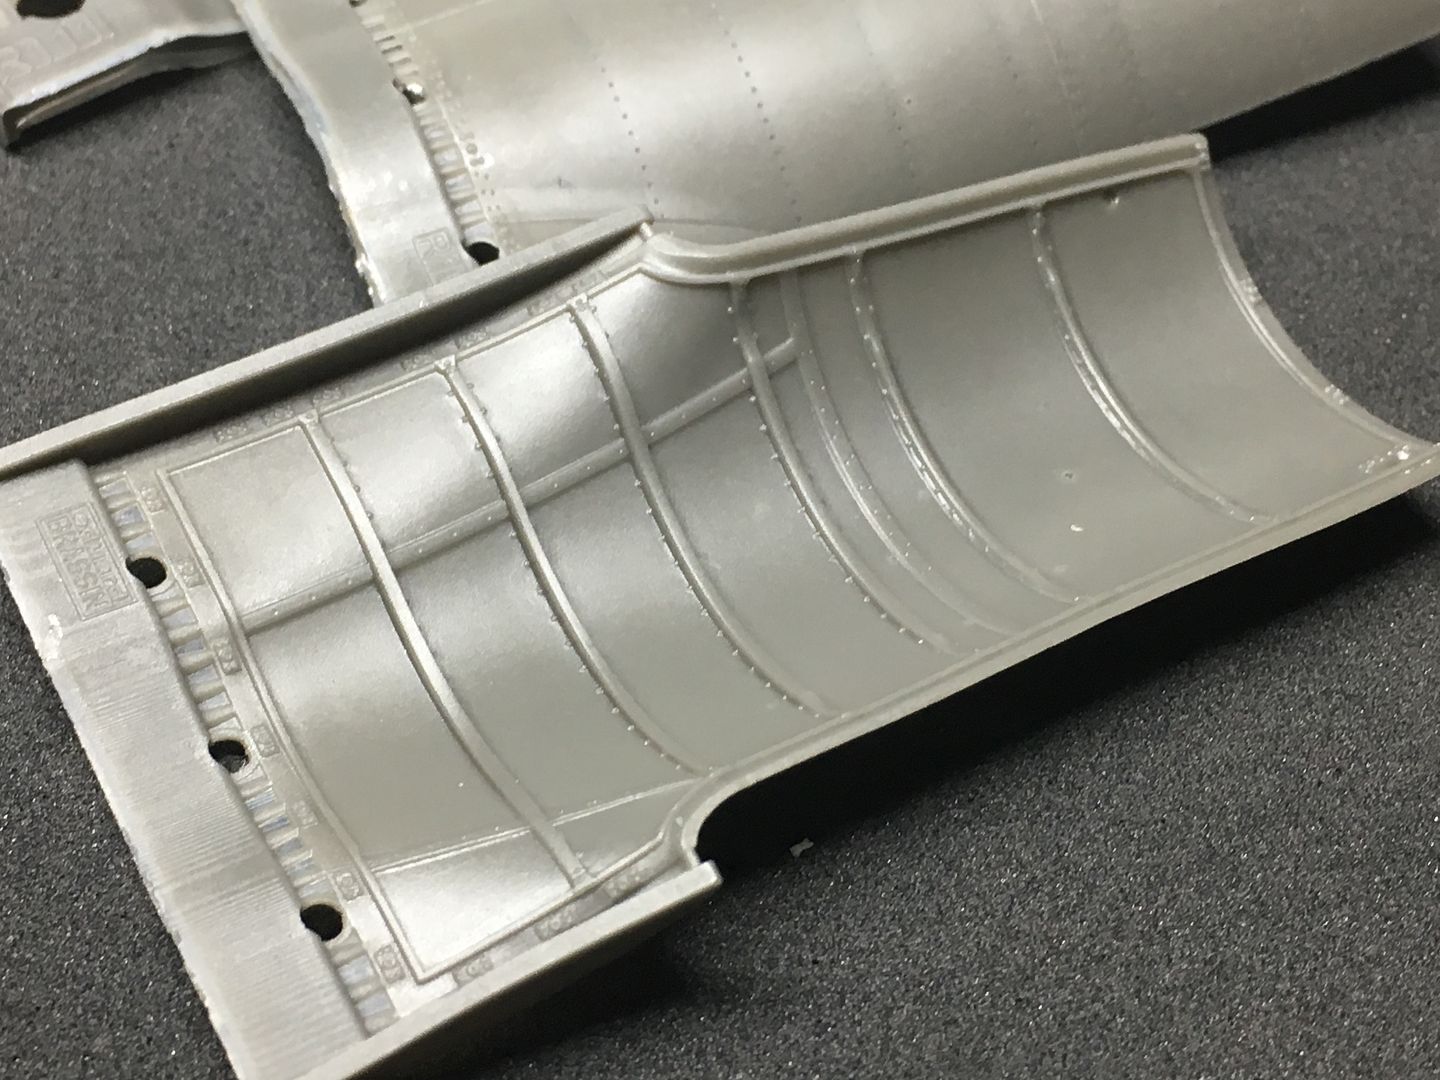
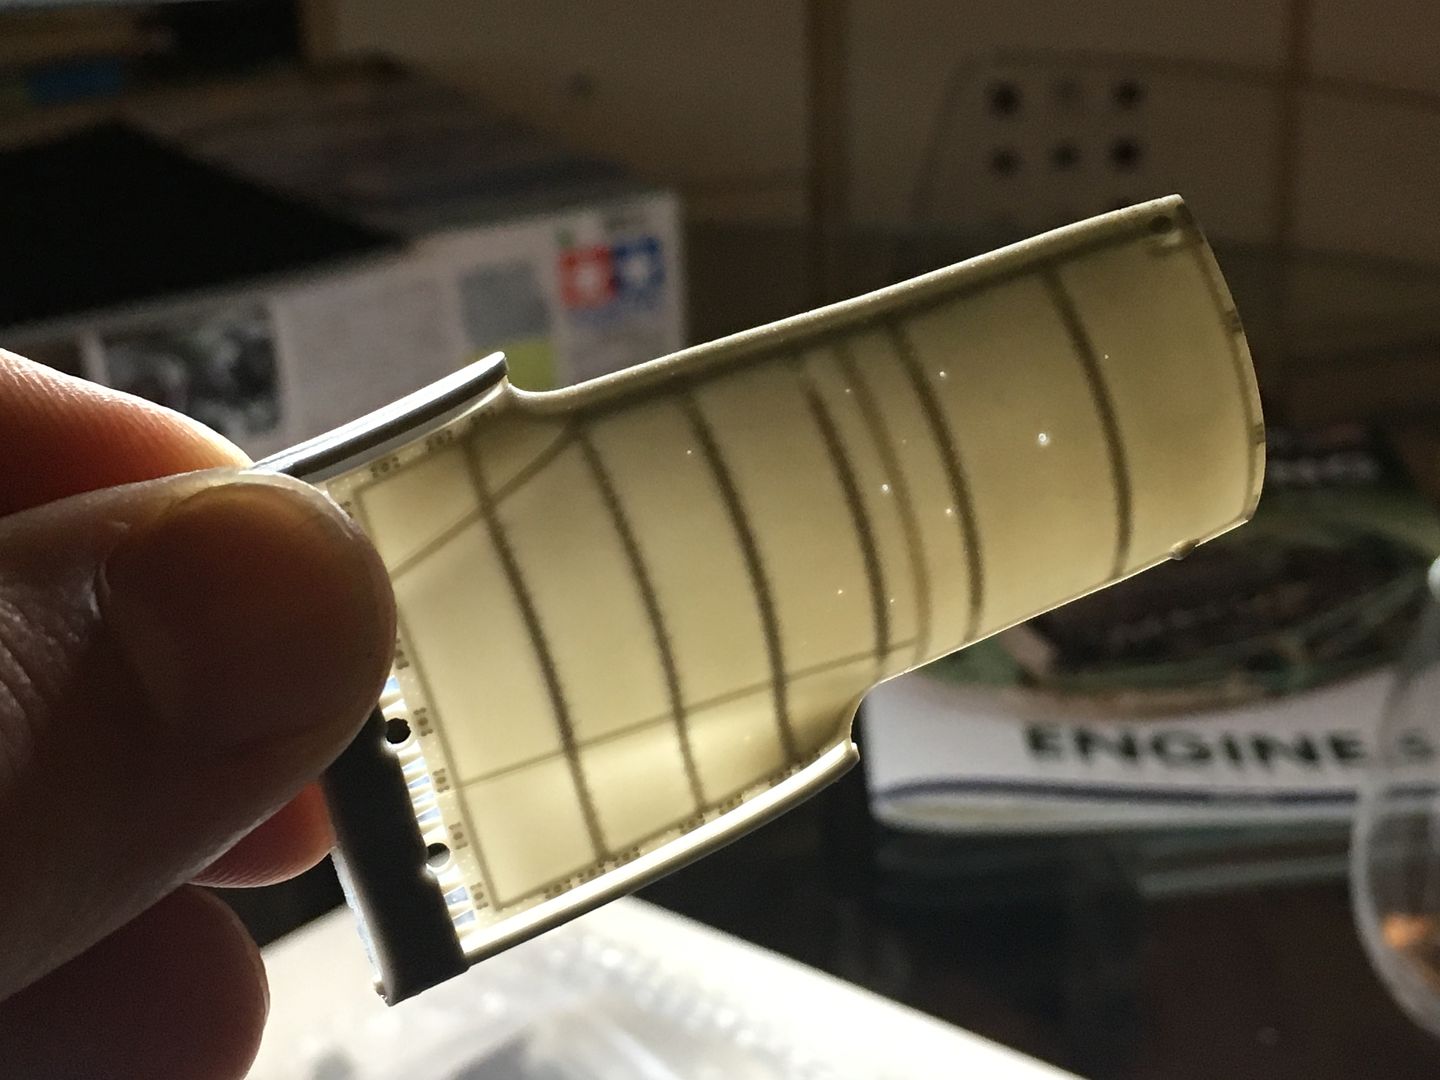
The kit includes the engine pod panels as well - these are very thin and nicely detailed...
I also bought this magazine, which actually features a Merlin engine (Spitfire) amongst others, so is a great source.
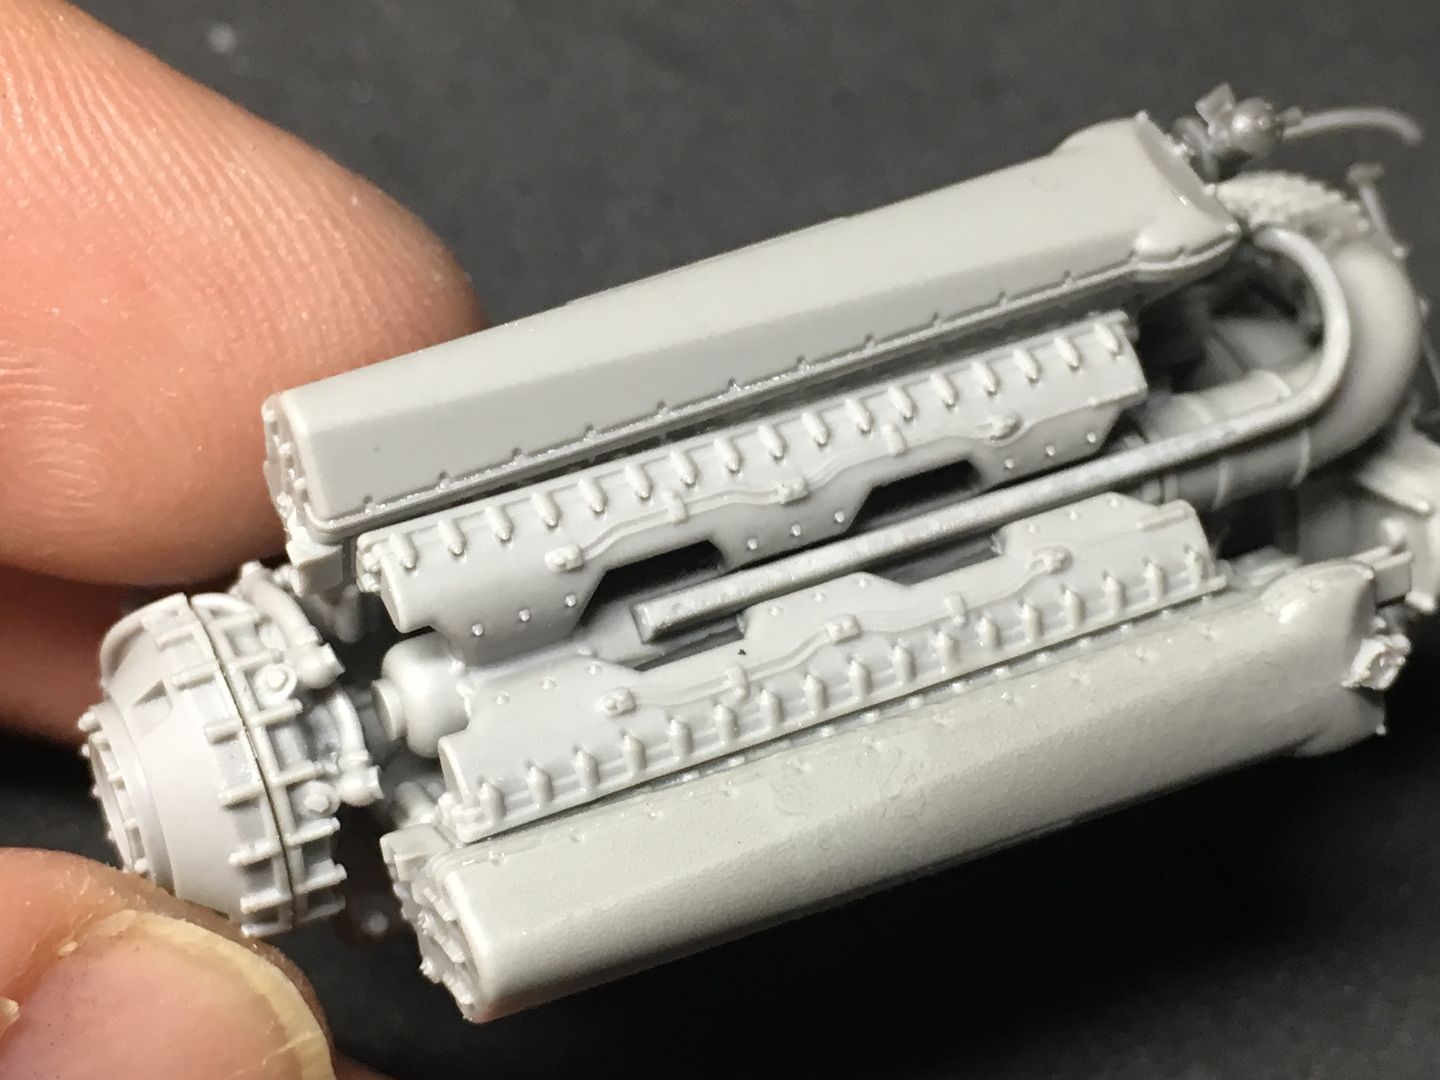
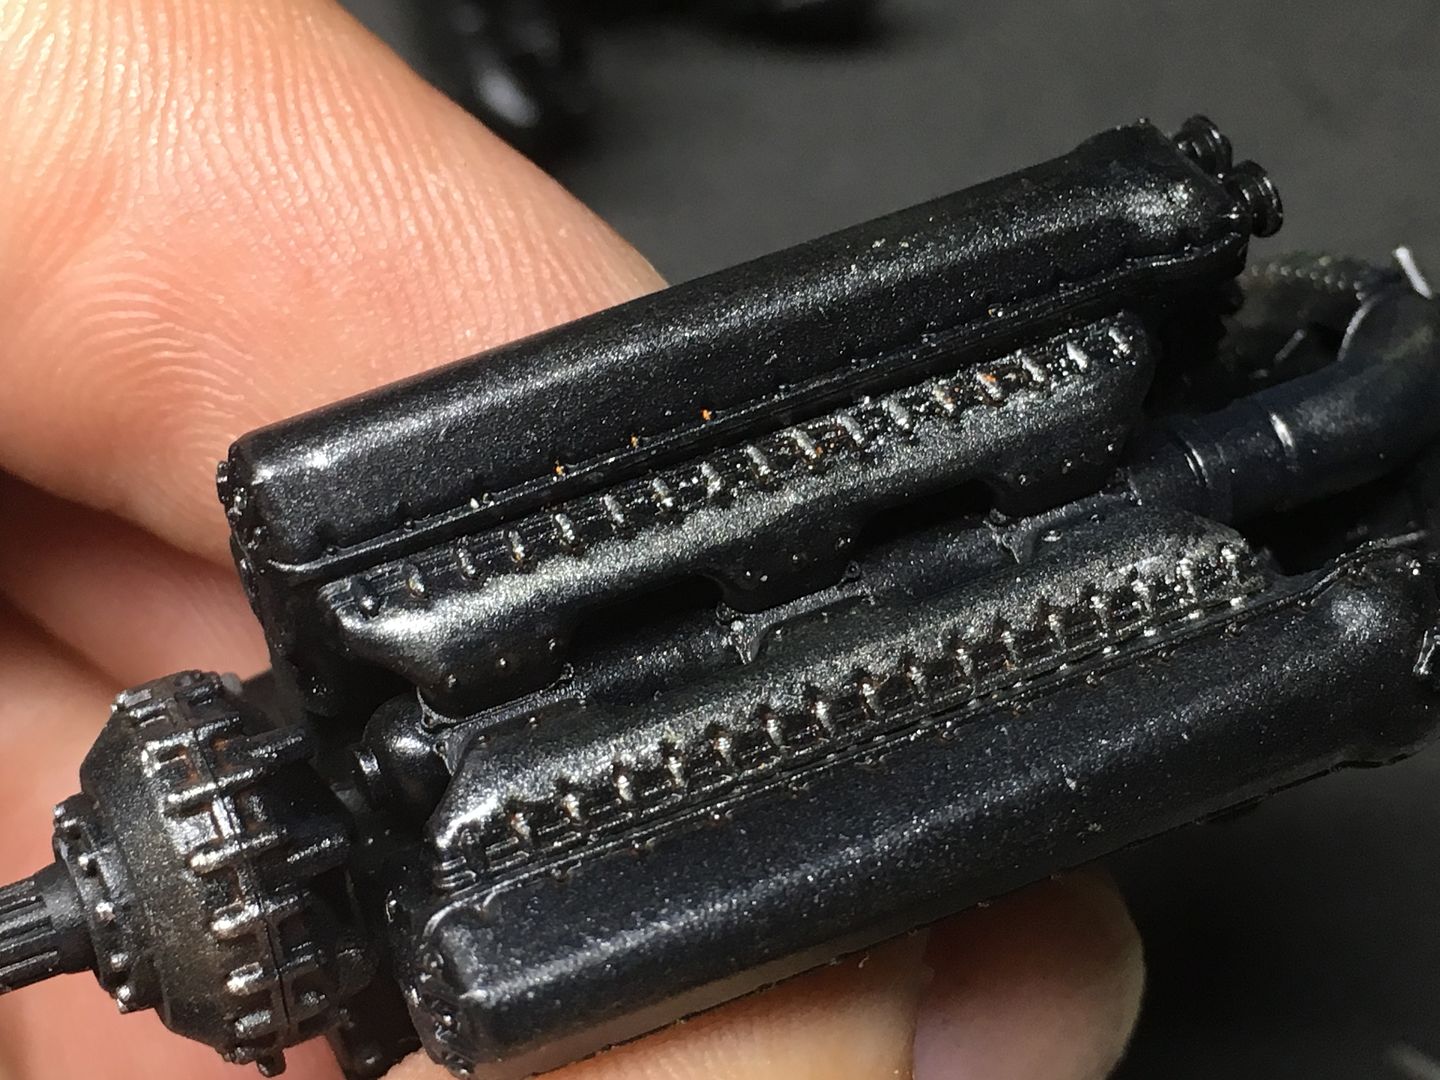
So made a start on the first engine (I think I will do one at a time and learn!)
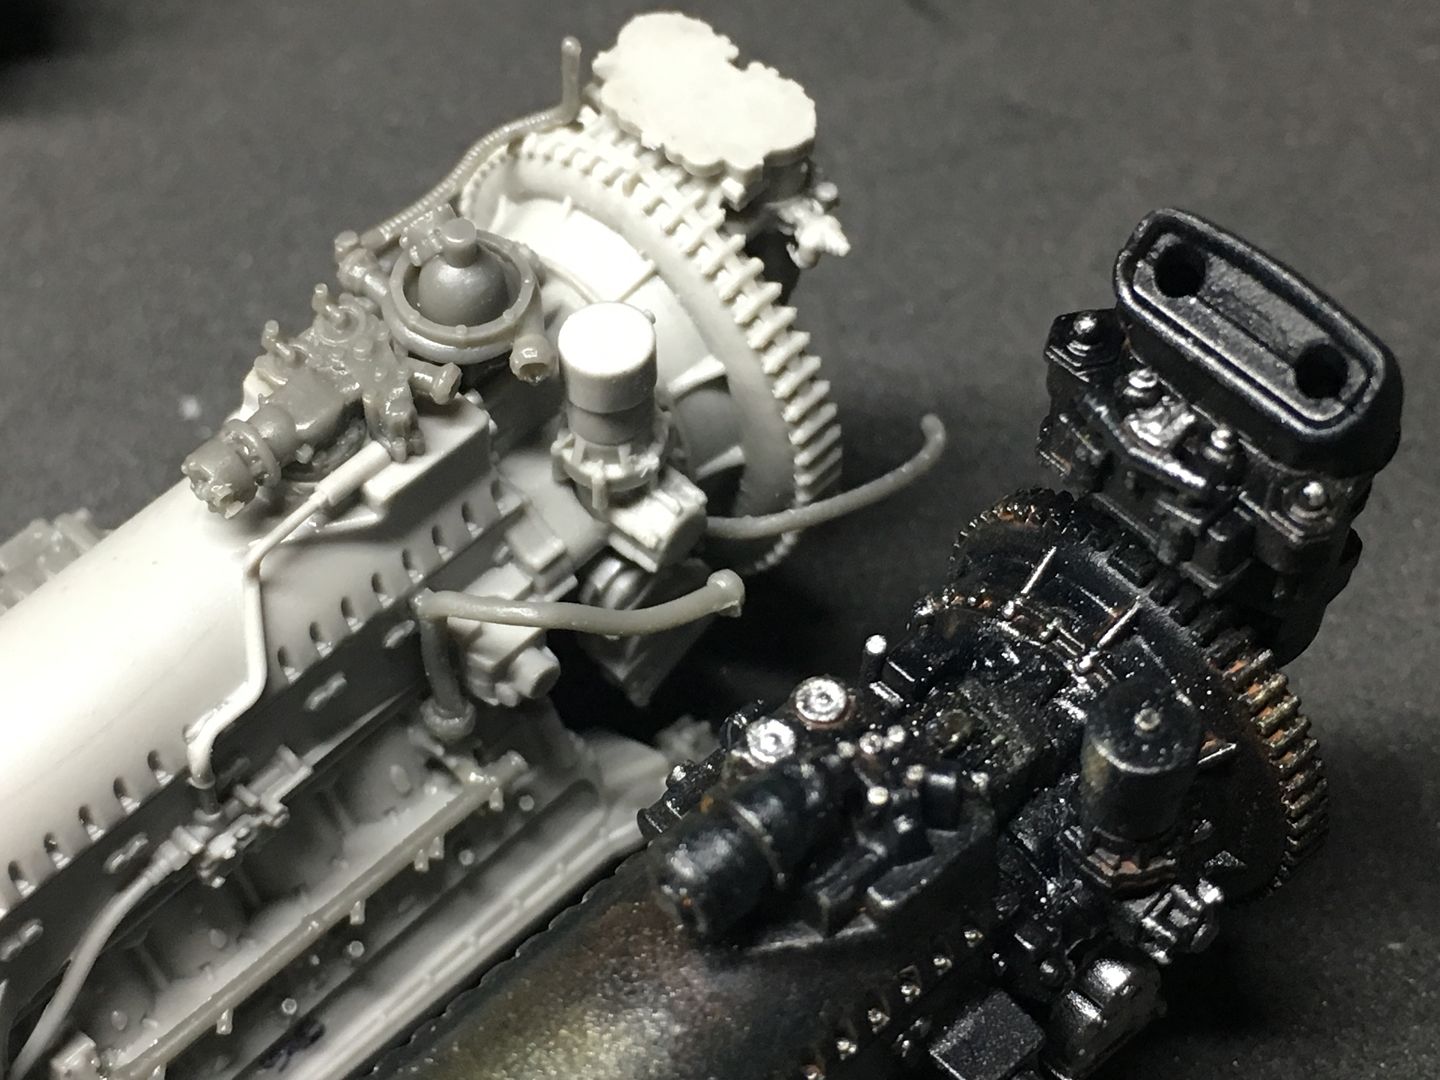
Detail really is nice - I have some shots comparing the ones from the kit that I had started, and you can see the clear difference (there should be - this engine kit is not cheap!) - a bit hard to make out detail on the gloss black engine (it was ready to be weathered)
Finally back on this after a lot of moving and office relocation. Packed up and sent a load of modelling stuff back to the UK, so just left enough to be able to carry on with some specific kits.
These are the first pictures uploaded with something other than Photobucket :rant:. I think the rest of this thread will disappear around Christmas, so I will try and update those images to keep this complete....
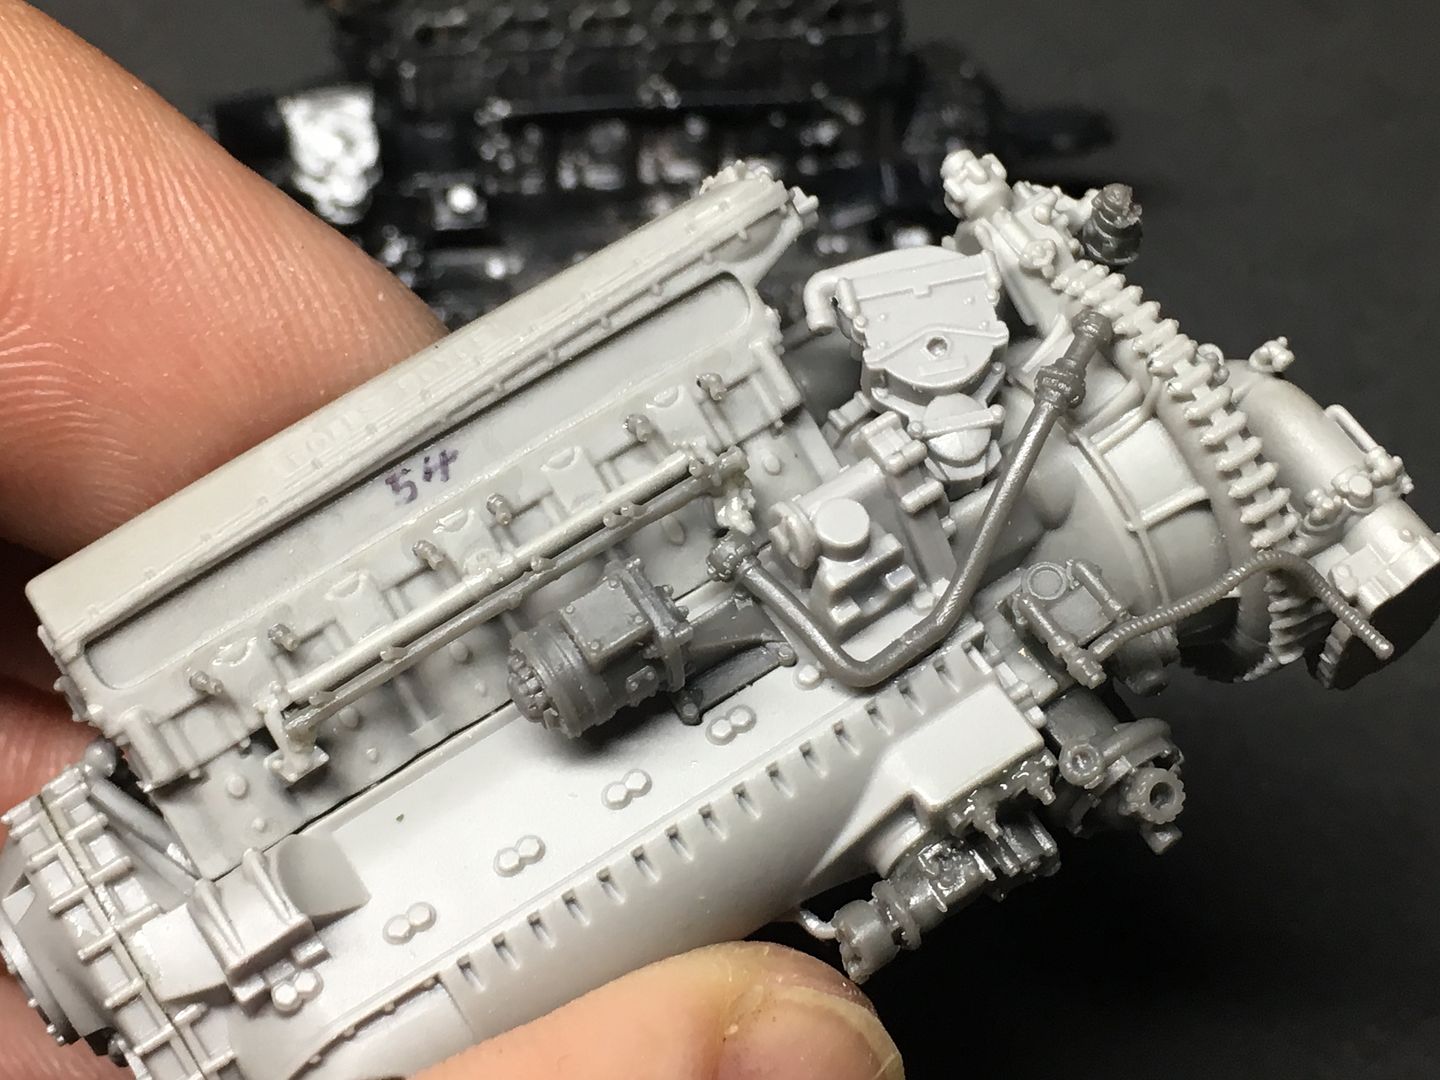
So I am carrying on with this engine detail kit -
Lots of rather thin framework and piping in the kit that has to be trimmed away from carriers - they actually come off quite well, and are not that hard to clean off - I found scraping with a blade pretty effective...

PE parts included...


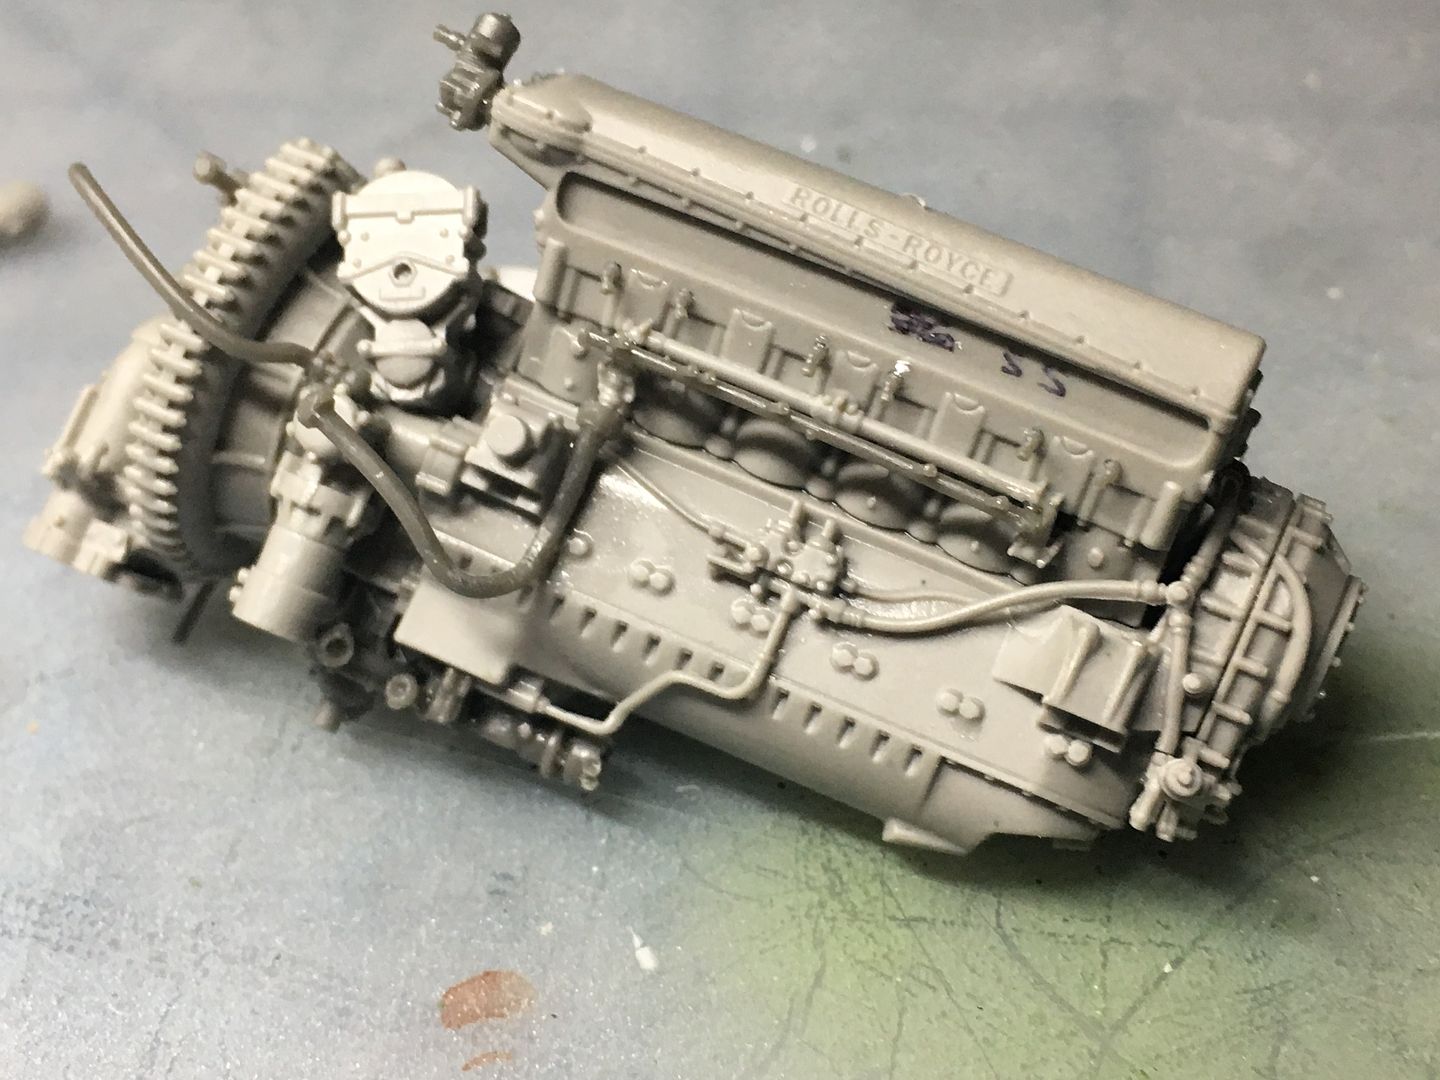
I painted the main block - kept re-touching as I went, adding parts etc...

Don't fit this PE part at this point - I was too early and had to remove later for clearance....doh!


I used my trusty metallic pens for details and highlights,,,

I painted and added some wiring to these engine frame parts before fitting to the block...


I've also started with some light weathering, as learning that is one of the reasons for this project (F1 cars tend to be pretty clean) - I am learning as I go so trying lots of things - oil wash, tamiya panel wash, pencils etc etc -
The copper metallic pens are great for this - really smooth and no visible 'flake'...

Also the first time using 'lead' for the wires - so much easier to shape and form, without putting any strain on anything (unlike trying to bend solid wire) - usual battle trying to identify where the wire it shows you to fix at stage 12 actually disappears to!!


Although black here, I painted these pipes a dark grey later on...


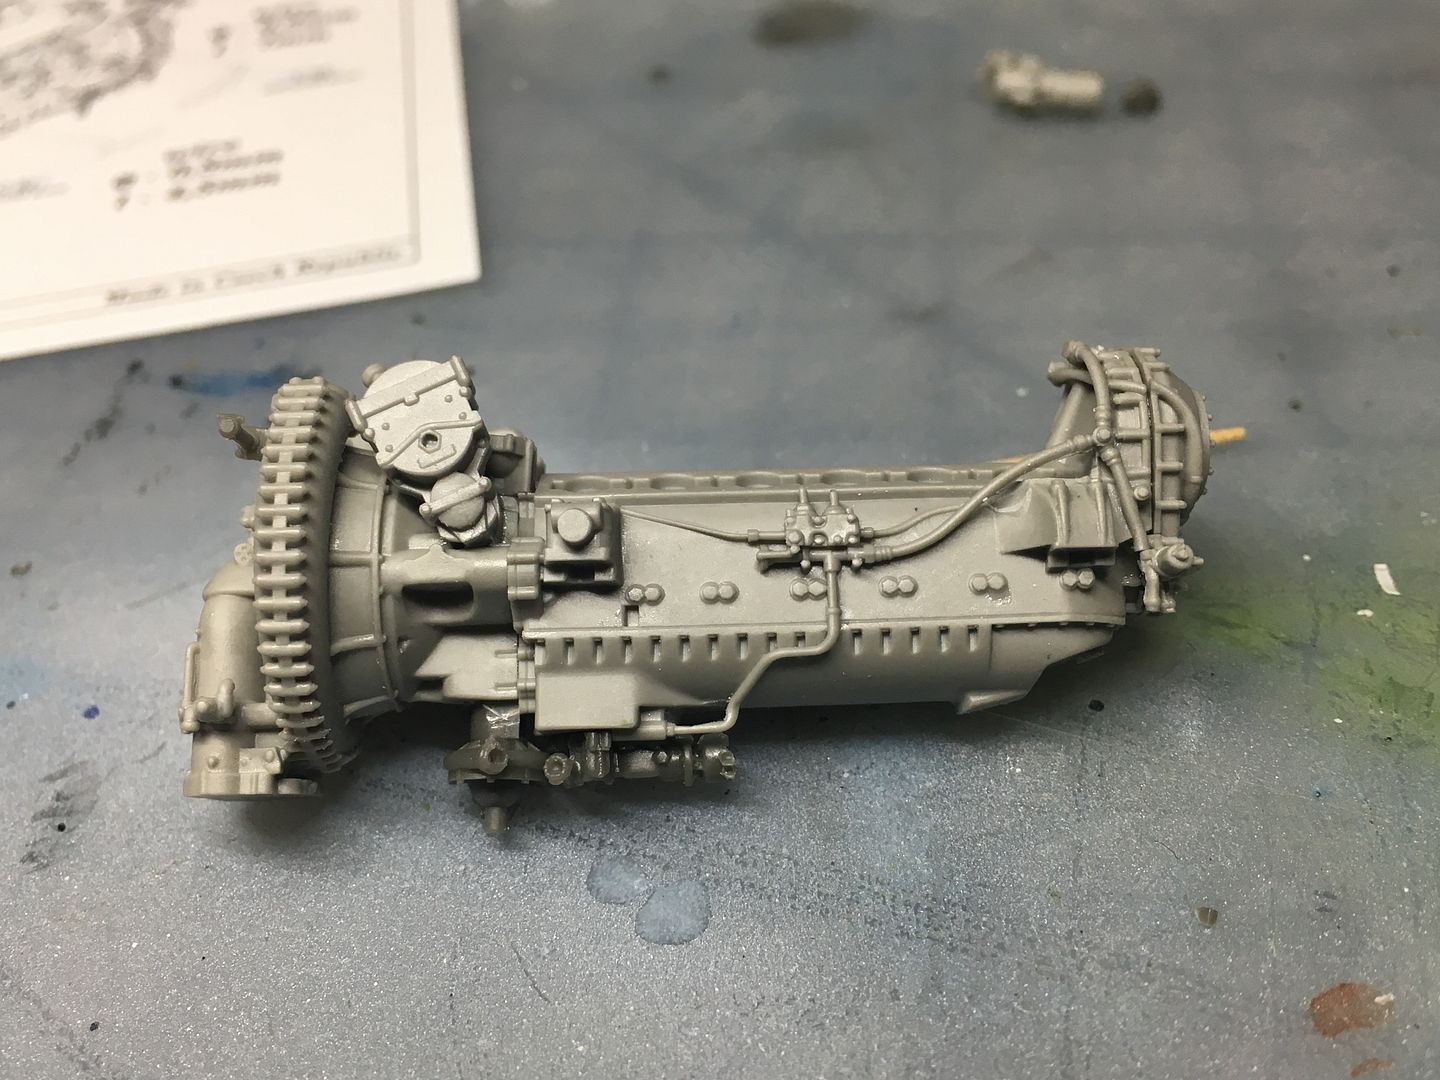
That is one engine structurally complete - I'll go back over it all and tidy up finishes etc, and add some more wiring, before trying it in the Tamiya kit wing (which I have not started yet) - I was going to build the other engine 'OBB' to compare, but I will now just build the detail version (like this) for the model. Maybe I will build the Tamiya verison for display next to the finished plane - or perhaps the other way round - mount the super detailed version on a 'trolley' - choices!
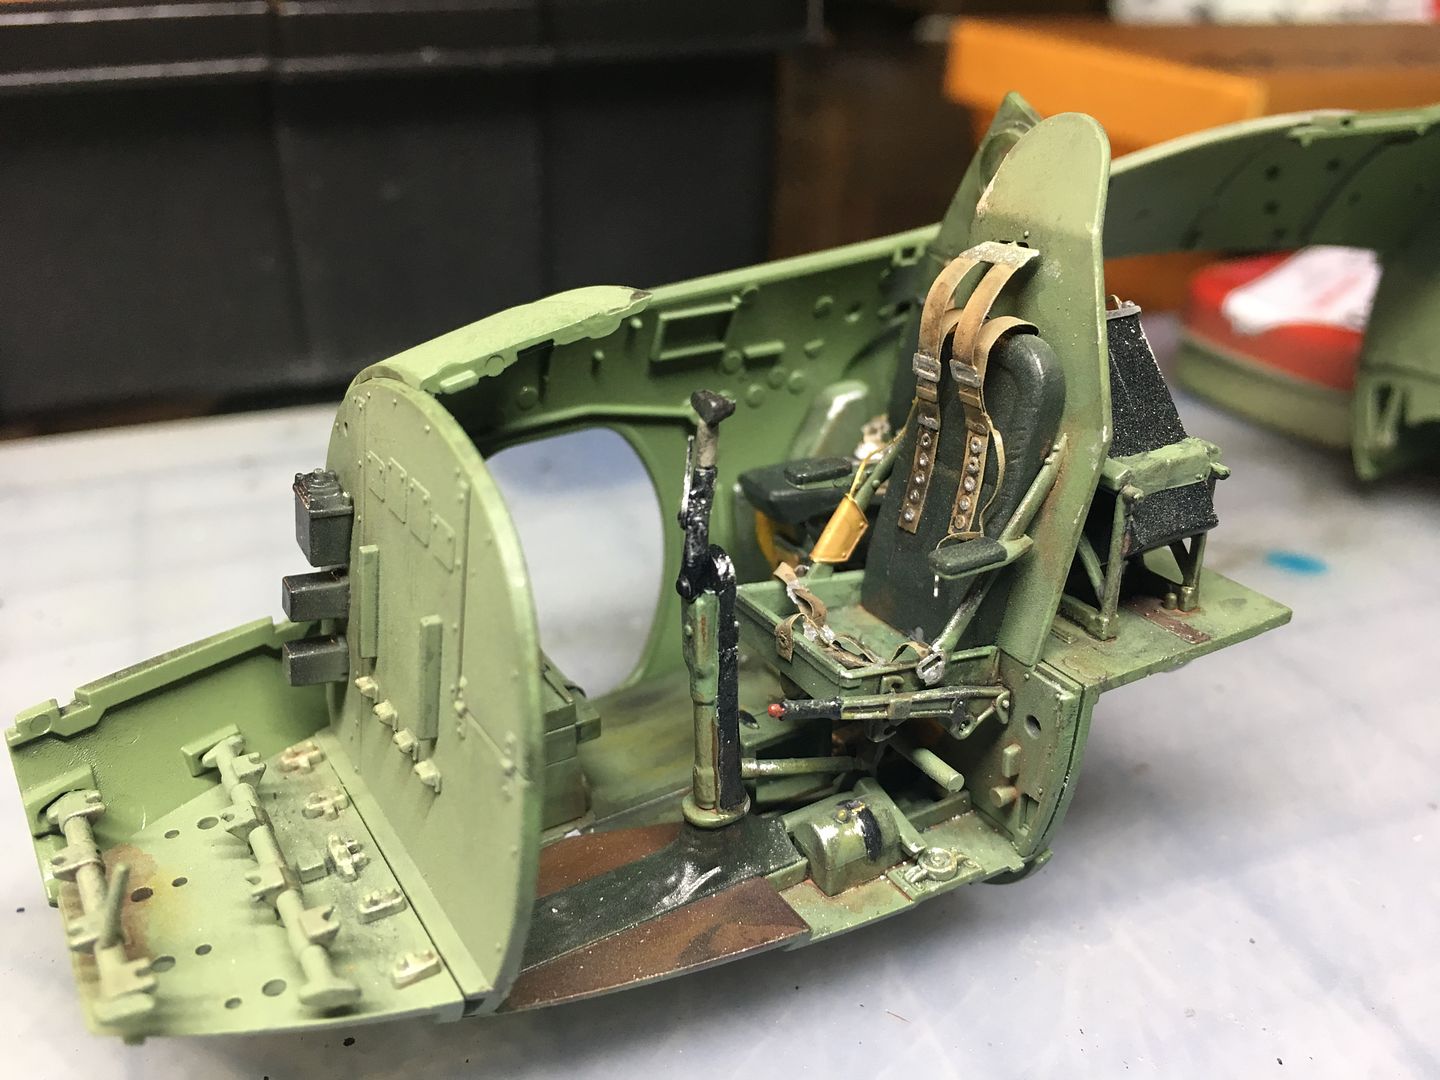
Because I keep coming back to this model after long breaks, I am learning techniques elsewhere that I want to apply here, so I am re-visiting other elements and re-doing some finishes etc - particularly the cockpit (actually, that is all I have completed!) -
Gun detail kits next!!
These are the first pictures uploaded with something other than Photobucket :rant:. I think the rest of this thread will disappear around Christmas, so I will try and update those images to keep this complete....
So I am carrying on with this engine detail kit -
Lots of rather thin framework and piping in the kit that has to be trimmed away from carriers - they actually come off quite well, and are not that hard to clean off - I found scraping with a blade pretty effective...
PE parts included...
I painted the main block - kept re-touching as I went, adding parts etc...
Don't fit this PE part at this point - I was too early and had to remove later for clearance....doh!
I used my trusty metallic pens for details and highlights,,,
I painted and added some wiring to these engine frame parts before fitting to the block...
I've also started with some light weathering, as learning that is one of the reasons for this project (F1 cars tend to be pretty clean) - I am learning as I go so trying lots of things - oil wash, tamiya panel wash, pencils etc etc -
The copper metallic pens are great for this - really smooth and no visible 'flake'...
Also the first time using 'lead' for the wires - so much easier to shape and form, without putting any strain on anything (unlike trying to bend solid wire) - usual battle trying to identify where the wire it shows you to fix at stage 12 actually disappears to!!
Although black here, I painted these pipes a dark grey later on...
That is one engine structurally complete - I'll go back over it all and tidy up finishes etc, and add some more wiring, before trying it in the Tamiya kit wing (which I have not started yet) - I was going to build the other engine 'OBB' to compare, but I will now just build the detail version (like this) for the model. Maybe I will build the Tamiya verison for display next to the finished plane - or perhaps the other way round - mount the super detailed version on a 'trolley' - choices!
Because I keep coming back to this model after long breaks, I am learning techniques elsewhere that I want to apply here, so I am re-visiting other elements and re-doing some finishes etc - particularly the cockpit (actually, that is all I have completed!) -
Gun detail kits next!!
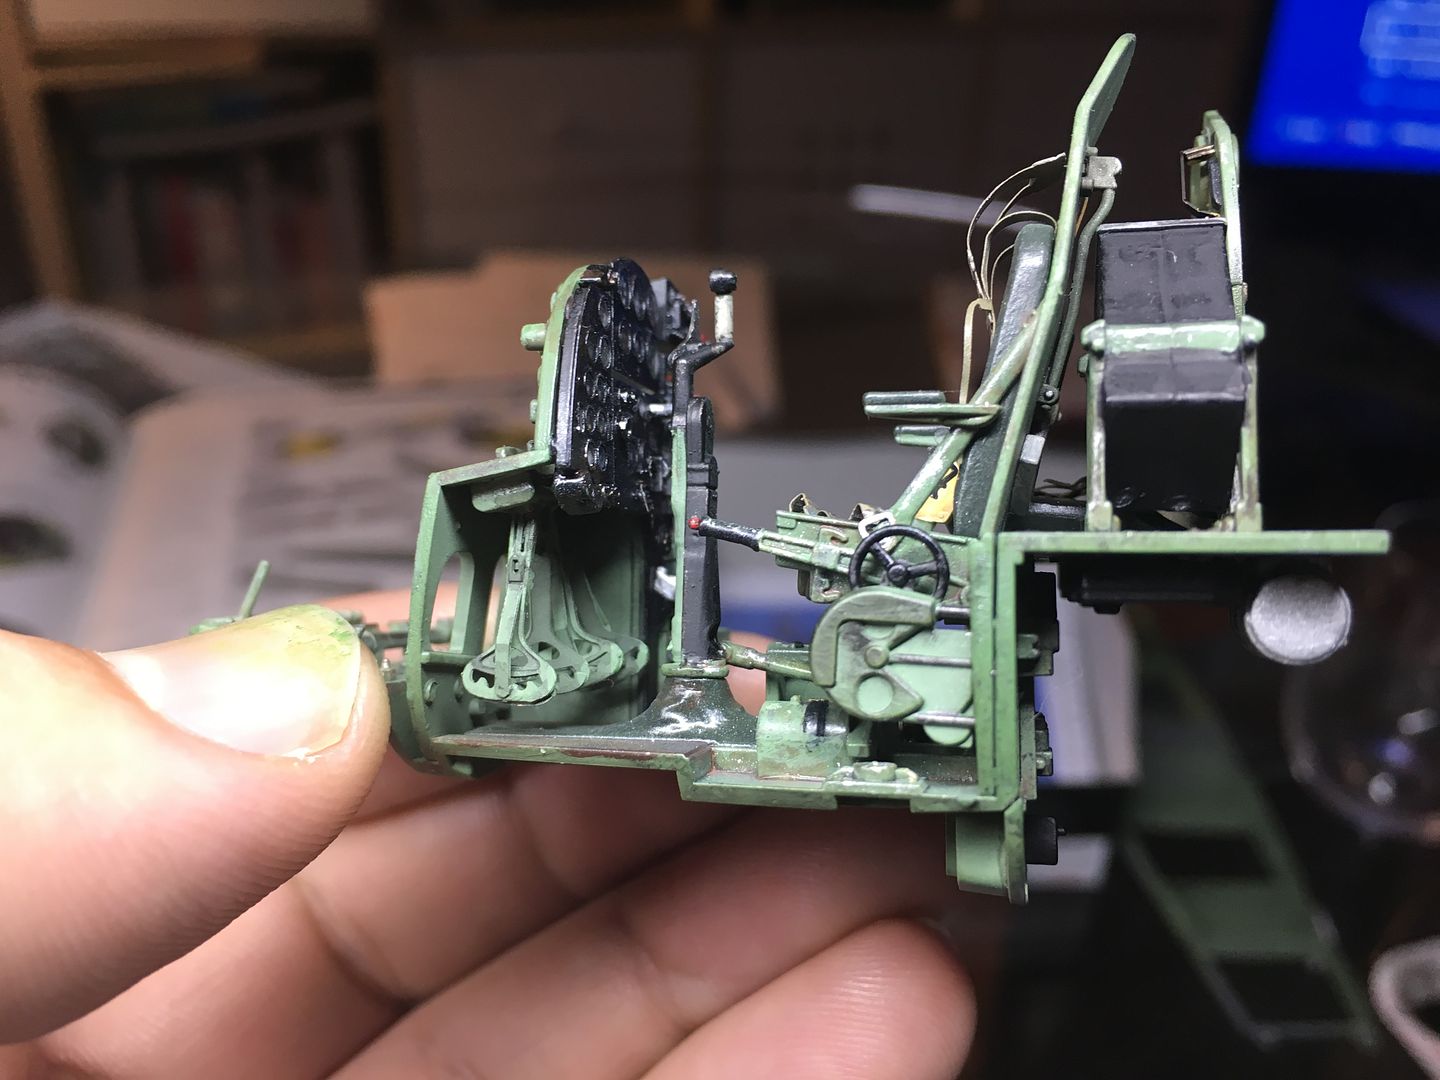
So - I also have the nose gun and belly (?) gun detail kits from Eduard.
I'm going to build the Tamiya engines and guns OOB as well to compare - seems a shame to waste the kit parts. Also have different display options then as well...
Extensive use of my metallic pens for these parts...

Silver, bronze and some black wash to pick out the detail.

As before, I'm touching up as I go...and revisiting parts after completion.

Went together pretty easily - this module will benefit from some fine chipping I think - very much learning the weathering game...at the moment it is all shiny until I dull it down later...


Note the PE parts on the ends of the guns - these come with the tamiya kit as a way to align everything whilst gluing - a nice touch.
I'm aware that it is very easy to over-do the weathering effects and general grubbiness of these models, so I am experimenting a bit at the moment...these may be too dirty...
Nose cone guns...

Nice brass bits but a bugger to align!

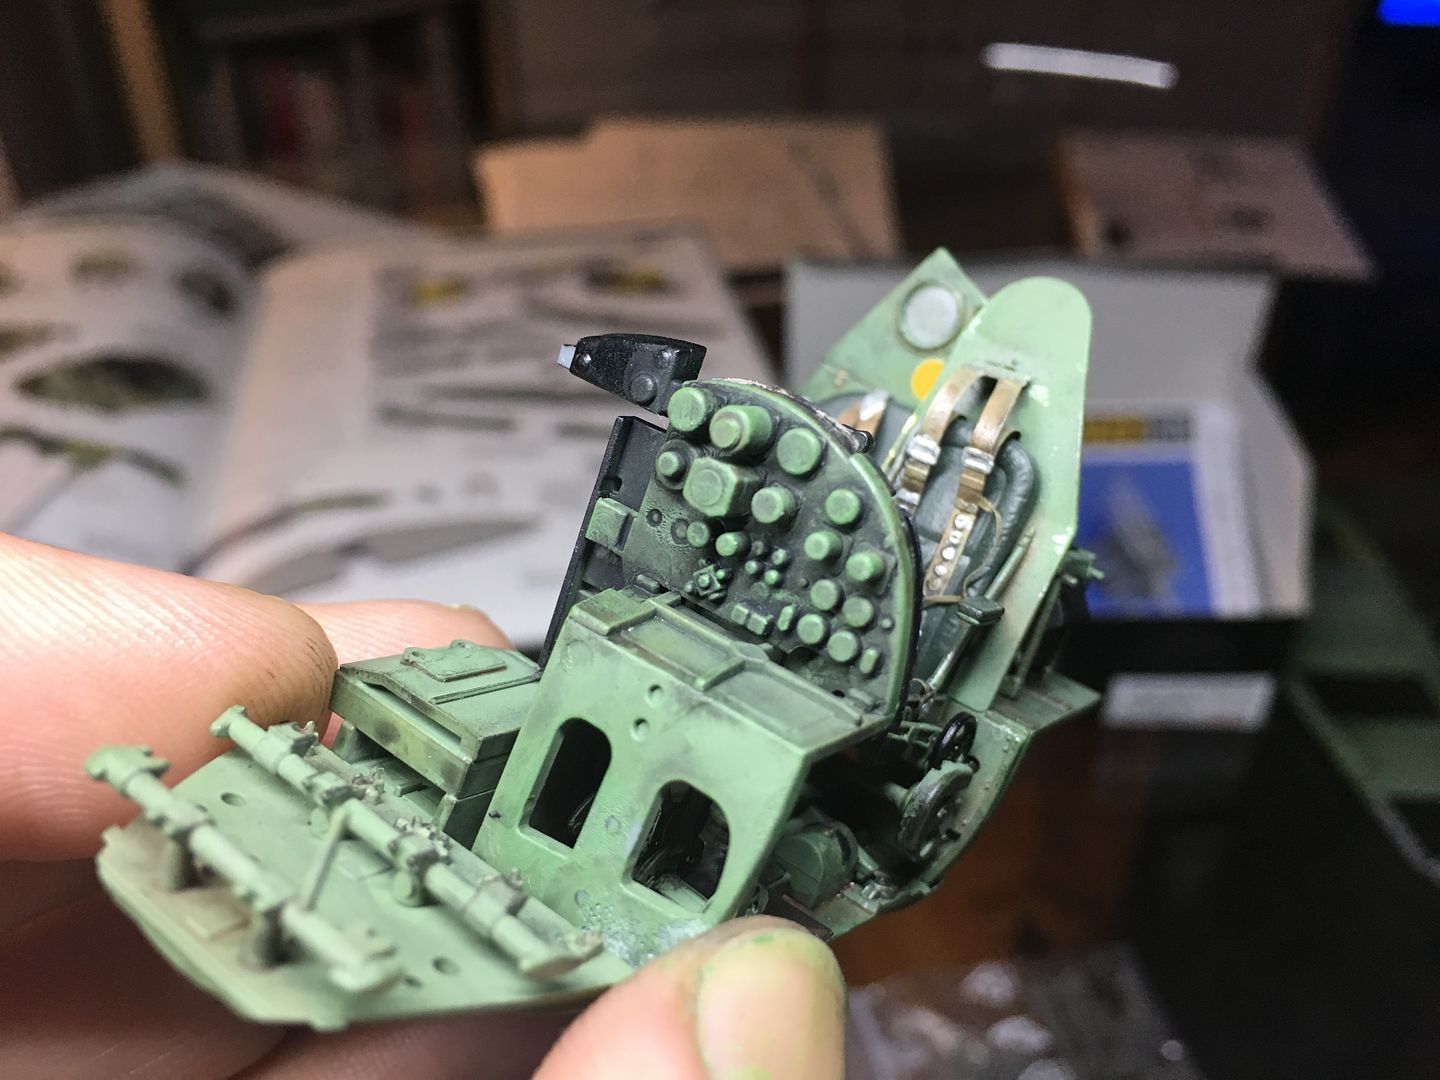
I'm re-visiting the cockpit area a little as well, to try and match earlier finished with ones I have learnt about more recently...


I'm going to build the Tamiya engines and guns OOB as well to compare - seems a shame to waste the kit parts. Also have different display options then as well...
Extensive use of my metallic pens for these parts...
Silver, bronze and some black wash to pick out the detail.
As before, I'm touching up as I go...and revisiting parts after completion.
Went together pretty easily - this module will benefit from some fine chipping I think - very much learning the weathering game...at the moment it is all shiny until I dull it down later...
Note the PE parts on the ends of the guns - these come with the tamiya kit as a way to align everything whilst gluing - a nice touch.
I'm aware that it is very easy to over-do the weathering effects and general grubbiness of these models, so I am experimenting a bit at the moment...these may be too dirty...
Nose cone guns...
Nice brass bits but a bugger to align!
I'm re-visiting the cockpit area a little as well, to try and match earlier finished with ones I have learnt about more recently...

Nose guns...

There is an alignment issue here - sorted later...

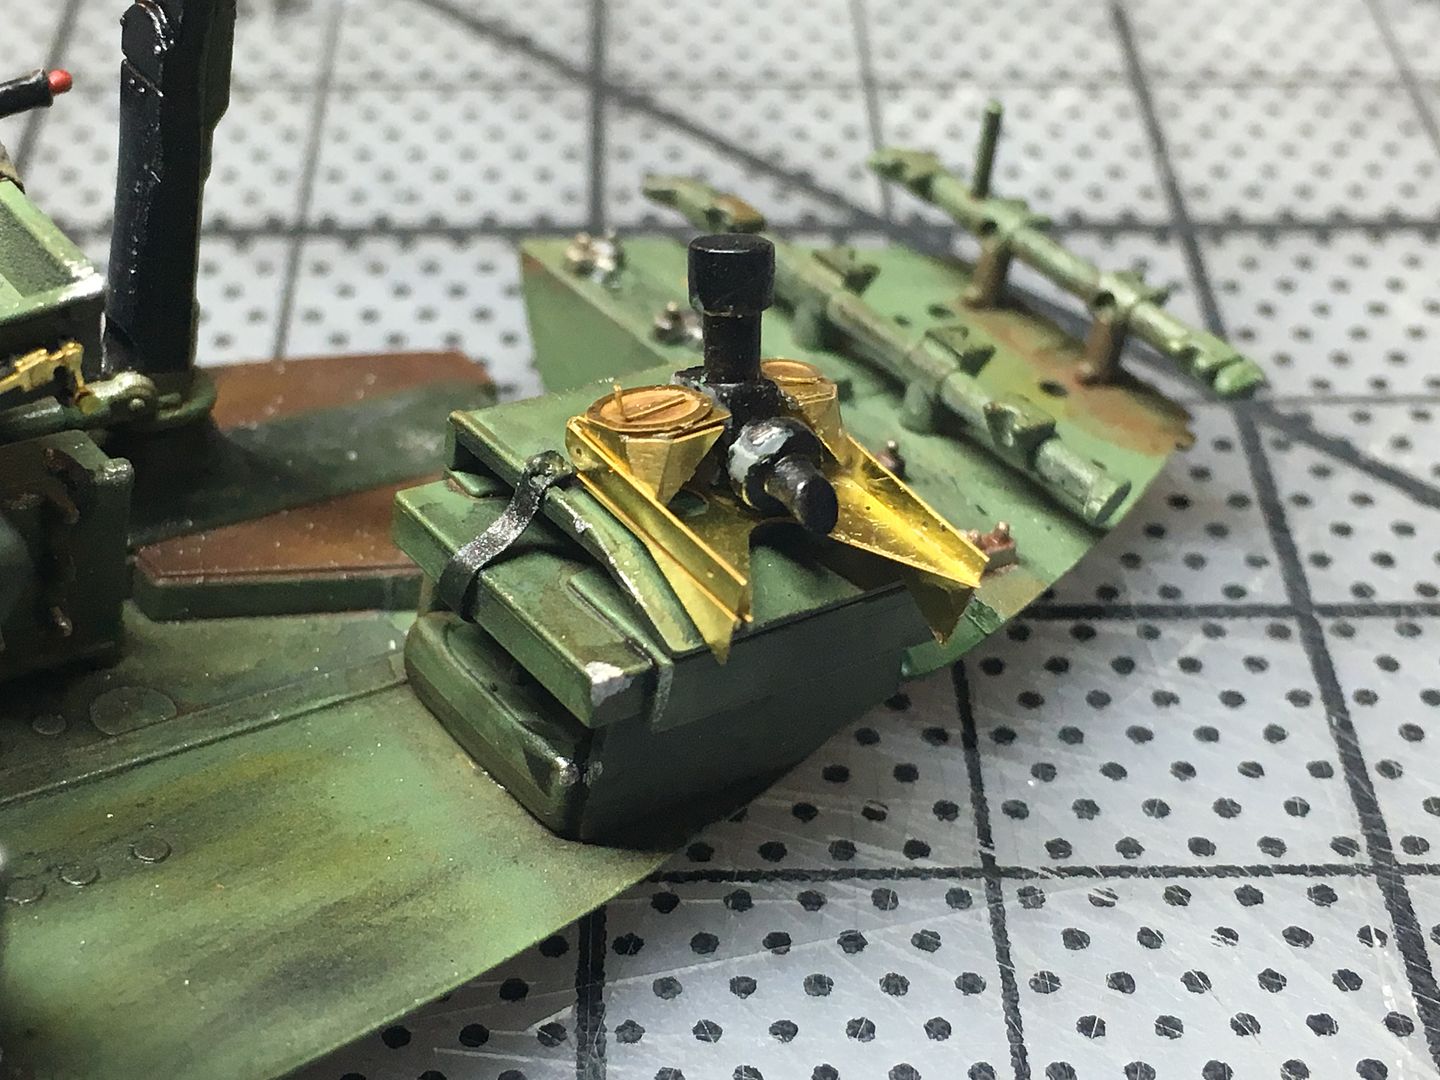
Added some more PE details to the ammo boxes - the chains. Not at all tiny!!! Also matched the 'weathering' a bit better as I updat emy techniques...


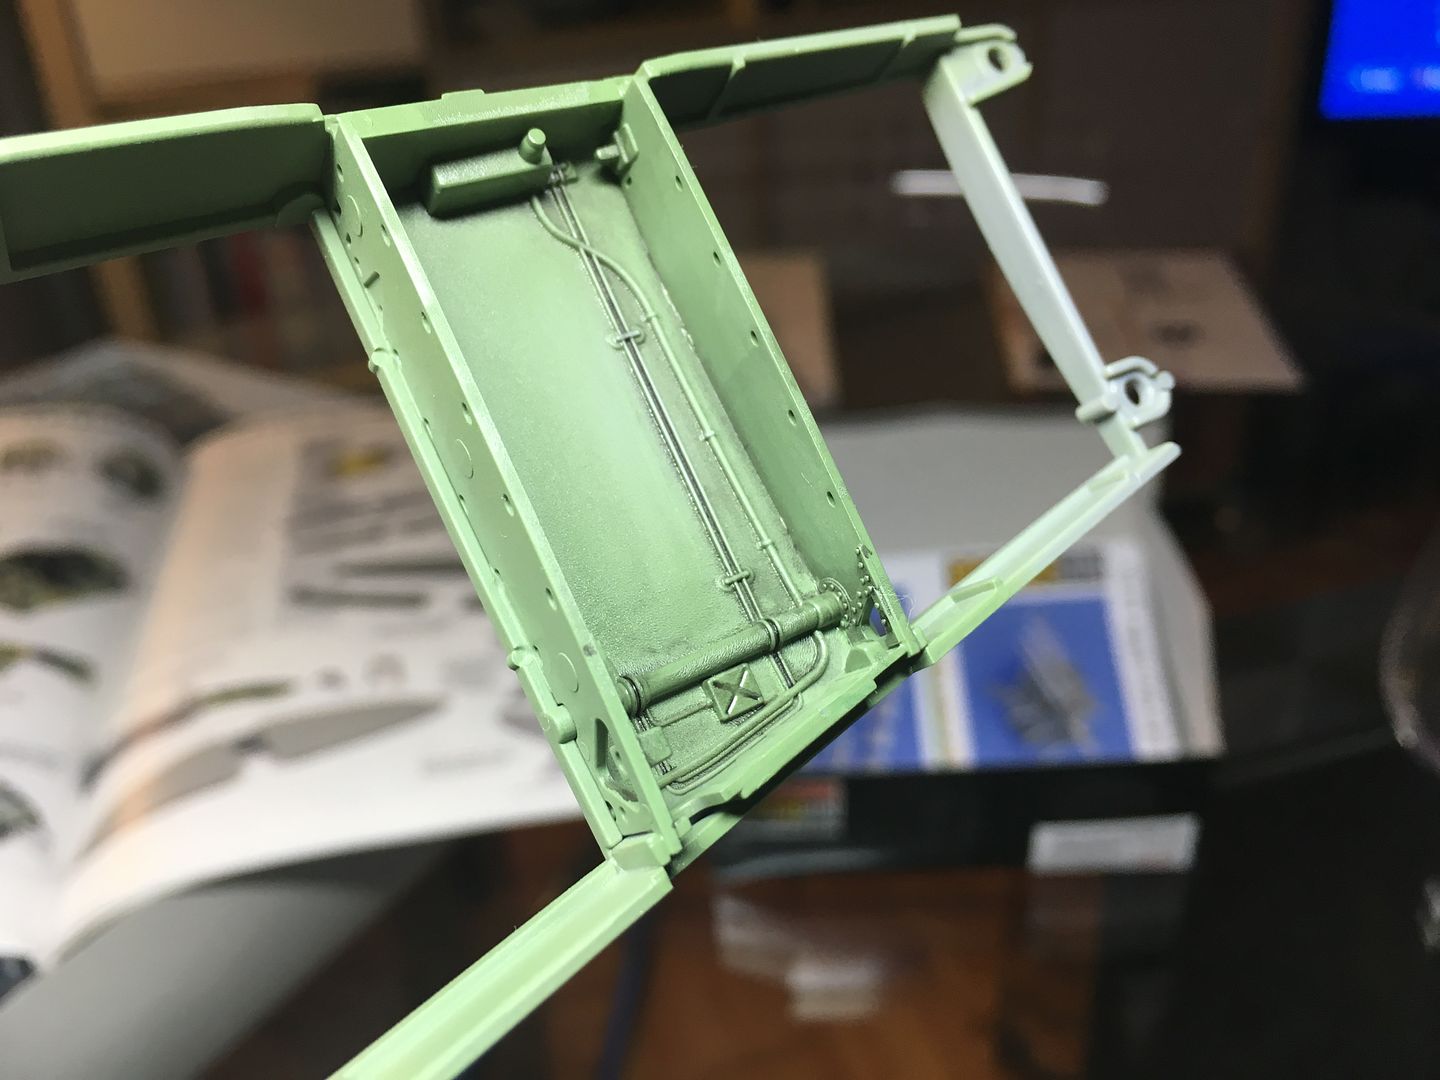
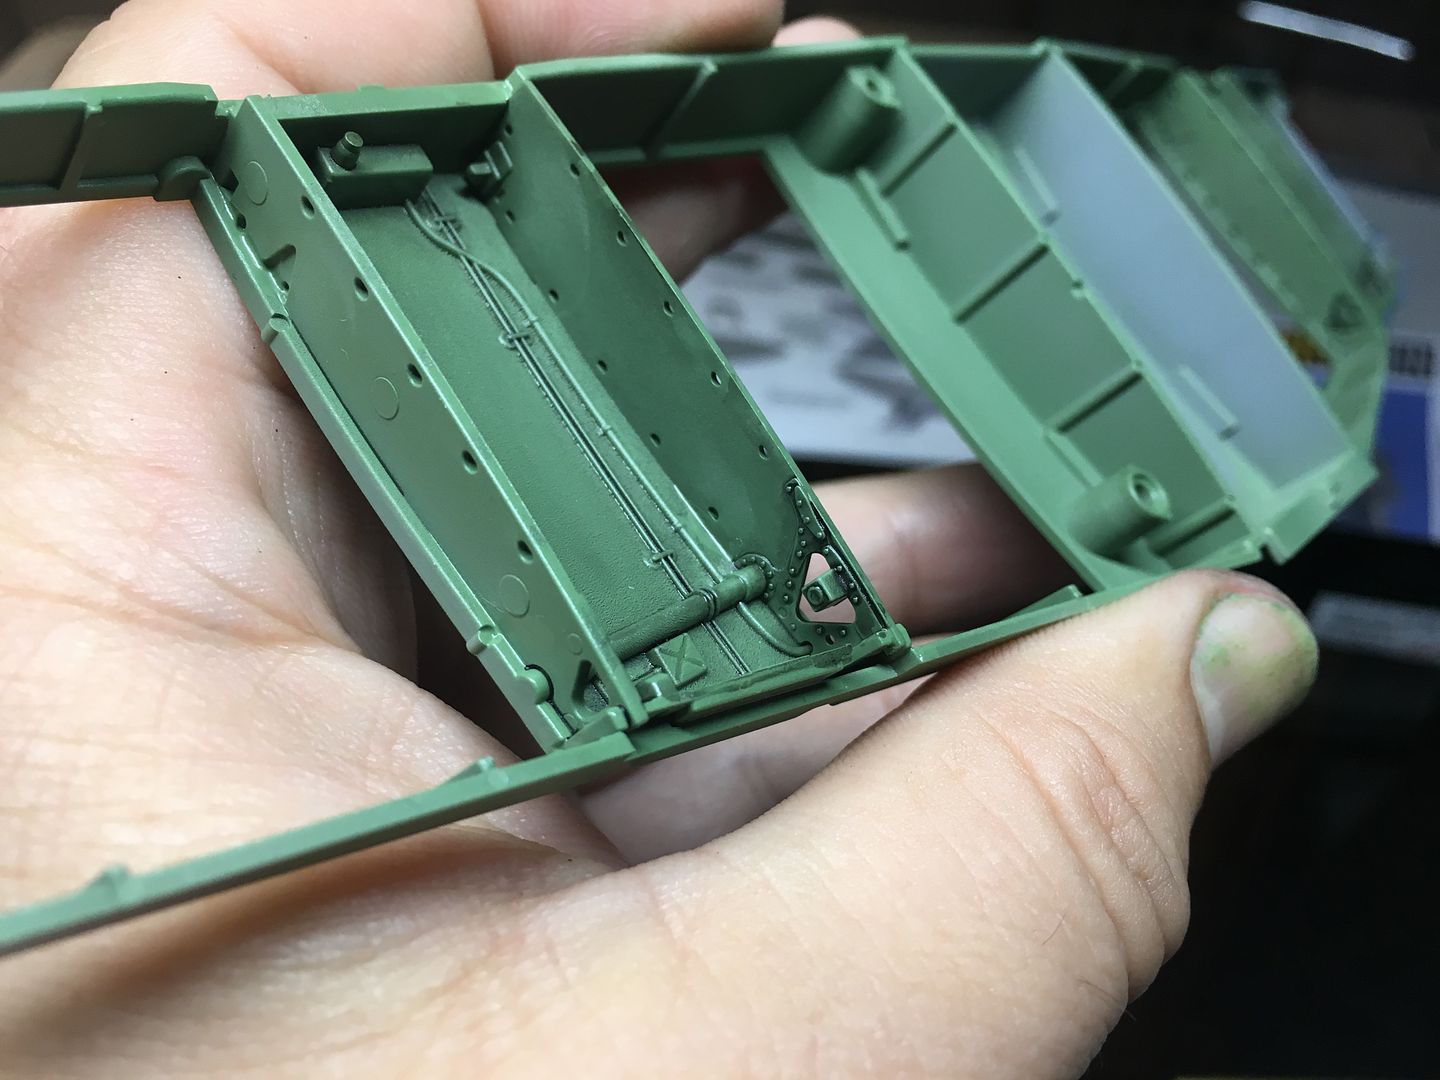
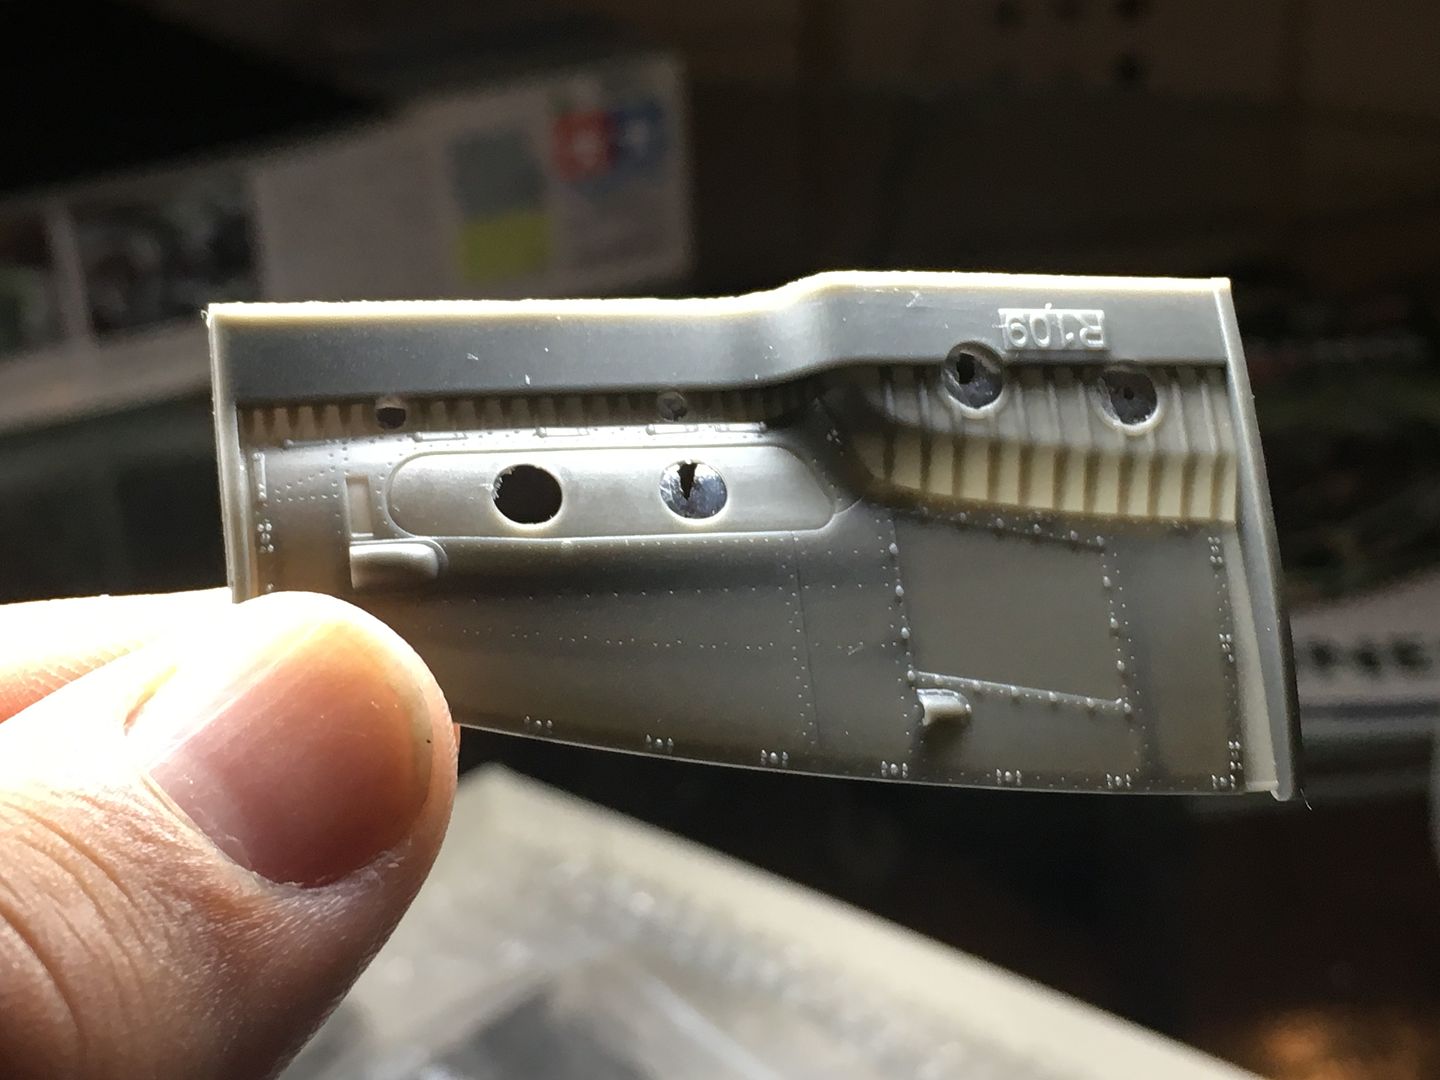
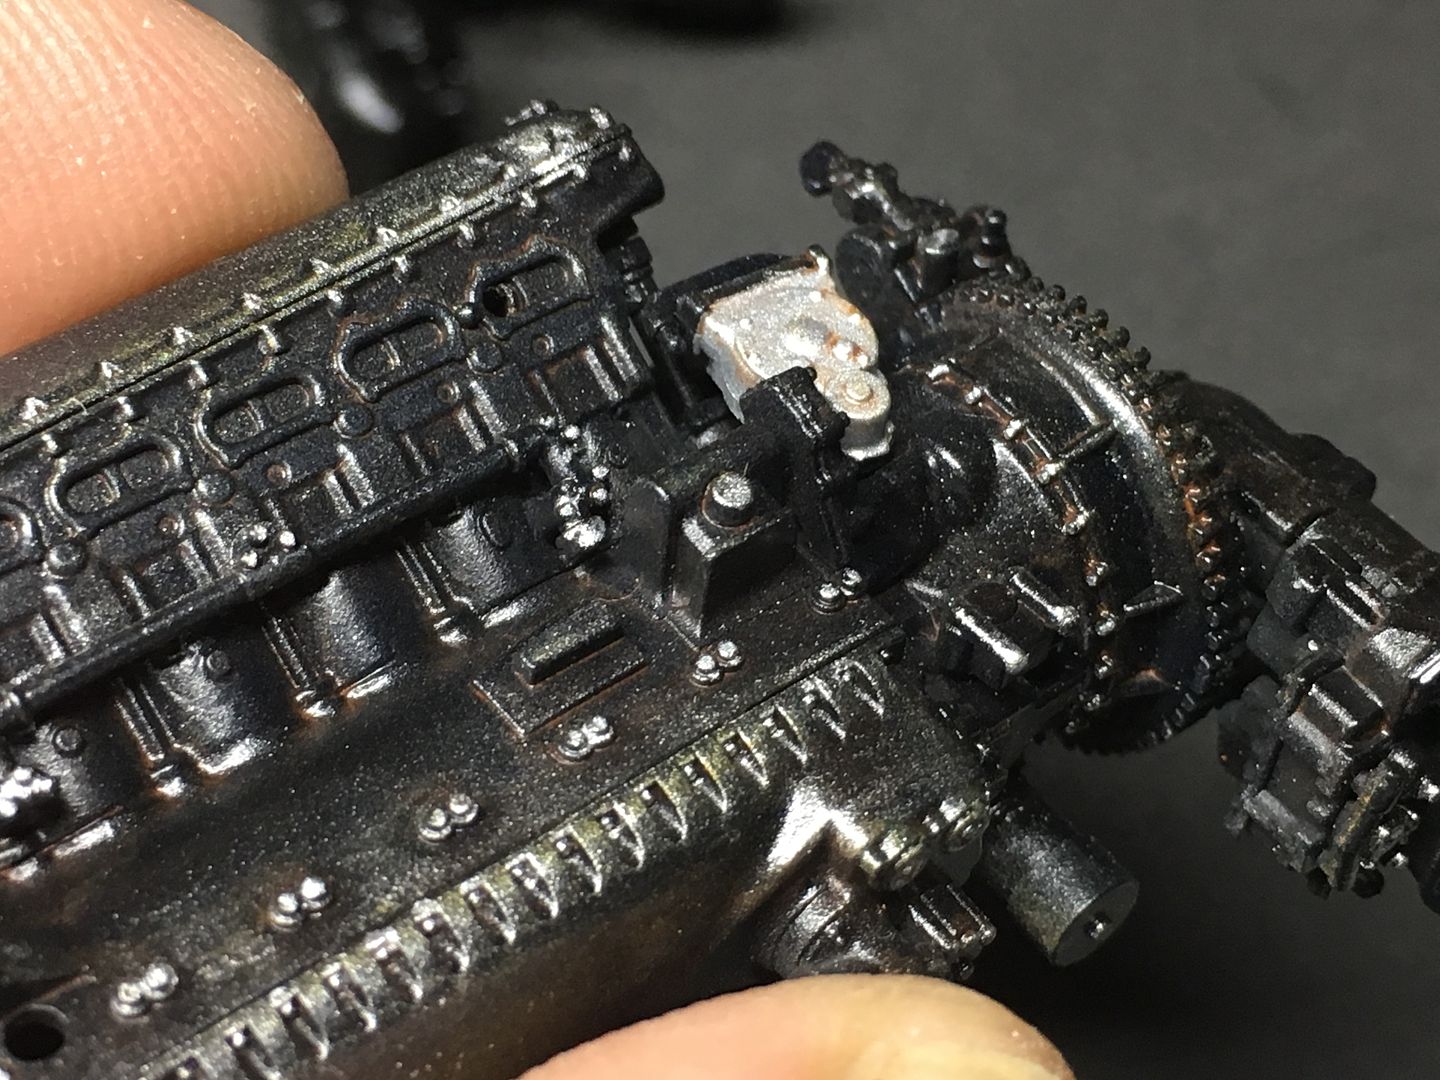
Back to the engines, and some of the engine nacelle panels. These are a silver finish (I assume aluminium) - I found the Tamiya dull ali and bit sparkly, so I chose to use the Alclad version, which is much 'smoother'. Unlike most bits, I primed these so ensure and even tint. Some nice PE parts (ribs) in these sections...


I used a combination of oils and black panel wash to give a 'used' oily look. The panel wash marks the 'edges' well, the oil is good for the 'flat' bits in between. I am liking the oils, I'll keep working ont the skills for these...


There is an alignment issue here - sorted later...
Added some more PE details to the ammo boxes - the chains. Not at all tiny!!! Also matched the 'weathering' a bit better as I updat emy techniques...
Back to the engines, and some of the engine nacelle panels. These are a silver finish (I assume aluminium) - I found the Tamiya dull ali and bit sparkly, so I chose to use the Alclad version, which is much 'smoother'. Unlike most bits, I primed these so ensure and even tint. Some nice PE parts (ribs) in these sections...
I used a combination of oils and black panel wash to give a 'used' oily look. The panel wash marks the 'edges' well, the oil is good for the 'flat' bits in between. I am liking the oils, I'll keep working ont the skills for these...
Gassing Station | Scale Models | Top of Page | What's New | My Stuff