Schumacher BossCat Comp Rebuild
Discussion


All,
My 13 y/o son is doing engineering at school, and wanted an engineering based project that he could do himself. He's been helping me a bit with my steam engine build (basic marking out, milling, turning etc under supervision), and has done some 3D modelling (Fusion) and 3D printing. He's also pretty capable in building and painting scale models (mainly Warhammer).
I thought a good prospect would be an old 1:16 Tamiya RC tank chassis off EBay, but they only seem to come up rarely in a state that needs some attention, and at a reasonable price.
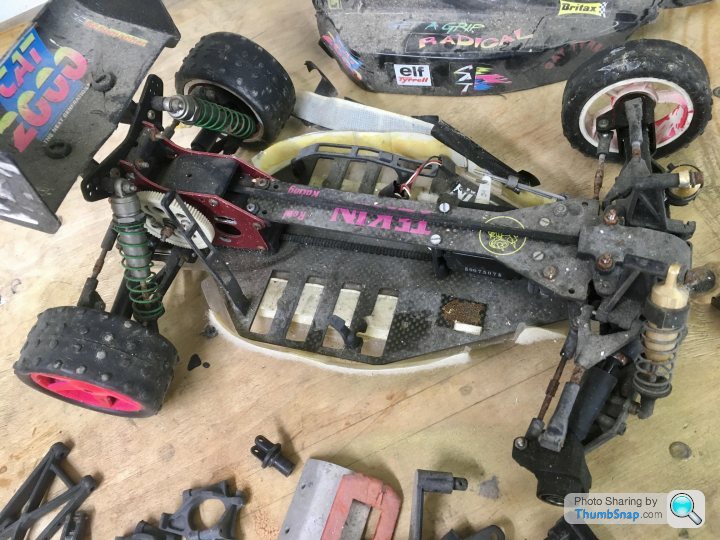
My friend heard about this, and has donated an old RC car. He was given it a while ago and never did anything with it. He thinks it's a Schumacher CAT 2000 (possibly EC). It's a prime candidate for stripping, cleaning, evaluating and re-building:

I have built and rebuilt several Tamiya RC cars, but know nothing of Schumachers.
So:
What car are we dealing with here? Is it half decent?
Are instructions / parts diagrams available?
Are spares available, if so, where is the "go-to" supplier?
Although the economics of restoring this are secondary (within reason) to the process of restoring it - are spares expensive? It would be great if we could also design/reverse engineer and make some parts if necessary.
What battery/esc/motor/wheels/tyre combination is good for a general back garden hack?
Any comments advice is welcome. Cheers.
My 13 y/o son is doing engineering at school, and wanted an engineering based project that he could do himself. He's been helping me a bit with my steam engine build (basic marking out, milling, turning etc under supervision), and has done some 3D modelling (Fusion) and 3D printing. He's also pretty capable in building and painting scale models (mainly Warhammer).
I thought a good prospect would be an old 1:16 Tamiya RC tank chassis off EBay, but they only seem to come up rarely in a state that needs some attention, and at a reasonable price.
My friend heard about this, and has donated an old RC car. He was given it a while ago and never did anything with it. He thinks it's a Schumacher CAT 2000 (possibly EC). It's a prime candidate for stripping, cleaning, evaluating and re-building:
I have built and rebuilt several Tamiya RC cars, but know nothing of Schumachers.
So:
What car are we dealing with here? Is it half decent?
Are instructions / parts diagrams available?
Are spares available, if so, where is the "go-to" supplier?
Although the economics of restoring this are secondary (within reason) to the process of restoring it - are spares expensive? It would be great if we could also design/reverse engineer and make some parts if necessary.
What battery/esc/motor/wheels/tyre combination is good for a general back garden hack?
Any comments advice is welcome. Cheers.
sgrimshaw said:
Extremely competant racing cars, not really designed for "backyard bashing".
Still going
https://www.racing-cars.com/
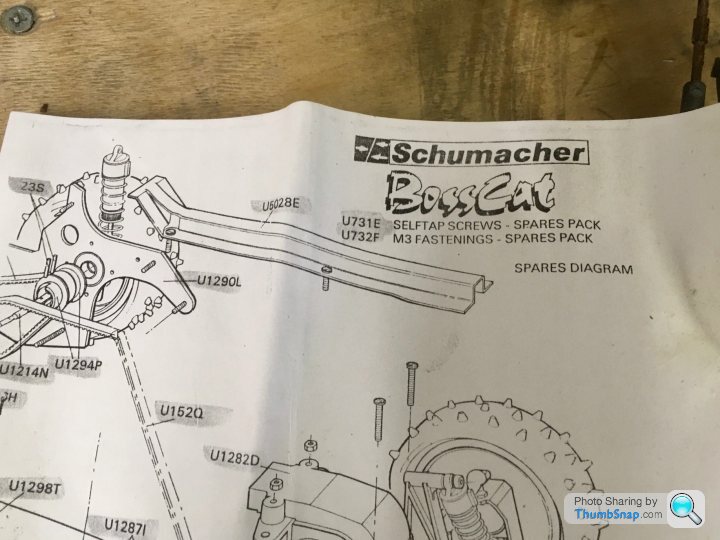
Website is full of info for both current and old models, inc manuals, exploded parts diagrams.
Spares available for old models.
Thanks.Still going
https://www.racing-cars.com/
Website is full of info for both current and old models, inc manuals, exploded parts diagrams.
Spares available for old models.
Could the performance be “de-rated” by fitting a crappy motor? Or are you suggesting the entire chassis setup isn’t right for anything other than RC race tracks?
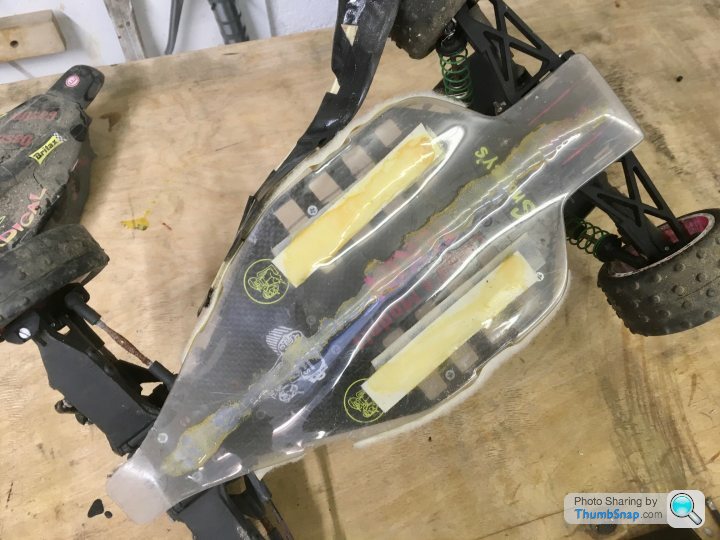
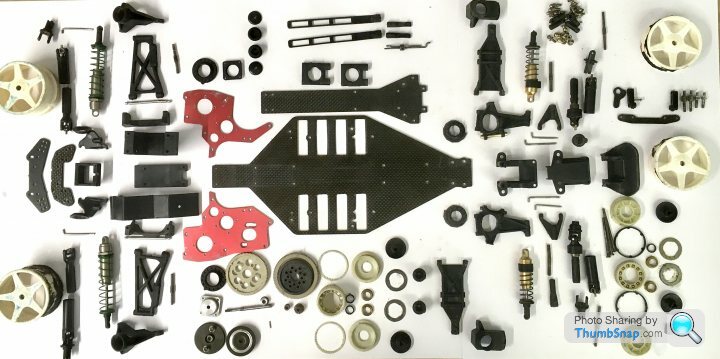
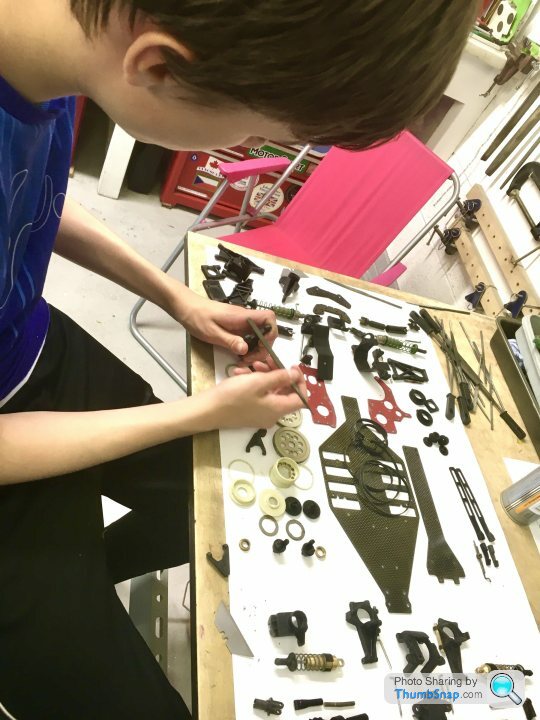
So he’s stripped it to pretty much component level:
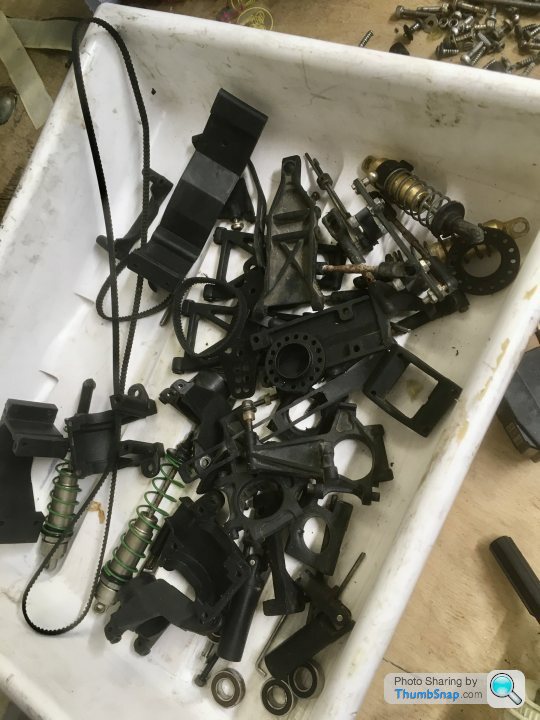
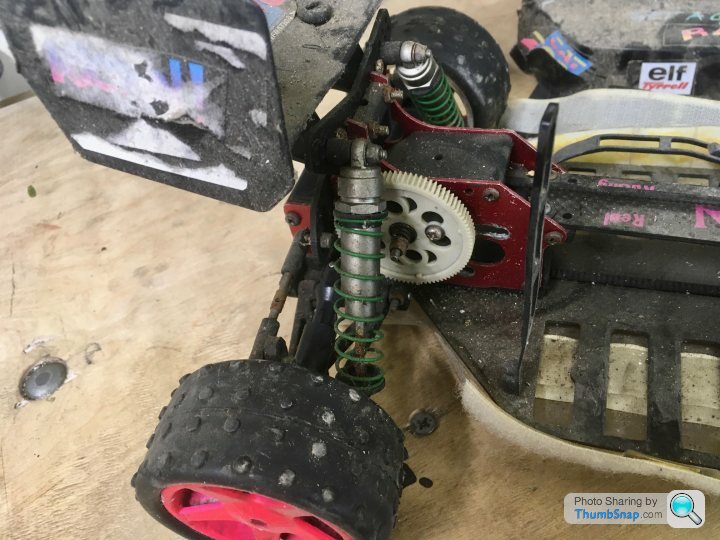
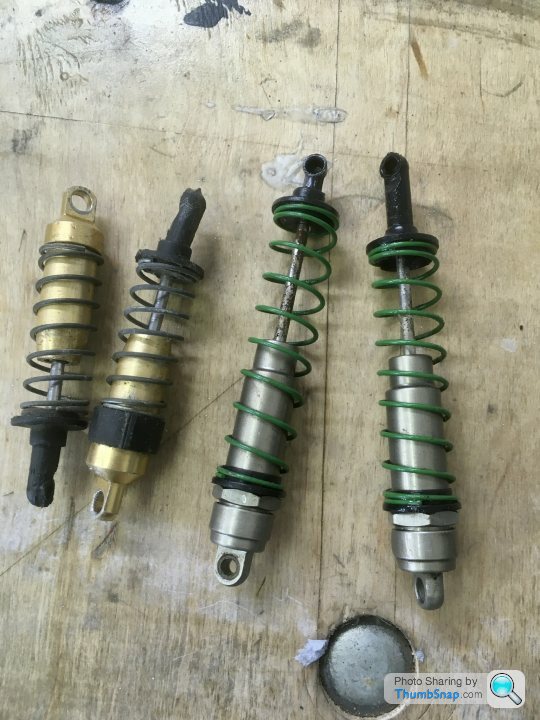
Shocks aren’t original and seem knackered, so they’ll need replacing.
Also some of the ball races have lost their shields. Might as well get a full bearing kit.
Total mish-mash of fasteners, so they’ll need replacing too.
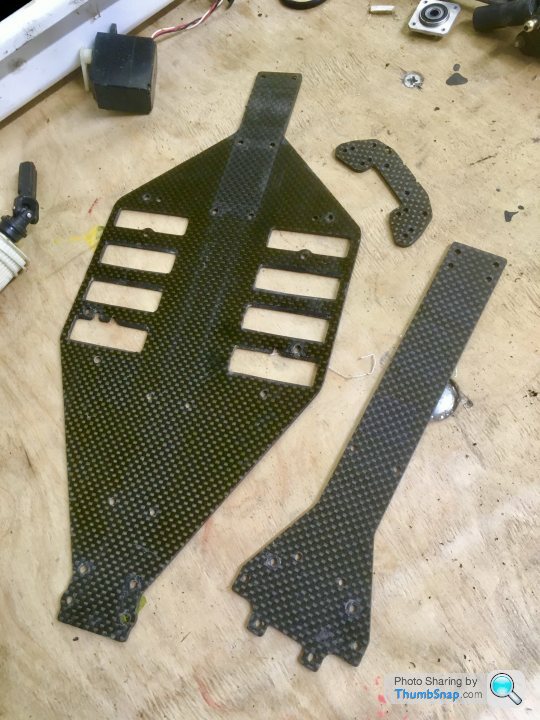
The carbon parts cleaned up nicely:
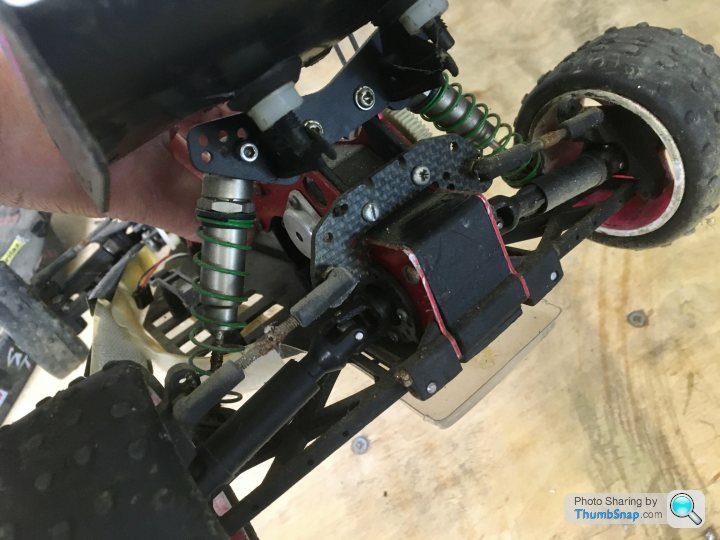
The pulleys have spacers on this one. The belt is damaged so will be replaced:
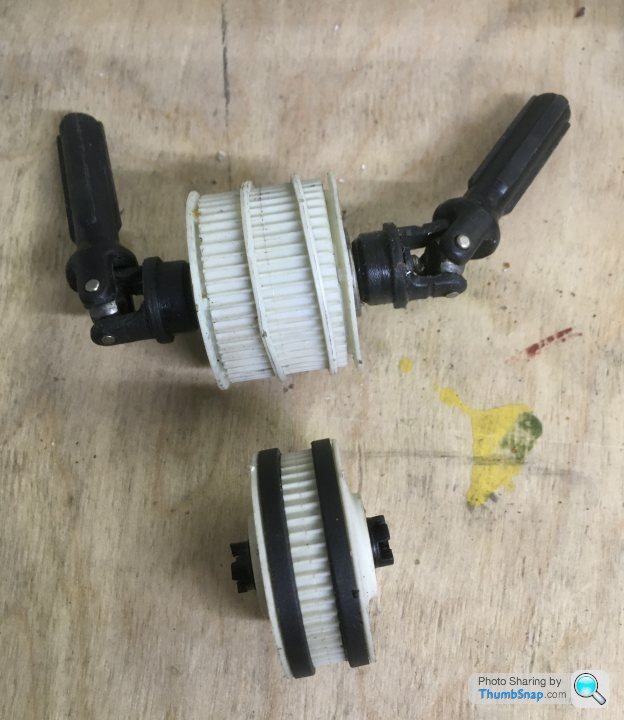
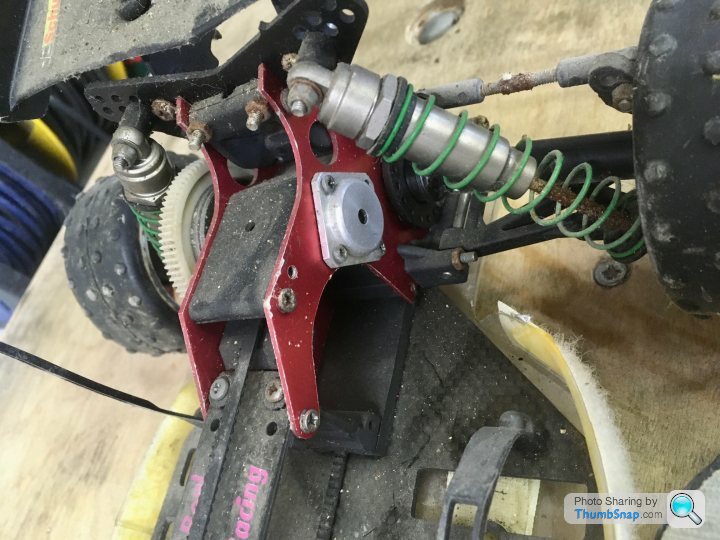
One of these pulleys is a bit chewed:
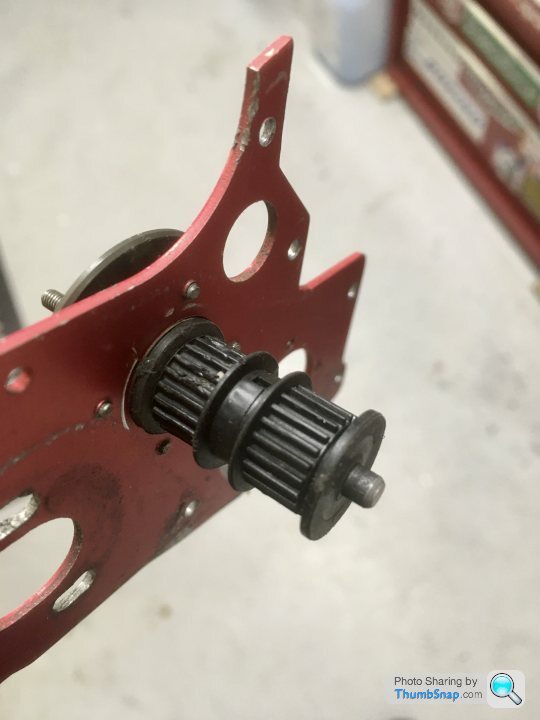
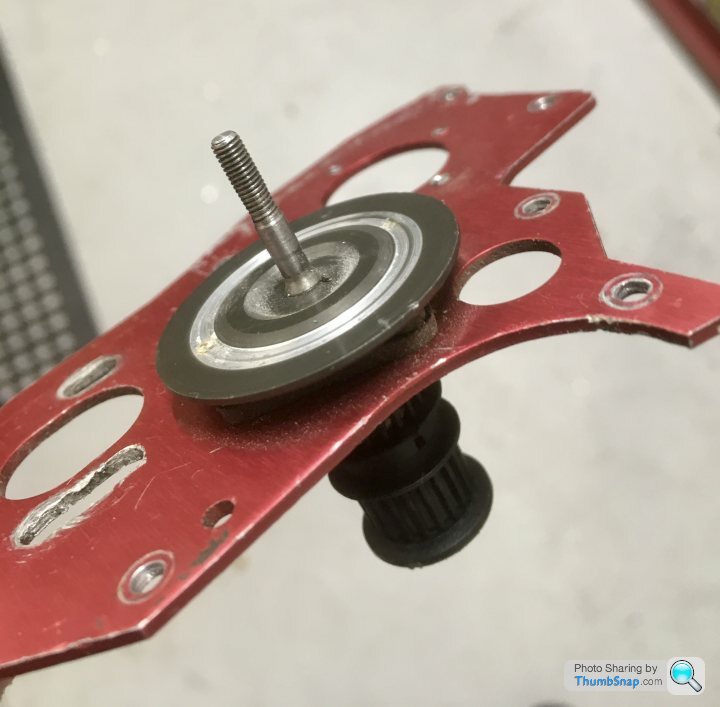
This is some kind of slip clutch, not sure what it’s for unless as a safety feature:
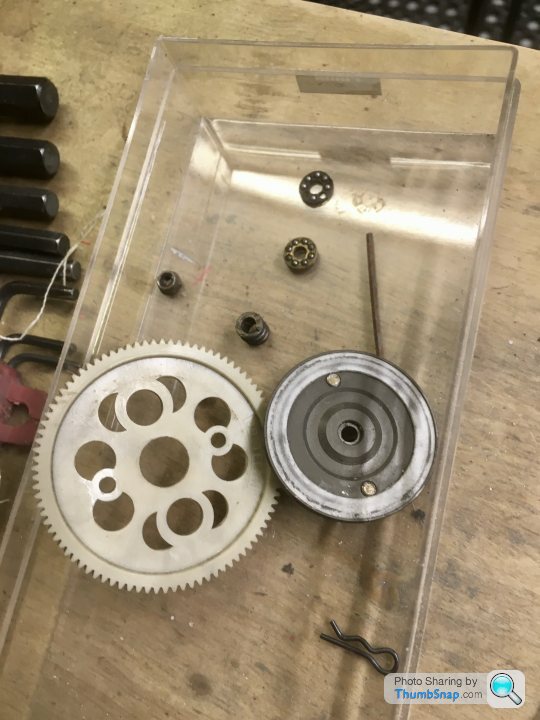
The other side of it presumably is removable, but we can’t get it off. The red side plates are bent, hopefully they can be straightened:
One of the original disc wheels is missing, but there’s a full set of spokes wheels, which are soaking in brake fluid to get rid of the terrible paint.
So it’s basically complete. Needs a few bits and a motor/ESC and batteries, and a body and undertray. Decent project.
Shocks aren’t original and seem knackered, so they’ll need replacing.
Also some of the ball races have lost their shields. Might as well get a full bearing kit.
Total mish-mash of fasteners, so they’ll need replacing too.
The carbon parts cleaned up nicely:
The pulleys have spacers on this one. The belt is damaged so will be replaced:
One of these pulleys is a bit chewed:
This is some kind of slip clutch, not sure what it’s for unless as a safety feature:
The other side of it presumably is removable, but we can’t get it off. The red side plates are bent, hopefully they can be straightened:
One of the original disc wheels is missing, but there’s a full set of spokes wheels, which are soaking in brake fluid to get rid of the terrible paint.
So it’s basically complete. Needs a few bits and a motor/ESC and batteries, and a body and undertray. Decent project.
TheBinarySheep said:
Wow this brings back memories. I'm sure I had one of these in the 90s.
In decent condition probably worth a couple of hundred quid on eBay. Probably almost as much as I paid for my new Schumacher laydown.
Thanks! Don’t think he’d sell it when it’s done, I think it might get used a bit then put next to his Mad Bull.In decent condition probably worth a couple of hundred quid on eBay. Probably almost as much as I paid for my new Schumacher laydown.
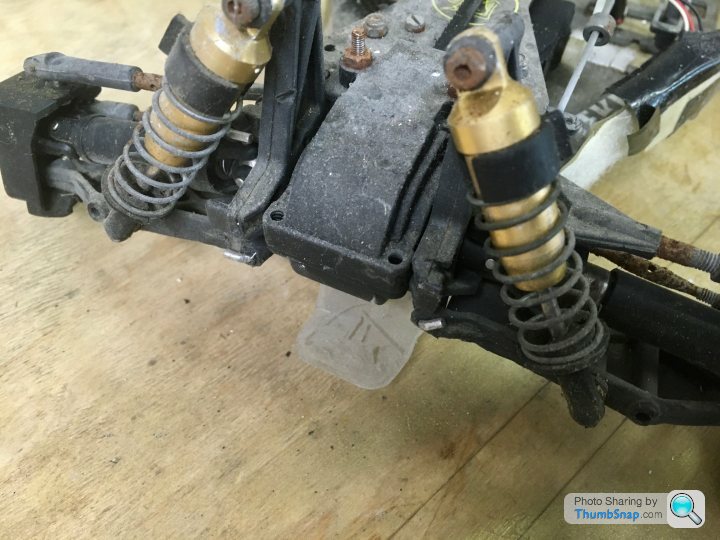
BTW I think the main issue with the dampers is corroded rods. I guess we could turn some new ones up on the lathe out of stainless.
A bigger issue might be the rather chewed up/asymmetric plastic ball sockets in the lower ends. Likewise I suppose we could make new ones, maybe part plastic, part aluminium of new ones aren’t available?
A bigger issue might be the rather chewed up/asymmetric plastic ball sockets in the lower ends. Likewise I suppose we could make new ones, maybe part plastic, part aluminium of new ones aren’t available?
groomi said:
Ah, those rear shocks aren't what I thought they were. They're not Schumacher at all - I've no idea what they are, or whether spares are available.
The plastic ball cups are no problem. Just stick with Schumacher items.
OK, if we needed 4 decent but not amazing shocks, what would you go for?The plastic ball cups are no problem. Just stick with Schumacher items.
Same with the motor/battery/ESC?
I did find some spares online from a couple of places, but none of the part numbers were anything like in the parts list, which seemed odd because they were under a drop-down for the bosscat.
BTW, I requested to join the vintage Schumacher FB group a few days ago (to get more advice), but its not been approved yet.
Cheers!
72twink said:
Ignore the Vintage Schumacher group on FB, find the True Vintage Schumacher page and join that - it’s not a dictatorship! Also don’t listen to Groomi - I started Lockdown with one XLS “for old times sake” and now I have 4 CATs, a TopCAT, a Cougar and no money - his boundless knowledge and enthusiasm is bankrupting me! Nice little project that but BossCATs are quite tricky to find bits for.
Cheers for that. By pure luck I found the True Schumacher group and got accepted straight away. Already got a lot of good info.Yep, restoring/ collecting old stuff can soon get out of hand, but all good fun!
Pretty much stripped to component parts now:
A few bent bits, a few things that need turning up on the lathe, and some minor standard parts to be bought, but nothing that can’t be sorted:
One of the layshaft pulleys will also need some work with a modelling chisel and a file:

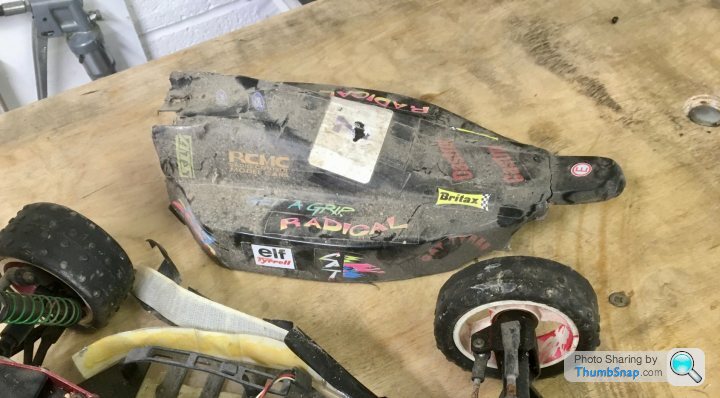
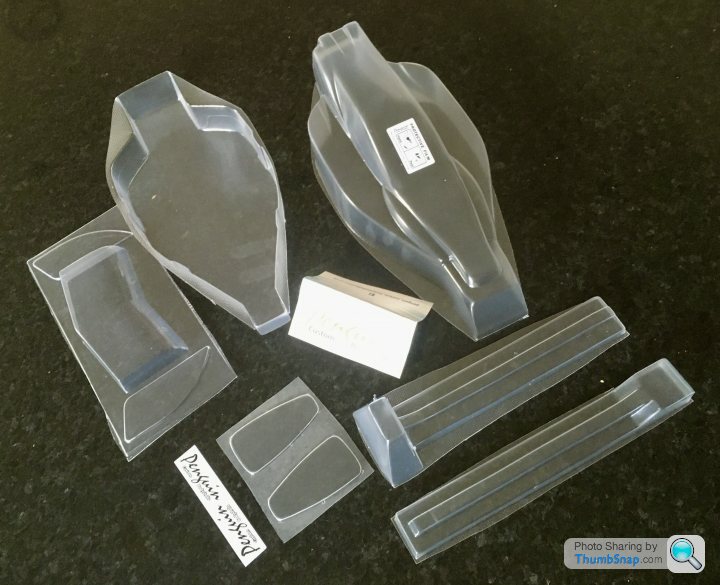
Ordered a body from Penguin yesterday, arrived today:
Also got new belts, and a bearing set on order. An FB group member is sending me a couple of front suspension parts. The rear diff was missing a bush, and had allowed the diff to tilt and rub against the transmission side plates - unbelievable crack-handedness:

Fastener sets are out of stock, but when I get those, the rebuild can start. Undecided about the JC Racing wheels, they are pretty grubby even after paint stripping, plus the rim strakes have been butchered, so I’m not sure if the tyres would stay on anyway. The way this thing has been treated makes me wince.
A few bent bits, a few things that need turning up on the lathe, and some minor standard parts to be bought, but nothing that can’t be sorted:
One of the layshaft pulleys will also need some work with a modelling chisel and a file:
Ordered a body from Penguin yesterday, arrived today:
Also got new belts, and a bearing set on order. An FB group member is sending me a couple of front suspension parts. The rear diff was missing a bush, and had allowed the diff to tilt and rub against the transmission side plates - unbelievable crack-handedness:
Fastener sets are out of stock, but when I get those, the rebuild can start. Undecided about the JC Racing wheels, they are pretty grubby even after paint stripping, plus the rim strakes have been butchered, so I’m not sure if the tyres would stay on anyway. The way this thing has been treated makes me wince.
I asked this question on FB but didn’t get an answer yet:
I appear to have Sport diffs, not Comp.
Can I fit flanged bearings to the plastic tri lobe washer carriers, or do I need to ‘stick’ (ha ha) with the plastic in brass bushes?
Reason I ask is because one of the bushes is missing and needs making or buying, and it would be cheap enough to buy bearings and be done with it.

The bearings are A532 above. Mine have the brass/plastic bushes instead.
I’ve got the RC bearings set already, but they’re not included.
Cheers.
I appear to have Sport diffs, not Comp.
Can I fit flanged bearings to the plastic tri lobe washer carriers, or do I need to ‘stick’ (ha ha) with the plastic in brass bushes?
Reason I ask is because one of the bushes is missing and needs making or buying, and it would be cheap enough to buy bearings and be done with it.
The bearings are A532 above. Mine have the brass/plastic bushes instead.
I’ve got the RC bearings set already, but they’re not included.
Cheers.
Cleaned up some of the plastic parts with a file/razor blade:
and sprayed them with a light coat of satin black. Sometimes there’s no way you can get all the ingrained dirt off, and/or any discolouration from scuffs etc, and a bit of paint covers a multitude of sins…
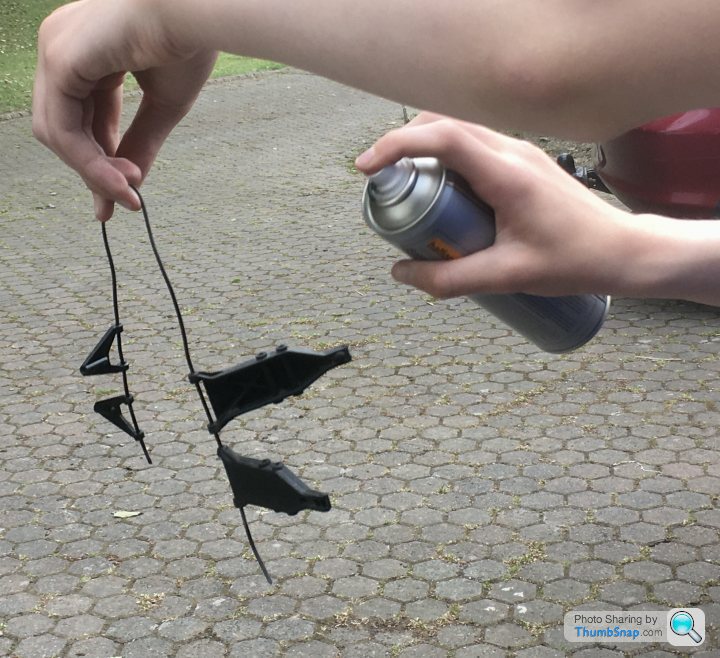
Some of the parts look like brand new now.
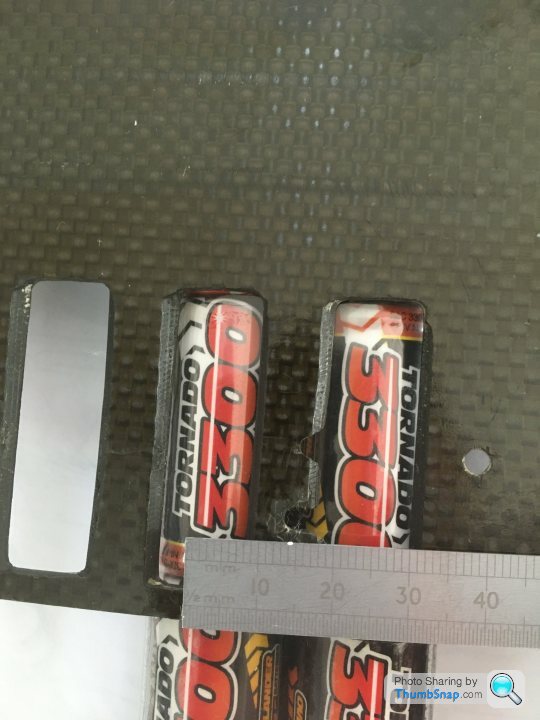
Also measured up for a 3300 NimH saddle pack, and ordered from Overlander:
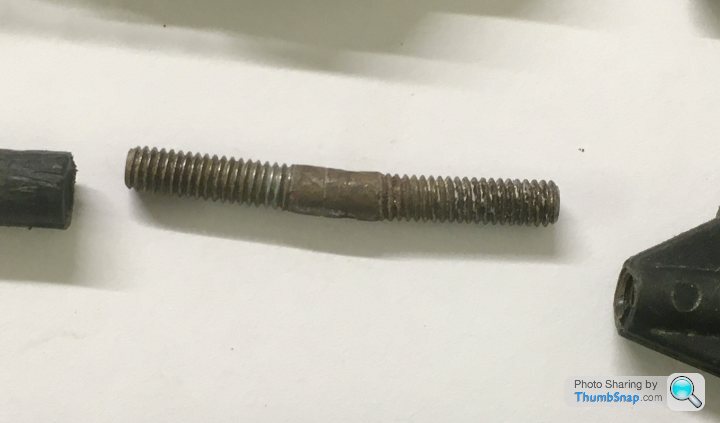
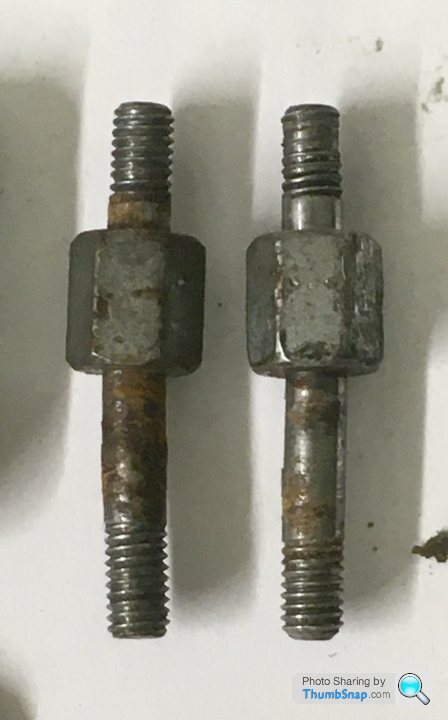
And got some 4mm silver steel to turn some new turnbuckles and a layshaft. I need to get a 4BA left hand die for the turnbuckles. A couple of shock spring retainers also need making from aluminium.
The wheels were screwed - the tyre retaining strakes had been cut off, they were scuffed to death and one of the rear drive spigots was rounded off. In the end we ordered a new set from JC Racing for £11, and a set of tyres for the the same amount.
Despite it being a bit of an engineering project, and economics not being the main consideration, so far, including the battery, we (I) have spent £190 on new and used parts…and that’s with using an existing motor and electronics from the Tamiya Mad Bull. Ah well at least the knackered chassis was free.
and sprayed them with a light coat of satin black. Sometimes there’s no way you can get all the ingrained dirt off, and/or any discolouration from scuffs etc, and a bit of paint covers a multitude of sins…
Some of the parts look like brand new now.
Also measured up for a 3300 NimH saddle pack, and ordered from Overlander:
And got some 4mm silver steel to turn some new turnbuckles and a layshaft. I need to get a 4BA left hand die for the turnbuckles. A couple of shock spring retainers also need making from aluminium.
The wheels were screwed - the tyre retaining strakes had been cut off, they were scuffed to death and one of the rear drive spigots was rounded off. In the end we ordered a new set from JC Racing for £11, and a set of tyres for the the same amount.
Despite it being a bit of an engineering project, and economics not being the main consideration, so far, including the battery, we (I) have spent £190 on new and used parts…and that’s with using an existing motor and electronics from the Tamiya Mad Bull. Ah well at least the knackered chassis was free.

Ash_ said:
Is this an engineering project for himself or for part of his school course? If so, is he documenting what he's found, problems he's had and how he plans to rectify etc?
Just for himself. He’s in year 9 and doing engineering. Said he wanted an engineering g project he could do on his own “in the garage with the radio on”. He’s also drawn up a replica light saber that he wants to make out of aluminium on the lathe, so I got him some bar stock yesterday. Progress is slow because he’s revising for end of year exams. Although it’s very tempting to do it myself, I’ve resisted so far.Ash_ said:
dr_gn said:
Ash_ said:
Is this an engineering project for himself or for part of his school course? If so, is he documenting what he's found, problems he's had and how he plans to rectify etc?
Just for himself. He’s in year 9 and doing engineering. Said he wanted an engineering g project he could do on his own “in the garage with the radio on”. He’s also drawn up a replica light saber that he wants to make out of aluminium on the lathe, so I got him some bar stock yesterday. Progress is slow because he’s revising for end of year exams. Although it’s very tempting to do it myself, I’ve resisted so far.
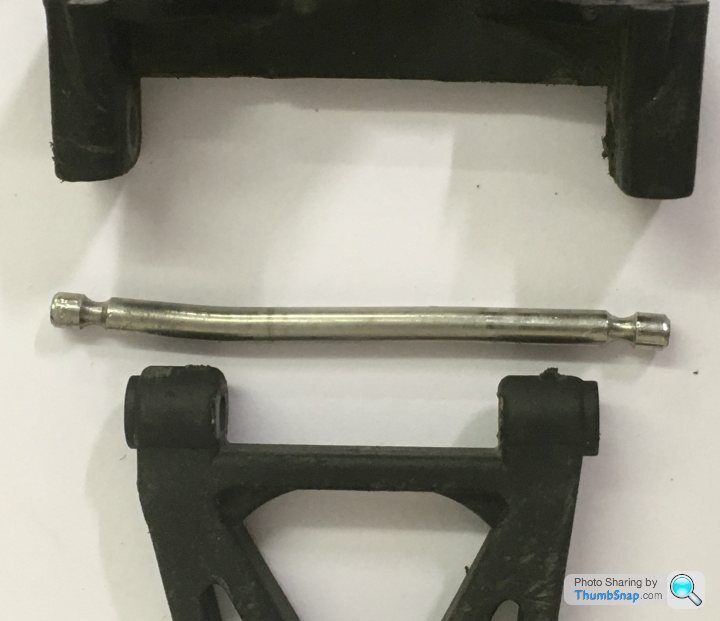
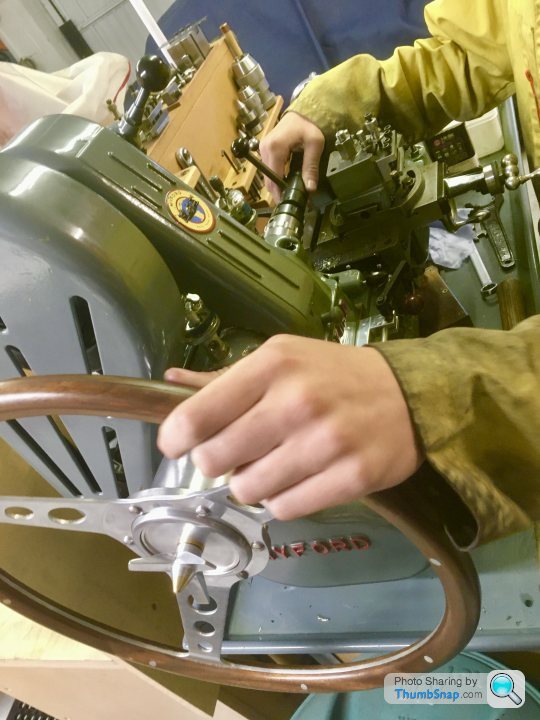
Anyway, had a couple of spare hours today, so we made the replacement track rods to replace the missing one.
Cut the 4mm rod to approximate length:

Bit of turning:
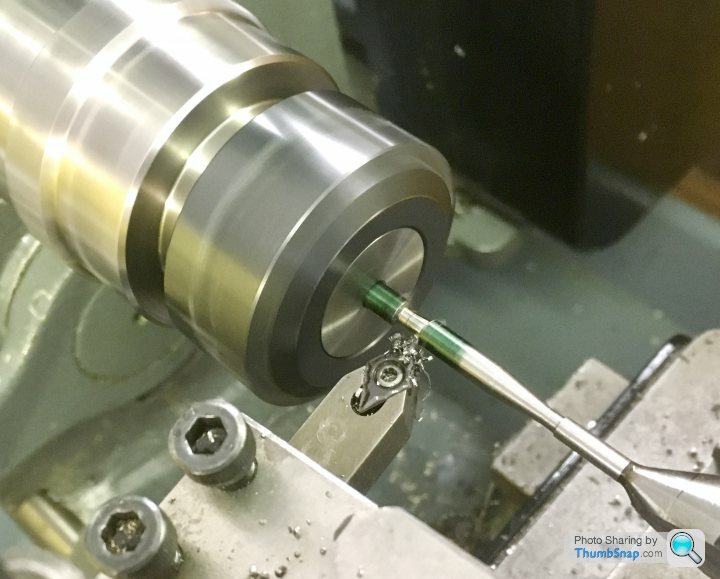
Bit of trigonometry, lots of figuring out, some trial, some error…

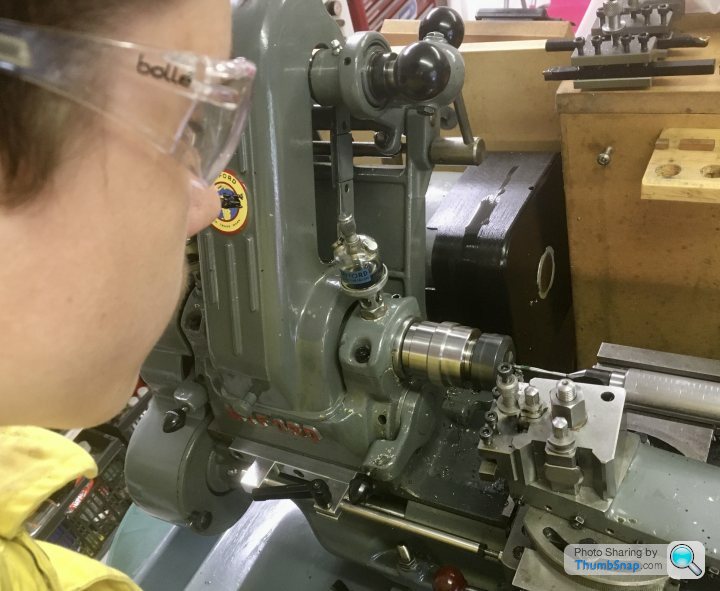

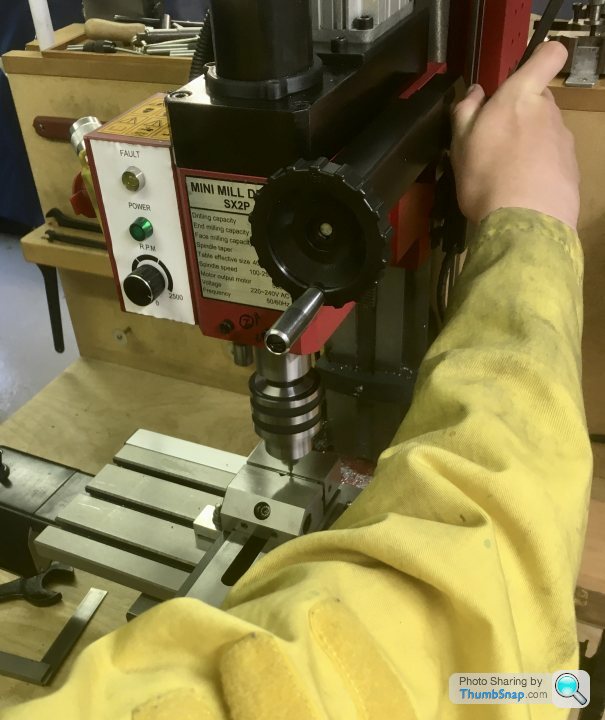
Some threading - a left-had tap from EBay, that’s a first for both of us…

Then drilling the through hole:
And finally put a ring to mark the left hand thread. After all that, and a final polish…success:
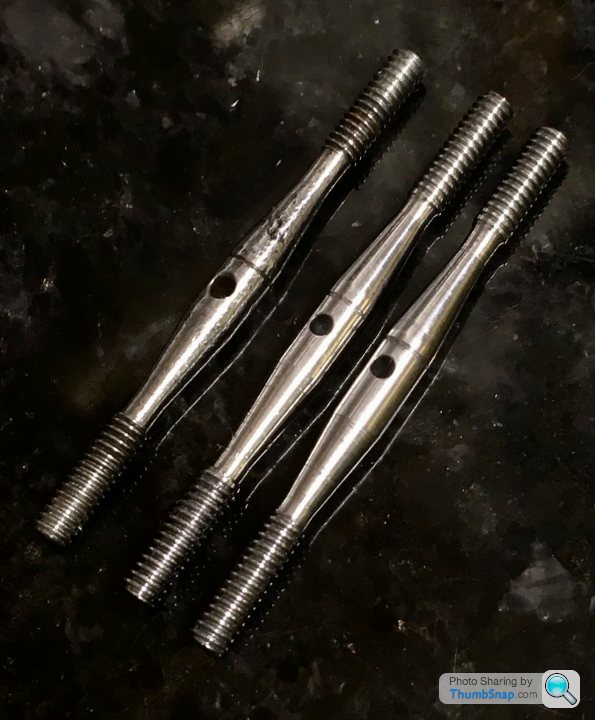
Almost identical to the original, would be far easier to buy one for a few quid, but we learned a lot and spent some garage time together.

Gassing Station | Scale Models | Top of Page | What's New | My Stuff