Latest Project: Matchbox 1/32 Bf-109E-3
Discussion


Here's my next model: a 1970's Matchbox 1/32 Messerschmitt 109E-3 (I think it's an E-4, but there you go). Swapped for a duplicate of my Spitfire stand, so I can't complain! It'll look great next to the Spitfire.
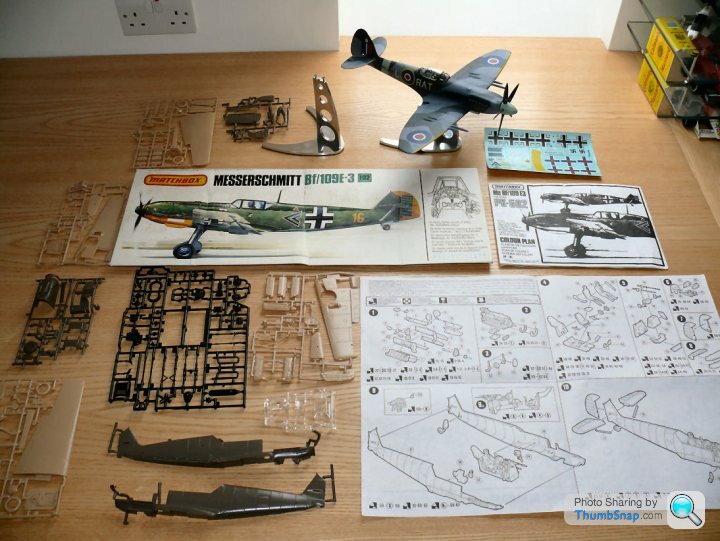
It's a great kit, even by todays standards - I've always rated Matchbox stuff quite highly considering the prices. Since this is a straight build as opposed to rebuild, I'm going to detail the engine bay, and add aftermarket (or even self-made) metal turned guns. Canopy will be closed, so I'll just add belts and an instrument panel, and try my hand at interior painting techniques. I'm looking at aftermarket decals, and a challenging airbrushed colour scheme.
Not sure when I'll get to make a start on it, but at least I've already built a stand for this one! I made it a bit taller than for the Spitfire.
Eric Mc said:
Brett Green's book (Osprey) on Modelling the 109E is worth getting hold of.
He might have extracts from it on his Hyperscale site.
As you know, I've already got:He might have extracts from it on his Hyperscale site.
OSPREY - MODELLING MANUAL 017 - MESSERSCHMITT BF 109
...but it concentrates on the G model, and it's not by Brett Green. I'll have another look.
Ginetta G15 Girl said:
dr_gn said:
Here's my next model: a 1970's Matchbox 1/32 Messerschmitt 109E-3 (I think it's an E-4, but there you go).
There was no significant difference between the E3 variant produced from the end of 1938 and the E4 variant produced from May 1940 aside from the fact that the former used the 20mm MGFF cannon in the wings and the latter used the 20mm MGFF-M cannon with improved ammunition.The E-4/N introduced in late 1940 had the improved Daimler-Benz DB601N engine to replace the earlier DB601A.
Ginetta G15 Girl said:
dr_gn said:
...but it concentrates on the G model, and it's not by Brett Green. I'll have another look.
Another option (if you can find it) is:Messerschmitt Bf 109 Versions B - E
Classic Aircraft No.2
Their history and how to model them
By Roy Cross and Gerald Scarborough
in collaboration with Hans J. Ebert
Publisher: Patrick Stephens Limited in association with Airfix Products Limited
First published: October 1972
ISBN: 0 85059 106 6
The book was originally written for modellers of the 1/24 Airfix kit.
perdu said:
I'm going to sit back comfortably here and enjoy this
In general I am a major Matchbox fan too, that looks very nice
bill
Never mind sitting back, it's about time you made a start on something yourself Bill! In general I am a major Matchbox fan too, that looks very nice
bill
Revell have re-released a lot of the Matchbox 1:32 models for peanuts. OK they're not state of the art, but at least for my current skill level, they are more than good enough to practice some detailing on. I'm intending to sand all the raised engine bay wiring off the heads/block, bulkheads etc and replace with lead wire for starters.
I want to get a good representation of braided wiring (ie a colour with a tracer band). I was wondering about using strands of the two colours of wire and twisting them to give a consistent effect. Any other tips?
BTW, I won't be starting it (officially at least) any time soon :-(
Ginetta G15 Girl said:
dr_gn said:
I think the most obvious thing is that the canopy upper edges were radiussed on the E3, and an angled edge on the E4 (like in the kit). so long as it looks good I'm not too bothered, but I'd at least like to use approximately the right markings and camo for the angled canopy variant.
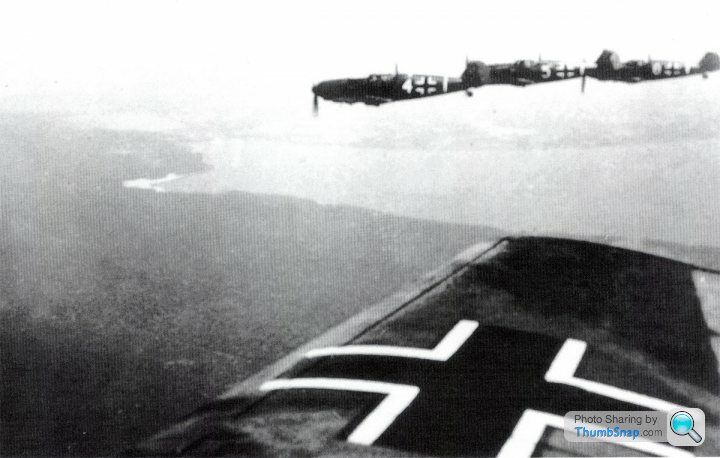
It's true to say that the E-3 entered service with the earlier canopy style of the B, C and D models but any number were retro-fitted by the time of the Battle of Britain.I have photo's of the E-3s of both I/JG2 and II/JG3 showing formations of aircraft with both canopy styles.
Having said that, if you only have the later canopy style in the kit make it up as an E-4 or even scratch up a bomb cradle / drop tank carrier and do it as an E-7
Edited by Ginetta G15 Girl on Saturday 13th February 22:09

Which I think is an E7 tropical version. If the only relevant difference is the supercharger filter and spinner, I'd paint it like this and scratch build the different parts.
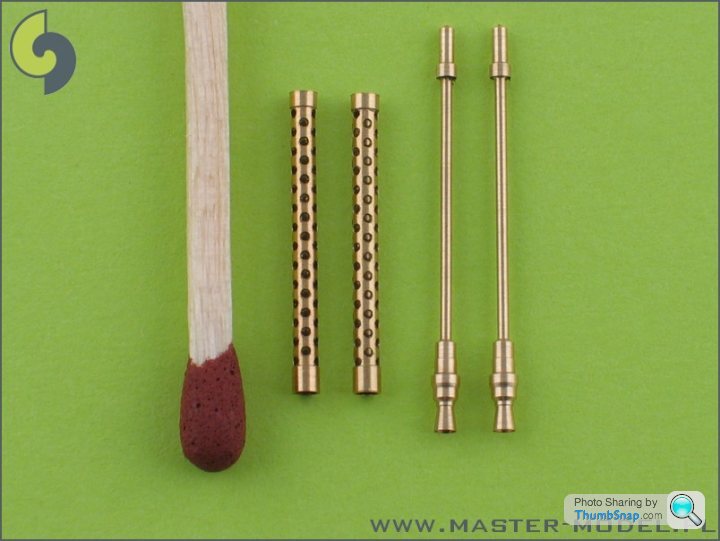
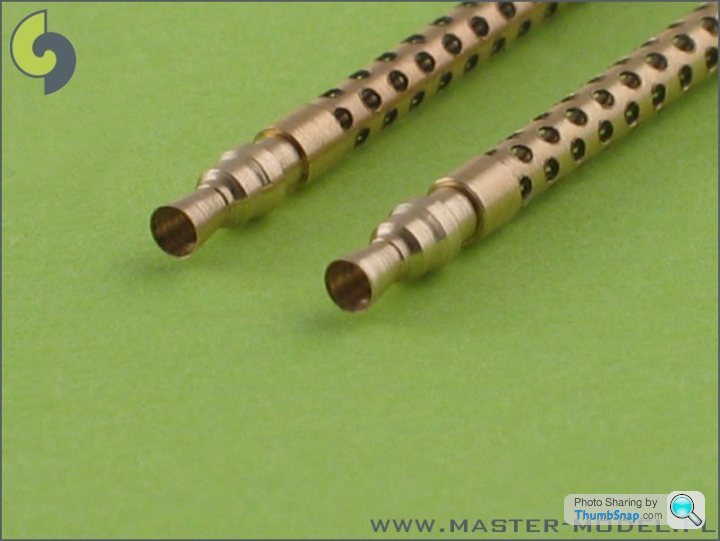
Here are the machined guns (ha ha) I was on about. The original plastic ones are not very good, so it would be rude not to buy some for the sake of £7, especially since they are on full view when the engine covers are off. Can't figure out if it's cheating not to make my own though. Then again...£7 seems very cheap for something that would take me many, many hours to make to a decent standard...
Even if I completely cocked up the rest of the engine bay, it would still look great with those bad boys in there!


Even if I completely cocked up the rest of the engine bay, it would still look great with those bad boys in there!
Ginetta G15 Girl said:
dr_gn said:
Which I think is an E7 tropical version. If the only relevant difference is the supercharger filter and spinner, I'd paint it like this and scratch build the different parts.
Aye that's an E-7 Trop of JG27, probably around mid 1941 in Sicily. I can't tell which Gruppe although it's probably I/JG27 because the other two Gruppen were in the Balkans. By the time the entire Geschwader were in the desert arena together they had re-equipped with the F model.Edited by Ginetta G15 Girl on Saturday 13th February 22:33
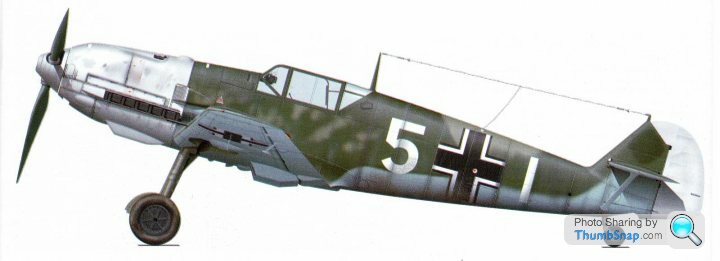
Right, I've changed my mind. I'm going to model this aircraft, since it has a small link to my family:

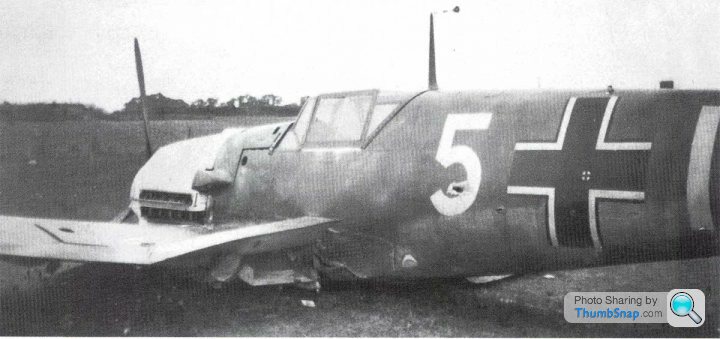
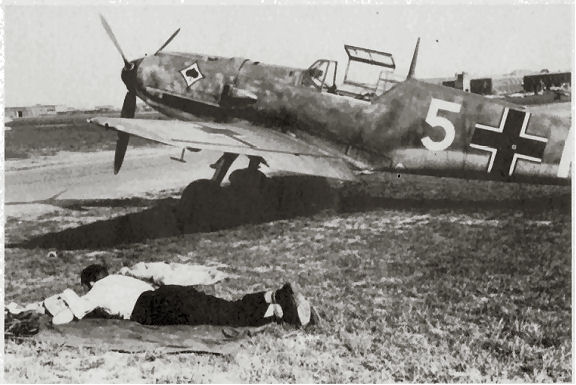
This is Bf 109 E 4 "White 5" of 3rd Gruppe/JG 53 (53rd Fighter wing, possibly based in Guernsey), shot down over Margate, Kent on 6th September 1940. The pilot was Unteroffizier Schulte and the aircraft crash landed near Manston airfield. The swastika has been painted out. That was because the Wing Commander, Hans-Jürgen Erdmann von Cramon-Taubadel married a girl who, in Goering's opinion, was not suitable (Jewish). He therefore ordered the unit to remove their "Ace of Spades" mascot from the cowlings of their Messerschmitts and paint a red band around the noses of their aircraft as a mark of shame. When Cramon-Taubadel was replaced, the “Ace of Spades” mascot was reinstated, but, in response to this, the unit overpainted the swastikas of their aircraft in protest.
The photo is taken in Barker's Pool, Sheffield. It was displayed in aid of the Sheffield Newspapers War Fund (some kind of fundraising effort where you could buy a sticker and put it on the aircraft). As a 10 year old boy, my Dad was shown around it. I have found the above little bit of history about this aircraft, but if anyone has any other pictures or info, I'd appreciate it.
Cheers,
Dr_GN
EDIT: You can just about see a wing and the canopy in the background I think.
Edited by dr_gn on Sunday 14th February 13:56
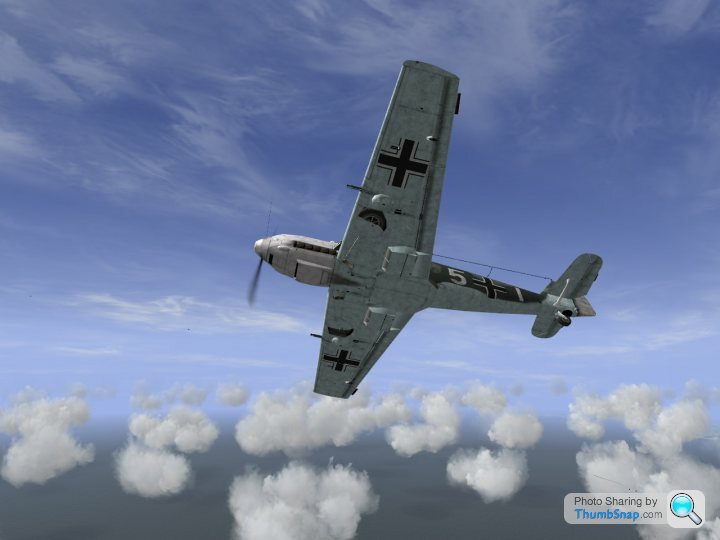
Thaks to a bit of research and (mainly) the good folks on Britmodeller, I've now got all I need to have a good go at it. Unbelievably, there's even a Flight Sim model of that very aircraft:


Eyyyyyyy what a romantic Valentine's day afternoon we're having. Never let it be said I don't know how to show a girl a good time.


Eyyyyyyy what a romantic Valentine's day afternoon we're having. Never let it be said I don't know how to show a girl a good time.
Eric Mc said:
Same here?
I wonder if the unit got into serious trouble with their very obvious snub of the Nazi emblem.
It would have been quite a brave thing to do.
I just asked exactly the same question on Britmodeller. I'd have expected the consequences to be severe. Maybe someone misinterpreted the reason for obscuring the swastika?I wonder if the unit got into serious trouble with their very obvious snub of the Nazi emblem.
It would have been quite a brave thing to do.
GJB said:
Built literally 100's of plastic kits in my early teens. Vast majority were WW2 military aircraft and lots of Luftwaffe because I liked the unusual and sometimes menacing camouflage schemes. I'm now in my mid 50's and started thinking about having another crack at these but obviously now have the funds to do a better job.
Great to see threads like this that provide inspiration and great reading matter. Like the larger scale models and would probably start with 1:32 or 1:48 scale and try to stick with one scale for consistency amongst the collection. If I went for a collection made up of WW2 Luftwaffe aircraft which scale has the greatest range of these aircraft and are there any particular manufacturers you'd recommend?
Only slightly off topic.
By the way those machine guns for £7.00 look amazing. Didn't even know such `add-ons` even existed.
1/32 is a bit big for me too - the requirement for detailing is a bit much for my time/skill, but, it was free so I can't complain. Great to see threads like this that provide inspiration and great reading matter. Like the larger scale models and would probably start with 1:32 or 1:48 scale and try to stick with one scale for consistency amongst the collection. If I went for a collection made up of WW2 Luftwaffe aircraft which scale has the greatest range of these aircraft and are there any particular manufacturers you'd recommend?
Only slightly off topic.
By the way those machine guns for £7.00 look amazing. Didn't even know such `add-ons` even existed.
I'm ordering a couple of Eduard Detail kits (really for the Hasegawa Bf109, but I'll adapt them). If you like the guns, how about these belts for only $10 :

With the detail kits and those belts, the cockpit will look great even it I mess the painting up.
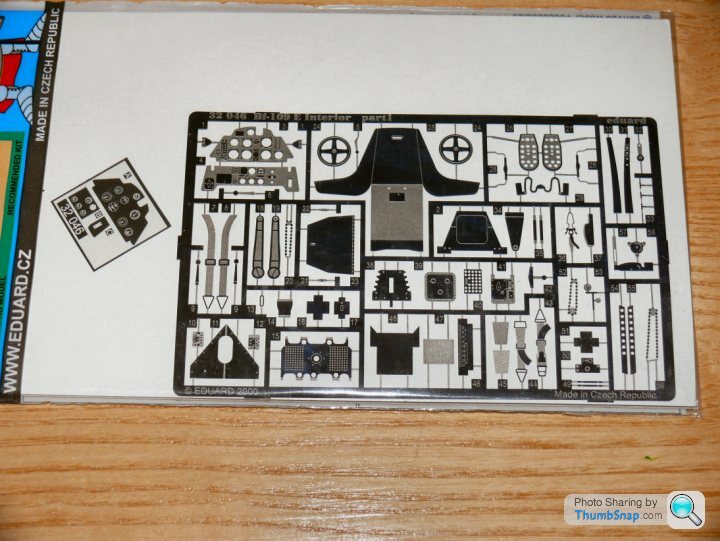
Some of my detail kits arrived at the weekend:
Eduard Cockpit set for Hasegawa models (I'll adapt it to fit)
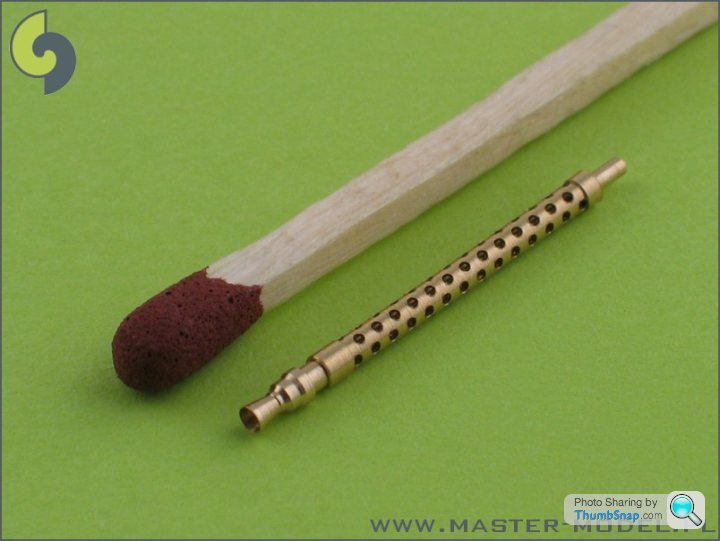
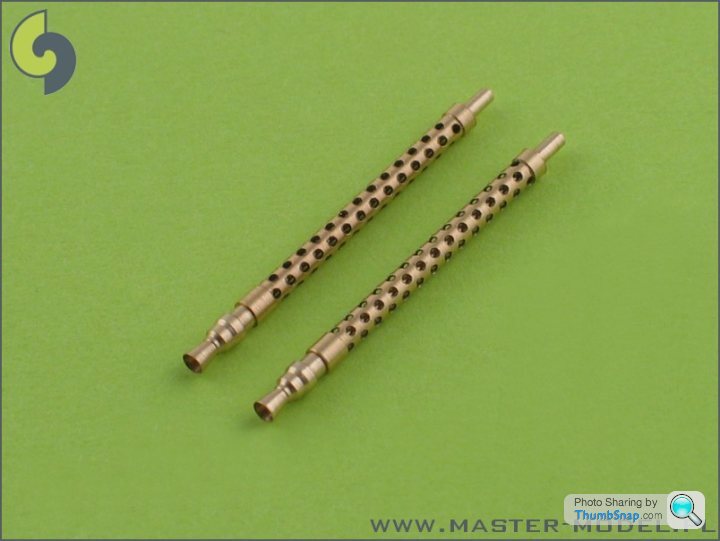
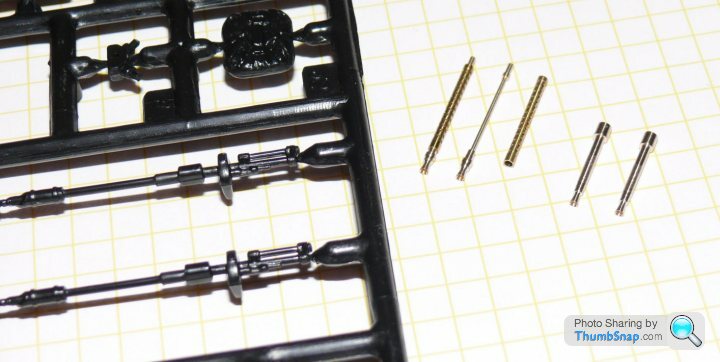
Master Model MG-17 and MG-FF brass turned/drilled guns. These things are works of art. The longer barrels with the cooling jackets fit above the engine, the two stubs fit in the wings. Each background square is 5mmx5mm:
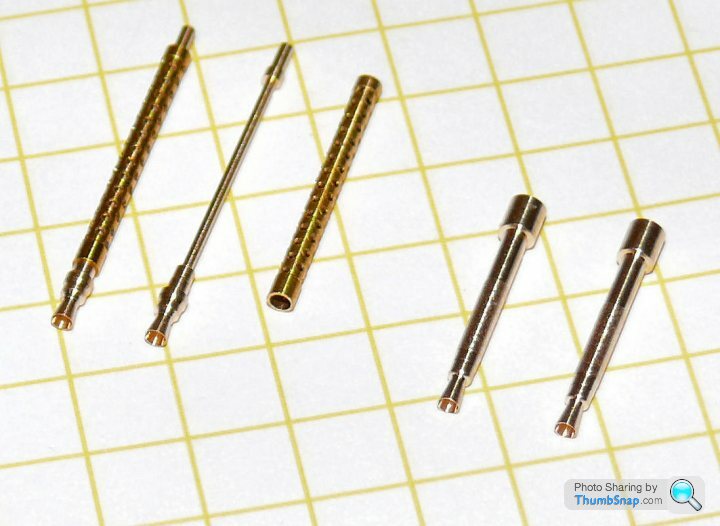
There is no comparison with the clunky originals, although I'll have to either make or adapt the existing breeches to suit the new brass items:
Still waiting for the external details etch kit, harness and possibly a canopy. I'll also get some lead wire and replace all the moulded in wiring and pipework with individual pieces.
Eduard Cockpit set for Hasegawa models (I'll adapt it to fit)

Master Model MG-17 and MG-FF brass turned/drilled guns. These things are works of art. The longer barrels with the cooling jackets fit above the engine, the two stubs fit in the wings. Each background square is 5mmx5mm:

There is no comparison with the clunky originals, although I'll have to either make or adapt the existing breeches to suit the new brass items:

Still waiting for the external details etch kit, harness and possibly a canopy. I'll also get some lead wire and replace all the moulded in wiring and pipework with individual pieces.


72twink said:
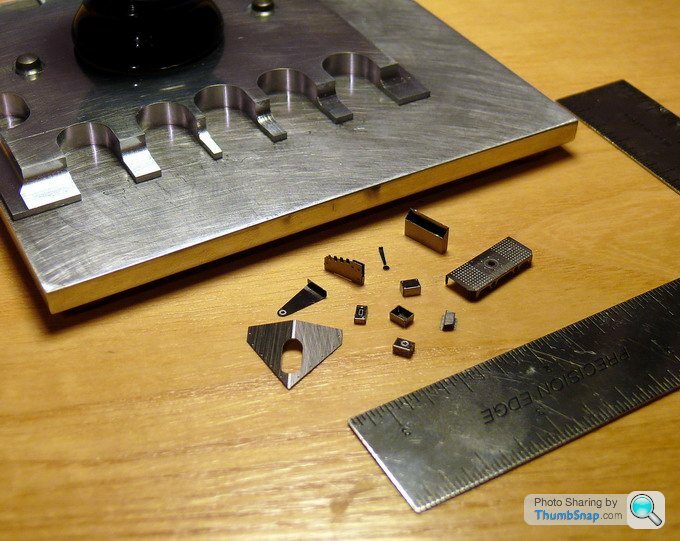
Nice etch folding tool Dr-Gn, as I haven't got a mill I bought one, and as a user can I make a sugesstion, often to get a 90 degree fold you need to go fractionally beyond 90 degs to allow for the "spring" of the etch, your "claws" have quite a square thick edge and that might hinder the over bending. If you've got any more scrap maybe a second go with thinner claws might be worth a try - I'm guessing the bites out of the edge were done after the bevelling so you can't go back and just add more bevel.
Thanks for the comments. It was just a bit of a milling experiment really, I just made the fingers random widths and lengths to see which ones got used the most. You're right though, they do indeed have a bit of thickness to them (1mm to be precise). I didn't want to go much thinner, because the smaller finger widths would probably then be too weak. I'm using it for the first bit of photo-etch I've ever seriously done, a couple of Eduard frets for the '109. It is very thin stuff, and bends to 90 dergrees without springing back. If it was much thicker, the tool might not work.I could always remove some material from the entire footprint by sanding on a bed plate, or just chamfer the top edges with a file. Once I find out which bits I use the most, on the next version I might just taper the fingers of one side down to a couple of hundred microns (ie no horizontal 'land'), and/or make it out of tool steel. That way it will never bend, but will be much harder to mill.
One things for sure - judging by the interest from Britmodeller members, there is defiitely a market for a cheap but functional tool of this type. If only I had that CNC mill...
72twink said:
I've just had a measure of my Etch-Mate, the fingers are concave radiused to a .5mm tip thickness, maybe as you say a swipe of a file on the tips to thin them should you run into difficulties with thicker etch.
That's interesting info - thanks a lot. I've been figuring out how to make them quicker in the lathe this morning, so on the next one I might try to shallow taper to 0.5mm, then concave radius back to the full thickness. I'll prove it in Al, then might do a 'final' one in tool steel.Do you clamp the etch by tightening the knob, or just press it with finger pressure?
Cheers,
So far so good with the new bending tool. These are some cockpit parts:
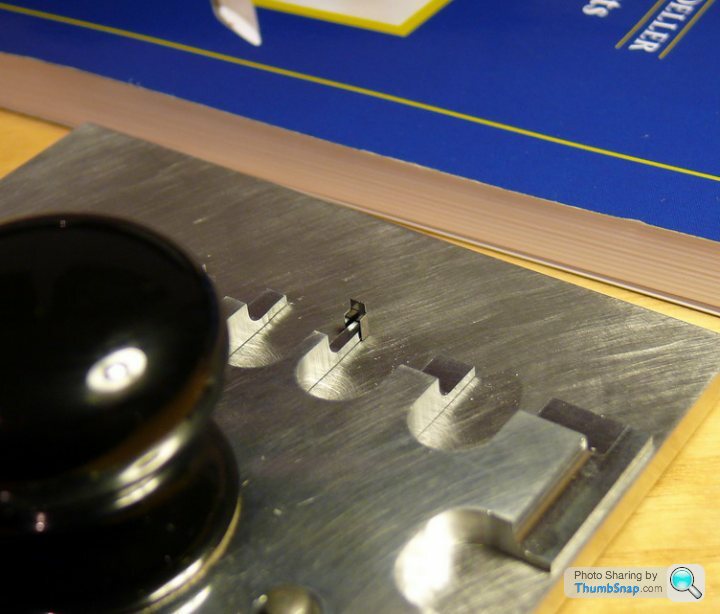
One hundred percent sucess rate up to now, although I suspect this is more due to the quality of Mr. Eduard's etchings than my bending tool! Whatever, it's certainly done a good job considering this is my first attempt at photo-etch.


One hundred percent sucess rate up to now, although I suspect this is more due to the quality of Mr. Eduard's etchings than my bending tool! Whatever, it's certainly done a good job considering this is my first attempt at photo-etch.
Edited by dr_gn on Sunday 21st March 22:25
Thanks, If anyone really wants one I could make some simple lathe tooling (to make the milling process quicker) and make a batch, wouldn't cost too much, but then again there would be no guarantees!
If there are any specific finger widths people use a lot, just let me know and I could incorporate them into the design.
If there are any specific finger widths people use a lot, just let me know and I could incorporate them into the design.
72twink said:
I've always used the knob to tighten down the clamp, mine is the small 4 or 4.5 inch version and I've found that with the plate turned round to do long single items that even on this short version the single clamp isn't enough and items have moved - the problem is of course fitting more clamps and still having guide pin space!
Is the knob too far away from the edge, or is the problem more at the corners? I could put another series of holes next to the continuous edge, and have a long steel strip under the knob to spread the pressure more evenly.72twink said:
I think it could be a combination of factors, the thumb screw is set well back to allow etch items to fit under the top plate, the top plate being ally can flex a tiny amount and the base is anodised so not as grippy as bare ally may have been. All these factors said I've usually been able to work round any issues.
I must admit I have virtually zero experience of photo-etch, but are you saying you put the larger portion of the bend under the main plate, leaving the small bit to be bent? Of course, the further the photo-etch is pushed towards the clamp point, the greater the 'fingers' will be lifted away from the edge (unless you put a corresponding thickness of material under the opposite side). And at the opposide side, the fingers will tend to be bent upwards against the base plate (depending upon the specific design of tool). Factor in the low stiffness of aluminium and I can see you'd have a potential problem.I mentioned a steel spreader plate: how about a /---^---\ shaped top clamp (the ^ represents the central clamping knob) which would act directly on the ends of the fingers, thereby eliminating much of the lifting problem? It could even be an extra part that could be used as and when necessary.
BTW, the maximum profile I can mill in my lathe without major hassle is about 80mm x 80mm.
Gassing Station | Scale Models | Top of Page | What's New | My Stuff