Discussion


Has anyone else done a bit of home curing recently?
I tend to do a batch of bacon around this time every year, which lasts me until the autumn. I’m no expert, but the results are improving every time.
I’d be happy to share the process as I go along this time, if anyone’s interested? Post and let me know, otherwise I’ll probably be lazy and not bother taking any photos along the way.
I picked up a side of pig from my favourite butcher at the weekend and plan to get it started tomorrow night.
Looking at doing some pork scratchings from the skin as well …
This’ll be my first attempt at the pork scratchings. Undecided yet whether to go down the oven route or the deep fry. Might try half a batch each way.
So far all I have done is dry out the skin in my fridge. It’ll have had 48 hours by this evening. Getting the skin as dry as possible before cooking is crucial. As far as I’ve learned from reading up in various places, it’s then a case of superheating. The hotter and faster you can cook the skin, the better (whether dry in the oven or wet in the deep fry). There’s a school of thought that multiple deep fries is the ‘proper’ way to go—fry once, dry off and cool, fry again … and the third time (supposedly) is the point where it stops being crackling and becomes a proper pork scratching.
So far all I have done is dry out the skin in my fridge. It’ll have had 48 hours by this evening. Getting the skin as dry as possible before cooking is crucial. As far as I’ve learned from reading up in various places, it’s then a case of superheating. The hotter and faster you can cook the skin, the better (whether dry in the oven or wet in the deep fry). There’s a school of thought that multiple deep fries is the ‘proper’ way to go—fry once, dry off and cool, fry again … and the third time (supposedly) is the point where it stops being crackling and becomes a proper pork scratching.
Tanguero said:
ETA: at the risk of hijacking the OPs thread I have a spreadsheet that calculates the bacon cure from weight that I can distribute if you are interested.
Hijacking is welcome. I started the thread to see who else was up for this sort of thing and see whether we could share methods for the PH food gang.I’ve got my dinner on the go just now, but will be getting started on my bacon (and maybe scratchings) later on.
BTW, I’ve never used Prague powder in my dry cures. I do use saltpetre.
I got distracted last night and didn’t make a start on the bacon yet. I did make pork scratchings though—and for a first attempt they were pretty successful!

I dried the pigskin out in my fridge for a couple of days, then cut it into short, thin strips.
I rubbed Maldon salt into the fatty side, then brushed it over with cider vinegar and left that to stand for a while.
Then it went in the oven at around 230º for 15 minutes (over a water bath to minimise smokiness in the kitchen). It came out like this:

Definitely progress!
Then I transferred it all into a deep fat fryer on maximum heat (which was outside on the balcony, again to avoid stinking up my flat) for about five or six minutes.
I dried the scratchings off on some kitchen roll, then shook them in a ground up mix of Maldon salt, cooking salt, paprika and Chinese five spice. They were bloody fantastic with a decent beer, and especially nice when still slightly warm.

Dead easy, and fast too. I’ll definitely be making a batch next time I have the guys round for a pint or two.
I dried the pigskin out in my fridge for a couple of days, then cut it into short, thin strips.
I rubbed Maldon salt into the fatty side, then brushed it over with cider vinegar and left that to stand for a while.
Then it went in the oven at around 230º for 15 minutes (over a water bath to minimise smokiness in the kitchen). It came out like this:
Definitely progress!
Then I transferred it all into a deep fat fryer on maximum heat (which was outside on the balcony, again to avoid stinking up my flat) for about five or six minutes.
I dried the scratchings off on some kitchen roll, then shook them in a ground up mix of Maldon salt, cooking salt, paprika and Chinese five spice. They were bloody fantastic with a decent beer, and especially nice when still slightly warm.
Dead easy, and fast too. I’ll definitely be making a batch next time I have the guys round for a pint or two.
Probably time I got around to posting this, eh? My bacon curing isn’t anything fancy, so hopefully demonstrates that it’s dead easy for anyone to have a go at.
To make back bacon you need to ask your butcher for a pork loin. I get a whole one (one side of the pig’s ‘back’) and have it split into the meat for baconing, the pork loin ‘steak’ (which is a huge amount of top-notch pork for cooking with), the skin (for the pork crackling you saw earlier in the thread) and the ribs, which I keep for soup making and for baking up as barbecue ribs.
Here’s one of the two pieces I end up with for bacon making.

I use a big airtight plastic box for dry-curing, and I start by mixing up my cure in the bottom of it. The basics are lots of table salt (there are plenty of guides and calculators online if you want to be precise with the amount, but I tend to go by eye) and a little bit of saltpetre. Saltpetre used to be difficult to buy, but you can easily get some via eBay nowadays, or ask your local butcher.
So: Lots of table salt, a little saltpetre, and a handful of dark brown sugar. Then you can also add other herbs/spices if you wish to play with the flavour. I added thyme, black pepper, coriander seeds and dried juniper berries. All crushed with a pestle and mortar.
Mix that lot up in the bottom of your big box. Mine looked like this:

Then you rub it all over your bacon-to-be. It’s vitally important that you get it well rubbed in to every nook and cranny of the meat.
Like this:

Then you stack the slabs of meat in your airtight box and put it in the fridge.
Go back to look at it the next morning and a LOT of liquid will have leached out of the meat. Like this:

Put the meat to one side and pour away the liquid. Then turn the meat slabs over and put them back in the box.
Every morning, you do the same. Pour away the liquid and rotate the meat (bottom slab on to the top each time). You’ll notice less and less liquid each day. You do this for about a week … you’ll notice when it starts to look like bacon instead of pork. There’s no hard and fast rule for when it’s ready—the longer you cure for the saltier your bacon will be.
This is where I’m at right now. I reckon I’ll be draining and turning the meat until Sunday/Monday.
The next steps are to wash the meat clean and then wrap in muslin to hang and air dry.
To make back bacon you need to ask your butcher for a pork loin. I get a whole one (one side of the pig’s ‘back’) and have it split into the meat for baconing, the pork loin ‘steak’ (which is a huge amount of top-notch pork for cooking with), the skin (for the pork crackling you saw earlier in the thread) and the ribs, which I keep for soup making and for baking up as barbecue ribs.
Here’s one of the two pieces I end up with for bacon making.
I use a big airtight plastic box for dry-curing, and I start by mixing up my cure in the bottom of it. The basics are lots of table salt (there are plenty of guides and calculators online if you want to be precise with the amount, but I tend to go by eye) and a little bit of saltpetre. Saltpetre used to be difficult to buy, but you can easily get some via eBay nowadays, or ask your local butcher.
So: Lots of table salt, a little saltpetre, and a handful of dark brown sugar. Then you can also add other herbs/spices if you wish to play with the flavour. I added thyme, black pepper, coriander seeds and dried juniper berries. All crushed with a pestle and mortar.
Mix that lot up in the bottom of your big box. Mine looked like this:
Then you rub it all over your bacon-to-be. It’s vitally important that you get it well rubbed in to every nook and cranny of the meat.
Like this:
Then you stack the slabs of meat in your airtight box and put it in the fridge.
Go back to look at it the next morning and a LOT of liquid will have leached out of the meat. Like this:
Put the meat to one side and pour away the liquid. Then turn the meat slabs over and put them back in the box.
Every morning, you do the same. Pour away the liquid and rotate the meat (bottom slab on to the top each time). You’ll notice less and less liquid each day. You do this for about a week … you’ll notice when it starts to look like bacon instead of pork. There’s no hard and fast rule for when it’s ready—the longer you cure for the saltier your bacon will be.
This is where I’m at right now. I reckon I’ll be draining and turning the meat until Sunday/Monday.
The next steps are to wash the meat clean and then wrap in muslin to hang and air dry.
Okay, so after about six days in the cure and a good soak (in cold water), then a wipe down and pat dry, it looked like this:

Then I wrapped each slab individually in muslin and instead of hanging I sat it on a drying rack on top of a kitchen cupboard. Turn it over every now and again, unwrap and rewrap from time to time (to help it dry out evenly) and job’s a good ’un.
After another week it looked like this:

A good sign that it’s ready is that what’s called the ‘pellicle’ starts to form. A very light dusting of white mould on the meat’s surface. It’s utterly harmless and you don’t even need to remove it. Think of it like the mould on the outside of a salami or something.
I took the slabs of cured and dried meat over to my friendly butcher, who sliced it for me. I got 150+ rashers of bacon and enough chunks from the ends of each slab to chop up and make a couple of good pasta sauces with (the end bits are saltier, so go well in a sauce).
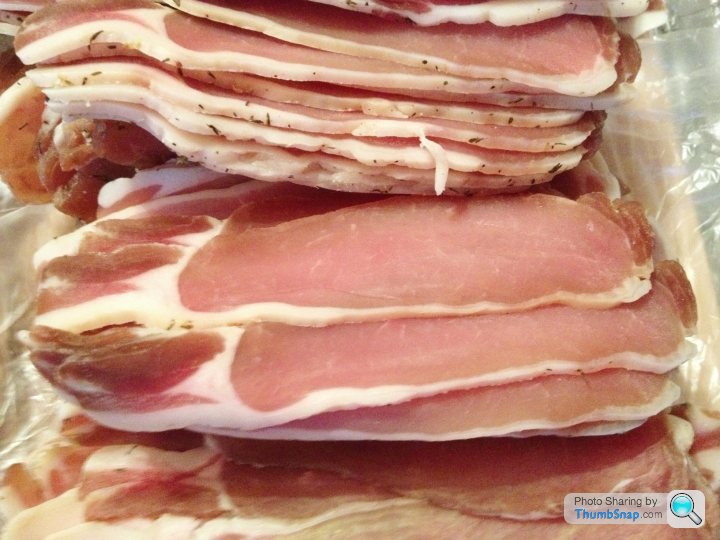
This stuff was definitely a success. Probably the best I’ve made yet. The juniper berry & coriander seed cure is a real winner!

Then I wrapped each slab individually in muslin and instead of hanging I sat it on a drying rack on top of a kitchen cupboard. Turn it over every now and again, unwrap and rewrap from time to time (to help it dry out evenly) and job’s a good ’un.
After another week it looked like this:
A good sign that it’s ready is that what’s called the ‘pellicle’ starts to form. A very light dusting of white mould on the meat’s surface. It’s utterly harmless and you don’t even need to remove it. Think of it like the mould on the outside of a salami or something.
I took the slabs of cured and dried meat over to my friendly butcher, who sliced it for me. I got 150+ rashers of bacon and enough chunks from the ends of each slab to chop up and make a couple of good pasta sauces with (the end bits are saltier, so go well in a sauce).
This stuff was definitely a success. Probably the best I’ve made yet. The juniper berry & coriander seed cure is a real winner!
Bacon’s funny stuff. It looks pretty unappetising through most of the process but we all know what glory awaits at the end.
Cheers for the kind words guys. My point here is to demonstrate that it’s bloody easy to do your own. The hardest part is finding a butcher who’s happy to help out by selling you the right cut and slicing it for you afterwards. You don’t even need a massive plastic box like I use, you can do it in individual zip-lock bags instead.
Cheers for the kind words guys. My point here is to demonstrate that it’s bloody easy to do your own. The hardest part is finding a butcher who’s happy to help out by selling you the right cut and slicing it for you afterwards. You don’t even need a massive plastic box like I use, you can do it in individual zip-lock bags instead.
Gassing Station | Food, Drink & Restaurants | Top of Page | What's New | My Stuff