Toylander build thread!
Discussion


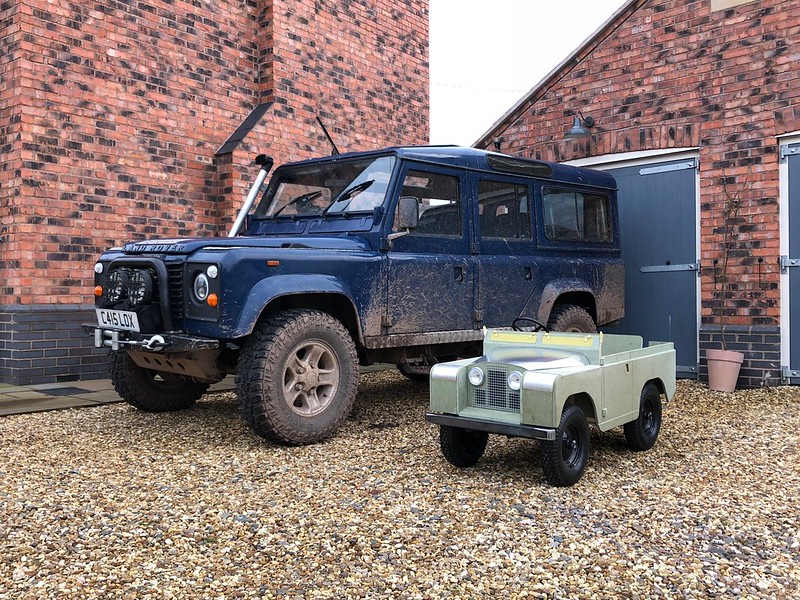
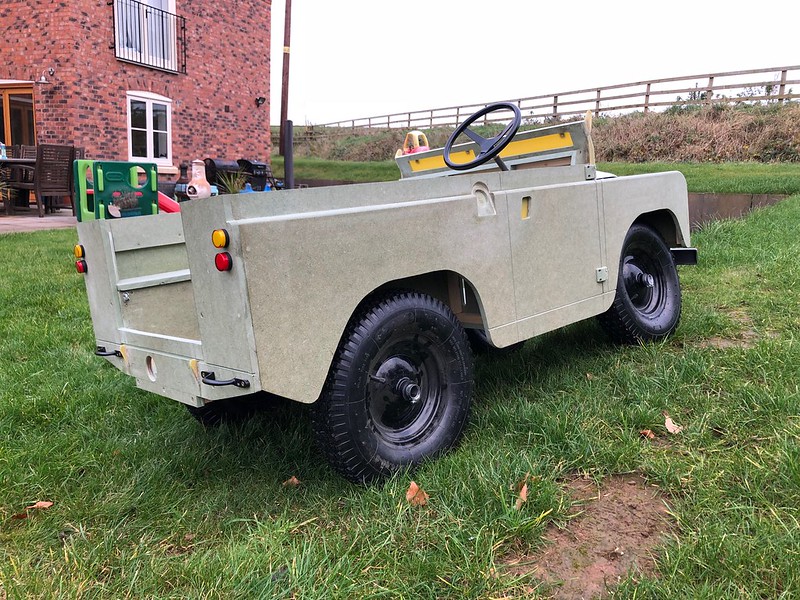
So as I have a passion for Land Rovers, a double garage, and an 18 month old who is obsessed with anything with a steering wheel, clearly it was time to build a Toylander. The only questions were was it to be a Series 1 or a Series 2, and does the PH build thread go in H, G & DIY, Scale Models or Land Rovers?
For those not familiar with these, it's a child's electric powered Land Rover (although Jeeps, tractors etc also available). They ain't cheap...£3950.00 for a factory built one is more than I paid originally for my Defender, and a complete kit is still nearly £1600.00. So I am doing it on the cheap, building as much as possible myself, and using as much mobility scooter running gear as possible, and fabricating/welding all steel parts where I can. I decided on the S2, as it's closer to my Defender, which can be used as a source of measurements etc!
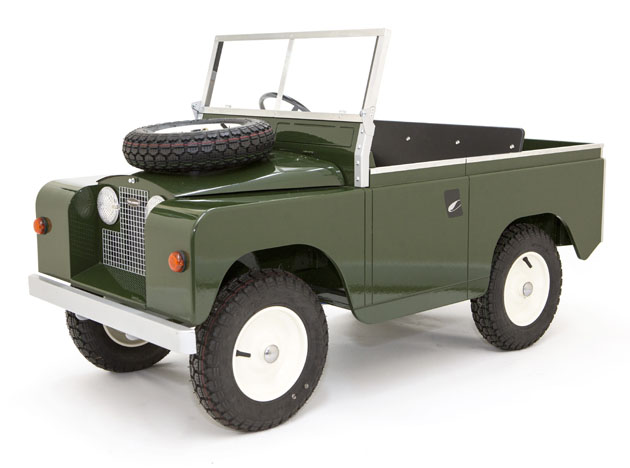
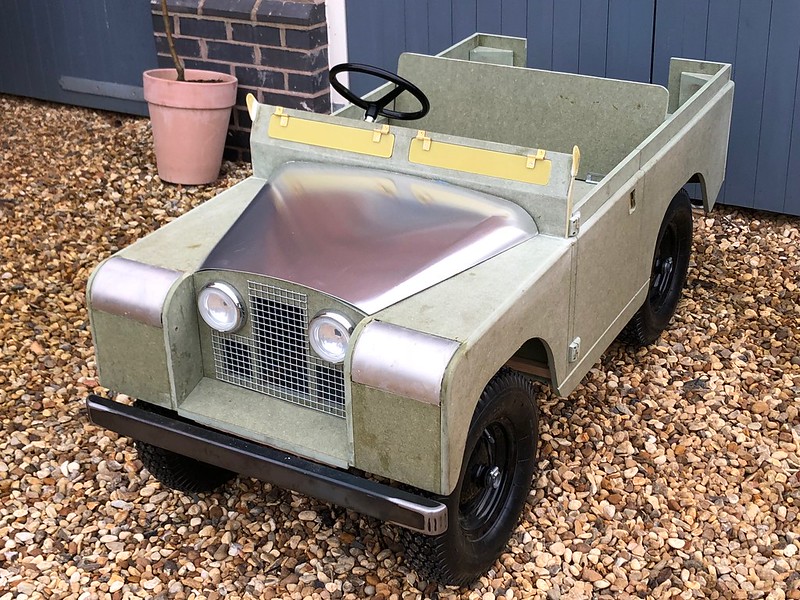
However, eBay and Gumtree are littered with some real abominations...many pretending to be Toylanders where they look more like a plywood armoured scooter, often with terrible proportions, small wheels, and awful finishes. So I really want to do mine, sorry, his...properly, and make some improvements to the basic design along the way. Paint finish, and attention to detail is everything on these...here is a factory car, and it looks nice...
However, I reckon I can do better, with improvements in the following areas:
-Routed panel lines (doors, sills etc)
-Proper routed recesses door handles and "lift up" handles/lock barrel
-Panel gaps in the front wings, the joins between tops/fronts/sides should be obvious
-Double check windscreen and bulkhead height as it looks a bit tall
-Windscreen should taper in at the top, it's not parallel sided on an Series vehicle
-Rout/recess the windscreen hinges into the bulkhead
-Kit indicators are way too big and way too low. And where are the signature Landy sidelights?
-Some rivet detail down the sides would break up the uncharacteristically smooth flanks!
-At the back, I'll route a slot to make the rear panel and rear crossmember look separate. All of the painted trim (galvanised cappings on the real thing) will be made from sheet material "riveted" on. More plates to represent chassis to body mounts.
-Door hinges...the doors don't open, but some later style SIII hinge dummies will be easy to make and break the sides up a bit more.
-Fuel cap, wipers, and some interior detail such as 3 front seats, a biscuit tin heater and the classic red/yellow/black gear knobs
-Bagding-proper LR stuff if possible, perhaps a GB sticker, little period tax disc, and number plates
-And it's got to be a factory colour, mid grey with limestone wheels is my current favourite
Anyway, here's what we have so far...it's early days obviously!
One of these bad boys, a Pride XL8 scooter. Purchased from Gumtree minus a seat and batteries for £48.00. It will donate the motor, transaxle/diff, wiring loom, and some suspension components. Looking at eBay, I reckon I can sell the remaining parts and get my £48.00 back.

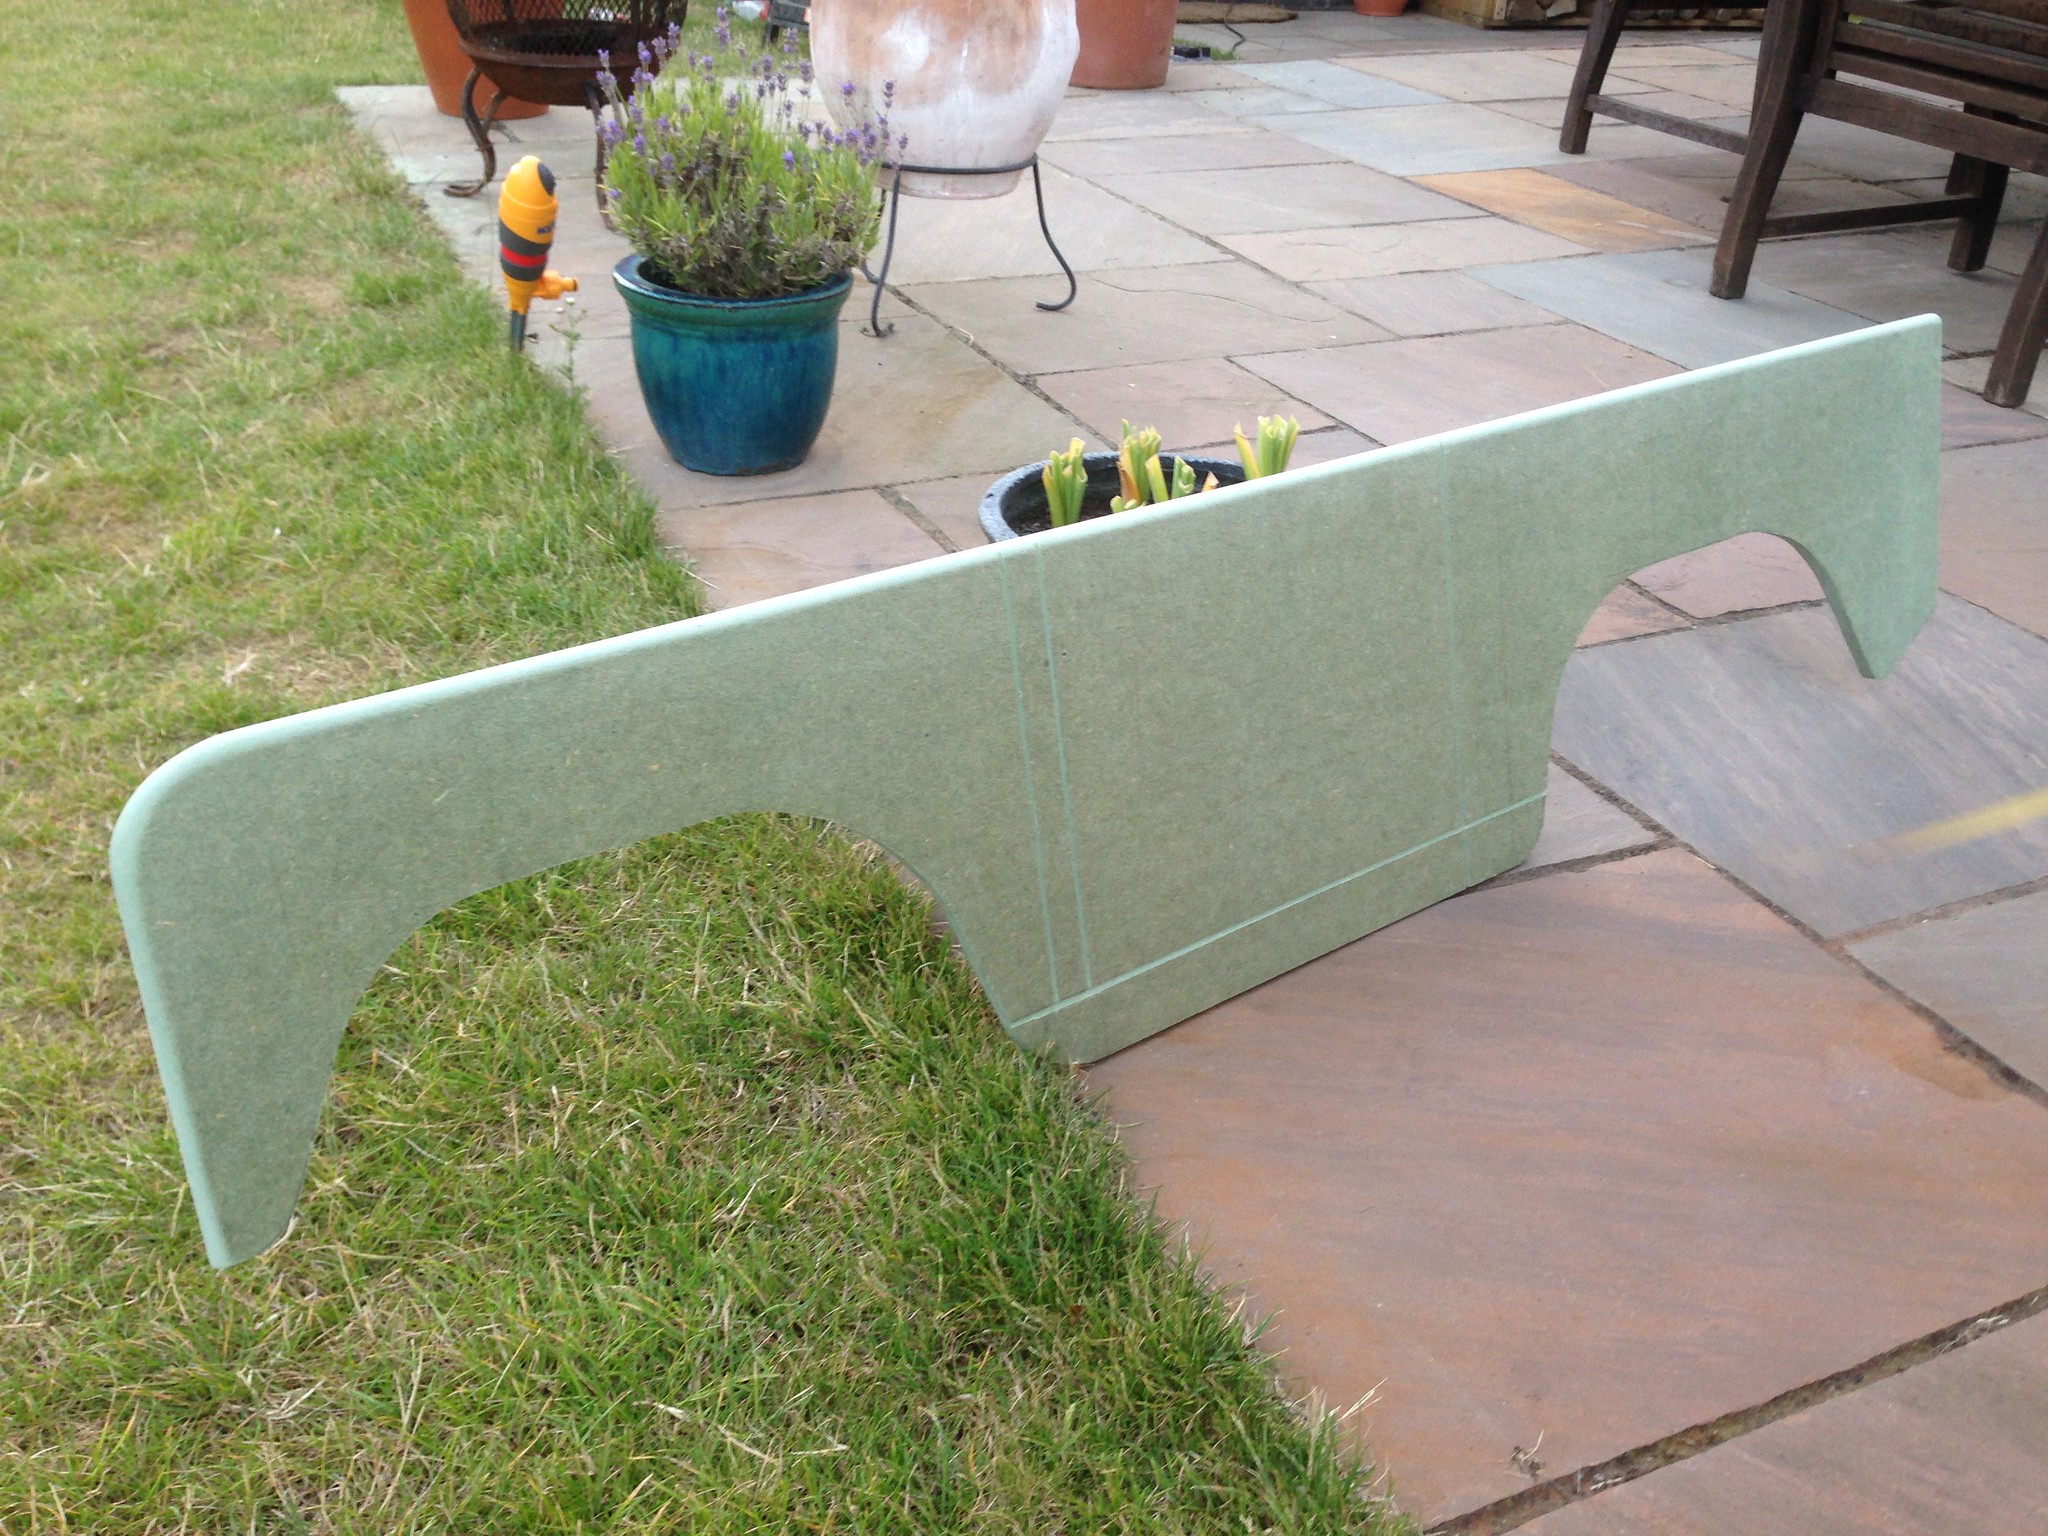
One excited 18m old boy, one 31 year old Defender 110, a local timber yard, 2 sheets of waterproof 12mm MDF (the green stuff) and 19mm square batten...
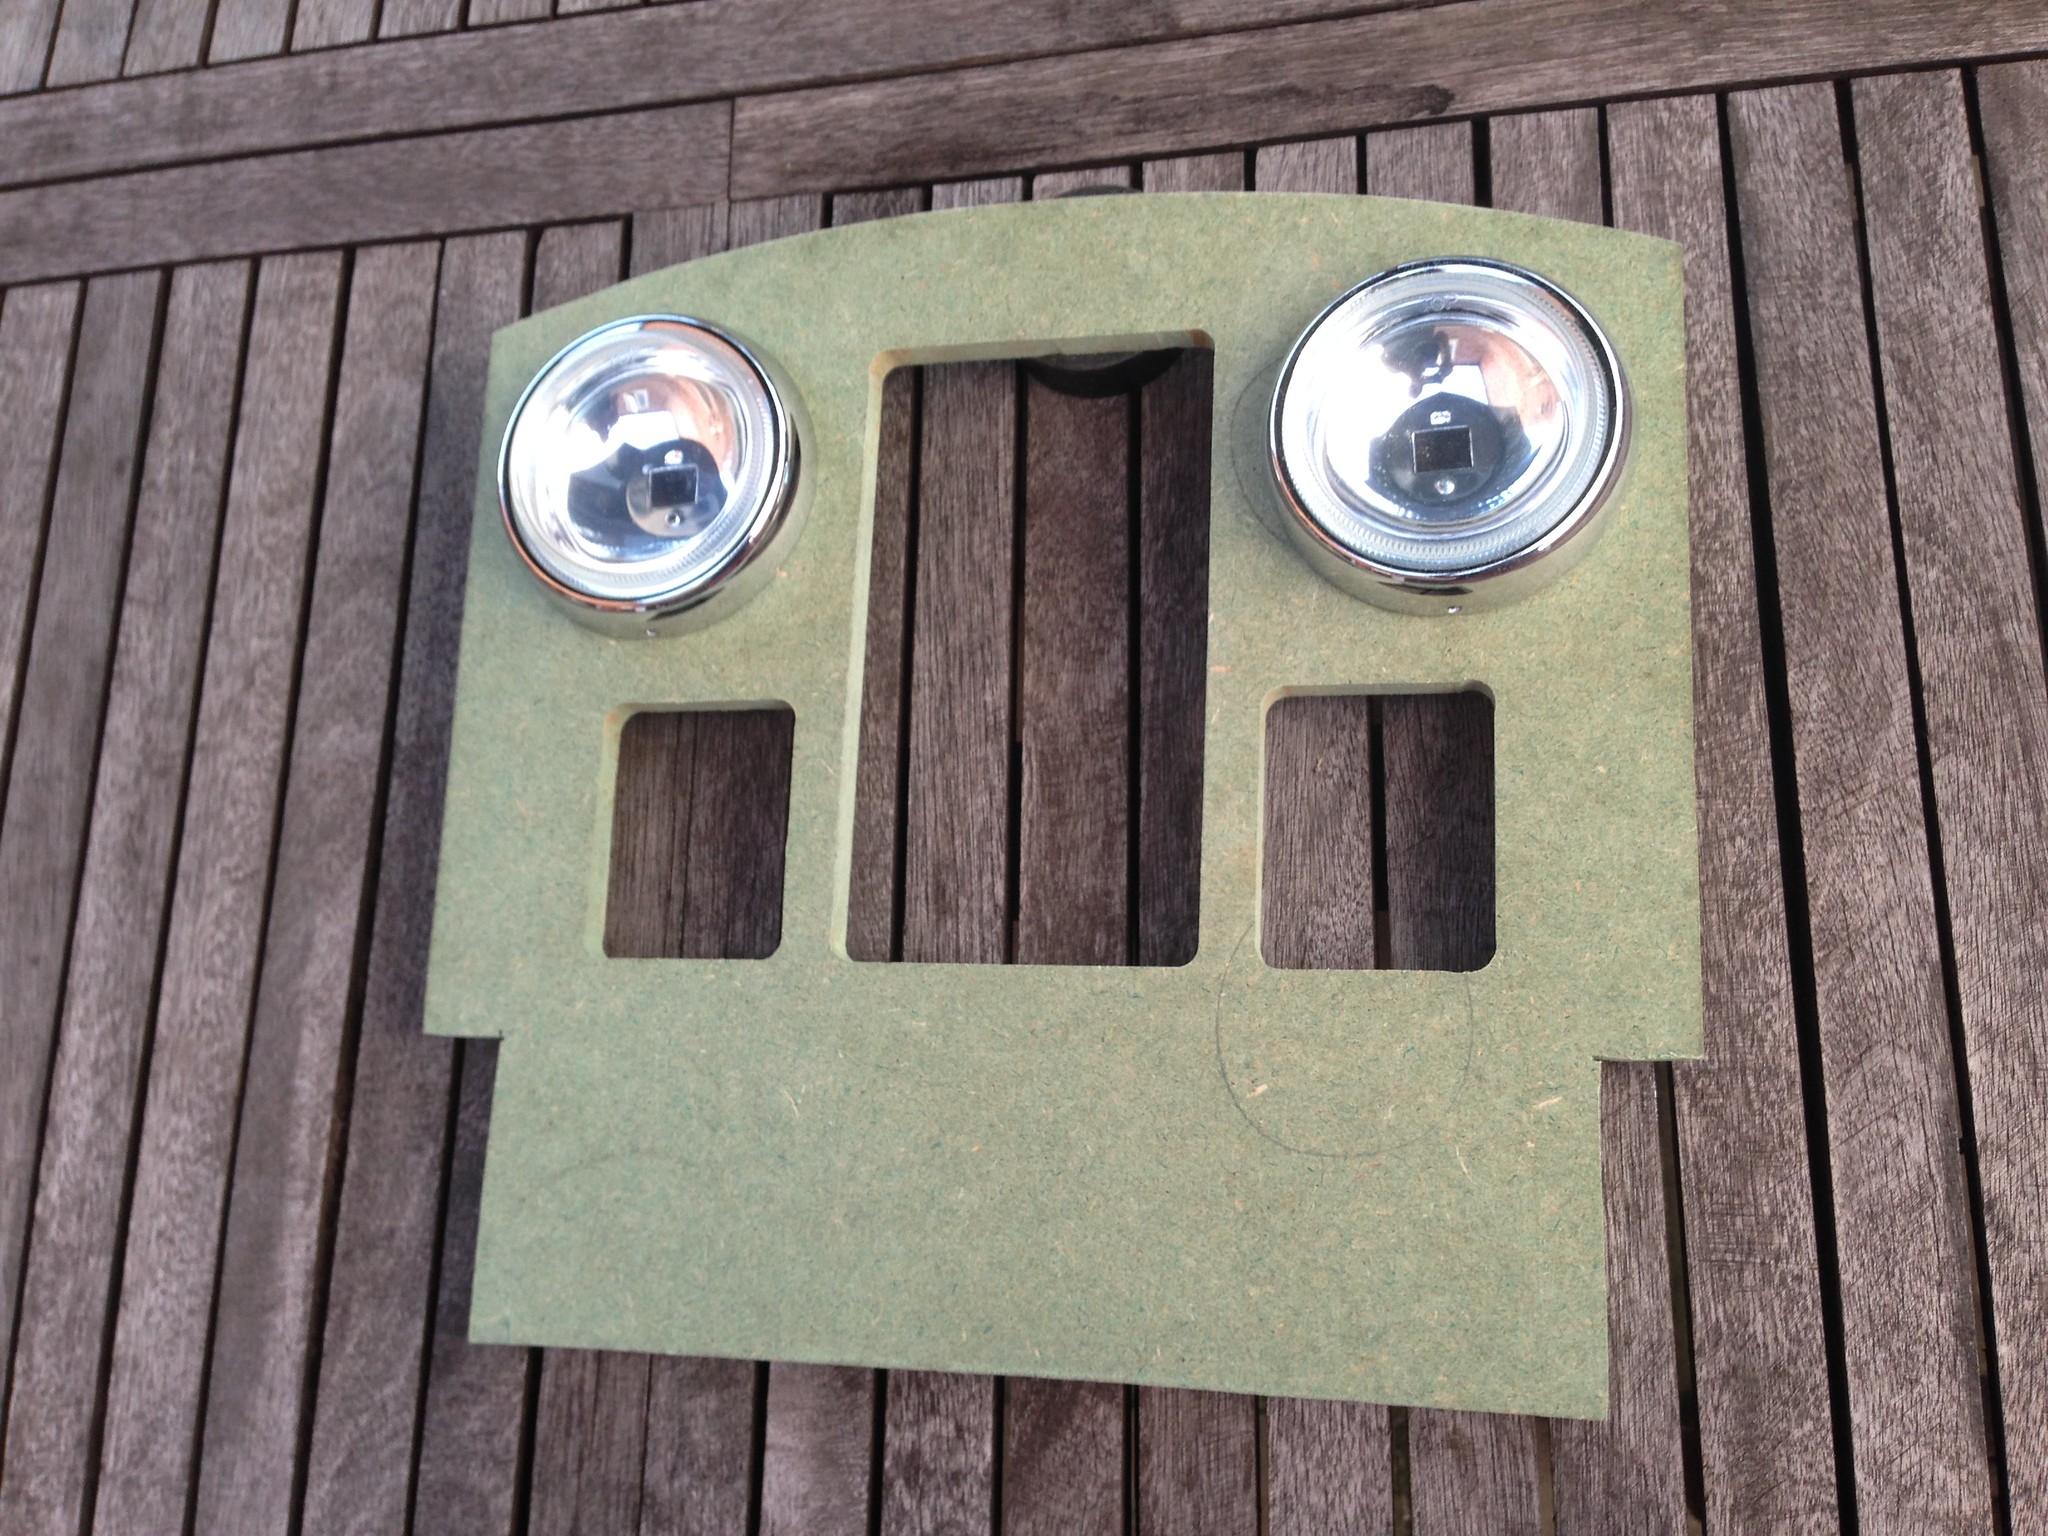
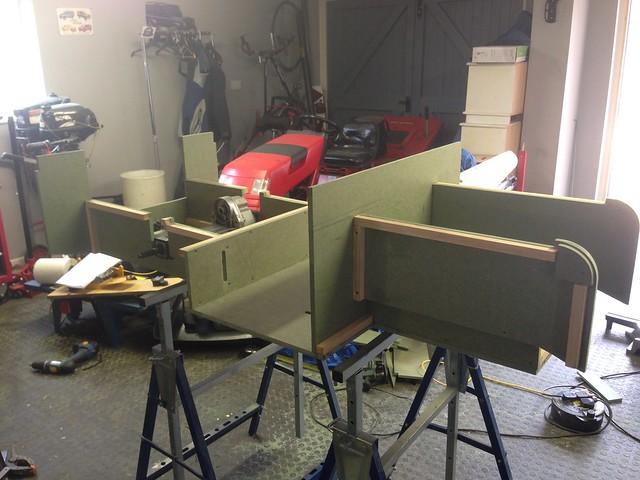
Lots of chopping and I now have this...
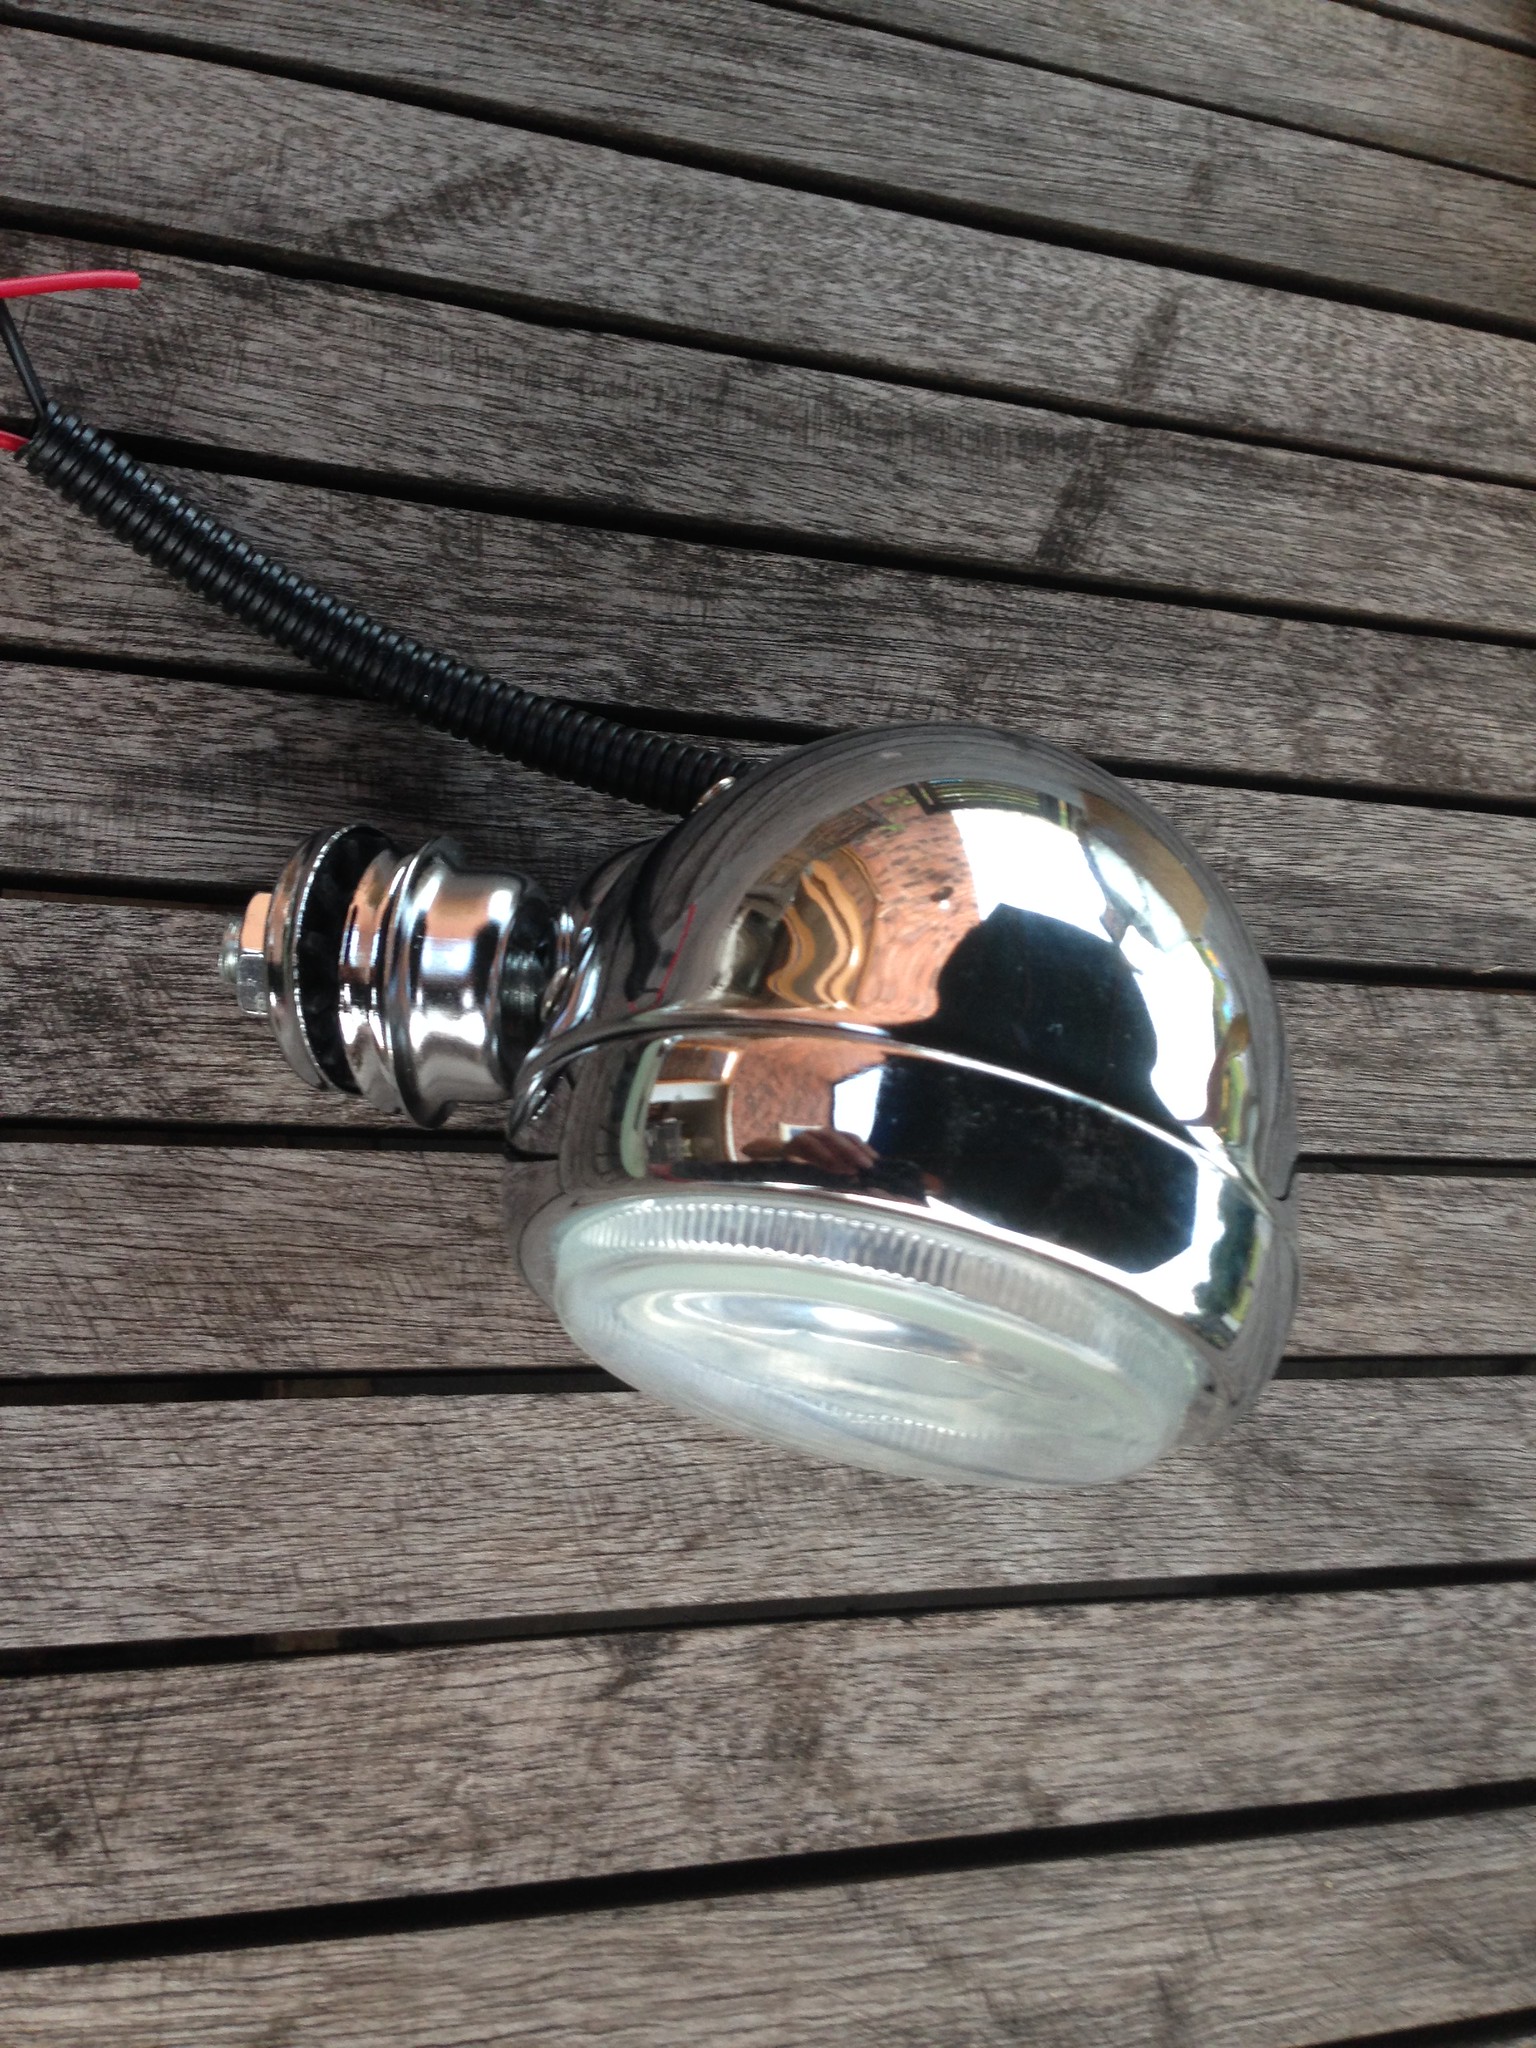
Now Toylander sell all of the parts, however I want to be a bit ingenious and tight where I can be. For example, the proper light kit is about £90, which seems a lot, so I managed to track down motorcycle foglights at £20 a pair, which once stripped down are perfect for the job, especially with some cheap H3 LED bulbs fitted to conserve battery power, and IMHO look better than the kit items. I've also managed to source some small round LED lights in white, red, and amber which will be a much better scale representation of the other lights...and far easier on the wallet at £2 each from eBay!
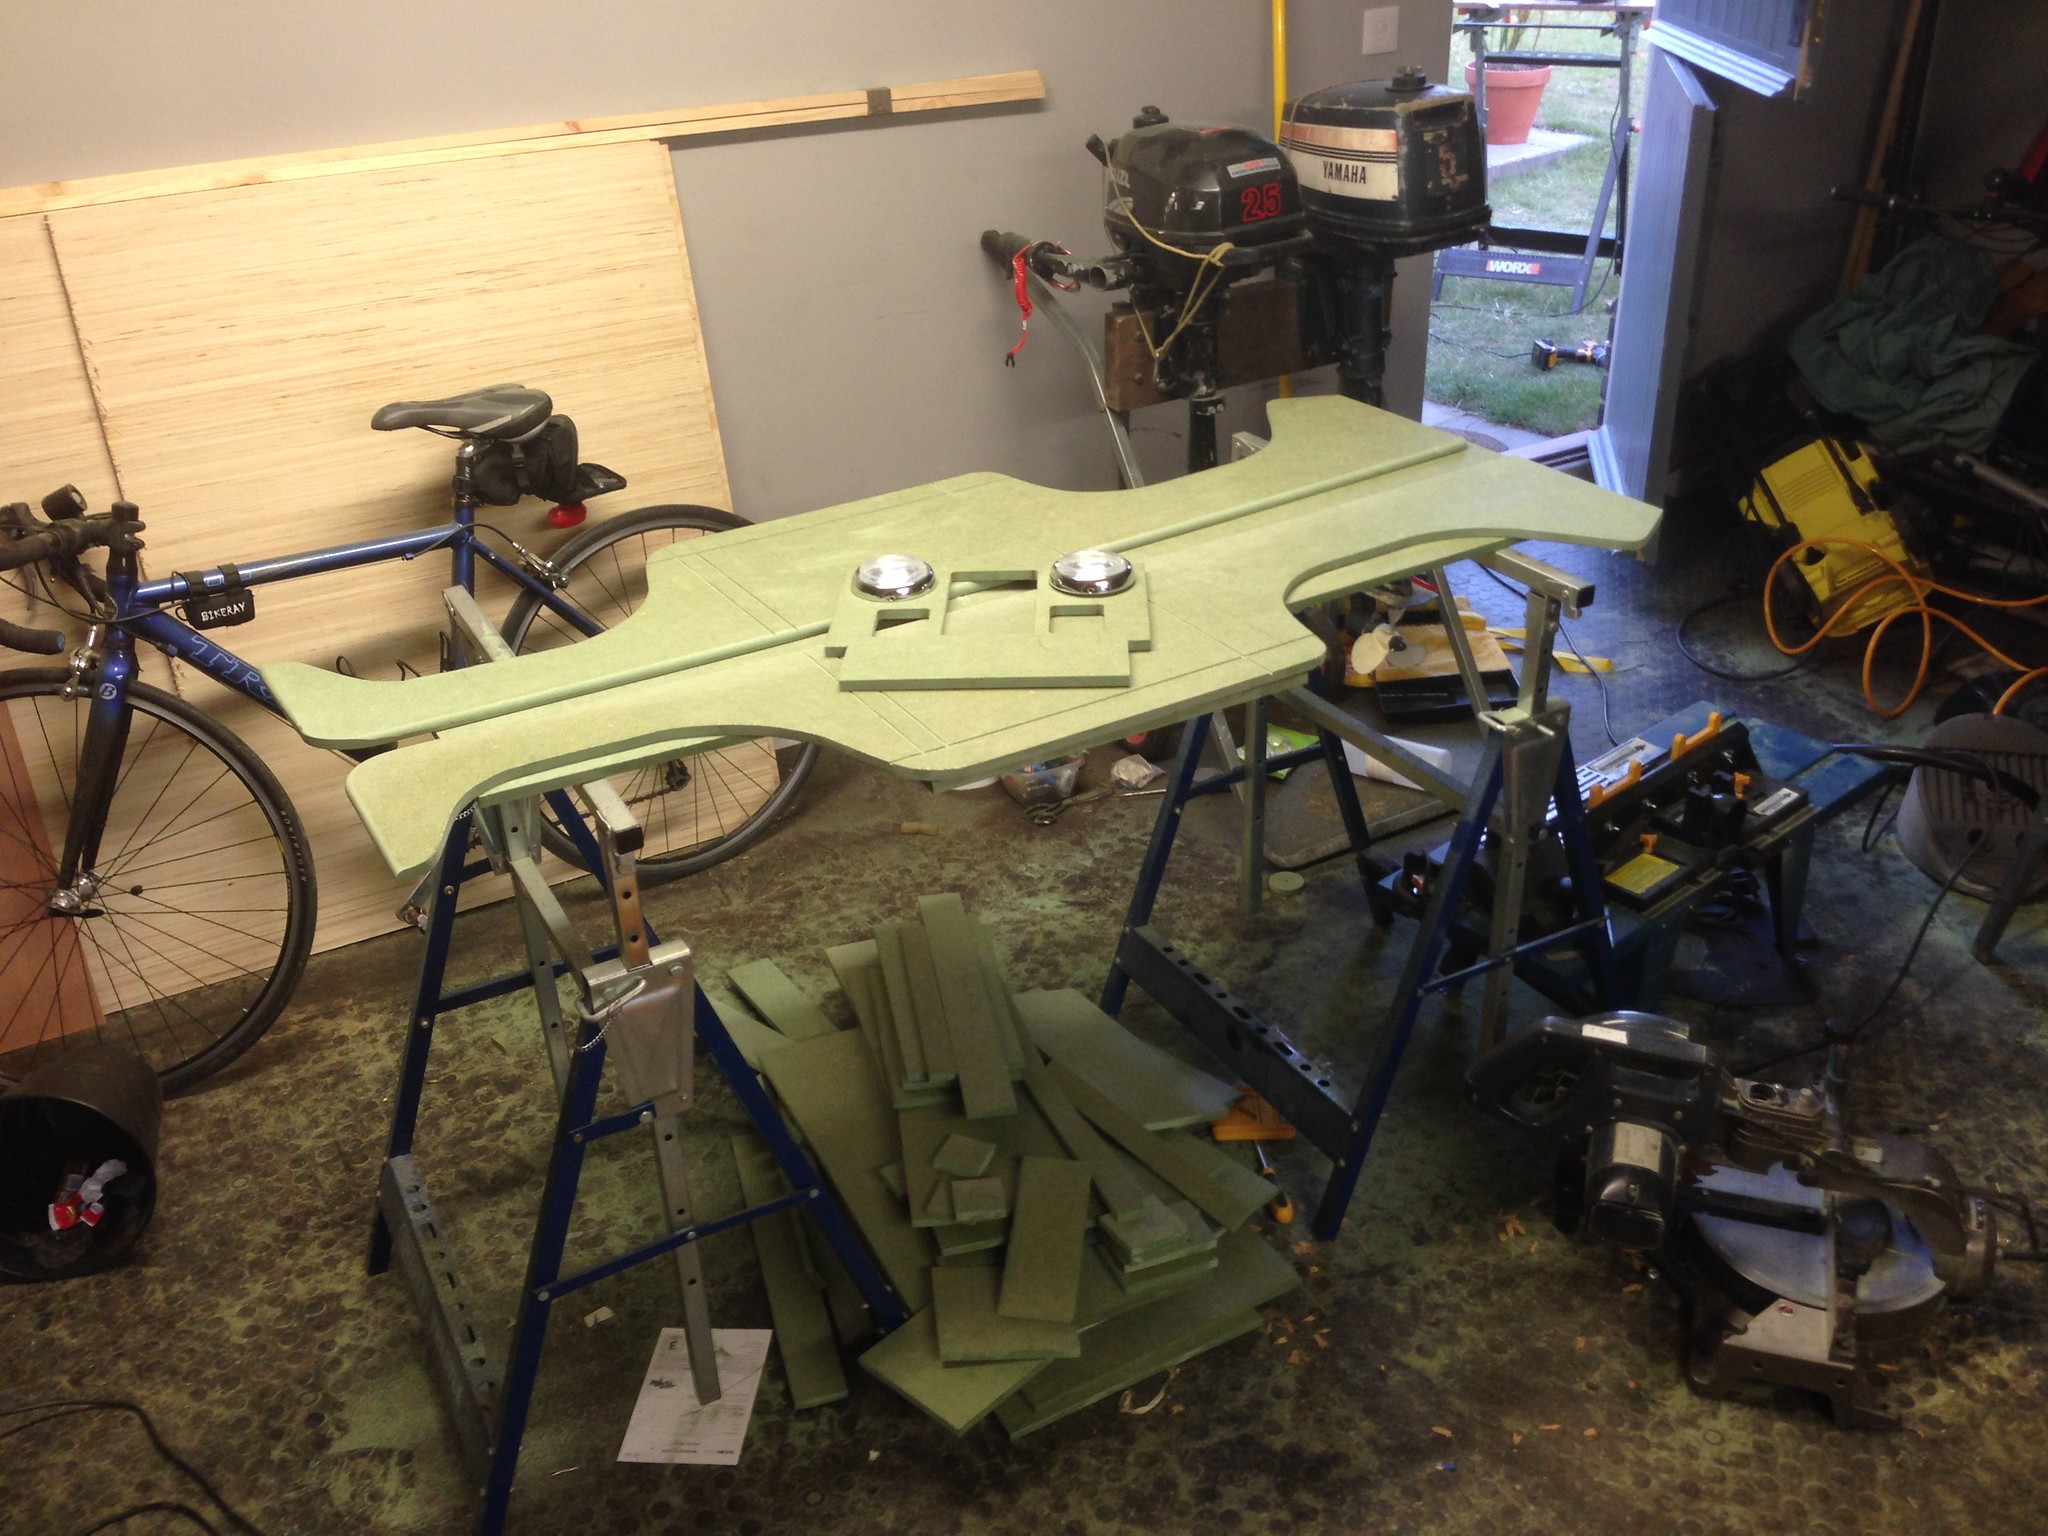
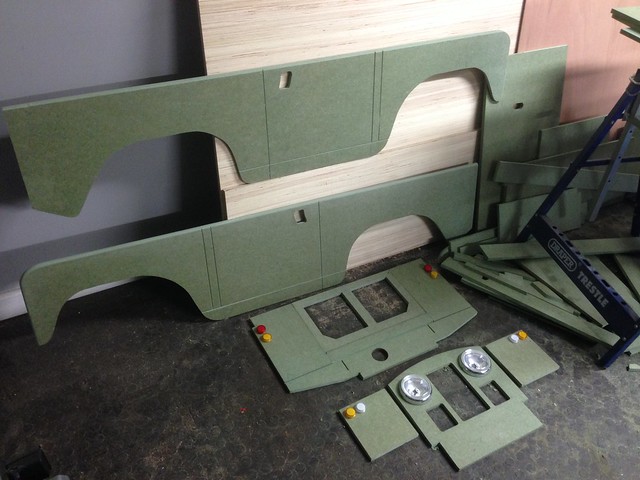
Anyway, now I have cut out all the MDF parts, time to do all the drilling/routing etc on these, and start to build the body tub. Updates to follow!
For those not familiar with these, it's a child's electric powered Land Rover (although Jeeps, tractors etc also available). They ain't cheap...£3950.00 for a factory built one is more than I paid originally for my Defender, and a complete kit is still nearly £1600.00. So I am doing it on the cheap, building as much as possible myself, and using as much mobility scooter running gear as possible, and fabricating/welding all steel parts where I can. I decided on the S2, as it's closer to my Defender, which can be used as a source of measurements etc!
However, eBay and Gumtree are littered with some real abominations...many pretending to be Toylanders where they look more like a plywood armoured scooter, often with terrible proportions, small wheels, and awful finishes. So I really want to do mine, sorry, his...properly, and make some improvements to the basic design along the way. Paint finish, and attention to detail is everything on these...here is a factory car, and it looks nice...
However, I reckon I can do better, with improvements in the following areas:
-Routed panel lines (doors, sills etc)
-Proper routed recesses door handles and "lift up" handles/lock barrel
-Panel gaps in the front wings, the joins between tops/fronts/sides should be obvious
-Double check windscreen and bulkhead height as it looks a bit tall
-Windscreen should taper in at the top, it's not parallel sided on an Series vehicle
-Rout/recess the windscreen hinges into the bulkhead
-Kit indicators are way too big and way too low. And where are the signature Landy sidelights?
-Some rivet detail down the sides would break up the uncharacteristically smooth flanks!
-At the back, I'll route a slot to make the rear panel and rear crossmember look separate. All of the painted trim (galvanised cappings on the real thing) will be made from sheet material "riveted" on. More plates to represent chassis to body mounts.
-Door hinges...the doors don't open, but some later style SIII hinge dummies will be easy to make and break the sides up a bit more.
-Fuel cap, wipers, and some interior detail such as 3 front seats, a biscuit tin heater and the classic red/yellow/black gear knobs
-Bagding-proper LR stuff if possible, perhaps a GB sticker, little period tax disc, and number plates
-And it's got to be a factory colour, mid grey with limestone wheels is my current favourite
Anyway, here's what we have so far...it's early days obviously!
One of these bad boys, a Pride XL8 scooter. Purchased from Gumtree minus a seat and batteries for £48.00. It will donate the motor, transaxle/diff, wiring loom, and some suspension components. Looking at eBay, I reckon I can sell the remaining parts and get my £48.00 back.
One excited 18m old boy, one 31 year old Defender 110, a local timber yard, 2 sheets of waterproof 12mm MDF (the green stuff) and 19mm square batten...
Lots of chopping and I now have this...
Now Toylander sell all of the parts, however I want to be a bit ingenious and tight where I can be. For example, the proper light kit is about £90, which seems a lot, so I managed to track down motorcycle foglights at £20 a pair, which once stripped down are perfect for the job, especially with some cheap H3 LED bulbs fitted to conserve battery power, and IMHO look better than the kit items. I've also managed to source some small round LED lights in white, red, and amber which will be a much better scale representation of the other lights...and far easier on the wallet at £2 each from eBay!
Anyway, now I have cut out all the MDF parts, time to do all the drilling/routing etc on these, and start to build the body tub. Updates to follow!
Glassman...you've lost me with the Breitling pic...go on then...
Colin...there's always that risk, however this is the little guy who will amuse himself for a full hour just sat on the ride on mower in my garage wearing out the steering linkage, whose first proper sentence was "want to go in brmm brmm now" whist gesticulating wildly at the Defender, and whilst sat surrounded by a pile of Peppa Pig and Twirly Woos books, ignored them all in favour of the Toylander build manual which was studied intently for 20 minutes with much pointing and "car!" comments.
And if it does one day just start gathering dust, I can sell it and put the not inconsiderable sum of cash a well built one commands into his first proper car fund. Or, perhaps buy a proper Series 3 project with the proceeds that we can rebuild together as dad and son, (assuming you can still drive diesel cars by 2032!) unless by that point all he's interested in is getting pissed, chasing girls and going to festivals. In which case, be nice if we can do that together too ;-)
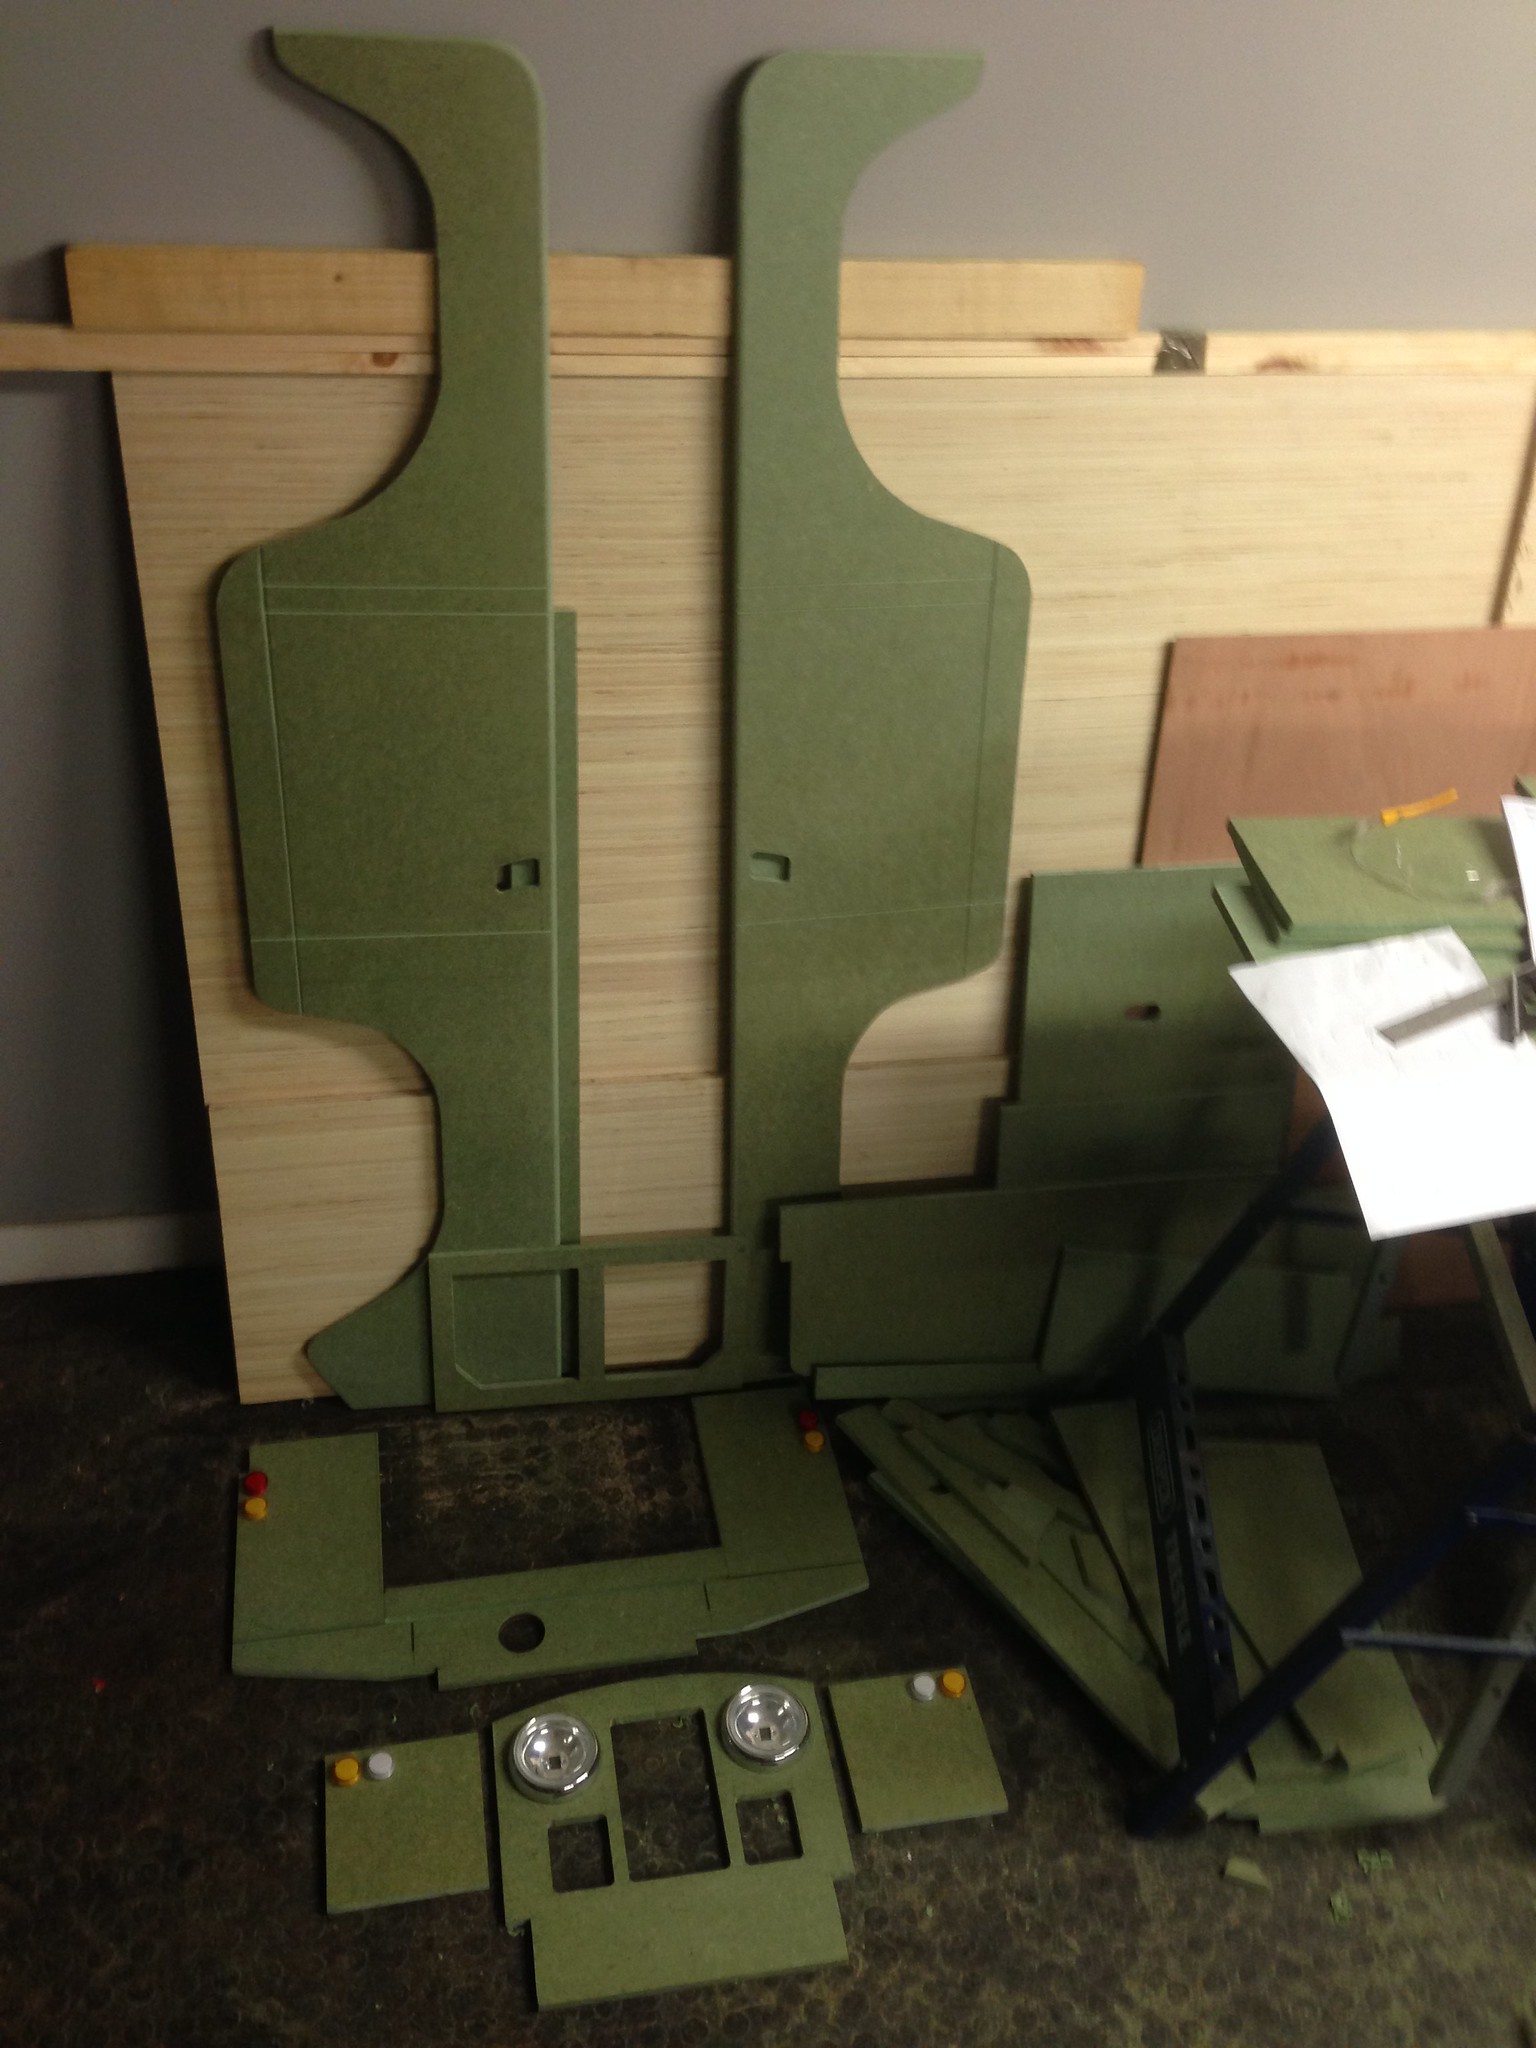
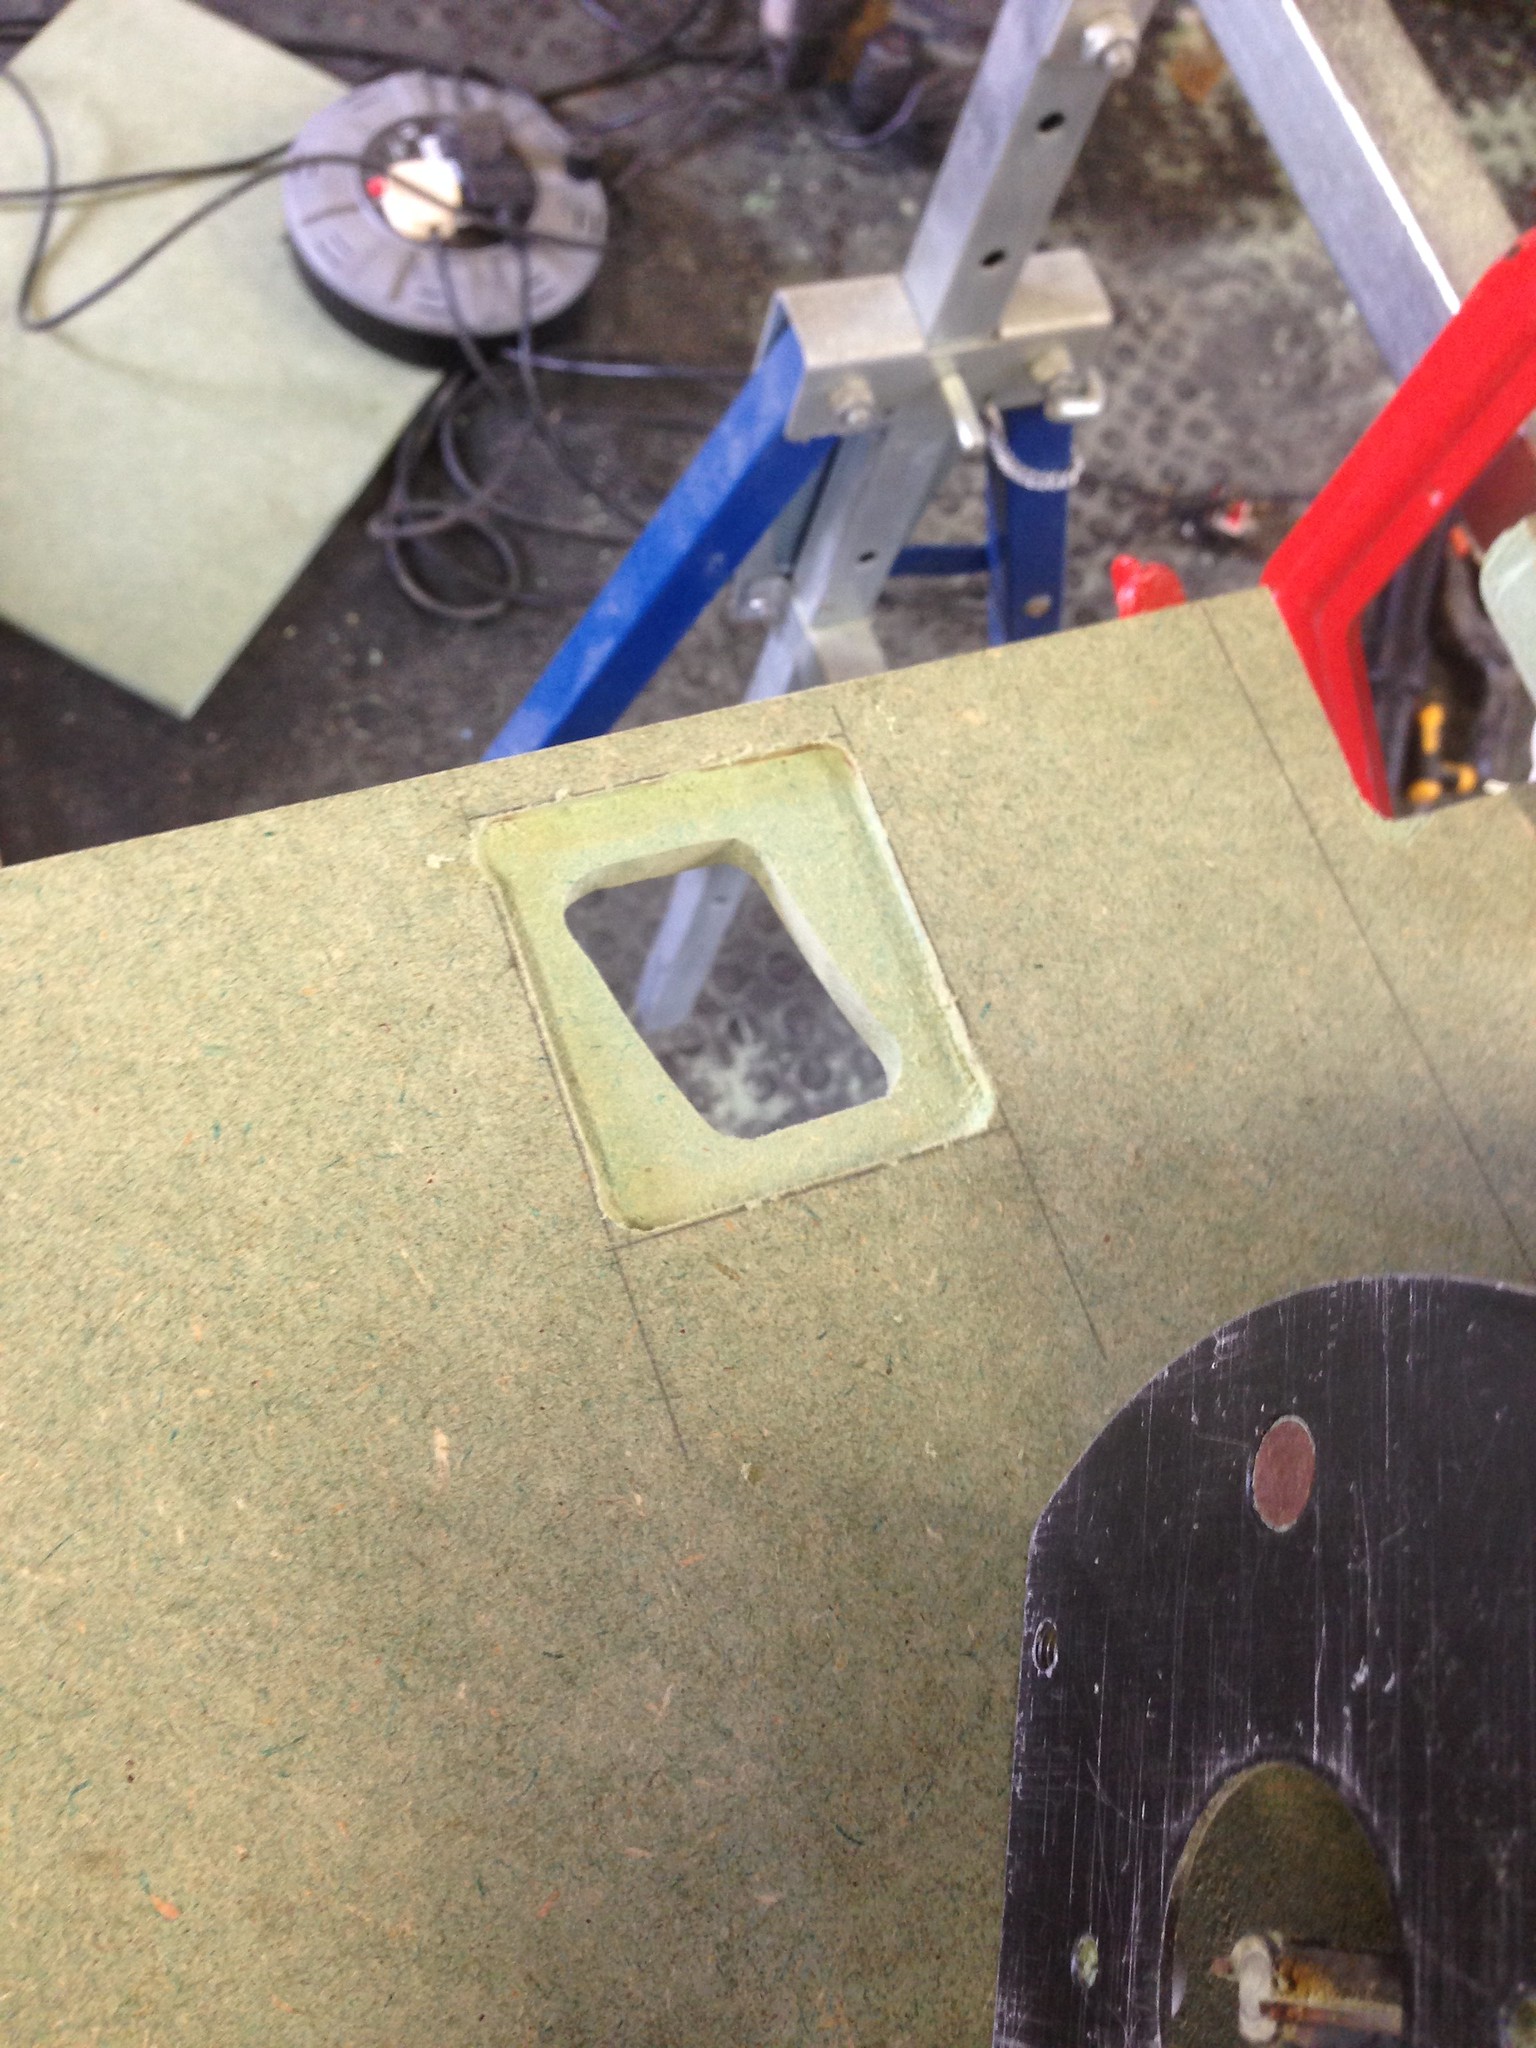
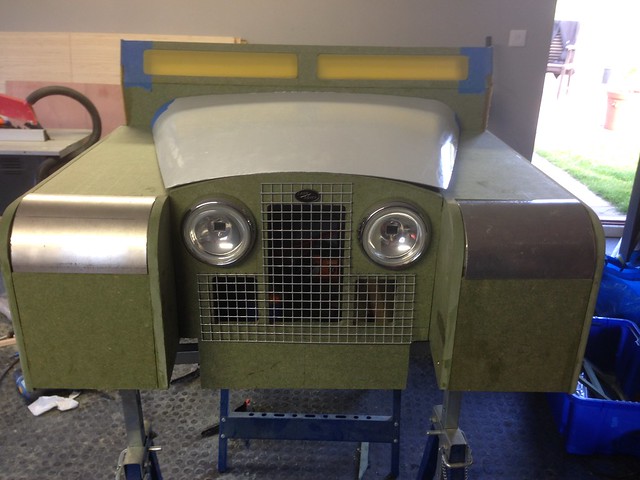
Well I'm finally at the stage where all the bits I cut out in the shape of the "blanks" have all been trimmed to size, holes drilled, details routed in etc...so finally I can start screwing it together!! 
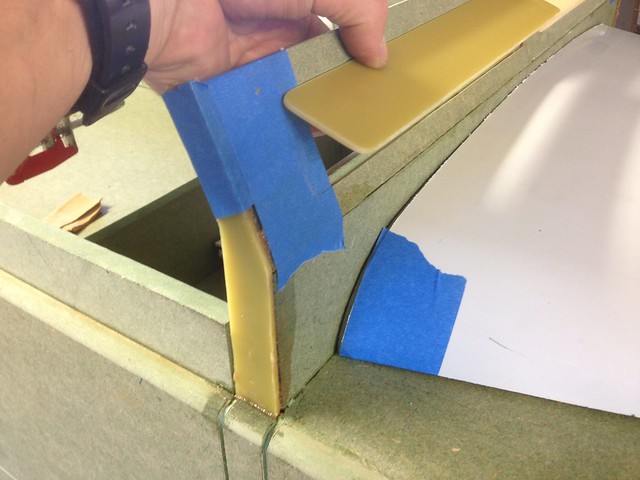
The small LED side/tail/indicator lamps arrived and look really good. OK they could be a bit "rounder" but with an O-ring around the base should look the part, and certainly much more in scale than the big Toylander lamps. I've also sourced wheels, and some GRP plate material that will make my improved version of the bulkhead ends/windscreen supports, without using the big crude metal ones as per plans. I'll also use that plate to blank off the back of the door handle recesses. These are not on the plans at all, Toylander will supply stickers to represent the handles but I don't like them, so I just copied the measurements from my 110 and scaled it down. (One for uber Land Rover geeks, yes my 110 being a really early one does have Series style lift up handles rather than push button jobbies)
And best of all, a guy I know vaguely has given me access to his workshop to use his lathe/mill etc, so the few bits that I'll need to machine I can do myself on his equipment. Adds a bit more interest and keeps it all my own work.
Three bits where I have "cheated" though are using the Toylander ready-rolled aluminium bonnet skin, as this apparently can be a nightmare to get right. Ditto the ally wing front curved panels, and the vac formed dash panel and instrument stickers. These are all highly visible and could really detract from the final finish if not done right. However I am going to try and have the instruments behind perspex "glass".
More to follow when assembly finally starts!
I went to the Kelmarsh Land Rover show at the weekend, where there were several Toylanders there. My son sat in one and loved it...we had the inevitable histrionics when I got him out, although it's amazing how quick a tantrum dissipates when the Red Devils parachute into the arena ring mid hissy fit!
Anyway, I've actually started to "build" rather than just "cut" now. It seems to all be going together nice and squarely, in these pics the front panel is just held in with a slight interference fit which is a good sign...


Anyway, I've actually started to "build" rather than just "cut" now. It seems to all be going together nice and squarely, in these pics the front panel is just held in with a slight interference fit which is a good sign...
Al Murphy said:
What tools have you been using for cutting the wood, I've got a jigsaw and a circualr saw but am wonering whether I should get a router for cutting the shapes out and rounding off the corners.
Thanks,
Al
Router is useful for the rolled bodysides, plus makes a much nicer job of the tailgate and grill panel cut outs. Cut off saw is useful for trimming the batten down. I have a table saw too which was certainly helpful cutting the bigger pieces.Thanks,
Al
Too Late said:
This went for £400 last night
I lost my bottel at around £380
http://www.ebay.co.uk/itm/Toylander-Electric-Ride-...
Seems an anwful lot to me, and to be honest I think the build is very shabby, on an old model that really doesn't look anything like a Jeep and doesn't even run. I'm going to start running a spreadsheet for all of my build costs, but I think it will be much less than a "normal" build cost with a bit of ingenuity here and there...I lost my bottel at around £380
http://www.ebay.co.uk/itm/Toylander-Electric-Ride-...
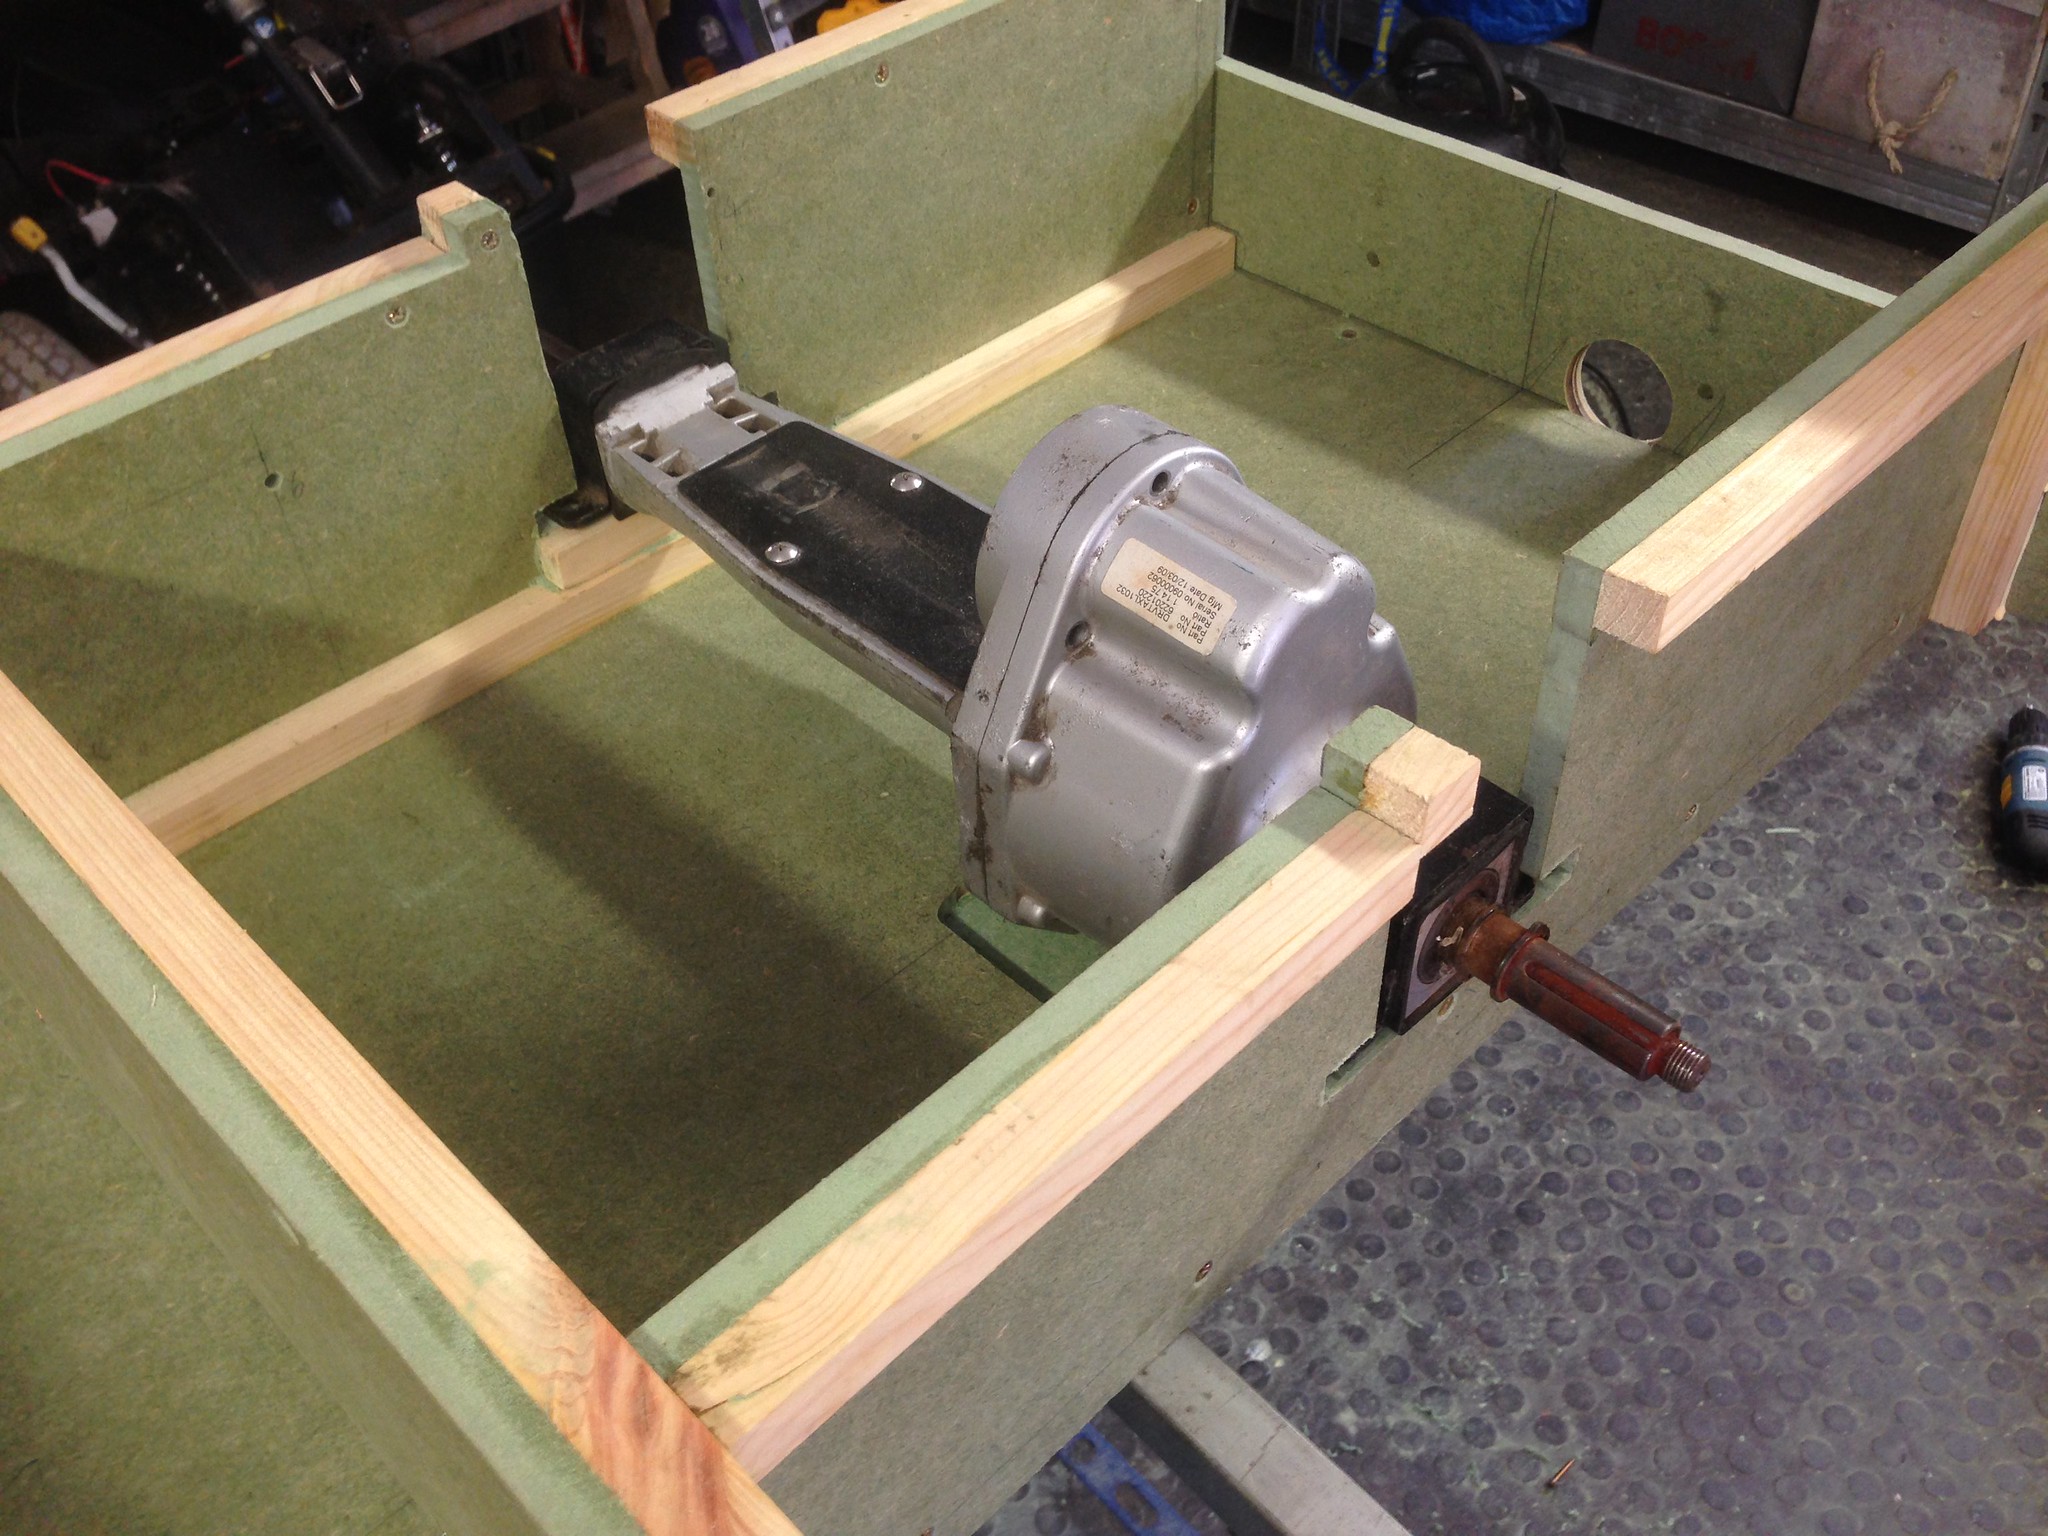
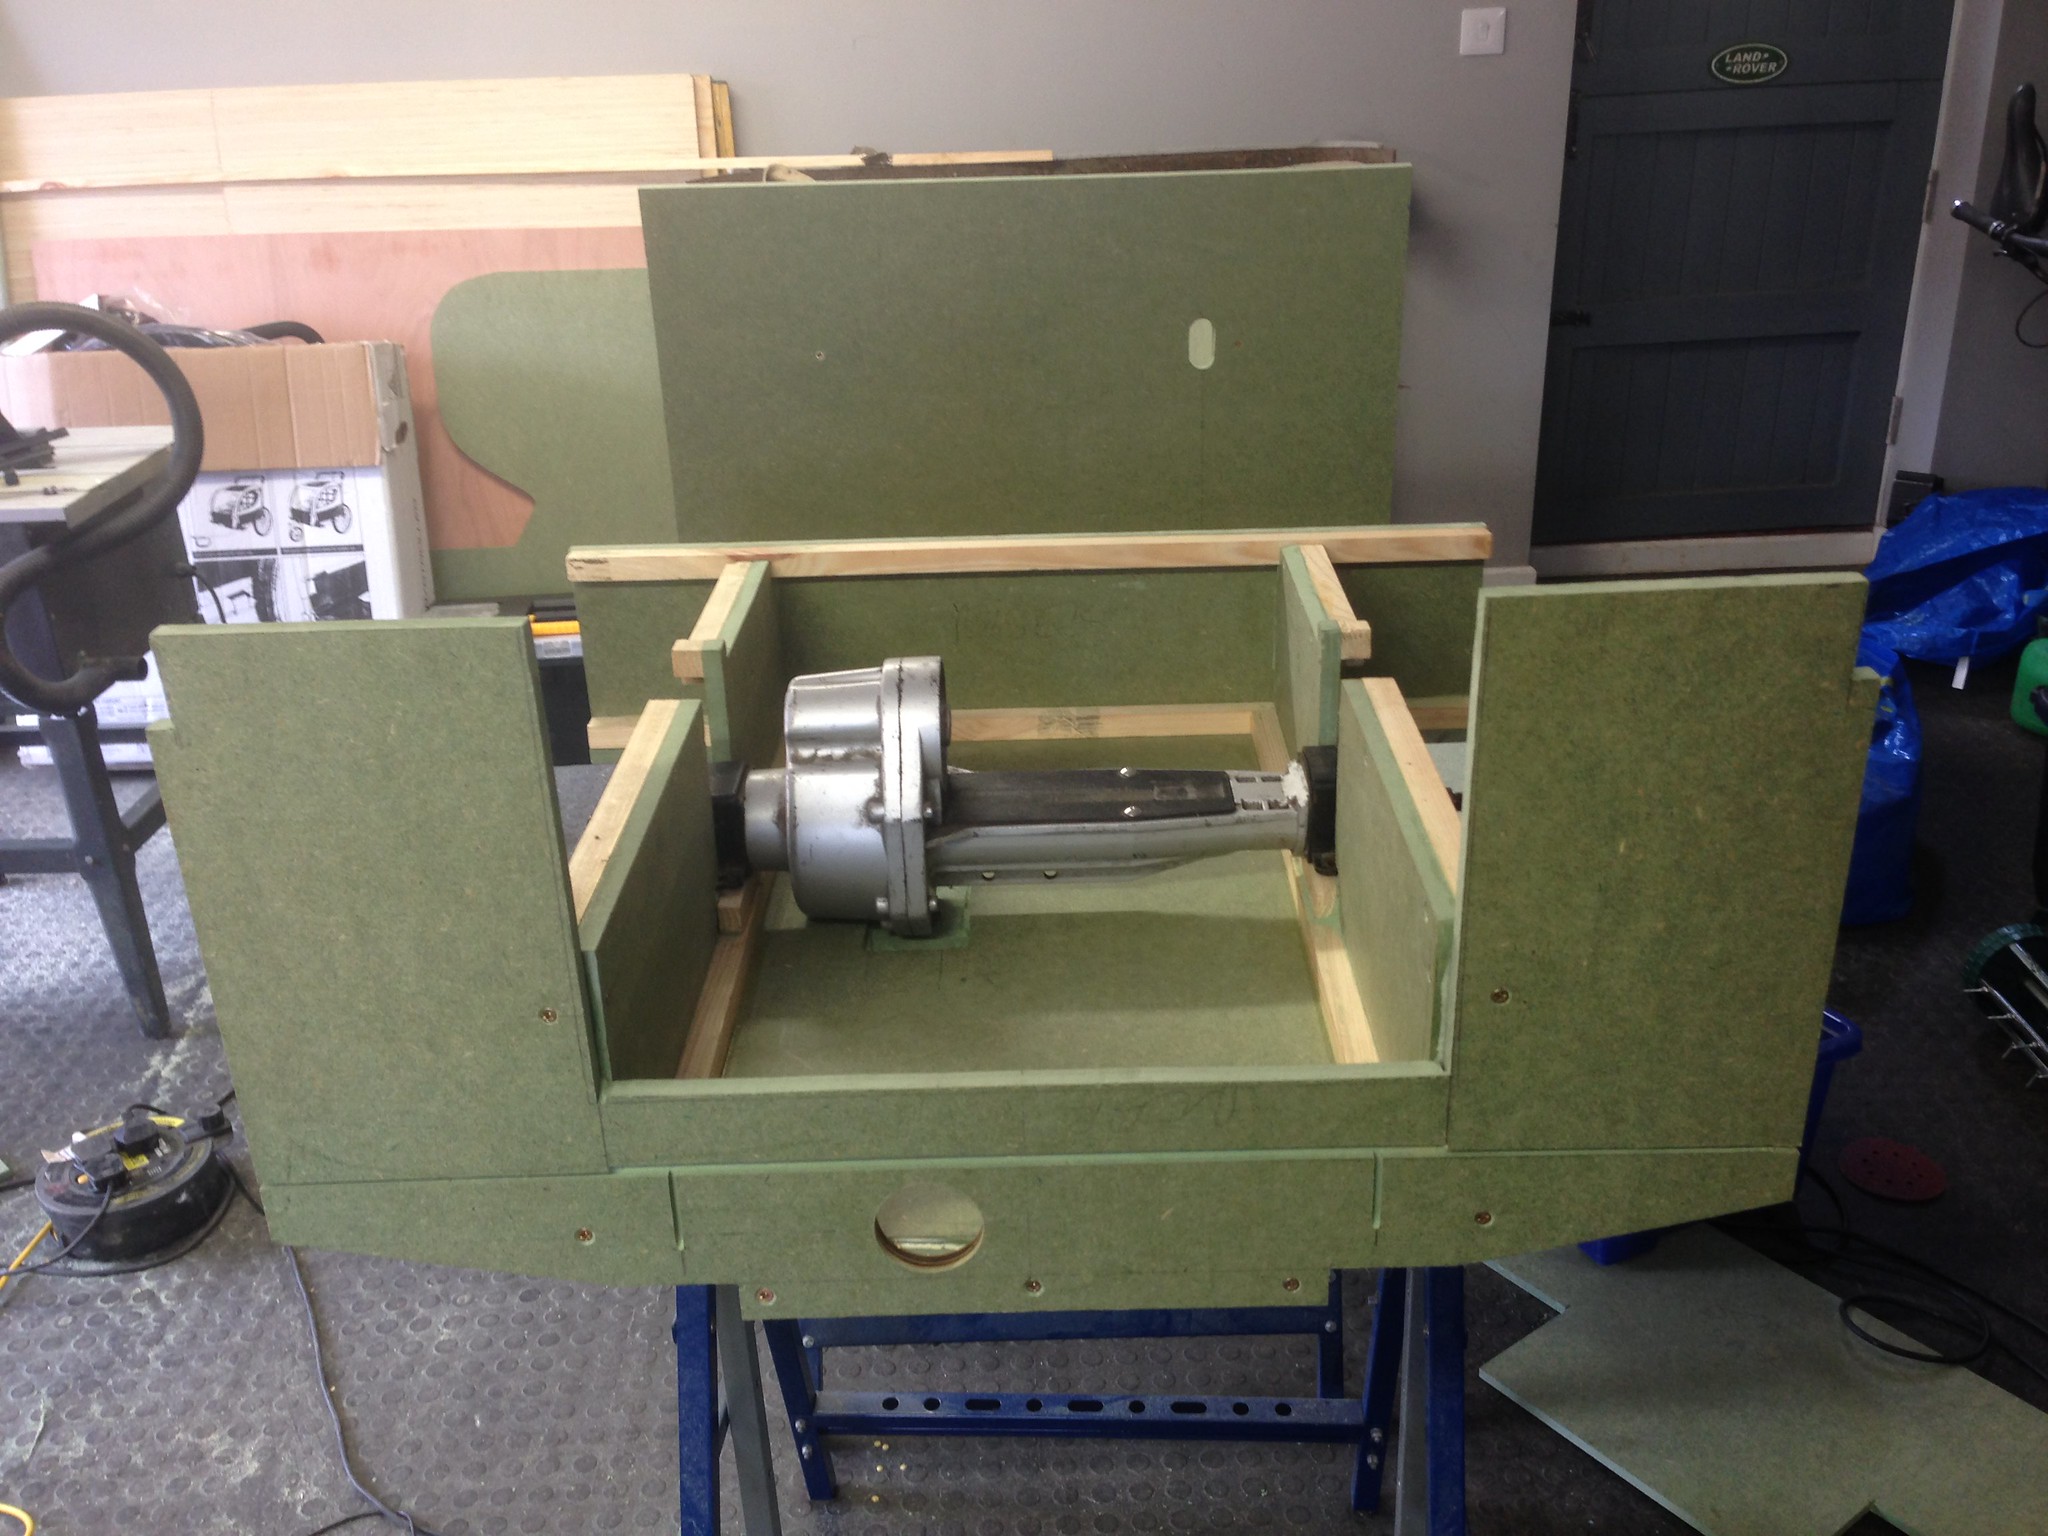
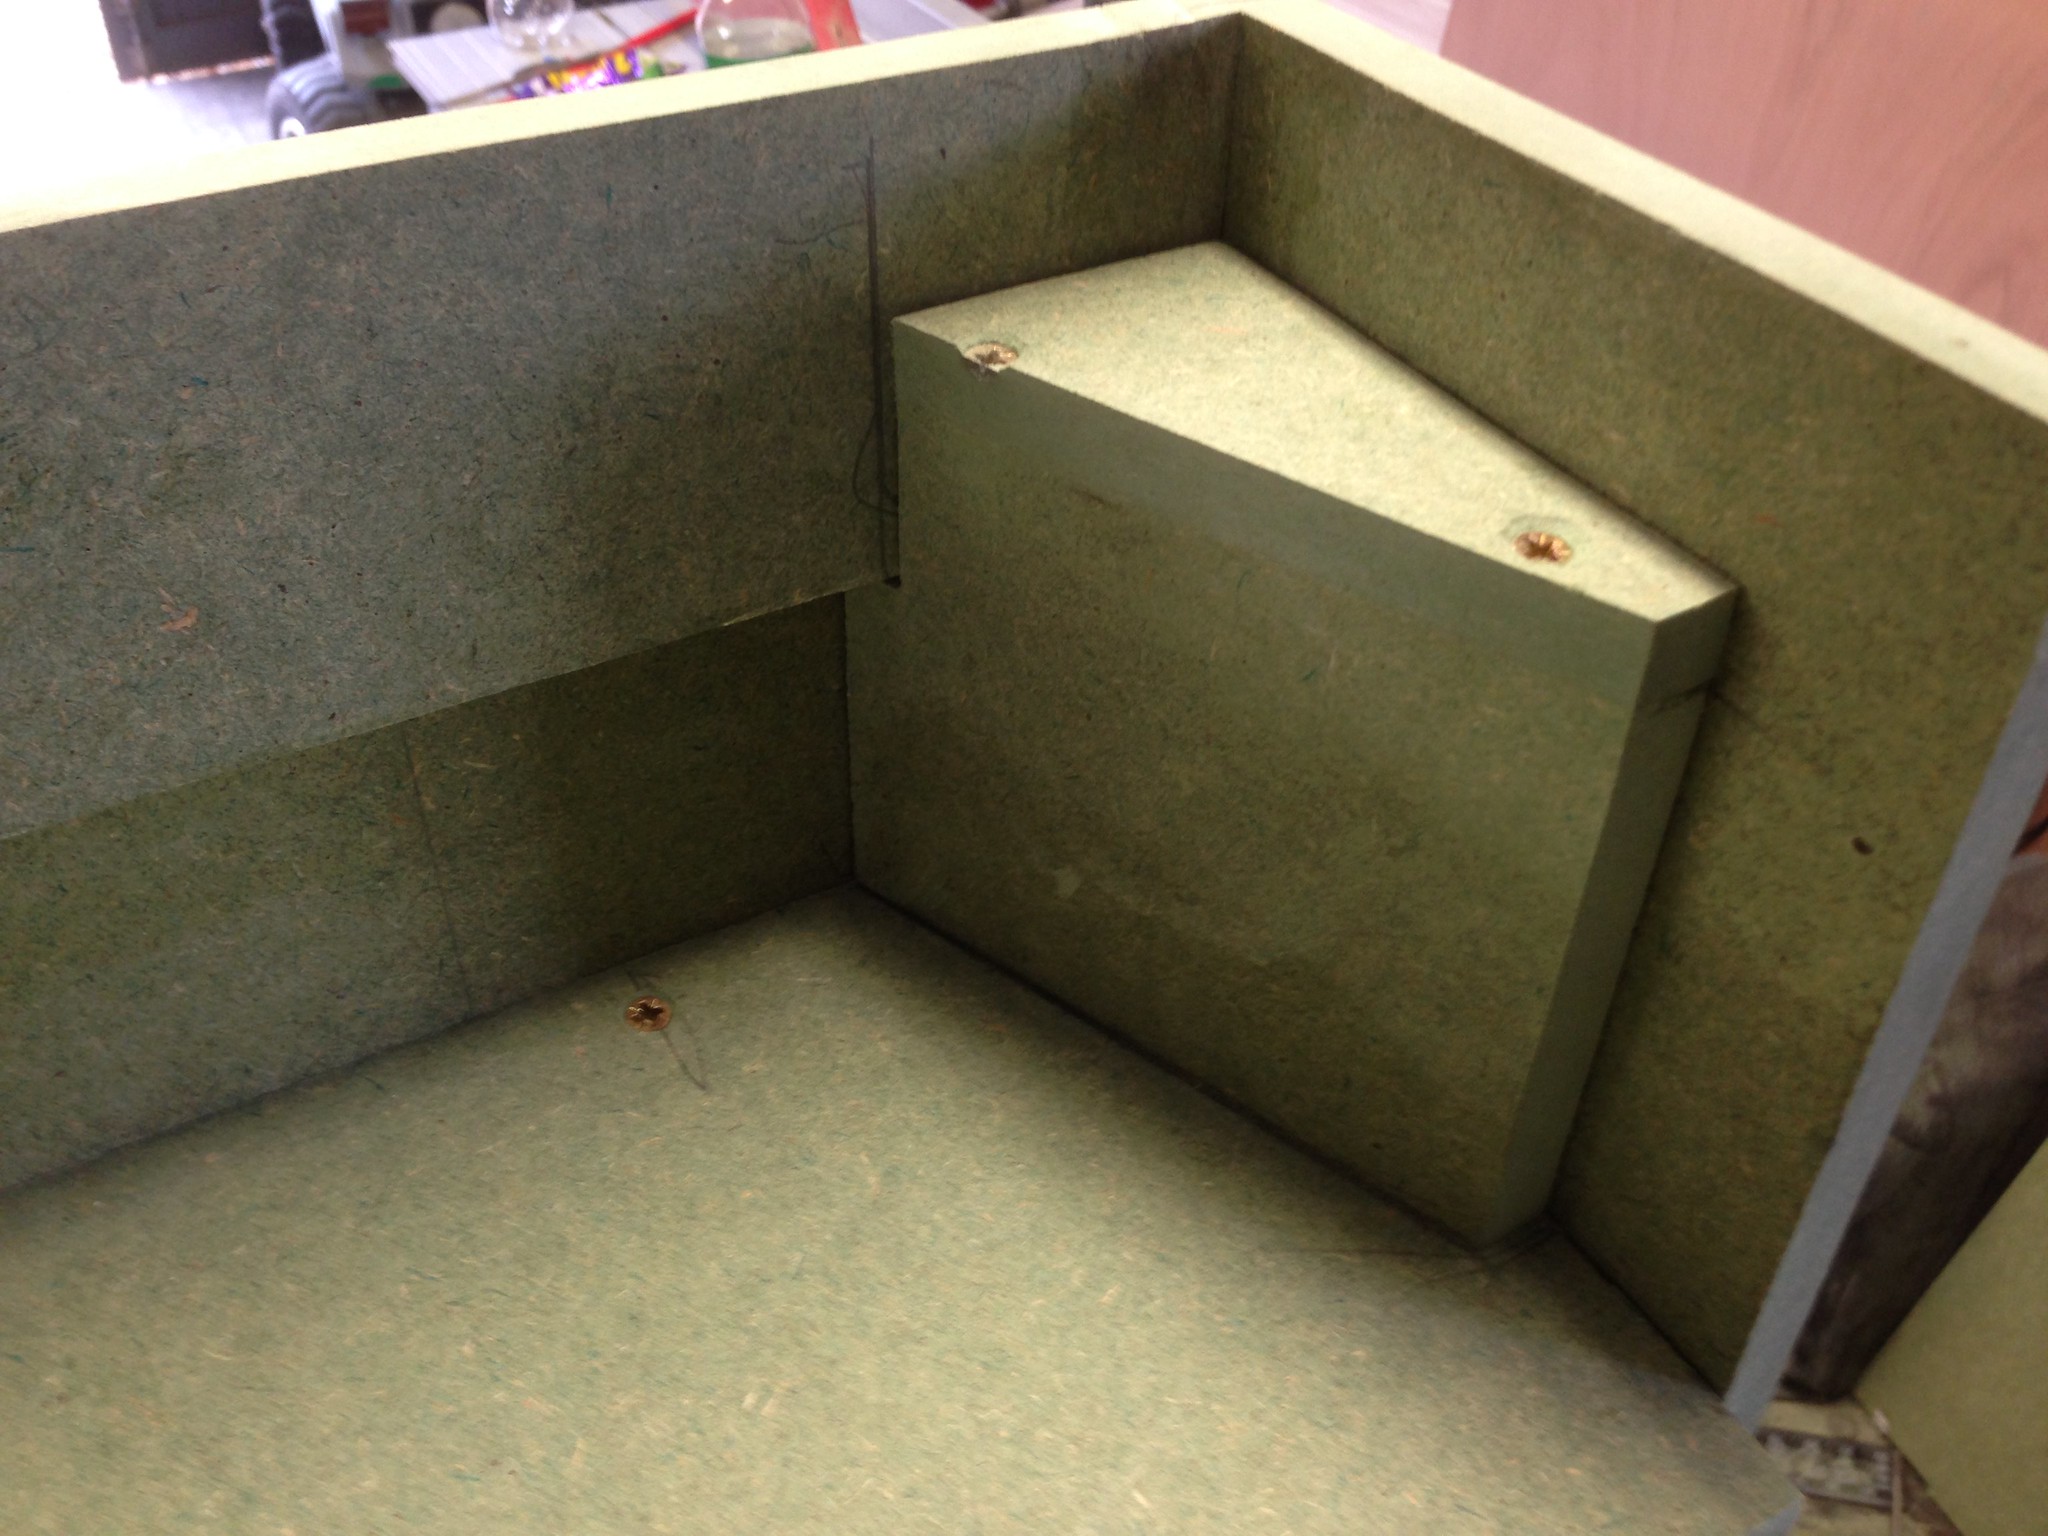
Bit more progress. This is the bit where we depart from the plans to install the scooter transaxle/diff assembly. The transaxle will live inside the rear tub, although clearance is very tight so I had to rout out a bit of the floor to make room for the bottom of the gearbox, and I'll need to do some sort of slightly raised cover to clear the top of the motor, but it will probably only need to be 10-15mm high.
The rear axle will be as per plan and bolted underneath the body. There will be chain drive down from the transaxle to each wheel, although I'll need to do the maths and gear it down a bit to compensate for the bigger wheels. The slots in the rear sides are oversize so I can remove the transaxle if needed, and also to allow a bit of fore and aft movement to get the tension on the chains right.
Rear panel on, you can see some of the additional routing to make the back end look a bit more landy-like.
Re the flooring, yes it is from there. It works very well indeed. I'll be honest, when I built the house/garage I had visions of this Zen-like, surgically clean, F1 factory style shrine, with a plasma on the wall and a few pot plants, and, erm, well you can see what happened. But the flooring shrugs off the oil incontinence of my ageing Land Rover very well and it's fine to use a jack/axle stands on too. If I do occasionally get carried away with the garage spring cleaning it cleans up very nicely too. If you are local and want a look before buying, PM me.
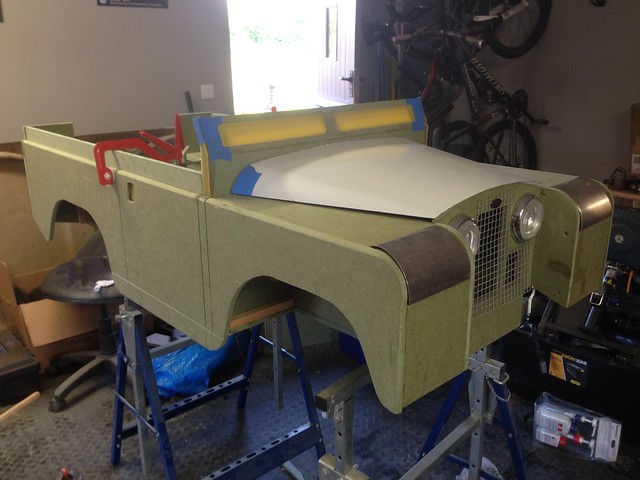
A bit more...
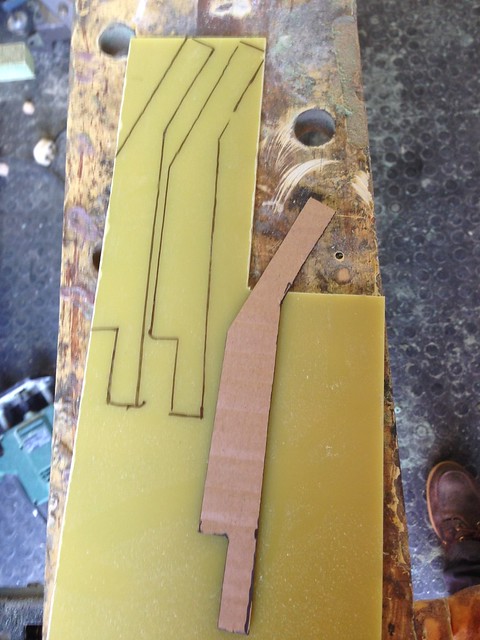
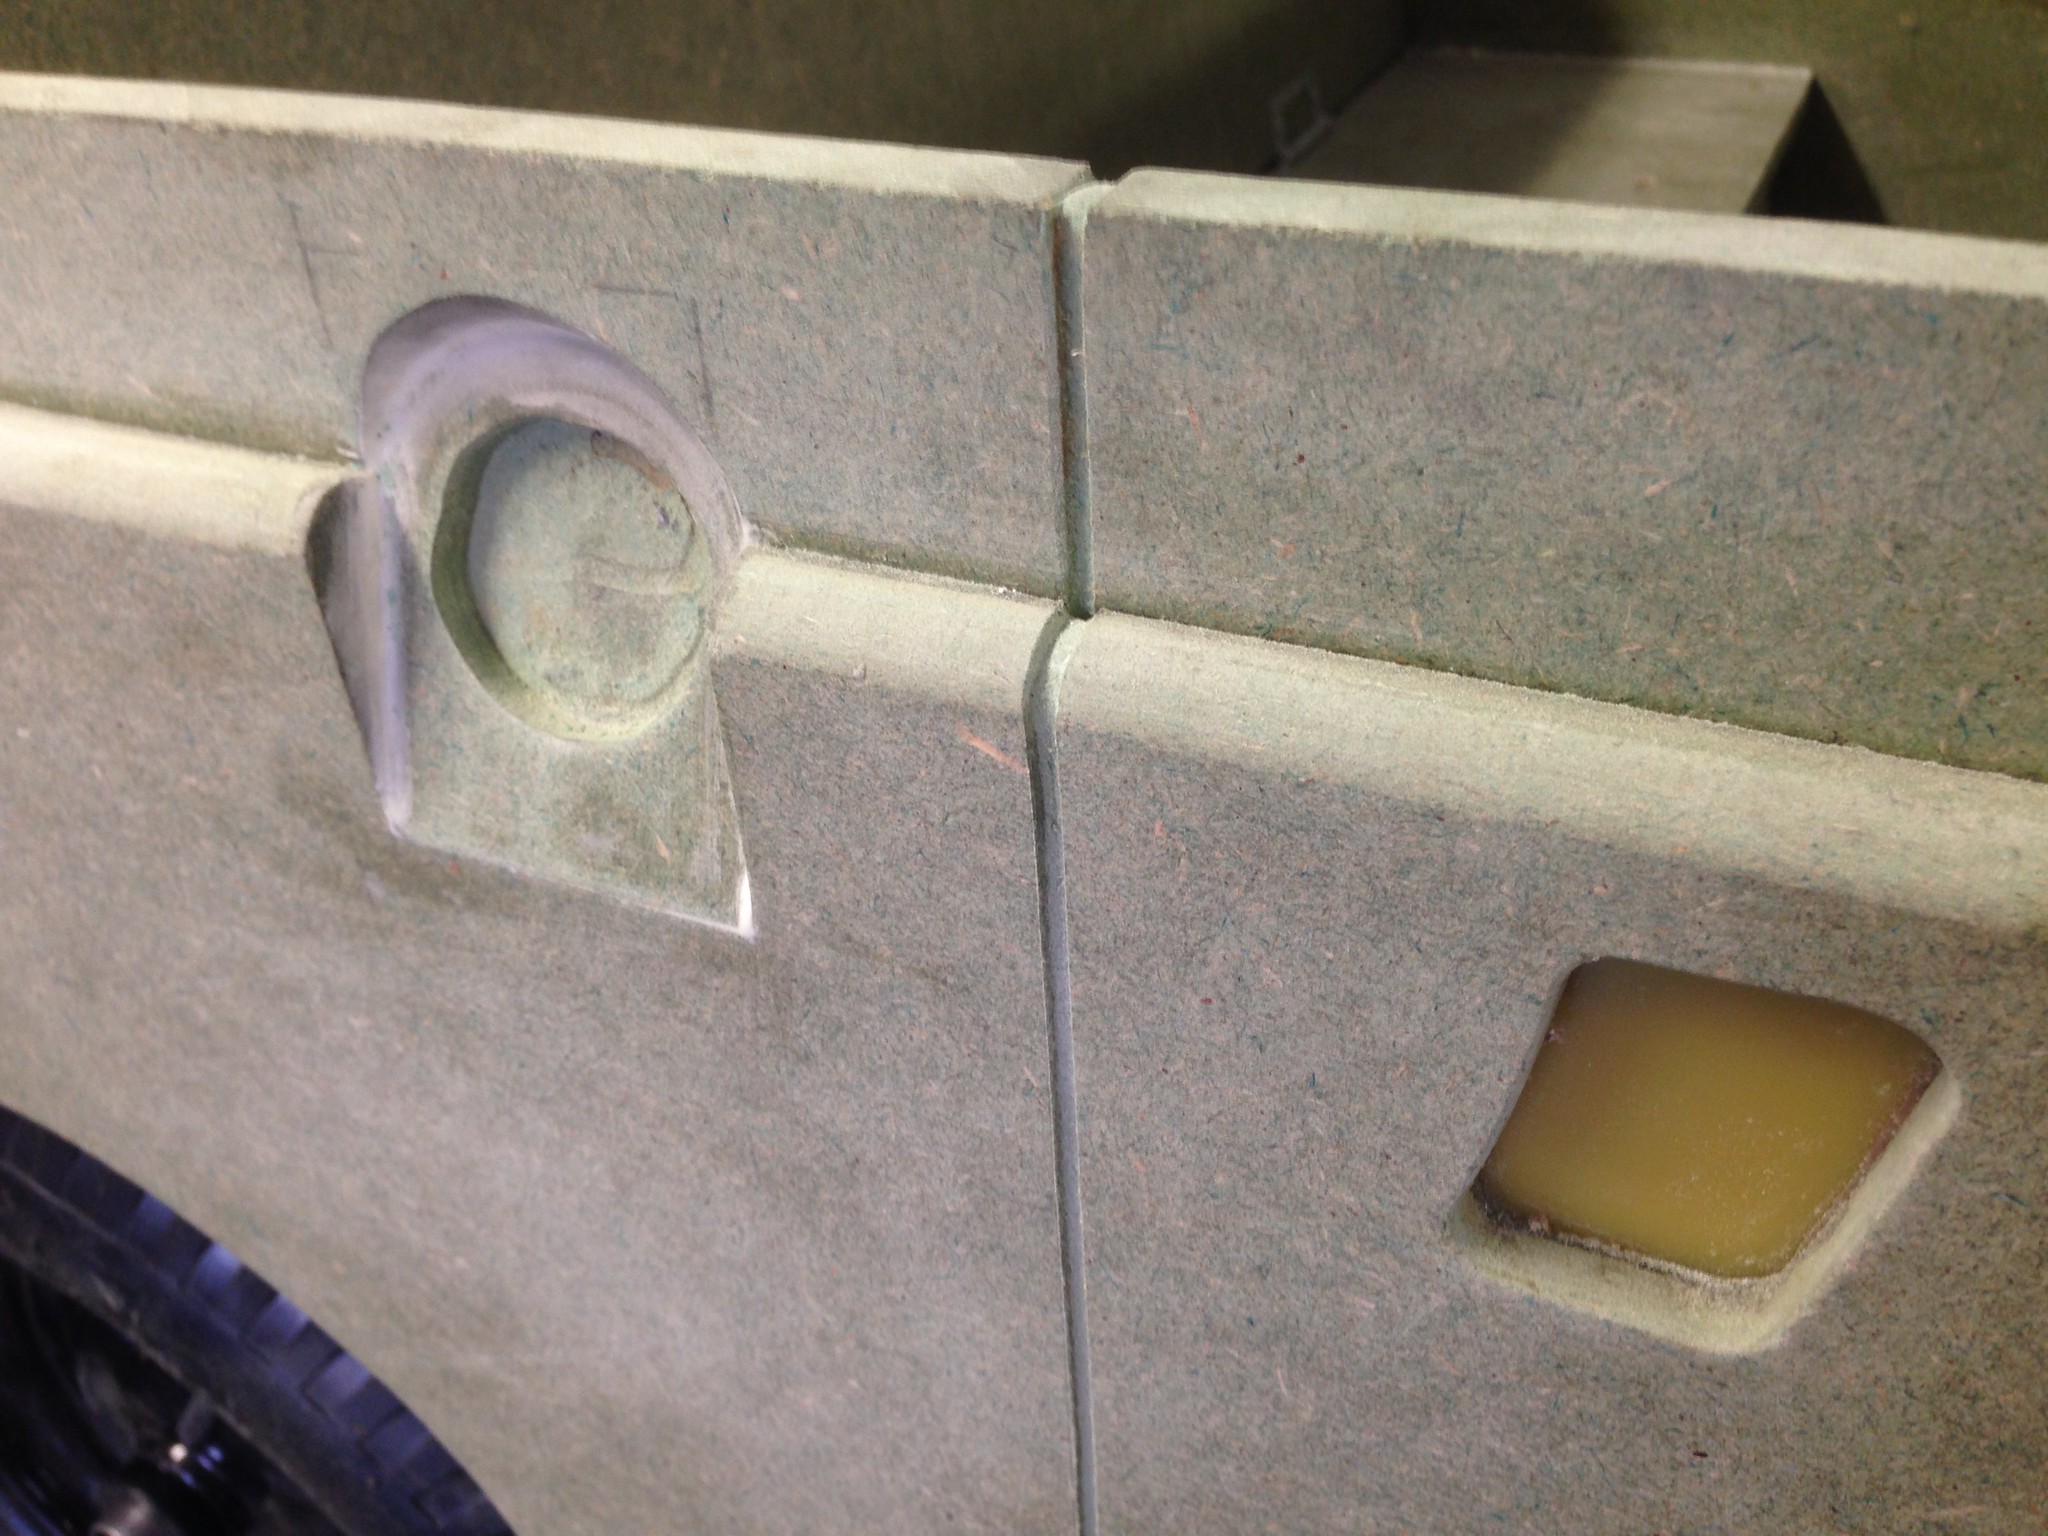
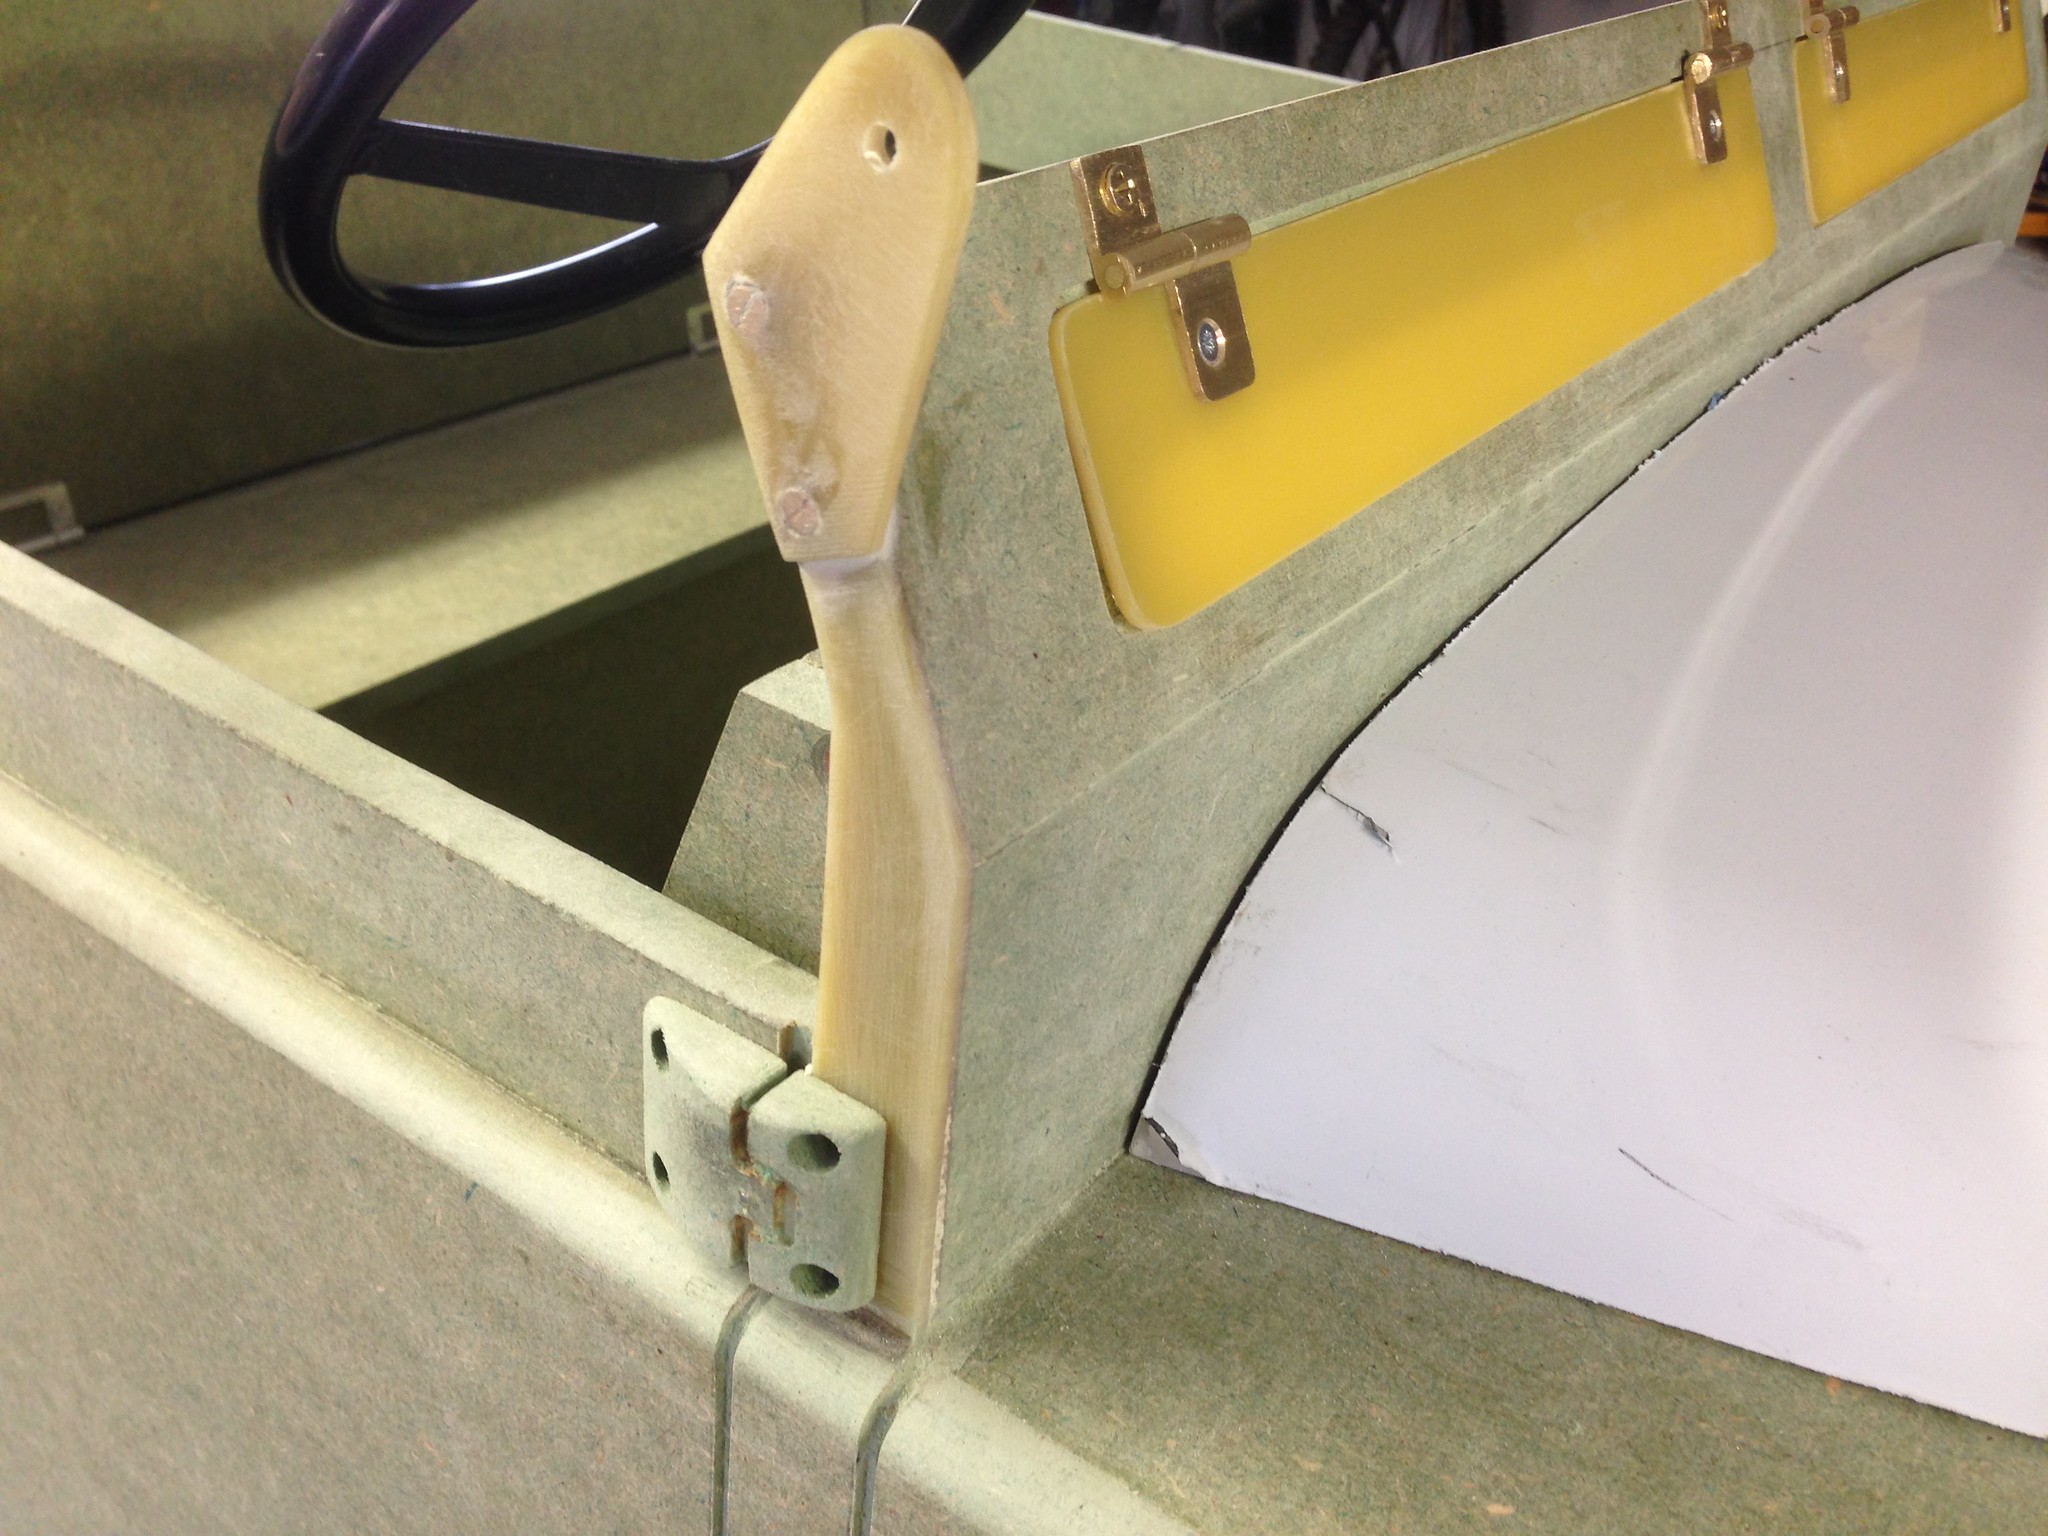
As I mentioned before, I wanted a bit more detail than the standard plans, so with some full scale measurements I've started the beginnings of the fuel filler/cap, and I've routed out the insides of the door handle recesses from inside the body, ready to fit the handles which I shall fabricate, and then blank it off with the yellow GRP plate material so it's smooth inside.
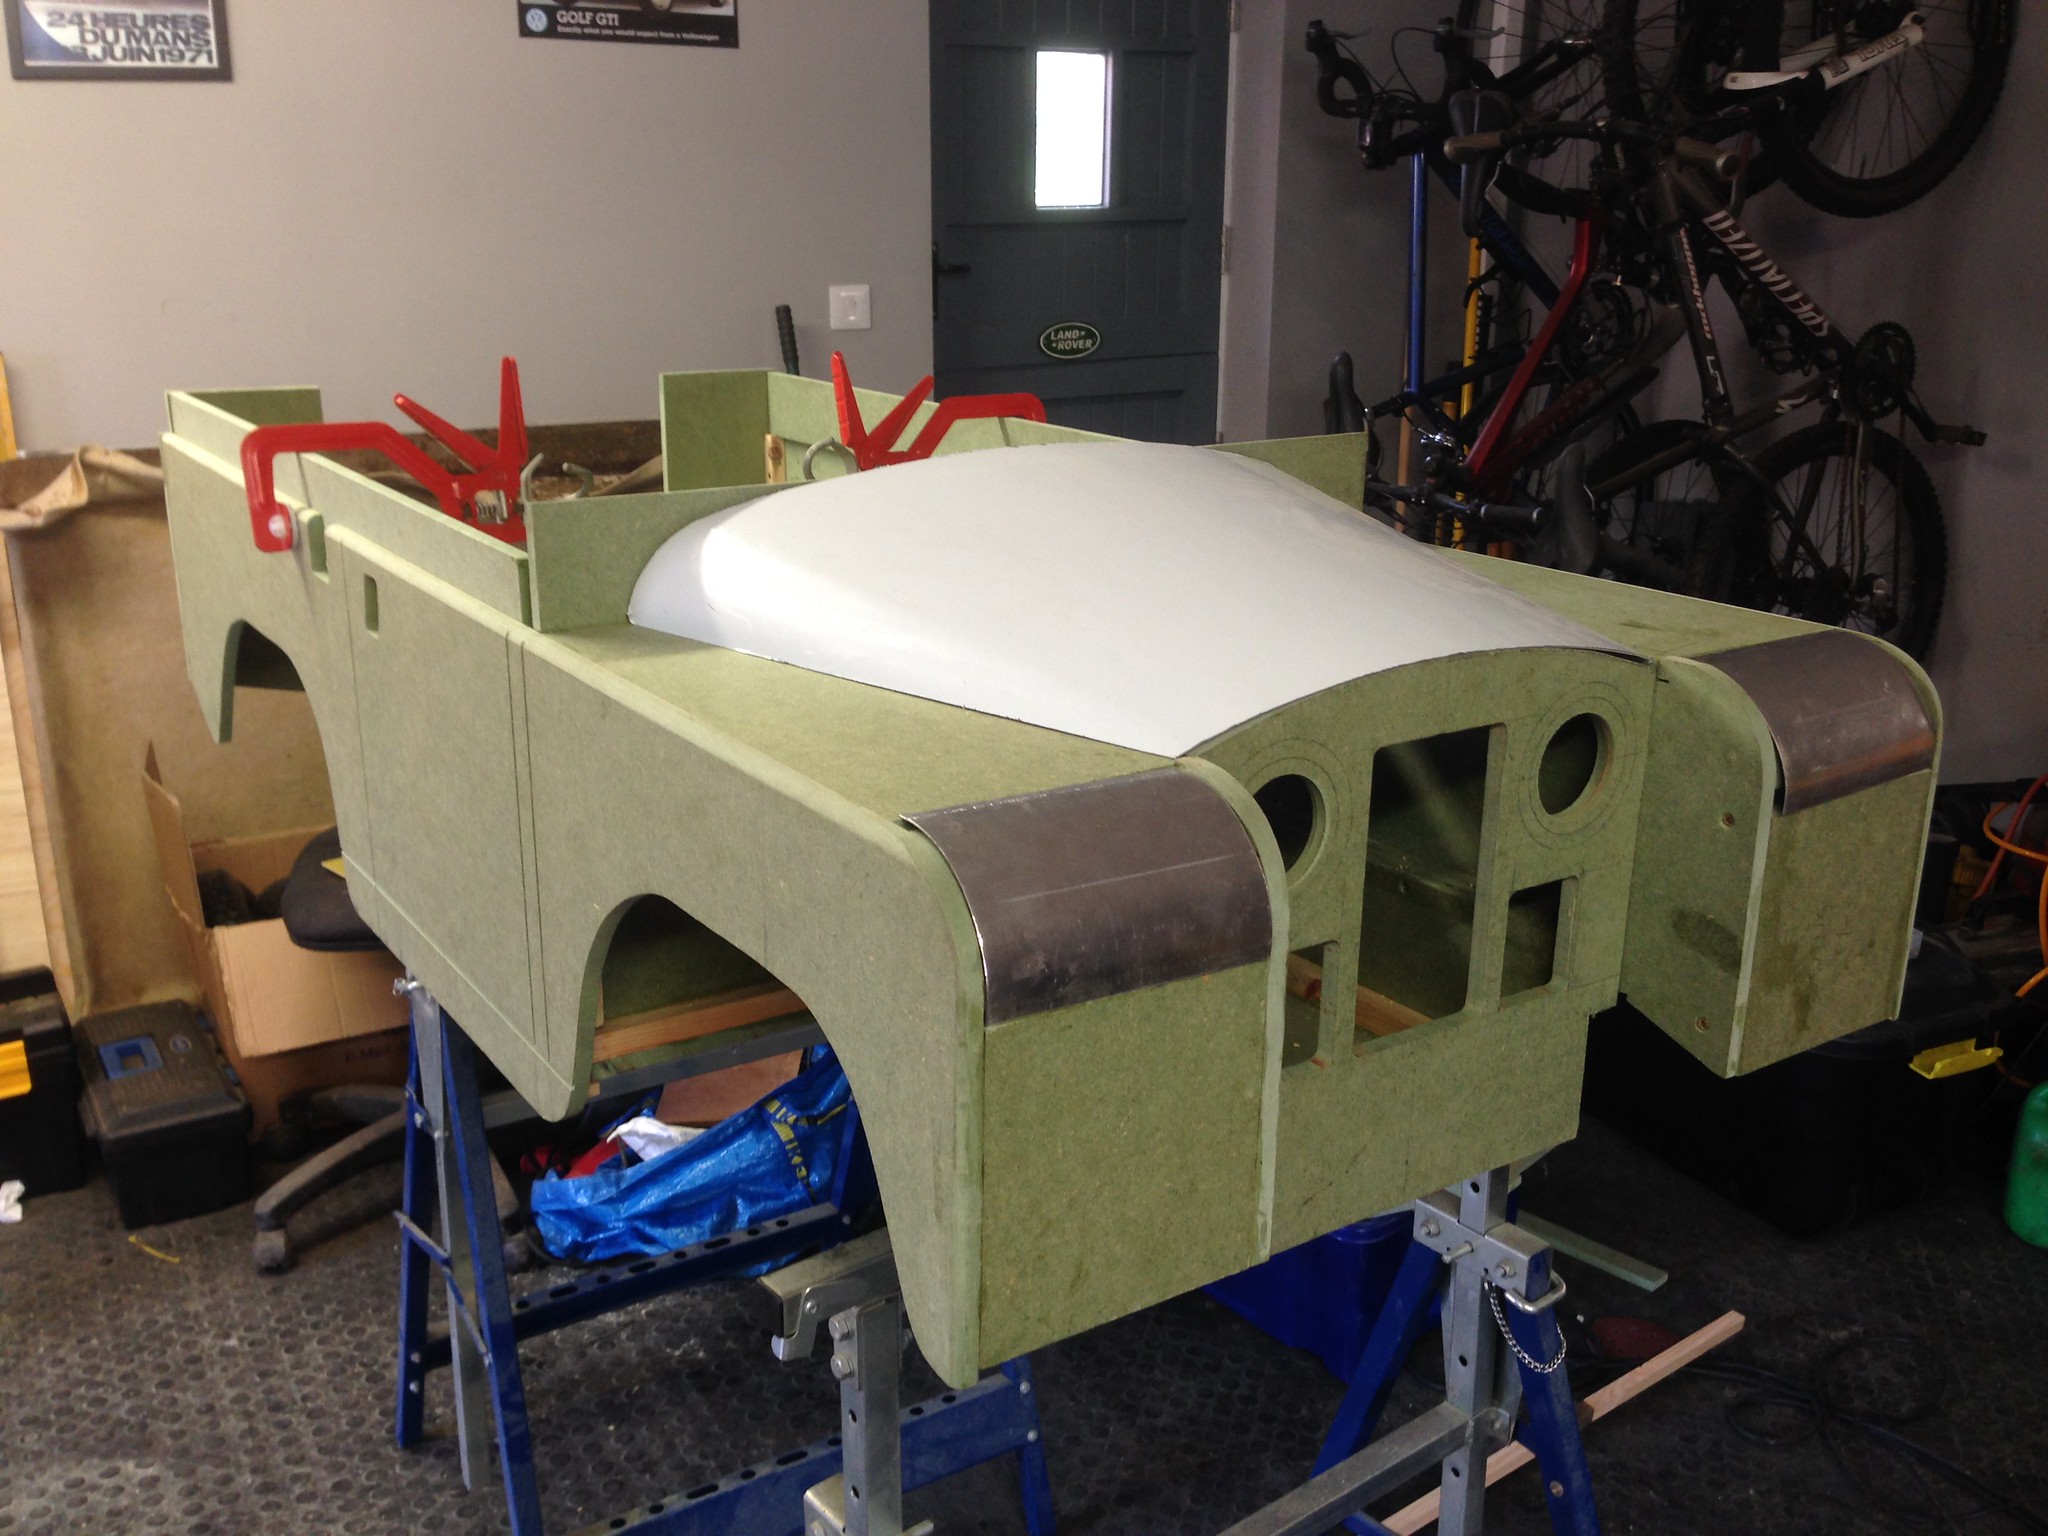
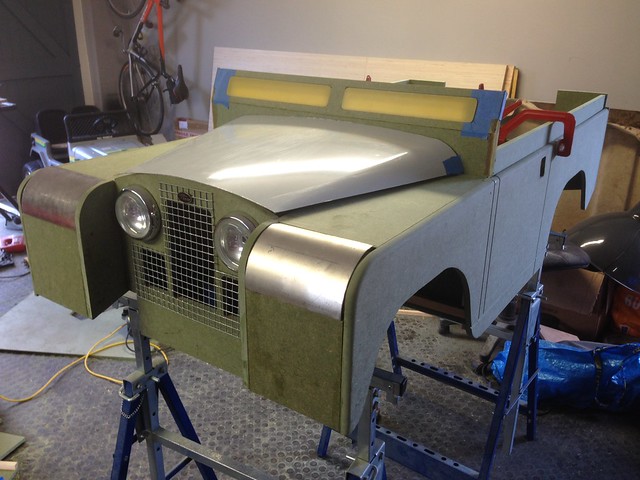
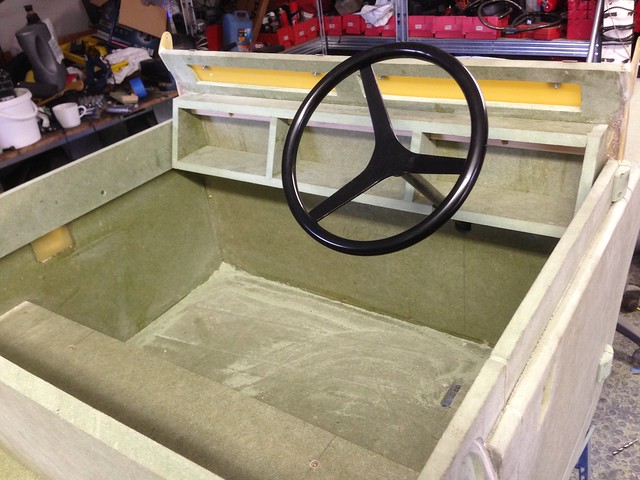
Body sides on was a very satisfying moment...no mistaking what it is now, especially with the aluminium bonnet placed in situ. The bonnet profile is a bit high in the pic, and will site lower once on it's ribs. The whole thing seems to have gone together very square and hopefully there won't be too much filling and sanding involved (although the ally front wing caps will need a fair bit of work)
Next will be the bulkhead (the angled top is not yet on) which will have opening vents, a real Landy hallmark (sadly dropped on the last line of TDCi models!)
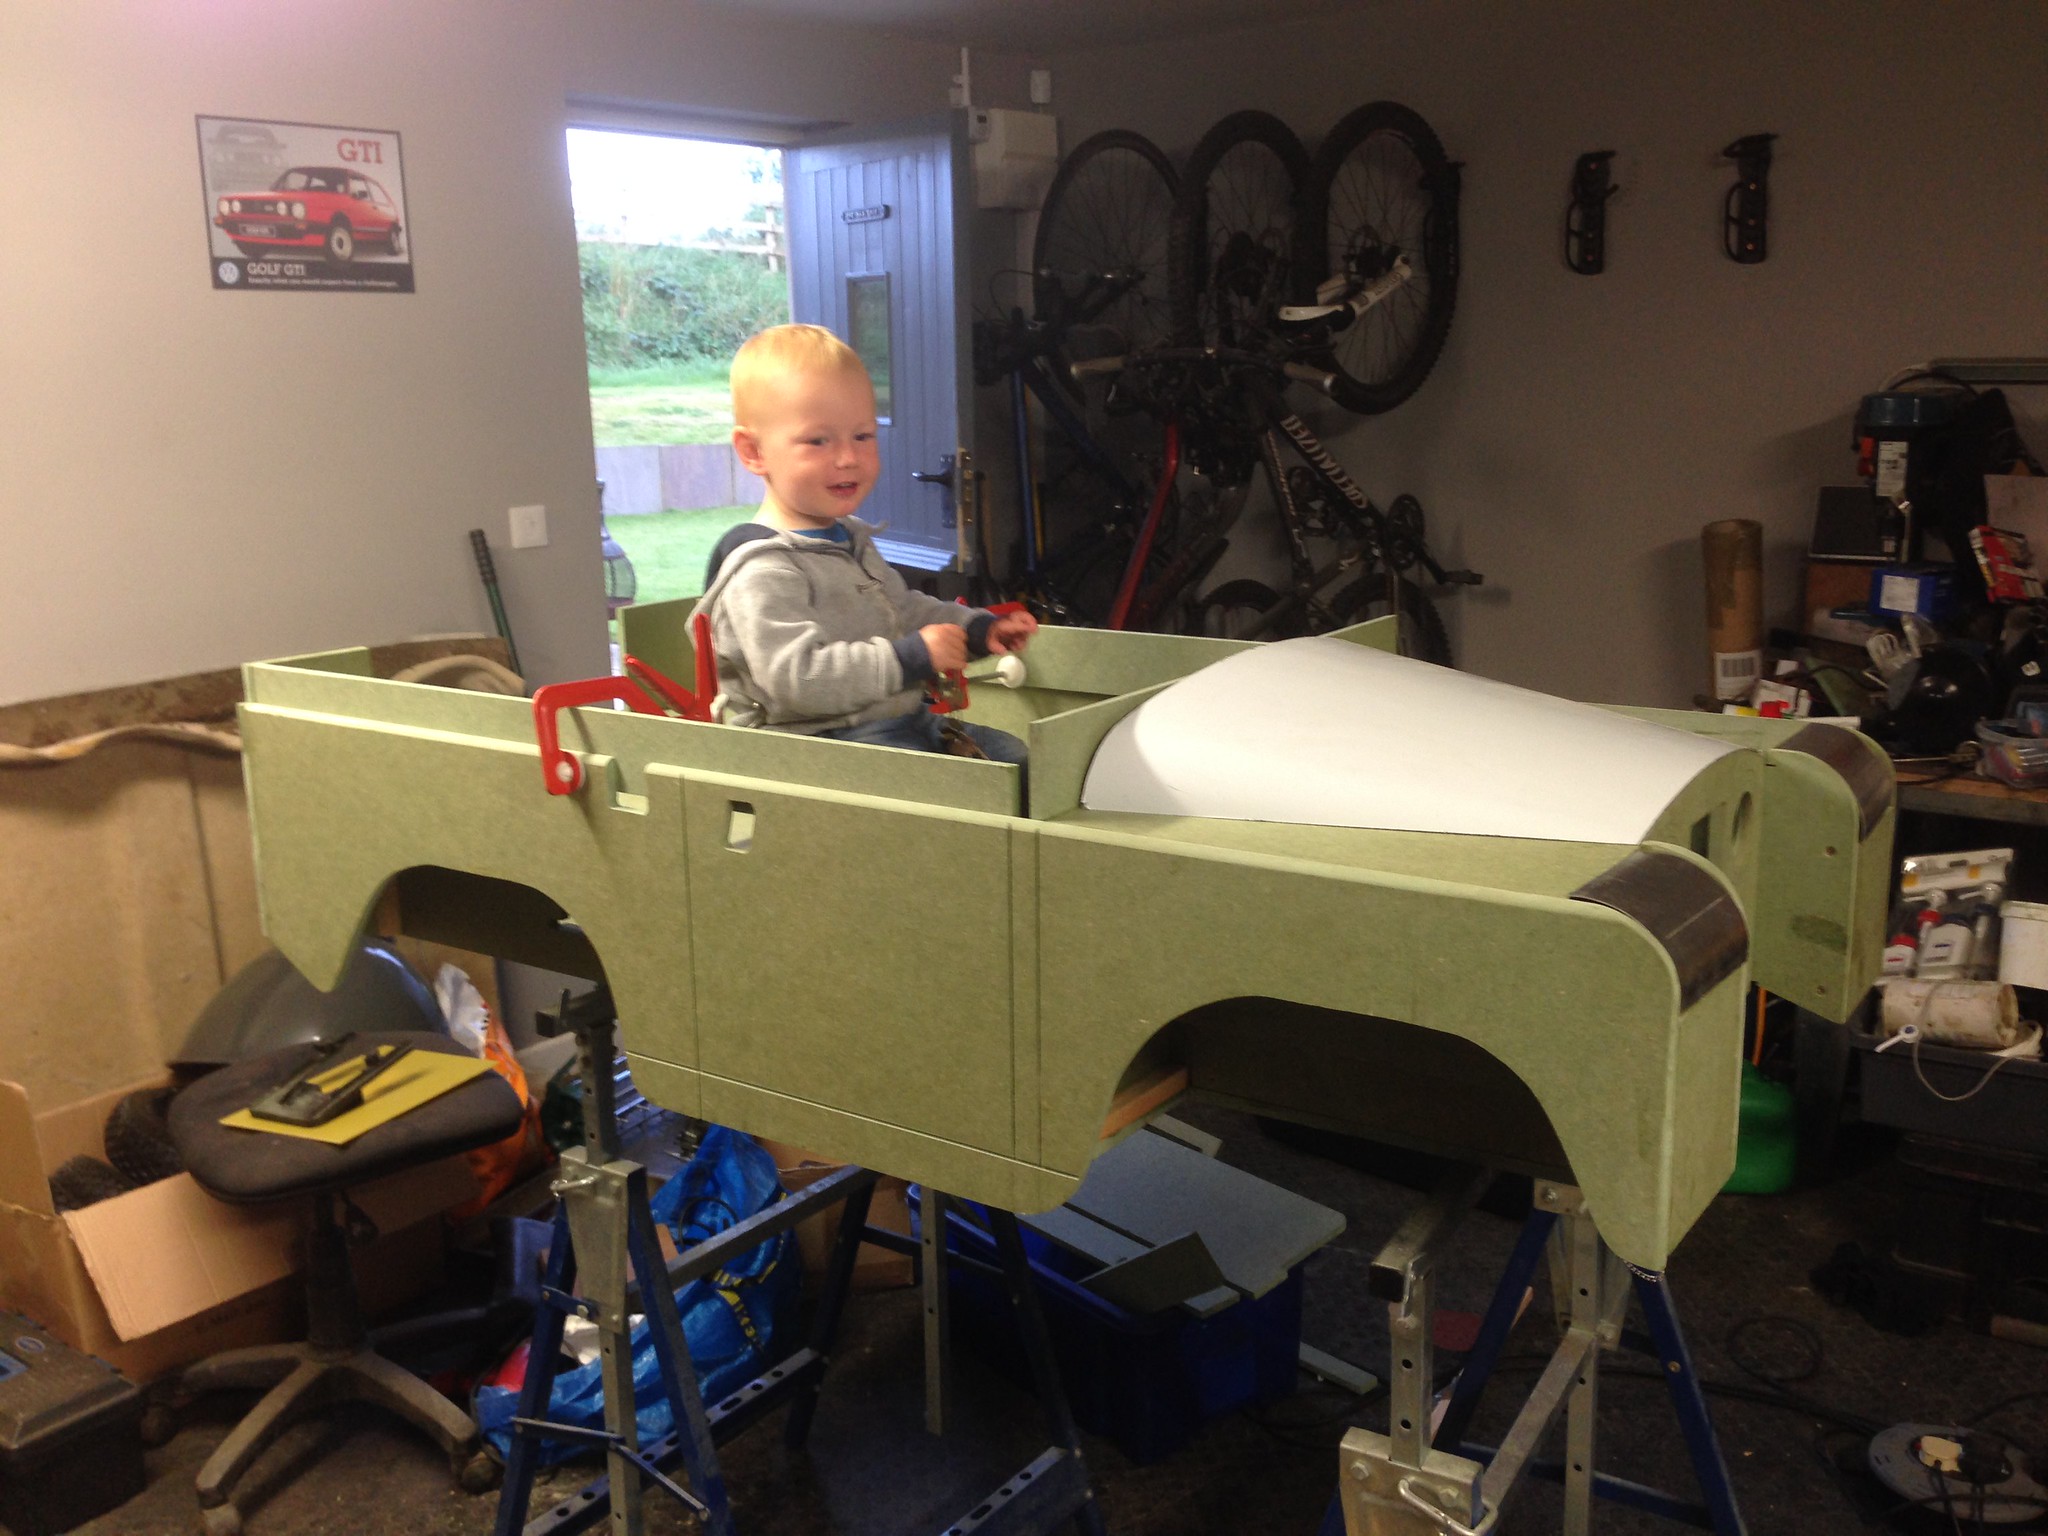
And someone saw their new car for the first time, pointed at it and shouted...
"Hammer!"

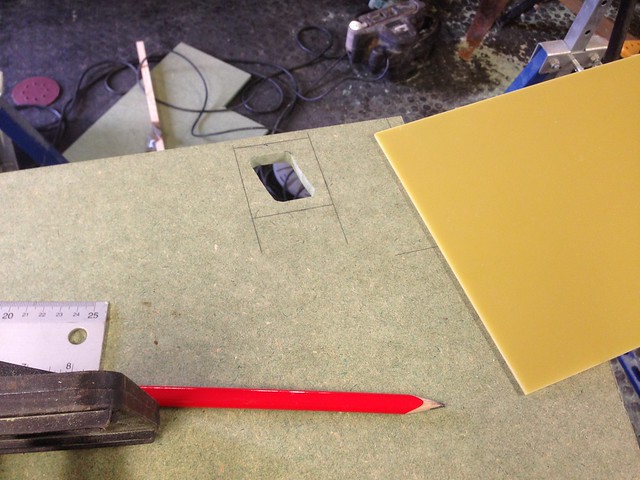

As I mentioned before, I wanted a bit more detail than the standard plans, so with some full scale measurements I've started the beginnings of the fuel filler/cap, and I've routed out the insides of the door handle recesses from inside the body, ready to fit the handles which I shall fabricate, and then blank it off with the yellow GRP plate material so it's smooth inside.
Body sides on was a very satisfying moment...no mistaking what it is now, especially with the aluminium bonnet placed in situ. The bonnet profile is a bit high in the pic, and will site lower once on it's ribs. The whole thing seems to have gone together very square and hopefully there won't be too much filling and sanding involved (although the ally front wing caps will need a fair bit of work)
Next will be the bulkhead (the angled top is not yet on) which will have opening vents, a real Landy hallmark (sadly dropped on the last line of TDCi models!)
And someone saw their new car for the first time, pointed at it and shouted...
"Hammer!"
Thanks guys! 
Miniman...go for it...TBH it was your original thread that made me think "if I ever have kids, I want to build one of those". Be great to see you pick yours up again...why did you stop?
More to follow...need to start thinking about steel bits soon and wielding the welding torch!
Miniman...go for it...TBH it was your original thread that made me think "if I ever have kids, I want to build one of those". Be great to see you pick yours up again...why did you stop?
anonymous said:
[redacted]
Ha...it will use the mobility scooter wiring harness which includes a 4mph/8mph switch and limiter potentiometer (working separate to the "throttle" which will both be under the bonnet away from little fingers! TBH 8mph is quite quick, and remember a mobility scooter is designed to carry some, erm, quite large people...so with just him in it, it should whizz along...hmmm...More to follow...need to start thinking about steel bits soon and wielding the welding torch!
Gah!! Typed out a long post about going "off piste" and making door handles out of broken dinghy booms, changing the angle of the top bulkhead to be more accurate, coming up with an alternative to the horrible Toylander screen hinges, GRP plate and SP106 marine epoxy being used in various areas, and having proper opening scuttle vents instead of drawn on lines, and then lost the post. Booger. So instead here are just the pics...worth 1000 words and all that...
More progress. Sorry, but I cheated and ordered all of the fabricated steel parts from Toylander...for some parts it was debatable whether making them would actually be any cheaper than just buying them, and it does mean that I've cut a load of time from the build. The exception is the front axle, which will use a lot of the scooter parts, as the swivels/stub axles are much better than the Toylander solution.
So we have a rear axle test fitted in position...really looking like a Landy now!
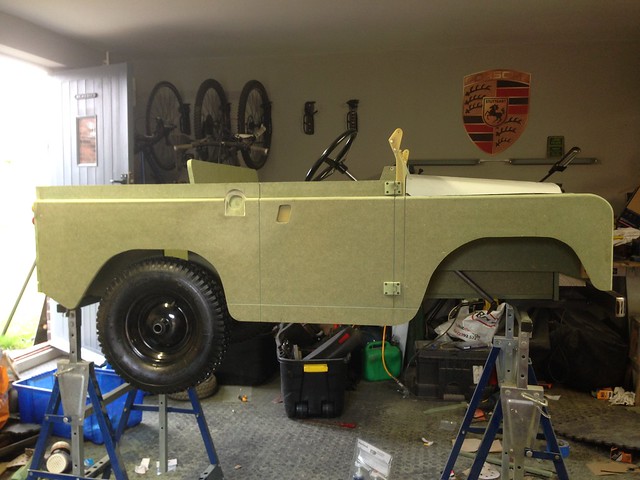
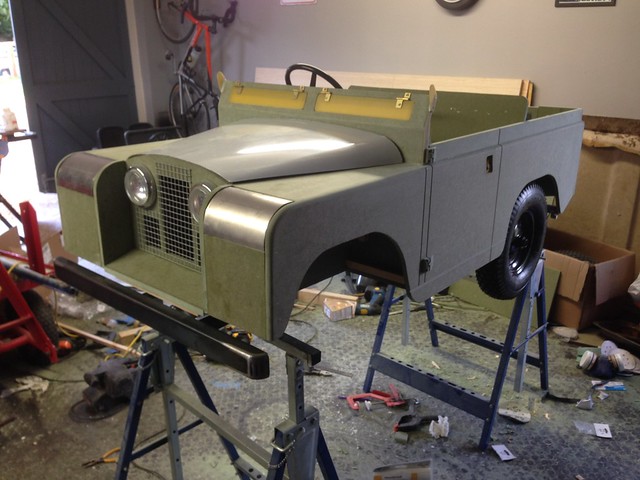
I really wanted to use the traditional steering wheel from an Austin J40 pedal car, would have been more in keeping, however it was too big at 9.5" so I went for the standard Toylander part, and will modify the boss to look a bit more convincing.
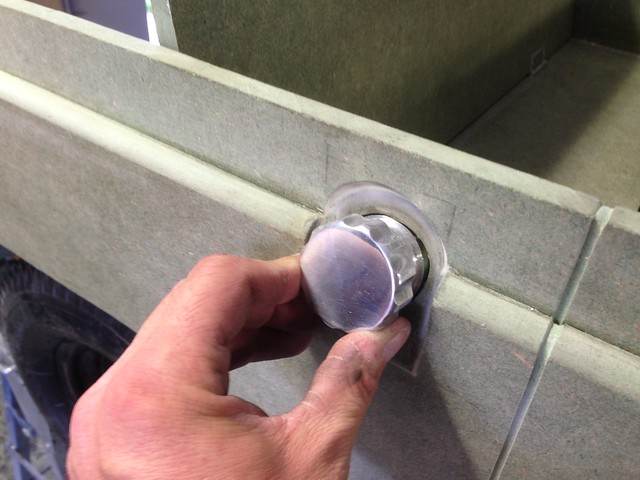
Rear lights, grab handles, and tailgate test fitted. Black stuff on the tailgate is 1.5 mm GRP plate routed in flush from behind.
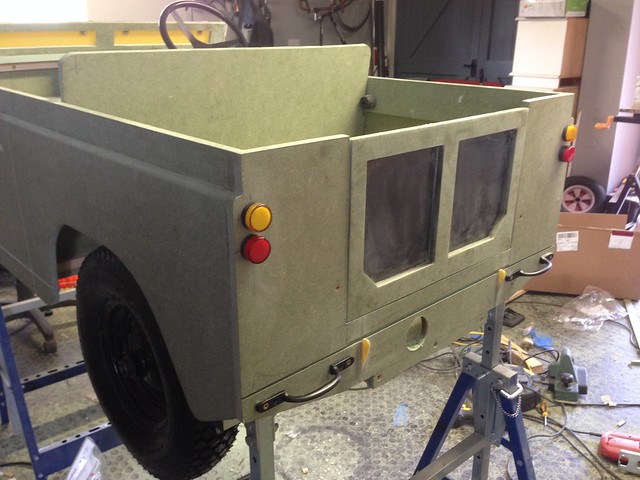
Bit of detail not on the plans, including fuel filler, opening scuttle vents, scale wiring covers, a much improved bulkhead end, and door hinges. Proper Landy geeks may spot they are Series 3/Defender hinges rather than the correct Series 2a ones, but were much easier to make and less likely to catch on things and do damage.
So that's the body pretty much done for now...I'll leave as is and get firstly a rolling chassis, then get the electrics up and running. Then I'll take the whole thing apart again and paint it...lots of prep work needed here, for example hiding those screw heads on the vent hinges, but no point in spraying it until every last screw hole has been drilled!
So we have a rear axle test fitted in position...really looking like a Landy now!
I really wanted to use the traditional steering wheel from an Austin J40 pedal car, would have been more in keeping, however it was too big at 9.5" so I went for the standard Toylander part, and will modify the boss to look a bit more convincing.
Rear lights, grab handles, and tailgate test fitted. Black stuff on the tailgate is 1.5 mm GRP plate routed in flush from behind.
Bit of detail not on the plans, including fuel filler, opening scuttle vents, scale wiring covers, a much improved bulkhead end, and door hinges. Proper Landy geeks may spot they are Series 3/Defender hinges rather than the correct Series 2a ones, but were much easier to make and less likely to catch on things and do damage.
So that's the body pretty much done for now...I'll leave as is and get firstly a rolling chassis, then get the electrics up and running. Then I'll take the whole thing apart again and paint it...lots of prep work needed here, for example hiding those screw heads on the vent hinges, but no point in spraying it until every last screw hole has been drilled!
Edited by Hard-Drive on Tuesday 12th September 17:17
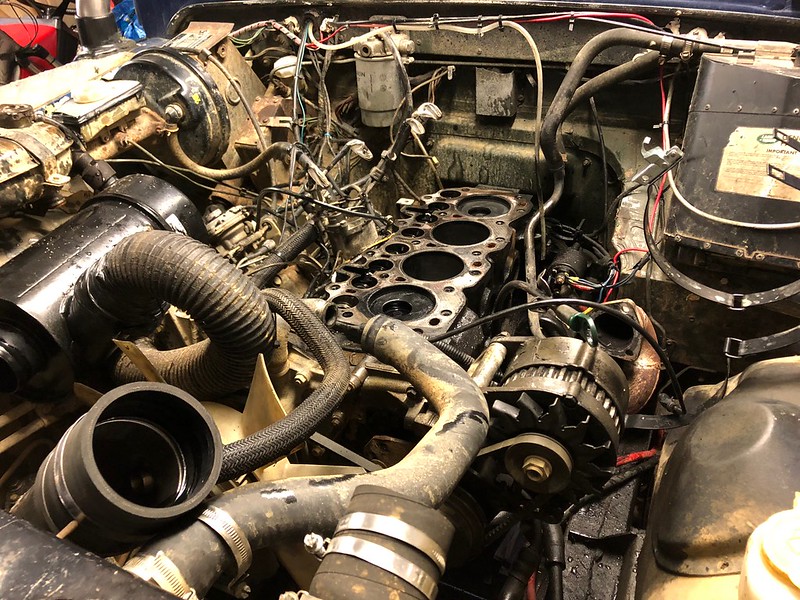
Been a bit slow recently due to this happening on the full sized one. Blown head gasket now fixed...must have been going slightly for as long as I've had her as magically now we have more power, less smoke, and no more oil leaks!
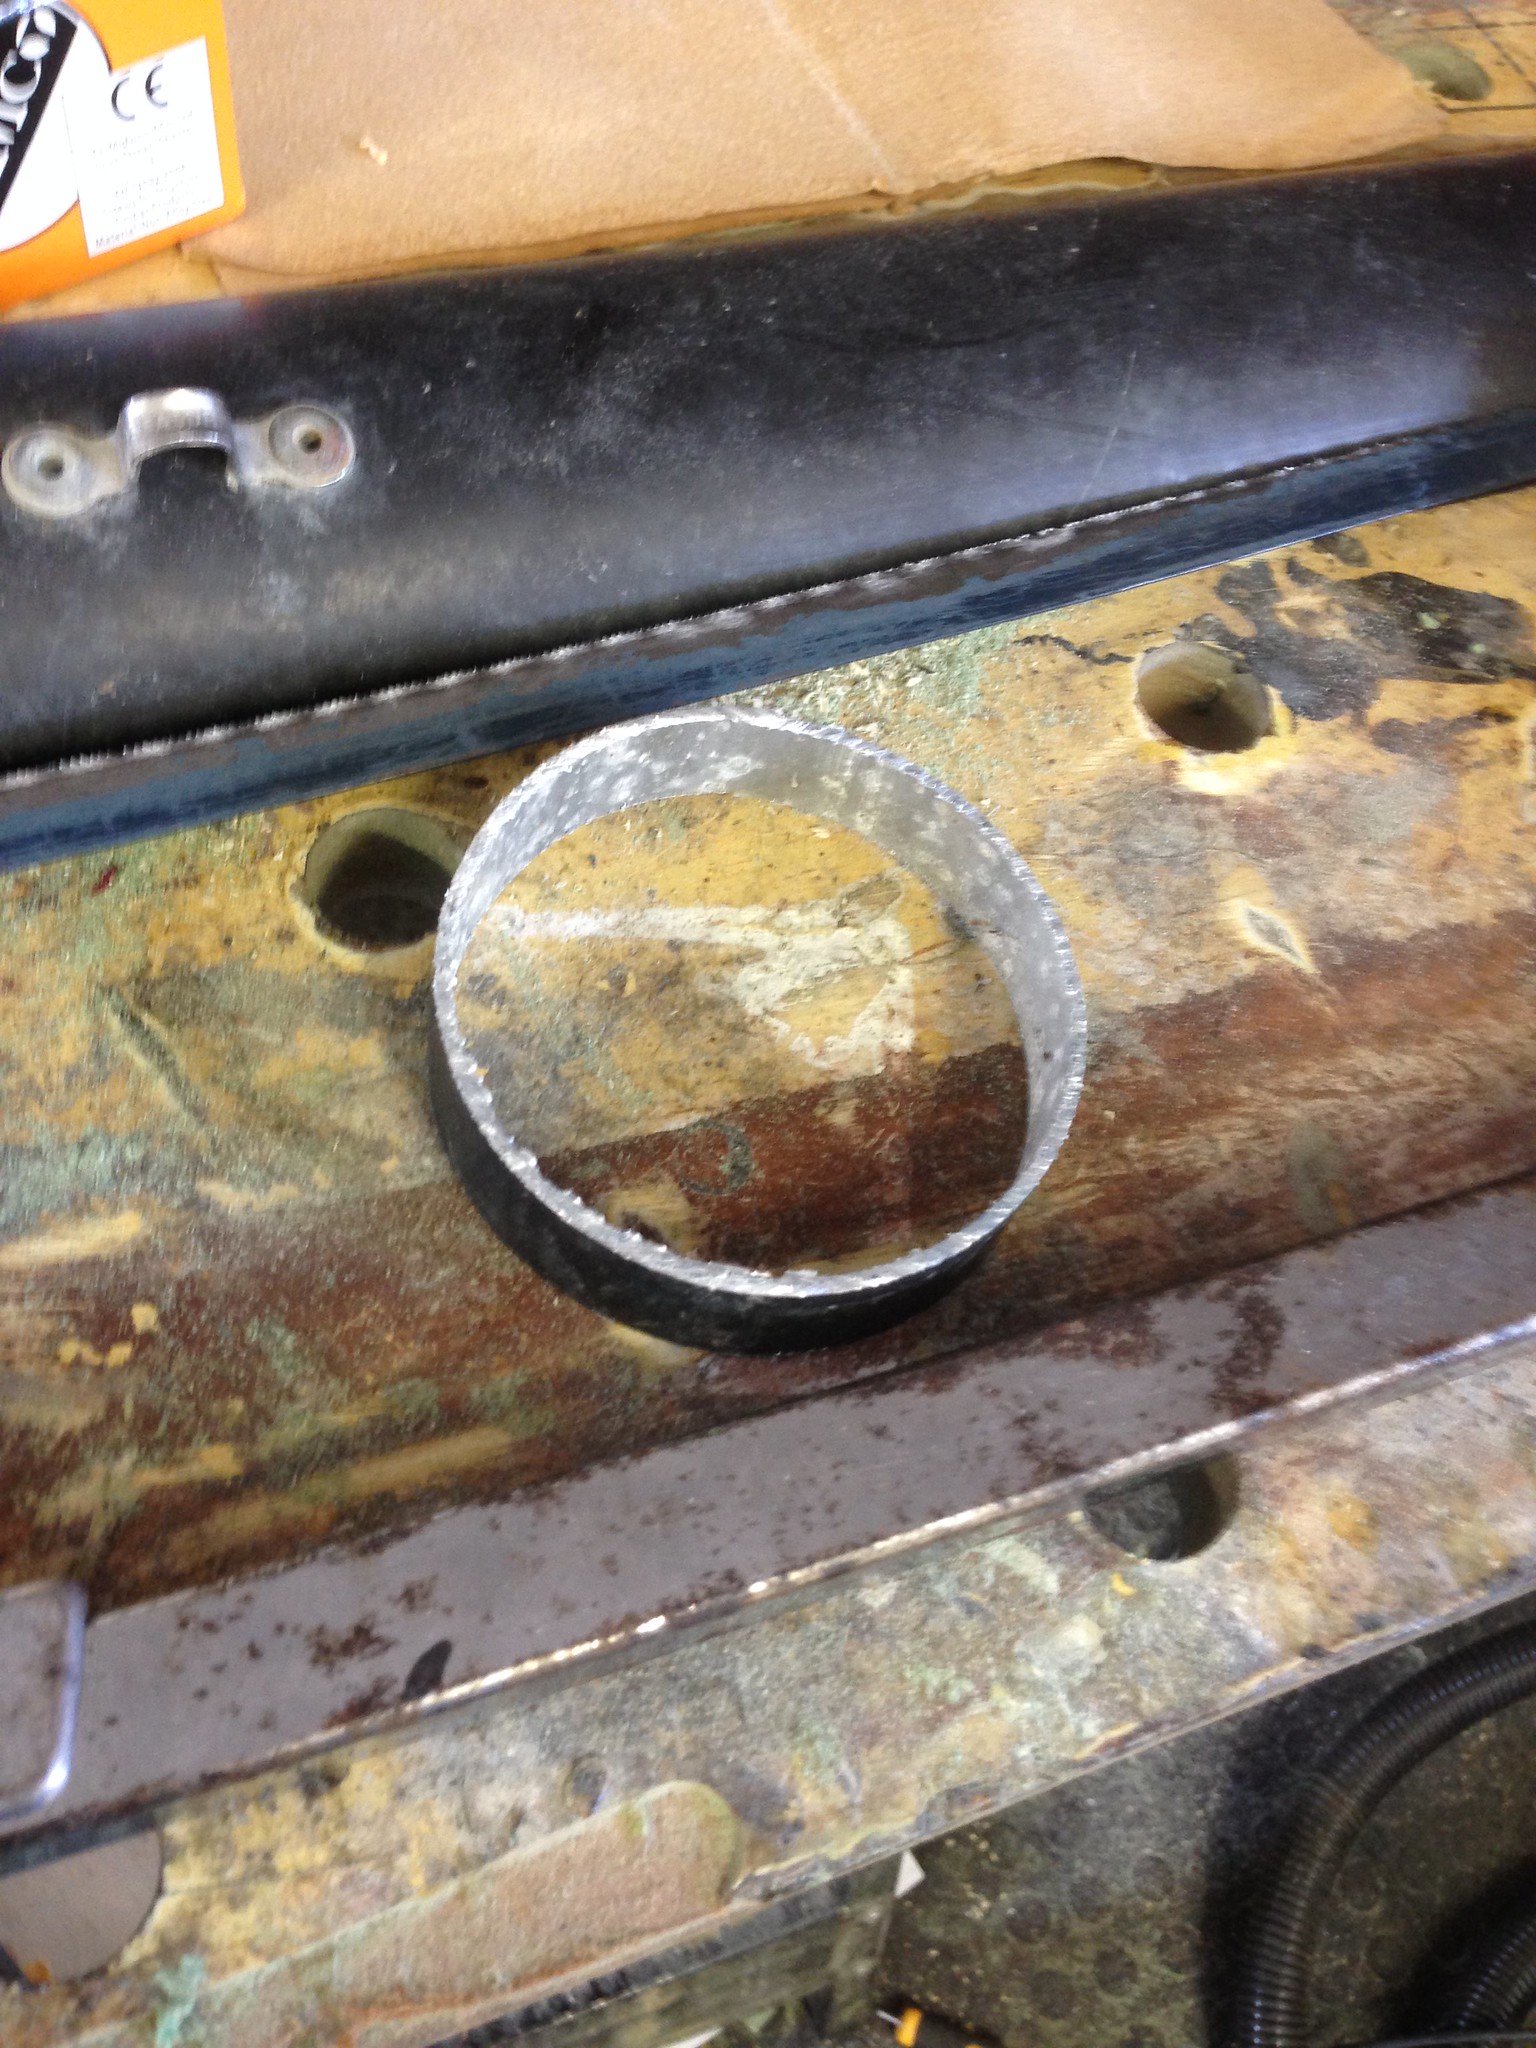
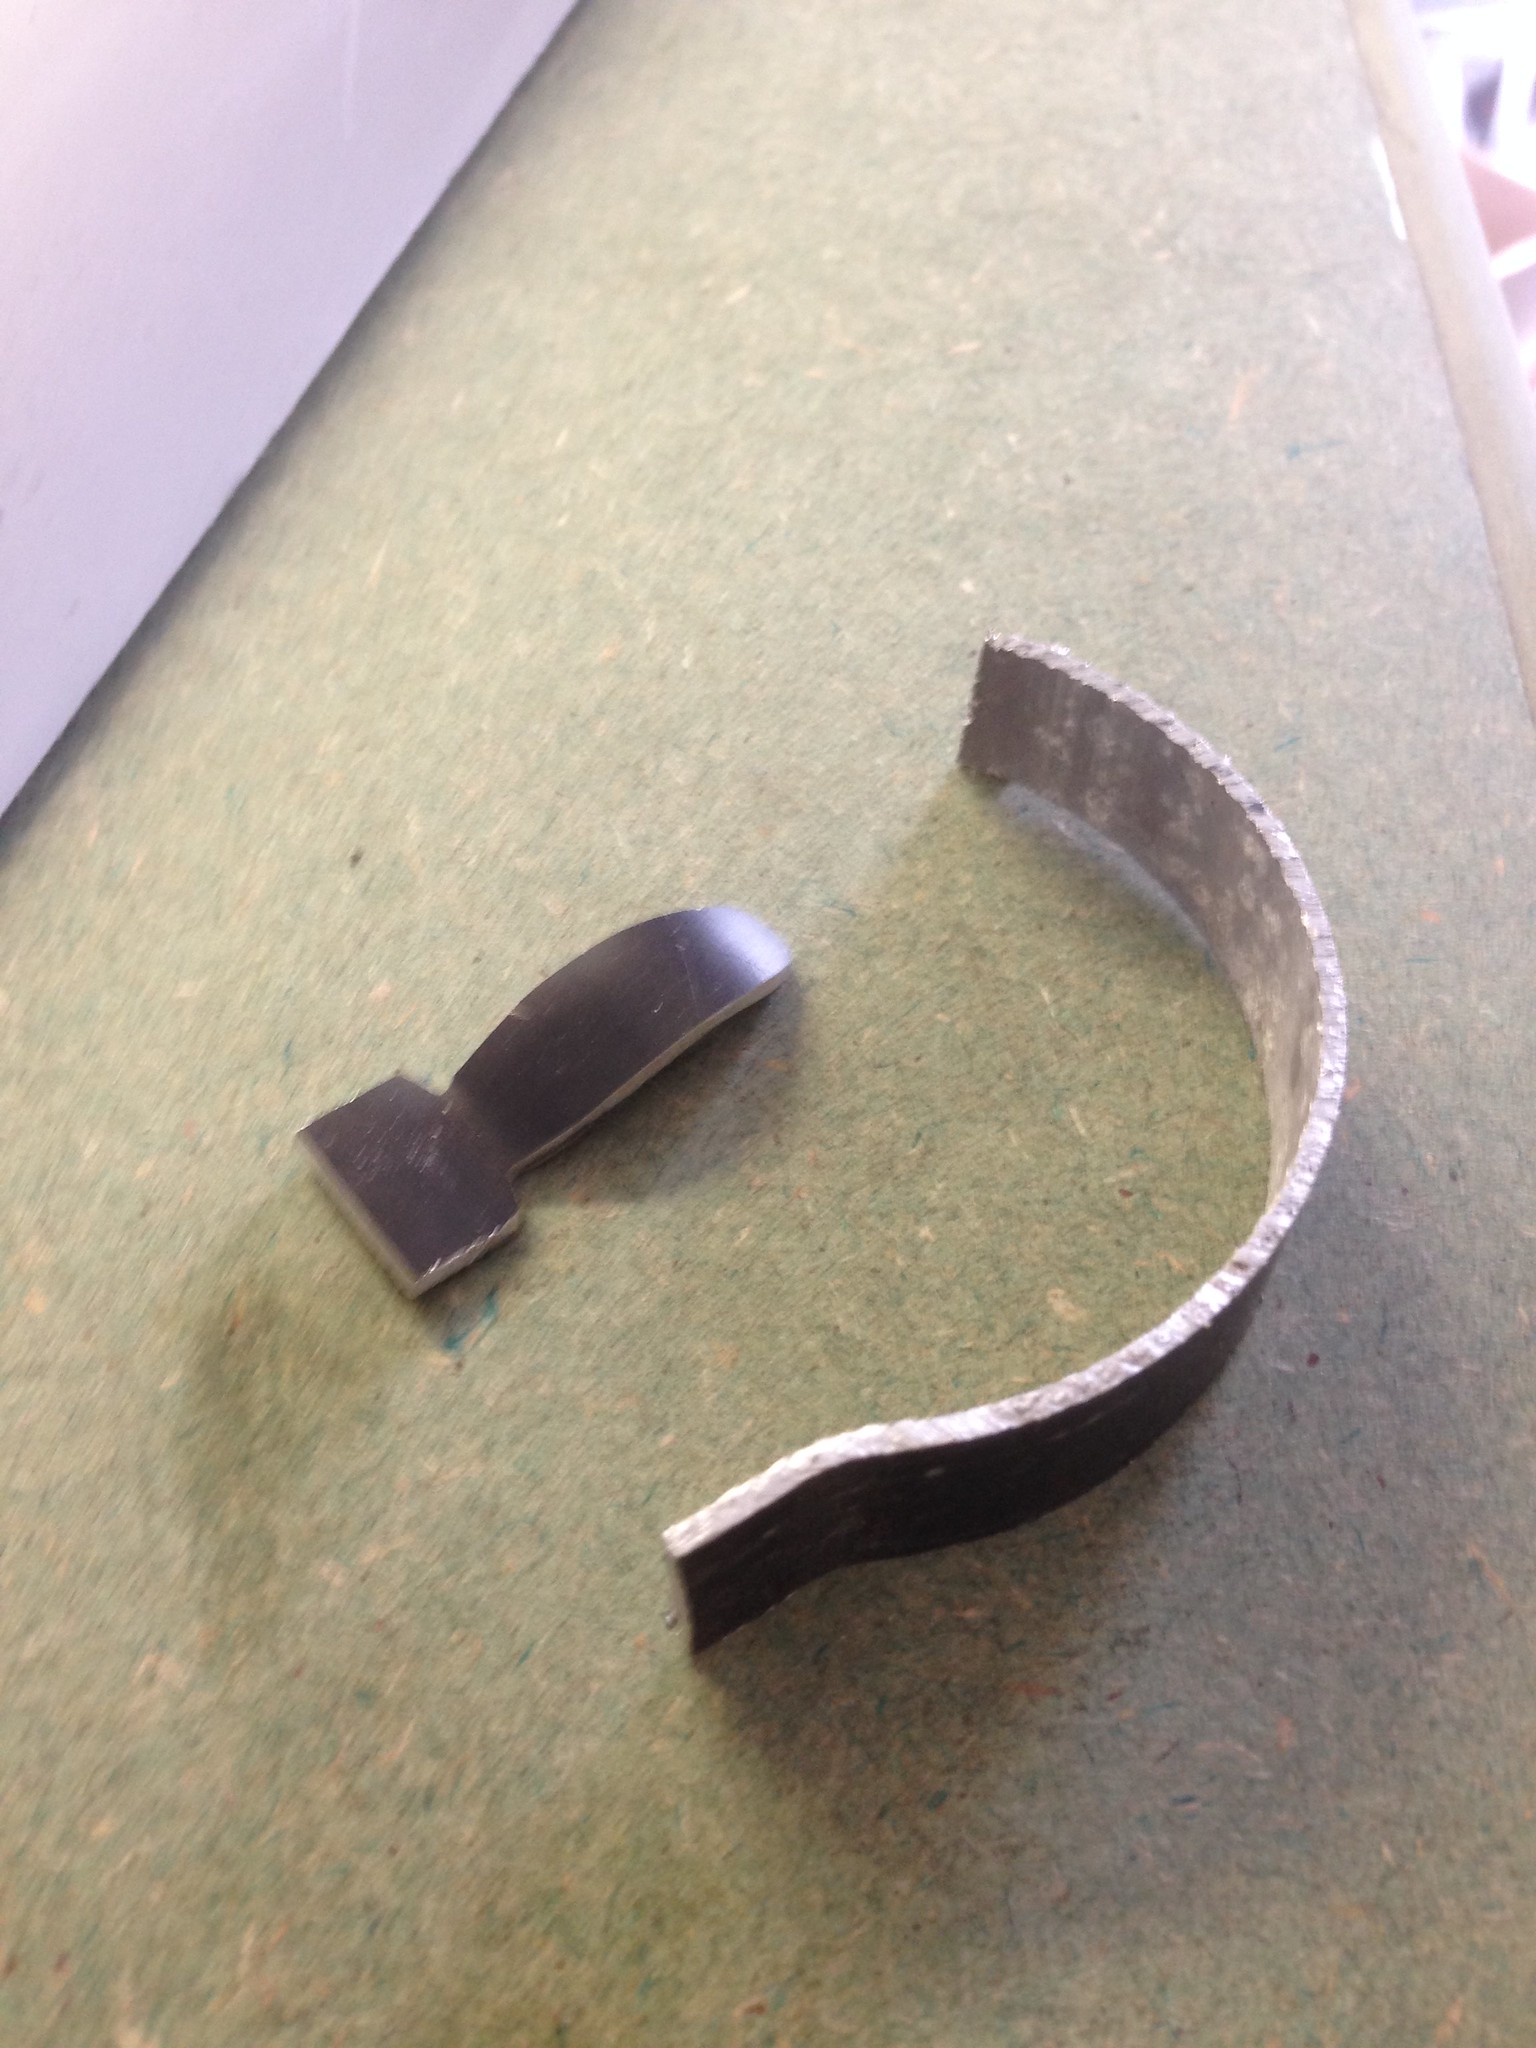
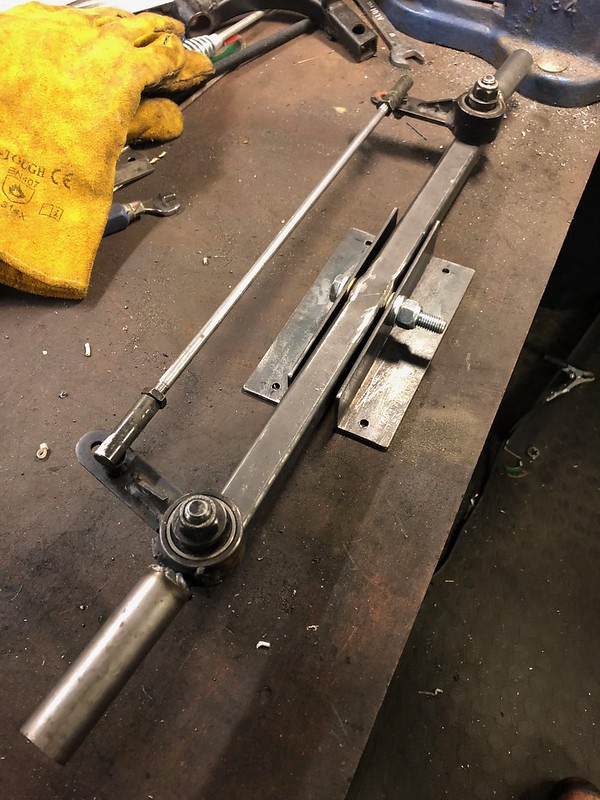
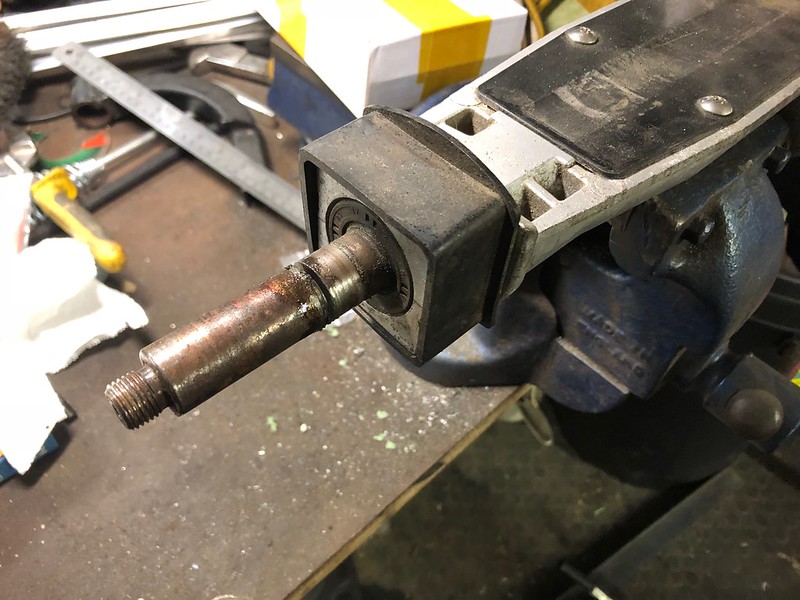
Anyway, back to the little one. I wanted to improve on the fairly pants Toylander design and use the stub axles from the mobility scooter. Here they are, with a sleeve I got turned up to make the axle longer and to go from 15mm OD to 1" to suit the bigger wheels. Bar and angle ready to make other bits...
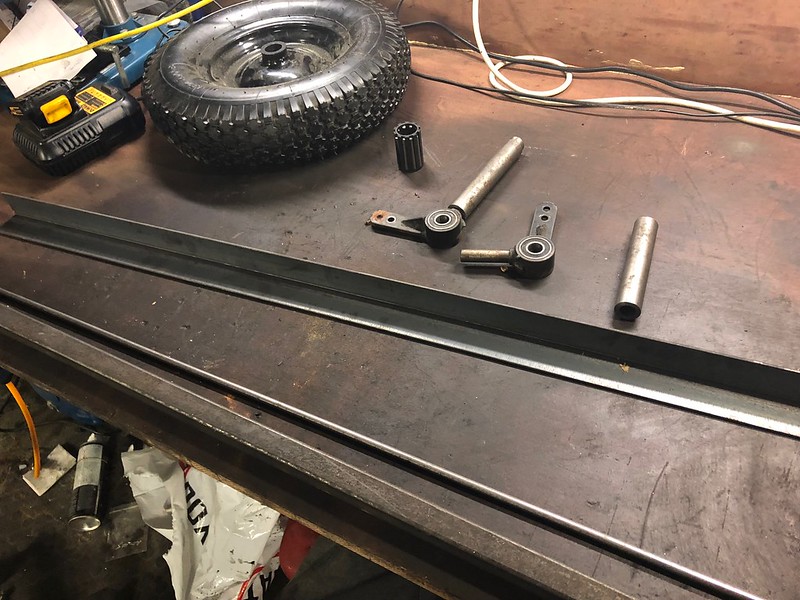
Drilling the central axle pivot in my high precision German pillar drill (...it's from Aldi). Axle is a swing axle, like a tractor...
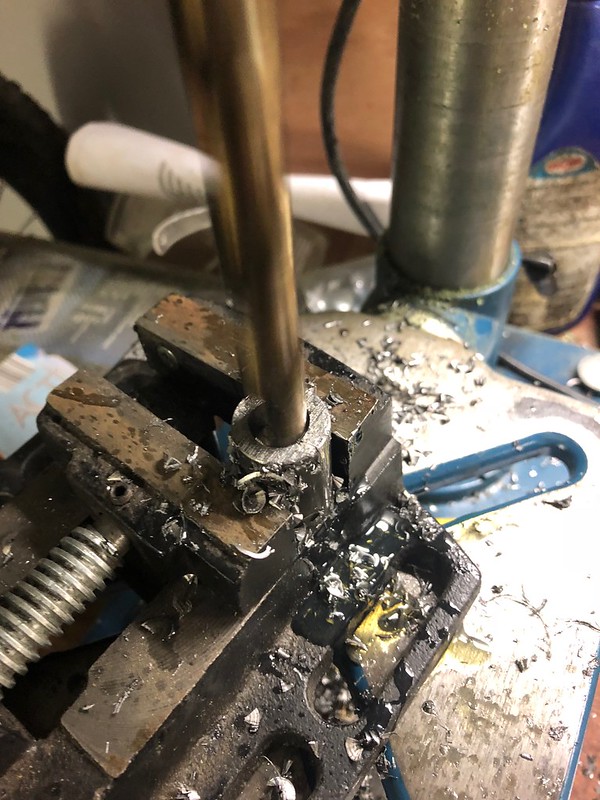
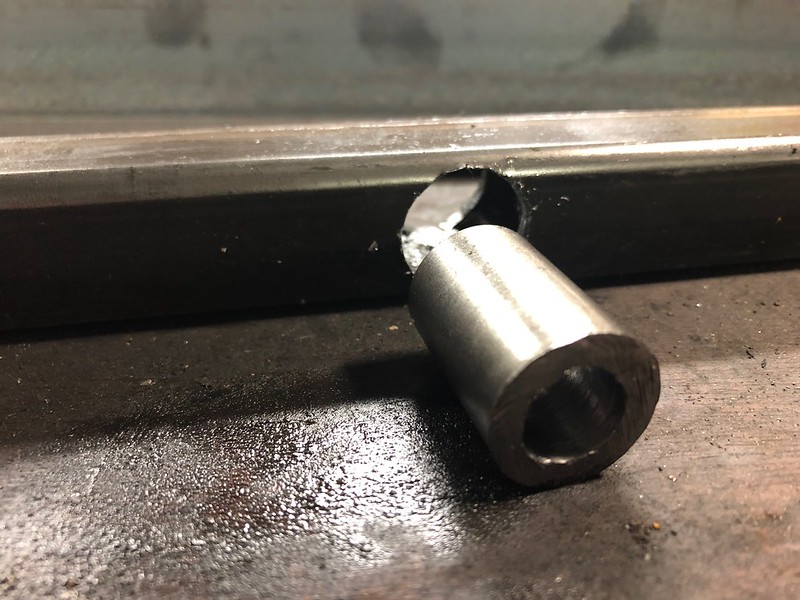
Finished piece ready to go into new axle beam...
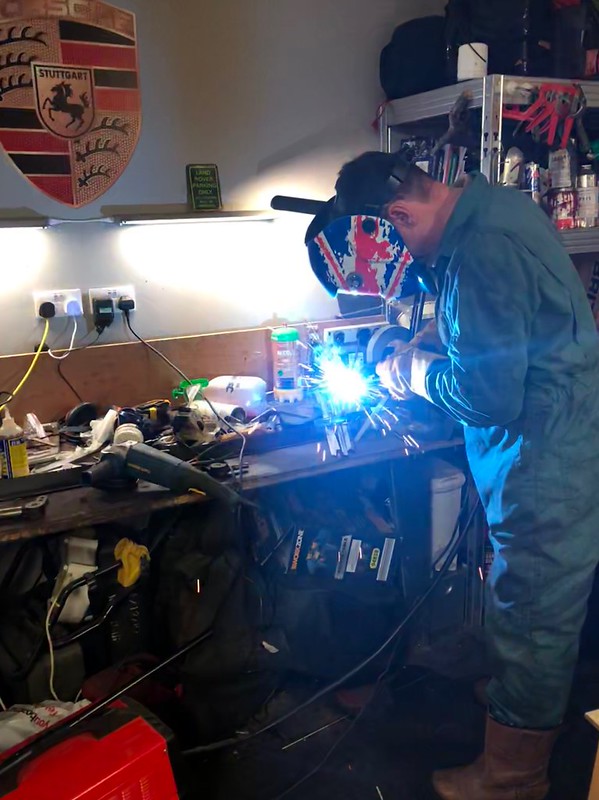
Welding it all together...
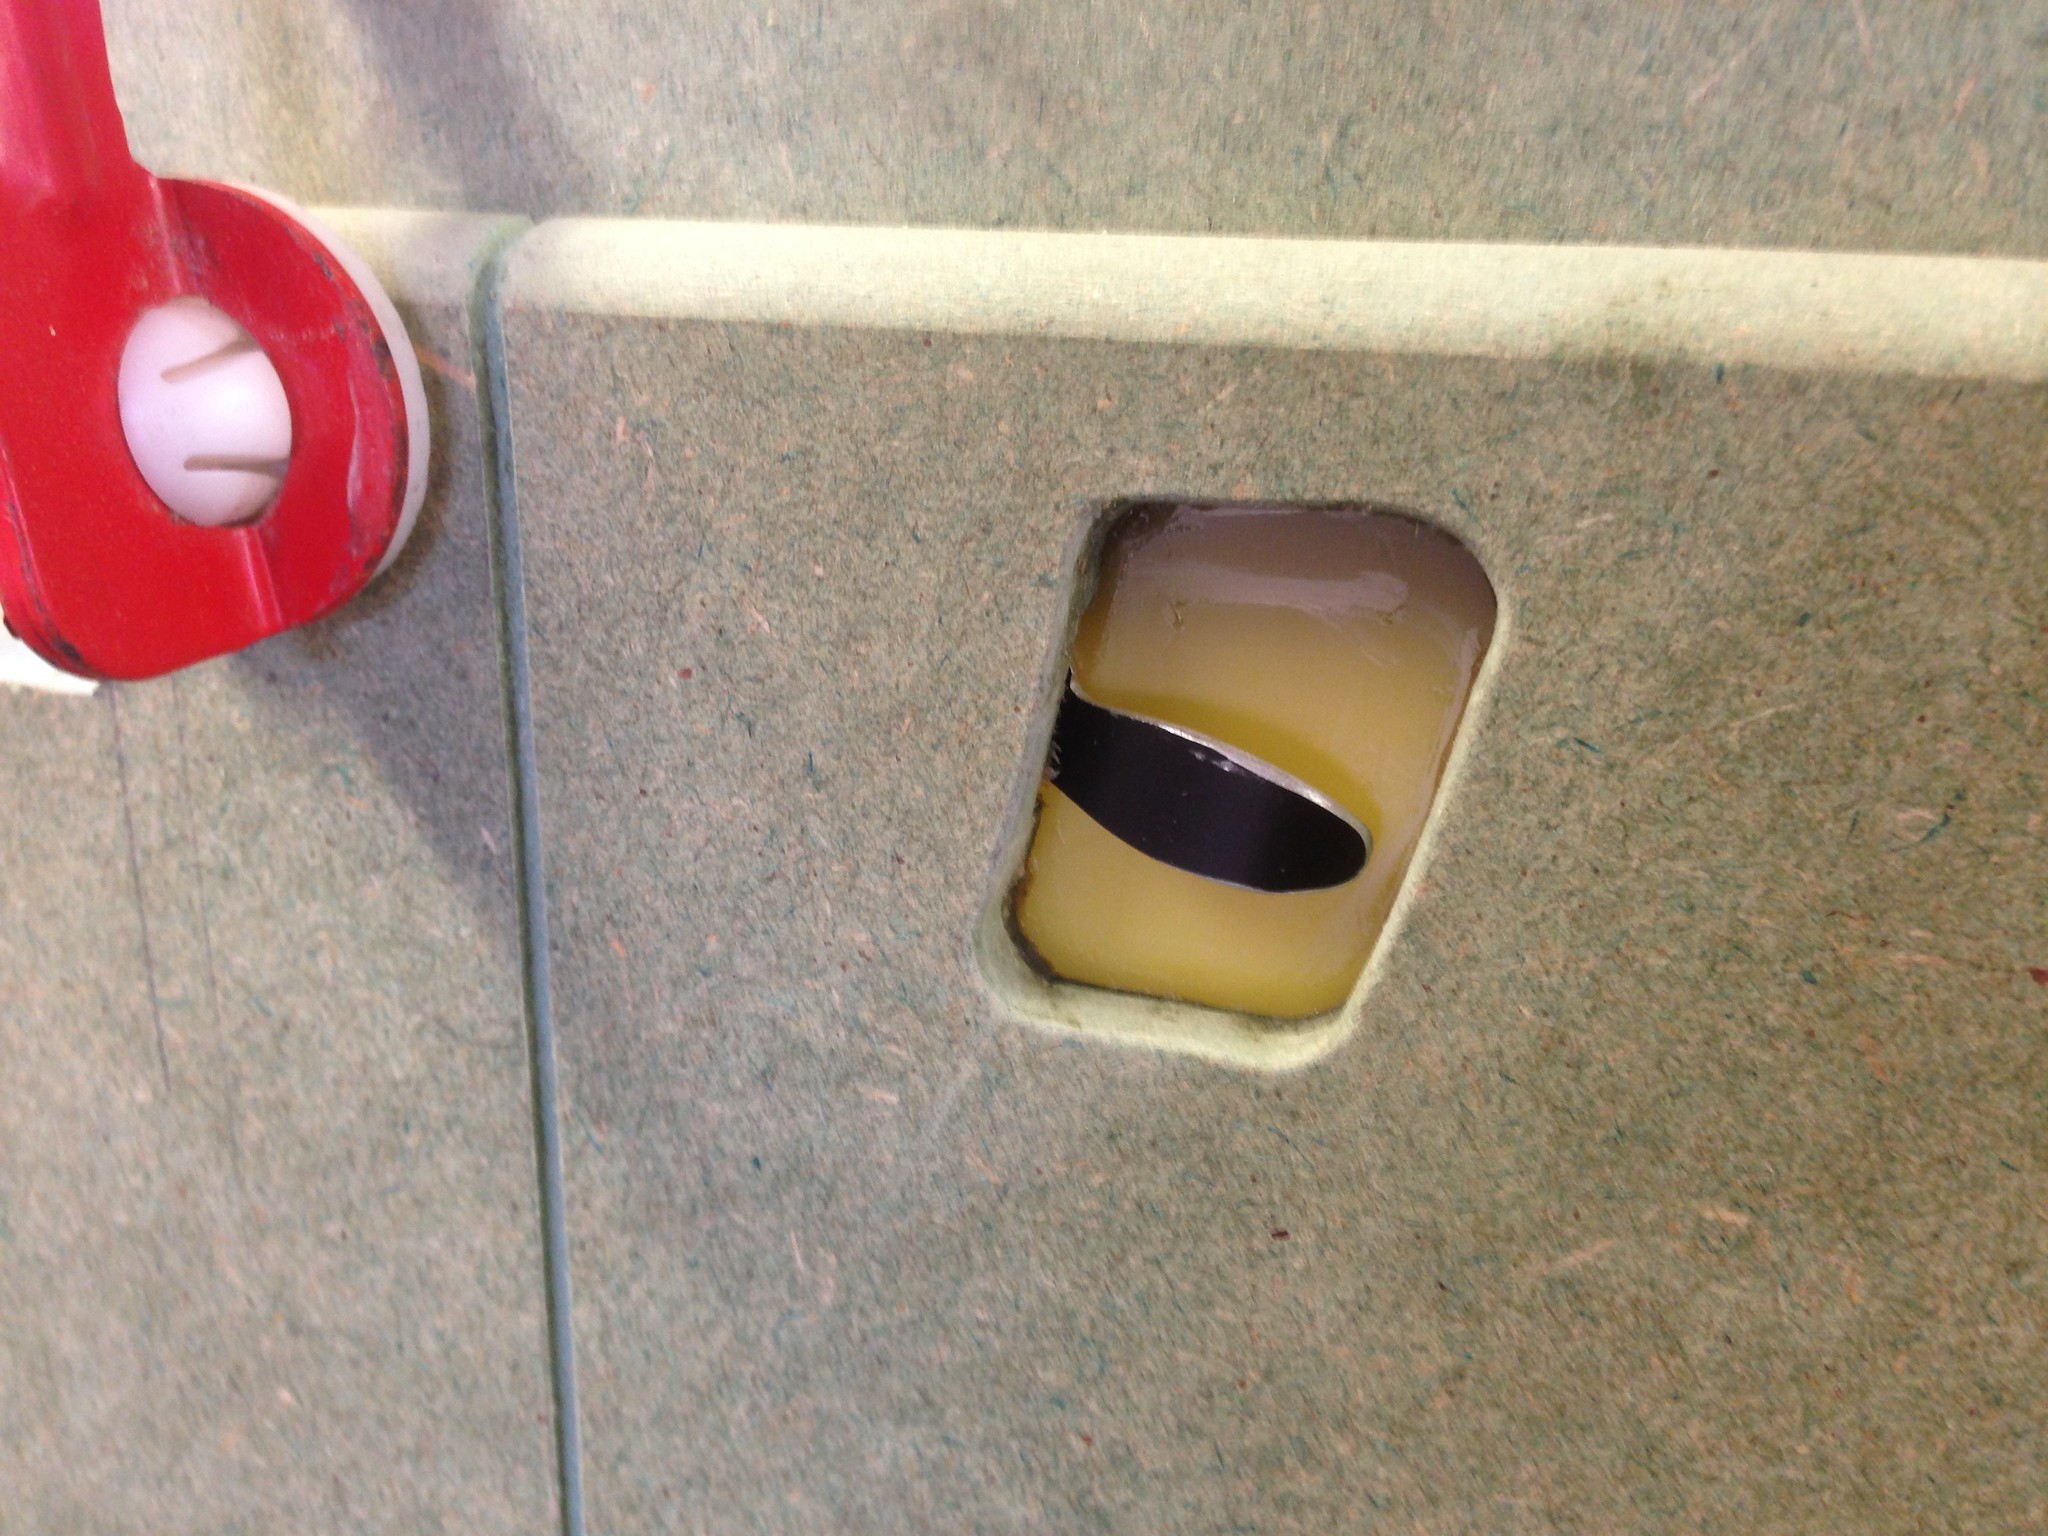
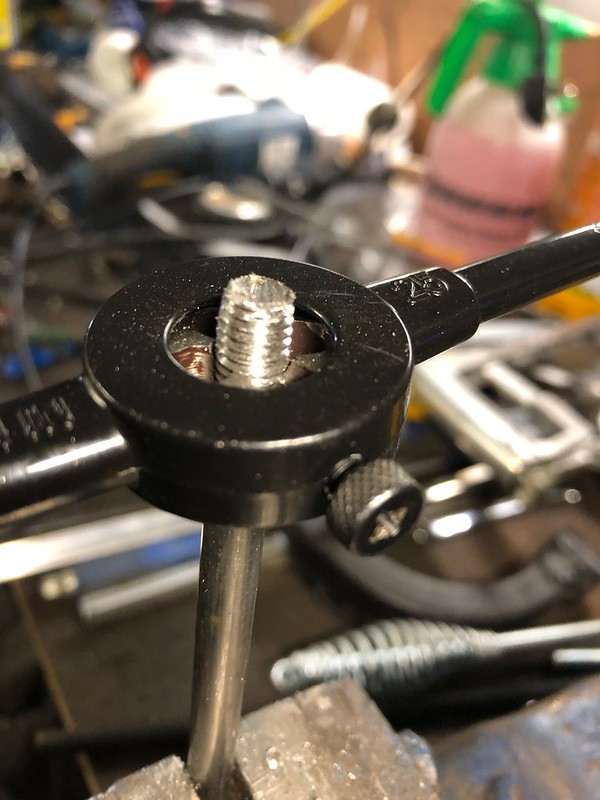
Making new track rods. Of course, one end had to be left hand threaded which threw me a bit...
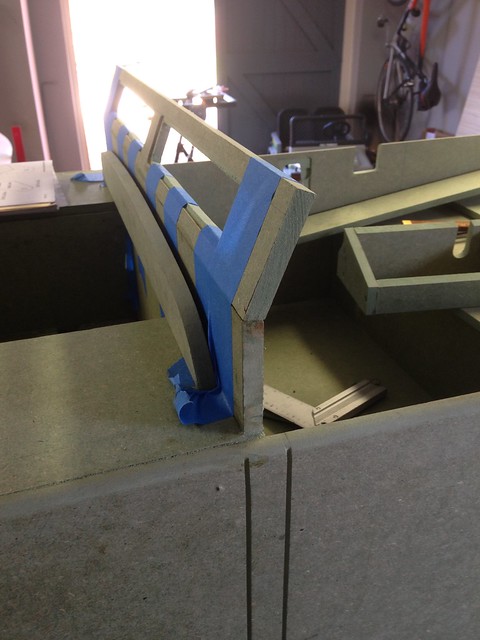
Axle on the bench...
And then on the vehicle...
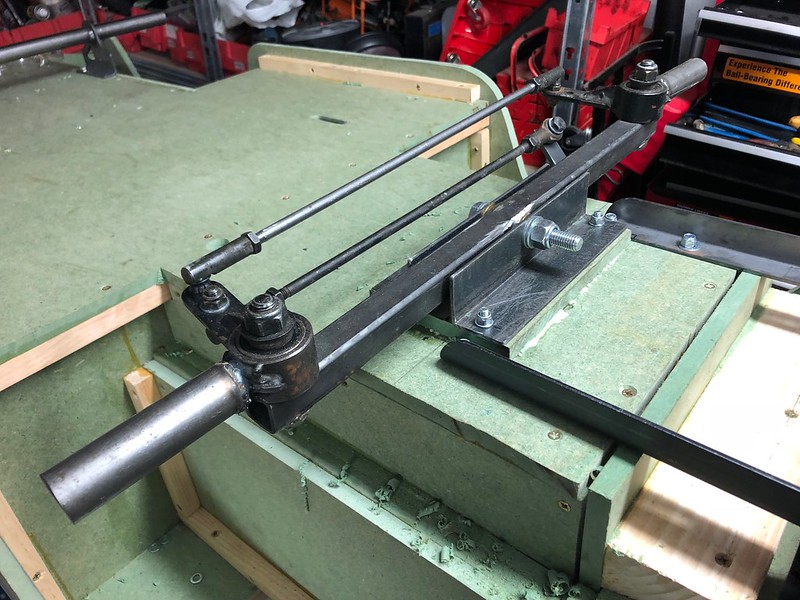
And today we had "roll out", with it sat on it's wheels and steering for the first time...
Got some "flex" (axle articulation) too!

Back into the workshop, and I chopped the ends off the old mobility scooter transaxle, where the old scooter wheels went straight onto, and fitted the gears to take the chain drive down to the back axle...
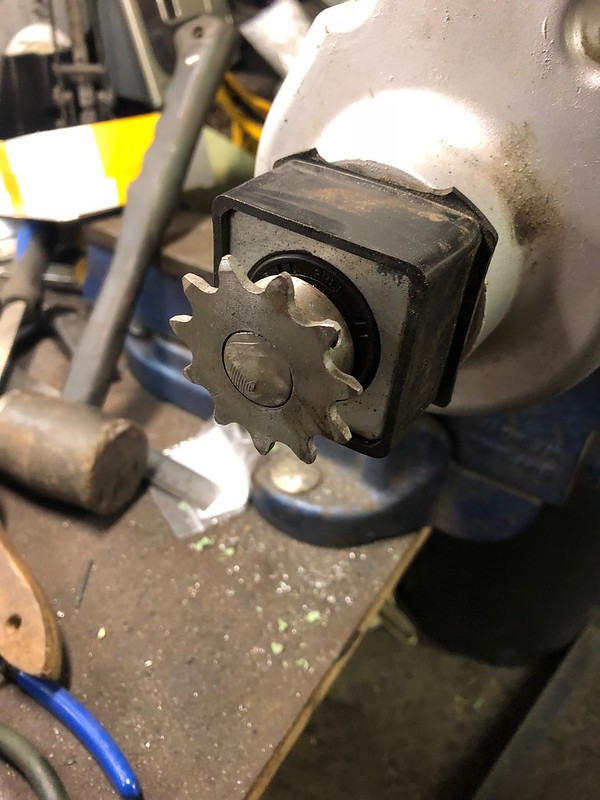
...and lastly test fitted the motor/transaxle in place. Now I can work out where the chains need to go, and cut the axle spacers on the rear axle to the right length, and weld the lower gears in place.
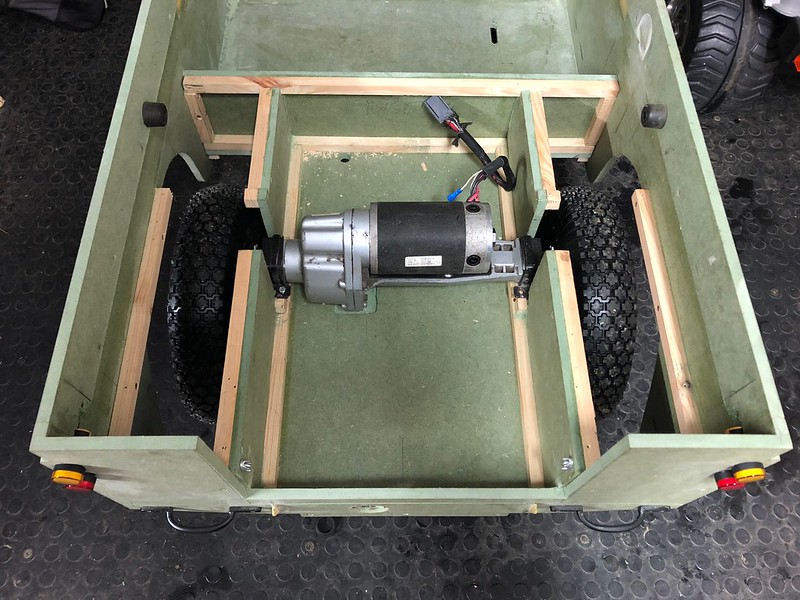
It really does feel like it's starting to come together now. Next thing is brakes, and an initial test fit of the scooter wiring harness to make sure it all moves properly, before then putting some slightly more bespoke wiring together.
Anyway, back to the little one. I wanted to improve on the fairly pants Toylander design and use the stub axles from the mobility scooter. Here they are, with a sleeve I got turned up to make the axle longer and to go from 15mm OD to 1" to suit the bigger wheels. Bar and angle ready to make other bits...
Drilling the central axle pivot in my high precision German pillar drill (...it's from Aldi). Axle is a swing axle, like a tractor...
Finished piece ready to go into new axle beam...
Welding it all together...
Making new track rods. Of course, one end had to be left hand threaded which threw me a bit...
Axle on the bench...
And then on the vehicle...
And today we had "roll out", with it sat on it's wheels and steering for the first time...
Got some "flex" (axle articulation) too!
Back into the workshop, and I chopped the ends off the old mobility scooter transaxle, where the old scooter wheels went straight onto, and fitted the gears to take the chain drive down to the back axle...
...and lastly test fitted the motor/transaxle in place. Now I can work out where the chains need to go, and cut the axle spacers on the rear axle to the right length, and weld the lower gears in place.
It really does feel like it's starting to come together now. Next thing is brakes, and an initial test fit of the scooter wiring harness to make sure it all moves properly, before then putting some slightly more bespoke wiring together.
Edited by Hard-Drive on Wednesday 28th August 09:25
I had a separate thread running to try and find an electronics expert to help with some wiring questions...I'll just combine it here.
@Journeymanpro...I can't PM you as your settings won't allow it. So I'll write it here...
So I connected everything up on the scooter at the weekend (2 x new 12v 50Ah batteries) but bear in mind the scooter is a bit of a skeleton now so it's a bench test, not a driving/running test.
The controls are...
The wig-wag pot
Another "tortoise/hare" rotary pot on the dash
A 4mph/8mph rocker switch
...and the controller is an EGIS unit. I've had a fiddle with it and apart from the motor cutting out if you turn the tortoise/hare pot up to full (worn pot I guess) it all works fine now. So I just need to get rid of the wig wag and 4/8 switch and somehow wire in a normal pot plus use this gear lever to handle 4/8 and reverse...
So here's the switches in the gear lever. The red switch handles 1st/2nd (or 4/8mph) and the black does reverse. They are just rocker switches.
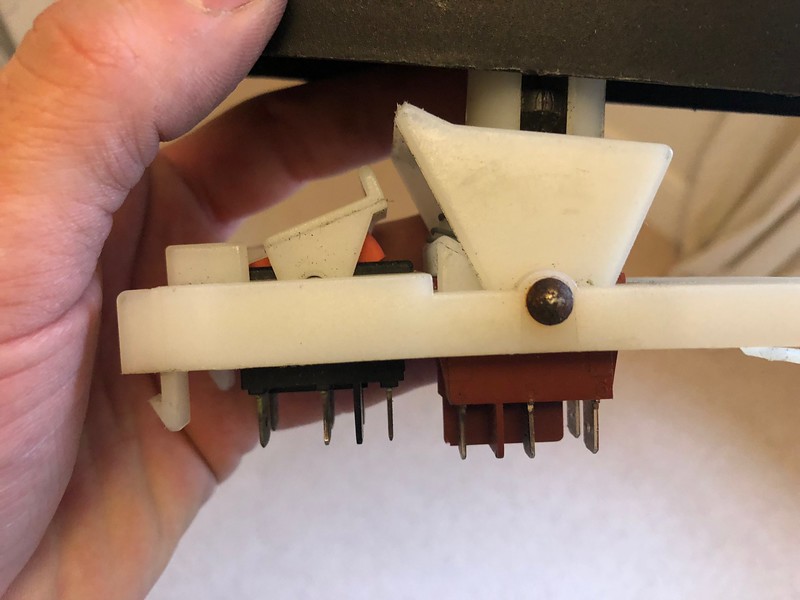
4mph...
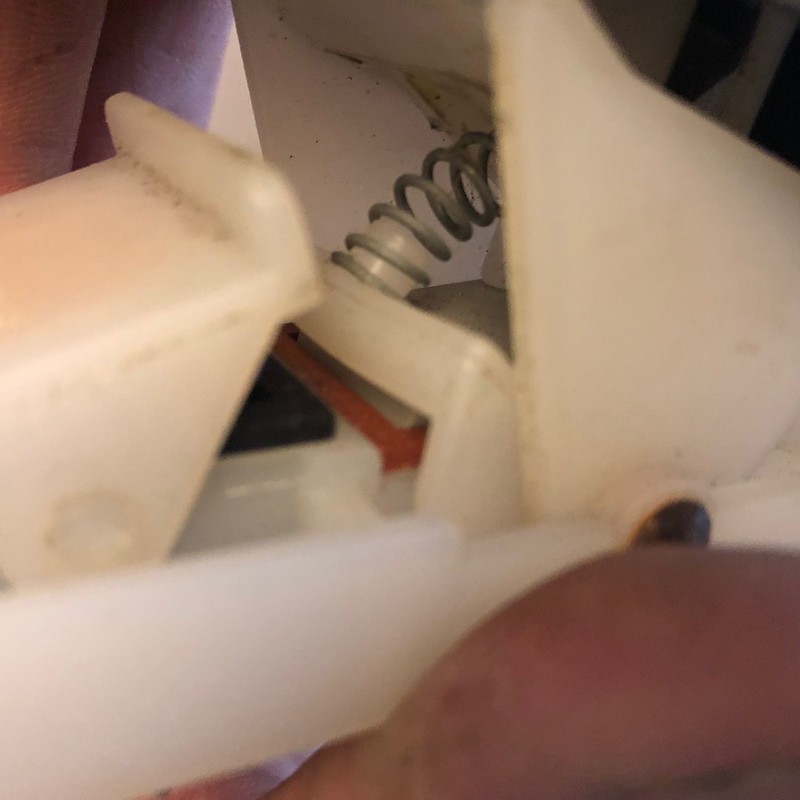
8mph...

Forward gear...
Reverse gear (pushed down with my finger for clarity rather than the lever)
The terminals...
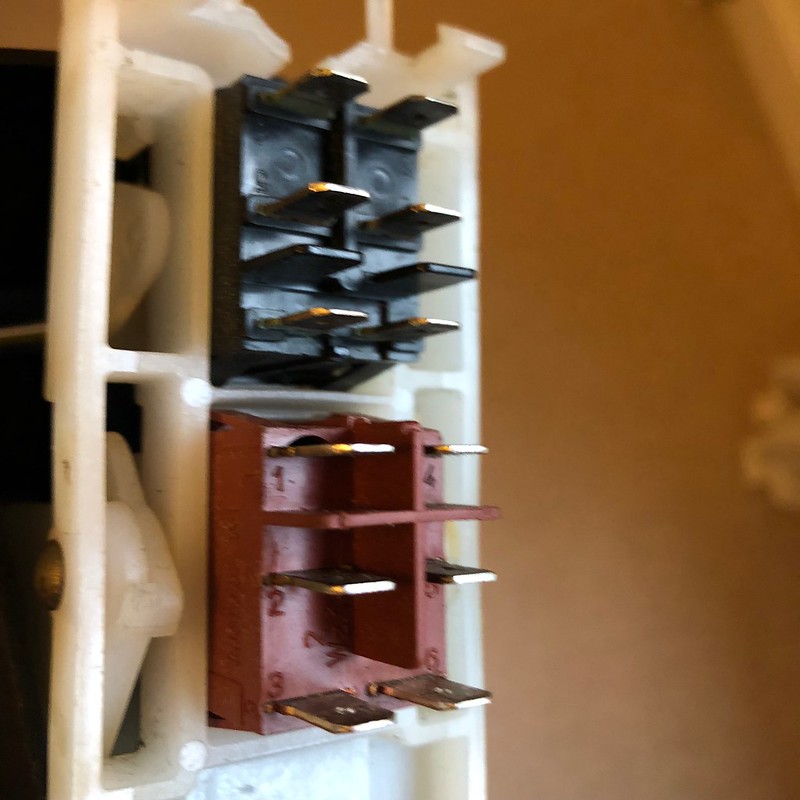
Any ideas? Thanks very much in advance!!
@Journeymanpro...I can't PM you as your settings won't allow it. So I'll write it here...
So I connected everything up on the scooter at the weekend (2 x new 12v 50Ah batteries) but bear in mind the scooter is a bit of a skeleton now so it's a bench test, not a driving/running test.
The controls are...
The wig-wag pot
Another "tortoise/hare" rotary pot on the dash
A 4mph/8mph rocker switch
...and the controller is an EGIS unit. I've had a fiddle with it and apart from the motor cutting out if you turn the tortoise/hare pot up to full (worn pot I guess) it all works fine now. So I just need to get rid of the wig wag and 4/8 switch and somehow wire in a normal pot plus use this gear lever to handle 4/8 and reverse...
So here's the switches in the gear lever. The red switch handles 1st/2nd (or 4/8mph) and the black does reverse. They are just rocker switches.
4mph...
8mph...
Forward gear...
Reverse gear (pushed down with my finger for clarity rather than the lever)
The terminals...
Any ideas? Thanks very much in advance!!
Sorry, it probably would have been helpful if I'd posted the content from the other thread to add some context here. Karona, I think the wiring may be more complex than that, as the scooter set up comes with a large speed control unit, that works in conjunction with the wig wag. However, are you saying that if I installed the SPDT rocker switch between the existing speed controller output and the motor, that would do it? The motor cables are rated at 3A (although they do seem pretty chunky for that amperage) There's no markings on the rocker switch apart from 12V, however it would appear from a bit of googling that all similar switched are rated to 24v and around 12A anyway so at a guess it would take it (or easily be replaced). I thought that the FWD/REV switching would have to happen between the controls and the speed controller, but will this solution of between the speed controller and the motor work just as well?
If so, that's one of my questions fixed. Obviously the 4mph/8mph is an easy one, no questions there either.
So lastly it's the pot. This is the wiring diagram for the linear pot I want to use:
http://www.farnell.com/datasheets/1699476.pdf?_ga=...
How do I wire it to replace the wig wag?
If so, that's one of my questions fixed. Obviously the 4mph/8mph is an easy one, no questions there either.
So lastly it's the pot. This is the wiring diagram for the linear pot I want to use:
http://www.farnell.com/datasheets/1699476.pdf?_ga=...
How do I wire it to replace the wig wag?
Toltec said:
I take it you have already found a manual for the egis controller?
e.g http://forums.parallax.com/discussion/download/486...
A quick look finds a reference to using a wigwag or single direction throttle with reverse switch so hopefully the wiring will be in there.
Er, no, I'd not even thought about that to be honest. I'd just not even considered that the controller might be programmable to work with the inline pot. So...e.g http://forums.parallax.com/discussion/download/486...
A quick look finds a reference to using a wigwag or single direction throttle with reverse switch so hopefully the wiring will be in there.
T H A N K Y O U!!!!!
So, armed with a cup of tea and a healthy dose of RTFM I shall have a look at that tonight and report back!!!
That's a beauty John, nice job. Love the "panel gaps" on the wings...that's something I forgot to do before I put the sides on. Slightly nervous about how to do it now without making a mess! Any more pics?
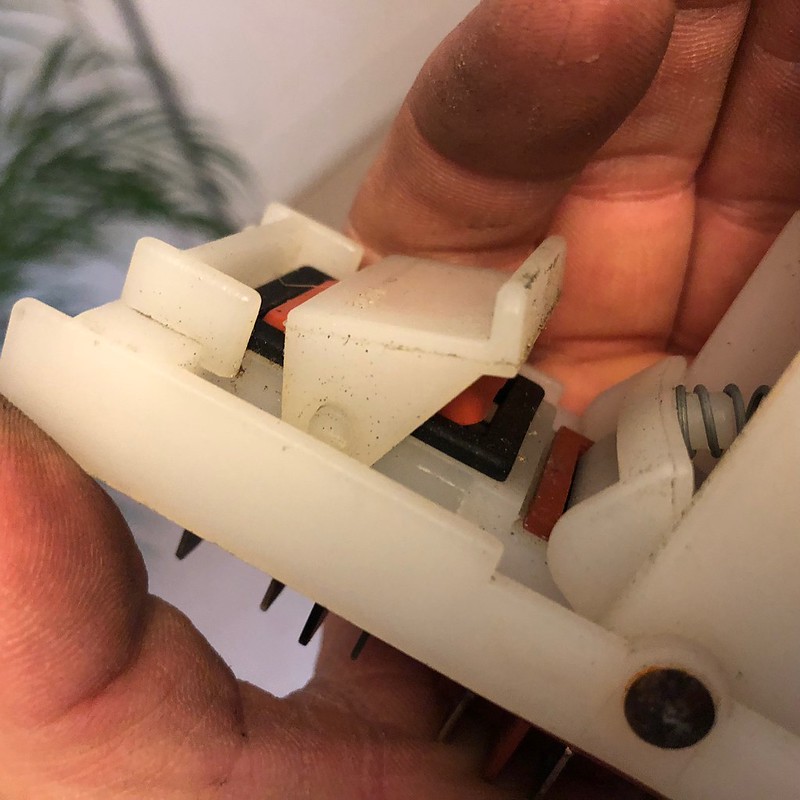
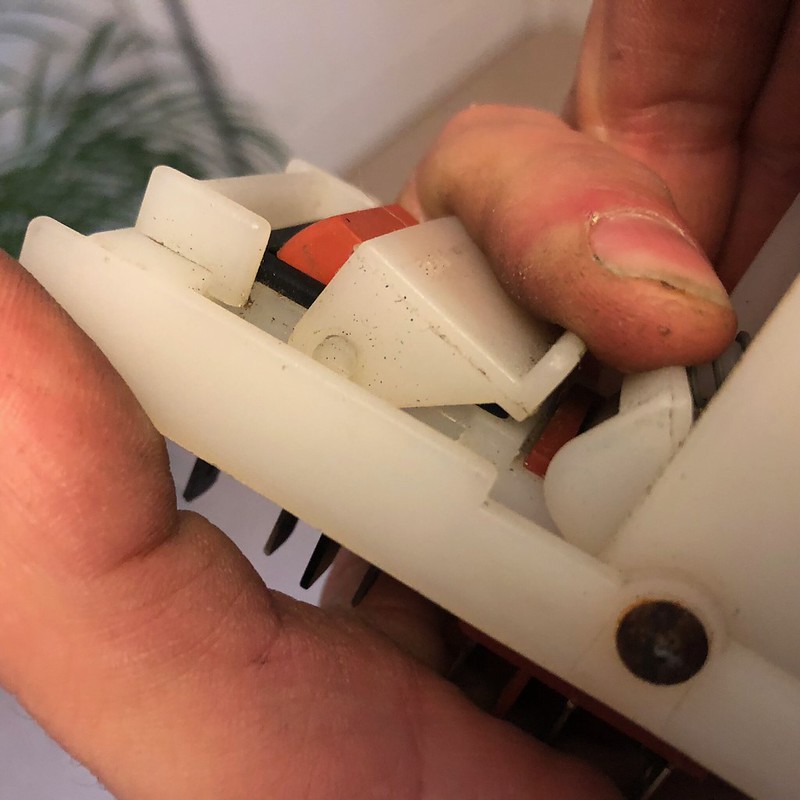
A question for you and the wider audience...my build is going to have the "gears" controlled via the lever shown earlier in this thread (but made to look like a Series 2 lever) but also a semi scale representation of the high low, 4WD and also overdrive levers. Can anyone think of some kind of cheap, preferably steel mechanism with some kind of detent stop on there, operating through about 30 degrees? The handle is irrelevant as I'll weld a new one on, I just want to think of something with a nice action to use as the base that's also fairly toddler proof.
On this pic, the red one needs to go back and forwards, as does the smaller black one, and the yellow one just goes up and down (easy peasy, rod/sleeve/spring)
ColinM50 said:
Depressing it may be Nichio, but afraid it's true. My one's for sale, had it twice on Ebay and not met the £25 minimum. Most Dad's realise the toy's for them and not the kiddy, those that don't soon learn
Well, if you’re selling a Toylander for £25 I’ll give you four times that right now and have a spare one. However, I suspect it’s probably a generic battery powered kids car that won’t deal with long grass or mud and won’t do 8mph or 8 miles between charges. I suspect when you can load up the vehicle in question with lots of your friends, an adult, pull a trailer and drive it round all day without charging the engagement factor probabky increases a bit....
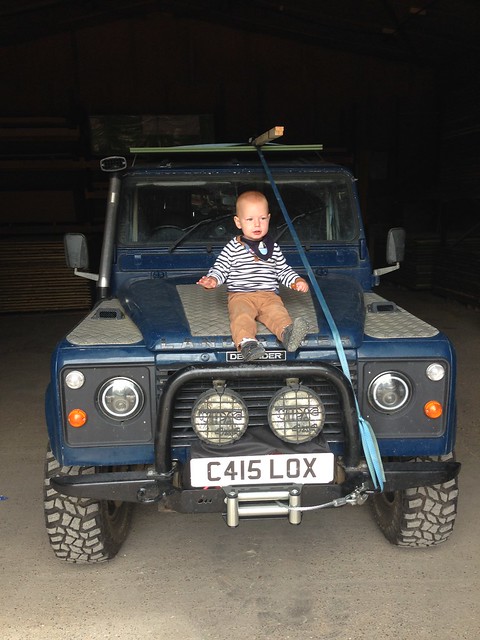
I know he's going to love it. He's Land Rover mad (although he can't say Land Rover, only "Jamrah"!) and points and shouts at the full size version every time we walk past it in the driveway.
He does have a Peg Perego Gaucho jeep (local garage sale, £15, dead, but got it going again) and even with new batteries it's got absolutely nowhere near the power or ability of the Toylander. It's 2/3 of the size and about half the weight and the speed control is a very crude 6V or 12V setup and just not even in the same league.
OK I will admit that a lot of the details are done for my own "benefit" and when we go to Landy shows next year perhaps I do want to be the Dad that made the coolest Toylander in the Toylander line up, and that a lot of the extra detail will be lost on him at a young age. But I don't care, and although it will not have been a cheap project once it's done, and he will be a lucky lad, I don't think anyone can call him "spolit" as it will have started off life as some sheets of MDF and a dead mobility scooter, and the biggest investment will have been time. And I've very much enjoyed building it so far!
Gassing Station | Homes, Gardens and DIY | Top of Page | What's New | My Stuff