Edwardian North Yorkshire Renovation
Discussion


Good morning, I have been meaning to put this thread up for a while. We moved into the property nearly three years ago now and having lived in many already renovated older properties we wanted to do it for ourselves to create a long term family home with our tastes and style.
The House:
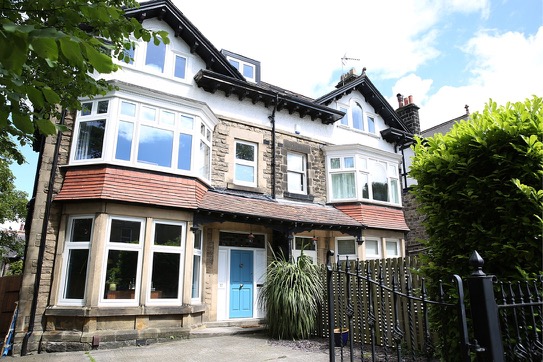
The property is a circa 5 floor (cellar and bad loft conversion)1900 Edwardian style Semi in Harrogate. One of the biggest challenges with the town its not always easy to find a property in the right area for schools and a close walk to the Stray (big open parkland) and the town, to have parking for at least 2 cars, a garden, minimal overlooking and potential to make it something ours.
Unfortunately it had suffered from years of bad DIY, conversion into 3 flats, conversion back again into a 6 bed house, a dodgy first floor conservatory and a lack of love and attention to anything.

The plan is to keep retain the charm of this period property whilst giving modern touches and turning it into a family home for a growing family
- Master Bedroom with large ensuite and dressing room
- Guest bed with Shower room
- 2 kids rooms
- Nursery
- Family bathroom
- large kitchen / living room open plan area
- Adult "best room"
- Outdoor entertaining space with garden fit for kids to play
We have completed a fair bit already and have just started the major restructuring works
The House:
The property is a circa 5 floor (cellar and bad loft conversion)1900 Edwardian style Semi in Harrogate. One of the biggest challenges with the town its not always easy to find a property in the right area for schools and a close walk to the Stray (big open parkland) and the town, to have parking for at least 2 cars, a garden, minimal overlooking and potential to make it something ours.
Unfortunately it had suffered from years of bad DIY, conversion into 3 flats, conversion back again into a 6 bed house, a dodgy first floor conservatory and a lack of love and attention to anything.
The plan is to keep retain the charm of this period property whilst giving modern touches and turning it into a family home for a growing family
- Master Bedroom with large ensuite and dressing room
- Guest bed with Shower room
- 2 kids rooms
- Nursery
- Family bathroom
- large kitchen / living room open plan area
- Adult "best room"
- Outdoor entertaining space with garden fit for kids to play
We have completed a fair bit already and have just started the major restructuring works
Garden Clean Up:
One of the first tasks was to clear out the jungle of a garden that had been left to its own devices for at least a few years
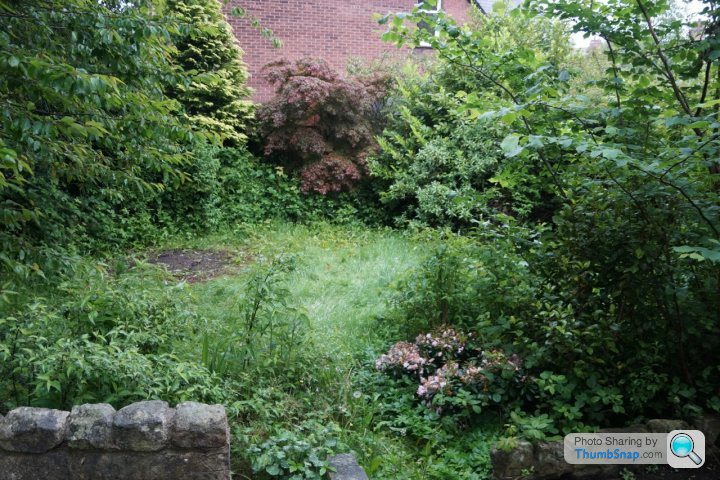

I decided to tackle this when we first moved in as we had no idea what sort of space we were looking at. After a trip to Le Mans I had a few days booked off which I was going to use as recovery time, the Mrs had different ideas!
3 days of hard slog, 2 skips full of garden waste and we now had a view of what the garden space could be.
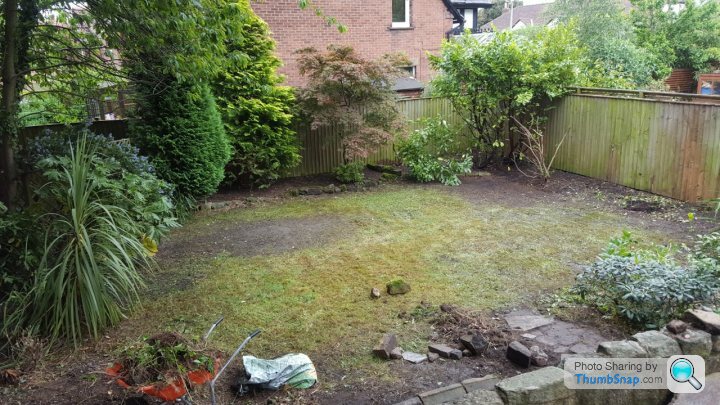
One of the first tasks was to clear out the jungle of a garden that had been left to its own devices for at least a few years
I decided to tackle this when we first moved in as we had no idea what sort of space we were looking at. After a trip to Le Mans I had a few days booked off which I was going to use as recovery time, the Mrs had different ideas!
3 days of hard slog, 2 skips full of garden waste and we now had a view of what the garden space could be.
Fermit and Sexy Sarah said:
I'm in, love a good restoration thread (we have one going too, although it's been slow updating!)
When you say 5 storey, are you meaning it's originally a 3 storey house, with the addition of a cellar and a loft conversion?
When we got it it wasWhen you say 5 storey, are you meaning it's originally a 3 storey house, with the addition of a cellar and a loft conversion?
Cellar - dump for all sorts of crap
Ground - kitchen, dining living and lounge (3 rooms)
First - master, separate bathroom, 2 bedrooms and a weird ass first floor conservatory (no good for anyone)
Second - office, 2x bedroom and shower room
Loft - same as the cellar
The plan currently is
Cellar - currently is a mess and used for storage but might end up being playroom / wine cellar
Ground - kitchen living, WC, and reception room
First - Master with en-suite and dressing room & Guest with en-suite, and currently a WC which might end up a wash room (washing machine / dryer)
Second - 2 x bedrooms, nursery & family bathroom
Loft which is currently a room (plastered, electrics but not bed room) ultimately this will end up being something for the kids.
To get everything in a house you end up spending insane amounts of money in Harrogate (well for a tight northerner) so the only way we could do it was to roll our sleeves up and have some vision
Edited by andrewjamesroberts on Sunday 10th February 12:34
I have been contemplating how to do these updates as we have been working on the house now for some time so what I think I will do is room by room until we are at present date then future update as and when!
Ground Floor Front Room:
Was (when we bought) - House main living room
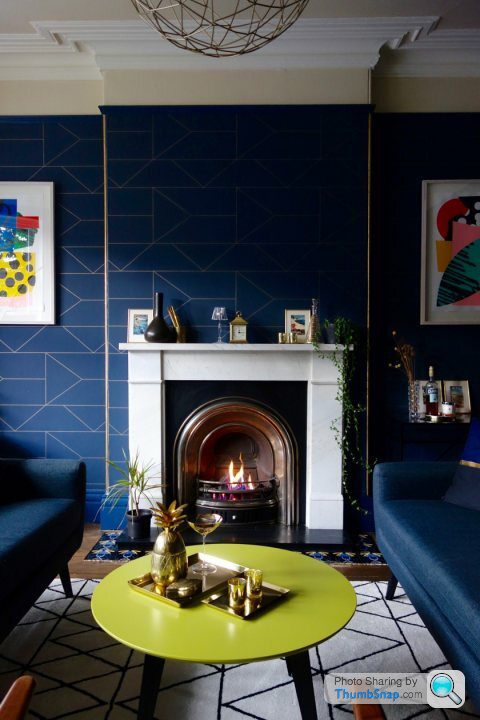
Now - Reception / grown up room.
I am a firm believer that there needs to be a space in a house that is away from all the distractions. A space where you can spend reading a book or listen to music. We also wanted a space where you can have conversation with guests have a drink and eat nibbles. Some people call it "the best room" or "the adult room".
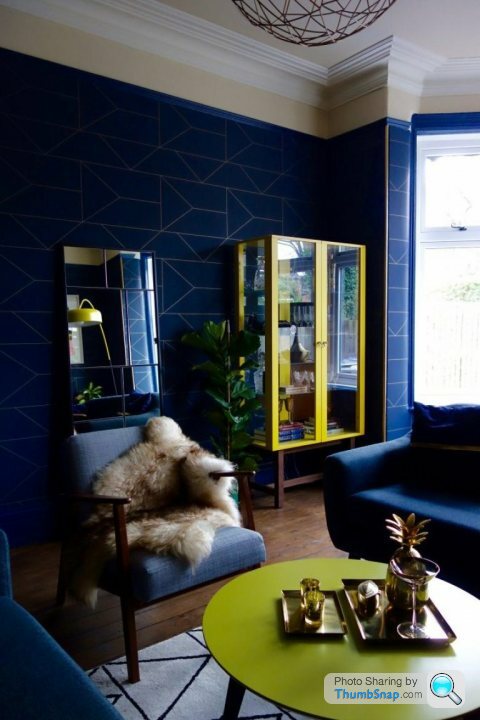
With this being the first room in the house that we started and finished we had no real budget in mind but wanted to utilise some of the furniture that we already had (2x Sofas & a mid century style sideboard) and try to mix the old and the new (which is a very hard balance to maintain)
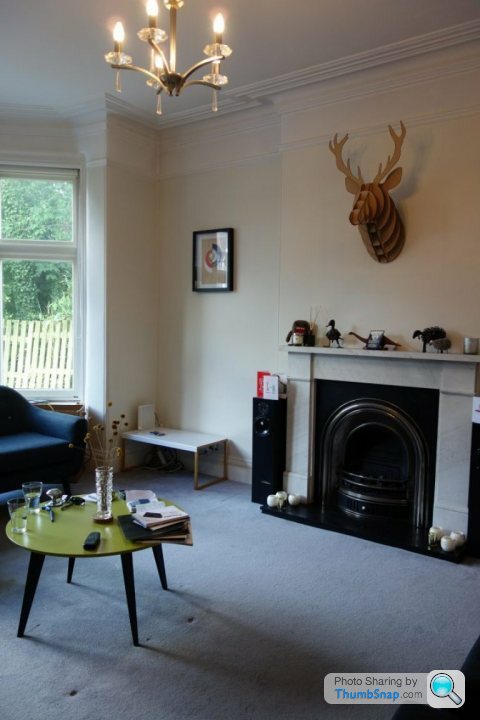
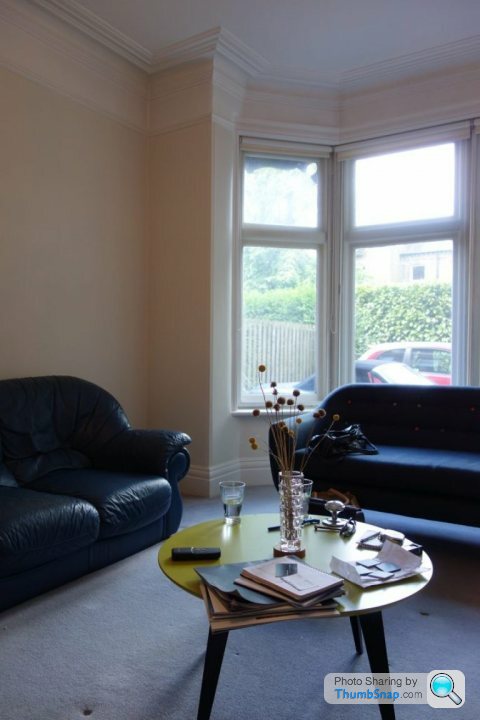
When we moved in it the room was used as the main living space for the family where the main house TV was. They had kept the original coving / picture rail which was a plus point but had got rid of features such as the ceiling rose and covered floorboards up with crap carpet. The pictures below were just after we had moved in. The blue leather sofa was theirs and we donated it to charity the rest of the bits were stuff we stuck up on the wall simply to put it somewhere whilst we worked out what the hell to do!
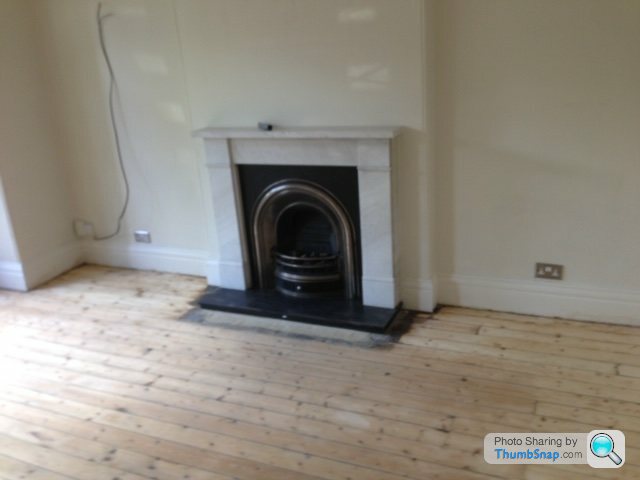
The Fireplace was not working so replaced all the key components including adding a IR remote control starter onto it
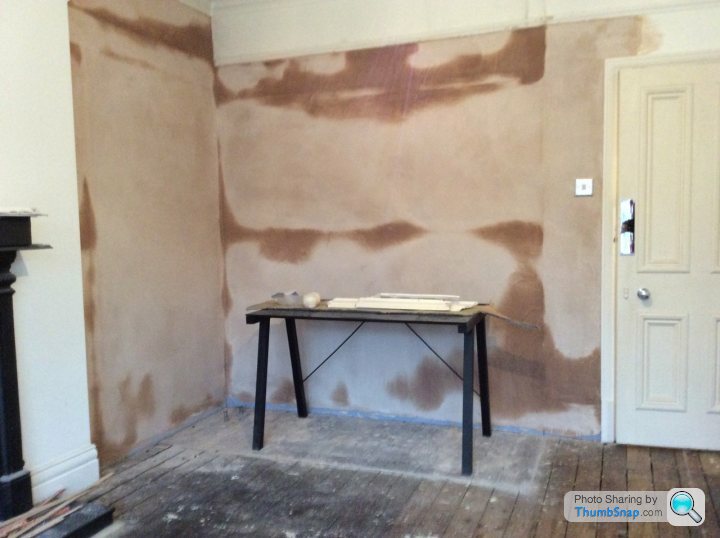
the first job was to rip up the carpets and see what we were dealing with underneath. I don't have any pics of the before floor but apparently this is fairly common there was a layer of tar around the edge of the room which needed dealing with before we can start sanding. I can tell you don't attempt to do this on the warmest day of the year whilst hungover literally blood sweat and tears are now encapsulated into the floor!
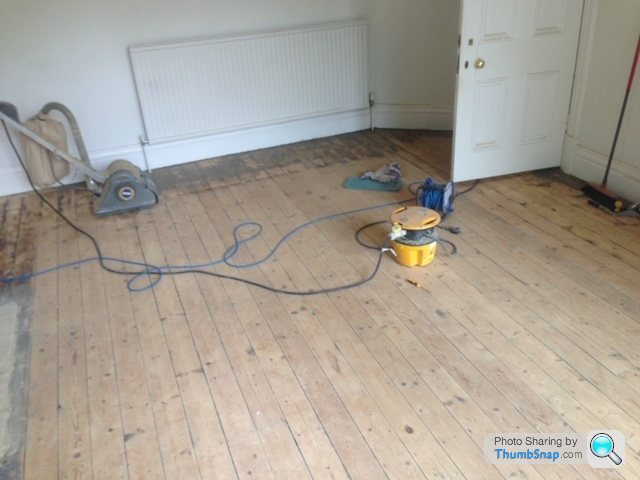
The sanding was a fun job which took a while to get used to but left the boards in a fairly decent state.
we decided to stain the boards darker as after reading online speaking to various people a dark room should be embraced (west facing) so use that as a strength and go darker!

There ware a few steps that I don't have pictures for and that was around replacing sockets / wiring + windows which were all rotten & single glazed. the controversial step was to put a residency 9 / quick slide solution in place which we don't regret doing at all. The were a reasonable price, the company who put them in did an amazing job of retaining all the original woodwork, sills etc. and to the untrained eye were wood now they have had time to get a little dirty.
We then gained some help via a friend who knows interiors for suggestions on how to go about joining up the space and utilising the furniture we already had.
The final output is below:
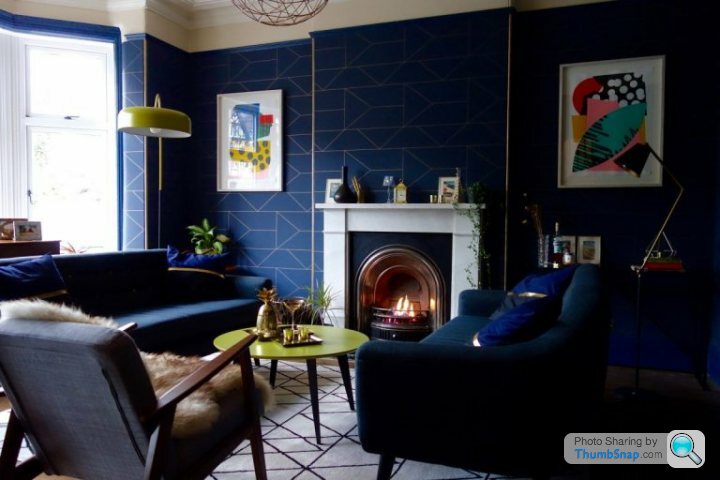

this took approx. a month to finish and in total (including furniture but not 2x sofas) was circa. £3000 (not including our labour). We used a mixture of Made.com, Ikea, Laradute and marks and spencer to finish it.
the cars outside (now both gone are a Mk2.5 MX5 and an Abarth 500 convertible).
Ground Floor Front Room:
Was (when we bought) - House main living room
Now - Reception / grown up room.
I am a firm believer that there needs to be a space in a house that is away from all the distractions. A space where you can spend reading a book or listen to music. We also wanted a space where you can have conversation with guests have a drink and eat nibbles. Some people call it "the best room" or "the adult room".
With this being the first room in the house that we started and finished we had no real budget in mind but wanted to utilise some of the furniture that we already had (2x Sofas & a mid century style sideboard) and try to mix the old and the new (which is a very hard balance to maintain)
When we moved in it the room was used as the main living space for the family where the main house TV was. They had kept the original coving / picture rail which was a plus point but had got rid of features such as the ceiling rose and covered floorboards up with crap carpet. The pictures below were just after we had moved in. The blue leather sofa was theirs and we donated it to charity the rest of the bits were stuff we stuck up on the wall simply to put it somewhere whilst we worked out what the hell to do!
The Fireplace was not working so replaced all the key components including adding a IR remote control starter onto it
the first job was to rip up the carpets and see what we were dealing with underneath. I don't have any pics of the before floor but apparently this is fairly common there was a layer of tar around the edge of the room which needed dealing with before we can start sanding. I can tell you don't attempt to do this on the warmest day of the year whilst hungover literally blood sweat and tears are now encapsulated into the floor!
The sanding was a fun job which took a while to get used to but left the boards in a fairly decent state.
we decided to stain the boards darker as after reading online speaking to various people a dark room should be embraced (west facing) so use that as a strength and go darker!
There ware a few steps that I don't have pictures for and that was around replacing sockets / wiring + windows which were all rotten & single glazed. the controversial step was to put a residency 9 / quick slide solution in place which we don't regret doing at all. The were a reasonable price, the company who put them in did an amazing job of retaining all the original woodwork, sills etc. and to the untrained eye were wood now they have had time to get a little dirty.
We then gained some help via a friend who knows interiors for suggestions on how to go about joining up the space and utilising the furniture we already had.
The final output is below:
this took approx. a month to finish and in total (including furniture but not 2x sofas) was circa. £3000 (not including our labour). We used a mixture of Made.com, Ikea, Laradute and marks and spencer to finish it.
the cars outside (now both gone are a Mk2.5 MX5 and an Abarth 500 convertible).
Edited by andrewjamesroberts on Tuesday 12th February 12:57
Bullet-Proof_Biscuit said:
In for updates.
Really like the blue & 'aztecky' tile pattern & carpet. And the metal edging. Much more audacious than I was expecting you to go for - Classic period e.g. dado rail, burgundy/ivory colours etc..
HH
Hi ! Thanks for the comments. We are definitely not the classic “Harrogate” period rinse and repeat types. Really like the blue & 'aztecky' tile pattern & carpet. And the metal edging. Much more audacious than I was expecting you to go for - Classic period e.g. dado rail, burgundy/ivory colours etc..
HH
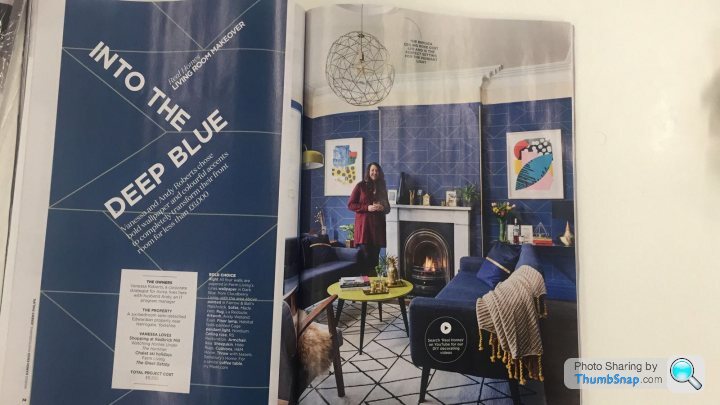
They are not tiles it’s wallpaper. The print style dates back to 1800s with an Art Deco touch we just placed some modern touches in there (yes I know it’s mixing decades!)
The coffee table has gone and has been replaced with a different one that is more in keeping with the overall design
The room was featured in some magazine last year I think “Real Homes”
Downstairs Hallway:
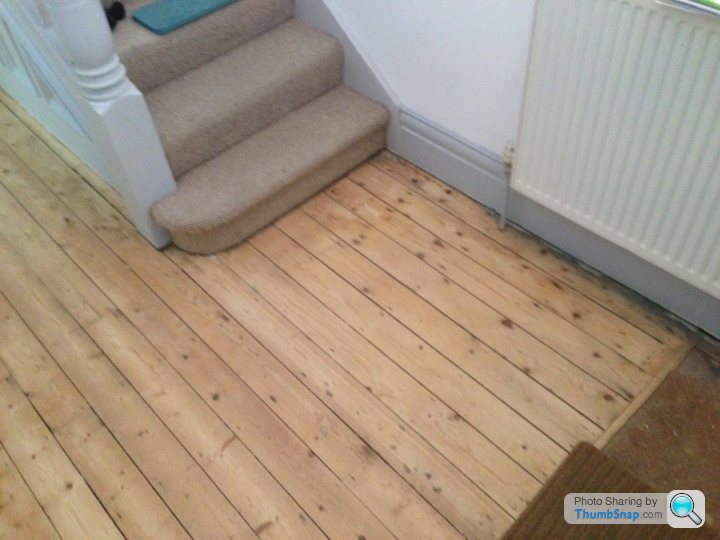
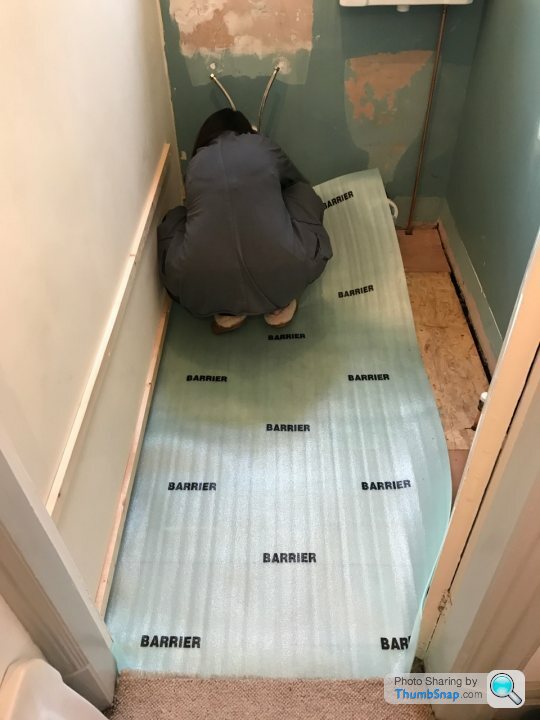
Whilst we had the sander we also decided to get rid of the crappy carpet to expose more of the fantastic floorboards.
The hallways will be one of the last things we decide to decorate as during all the renovations these will just get destroyed!
This is on the day we moved in (hence all the boxes).
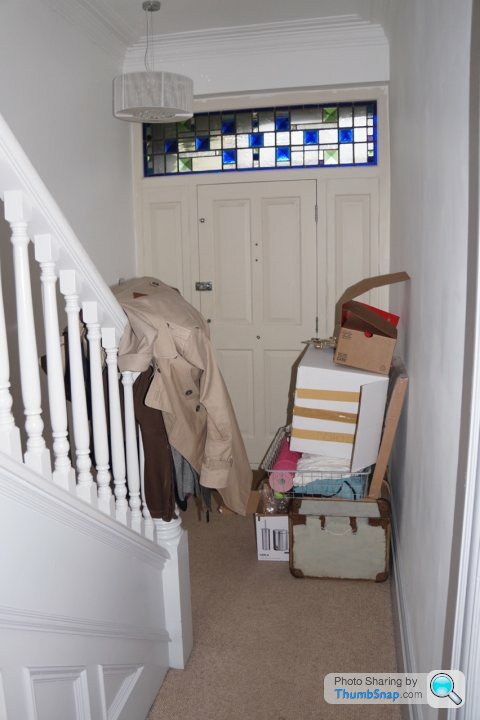
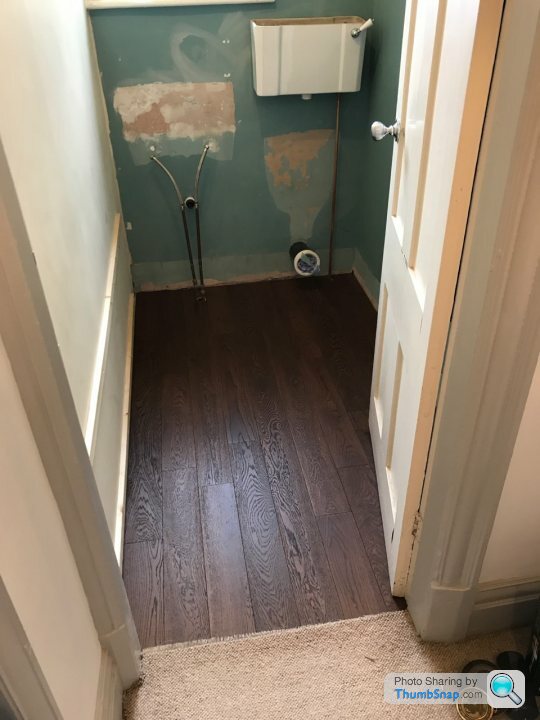
We then stripped the boards and painted the door. At some point in the future we will get the leaded light encapsulated in a double glazed unit.


The Mrs wants to tile the hallway in traditional tiles or we might just end up staining it a similar colour as the blue room.
Ultimately we will want a traditional cast iron rad in here and a bench for shoes etc.
Whilst we had the sander we also decided to get rid of the crappy carpet to expose more of the fantastic floorboards.
The hallways will be one of the last things we decide to decorate as during all the renovations these will just get destroyed!
This is on the day we moved in (hence all the boxes).
We then stripped the boards and painted the door. At some point in the future we will get the leaded light encapsulated in a double glazed unit.
The Mrs wants to tile the hallway in traditional tiles or we might just end up staining it a similar colour as the blue room.
Ultimately we will want a traditional cast iron rad in here and a bench for shoes etc.
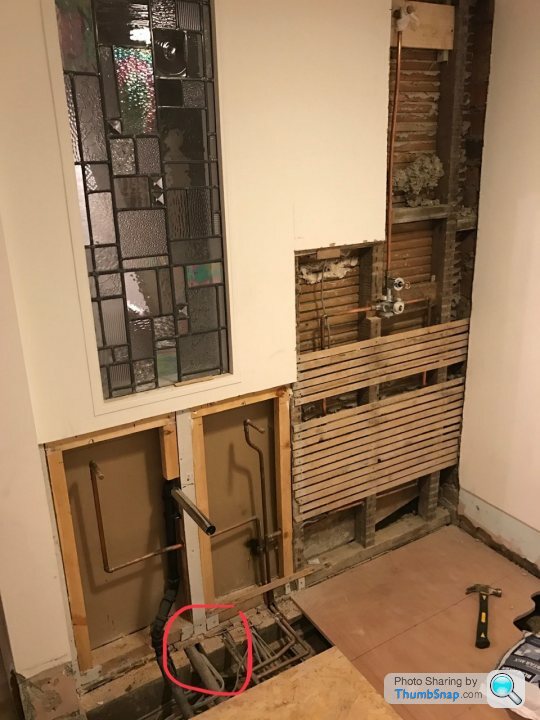
First floor - WC:
Was family bathroom (Toilet, Bath & Sink)
Now: 1st Floor W/C
Long Term: Washing machine / Drying room
We now move onto the first floor where the fun and games start to happen with weird layouts. As I have previously mentioned this house at some point has been multiple flats back to a house back into flat and a now a house again.
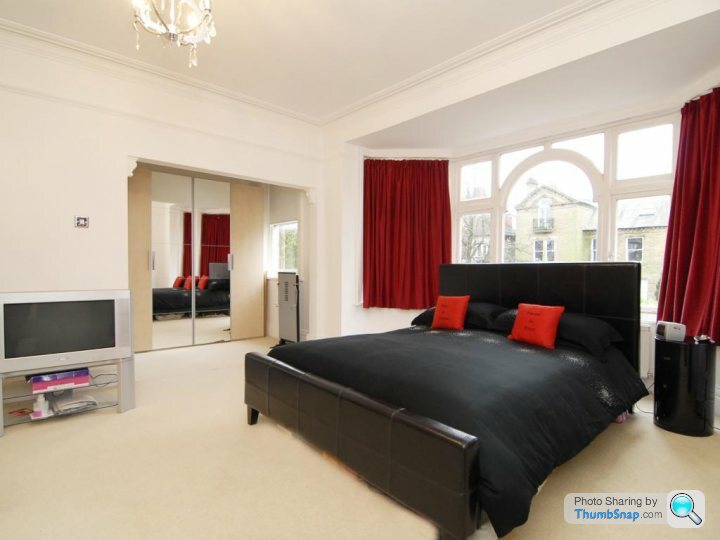
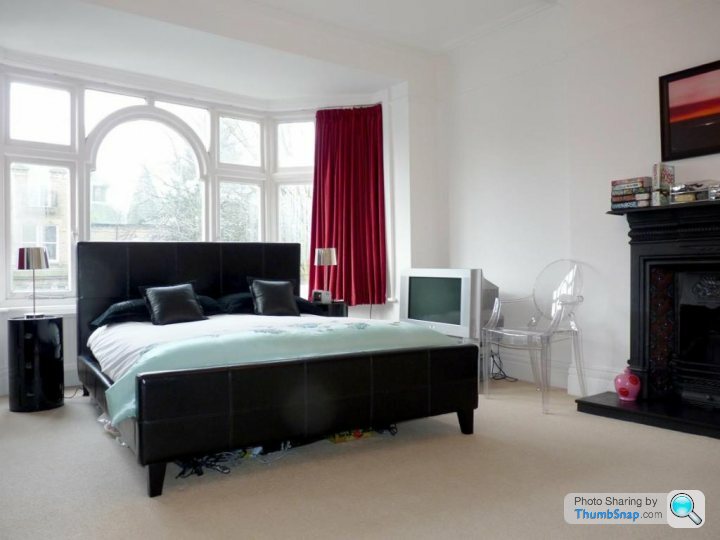
This floor when we bought it was housed the master bedroom (with a weird enclave dressing area) but some of the room had been taken for the family bathroom (to put the bath, two tiny bedrooms and a weird first floor conservatory . The ultimate plan was to turn the old master room (with enclave) into a fantastic guest bedroom with ensuite shower & W/C. We would use this room initially as our master bedroom until we had got the next phase complete (approx 6 months).
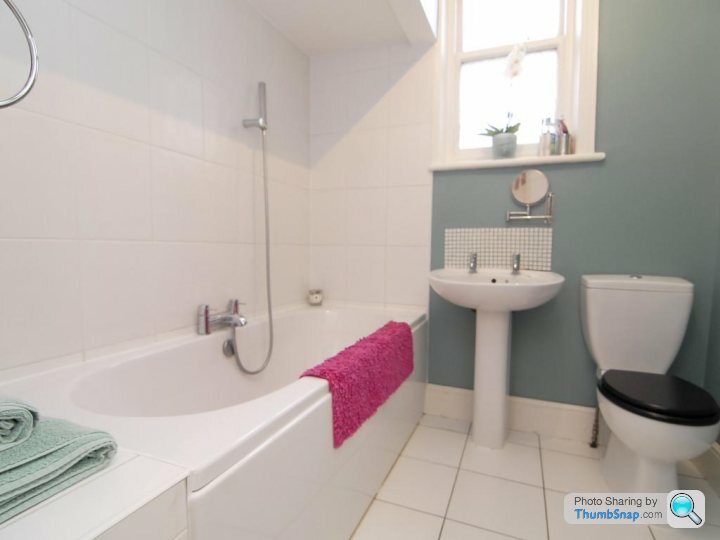
Pictures from Right Move when we bought: bathroom
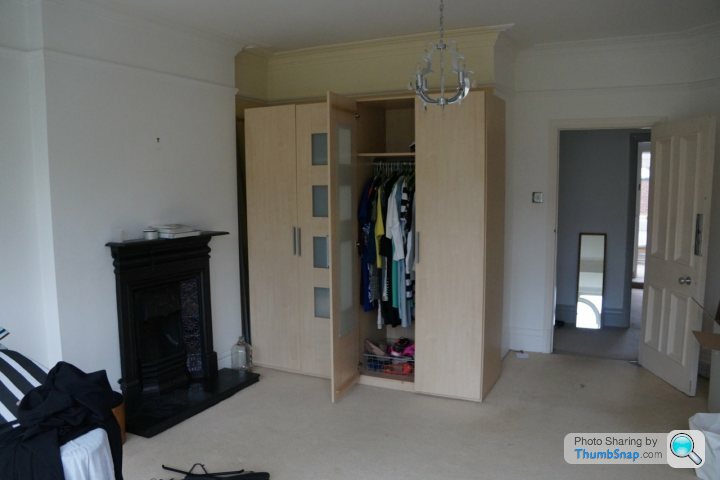
Below is the weird cutout in the to be guest room which needs to go (covered by the wardrobe)
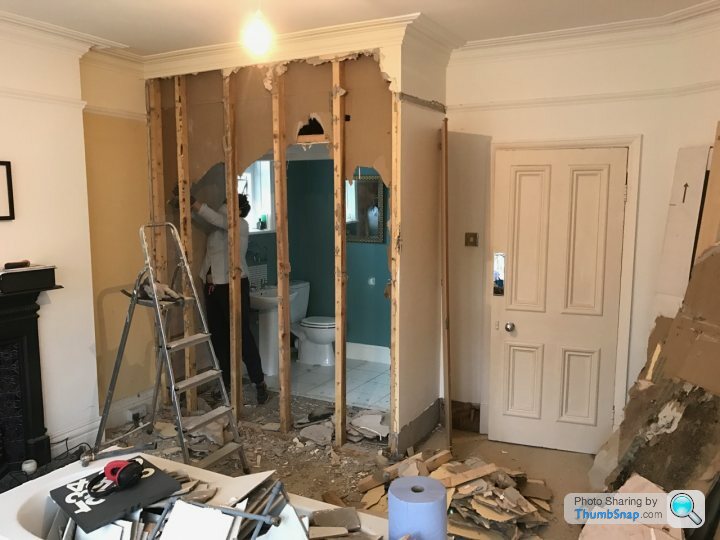
First thing was to reclaim this into the bedroom
As there was coving round the room we had our fingers crossed that whoever had butchered the house had taken a shortcut and just covered it over with the stud walling so we then didn't have to go through the process in templating and having it made up. With luck this was the case! All we had to do was a bit of sanding to smooth out where they had put some sort of adhesive for the stud to attach to (first bodge of many)
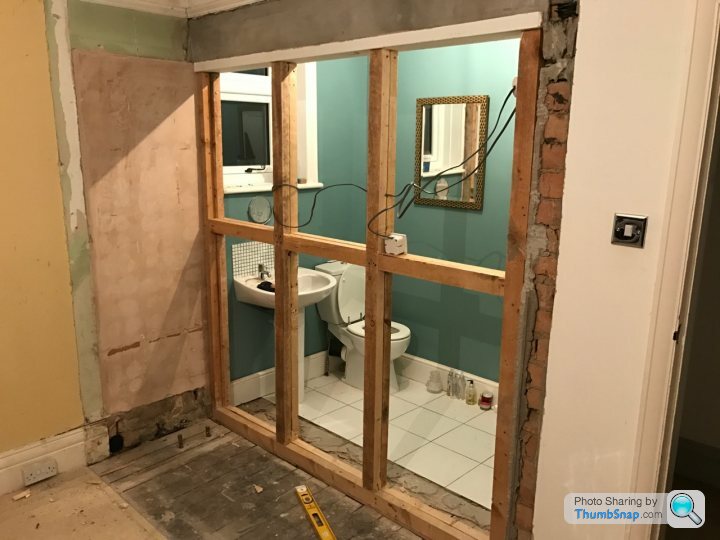
We then built our very first Stud wall out of the reclaimed wood taken from the wall we had just taken down
It was then boarded up and we also had to take some of the old crappy plaster from the adjacent wall as it would have just looked a mess if we hadn't.
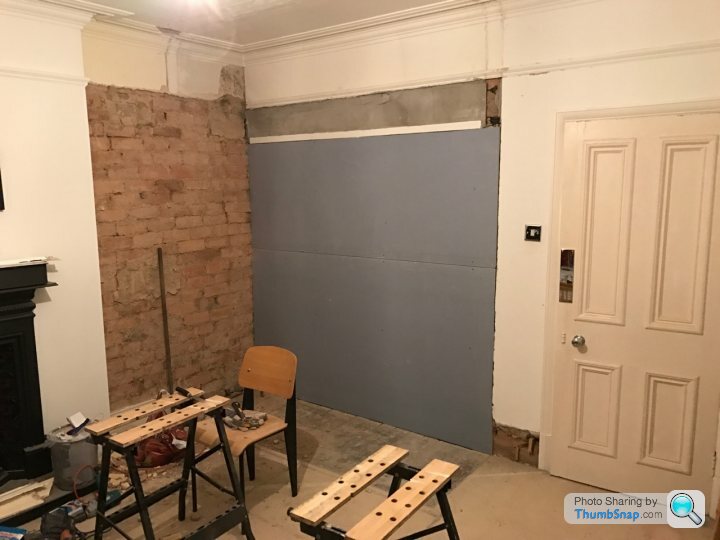
This was then plastered to make good in the guest bedroom.
Was family bathroom (Toilet, Bath & Sink)
Now: 1st Floor W/C
Long Term: Washing machine / Drying room
We now move onto the first floor where the fun and games start to happen with weird layouts. As I have previously mentioned this house at some point has been multiple flats back to a house back into flat and a now a house again.
This floor when we bought it was housed the master bedroom (with a weird enclave dressing area) but some of the room had been taken for the family bathroom (to put the bath, two tiny bedrooms and a weird first floor conservatory . The ultimate plan was to turn the old master room (with enclave) into a fantastic guest bedroom with ensuite shower & W/C. We would use this room initially as our master bedroom until we had got the next phase complete (approx 6 months).
Pictures from Right Move when we bought: bathroom
Below is the weird cutout in the to be guest room which needs to go (covered by the wardrobe)
First thing was to reclaim this into the bedroom
As there was coving round the room we had our fingers crossed that whoever had butchered the house had taken a shortcut and just covered it over with the stud walling so we then didn't have to go through the process in templating and having it made up. With luck this was the case! All we had to do was a bit of sanding to smooth out where they had put some sort of adhesive for the stud to attach to (first bodge of many)
We then built our very first Stud wall out of the reclaimed wood taken from the wall we had just taken down
It was then boarded up and we also had to take some of the old crappy plaster from the adjacent wall as it would have just looked a mess if we hadn't.
This was then plastered to make good in the guest bedroom.
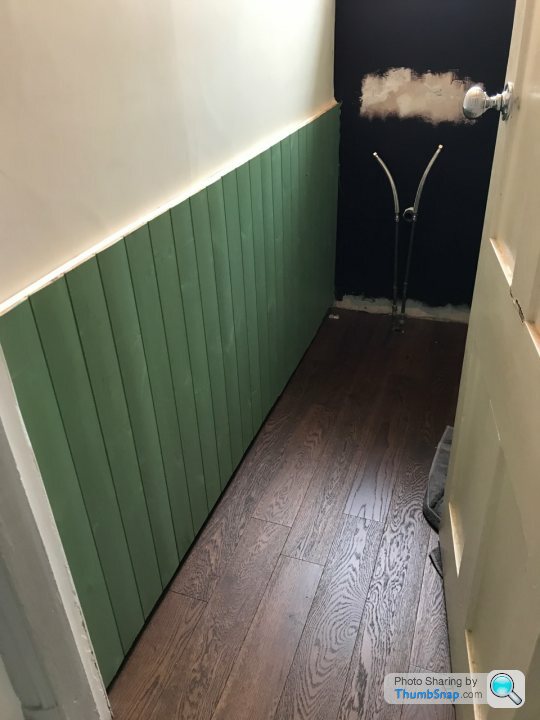
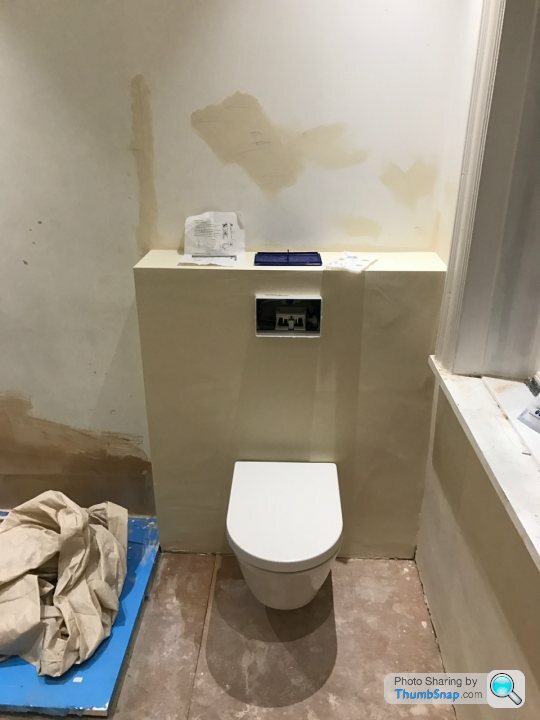
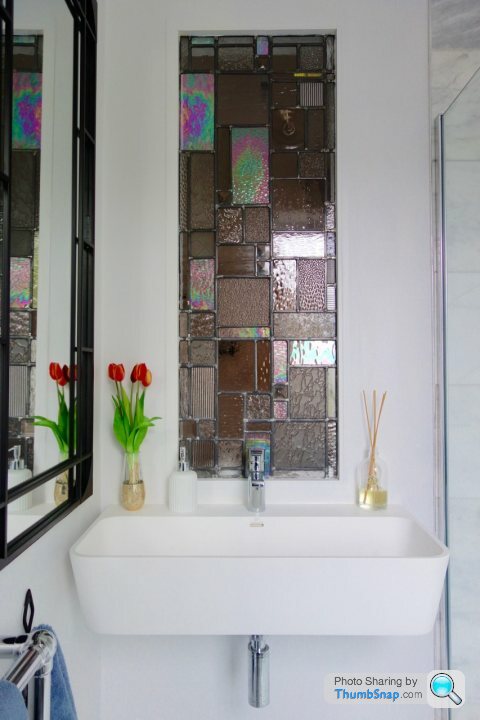
First Floor W/C Part 2:
The next job was to then start building the W/C.
After getting a mate in to do the plumbing we laid the floor. The floorboards in this rom were in a terrible state as they had been tiled onto directly by mr bodge so they had to go. We decided to go fo a engineered floor (I'm sure the mrs will love me for posting this!)
found an old top cistern toilet in the cellar that had been at some point ripped out and dumped (it was in still great condition) but needed to have the down piper reduced due to height restrictions (I must have spent 3 hours fitting a refitting this down pipe as we had to mess around with the flow reducing bungs to ensure that A) it would not be reminiscent of the log flume at alton towers and B) be able to flush solids down the pan!
I need to say, before I started this project the most DIY I had done was painting walls & replacing light fittings.
Next we decided to have some half height cladding which actually was fairly straight forward!

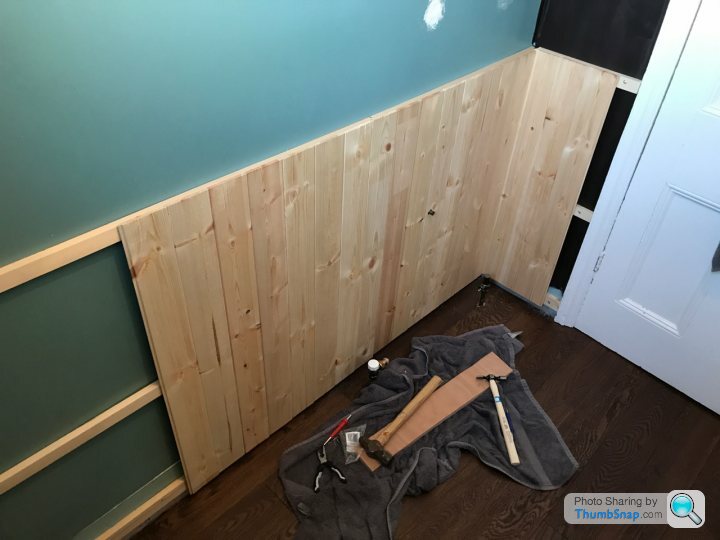
It was a fairly slow start but we got I got into the groove and found it fairly therapeutic!
We are as lover of old cast iron radiators so was really lucky to find this one on Ebay and it belonged to a chap who literally lived across the road (he delivered for free)

Again we found a brand new (second hand) Burlington sink 2 streets away (we had to pick this up)
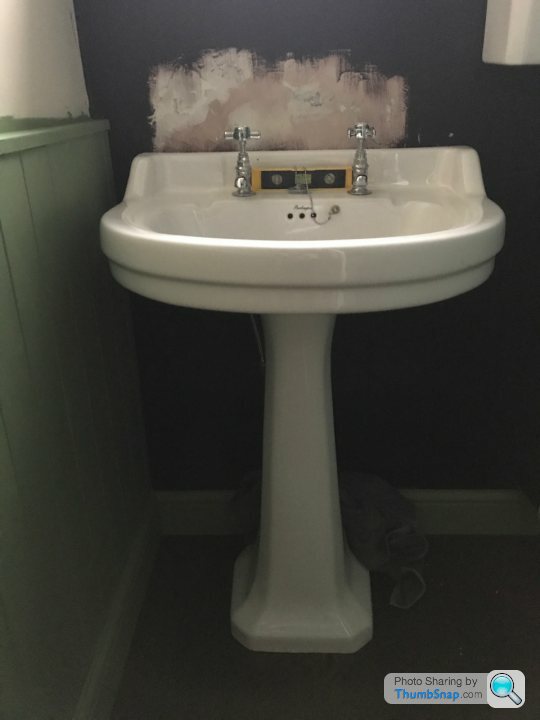
I would like to put it out there I am a fan of a novelty (but not to tacky) W/C. I like them to have slightly quirky features but not over the top!
We both have a love of winter sports and love Vintage ski posters. After spending ages looking through House for inspiration we found this wall paper !
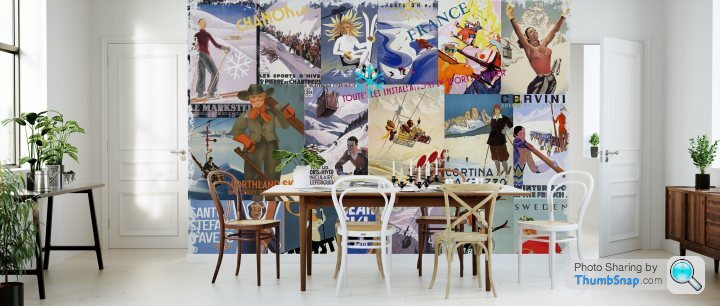
We weren't sure if it was going to work but bit the bullet for the 50 quid or so that it cost.
I know this is a personal thing but actually it worked really well (in our opinion)!
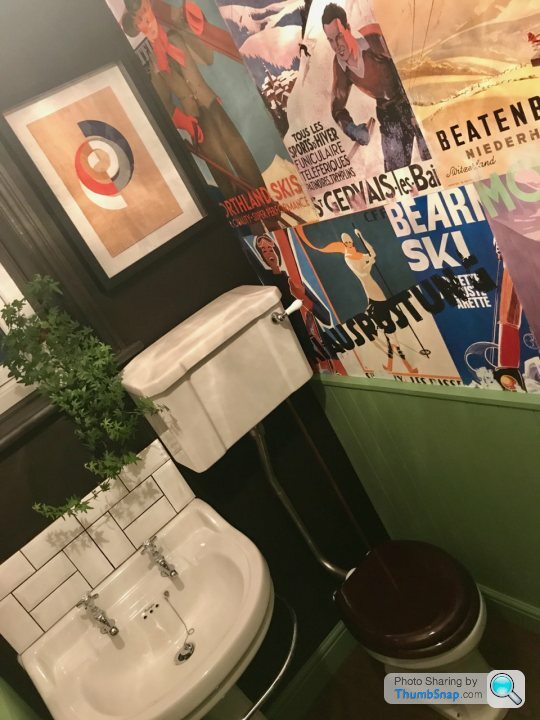
This room is now finished its a temporary stop gap until we get a downstairs toilet in (2 years) in which we will transfer all the hardware downstairs. And ultimately be a washing machine room.
The next room I will post will be the guest bedroom and ensuite (next time I get 45 mins spare)
The next job was to then start building the W/C.
After getting a mate in to do the plumbing we laid the floor. The floorboards in this rom were in a terrible state as they had been tiled onto directly by mr bodge so they had to go. We decided to go fo a engineered floor (I'm sure the mrs will love me for posting this!)
found an old top cistern toilet in the cellar that had been at some point ripped out and dumped (it was in still great condition) but needed to have the down piper reduced due to height restrictions (I must have spent 3 hours fitting a refitting this down pipe as we had to mess around with the flow reducing bungs to ensure that A) it would not be reminiscent of the log flume at alton towers and B) be able to flush solids down the pan!
I need to say, before I started this project the most DIY I had done was painting walls & replacing light fittings.
Next we decided to have some half height cladding which actually was fairly straight forward!
It was a fairly slow start but we got I got into the groove and found it fairly therapeutic!
We are as lover of old cast iron radiators so was really lucky to find this one on Ebay and it belonged to a chap who literally lived across the road (he delivered for free)
Again we found a brand new (second hand) Burlington sink 2 streets away (we had to pick this up)
I would like to put it out there I am a fan of a novelty (but not to tacky) W/C. I like them to have slightly quirky features but not over the top!
We both have a love of winter sports and love Vintage ski posters. After spending ages looking through House for inspiration we found this wall paper !
We weren't sure if it was going to work but bit the bullet for the 50 quid or so that it cost.
I know this is a personal thing but actually it worked really well (in our opinion)!
This room is now finished its a temporary stop gap until we get a downstairs toilet in (2 years) in which we will transfer all the hardware downstairs. And ultimately be a washing machine room.
The next room I will post will be the guest bedroom and ensuite (next time I get 45 mins spare)
Hi again !
Apologies for the lack of updates things have been crazy busy with work and the latest parts of this renovation
This morning its all about the main guest room with adjoining ensuite Part 1!
When we moved in:
This room was used for the previous owners master bedroom / dressing room. The challenge was it sits on a main road and we didn't want our main bedroom to have traffic noise.
The room is a decent size with a small extra bit on the side which was being used as a dressing room. As you can see from my previous posts there was also a weird cut out where the bathroom had nicked space for the bath (which we fixed above).
Looking through the planning portal at when this building was flats we noticed that the extra bit being used as a dressing room used to be a kitchen so we were hoping to leverage this for our plans.
This was the first thing we tackled:
This was the layout plan which had everything we needed for a guest room.
Our hopes had come true that all the water pipes and some of the waste pipers were already in the floor making life that little bit simpler!
One of the features of this room was a awesome window which was just enough opaque to not become some sort of voyer paradise !
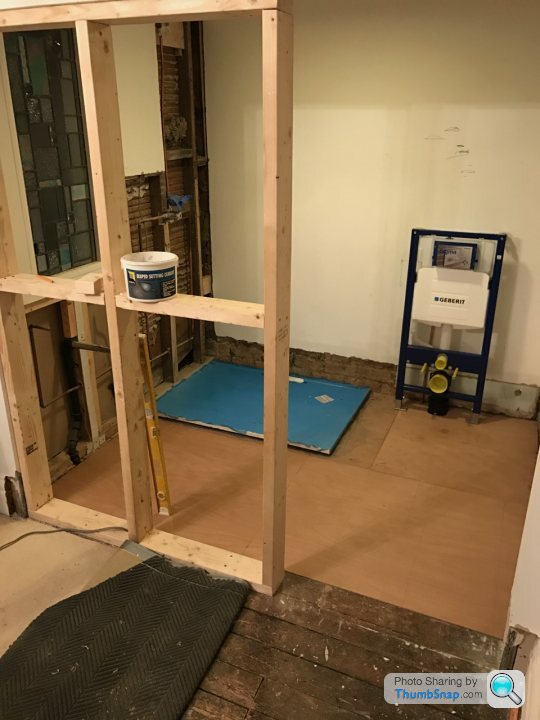
Shower try studs and hidden cistern now installed
Wall plastered in
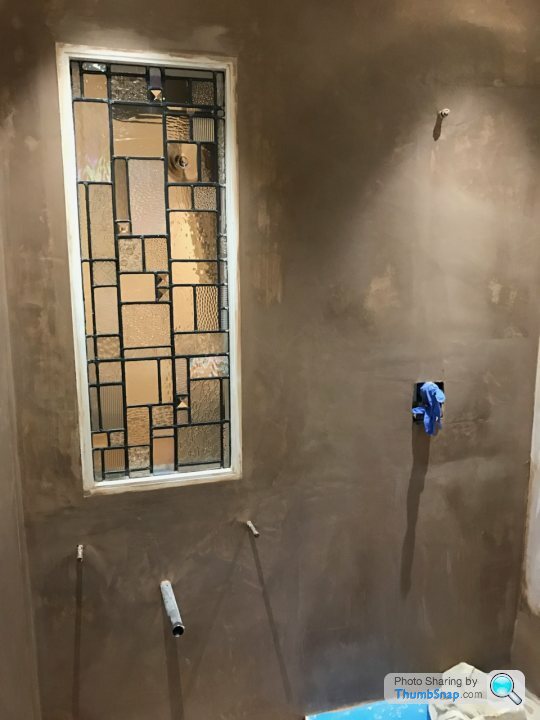
Room plastered
Toilet in.

Sink in.
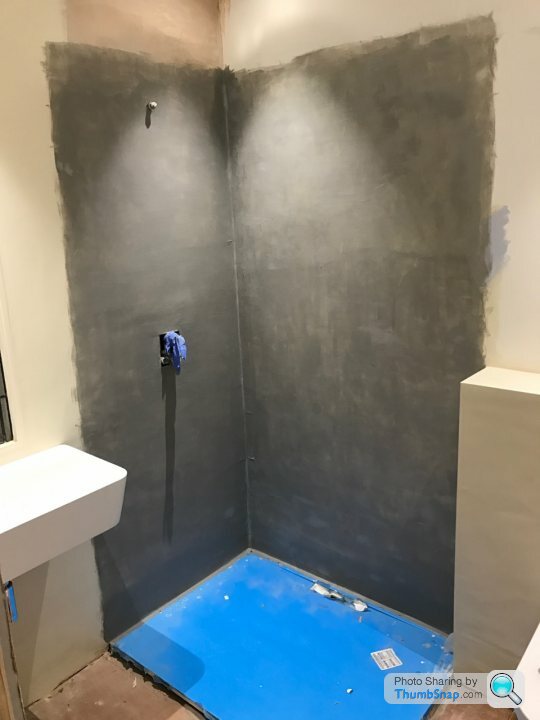
Shower area waterproofed
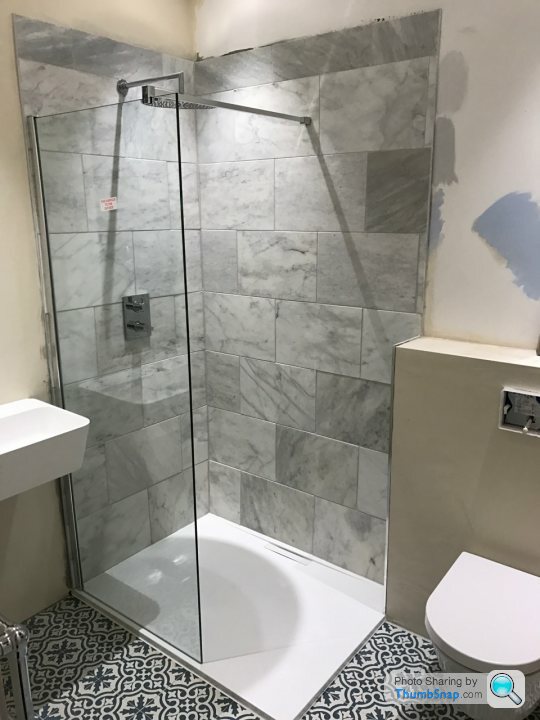
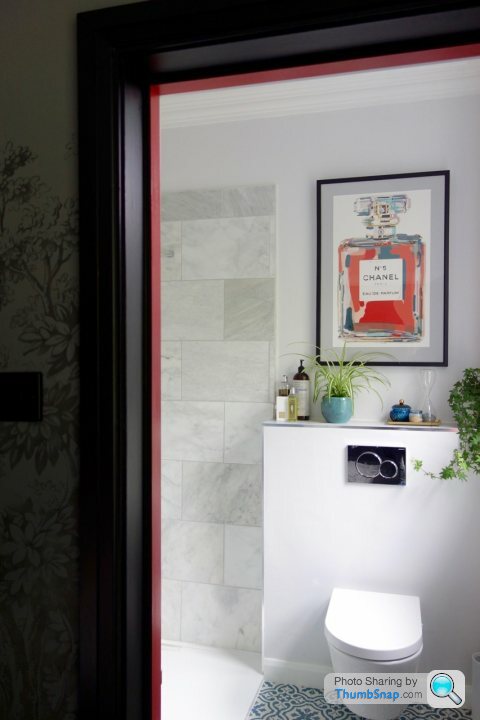
Tiles in
Completed Room:
Part 2 will be the actual guest room!
Apologies for the lack of updates things have been crazy busy with work and the latest parts of this renovation
This morning its all about the main guest room with adjoining ensuite Part 1!
When we moved in:
This room was used for the previous owners master bedroom / dressing room. The challenge was it sits on a main road and we didn't want our main bedroom to have traffic noise.
The room is a decent size with a small extra bit on the side which was being used as a dressing room. As you can see from my previous posts there was also a weird cut out where the bathroom had nicked space for the bath (which we fixed above).
Looking through the planning portal at when this building was flats we noticed that the extra bit being used as a dressing room used to be a kitchen so we were hoping to leverage this for our plans.
This was the first thing we tackled:
This was the layout plan which had everything we needed for a guest room.
Our hopes had come true that all the water pipes and some of the waste pipers were already in the floor making life that little bit simpler!
One of the features of this room was a awesome window which was just enough opaque to not become some sort of voyer paradise !
Shower try studs and hidden cistern now installed
Wall plastered in
Room plastered
Toilet in.
Sink in.
Shower area waterproofed
Tiles in
Completed Room:
Part 2 will be the actual guest room!
Edited by andrewjamesroberts on Saturday 16th March 09:18
ben5575 said:
Ha, spider plants in bathrooms reminds me of my youth!
I like how you're using the wc boxing as a shelf for the shower. I take it it's tiled on the shower side? Do you have any issues with the wc face of the boxing getting wet
Thanks! Love a spider plant, nearly impossible to kill!I like how you're using the wc boxing as a shelf for the shower. I take it it's tiled on the shower side? Do you have any issues with the wc face of the boxing getting wet
Yep it’s tiled on the shower edge, the front gets wet from time to time we have used bathroom paint so it’s mould resistant so nothing to worry about!

Guest Bedroom part 2
As per my last post you have seen the before pics to the room. It followed the same same theme as the rest of the house, un loved and a lack of any individuality!
This room ultimately is going to be a guest room but we will live in it for a bit until the next phase is completed working to the master suite (which will be one of the last things we do is finished)
As with the "blue room" (this is above) it faces west and is quite a dark space but is dominated by the big bay overlooking a main road!
We wanted something guests would look forward to staying in that was not reminiscent of a standard hotel style guest room but more luxury boutique
I don't have a picture of the before shots on the floor but once we had sanded the floorboards back they were a bit of a mismatch and 2 / 3 varying shades of pine!
The decision was made not have carpet (which we generally don't like but as Mick Jagger once said, Paint it black (which was looped whilst we were doing this to my wife annoyance!


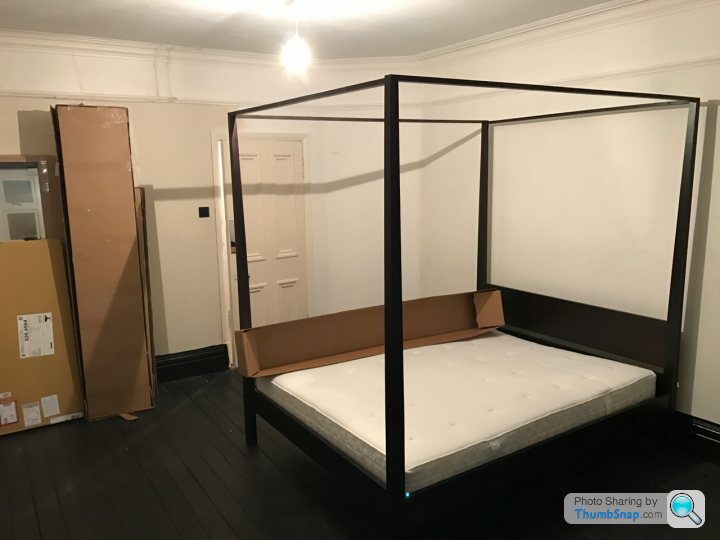
What does any guest love when staying somewhere? . . . . Thats right folks a 4 Poster Bed!
This was a bargain off Maisons Du Monde (circa 350) plus slats (which we got from Ikea as it was a Euro King)
Having never been a fan of wallpaper we seem to be embracing it in this house and we were recommended this one:

The print was from a 1800's house in London.

We loved the colours and it matched the black flooring gradually fading to a lighter grey at the top.
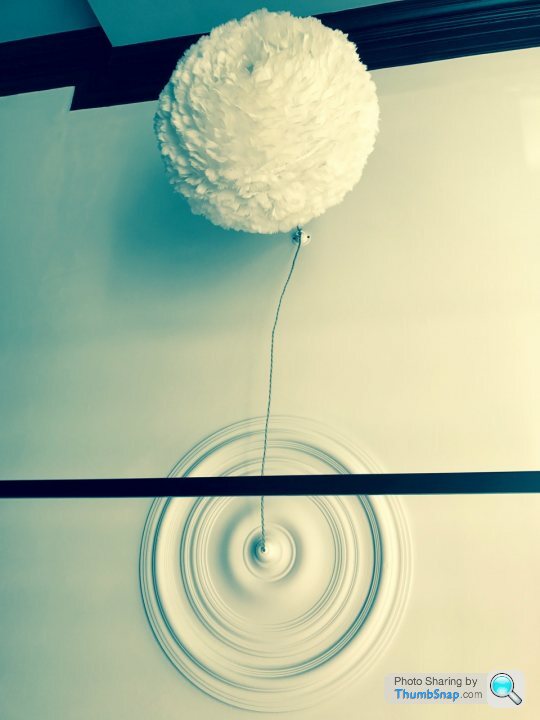
Another must for this room was to be adding another ceiling rose and something that I have wanted for a while in a property, A Vita Eos shade (slightly arty pic). As the light was sitting above the cross beam of the bed we needed to swag it across using some silver braided cable and a custom-made porcelain rose adaptor. (this pic also shows that we painted the coving black to match the floor)
As with all these room renovations I get loads of photos early on then nothing until the room is complete.


I have no idea on the final budget for this room, I chose not to (and still haven't) look up the total cost of the wall paper.
Big hats off to Karen Knox @ making spaces (google it) who is working as our designer on this project who has brought everything together from sourcing some of the furniture to cool little details like painting the door jams to match the highlights of the room (something that we would never think of!) and to help us make the bold decisions!
As per my last post you have seen the before pics to the room. It followed the same same theme as the rest of the house, un loved and a lack of any individuality!
This room ultimately is going to be a guest room but we will live in it for a bit until the next phase is completed working to the master suite (which will be one of the last things we do is finished)
As with the "blue room" (this is above) it faces west and is quite a dark space but is dominated by the big bay overlooking a main road!
We wanted something guests would look forward to staying in that was not reminiscent of a standard hotel style guest room but more luxury boutique
I don't have a picture of the before shots on the floor but once we had sanded the floorboards back they were a bit of a mismatch and 2 / 3 varying shades of pine!
The decision was made not have carpet (which we generally don't like but as Mick Jagger once said, Paint it black (which was looped whilst we were doing this to my wife annoyance!
What does any guest love when staying somewhere? . . . . Thats right folks a 4 Poster Bed!
This was a bargain off Maisons Du Monde (circa 350) plus slats (which we got from Ikea as it was a Euro King)
Having never been a fan of wallpaper we seem to be embracing it in this house and we were recommended this one:
The print was from a 1800's house in London.
We loved the colours and it matched the black flooring gradually fading to a lighter grey at the top.
Another must for this room was to be adding another ceiling rose and something that I have wanted for a while in a property, A Vita Eos shade (slightly arty pic). As the light was sitting above the cross beam of the bed we needed to swag it across using some silver braided cable and a custom-made porcelain rose adaptor. (this pic also shows that we painted the coving black to match the floor)
As with all these room renovations I get loads of photos early on then nothing until the room is complete.
I have no idea on the final budget for this room, I chose not to (and still haven't) look up the total cost of the wall paper.
Big hats off to Karen Knox @ making spaces (google it) who is working as our designer on this project who has brought everything together from sourcing some of the furniture to cool little details like painting the door jams to match the highlights of the room (something that we would never think of!) and to help us make the bold decisions!
Edited by andrewjamesroberts on Sunday 17th March 09:25
Edited by andrewjamesroberts on Thursday 4th July 21:46
Thanks all for the kind words!
Lots of hard work went into this
Harry I have watched your renovation since the start and love the building and what you have done to it!
We no longer use this room as ours but the room is used frequently by friends and family when they come and stay
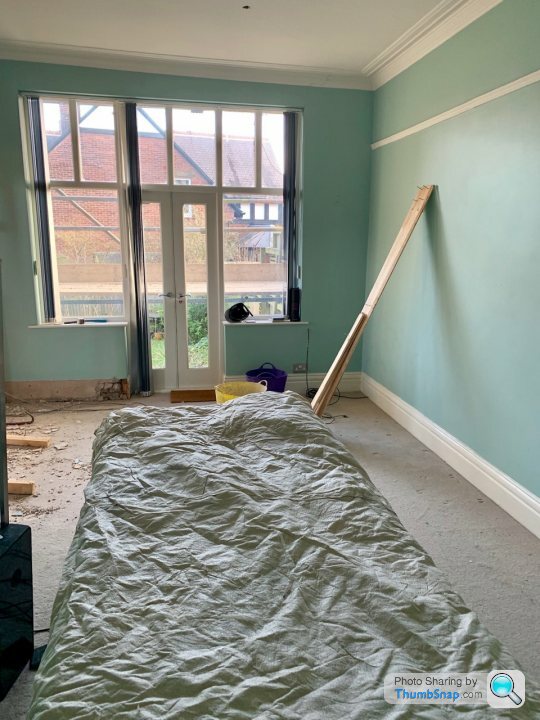
Actually it’s currently a makeshift kitchen as the big structural piece of the renovation is well under way ( updates will come on this)!
[url |https://thumbsnap.com/5BCfEPLL[/url]
excuse all the baby stuff!!
Lots of hard work went into this
Harry I have watched your renovation since the start and love the building and what you have done to it!
We no longer use this room as ours but the room is used frequently by friends and family when they come and stay
Actually it’s currently a makeshift kitchen as the big structural piece of the renovation is well under way ( updates will come on this)!
[url
|https://thumbsnap.com/5BCfEPLL[/url]excuse all the baby stuff!!
Edited by andrewjamesroberts on Sunday 17th March 19:13
If grand designs has taught me anything, doing renovation works is a sure fire way to get pregnant!
This moves us swiftly onto the Nursery !

This started life as the previous owners study and it was going to be our home office but we were over the moon having to build a nursery instead!
we don't have tonnes of photos the development of the room, but to be honest there wasn't a lot we had to do.
Main things were:
- Add in a few plug sockets (we ended up rewiring the whole floor but that will be in a different post)
- Add a radiator (this rom did not have one)
- New skirting board
- Paint
- Carpet
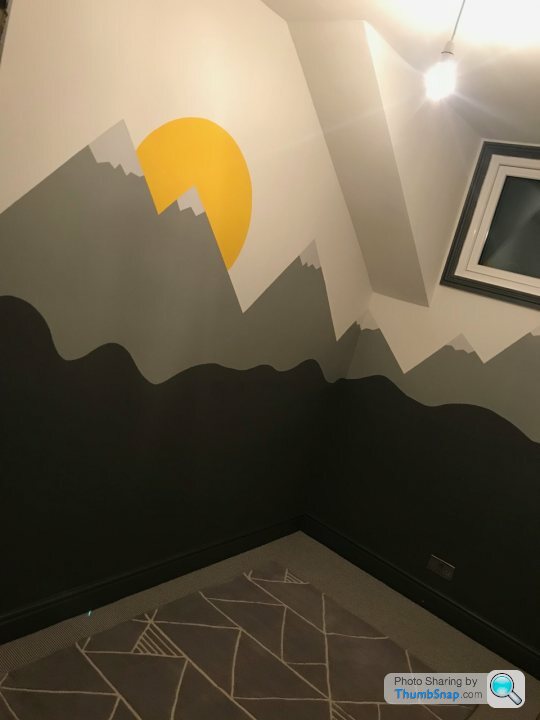
We wanted to add a creative splash into this room and we love the mountains so created the below!


Just a short post today, more on the other rooms on this floor later!
This moves us swiftly onto the Nursery !
This started life as the previous owners study and it was going to be our home office but we were over the moon having to build a nursery instead!
we don't have tonnes of photos the development of the room, but to be honest there wasn't a lot we had to do.
Main things were:
- Add in a few plug sockets (we ended up rewiring the whole floor but that will be in a different post)
- Add a radiator (this rom did not have one)
- New skirting board
- Paint
- Carpet
We wanted to add a creative splash into this room and we love the mountains so created the below!
Just a short post today, more on the other rooms on this floor later!
Thanks for all the positive feedback!
I have hinted at it throughout the thread but I thought I would just post a teaser of things to come (this is currently mid way through!

This will replace the hideous first floor conservatory and create some new a exciting spaces in the house!
I have hinted at it throughout the thread but I thought I would just post a teaser of things to come (this is currently mid way through!
This will replace the hideous first floor conservatory and create some new a exciting spaces in the house!
Edited by andrewjamesroberts on Thursday 21st March 06:50
Next Update, Trying to bring this up to date as fast as possible
Top floor (2nd) front bedroom
This is another front of the house bedroom so another inky dark room. Ultimately this will end up being a kids room but at the moment its another guest room (my wife is from west London and we tent to have several of her friends up at a time several times a year).
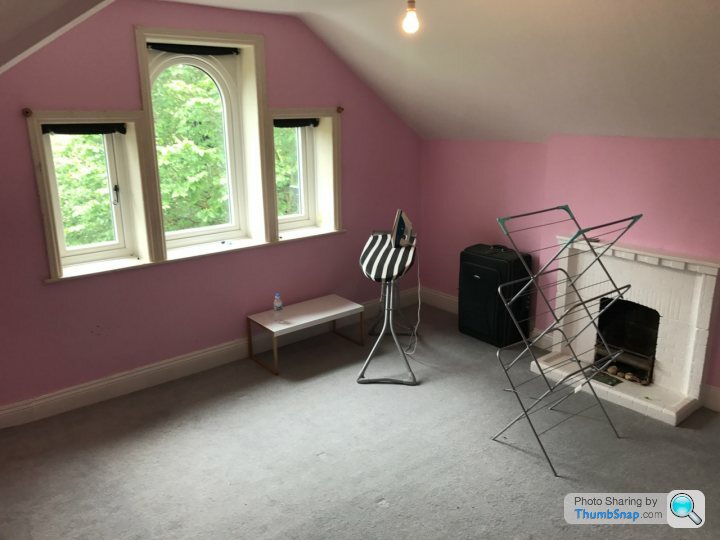
This is how the room started. it was another Pink room with a faux fireplace that was made to look like painted brick but was actually cast concrete! There was also a home made cupboard in the corner which also had to go!
 [url]
[url]
 |https://thumbsnap.com/du2GIGeG[/url]

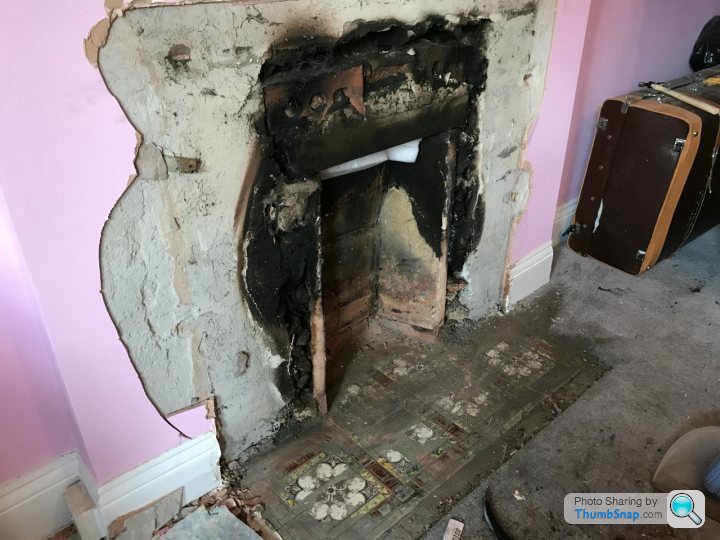
Simple job with a big hammer and a crowbar to get rid of both the fire place and the cupboard in one swoop!
Under the hideous fireplace there were some really nice tiles with the Yorkshire white rose, god knows why these were covered up!
 [url]
[url]
 |https://thumbsnap.com/xVqFR7d0[/url]
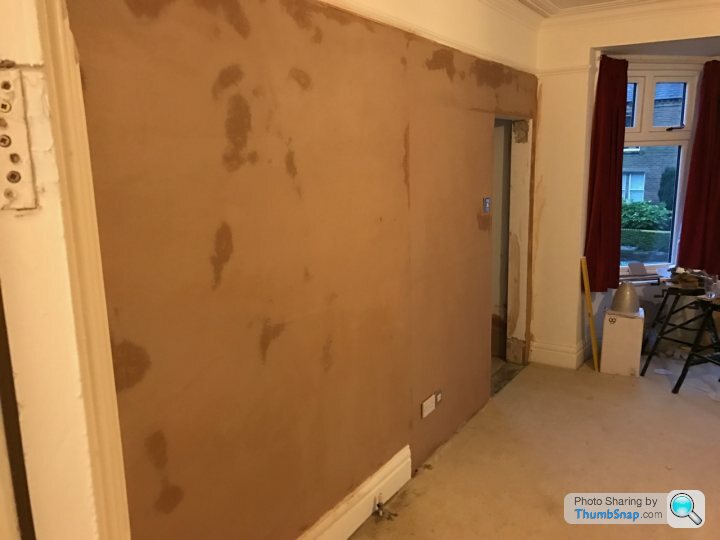
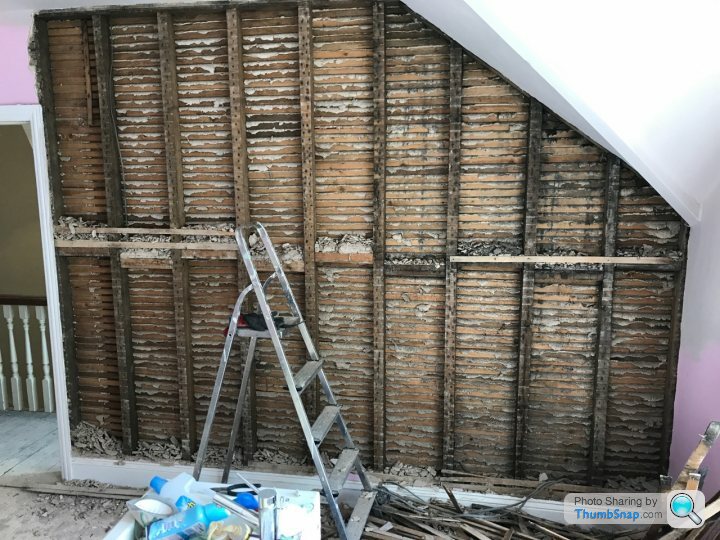
After doing some investigating the plaster on the back wall had to go, it was cracked un even and we wanted to swap the handing on the door over (so we had to move the switch and we also wanted to add some sockets to this wall. It was simpler to get rid of the old lat and plaster and board this up then skim.

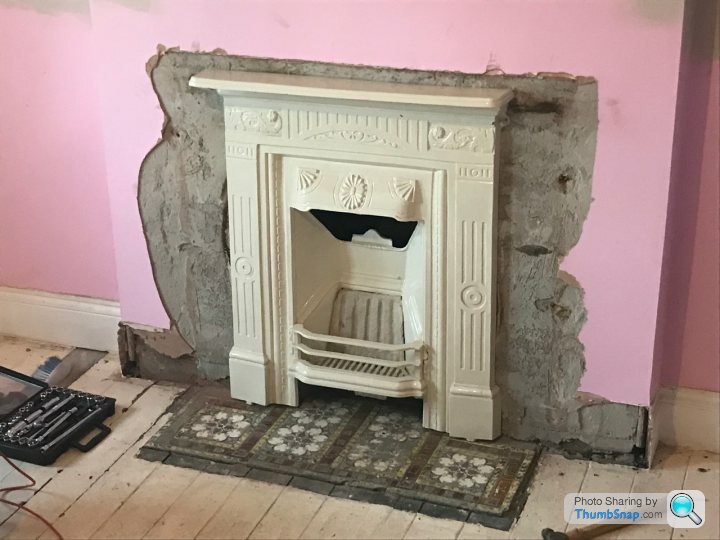
Before the room was re skimmed we needed to replace the fireplace so we found this one on Ebay that fitted perfectly (the tiles also cleaned up ok
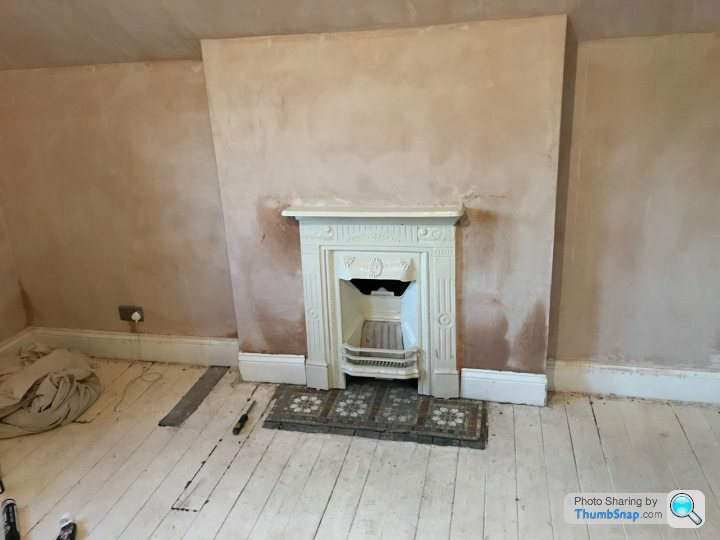
New Rad fitted
More Dark paint, and light fitting in

Floor painted

We then found this cool effect to create some custom headboard artwork using a metallic copper paint and a liquid that "rusts" the copper instantly to create a cool unique piece of art

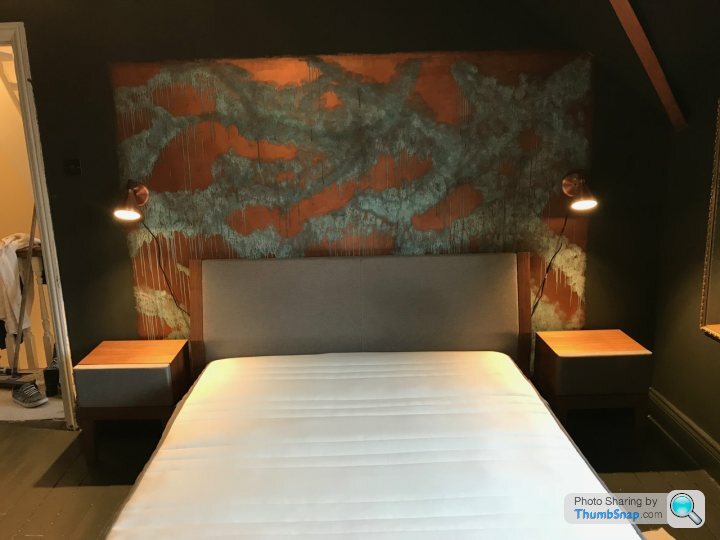
The final room looks like this

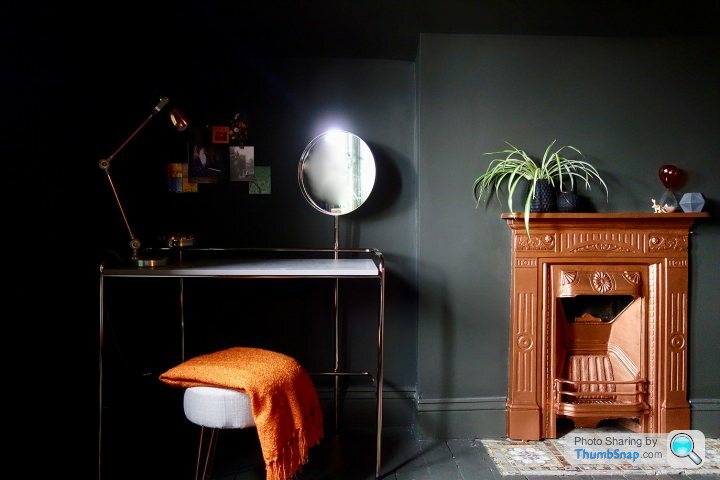


Our designer friend helped style this room in terms of picking our the dressing table, chair, lighting and placement of all the furniture. She again helped us make bold design decisions in colours and the awesome copper backdrop!
In addition to the cosmetic work on this floor there was a step in-between where I stripped out all the electrics on the whole floor and re-wired the lot. We found some "shocking" work like live cables buried in plaster with our tape over the ends loads of dead legs etc.
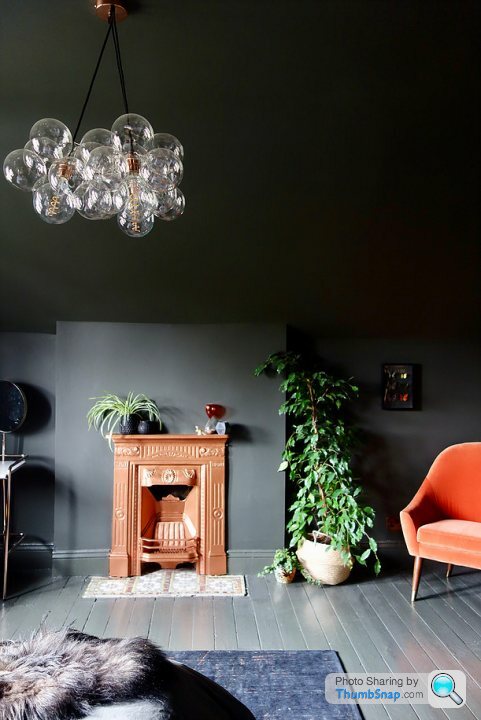
This concludes all the rooms at the front of the house. Our idea was to keep these all dark (due to the lighting) and try and keep these semi traditional.
The back of the house we are wanting to make slightly modern whilst nodding to the roots of the house!
Top floor (2nd) front bedroom
This is another front of the house bedroom so another inky dark room. Ultimately this will end up being a kids room but at the moment its another guest room (my wife is from west London and we tent to have several of her friends up at a time several times a year).
This is how the room started. it was another Pink room with a faux fireplace that was made to look like painted brick but was actually cast concrete! There was also a home made cupboard in the corner which also had to go!
[url]|https://thumbsnap.com/du2GIGeG[/url]Simple job with a big hammer and a crowbar to get rid of both the fire place and the cupboard in one swoop!
Under the hideous fireplace there were some really nice tiles with the Yorkshire white rose, god knows why these were covered up!
[url]|https://thumbsnap.com/xVqFR7d0[/url]After doing some investigating the plaster on the back wall had to go, it was cracked un even and we wanted to swap the handing on the door over (so we had to move the switch and we also wanted to add some sockets to this wall. It was simpler to get rid of the old lat and plaster and board this up then skim.
Before the room was re skimmed we needed to replace the fireplace so we found this one on Ebay that fitted perfectly (the tiles also cleaned up ok
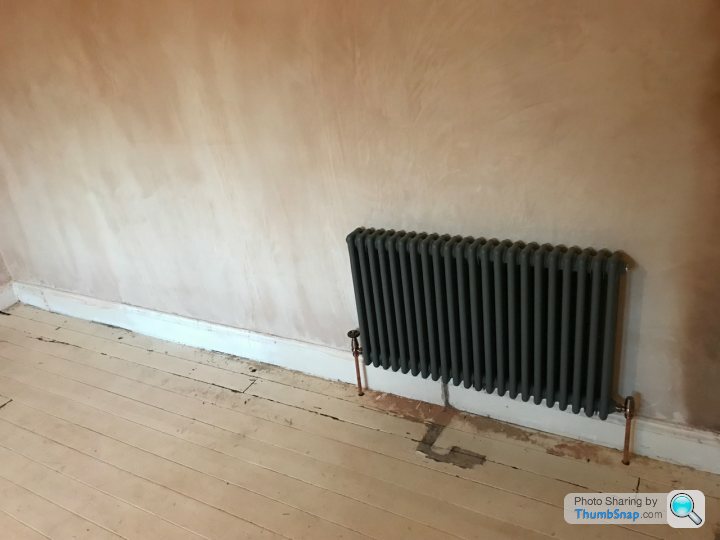
New Rad fitted
More Dark paint, and light fitting in
Floor painted
We then found this cool effect to create some custom headboard artwork using a metallic copper paint and a liquid that "rusts" the copper instantly to create a cool unique piece of art
The final room looks like this
Our designer friend helped style this room in terms of picking our the dressing table, chair, lighting and placement of all the furniture. She again helped us make bold design decisions in colours and the awesome copper backdrop!
In addition to the cosmetic work on this floor there was a step in-between where I stripped out all the electrics on the whole floor and re-wired the lot. We found some "shocking" work like live cables buried in plaster with our tape over the ends loads of dead legs etc.
This concludes all the rooms at the front of the house. Our idea was to keep these all dark (due to the lighting) and try and keep these semi traditional.
The back of the house we are wanting to make slightly modern whilst nodding to the roots of the house!
Edited by andrewjamesroberts on Friday 22 March 06:39
Hi not sure on forum advertising rules but her site is
https://www.making-spaces.net
There are a few other rooms that we have completed but I will put them up later. I have a sleeping child and a sick (and sleeping wife) so I can start updating on the structural parts the this project!
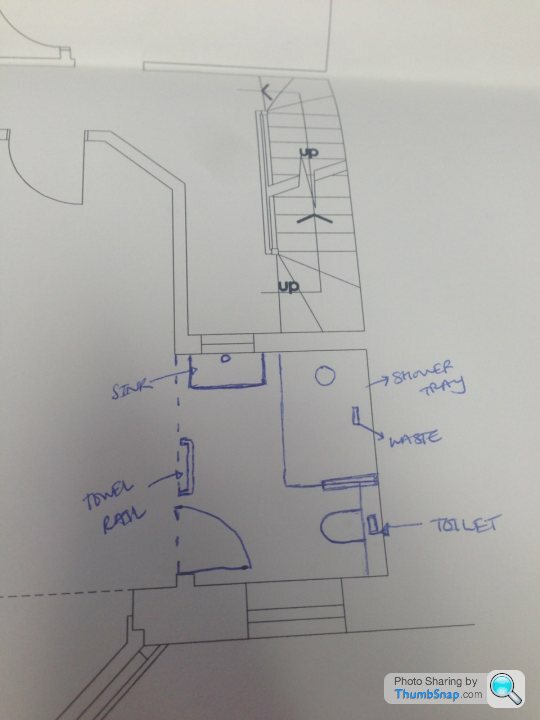
The starting Point (Ground Floor)
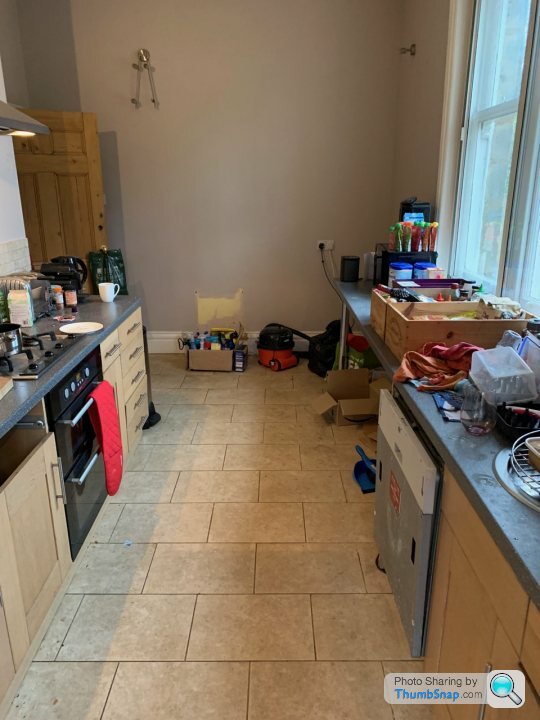
There was a gally kitchen and a dining room / living room separated by a massive thick wall (which turns out to be an old earth and chimney, more on this later)
The kitchen was old and tired but functional. The chap who had the house before us had never spent any time cleaning it or fixing minor leaks so it was a mess!
The weird stairs at the back of the house in the plans below were odd levels that the garden existed on and the stairs down into the cellar.


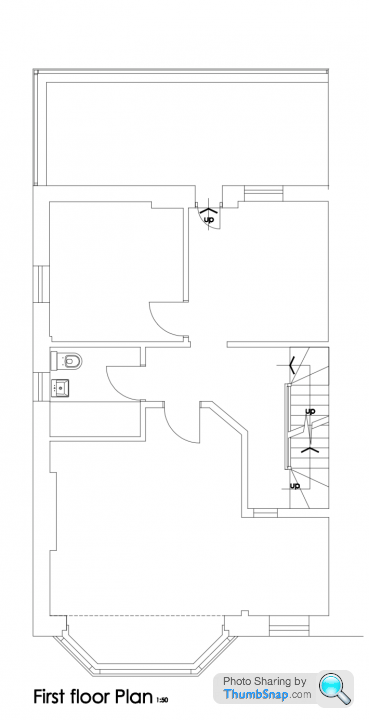
First Floor
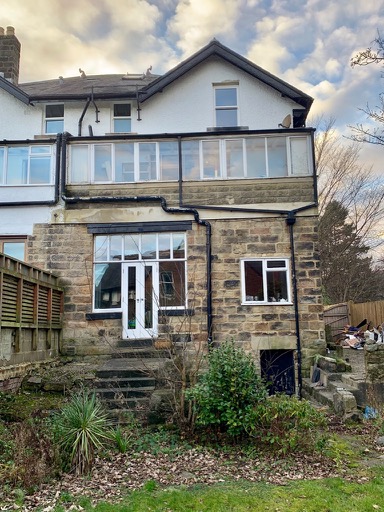
The rooms we are tackling on this part were the top three in the image below. Originally 2 bedrooms and the weird ass first floor conservatory

I don't have pics of the 2 bedrooms for some reason . . . they were fairly non descript and about 3m x 3m big. Above is the conservatory when we took ownership of the house, the previous owner left the foosball table (which I gave to a friend with 2 young boys who were football crazy)
The Plans
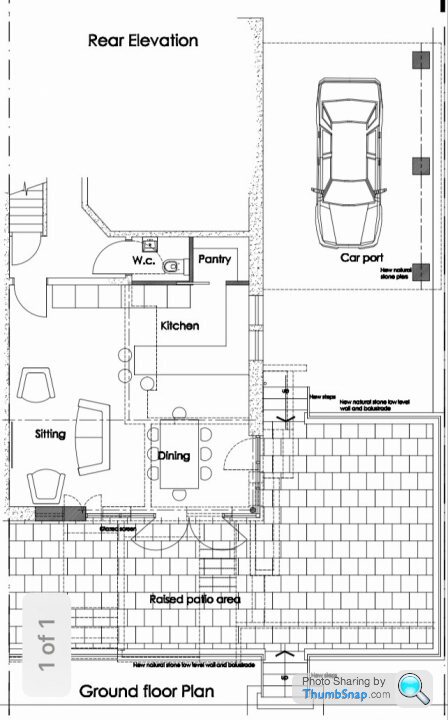

The plans!
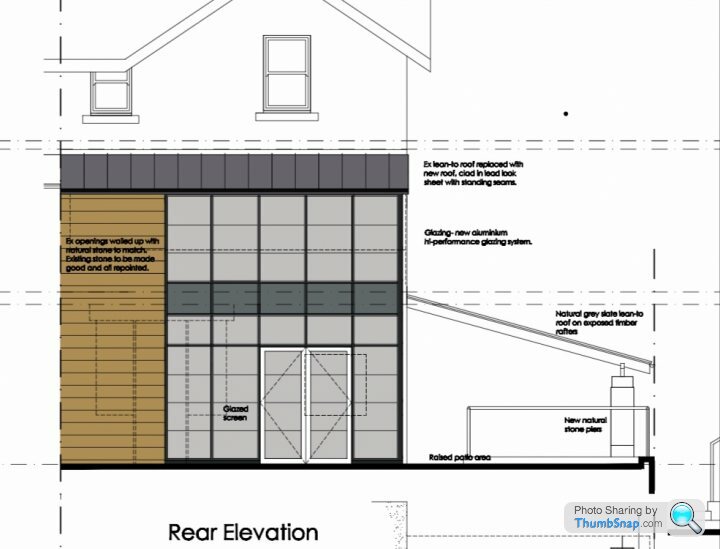
We are going to be knocking lots of wall down downstairs to create a open plan area with new kitchen and family room. We also are going to form a new downstairs toilet and a pantry for the kitchen. French doors will open onto a massive patio area with stairs down to the garden (these have changed since the pics were done but I will update later)
Upstairs we are going to create a new master suite with dressing area, ensuite and bedroom overlooking the garden.
Looking at the back of the house we are having the stone that will be taken from knocking down the rear of the house to build a new wall (to the left of the elevation) and then a big 6.5m wrap around glazing system (matt black) that will extend down the side of the house.
The new roof will be finished in anthracite standing seam aluminium.
This will gain us minimal Sq footage but create some new spaces to live in. The Car port won't be done for a while if at all but we wanted to ensure that we had the option with planning to build in the future!
https://www.making-spaces.net
There are a few other rooms that we have completed but I will put them up later. I have a sleeping child and a sick (and sleeping wife) so I can start updating on the structural parts the this project!
The starting Point (Ground Floor)
There was a gally kitchen and a dining room / living room separated by a massive thick wall (which turns out to be an old earth and chimney, more on this later)
The kitchen was old and tired but functional. The chap who had the house before us had never spent any time cleaning it or fixing minor leaks so it was a mess!
The weird stairs at the back of the house in the plans below were odd levels that the garden existed on and the stairs down into the cellar.
First Floor
The rooms we are tackling on this part were the top three in the image below. Originally 2 bedrooms and the weird ass first floor conservatory
I don't have pics of the 2 bedrooms for some reason . . . they were fairly non descript and about 3m x 3m big. Above is the conservatory when we took ownership of the house, the previous owner left the foosball table (which I gave to a friend with 2 young boys who were football crazy)
The Plans
The plans!
We are going to be knocking lots of wall down downstairs to create a open plan area with new kitchen and family room. We also are going to form a new downstairs toilet and a pantry for the kitchen. French doors will open onto a massive patio area with stairs down to the garden (these have changed since the pics were done but I will update later)
Upstairs we are going to create a new master suite with dressing area, ensuite and bedroom overlooking the garden.
Looking at the back of the house we are having the stone that will be taken from knocking down the rear of the house to build a new wall (to the left of the elevation) and then a big 6.5m wrap around glazing system (matt black) that will extend down the side of the house.
The new roof will be finished in anthracite standing seam aluminium.
This will gain us minimal Sq footage but create some new spaces to live in. The Car port won't be done for a while if at all but we wanted to ensure that we had the option with planning to build in the future!
Edited by andrewjamesroberts on Sunday 24th March 13:57
Here we go!
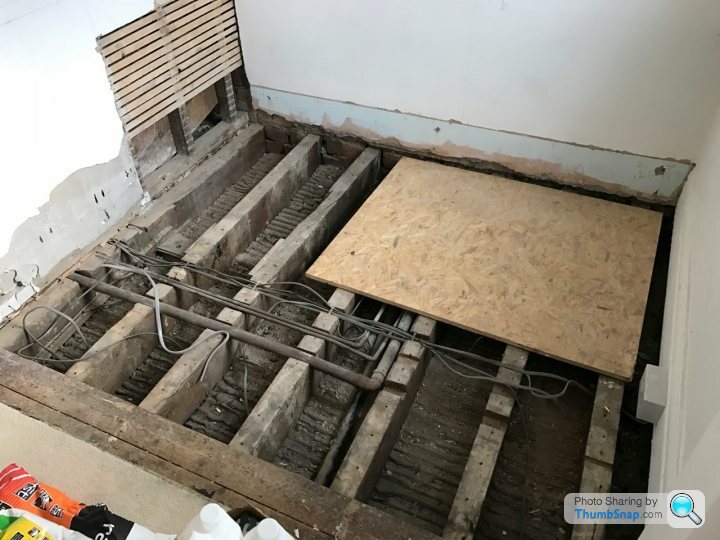
There are about three months of renovations to get through (the work started Jan 4th and is still ongoing)
The demolition!
Scaffolding up!
[url |https://thumbsnap.com/91fInely[/url]
This was a stud wall that connects the dining room to the kitchen.
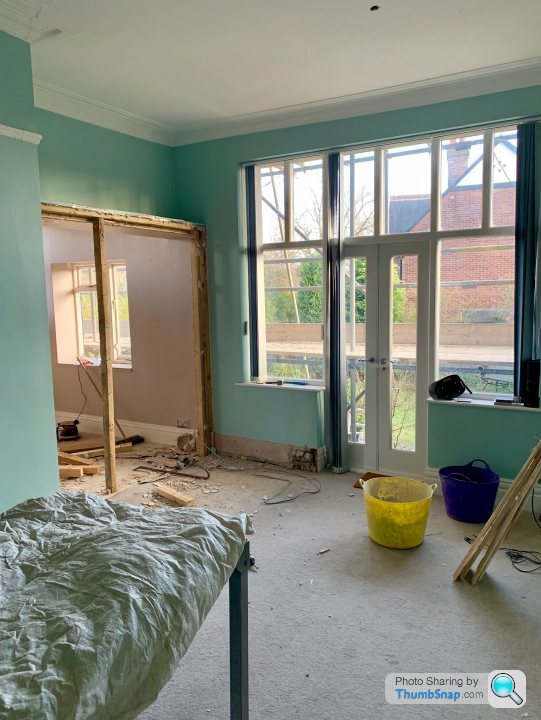
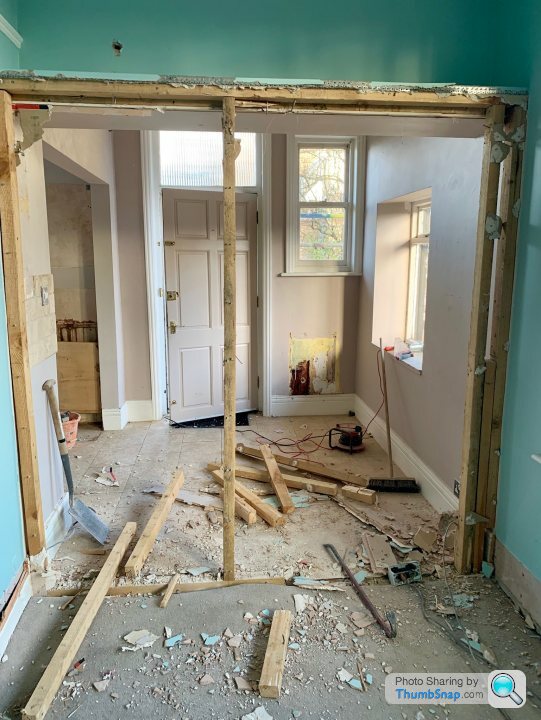
Next job - take the kitchen out

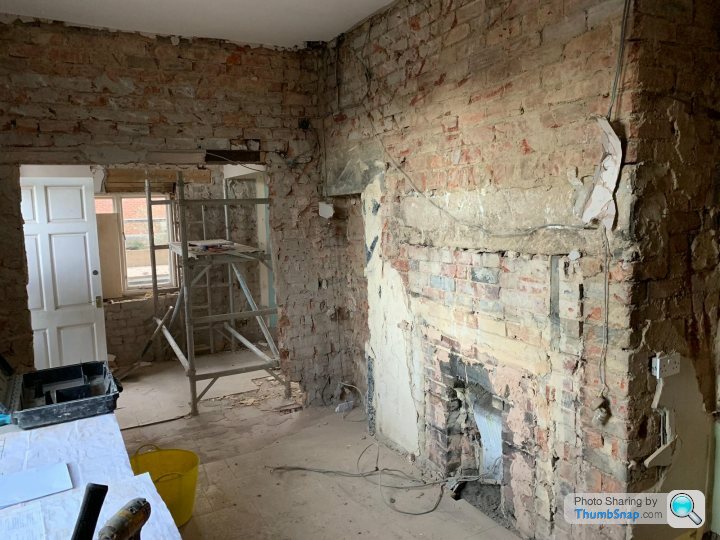
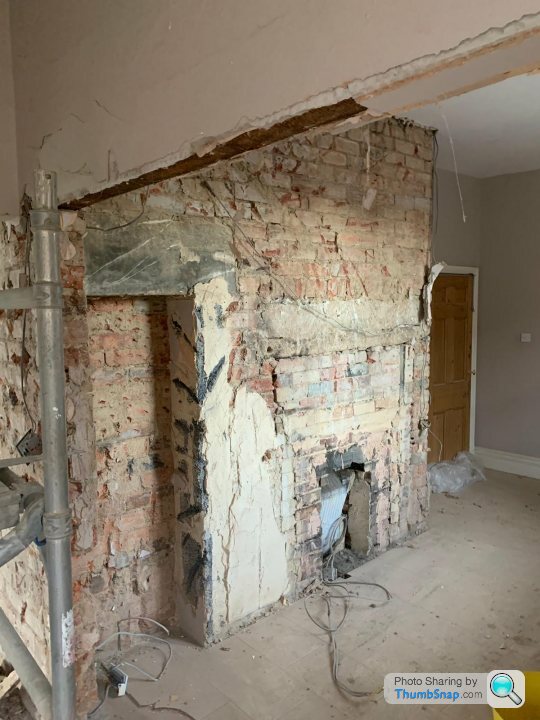
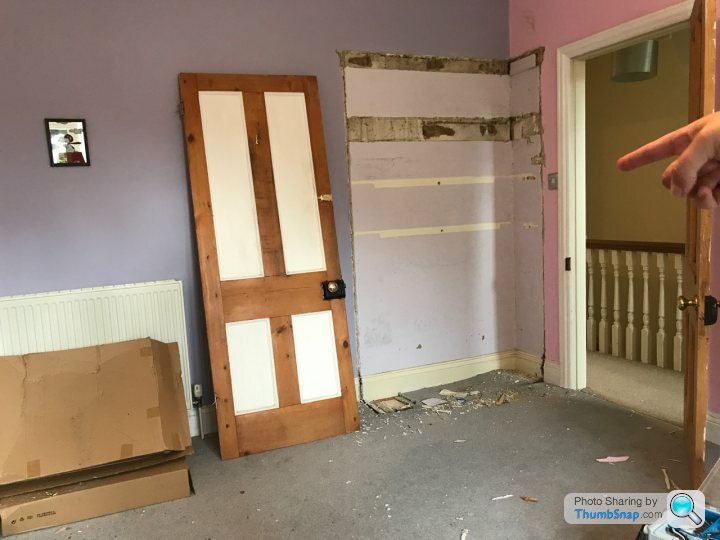
In taking the kitchen out they uncovered an old fireplace which was probably the main heating source to the house when it was build. This is going to cause us issues later on (probably a later post).
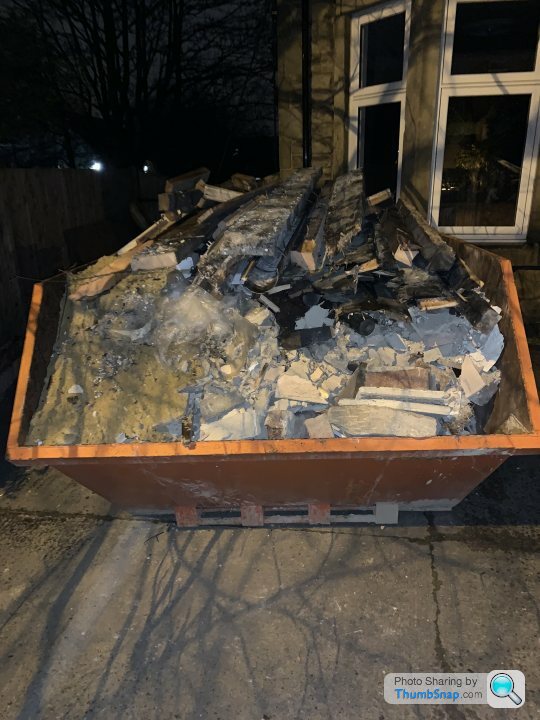
First skip of many!!
Loo’s arrived!

My wife and 6 month old son moved down to her dads as she was still On maternity it worked quite well. This means that most photos are taken in the dark as I only saw the house after work and not on the weekends as I was down in London visiting them.
All internal doors that led to these spaces were covered in dust guards and OSB sheets. However this did not contain the dust at all. That stuff gets everywhere! The house was daily secure during this and it was fairly warm although I’m scared to do a meter reading as the heating was on most of the time!!
There are about three months of renovations to get through (the work started Jan 4th and is still ongoing)
The demolition!
Scaffolding up!
[url
|https://thumbsnap.com/91fInely[/url]This was a stud wall that connects the dining room to the kitchen.
Next job - take the kitchen out
In taking the kitchen out they uncovered an old fireplace which was probably the main heating source to the house when it was build. This is going to cause us issues later on (probably a later post).
First skip of many!!
Loo’s arrived!
My wife and 6 month old son moved down to her dads as she was still On maternity it worked quite well. This means that most photos are taken in the dark as I only saw the house after work and not on the weekends as I was down in London visiting them.
All internal doors that led to these spaces were covered in dust guards and OSB sheets. However this did not contain the dust at all. That stuff gets everywhere! The house was daily secure during this and it was fairly warm although I’m scared to do a meter reading as the heating was on most of the time!!
Ace-T said:
Very nice indeed! The walls look a very dark green, is that the colour, or just my device? More info on that fabulous copper paint effect would be gratefully received too.
Thanks again for sharing this.
Hi sorry I missed this question!Thanks again for sharing this.
The copper effect was simple and really cheep to do.
We used the copper paint that we had left over from painting the fireplace then sponged this stuff on top
https://www.craigandrose.com/artisan-copper-patina
Within seconds it starts to oxidise the copper and leave the cool Patina effect
Gassing Station | Homes, Gardens and DIY | Top of Page | What's New | My Stuff