My Garage Build
Discussion


I have enjoyed reading about other builds in the past so thought I had better start a thread about my own effort.
This is where it all started. A large shed but not large enough for a car:
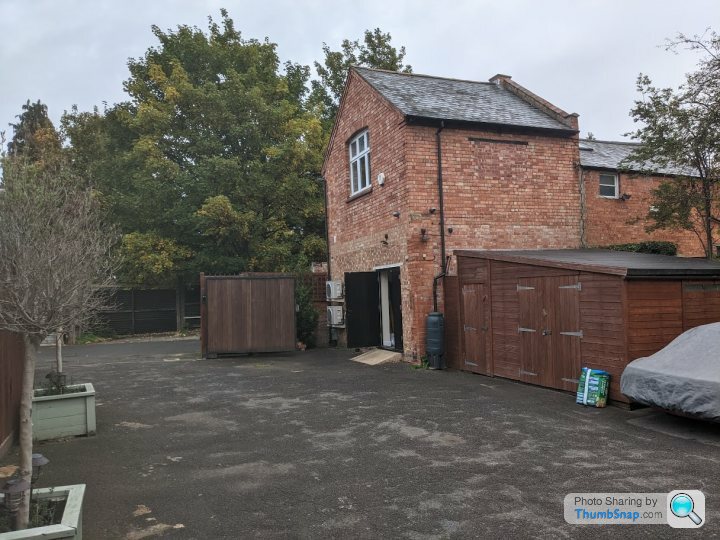
The building behind the shed is almost big enough to be a double garage but had been expensively converted to an office / workshop by the previous owners so it would be a shame to remove. Being close to the boundary wall and above some amount of m2 I needed to apply for planning for the new garage and also building regs. Lucikly it received planning at first asking, slightly lucky as we are in a conservation area. Building regs were happy with the design (from a kit supplier) as long as I applied fire proofing stuff to the boundary wall.
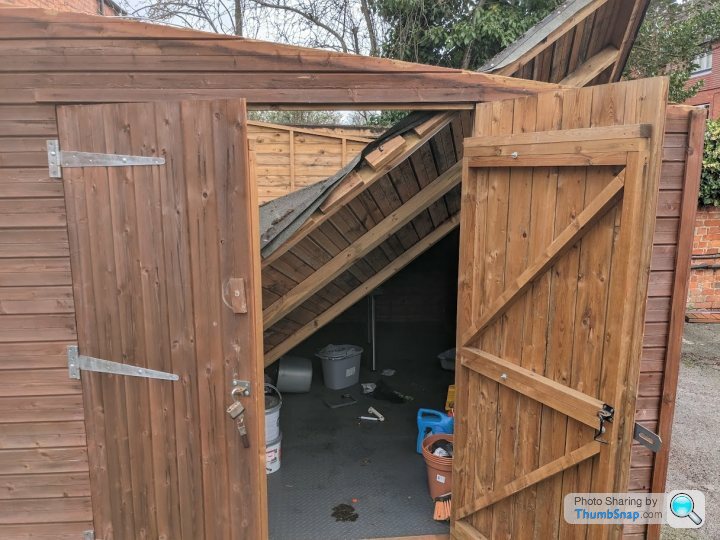
Despite reading the ledgendary how to demolish a shed thread on PH I took a more considered approach as I wanted to use some of the wood to build a smaller shed (largely to keep family junk out of my new garage) and my mate wanted the rest to build his own shed. That said demolition of the roof did not go completely to plan....
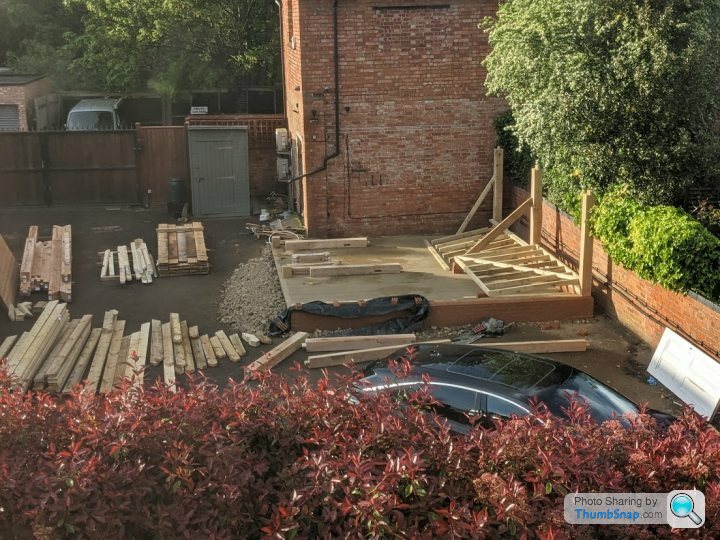
Once the site was clear I got some groundworkers in to dig foundations. These are 1m deep along the two walls and reinforced around the points where the front posts will sit:
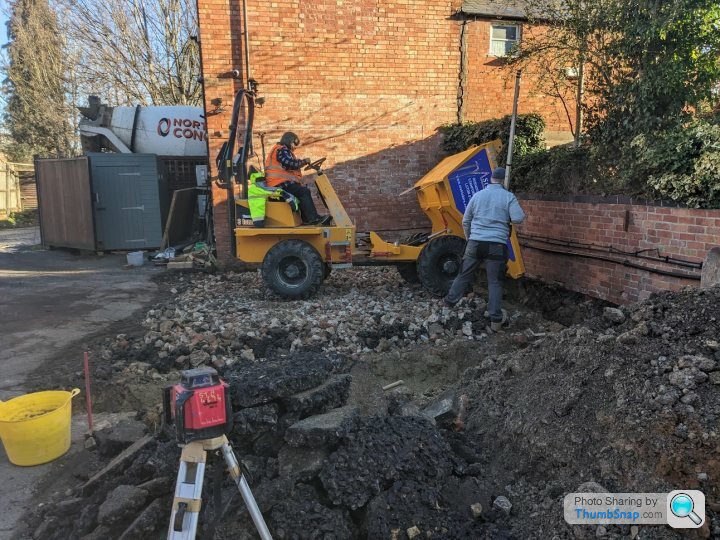
The groundworker was fantastic and the result is a level slab with the required dwarf wall build within mm of the kit suppliers requirments:

Now the groundwork has finished it is over to me to build the frame, which arrives Friday. Following that a load of roofing stuff will arrive and I will then be tiling the roof.
I will post updates as I go if anyone is interested.
Ben
This is where it all started. A large shed but not large enough for a car:
The building behind the shed is almost big enough to be a double garage but had been expensively converted to an office / workshop by the previous owners so it would be a shame to remove. Being close to the boundary wall and above some amount of m2 I needed to apply for planning for the new garage and also building regs. Lucikly it received planning at first asking, slightly lucky as we are in a conservation area. Building regs were happy with the design (from a kit supplier) as long as I applied fire proofing stuff to the boundary wall.
Despite reading the ledgendary how to demolish a shed thread on PH I took a more considered approach as I wanted to use some of the wood to build a smaller shed (largely to keep family junk out of my new garage) and my mate wanted the rest to build his own shed. That said demolition of the roof did not go completely to plan....
Once the site was clear I got some groundworkers in to dig foundations. These are 1m deep along the two walls and reinforced around the points where the front posts will sit:
The groundworker was fantastic and the result is a level slab with the required dwarf wall build within mm of the kit suppliers requirments:
Now the groundwork has finished it is over to me to build the frame, which arrives Friday. Following that a load of roofing stuff will arrive and I will then be tiling the roof.
I will post updates as I go if anyone is interested.
Ben
alfabeat said:
Delivery on Friday, for a perfect bank holiday weekend of activity! Keep the updates coming!
What garage kit have you gone for?
Bank holiday weekend and next week off work to hopefully break the back of the job (or my own back)What garage kit have you gone for?
The kit is from https://www.tradeoak.com/oak-garages/ with some customisation, specifically a hip roof at one end and a gable where it will abut the existing out building.
Loads of deliveries of various ancilliary bits and bobs over the past few days, starting to get excited.....

Some good progress today albeit not as much as I would have liked.
However, I will start with yesterday. As it was my final day in the office prior to my week off building I asked my colleage to bring along my scaffold tower that I had lent him some years ago. All fitted in the car no problem but took up more space than I remembered. After work I set off to collect a Genie lift that I was hiring to help move the larger beams. According to the datasheet it should fit no bother but I was doubtful it would fit with the scaffold.
Thanks to some help from a very patient man at the hire place I did get it all in:

Last night I tried to track down the owner of the car that usual parks blocking the top of the alley behind my house. Not toally blocking, but blocking in a way a lorry would not get in or out. Did not manage to find him but left a note and to my immense relief the alley was clear this morning.
At about 11:00 I got a call from the driver saying he was stuck at Dartford so would not be with me until 13:00ish. This was a bit annoying as it wasted a morning but I had a bit of plaster to skim / tidy in the house so not much of a issue. At 13:30 he rang to say he was 5 mins away so I duly went outside to meet him. Access to the back of mine is somewhat tight, on seeing it he decided he needed to be facing the other way, cue me helping him reverse back onto a busy road. After that we were in (just)
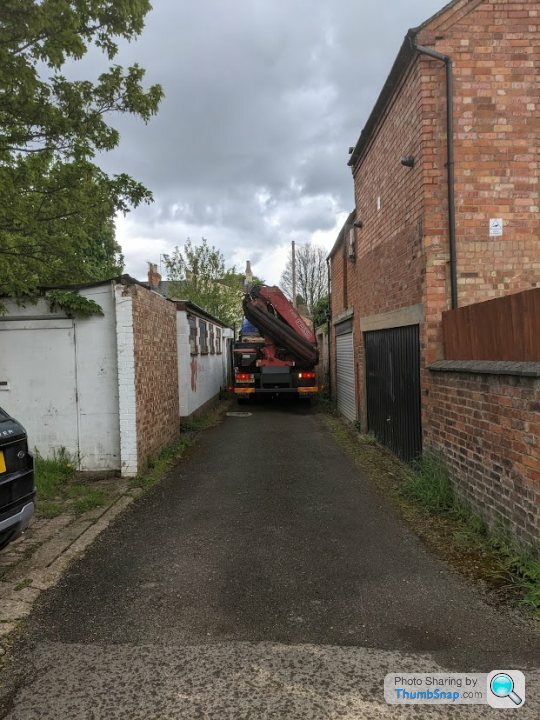
As you can see I do have a tight back passage.
The garage was split into two bundles which were then lifted into the garden:

The driver was ultra helpful and said he had ages until his next job so spent an extra 15 mins splitting the bundles and craning them into convenient spots. This was a decision he would regret as when it came to leave some stroker had parked in a position that made his escape rather challenging. Long story short the Police were involved but had not had to turn up before he was able to escape (off to London to remove traffic lights for the Coronation parade!)
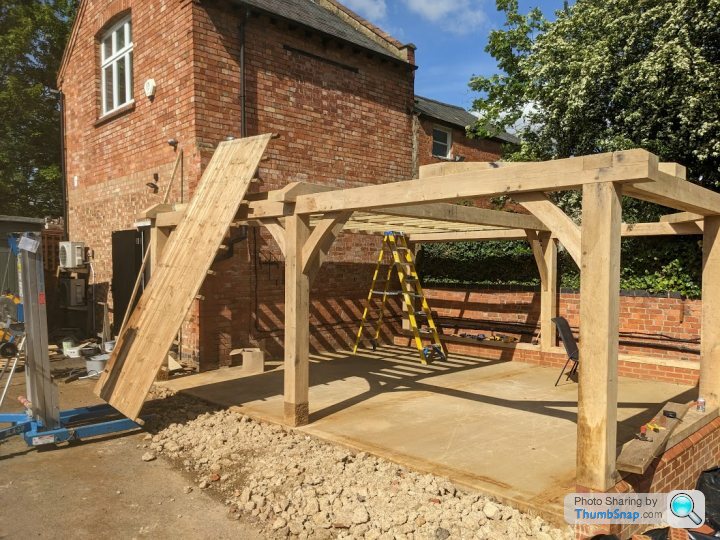
This then left me and my step son to move the wood into a sensible position then when he had gone off to a sleepover left me to move some of the huge corner posts. My plan is to construct the frame of the back wall then tip it over, install the cladding and lift it back into place. Before I decided it was time for a beer (and I ran out of screws) I managed to get the sole plates and three of the posts fitted and the dowls hammered into place and the frame for one of the bays done.
Weather looks rubbish tomorrow but it is also the only day my mate can come and supply some additional muscle so hopefully will get all the heavy bits done.......
However, I will start with yesterday. As it was my final day in the office prior to my week off building I asked my colleage to bring along my scaffold tower that I had lent him some years ago. All fitted in the car no problem but took up more space than I remembered. After work I set off to collect a Genie lift that I was hiring to help move the larger beams. According to the datasheet it should fit no bother but I was doubtful it would fit with the scaffold.
Thanks to some help from a very patient man at the hire place I did get it all in:
Last night I tried to track down the owner of the car that usual parks blocking the top of the alley behind my house. Not toally blocking, but blocking in a way a lorry would not get in or out. Did not manage to find him but left a note and to my immense relief the alley was clear this morning.
At about 11:00 I got a call from the driver saying he was stuck at Dartford so would not be with me until 13:00ish. This was a bit annoying as it wasted a morning but I had a bit of plaster to skim / tidy in the house so not much of a issue. At 13:30 he rang to say he was 5 mins away so I duly went outside to meet him. Access to the back of mine is somewhat tight, on seeing it he decided he needed to be facing the other way, cue me helping him reverse back onto a busy road. After that we were in (just)
As you can see I do have a tight back passage.
The garage was split into two bundles which were then lifted into the garden:
The driver was ultra helpful and said he had ages until his next job so spent an extra 15 mins splitting the bundles and craning them into convenient spots. This was a decision he would regret as when it came to leave some stroker had parked in a position that made his escape rather challenging. Long story short the Police were involved but had not had to turn up before he was able to escape (off to London to remove traffic lights for the Coronation parade!)
This then left me and my step son to move the wood into a sensible position then when he had gone off to a sleepover left me to move some of the huge corner posts. My plan is to construct the frame of the back wall then tip it over, install the cladding and lift it back into place. Before I decided it was time for a beer (and I ran out of screws) I managed to get the sole plates and three of the posts fitted and the dowls hammered into place and the frame for one of the bays done.
Weather looks rubbish tomorrow but it is also the only day my mate can come and supply some additional muscle so hopefully will get all the heavy bits done.......
Day 2 (Coronation Saturday) was really quite wet but per my previous post was also the only day my mate could get a pink pass and come and help. Fortuitously another mate responded to a general Facebook cry for help (see Facebook is useful) and a neighbour was roped in via our local WhatsApp group (it started with him asking if anyone fancied a pint......)
The first task of the day was to cut the cladding for the back wall, my initial plan was to build the entire back wall flat, paint the cladding then lift it up. This proved to be impossible as the weather meant painting could not happen. But one of the gang had a good idea about just cladding each bay inbetween the oak uprights, this would mean the frame and cladding could be done but fitted into the main beams later. Whilst the back wall will never be seen again I also think this approach will look good on the visible walls.
We got into quite a decent rhythm as a sawmill / installation team and raced through this task. I had recently purchased a nail gun from a PHer and had loaded it with stainless steel nails which really sped things up (the gun vs. a hammer rather than the nails being stainless.) Using the nail gun looked great fun but I didn't get a look in.....

Next task was to build up the left hand side of the back wall. The way the beams were supplied meant the order had to be back, front then the massive 5.5m front to back beams. To complicate matters the front to back beams are longer than the gap between the front and back walls (of course.) The approach we took was to build the back wall then strap one of the long beams to the Genie, raise it above the height of the back wall and maneuver it into postion. We then build the front wall using man power to lift the slightly smaller, albeit not insubstantial beams.
To further complicate things until at least one of the front to back beams is fitted the front and back walls are not really that stable. On fitting the first long beam it would not slide into place no matter how hard we hit it. It was then we spotted that there was a champher on the joint meaning we were 180 degrees off. This was particularly annoying as we had measured all of the mounting points to make sure it did not matter which way round we had it. We decided that it would be quicker to lift the beam and chisel out the champher on the receiving beams, in the event I am not sure it was but it was certainly less painful as manually rotating it.
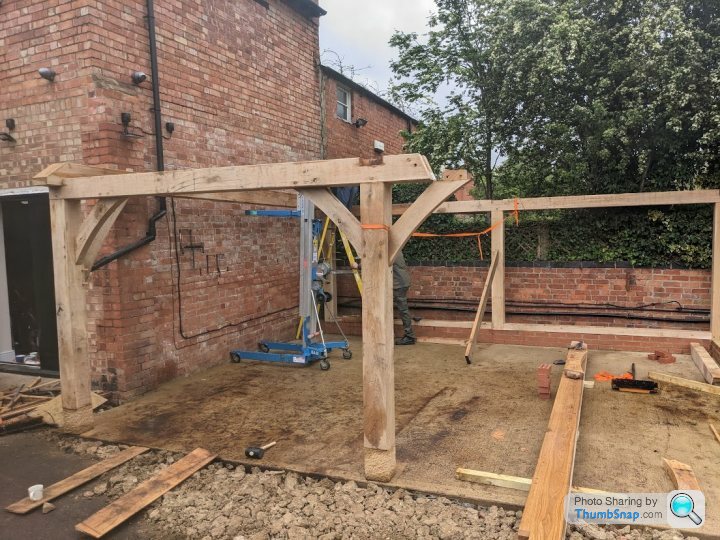
Compared to the edge beam the central one was a doddle, there was a lot more room to maneuver the lift, it had ambidextrous champhers and dropped into place straight away.
The final beam should have been simple however that did not prove to the the case. It simply did not sit correctly. A quick bit of measuring explained why. Ideally the joists would have been cut to allow the frame to be assembled from right to left, the brick wall on the right could then be used as a reliable datum. As this was not possible due to the way the front and back beams were jointed we had built left to right. Over the day the other two beams were around 20cm to far right (perhaps they belong in NP&E.) A good bit of swearing and hitting stuff with a mallet got everything back into shape. We were all soaked but very satisified with what we had achieved.
I am in my element doing tasks like this and I always worry that the people I rope in to help are not enjoying it as much as I am, but even in the pouring rain we were usually laughing. Probably the most annoyed was the mrs who was on tea duty.....
The forecast is better tomorrow but I am reduced to me plus a semi reluctant mrs BigBen. Crucially all the heavy parts are done so I can now manage with or without help.....
The first task of the day was to cut the cladding for the back wall, my initial plan was to build the entire back wall flat, paint the cladding then lift it up. This proved to be impossible as the weather meant painting could not happen. But one of the gang had a good idea about just cladding each bay inbetween the oak uprights, this would mean the frame and cladding could be done but fitted into the main beams later. Whilst the back wall will never be seen again I also think this approach will look good on the visible walls.
We got into quite a decent rhythm as a sawmill / installation team and raced through this task. I had recently purchased a nail gun from a PHer and had loaded it with stainless steel nails which really sped things up (the gun vs. a hammer rather than the nails being stainless.) Using the nail gun looked great fun but I didn't get a look in.....
Next task was to build up the left hand side of the back wall. The way the beams were supplied meant the order had to be back, front then the massive 5.5m front to back beams. To complicate matters the front to back beams are longer than the gap between the front and back walls (of course.) The approach we took was to build the back wall then strap one of the long beams to the Genie, raise it above the height of the back wall and maneuver it into postion. We then build the front wall using man power to lift the slightly smaller, albeit not insubstantial beams.
To further complicate things until at least one of the front to back beams is fitted the front and back walls are not really that stable. On fitting the first long beam it would not slide into place no matter how hard we hit it. It was then we spotted that there was a champher on the joint meaning we were 180 degrees off. This was particularly annoying as we had measured all of the mounting points to make sure it did not matter which way round we had it. We decided that it would be quicker to lift the beam and chisel out the champher on the receiving beams, in the event I am not sure it was but it was certainly less painful as manually rotating it.
Compared to the edge beam the central one was a doddle, there was a lot more room to maneuver the lift, it had ambidextrous champhers and dropped into place straight away.
The final beam should have been simple however that did not prove to the the case. It simply did not sit correctly. A quick bit of measuring explained why. Ideally the joists would have been cut to allow the frame to be assembled from right to left, the brick wall on the right could then be used as a reliable datum. As this was not possible due to the way the front and back beams were jointed we had built left to right. Over the day the other two beams were around 20cm to far right (perhaps they belong in NP&E.) A good bit of swearing and hitting stuff with a mallet got everything back into shape. We were all soaked but very satisified with what we had achieved.
I am in my element doing tasks like this and I always worry that the people I rope in to help are not enjoying it as much as I am, but even in the pouring rain we were usually laughing. Probably the most annoyed was the mrs who was on tea duty.....
The forecast is better tomorrow but I am reduced to me plus a semi reluctant mrs BigBen. Crucially all the heavy parts are done so I can now manage with or without help.....
rustyuk said:
Would you mind sharing some rough or high level costs?
I had been looking to get a garage built and stopped once I received the first quote at 40k plus extras.
To try and get that figure down I had been thinking about getting a concrete slab put down and then buying a kit exactly like yours.
My current rough pricing was 15k plus extras.
I am expecting to be at around £30k including ground works in an approxmiate 1/3 to 2/3 splif of costs.I had been looking to get a garage built and stopped once I received the first quote at 40k plus extras.
To try and get that figure down I had been thinking about getting a concrete slab put down and then buying a kit exactly like yours.
My current rough pricing was 15k plus extras.
paulmac said:
Really interested in how you get on with this, esp as you are diy. I’m in the process of getting planning permission / structural assessment for an identical build, we’ve been looking at trade oak kits also (as well as roundwood, who seem cheaper but only 150mm uprights I think). Was there anything in particular that made you go for the trade oak kit?
Out of interest, did you get your dwarf wall built by the folks that did your groundwork? Also, are you diying the roof or getting someone to do it for you - What sort of % of the build cost do you expect the roof to be? (Sorry that’s a lot of questions!)
I can't recall why I chose trade oak other than the salesperson was helpful and not a knob. Out of interest, did you get your dwarf wall built by the folks that did your groundwork? Also, are you diying the roof or getting someone to do it for you - What sort of % of the build cost do you expect the roof to be? (Sorry that’s a lot of questions!)
The wall was built by the groundworkers. The roof will be DIY and I suspect around £2k with that cost dominated by choice of tiles. This excludes time off work for any fall related injuries I may sustain in the process.....
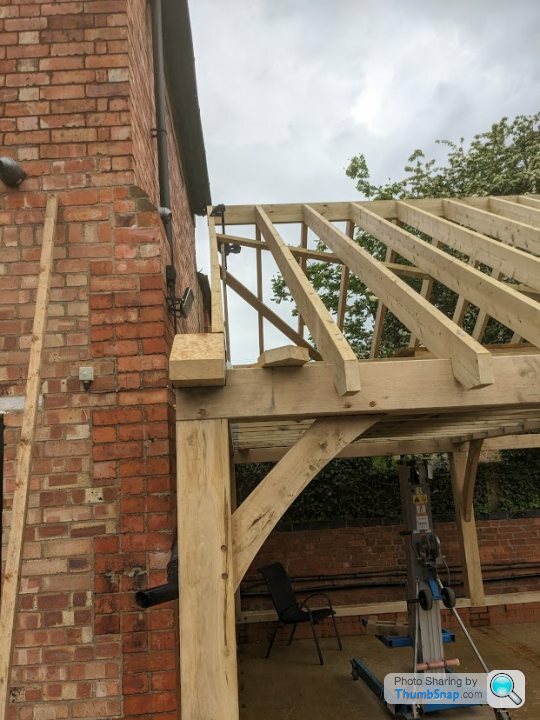
Day 3 (the Boxing day of the coronation.) Quite different weather conditions today, I have small bits of sunburn. No external help today apart from Mrs BigBen. I managed to install the attic trusses for the storage area which will be over the left hand bay:
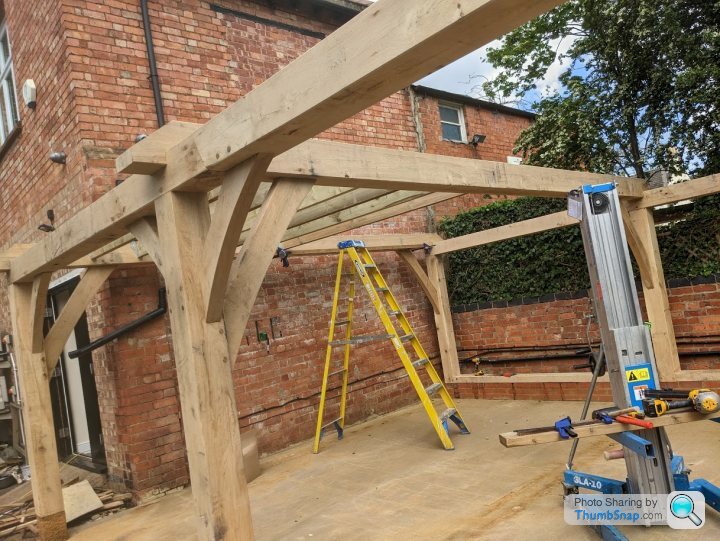
Once this was done I was able to hoist the floor or the old shed onto the roof to act as a platform to be used whilst assembling the remainder of the roof:
Next step was installing the ridge beam. This went fairly smoothly with the caveat that the peak appeared to be off centre. I was at this point I realised one of the few tools I don't own is a plumb line. I improvised one with some garden string and a hammer and found the ridge was on centre but I had messed up in the moring and the Attic trusses were a few CM away from where they should be. This won't be a problem but is slightly annoying.
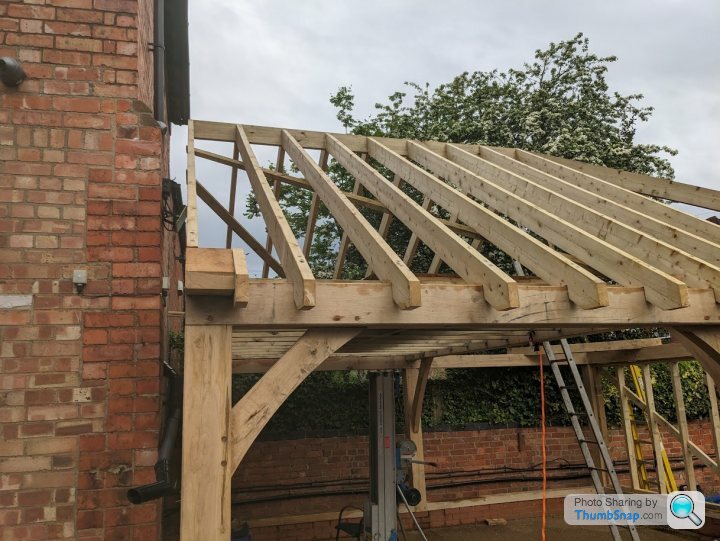
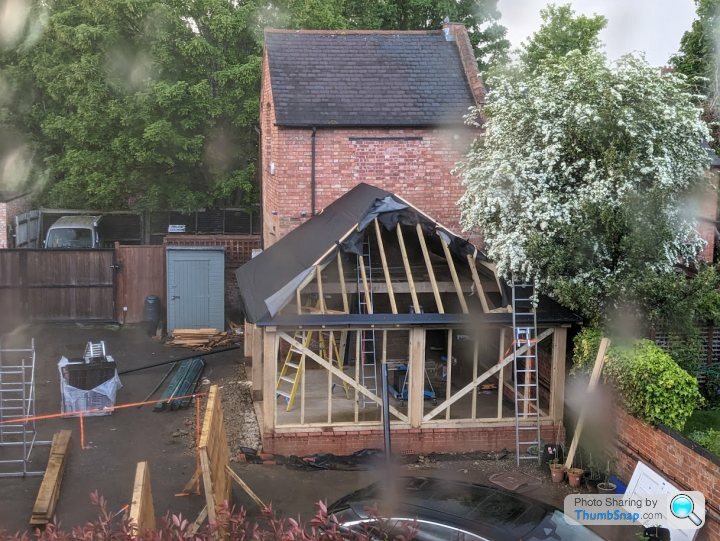
With some extreme bravery from the Mrs supporting the beams whilst I passed them up we managed to get the skeleton of the roof fitted:
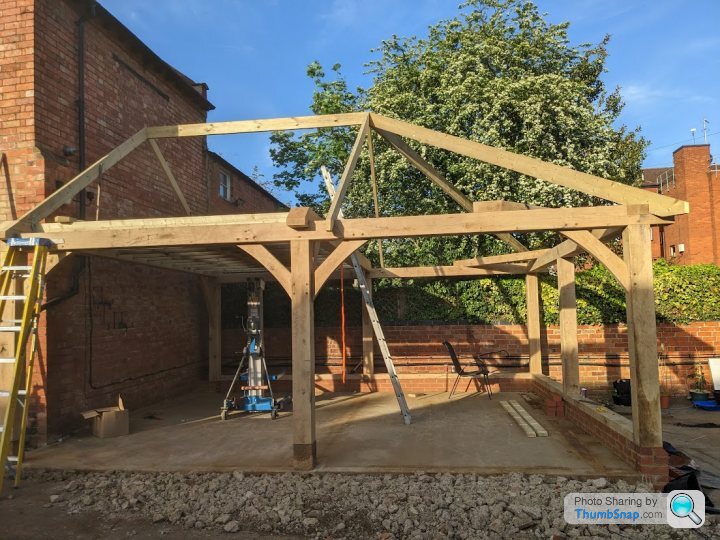
This now means I can just about do the remaining parts of the build on my own. I have orderd the right nails for my gun and made some wooden spacers so the joists will be easy to align. The hipped part of the roof will be a bit trickier but I am sure I can figure out some hacks.
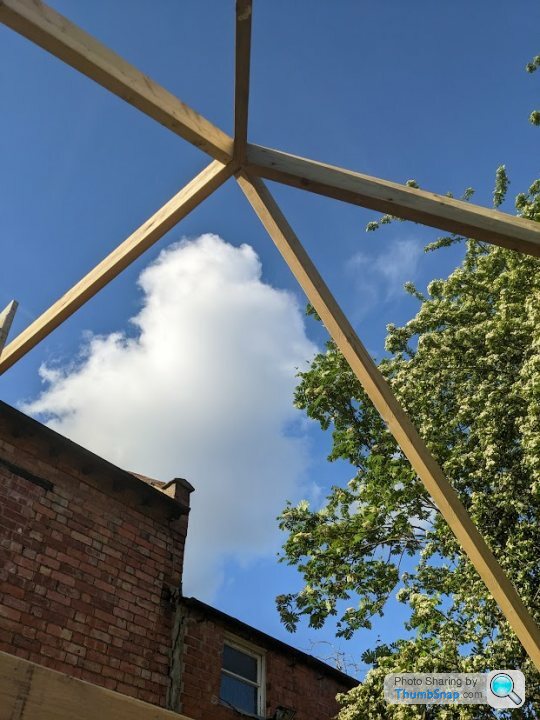
I finished the day off by building (but not cladding) one of the panels for the side wall and then capture an 'arty' picture of the roof
Weather looks less good tomorrow and we have lunch guests so expect less progress.
Once this was done I was able to hoist the floor or the old shed onto the roof to act as a platform to be used whilst assembling the remainder of the roof:
Next step was installing the ridge beam. This went fairly smoothly with the caveat that the peak appeared to be off centre. I was at this point I realised one of the few tools I don't own is a plumb line. I improvised one with some garden string and a hammer and found the ridge was on centre but I had messed up in the moring and the Attic trusses were a few CM away from where they should be. This won't be a problem but is slightly annoying.
With some extreme bravery from the Mrs supporting the beams whilst I passed them up we managed to get the skeleton of the roof fitted:
This now means I can just about do the remaining parts of the build on my own. I have orderd the right nails for my gun and made some wooden spacers so the joists will be easy to align. The hipped part of the roof will be a bit trickier but I am sure I can figure out some hacks.
I finished the day off by building (but not cladding) one of the panels for the side wall and then capture an 'arty' picture of the roof
Weather looks less good tomorrow and we have lunch guests so expect less progress.
Day 4 (bank holiday monday)
Not a huge amount of progress today due to lunch guests. Tasks were:
- Treating the back wall panels with another coat of flameproofing liquid. One panel now done with the target 3 coats, 1 coat to go on the other. Back wall panels can be installed soon.
- Built the final side panel (but not clad)
- Made the temporary platform above the attic trusses safer as I will be working on it a lot
- Devised a jig for fitting the remaining joists on the non hipped part of the roof. Essentially this will allow me to work alone and fit the joists without an assistant. I will take a picture of it tomorrow
- Spotted that my dodgy measuring of the attic trusses yesterday left one of them in the way of some of the joists, no real loss of attic space by removing it so I have. Annoyed at myself for not spotting it yesterday.
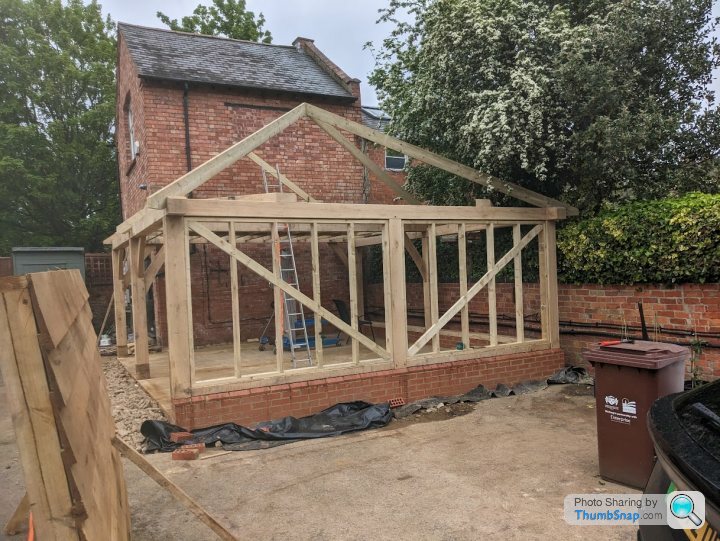
DIfficult to see from the picture but each panel is slightly recessed so the cladding will go between the vertical beams, different to the suggested builds / library photos but think it will look better and shows of the frame. I may ultimately put some kind of draft proofing round the edges but probably won't.
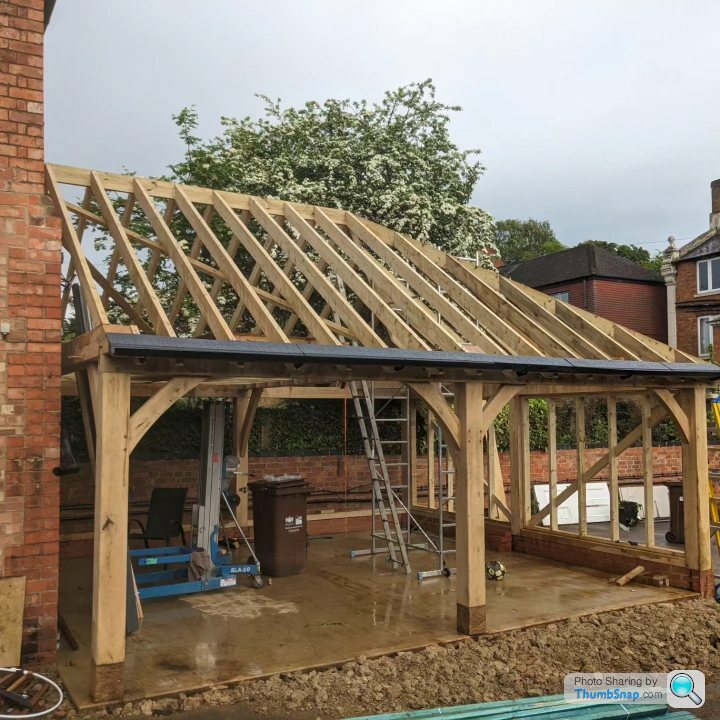
Tomorrow the roof slates, ridge tiles and battens arrive. Hope to at least have all the joists installed by the end, if not the membrane etc
Ben
Not a huge amount of progress today due to lunch guests. Tasks were:
- Treating the back wall panels with another coat of flameproofing liquid. One panel now done with the target 3 coats, 1 coat to go on the other. Back wall panels can be installed soon.
- Built the final side panel (but not clad)
- Made the temporary platform above the attic trusses safer as I will be working on it a lot
- Devised a jig for fitting the remaining joists on the non hipped part of the roof. Essentially this will allow me to work alone and fit the joists without an assistant. I will take a picture of it tomorrow
- Spotted that my dodgy measuring of the attic trusses yesterday left one of them in the way of some of the joists, no real loss of attic space by removing it so I have. Annoyed at myself for not spotting it yesterday.
DIfficult to see from the picture but each panel is slightly recessed so the cladding will go between the vertical beams, different to the suggested builds / library photos but think it will look better and shows of the frame. I may ultimately put some kind of draft proofing round the edges but probably won't.
Tomorrow the roof slates, ridge tiles and battens arrive. Hope to at least have all the joists installed by the end, if not the membrane etc
Ben

Today was a mixed bag. I made a good start by going to a roofing shop and learning about hidden gutters I also bought the flashing I will use to seal the roof against the wall which it abuts. The staff in the roofing shop was a bit taken aback by someone asking no doubt simple questions about the products but was very helpful (if I suspect cynical about how I will manage, which he may not be wrong about.)
I then got the remainder of the joists fitted to the 'apex' part of the roof. As per my post yesterday I had made a jig which set the distance between joists which made it managable for a lone worker even if two would have been better.
Next job was to fit the central joist between the two sides of the hip, it was then I noticed it was hanging rather too far off the main beam, certainly further than could be fixed with a mallet which is what has worked with most of the rest of the build. This meant something had gone wrong across the roof to the tune of 20cm or so. Another check of the palns and it became clear this had come back to bite me.
Notice the joists on the left are not flush with the end of the garage, this is because they are sitting in two cut outs which if the main beam was the right way round would be 20cm to the left of the image. This was very very annoying as I hadn't spotted it much earlier, i.e. yesterday, but not the end of the world.
Next task was to unscrew the bottom of each joist then using my trusty mallet whack them all about 20cm to the left. To make it more fun some of the screws (they are big bu**ers) were properly stuck so needed me to get a breaker bar out. My other concern was when all the screws were out the roof totally collapsing, so I installed some bracing to prevent this. I did manage to get it all aligned but it took most of the afternoon by the time it was sorted.
I finished up by pre-drilling the remaing joists and putting up a scaffold tower so they are ready to install in the morning when hopefully it will be raining a bit less.
The tiles also arrive tomorrow so it is frustrating not to be ready for them.
I then got the remainder of the joists fitted to the 'apex' part of the roof. As per my post yesterday I had made a jig which set the distance between joists which made it managable for a lone worker even if two would have been better.
Next job was to fit the central joist between the two sides of the hip, it was then I noticed it was hanging rather too far off the main beam, certainly further than could be fixed with a mallet which is what has worked with most of the rest of the build. This meant something had gone wrong across the roof to the tune of 20cm or so. Another check of the palns and it became clear this had come back to bite me.
BigBen said:
We decided that it would be quicker to lift the beam and chisel out the champher on the receiving beams, in the event I am not sure it was but it was certainly less painful as manually rotating it.
Notice the joists on the left are not flush with the end of the garage, this is because they are sitting in two cut outs which if the main beam was the right way round would be 20cm to the left of the image. This was very very annoying as I hadn't spotted it much earlier, i.e. yesterday, but not the end of the world.
Next task was to unscrew the bottom of each joist then using my trusty mallet whack them all about 20cm to the left. To make it more fun some of the screws (they are big bu**ers) were properly stuck so needed me to get a breaker bar out. My other concern was when all the screws were out the roof totally collapsing, so I installed some bracing to prevent this. I did manage to get it all aligned but it took most of the afternoon by the time it was sorted.
I finished up by pre-drilling the remaing joists and putting up a scaffold tower so they are ready to install in the morning when hopefully it will be raining a bit less.
The tiles also arrive tomorrow so it is frustrating not to be ready for them.
JeremyH5 said:
CharlesdeGaulle said:
JeremyH5 said:
This is a very impressive job, we are not worthy
I'm mildly reassured that he made a mistake earlier. I feel (very slightly) less inadequate now. But yeah, it's an impressive effort.

Aluminati said:
Step flashing in the wall ? I’ve got some ally soakers laying about somewhere that might help.
Yes, at least that is the plan. I have some lead alternative stuff (I know it is not as good but I also know my limits) Actually a roofing question whilst you are here. As you can hopefully see in some of the pictures the wall of the ajoining building has a 'step' at the front end such that my hidden gutter comes up against a corner. What do I do in this area?
My instinct is to make a wooden gully that guides it round the corner which I would then line with the lead replacement stuff. Would that be good enough?
Today's progress does not look like lots but has been very satisfying.
First job of the day was to collect Mrs Big Bens car from a local ish garage. We left very early as the tiles were due to arrive. Naturally whilst at said garage the call came "I am outside your house with the tiles". I requested he drove round the back to drop them, it then became apparent he was in an full size articulated lorry (I was told it would be a normal builders merchant type truck). I asked him to wait 5 mins, for what I knew was a 10 minute journey, but it seems today was "crash your car in Northampton day" and it took nearly half an hour. As I neared home it dawned on me some of the massive jam was potentially my delivery truck blocking the road so I ditched the car and got an e-scooter home......
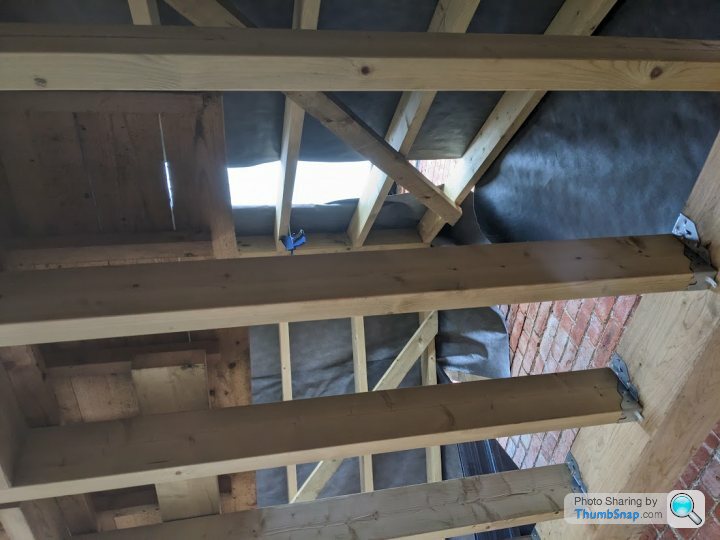
Next job was fitting the rest of the roof joists and tidying up a few I was not happy with. Luckily I had a freind to help today so that sped things up and we had all the joists in by lunchtime.
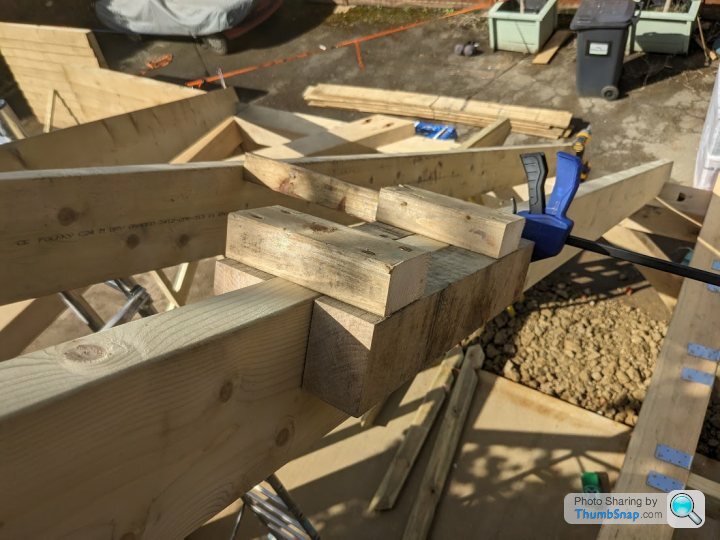
At this point I will share a picture of my joist spacing jig. It was originally made for the ridge beam and when used in conjunction with a bit of wood of identical length at the base allowed me to install joists single handed (still not as easy as with a mate.) In the picture shown I added a side bar which matches the spacing of the hip roof sections again to be used with an identical spacer at the base of the rafters:
 [url]
[url]
After lunch the afternoon was spent fitting guttering and soffit membrane protection boards. The latter are something that is apparently used in roofing that I didn't know about until a few weeks ago. The purpose is to give an edge to the waterproof membrane which will be under the tiles on the roof. They are made of quite thin plastic and are easy to cut to angles at the hipped ends.
Installing the guttering (only roughly for now) gives me a reference point for the first row of tiles which should slightly overhang the gutter
 |https://thumbsnap.com/uLDmsgLf[/url]
Tomorrow will be spent installing and battening the roofing membrane and possibly even installing a few tiles.....
First job of the day was to collect Mrs Big Bens car from a local ish garage. We left very early as the tiles were due to arrive. Naturally whilst at said garage the call came "I am outside your house with the tiles". I requested he drove round the back to drop them, it then became apparent he was in an full size articulated lorry (I was told it would be a normal builders merchant type truck). I asked him to wait 5 mins, for what I knew was a 10 minute journey, but it seems today was "crash your car in Northampton day" and it took nearly half an hour. As I neared home it dawned on me some of the massive jam was potentially my delivery truck blocking the road so I ditched the car and got an e-scooter home......
Next job was fitting the rest of the roof joists and tidying up a few I was not happy with. Luckily I had a freind to help today so that sped things up and we had all the joists in by lunchtime.
At this point I will share a picture of my joist spacing jig. It was originally made for the ridge beam and when used in conjunction with a bit of wood of identical length at the base allowed me to install joists single handed (still not as easy as with a mate.) In the picture shown I added a side bar which matches the spacing of the hip roof sections again to be used with an identical spacer at the base of the rafters:
[url]After lunch the afternoon was spent fitting guttering and soffit membrane protection boards. The latter are something that is apparently used in roofing that I didn't know about until a few weeks ago. The purpose is to give an edge to the waterproof membrane which will be under the tiles on the roof. They are made of quite thin plastic and are easy to cut to angles at the hipped ends.
Installing the guttering (only roughly for now) gives me a reference point for the first row of tiles which should slightly overhang the gutter
|https://thumbsnap.com/uLDmsgLf[/url]Tomorrow will be spent installing and battening the roofing membrane and possibly even installing a few tiles.....
Aluminati said:
You can put a corner fillet in to direct the water away from the rebate at the bottom of the reveal, top doesn’t matter. Sounds like they have sold you a secret gutter which is not ideal, as it will mean a straight cut for the chase for the lead alternative. ( It’ll look pretty s t to be honest) when your slate/tile overhangs the eave is should fit roughly in the centre of the gutter. If I remember correctly, you are Cambridge way, if you want me to whizz up Saturday morning for a couple of hours to give you a crash course, no problem. Much tea and digestives will be required.
:Edit:
Wooden gutters lined with lead alternative are making my teeth itch
That is an amazing offer but sadly I am quite a bit further away than Cambridge (I came to you from work) and have to oand watch the Saints get beaten by Saracens Saturday.t to be honest) when your slate/tile overhangs the eave is should fit roughly in the centre of the gutter. If I remember correctly, you are Cambridge way, if you want me to whizz up Saturday morning for a couple of hours to give you a crash course, no problem. Much tea and digestives will be required. :Edit:
Wooden gutters lined with lead alternative are making my teeth itch
Edited by Aluminati on Wednesday 10th May 19:29
I thought I could do a stepped chase over the secret gutter bit, what's the reason why not?
For the sake of your teeth I will avoid wood covered in lead alternative
. Bit am still not clear what needs to happen at the bottom of the secret gutter where it meets the pillar / corner (apologies if I have missed something)Aluminati said:
What slate/tile are you using ?
Sandtoft New Cassius. They are a flat interlocking clay tile. I chose them because they are slate coloured and I like the choice of name for a clay tile.https://www.roofingsuperstore.co.uk/product/sandto...
This is a side view of the soaker / gutter (flashing omitted because I forgot)
It is what to do when the wall turns the corner, shown in the lower part of the picture, that I am struggling with . I guess I can cut the secret gutter with a mitre joint so it overlaps a corner bit somewhat......
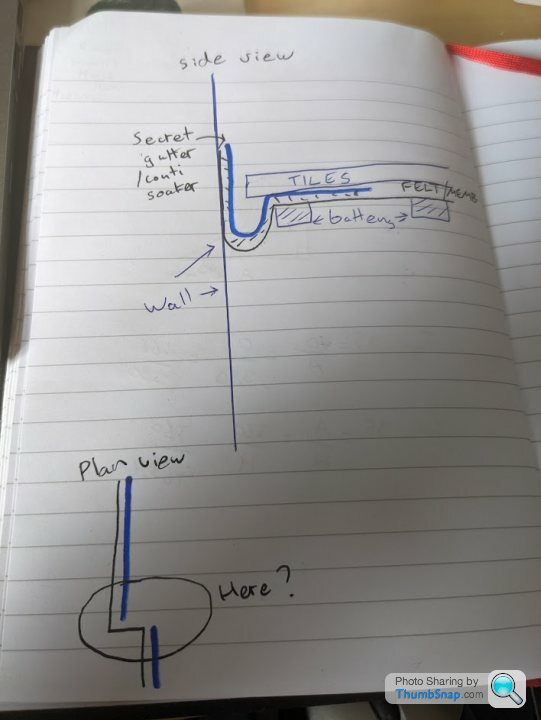
It is what to do when the wall turns the corner, shown in the lower part of the picture, that I am struggling with . I guess I can cut the secret gutter with a mitre joint so it overlaps a corner bit somewhat......
Aluminati said:
Depending on the depth of the rebate, I would run the gutter through flush, put a timber packer behind the upstand and dress lead alternative across and down.
It is not too deep so that should work. Thank youSchwarz930 said:
So is that Secret gutter instead of a lead flashing where the new garage roof abuts the gable of the existing building?
Was this supposed to be an easier solution for DIY?
Yes, from my reasearch you are supposed to use a secret gutter in conjunction with flat interlocking tiles as lead will not seal against horizontal / driving water in the same way as it would with say a double Roman tile. The flashing goes over the gutter then onto the tiles, the gutter is an extra escape route AIUI.Was this supposed to be an easier solution for DIY?
Day 7. Rudely awoken this morning by my mate calling to say he had a few hours to spare if I needed him. I took him up on his offer and we made excelling progress in fitting roofing membrane getting nearly all of the 'apex' bit of the roof covered in only an hour or so.
The process for installing membrane is to pull it tight across all the joists but allow a bit of sag inbetwen to form sort of cloth gutters, of the six runs installed today 5 are pretty decent and one is merely OK (based on my total lack of roofing experience).
At lunchtime I decided I should get a ridge hook for my ladder so I will be more safely able to climb around the roof when tiling. I picked one up from the local screwfix. Whilst there I decided to pick up a sandwich from Greggs only to find the Google Pay app on my phone was not working and I had no money with me, the nice lad in Greggs said "don't worry this one is on me" and didn't charge me, I went back later on the school run and he refused to take payment, top service from Greggs!
After lunch it proceeded to rain, not in a small way but in a risk of drowning way, this somewhat slowed progress but I sat under the already installed membrane and confirm both it and the guttering is doing a fine job. Although I couldn't figure out why I kept getting wet:
When the rain turned to bright sunshine, as has been the weather pattern this week, I got back on the roof and installed the final two runs of the main roof section. This left me a problem of not being able to reach the peak of the roof to tack them into place as the access points were now covered. Luckily I still have the Genie lift, a pallet and a willing child whose mum wasn't looking. No photos so no evidence but the membrane is secure
Tomorrow I will install the final bits of membrane (Hopefully have enough left on the roll) and batten the entire roof ready for tiling. That is my target anyway and it looks like a dry day.
Final question for today. At the apex and hips I believe I have a choice of leave the membrane covering them (preferred) or cutting it just shy to allow roof ventilation. I believe the ventilation is only necessary if I planned to insulate the roof which I don't. If I change my mind in future I can always cut it from the inside. Please correct me if this is wrong.
Chumley.mouse said:
I’ve always laid one length of membrane followed by the battens then worked up the roof , that way you work off the battens. Any reason you didn’t do it that way ?
I’d just flap the membrane over on the hips, cut one side neat so it looks good from the inside then just flap the other side over on the outside.
This might be a stupid question but was there any option/ reason to not have a freestanding garage with a completely hipped roof to avoid the issues with the flashings/ secret gutter ?
To answer question one pure ignorance on my part / I had read some guides suggesting setting the battens with two tiles at the bottom then fit the top one and set the gauge that way. That said it is 'just' maths so I suppose not necessary.I’d just flap the membrane over on the hips, cut one side neat so it looks good from the inside then just flap the other side over on the outside.
This might be a stupid question but was there any option/ reason to not have a freestanding garage with a completely hipped roof to avoid the issues with the flashings/ secret gutter ?
The reason for wanting it joined to the adjacent building is I will ultimately have a connecting door as that is where all my tools / general stuff is kept. It will also be easier to run power. Having a fully hipped roof would not allow the attic space that I have above the non hipped bit.
Gassing Station | Homes, Gardens and DIY | Top of Page | What's New | My Stuff