Restoration Blog as promised.
Discussion


Following on from my previous post earlier this month, I thought it about time to write up the first stages of the renovation.
We purchased the property knowing that it needed a bit of TLC and some repairs to get it back to an acceptable standard.
A bit of background on the property to start with will give you some idea of the tasks ahead.
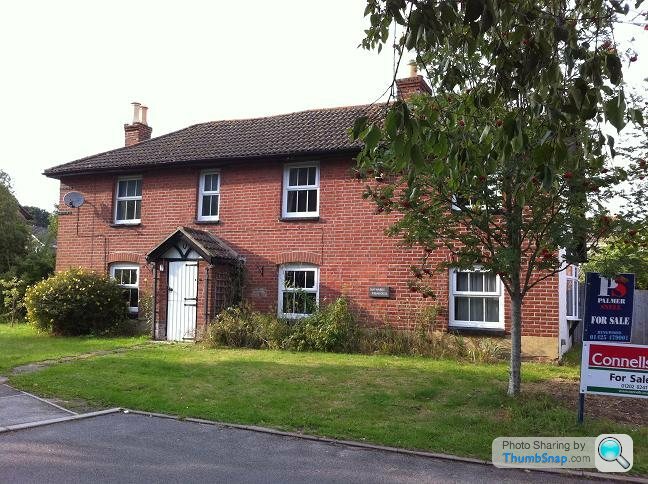

The house built out of cob (mud) around 1700 and has 1704 carved into the inglenook fireplace. We have since found out that it used to be single storey with upstairs added at a later date. This was then followed by a milk dairy to the left and a single storey extension to the right which was then made double storey at some point in the last 50 years.
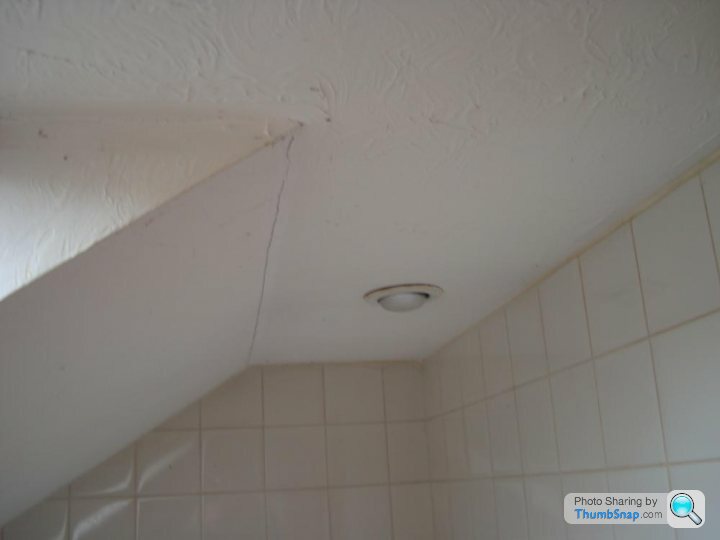
The roof was originally thatch when it was all on one level, then slate once it was extended and finally the current concrete tiles when the right hand extension was done. This is the start of the problems and the excess weight on the old beams caused the ridge to sag and put excess weight on the left hand wall causing some rather large cracks to both inside and out. This has been braced and the roof locally strengthened although this is required to be redone (rentention on the mortgage).
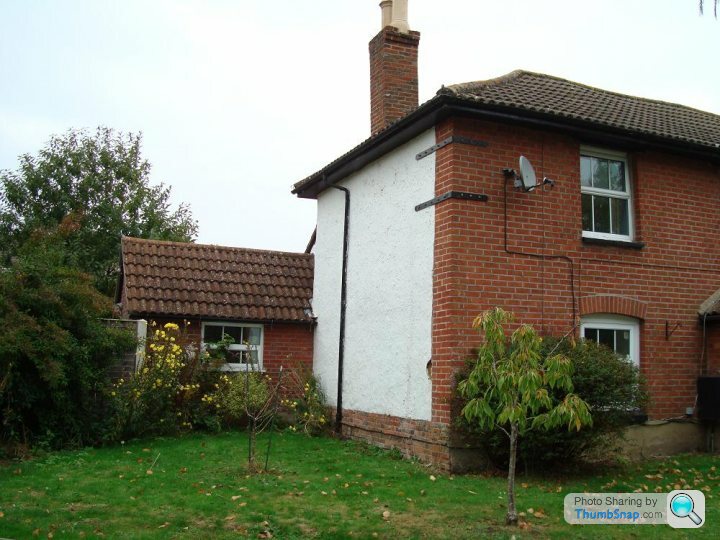
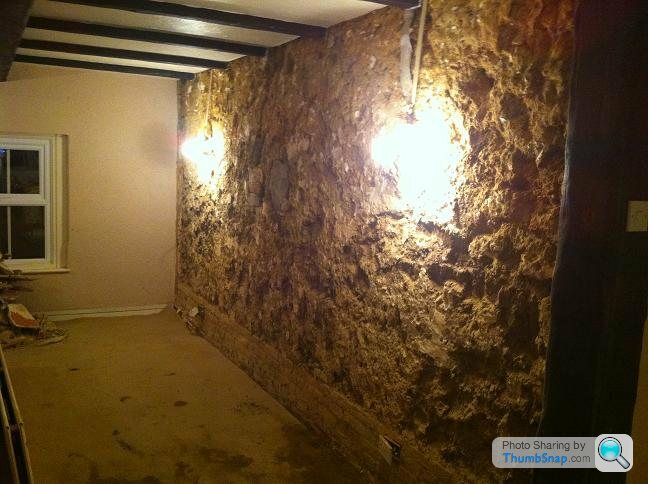
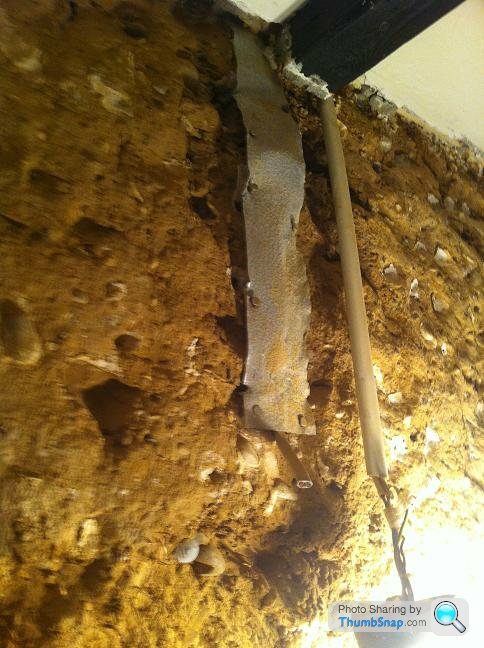
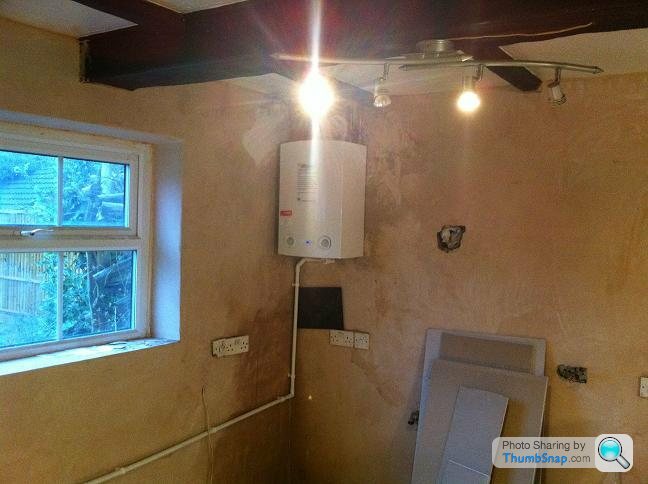
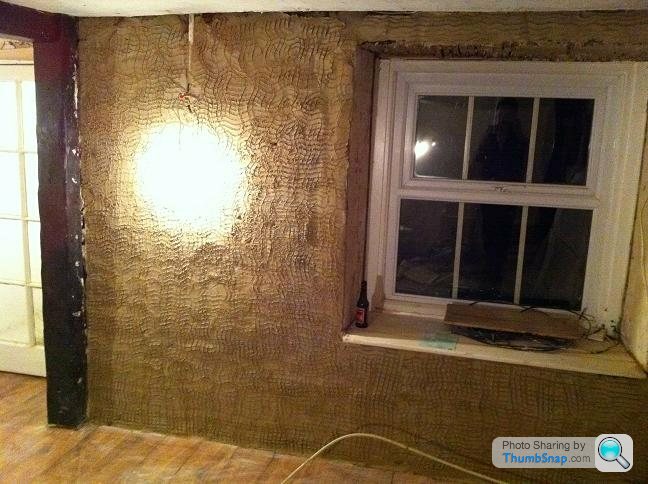
On the same wall you can see a large chunk of the protective lime plaster has disappeared allowing water direct access to the cob behind. Other area’s have blown behind this as the previously owner has painted the whole area with a non breathable paint resulting in the whole wall covering having to be ripped off and redone with lime plaster and a breathable paint which cannot be started to spring time.
We completed on December 2nd and immediately hit the first problem trying to find the water main (the house was empty so had been switched off and everything drained down). It was now dark and sub zero degree’s outside so luckily we found the water main quite quickly and proceed to turn the handle. Unfortunately this did not get the water flowing but did bring my neighbour out of his house as we managed to turn his off instead!
The next half an hour was spent prodding the lawn with my partners bright pink brolly (great first impression to the new neighbours) trying unsuccessfully to locate our main. At this point we were rather cold and with the house registering 3 degrees inside we called it a night.
The following day we finally found the main and got the water back on to find that the boiler didn’t work. This was more of a problem because of the type of house construction which meant the cob was getting very damp and if not rectified urgently would cause quite a bit of damage. A quick post on PH found me a friendly PH’r who was a plumber and could come out straight away. After 8 hours he finally got the boiler going but hen found out only 4 of the 14 radiators were working – I started losing faith already at this point. This was tested even more when the stopcock for the outside tap (located in the office) decided to blow smacking the plumber in the face and pissing water everywhere……
The following day was spent with the plumber replacing every single thermostat on the radiators to get them working which could be termed as successful as we got heat to every rad although trying to balance the system which comprised of standard copper piping and microbore mixed together along with no room thermostat and a faulty cylinder which was pumping hot water back into the overflow tank so so far:
New Boiler needed? Check
New cylinder needed? Check
New pipework? Check
Great start…… although we found out that the downstairs shower room has underfloor heating which we knew nothing about although as with the current theme – the repo company had kindly decided to take the electronic controller/thermostat wih a replacement retailing at £200 (more research needed).
I managed to replace the stopcock which also included ejecting the sodden carpet and underlay to the garden which revealed that it had been dripping for some time so was a blessing in disguise really.
Anyway after a stressful couple of days we finally had heat to the house which created a nicer atmosphere to work in.
During this time my partner spent the first 3 days cleaning the kitchen and utility room thoroughly and unpacking the boxes so that all the cupboards were full and starting to feel homely.
The following day bought snow and an expert to inspect all the cob walls to get to the bottom of some of the damp problems. He had great fun exploring chimneys and discovering a few additions and old parts of the house (more to come later on this) but basically came to the conclusion that the cob was in pretty good condition apart from a few areas.
Forgive me if you already understand cob construction but as I knew nothing about it before I purchased this hen I will give a quick explanation. A cob house has no foundations and is built on a pile of rubble with a 5 brick course followed by mud. This is then normally covered by lime plaster followed by lime paint which allows any moisture that is brought up through the floor to escape through the walls.
Now, large areas of the downstairs have been painted with a plastic paint and given an artex finish which is not breathable and not allowing the moisture to escape. This forces the moisture higher up the wall and in extreme circumstances can cause the cob to disintegrate leaving the house supported by just the 2 layers of plaster which wouldn’t last very long!!
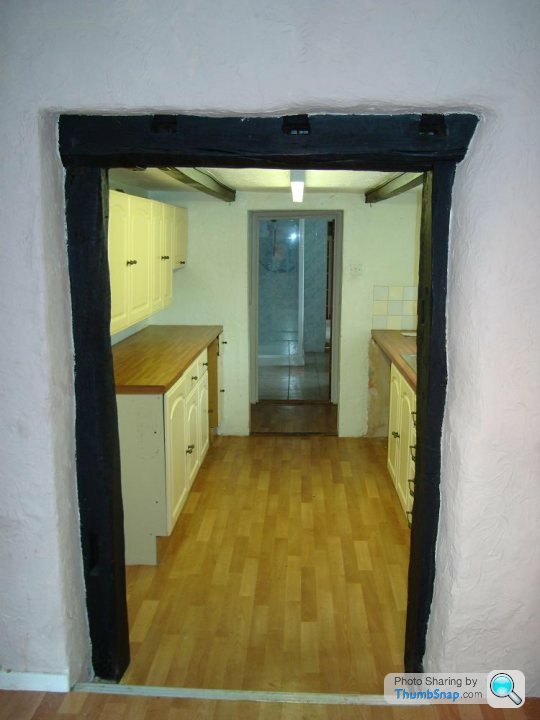
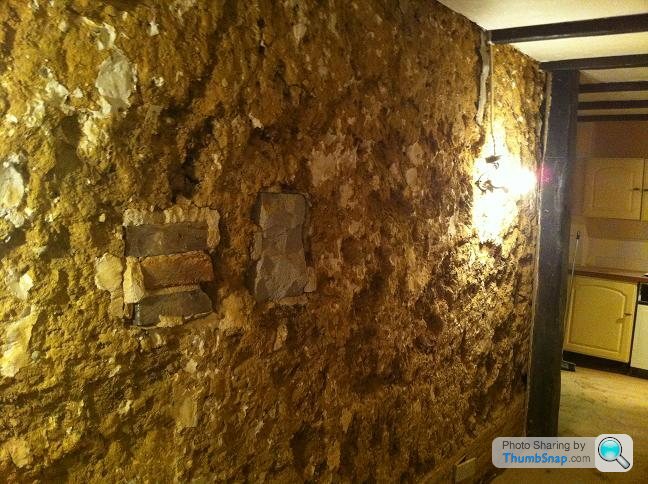
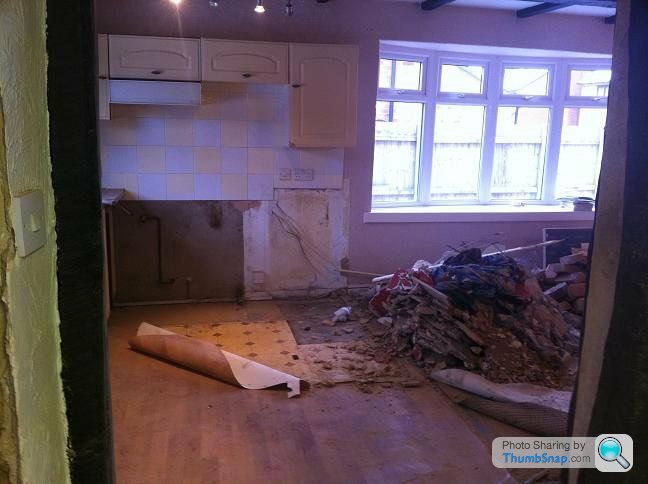
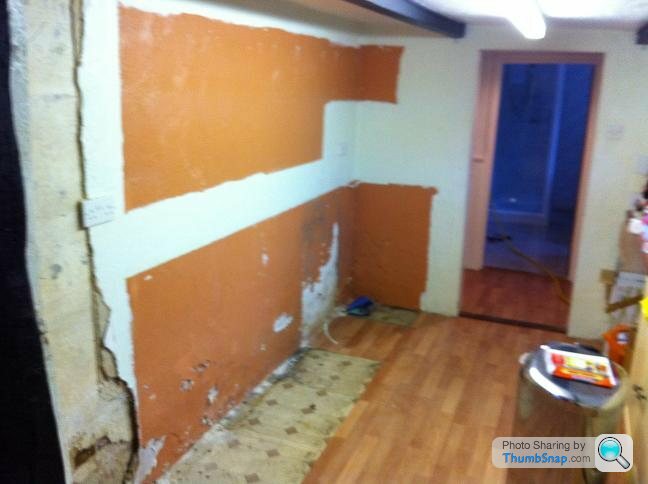
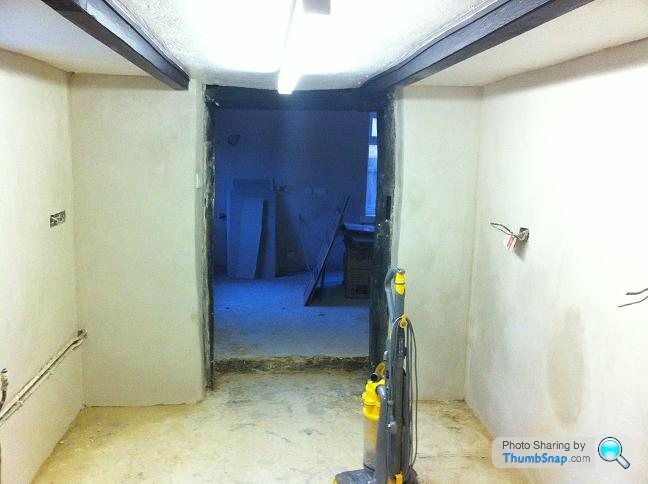
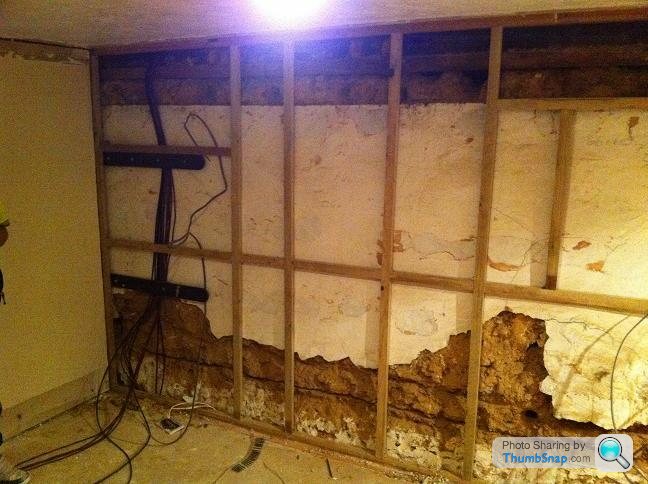
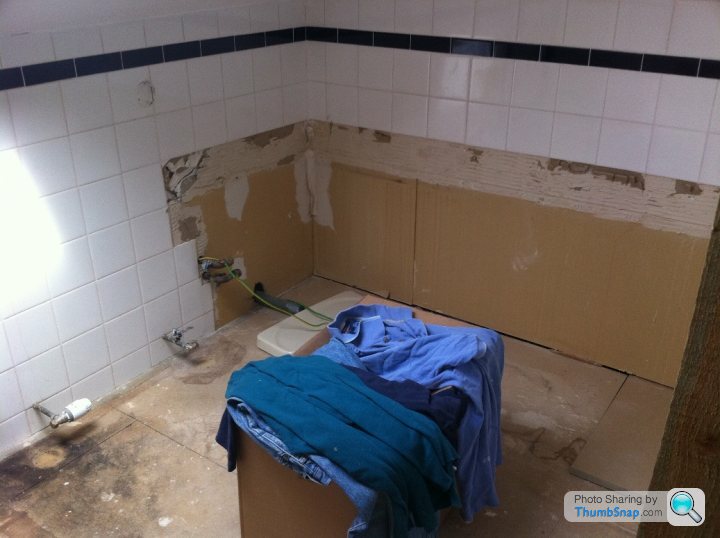
Based on this, I quickly decided that now was a good time to check as we hadn’t moved in yet. The worst looking area was near the doorway between the kitchen and utility room.
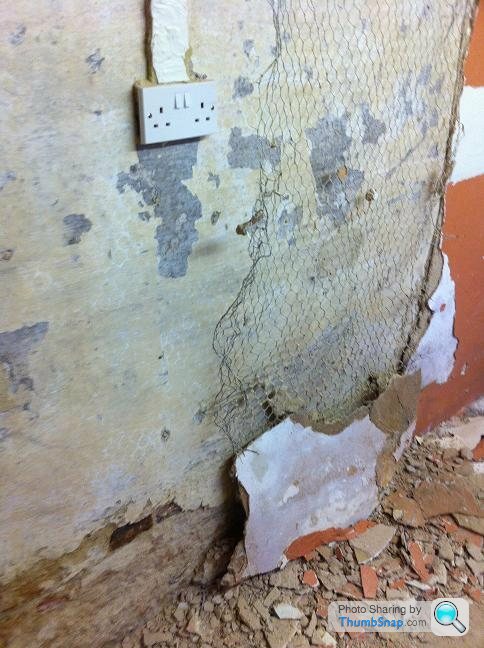
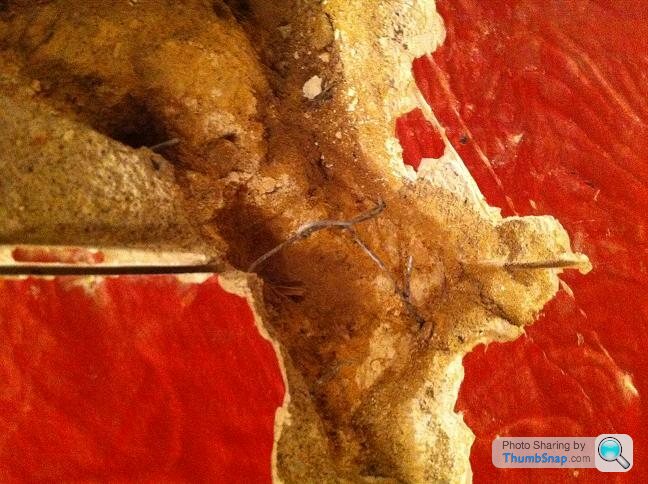
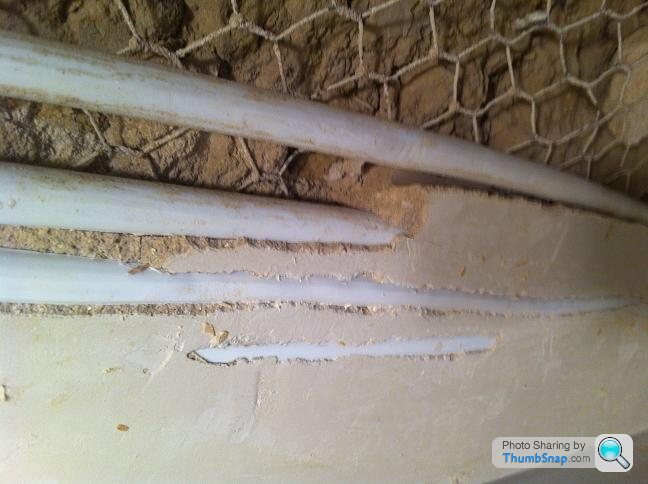
We started probing a bit deeper around the damp patch when we discovered a mix of plastic paint, modern plaster, cement, chicken wire, a sandstone type render,lime plaster and lime wash all on top of the cob so no wonder that the moisture was struggling to escape.
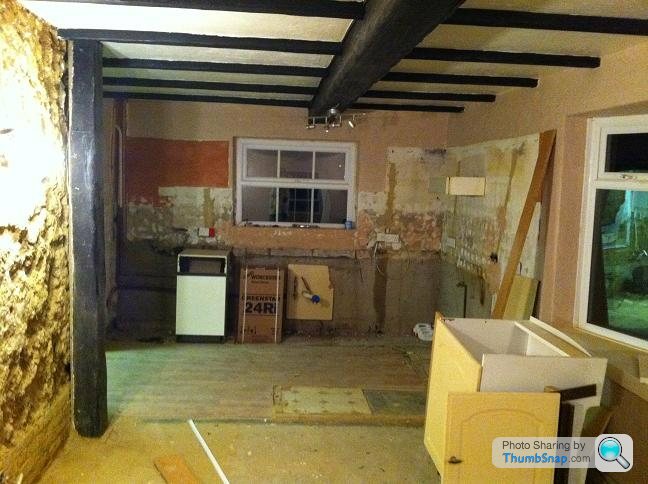
The following day Mrs Herbs was back at work so I thought I would start stripping the wall a bit more. I then got a bit carried away…..

Strange backfilled holes

How many attempts needed to hang a cupboard?

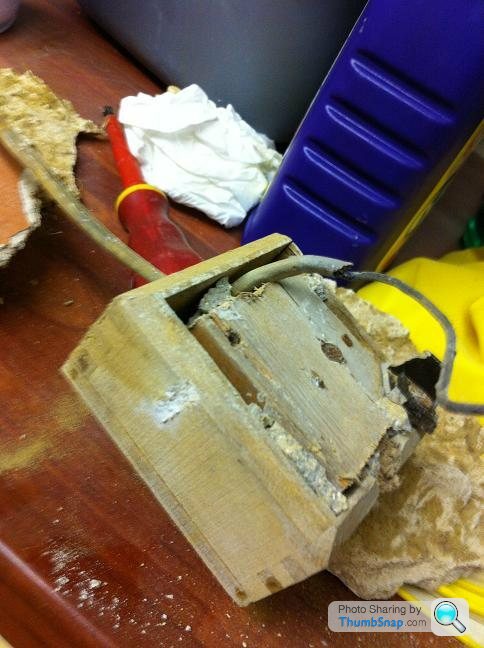
A early 20th century plug socket


By this point you have probably noticed that the holes are all aligned which I’m still puzzles about (shelving possibly?) and you probably didn’t notice the huge amount of dust covering everything and certainly didn’t notice that said dust can penetrate closed cupboards and drawers which was the first thing Mrs Herbs noticed when she got back from work. Cue me in dog house and her insisting we go out for dinner.
More to follow….
We purchased the property knowing that it needed a bit of TLC and some repairs to get it back to an acceptable standard.
A bit of background on the property to start with will give you some idea of the tasks ahead.
The house built out of cob (mud) around 1700 and has 1704 carved into the inglenook fireplace. We have since found out that it used to be single storey with upstairs added at a later date. This was then followed by a milk dairy to the left and a single storey extension to the right which was then made double storey at some point in the last 50 years.
The roof was originally thatch when it was all on one level, then slate once it was extended and finally the current concrete tiles when the right hand extension was done. This is the start of the problems and the excess weight on the old beams caused the ridge to sag and put excess weight on the left hand wall causing some rather large cracks to both inside and out. This has been braced and the roof locally strengthened although this is required to be redone (rentention on the mortgage).
On the same wall you can see a large chunk of the protective lime plaster has disappeared allowing water direct access to the cob behind. Other area’s have blown behind this as the previously owner has painted the whole area with a non breathable paint resulting in the whole wall covering having to be ripped off and redone with lime plaster and a breathable paint which cannot be started to spring time.
We completed on December 2nd and immediately hit the first problem trying to find the water main (the house was empty so had been switched off and everything drained down). It was now dark and sub zero degree’s outside so luckily we found the water main quite quickly and proceed to turn the handle. Unfortunately this did not get the water flowing but did bring my neighbour out of his house as we managed to turn his off instead!
The next half an hour was spent prodding the lawn with my partners bright pink brolly (great first impression to the new neighbours) trying unsuccessfully to locate our main. At this point we were rather cold and with the house registering 3 degrees inside we called it a night.
The following day we finally found the main and got the water back on to find that the boiler didn’t work. This was more of a problem because of the type of house construction which meant the cob was getting very damp and if not rectified urgently would cause quite a bit of damage. A quick post on PH found me a friendly PH’r who was a plumber and could come out straight away. After 8 hours he finally got the boiler going but hen found out only 4 of the 14 radiators were working – I started losing faith already at this point. This was tested even more when the stopcock for the outside tap (located in the office) decided to blow smacking the plumber in the face and pissing water everywhere……
The following day was spent with the plumber replacing every single thermostat on the radiators to get them working which could be termed as successful as we got heat to every rad although trying to balance the system which comprised of standard copper piping and microbore mixed together along with no room thermostat and a faulty cylinder which was pumping hot water back into the overflow tank so so far:
New Boiler needed? Check
New cylinder needed? Check
New pipework? Check
Great start…… although we found out that the downstairs shower room has underfloor heating which we knew nothing about although as with the current theme – the repo company had kindly decided to take the electronic controller/thermostat wih a replacement retailing at £200 (more research needed).
I managed to replace the stopcock which also included ejecting the sodden carpet and underlay to the garden which revealed that it had been dripping for some time so was a blessing in disguise really.
Anyway after a stressful couple of days we finally had heat to the house which created a nicer atmosphere to work in.
During this time my partner spent the first 3 days cleaning the kitchen and utility room thoroughly and unpacking the boxes so that all the cupboards were full and starting to feel homely.
The following day bought snow and an expert to inspect all the cob walls to get to the bottom of some of the damp problems. He had great fun exploring chimneys and discovering a few additions and old parts of the house (more to come later on this) but basically came to the conclusion that the cob was in pretty good condition apart from a few areas.
Forgive me if you already understand cob construction but as I knew nothing about it before I purchased this hen I will give a quick explanation. A cob house has no foundations and is built on a pile of rubble with a 5 brick course followed by mud. This is then normally covered by lime plaster followed by lime paint which allows any moisture that is brought up through the floor to escape through the walls.
Now, large areas of the downstairs have been painted with a plastic paint and given an artex finish which is not breathable and not allowing the moisture to escape. This forces the moisture higher up the wall and in extreme circumstances can cause the cob to disintegrate leaving the house supported by just the 2 layers of plaster which wouldn’t last very long!!
Based on this, I quickly decided that now was a good time to check as we hadn’t moved in yet. The worst looking area was near the doorway between the kitchen and utility room.
We started probing a bit deeper around the damp patch when we discovered a mix of plastic paint, modern plaster, cement, chicken wire, a sandstone type render,lime plaster and lime wash all on top of the cob so no wonder that the moisture was struggling to escape.
The following day Mrs Herbs was back at work so I thought I would start stripping the wall a bit more. I then got a bit carried away…..
Strange backfilled holes
How many attempts needed to hang a cupboard?
A early 20th century plug socket
By this point you have probably noticed that the holes are all aligned which I’m still puzzles about (shelving possibly?) and you probably didn’t notice the huge amount of dust covering everything and certainly didn’t notice that said dust can penetrate closed cupboards and drawers which was the first thing Mrs Herbs noticed when she got back from work. Cue me in dog house and her insisting we go out for dinner.
More to follow….
Thanks for the encouragement. I have joined periodproperty and can see it being a fountain of knowledge. I forget to mention in last nights post that when I stripped the other side of the utility room (pics to follow) it opened up a small gap between 2 walls where just can just about see half a tree trunk complete with bark which was part of the original structure.
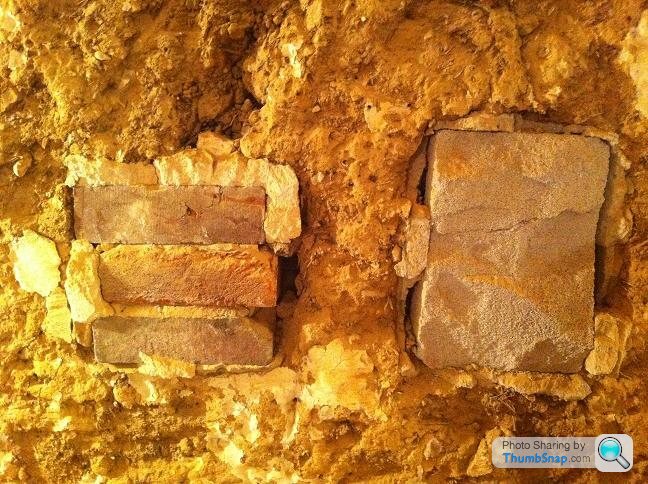
With regards to the holes, I did wonder about that but they have been back filled with half modern bricks at some point in the last 100-125 years or so rather than use cob bricks so assume that whatever was there was present for quite some time after completion ruling out building supports so still no closer to working out their purpose.
I will try and get another update done this evening with some more photo's attached.
I have another update ready to upload this evening but in the meantime to answer your question, the property amazingly has not been listed as it has been extended so much over the years that by the time they came to view the property, there was little resemblance to the original property externally. Verwood Historical Society have quite a bit of history on the house inclduing that it used to be a "J plan" cottage of which there is only 4 in the county/country (conflicting reports).
It also used to be owned by the Stanfield family of which two were part of the Tolpuddle Martyrs (I'll let you do your own research if you interested in the story rather than bore everyone)who were sent to Australia and it alledges that this house was one of everal properties where they used to hold their secret meetings.
It also used to be owned by the Stanfield family of which two were part of the Tolpuddle Martyrs (I'll let you do your own research if you interested in the story rather than bore everyone)who were sent to Australia and it alledges that this house was one of everal properties where they used to hold their secret meetings.
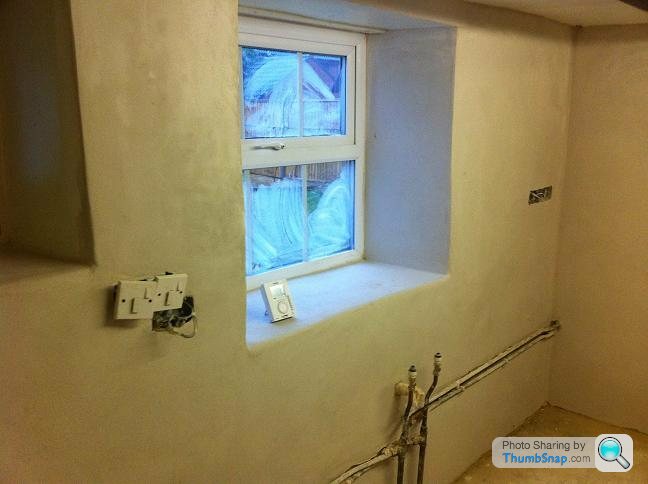
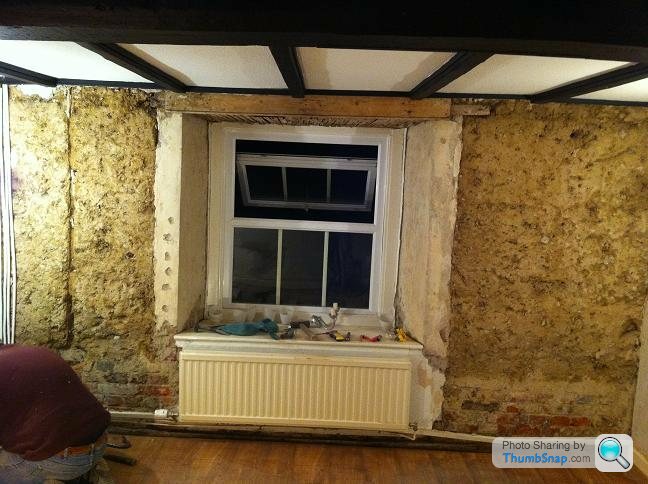
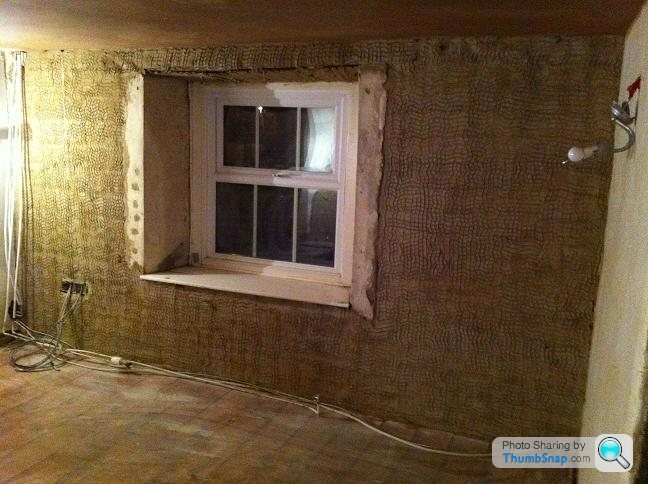
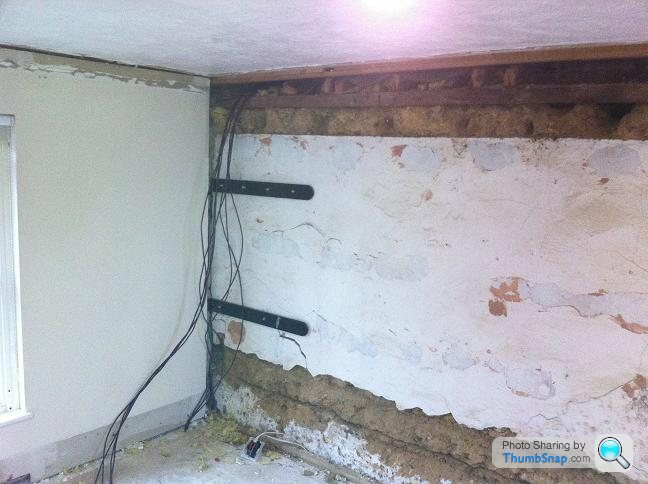
I spent the next few days attempting to strip the rest of the utility room with varying degrees of success. The external wall was extremely damp at the base – so much so that the chicken wire that had been set in concrete had completely disappeared leaving only a rust pattern in the plaster and cob.
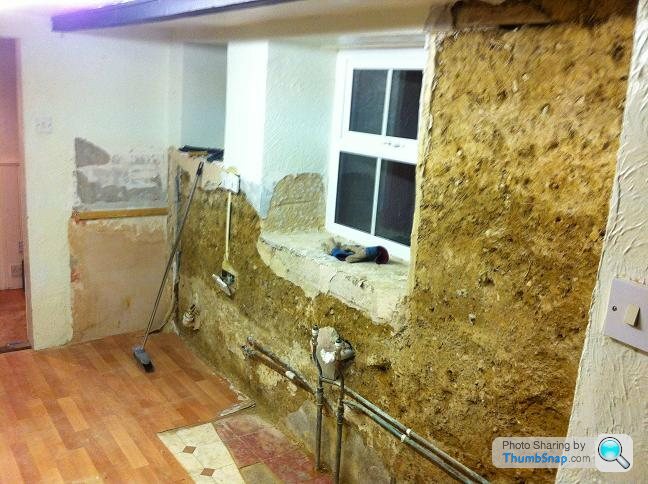


Other discoveries included half a tree trunk complete with bark which i’m guessing is part of the original structure of the house. We also managed to uncover an old electric box complete with trunking. The cob around the window sill was in particularly bad shape and had been concreted over which having looked at the condition behind it decided to leave in situ rather than cause further problems.
I’ll let the photo’s explain more.
The next job was to insulate the three tanks in the loft as one had frozen solid and the others were not far behind it so we bought some of the space foil and covered all the sides and lid in it which to date have worked quite well. It has also uncovered another job meaning that I now need to insulated the whole loft as the current insulation is not up to standard.
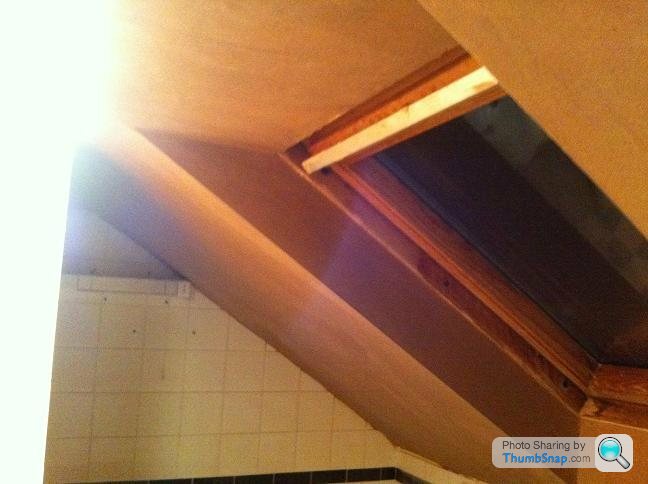
Whilst we are in the loft, it is a good time to share a discovery with you. As mentioned previously, the left hand wall had been braced on the outside and the roof strengthened internally. It looks like they have built a breeze block “breast” to take some of the load of the floor/ceiling joists. (you can see the new ones put in that do not extend to the external wall once I get a photo taken) By crawling up to the edge you can actually see the bedroom room as it used to be with the original fireplace in and decor from circa 20 - 40 years ago. We were hoping to reopen this at some point as it would be nice to have the fire exposed as well as opening up more space as the cupboards either side are quite deep but after seeing this I don’t particularly fancy disturbing the structure any more than necessary so we will leave it hidden.
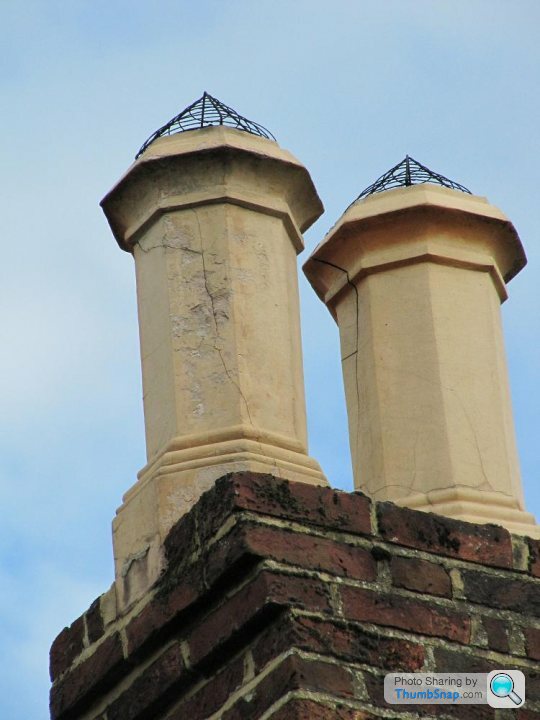
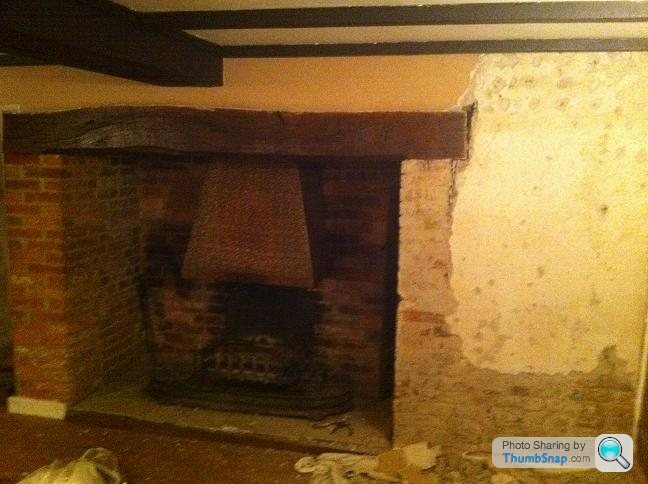
At the weekend we got a chimney sweep out to sweep both chimneys in preparation for a wood burner and open fire (although we may put two wood burners in). One of the chimneys is lined whilst the other is not. However he did discover that the pots on the left hand chimney are cracked and one needs to be capped as you are only meant to have one pot per fireplace (the other one would have serviced the fireplace in the bedroom which has been covered up). I’m still in the process of trying to find replacements as they are a quite rare twisted design and seem to be bloody expensive). The boards on the inglenook are not fire board so these need to be removed, template and replaced.
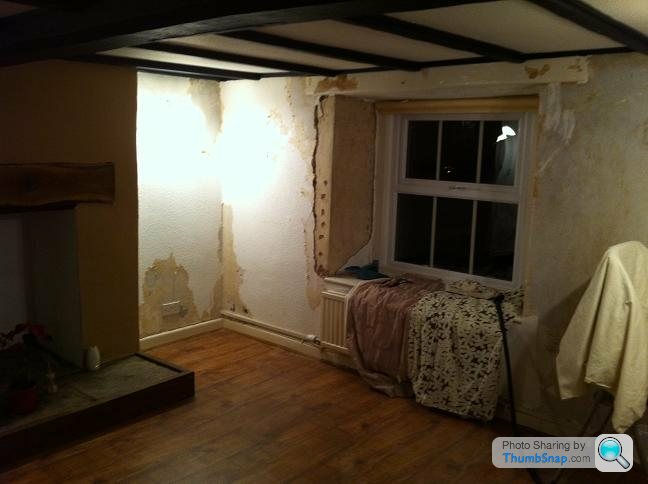
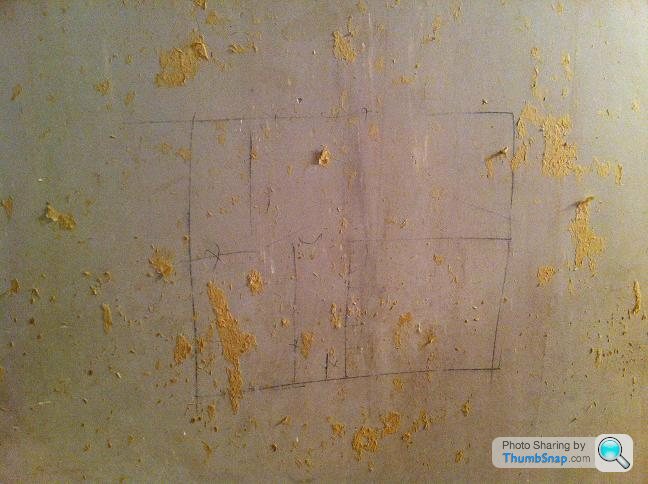
My attention next turned to the two lounges where the previous owner told us they have used anaglypta wallpaper which is reality turns out to be woodchip paper which is some area’s have been covered with a plain paper and then painted. Mrs Herbs along with her parents spent the best part of 2 days stripping this off which was extremely tedious. They did uncover some drawings done in pencil right back on the lime plaster although we have no idea on dates on this.
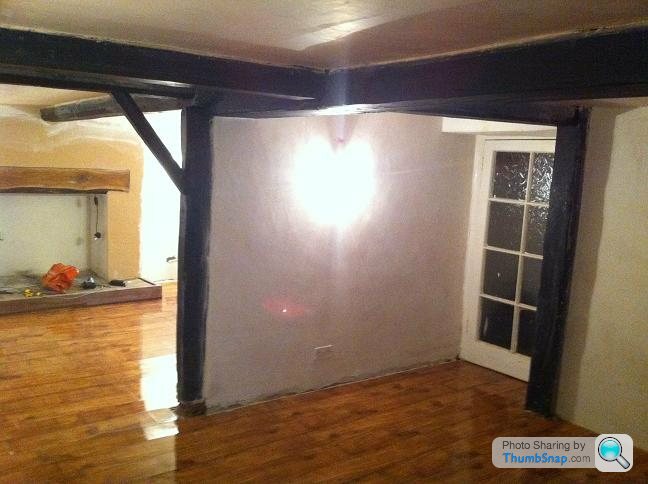
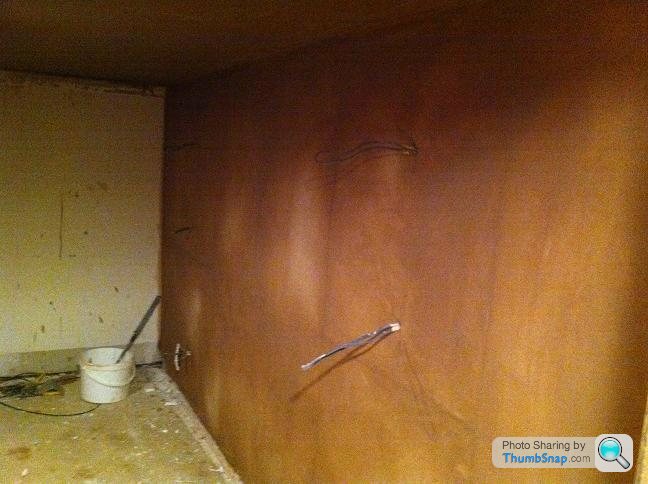
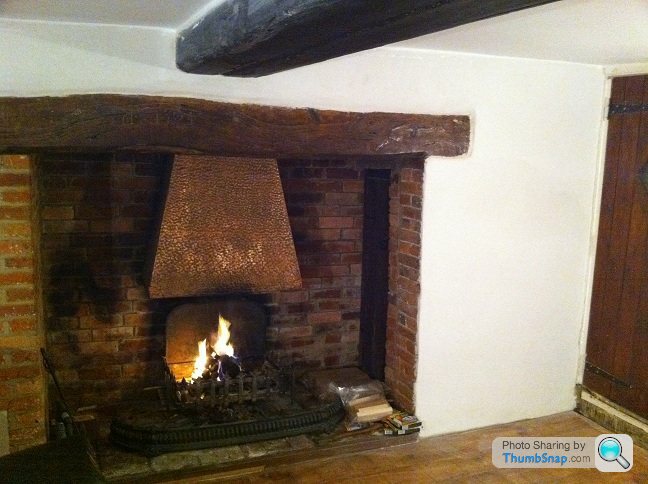
Whilst they were doing this I turned my attention to the wall on the right of the inglenook which had been papered and then painted with what I can only describe a cross between a terracotta plaster coupled with butterscotch. The back of this wall is visible inside the old kiln room which is accessed via a door inside the inglenook and is made of cob. I decided to strip back the plaster as far as I could so that I could expose a bit more of the brick column to mirror the left side which IMO looks much nicer. I made a start hoping that I wouldn’t hit the cob too early and then kept going and going and going..... The whole wall was faced with brick which was a great result and whilst stripping it back came across the original layers of lime wash which included a lovely deep red one.


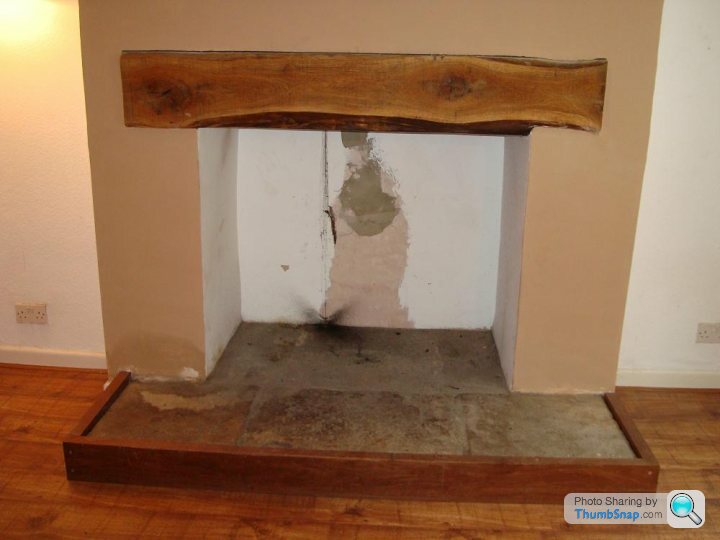
I’m still in the process of trying to clean the bricks up to a decent standard whilst retaining the character which is a b h of a job and extremely time consuming but needs to be done and sealed before the plasterer comes in. I haven’t made my mind up yet whether to leave the whole wall as exposed brick or go for a thicker column. I’m swaying at the moment towards an “L” shaped section of brink and the rest plastered (similar to the picture above). Thoughts appreciated on this one?
Whilst you are on a roll doing demolition why stop?
I have agreed to get a plasterer in to do 4 rooms in one go as lime plaster is made up of several different coats which need time to dry in between so doing a big chunk of work in one go works out much cheaper. Bearing this in mind I needed to strip the old external cob wall which now separates the lounge and breakfast room.
I think pictures explain this well!
Apart from the uncovering the usual chicken wire, we found a live lighting cable which had just been plastered over and more interestingly 2 bricked up holes (which can also been seen inside the second chimney once I take a photo) which I am taking as an uneducated guess to be possibly be small external ovens. (The land here was not very arable hence the pottery kiln which was sandwiched between the Inglenook and bread oven (mentioned above). They used to make pottery to supplement their income alongside animals as they couldn’t grow crops. With this in mind I can only assume these used to be similar although that is a completely uneducated guess and is something I will look into more in the future.
Other discoveries included half a tree trunk complete with bark which i’m guessing is part of the original structure of the house. We also managed to uncover an old electric box complete with trunking. The cob around the window sill was in particularly bad shape and had been concreted over which having looked at the condition behind it decided to leave in situ rather than cause further problems.
I’ll let the photo’s explain more.
The next job was to insulate the three tanks in the loft as one had frozen solid and the others were not far behind it so we bought some of the space foil and covered all the sides and lid in it which to date have worked quite well. It has also uncovered another job meaning that I now need to insulated the whole loft as the current insulation is not up to standard.
Whilst we are in the loft, it is a good time to share a discovery with you. As mentioned previously, the left hand wall had been braced on the outside and the roof strengthened internally. It looks like they have built a breeze block “breast” to take some of the load of the floor/ceiling joists. (you can see the new ones put in that do not extend to the external wall once I get a photo taken) By crawling up to the edge you can actually see the bedroom room as it used to be with the original fireplace in and decor from circa 20 - 40 years ago. We were hoping to reopen this at some point as it would be nice to have the fire exposed as well as opening up more space as the cupboards either side are quite deep but after seeing this I don’t particularly fancy disturbing the structure any more than necessary so we will leave it hidden.
At the weekend we got a chimney sweep out to sweep both chimneys in preparation for a wood burner and open fire (although we may put two wood burners in). One of the chimneys is lined whilst the other is not. However he did discover that the pots on the left hand chimney are cracked and one needs to be capped as you are only meant to have one pot per fireplace (the other one would have serviced the fireplace in the bedroom which has been covered up). I’m still in the process of trying to find replacements as they are a quite rare twisted design and seem to be bloody expensive). The boards on the inglenook are not fire board so these need to be removed, template and replaced.
My attention next turned to the two lounges where the previous owner told us they have used anaglypta wallpaper which is reality turns out to be woodchip paper which is some area’s have been covered with a plain paper and then painted. Mrs Herbs along with her parents spent the best part of 2 days stripping this off which was extremely tedious. They did uncover some drawings done in pencil right back on the lime plaster although we have no idea on dates on this.
Whilst they were doing this I turned my attention to the wall on the right of the inglenook which had been papered and then painted with what I can only describe a cross between a terracotta plaster coupled with butterscotch. The back of this wall is visible inside the old kiln room which is accessed via a door inside the inglenook and is made of cob. I decided to strip back the plaster as far as I could so that I could expose a bit more of the brick column to mirror the left side which IMO looks much nicer. I made a start hoping that I wouldn’t hit the cob too early and then kept going and going and going..... The whole wall was faced with brick which was a great result and whilst stripping it back came across the original layers of lime wash which included a lovely deep red one.
I’m still in the process of trying to clean the bricks up to a decent standard whilst retaining the character which is a b
h of a job and extremely time consuming but needs to be done and sealed before the plasterer comes in. I haven’t made my mind up yet whether to leave the whole wall as exposed brick or go for a thicker column. I’m swaying at the moment towards an “L” shaped section of brink and the rest plastered (similar to the picture above). Thoughts appreciated on this one?Whilst you are on a roll doing demolition why stop?
I have agreed to get a plasterer in to do 4 rooms in one go as lime plaster is made up of several different coats which need time to dry in between so doing a big chunk of work in one go works out much cheaper. Bearing this in mind I needed to strip the old external cob wall which now separates the lounge and breakfast room.
I think pictures explain this well!
Apart from the uncovering the usual chicken wire, we found a live lighting cable which had just been plastered over and more interestingly 2 bricked up holes (which can also been seen inside the second chimney once I take a photo) which I am taking as an uneducated guess to be possibly be small external ovens. (The land here was not very arable hence the pottery kiln which was sandwiched between the Inglenook and bread oven (mentioned above). They used to make pottery to supplement their income alongside animals as they couldn’t grow crops. With this in mind I can only assume these used to be similar although that is a completely uneducated guess and is something I will look into more in the future.

JCW said:
Good luck with this. Having done something similar, albeit abroad I know what you're going to experience and whilst it will be in an 'interesting' journey the finished product is worth it especially as you sound like you're going to complete the job properly. Like the Z4M by the way.

Thanks - it'll better be worth it as the Z4 has gone to help pay for it!! Martin Keene said:
Nice looking place. Presumably once all the modern materials have been removed and the cob lime plasered again it will all dry out in time?
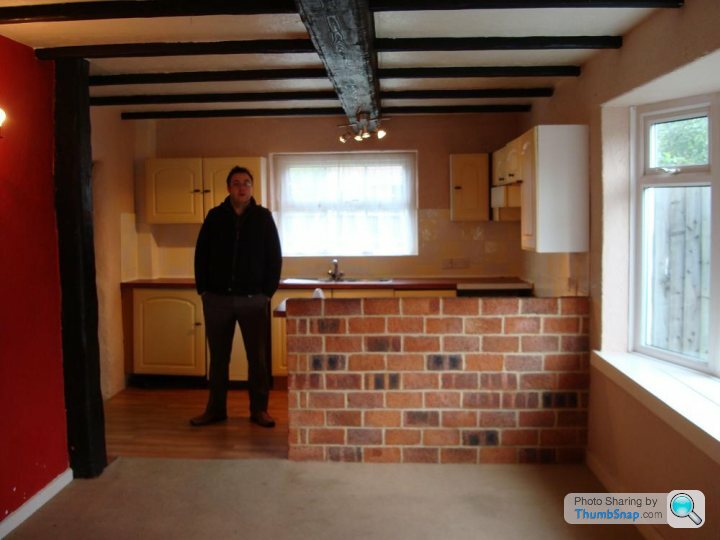
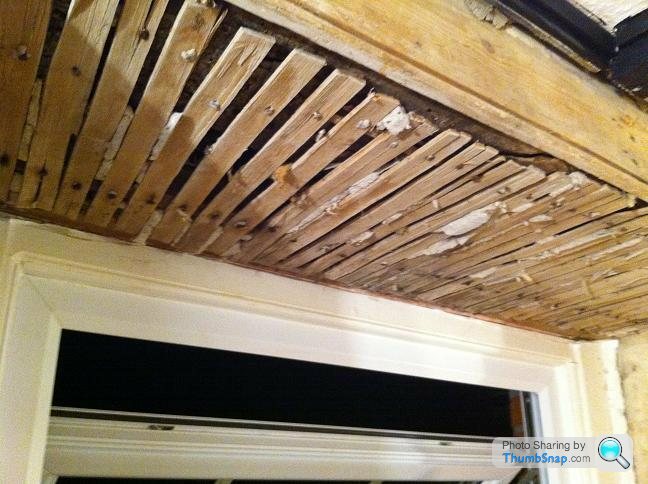
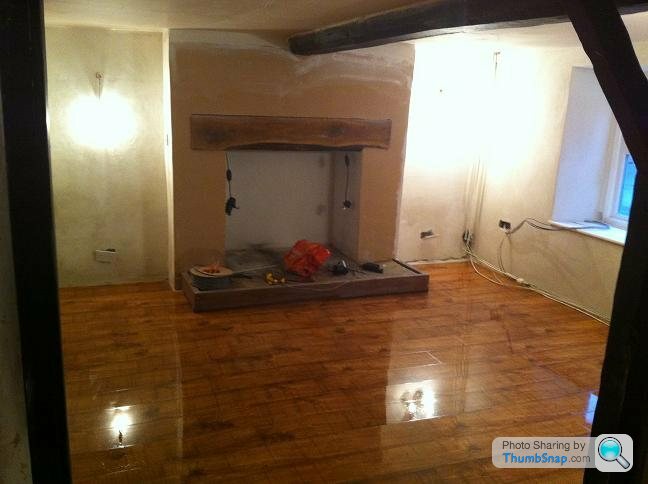
Thank you. The walls that were uncovered 2-3 weeks have already dried out hugely and changed colour so after another couple of weeks hopefully the others will be in a similar state by then. Once that happens then they can be lime plastered and coated with a clay paint ( similar to lime wash but slightly harder wearing so less chance of it rubbing off onto clothing ( or kittens lol )Been manic so not had time to write up everything else that has happened recently but thought i would show some photo's from last night as I was removing the lounge ceiling which goes some way to answering the questions I had as to why it had a new fireplace....
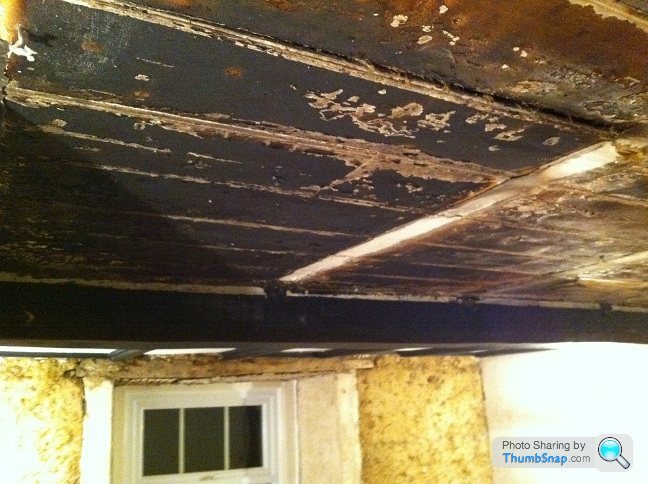
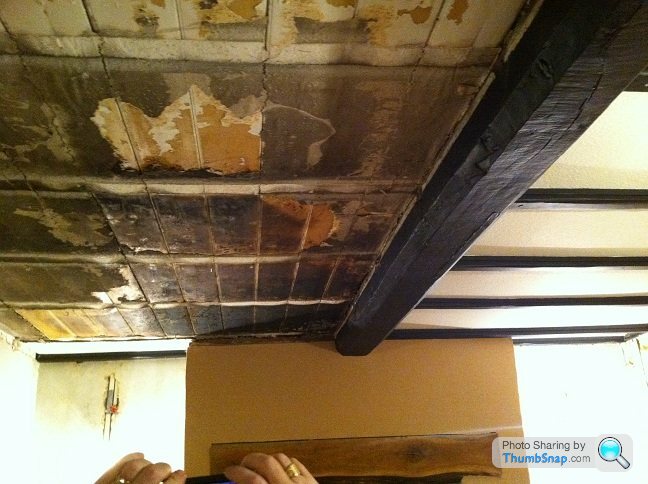
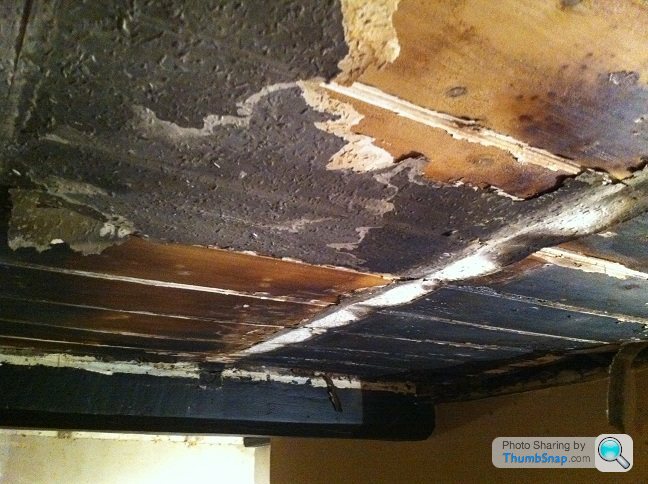

This explains why the fireplace had to be rebuilt and why the big wooden lintel was replaced and why the electrics are a bit more modern than i expected in this part of the house. With the materials used, I estimate this must have been around the 50's when it was rebuilt.
A proper update will follow next week when I have a spare moment.
Edited by Herbs on Thursday 13th January 16:16
A quick update.
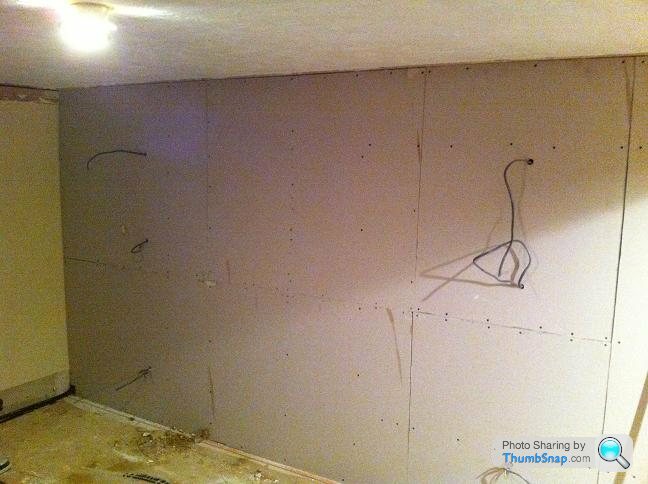
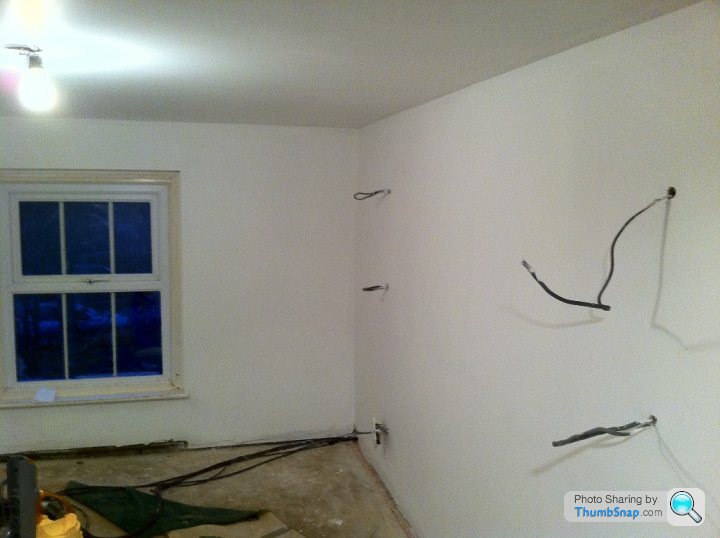
The plasterers are in at the moment as is the plumber who is replacing the boiler and cylinder. We ended having a bit more done than first anticipated after having to rip out one on the bedroom walls. As they were doing that it made sense to get the ceilings done in both lounges, the bedroom and en-suite all at the same time.
I also had a manic 3 evenings in which to run 4 Cat6 and twin satellite cables to each room which had to be done before the plasterers started.
I'll hopefully have some photo's of the finished plastering along with the before and during ones i've already taken at some point this coming week so I can do a proper update with images.
My to do list has now got longer than both my arms. I need to source some hearth tiles for the inglenook and floor tiles for the kitchens and breakfast room. does anyone recommend any decent suppliers or styles that will suit the house?
Light at the end of the tunnel!!!
The plasterers and plumber finally finished this weekend meaning that downstairs is starting to take shape so it's time to finally post some before, during and after photo's (before decoration)
Kitchen:

Kitchen/Utility Room:
Lounge:


Bedroom:

En-suite
The clay paint has just been delivered so can get on with painting next week, then move onto heart tiles and kitchen floor and more importantly - get some of the radiators fitted downstairs so its not so chuffing cold!
The plasterers and plumber finally finished this weekend meaning that downstairs is starting to take shape so it's time to finally post some before, during and after photo's (before decoration)
Kitchen:
Kitchen/Utility Room:
Lounge:
Bedroom:
En-suite
The clay paint has just been delivered so can get on with painting next week, then move onto heart tiles and kitchen floor and more importantly - get some of the radiators fitted downstairs so its not so chuffing cold!
Edited by Herbs on Sunday 13th February 21:00
Sorry been manic trying to get as much done as possible. I will try and get the photo's up tomorrow.
It is coming on okay, new boiler and cylinder in and working. New ceiling in, all plastering done. A few hiccups which I will explain in greater detail tomorrow........
It is coming on okay, new boiler and cylinder in and working. New ceiling in, all plastering done. A few hiccups which I will explain in greater detail tomorrow........
Edited by Herbs on Friday 4th March 23:52
God - has it really been 5 months since an update!!! 
i'll try and get up written up in the next 2 weeks. It's been a hard time working every night after work and every weekend and it's coming together. I'm on holiday next week so will try and get the photo's collated and uploaded.
apologies for the delay
i'll try and get up written up in the next 2 weeks. It's been a hard time working every night after work and every weekend and it's coming together. I'm on holiday next week so will try and get the photo's collated and uploaded.
apologies for the delay
Grandad Gaz said:
Me too!
Can I ask what sort of paint you will be using on the lime rendered walls? I'm doing something very similar (not cob though!)
BTW, I thought cob buildings were impossible to get a mortgage on. "Non standard construction", I think they call it.
I have used clay paint on the Walls as it is breathable as per lime wash but much more hard wearing - the texture is fantasic too and shows the imperfections and contours of wall beneath it which reflects the light beautifully. Can I ask what sort of paint you will be using on the lime rendered walls? I'm doing something very similar (not cob though!)
BTW, I thought cob buildings were impossible to get a mortgage on. "Non standard construction", I think they call it.
Mortgage wasn't a problem and we used a normal high street lender (building society) with a full survey carried out by Campdavid on here which answered any query they had.
I believe an update is slightly overdue 
I'll do the update room by room as there is rather a few photo's and more work done than anticipated.
Old Lounge & New Lounge:
The last update showed the uncovered fire damaged ceiling and the plasterer was just finishing. So where to begin?
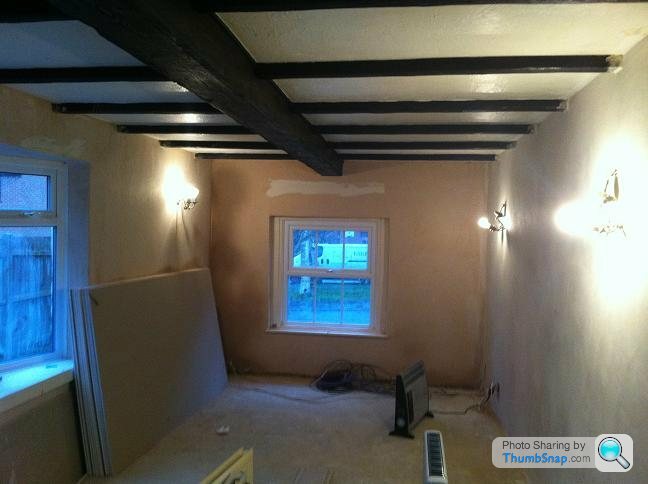
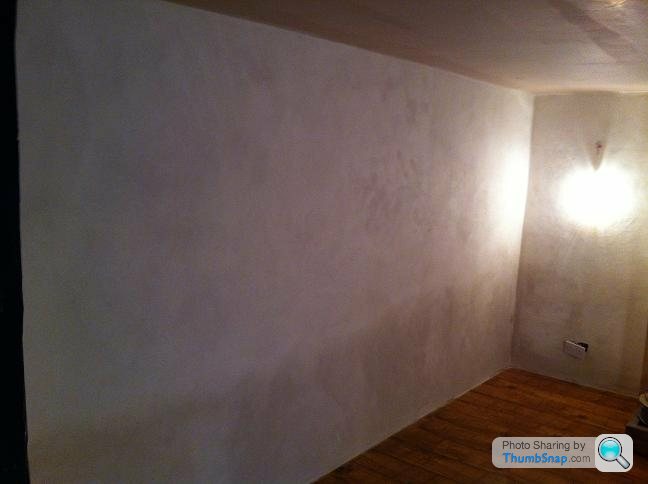
Well the walls were given a light sand once they had dried. A few cracks appeared which was to be expected as the lime plaster takes a long time to dry and harden so with a wet sponge and the results of the sanding it is very easy to mould it together to seal them.

A few coats of clay paint were applied which looks fantastic and has a texture and finish that is unlike other paints.


The beams were a constant source of dust so these gaps were sealed before they were painted with Jacobean Black. By this point we have moved in (the royal wedding weekend) and have a single radiator trying to heat downstairs……


Speaking of radiators, 3 of these arrived…..

I ever so slightly underestimated the weight of these. The father in law and myself attempted to move them and couldn’t even get one end off the floor so a call was put into a couple of mates who came to help and joke about us being too weak to lift a radiator. This also failed…..
The next hour was spent getting a neighbour to join us, jokes at our expenses, attempting to lift followed by “bloody hell how heavy is this!”. Eventually with 4 neighbours including two firemen and 8 of us in total we just about managed to get them into the house.
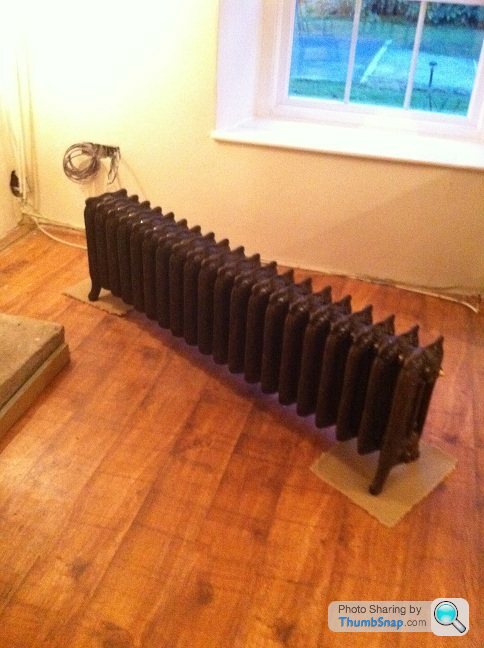
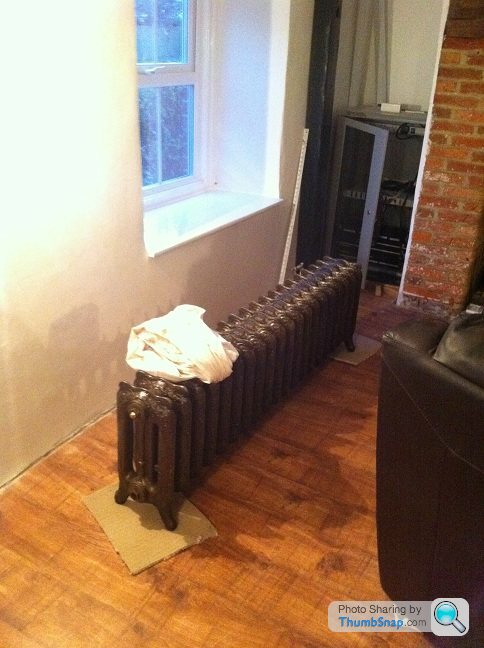

We opted for these as i wasn't happy hanging rads back on the walls and felt these were more in keeping with the property.

These got plumbed in by a Ph’er and then the skirting added. This was fun as there wasn’t a straight edge or plumb line in sight. Before this was done, the comms cupboard arrived and hours of punching cables ensued. Once this was done the column hiding the heating pipes was refitted and I created the rest of the door frame to enable us to fit a door and hide it all from view.


As I was dusting off my woodworking skills not seen since my school days I also knocked up a column to go into the other lounge to enclose the 4 pipes that were bulging out of the wall before (as seen in previous postings) as we had left them exposed so as to not dry out the cob as was happening before.

The woodburner arrived much to the cats curiosity and was fitted with no fuss in about half a day along with an iron frame and fireboards. It’s now starting to feel like a house again well one room .
.

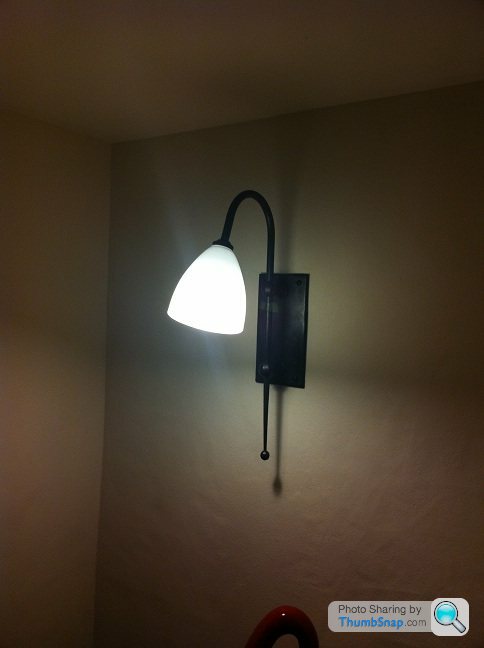
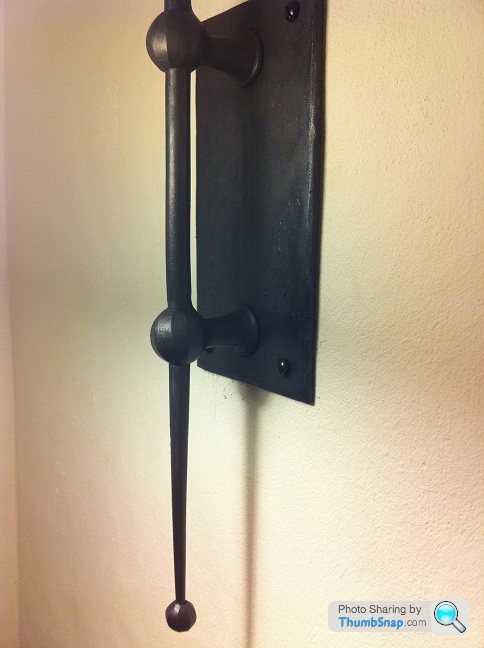
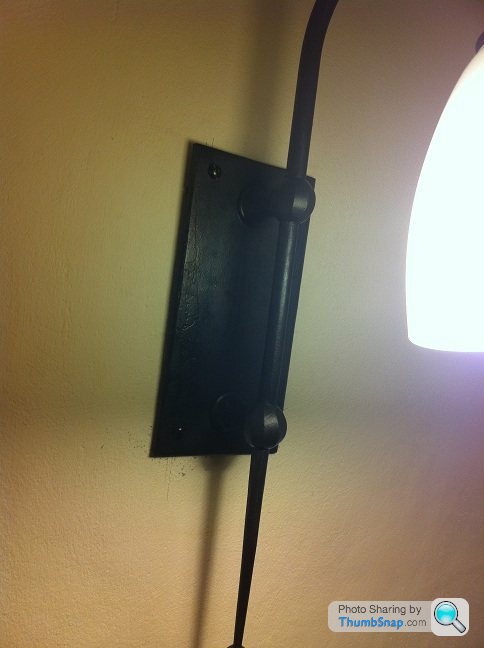
We had commissioned an Ironworks company to make some wall lights for us and were really happy with the quality and although very were a few hundred plus per light you certainly get what you pay for and would happily recommend them.


The floor had taken a battering by this point so this was sanded and sealed and again we were amazed by the results – these photo’s show how it actually looks once dried so all in all this room is almost done bar a few final touches such as doors, the inglenook woodburner, stairway door frame, more doors and blinds/curtains etc.


The next update will be much sooner this time
I'll do the update room by room as there is rather a few photo's and more work done than anticipated.
Old Lounge & New Lounge:
The last update showed the uncovered fire damaged ceiling and the plasterer was just finishing. So where to begin?
Well the walls were given a light sand once they had dried. A few cracks appeared which was to be expected as the lime plaster takes a long time to dry and harden so with a wet sponge and the results of the sanding it is very easy to mould it together to seal them.
A few coats of clay paint were applied which looks fantastic and has a texture and finish that is unlike other paints.
The beams were a constant source of dust so these gaps were sealed before they were painted with Jacobean Black. By this point we have moved in (the royal wedding weekend) and have a single radiator trying to heat downstairs……
Speaking of radiators, 3 of these arrived…..
I ever so slightly underestimated the weight of these. The father in law and myself attempted to move them and couldn’t even get one end off the floor so a call was put into a couple of mates who came to help and joke about us being too weak to lift a radiator. This also failed
…..The next hour was spent getting a neighbour to join us, jokes at our expenses, attempting to lift followed by “bloody hell how heavy is this!”. Eventually with 4 neighbours including two firemen and 8 of us in total we just about managed to get them into the house.
We opted for these as i wasn't happy hanging rads back on the walls and felt these were more in keeping with the property.
These got plumbed in by a Ph’er and then the skirting added. This was fun as there wasn’t a straight edge or plumb line in sight. Before this was done, the comms cupboard arrived and hours of punching cables ensued. Once this was done the column hiding the heating pipes was refitted and I created the rest of the door frame to enable us to fit a door and hide it all from view.
As I was dusting off my woodworking skills not seen since my school days I also knocked up a column to go into the other lounge to enclose the 4 pipes that were bulging out of the wall before (as seen in previous postings) as we had left them exposed so as to not dry out the cob as was happening before.
The woodburner arrived much to the cats curiosity and was fitted with no fuss in about half a day along with an iron frame and fireboards. It’s now starting to feel like a house again well one room
.We had commissioned an Ironworks company to make some wall lights for us and were really happy with the quality and although very were a few hundred plus per light you certainly get what you pay for and would happily recommend them.
The floor had taken a battering by this point so this was sanded and sealed and again we were amazed by the results – these photo’s show how it actually looks once dried so all in all this room is almost done bar a few final touches such as doors, the inglenook woodburner, stairway door frame, more doors and blinds/curtains etc.
The next update will be much sooner this time
Edited by Herbs on Sunday 15th April 20:55
How time passes when you are having fun (or not as the case may be )!!
Well a quick update on the kitchen as promised although I will do a recap as it has been so long.
We had to hire a breaker to remove the 2+” inch thick concrete they kindly put on the kitchen walls and managed to lift the 3 layers of flooring that was down taking it back to the concrete slab.
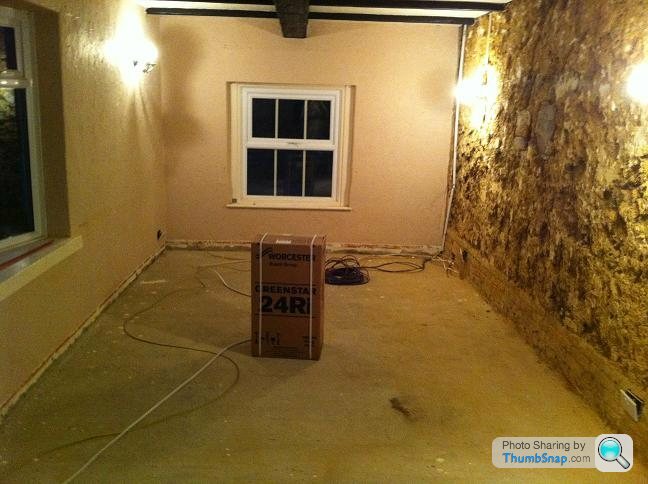
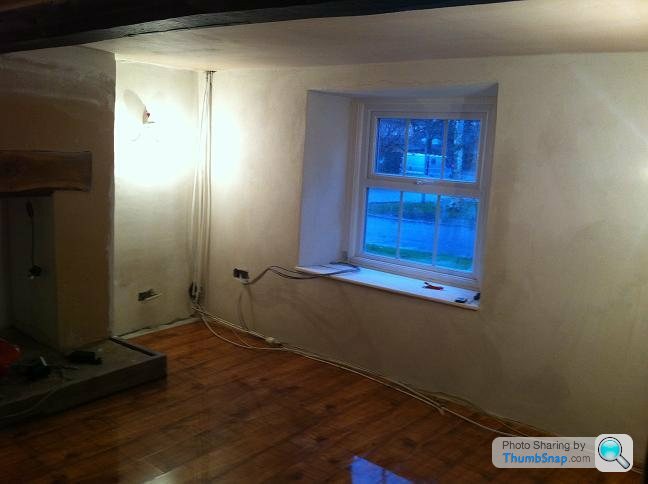
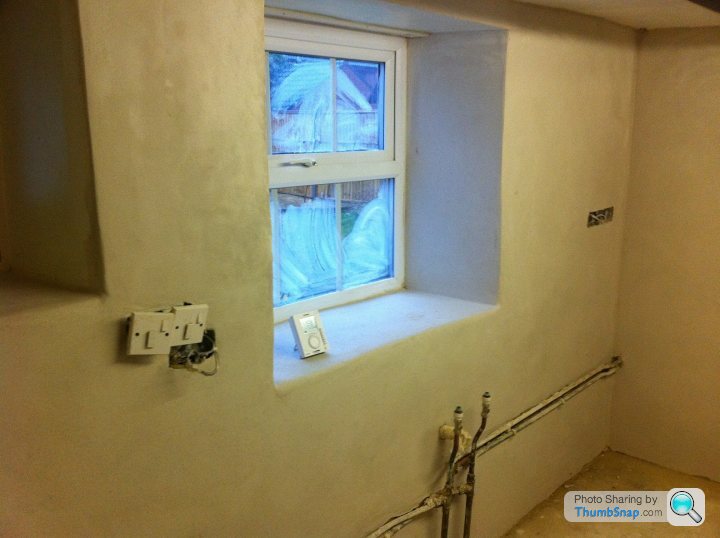
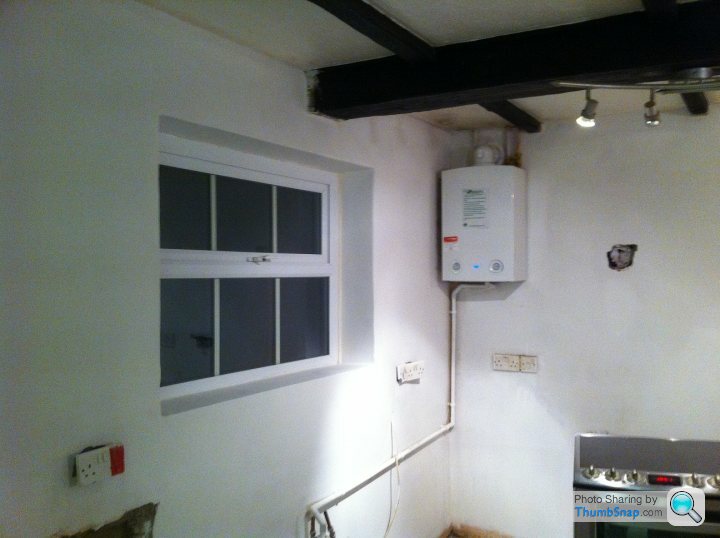
The walls were lime plastered except the ones in the 20th century extension which was multi-finished. The new boiler was fitted providing some much needed hot water and heat – fed up of working in temps hitting -5 degrees inside and having to open doors and windows in the depths of winter with snow on the ground to let heat in!! I love the quirks of solid walls.
Anyway I digress, CAT 6 cables were run to two points in the room as were twin coax then the walls were built up with 4 layers of lime and left to dry for 4 weeks before being covered with clay paint – which was chosen for its breathability and hardness compared to lime wash, it also gives a lovely matt finish that you cannot achieve with modern paints.
The beams were repainted and finally the flagstone floor was delivered and laid. Another cast iron radiator was fitted along with skirting and what was salvageable of the old kitchen has been refitted whilst the rest of the house is done. We finally had a place where we can amost sit and eat civally
We cannot wait to buy new furniture instead of using the temporary bits and pieces.
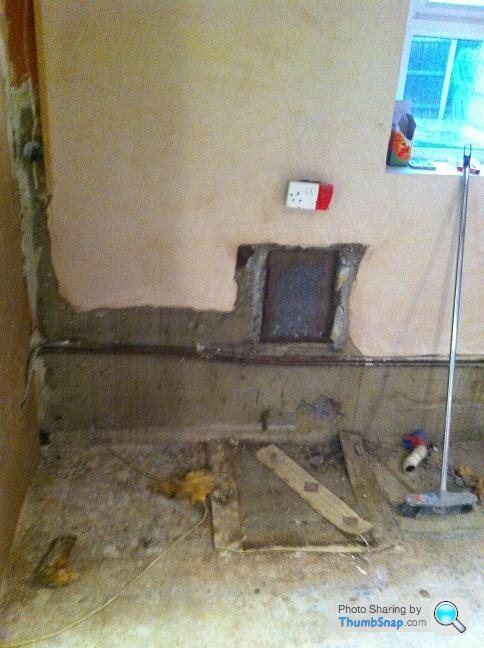
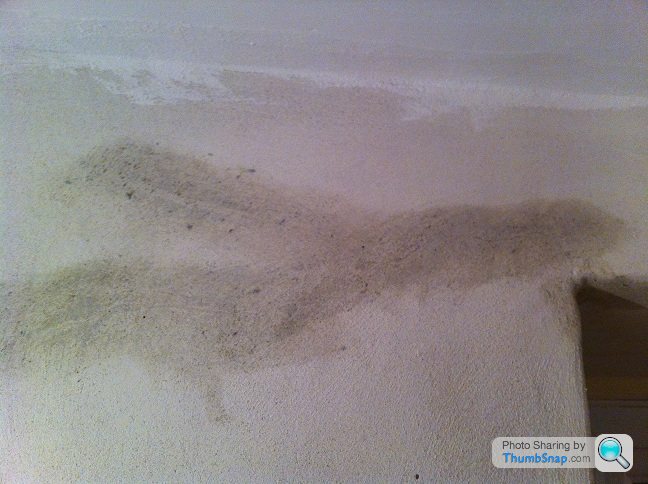
The one problem we hoped to solve by this unfortunately wasn’t as you can see in the photo’s below how one wall wasn’t drying out – this was the water which was being trapped in the wall before. To cut a long story short it involved the drains being replaced and discovering the rear external wall unsurprisingly enough also being covered in non-breathable materials (that’s another story)


)!!Well a quick update on the kitchen as promised although I will do a recap as it has been so long.
We had to hire a breaker to remove the 2+” inch thick concrete they kindly put on the kitchen walls and managed to lift the 3 layers of flooring that was down taking it back to the concrete slab.
The walls were lime plastered except the ones in the 20th century extension which was multi-finished. The new boiler was fitted providing some much needed hot water and heat – fed up of working in temps hitting -5 degrees inside and having to open doors and windows in the depths of winter with snow on the ground to let heat in!! I love the quirks of solid walls.
Anyway I digress, CAT 6 cables were run to two points in the room as were twin coax then the walls were built up with 4 layers of lime and left to dry for 4 weeks before being covered with clay paint – which was chosen for its breathability and hardness compared to lime wash, it also gives a lovely matt finish that you cannot achieve with modern paints.
The beams were repainted and finally the flagstone floor was delivered and laid. Another cast iron radiator was fitted along with skirting and what was salvageable of the old kitchen has been refitted whilst the rest of the house is done. We finally had a place where we can amost sit and eat civally
We cannot wait to buy new furniture instead of using the temporary bits and pieces.
The one problem we hoped to solve by this unfortunately wasn’t as you can see in the photo’s below how one wall wasn’t drying out – this was the water which was being trapped in the wall before. To cut a long story short it involved the drains being replaced and discovering the rear external wall unsurprisingly enough also being covered in non-breathable materials (that’s another story)
Next Update:
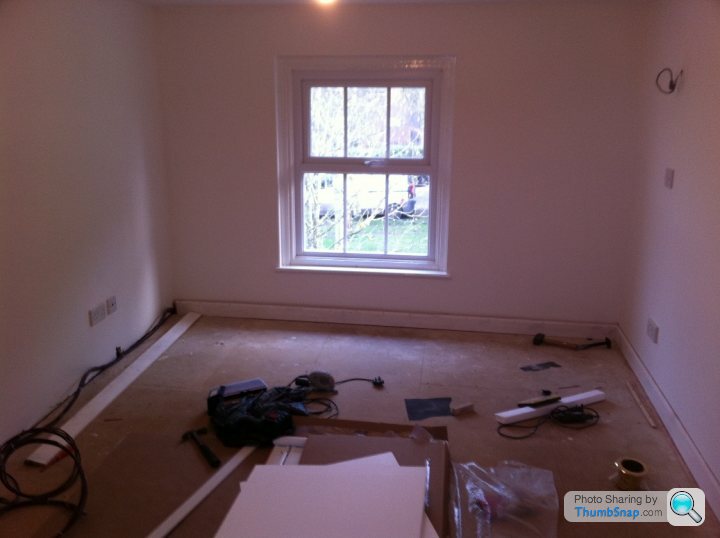
Moving upstairs to our bedroom which you last saw previously in the thread as having a wall rebuilt and being plastered. SWMBO decides that we should refit the en-suite before finishing the bedroom so that when the carpet gets laid it won’t get damaged – who am I to argue?.....
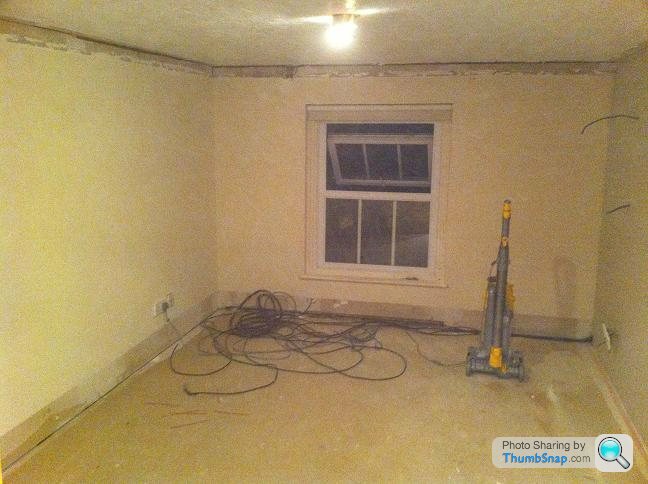
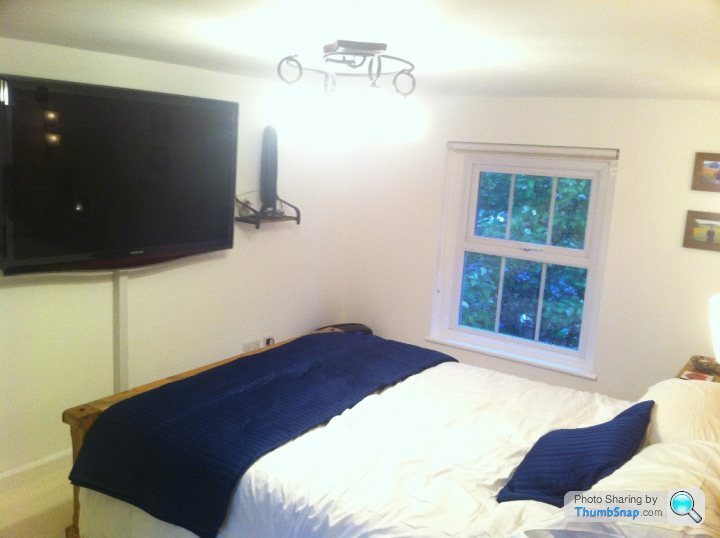
Firstly the bedroom window was stripped right back to wood and re-glossed before the whole room was painted.


The cat 6 was then run behind the skirting as was the surround sound cables with the TV mounted on the wall.
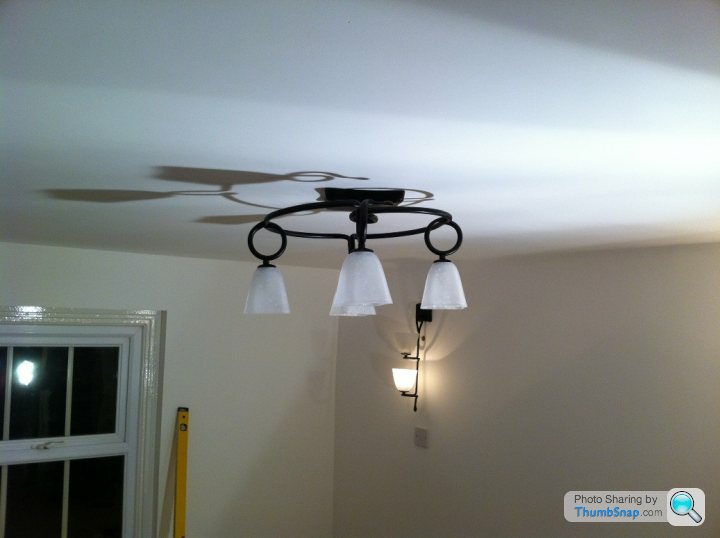
We found some more wrought iron lights and fitted these as the main light and bedside lamps.


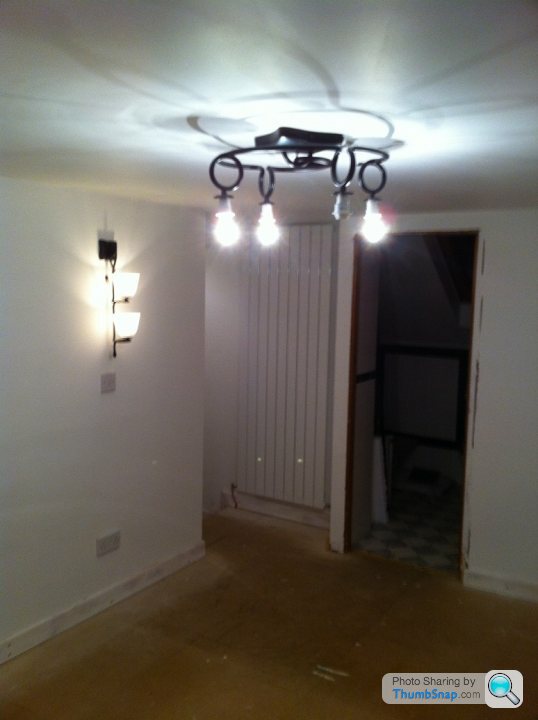
The bedroom is accessed via a 12ft corridor which has a couple of steps in. Mounted at the top of these steps was the radiator meaning that by the time you got to the lower part the rad appears halfway up the wall and looked st. The door architrave to the En-suite needed to be replaced at the same timeso I decided I would build something more in keeping with the rest of the house.

We decided that as this room was in the more modern part of the building we could go for a good blend of traditional and modern so decided to install a vertical radiator which sits nicely in the corner without overhanging the step but not looking too out of place.

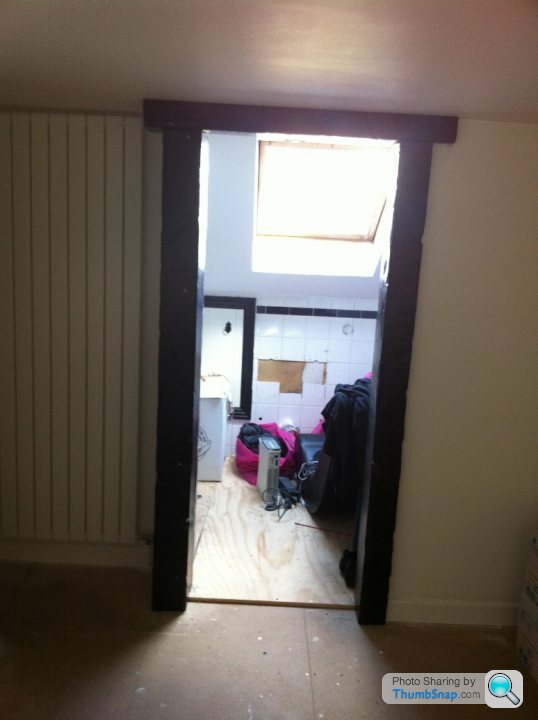
On the subject of steps we had to lift the top step to secure the floor and remove the flex which was causing an annoying squeak. Once the step was lifted you could see the old external wall which the step spanned, the squeak was caused by the steps not actually secured properly and just resting on the top of the mud wall. Surprises were starting not to surprise us as this point although the excellent plumbing did manage too!!
Points given if you can explain their decision making progress

I needed to make up some shelves to put the surround sound and DVD player on so I cheated slightly by purchasing some pine ones from IKEA and set about making my mark on them which I was pleased with the outcomeOur TV unfortunately didn’t fit in the lounge downstairs meaning that our 40” from the bedroom is now residing in the lounge and the 55” LCD is at the end of the bed!


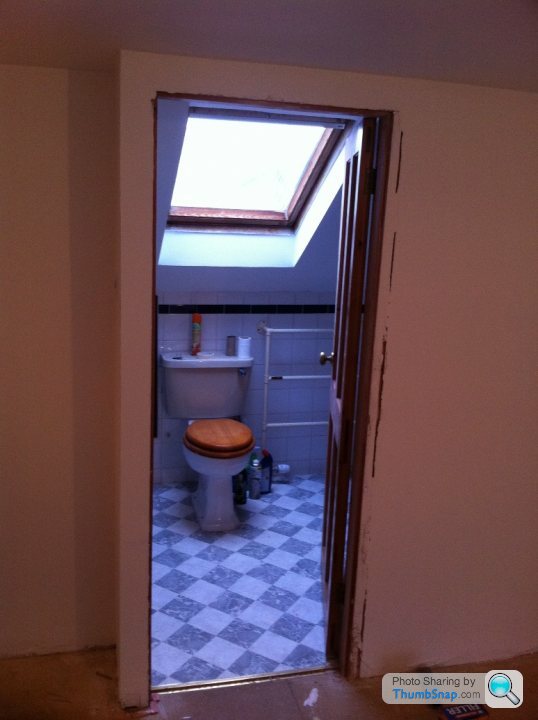
Onto the En-suite which although dated was fully functional, we decided after much deliberating that this would be the one room in the house that could get away with being both modern & hi tech without impacting on the property overall (the bedroom works well as a transgression between this and the rest of the house. After countless hours on the net and scouring Houzz (a fantastic website) we decided to redo everything totally, the room had already been replastered to remove the artexing so we set about removing the existing suite. Once this was done the floor was overboarded with marine ply.


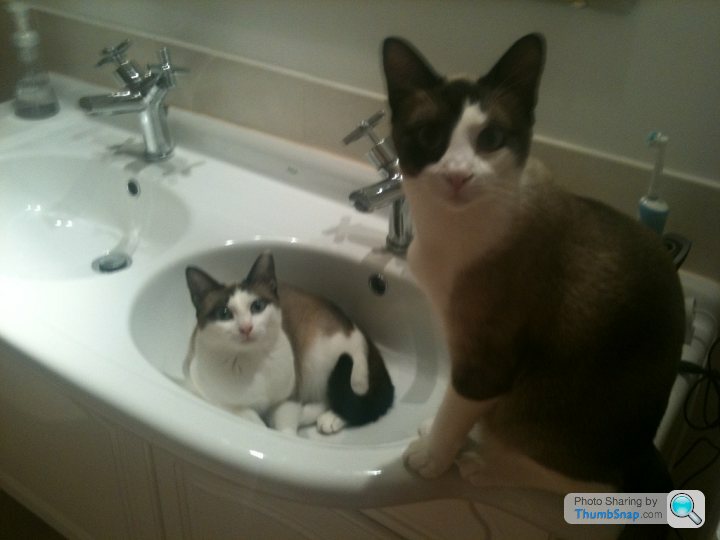
After a laborious weekend doing the floor and running electricity to the bath, we got up to go to work and discovered we had lost one of our housecats. After 10 minutes of calling for it we heard faint mewing coming from under the floor……
The little fker had squeezed through the cutout in the floor for the drain pipe for the bath and couldn’t get back out cue a panicking Mrs Herbs. The only way to get it out was to lift the section of floor we put down then use a jigsaw to enlarge the hole. 
Mmmm - jigsaw and scared cat in enclosed space what could go wrong……
The joists run parallel to the room so after attempting to get the cat away from the hole, I enlarged it only to find no bd cat.
The bloody thing had gone deathly quiet and with an open breezeblock cavity one end and god only knows what the other as we know it spans the old external wall and changes height at least twice it wasn’t looking good.
After 20 minutes we hear scrabbling underneath the bedroom so somehow it managed to navigates way across the joists......
At this point of being late for work and dealing with an increasingly upset Mrs, the fking floor which I had spent all weekend laying had to be lifted along with the floor underneath (I was thinking at this point about the old practice of burying cats in walls to bring luck and ward off evil spirits and wondering whether it worked or not).
Taking that route would probably mean no more dinners for me from Mrs Herbs (amongst other things ) so the floor was lifted and after chucking a load of cat treats down the hole we eventually coaxed the thing out much to Mrs Herbs relief.


Moving upstairs to our bedroom which you last saw previously in the thread as having a wall rebuilt and being plastered. SWMBO decides that we should refit the en-suite before finishing the bedroom so that when the carpet gets laid it won’t get damaged – who am I to argue?.....
Firstly the bedroom window was stripped right back to wood and re-glossed before the whole room was painted.
The cat 6 was then run behind the skirting as was the surround sound cables with the TV mounted on the wall.
We found some more wrought iron lights and fitted these as the main light and bedside lamps.
The bedroom is accessed via a 12ft corridor which has a couple of steps in. Mounted at the top of these steps was the radiator meaning that by the time you got to the lower part the rad appears halfway up the wall and looked s
t. The door architrave to the En-suite needed to be replaced at the same timeso I decided I would build something more in keeping with the rest of the house. We decided that as this room was in the more modern part of the building we could go for a good blend of traditional and modern so decided to install a vertical radiator which sits nicely in the corner without overhanging the step but not looking too out of place.
On the subject of steps we had to lift the top step to secure the floor and remove the flex which was causing an annoying squeak. Once the step was lifted you could see the old external wall which the step spanned, the squeak was caused by the steps not actually secured properly and just resting on the top of the mud wall. Surprises were starting not to surprise us as this point although the excellent plumbing did manage too!!
Points given if you can explain their decision making progress
I needed to make up some shelves to put the surround sound and DVD player on so I cheated slightly by purchasing some pine ones from IKEA and set about making my mark on them which I was pleased with the outcome
Our TV unfortunately didn’t fit in the lounge downstairs meaning that our 40” from the bedroom is now residing in the lounge and the 55” LCD is at the end of the bed! Onto the En-suite which although dated was fully functional, we decided after much deliberating that this would be the one room in the house that could get away with being both modern & hi tech without impacting on the property overall (the bedroom works well as a transgression between this and the rest of the house. After countless hours on the net and scouring Houzz (a fantastic website) we decided to redo everything totally, the room had already been replastered to remove the artexing so we set about removing the existing suite. Once this was done the floor was overboarded with marine ply.
After a laborious weekend doing the floor and running electricity to the bath, we got up to go to work and discovered we had lost one of our housecats. After 10 minutes of calling for it we heard faint mewing coming from under the floor……
The little f
ker had squeezed through the cutout in the floor for the drain pipe for the bath and couldn’t get back out cue a panicking Mrs Herbs. The only way to get it out was to lift the section of floor we put down then use a jigsaw to enlarge the hole. Mmmm - jigsaw and scared cat in enclosed space what could go wrong……
The joists run parallel to the room so after attempting to get the cat away from the hole, I enlarged it only to find no b
d cat.The bloody thing had gone deathly quiet and with an open breezeblock cavity one end and god only knows what the other as we know it spans the old external wall and changes height at least twice it wasn’t looking good.
After 20 minutes we hear scrabbling underneath the bedroom so somehow it managed to navigates way across the joists......
At this point of being late for work and dealing with an increasingly upset Mrs, the f
king floor which I had spent all weekend laying had to be lifted along with the floor underneath (I was thinking at this point about the old practice of burying cats in walls to bring luck and ward off evil spirits and wondering whether it worked or not). Taking that route would probably mean no more dinners for me from Mrs Herbs (amongst other things
) so the floor was lifted and after chucking a load of cat treats down the hole we eventually coaxed the thing out much to Mrs Herbs relief.Gassing Station | Homes, Gardens and DIY | Top of Page | What's New | My Stuff