Building a Squaredrop camper
Discussion


Where to start...
Well, during the worst parts of the pandemic, my housemate bought, converted and flipped three Sprinter vans. He did a great job and made good money doing it. Having done it before, I know how much of a pain it is, and I certainly didn't have much interest in doing it again.
However, quite recently I've been getting into off roading/overlanding a little, and am getting a little bored of tent camping, wanting something a little more comfy. A recent podcast that we did at my work with a couple of guys that started a business renting out such things as pickup trucks with RTTs and a couple of overlanding trailers gave me the inspiration I needed to build my own, and so less than a week later I'd bought an old utility trailer with the view to building a squaredrop trailer of my own.
Why build one you ask? well...
1. I'm cheap
2. I'm poor
3. I'd like to flip it for a profit eventually
4. I'm poor
5. I already don't have enough free time, might as well compound the problem
and why a squaredrop you ask? Well..
1. Easier to build than a teardrop
2. more comfortable than a ground tent
3. Less setup/break-down time than a tent and can in theory leave it loaded and ready to go
4. unlike a RTT you can leave your camp set up and come back later
So, here's what I bought, alongside my sort of trusty tow-rig.
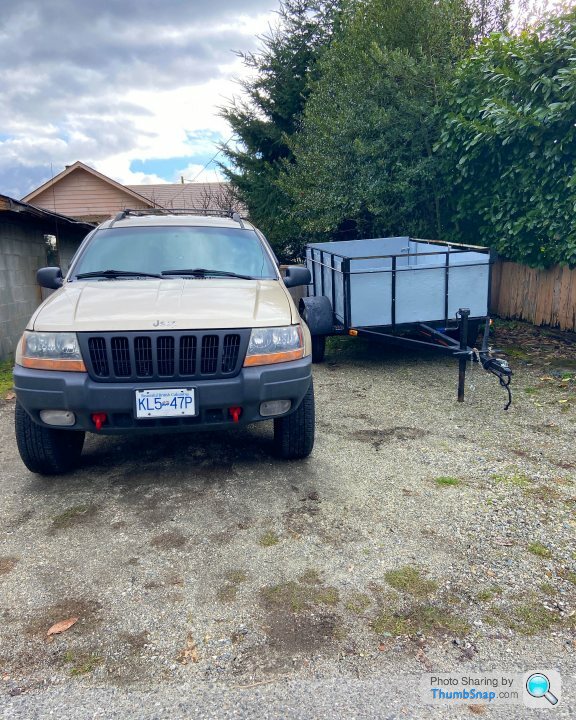
Not owning a welder, an already assembled and fairly solid used utility trailer seemed the best choice. Not so sure I feel the same way now... Stay tuned for more...
Well, during the worst parts of the pandemic, my housemate bought, converted and flipped three Sprinter vans. He did a great job and made good money doing it. Having done it before, I know how much of a pain it is, and I certainly didn't have much interest in doing it again.
However, quite recently I've been getting into off roading/overlanding a little, and am getting a little bored of tent camping, wanting something a little more comfy. A recent podcast that we did at my work with a couple of guys that started a business renting out such things as pickup trucks with RTTs and a couple of overlanding trailers gave me the inspiration I needed to build my own, and so less than a week later I'd bought an old utility trailer with the view to building a squaredrop trailer of my own.
Why build one you ask? well...
1. I'm cheap
2. I'm poor
3. I'd like to flip it for a profit eventually
4. I'm poor
5. I already don't have enough free time, might as well compound the problem
and why a squaredrop you ask? Well..
1. Easier to build than a teardrop
2. more comfortable than a ground tent
3. Less setup/break-down time than a tent and can in theory leave it loaded and ready to go
4. unlike a RTT you can leave your camp set up and come back later
So, here's what I bought, alongside my sort of trusty tow-rig.
Not owning a welder, an already assembled and fairly solid used utility trailer seemed the best choice. Not so sure I feel the same way now... Stay tuned for more...
I guess this is maybe more of a North American thing. It’s going to be an off-road ready mini caravan. 5x8 footprint, 4ft tall. Sleeping quarters at the front with a queen size bed and rear hatch opens to a galley kitchen. Think small van conversion, without the engine. Means the tow vehicle can leave camp without having to break it down.
The squaredrop is a derivation from the classic teardrop camper and usually is built more towards ‘overlanding’ and off road use, I guess because of its more rugged looks. I’m going in this direction just because squares are easier to build than curves.
Here’s my inspiration:
The squaredrop is a derivation from the classic teardrop camper and usually is built more towards ‘overlanding’ and off road use, I guess because of its more rugged looks. I’m going in this direction just because squares are easier to build than curves.
Here’s my inspiration:
Edited by samj2014 on Tuesday 26th April 18:08
Well in the interest of keeping you guys interested, I'll add another update - I'm a little behind here and I'm going to go out and do some work on it this next couple of days.
I'm not very good at taking photos as I'm going but I'll add what I have. First thing was to remove all the panelling, sides etc. from the trailer so I have a clean base to start from. Underneath was a lot of surface rust. Luckily this thing was built pretty heavy so I'm not worried about the structure, but it meant a lot of time with a grinder cleaning and prepping for paint.
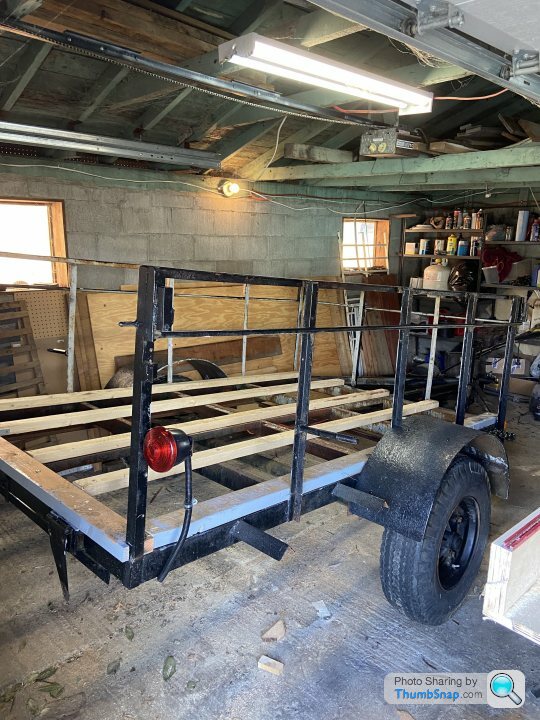
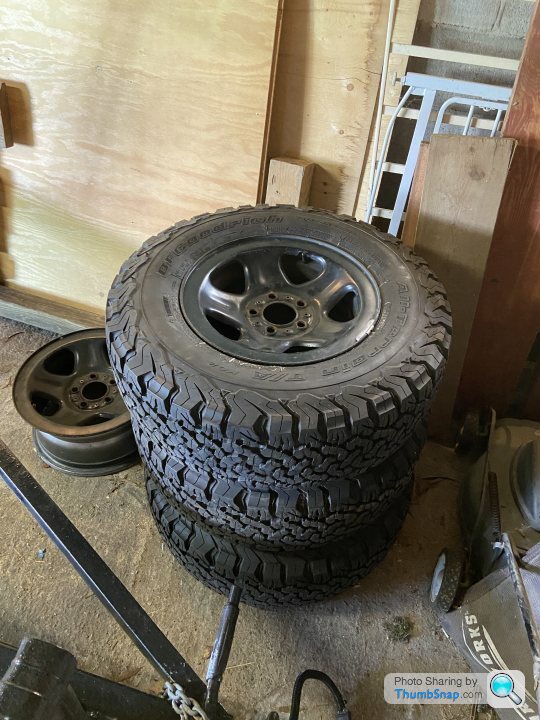
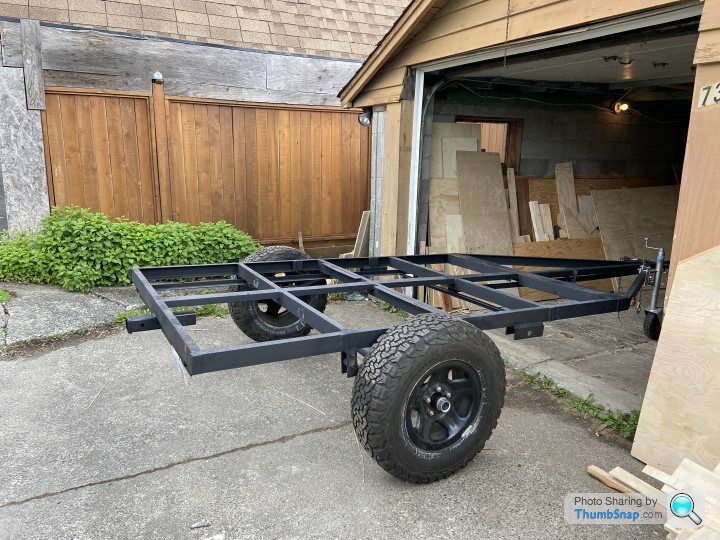
I also soon realised that though it had a heavy duty 3.5 ton axle on it, it had 'dayton' style hubs which meant very old and specific wheels and tyres, which weren't really going to suit what I needed. Bit of a bummer, I ended up having to buy a new axle. It wasn't too expensive ($400) but this is where I started realising that I probably should've just built a trailer frame from scratch. Next time. At this point I sourced four Jeep steel wheels from an XJ for $50 and a set of 3 lightly used BFG K02 tyres for about another $200 - total bargain. Fitted up these look pretty tidy, but I'm going to need some wheel spacers as the offset on the rims isn't quite right and there's not a lot of clearance.
Meanwhile progress is pretty slow with the grinding and painting as the weather wasn't great and our garage is pretty tight. This took a few weeks as there was a lot of small pieces of metal to remove and I wanted to do a decent job. (you can see one of the centerless dayton style wheels in the background)
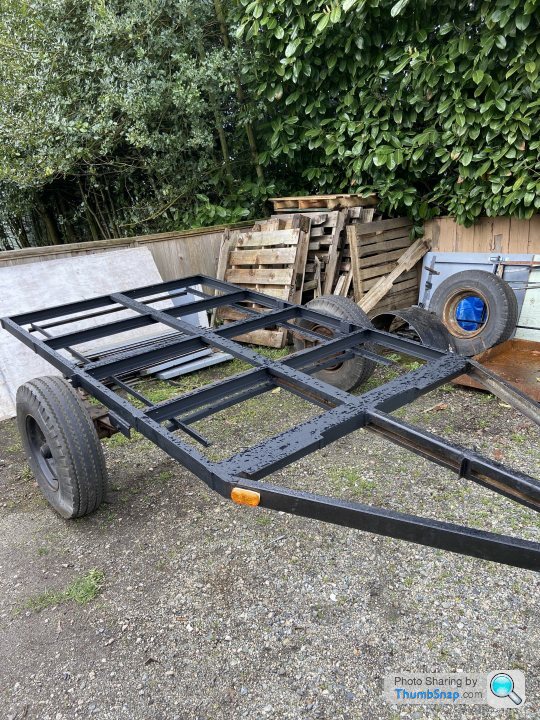
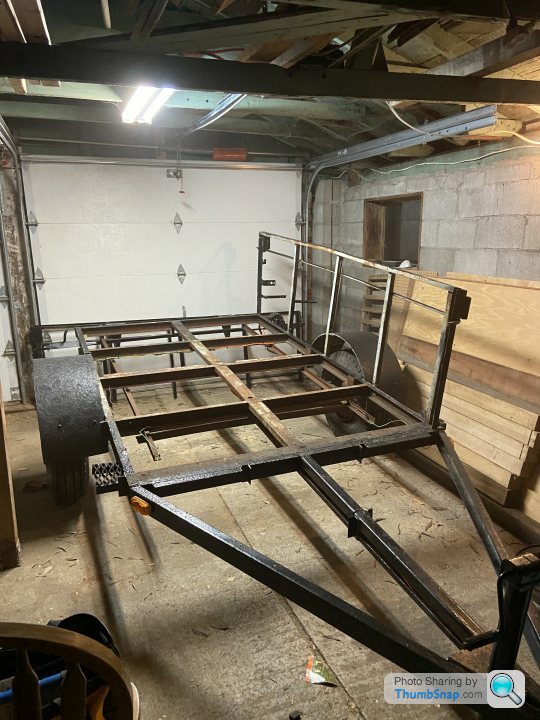
Eventually I got the frame painted and finished. There are a few spots I'd like to touch up but it's good enough to last a few years probably. I got the axle swapped and wheels fitted. I also decided to cut out the original jack as it wasn't in great shape and I fitted a bolt-on swivel jack so that it can move totally out of the way for going off road.
Old axle off, leaf springs painted.

New axle and wheels fitted
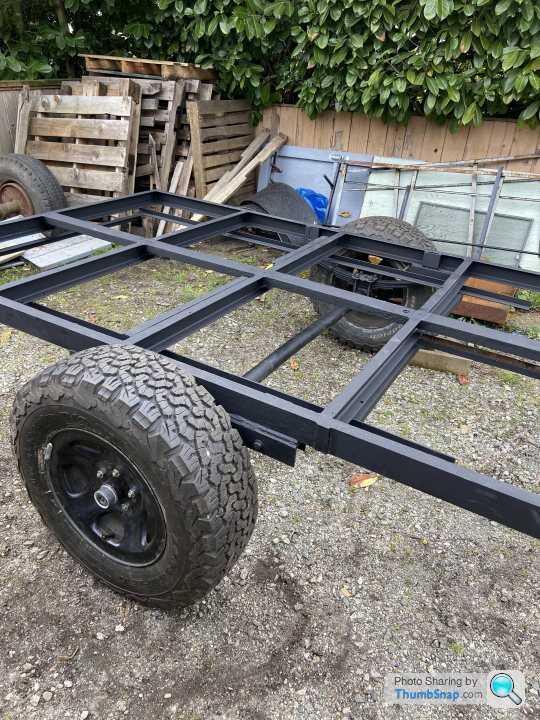
Clearance is a little tight. I'm thinking either 1/2" or 1" wheel spacers should be plenty

New swivel jack fitted

More to come...
I'm not very good at taking photos as I'm going but I'll add what I have. First thing was to remove all the panelling, sides etc. from the trailer so I have a clean base to start from. Underneath was a lot of surface rust. Luckily this thing was built pretty heavy so I'm not worried about the structure, but it meant a lot of time with a grinder cleaning and prepping for paint.
I also soon realised that though it had a heavy duty 3.5 ton axle on it, it had 'dayton' style hubs which meant very old and specific wheels and tyres, which weren't really going to suit what I needed. Bit of a bummer, I ended up having to buy a new axle. It wasn't too expensive ($400) but this is where I started realising that I probably should've just built a trailer frame from scratch. Next time. At this point I sourced four Jeep steel wheels from an XJ for $50 and a set of 3 lightly used BFG K02 tyres for about another $200 - total bargain. Fitted up these look pretty tidy, but I'm going to need some wheel spacers as the offset on the rims isn't quite right and there's not a lot of clearance.
Meanwhile progress is pretty slow with the grinding and painting as the weather wasn't great and our garage is pretty tight. This took a few weeks as there was a lot of small pieces of metal to remove and I wanted to do a decent job. (you can see one of the centerless dayton style wheels in the background)
Eventually I got the frame painted and finished. There are a few spots I'd like to touch up but it's good enough to last a few years probably. I got the axle swapped and wheels fitted. I also decided to cut out the original jack as it wasn't in great shape and I fitted a bolt-on swivel jack so that it can move totally out of the way for going off road.
Old axle off, leaf springs painted.
New axle and wheels fitted
Clearance is a little tight. I'm thinking either 1/2" or 1" wheel spacers should be plenty
New swivel jack fitted
More to come...
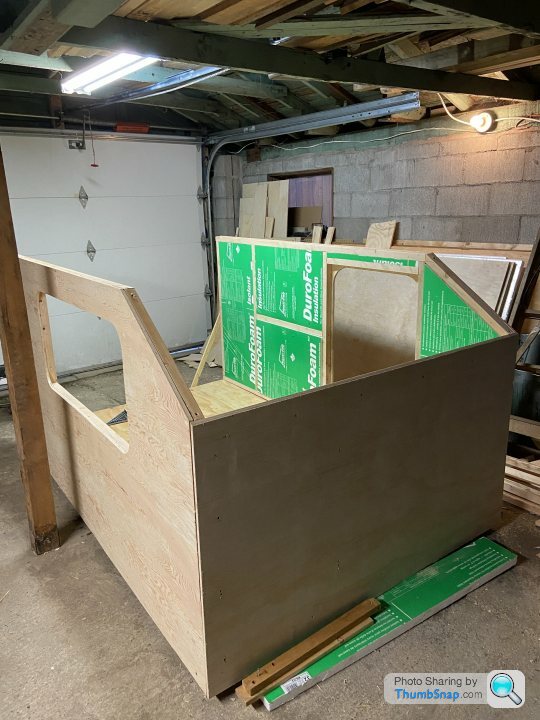
Well, I started building the actual thing itself. Progress has been slow since I don't have as much free time as I'd like but I'm getting somewhere.
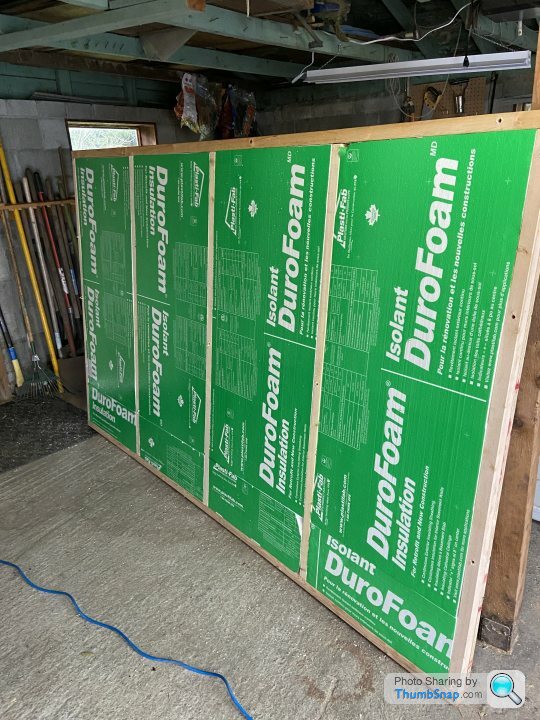
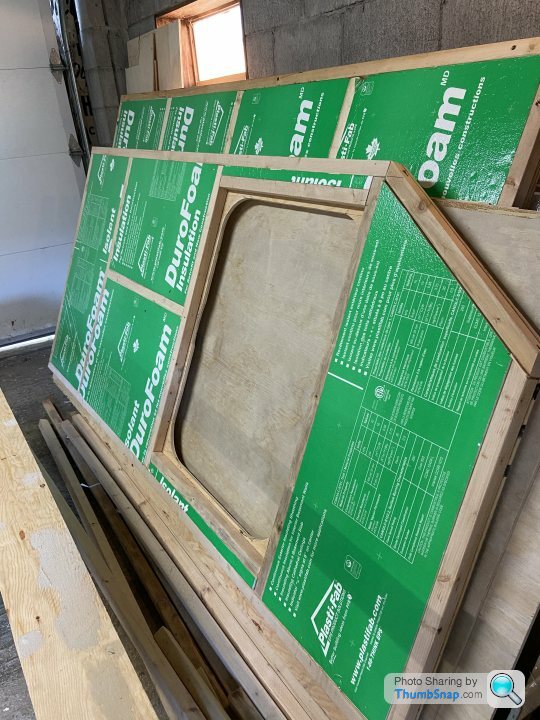
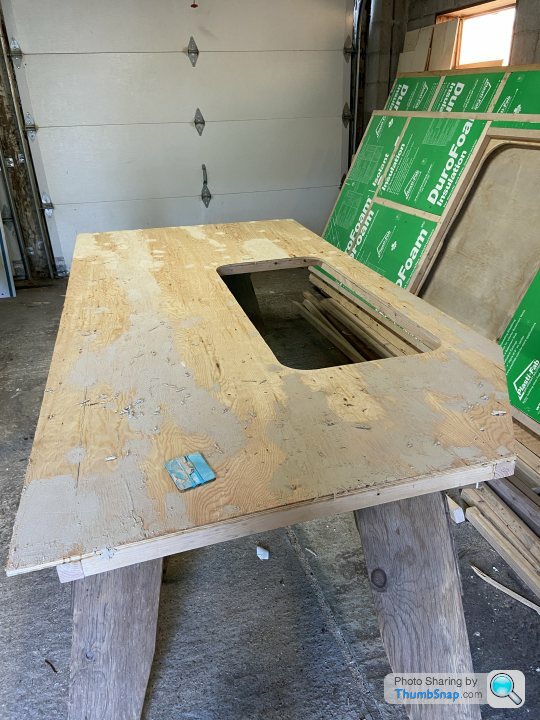
I started by framing out the floor - 3/4" ply with 2x2 batons, 1.5" insulation, 5x8' footprint
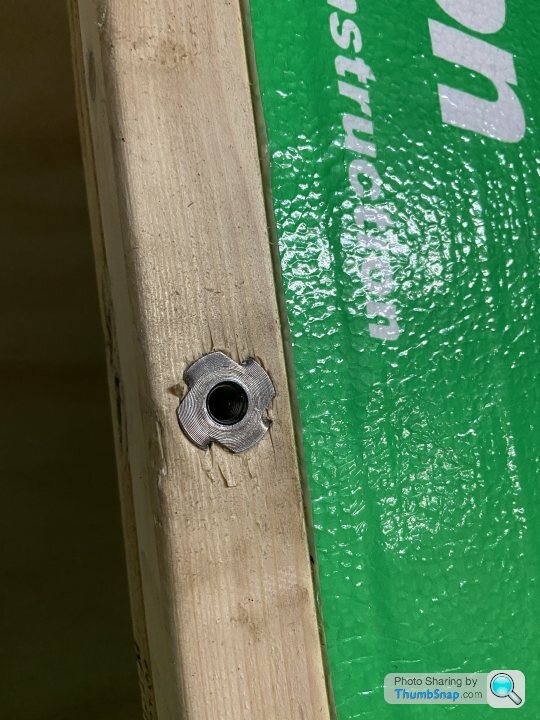
Next I had to figure out how to attach the floor to the frame. I decided tee nuts were the way to do it, sandwiched between the top layer of ply and I'll bolt through from the underside of the trailer - this means I can (in theory) separate the frame/body if I need to. Cue lots of swearing and drilling holes in the wrong places, but I got it figured out.
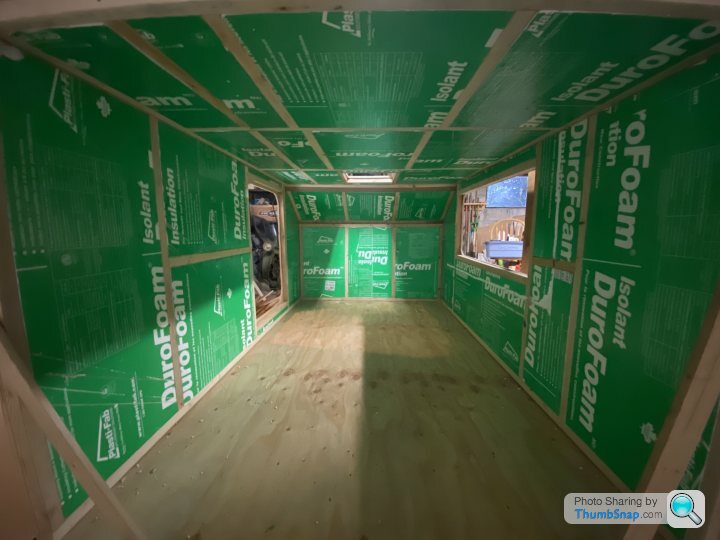
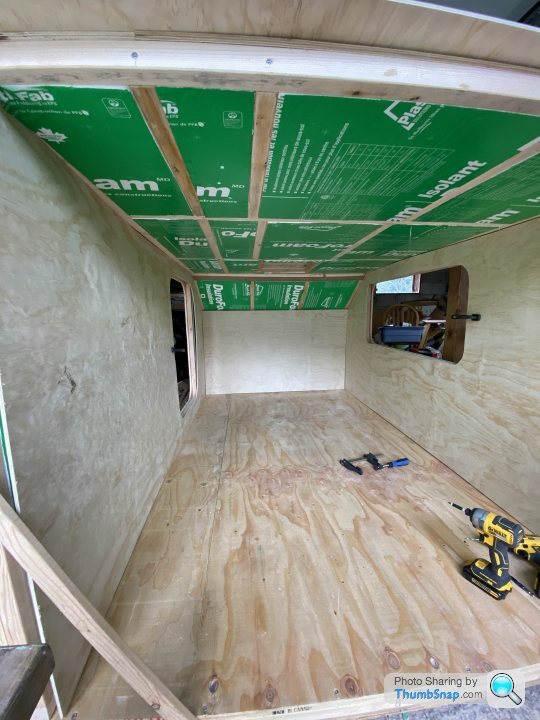
Walls framed out with 1/2" ply and 2x2 batons - I didn't use the best quality ply so lots of filling and sanding here, annoyingly
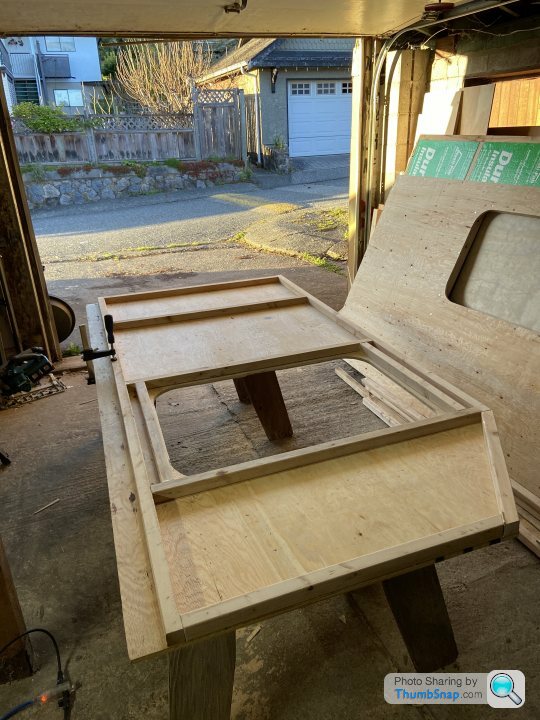
Now I'm having somebody make some modifications to the trailer frame - the axle needs to move back a little, so in the mean time I'm mock-assembling the body of the trailer in our garage. I'll frame out each section and get all the exterior/interior panels cut, that way I can make sure it all fits and then when I have the frame back in a week or two I can just assemble everything on the frame, glue and screw it together and it should all work out great... right?
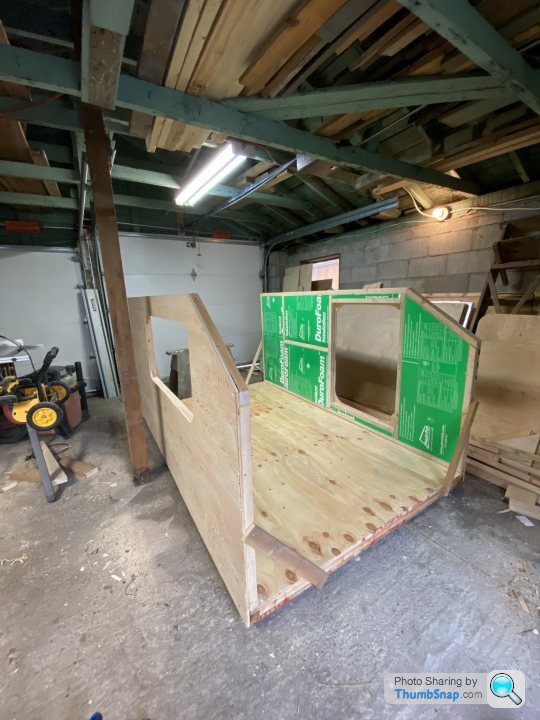
This is where I'm at right now - I've got most of the electrics figured out already, but more on that later.
I started by framing out the floor - 3/4" ply with 2x2 batons, 1.5" insulation, 5x8' footprint
Next I had to figure out how to attach the floor to the frame. I decided tee nuts were the way to do it, sandwiched between the top layer of ply and I'll bolt through from the underside of the trailer - this means I can (in theory) separate the frame/body if I need to. Cue lots of swearing and drilling holes in the wrong places, but I got it figured out.
Walls framed out with 1/2" ply and 2x2 batons - I didn't use the best quality ply so lots of filling and sanding here, annoyingly
Now I'm having somebody make some modifications to the trailer frame - the axle needs to move back a little, so in the mean time I'm mock-assembling the body of the trailer in our garage. I'll frame out each section and get all the exterior/interior panels cut, that way I can make sure it all fits and then when I have the frame back in a week or two I can just assemble everything on the frame, glue and screw it together and it should all work out great... right?
This is where I'm at right now - I've got most of the electrics figured out already, but more on that later.

Thanks guys, lots of mistakes and learning as I go.
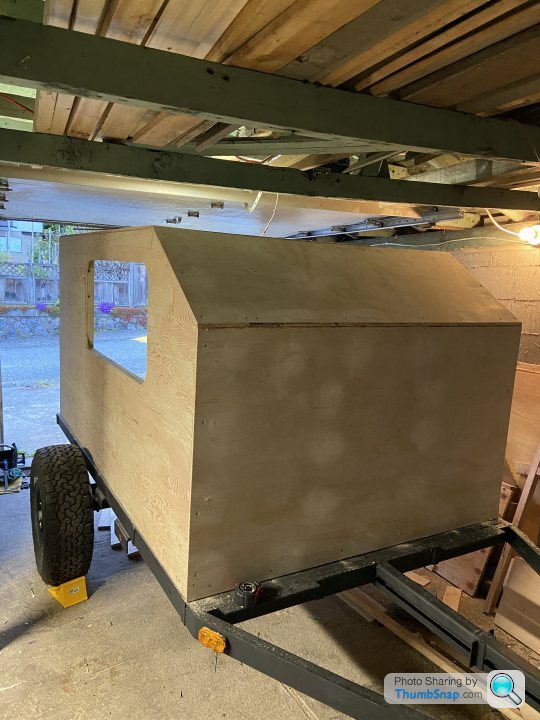
Case in point, I built the walls backwards - the door that I bought is meant for the right side, and as you can see the hole is on the left. I thought I triple checked before I built the damn things but somehow I still screwed it up...
I'm as yet undecided as to whether I'll live with the door opening the wrong way or if I'll order a new door and save this one for a potential future build/sell it, but it wasn't cheap (around $600cad)

missing the VR6 said:
Is there enough insulation for that to be functional all year round?
I would think so - there's more insulation than in your typical mass-built caravan (an inch and a half of EPS on every wall, floor, ceiling). That said to make it properly functional in winter I'd want to have some kind of propane/diesel heater. I don't think I'm going to put that kind of money into this one, but it should be fine for three seasons as-is.CubanPete said:
Looks awesome. I've been toying with building something like this, but the current project list is big...
Chinese diesel heaters are about £80, so not money that would break the bank...
The problem isn’t the money - the way I’m wiring this thing (I’ll explain later) means it’ll be tough to make it work properly without totally draining my battery as they use a lot of power when they first turn on. A propane heater would work better but there are fewer cheap ones around Chinese diesel heaters are about £80, so not money that would break the bank...
Edited by samj2014 on Wednesday 11th May 07:26
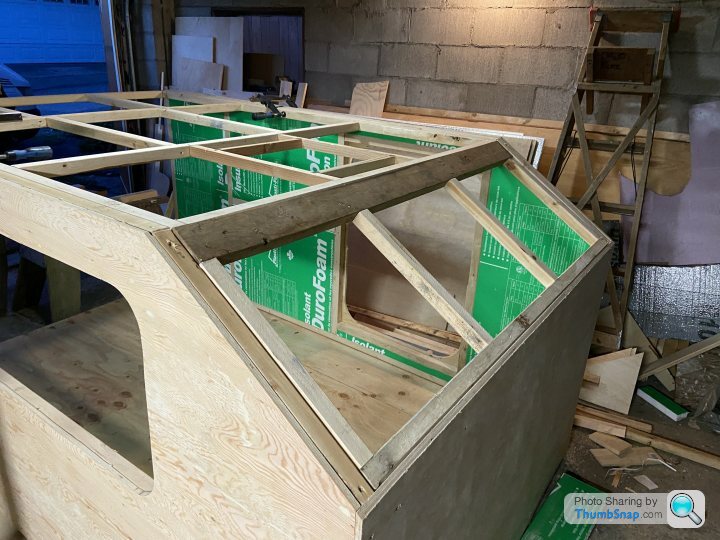
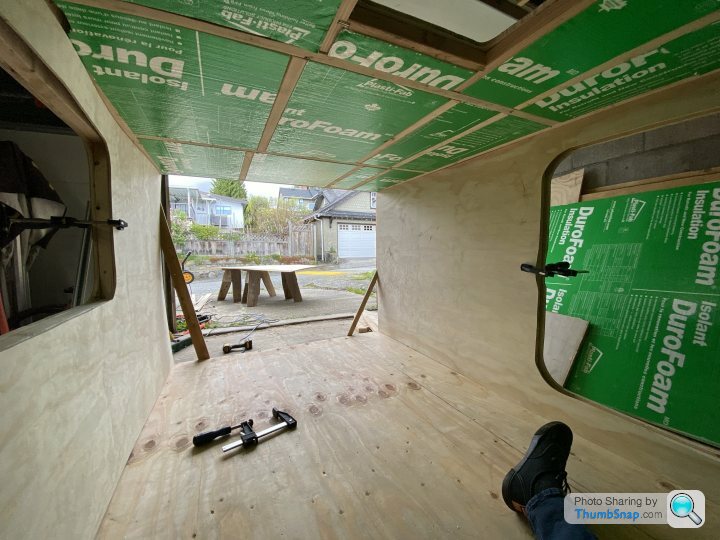
Good progress today - got the roof panels cut, fitted and insulated. Took a while to get the chamfers on the edges right and unfortunately not everything is quite as square as I’d like it to be, mostly down to not having the most accurate tools and the unfortunate realities of working with big pieces of bendy wood. Whatever doesn’t fit perfectly I can fix with either sanding or filler however.
Thankfully it looks great from a distance.

Thankfully it looks great from a distance.
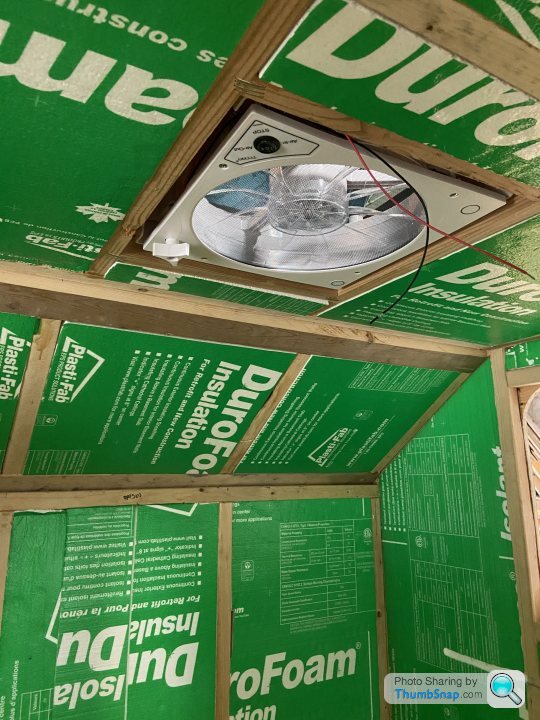
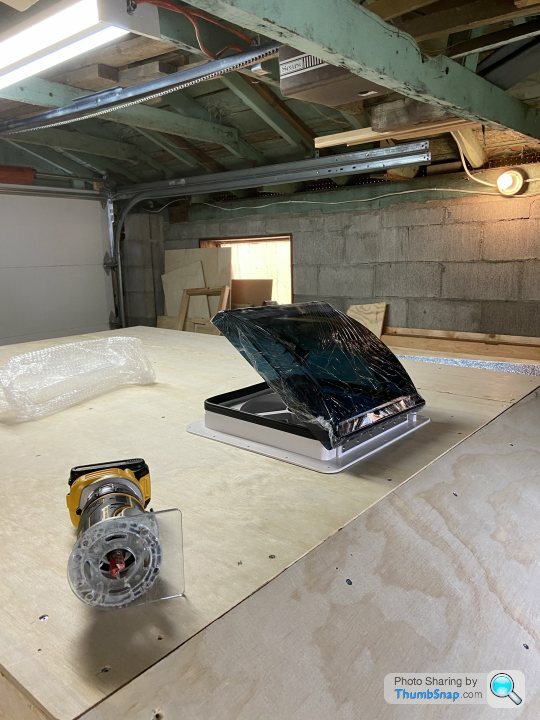
I managed to get the roof vent/fan test-fitted with a little trimming on the opening.
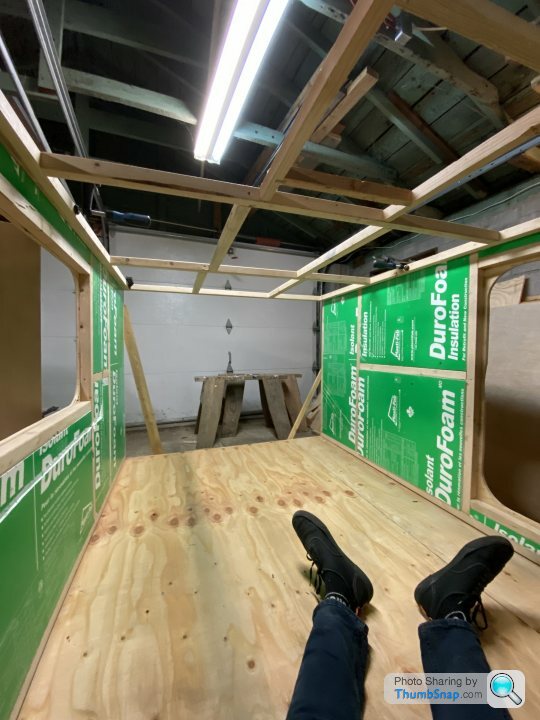
Cut most of the interior plywood panels yesterday and test-fitted.
Trailer is having some welding done next week so hopefully next Tuesday/Wednesday I'll be able to put the cab on the frame and get it glued/screwed together. Next big thing is the hurricane hinge showing up so I can make/fit the rear hatch and get it fully waterproof. Hopefully just a few weeks away from it being functional on a basic level - I have a feeling it's going to come together pretty quickly.
missing the VR6 said:
Impressively quick work there, how much longer do you think it'll take?
I'm thinking a few more weeks, I really only have time to work on it on my weekends but as you can see it's not huge.poo at Paul's said:
How much taller would it need to be to stand up in…assuming one is not a midget wrestler?
It would need to be probably a couple of feet taller for your average person to be able to stand in it, but it's really only designed to be a sleeping space. There would be room to sit though, and I have seen some with seating/table arrangements in them but that's pushing it a bit for me. The beauty of this is that it's (mostly) designed around a single full-size sheet of plywood, so it's simple to make and uses little in the way of material and with little waste.Scrump said:
That is going together really quickly.
I am sure it will look better with some lining etc, but the pictures reminded me of this:
Hah. I'm just lining it with the plywood you see there and will just be varnishing it, but with lights, cupboards and some soft furnishings it should look a little nicer.I am sure it will look better with some lining etc, but the pictures reminded me of this:
I've got a trip planned at the end of august with my dad who I've not seen since a couple of years before COVID started, and I want to be able to use it this summer and possibly rent it out to pay some of the expenses off - hence me cracking on with this and just getting it done. I don't want it to drag out if I can help it
Well I had the welding done on the frame. Axle moved back 16” (60/40 is the ideal placement with 40% of the bed behind the axle) and added a 2” hitch receiver to the back.
Once I had it back I tore the whole thing apart and got the floor mounted to the frame. Lots of big bolts (I think about ten) holding floor to frame and it should be staying put.


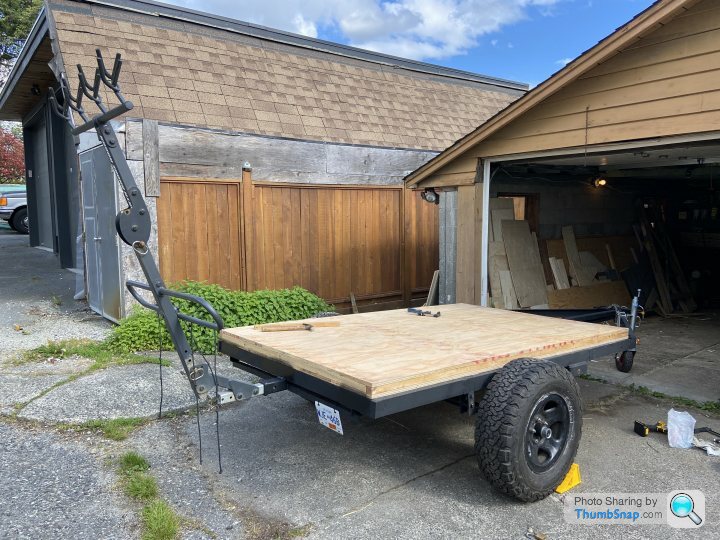
Trial fitted my bike rack, because why not.
Once I had it back I tore the whole thing apart and got the floor mounted to the frame. Lots of big bolts (I think about ten) holding floor to frame and it should be staying put.
Trial fitted my bike rack, because why not.
missing the VR6 said:
The big questions is, will it be ready for bike park season?
Haha, Whistler opened a week or so ago so no, but hopefully I can catch some of the season, though honestly bike park isn’t my thing. I prefer big pedally rides and loamy/techy descents. Fast bike park trails scare me - things can go wrong way too quickly and in a much bigger way.s6boy said:
Interesting thread Sam and good to see your progress so far. Are you planning on some proper waterproofing, specifically underneath?
I sealed the bottom with polyurethane. The rest will be fibreglassed and then painted with angle mouldings on all the edges - any exterior fittings will be double sealed with butyl tape and RV sealant.I’m not too worried about the underneath because while I’ll likely drive it in the rain, it will dry and isn’t likely to stay constantly wet as the top is (it rains a lot here on the west coast of BC)
Edited by samj2014 on Friday 3rd June 03:09
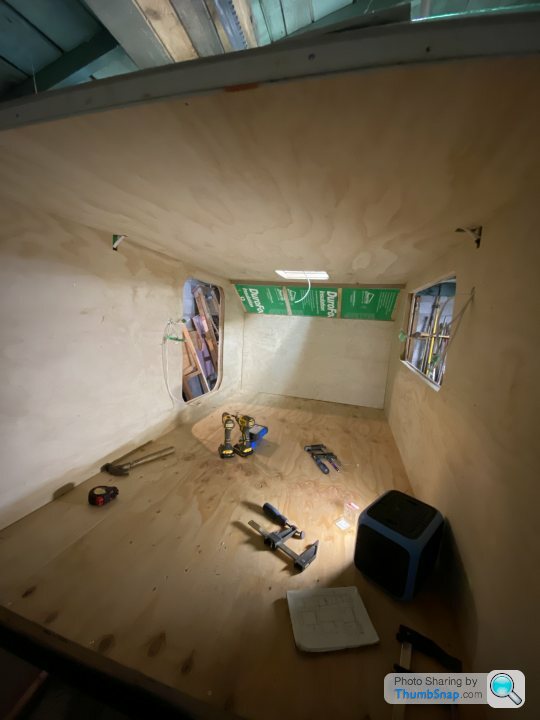
Photo dump - body built on frame. Ran electrics. Most of interior panels fitted. Much filling on exterior required.
The little blue box is my power station with 12v DC, built in inverter for 120v, built in solar charge controller, usb, lighter socket outputs etc. this will be the power source for the whole trailer and saves me a ton of time and energy building a ‘proper’ setup.


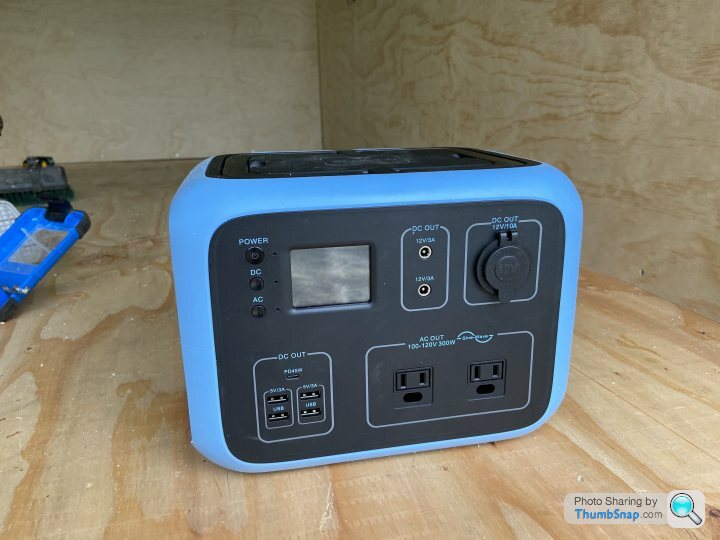
The little blue box is my power station with 12v DC, built in inverter for 120v, built in solar charge controller, usb, lighter socket outputs etc. this will be the power source for the whole trailer and saves me a ton of time and energy building a ‘proper’ setup.
take-good-care-of-the-forest-dewey said:
There are alternatives to diesel heaters that don't use power.
https://youtu.be/6ZnayOUQN28
The cheap Chinese ones can be quite temperamental.
That’s a very cool video.https://youtu.be/6ZnayOUQN28
The cheap Chinese ones can be quite temperamental.
Having already done a van build with a diesel heater I know that for me the main issue is power - I don’t have any plan to hook the camper up to the alternator on my vehicle and the flow plug on a diesel heater would kill my battery. If I were to install a heater it would be propane powered, but the idea of this isn’t to have a caravan, it’s comfortable camping one step up from a tent. So right now I’m not going to worry about it. If I want to install one later on it won’t be too hard to saw something holes in the side and plumb one in.
sebdangerfield said:
What a lovely project and neat work.
I’m interested in the makeup of the walls. Did you use a vapour barrier with the insulation or is it sandwiched between the ply?
Thanks, no vapour barrier. I have done this in the past with vans but wasn't as concerned with this build since the outer skin won't attract condensation like the outer skin of a van.I’m interested in the makeup of the walls. Did you use a vapour barrier with the insulation or is it sandwiched between the ply?
sebdangerfield said:
Ah ok, so because it’s wood it’s not needed?
What level of fit out are you going for?
From what I understand the main need for the vapour barrier in the van is because of the condensation on the metal which causes it to rust, so yeah my assumption is that because the camper is made of wood it’s not an issue. It’s not something I’ve really read about anywhere in the context of teardrop trailers (and there’s a LOT of info out there).What level of fit out are you going for?
I’m going for basic but a high level of finish. Hopefully. Or as high level of finish as I can produce with my amateur skills.
Edited by samj2014 on Tuesday 7th June 08:25
R56Cooper said:
That little power station looks like an awesome bit of kit too.
Yeah I’m actually really excited about that. Things have really come on in that department the last few years. I’ve been using it a little the last few days and it’s still showing as full. It’ll be really great for regular tent camping too.Gassing Station | Tents, Caravans & Motorhomes | Top of Page | What's New | My Stuff