Classic Aston Martin V8's
Discussion


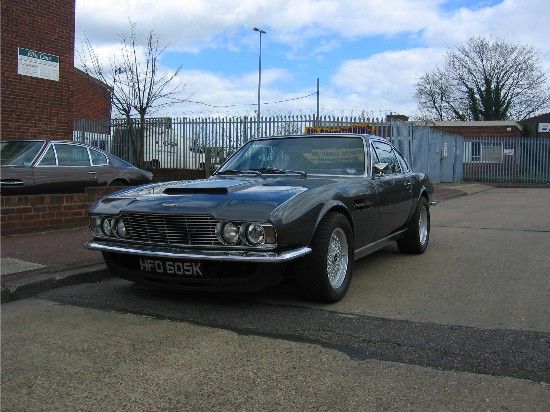
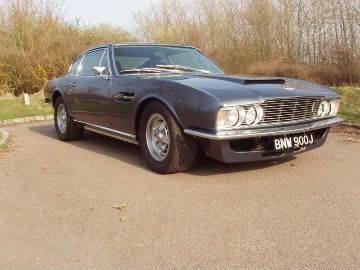
This thread was originally meant to be just about my 1972 Aston Martin V8 but I felt the need to set the scene and talk about my previous and first Aston Martin, a 1971 DBS V8, which may help to explain my addiction for throwing vast sums of money at ropey old motors…. Apologies for the length but hopefully it’s an enjoyable read.
February 2005, that was when I bought my first Aston, a 1971 DBS V8, from a Coys auction at a classic car show in Maastricht. I saw it on their website, booked a ticket on the Eurostar and headed over for the show. I got there an hour or two before the auction started, crawled over and under it enough to form an opinion that it was worth it if the price was right.
The bidding started and the price went up quite quickly to near my limit but then thankfully slowed. I put my bid in but was outbid, so I bid again to what was my max (having carefully calculated buyers premium, VAT etc) and won!
A DBS V8 for £11k, I couldn’t think of a better car for the money. The next day, still somewhat in a state of shock, I drove it back to England.
As I crossed Northern Europe, I soon got used to the people leaning out there cars with phones taking pictures. When I stopped for petrol, the car would be surrounded. It was surreal and something I had never experienced before. The journey home passed without incident, although I was convinced I wasn’t going to make it and that some terminal problem would end the adventure. But nothing happened, the Aston just rolled along the Autoroute without a single issue. At the Eurotunnel, I was waved straight through and soon I was back home in London with my Aston Martin.
The eight years that followed were a rollercoaster! That car sucked up every spare penny I had. But I tried to use it as much as I could.
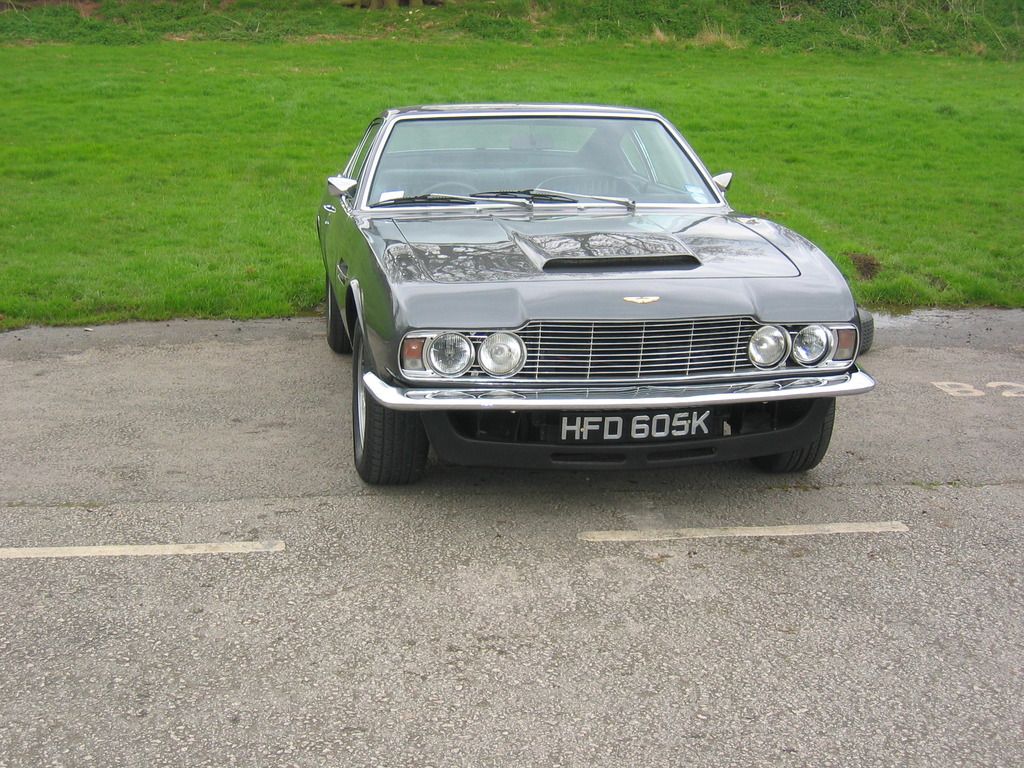
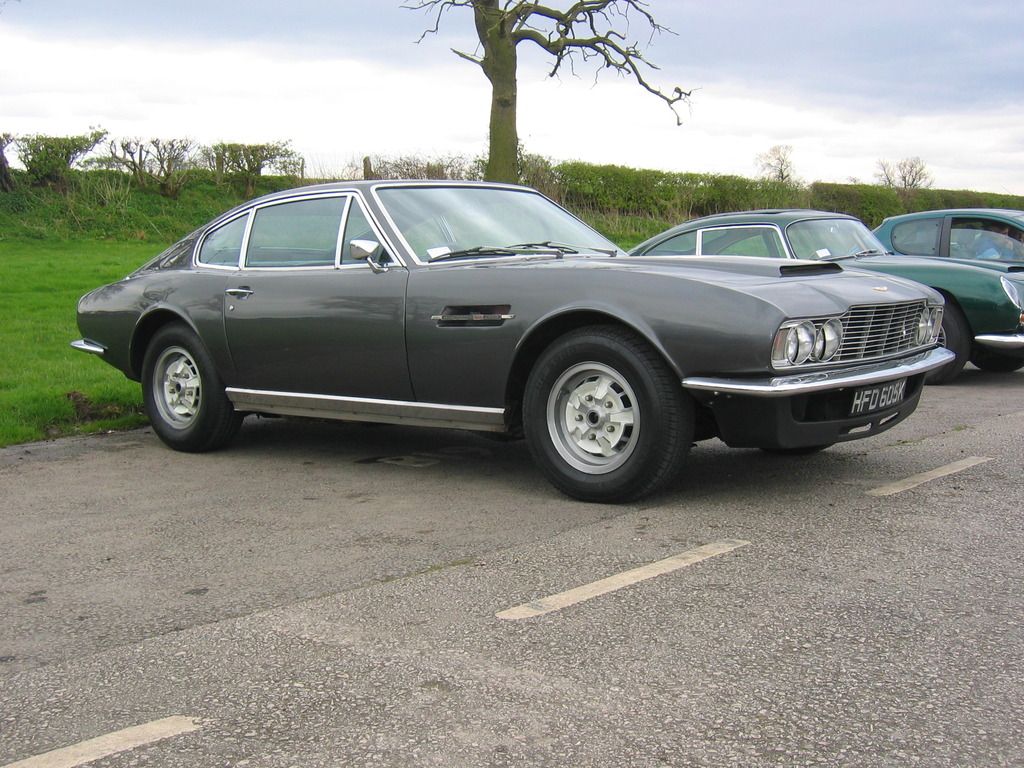
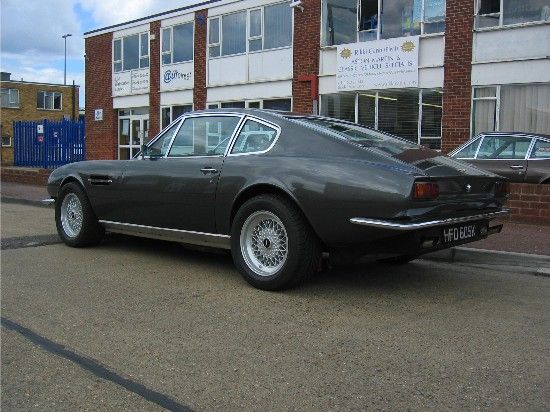
Here are some photos from an AMOC instruction day at Curborough, which show the car as bought.
It took me and the Mrs on weekends away and trips abroad.
I went through the running gear, upgrading and replacing bits as necessary. I lowered the suspension, fitted some later wheels with better tyres, and continued to drive it as much as possible.

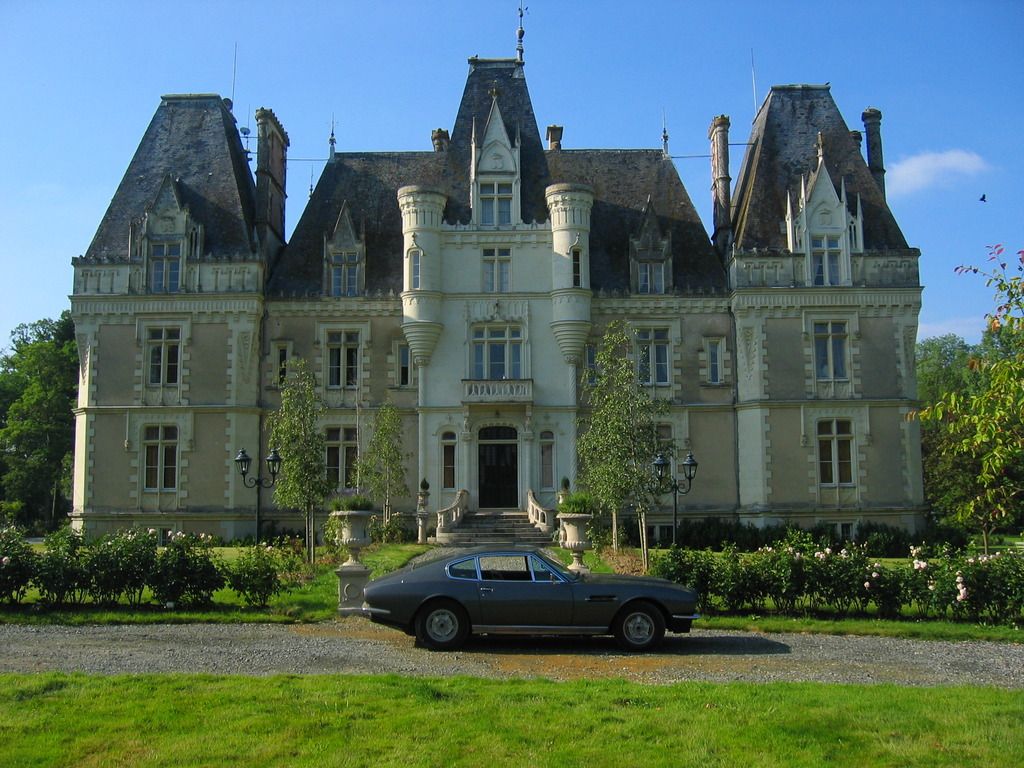
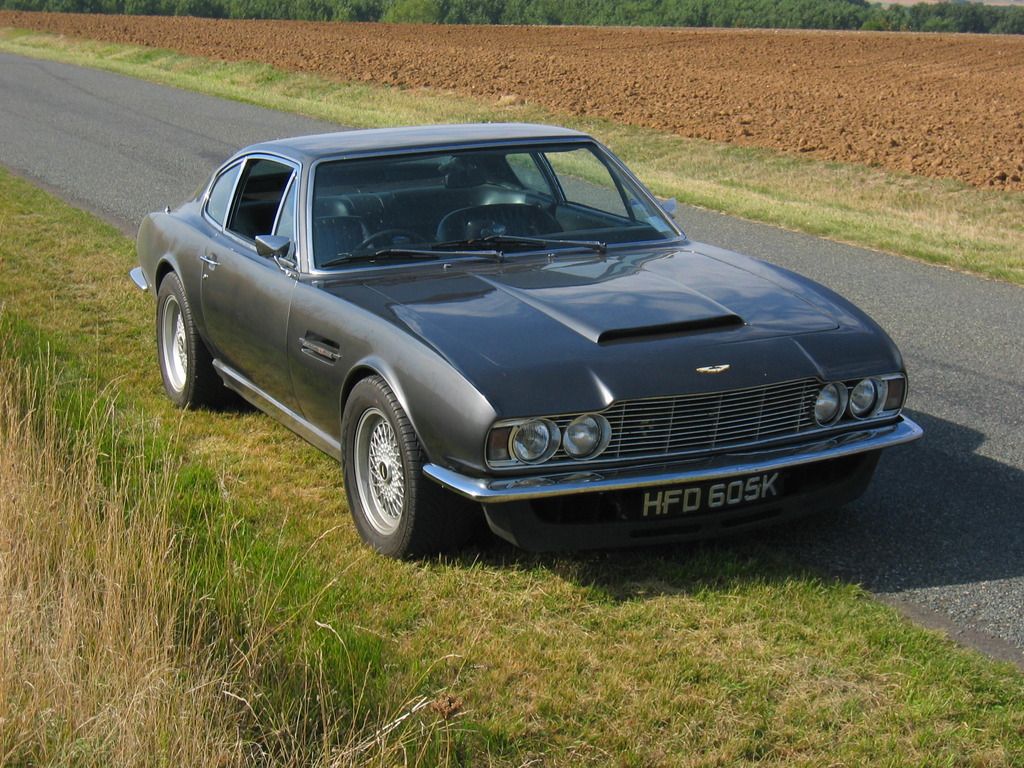
More trips abroad, here in rural France on the way to a friends wedding.
Rolling road day
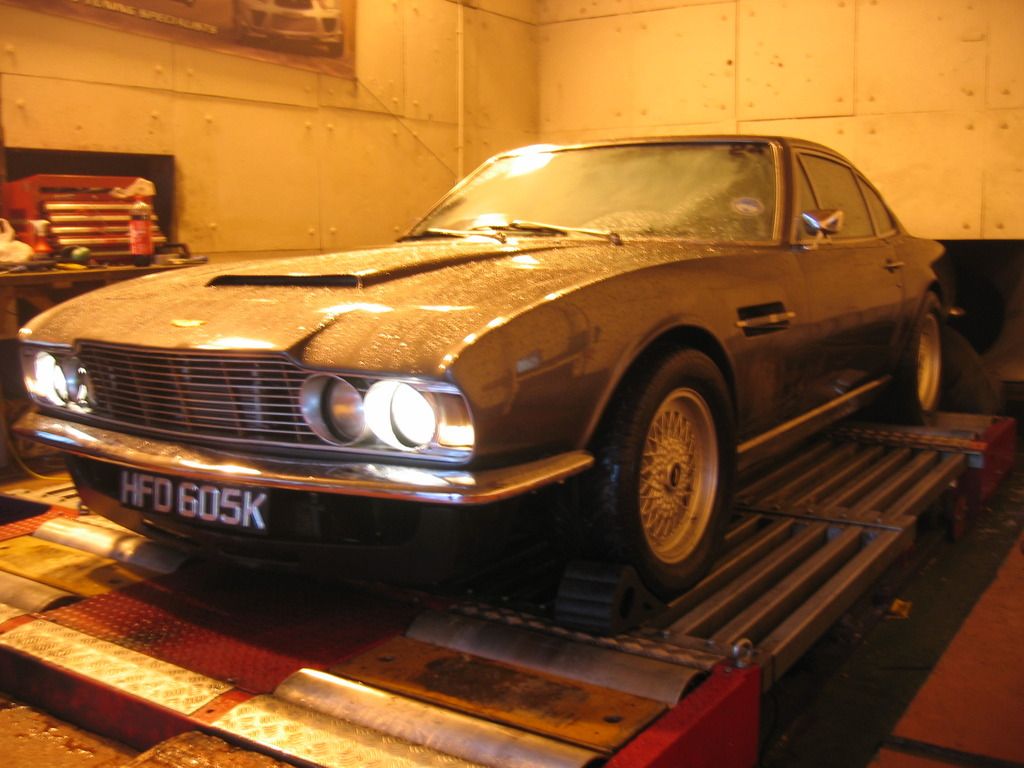
I even did a RWYB day in it at Santa Pod!

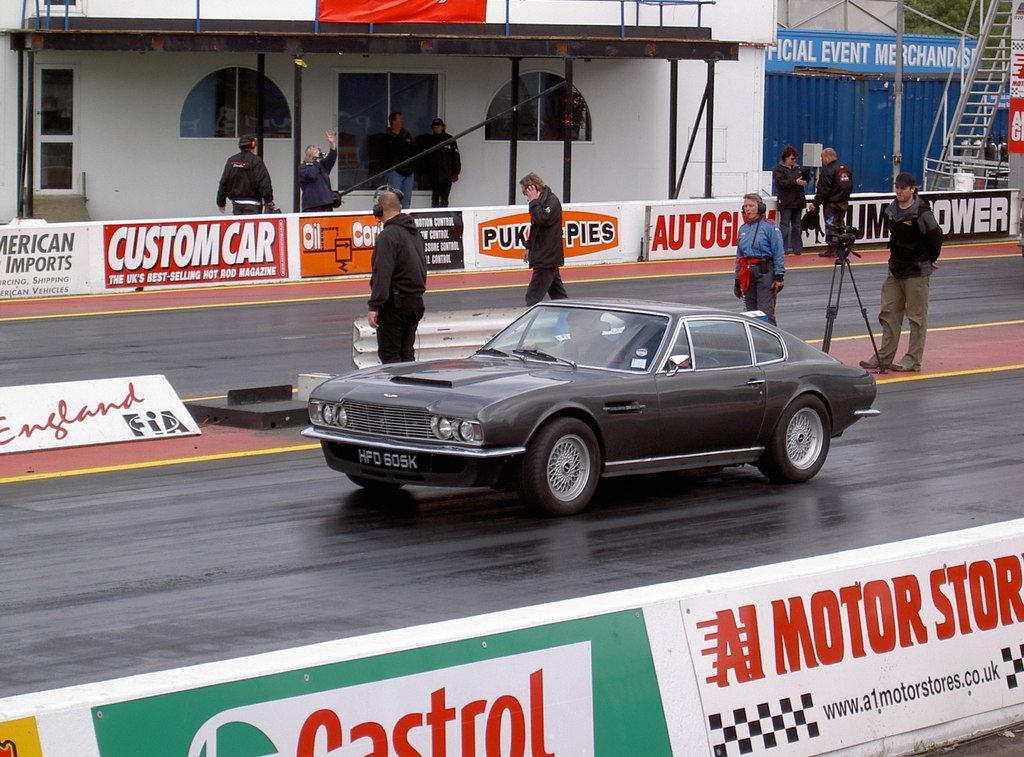
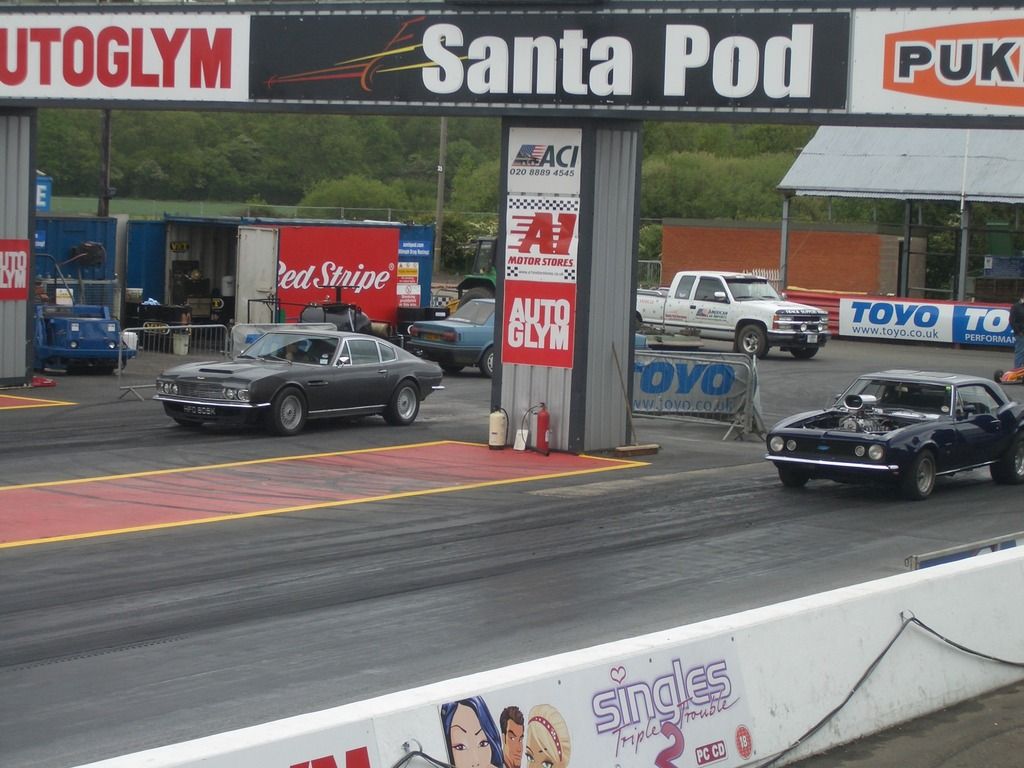
(I smoked the Camaro...)
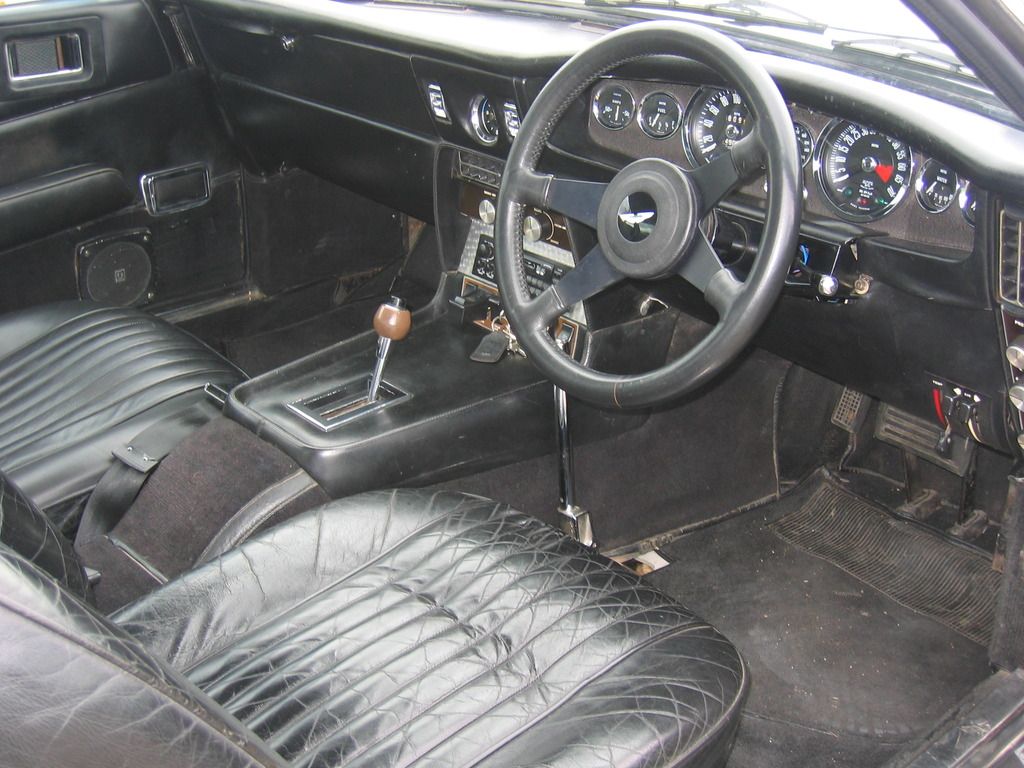
After a few years, one improvement I did want to make was to convert it from the 3 speed Torqueflite automatic gearbox to a manual. The mechanical fuel injected engines did not have an abundance of torque low down and needed to be revved so a manual suited the engine much better. I test drove two manual cars belonging to other AMOC members which underlined how much better the manual was.
I found the correct dog leg ZF manual box for £5k and was all set to get it installed when it became apparent that the car needed a full engine rebuild. So the gearbox was sold and the engine was rebuilt, which stopped the oil pressure gauge flicking all over the place!
It sounds so simple when you type it like that, but I had never spent such a significant sum on a car before. The rebuild cost of the engine was far in excess of the purchase price..
But even after the newly rebuilt engine was back in the car, I was always chasing problems. I just didn’t have the cash to really sort the car out, all the money I spent was just keeping it on the road rather than improving it. Despite the thousands I spent every year, it was still a condition 2/3 car. Everything went wrong with it: brakes, suspension, steering. I always thought that once something was repaired you could forget about it but not with this car. We replaced a number of components two or three times. The Mechanical Fuel Injection pump kept leaking, despite being rebuilt, so that had to come off and be sent back to the company that reconditioned it the first time. The problems just went on and on...
Then it failed the MOT due to corrosion….
Despite all of the above, I never thought of selling it (okay I did but only briefly!). What else would give me so much pleasure (and pain!) for the same price? This was before prices had got silly. So I found a chap who knew Astons (a fellow DBS V8 owner) but who worked on his own in a single unit to do the work, thus avoiding the eye watering prices some Aston specialists were quoting.
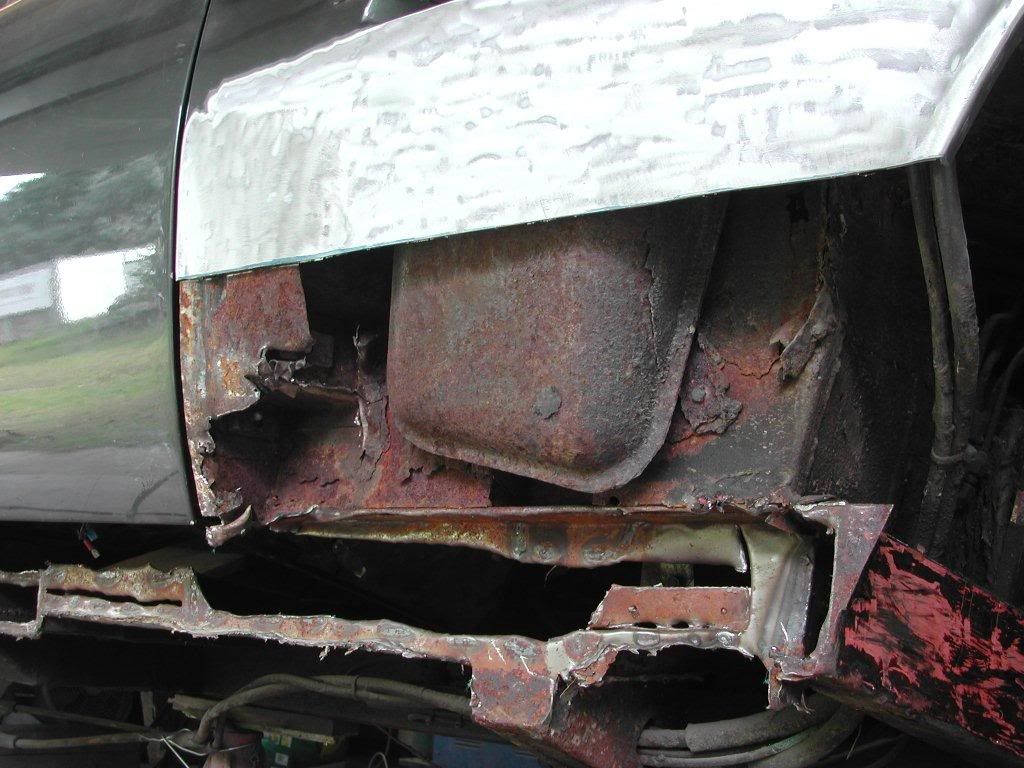
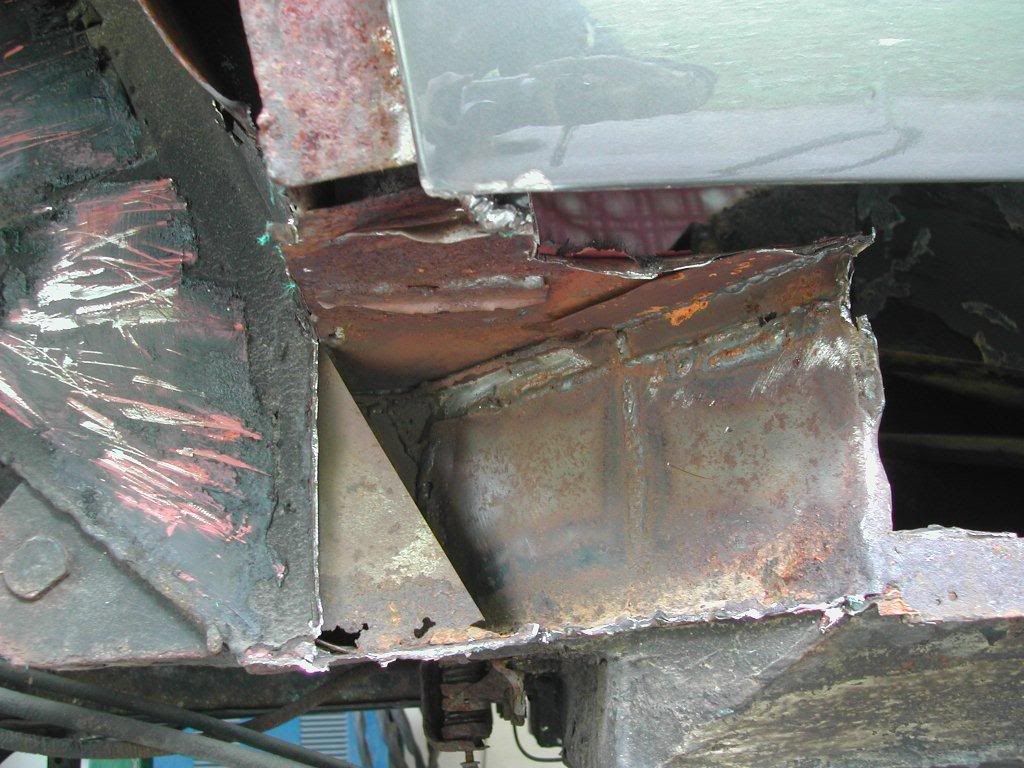
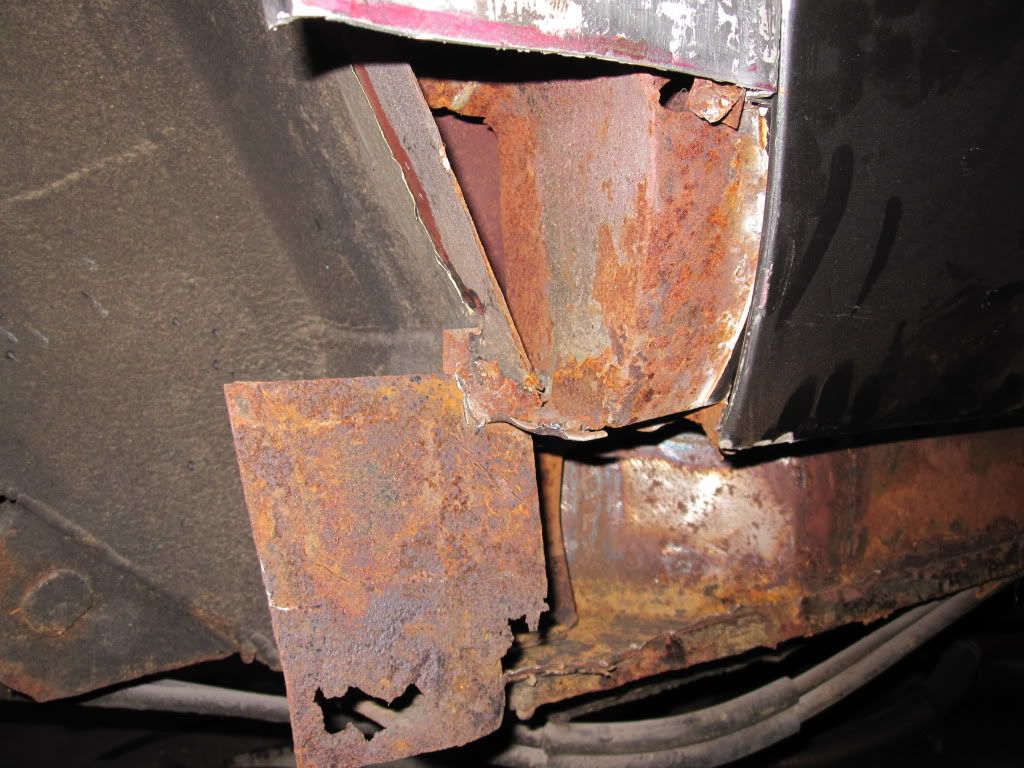
He stripped it all back and uncovered all manner of horrors. Accident damage that had been badly repaired and corrosion everywhere. Boot floor, inner wings, sills, A post, B post, floor plans, door frames etc. The corrosion was the worst he’d ever seen and this was not helped by the fact that my Aston had been very badly restored at some point in the past for a previous owner in Holland with all manner of bodges by someone who clearly knew nothing about Astons. I have hundreds of pictures of the restoration but these should give you an idea of the extent of the rot.
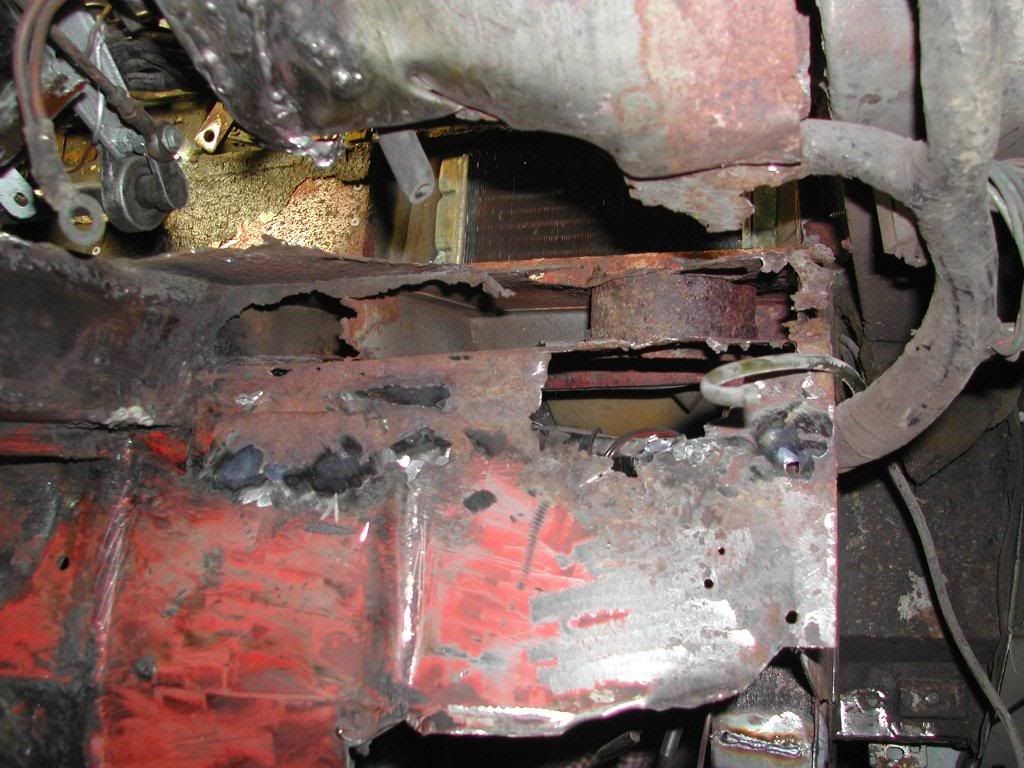
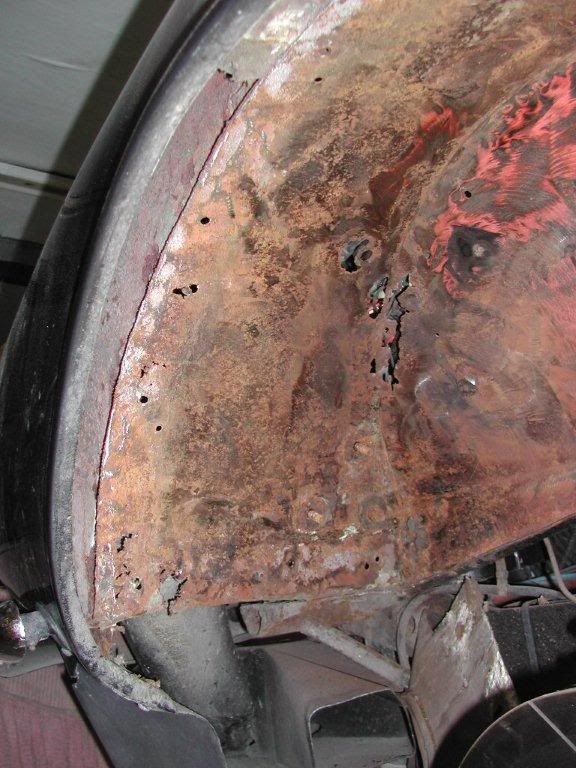
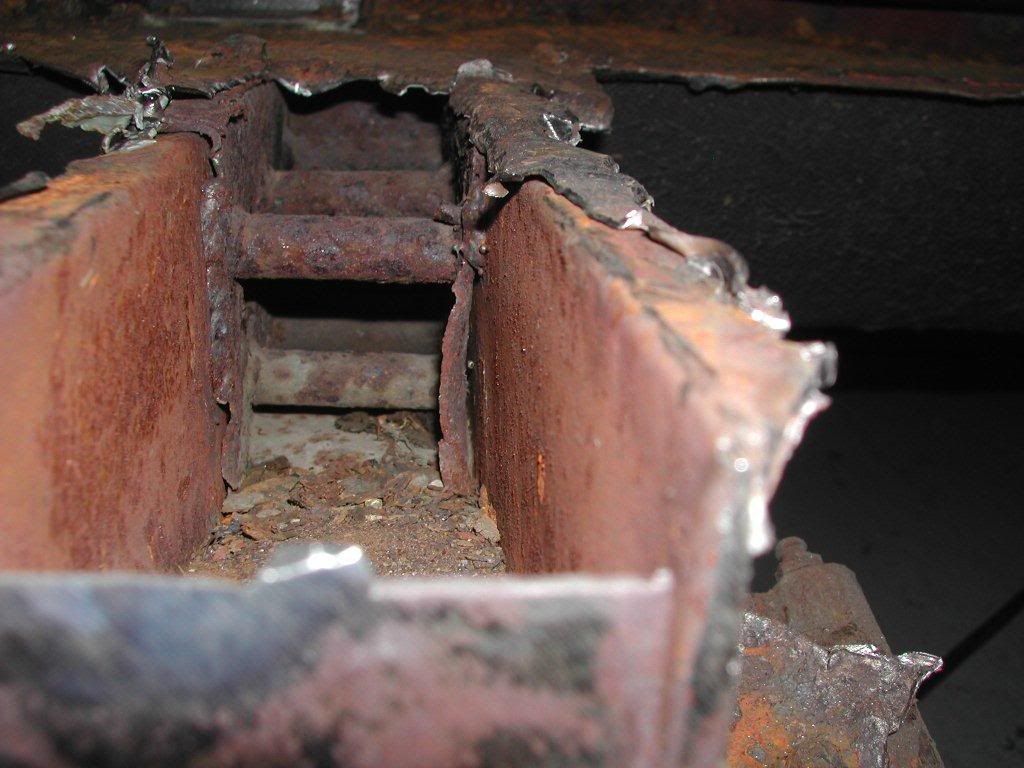
You get the idea.
But he worked through it all one section at a time, until everything was done.

The work took time but this helped me as it allowed payments to be spread over the years making it much less painful.
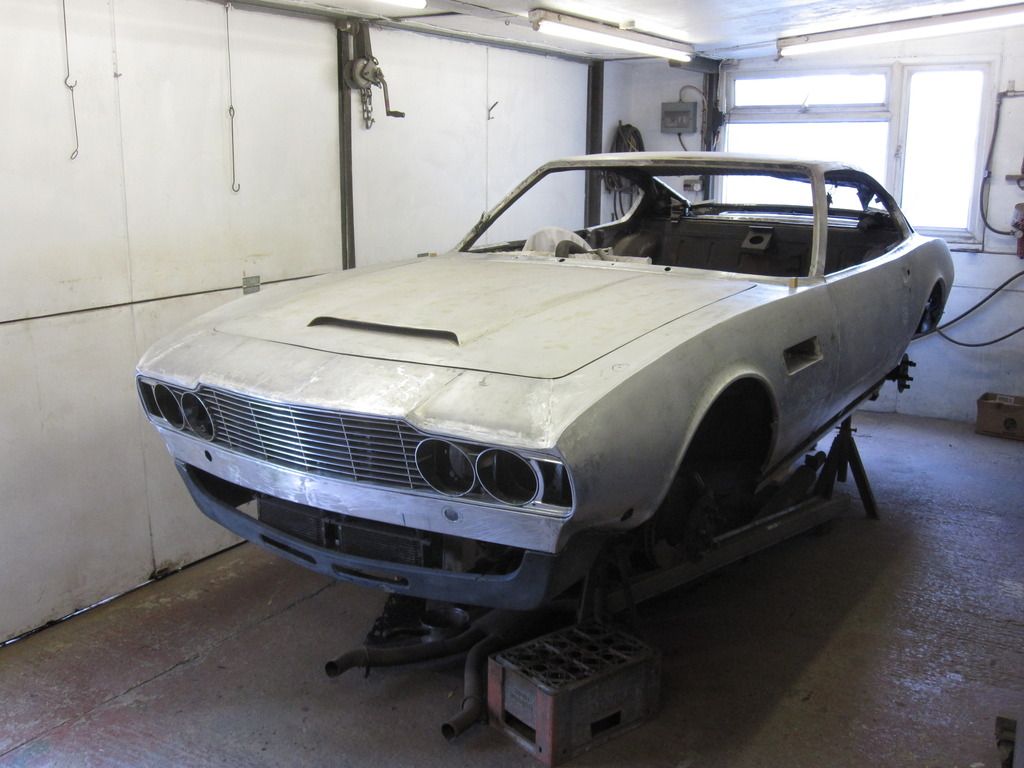
The shell finally finished and ready to start painting..
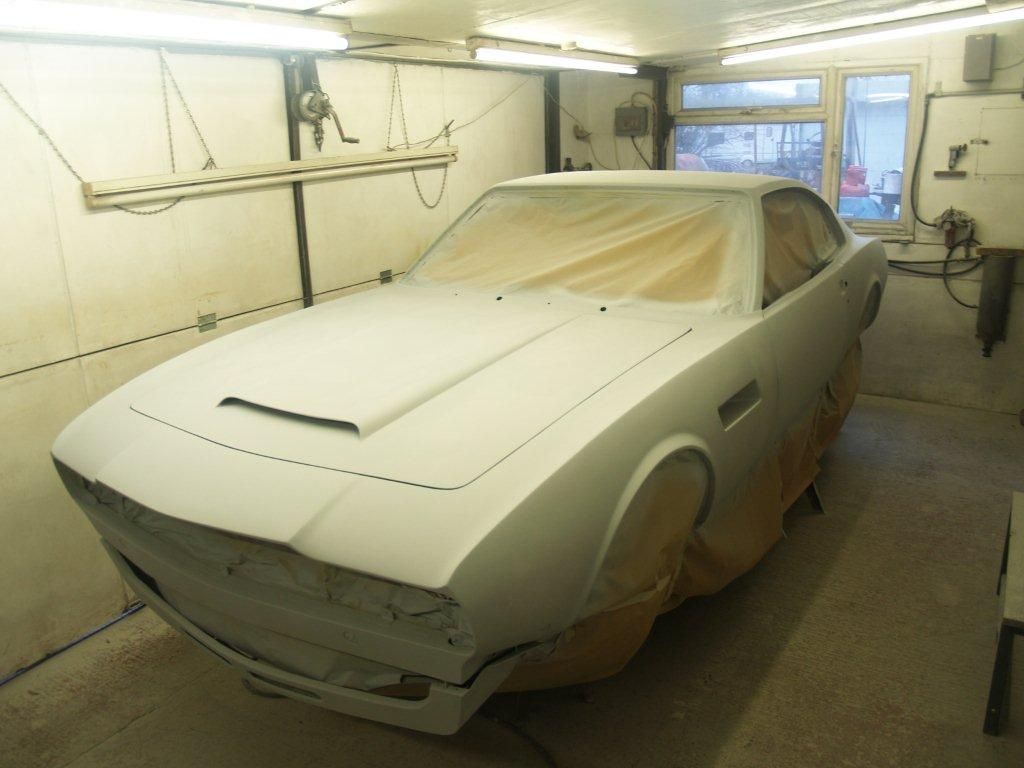
In primer
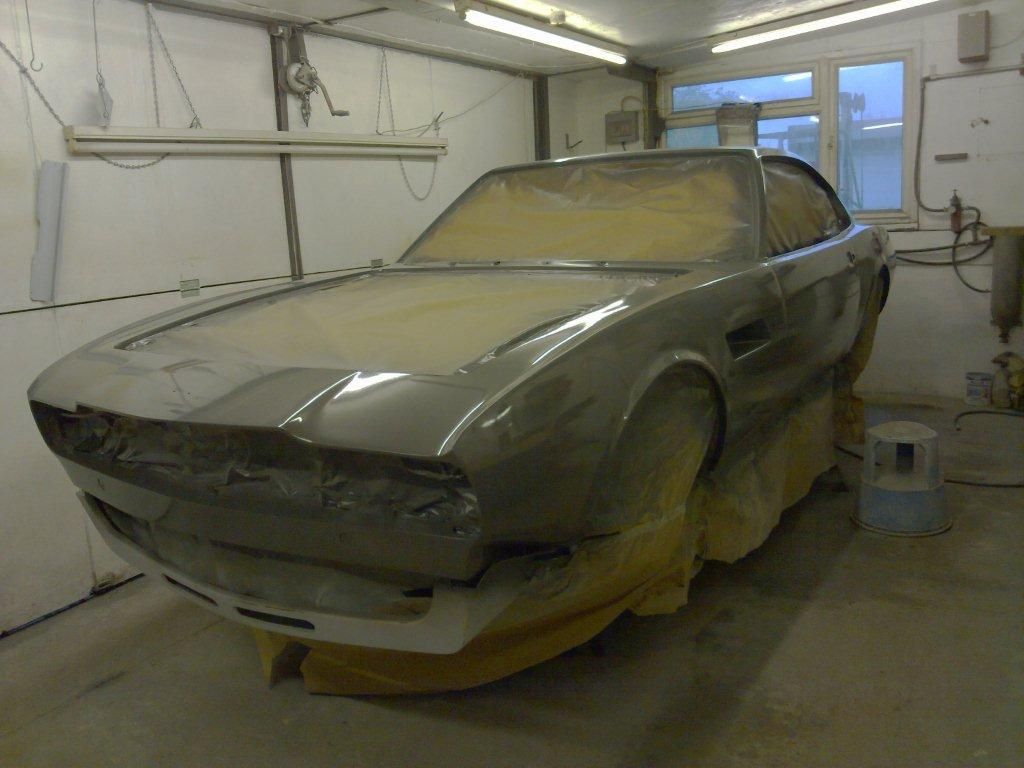
First coat
Paint finished
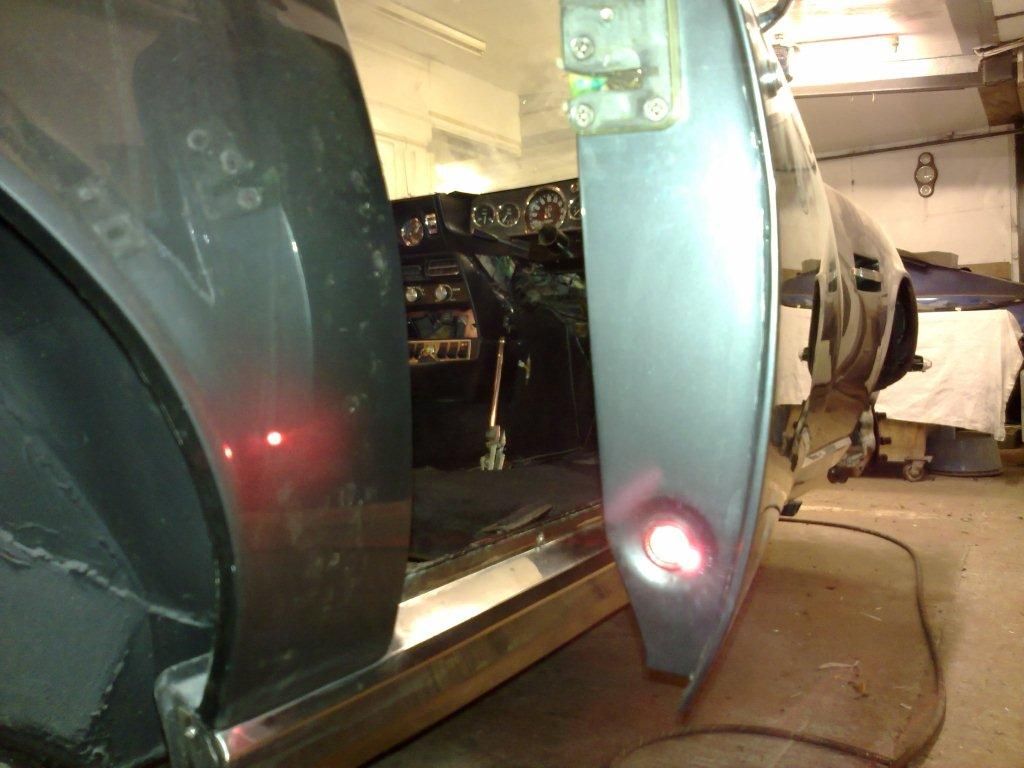
He also fixed all the niggling little bits and pieces that never worked in my ownership, such as the red lights on the doors that come on when they open.
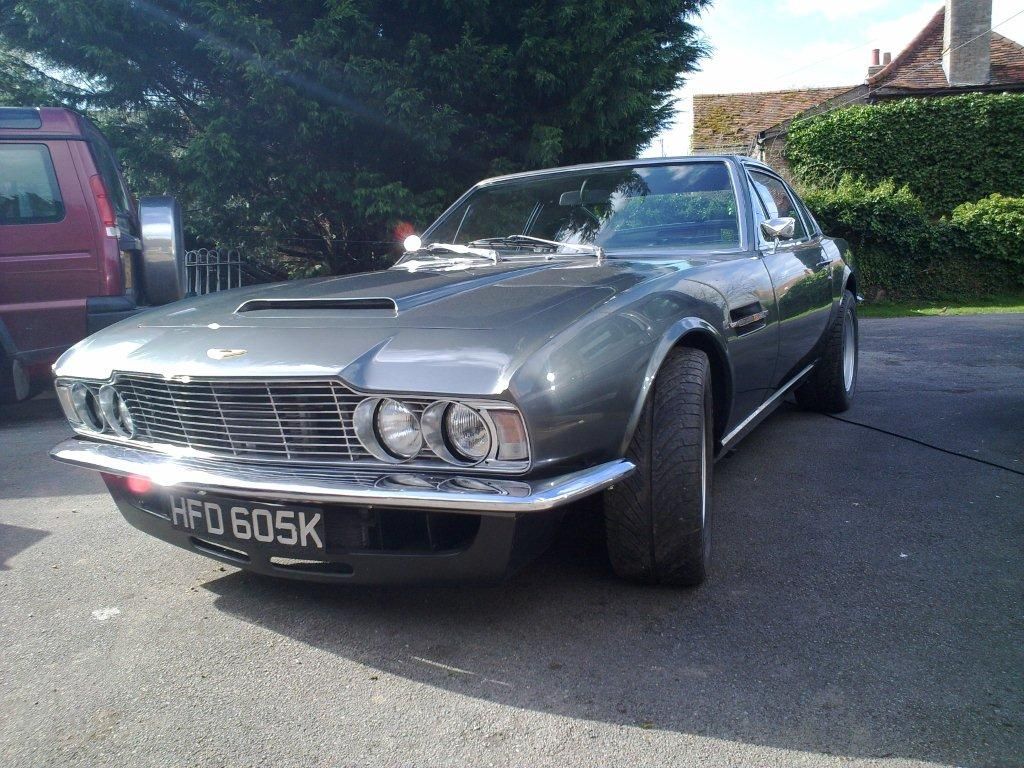
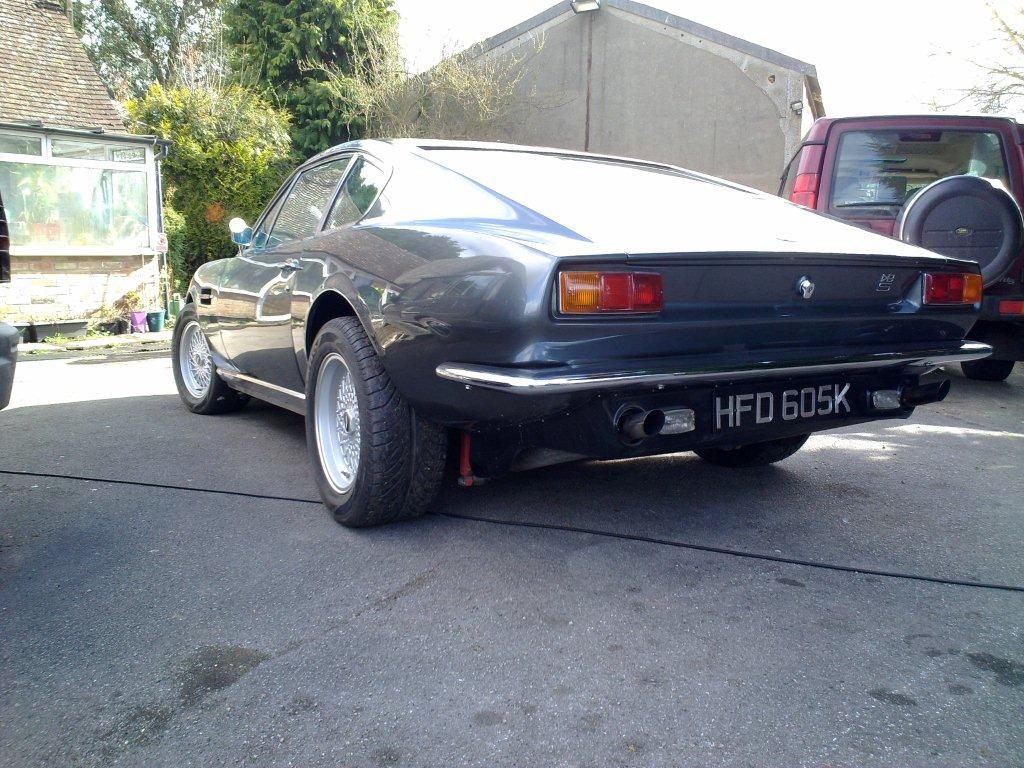
When it was finished, the car had never looked so good.
But by now (2013) prices really had started to go up to the point where I thought it was time to sell. We were about to start a building project at home and the money from the car would be a big contributor towards it. If I was going to sell it, then it would never look this good again so now was the time. I booked it in for the Bonhams auction at Newport Pagnell in May 2013 and secretly hoped it wouldn’t sell…
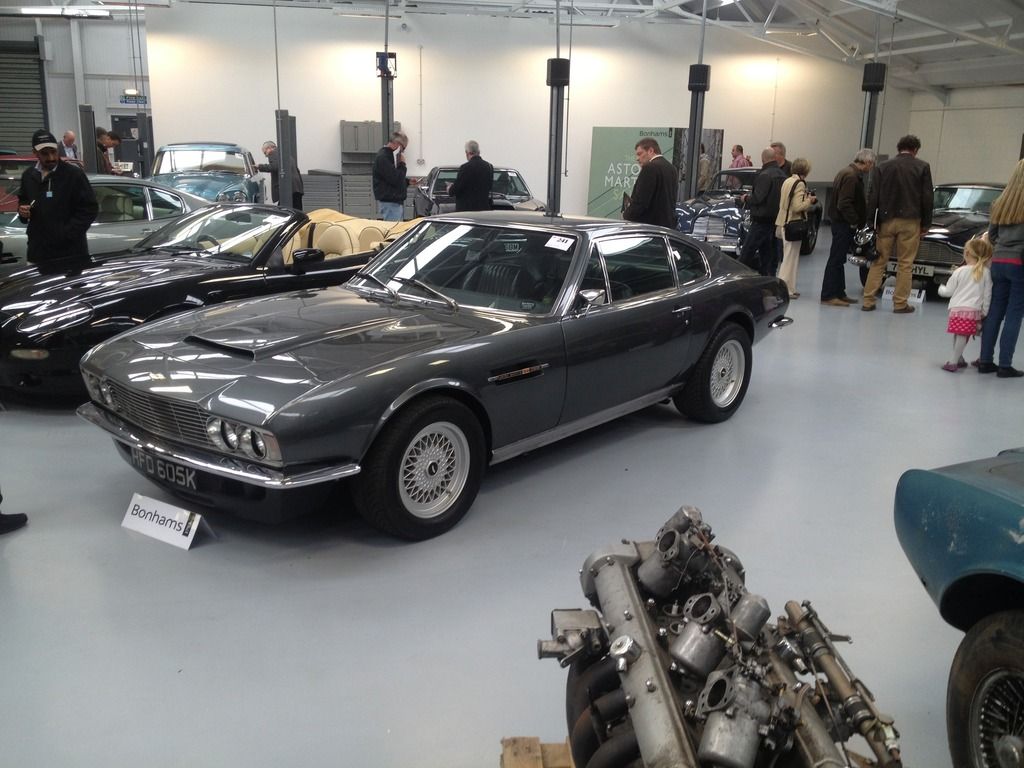
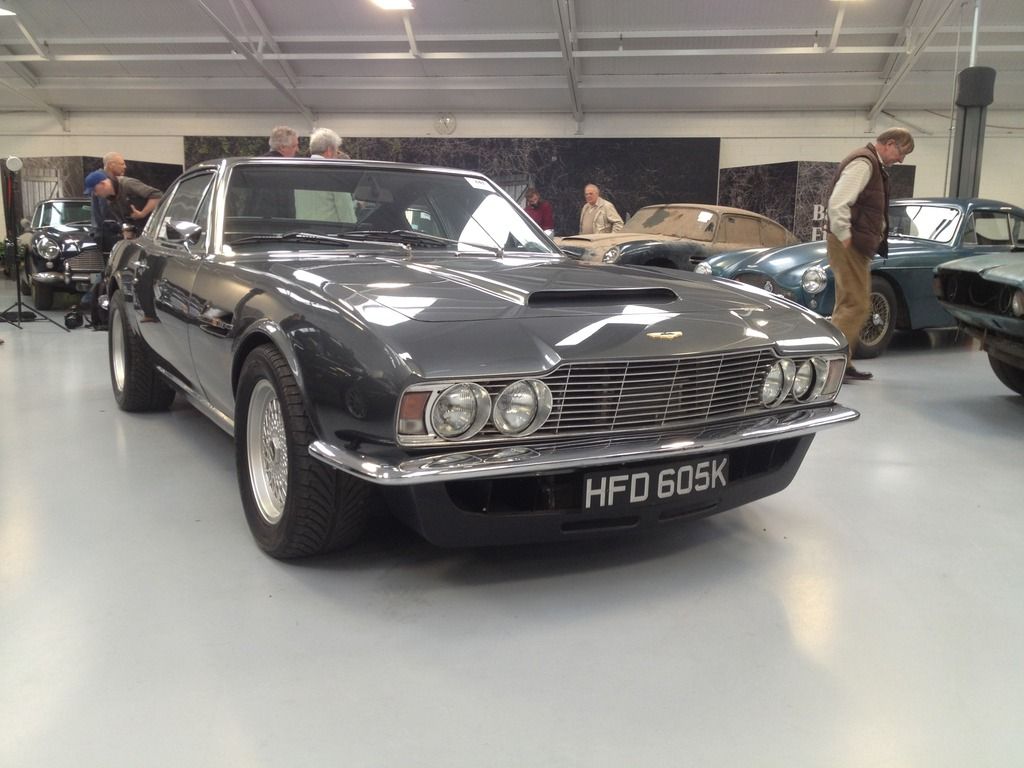
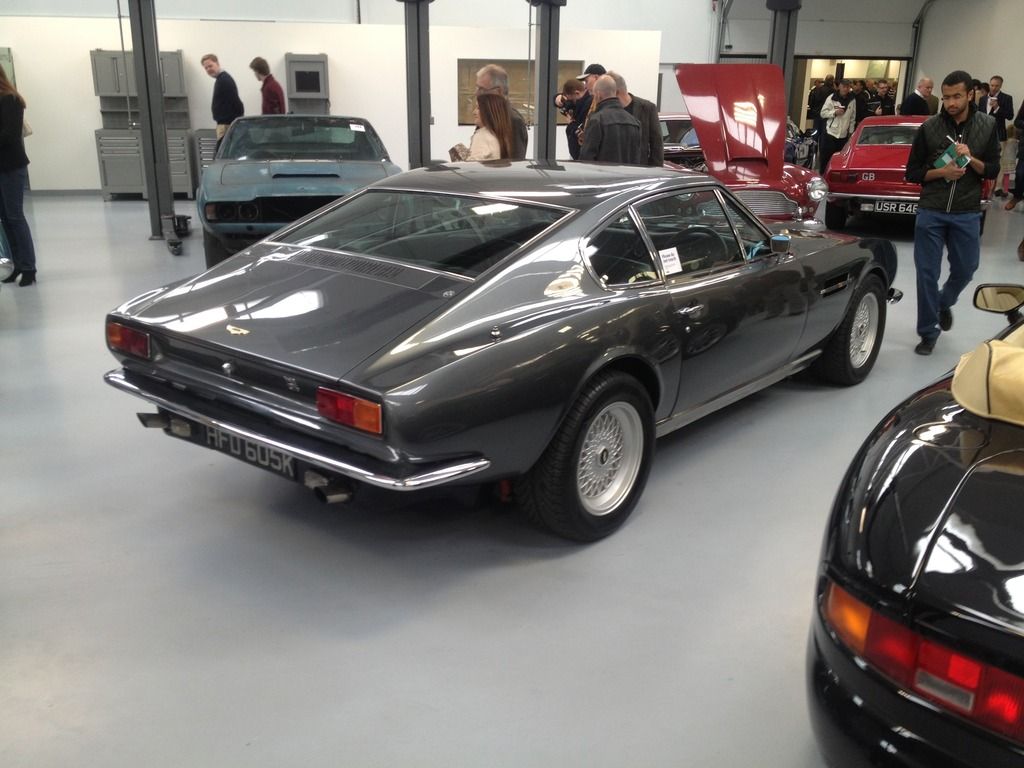
But of course it did, for £60k to a chap in Germany.
I was gutted. The car had gone straight from the restorer to Bonhams and I’d never even had a chance to drive it in its newly restored form. I’ve bought and sold plenty of cars over the years but this one really got to me. I missed not having an Aston terribly, it had been such a part of my life.
I managed to hold out until 2015. In the meantime, a Porsche 996 Turbo came and went, then a Mercedes CL55 Supercharged, followed by a Porsche 997 Turbo. All great cars but none had the sense of occasion that the Aston V8 had. I followed the market closely but it was just going up and up and up. I could not have bought my car back for £60k, good ones were now pushing £100k.
To be continued…
February 2005, that was when I bought my first Aston, a 1971 DBS V8, from a Coys auction at a classic car show in Maastricht. I saw it on their website, booked a ticket on the Eurostar and headed over for the show. I got there an hour or two before the auction started, crawled over and under it enough to form an opinion that it was worth it if the price was right.
The bidding started and the price went up quite quickly to near my limit but then thankfully slowed. I put my bid in but was outbid, so I bid again to what was my max (having carefully calculated buyers premium, VAT etc) and won!
A DBS V8 for £11k, I couldn’t think of a better car for the money. The next day, still somewhat in a state of shock, I drove it back to England.
As I crossed Northern Europe, I soon got used to the people leaning out there cars with phones taking pictures. When I stopped for petrol, the car would be surrounded. It was surreal and something I had never experienced before. The journey home passed without incident, although I was convinced I wasn’t going to make it and that some terminal problem would end the adventure. But nothing happened, the Aston just rolled along the Autoroute without a single issue. At the Eurotunnel, I was waved straight through and soon I was back home in London with my Aston Martin.
The eight years that followed were a rollercoaster! That car sucked up every spare penny I had. But I tried to use it as much as I could.
Here are some photos from an AMOC instruction day at Curborough, which show the car as bought.


It took me and the Mrs on weekends away and trips abroad.

I went through the running gear, upgrading and replacing bits as necessary. I lowered the suspension, fitted some later wheels with better tyres, and continued to drive it as much as possible.


More trips abroad, here in rural France on the way to a friends wedding.

Rolling road day

I even did a RWYB day in it at Santa Pod!


(I smoked the Camaro...)
After a few years, one improvement I did want to make was to convert it from the 3 speed Torqueflite automatic gearbox to a manual. The mechanical fuel injected engines did not have an abundance of torque low down and needed to be revved so a manual suited the engine much better. I test drove two manual cars belonging to other AMOC members which underlined how much better the manual was.
I found the correct dog leg ZF manual box for £5k and was all set to get it installed when it became apparent that the car needed a full engine rebuild. So the gearbox was sold and the engine was rebuilt, which stopped the oil pressure gauge flicking all over the place!


It sounds so simple when you type it like that, but I had never spent such a significant sum on a car before. The rebuild cost of the engine was far in excess of the purchase price..
But even after the newly rebuilt engine was back in the car, I was always chasing problems. I just didn’t have the cash to really sort the car out, all the money I spent was just keeping it on the road rather than improving it. Despite the thousands I spent every year, it was still a condition 2/3 car. Everything went wrong with it: brakes, suspension, steering. I always thought that once something was repaired you could forget about it but not with this car. We replaced a number of components two or three times. The Mechanical Fuel Injection pump kept leaking, despite being rebuilt, so that had to come off and be sent back to the company that reconditioned it the first time. The problems just went on and on...
Then it failed the MOT due to corrosion….
Despite all of the above, I never thought of selling it (okay I did but only briefly!). What else would give me so much pleasure (and pain!) for the same price? This was before prices had got silly. So I found a chap who knew Astons (a fellow DBS V8 owner) but who worked on his own in a single unit to do the work, thus avoiding the eye watering prices some Aston specialists were quoting.
He stripped it all back and uncovered all manner of horrors. Accident damage that had been badly repaired and corrosion everywhere. Boot floor, inner wings, sills, A post, B post, floor plans, door frames etc. The corrosion was the worst he’d ever seen and this was not helped by the fact that my Aston had been very badly restored at some point in the past for a previous owner in Holland with all manner of bodges by someone who clearly knew nothing about Astons. I have hundreds of pictures of the restoration but these should give you an idea of the extent of the rot.


You get the idea.
But he worked through it all one section at a time, until everything was done.


The work took time but this helped me as it allowed payments to be spread over the years making it much less painful.
The shell finally finished and ready to start painting..

In primer

First coat

Paint finished

He also fixed all the niggling little bits and pieces that never worked in my ownership, such as the red lights on the doors that come on when they open.

When it was finished, the car had never looked so good.


But by now (2013) prices really had started to go up to the point where I thought it was time to sell. We were about to start a building project at home and the money from the car would be a big contributor towards it. If I was going to sell it, then it would never look this good again so now was the time. I booked it in for the Bonhams auction at Newport Pagnell in May 2013 and secretly hoped it wouldn’t sell…


But of course it did, for £60k to a chap in Germany.
I was gutted. The car had gone straight from the restorer to Bonhams and I’d never even had a chance to drive it in its newly restored form. I’ve bought and sold plenty of cars over the years but this one really got to me. I missed not having an Aston terribly, it had been such a part of my life.
I managed to hold out until 2015. In the meantime, a Porsche 996 Turbo came and went, then a Mercedes CL55 Supercharged, followed by a Porsche 997 Turbo. All great cars but none had the sense of occasion that the Aston V8 had. I followed the market closely but it was just going up and up and up. I could not have bought my car back for £60k, good ones were now pushing £100k.
To be continued…
In April 2015, while browsing all the usual internet sites, I saw a project for sale, a 1972 Aston Martin V8. I would have preferred another DBS V8 but there was nothing in my price range and this looked interesting.
The Series 2 (as they are sometime unofficially referred to) is essentially the same car as the DBS V8, the only external difference being the single headlight front instead of the twin headlight style of the earlier car. The engine is still the mechanically fuel injected V8, whose power wasn’t matched by the Weber Carb’d cars until the Vantage was introduced in 1978.
Internally there were very minor changes, the main one being improved controls for the air-conditioning system that was now standard equipment (it was only an option on the DBS V8).
288 of these cars were built before the Series 3 was introduced in 1973. Series 3 cars have a bigger bonnet bulge to clear the air box for the carbs whereas the DBS V8 and Series 2 feature a lower bonnet bulge.
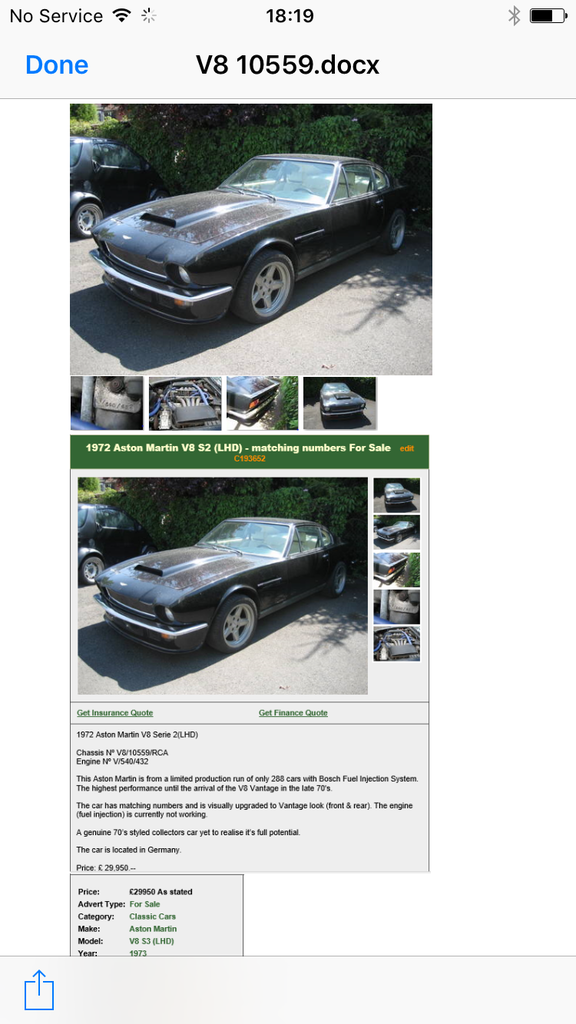
Here are a couple of pictures showing the car from the ad.
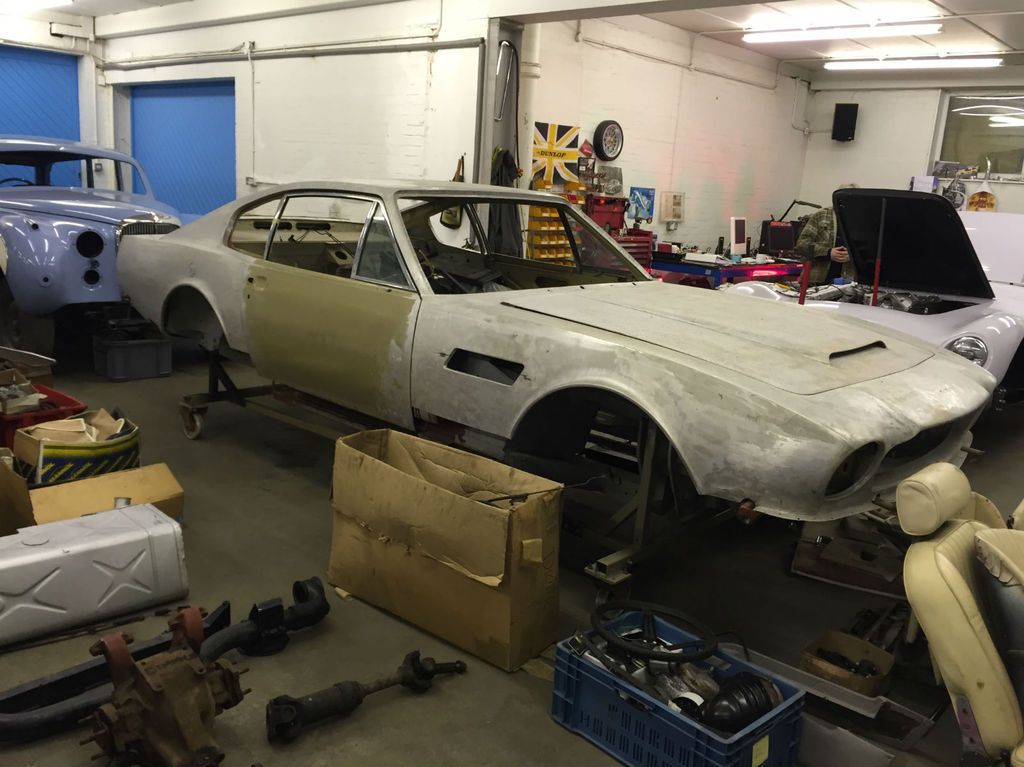

Not the usual rusty barn find project but a stripped down shell (parts in boxes) complete with a fully rebuilt engine. Initially the dealer was listing the engine as one item and separately the body shell (with the parts) as another item.
I went to view the car with the bodyshop man who restored my DBS V8. We checked over the shell, which needed some work, but was a good base to start. Crucially we could see everything so there should be no nasty surprises to uncover.
The car itself was abit of a strange one. I was able to determine with help from Works Service that it was an original UK RHD car but at some point in its past, it had been exported to Europe, converted to LHD and ‘customised’. This boiled down to somebody modifying the rear bodywork to make it look like a later post 1978 Osca India V8 with a flip tail. I guess this is no different to someone forward dating a 911 which was very popular in the 1980’s.
The car had passed through several owners and countries before ending up in Germany where the restoration had started and the strip down had begun. Prior to the strip down, the car had been painted black with a tan interior and had later wheels fitted. Here’s a pic of an old ad (from 2010) for the car before it was stripped down.
Note it’s wearing a Series 3 bonnet in the photo but now has the correct Series 2 bonnet.
The bodyshop that started work on the car was in Germany but it had no experience of working on Astons. Fortunately they had not got too far before work stopped.
The vendor told me that engine had been sent to Goldsmith & Young in the UK for a rebuild and I was able to speak to John Goldsmith who confirmed that he knew the car and had indeed rebuilt the engine, including sending the Bosch mechanical fuel injection pump to Germany for overhauling.
He also told me that he had been brought in by a previous owner to repatriate the car, along with all the parts and the engine. But other than bring it back and rebuild the engine, he had done nothing further with it. This owner was a German man who, on looking back through some of my old emails, had actually emailed me in the past to see if I wanted to sell my DBS V8. According to John Goldsmith, he is a part time car dealer and when the quotes to rebuild the car came in, it was too much for him and he sold it on.
Works Service were also able to tell me that the car was originally Cornish Gold with a red leather interior and that the engine the dealer was selling was the matching number engine for the chassis, which was important to me. The interior would therefore appear to be the original that has been painted cream. If you look closely in the pictures above you can see the red is still visible in places.
So a deal was agreed and I purchased the engine, the bodyshell and all the parts for £34k. This was the same price that the previous German owner had paid Goldsmith & Young just to rebuild the engine.
Although it’s difficult to describe a project at this price as a good deal, it was the only way I could get back into Aston V8 ownership. From the restoration of my DBS V8, I had a fair idea what the bodywork costs would be so I knew that I would at worst come out at market value for the car which I estimated to be around £70-80k when it was finished. I don’t intend to sell it but it helps the man maths if the numbers add up! Not having to rebuild the engine was a significant factor in the purchase too.
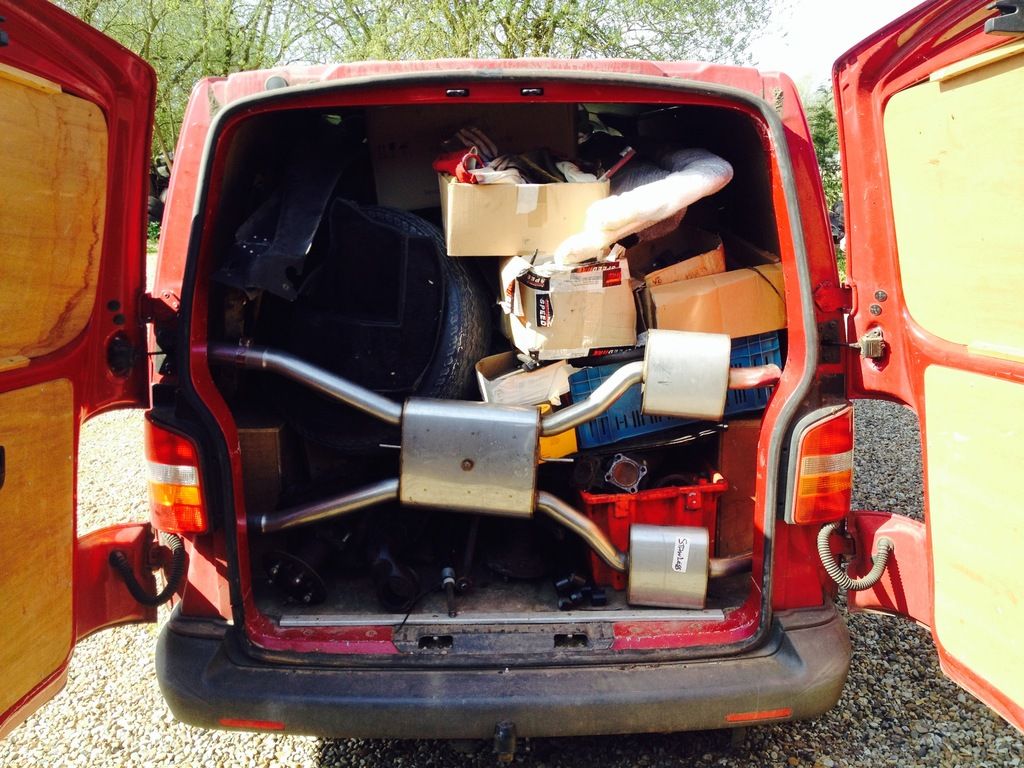
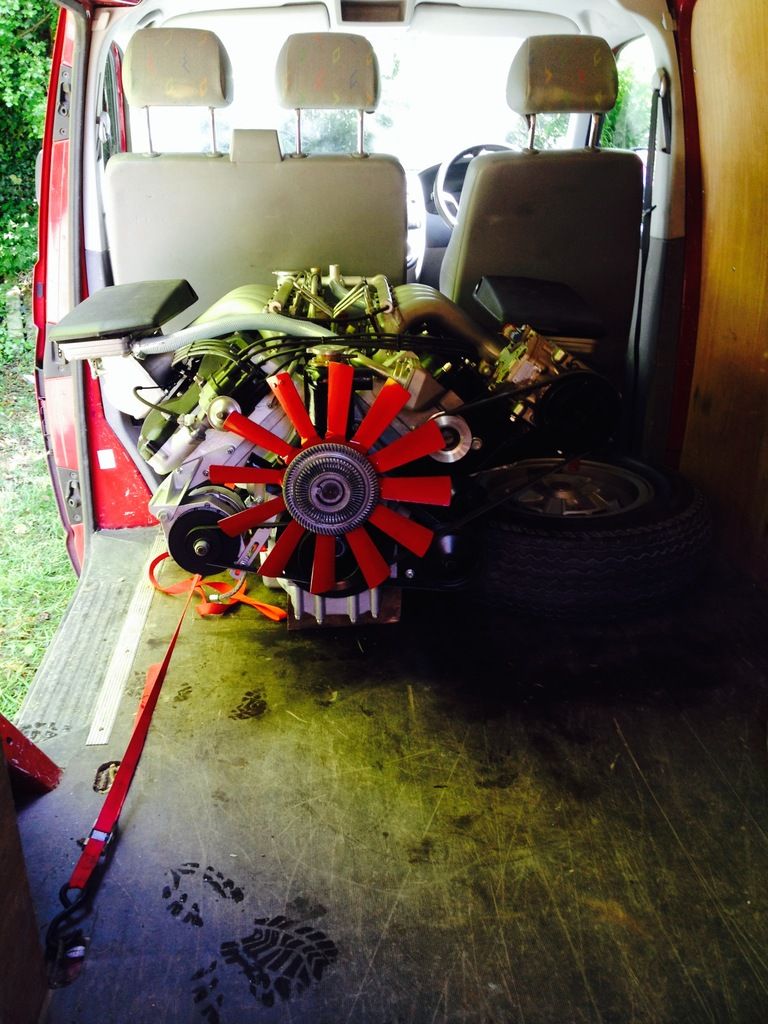
We collected the car in April 2015. The bodyshell and glass went to the bodyshop and I loaded everything else, including the engine, into my van and brought it all home.


To be continued…
The Series 2 (as they are sometime unofficially referred to) is essentially the same car as the DBS V8, the only external difference being the single headlight front instead of the twin headlight style of the earlier car. The engine is still the mechanically fuel injected V8, whose power wasn’t matched by the Weber Carb’d cars until the Vantage was introduced in 1978.
Internally there were very minor changes, the main one being improved controls for the air-conditioning system that was now standard equipment (it was only an option on the DBS V8).
288 of these cars were built before the Series 3 was introduced in 1973. Series 3 cars have a bigger bonnet bulge to clear the air box for the carbs whereas the DBS V8 and Series 2 feature a lower bonnet bulge.
Here are a couple of pictures showing the car from the ad.


Not the usual rusty barn find project but a stripped down shell (parts in boxes) complete with a fully rebuilt engine. Initially the dealer was listing the engine as one item and separately the body shell (with the parts) as another item.
I went to view the car with the bodyshop man who restored my DBS V8. We checked over the shell, which needed some work, but was a good base to start. Crucially we could see everything so there should be no nasty surprises to uncover.
The car itself was abit of a strange one. I was able to determine with help from Works Service that it was an original UK RHD car but at some point in its past, it had been exported to Europe, converted to LHD and ‘customised’. This boiled down to somebody modifying the rear bodywork to make it look like a later post 1978 Osca India V8 with a flip tail. I guess this is no different to someone forward dating a 911 which was very popular in the 1980’s.


The car had passed through several owners and countries before ending up in Germany where the restoration had started and the strip down had begun. Prior to the strip down, the car had been painted black with a tan interior and had later wheels fitted. Here’s a pic of an old ad (from 2010) for the car before it was stripped down.

Note it’s wearing a Series 3 bonnet in the photo but now has the correct Series 2 bonnet.
The bodyshop that started work on the car was in Germany but it had no experience of working on Astons. Fortunately they had not got too far before work stopped.

The vendor told me that engine had been sent to Goldsmith & Young in the UK for a rebuild and I was able to speak to John Goldsmith who confirmed that he knew the car and had indeed rebuilt the engine, including sending the Bosch mechanical fuel injection pump to Germany for overhauling.
He also told me that he had been brought in by a previous owner to repatriate the car, along with all the parts and the engine. But other than bring it back and rebuild the engine, he had done nothing further with it. This owner was a German man who, on looking back through some of my old emails, had actually emailed me in the past to see if I wanted to sell my DBS V8. According to John Goldsmith, he is a part time car dealer and when the quotes to rebuild the car came in, it was too much for him and he sold it on.
Works Service were also able to tell me that the car was originally Cornish Gold with a red leather interior and that the engine the dealer was selling was the matching number engine for the chassis, which was important to me. The interior would therefore appear to be the original that has been painted cream. If you look closely in the pictures above you can see the red is still visible in places.
So a deal was agreed and I purchased the engine, the bodyshell and all the parts for £34k. This was the same price that the previous German owner had paid Goldsmith & Young just to rebuild the engine.
Although it’s difficult to describe a project at this price as a good deal, it was the only way I could get back into Aston V8 ownership. From the restoration of my DBS V8, I had a fair idea what the bodywork costs would be so I knew that I would at worst come out at market value for the car which I estimated to be around £70-80k when it was finished. I don’t intend to sell it but it helps the man maths if the numbers add up! Not having to rebuild the engine was a significant factor in the purchase too.
We collected the car in April 2015. The bodyshell and glass went to the bodyshop and I loaded everything else, including the engine, into my van and brought it all home.


To be continued…
I'm really pleased everyone is enjoying the thread, it helps ease the pain!
It was hard selling the DBS V8 without experiencing the new and improved version but at the time it seemed the right thing to do. I had moved from London to rural Devon (near the sea) and the car would not have looked that nice for long down here. It was a wrench selling but needs must. If prices had stayed at the level I paid for it then I would, in all likelihood, have kept hold of it. I wish in many ways prices had stayed low and we had not experienced the boom. As soon as something become valuable, it does take a little of the joy out of it.
There are lots of updates to come, but please bear with me as I have to upload all the photos and then link to here.
williamp said:
Fantastic. Here was mine:
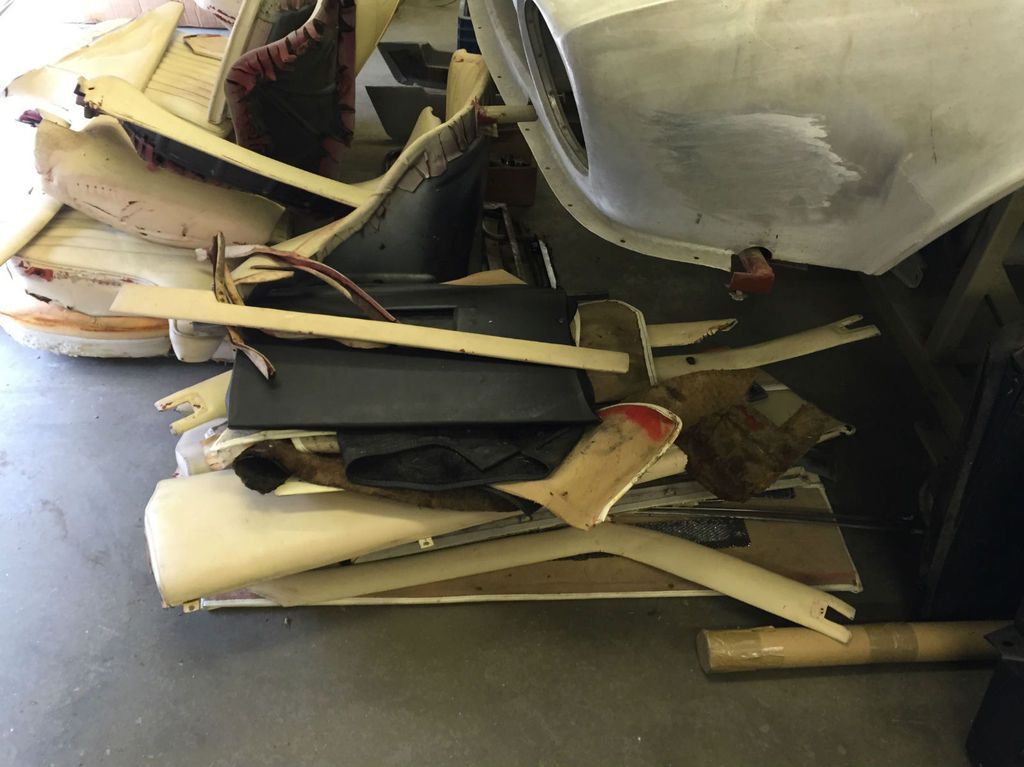
Hi Will, we met very briefly at one of the DBS V8 days at Gaydon when yours was red. This must have been 2005 or 2006?So the first thing to do when I got the van home was to unload everything into the Carcoon Veloce I had bought. My barn/garage isn’t the driest and so this would be a much better environment to store things. Once everything was in, the next task was to go through all the boxes and come up with a list of what was there and what was missing.
I knew, when taking on a project like this, that there was bound to be a lot of parts to acquire but I was pleasantly surprised that it was not as bad as I feared. There were inevitably parts missing but by and large it was pretty complete.
The main problem areas related to parts specific to the LHD conversion and that nothing from the original RHD spec of the car had been retained.
The LHD steering rack was missing as was a lot of the parts for the dash board. While it is my intention to make the car RHD those LHD parts would have been useful to sell. It also meant any thoughts of keeping it LHD for the sake of ease were dispelled – there was also abit of man maths again as LHD Astons seem to be worth more than RHD due to rarity.
The LHD steering rack is worth thousands, clearly someone along the way realised the same and sold it! The pedal box and pedals were also conspicuous by their absence.
Inside, in an attempt to maintain the Oscar India look of the car, a previous owner had tried to make the dash look later by using after market gauges and dash panel. Again, they had not retained the original parts… The LHD dash top was missing also.
None of these were an issue now, but it was best to be prepared so I could start searching for all the missing parts while the bodywork was being worked on.
Of more immediate concern was how to get the engine out of the van! It had gone in at the vendor’s workshop with a big engine hoist through the side door and then I had strapped it down.
But I didn’t have an engine hoist at home..... I looked into hiring one but they all seemed fairly light weight and I was not convinced they were up to the job of lifting such a heavy engine.
What I did have though was a neighbour who ran a plant hire company and had scalpel like precision with a mini digger.

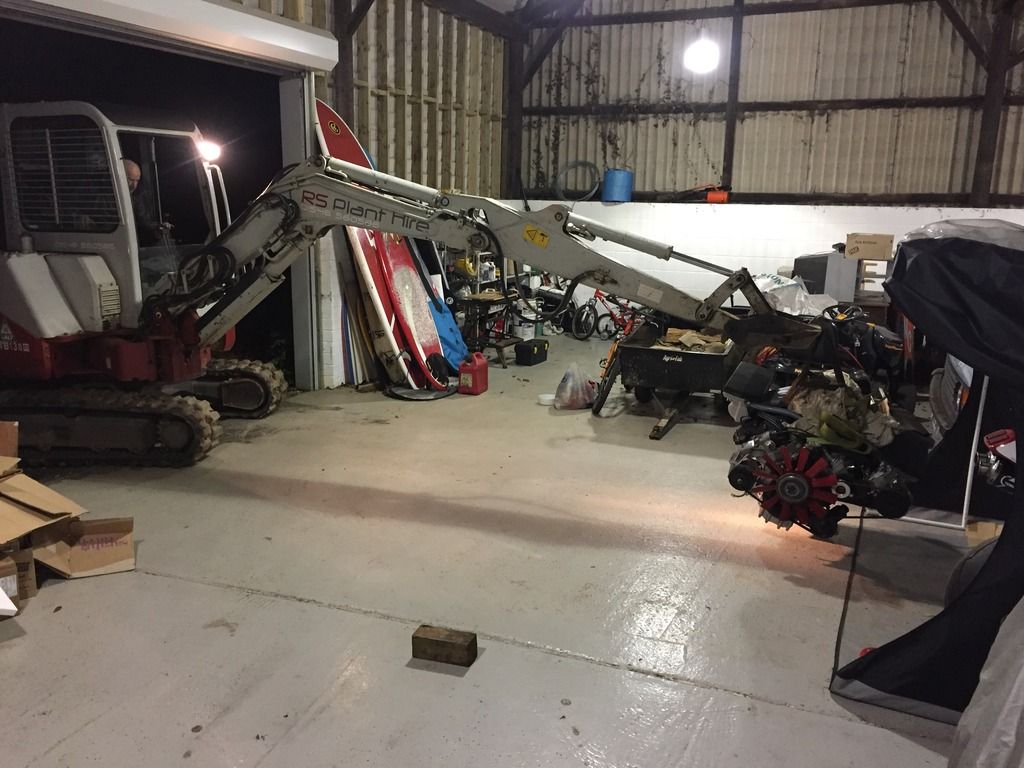
Job done!
I will try to get the next update done tonight. Sorry for the delay, I was distracted by that fantastic thread where the chap is putting a M5 V10 into a Capri!
The threads so far take us upto mid-way through 2015. The updates from now on will concern the actual work we have done to the car, and various parts I have acquired from a number of sources.
The threads so far take us upto mid-way through 2015. The updates from now on will concern the actual work we have done to the car, and various parts I have acquired from a number of sources.
With the shell back at the body shop, the first decision that had to be made with the car related to the incorrect flip tail rear that had been created at some point in its past to make it look like a later car.
Now my favourite all time Aston is a late eighties V8 Vantage X-pack so I do love the flip tail look. But I cannot afford one of these and trying to make an early car look like a late one does not feel right.
Here, from Tim Cottingham’s excellent website (www.astonmartins.com) is a photo clearly showing the early and later style rears for the V8.
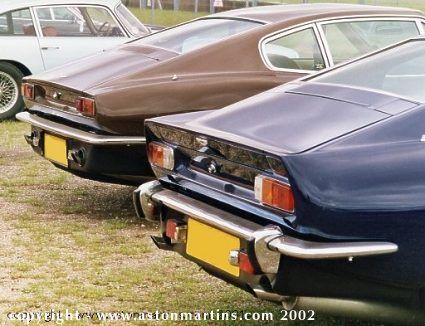
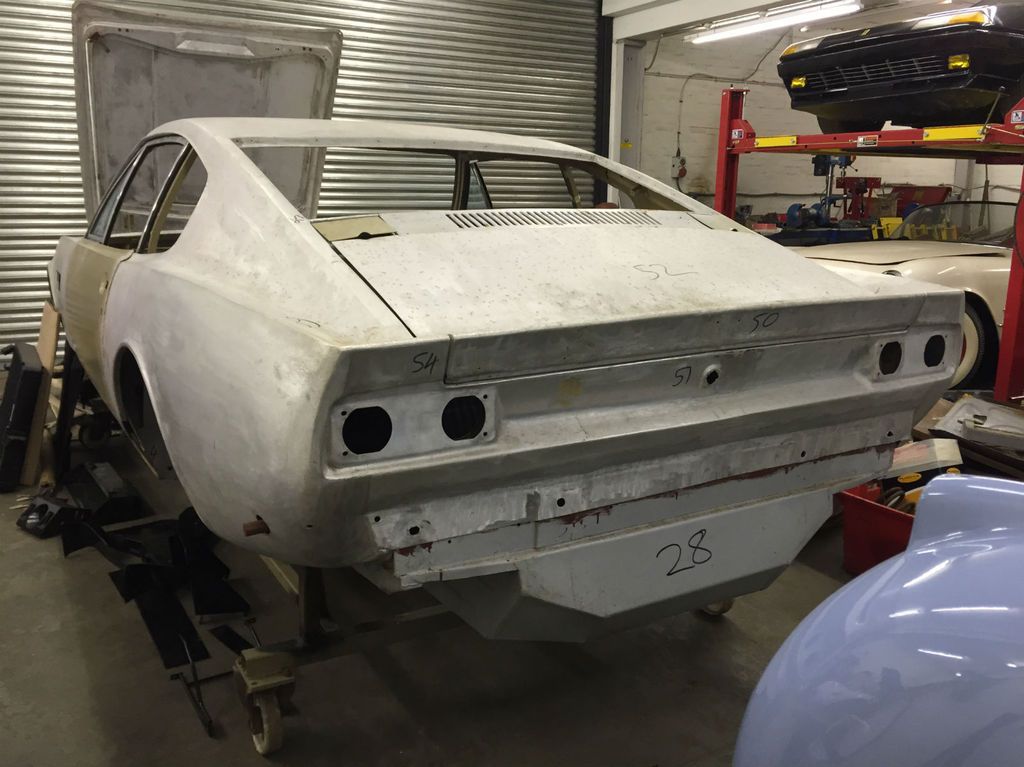
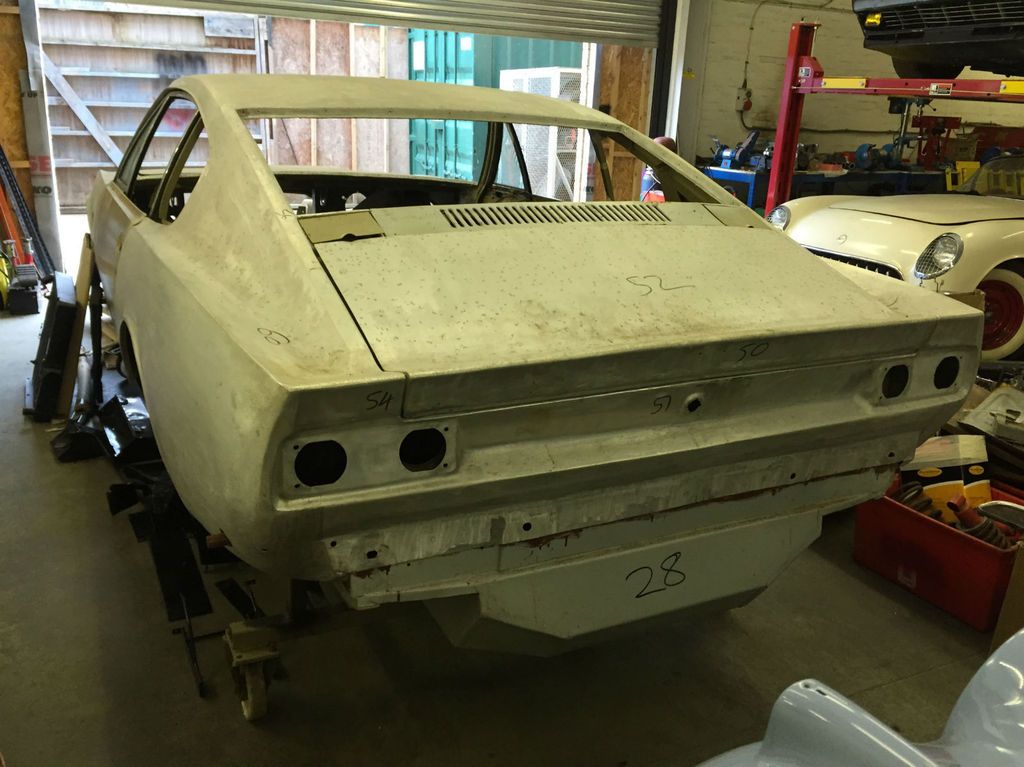
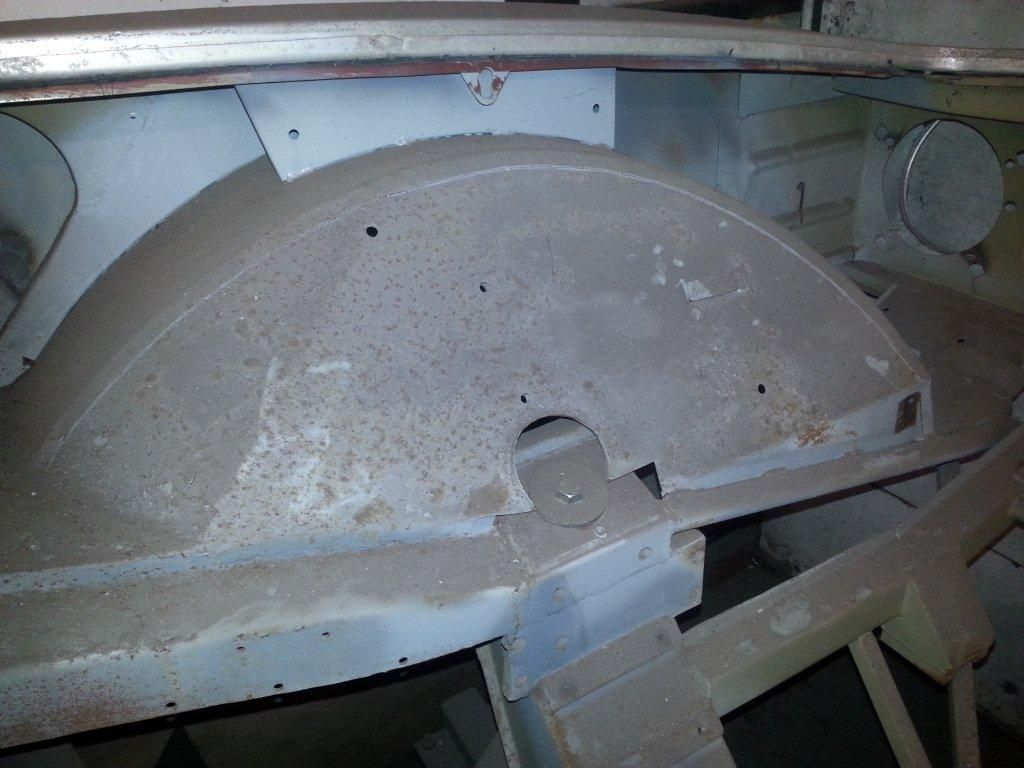
With the value of the early cars climbing, I decided to remove the fliptail and go back to what should be original for the car.
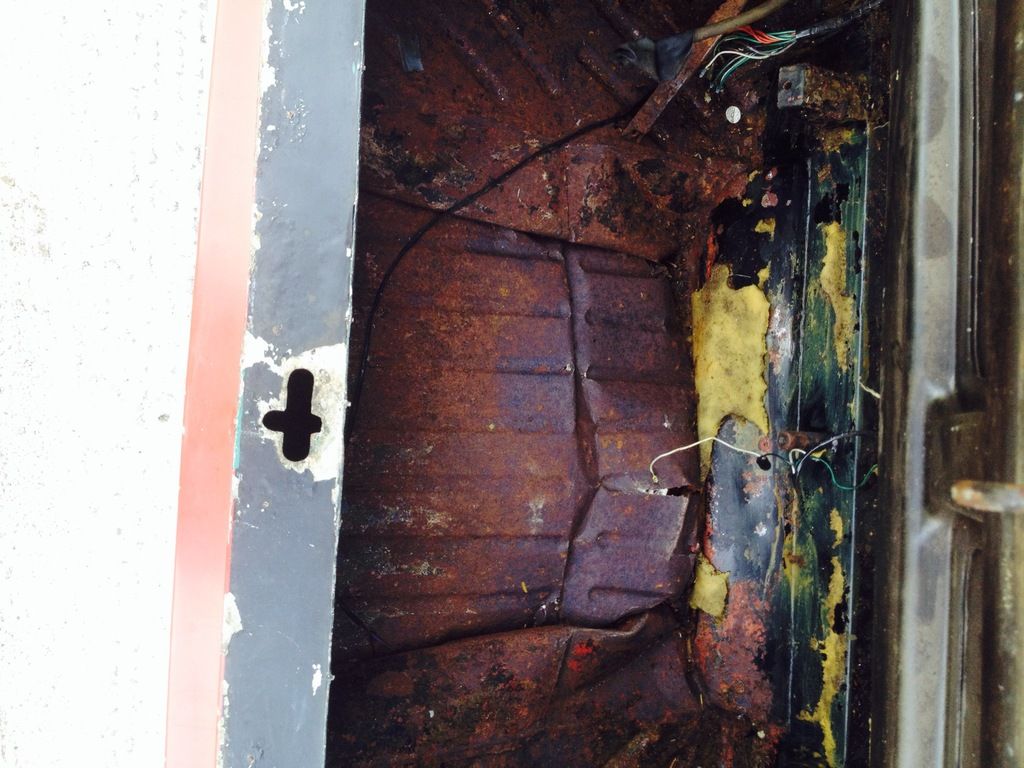
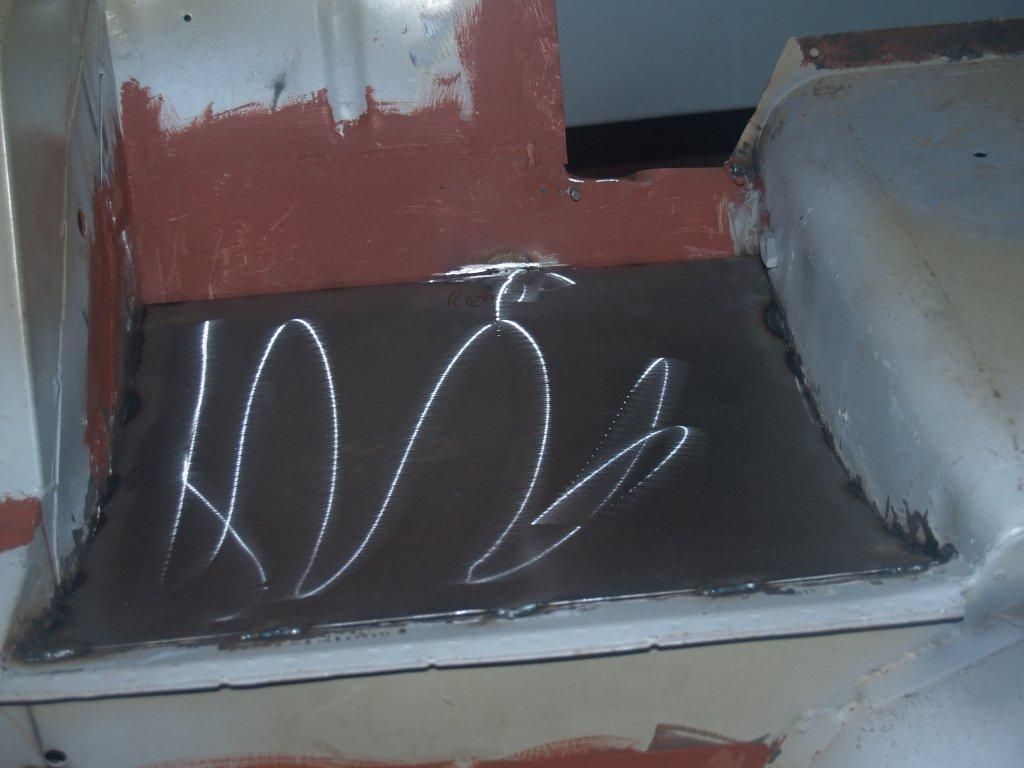
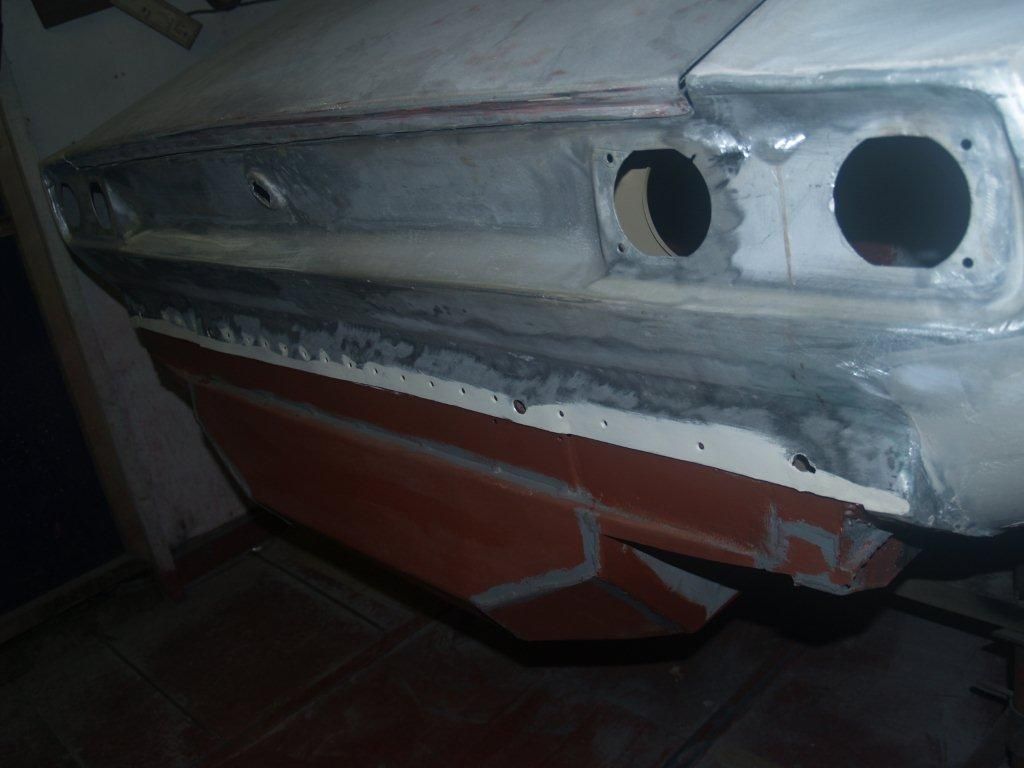
Besides, keeping it and making it a correct fliptail would have entailed further work as the later cars with the fliptail had the reversing lights in the main cluster while on the earlier cars they were located lower down in the rear valence (see photo above). You can see from the photo below of my shell that whoever did the work had kept the holes correct for the early car and not allowed for the extra holes needed for the reversing lights.
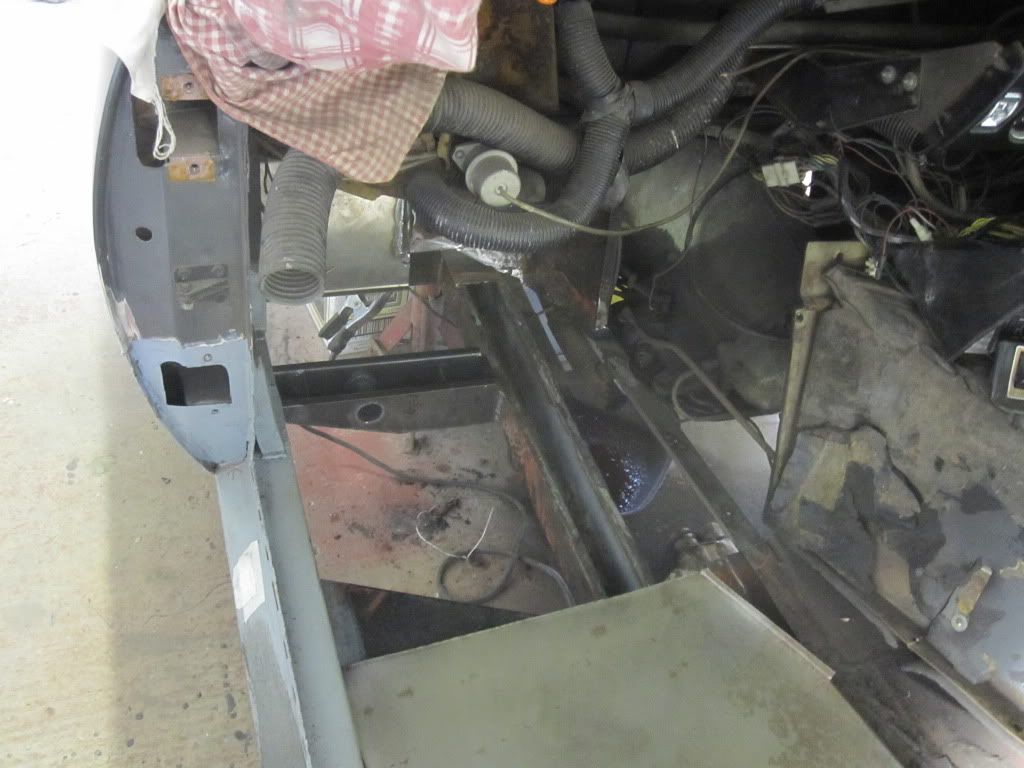
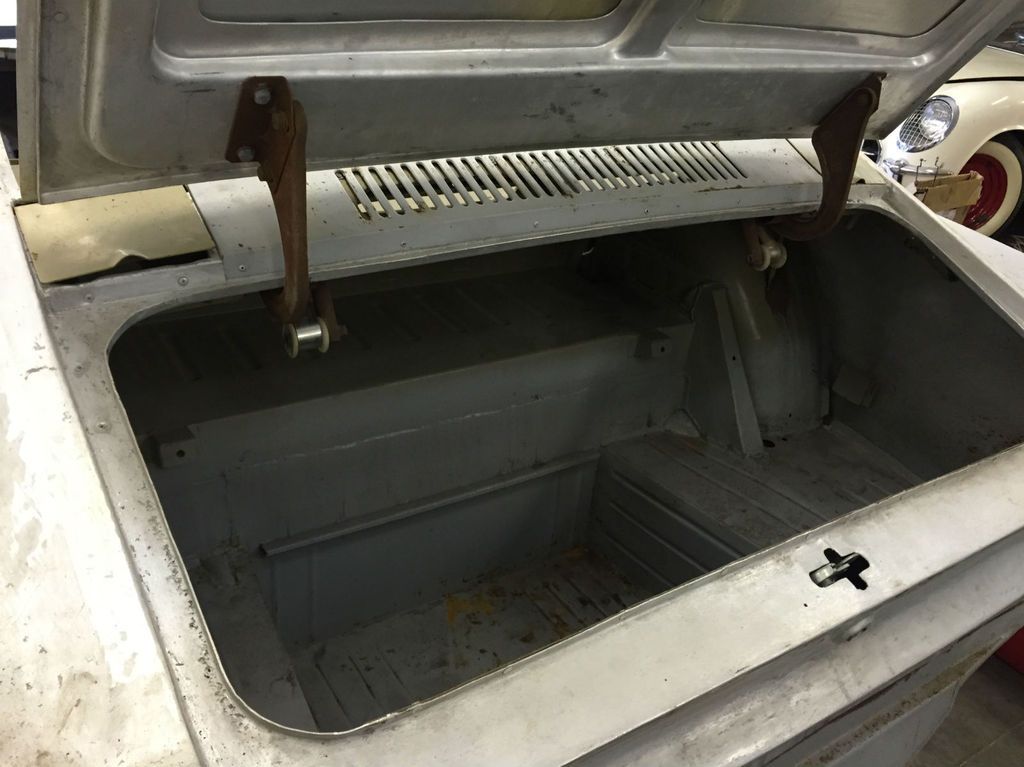
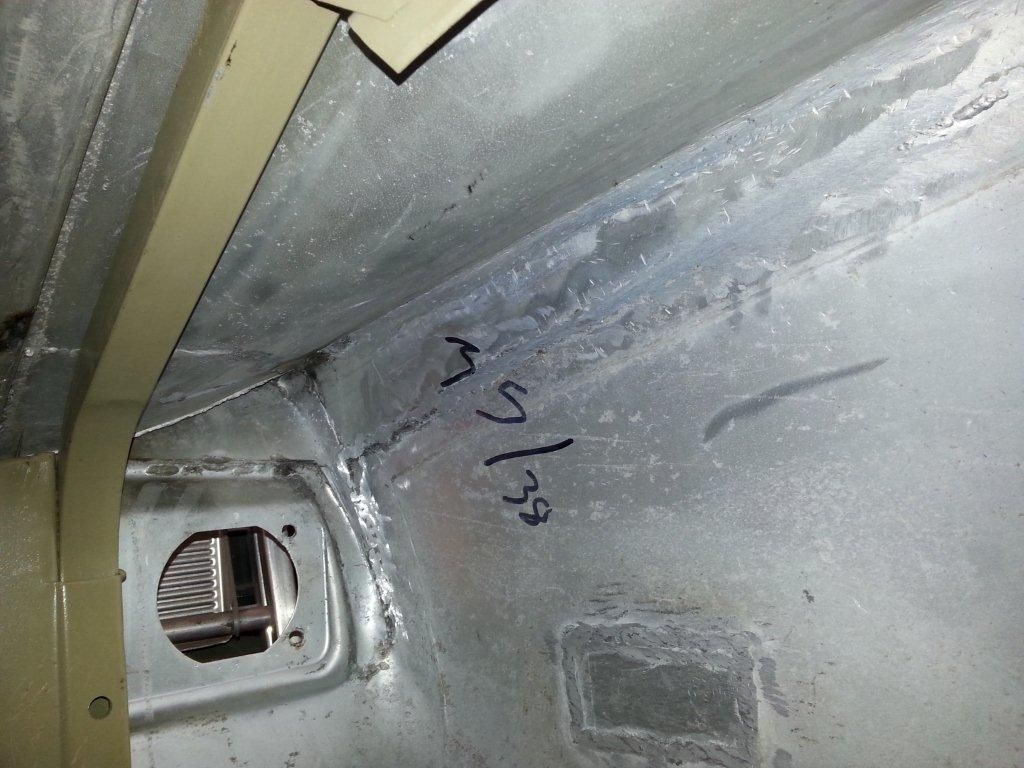
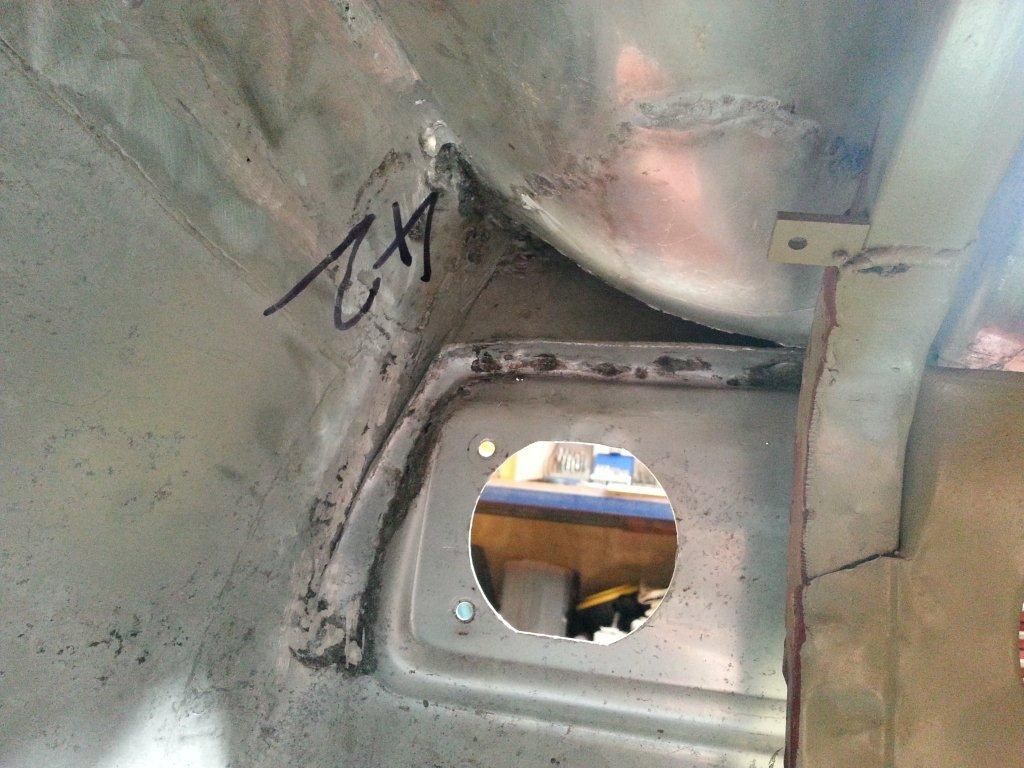
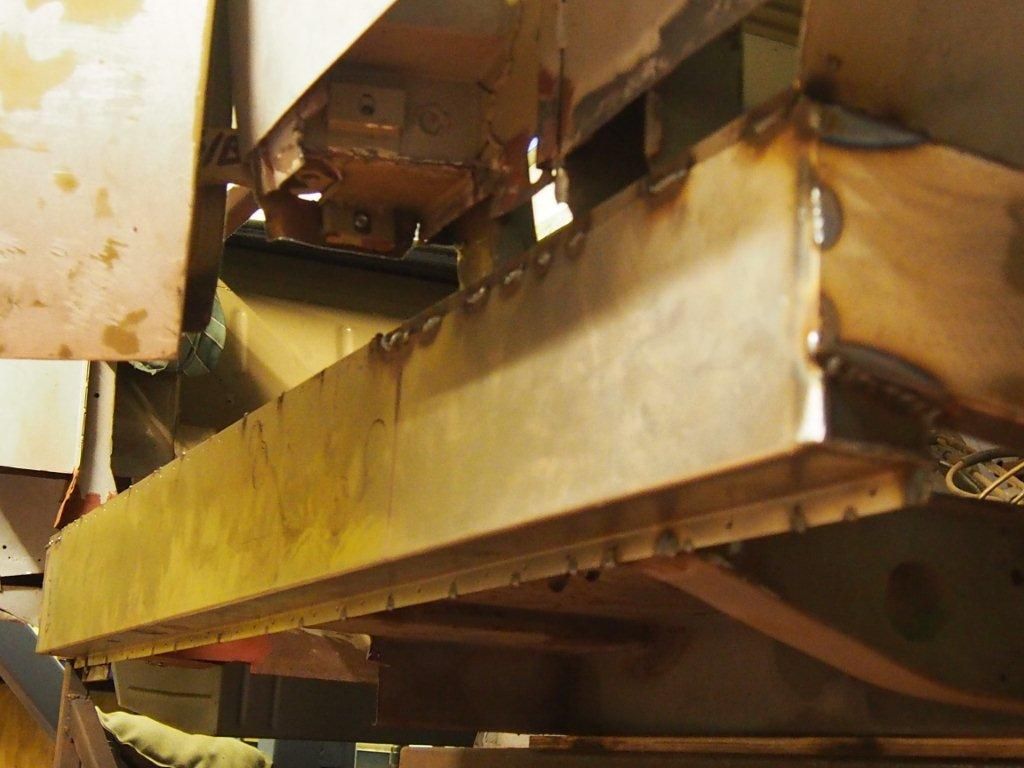
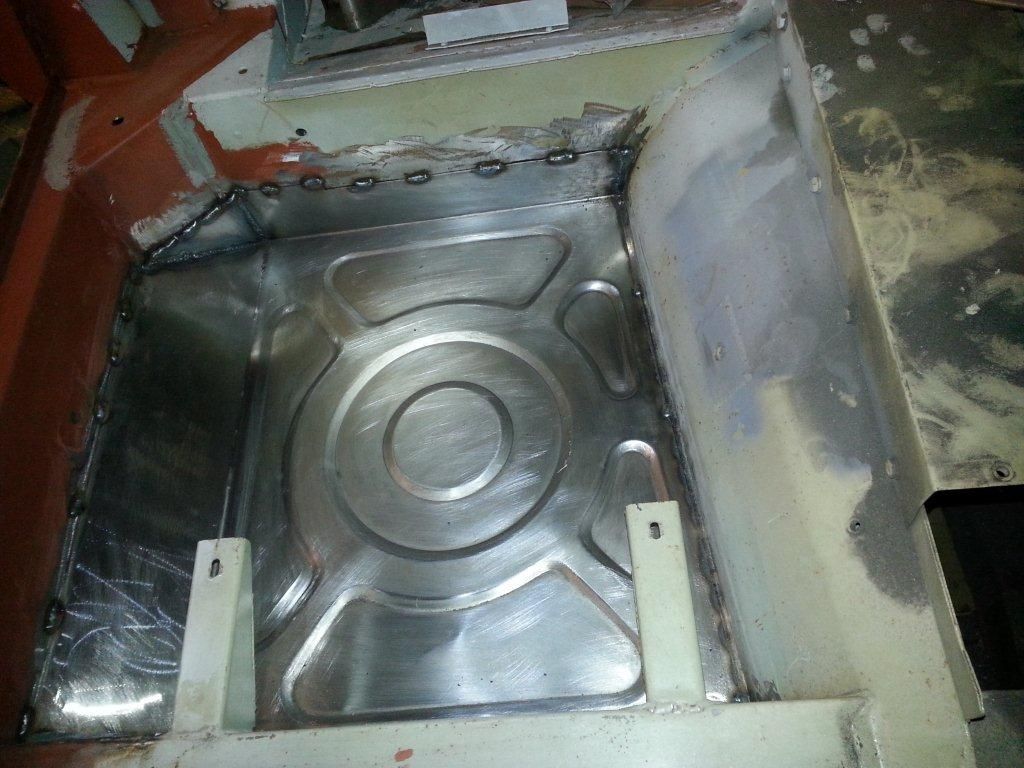
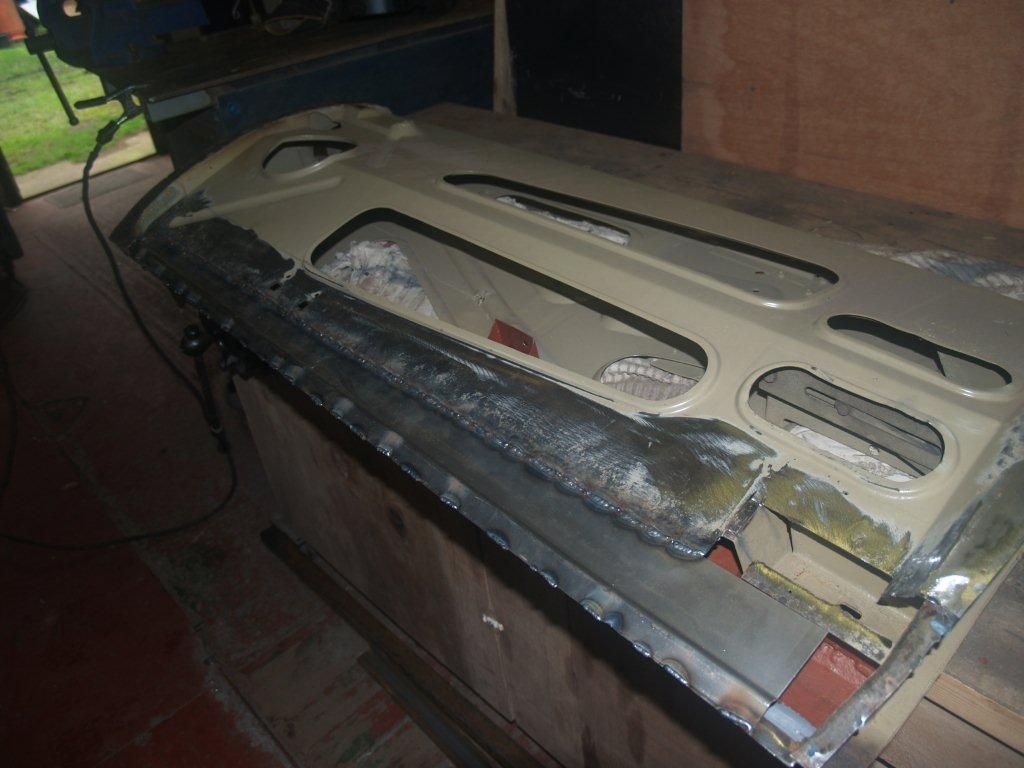
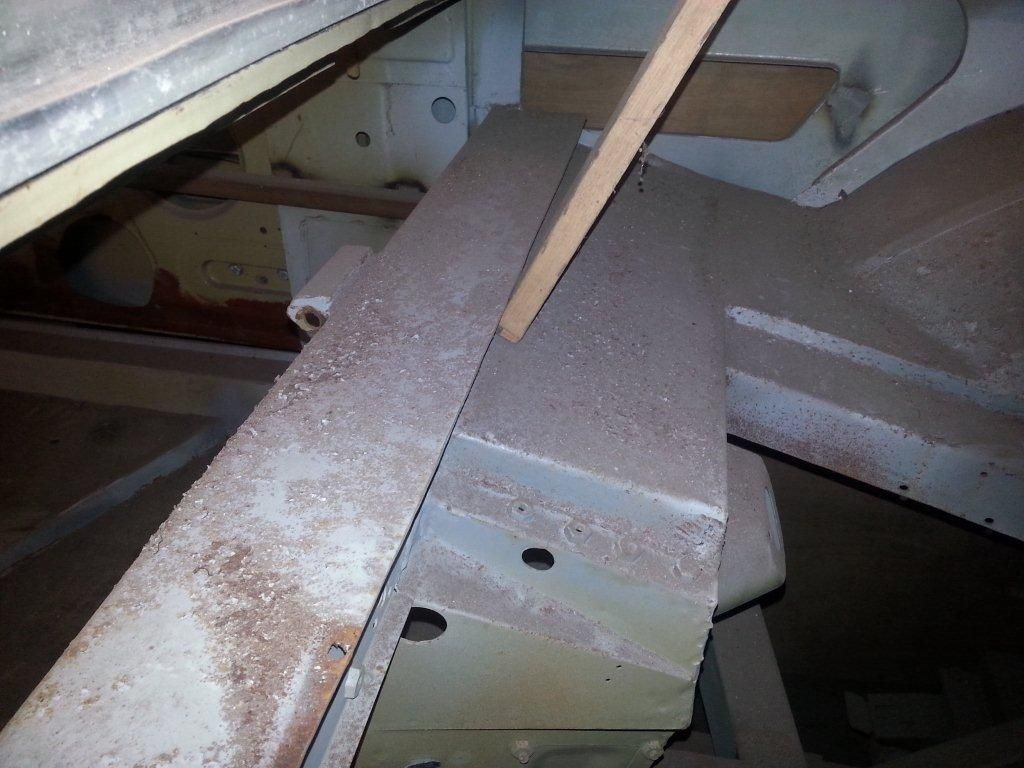
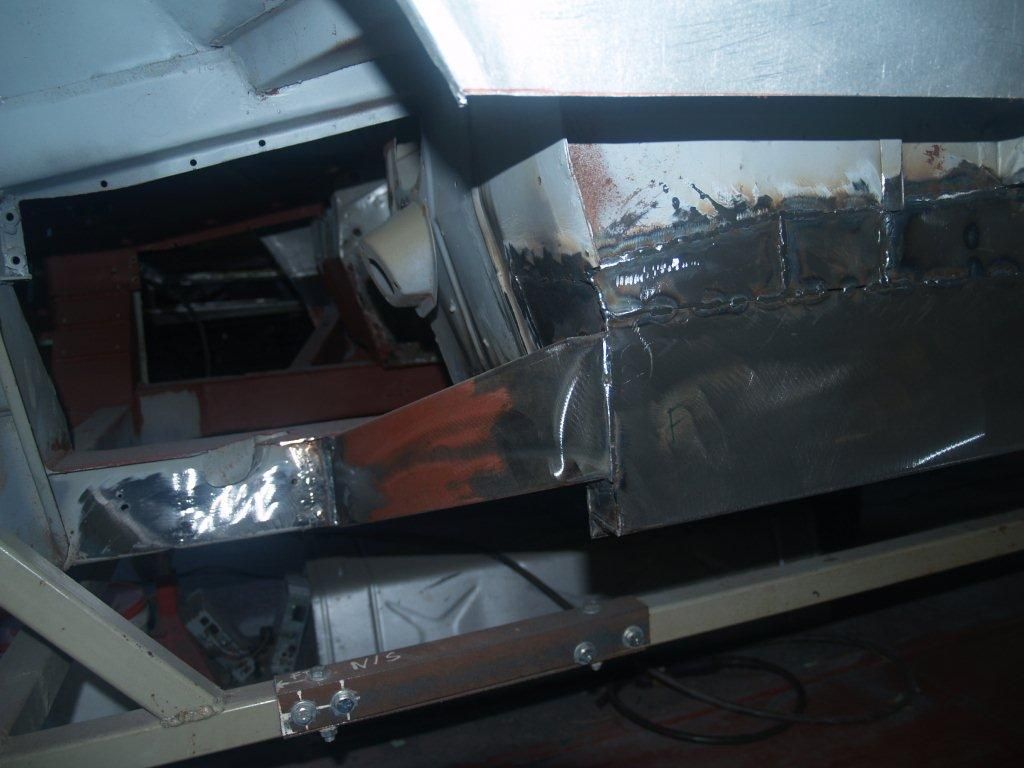
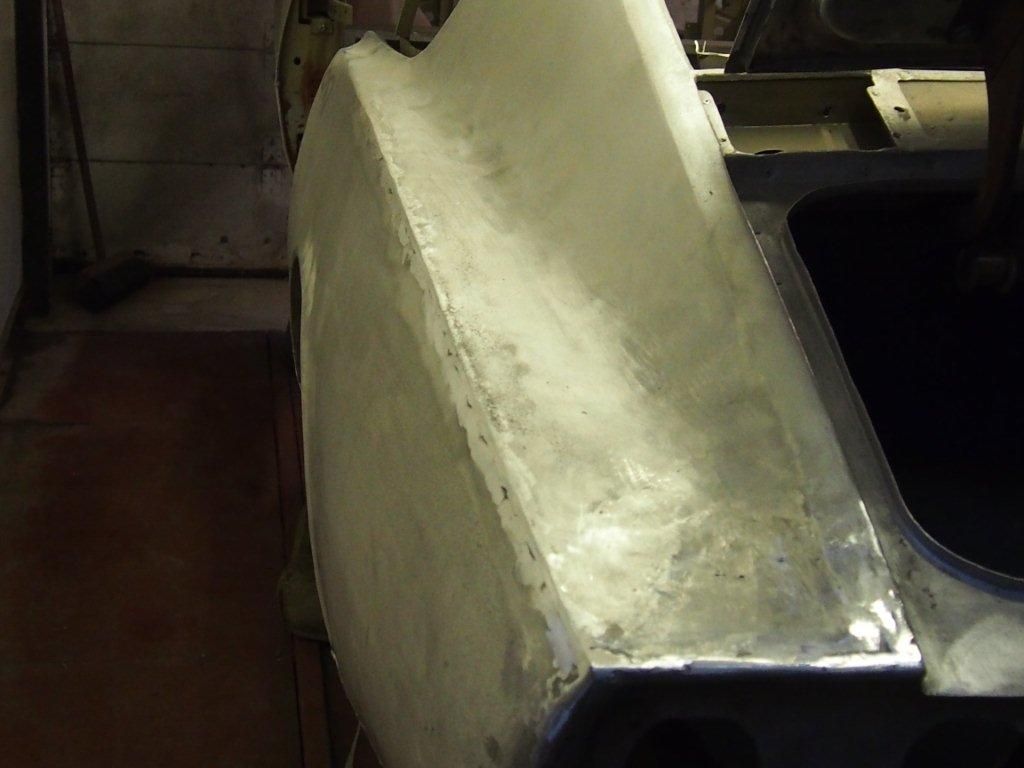
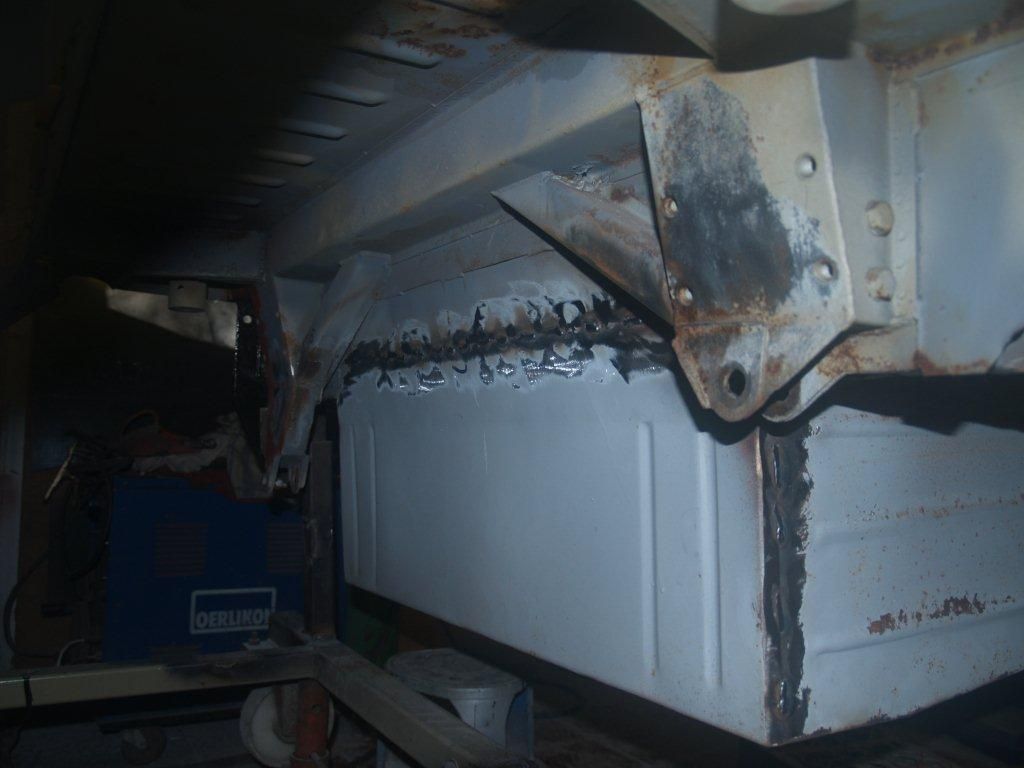
Once this decision had been made, there was immediately another one to be taken! The way the flip tail on my car had been created was by adding in additional metal to build up the height. Here are some photos taken inside the boot of mine looking up at the work that had been done.
To return it to original we could either unpick this work and then weld it back to standard or we could look for an entire rear section from another car. We would then cut off the rear of mine and weld in the replacement.
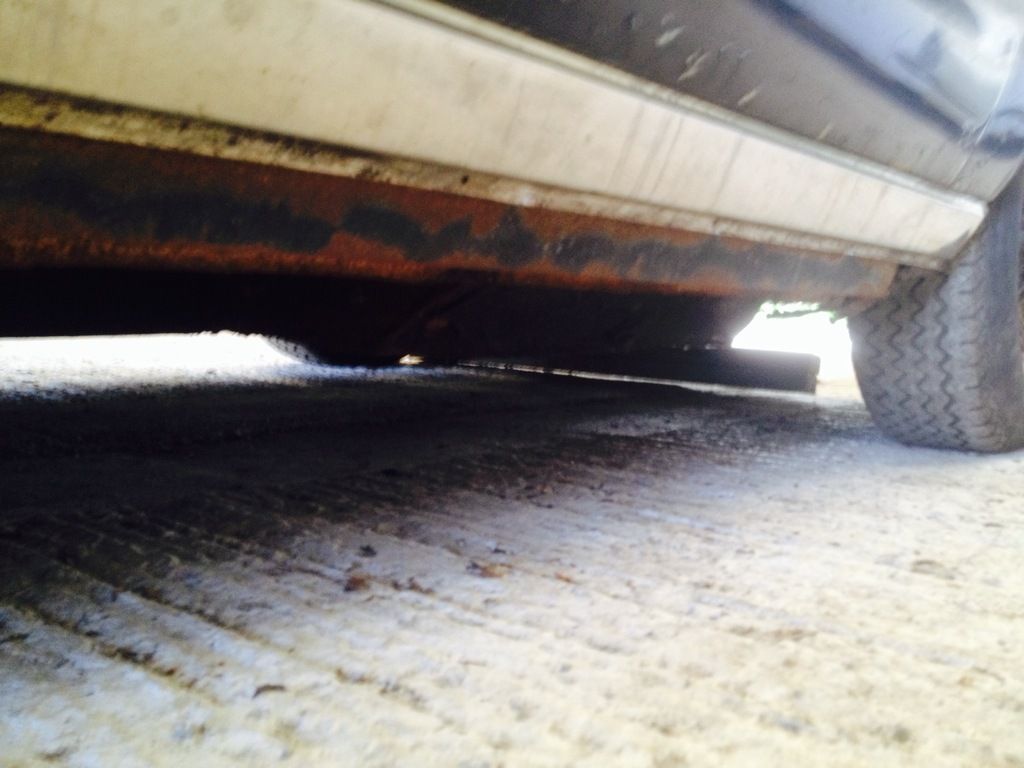
In July 2015, I saw an advert for an auction local to me in Devon that was selling off a number of cars at the owner’s house. All were in fairly poor condition but among the lots was a complete blue Aston Martin DBS and also a red DBS shell. If the price was right, this could be an option.
I went along to the auction and registered to bid. It was being run by a local auction company who, it turned out, was owned by the parents of a girl in my son's class! So I had a chat with them to find out the background.
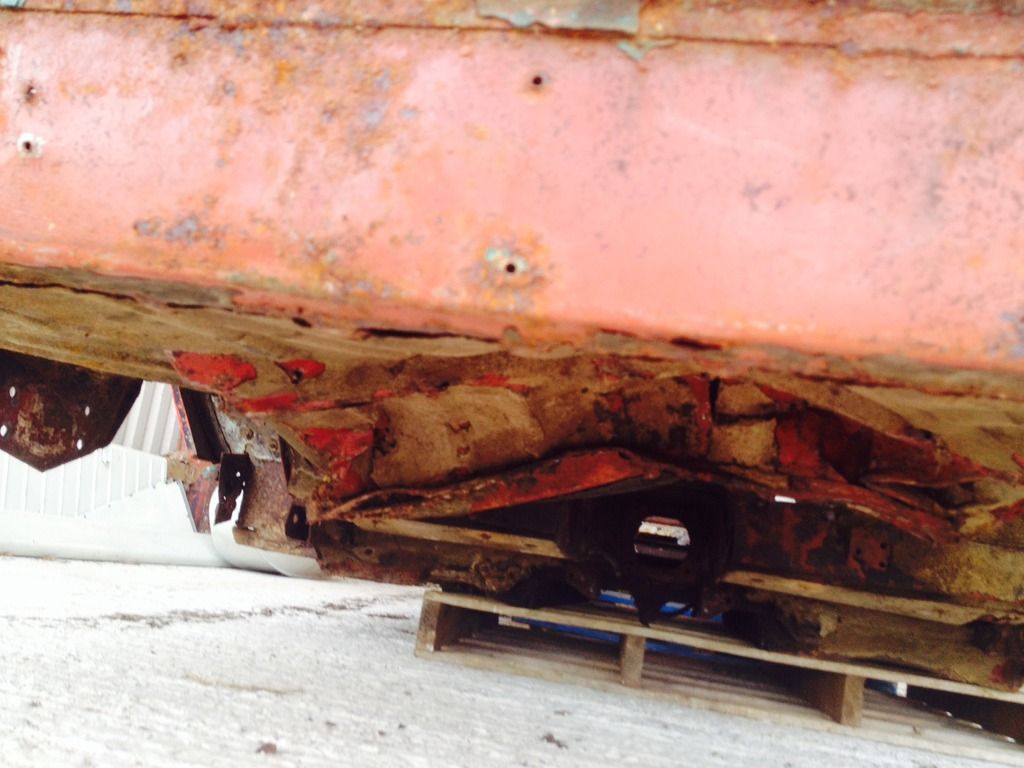
All the lots are the property of one man who is very wealthy and has quite a collection. The auction was mostly for the rubbish he didn't want anymore. Most of the lots were either projects or not in great condition. Having said that, I was hoping that the location in deepest darkest Devon and lack of awareness of the auction (they don't usually run classic car auctions) may throw up some bargains... The red shell was being sold without a reserve and the blue DBS had an estimate of £6,000 to £7,000.
On viewing the red shell, it was clear that it was in a pretty bad way and I decided we are better off trying to repair mine, unless it went for a ridiculous price. We knew it would cost approx. £2,400.00 to do the work to my shell so unless it was very cheap it would not be worth it considering the amount of work the red shell needed. I would also have to factor in transportation costs. Here’s what it looked like:


The blue DBS was interesting and I intended to see what happened with the bidding. It had clearly been stored for some time and was in need of a restoration. It was missing it's original engine and was instead fitted with a 4.2 Jaguar engine. This would clearly effect the value as the engines are an important part of an Aston but they do come up for sale from time to time.
What was strange was that the owner had gone to extreme lengths to make it hard to identify the car. The VIN plates were missing and there was no paperwork with the car, not to mention the incorrect engine meant no engine number. I couldn’t understand why someone would do that as any history with a car like this could only add to the value. It would not have been too hard to find the identity as old Astons will usually have the chassis number written in crayon on the inside of a lot of the trim pieces, but it wasn't possible at the auction. There should also be a chassis number stamped on one of the chassis cross members but I was unable to locate it.
It was too good to cut up for mine but I thought it could be worth buying, tracing the id and then selling on at another auction. It was a risk, but the car was a worthwhile project. I didn't get many pics of the blue DBS, but here's what I have:

At the auction the red shell went for £3074 (inc commission) and the blue car went for £17,490 (inc commission).
Both bought by the same man who looked to be a wealthy enthusiast as opposed to a dealer. He probably would have gone a lot higher as he was very agrressive in his bidding, but there was no real appetite for the projects in the room. They were certainly too rich for me. The red shell was in really bad shape and £17.5k for a DBS without it's engine, no paperwork and question marks over it's identity didn't seem a bargain. Having said that, a few days later a complete DBS project (with the correct but non-running engine) sold for £60k at a Brightwells auction....
I also managed to keep my hand down for a rather sad looking Mercedes 450 SEL 6.9 with a lot of rot, that again went for more than I thought it was worth. There were few bargains at this auction so the vendor must have been happy!
I chased up another early V8 rear end that someone I knew had sold to a man who raced a V8 in the AMOC championship but he wanted to hold onto it in case he damaged his car racing.
So at that point I decided it was better the devil you know and it would make more sense to repair what we had rather than waiting until another rear turned up (who knows when that would happen). This meant we could get started on the car.
I purchased a good condition used bootlid from Puddleduck Parts, a company who used to be the source for used Aston Parts but were now in the process of closing down. This would give us the line to work to when reducing the height of the rear wings.
Now my favourite all time Aston is a late eighties V8 Vantage X-pack so I do love the flip tail look. But I cannot afford one of these and trying to make an early car look like a late one does not feel right.
Here, from Tim Cottingham’s excellent website (www.astonmartins.com) is a photo clearly showing the early and later style rears for the V8.

With the value of the early cars climbing, I decided to remove the fliptail and go back to what should be original for the car.
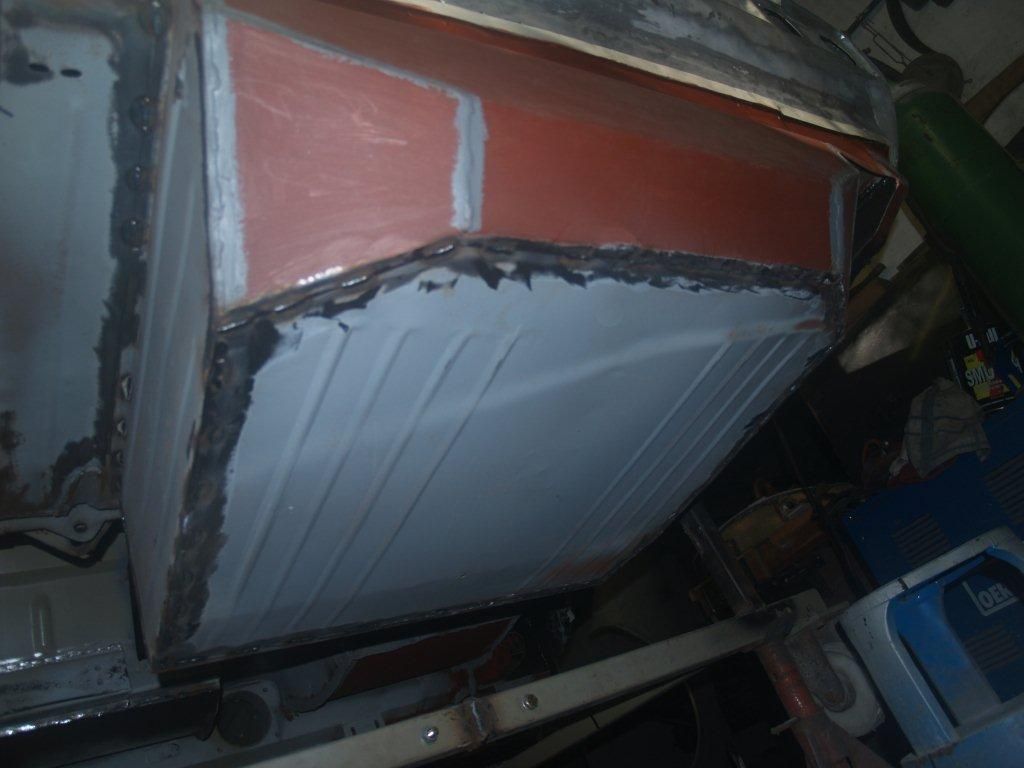
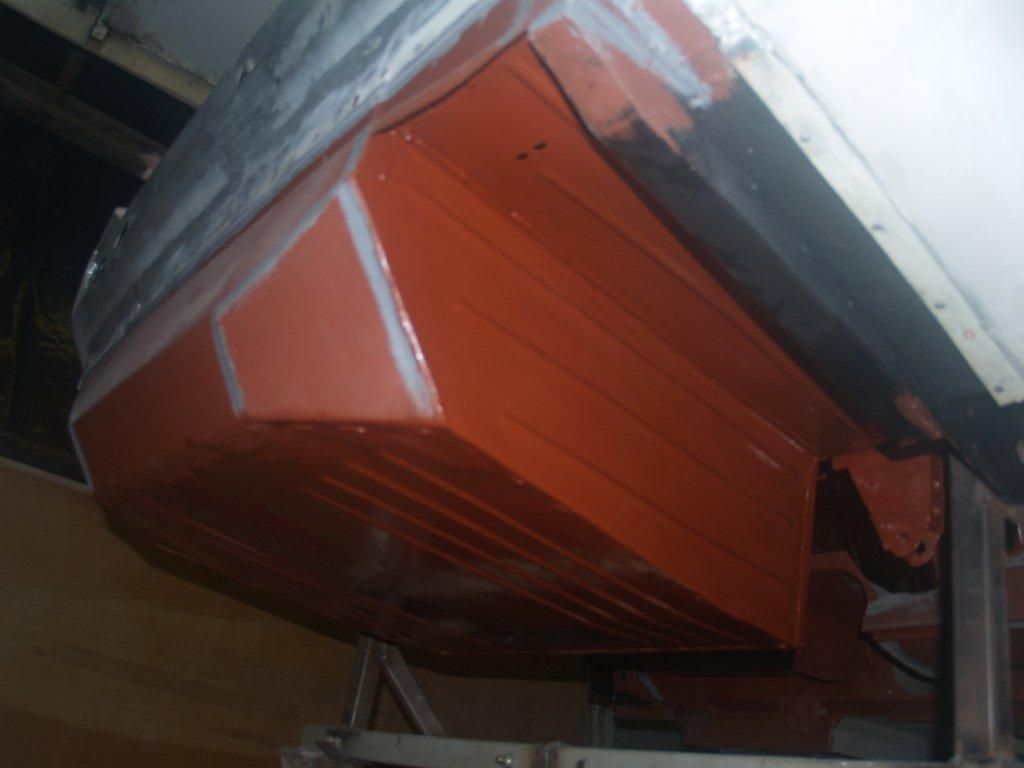
Besides, keeping it and making it a correct fliptail would have entailed further work as the later cars with the fliptail had the reversing lights in the main cluster while on the earlier cars they were located lower down in the rear valence (see photo above). You can see from the photo below of my shell that whoever did the work had kept the holes correct for the early car and not allowed for the extra holes needed for the reversing lights.

Once this decision had been made, there was immediately another one to be taken! The way the flip tail on my car had been created was by adding in additional metal to build up the height. Here are some photos taken inside the boot of mine looking up at the work that had been done.


To return it to original we could either unpick this work and then weld it back to standard or we could look for an entire rear section from another car. We would then cut off the rear of mine and weld in the replacement.
In July 2015, I saw an advert for an auction local to me in Devon that was selling off a number of cars at the owner’s house. All were in fairly poor condition but among the lots was a complete blue Aston Martin DBS and also a red DBS shell. If the price was right, this could be an option.
I went along to the auction and registered to bid. It was being run by a local auction company who, it turned out, was owned by the parents of a girl in my son's class! So I had a chat with them to find out the background.
All the lots are the property of one man who is very wealthy and has quite a collection. The auction was mostly for the rubbish he didn't want anymore. Most of the lots were either projects or not in great condition. Having said that, I was hoping that the location in deepest darkest Devon and lack of awareness of the auction (they don't usually run classic car auctions) may throw up some bargains... The red shell was being sold without a reserve and the blue DBS had an estimate of £6,000 to £7,000.
On viewing the red shell, it was clear that it was in a pretty bad way and I decided we are better off trying to repair mine, unless it went for a ridiculous price. We knew it would cost approx. £2,400.00 to do the work to my shell so unless it was very cheap it would not be worth it considering the amount of work the red shell needed. I would also have to factor in transportation costs. Here’s what it looked like:


The blue DBS was interesting and I intended to see what happened with the bidding. It had clearly been stored for some time and was in need of a restoration. It was missing it's original engine and was instead fitted with a 4.2 Jaguar engine. This would clearly effect the value as the engines are an important part of an Aston but they do come up for sale from time to time.
What was strange was that the owner had gone to extreme lengths to make it hard to identify the car. The VIN plates were missing and there was no paperwork with the car, not to mention the incorrect engine meant no engine number. I couldn’t understand why someone would do that as any history with a car like this could only add to the value. It would not have been too hard to find the identity as old Astons will usually have the chassis number written in crayon on the inside of a lot of the trim pieces, but it wasn't possible at the auction. There should also be a chassis number stamped on one of the chassis cross members but I was unable to locate it.
It was too good to cut up for mine but I thought it could be worth buying, tracing the id and then selling on at another auction. It was a risk, but the car was a worthwhile project. I didn't get many pics of the blue DBS, but here's what I have:


At the auction the red shell went for £3074 (inc commission) and the blue car went for £17,490 (inc commission).
Both bought by the same man who looked to be a wealthy enthusiast as opposed to a dealer. He probably would have gone a lot higher as he was very agrressive in his bidding, but there was no real appetite for the projects in the room. They were certainly too rich for me. The red shell was in really bad shape and £17.5k for a DBS without it's engine, no paperwork and question marks over it's identity didn't seem a bargain. Having said that, a few days later a complete DBS project (with the correct but non-running engine) sold for £60k at a Brightwells auction....
I also managed to keep my hand down for a rather sad looking Mercedes 450 SEL 6.9 with a lot of rot, that again went for more than I thought it was worth. There were few bargains at this auction so the vendor must have been happy!
I chased up another early V8 rear end that someone I knew had sold to a man who raced a V8 in the AMOC championship but he wanted to hold onto it in case he damaged his car racing.
So at that point I decided it was better the devil you know and it would make more sense to repair what we had rather than waiting until another rear turned up (who knows when that would happen). This meant we could get started on the car.
I purchased a good condition used bootlid from Puddleduck Parts, a company who used to be the source for used Aston Parts but were now in the process of closing down. This would give us the line to work to when reducing the height of the rear wings.
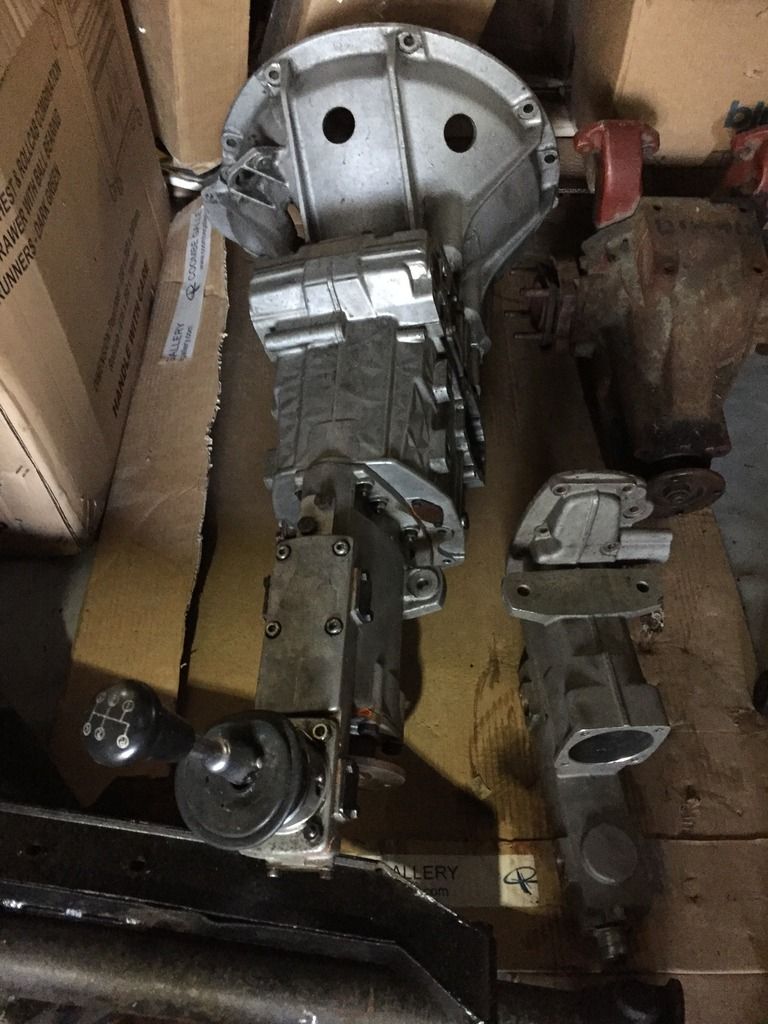
At the beginning of this thread, I talked about how one of the changes I had wanted to make to my DBS V8 was to replace the automatic gearbox with a manual.
The new 1972 car came with the same 3 speed auto Chrysler Torqueflite gearbox as my DBS V8:
By chance, when I was negotiating the purchase of the car itself, there was an original and full refurbished ZF manual gearbox being sold by an AMOC member on eBay. It was on for £12k but did not sell so I contacted him and, when I had complete the purchase of the car, we agreed a deal at £10k. A lot of money for a gearbox but they rarely come up and this was a key part of my restoration. The deal included the propshaft (which I was missing) and other parts. I could have gone for an aftermarket transmission, such as a Tremec, but these are no cheaper and I wanted to have something that was correct for the car even if the shift wasn't quite as slick.
When I went to collect the gearbox, it turned out the seller had converted several early V8 road cars into race cars over the years and had boxes of all the parts he had stripped out just sitting around in his garage!
So from him I was able to buy excellent used examples of all the gauges, dash panels, A-post trim panels with switches, centre console, clock panel with electric window switches, under dash panels as well as numerous other interior bits. Basically a whole load of the parts I was missing were right here! This saved an enormous amount of time and money tracking all these bits down.
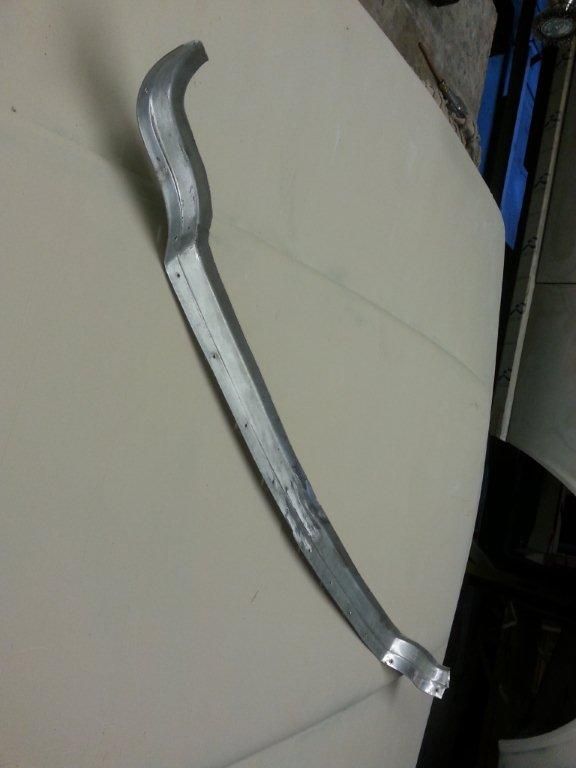
I also bought a very good condition front valance, as mine was missing, and rear valances (they're made up of three parts- left, right and cetnre) as mine were in very poor condition.
A very useful haul indeed! With the rise in prices of these cars, and the fact that they were made in very small numbers to begin with, means that finding second hand parts is becoming harder and harder so I was very lucky with this find.
I flogged the Torqueflite on EBay to a really nice guy. I had no idea what condition it was in as I'd never used it but he was happy with the deal. They're not rare and are fitted to loads of Dodge/Chrysler vehicles, not to mention the Jenson Interceptor. There's one on Ebay right now where the vendor is listing it as an Aston part and asking £1,850, needless to say it has been on sale for some time...
A short while after this discovery, an advertisement appeared in the classified section of the monthly AMOC newletter from a member clearing out a small number of parts. The ad had been placed by someone who had done some jobs on my DBS V8 for me in my first year of ownership, so it was great to make contact again after 10 years. Among the parts he was selling was a reconditioned RHD steering rack, a deal was done and the part arrived a few days later and was in excellent condition. Another difficult to find part ticked off the list.
The Aston world is a very small one and everyone I have spoken to has been incredibly helpful. I have acquired most of the missing big ticket items and I'm sure I'll be able to get any remaining parts via the numerous specialists parts supplies or even Works Service.
My next update will start detailing the restoration work that has begun on the car....
The new 1972 car came with the same 3 speed auto Chrysler Torqueflite gearbox as my DBS V8:
By chance, when I was negotiating the purchase of the car itself, there was an original and full refurbished ZF manual gearbox being sold by an AMOC member on eBay. It was on for £12k but did not sell so I contacted him and, when I had complete the purchase of the car, we agreed a deal at £10k. A lot of money for a gearbox but they rarely come up and this was a key part of my restoration. The deal included the propshaft (which I was missing) and other parts. I could have gone for an aftermarket transmission, such as a Tremec, but these are no cheaper and I wanted to have something that was correct for the car even if the shift wasn't quite as slick.

When I went to collect the gearbox, it turned out the seller had converted several early V8 road cars into race cars over the years and had boxes of all the parts he had stripped out just sitting around in his garage!
So from him I was able to buy excellent used examples of all the gauges, dash panels, A-post trim panels with switches, centre console, clock panel with electric window switches, under dash panels as well as numerous other interior bits. Basically a whole load of the parts I was missing were right here! This saved an enormous amount of time and money tracking all these bits down.
I also bought a very good condition front valance, as mine was missing, and rear valances (they're made up of three parts- left, right and cetnre) as mine were in very poor condition.
A very useful haul indeed! With the rise in prices of these cars, and the fact that they were made in very small numbers to begin with, means that finding second hand parts is becoming harder and harder so I was very lucky with this find.
I flogged the Torqueflite on EBay to a really nice guy. I had no idea what condition it was in as I'd never used it but he was happy with the deal. They're not rare and are fitted to loads of Dodge/Chrysler vehicles, not to mention the Jenson Interceptor. There's one on Ebay right now where the vendor is listing it as an Aston part and asking £1,850, needless to say it has been on sale for some time...
A short while after this discovery, an advertisement appeared in the classified section of the monthly AMOC newletter from a member clearing out a small number of parts. The ad had been placed by someone who had done some jobs on my DBS V8 for me in my first year of ownership, so it was great to make contact again after 10 years. Among the parts he was selling was a reconditioned RHD steering rack, a deal was done and the part arrived a few days later and was in excellent condition. Another difficult to find part ticked off the list.
The Aston world is a very small one and everyone I have spoken to has been incredibly helpful. I have acquired most of the missing big ticket items and I'm sure I'll be able to get any remaining parts via the numerous specialists parts supplies or even Works Service.
My next update will start detailing the restoration work that has begun on the car....
December 2015
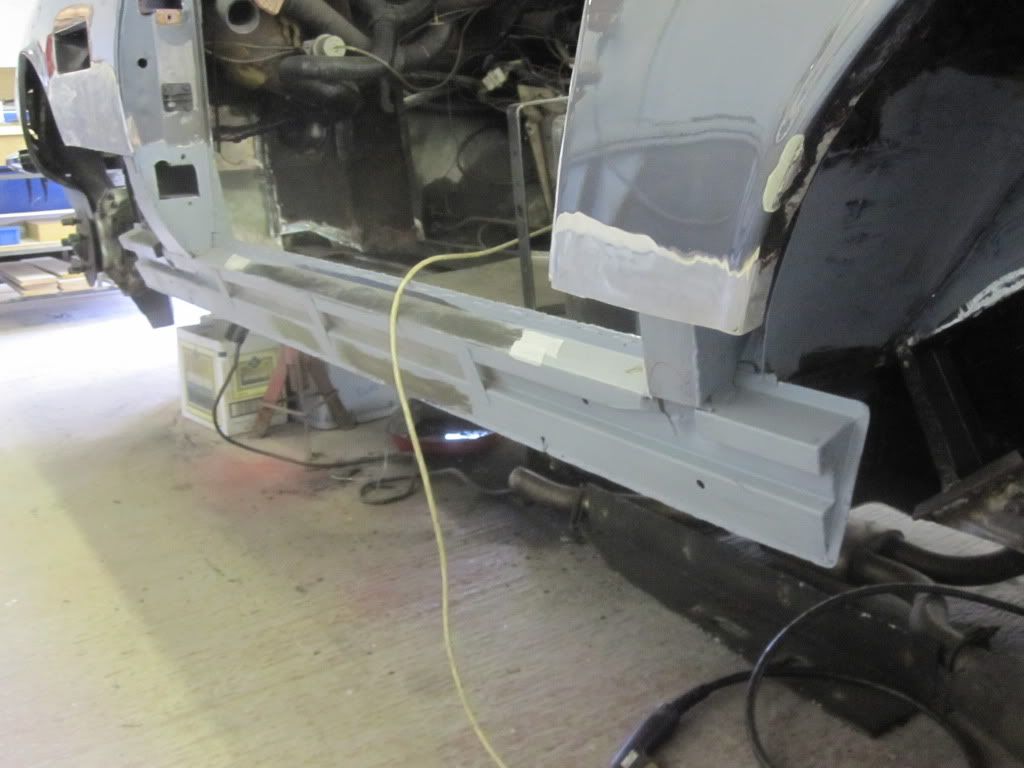
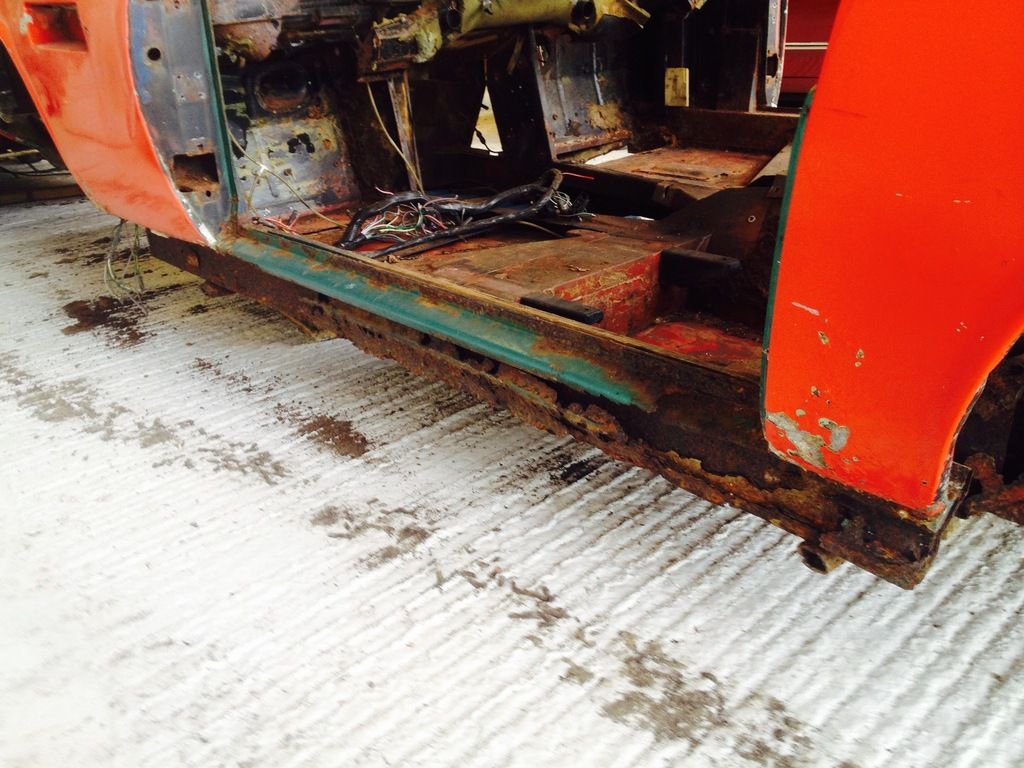
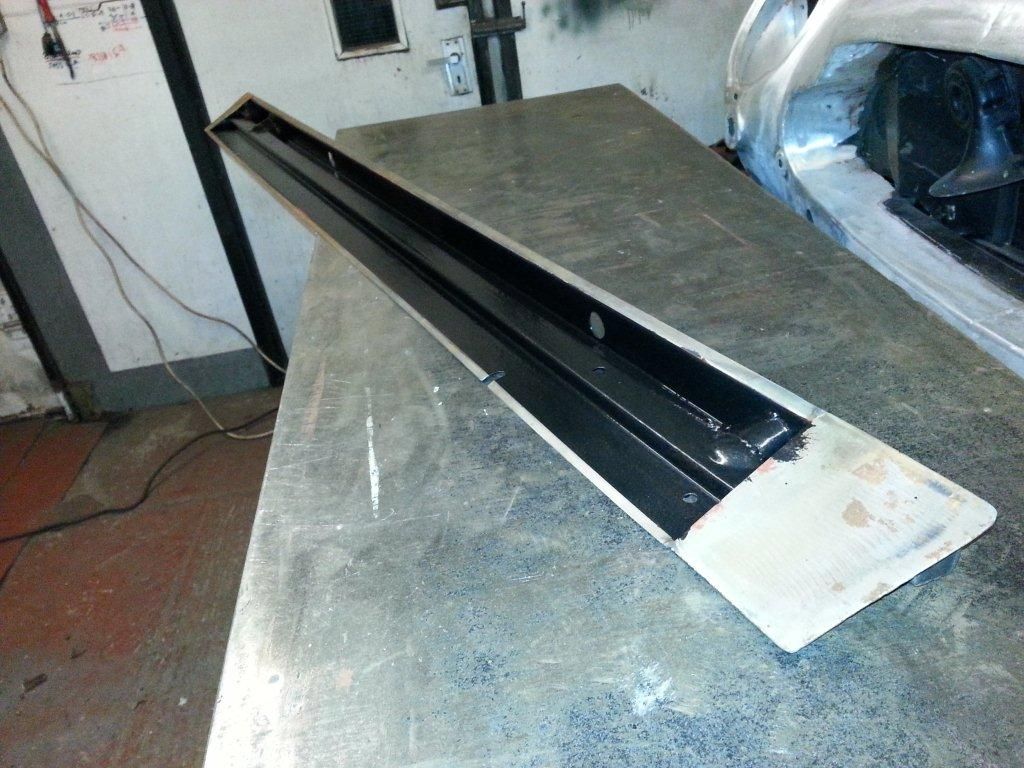
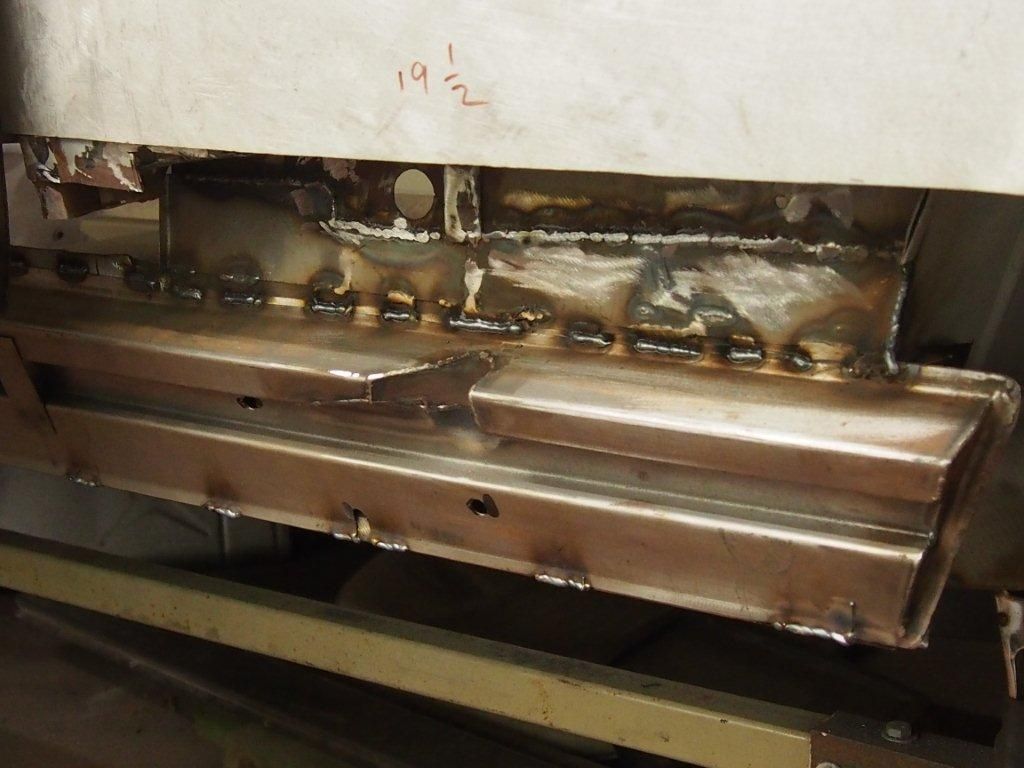
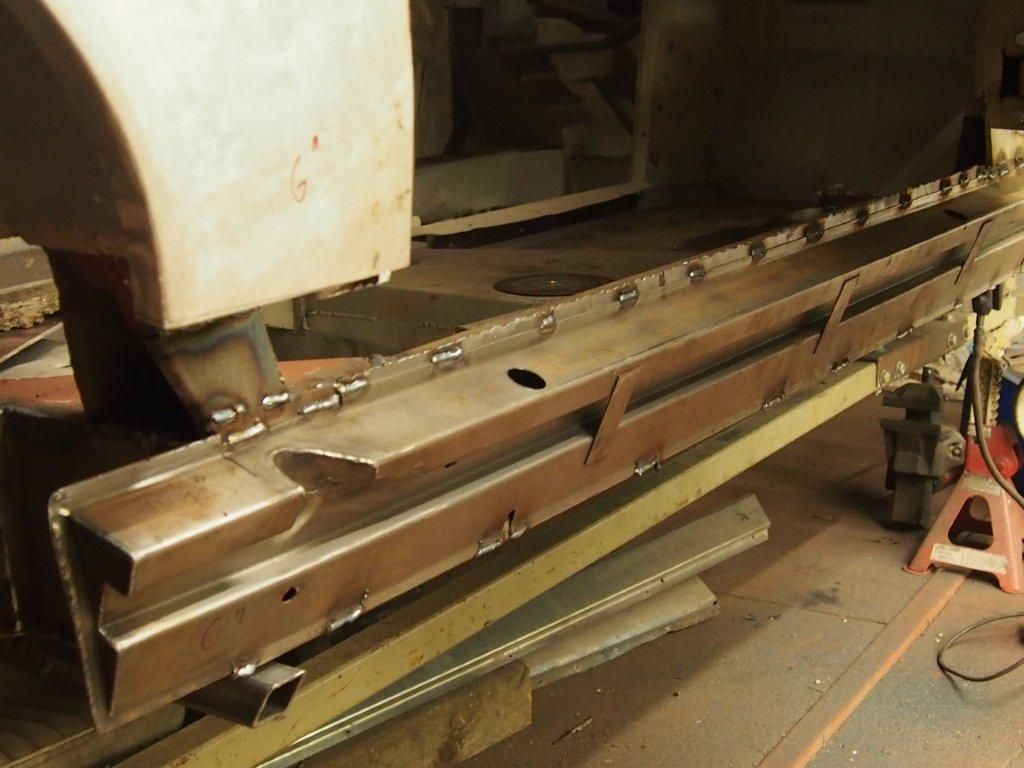
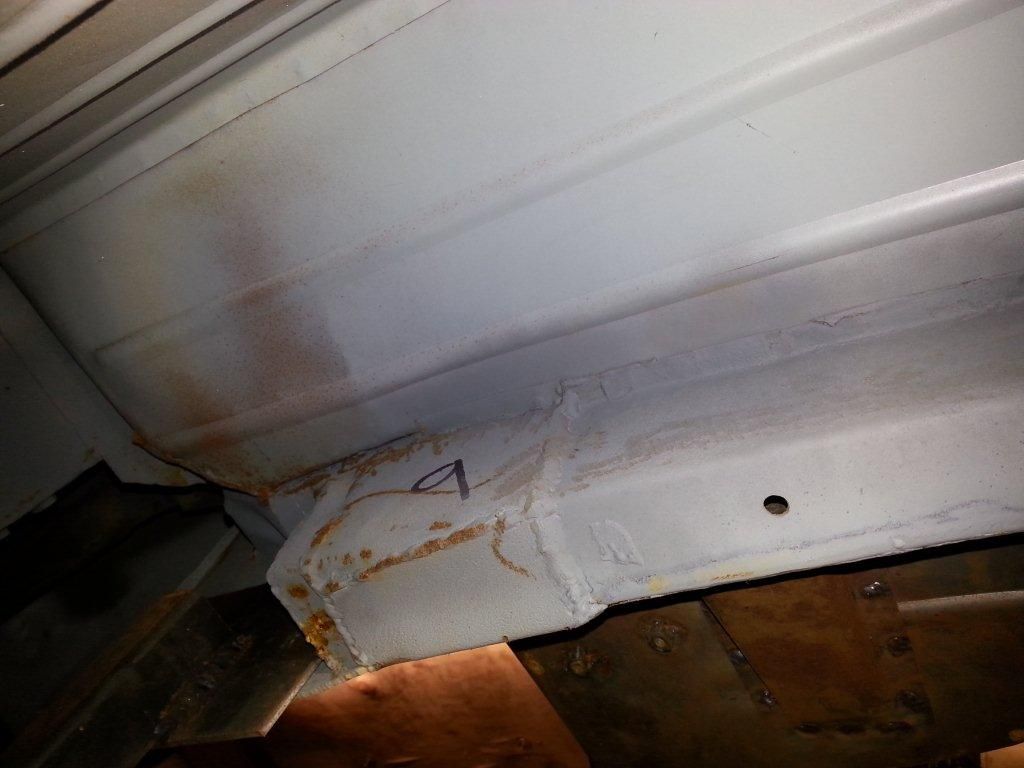
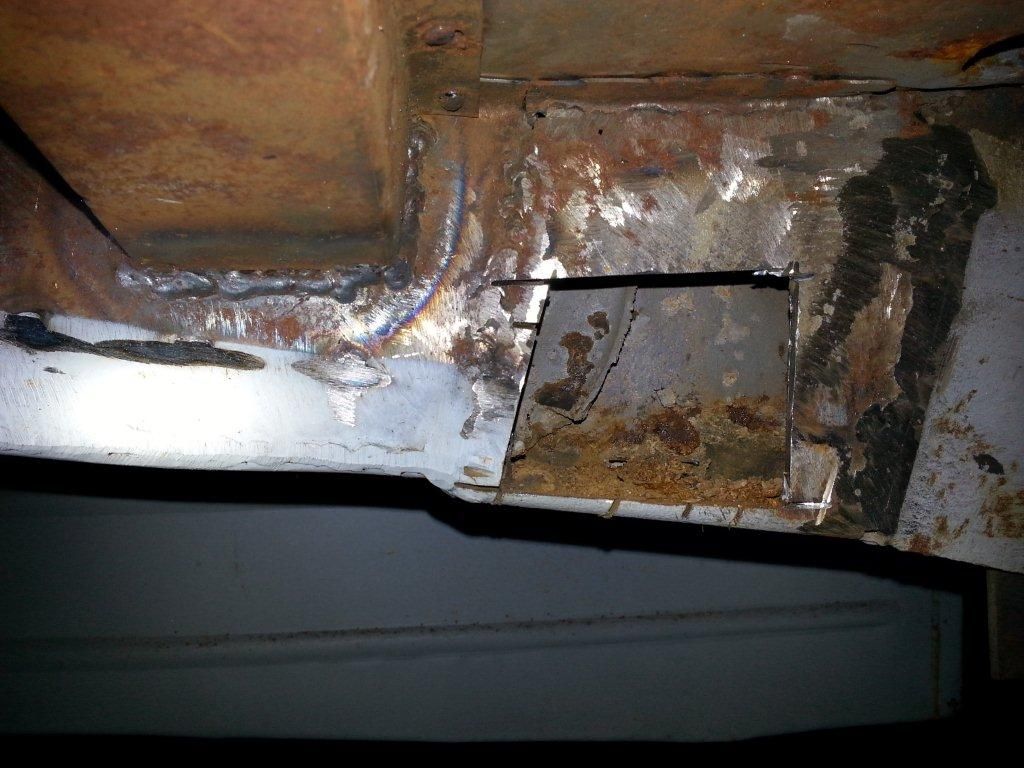
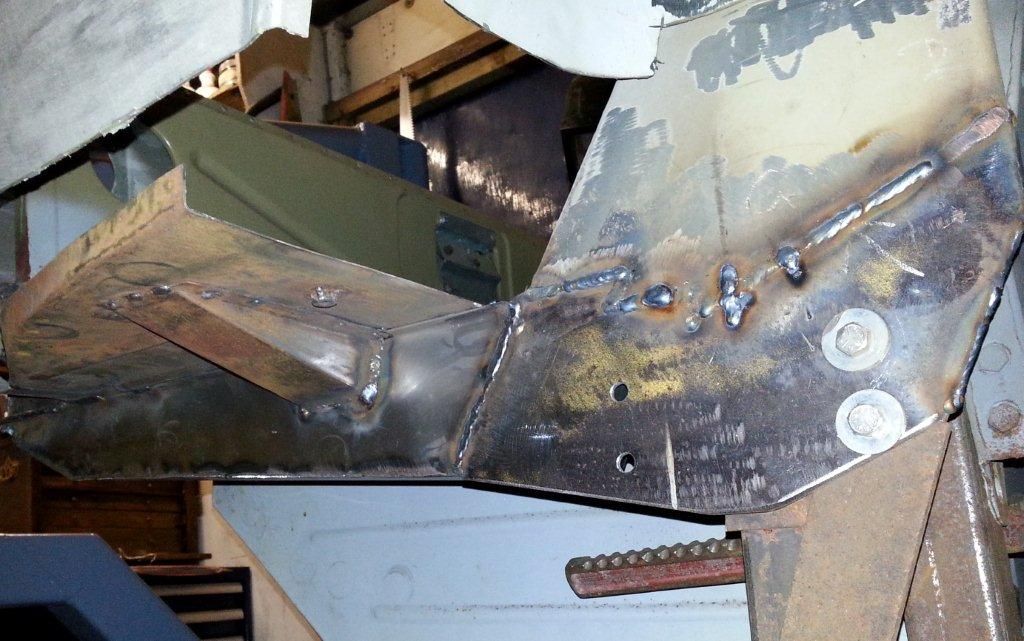
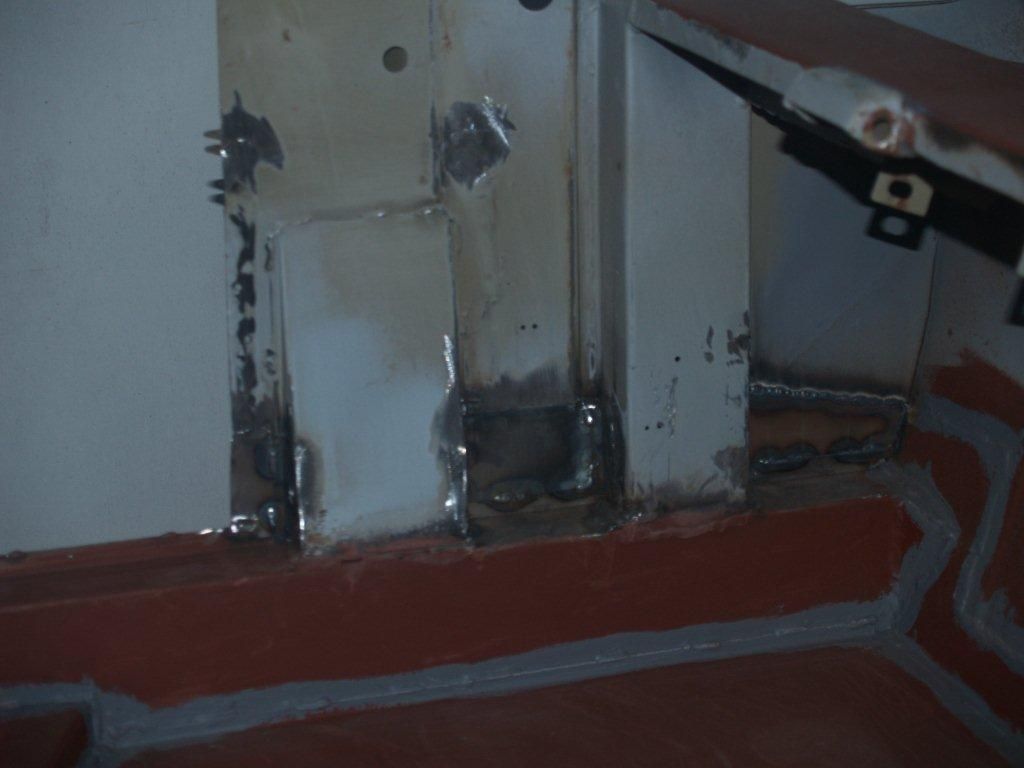
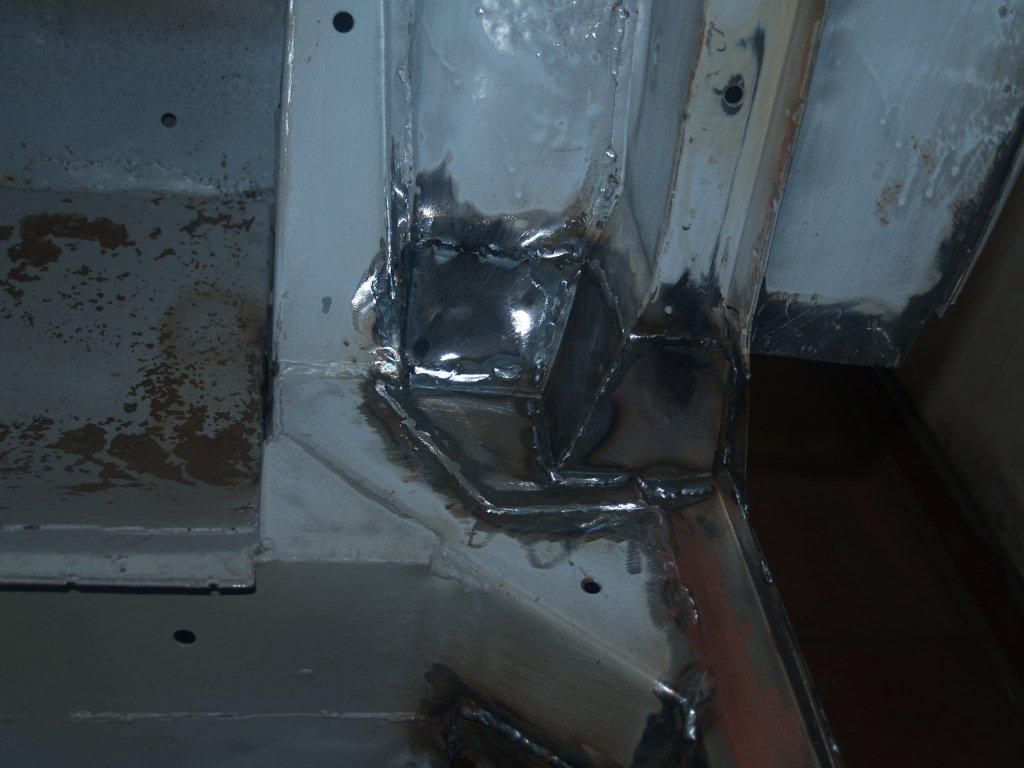
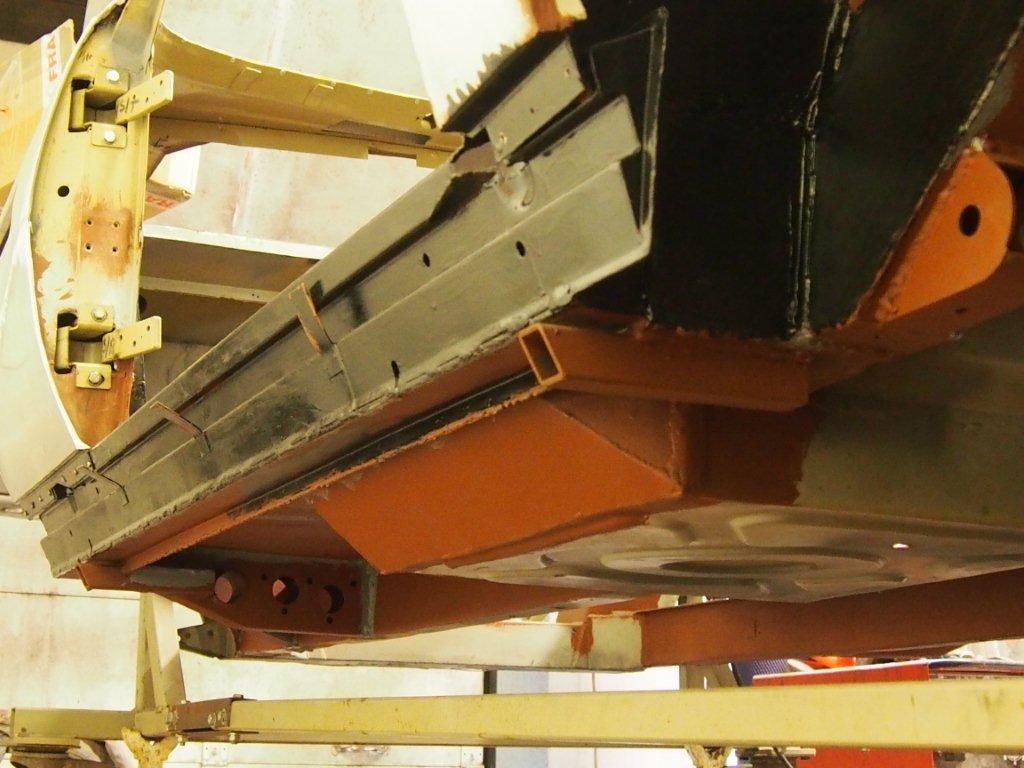
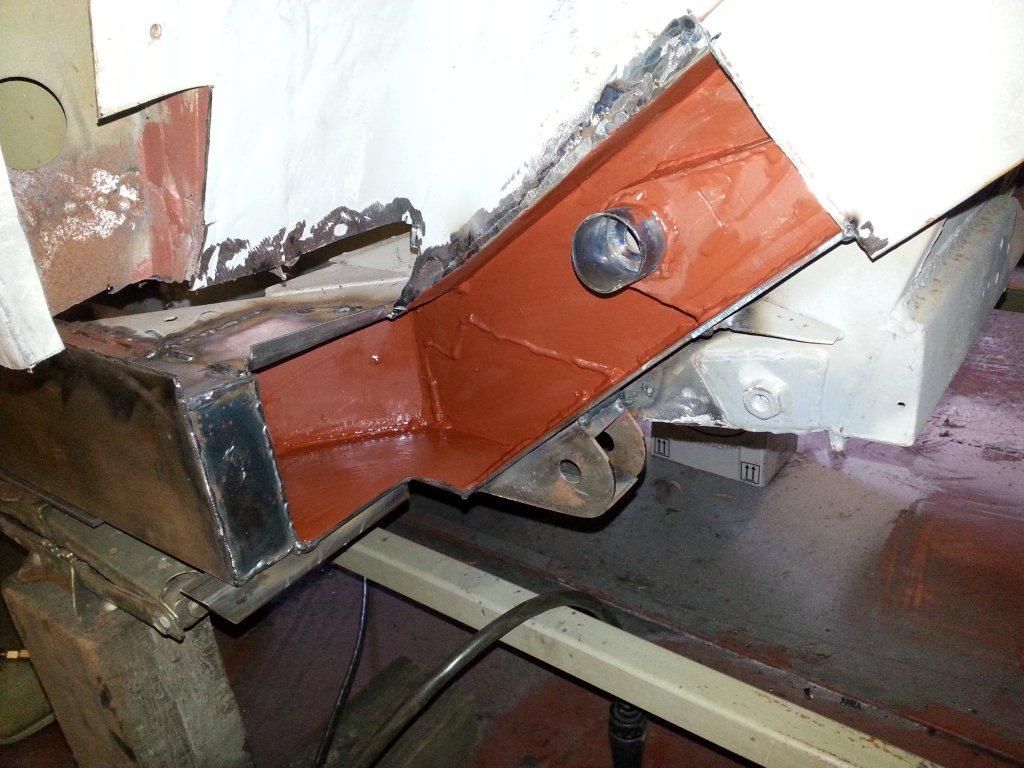
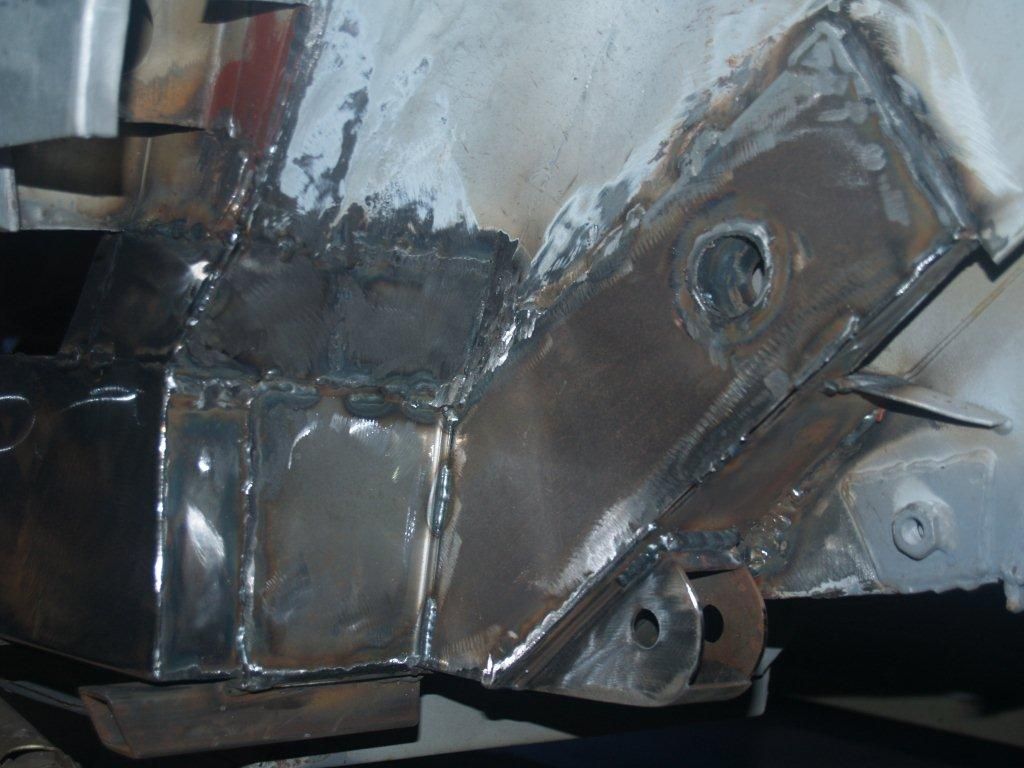
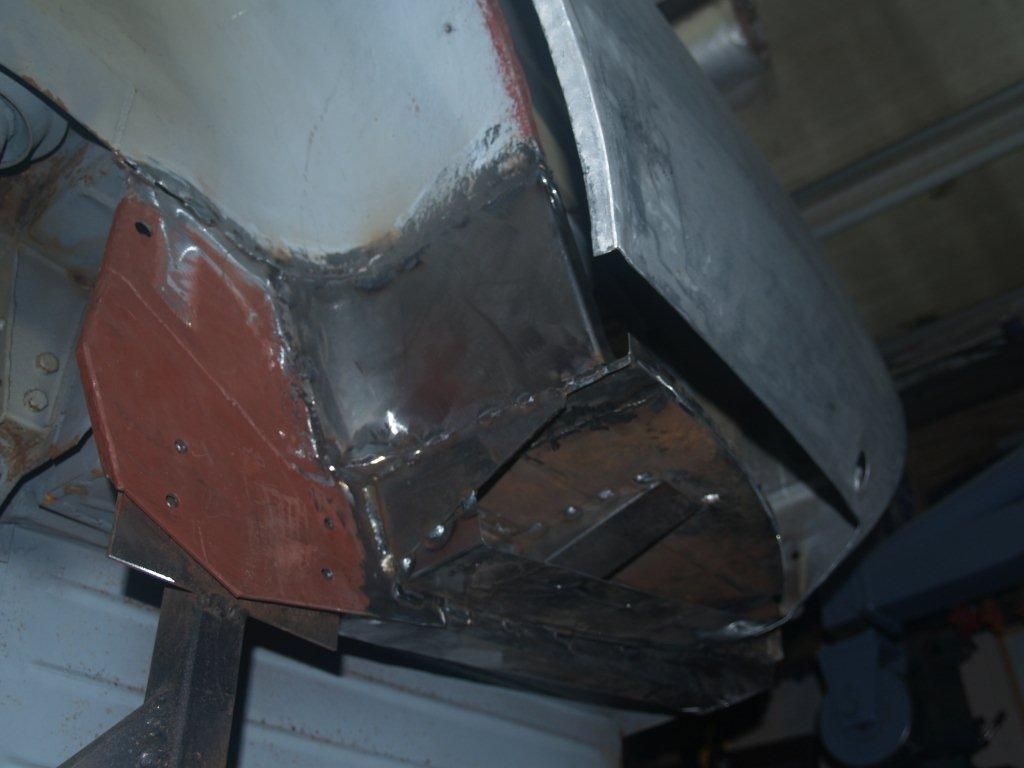
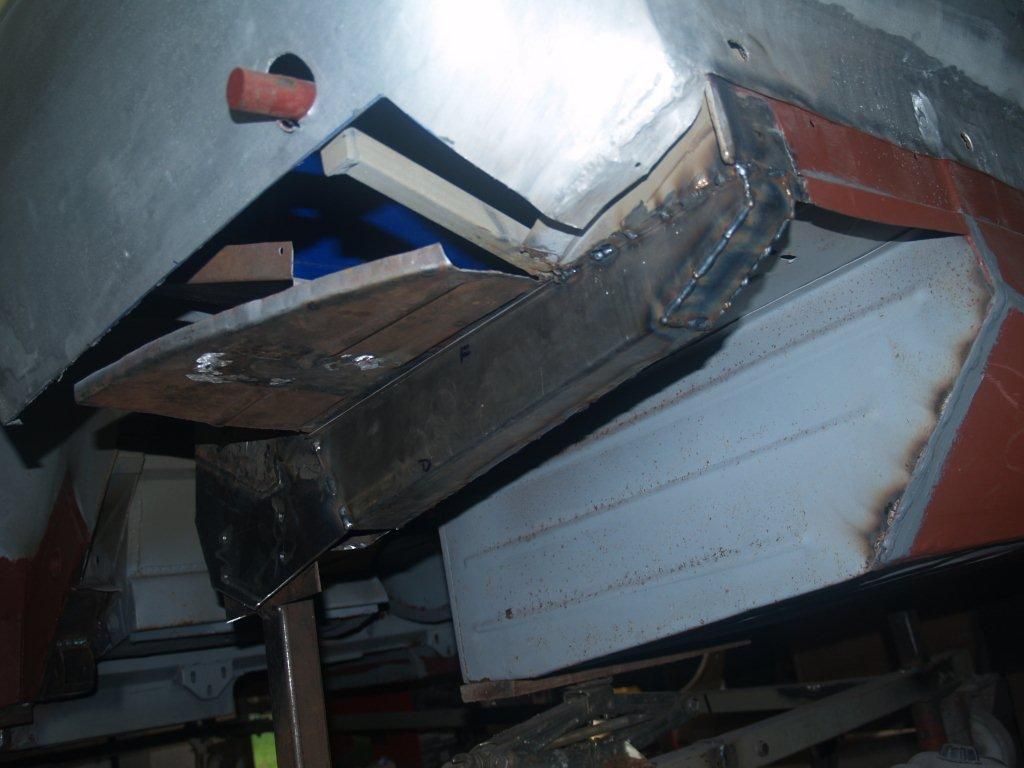
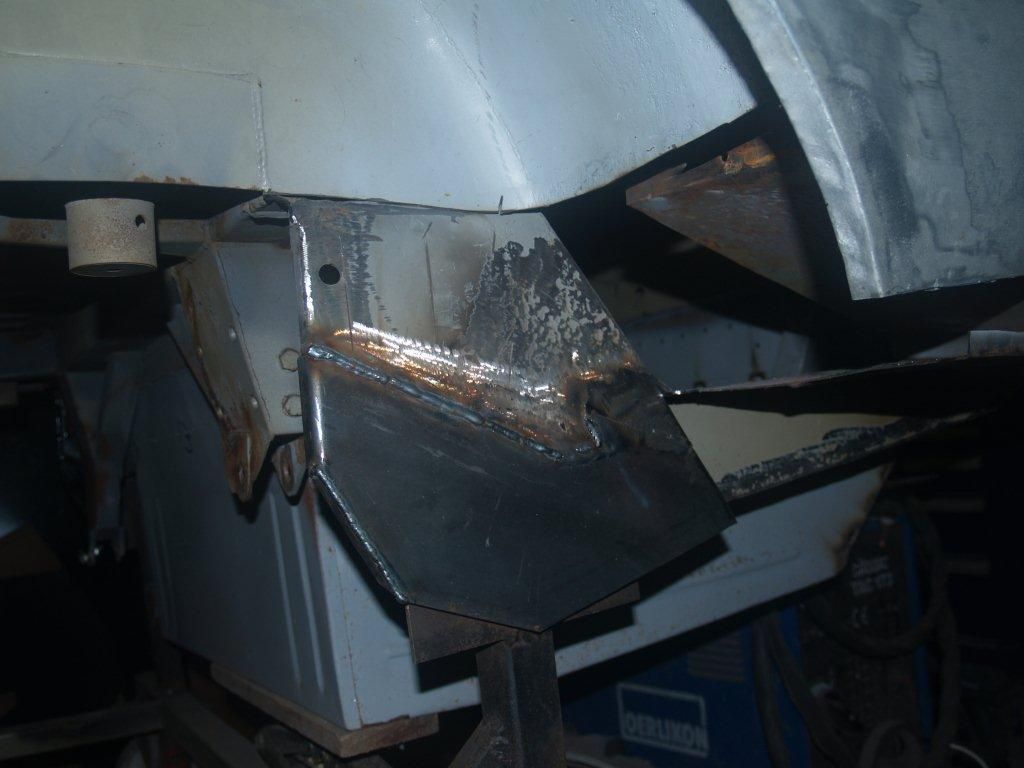
Inner sill: Given the poor condition of the old inner sill, we decided the best course of action would be to completely replace it and start with new material. This was to be a good decision as the old sections had been previously repaired poorly.
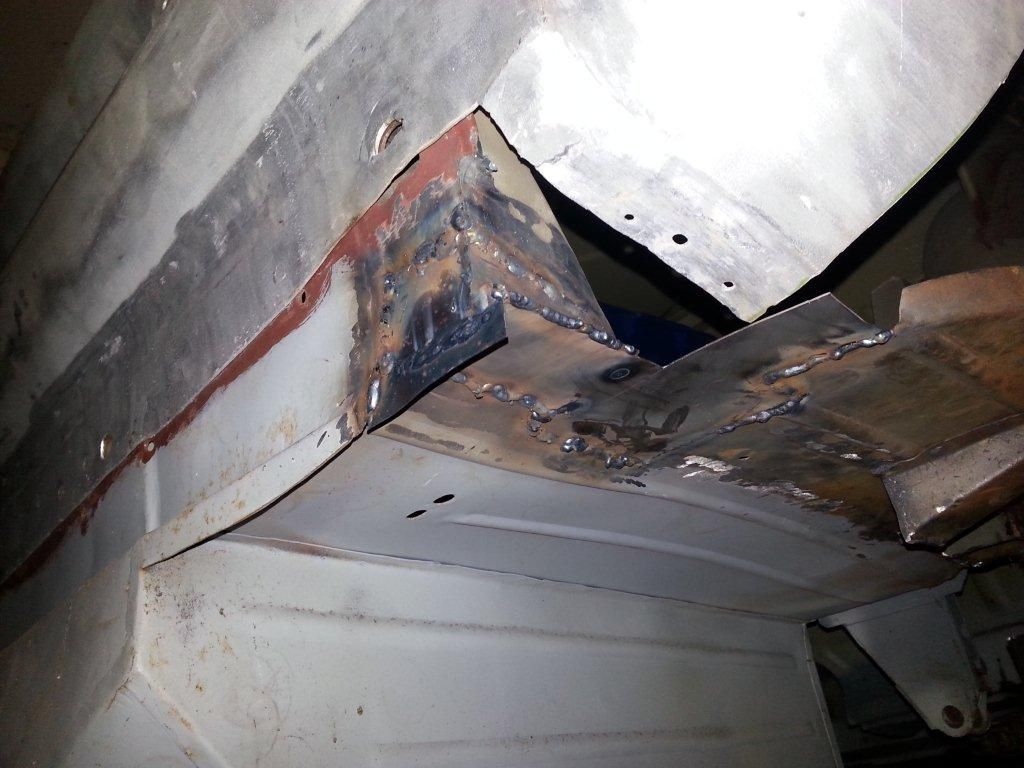
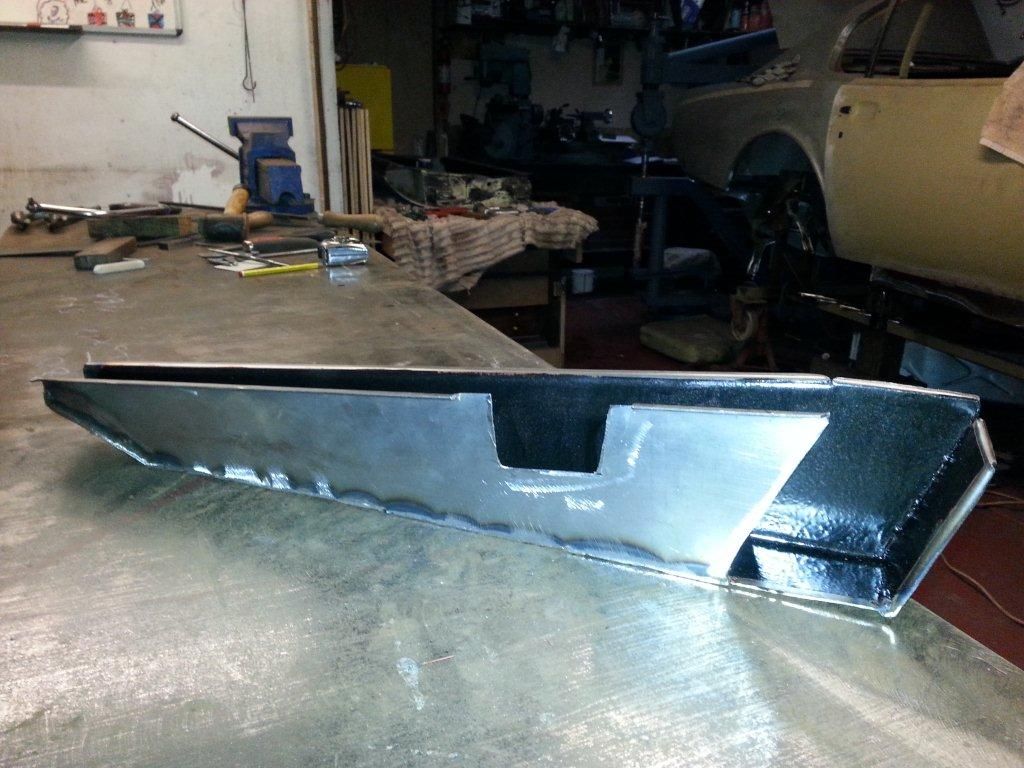
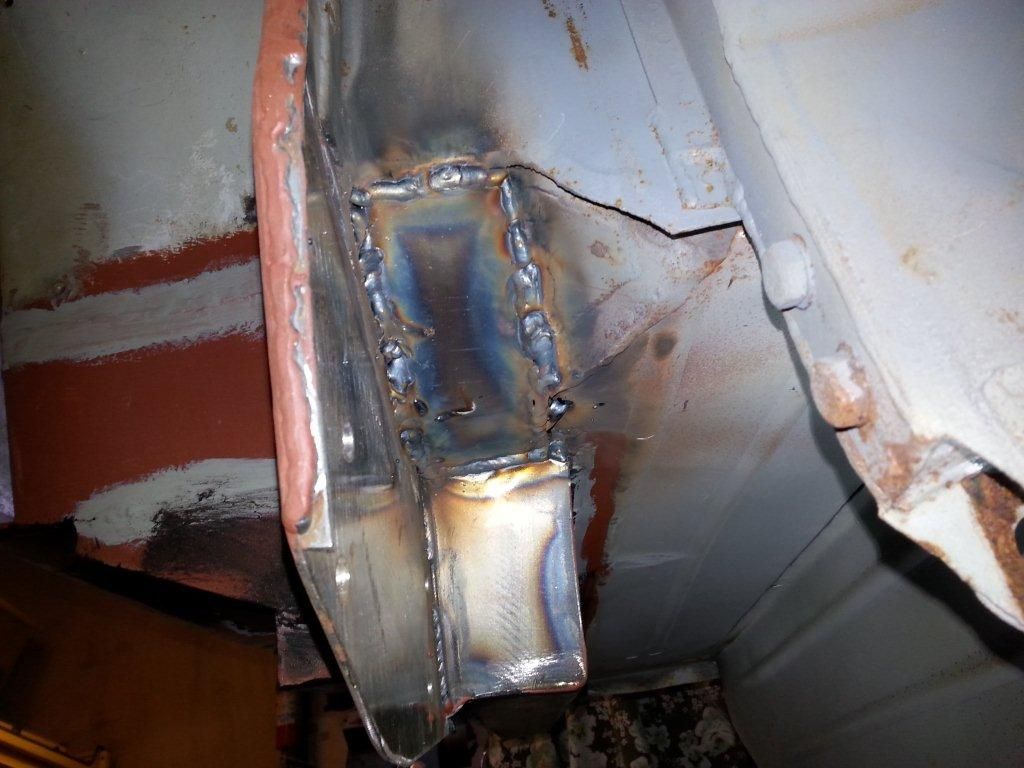
OS Out-rigger: As the project came with some new members replacing them required little thought. The original member although looked fine, initially, the size was in-correct and the shape where it joined the sill was completely wrong so replacing was inevitable.
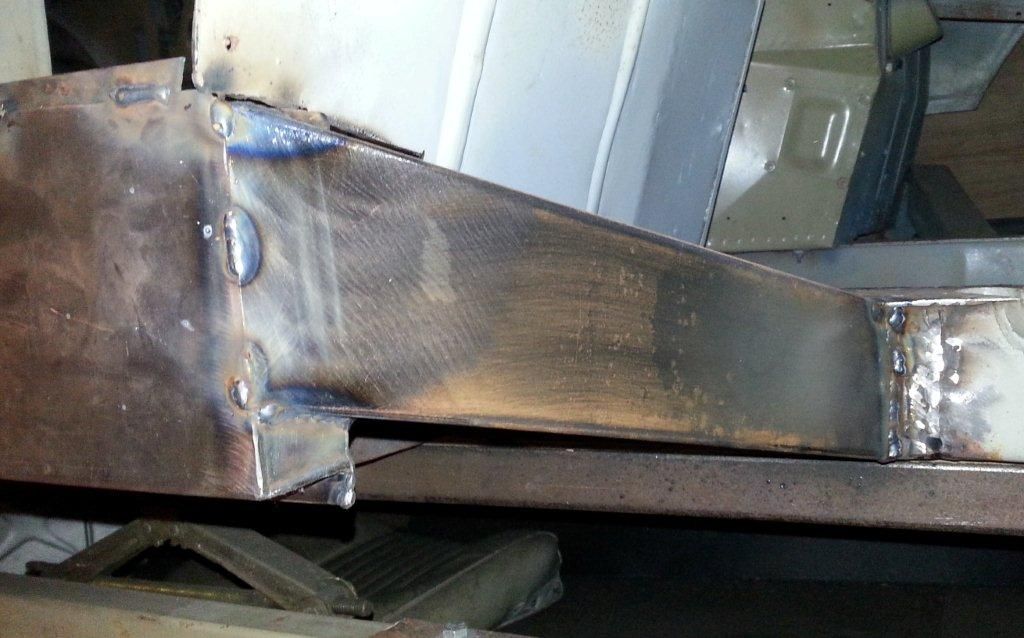
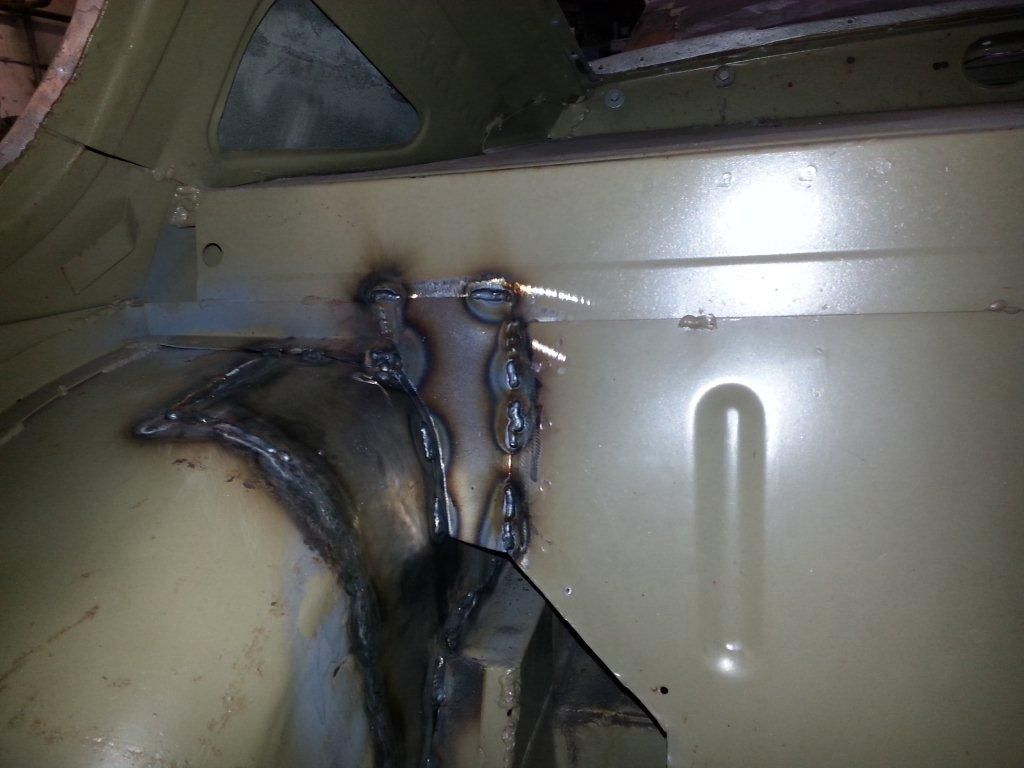
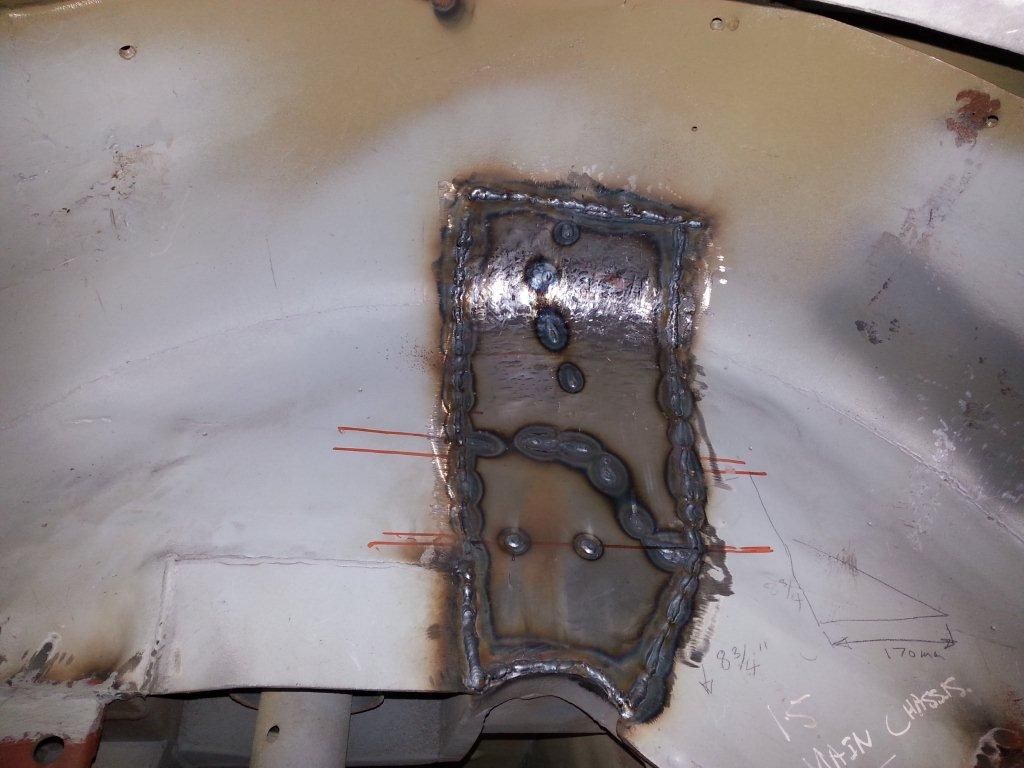
Outrigger to chassis location: quite often where this member joins the main chassis rail, there is some corrosion but on this occasion it was corroded right through requiring the inner side section repairing too. This was not obvious from the outside only a small rusty pin hole could be see engine side.
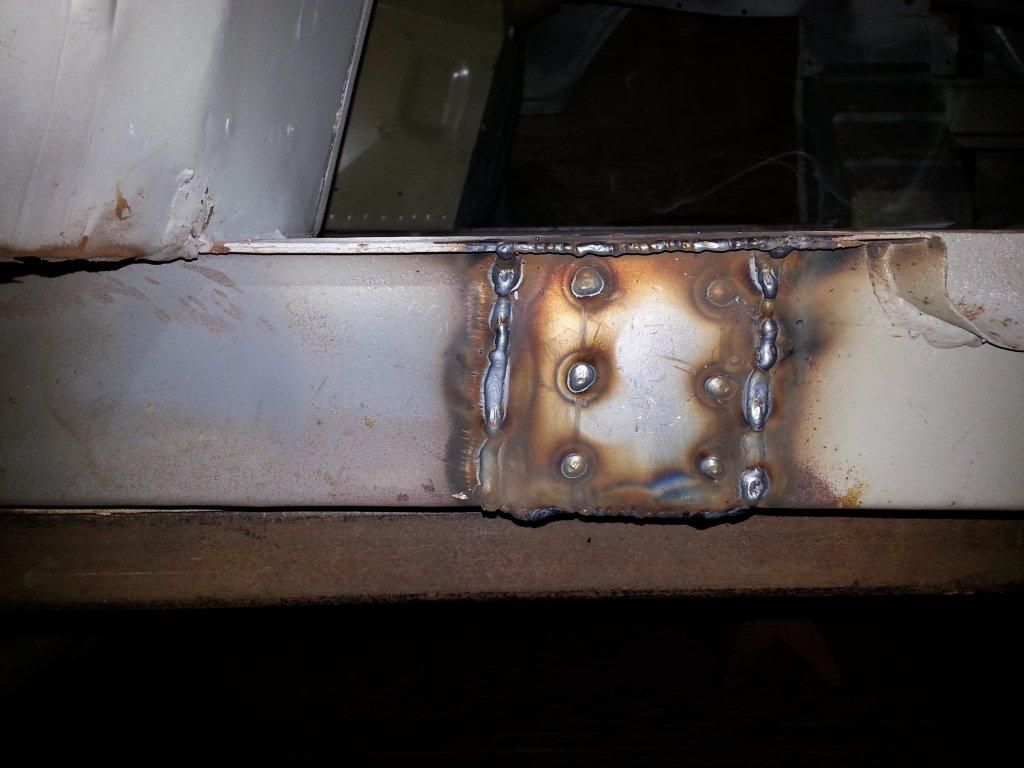
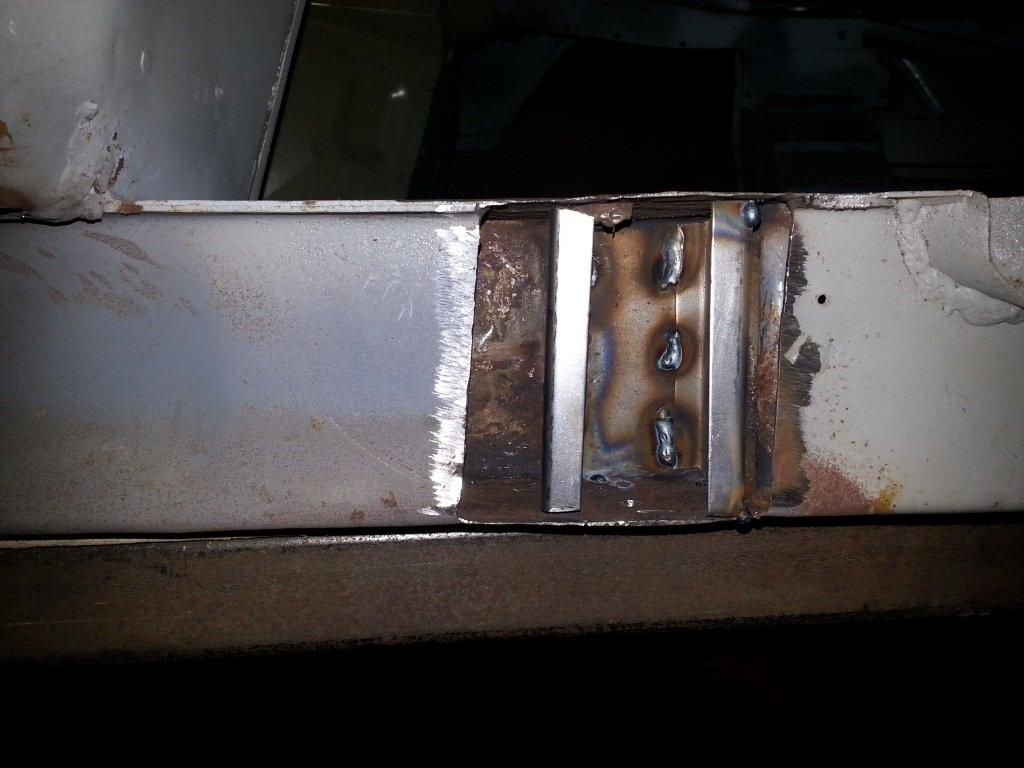
Note the welds are not fully completed just tacks in places.
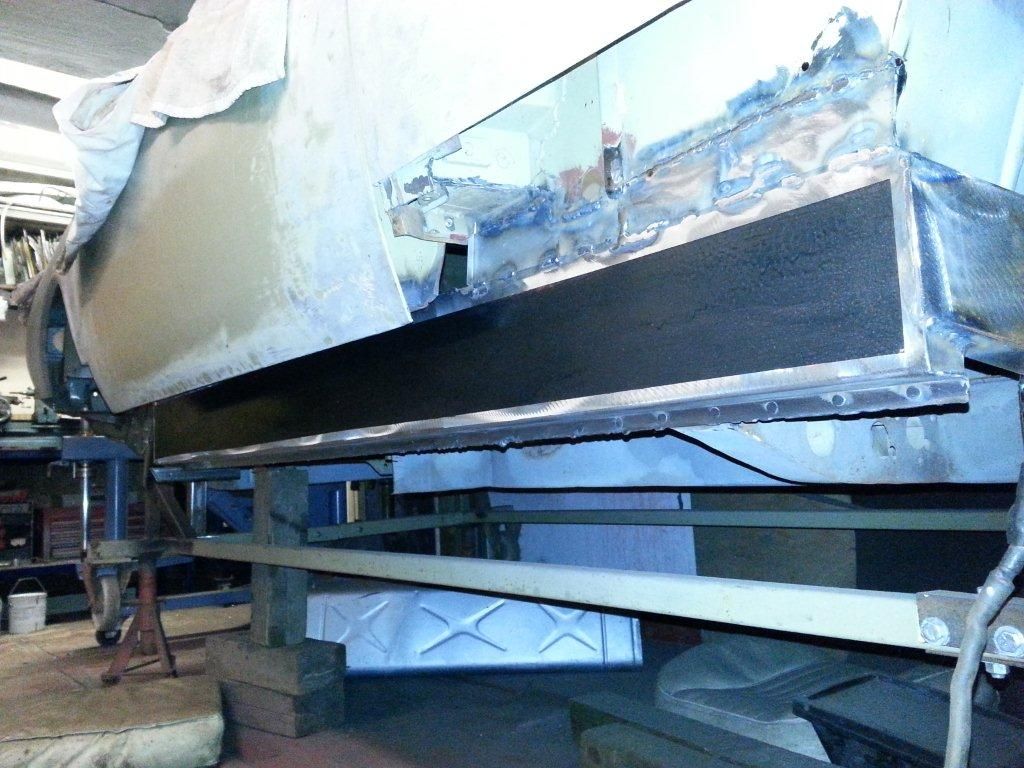
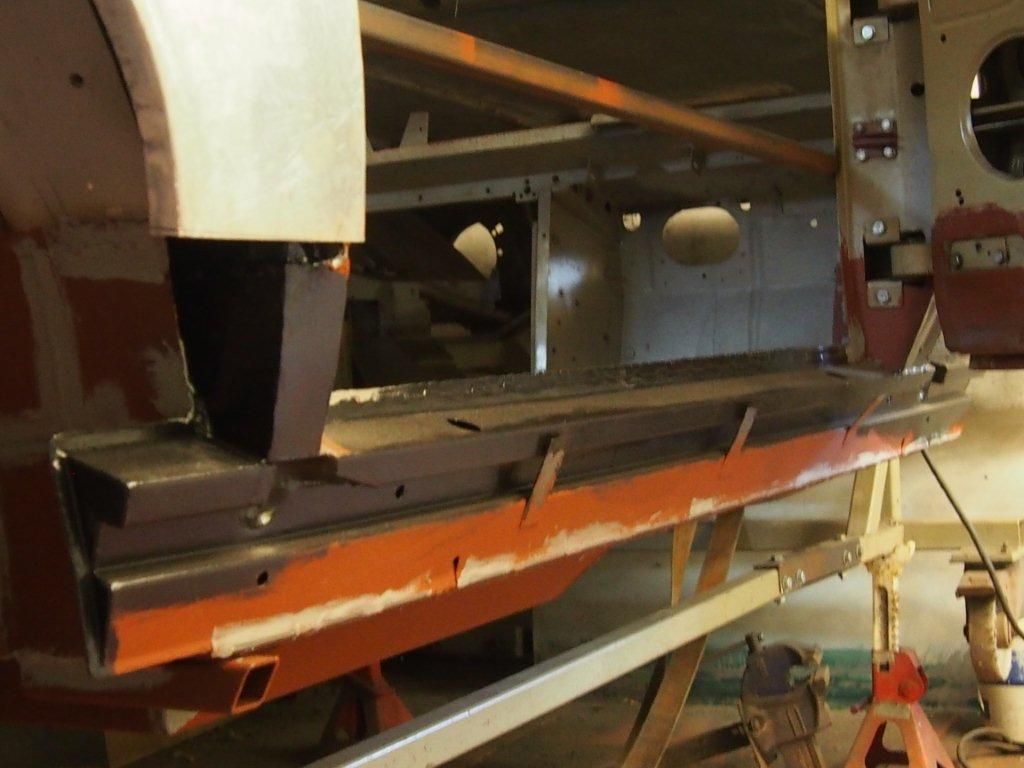
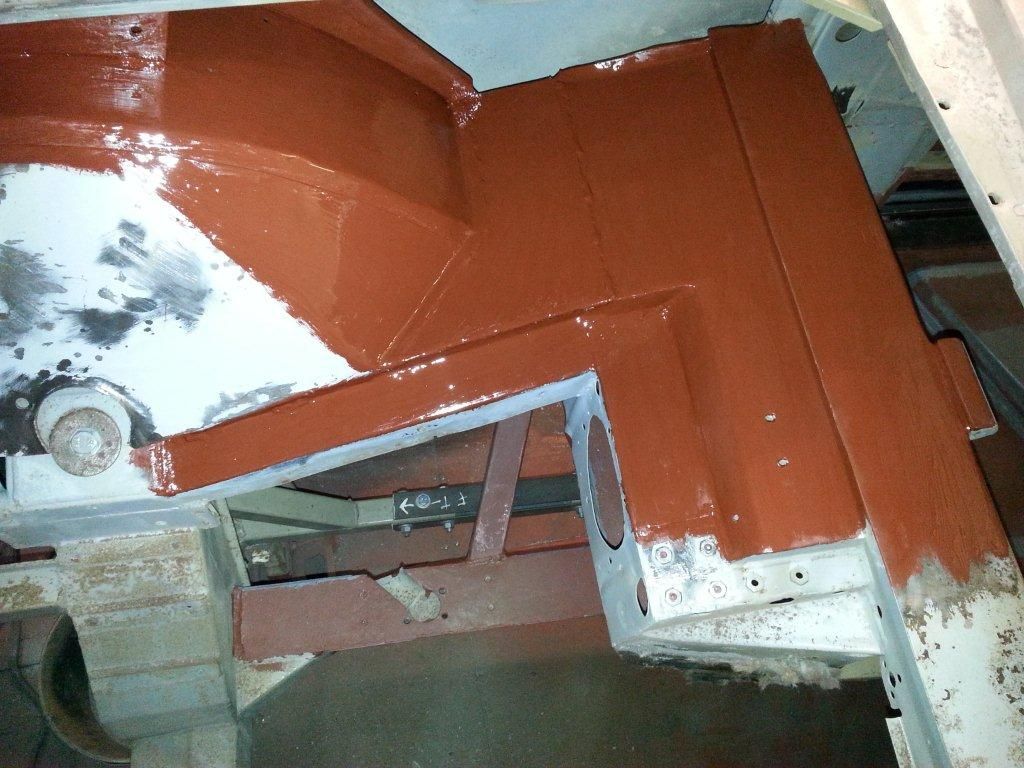
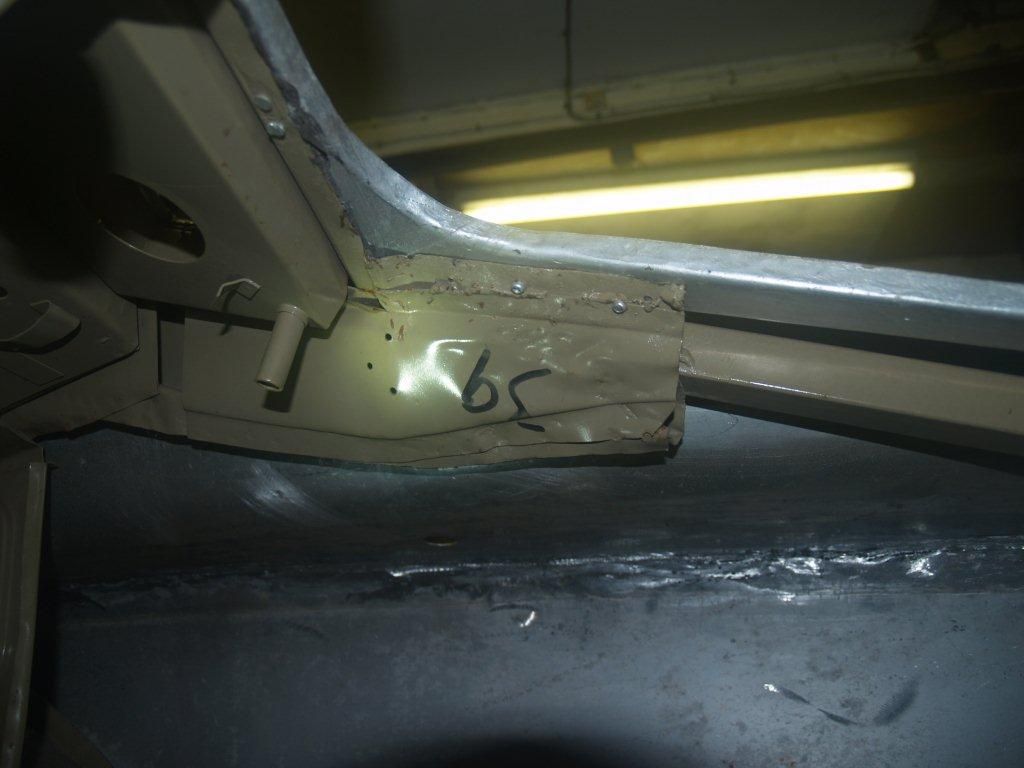
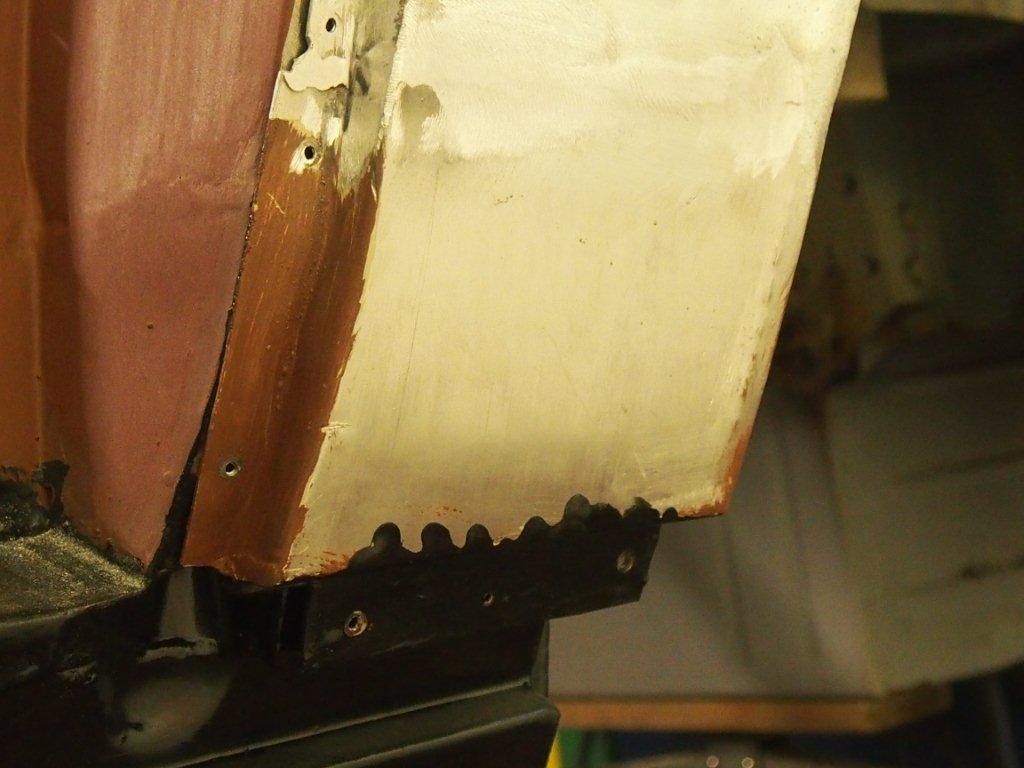
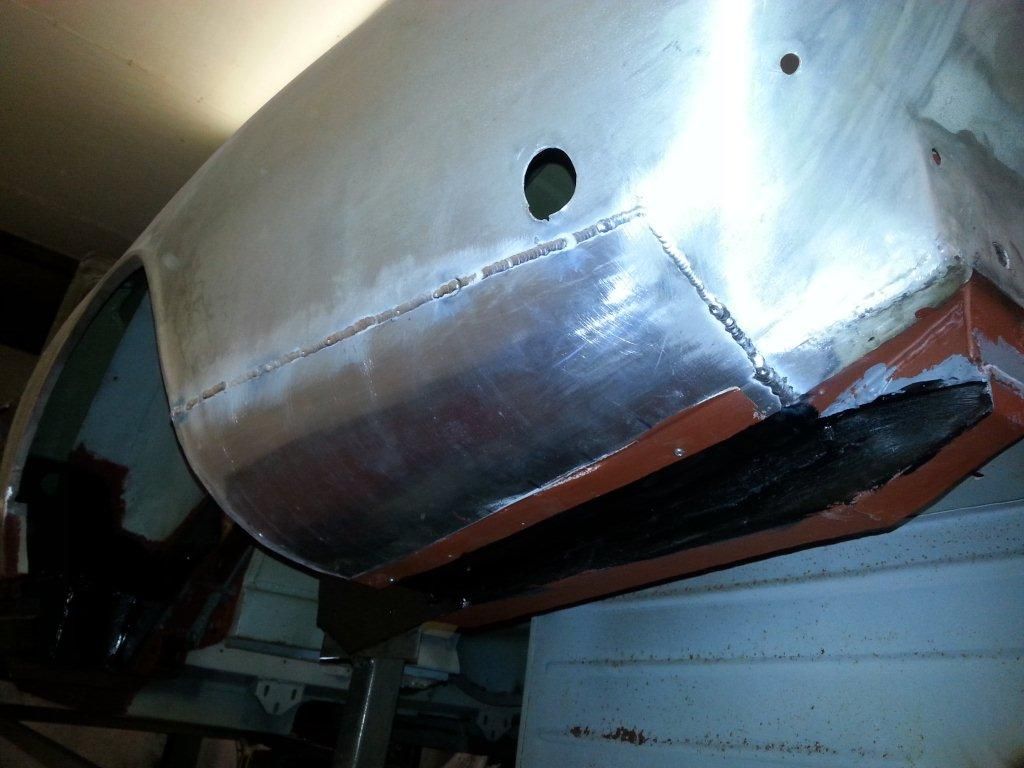
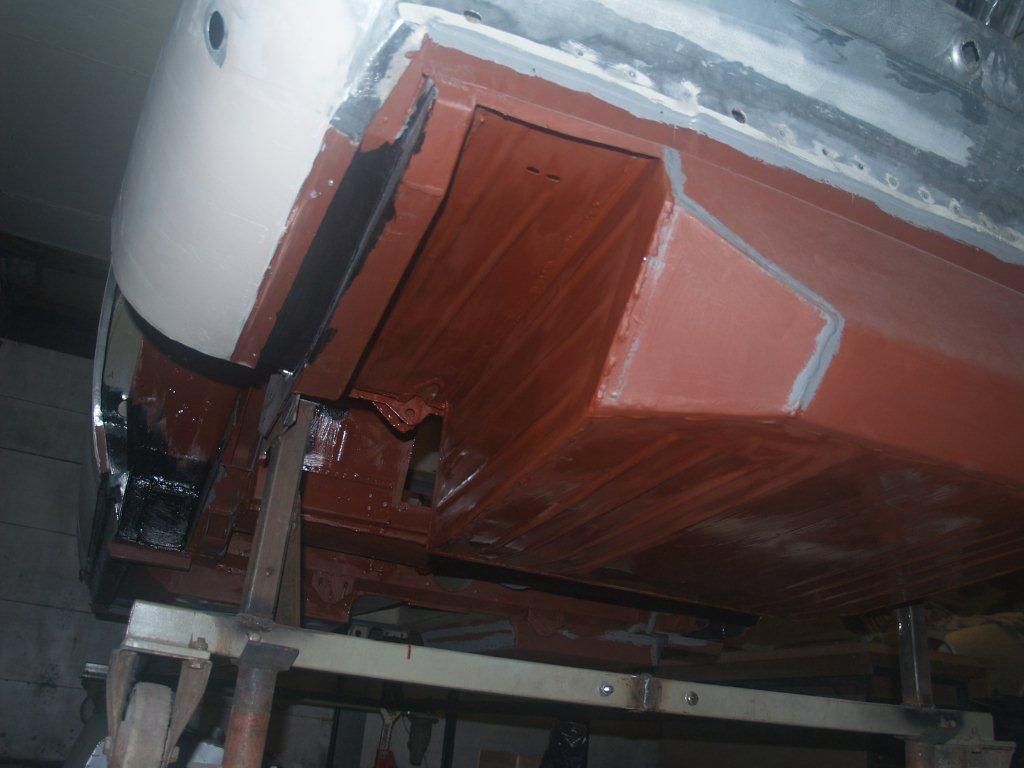
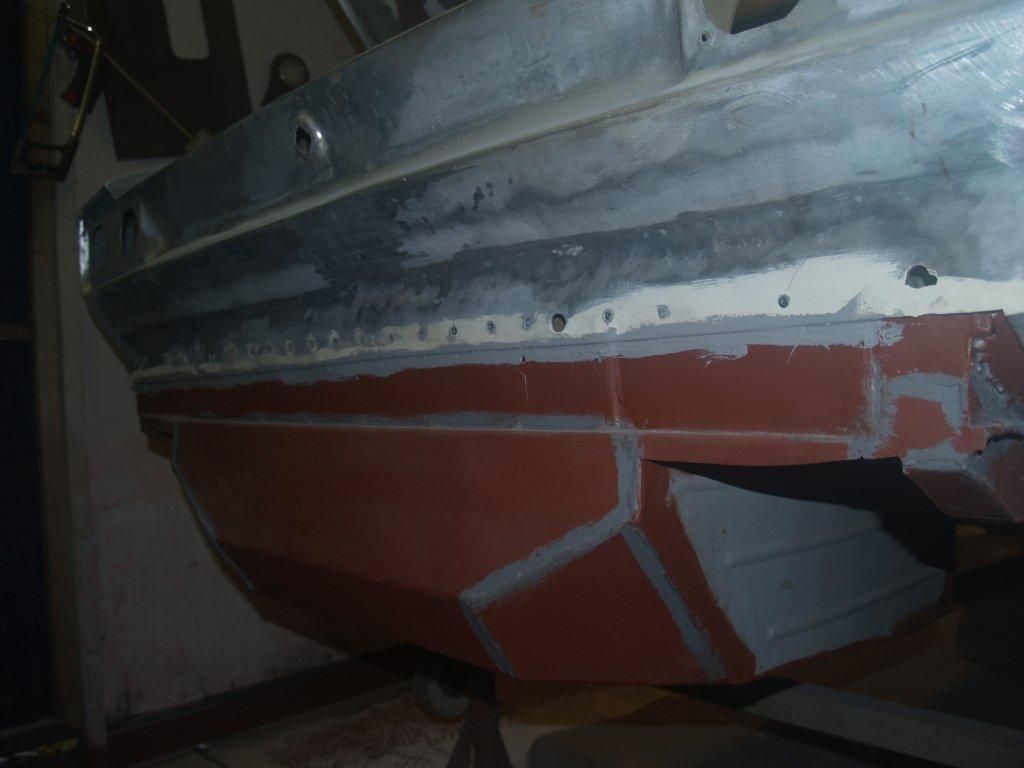
This photo shows the rear of the car where work has started to bring the rear back to original.The second hand boot lid is in place and you can see where we have started to unpick the metal.

Inner sill: Given the poor condition of the old inner sill, we decided the best course of action would be to completely replace it and start with new material. This was to be a good decision as the old sections had been previously repaired poorly.


OS Out-rigger: As the project came with some new members replacing them required little thought. The original member although looked fine, initially, the size was in-correct and the shape where it joined the sill was completely wrong so replacing was inevitable.

Outrigger to chassis location: quite often where this member joins the main chassis rail, there is some corrosion but on this occasion it was corroded right through requiring the inner side section repairing too. This was not obvious from the outside only a small rusty pin hole could be see engine side.


Note the welds are not fully completed just tacks in places.
This photo shows the rear of the car where work has started to bring the rear back to original.The second hand boot lid is in place and you can see where we have started to unpick the metal.

January 2016 update from the restorer
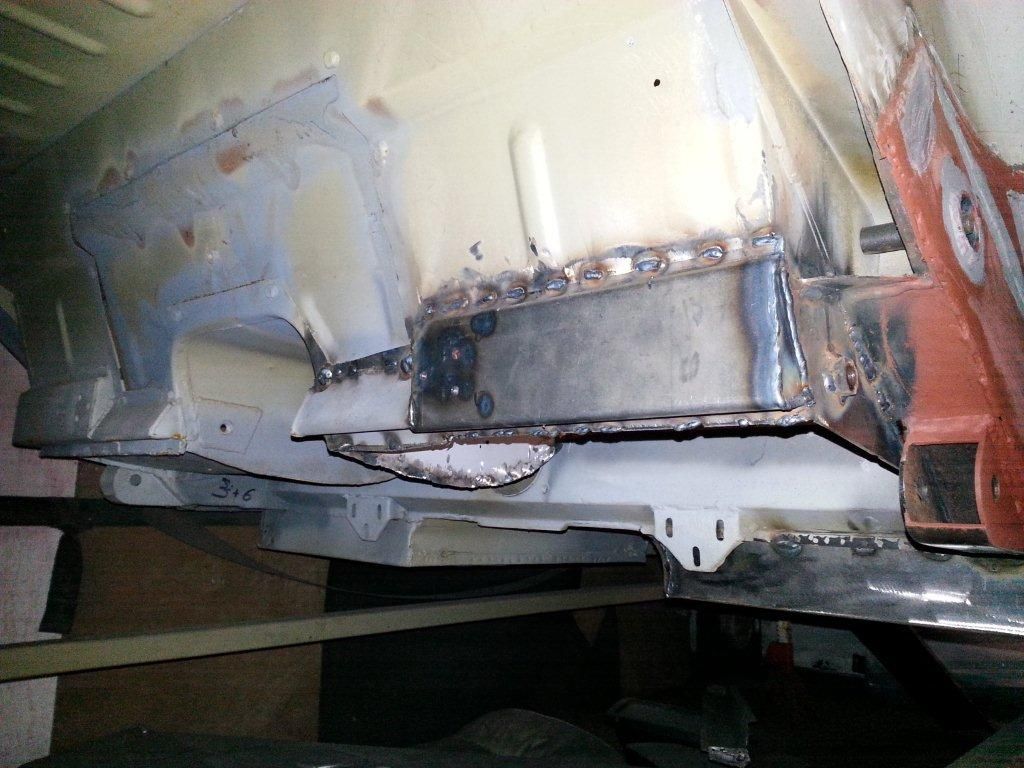
Sills: These have been painted inside before welding, all helps in the combat against corrosion.
Radius rod location: Again painted inside before final side cover
welding.
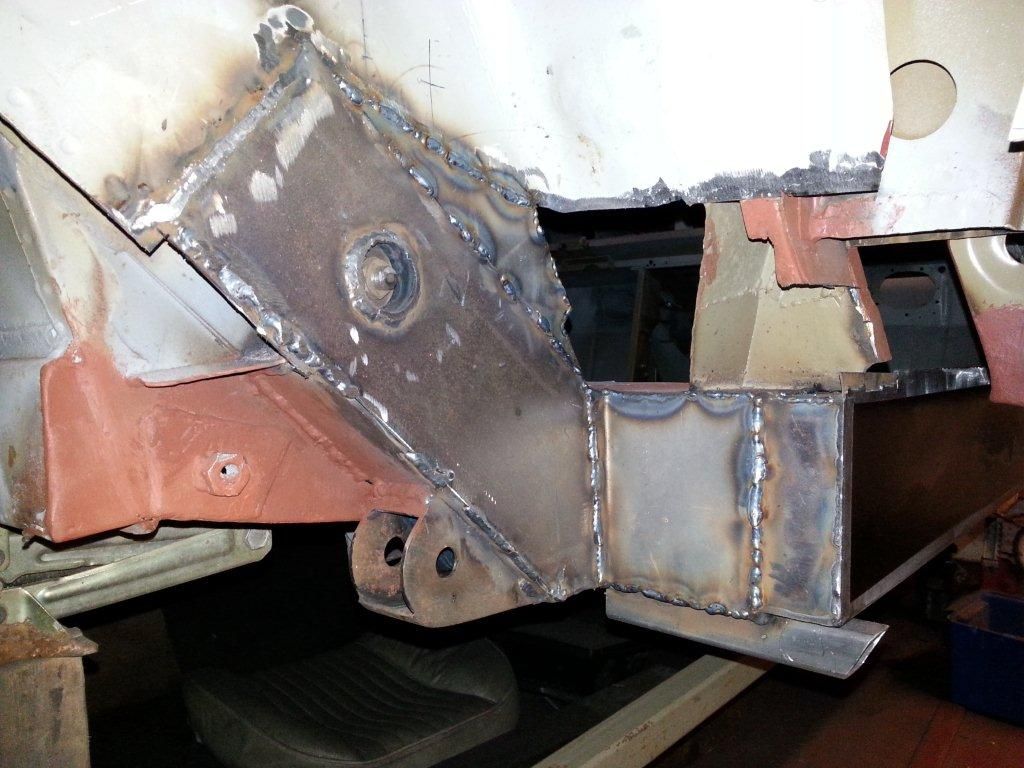
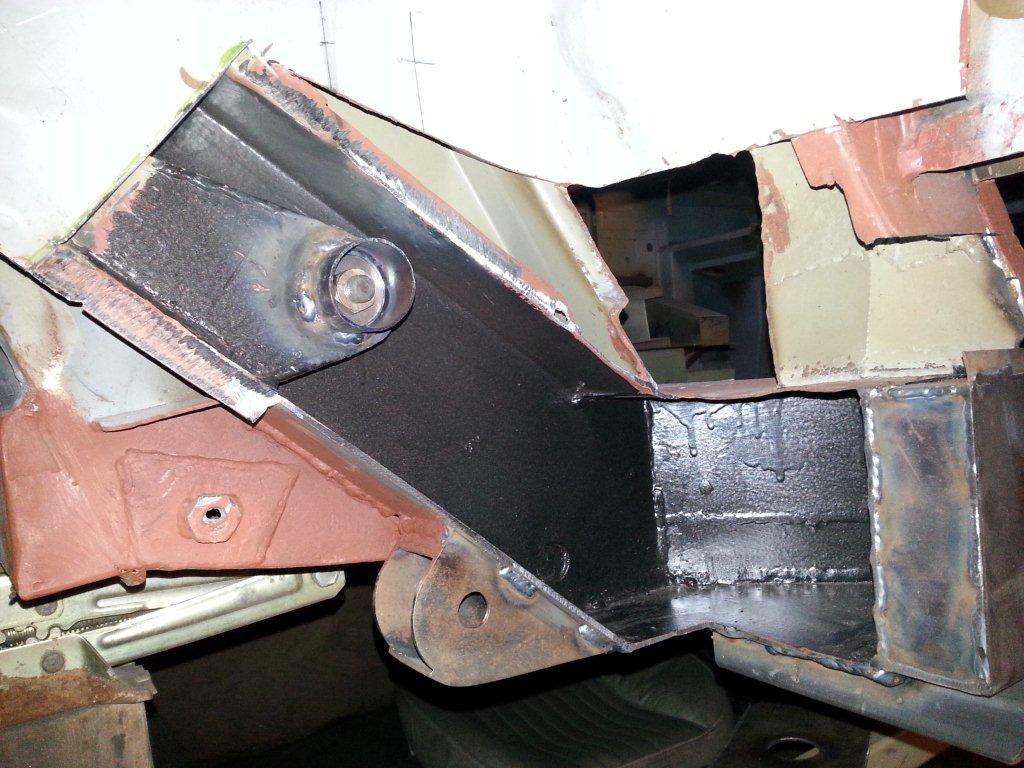
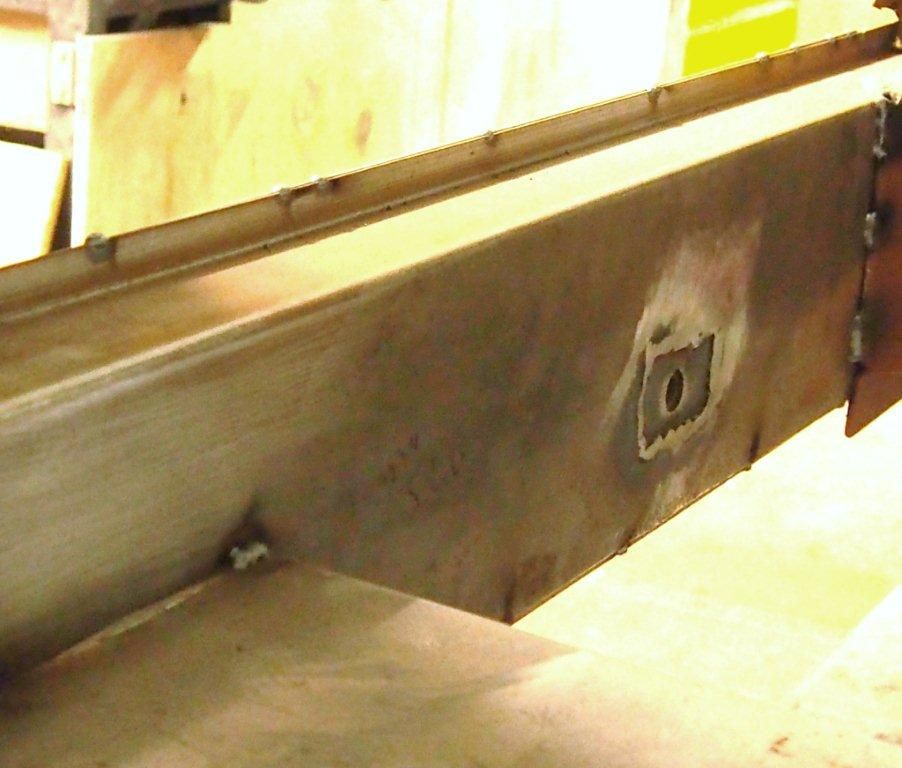
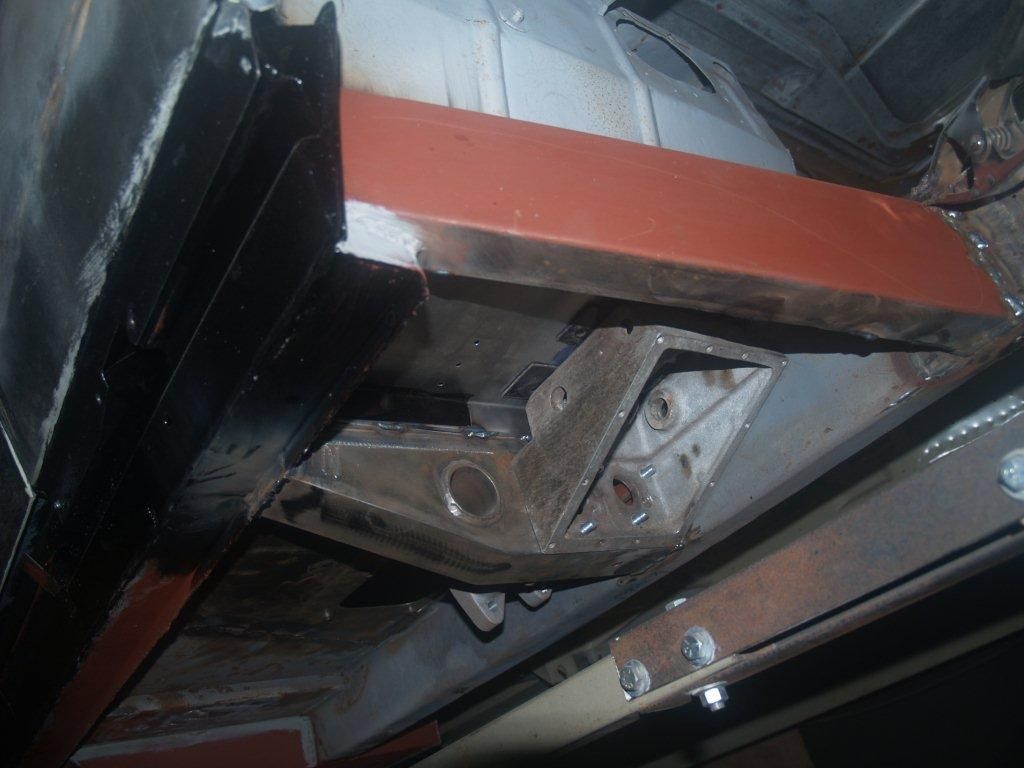
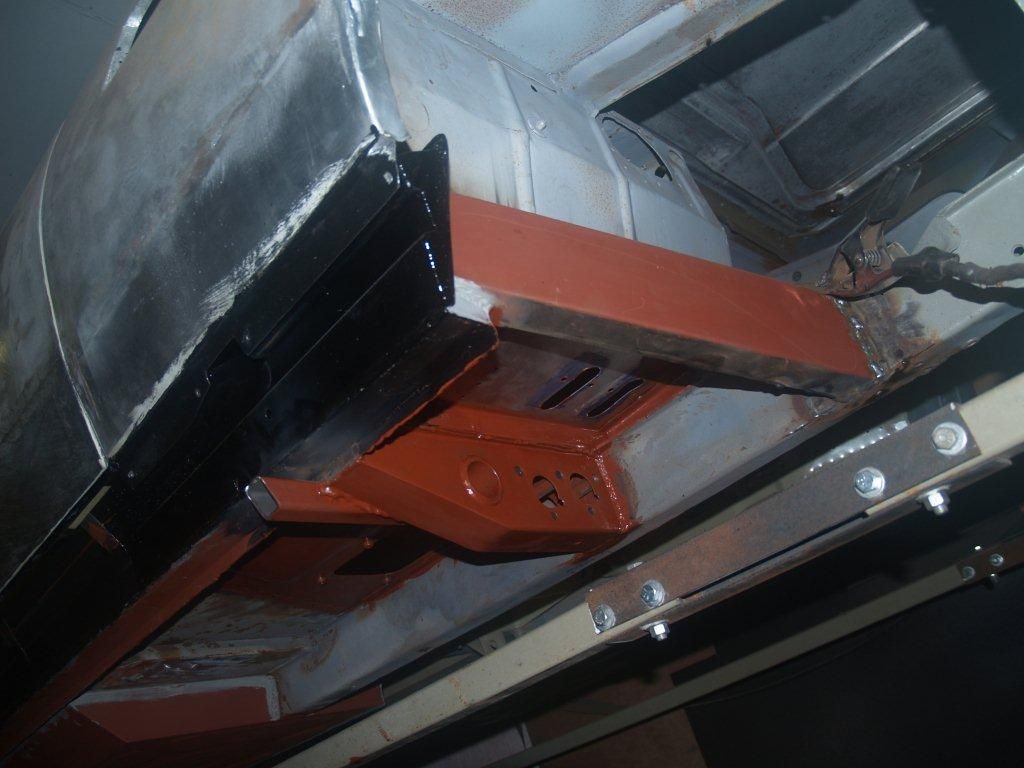
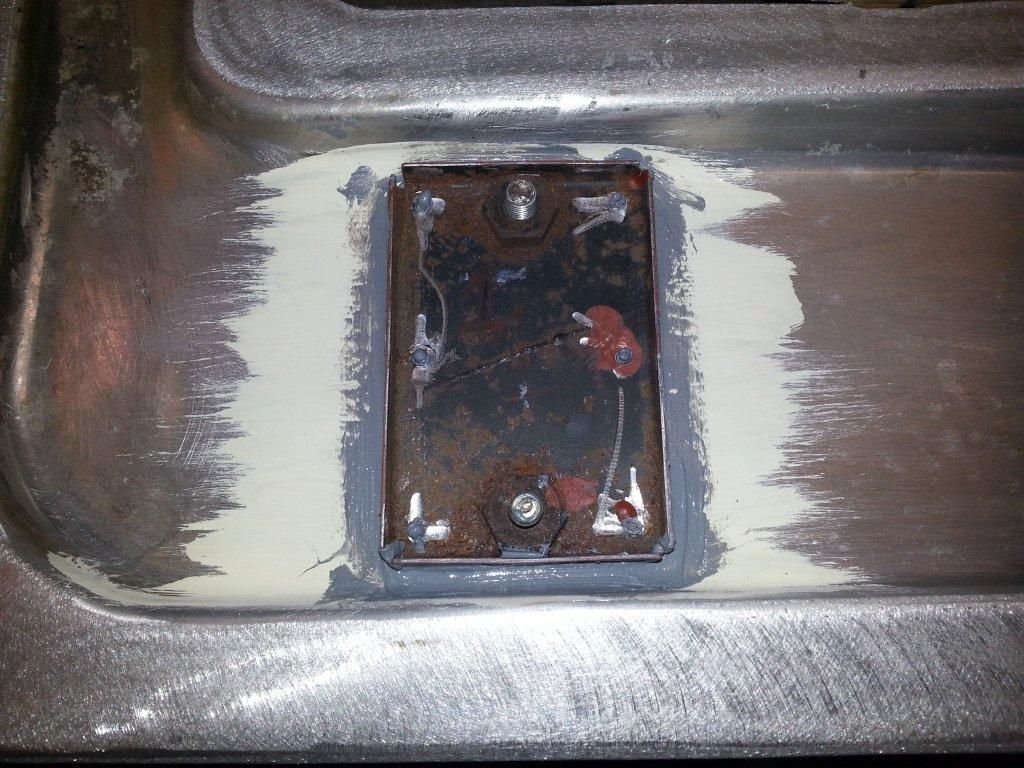
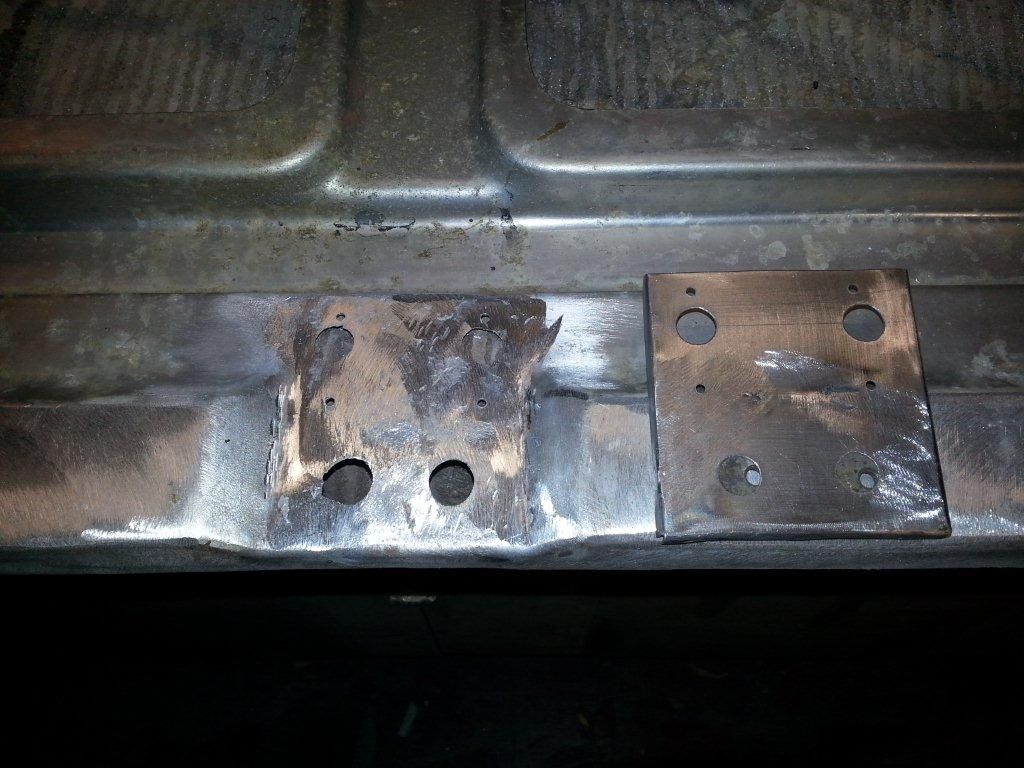
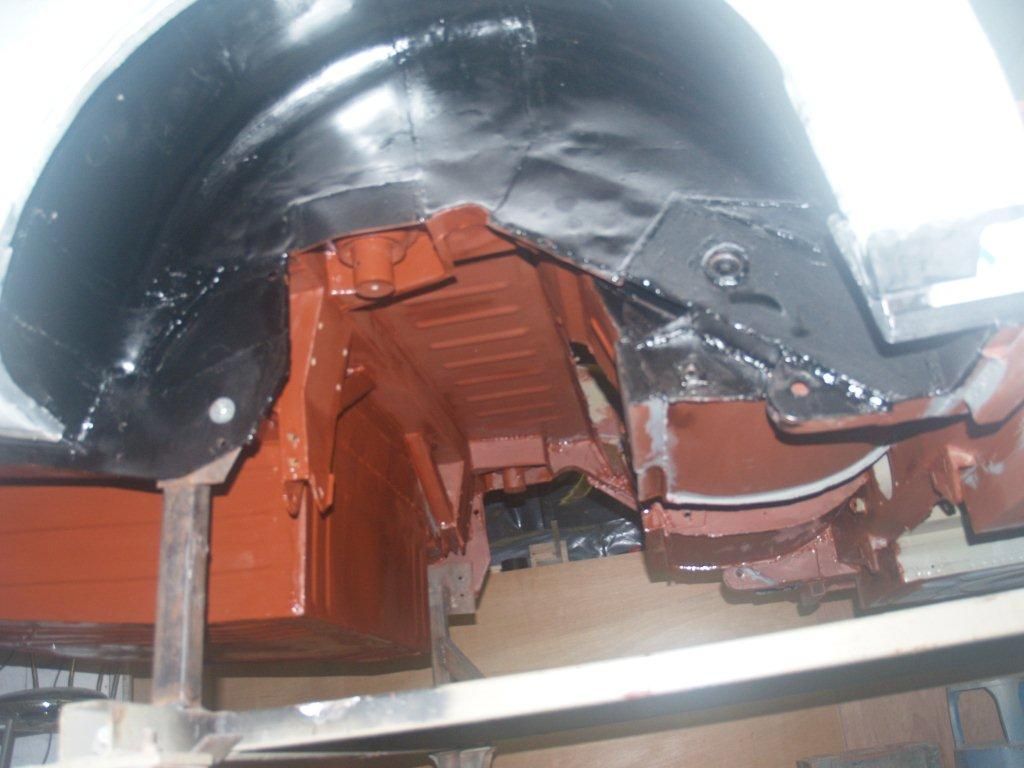
Boot floor rail and support plate: This had been repaired, badly, and the rust could be seen through the first cut out. On seeing the condition, and the fact that the boot floor inside was distorted (but salvageable) once the old rail was removed, a new rail was made and attached after some interior sections replaced. The support plate, identified with the four holes which originally held the original lever arm shocks, was bent. corroded and miss-shaped so I decided to replace at the highest point.
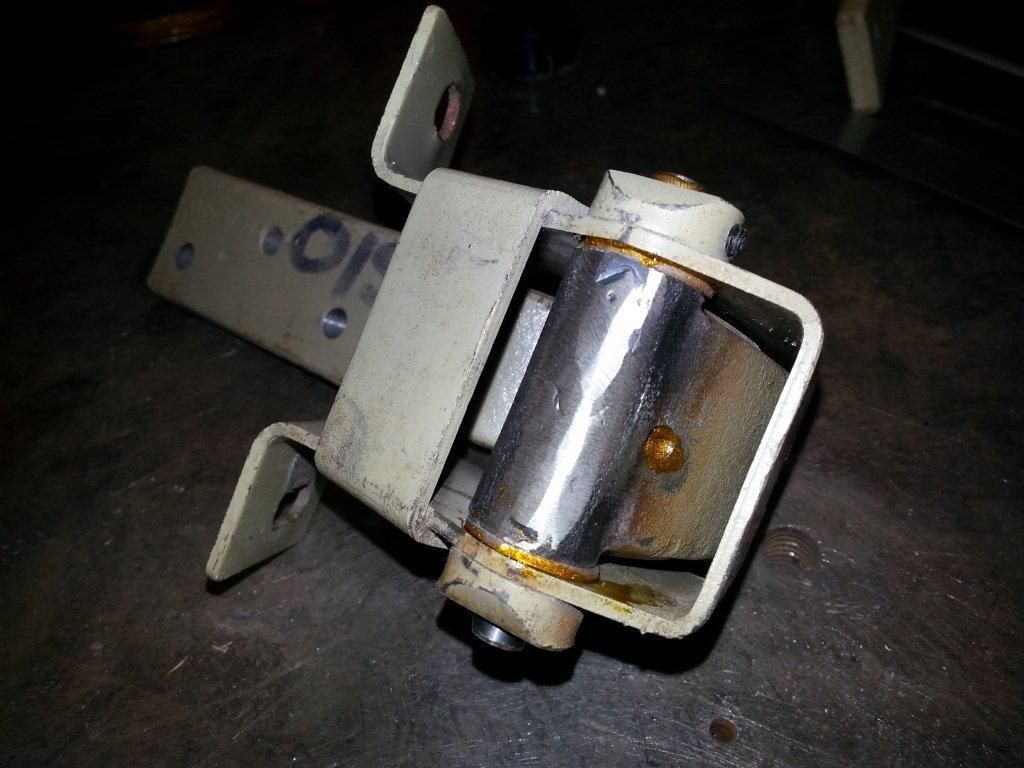
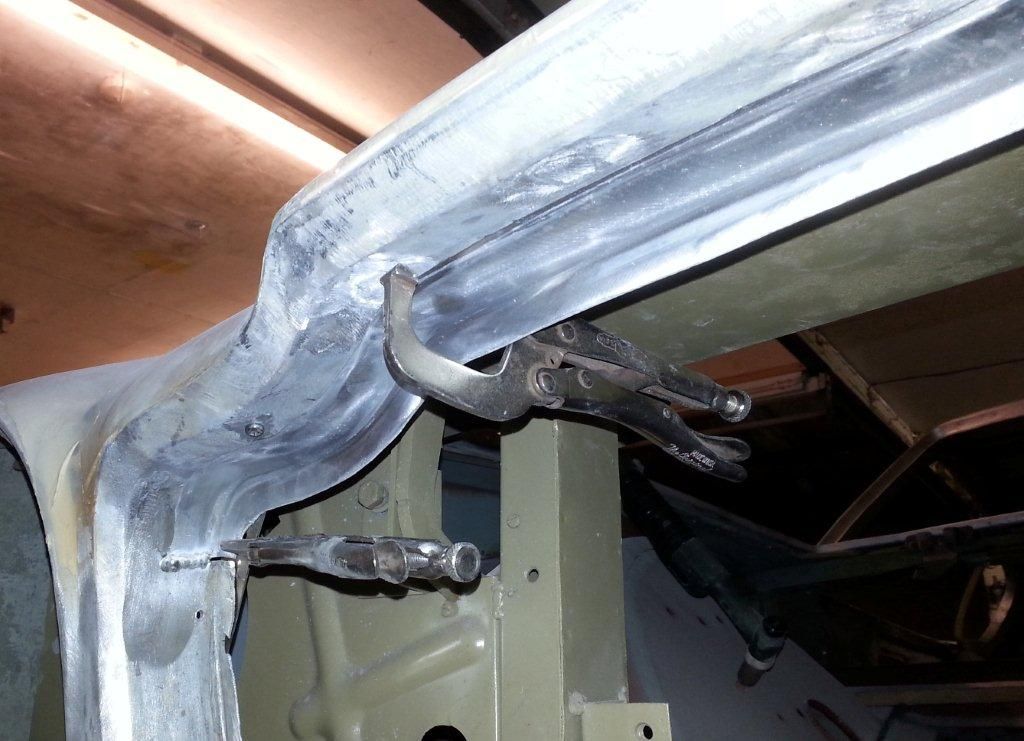
Door hinge: During setting up for position of the profiled sill, ensuring sufficient gap to the door at lowest edge, it became clear that the top hinge has excessive clearance, therefore will need refurbishment. The NS unit will probably need doing too. A job for the list.
Stainless steel sill covers: When setting up the sills, I loosely clip the top stainless cover in place to give an overall view and check there is an even gap to the door, this to me is quite a focal point and needs to look right. During this operation I noticed that the top cut outs where the lower edge of the quarter panels pass through - had been cut to the horizontal fold or slightly beyond, which should leave a lip nearer the width of the quarter panel fold edge usually 8- 12 mm. This visually will show a larger gap and not help to keep out dirt falling inside.
I could weld a section in place, but over this length if fully welded will distort - making more work. Therefore, we decided to replace them with new ones.
Sills: These have been painted inside before welding, all helps in the combat against corrosion.


Radius rod location: Again painted inside before final side cover
welding.


Boot floor rail and support plate: This had been repaired, badly, and the rust could be seen through the first cut out. On seeing the condition, and the fact that the boot floor inside was distorted (but salvageable) once the old rail was removed, a new rail was made and attached after some interior sections replaced. The support plate, identified with the four holes which originally held the original lever arm shocks, was bent. corroded and miss-shaped so I decided to replace at the highest point.


Door hinge: During setting up for position of the profiled sill, ensuring sufficient gap to the door at lowest edge, it became clear that the top hinge has excessive clearance, therefore will need refurbishment. The NS unit will probably need doing too. A job for the list.
Stainless steel sill covers: When setting up the sills, I loosely clip the top stainless cover in place to give an overall view and check there is an even gap to the door, this to me is quite a focal point and needs to look right. During this operation I noticed that the top cut outs where the lower edge of the quarter panels pass through - had been cut to the horizontal fold or slightly beyond, which should leave a lip nearer the width of the quarter panel fold edge usually 8- 12 mm. This visually will show a larger gap and not help to keep out dirt falling inside.
I could weld a section in place, but over this length if fully welded will distort - making more work. Therefore, we decided to replace them with new ones.
March 2016 – Update from the restorer
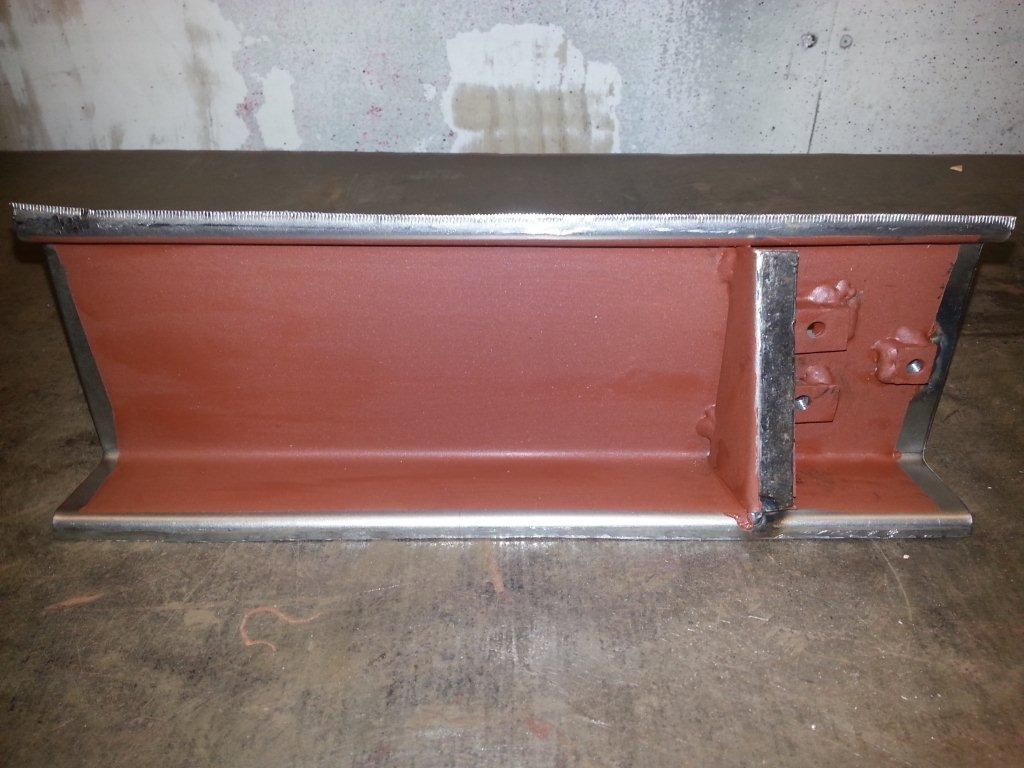
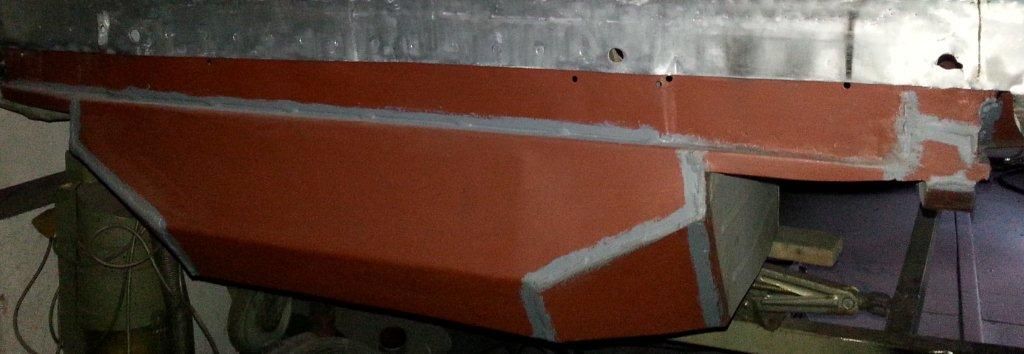
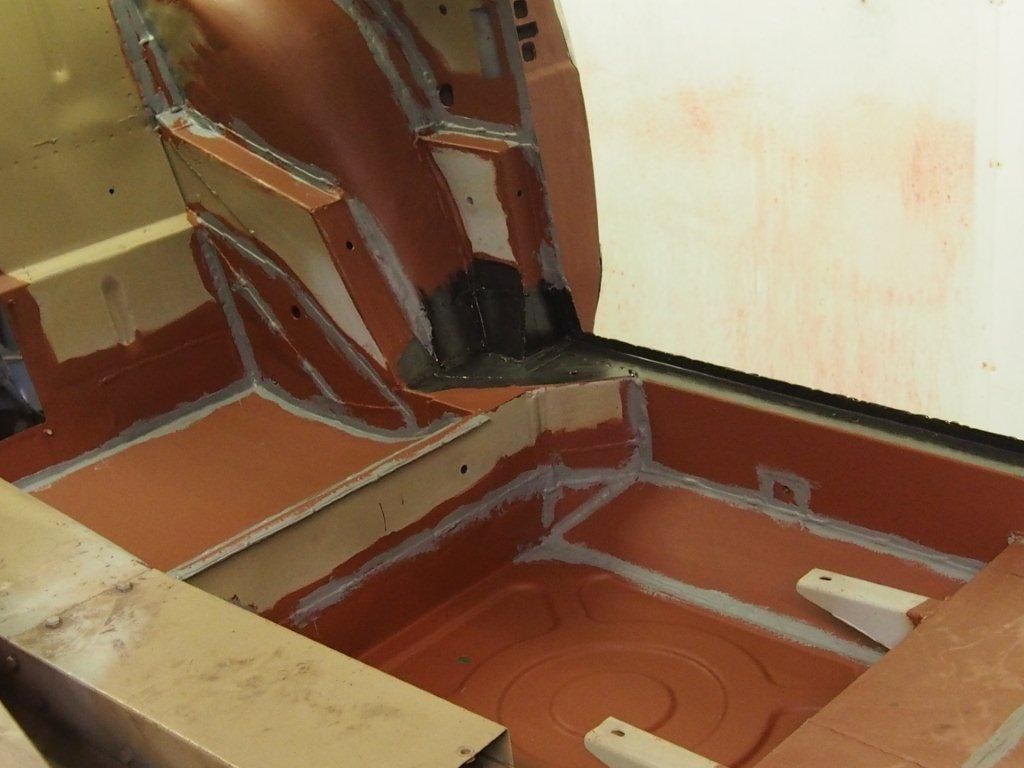
OS Sill: This is all finished along with the A and B post, primer painted and joints are sealed.
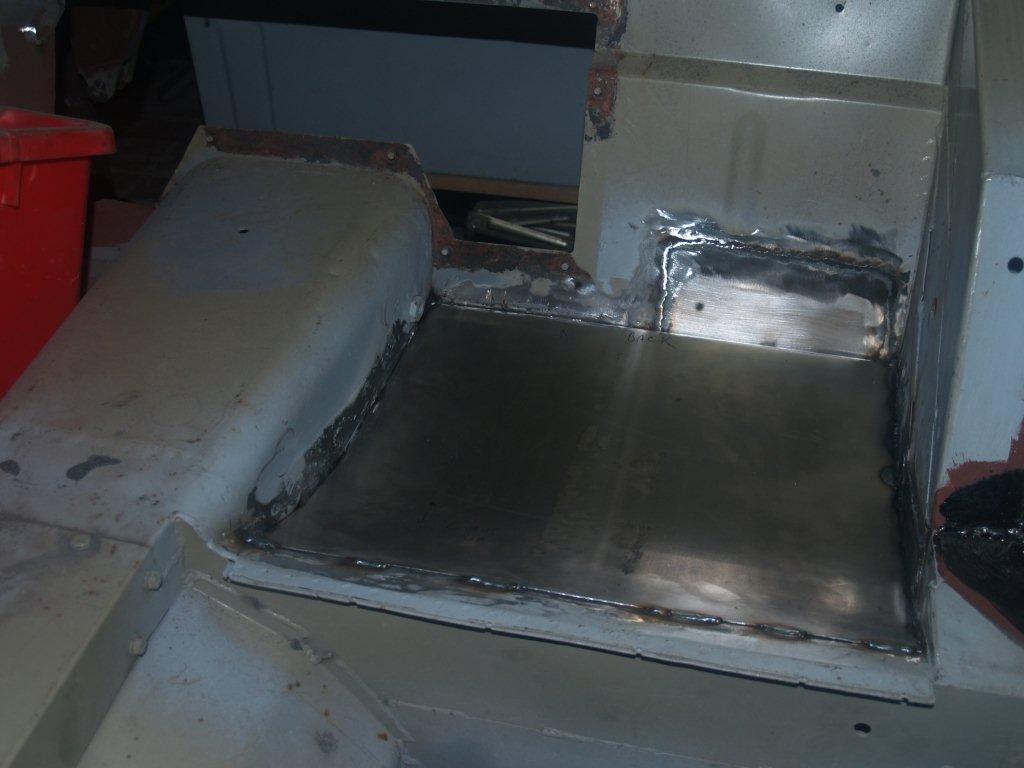
OS Bum panel: although the original was reasonably sound, the supporting member to the rear which also supports the hand brake cable was corroded and was best being replaced. Replacing the member required a new bum panel too, the previous panel was distorted from previous repairs.
NSR floor panel: As the car came with a new panel this is now welded in place, but beforehand needed some cleaning up as previously stored in slightly damp conditions. All welded in place and finished with primer with edges sealed as usual.
Door Hinges: in the process of setting up the door for best fit to adjacent quarters, it became clear the hinges were worn. Initially after rebuilding the lower hinge which initially seamed to only one, the top hinge required reworking too. Both are refitted assembled with lubrication and holes for future lubrication which there was a lack of.
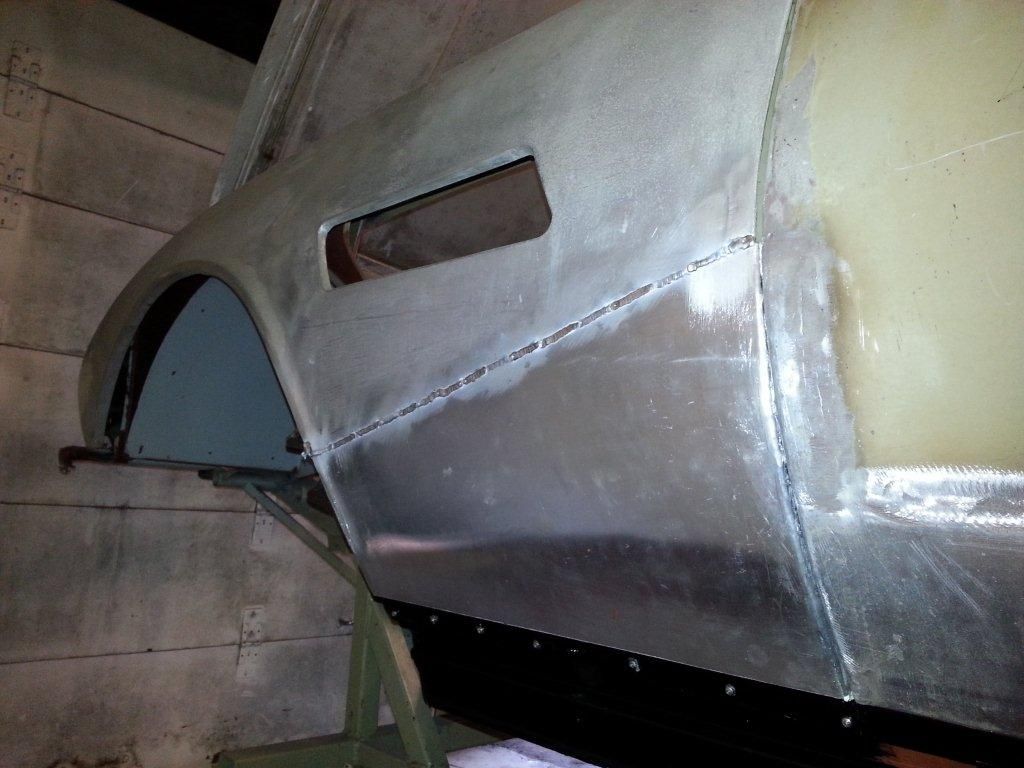
OSR Quarter: I have made a start of returning this to the original shape after removing the sections which emulated the flip tail shape. All is going reasonably well but the corner section where the light is located will need re-fabricating as original shape has unfortunately been destroyed by over welding in the course of previously making the flip tail corner shape.
Boot lid: Bolted to the hinges and adjusted for best position, all aligns reasonably well - giving me a line to work to with the quarter panel edge. At some point the boot lid skin will need to be removed from the aluminium frame for re-bonding together as the side seams are split.
OS Sill: This is all finished along with the A and B post, primer painted and joints are sealed.

OS Bum panel: although the original was reasonably sound, the supporting member to the rear which also supports the hand brake cable was corroded and was best being replaced. Replacing the member required a new bum panel too, the previous panel was distorted from previous repairs.


NSR floor panel: As the car came with a new panel this is now welded in place, but beforehand needed some cleaning up as previously stored in slightly damp conditions. All welded in place and finished with primer with edges sealed as usual.

Door Hinges: in the process of setting up the door for best fit to adjacent quarters, it became clear the hinges were worn. Initially after rebuilding the lower hinge which initially seamed to only one, the top hinge required reworking too. Both are refitted assembled with lubrication and holes for future lubrication which there was a lack of.

OSR Quarter: I have made a start of returning this to the original shape after removing the sections which emulated the flip tail shape. All is going reasonably well but the corner section where the light is located will need re-fabricating as original shape has unfortunately been destroyed by over welding in the course of previously making the flip tail corner shape.
Boot lid: Bolted to the hinges and adjusted for best position, all aligns reasonably well - giving me a line to work to with the quarter panel edge. At some point the boot lid skin will need to be removed from the aluminium frame for re-bonding together as the side seams are split.
April 2016 - Update
OSR Inner wing top repair: This area had caught my eye several times and closer inspection revealed a previous unsound repair. All corrosion was cut out and replaced as required.
NS Boot rail end repair: Remaining section to be replaced here as being bent and corroded.
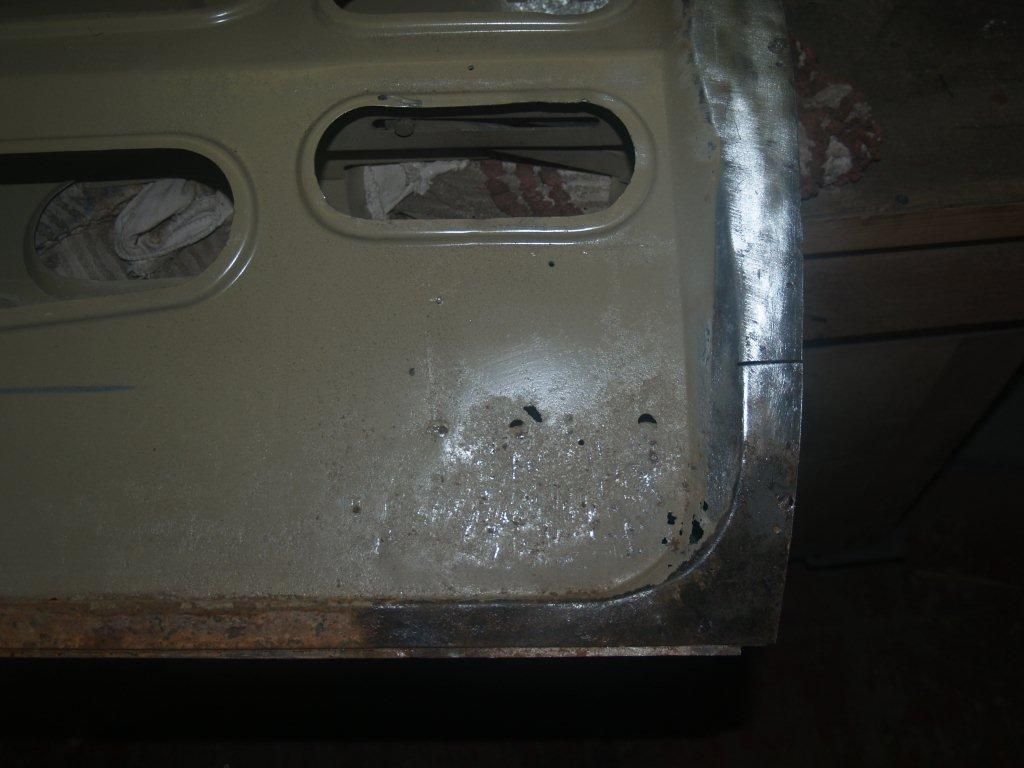
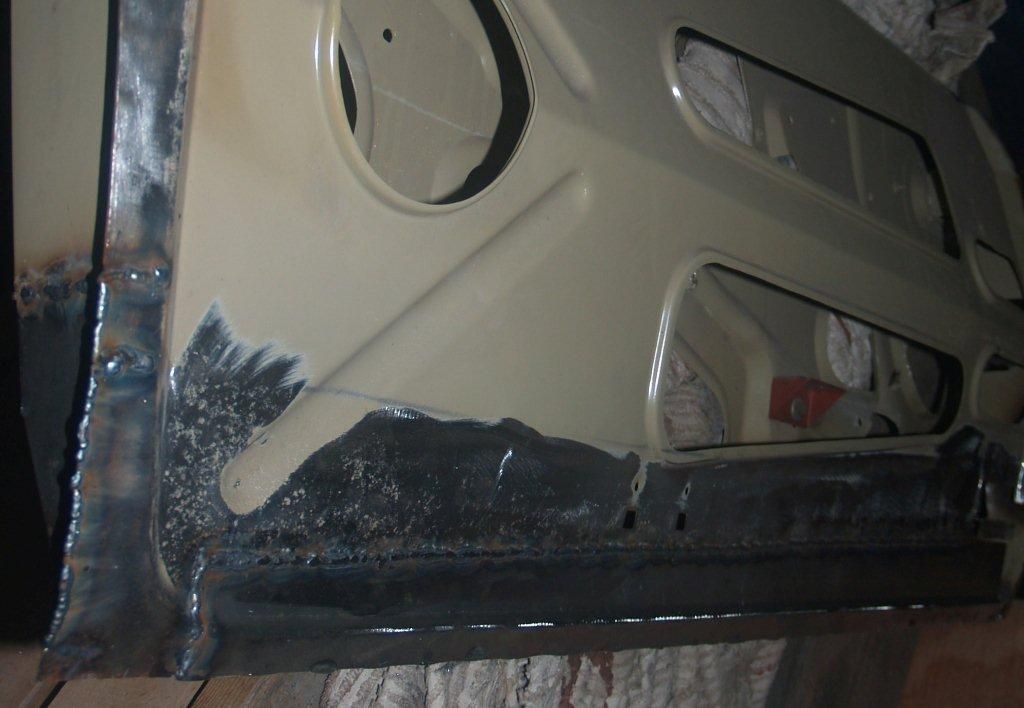
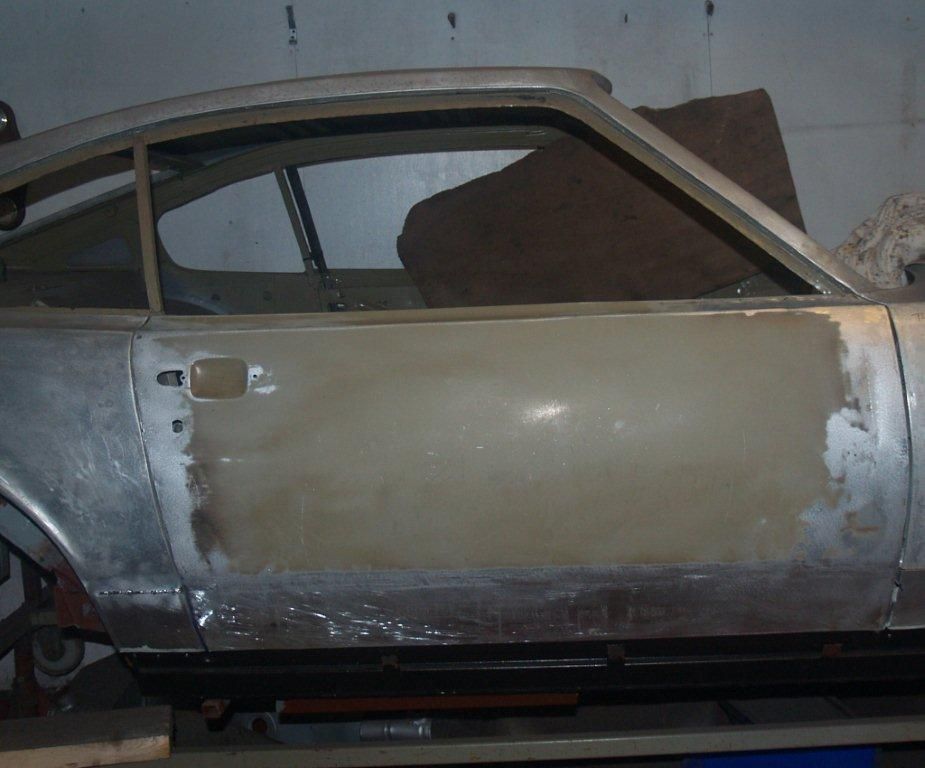
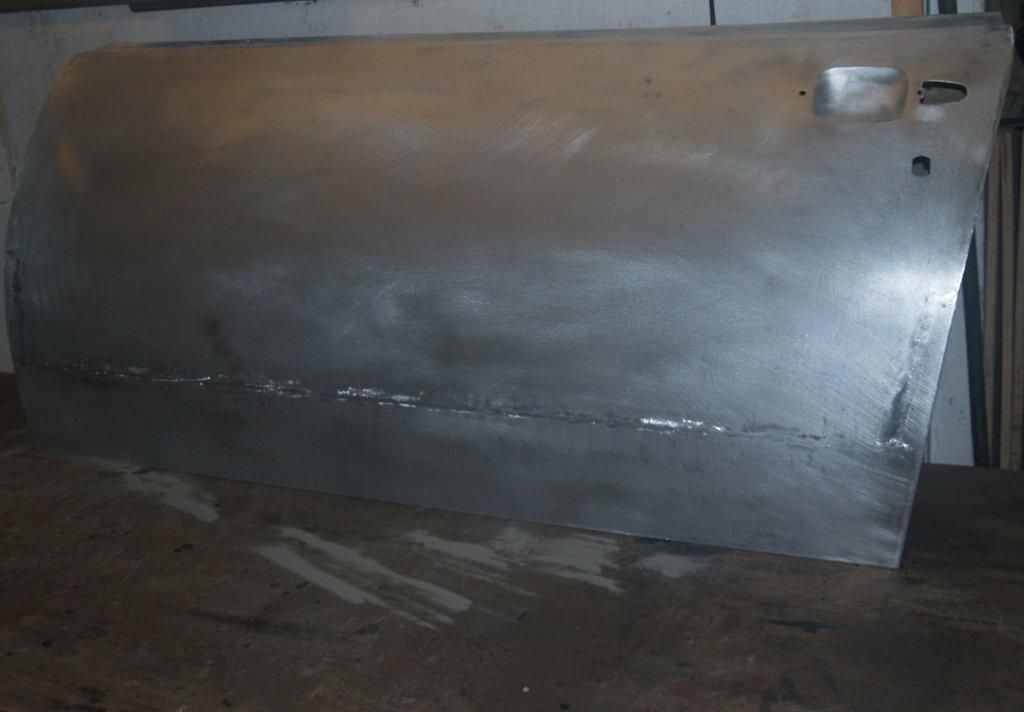
OS Door: After making the new aluminium lower quarters and in the process of setting up for position and alignment with the door for welding, which showed the door bottom not to be straight along the bottom edge in both planes. Closer inspection showed the door to have been previously repaired with a new bottom with distortion and leaving some corroded sections in place.
Removing the door skin has revealed a poorly repaired bottom section, which is in the process of being fully refurbished and straightened along with new lowers section to the door skin as well.
I appreciate the rust repairs do not make the most exciting reading but I thought it important to illustrate that even a superficially good shell can hide all manner of issues.
OSR Inner wing top repair: This area had caught my eye several times and closer inspection revealed a previous unsound repair. All corrosion was cut out and replaced as required.


NS Boot rail end repair: Remaining section to be replaced here as being bent and corroded.

OS Door: After making the new aluminium lower quarters and in the process of setting up for position and alignment with the door for welding, which showed the door bottom not to be straight along the bottom edge in both planes. Closer inspection showed the door to have been previously repaired with a new bottom with distortion and leaving some corroded sections in place.
Removing the door skin has revealed a poorly repaired bottom section, which is in the process of being fully refurbished and straightened along with new lowers section to the door skin as well.


I appreciate the rust repairs do not make the most exciting reading but I thought it important to illustrate that even a superficially good shell can hide all manner of issues.
July 2016 Update
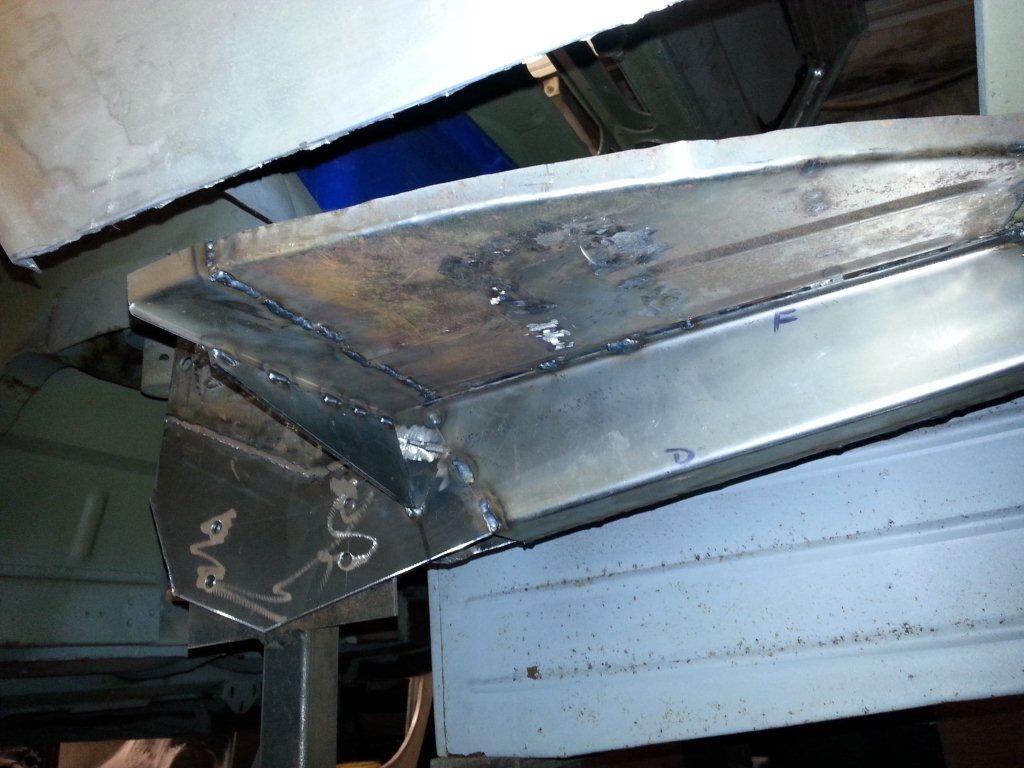
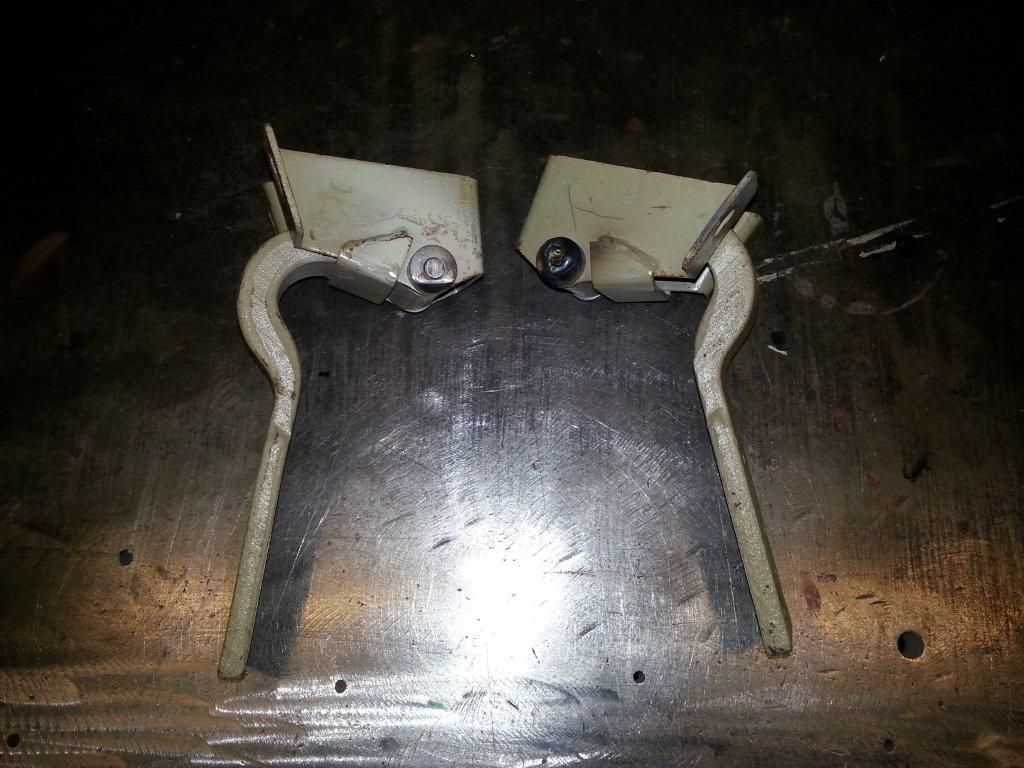
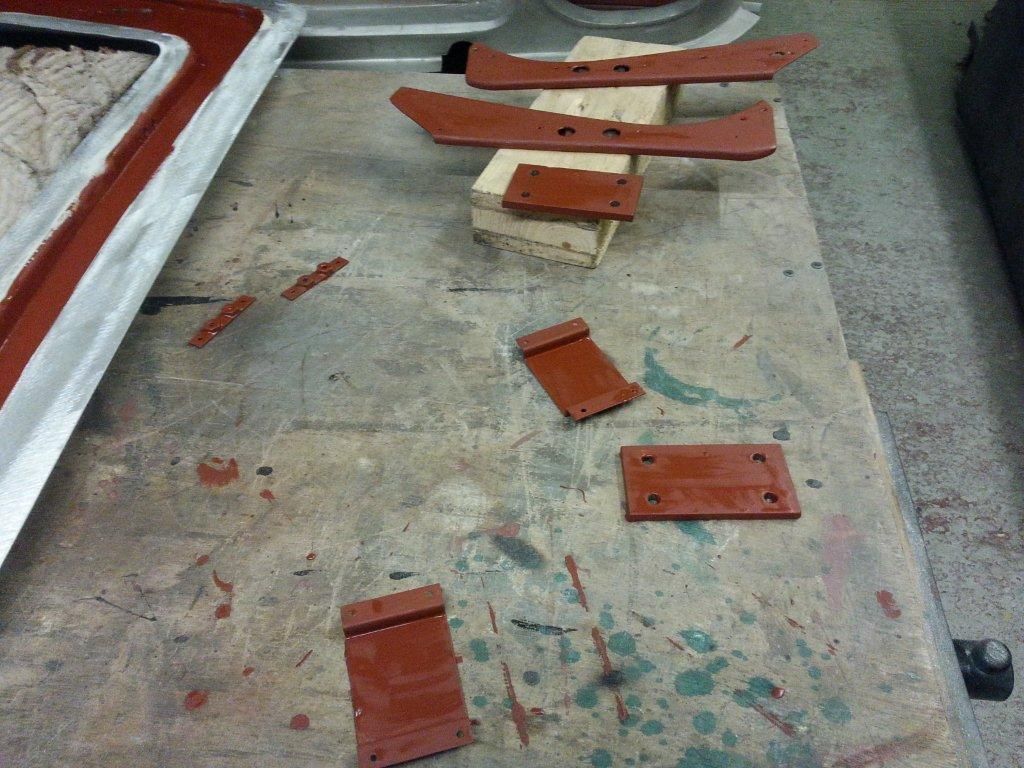
Pedal Box out-rigger: Now having the pedal box and new studded bracket, this member has been set in place and welded. It was just as well I had these castings it gave me the opportunity to check all went together freely, but the through holes in the new steel cross member which these two castings straddled in position - were slightly out of position. However; with careful fileing I was able to give extra clearance to the member before welding in place. Enlarging these holes would have been quite difficult afterwards being so confined. The pedal box floor is all set in place too and primer painted.
OS Door: In the last update I had removed the door skin as the lower section was not very straight and I had my doubts about its condition. The steel frame had previously been repaired, but the standard was not good enough and inner facing sections required replacing. The steel previously replaced section required straightening before further sections could be replaced. The door skin was corroded to the bottom so the 5-6" was replaced along its length and giving me the opportunity to finish with a nice straight bottom edge. Before fitting the door skin it was painted in primer and finished in black paint to resist further corrosion as best possible.
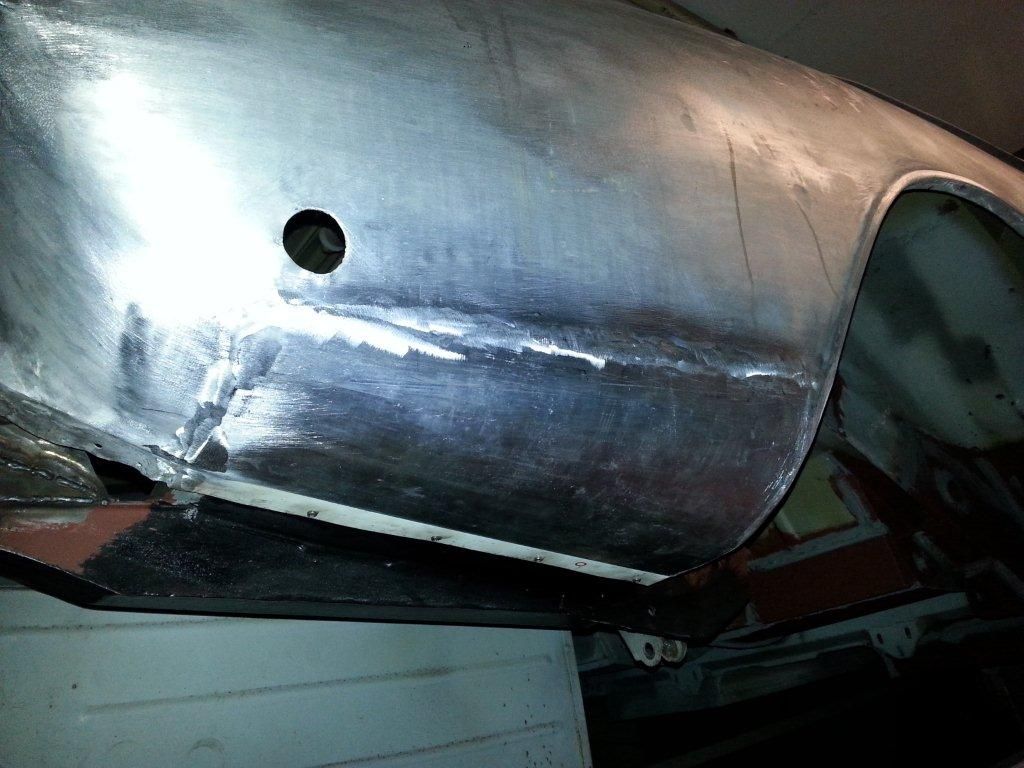
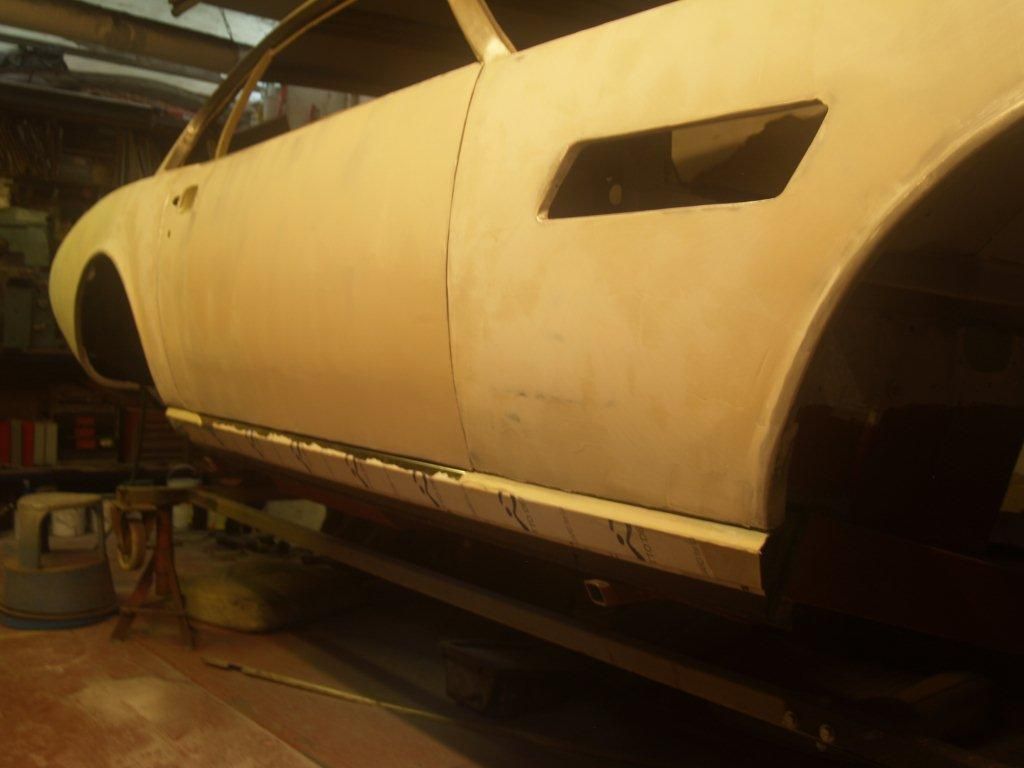
OS Side: New aluminium sections for the lower quarters above the sill line have been made and welded in place, after the inner sides were painted. The new stainless steel sill cover has also carefully been set in place giving even clearance to the door and quarter panel lower edges.
OSR quarter underside: This panel section which is located below the rear bumper line needed replacing, the inside had been attacked getting worse closer to the lowest edge where moisture and dirt often collects past the inner wing covers. this is quite a common place for corrosion.
Steel rear panel: Although previous structural repair work replaced full panels, the welding of the joints is inconsistent and not finished properly. While working only on the offside at the moment (given limited floor space) these suspect areas have been thoroughly cleaned, rewelded and finished in primer and sealed. Further areas will need similar rework to be satisfactory.
Engine Bay: This is another area having been partly finished by previous repairs, which is demonstrated by lifting primer due to surface rust. This entire area will need thoroughly cleaning of which I have started to the OS and applied primer to areas where I am satisfied.
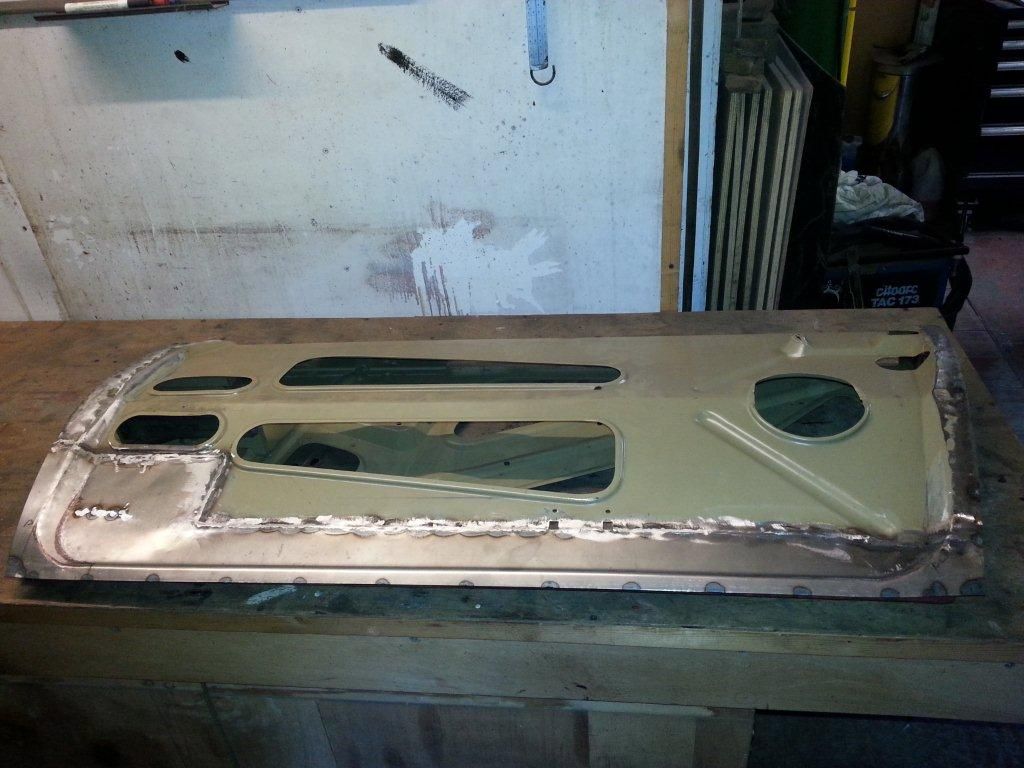
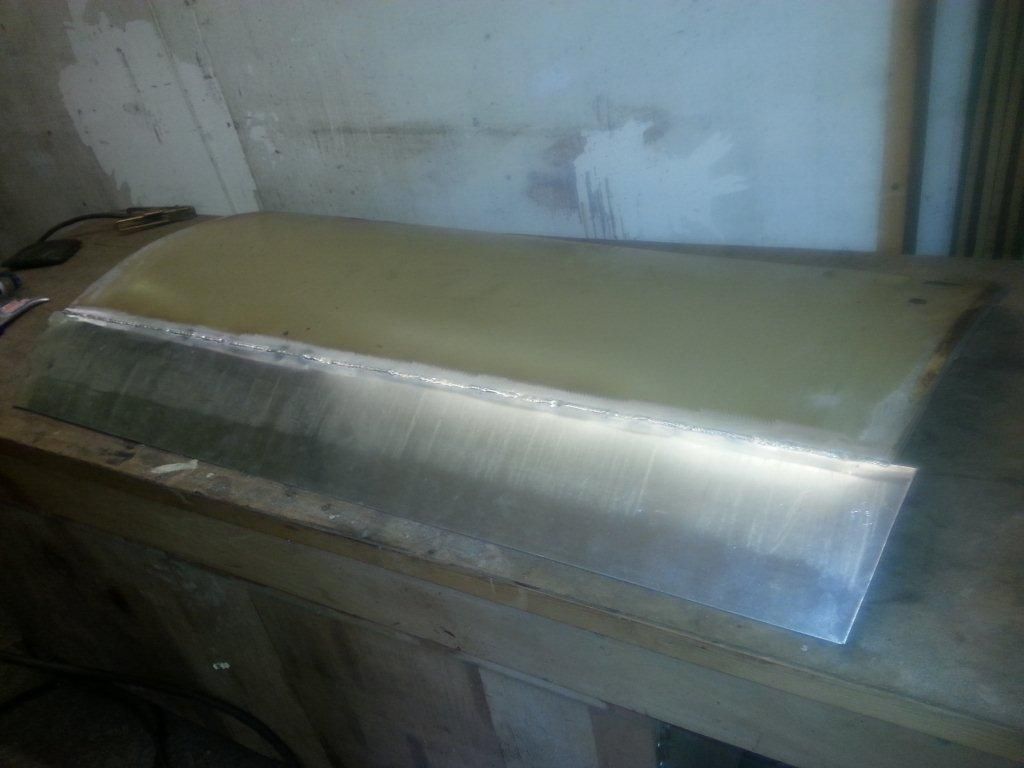
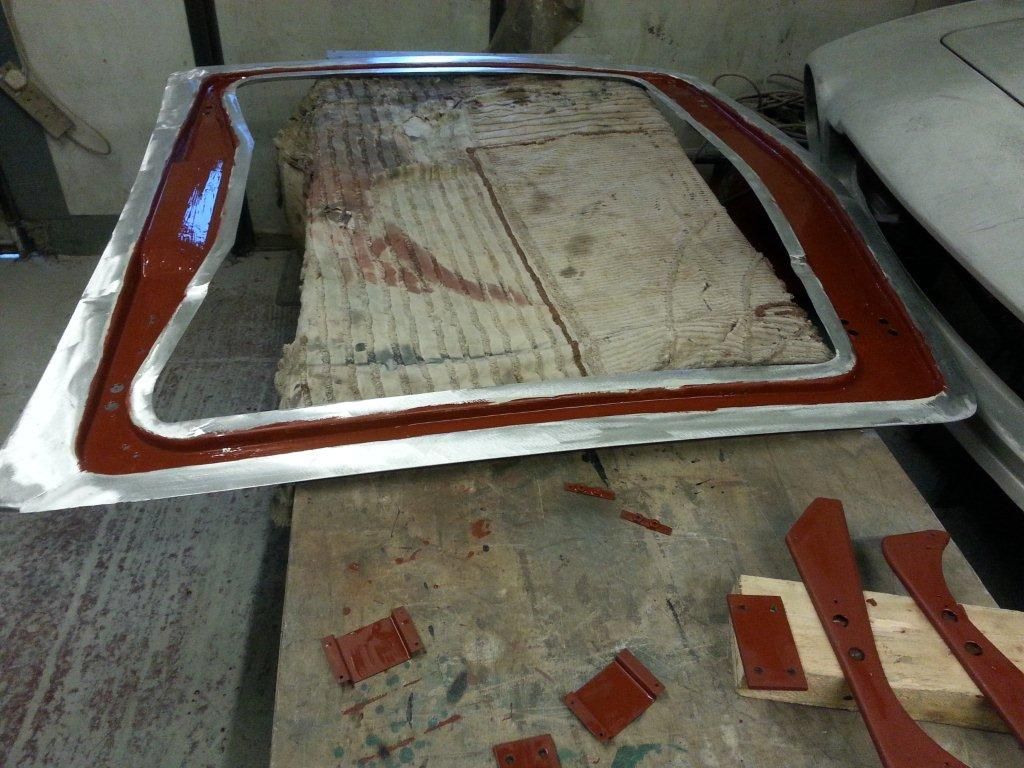
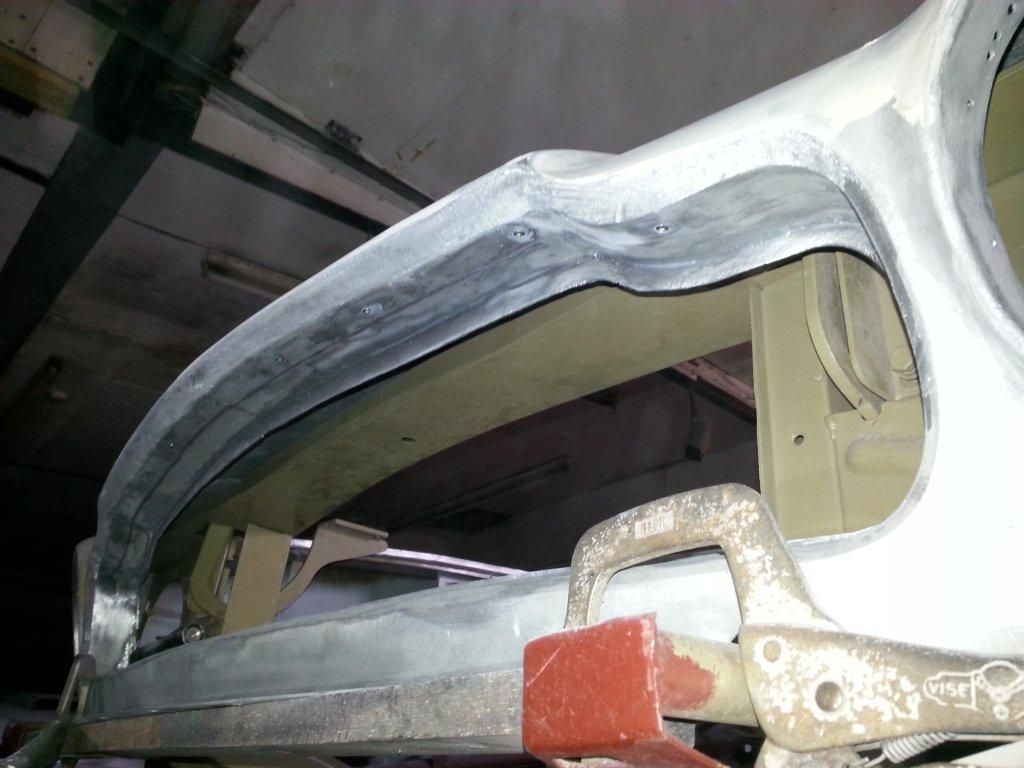
Boot lid: Like most Astons of this age, the bonnet and boot lid were made of two aluminium sections glued together with araldite. Over the years moisture and corrosion has crept into the joints and often shown by splits. This boot lid was no exception. After splitting, the two halves were thoroughly cleaned, the hinge bracket support plates inside were cleaned and re-riveted in place but the latch securing plate was remade and riveted in place too. The boot lid was re-bonded together yesterday.
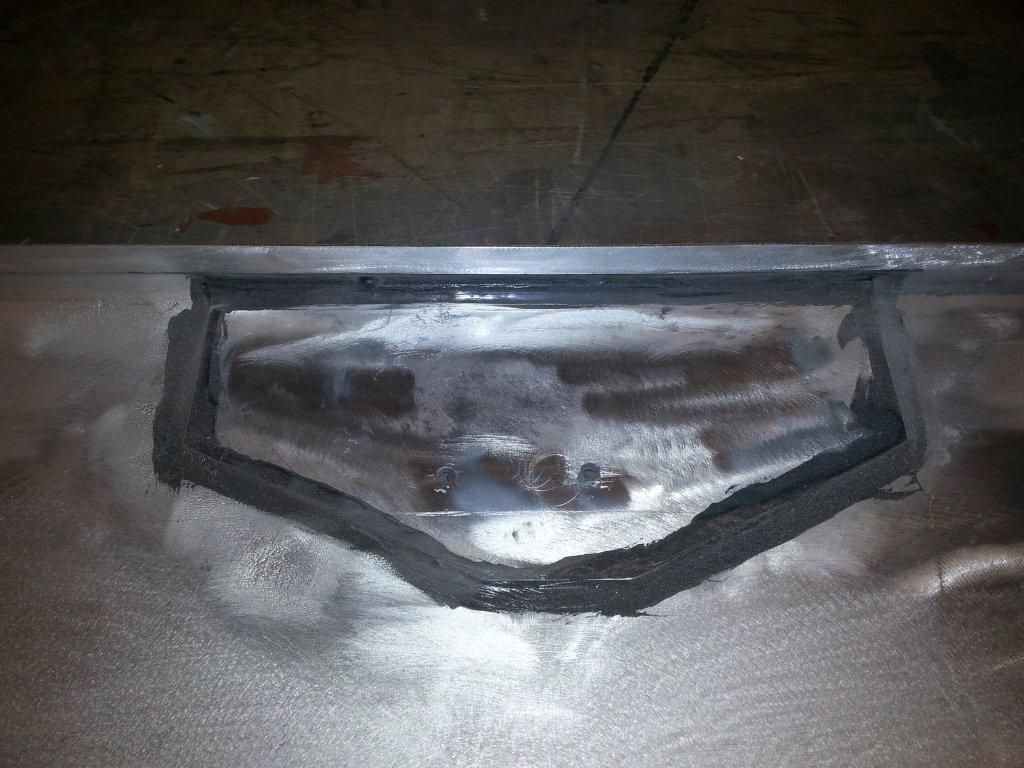
OSR quarter: The transformation to the original shape with welding, shaping etc to this side, is finished and I have started applying filler to finish. At some point in the cars history damage has occurred to this corner, not surprising really as many have, which was shown by the condition of the steel supporting member located beside the OS fuel filler - inside the boot. To gain some limited access to the aluminium quarter to shape, this damaged member was removed and replaced afterwards although access to this area was somewhat confined.

OS Side: While work is limited to working on the OS, I have started applying filler to this side before the whole process working on the steelwork etc restarts to the nearside.
Pedal Box out-rigger: Now having the pedal box and new studded bracket, this member has been set in place and welded. It was just as well I had these castings it gave me the opportunity to check all went together freely, but the through holes in the new steel cross member which these two castings straddled in position - were slightly out of position. However; with careful fileing I was able to give extra clearance to the member before welding in place. Enlarging these holes would have been quite difficult afterwards being so confined. The pedal box floor is all set in place too and primer painted.


OS Door: In the last update I had removed the door skin as the lower section was not very straight and I had my doubts about its condition. The steel frame had previously been repaired, but the standard was not good enough and inner facing sections required replacing. The steel previously replaced section required straightening before further sections could be replaced. The door skin was corroded to the bottom so the 5-6" was replaced along its length and giving me the opportunity to finish with a nice straight bottom edge. Before fitting the door skin it was painted in primer and finished in black paint to resist further corrosion as best possible.


OS Side: New aluminium sections for the lower quarters above the sill line have been made and welded in place, after the inner sides were painted. The new stainless steel sill cover has also carefully been set in place giving even clearance to the door and quarter panel lower edges.

OSR quarter underside: This panel section which is located below the rear bumper line needed replacing, the inside had been attacked getting worse closer to the lowest edge where moisture and dirt often collects past the inner wing covers. this is quite a common place for corrosion.

Steel rear panel: Although previous structural repair work replaced full panels, the welding of the joints is inconsistent and not finished properly. While working only on the offside at the moment (given limited floor space) these suspect areas have been thoroughly cleaned, rewelded and finished in primer and sealed. Further areas will need similar rework to be satisfactory.

Engine Bay: This is another area having been partly finished by previous repairs, which is demonstrated by lifting primer due to surface rust. This entire area will need thoroughly cleaning of which I have started to the OS and applied primer to areas where I am satisfied.


Boot lid: Like most Astons of this age, the bonnet and boot lid were made of two aluminium sections glued together with araldite. Over the years moisture and corrosion has crept into the joints and often shown by splits. This boot lid was no exception. After splitting, the two halves were thoroughly cleaned, the hinge bracket support plates inside were cleaned and re-riveted in place but the latch securing plate was remade and riveted in place too. The boot lid was re-bonded together yesterday.


OSR quarter: The transformation to the original shape with welding, shaping etc to this side, is finished and I have started applying filler to finish. At some point in the cars history damage has occurred to this corner, not surprising really as many have, which was shown by the condition of the steel supporting member located beside the OS fuel filler - inside the boot. To gain some limited access to the aluminium quarter to shape, this damaged member was removed and replaced afterwards although access to this area was somewhat confined.


OS Side: While work is limited to working on the OS, I have started applying filler to this side before the whole process working on the steelwork etc restarts to the nearside.

I'm comfortable with the use of filler, it's not excessive and I'm not sure what other option there is. Lead loading? Lots of potential problems with that. These cars are over 40 years old, restoration techniques have changed significantly in this time.
October 2016 Update from the restorer
NS Steelwork: Most of the structural steelwork is finished to the nearside, this includes radius rod area, sill, out riggers, floors and the rear boot rail etc:
NS A & B Posts
NS Sills
NS Radius Rod
NS Boot floor
NS door hinges: initially fitting the door to check the general fit and shape, it was clear the hinges were slack with wear. As with the OS these required making new bronze bushes, pins and lubricated on assembly. The door refitting demonstrated further inspection was required with the hinges which were slightly bent. Straightening these quickly showed an improved door alignment and fit.
NS Door: despite this door having been repaired before, which left something to be desired, the bottom edge was not straight and the outer skin folded edge barely covered the steel frame. The skin was removed revealing serious corrosion to the steel frame and the skin also corroded to the lower 5 inches at least. The steel frame required the bottom replacing which gave me access to the lower hinge location for reconstruction. Fortunately the top hinge location only required sectional repairs. Prior to the skin being refitted, the insides were primer and black painted for future resistance to corrosion.

NS Lower aluminium quarters above sill line: Both these panel sections have been remade and just welded. As with other panels these were painted on the inside before welding. As you can see the front section has been welded higher towards the door edge, this is to accommodate a crack running up the A post edge and this was the easiest way to resolve the problem.
NSR Floor panel: this panel only required the angled section which attaches to the sill replacing. This area has been thoroughly cleaned, primered with all joints sealed.
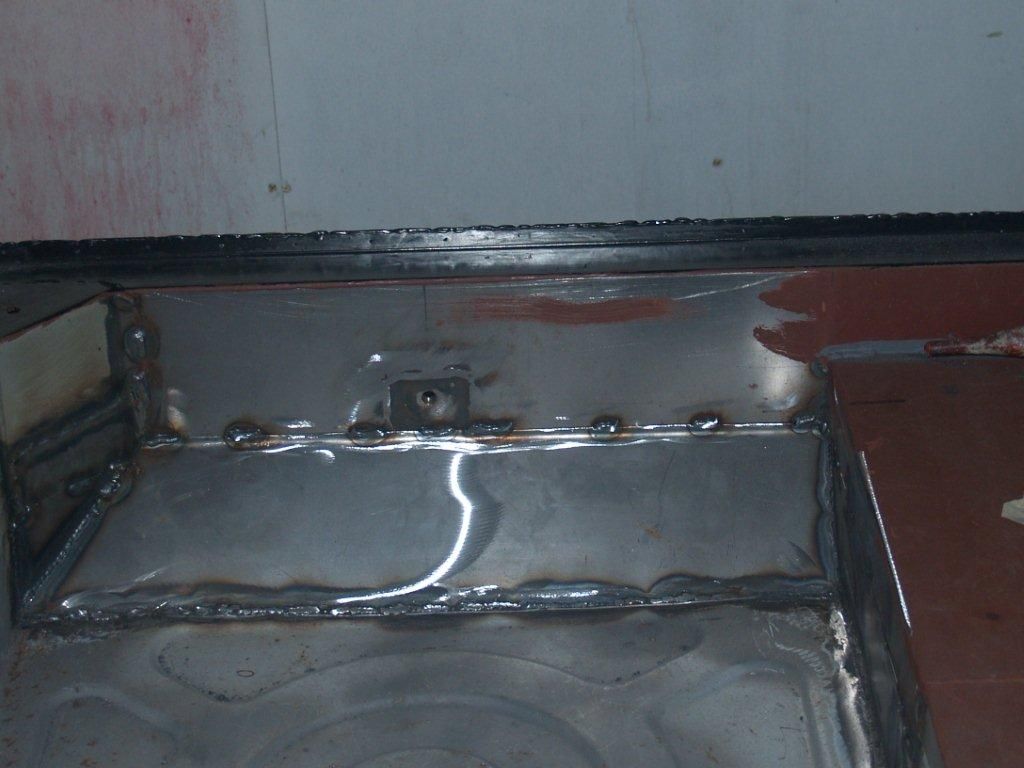
NS Boot Rail & Shock absorber plate:I had given this area thought for sometime before proceeding. The boot rail had been repaired but the question was 'how good'. The shock plate looked odd and after cleaning it became clear that a piece of sheet steel had been welded over the top to conceal the corrosion, it had to be replaced! Removing and renewing required the boot rail to be part removed which proved to be justified as this was not to the standard befitting of this project. Adjoining sections to the inner wing and boot floor side panel have been replaced too.
NSR Lower aluminium quarter, below bumper line: To gain access to the boot rail, this section was removed and showed corrosion to the inside so a new panel was shaped and now welded in place. Again it has been painted to the inside before welding.
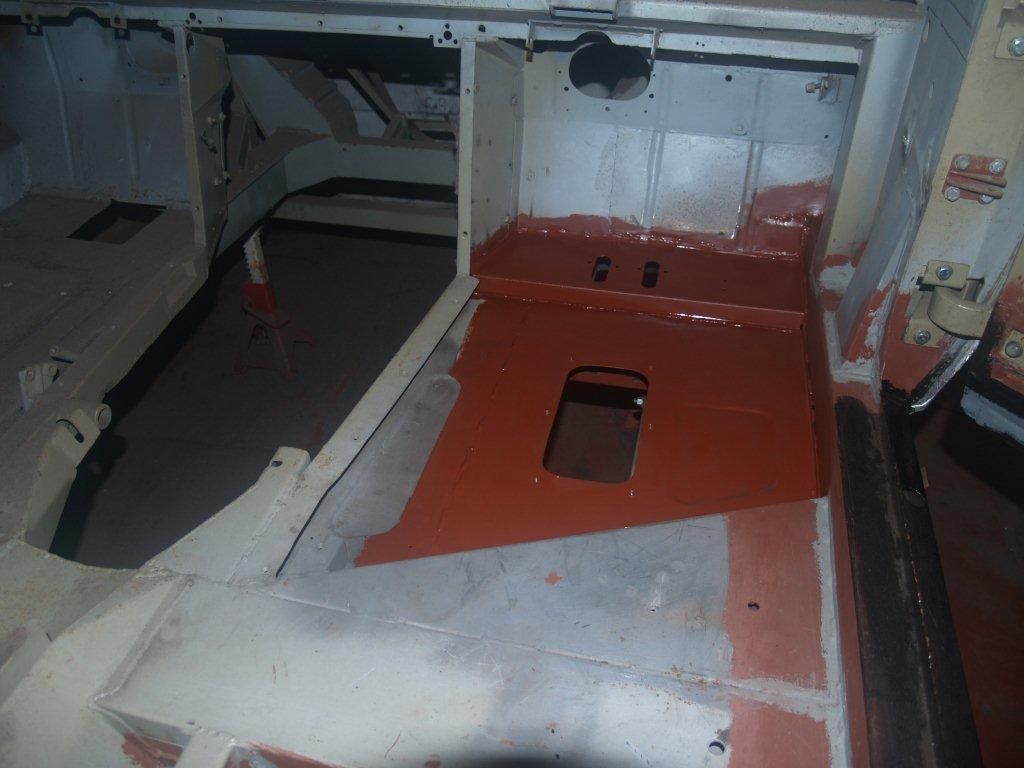
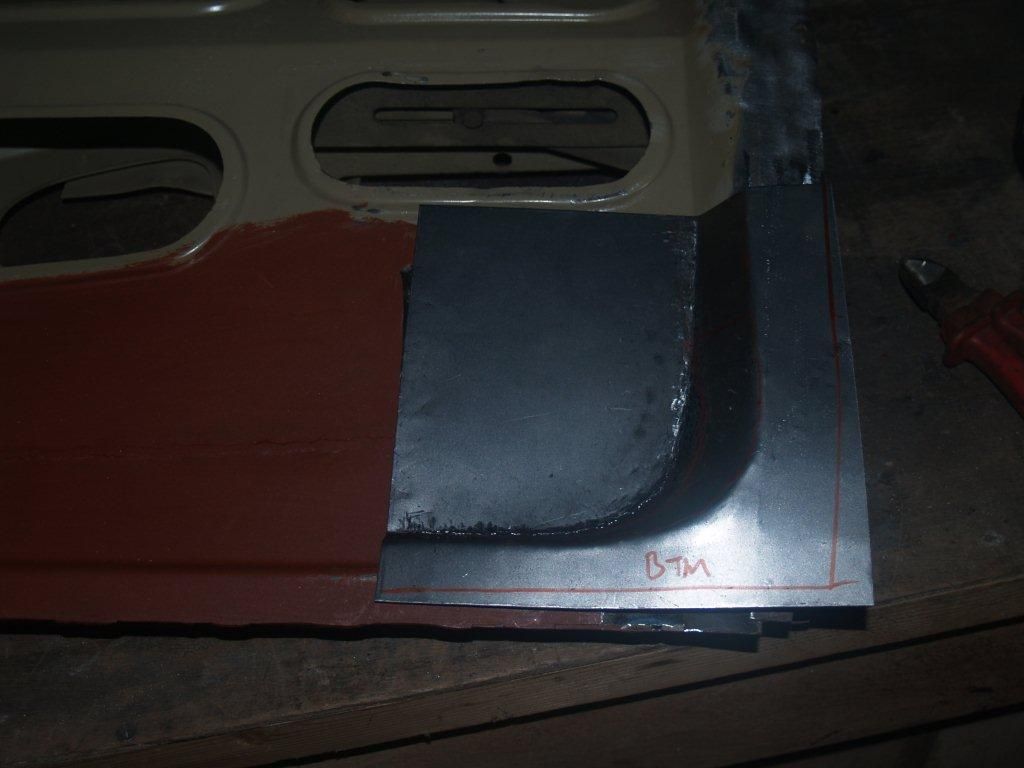
NSR Seat panel: This has been replaced with a new panel I made, again removing the old section gave me access to repair the adjoining back panel where the handbrake cable securing is located.
NSR Upper aluminium quarter reshape: All added sections which made the poorly shaped 'flip tail' conversion have been removed and the panel re-welded to the length required along with the section to the rear around the rear light location.
Although the aluminium quarters front and rear to the nearside have new sections welded in place, the next stage is to dress and shape to finish before commencing to the next stage.
October 2016 Update from the restorer
NS Steelwork: Most of the structural steelwork is finished to the nearside, this includes radius rod area, sill, out riggers, floors and the rear boot rail etc:
NS A & B Posts


NS Sills


NS Radius Rod


NS Boot floor


NS door hinges: initially fitting the door to check the general fit and shape, it was clear the hinges were slack with wear. As with the OS these required making new bronze bushes, pins and lubricated on assembly. The door refitting demonstrated further inspection was required with the hinges which were slightly bent. Straightening these quickly showed an improved door alignment and fit.

NS Door: despite this door having been repaired before, which left something to be desired, the bottom edge was not straight and the outer skin folded edge barely covered the steel frame. The skin was removed revealing serious corrosion to the steel frame and the skin also corroded to the lower 5 inches at least. The steel frame required the bottom replacing which gave me access to the lower hinge location for reconstruction. Fortunately the top hinge location only required sectional repairs. Prior to the skin being refitted, the insides were primer and black painted for future resistance to corrosion.


NS Lower aluminium quarters above sill line: Both these panel sections have been remade and just welded. As with other panels these were painted on the inside before welding. As you can see the front section has been welded higher towards the door edge, this is to accommodate a crack running up the A post edge and this was the easiest way to resolve the problem.

NSR Floor panel: this panel only required the angled section which attaches to the sill replacing. This area has been thoroughly cleaned, primered with all joints sealed.


NS Boot Rail & Shock absorber plate:I had given this area thought for sometime before proceeding. The boot rail had been repaired but the question was 'how good'. The shock plate looked odd and after cleaning it became clear that a piece of sheet steel had been welded over the top to conceal the corrosion, it had to be replaced! Removing and renewing required the boot rail to be part removed which proved to be justified as this was not to the standard befitting of this project. Adjoining sections to the inner wing and boot floor side panel have been replaced too.


NSR Lower aluminium quarter, below bumper line: To gain access to the boot rail, this section was removed and showed corrosion to the inside so a new panel was shaped and now welded in place. Again it has been painted to the inside before welding.

NSR Seat panel: This has been replaced with a new panel I made, again removing the old section gave me access to repair the adjoining back panel where the handbrake cable securing is located.

NSR Upper aluminium quarter reshape: All added sections which made the poorly shaped 'flip tail' conversion have been removed and the panel re-welded to the length required along with the section to the rear around the rear light location.

Although the aluminium quarters front and rear to the nearside have new sections welded in place, the next stage is to dress and shape to finish before commencing to the next stage.
March 2017 Update
Boot floor: Although this area had been previously replaced, the surface condition and welds were unsatisfactory. Previously the car had been stored in damp conditions and with only a light coat of primer paint surface rust developed everywhere. The previous welds too were quite unsatisfactory with only tack welds in some places and now welded properly, surfaces prepared and painted with a generous coat of primer finished with sealed joints.

Bonnet: Being the largest and last panel to be closely scrutinised, it became clear that attempts had been made by welding edges together to stop the skin and frame from splitting. As with the boot lid, the skin and frame were originally glued together with araldite - but over time and moisture these panels split. Therefore splitting the bonnet was required, exposing inside showing the location or the hinges to be cracked and required welding . Steel inserts which are located inside the bonnet cavity were cleaned and painted along with the inside of the cavity before the skin and frame were re-bonded together.
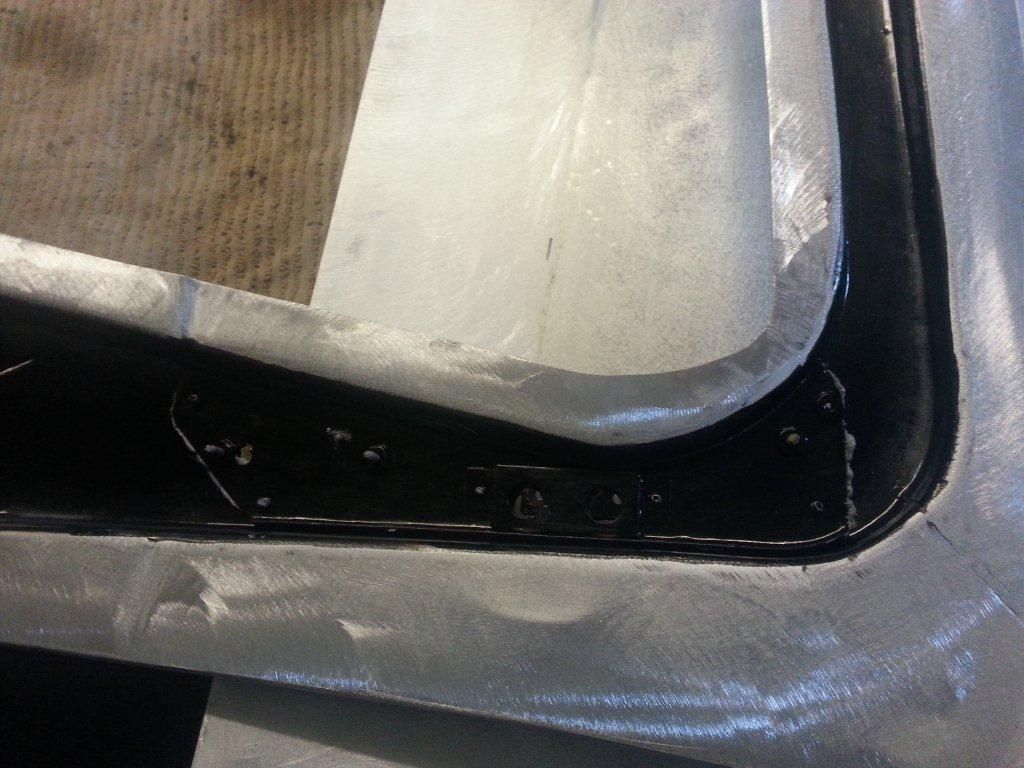
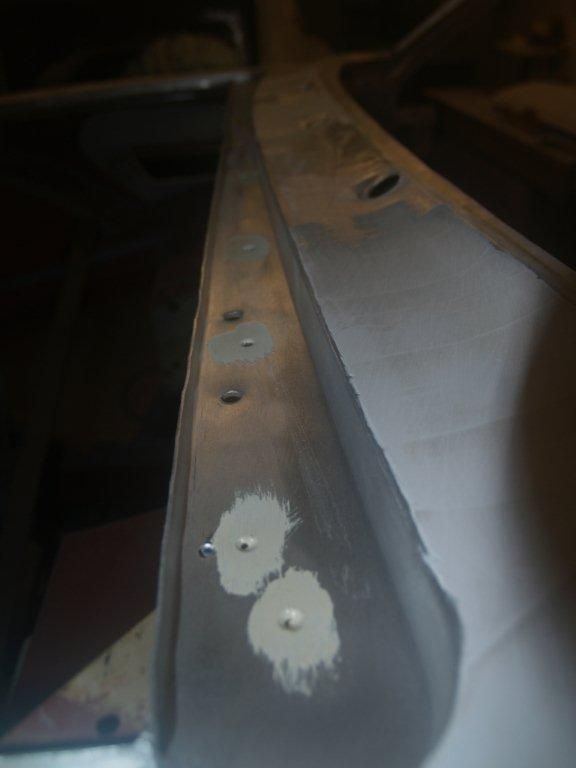
Boot and bonnet aperture: In the runoff gallery the aluminium quarters are joined here to the steel frame with rivets. These rivets had been previously replaced by larger 4mm rivets, originally smaller 1/8", but were scruffy and poorly fitted. I have replaced all with stainless steel rivets, applied with sealant to reduce unsightly corrosion at these locations.
Grille aperture : When preparing the front panel, it became clear the location for the grille was miss-shaped which required straightening with the front panel. The supporting strip which was loosely riveted to the front panel underside, was removed to straighten and re-weld where it was joined in the middle. The previous loose fitting rivet holes were welded up too, re-drilled and fitted together with stainless steel rivets of coarse.
Rear Panel : As with the other secured edges, this one was not different and the previous again oversize 4mm rivets were removed and replaced with stainless steel countersink rivets giving a neater appearance. Bottom edge of the panel has been sealed to reduce corrosion between the two also.
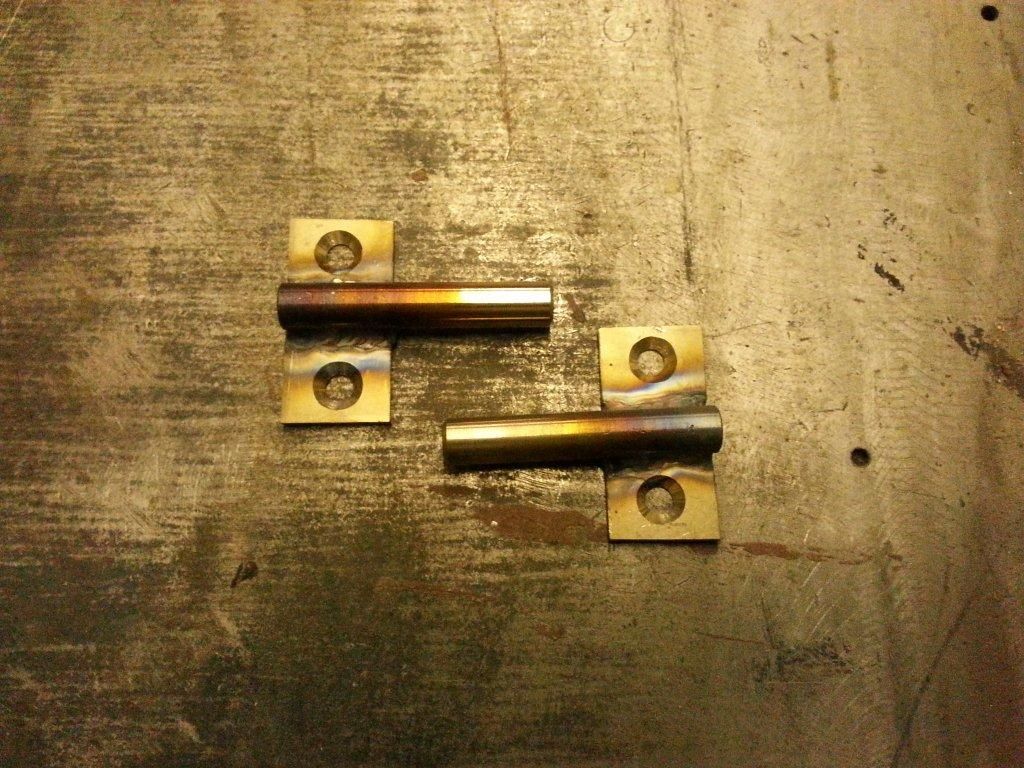
Bonnet Pins: These were not attached to the bonnet but are often scruffy looking, so as required to hold bonnet closed - I made a pair in stainless steel which will not require painting. Although not original, the painted pins become scruffy with constant contact with the latches.
Boot floor: Although this area had been previously replaced, the surface condition and welds were unsatisfactory. Previously the car had been stored in damp conditions and with only a light coat of primer paint surface rust developed everywhere. The previous welds too were quite unsatisfactory with only tack welds in some places and now welded properly, surfaces prepared and painted with a generous coat of primer finished with sealed joints.


Bonnet: Being the largest and last panel to be closely scrutinised, it became clear that attempts had been made by welding edges together to stop the skin and frame from splitting. As with the boot lid, the skin and frame were originally glued together with araldite - but over time and moisture these panels split. Therefore splitting the bonnet was required, exposing inside showing the location or the hinges to be cracked and required welding . Steel inserts which are located inside the bonnet cavity were cleaned and painted along with the inside of the cavity before the skin and frame were re-bonded together.


Boot and bonnet aperture: In the runoff gallery the aluminium quarters are joined here to the steel frame with rivets. These rivets had been previously replaced by larger 4mm rivets, originally smaller 1/8", but were scruffy and poorly fitted. I have replaced all with stainless steel rivets, applied with sealant to reduce unsightly corrosion at these locations.

Grille aperture : When preparing the front panel, it became clear the location for the grille was miss-shaped which required straightening with the front panel. The supporting strip which was loosely riveted to the front panel underside, was removed to straighten and re-weld where it was joined in the middle. The previous loose fitting rivet holes were welded up too, re-drilled and fitted together with stainless steel rivets of coarse.


Rear Panel : As with the other secured edges, this one was not different and the previous again oversize 4mm rivets were removed and replaced with stainless steel countersink rivets giving a neater appearance. Bottom edge of the panel has been sealed to reduce corrosion between the two also.


Bonnet Pins: These were not attached to the bonnet but are often scruffy looking, so as required to hold bonnet closed - I made a pair in stainless steel which will not require painting. Although not original, the painted pins become scruffy with constant contact with the latches.

Thought I would update this thread.
Things ground to a halt last year with the bodywork but after Christmas I decided to get back on the case to push things on and I'm pleased to say progress is being made.
Unfortunately, thanks to Photobucket all the previous photo links are broken so here's a brief recap:
1972 Aston Martin V8 Project (as bought)
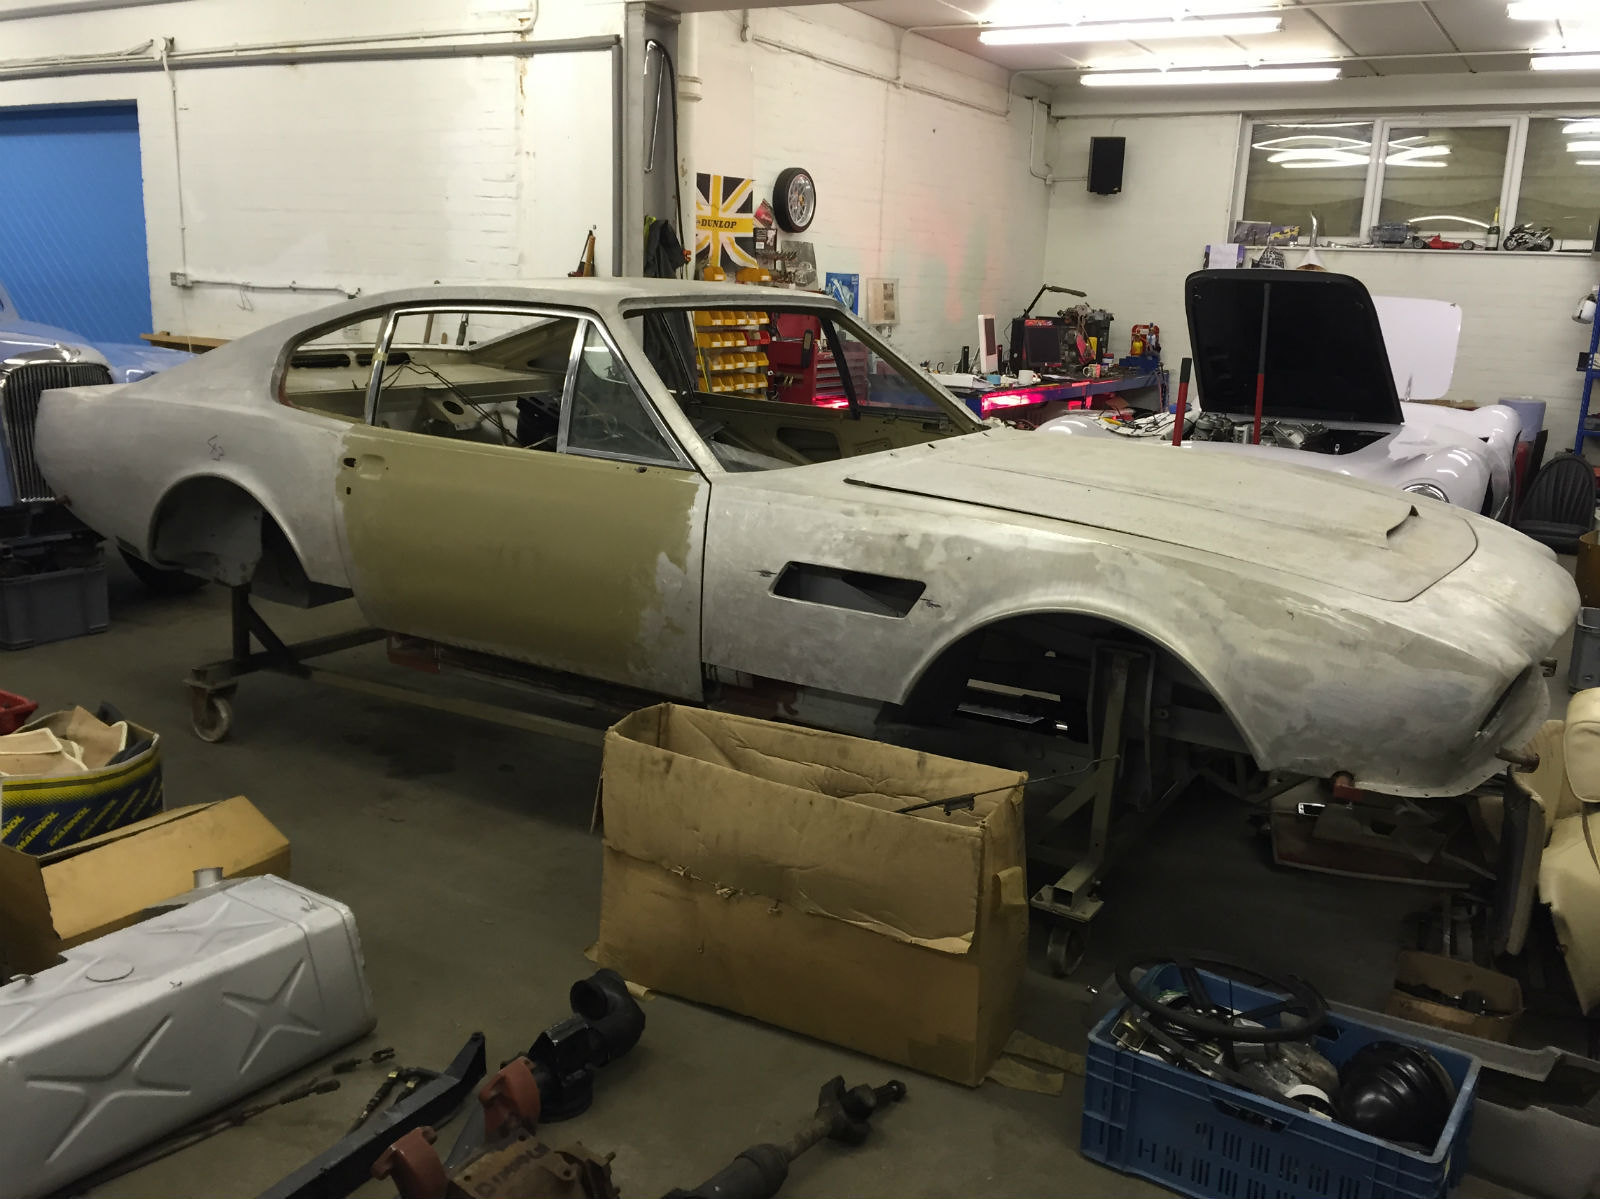 AM V8 2
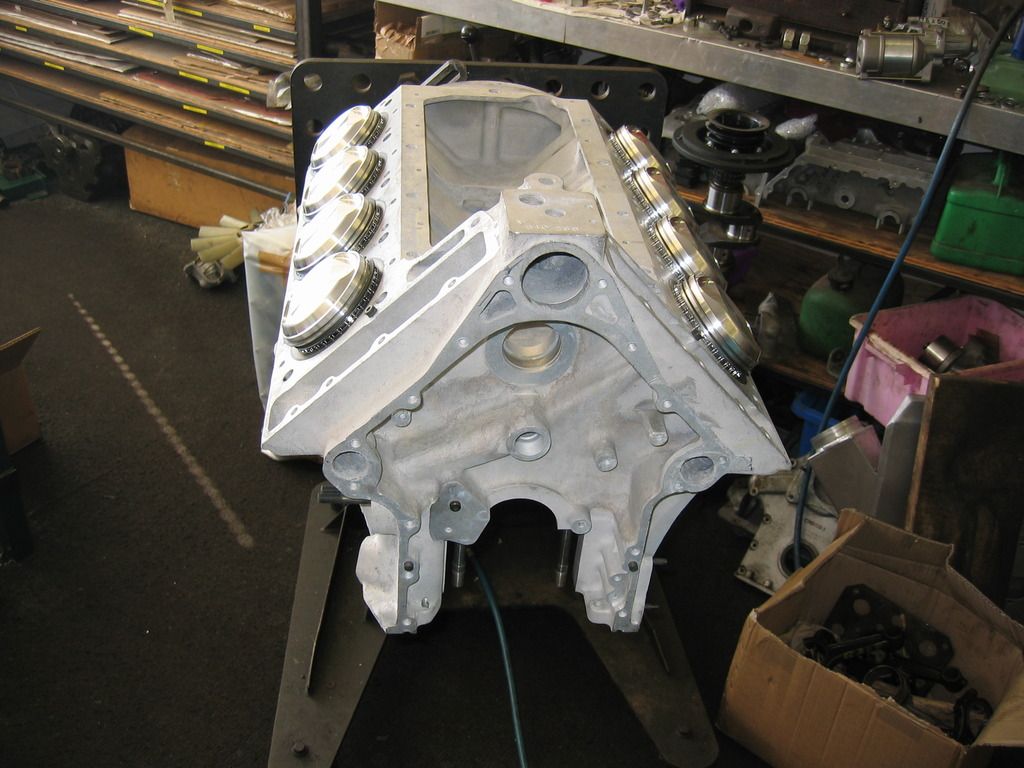
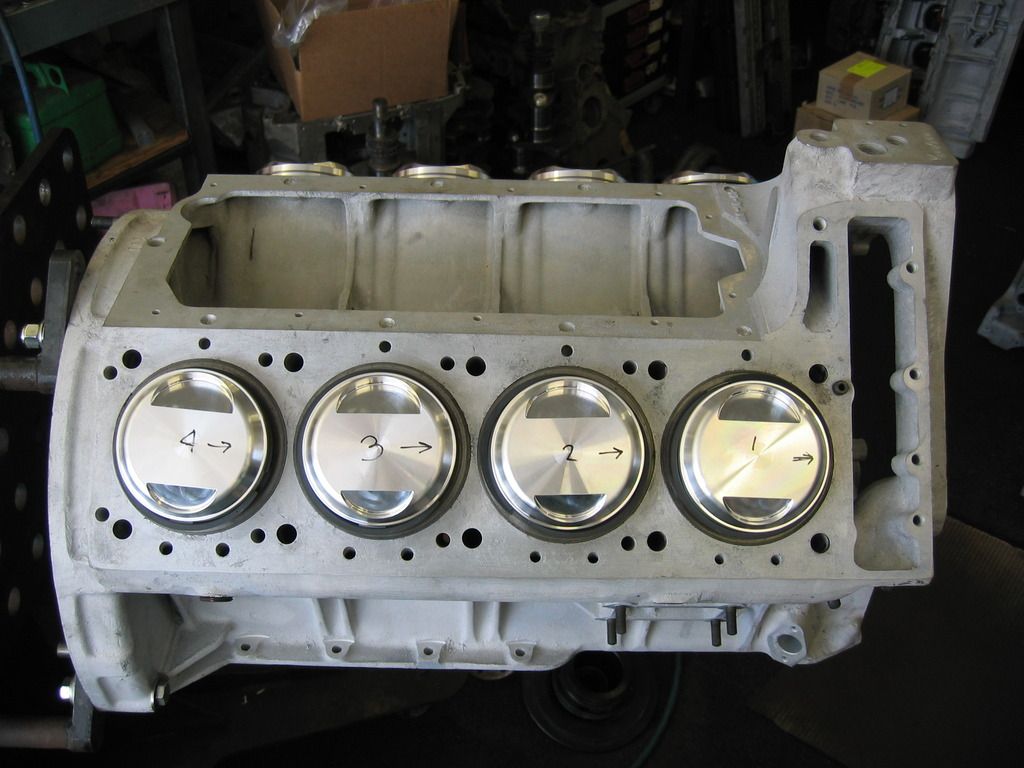
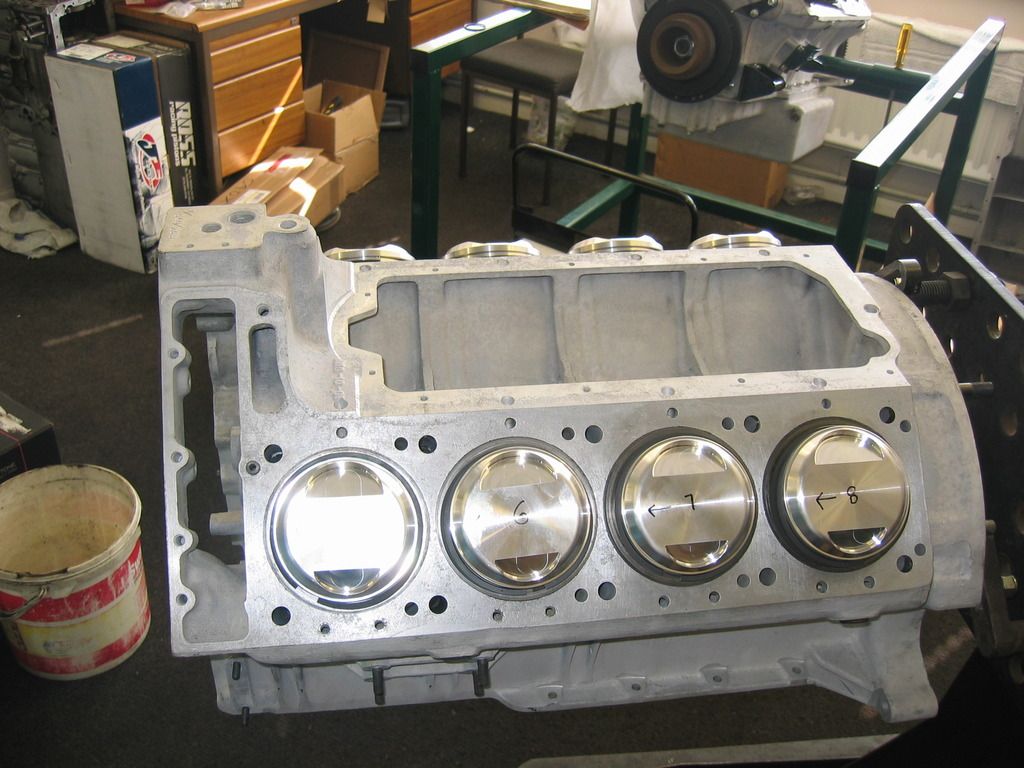
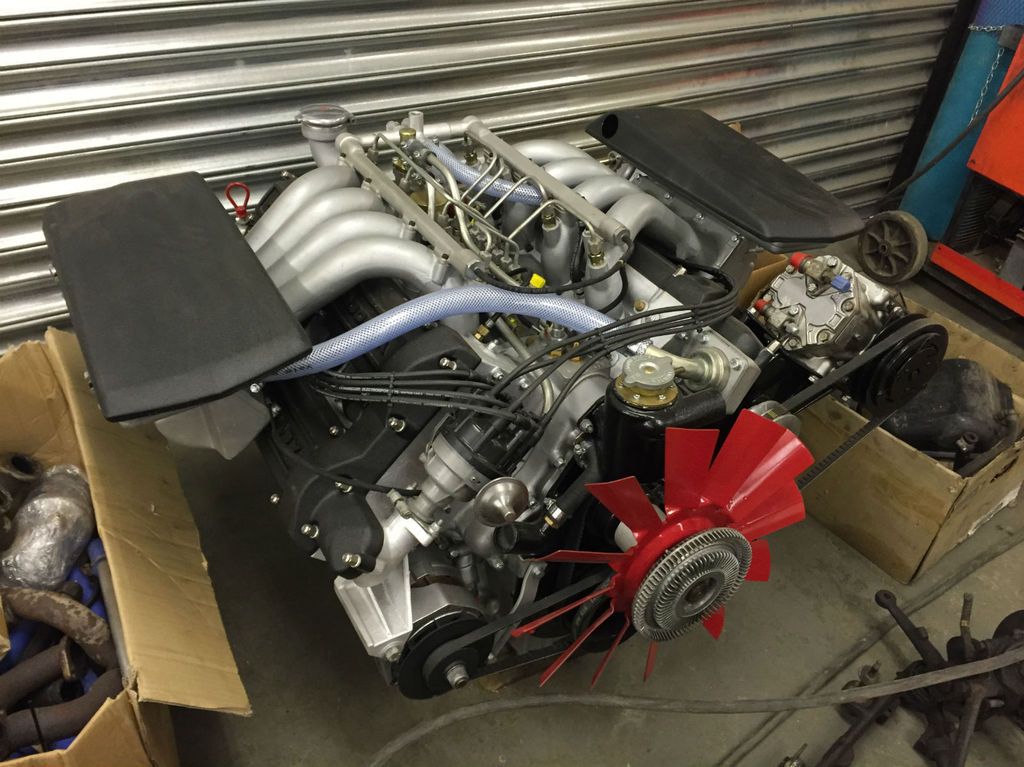
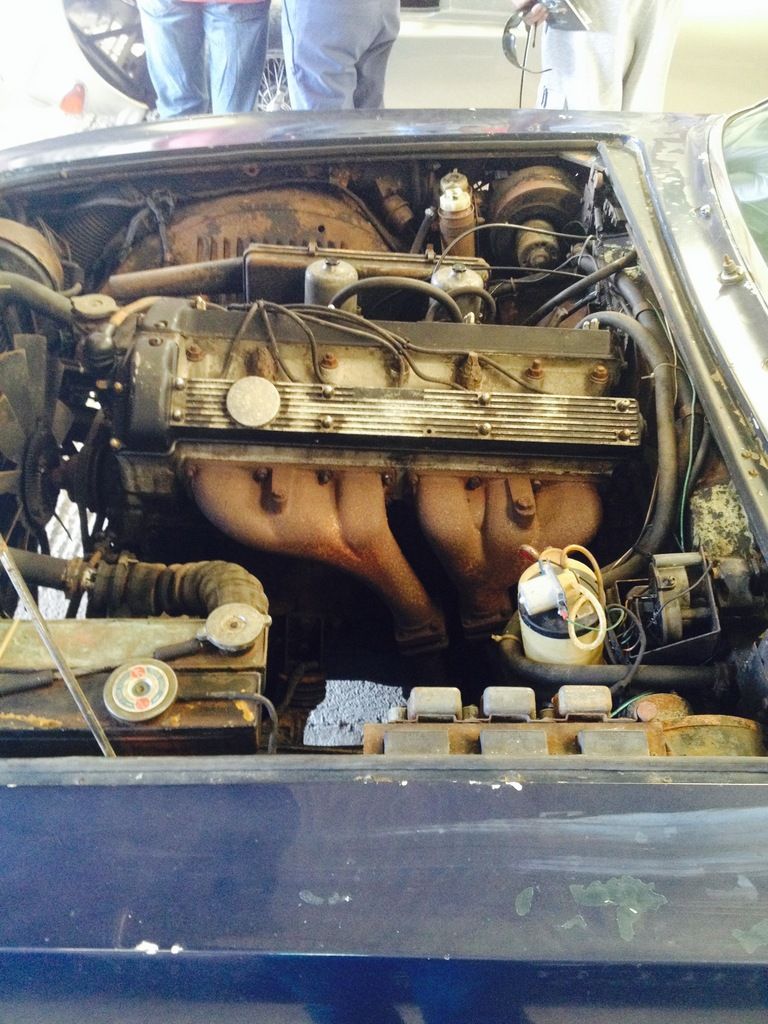
It came with the original engine that had been rebuilt but not run
 AM V8 10
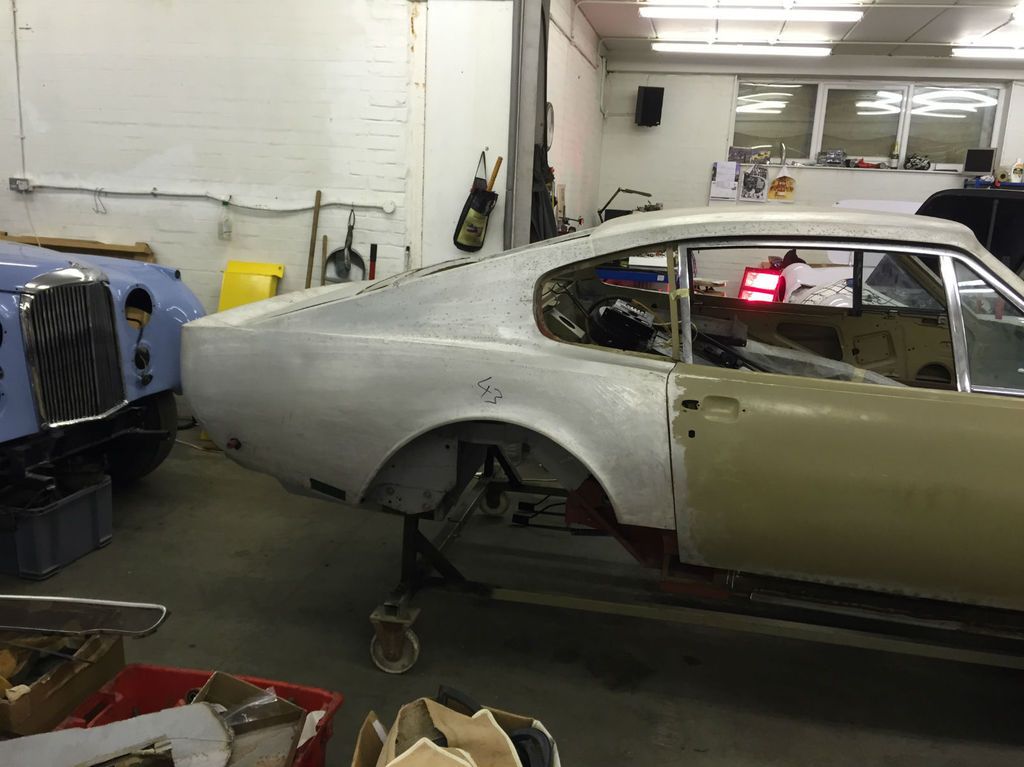
We removed and reshaped the rear to get rid of the incorrect flip tail
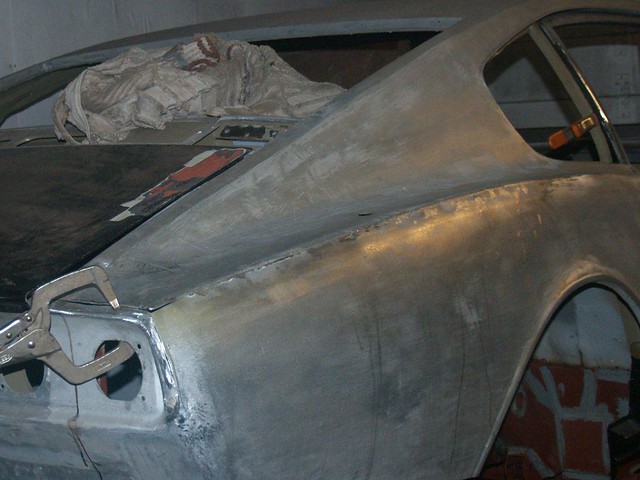 OSR quarter (12)
Lots of repairs to the shell including welding in the sills
 OS Out-rigger
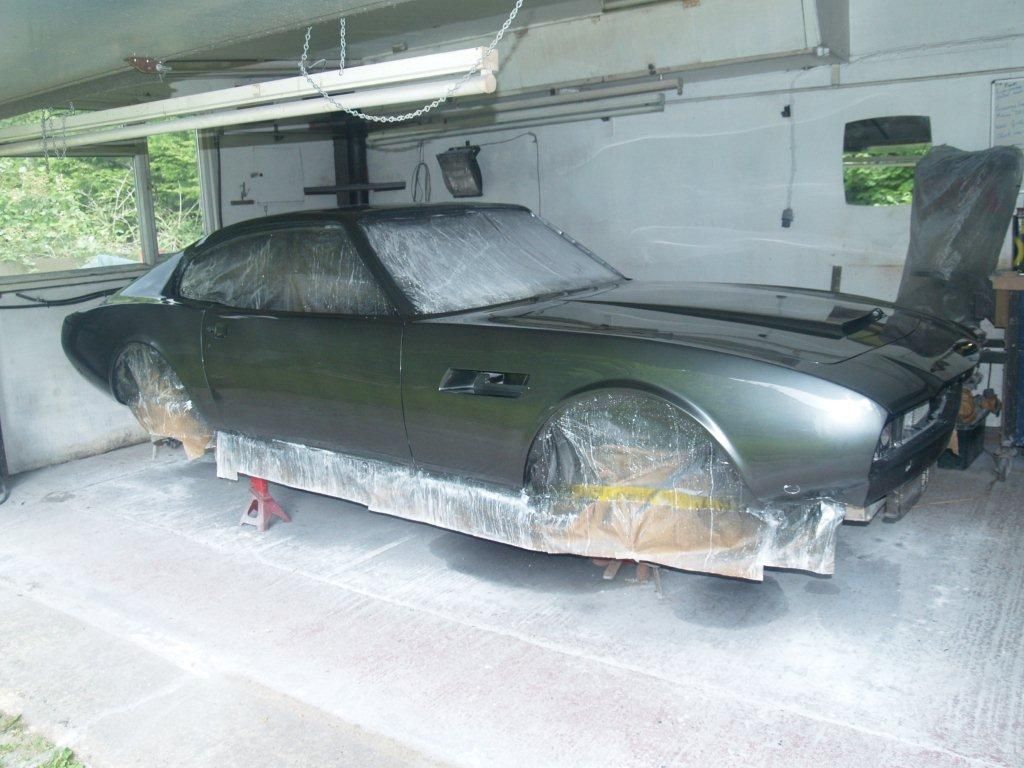
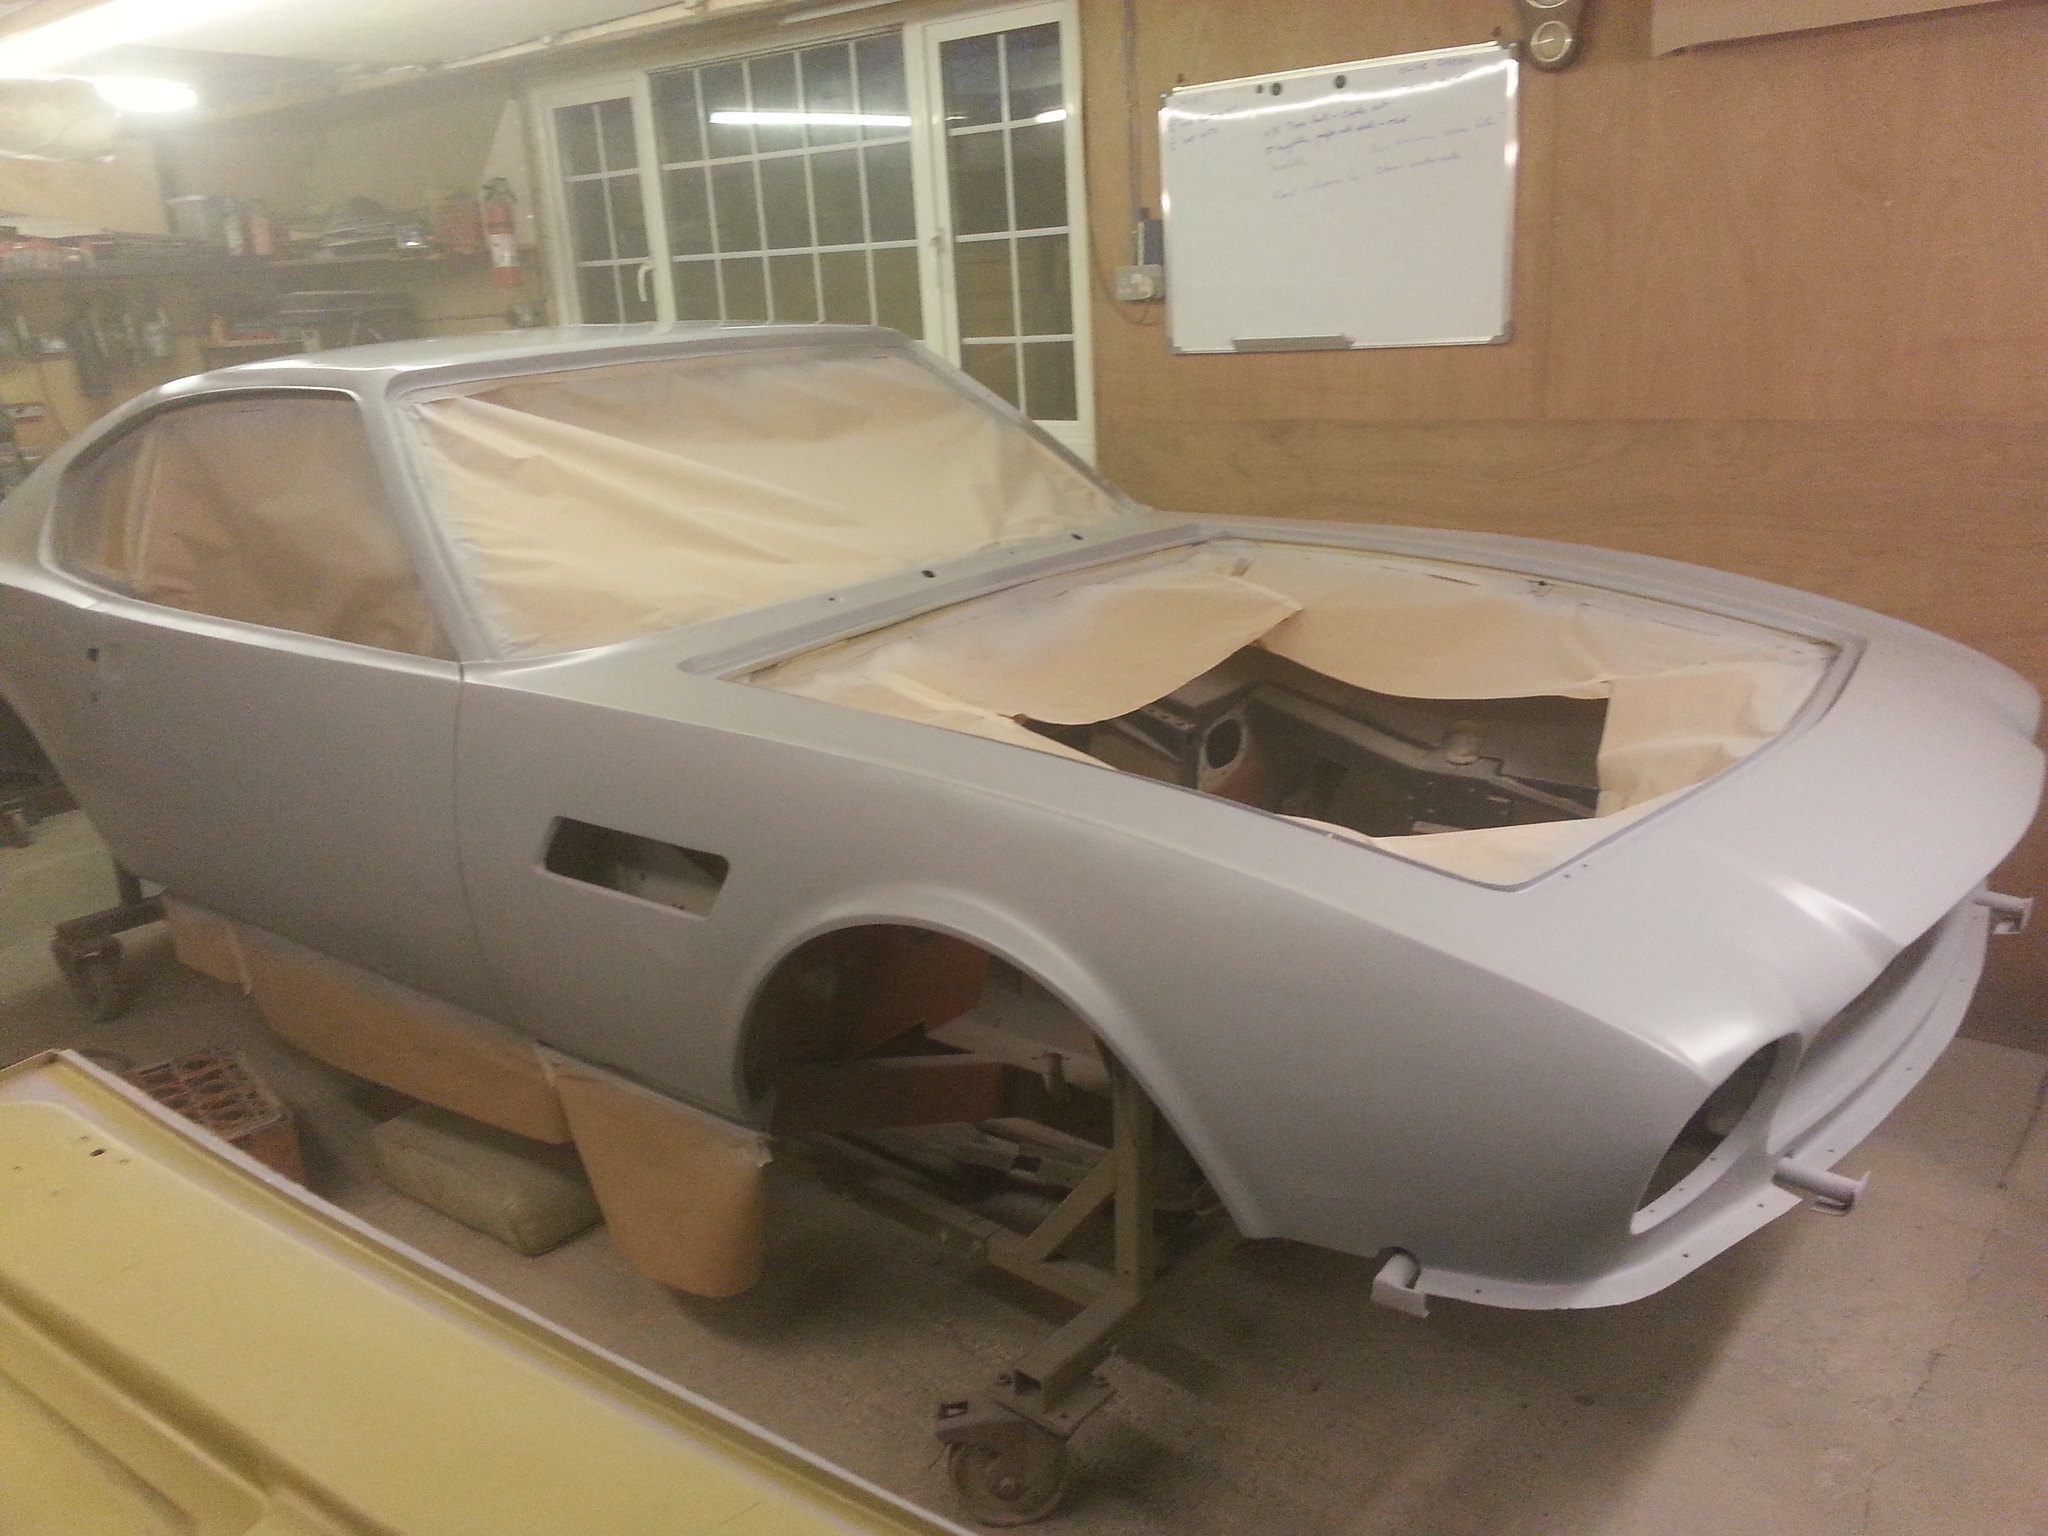
That brings things upto date. All repairs to the body are now finished and the shell is now in primer and curing...
 20180403_195114
We've had the engine on the dyno and it runs well, which is a relief as it has not been run since it was rebuilt 4 or 5 years ago. The engines heat cycles are ok, we did a power run and it's over 340bhp and thats without maximum throttle. Once it's in the car, we'll put it on the rolling road and test it some more.
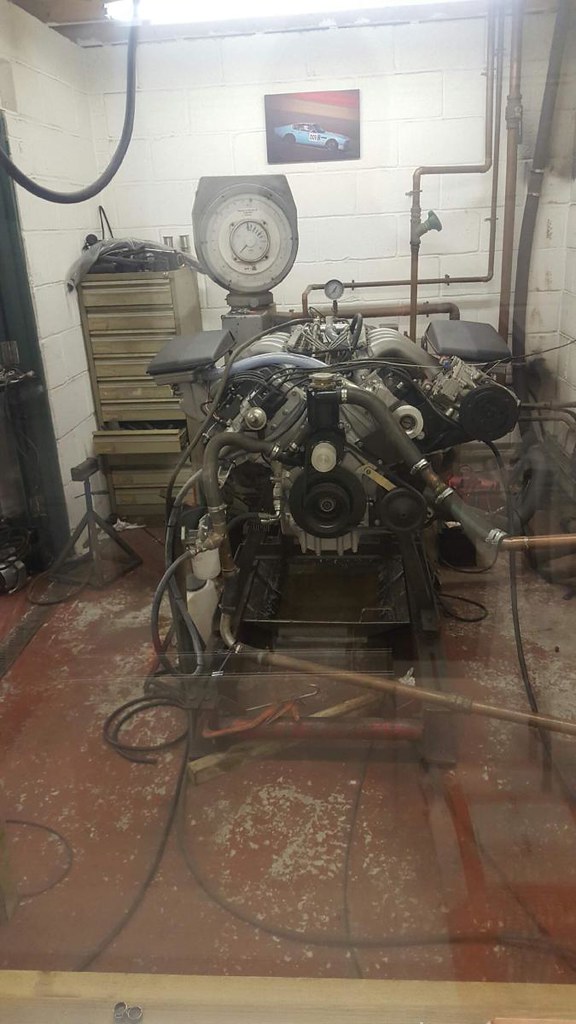 Engine on dyno
I've also been slowly picking up more of the missing parts. Latest acquisition was these badges for the wing vents from another AMOC member.
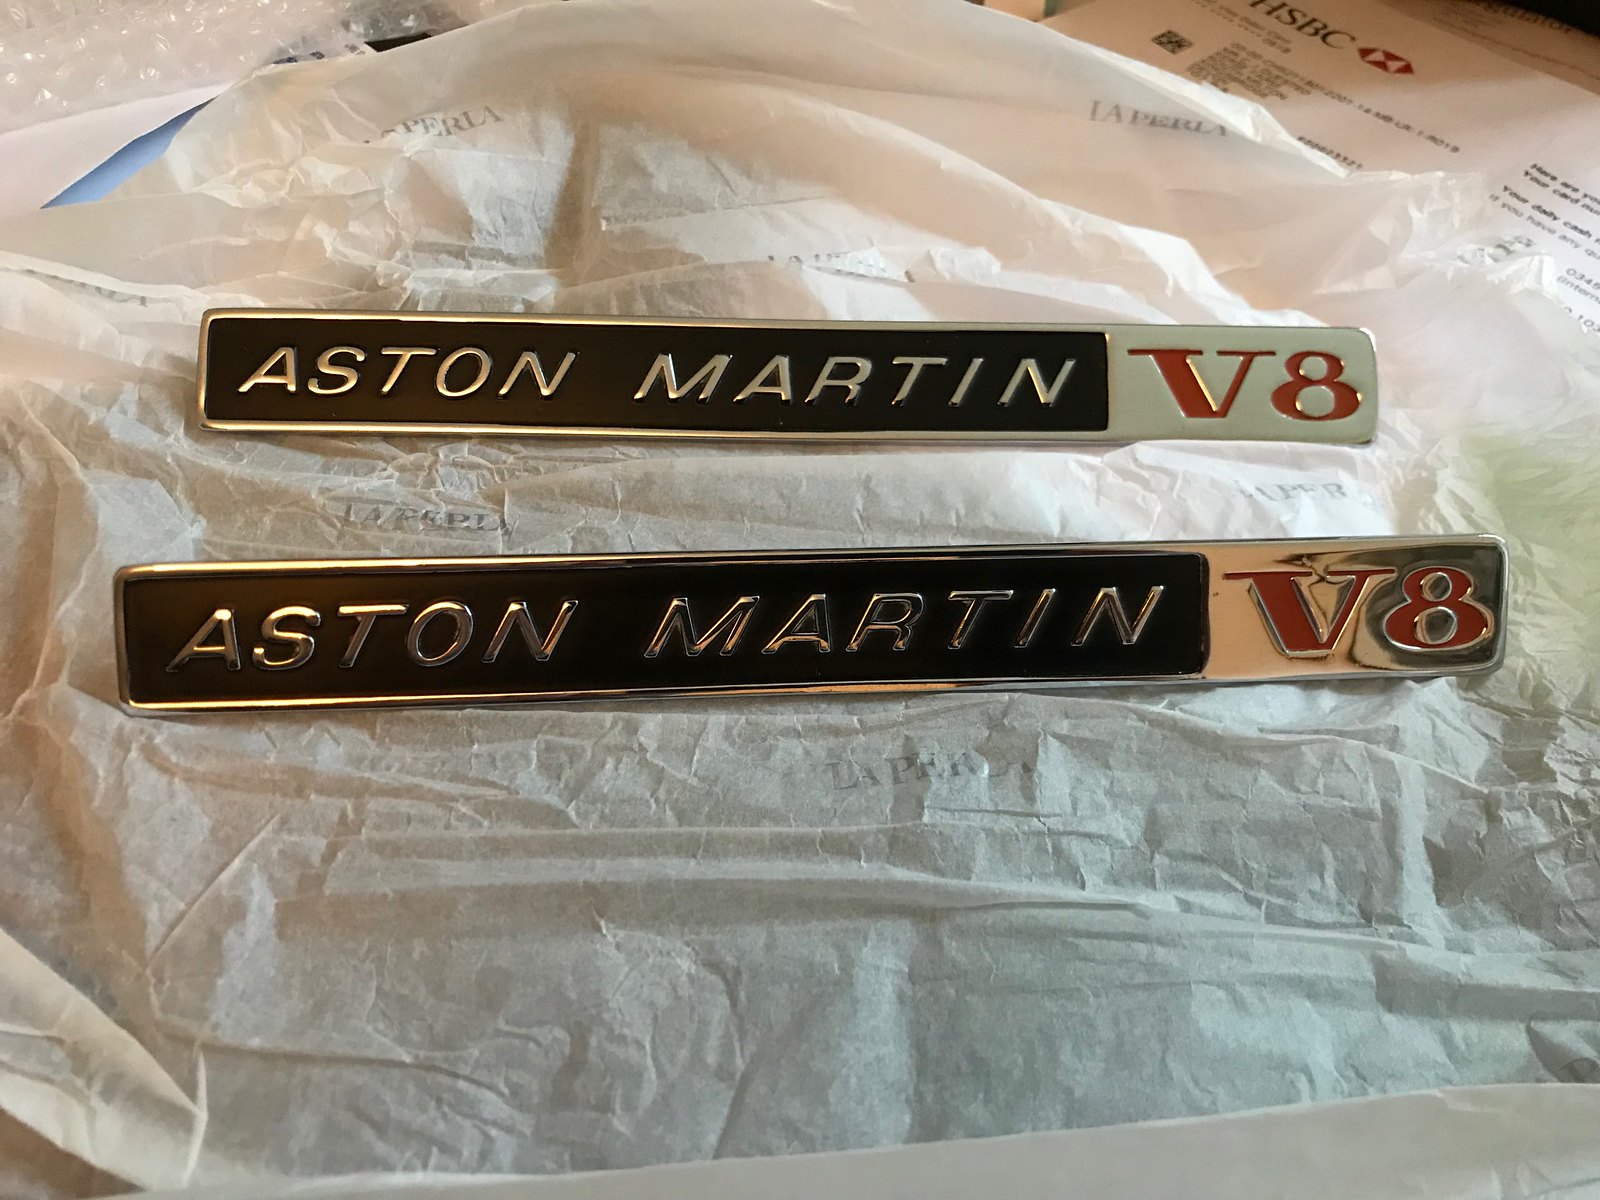 IMG_0563
Things ground to a halt last year with the bodywork but after Christmas I decided to get back on the case to push things on and I'm pleased to say progress is being made.
Unfortunately, thanks to Photobucket all the previous photo links are broken so here's a brief recap:
1972 Aston Martin V8 Project (as bought)
AM V8 2It came with the original engine that had been rebuilt but not run
AM V8 10We removed and reshaped the rear to get rid of the incorrect flip tail
OSR quarter (12)Lots of repairs to the shell including welding in the sills
OS Out-riggerThat brings things upto date. All repairs to the body are now finished and the shell is now in primer and curing...
20180403_195114We've had the engine on the dyno and it runs well, which is a relief as it has not been run since it was rebuilt 4 or 5 years ago. The engines heat cycles are ok, we did a power run and it's over 340bhp and thats without maximum throttle. Once it's in the car, we'll put it on the rolling road and test it some more.
Engine on dynoI've also been slowly picking up more of the missing parts. Latest acquisition was these badges for the wing vents from another AMOC member.
IMG_0563Edited by CQ8 on Sunday 8th April 16:27
Once the painting is finished, one of the first things to be fitted will be a new wiring loom. The wiring loom for mine was missing but even if it had been there I would have ordered a new one, putting back 46 year old wiring would not be a sensible idea! The new loom is only available from Autosparks and is custom made. Not cheap at £1700 but nothing is on these cars. Lead time is 6-8 weeks so hopefully it will be ready for mid-May.
The dashboard assembly will also be going in quite soon after painting as well so in preparation I had all these items recovered. There's quite a few individual pieces but I have pull together a complete set from what came with the car and the bits I sourced from the ex race car. These are now ready to be collected from the trimmers.
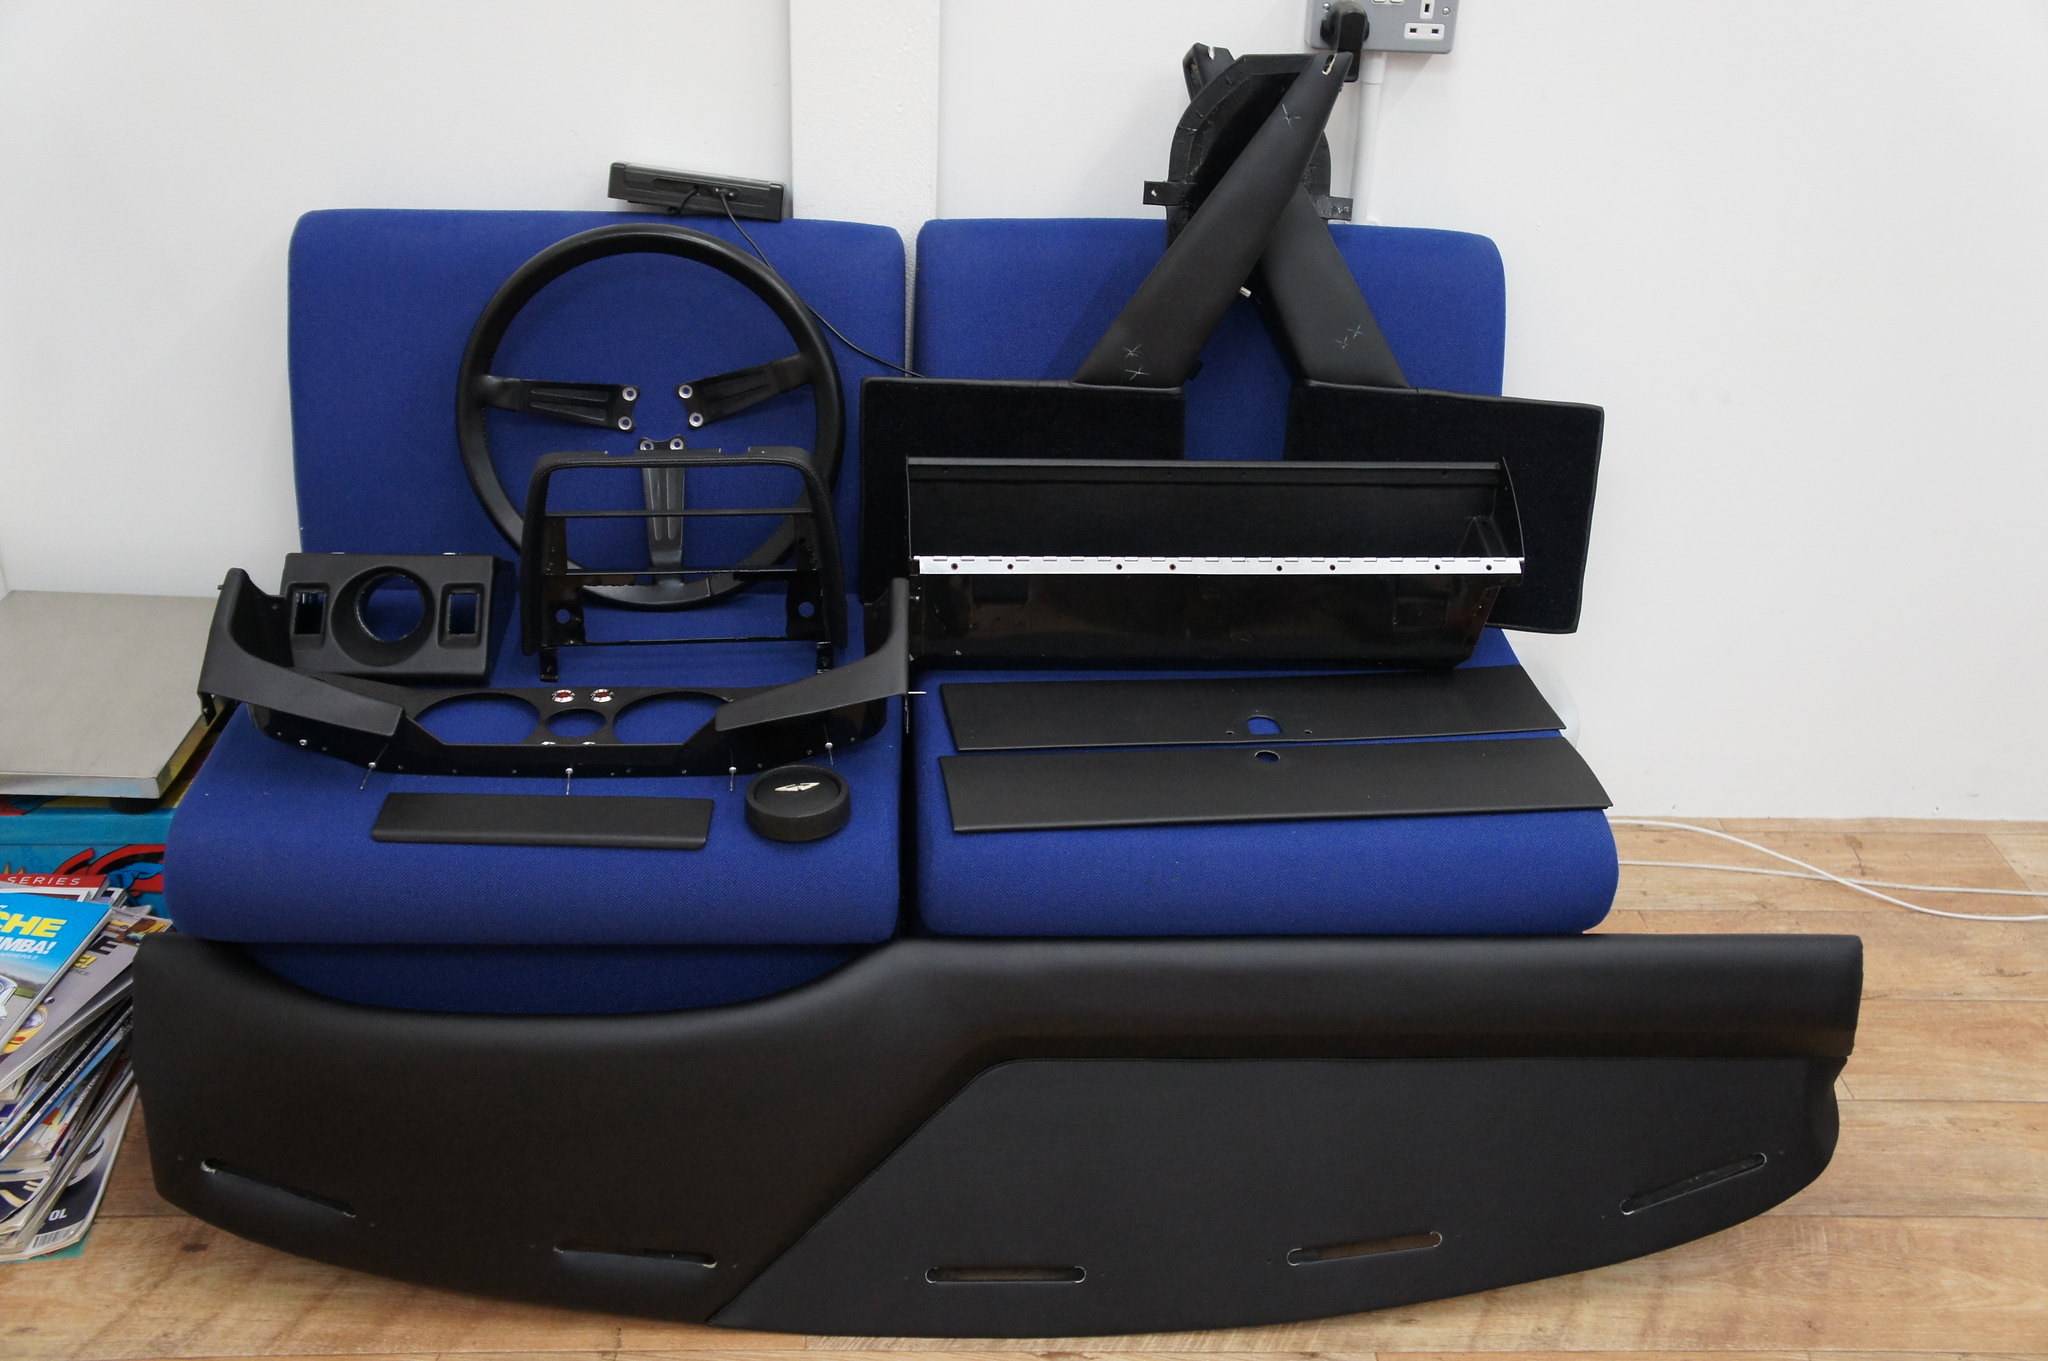 DSC05785
The dashboard assembly will also be going in quite soon after painting as well so in preparation I had all these items recovered. There's quite a few individual pieces but I have pull together a complete set from what came with the car and the bits I sourced from the ex race car. These are now ready to be collected from the trimmers.
DSC05785Latest update on the V8
The colour I have chosen is Olive Green. It's a metallic but a period Aston colour.
The exterior is now mostly green, but painted in a non metallic colour, the closest to olive green that the paint suppliers could mix. This will give some colour to the bodywork and the opportunity to correct any imperfections which may have been over looked before the final colour application.
The bonnet underside surround has been finished in the olive green with the centre section blackened with stone chip paint.
The engine bay aperture edge and channel have also been finished in the olive green with the upper part of the inner wings and bulk head blackened too, giving a crinkle finish in matt black as with original.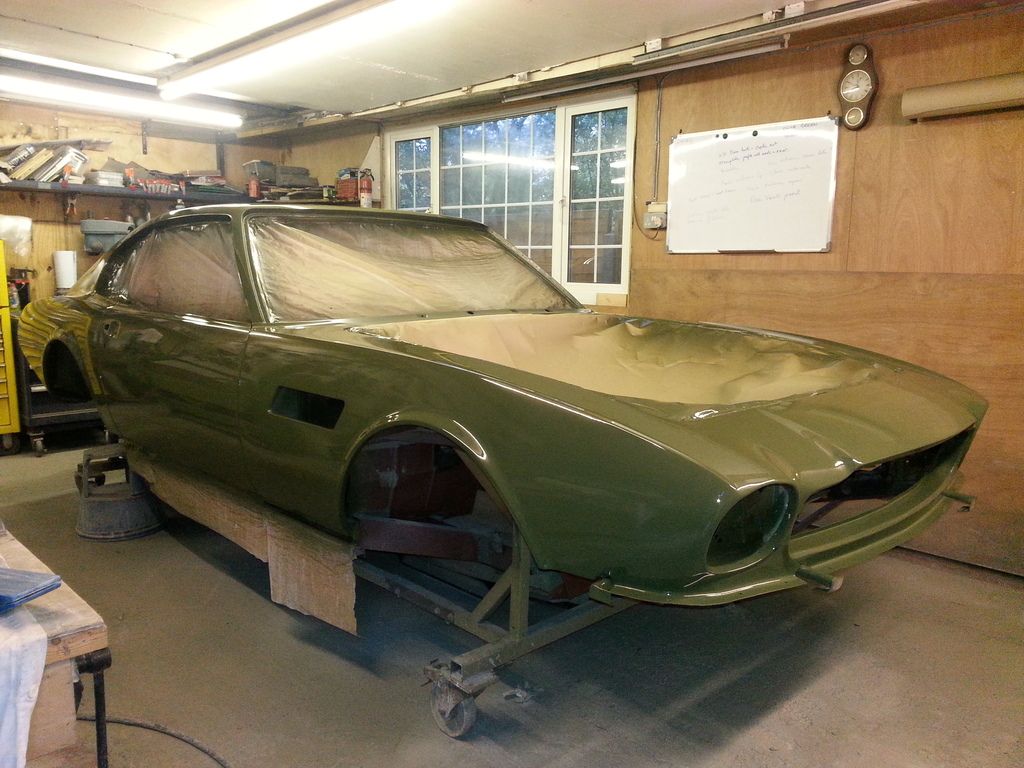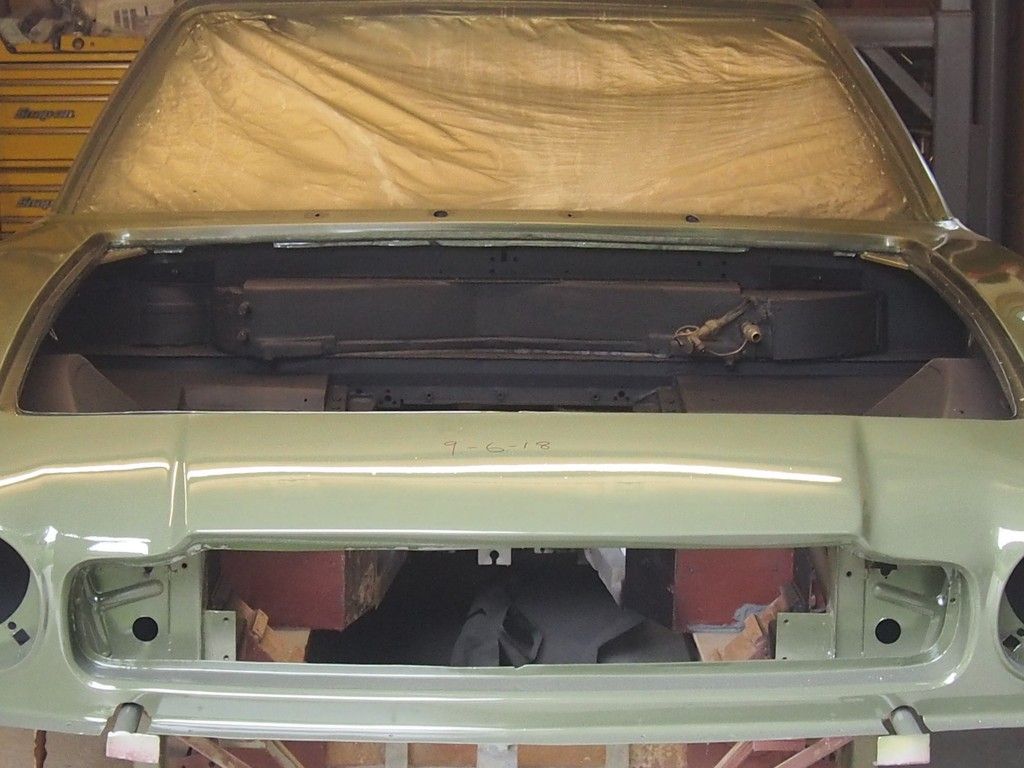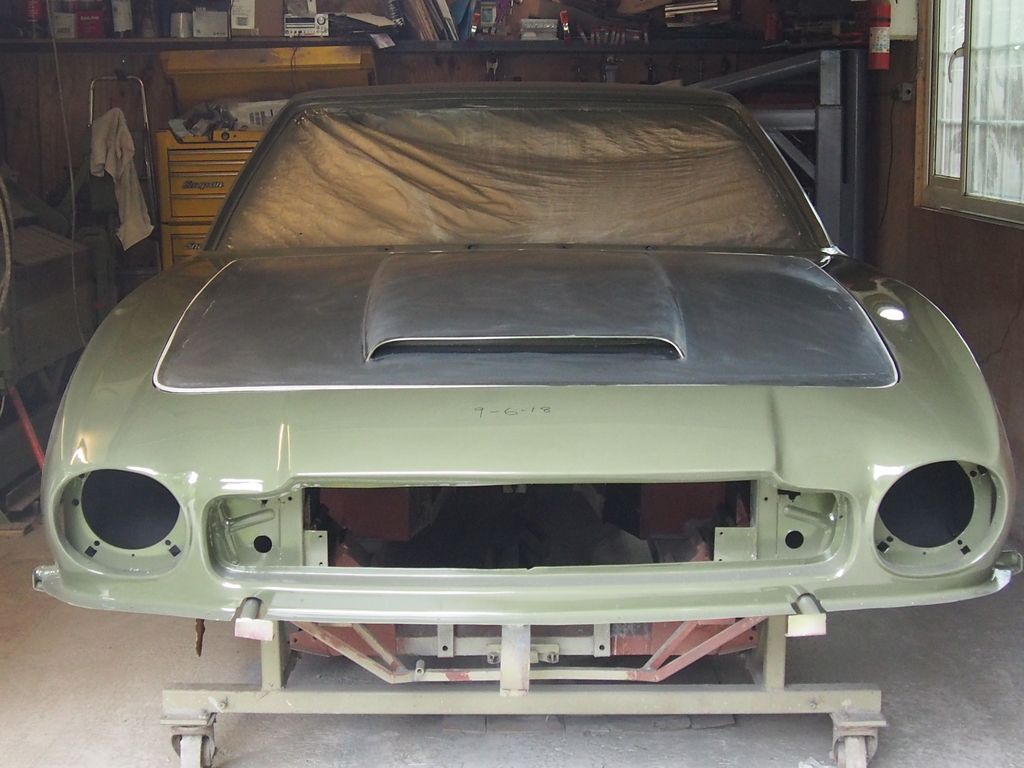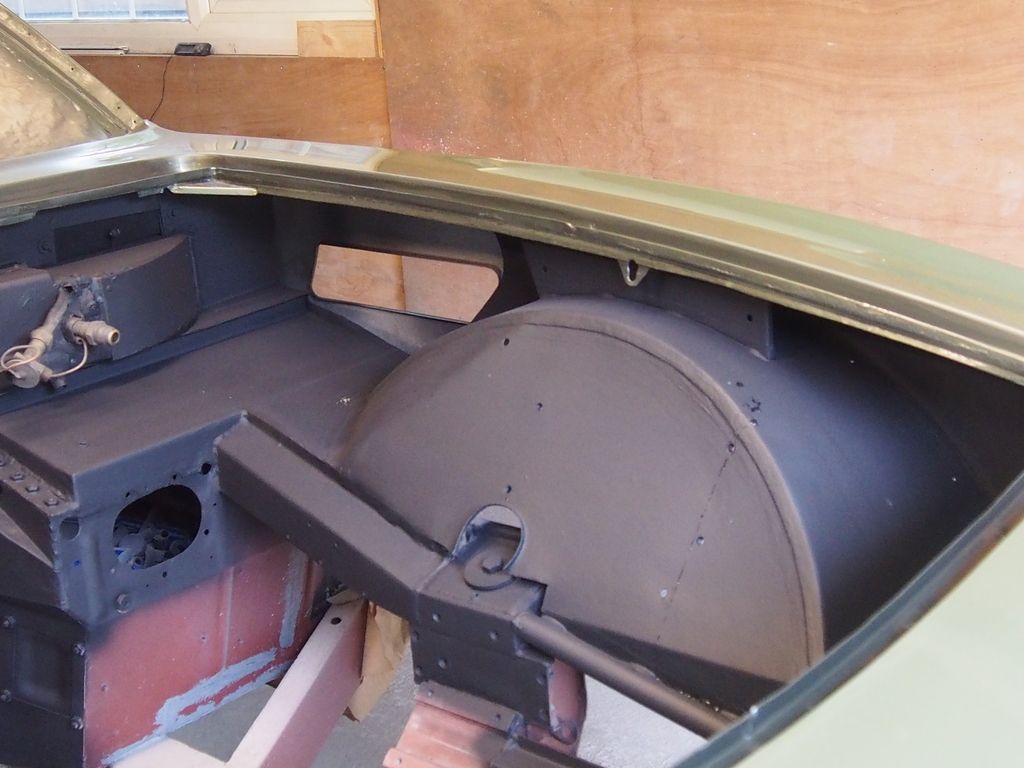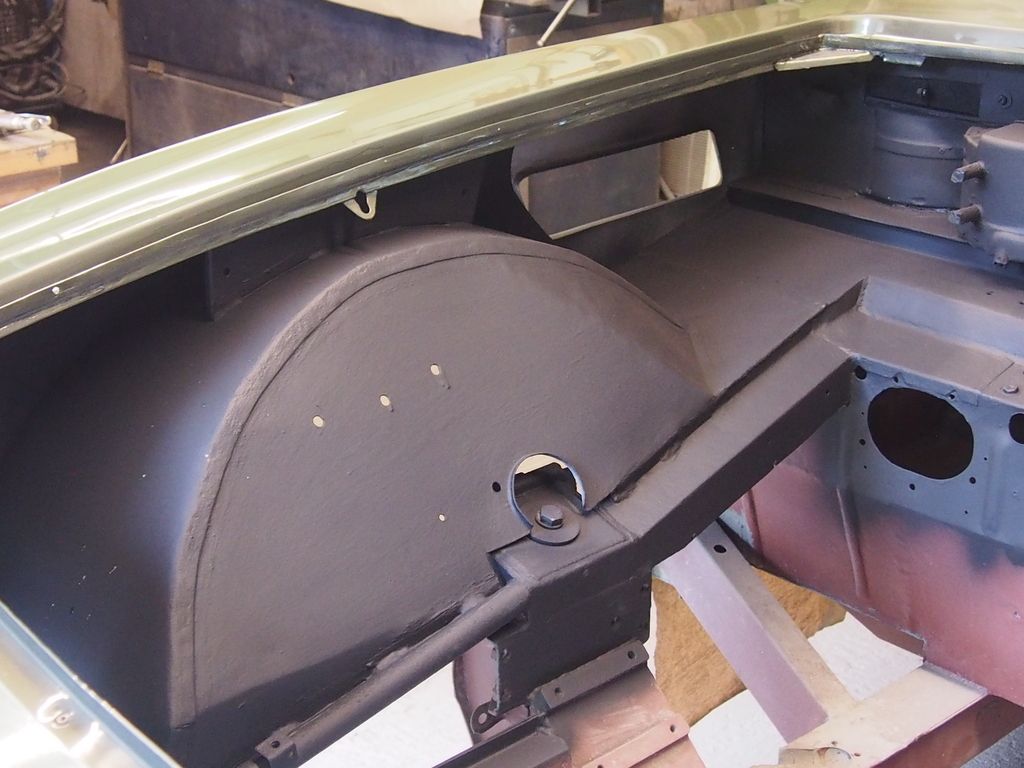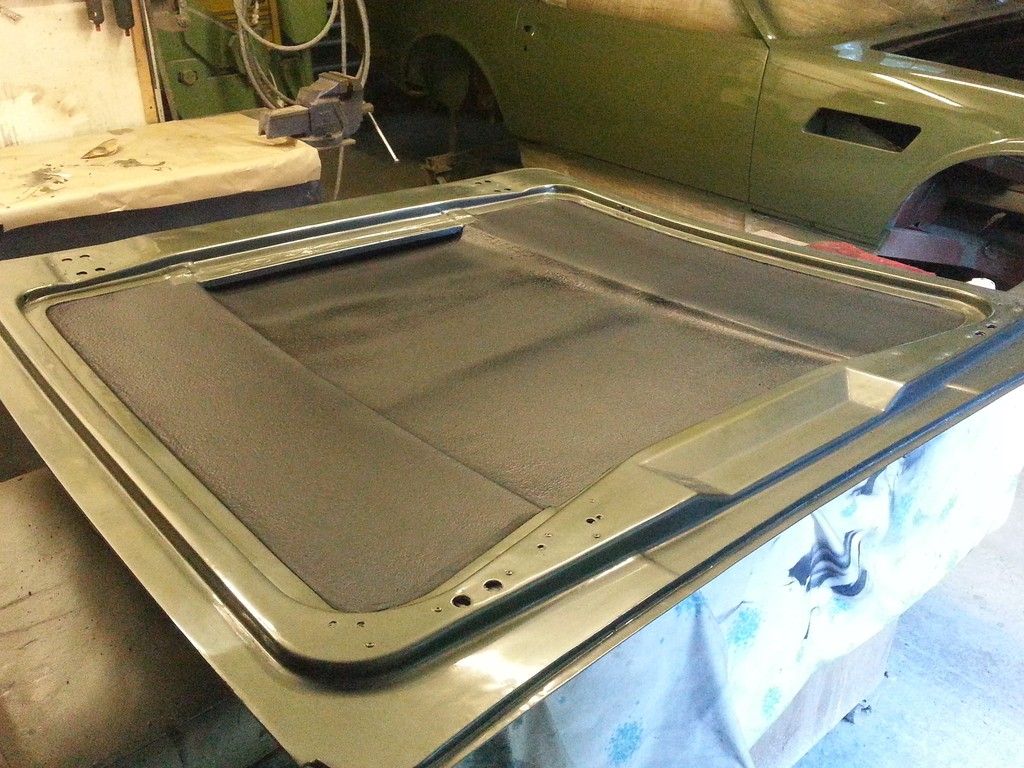


Just a small update on the project.
Managed to track down the two missing gauges, water temperature and oil pressure. The water temp gauge will need a new bezel but these are available.
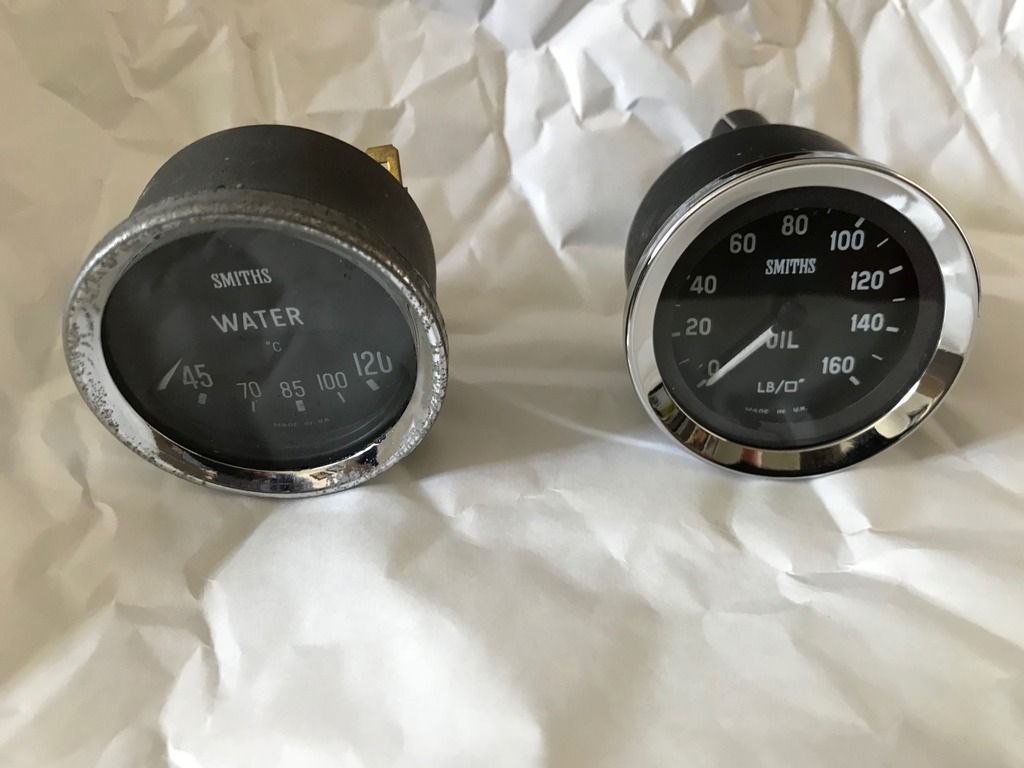
I also now have the two brake master cylinders. These proved harder to find as most specialists will only do them on an exchange basis, a problem for me as both of mine are missing. However by going for uprated and more powerful versions I was able to get them off the shelf without exchange.

Edited by CQ8 on Tuesday 17th July 23:20
Gassing Station | Readers' Cars | Top of Page | What's New | My Stuff