Pembleton mkII - Tin Tub
Discussion


Introduction
Having owned my 2cv engined Pembleton for now just over a year, I’ve never quite been happy with it. In my ownership so far I’ve done quite a few bits and bobs to it that can be read on my other thread HERE
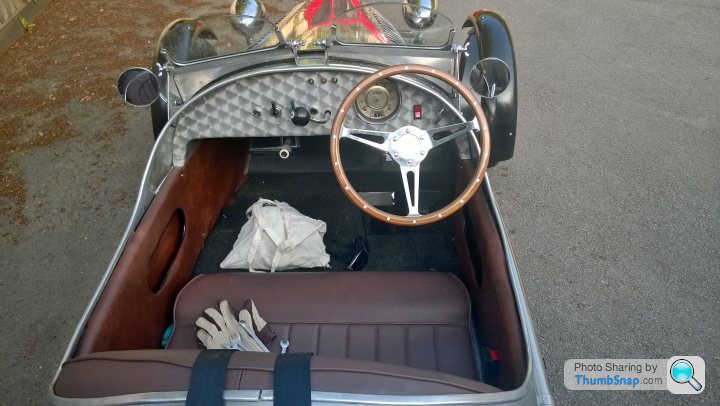
My main issue is its size. It’s very small and I’m not… 6ft 4” and 110kgs to be precise. I’ve helped the situation by fitting a smaller diameter dished wheel and a moulded seat base, but it’s still not exactly spacious. When it’s 2 up, both me and the passenger are wedged in at the hips. When I bought it I convinced myself it was okay, and despite it not being completely un-driveable, it still isn’t where I want it to be.
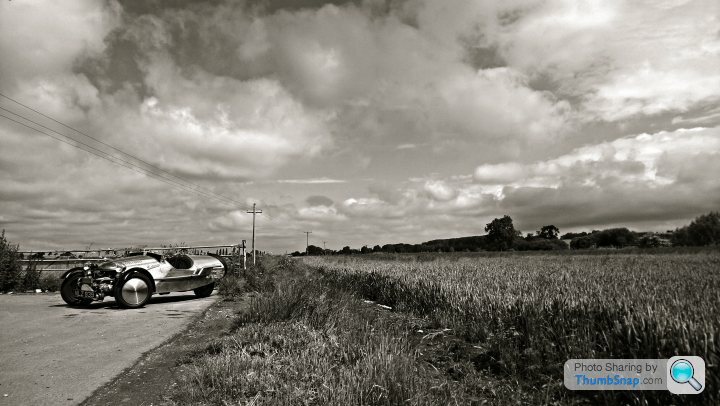
In my quest for a suitable replacement I nearly bought a Westfield SEW. This was very fast and hugely fun, but it just didn’t feel special enough. At the risk of sounding bah humbug and derogatory, it just felt like a plastic kit car, albeit a very fast, capable one.
I also went to Mark Grinnalls workshop and sat in a selection of Scorpions he had in. Alas, I’m too tall/wide again so it was back to the drawing board.
One option was to chop the Pembleton in half and make it longer, this would certainly fix the length problem, but would still be an issue at the hips, and I didn’t like the idea of taking what is otherwise a beautifully finished vehicle and butchering it.
In a bit of a flippant comment to my wife about building myself a car, she looked at me blankly and said “well, why don’t you? I think it’s a good idea as then you’ll get exactly what you want”… this started my brain on a mission.
Phil and Guy, who own and run the Pembleton motor company, offer a LWB chassis. Upon speaking to Phil, it became apparent that this chassis may be perfect for my needs. It has an additional 8” of length, and 3” of width in the cockpit (as the actress said to the bishop) and he has used this chassis to build a factory assembled car for a 6ft 6” BIG BLOKE, and he was absolutely fine. So the hunt was on for parts/donor.
Having owned my 2cv engined Pembleton for now just over a year, I’ve never quite been happy with it. In my ownership so far I’ve done quite a few bits and bobs to it that can be read on my other thread HERE
My main issue is its size. It’s very small and I’m not… 6ft 4” and 110kgs to be precise. I’ve helped the situation by fitting a smaller diameter dished wheel and a moulded seat base, but it’s still not exactly spacious. When it’s 2 up, both me and the passenger are wedged in at the hips. When I bought it I convinced myself it was okay, and despite it not being completely un-driveable, it still isn’t where I want it to be.
In my quest for a suitable replacement I nearly bought a Westfield SEW. This was very fast and hugely fun, but it just didn’t feel special enough. At the risk of sounding bah humbug and derogatory, it just felt like a plastic kit car, albeit a very fast, capable one.
I also went to Mark Grinnalls workshop and sat in a selection of Scorpions he had in. Alas, I’m too tall/wide again so it was back to the drawing board.
One option was to chop the Pembleton in half and make it longer, this would certainly fix the length problem, but would still be an issue at the hips, and I didn’t like the idea of taking what is otherwise a beautifully finished vehicle and butchering it.
In a bit of a flippant comment to my wife about building myself a car, she looked at me blankly and said “well, why don’t you? I think it’s a good idea as then you’ll get exactly what you want”… this started my brain on a mission.
Phil and Guy, who own and run the Pembleton motor company, offer a LWB chassis. Upon speaking to Phil, it became apparent that this chassis may be perfect for my needs. It has an additional 8” of length, and 3” of width in the cockpit (as the actress said to the bishop) and he has used this chassis to build a factory assembled car for a 6ft 6” BIG BLOKE, and he was absolutely fine. So the hunt was on for parts/donor.
Edited by Ambleton on Monday 10th October 21:53
Thanks!
I have a deeply unsettling love for stupid cars, especially three wheelers. They're just so unusual I can't help but be drawn in by them!
Be warned this will be a long running thread! But I will keep it up to try to be thorough. I'm sure a lot of people will get bored, but I want this to almost be a full build blog.
I will be running the 2 Pembleton threads in parallel for a while. The plan is to keep the current one (making it better all the time) until my second one is completed, then sell my current one...
Edited by Ambleton on Thursday 20th April 21:13
Jonmx said:
One of my ex's fathers had a Lomax 3 wheeler, I thought it was bloody stupid, then I had a go in it. I still thought it was bloody stupid, but great fun! I can see why people take a shine to them. 
It all started with a Lomax over 8 years ago at the ripe old age of 18! www.pistonheads.com/gassing/topic.asp?t=871767
Not many people get the chance to build themselves a car at 26!
Engine
People have used all sorts of engines over the years. Engines that have been mated to 2cv gearboxes include the BMW airhead engines from the R75, R80 and R100 bikes, the later BMW oil head engines from the likes of the R850 and R1100 (like the kits Pete Sparrow sells), the flat 4 engine from the Ami Super/GS and Moto Guzzi engines of all types and sizes, I’ve even seen one with a Panhard flat twin.
In my opinion nothing beats the look of a Vtwin at the front of a cycle car, like the early morgans...

The Moto Guzzi 750cc small block is supposed to be the best engine for a Pembleton. Its output of 48bhp is a healthy 70% increase over the standard 29bhp from the 2cv motor, and it revs a bit higher too.
Fitted with Phil Gregorys (Pembleton Motor Company) 19" wire wheels increases the top speed a bit, and if you want an even higher cruising speed, then you can fit a 2cv/Dyane hybrid gearbox, which offers a 4% increase in top. this is made up of the 2cv gearset, with the crownwheel and pinion from the dyane.
This engine is almost exactly the same weight as a 2cv engine, so it doesn’t upset the balance of the vehicle either.
The earlier carb bikes are the best. The later ones are fuel injected and I didn’t want the hassle of fitting all the sensors and switches to trick the ecu into thinking that things like the centre stand were folded away, adding in a lambda sensor and all the extra wiring.
It’s a relatively simple job to mate a Guzzi small block to a 2cv gearbox as its just 3x adaptor plates and a bit of jiggery pokery. Other, bigger, guzzi engines can be used but the extra grunt and weight can unsettle it, and it’s a more complicated job, with the engine hanging out further at the front too. I also didn’t like the idea of lunching the gearbox, which has remained largely unchanged since the first 425cc 2cv with 12bhp.
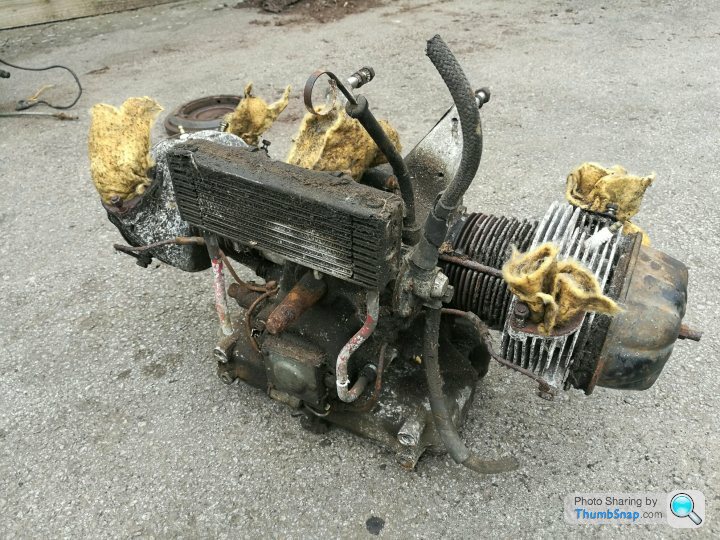
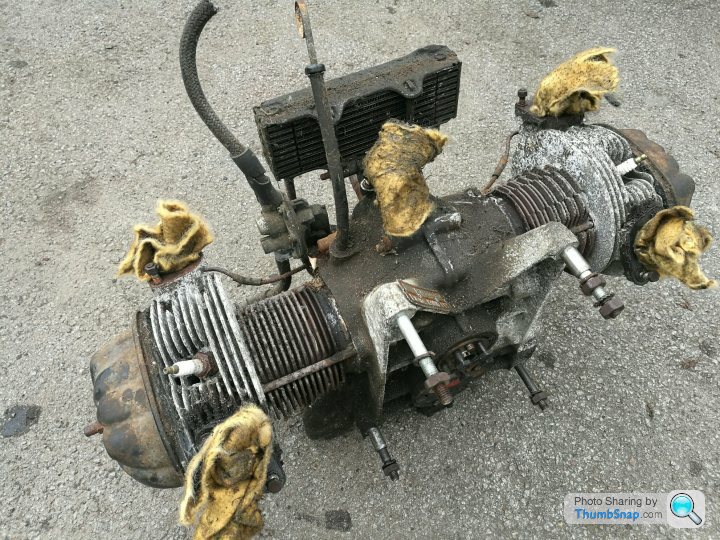
I was given a tip off about a 1991 Moto Guzzi 750T that was being broken as the final drive had seized. The 750T was a UK market specific bike that never sold very well. Stock image below...

A call to the seller and an exchange of emails had secured almost everything I needed, including a full electronic ignition, dynamo and rectifier, coils etc. I now need to source a pair of Carbs, but these can be bought new from Dellorto at a reasonable cost (circa £200)
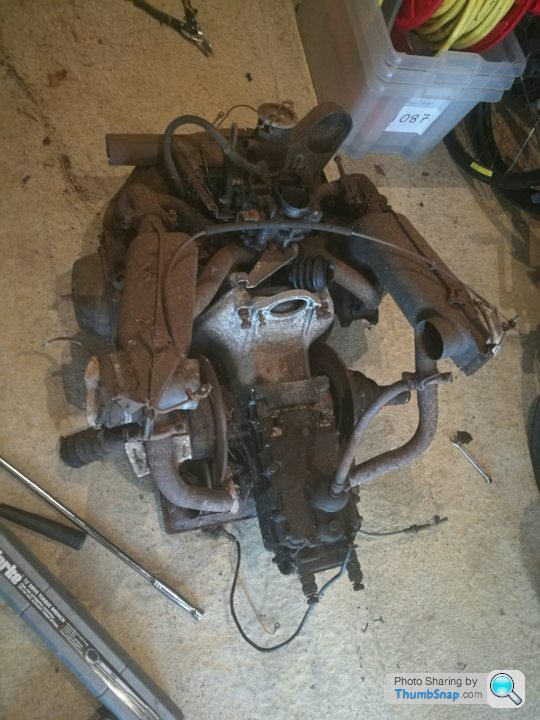
Images of the engine below....
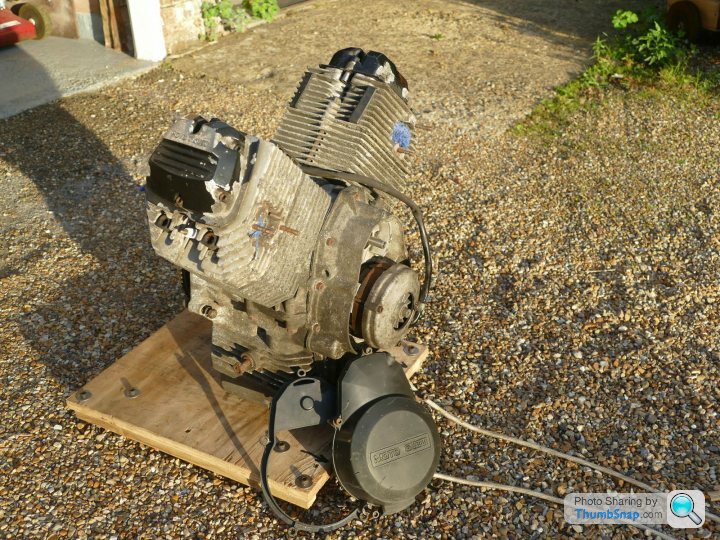
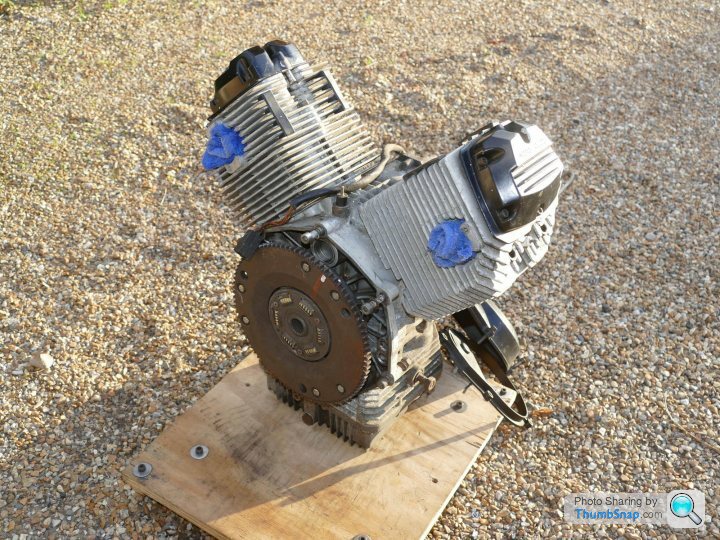
It'll need a freshen up, but that will come later!
People have used all sorts of engines over the years. Engines that have been mated to 2cv gearboxes include the BMW airhead engines from the R75, R80 and R100 bikes, the later BMW oil head engines from the likes of the R850 and R1100 (like the kits Pete Sparrow sells), the flat 4 engine from the Ami Super/GS and Moto Guzzi engines of all types and sizes, I’ve even seen one with a Panhard flat twin.
In my opinion nothing beats the look of a Vtwin at the front of a cycle car, like the early morgans...
The Moto Guzzi 750cc small block is supposed to be the best engine for a Pembleton. Its output of 48bhp is a healthy 70% increase over the standard 29bhp from the 2cv motor, and it revs a bit higher too.
Fitted with Phil Gregorys (Pembleton Motor Company) 19" wire wheels increases the top speed a bit, and if you want an even higher cruising speed, then you can fit a 2cv/Dyane hybrid gearbox, which offers a 4% increase in top. this is made up of the 2cv gearset, with the crownwheel and pinion from the dyane.
This engine is almost exactly the same weight as a 2cv engine, so it doesn’t upset the balance of the vehicle either.
The earlier carb bikes are the best. The later ones are fuel injected and I didn’t want the hassle of fitting all the sensors and switches to trick the ecu into thinking that things like the centre stand were folded away, adding in a lambda sensor and all the extra wiring.
It’s a relatively simple job to mate a Guzzi small block to a 2cv gearbox as its just 3x adaptor plates and a bit of jiggery pokery. Other, bigger, guzzi engines can be used but the extra grunt and weight can unsettle it, and it’s a more complicated job, with the engine hanging out further at the front too. I also didn’t like the idea of lunching the gearbox, which has remained largely unchanged since the first 425cc 2cv with 12bhp.
I was given a tip off about a 1991 Moto Guzzi 750T that was being broken as the final drive had seized. The 750T was a UK market specific bike that never sold very well. Stock image below...
A call to the seller and an exchange of emails had secured almost everything I needed, including a full electronic ignition, dynamo and rectifier, coils etc. I now need to source a pair of Carbs, but these can be bought new from Dellorto at a reasonable cost (circa £200)
Images of the engine below....
It'll need a freshen up, but that will come later!
Other Donor Bits
With the engine now acquired, it was time to hunt for the rest of the bits I needed.
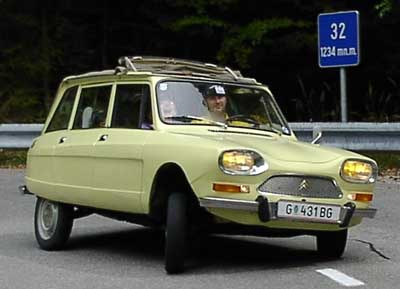
I managed to locate a chap who was selling an Ami rolling chassis. or those unfamiliar with old citroens, the ami was basically a larger car available as a saloon or estate based on 2cv underpinnings...
It had been stood on a farm for many years and was cheap, I have its number plates and all the numbers are matching, so I'll apply for the V5
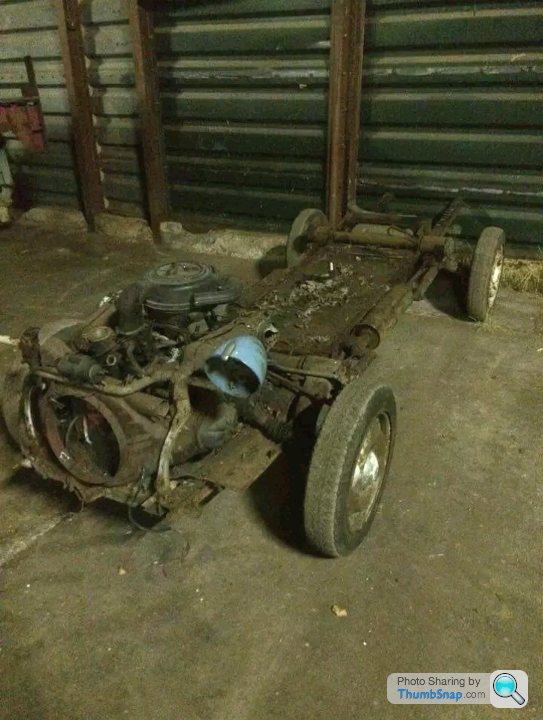
A deal was done and I went to collect it in a partially stripped down state with a hire van. There are several advantages to an Ami, and some challenges.
First off, they have inertia dampers mounted to the hubs. These are quite heavy, but once removed, will give free mounting holes for rotating mudguards – something that is missing on my current Pembleton. In addition to this they have larger, stronger wheel bearings, a Citroen M28 engine (+3bhp and higher compression of 9.0:1), an ARB (not fitted to 2CVs or dyanes), and a slightly different steering rack where the pinion comes out at a steeper angle. I have a spare 2cv steering rack floating around so I might use this instead… I’ll cross that bridge when I get to it…
Conversely the rear arm offset is slightly shorter as the track at the rear slightly narrower on an Ami. In my instance (using just one of the rear arms, turned around) I’ll either need to mod the chassis to get the rear wheel to sit centrally, or locate a suitable 2CV rear arm and use that instead.
Another option is to put an MGA wire wheel on the back with a splined adaptor. This will change the offset of the fitting, but I want to ensure that these 2 figures are the same before I commit to anything as I really don’t want an offset rear wheel….
In addition to this, as Amis are now very thin on the ground, so unwanted spares/parts are much more desirable.
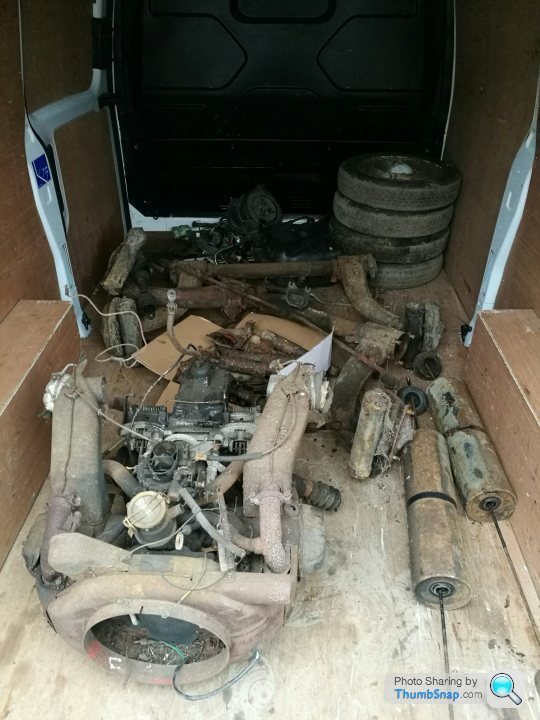
Everything is very mucky, oily and greasy, but generally sound....
With the engine now acquired, it was time to hunt for the rest of the bits I needed.
I managed to locate a chap who was selling an Ami rolling chassis. or those unfamiliar with old citroens, the ami was basically a larger car available as a saloon or estate based on 2cv underpinnings...
It had been stood on a farm for many years and was cheap, I have its number plates and all the numbers are matching, so I'll apply for the V5
A deal was done and I went to collect it in a partially stripped down state with a hire van. There are several advantages to an Ami, and some challenges.
First off, they have inertia dampers mounted to the hubs. These are quite heavy, but once removed, will give free mounting holes for rotating mudguards – something that is missing on my current Pembleton. In addition to this they have larger, stronger wheel bearings, a Citroen M28 engine (+3bhp and higher compression of 9.0:1), an ARB (not fitted to 2CVs or dyanes), and a slightly different steering rack where the pinion comes out at a steeper angle. I have a spare 2cv steering rack floating around so I might use this instead… I’ll cross that bridge when I get to it…
Conversely the rear arm offset is slightly shorter as the track at the rear slightly narrower on an Ami. In my instance (using just one of the rear arms, turned around) I’ll either need to mod the chassis to get the rear wheel to sit centrally, or locate a suitable 2CV rear arm and use that instead.
Another option is to put an MGA wire wheel on the back with a splined adaptor. This will change the offset of the fitting, but I want to ensure that these 2 figures are the same before I commit to anything as I really don’t want an offset rear wheel….
In addition to this, as Amis are now very thin on the ground, so unwanted spares/parts are much more desirable.
Everything is very mucky, oily and greasy, but generally sound....
TooMany2cvs said:
Or the third option would be to modify the Ami rear arm.
2cv arm would be easier, but you'd be losing the bigger wheel bearing (which is probably more relevant on the back than the front).
That is also an option... I'm hoping that the offset change in an MGA wire wheel + adaptor = 1/2 the change in rear track between the 2cv and ami...2cv arm would be easier, but you'd be losing the bigger wheel bearing (which is probably more relevant on the back than the front).
That way I could have wire wheels all round and everything would match without any cutting/welding of chassis or suspension arms.
It would also mean a wider rear wheel, not that it changes anything much.
A bit of light googling has unearthed that the rear track of the 2cv is 1260mm, and the rear track if the ami is 1220mm...
I know they used the same cross tube and wheels, so each of the arms are 20mm narrower athwart...
I need to measure up the mga wheel and adaptor I have! Here's hoping
I know they used the same cross tube and wheels, so each of the arms are 20mm narrower athwart...
I need to measure up the mga wheel and adaptor I have! Here's hoping
So what have I got
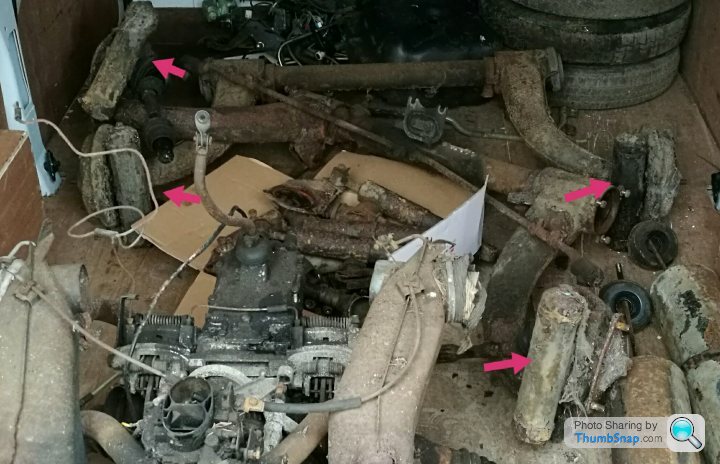
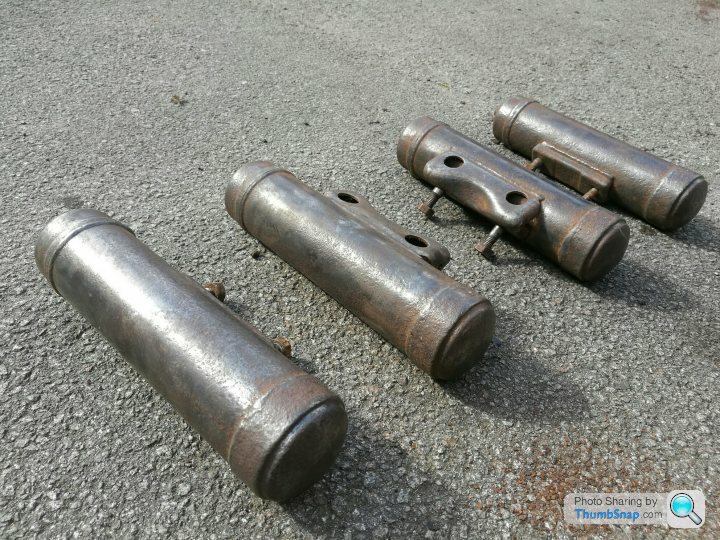
The first thing to do was to start to break down the larger chunks of the donor. The Inertia dampers came off without too much trouble. One of the captive studs started rotating, but the nut was carefully cut free. Once given a tickle with a wire wheel they came up pretty and upon giving them a vigorous shake, appeared to be working well too. I managed to sell these for £100 and sent them packing off up to Scotland..
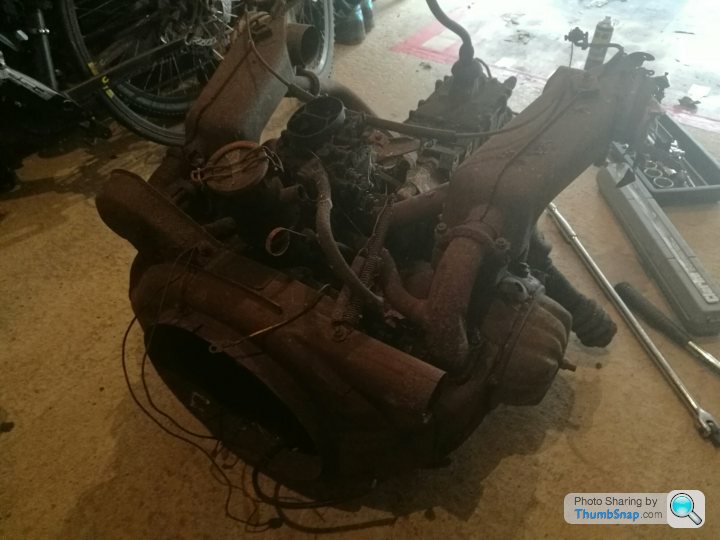
Whilst getting the engine/gearbox out the back of the van with my wife and shoving it in the back of the garage, it became apparent it was not manageable to keep them together. I underestimated how much stronger I was than my wife and subsequently she ended up hurting herself (not seriously). Although they’re relatively light components (for an engine and gearbox), the assembly was probably approaching 80kgs. After a couple of weeks in the back of the garage I decided it was time to drag it out and get it split.
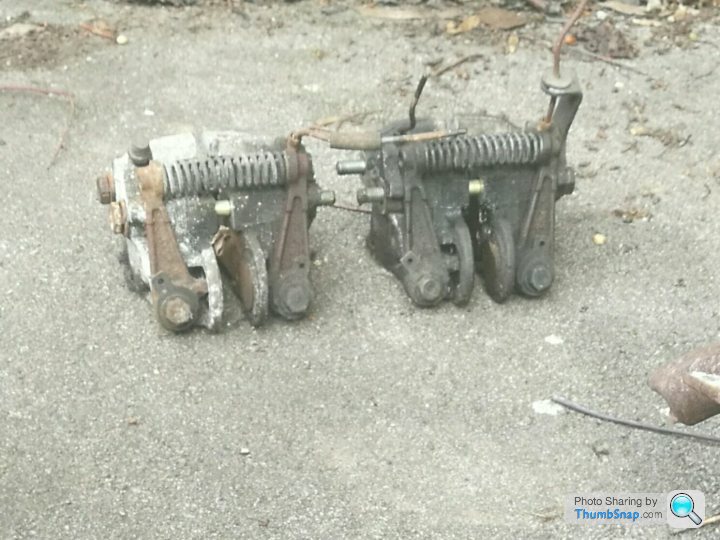
First and easiest parts to remove are the brake callipers from the gearbox casting. These come in 2 halves and are really simple, but effective little units with the handbrake mechanism and pads in the same assembly.
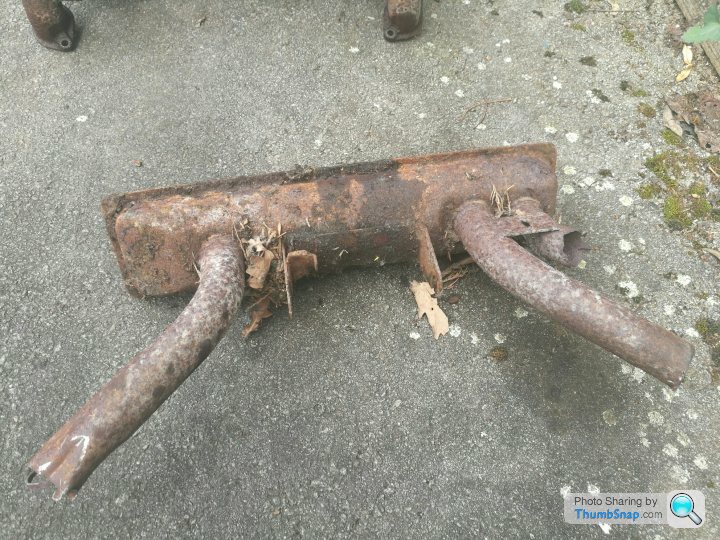
Next to be removed was the central solex carb, inlet/exhaust spider, heat exchanger shrouds and first silencer. The 4x bolts and 4x nuts that hold the spider were thankfully okay to remove (no shearing) and with some careful (read barbaric) use of the angle grinder on the rusted exhaust down pipes, came free without much hassle.
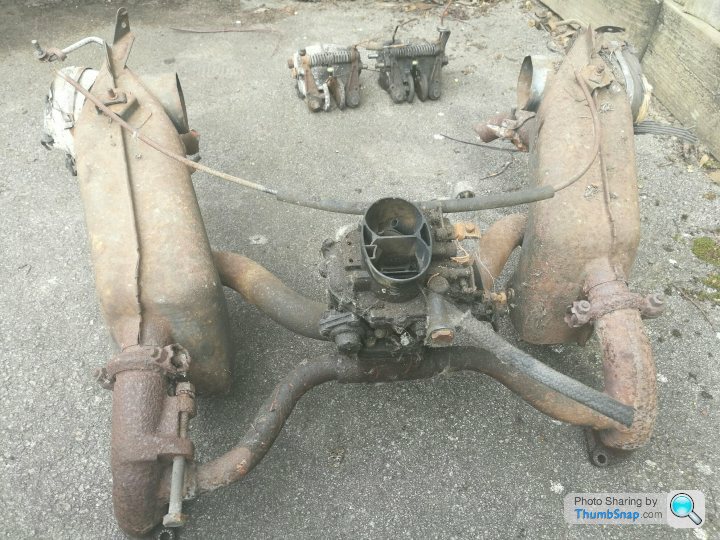
After a few more nuts removed the remnants of the exhaust system lifted away without issue
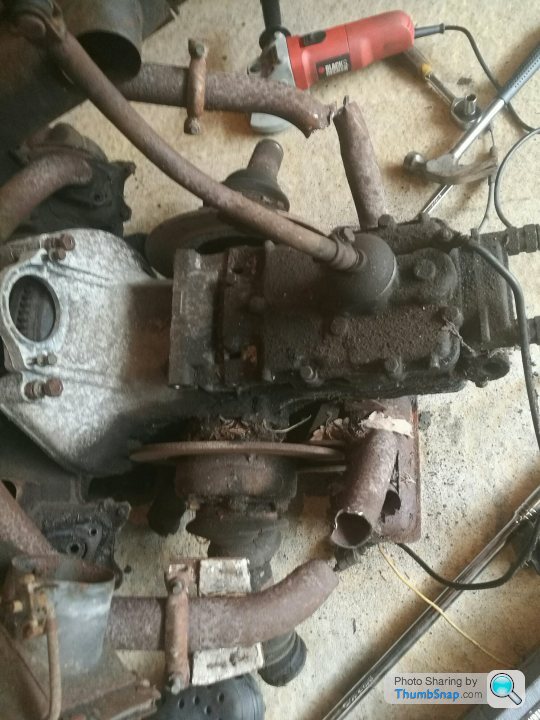
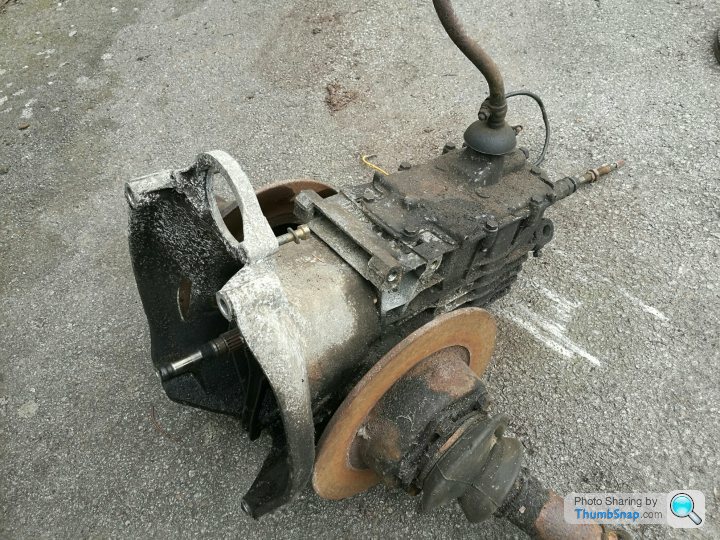
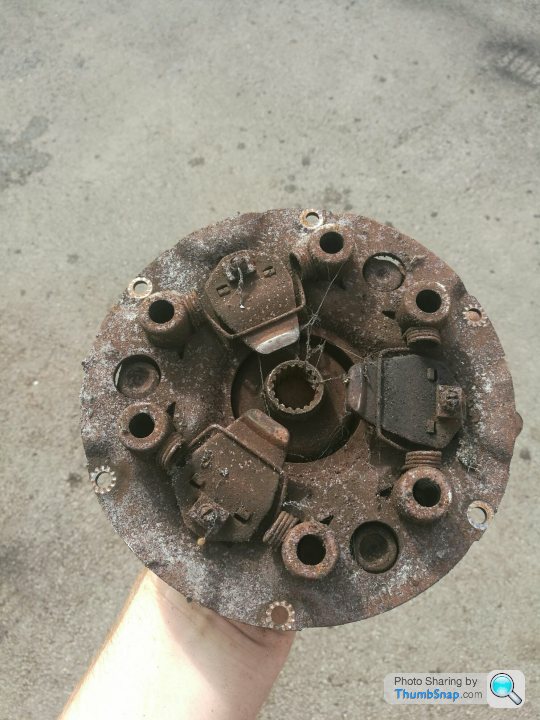
After this, I decided the next action was to remove the gearbox. This at least means that I now have 2 manageable chunks to move around at about 35-40kgs a piece, instead of one big lump. Only four studs hold the gearbox and engine together and they all came out trouble free. Thankfully, although everything is tight, nothing seems to be seized.
Gearbox separated.
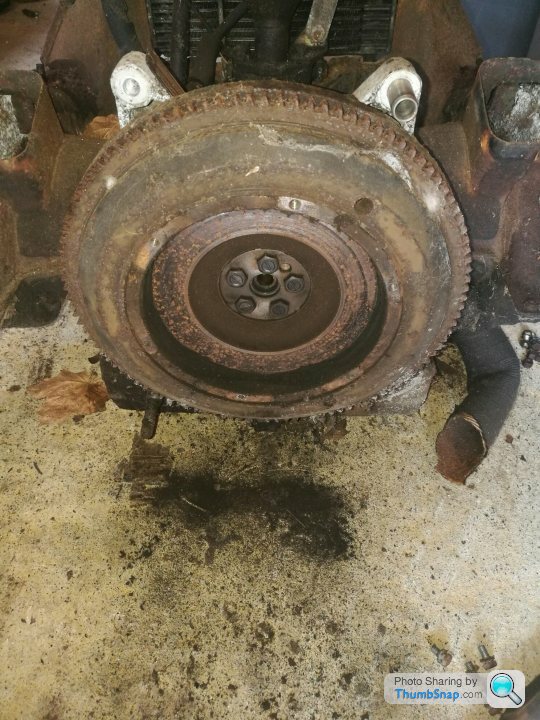
With the gearbox now out of the way we can see the clutch on the back of the flywheel.
This is an old clutch (possibly the original) and is a 3 finger design. Instead of a diaphragm clutch where it’s a pressed piece of spring steel offering many self-sprung fingers, this design had 3 plates with hinges and torsion springs. You cannot get these type of clutches anymore and instead I will need a diaphragm conversion. As you can see, despite all the rust, it’s actually not that bad.
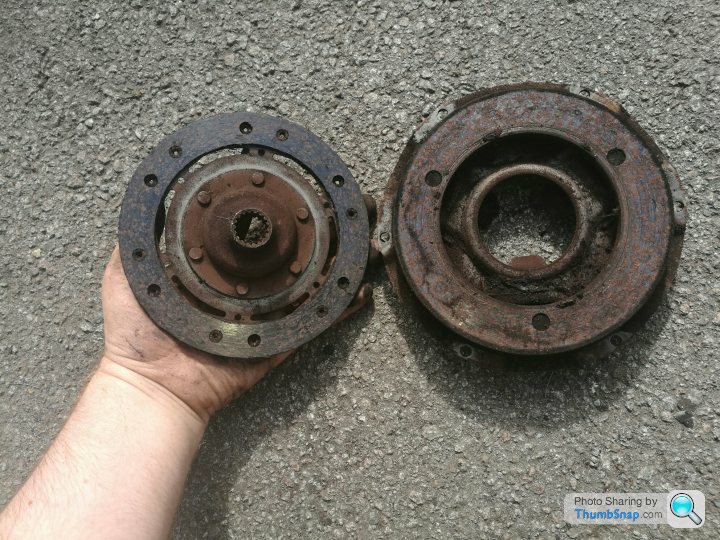
With the clutch off, it’s now time to remove the flywheel. This is a pretty lardy thing at about 9.5kgs, so removal assists lugging the engine around too. This is held on by 5 bolts. The plan is to get it lightened and balanced, so should improve engine response between gear changes and acceleration, which is a worthwhile trade off against tractability and rolling torque uphill, which is remedied by the more powerful engine. There’s not many people who do this now, so I’ll have to do my research and locate someone to do it.

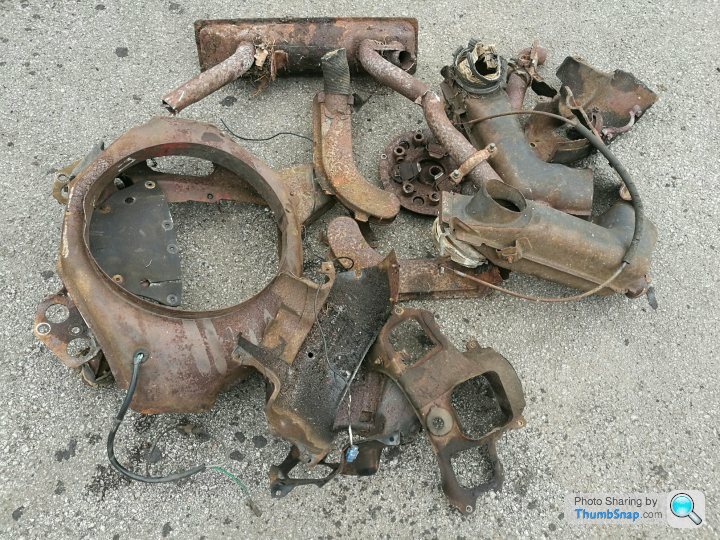
Now it’s time to tackle all the crusty, knackered cooling shrouds and tin-ware. This had rusted through in places and was not pretty. It’s very thin and so resembles a razor blade too. Most of the screws were seized into this or just broke through the rust – the rest were cut off with a grinder.
Now all this is removed we can actually see the bare bones of the engine. Upon trying to remove the oil cooler, one of the ali pipes had seized in the union and sheared the tube, so I cut the legs.
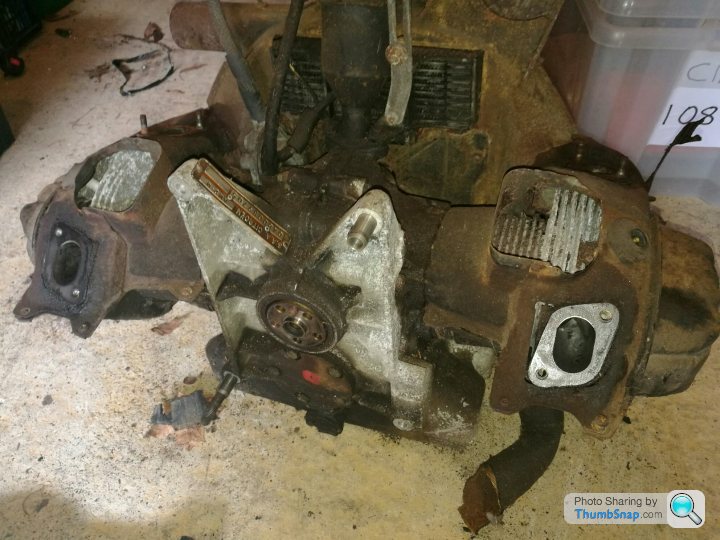
Thats a whole load of crappy tinware! If it was in half decent nick it would be worth a fair bit! Buts its not....
The first thing to do was to start to break down the larger chunks of the donor. The Inertia dampers came off without too much trouble. One of the captive studs started rotating, but the nut was carefully cut free. Once given a tickle with a wire wheel they came up pretty and upon giving them a vigorous shake, appeared to be working well too. I managed to sell these for £100 and sent them packing off up to Scotland..
Whilst getting the engine/gearbox out the back of the van with my wife and shoving it in the back of the garage, it became apparent it was not manageable to keep them together. I underestimated how much stronger I was than my wife and subsequently she ended up hurting herself (not seriously). Although they’re relatively light components (for an engine and gearbox), the assembly was probably approaching 80kgs. After a couple of weeks in the back of the garage I decided it was time to drag it out and get it split.
First and easiest parts to remove are the brake callipers from the gearbox casting. These come in 2 halves and are really simple, but effective little units with the handbrake mechanism and pads in the same assembly.
Next to be removed was the central solex carb, inlet/exhaust spider, heat exchanger shrouds and first silencer. The 4x bolts and 4x nuts that hold the spider were thankfully okay to remove (no shearing) and with some careful (read barbaric) use of the angle grinder on the rusted exhaust down pipes, came free without much hassle.
After a few more nuts removed the remnants of the exhaust system lifted away without issue
After this, I decided the next action was to remove the gearbox. This at least means that I now have 2 manageable chunks to move around at about 35-40kgs a piece, instead of one big lump. Only four studs hold the gearbox and engine together and they all came out trouble free. Thankfully, although everything is tight, nothing seems to be seized.
Gearbox separated.
With the gearbox now out of the way we can see the clutch on the back of the flywheel.
This is an old clutch (possibly the original) and is a 3 finger design. Instead of a diaphragm clutch where it’s a pressed piece of spring steel offering many self-sprung fingers, this design had 3 plates with hinges and torsion springs. You cannot get these type of clutches anymore and instead I will need a diaphragm conversion. As you can see, despite all the rust, it’s actually not that bad.
With the clutch off, it’s now time to remove the flywheel. This is a pretty lardy thing at about 9.5kgs, so removal assists lugging the engine around too. This is held on by 5 bolts. The plan is to get it lightened and balanced, so should improve engine response between gear changes and acceleration, which is a worthwhile trade off against tractability and rolling torque uphill, which is remedied by the more powerful engine. There’s not many people who do this now, so I’ll have to do my research and locate someone to do it.
Now it’s time to tackle all the crusty, knackered cooling shrouds and tin-ware. This had rusted through in places and was not pretty. It’s very thin and so resembles a razor blade too. Most of the screws were seized into this or just broke through the rust – the rest were cut off with a grinder.
Now all this is removed we can actually see the bare bones of the engine. Upon trying to remove the oil cooler, one of the ali pipes had seized in the union and sheared the tube, so I cut the legs.
Thats a whole load of crappy tinware! If it was in half decent nick it would be worth a fair bit! Buts its not....
toomany2cvs said:
Ambleton said:
There’s not many people who do this now, so I’ll have to do my research and locate someone to do it.
Talk to Geoff.http://www.2cv-speed-shop.co.uk/
Ambleton said:
Thats a whole load of crappy tinware! If it was in half decent nick it would be worth a fair bit! Buts its not....
PLEASE tell me you haven't binned the cylinder shrouds... Later engines have rubber ones, which are rubbish, so the metal ones are always in demand. I'll give 'em a home, if they're heading binwards!The tinware is still in the shed, although its pretty FUBARd. You're more than welcome to it all!
TooMany2cvs said:
Read the blurb... It's a diaphragm conversion 
Doofus said:
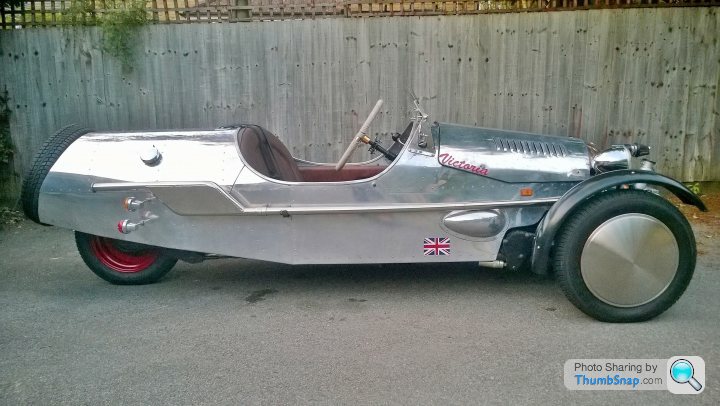
Is there any reason that you're not using Victoria as a donor? I know you said you'd sell that in the end, but you could always sell it as a rolling/not rolling chassis once you've taken all the (tried and tested) parts that you need.
The current market value of Victoria is in the region of £7.5k. In a none rolling state she's probably worth £3k. So far all the donor parts for Tin Tub have cost me £450 once I factor in what I've made back on the inertia dampers. I'm hoping that the total build will come in at around £6.5k.
Most of the hard work is actually going to be in making the bodywork. The mechanicals is bread and butter and actually not usually a problem.
Thanks! They're certainly good fun!
Well I've measured up the MGA wire wheel I have with the aforementioned adaptor. Over a standard 2cv wheel, it will increase the offset by 69mm (give or take a smidge).
This means I have the following options...
1- shorten the arm by around 50mm and use the mga wheel and adptor
2- lengthen the arm by 20mm and use a standard 2cv wheel.
3- offset the arm mount on the chassis so its 50mm further outboard and use the mga wire wheel and adaptor.
4- offset the arm mount on the chassis so its 20mm further inboard and use a standard 2cv rear wheel.
5- not use these arms on the rear at all and find a standard 2cv arm with 2cv wheel....
Either way, these adaptors and wheel is targeted for my other pembleton, so the front track in that will go up by about 140mm...


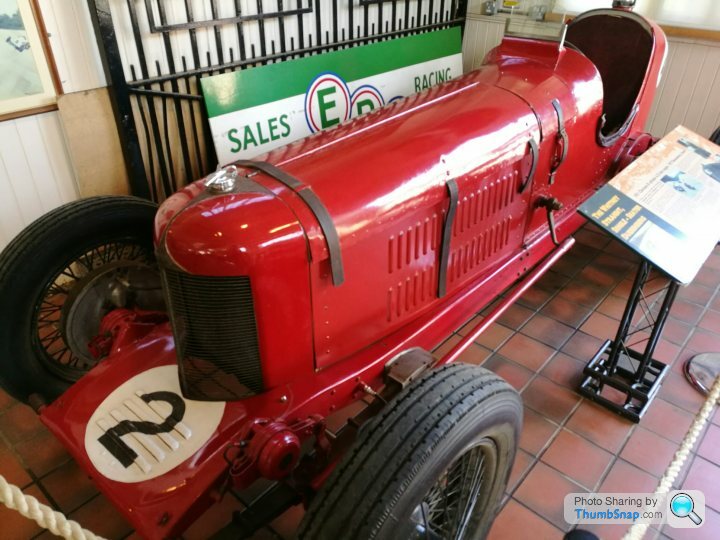
A couple of weeks ago I went to the Brooklands museum. For anyone who hasn’t been, I’d thoroughly recommend a visit. Standing on the track and looking round actually gave me goosebumps.

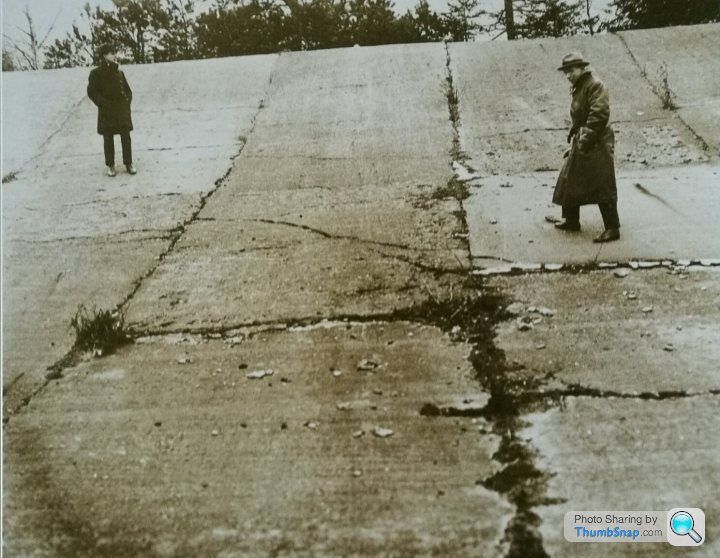
I spoke to one of the volunteers there and I commented about how it was a shame that the track had deteriorated so much. He told me that the track was built before any heavy machinery, by blokes with buckets and spades, built in sections with shuttering and that it was pretty ropey even back in the day! I didn’t really believe him until I bought a book from the shop about the history of the place. This photo is from the 1920’s!! (OMG)
Whilst I was there I also got a lot of inspiration from the cars there. Some are relatively simple, some a relatively complex. The great thing about the Pembleton is that if you want to do something a bit different, you do! I struggle with the concept of other kit cars as once they are completed, they are just the same as all the other completed ones.
Here are a few inspirational ideas I had….
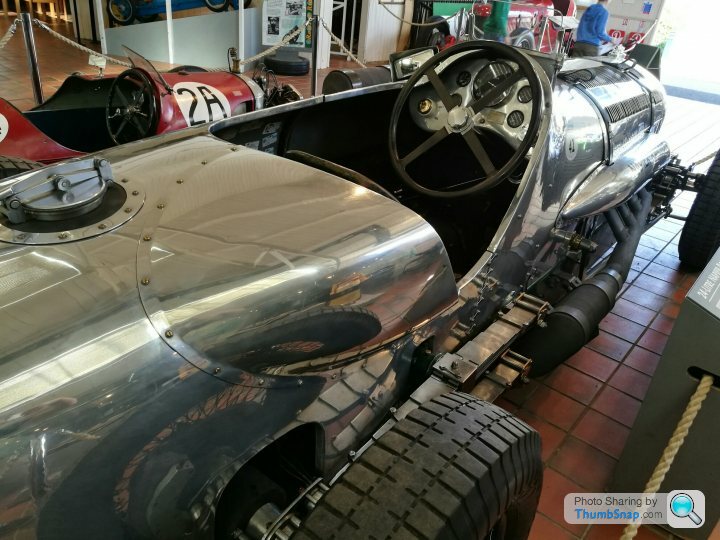
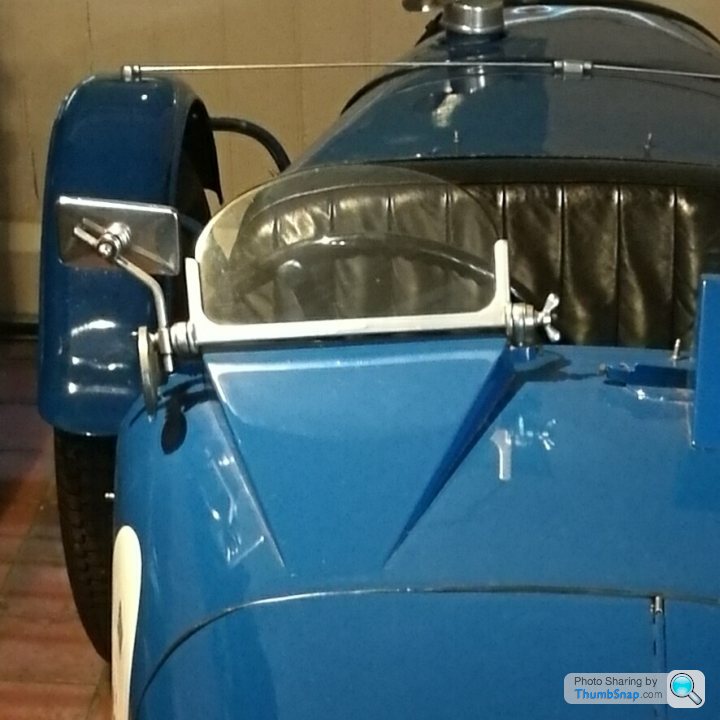
First up is the Napier Railton – this is the record holder at Brooklands and clocked a whopping average speed of 143mph in 1935.
Here’s a picture of it on its’ record run (yes, all four wheels are off the track)
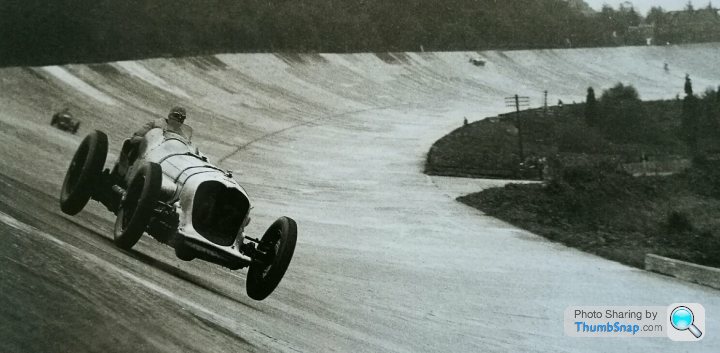
It has no front brakes. The owner also took it to the salt flats over in the states and did an endurance 24hr speed run, where it averaged over 150mph over the full 24hrs in 1936 (including fuel and tyre stops). Yikes!
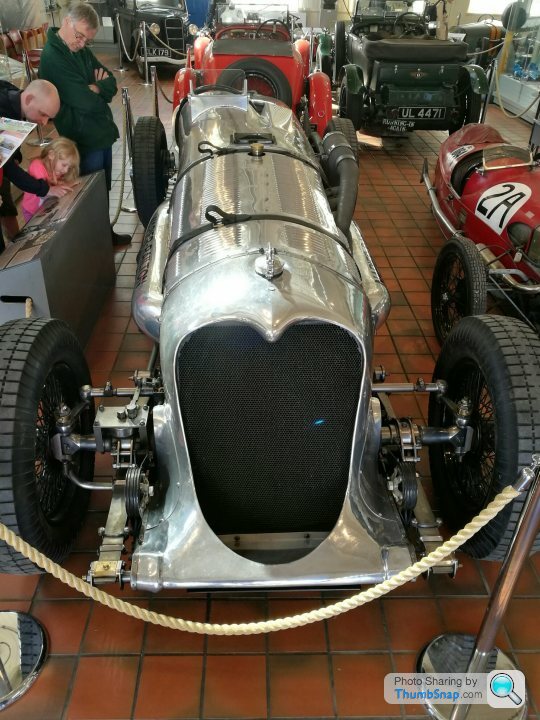
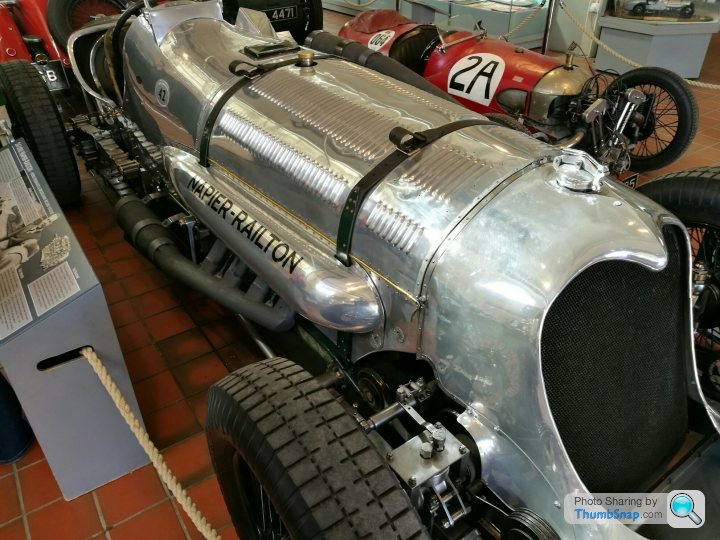
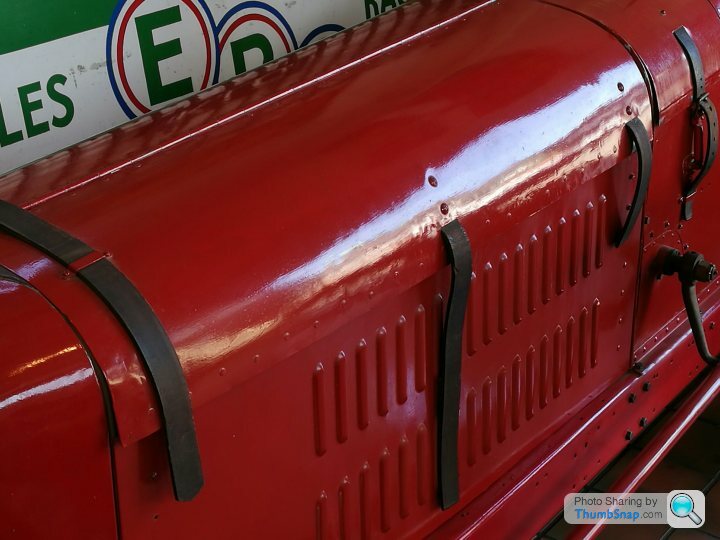
Anyway – whilst I was looking around this fine piece of craftsmanship and automotive god, I noticed that the barrelled bodywork had an extra riveted blister behind the drivers right hand shoulder, essentially squaring up the bodywork and allowing a higher back seat. I have noticed on the Pembleton that very occasionally I feel the seat back digging into my RH shoulder as it drops. This is something that I might try to incorporate into tin tub (when I get to that stage)
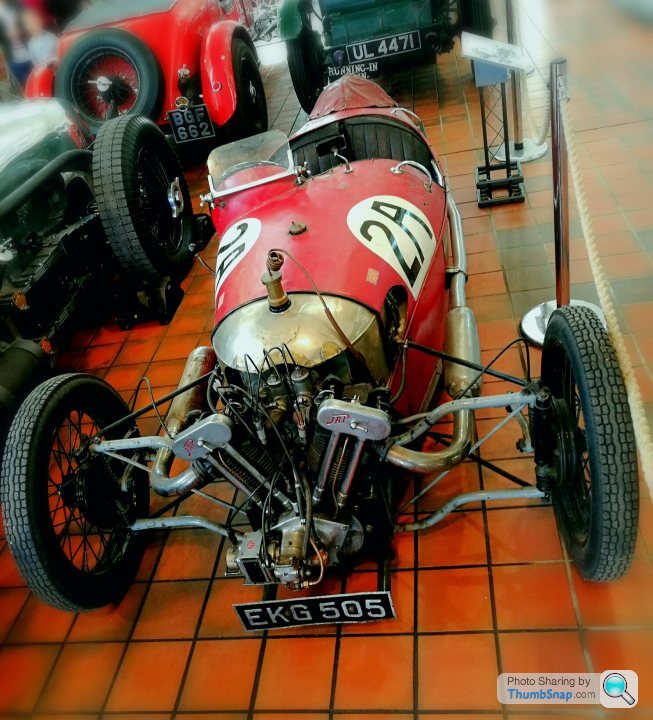
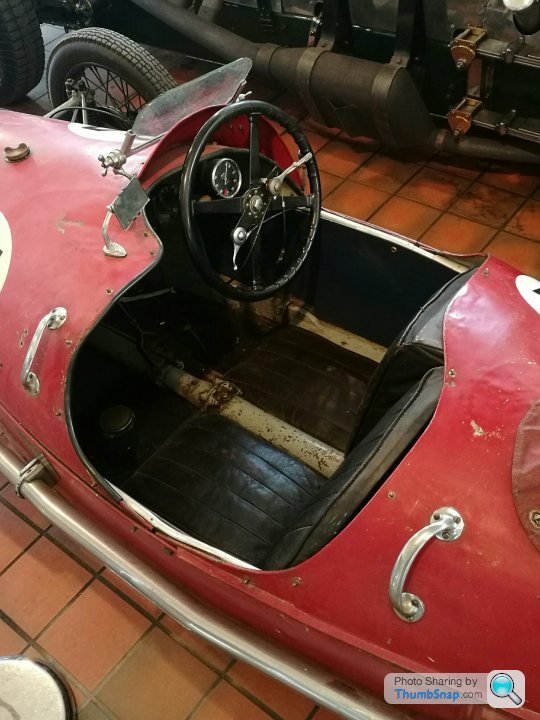
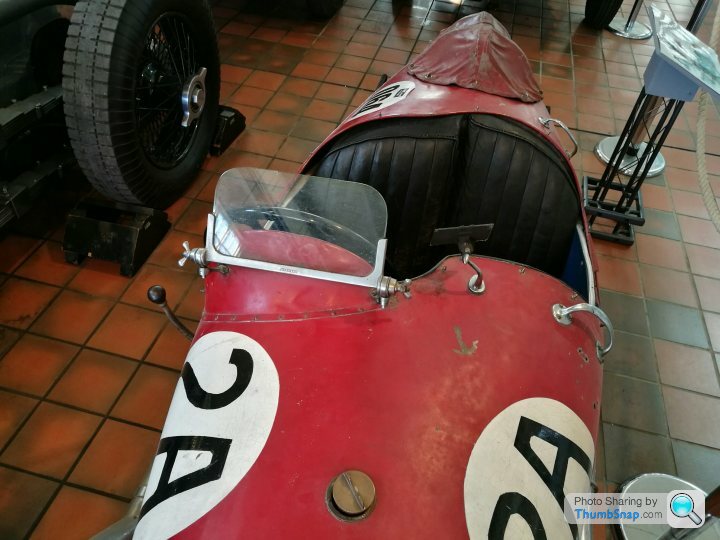
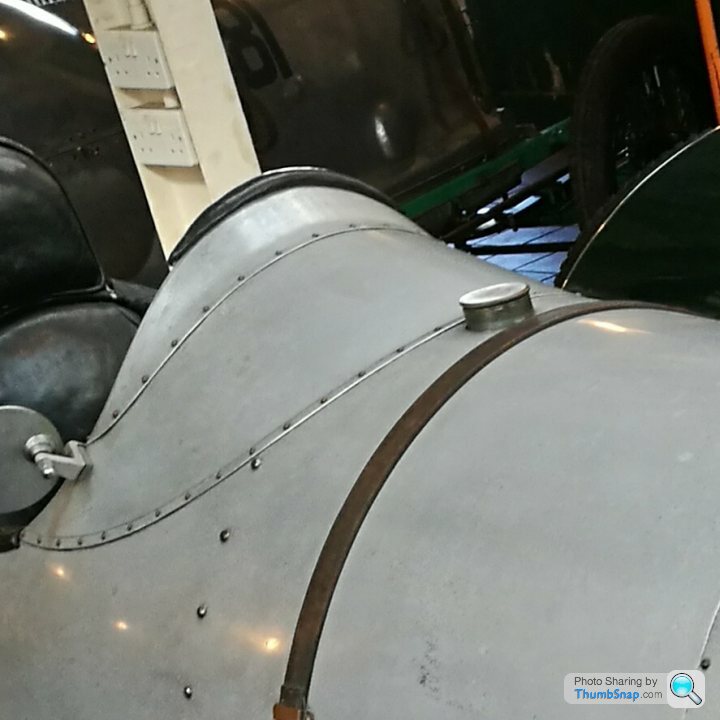
In the same room as the Napier Railton was another icon… A little Morgan three wheeler with the JAPrestwich Vtwin. I loved how ratty this was and was pleased that the museum had kept it in its oily rag condition. What I particularly liked about this was the offset seating. This means that the shoulders of the driver and passenger are offset, allowing the driver to saw at the wheel without worrying about inconveniencing the passenger. This seemed a relatively common feature on narrow cars of this era, but the offset was also carried into the scuttle at the front
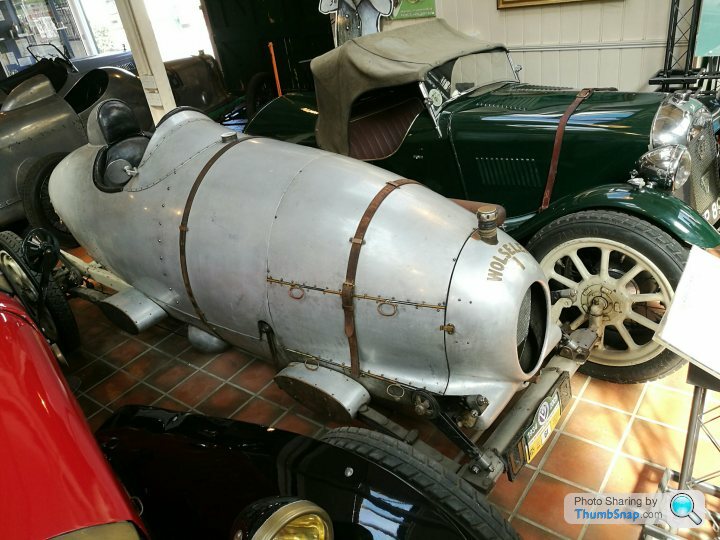
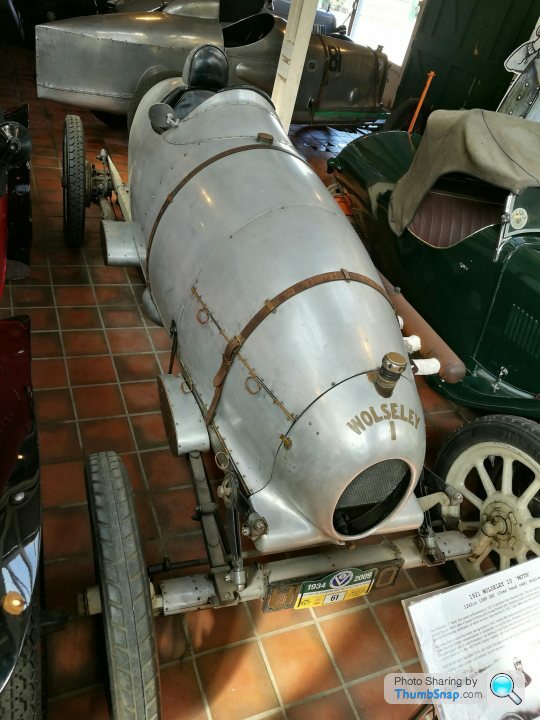
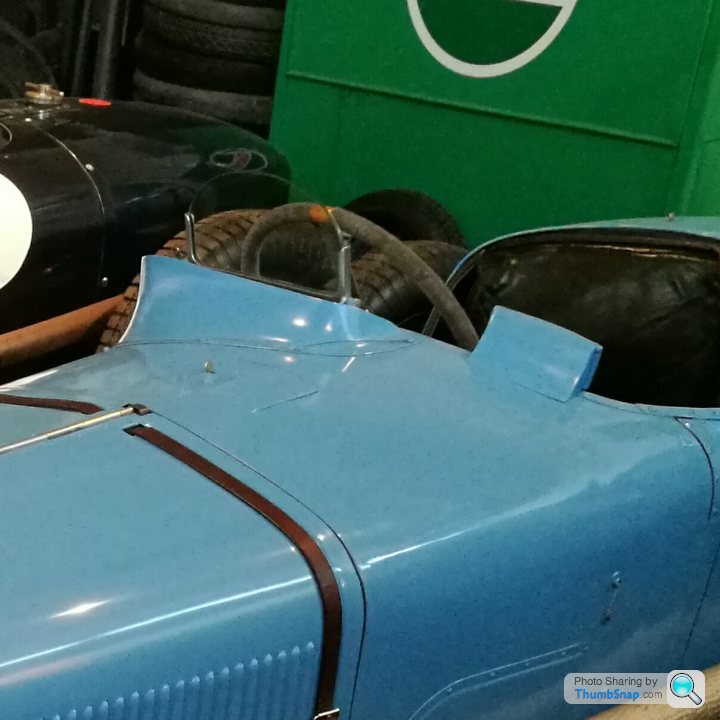
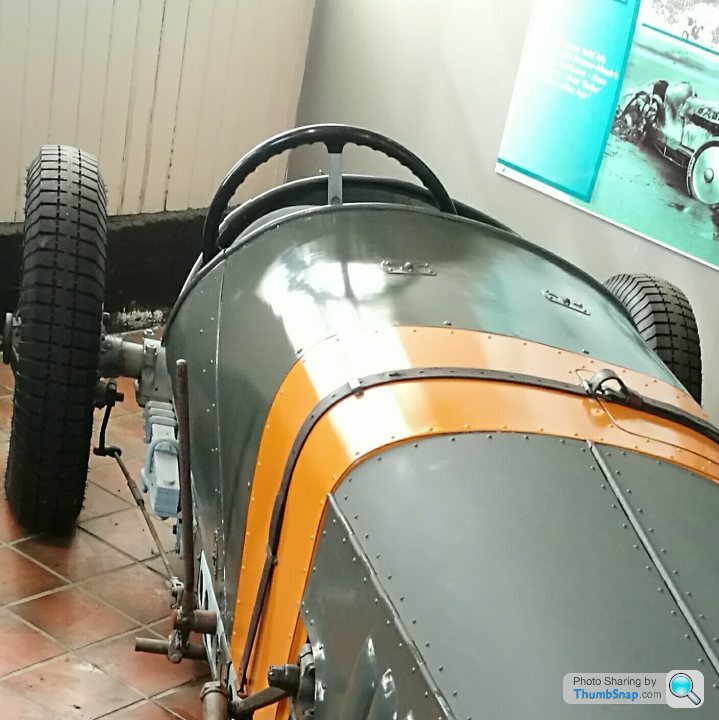
In one of the adjoining rooms was this tiny little belly tank style racer, built by Wolseley. This was bare, unpolished aluminium and had a nice white/grey powdery appearance to it. In contrast, the brass fittings really stood out and gave it a special quality that I’ve not really seen elsewhere. It was just raw and honest.
Opposite the Napier Railton was this rather tall narrow Duesenberg Straight single seater. The bonnet straps on this were actually riveted to the inside of the bonnet, then fed out through slits/louvres to the exterior, before feeding through the buckles on the bodywork. I’ve not seen this treatment before but it works really well and should be very easy to replicate on the Pembleton.
The next one that I need to think a little more about is a blister at the front to raise up the Brooklands screens and offer a little more protection. There seems to be a broad spectrum of how this is done. This varies from the very basic “box” to a localised additional blister, right the way through to an asymmetric scuttle, favoured to the drivers side. See the selection below:


I spoke to one of the volunteers there and I commented about how it was a shame that the track had deteriorated so much. He told me that the track was built before any heavy machinery, by blokes with buckets and spades, built in sections with shuttering and that it was pretty ropey even back in the day! I didn’t really believe him until I bought a book from the shop about the history of the place. This photo is from the 1920’s!! (OMG)
Whilst I was there I also got a lot of inspiration from the cars there. Some are relatively simple, some a relatively complex. The great thing about the Pembleton is that if you want to do something a bit different, you do! I struggle with the concept of other kit cars as once they are completed, they are just the same as all the other completed ones.
Here are a few inspirational ideas I had….
First up is the Napier Railton – this is the record holder at Brooklands and clocked a whopping average speed of 143mph in 1935.
Here’s a picture of it on its’ record run (yes, all four wheels are off the track)
It has no front brakes. The owner also took it to the salt flats over in the states and did an endurance 24hr speed run, where it averaged over 150mph over the full 24hrs in 1936 (including fuel and tyre stops). Yikes!
Anyway – whilst I was looking around this fine piece of craftsmanship and automotive god, I noticed that the barrelled bodywork had an extra riveted blister behind the drivers right hand shoulder, essentially squaring up the bodywork and allowing a higher back seat. I have noticed on the Pembleton that very occasionally I feel the seat back digging into my RH shoulder as it drops. This is something that I might try to incorporate into tin tub (when I get to that stage)
In the same room as the Napier Railton was another icon… A little Morgan three wheeler with the JAPrestwich Vtwin. I loved how ratty this was and was pleased that the museum had kept it in its oily rag condition. What I particularly liked about this was the offset seating. This means that the shoulders of the driver and passenger are offset, allowing the driver to saw at the wheel without worrying about inconveniencing the passenger. This seemed a relatively common feature on narrow cars of this era, but the offset was also carried into the scuttle at the front
In one of the adjoining rooms was this tiny little belly tank style racer, built by Wolseley. This was bare, unpolished aluminium and had a nice white/grey powdery appearance to it. In contrast, the brass fittings really stood out and gave it a special quality that I’ve not really seen elsewhere. It was just raw and honest.
Opposite the Napier Railton was this rather tall narrow Duesenberg Straight single seater. The bonnet straps on this were actually riveted to the inside of the bonnet, then fed out through slits/louvres to the exterior, before feeding through the buckles on the bodywork. I’ve not seen this treatment before but it works really well and should be very easy to replicate on the Pembleton.
The next one that I need to think a little more about is a blister at the front to raise up the Brooklands screens and offer a little more protection. There seems to be a broad spectrum of how this is done. This varies from the very basic “box” to a localised additional blister, right the way through to an asymmetric scuttle, favoured to the drivers side. See the selection below:
Edited by Ambleton on Wednesday 3rd May 21:20
Doofus said:
I'm pretty sure there's a Pembleton Brooklands with blisters behind the seats like that Napier Railton. I think it's Colin Wilson's, and somewhere on the web, he posted a detailed account of how he did it. I think he drew the blister, rather then riveted it.
Well recalled! A bit of light googling has revealed this...

The Back End
A lot of 3 wheeler kit car manufacturers and Morgan offer the back of their models with what is usually called a beetle back. This is wide at the front and tapers to a bit of a rounded point and resembles the back of beetle (shock). Below is a jzr:

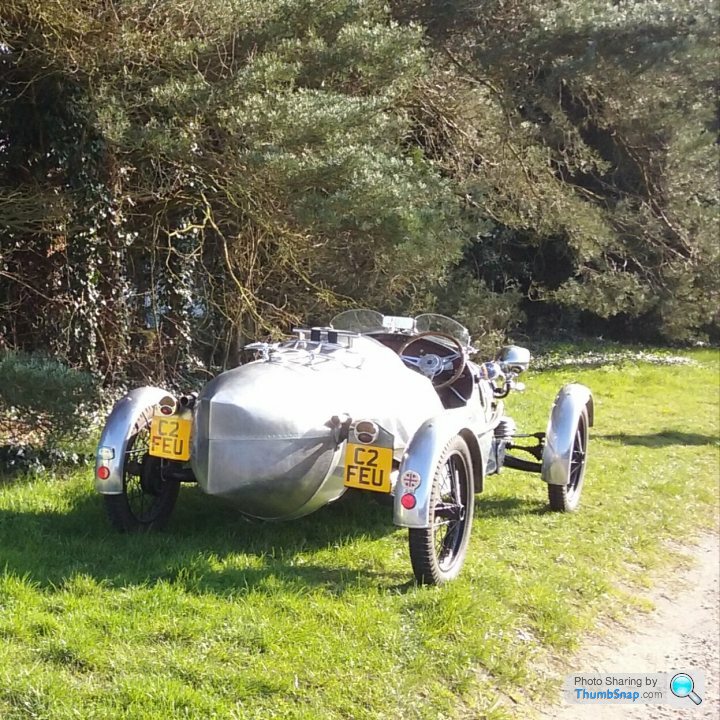
There are 2 “standard” options available when you build a Pembleton. The first, and most popular to date, is the barrel back. This is as per Victoria and is also the most simple to make. The back of the car is then finished off by a spare wheel as per some BSA 3 wheelers and some models of the original Morgan three wheeler. Morgan F4 shown below:
+5.jpg)
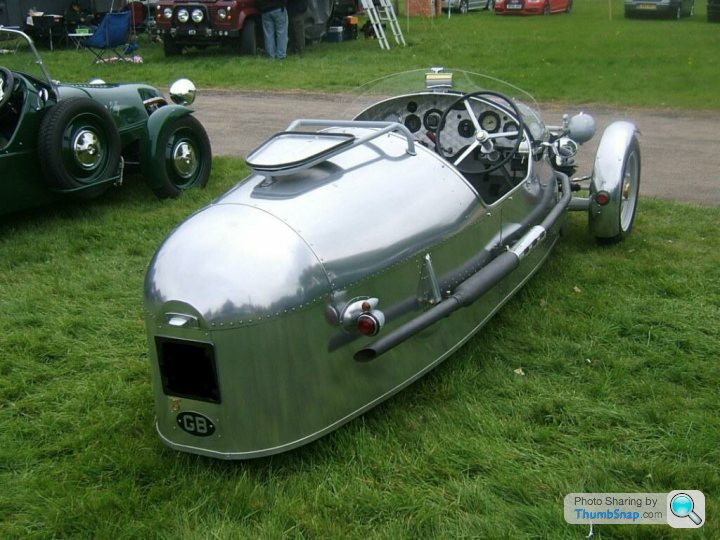
The other option is the bullet tail and has not been available from the factory for that long (probably 18 months to 2 years). This finishes off the tapered body with a spun dome with a flatted end as per below:
BUT…
We’re talking about Pembleton owners here, and if there’s something that can be built in a different way, it will be. See below for a selection of styles owners have gone for….
I love how Duncan has treated the rear lights on his silver surfer ii!
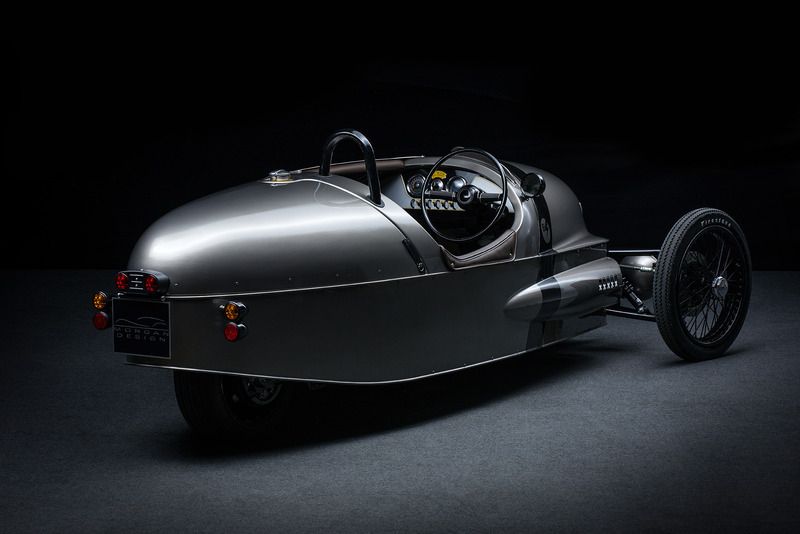
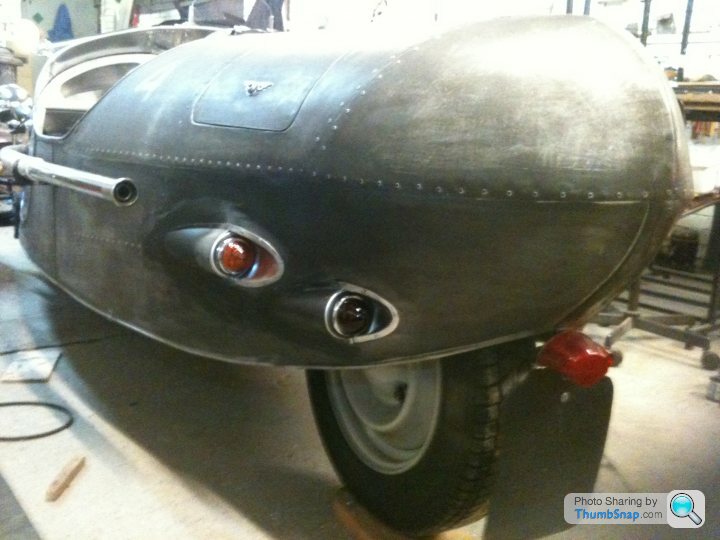
Upon reviewing all the options I think I’m going to try and get the rear end looking similar to the new EV Morgan as per suggested by BajaBill above! The aim will be a kind of hybrid between the bullet tail, and the rising skirt of the barrel back, exposing the rear wheel. This means that I definitely want to go for a rear wire wheel!
The reason for this is that with the bullet tail and a horizontal skirt, it can (in my opinion) look like an upturned loaf tin hovering off the floor. And when parked on grass, I think it looks particularly odd. See this image below of one at Stoneleigh this year (this is a really really nice Pembleton otherwise)
A lot of 3 wheeler kit car manufacturers and Morgan offer the back of their models with what is usually called a beetle back. This is wide at the front and tapers to a bit of a rounded point and resembles the back of beetle (shock). Below is a jzr:
There are 2 “standard” options available when you build a Pembleton. The first, and most popular to date, is the barrel back. This is as per Victoria and is also the most simple to make. The back of the car is then finished off by a spare wheel as per some BSA 3 wheelers and some models of the original Morgan three wheeler. Morgan F4 shown below:
The other option is the bullet tail and has not been available from the factory for that long (probably 18 months to 2 years). This finishes off the tapered body with a spun dome with a flatted end as per below:
BUT…
We’re talking about Pembleton owners here, and if there’s something that can be built in a different way, it will be. See below for a selection of styles owners have gone for….
I love how Duncan has treated the rear lights on his silver surfer ii!
Upon reviewing all the options I think I’m going to try and get the rear end looking similar to the new EV Morgan as per suggested by BajaBill above! The aim will be a kind of hybrid between the bullet tail, and the rising skirt of the barrel back, exposing the rear wheel. This means that I definitely want to go for a rear wire wheel!
The reason for this is that with the bullet tail and a horizontal skirt, it can (in my opinion) look like an upturned loaf tin hovering off the floor. And when parked on grass, I think it looks particularly odd. See this image below of one at Stoneleigh this year (this is a really really nice Pembleton otherwise)
TooMany2cvs said:
I'm still not convinced...
I really like the style in this image - and agree the normal wheel looks odd there.
...but...
That's a much lower angle than anybody's normally going to be looking at it, and it looks like it's sitting quite high on the suspension. Adjust it down a bit, look from any angle other than lying on the ground, and I don't think it'll be an issue - especially with a wheel painted black to "hide" a bit more.
Heres a picture of Duncan's silver surfer I (brooklands) on the right, with silver surfer II (supersports) on the left. I really like the style in this image - and agree the normal wheel looks odd there.
...but...
That's a much lower angle than anybody's normally going to be looking at it, and it looks like it's sitting quite high on the suspension. Adjust it down a bit, look from any angle other than lying on the ground, and I don't think it'll be an issue - especially with a wheel painted black to "hide" a bit more.

I'm not sure on the underneath of the tail wrapping up so much, but its hard to fault the mans metalworking skills!
The Finish?!
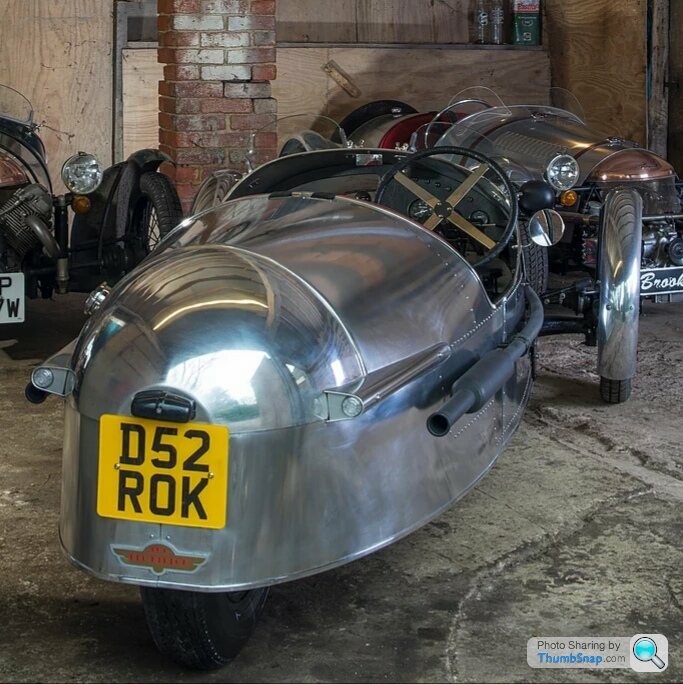
My other quandary is finish. The Polished aluminium is cool and does look good, but once polished is a right PITA to keep looking really fresh. Within a couple of days use, water droplets, hand prints, oil mist and general road crud means it needs re-doing!
As far as all my research shows so far, there’s no such thing as a lacquer for mirror polished aluminium either…
Any ideas what happens if you lacquer unpolished aluminium?? I assume the lacquer fills in all the little scratches and it just goes a flat gloss grey colour?? (I might need to do a sample piece)
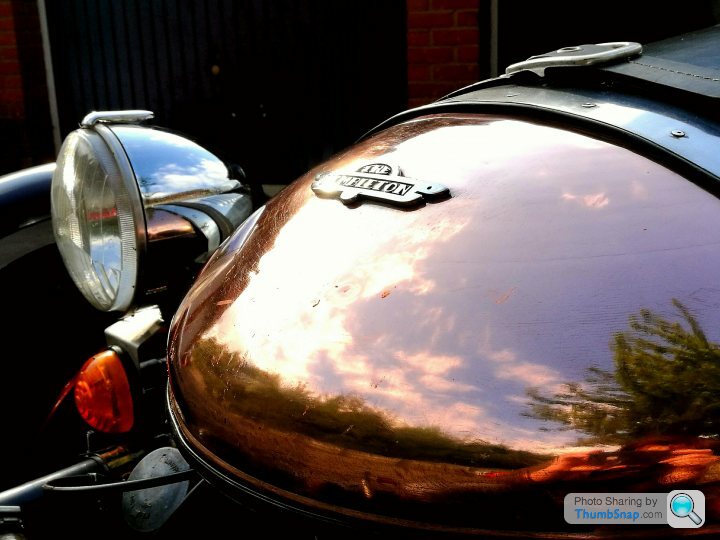
Untreated aluminium takes a couple of years of neglect before it starts to look cool enough to pull it off (like the Wolseley pictured earlier). The other option is to paint it.
The other weekend I went to the VHRA Nationals at Santa Pod. It was a pretty low key affair and there wasn’t that many people there, but looking around the vehicles got me thinking about finishes. I’m still undecided if I want to try and cheat and make it look old and ratty, or minty fresh new build… It’s really difficult to pull off an old look when you’re being so careful during the build and using new or refurb components – is it a bit dishonest?
Anyway, there was this beautiful car (Ford Model A?) painted in a warm grey/mushroom colour and it looked great.
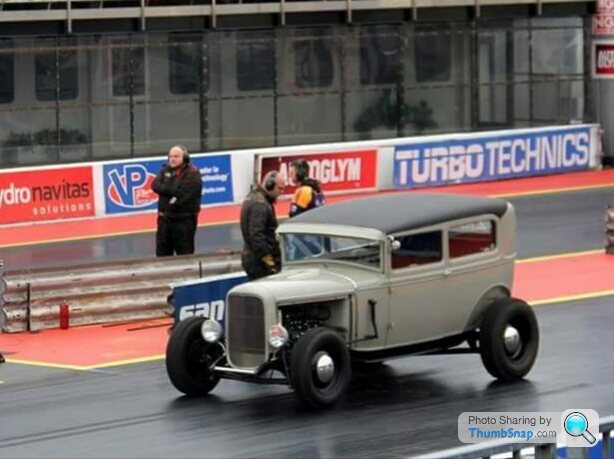
If I did paint the Pembleton, it would definitely be in this kind of colour and I think it would be set off nicely against the brass or copper nose and other brass fittings (lamps, mirrors etc), with a black interior, exhaust, cycle wings and wheels.
The colour I have found most similar (I think) for the moment is RAL 7032 Pebble Grey.
I might get a tester plaque done and see what it looks like!
My other quandary is finish. The Polished aluminium is cool and does look good, but once polished is a right PITA to keep looking really fresh. Within a couple of days use, water droplets, hand prints, oil mist and general road crud means it needs re-doing!
As far as all my research shows so far, there’s no such thing as a lacquer for mirror polished aluminium either…
Any ideas what happens if you lacquer unpolished aluminium?? I assume the lacquer fills in all the little scratches and it just goes a flat gloss grey colour??
(I might need to do a sample piece)Untreated aluminium takes a couple of years of neglect before it starts to look cool enough to pull it off (like the Wolseley pictured earlier). The other option is to paint it.
The other weekend I went to the VHRA Nationals at Santa Pod. It was a pretty low key affair and there wasn’t that many people there, but looking around the vehicles got me thinking about finishes. I’m still undecided if I want to try and cheat and make it look old and ratty, or minty fresh new build… It’s really difficult to pull off an old look when you’re being so careful during the build and using new or refurb components – is it a bit dishonest?
Anyway, there was this beautiful car (Ford Model A?) painted in a warm grey/mushroom colour and it looked great.
If I did paint the Pembleton, it would definitely be in this kind of colour and I think it would be set off nicely against the brass or copper nose and other brass fittings (lamps, mirrors etc), with a black interior, exhaust, cycle wings and wheels.
The colour I have found most similar (I think) for the moment is RAL 7032 Pebble Grey.
I might get a tester plaque done and see what it looks like!
Gassing Station | Readers' Cars | Top of Page | What's New | My Stuff