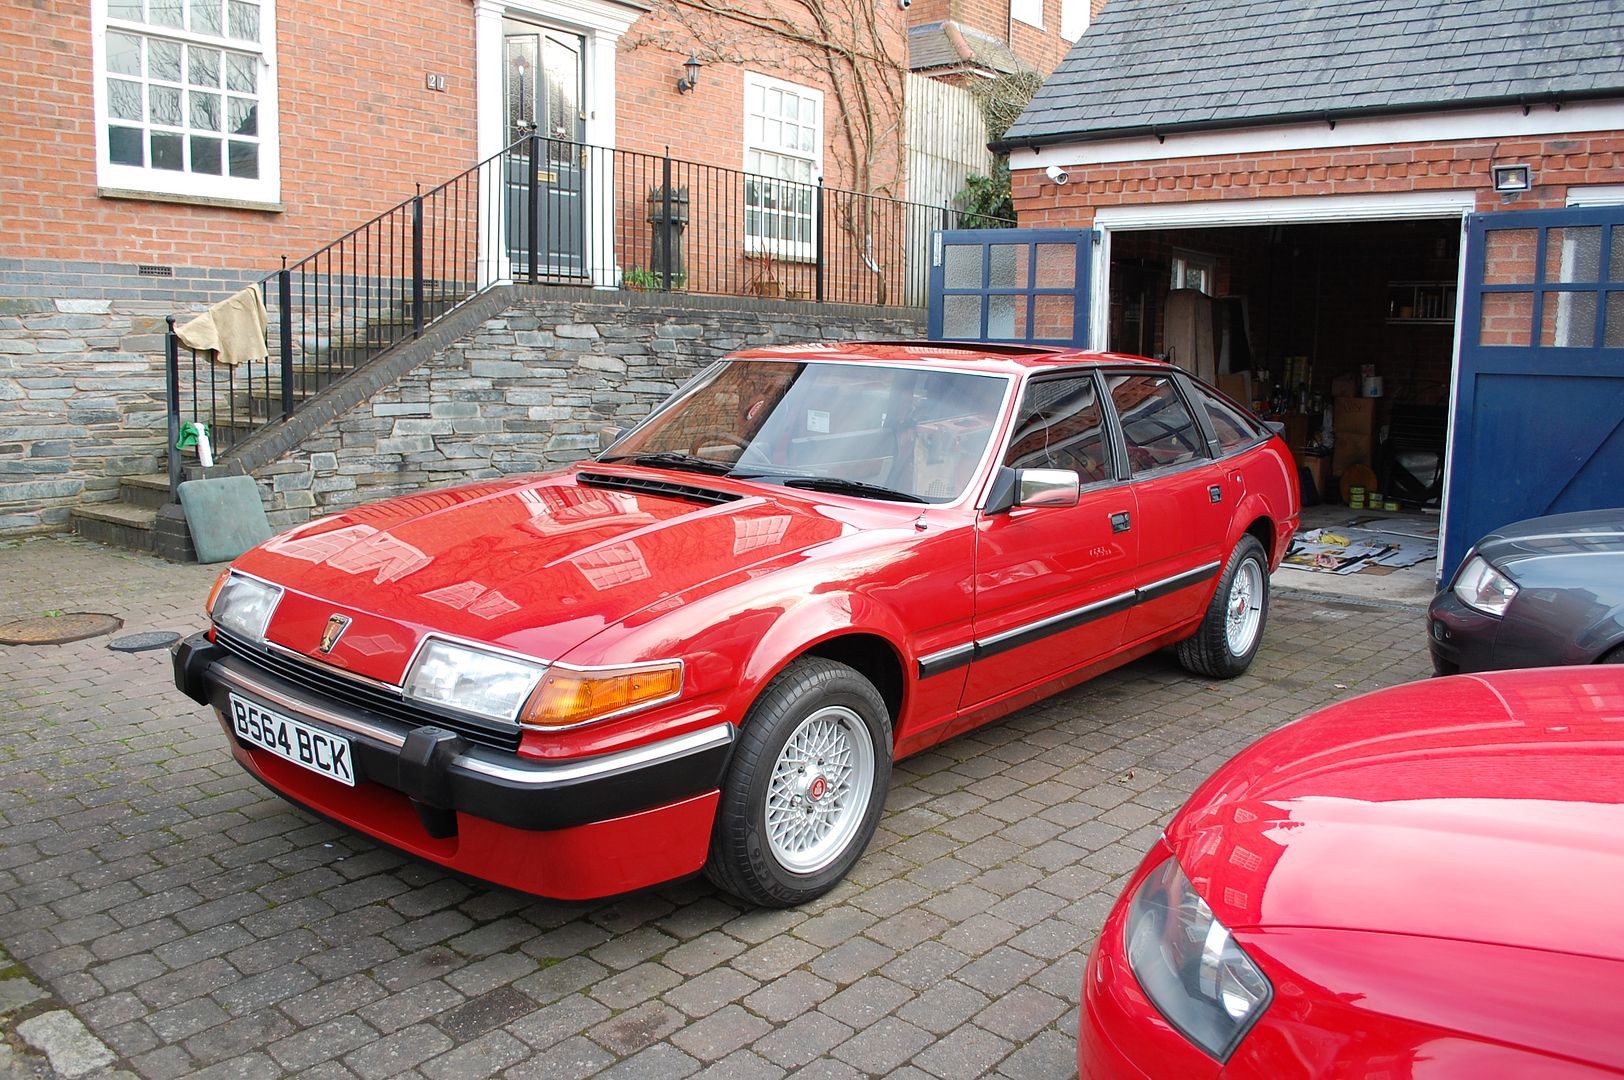
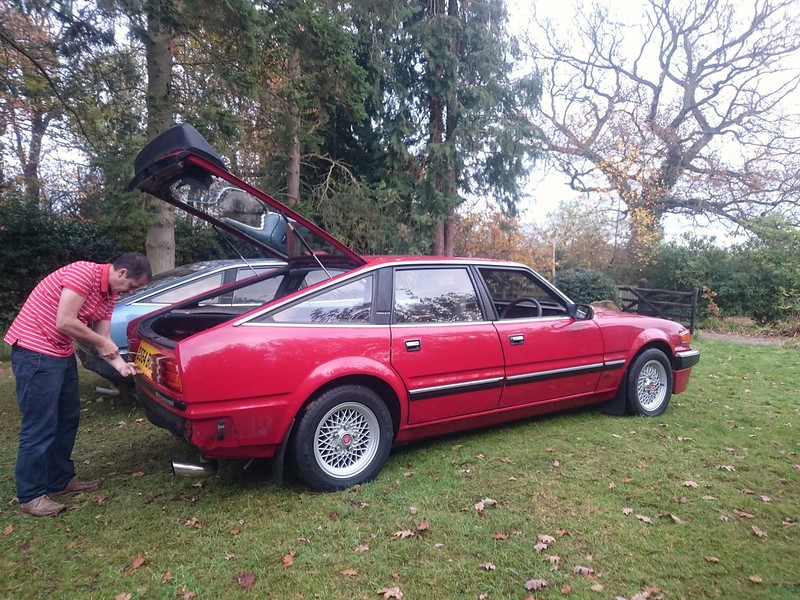
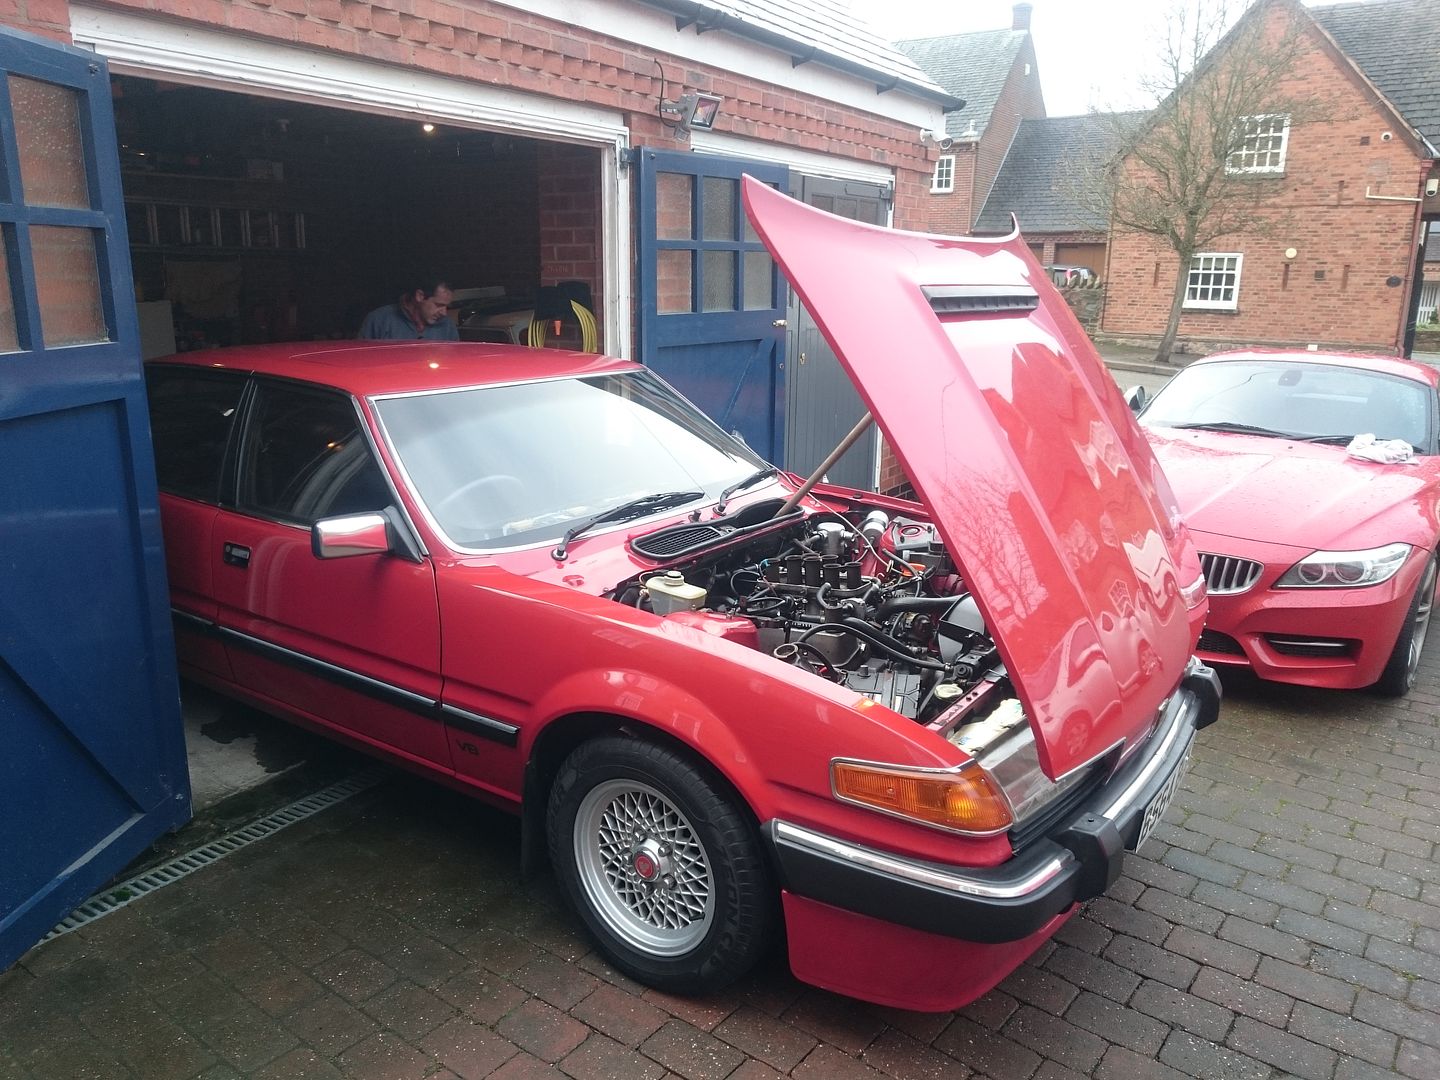
1985 Rover 3500 Vitesse
Discussion


After having a lot of fun writing the thread on my 1275GT, I thought it was time to start a thread on my latest project.
Bought in October 2016 as an almost running project, (MOT ran out a few days before I viewed it) the old girl needed some love.
Nearly 2 years later and it's almost ready to go back onto the road!
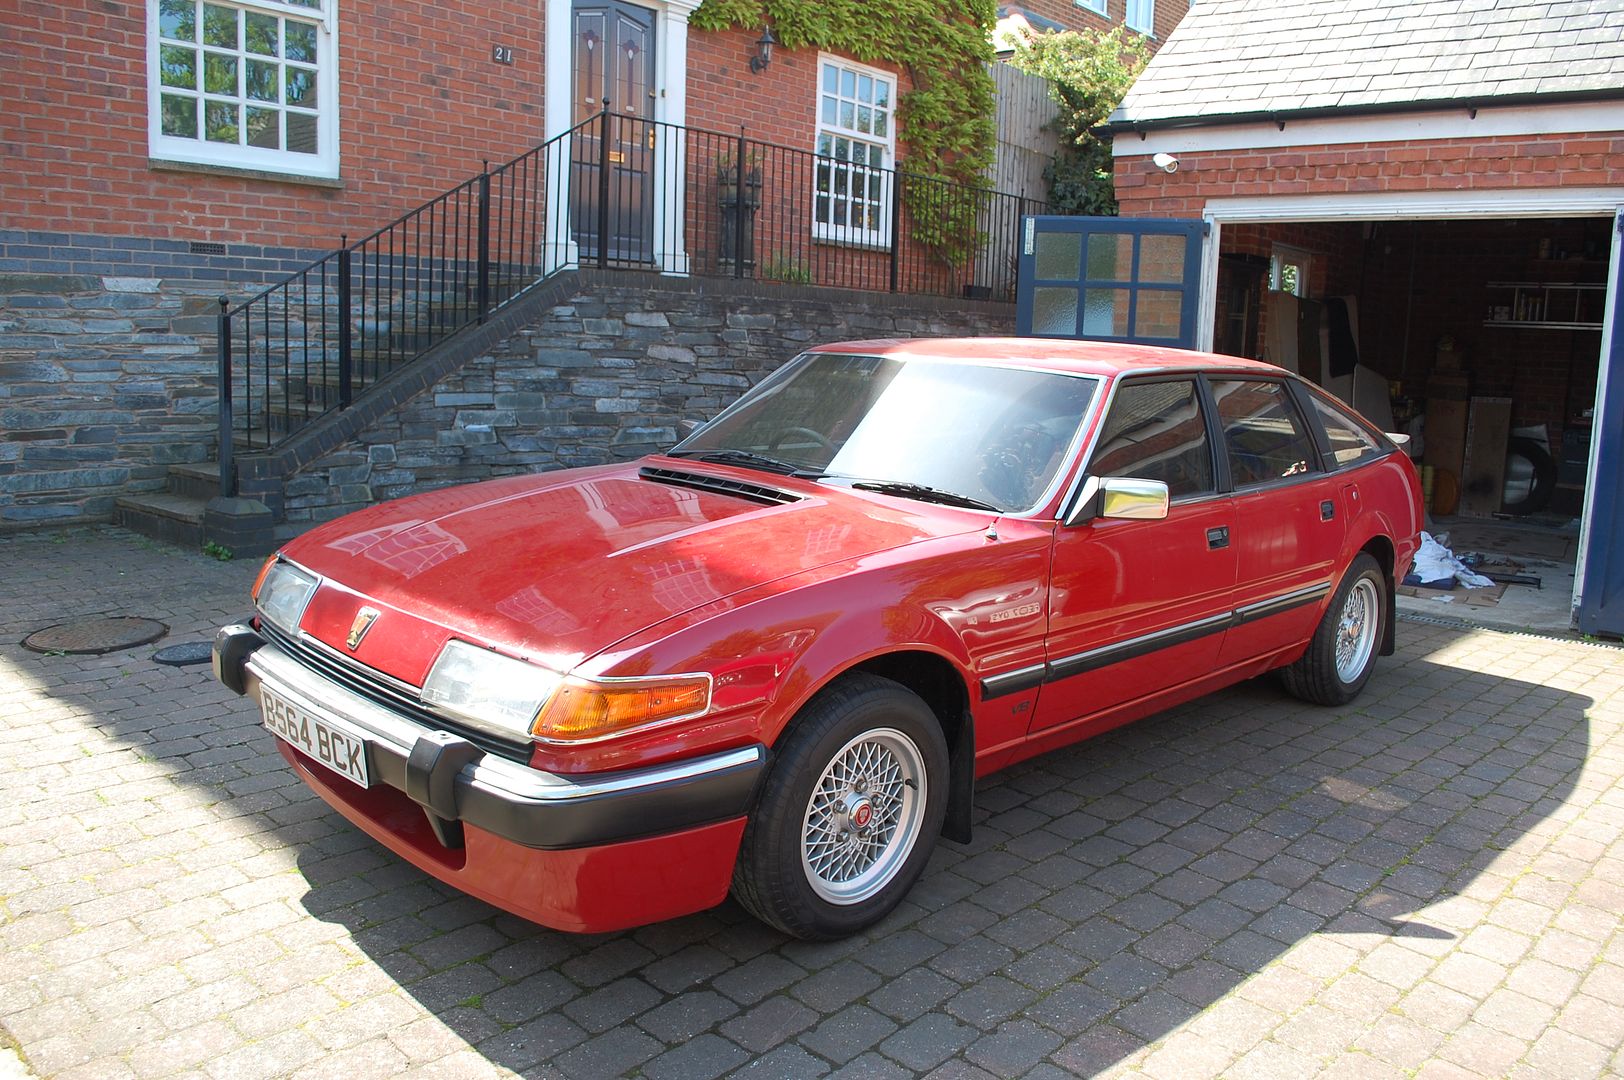
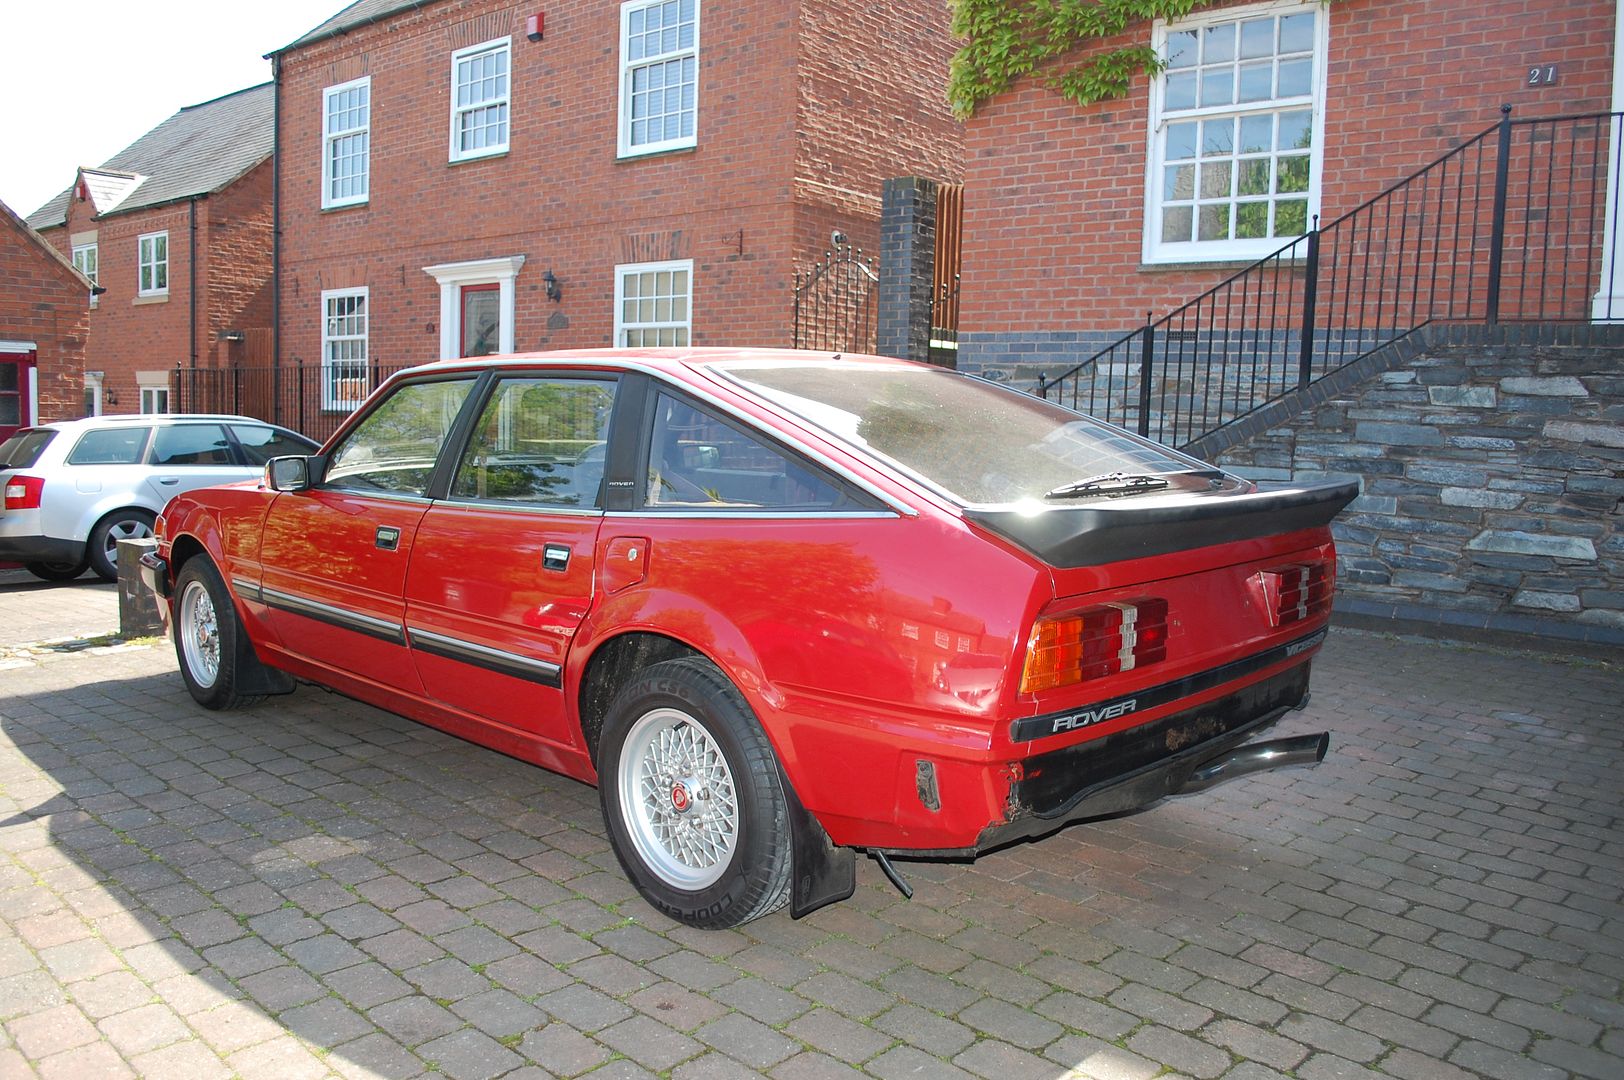
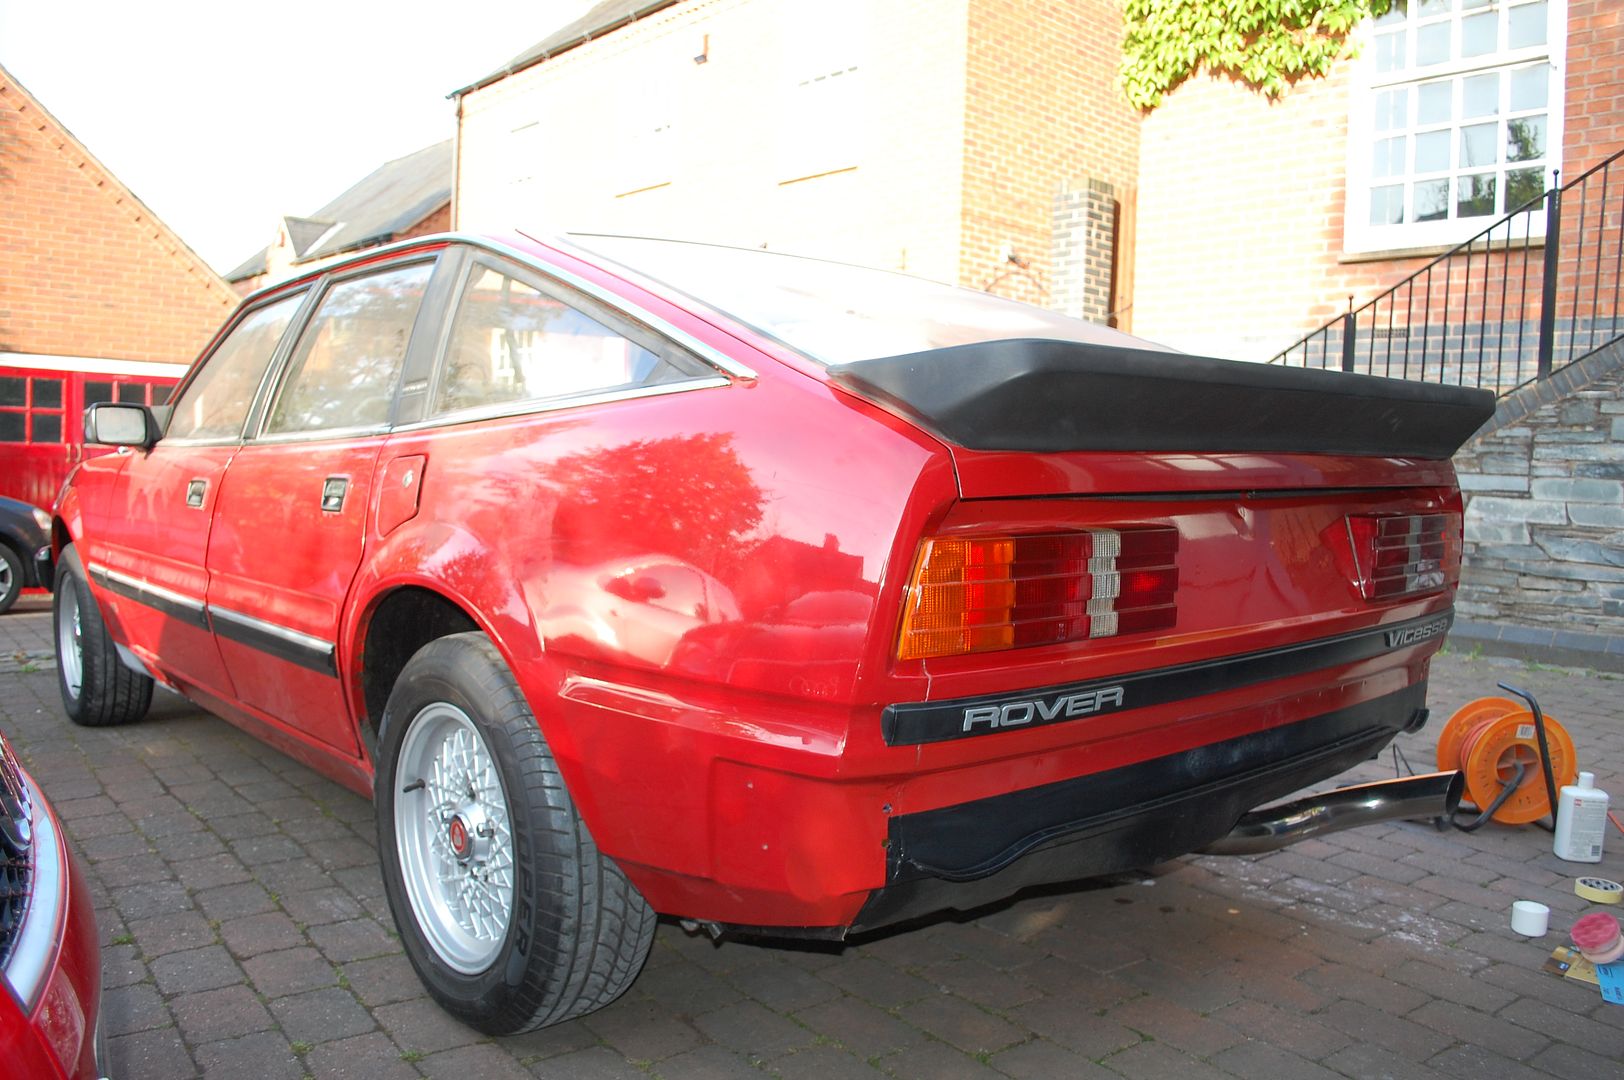
It's a 1985 Rover SD1 3500 Vitesse. Its a late Single Plenum with a factory Deep Chin Spoiler, Aircon (sadly non functioning), and dealer fitted cruise control. The majority of the car is still wearing its original paint with a few touched up areas mainly on the drivers side which is its weakest side. I've spent the last 2 years on and off sorting a few scabby areas and removing the layers of underseal to reveal lovely factory paint, rebuilding the engine, and generally going through every single thing on the car.
The day I viewed her, October 2016.

To April 2018.
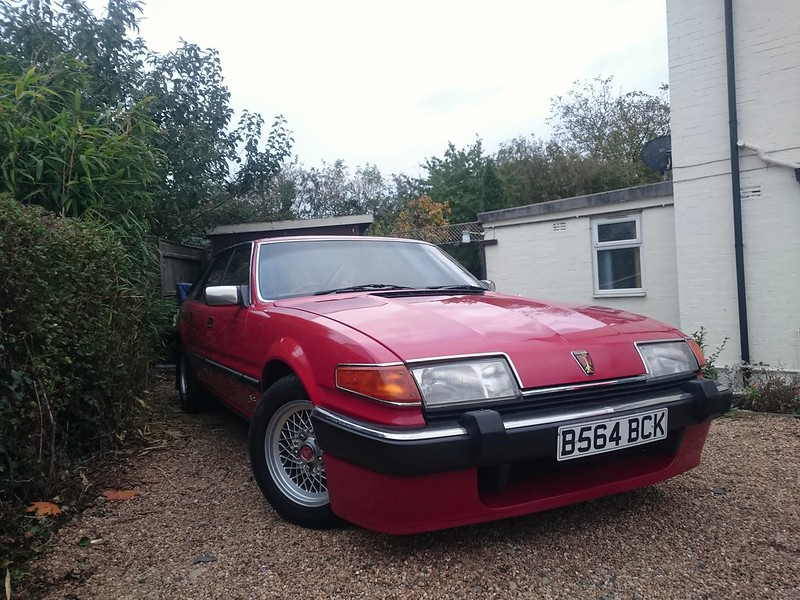
To now, 2021.

If people are interested, I'll start writing up what I've done, I took a lot of pictures...
Joe
Bought in October 2016 as an almost running project, (MOT ran out a few days before I viewed it) the old girl needed some love.
Nearly 2 years later and it's almost ready to go back onto the road!
It's a 1985 Rover SD1 3500 Vitesse. Its a late Single Plenum with a factory Deep Chin Spoiler, Aircon (sadly non functioning), and dealer fitted cruise control. The majority of the car is still wearing its original paint with a few touched up areas mainly on the drivers side which is its weakest side. I've spent the last 2 years on and off sorting a few scabby areas and removing the layers of underseal to reveal lovely factory paint, rebuilding the engine, and generally going through every single thing on the car.
The day I viewed her, October 2016.

To April 2018.

To now, 2021.
If people are interested, I'll start writing up what I've done, I took a lot of pictures...
Joe
Edited by 1275 GT on Saturday 27th November 11:32
Thank you for the kind words and enthusiasm.
I entirely blame the Goodwood Members Meeting live streams. The brilliant races with SD1s dicing against minis and capris just entice you back to those cars. At the time I had already run a 1275GT as a daily driver, and my attention turned to the v8 memories of my dads SD1 he had in the 90's. He had also aspried for a Vitesse, but even in 1990 they still carried quite the premium over the lesser models. He ended up with a very nice 1985 3500 VDP in Moonraker blue and would probably still have it if it hadn't been stolen in around 1999.
We'd talked about it for quite some time, and both decided that this time it had to be a Vitesse.
Like everyone that's after a Vitesse I had set my heart on a Twin Plenum. At the time I really didn't know the specifics of what made them different. There's so much hearsay it's hard to work out what's true or not!
I had visited an auction earlier in the year with the intention of going home with a very nice looking Silver Twin Plenum. But after the price reached way over my budget, (and almost 4x the original estimate) it wasn't meant to be.
I then found an amazing looking TP Vitesse advertised in a classic car mag with 39k miles from new. I viewed it and fell in love, it wasn't perfect, but it wasn't far off. A deal was done, and the following week before I picked it up was spent doing some serious digging. It was a converted single plenum, the owner got seriously cagey when i went back to him, and ultimately I walked away.
There was then a rumor of a Twin Plenum that had sat in a garage since 1997 on the Owners Club Forum.
I viewed that and initially wrote it off as a rebadged 2600. But that is a different story that I'll tell when I get around to restoring it...
At this point I was getting a little desperate.
Enter an ebay listing for a Red Single Plenum Vitesse that had been listed for sale earlier in the year. ( I hadn't been interested as I only wanted a twin) But this time at a much cheaper price.
So after a phone call I hopped in the car and went down to Cambridge to have a look.

I knew I was in trouble as soon as I was greeted by this on the guys driveway.
I was probably there for 3 or 4 hours making sure I found all of its secrets.
The most obvious being the original engine under a carpet in the guys shed. I suppose that's why it was suddenly cheaper!
I did try to drive it, but it was a spluttering mess that would barely move under its own power.
A few days later after narrowly avoiding a bidding war with another SD1 Club member we agreed a price.
I hired a trailer and borrowed my friends Discovery, and again drove back down to Cambridge.
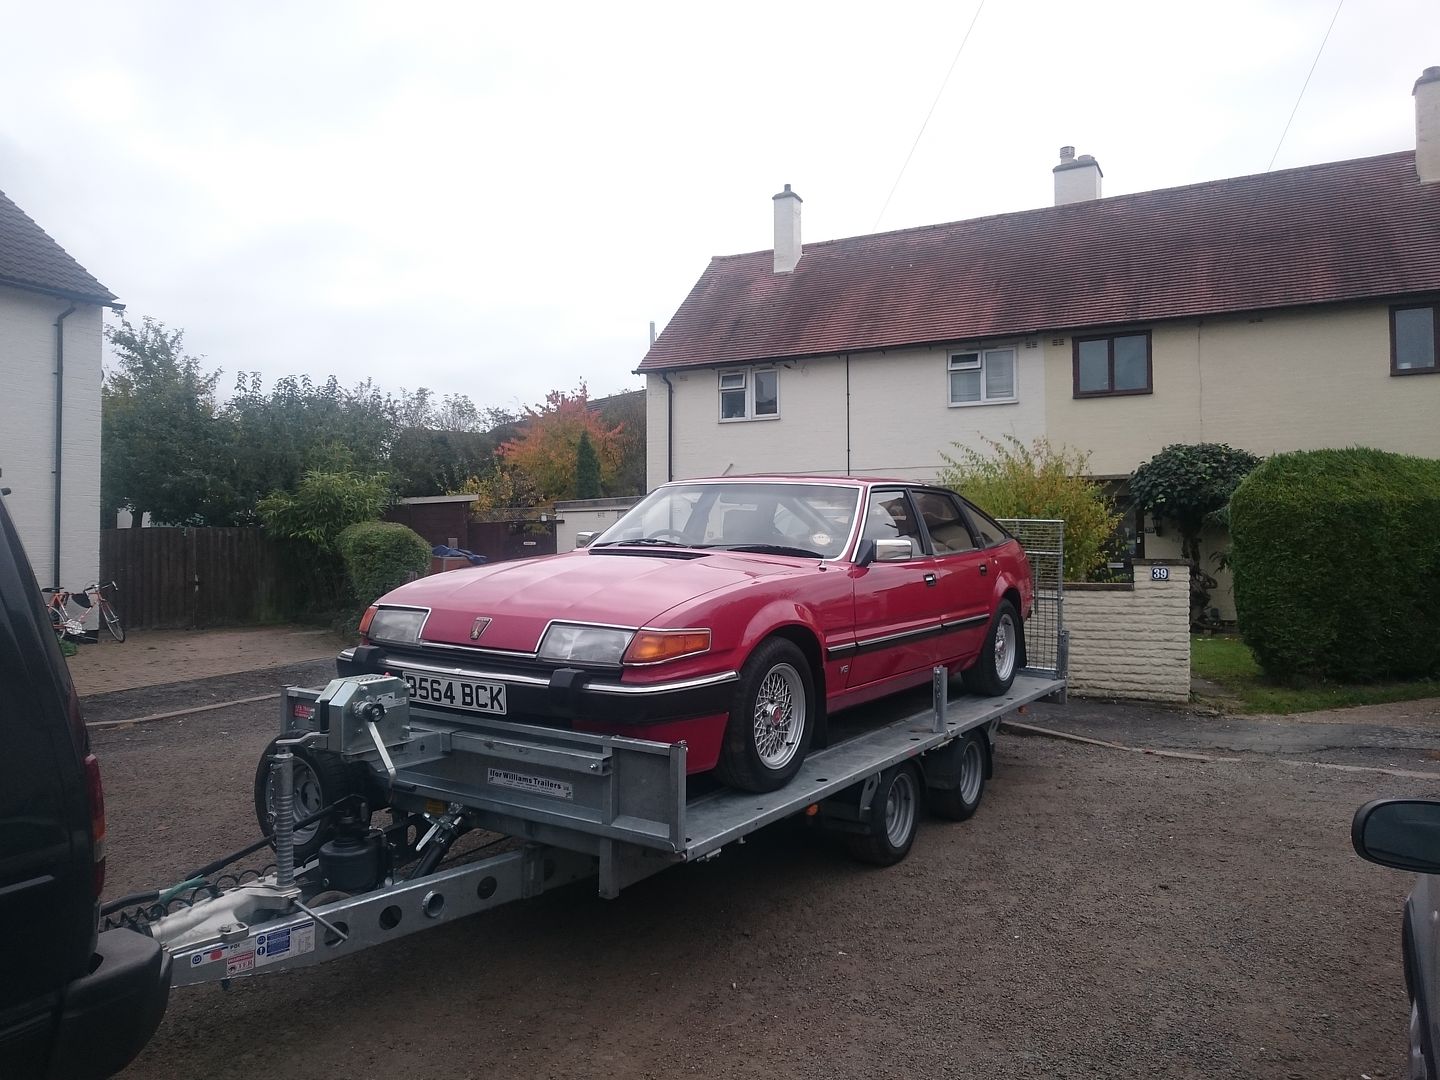
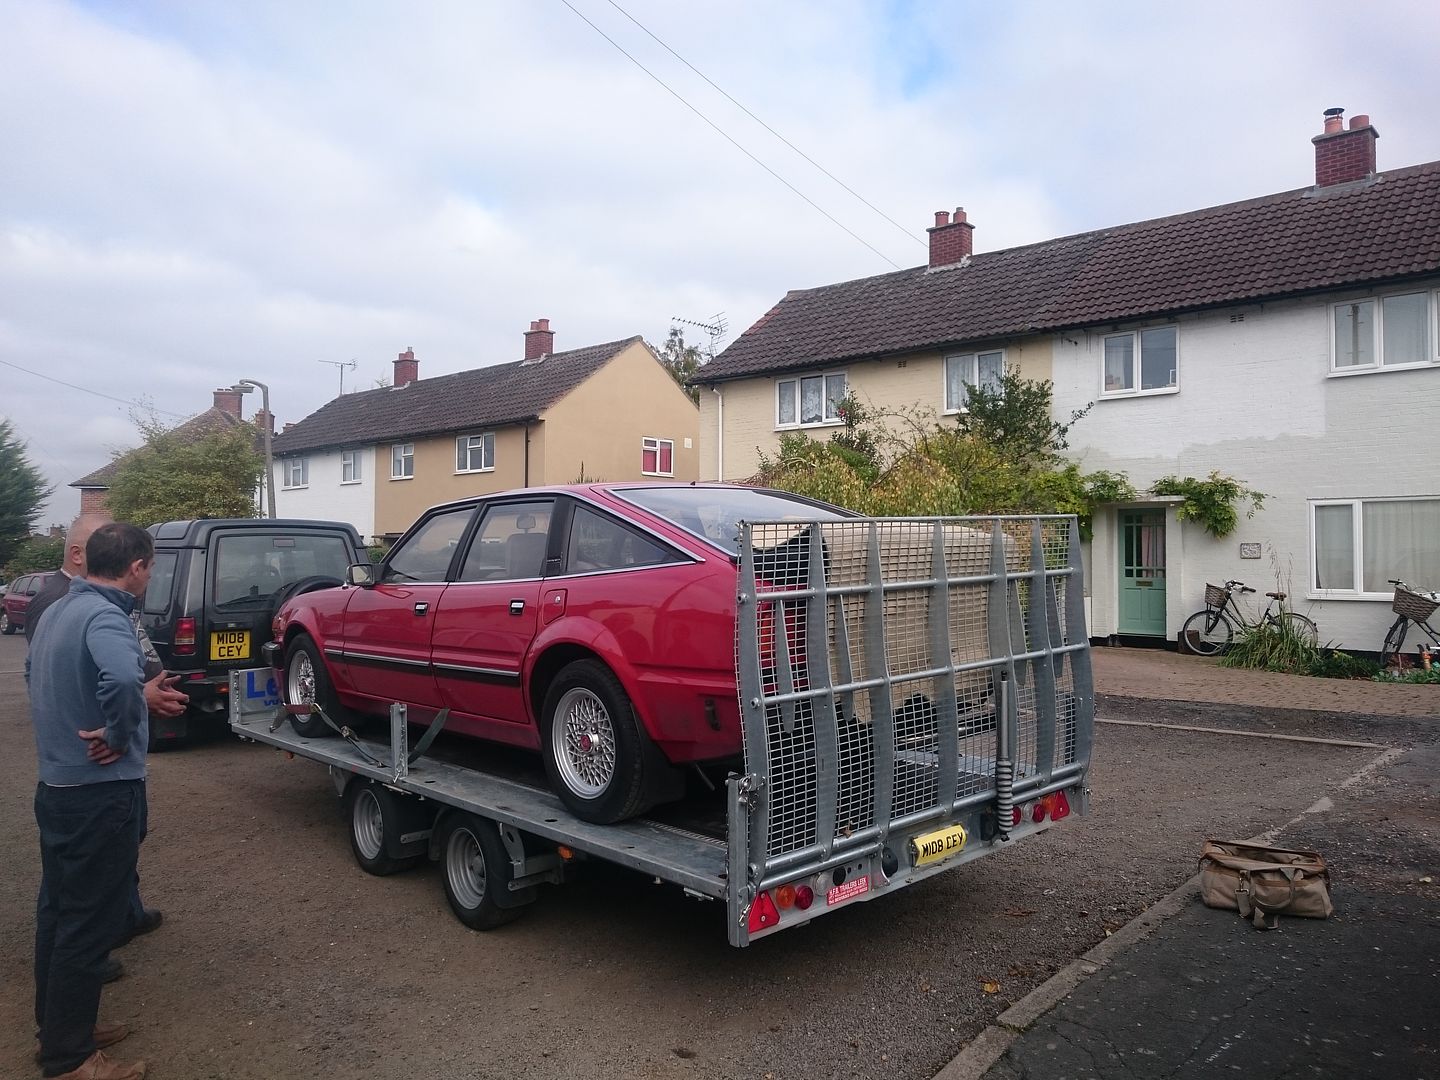
I hired the largest trailer they had, and low and behold the Rover didn't fit. Of course all the spares the car had were in the boot, and had to come out to remove the bumper! But it went on eventually. A spare bit of carpet saving the spoiler.
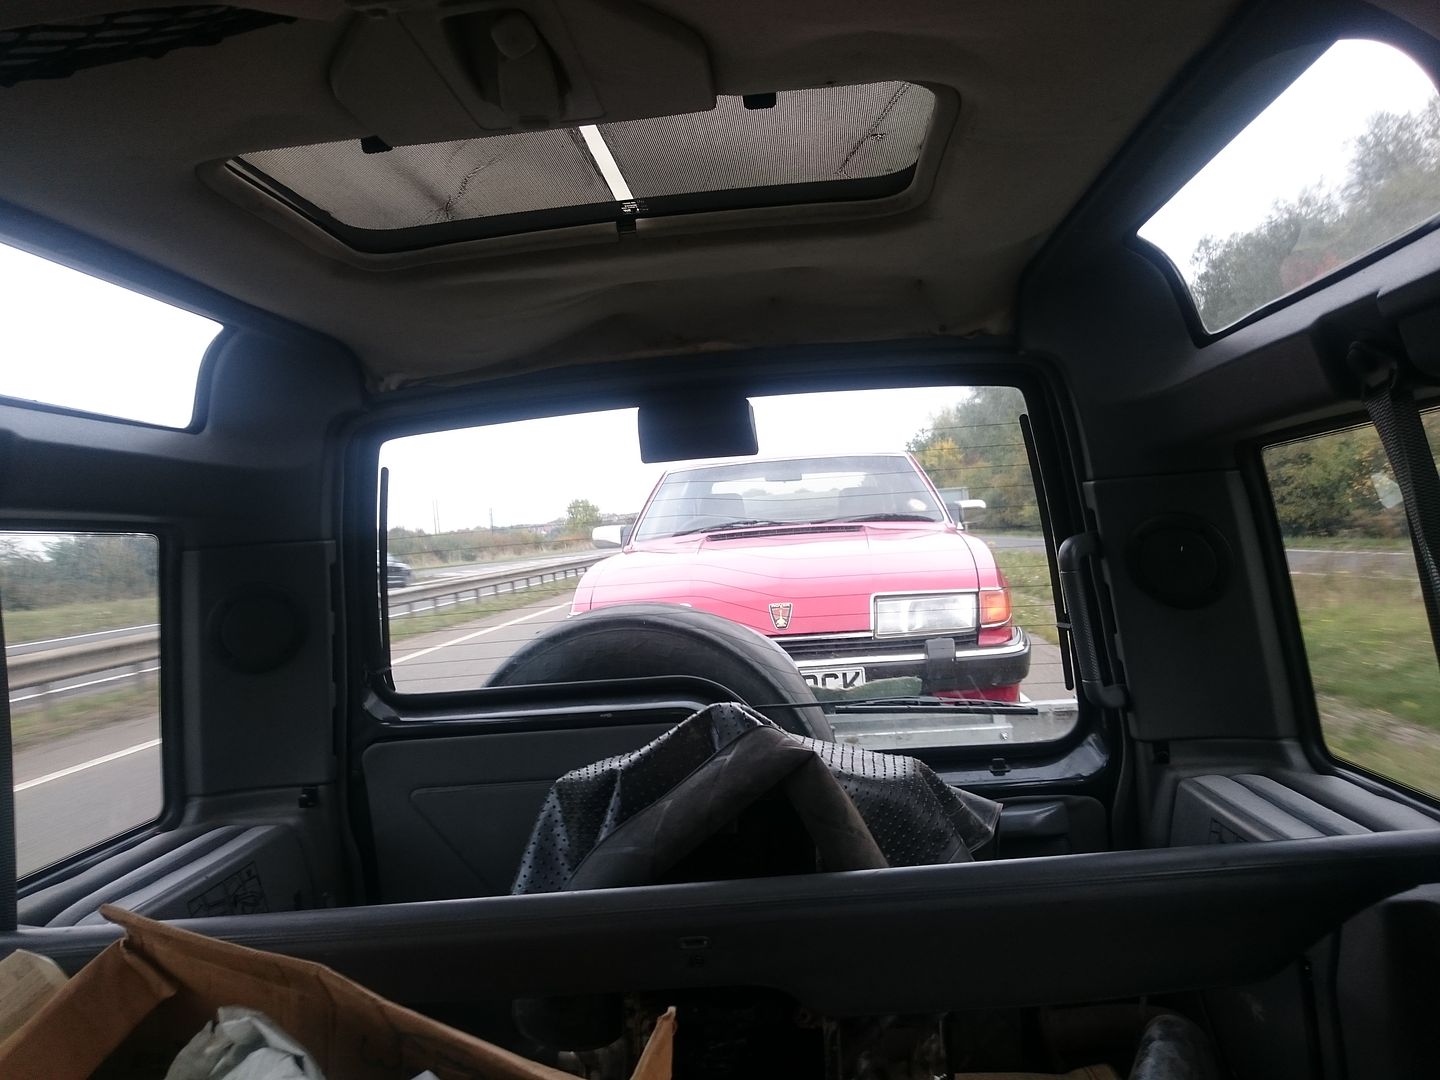
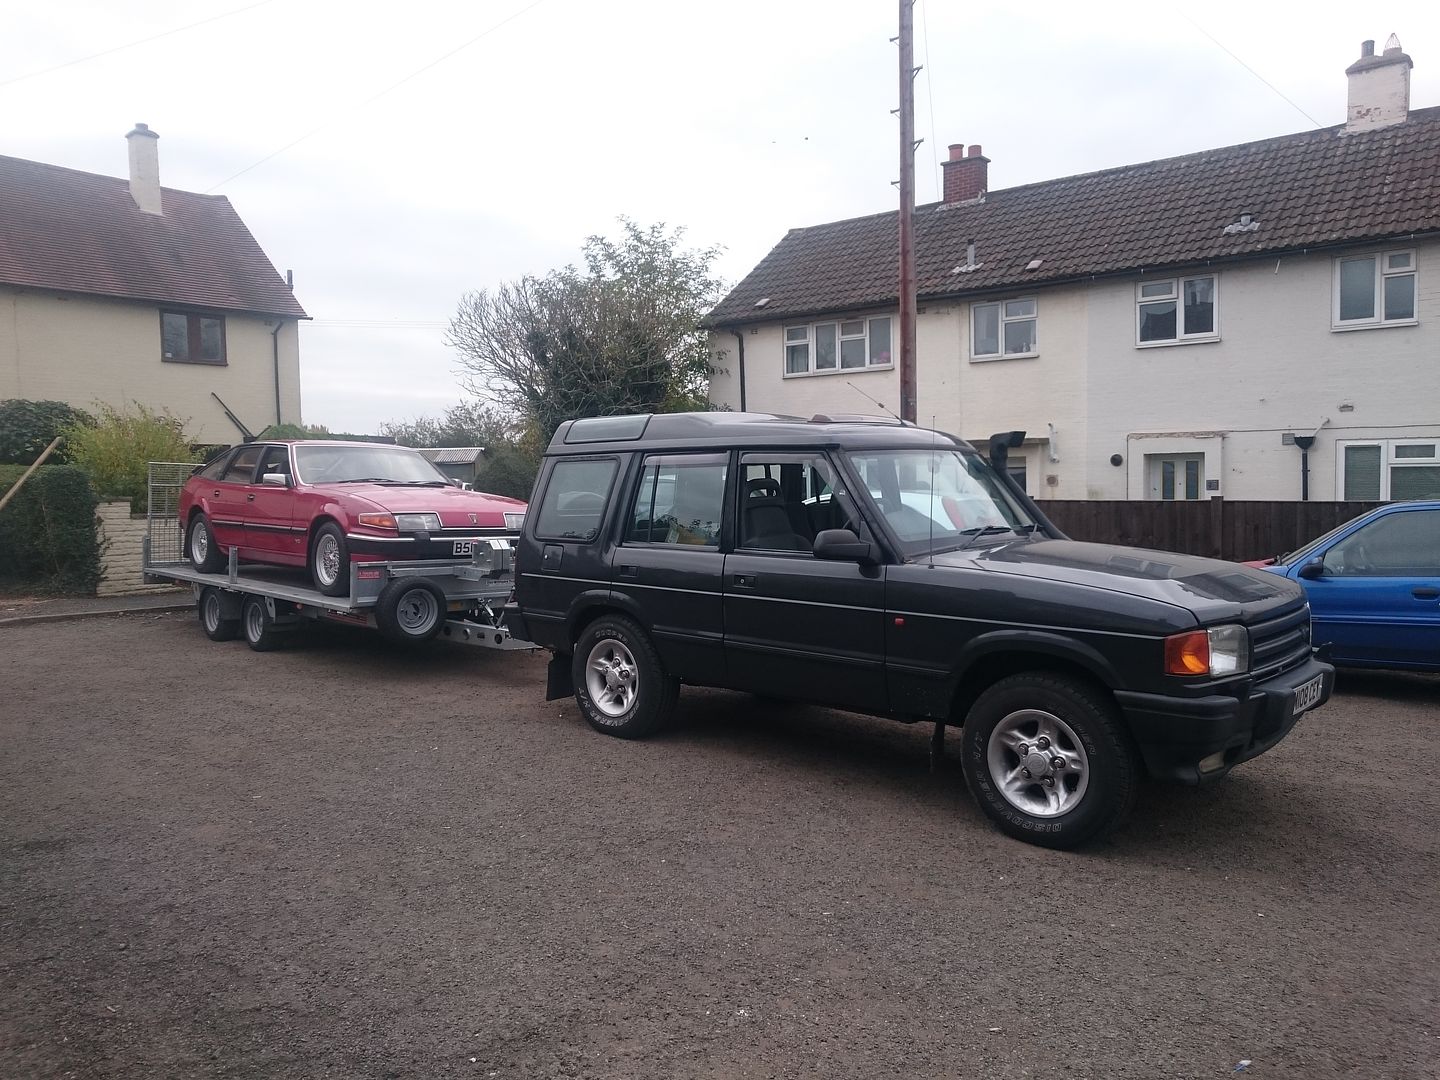
Damn Tailgaters....
You can also see the original engine under an old floor mat in the boot of the Disco. He had a few enquiries asking to sell it seperately, but luckily he also agreed it needed to go with the car.
One of the few older cars that aren't dwarfed by modern cars.
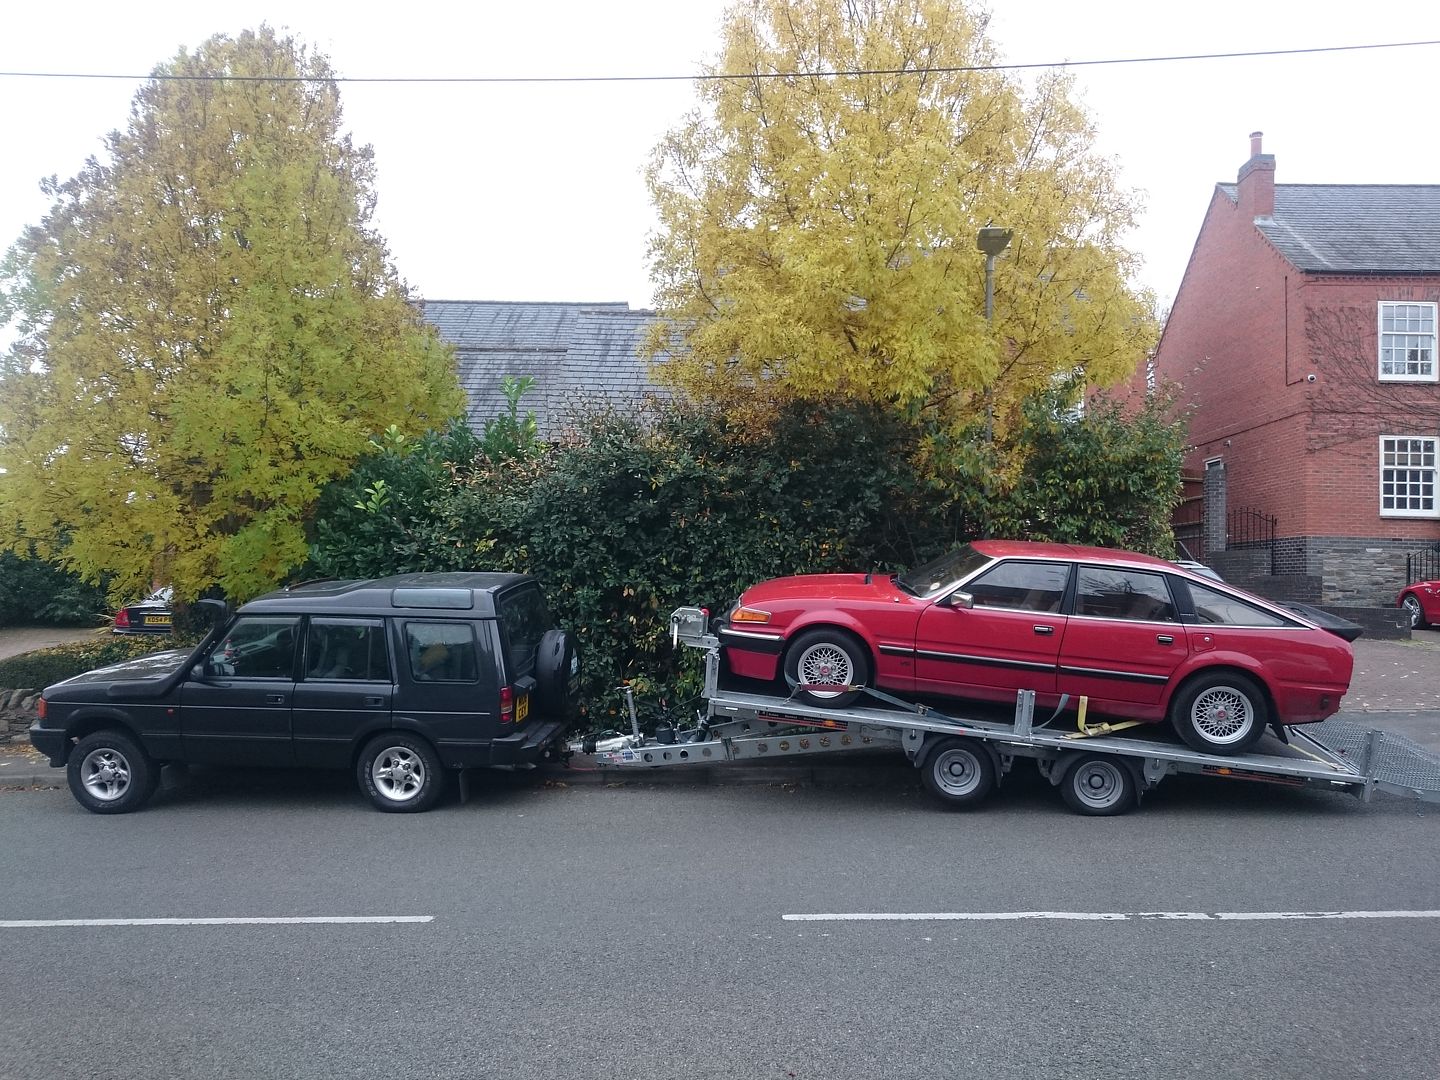
The car was complete and in alright nick when I got it, having been in almost constant use its entire life with around 132k on the clock.
The car had been cherished by its previous long term owner, and sold in may '16. The new owner had the car for approximately 2 weeks before it suffered a major mechanical failure (Engine blew up). Both the repairs he paid for, and the replacement engine he eventually had installed never really worked. Hence why after only a few months of ownership it was back up for sale and mine! Running and driving, but not well.
You can kind of see from the next picture what I was going to be dealing with, a car prepared for living outside, lathered in underseal. It definitely had a few areas that needed a little more attention as well as the mechanical problems...
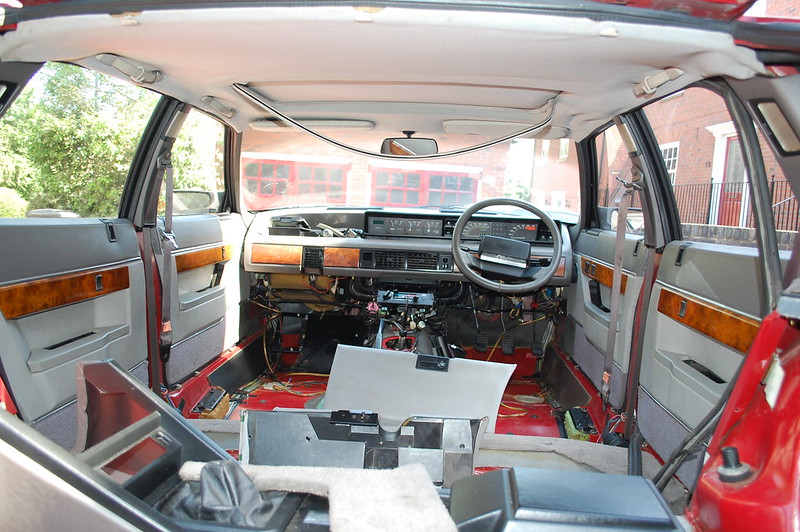
But I do like a challenge. I think it was 2 days before I had most of the interior out. I'll sort the pictures of that when I get a chance.
Joe
I entirely blame the Goodwood Members Meeting live streams. The brilliant races with SD1s dicing against minis and capris just entice you back to those cars. At the time I had already run a 1275GT as a daily driver, and my attention turned to the v8 memories of my dads SD1 he had in the 90's. He had also aspried for a Vitesse, but even in 1990 they still carried quite the premium over the lesser models. He ended up with a very nice 1985 3500 VDP in Moonraker blue and would probably still have it if it hadn't been stolen in around 1999.
We'd talked about it for quite some time, and both decided that this time it had to be a Vitesse.
Like everyone that's after a Vitesse I had set my heart on a Twin Plenum. At the time I really didn't know the specifics of what made them different. There's so much hearsay it's hard to work out what's true or not!
I had visited an auction earlier in the year with the intention of going home with a very nice looking Silver Twin Plenum. But after the price reached way over my budget, (and almost 4x the original estimate) it wasn't meant to be.
I then found an amazing looking TP Vitesse advertised in a classic car mag with 39k miles from new. I viewed it and fell in love, it wasn't perfect, but it wasn't far off. A deal was done, and the following week before I picked it up was spent doing some serious digging. It was a converted single plenum, the owner got seriously cagey when i went back to him, and ultimately I walked away.
There was then a rumor of a Twin Plenum that had sat in a garage since 1997 on the Owners Club Forum.
I viewed that and initially wrote it off as a rebadged 2600. But that is a different story that I'll tell when I get around to restoring it...
At this point I was getting a little desperate.
Enter an ebay listing for a Red Single Plenum Vitesse that had been listed for sale earlier in the year. ( I hadn't been interested as I only wanted a twin) But this time at a much cheaper price.
So after a phone call I hopped in the car and went down to Cambridge to have a look.
I knew I was in trouble as soon as I was greeted by this on the guys driveway.
I was probably there for 3 or 4 hours making sure I found all of its secrets.
The most obvious being the original engine under a carpet in the guys shed. I suppose that's why it was suddenly cheaper!
I did try to drive it, but it was a spluttering mess that would barely move under its own power.
A few days later after narrowly avoiding a bidding war with another SD1 Club member we agreed a price.
I hired a trailer and borrowed my friends Discovery, and again drove back down to Cambridge.


I hired the largest trailer they had, and low and behold the Rover didn't fit. Of course all the spares the car had were in the boot, and had to come out to remove the bumper! But it went on eventually. A spare bit of carpet saving the spoiler.

Damn Tailgaters....
You can also see the original engine under an old floor mat in the boot of the Disco. He had a few enquiries asking to sell it seperately, but luckily he also agreed it needed to go with the car.
One of the few older cars that aren't dwarfed by modern cars.

The car was complete and in alright nick when I got it, having been in almost constant use its entire life with around 132k on the clock.
The car had been cherished by its previous long term owner, and sold in may '16. The new owner had the car for approximately 2 weeks before it suffered a major mechanical failure (Engine blew up). Both the repairs he paid for, and the replacement engine he eventually had installed never really worked. Hence why after only a few months of ownership it was back up for sale and mine! Running and driving, but not well.
You can kind of see from the next picture what I was going to be dealing with, a car prepared for living outside, lathered in underseal. It definitely had a few areas that needed a little more attention as well as the mechanical problems...

But I do like a challenge. I think it was 2 days before I had most of the interior out. I'll sort the pictures of that when I get a chance.
Joe
Edited by 1275 GT on Sunday 13th December 15:30
Thank you for all the kind words, I wasn't expecting such a strong positive response!
I absolutely love it, so I'm very happy to see other people think that too.
Its currently just missing bits of trim, its sunroof, and headlining. I'm currently working away to restore and refit this stuff. Aim for the car is to get it finished in the next few weeks and enjoy it as much as I can over the summer.
Well you lot asked so here we go!
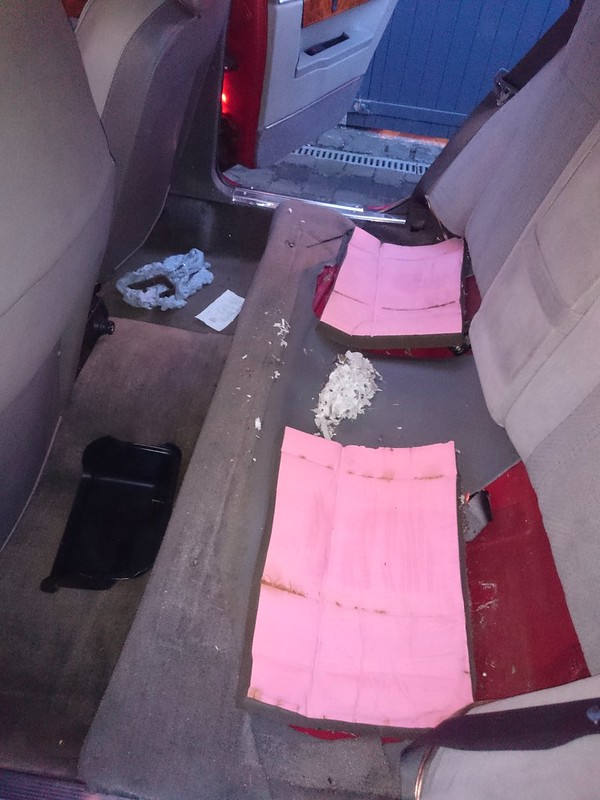
I realised quite quickly that I'd bought a car on the brink, If it had spent too much longer outside, it would have been ruined. What the car deserved was some real love. So we'll start with the nasty grotty parts of the car. I started stripping the interior out days after I got the car.
For a 33 year old British car it was remarkably good. Some bits of corrosion where inevitable but I'd found them when I viewed the car, so not unexpected.
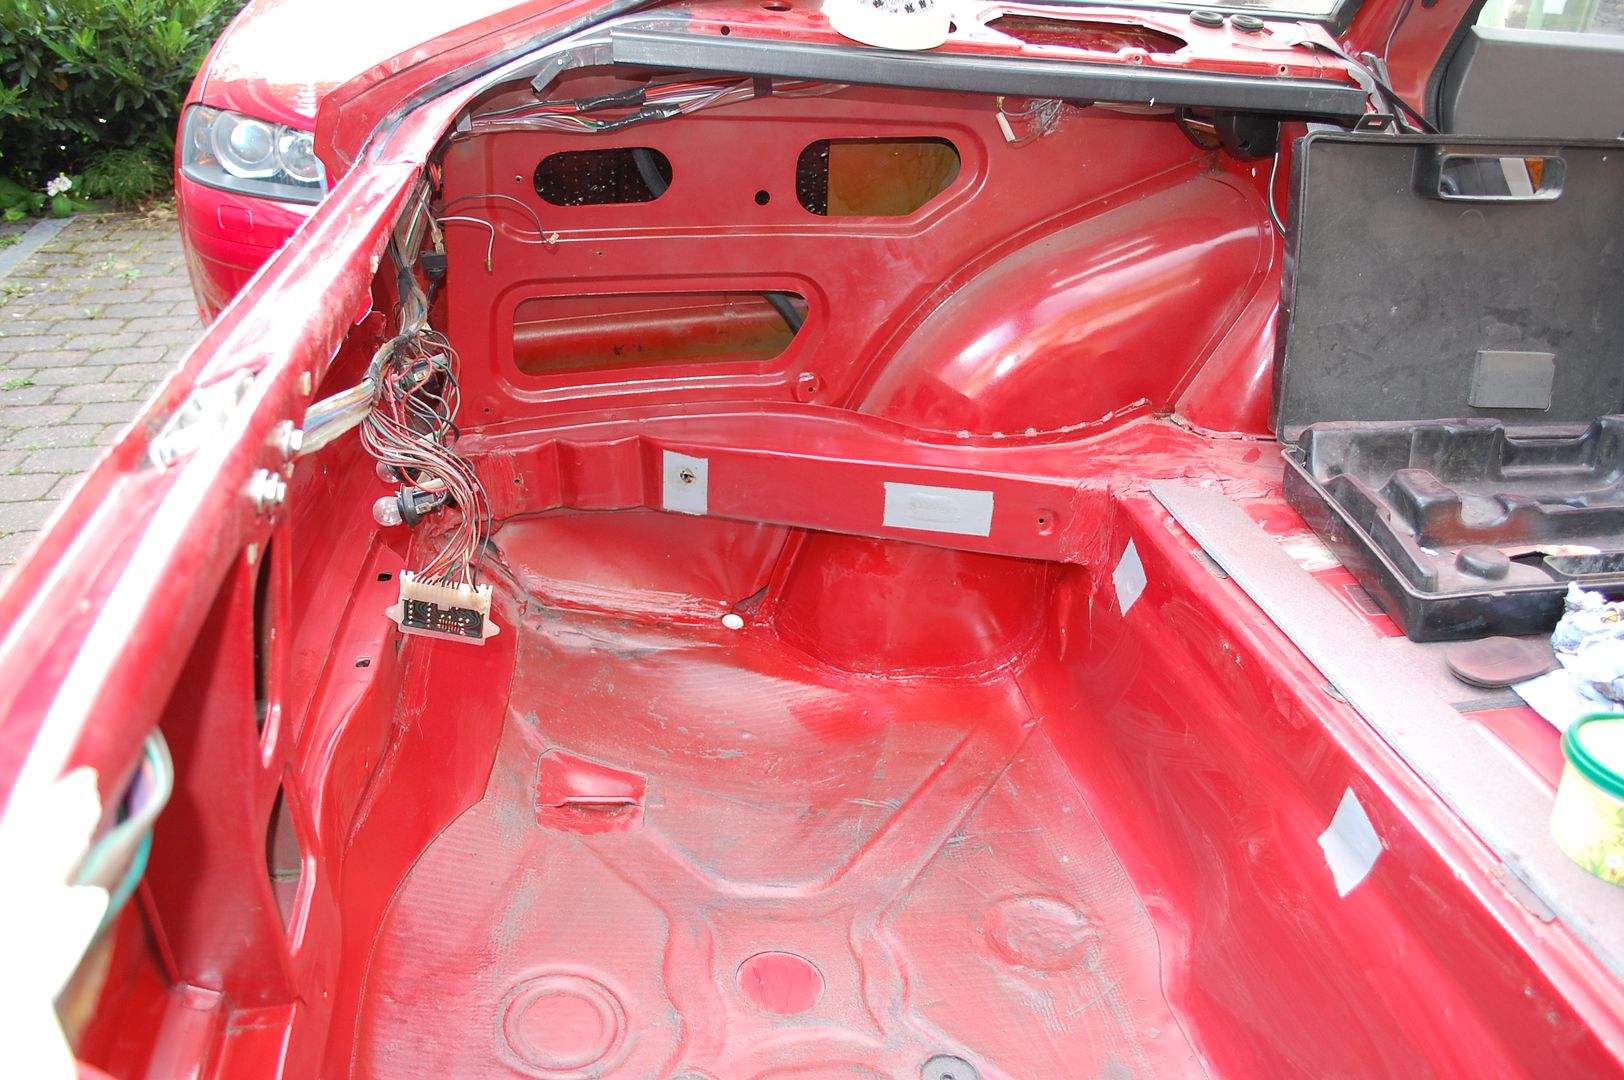
As the boot was where I found corrosion that was the starting point.

Makes an excellent bench for stripping! My dad really enjoying being back in an SD1.
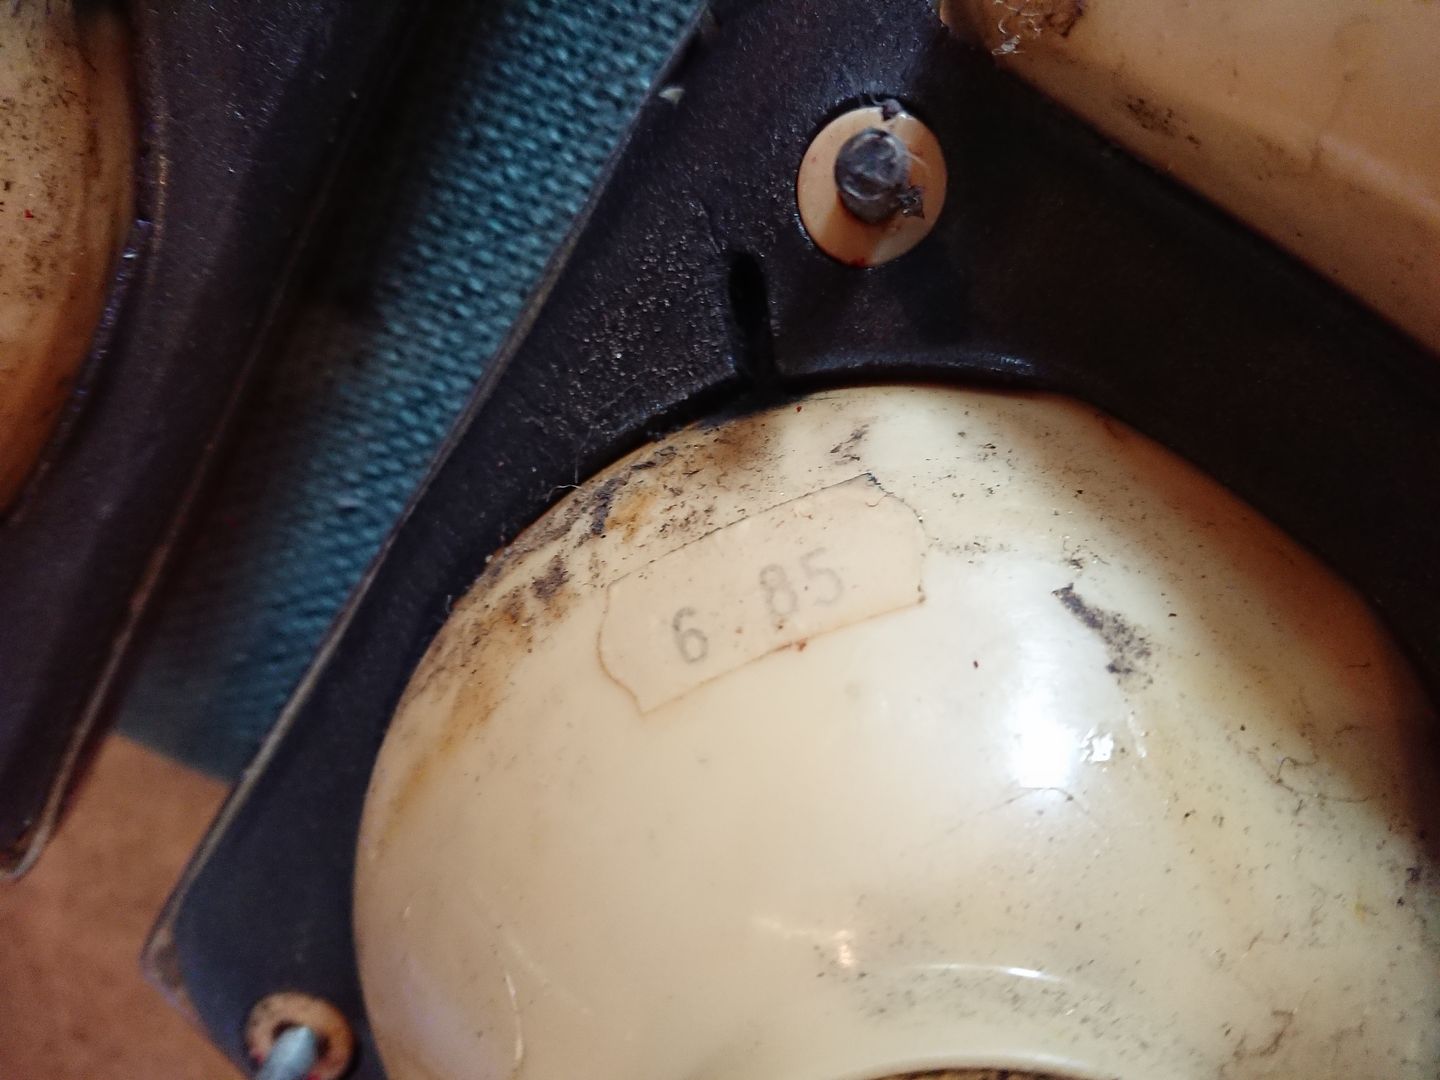
The rear speaker covers were original, but sadly completely shot.

Original Feb 1985.
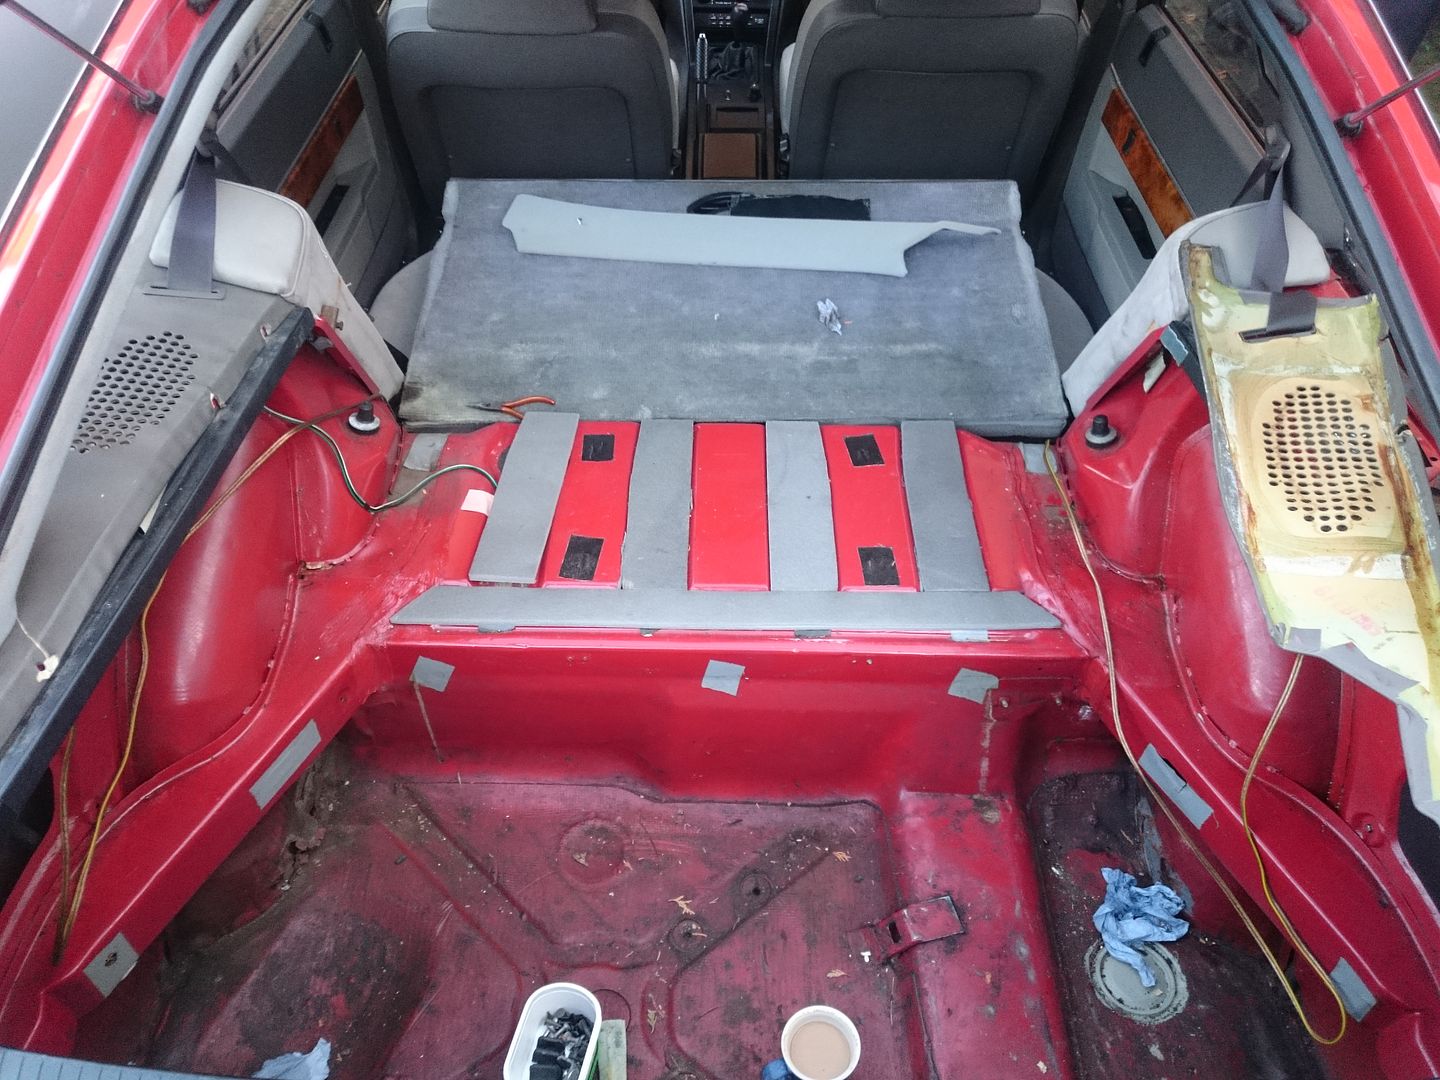
The boot carpet was dirty but present, (apart from the incredibly rare under spare wheel bit!
You can also see some appalling after market stereo wiring. All Fixable though.
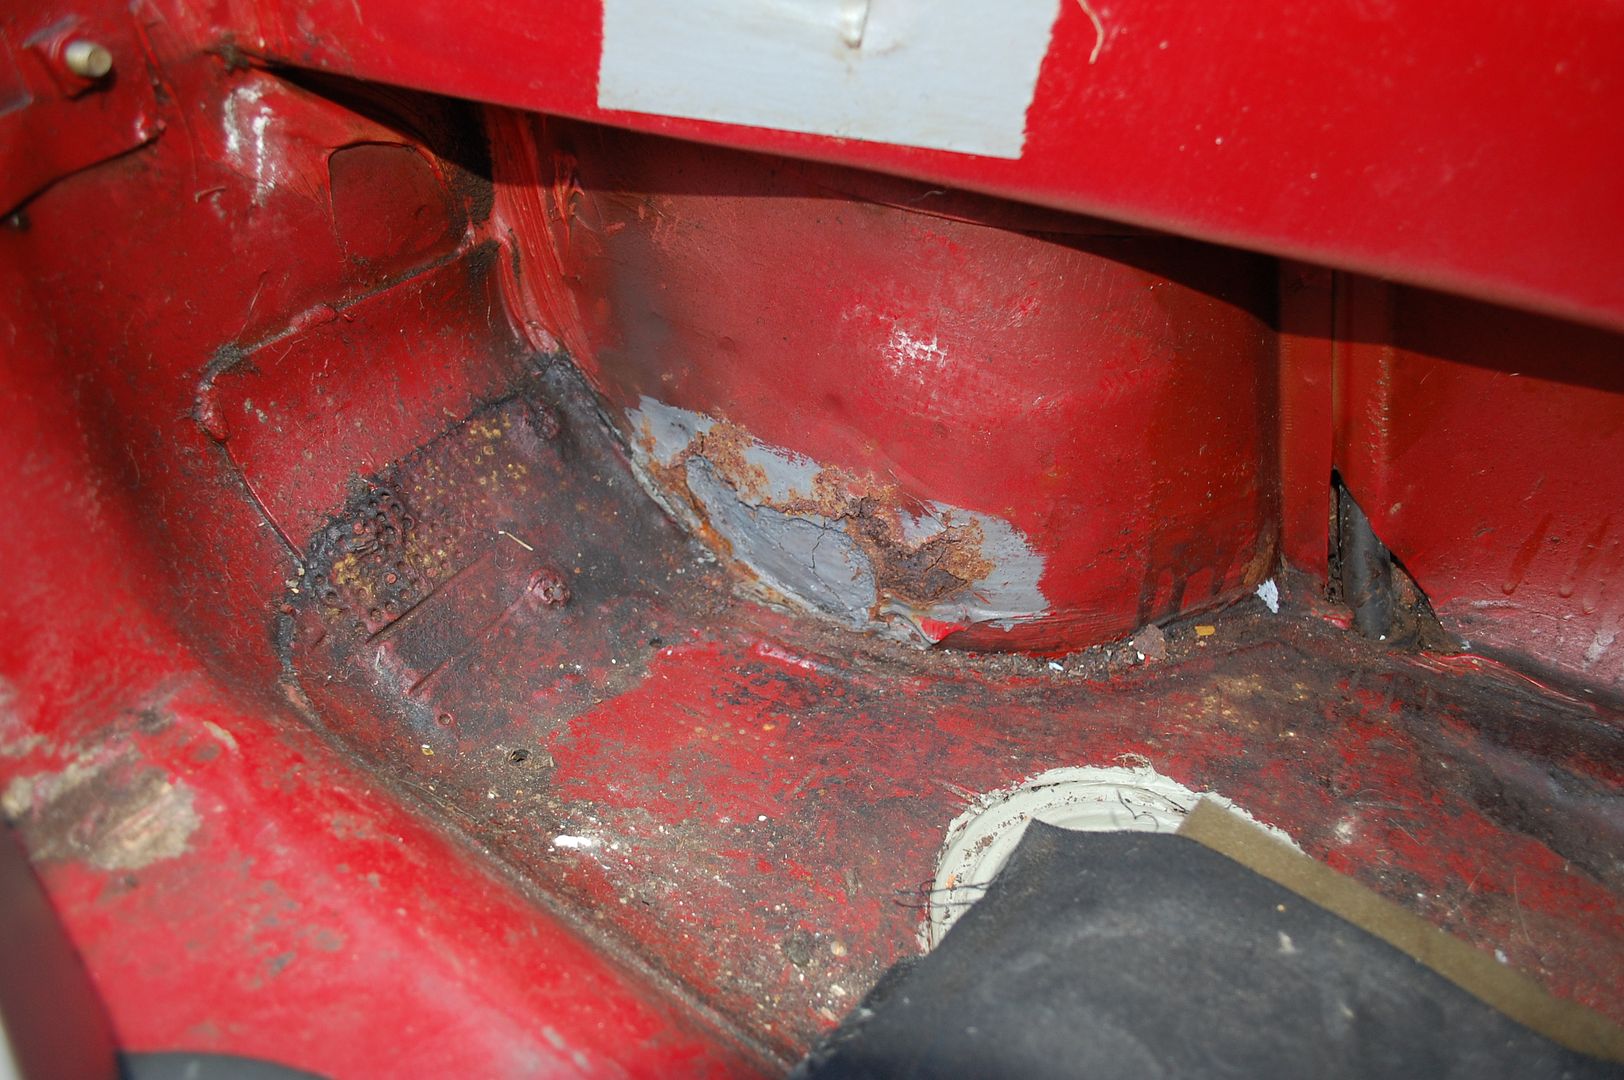
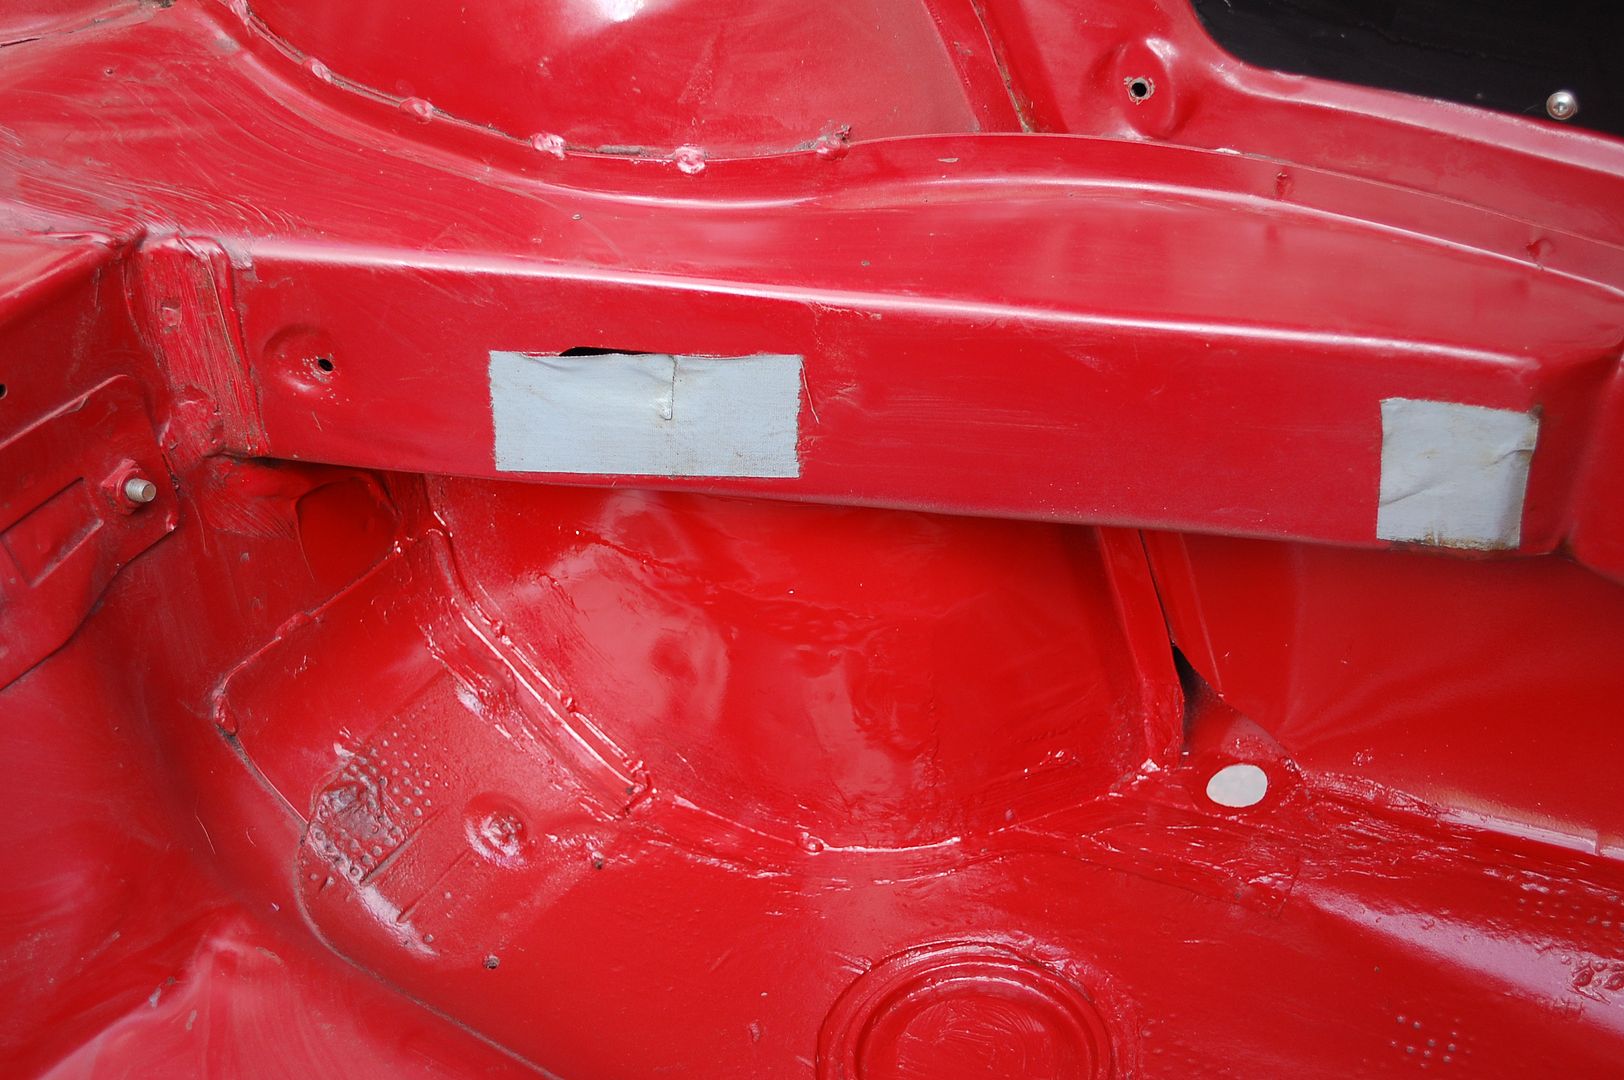
The boot was by far the worst area, with the bottom area of the inner arch both sides making up the most of the corrosion. All other surfaces where covered in a wax oil substance, which had saved the car.
The chassis legs are immaculate though, as are the rest of the inner arches, boot floor, and rear panel.
I wanted to make sure that the lower arch corrosion didn't intrude further into the structure of the car, so out came the boot carpet and rear bench.
I also wanted to inspect the inner rear wings. Easily done with the boot carpet removed.

Passenger side looked amazing, apart from the previous owners bashing to fit 6x9 speakers...
Drivers side has a weird repair, that is still a mystery. But the general condition was again amazing. Coming from minis this really is unprecedented!
Both absolutely covered in wax so no corrosion here!
With the trims removed I could also inspect the door steps.
The rear drivers side door step will need attention.

The rear seats come out easily, and again nice to see unmolested factory wiring. Weird to see it in a ribbon rather than taped up!
I did find a mouse nest under the rear bench, but luckily for me they hadn't use the seat material, or the foam supports!
Even found a spare tailgate vent! Really pleased to not find any further corrosion, and the carpet and body work I unearthed was in really good nick.


Looks like I stumbled onto a good car!
With the rear bench removed I did find that one of the folding rear seat brackets was severely bent, another item that I'd need to replace.
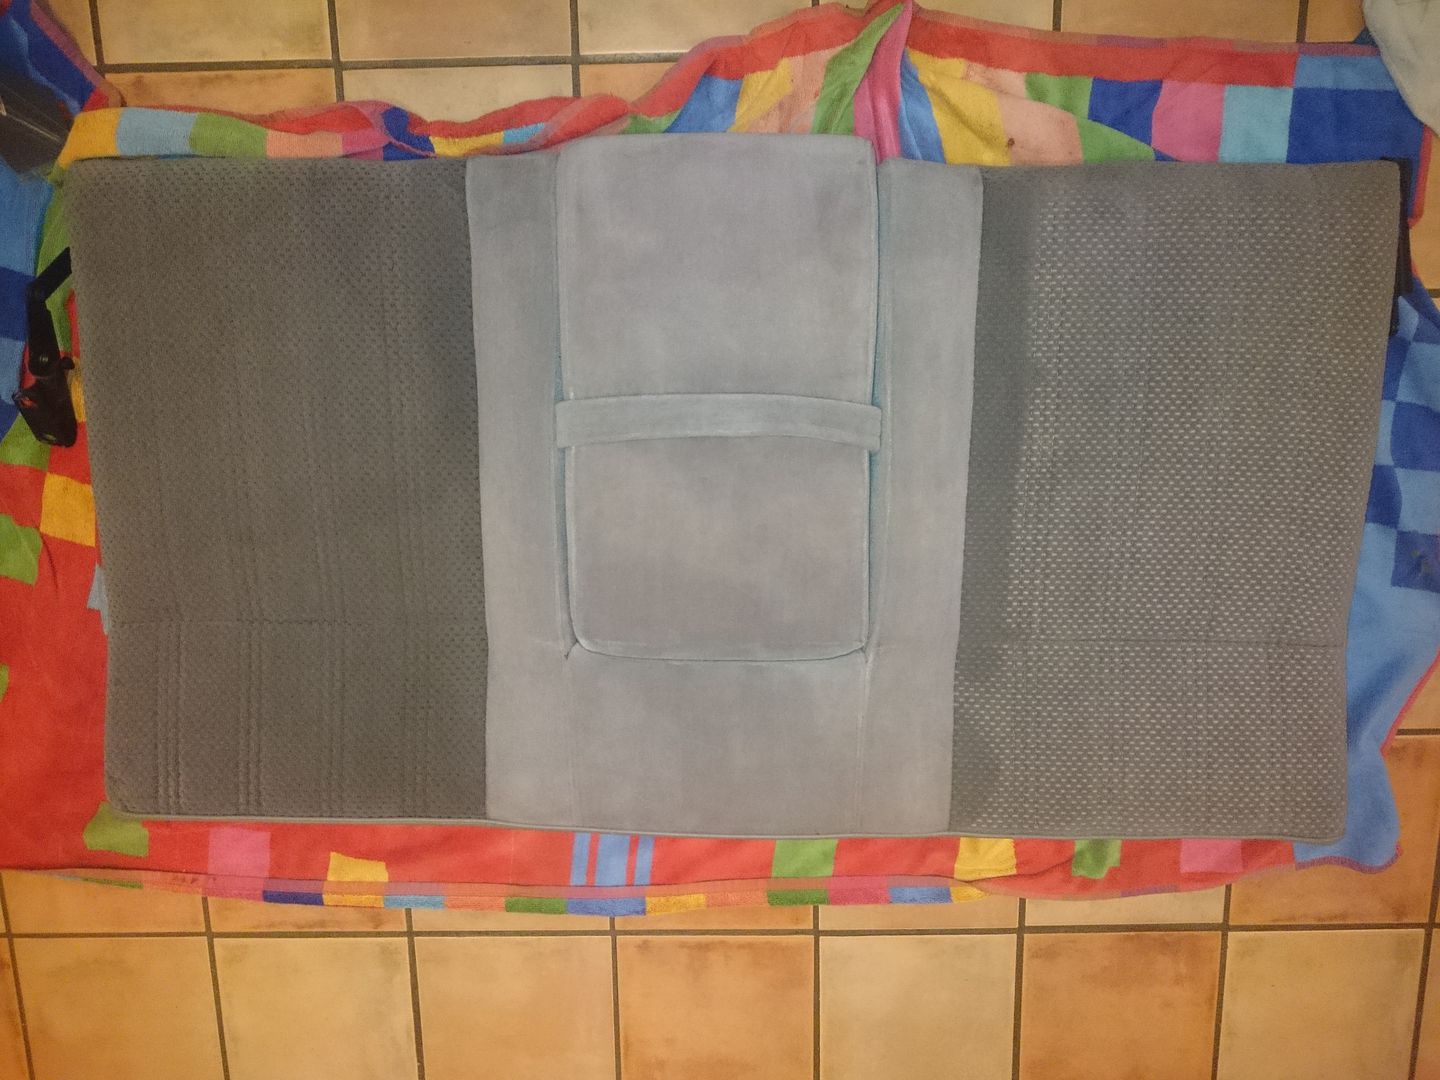
I had invested in a wet-vac, so I put it to good use to see how the velour would clean up. The answer was very well!
Another thing I found when removing all the seats was this.
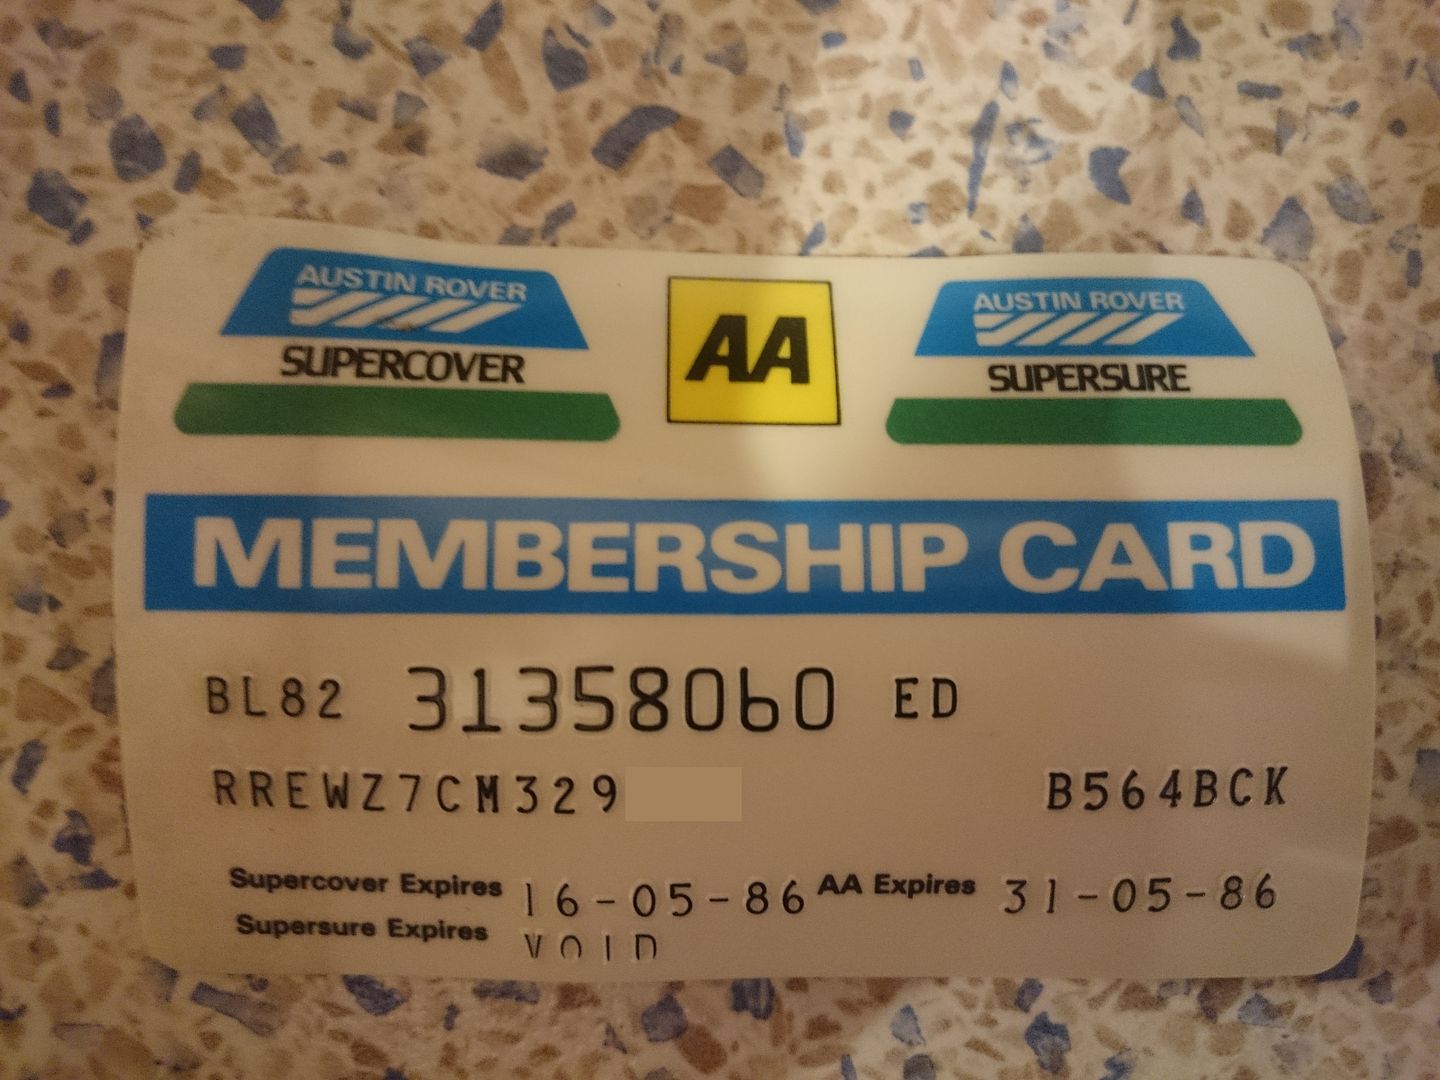
The original dealer supplied Supercover Membership card, now that's a seriously cool find!
With no horrors found I started to develop a plan of action.
First was something that had come up when the car previously sold, the non-functioning speedo.
When the car sold previously it transpired that the speedo had stopped working. Some investigation by the previous owner revealed the speedo transducer had failed. These are one of the many rocking horse poop items on the Vitesse, and actually caused it to lose hundreds of pounds worth of bids when it sold. These are hard to find and are specific to the rear axle ratio. For a manual Vitesse it has to be the orange plastic gear.
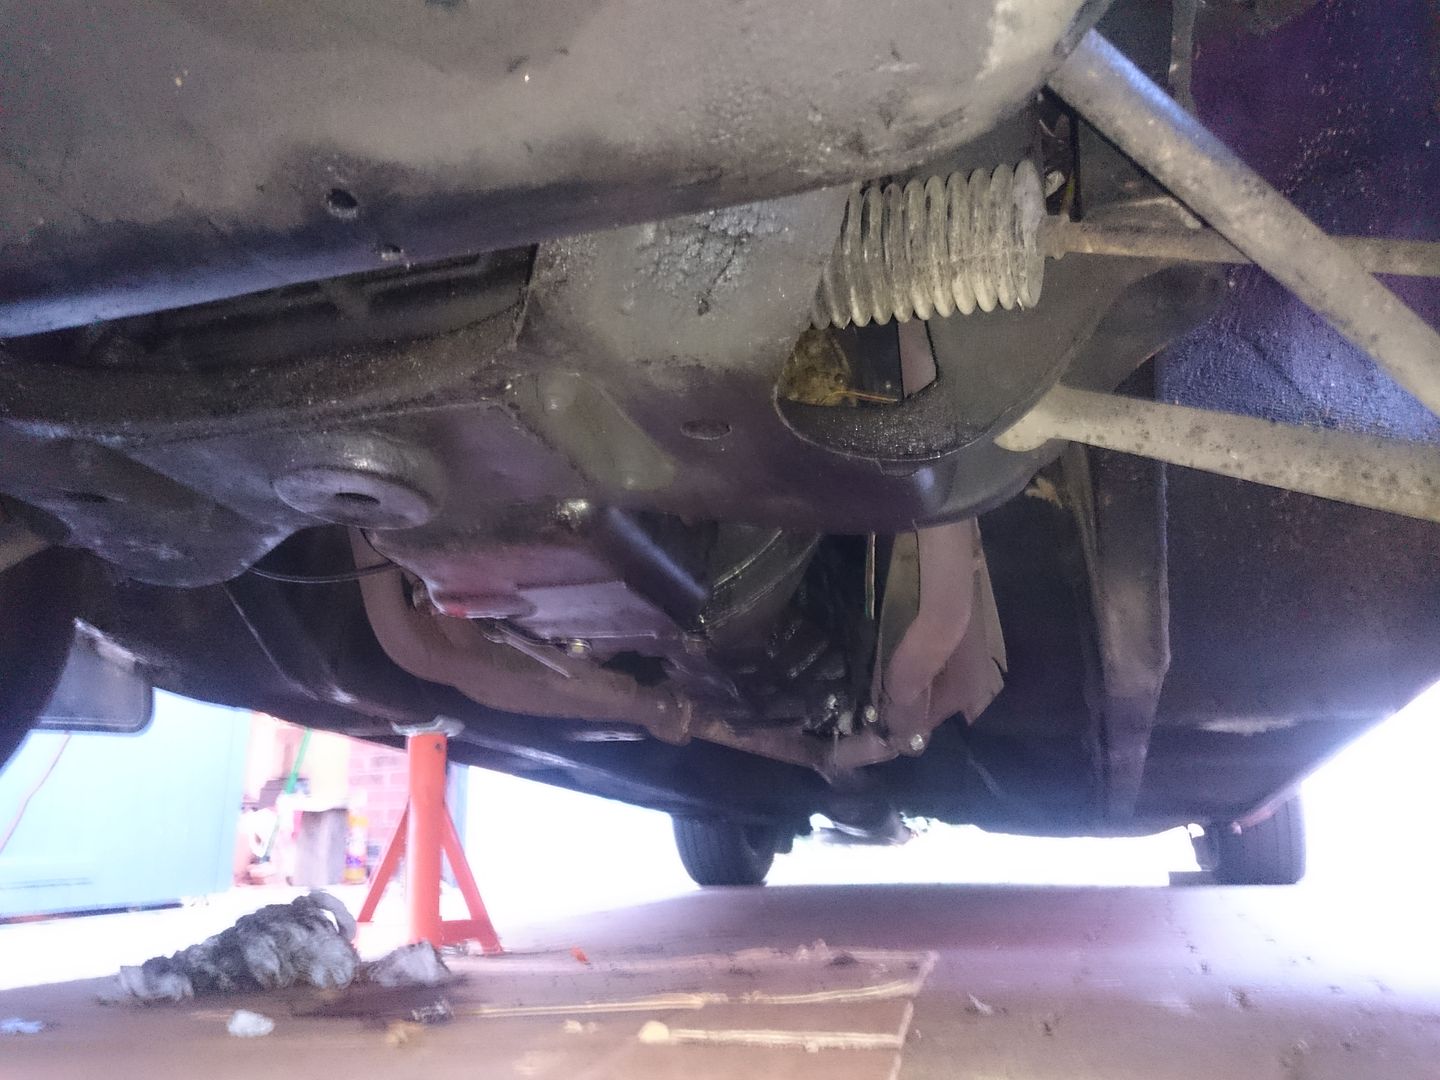
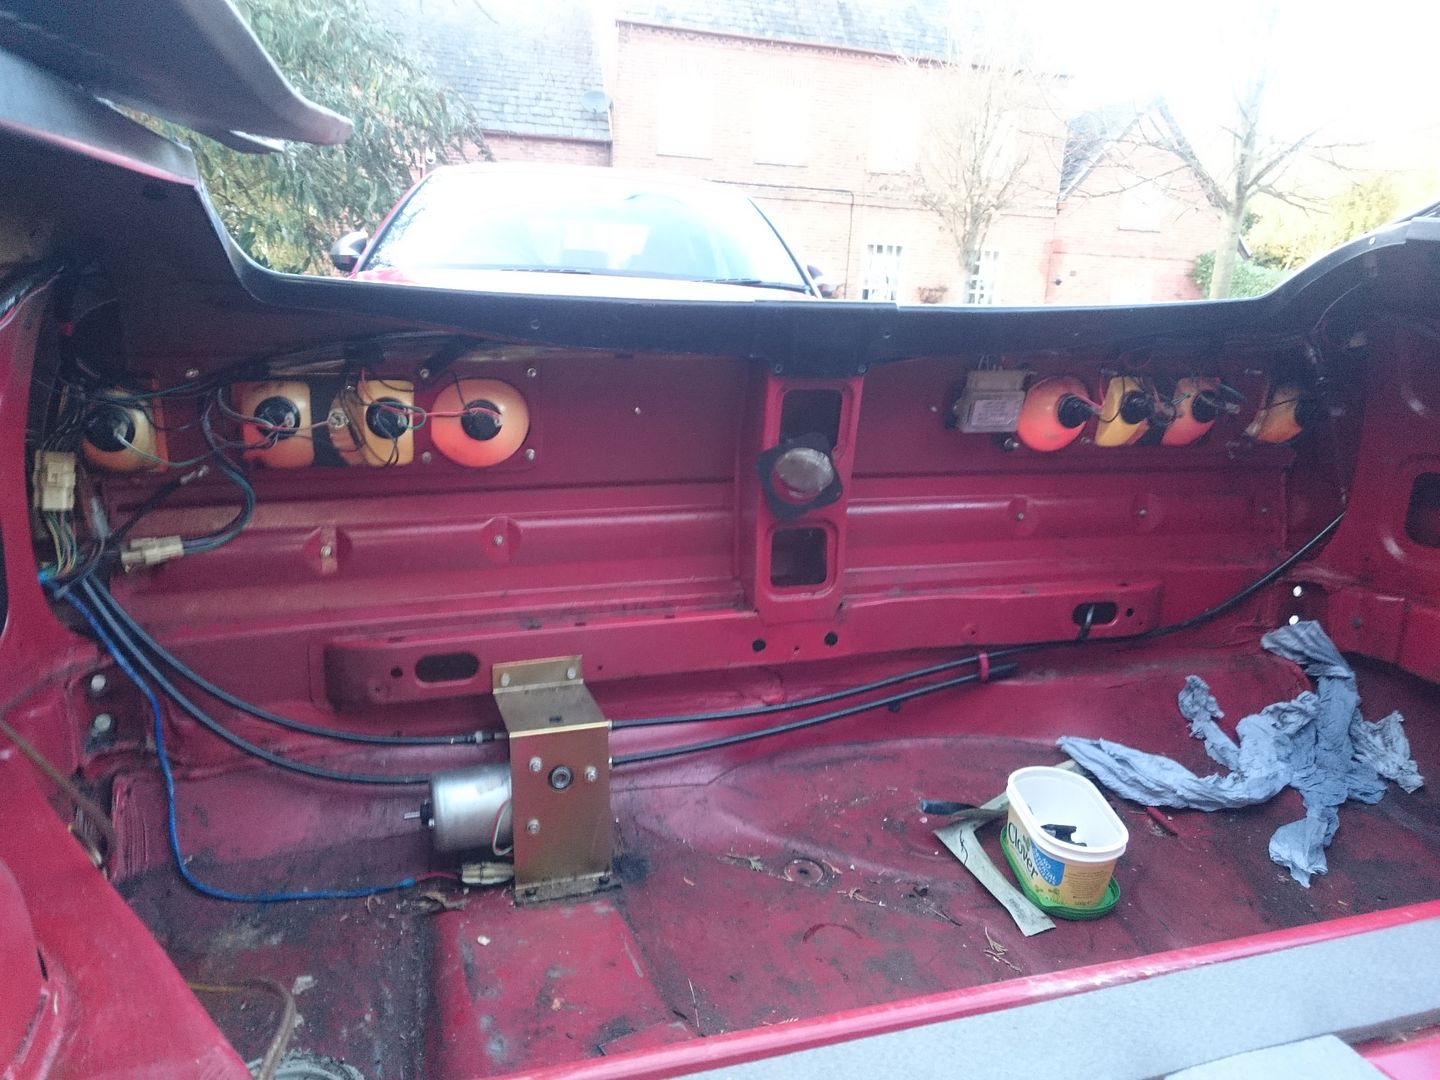
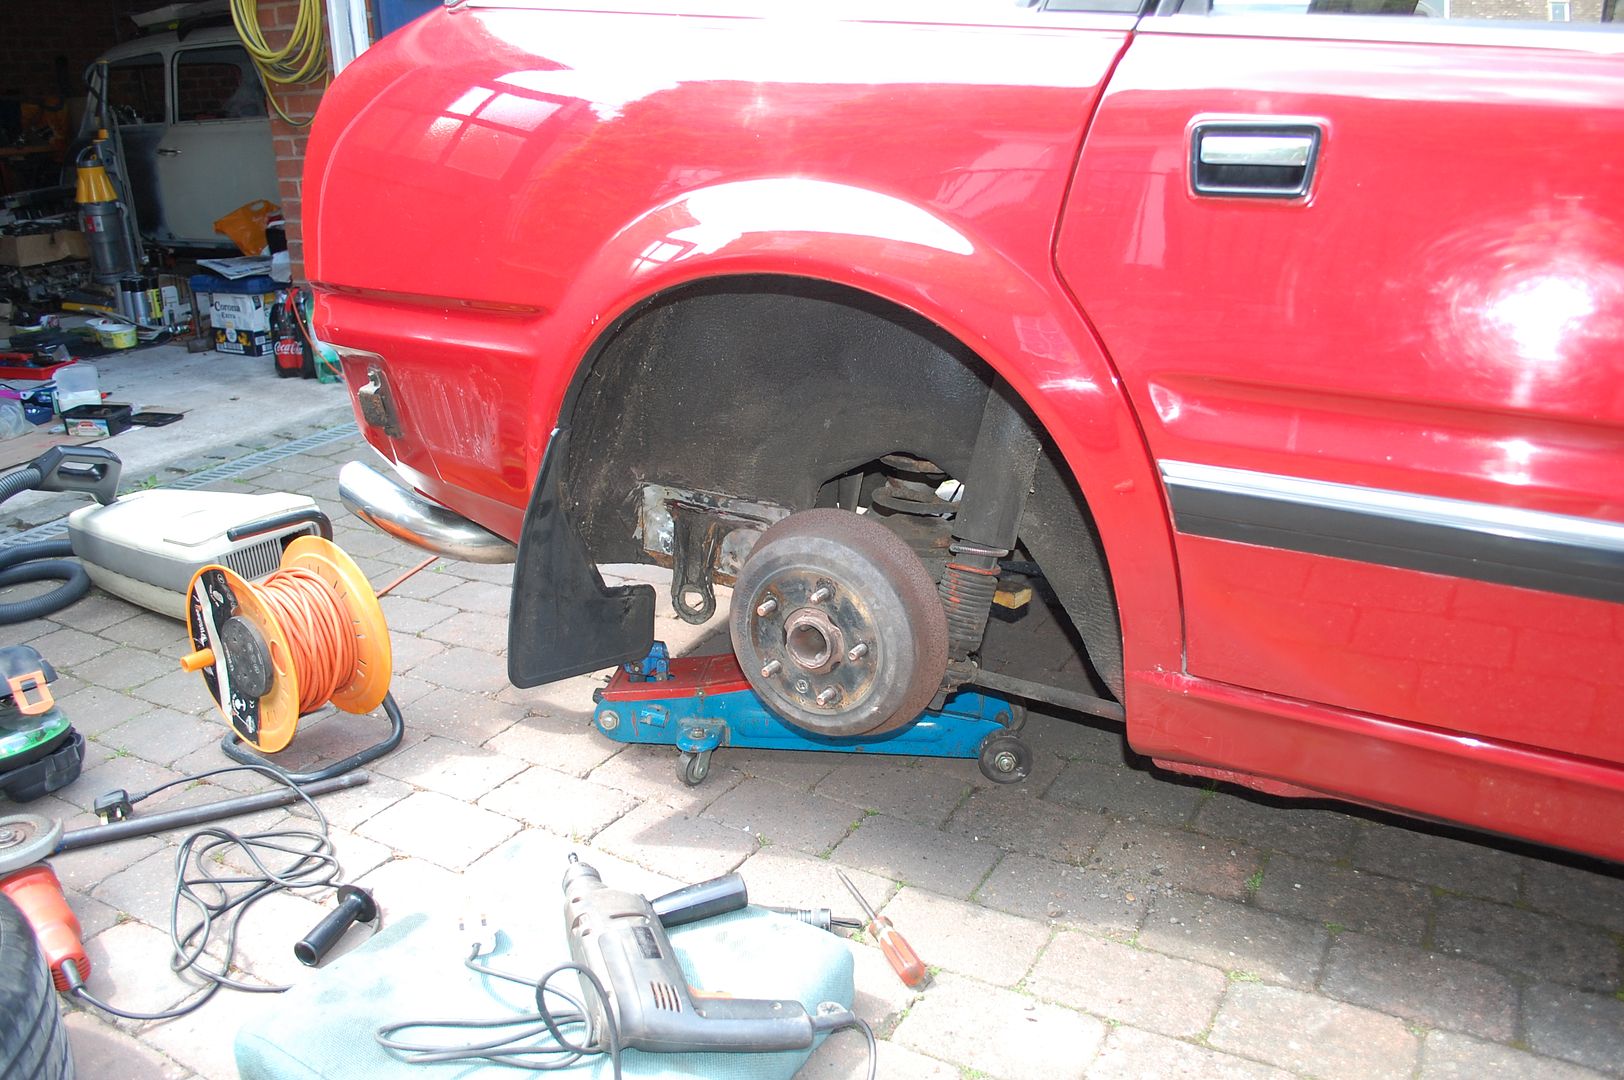
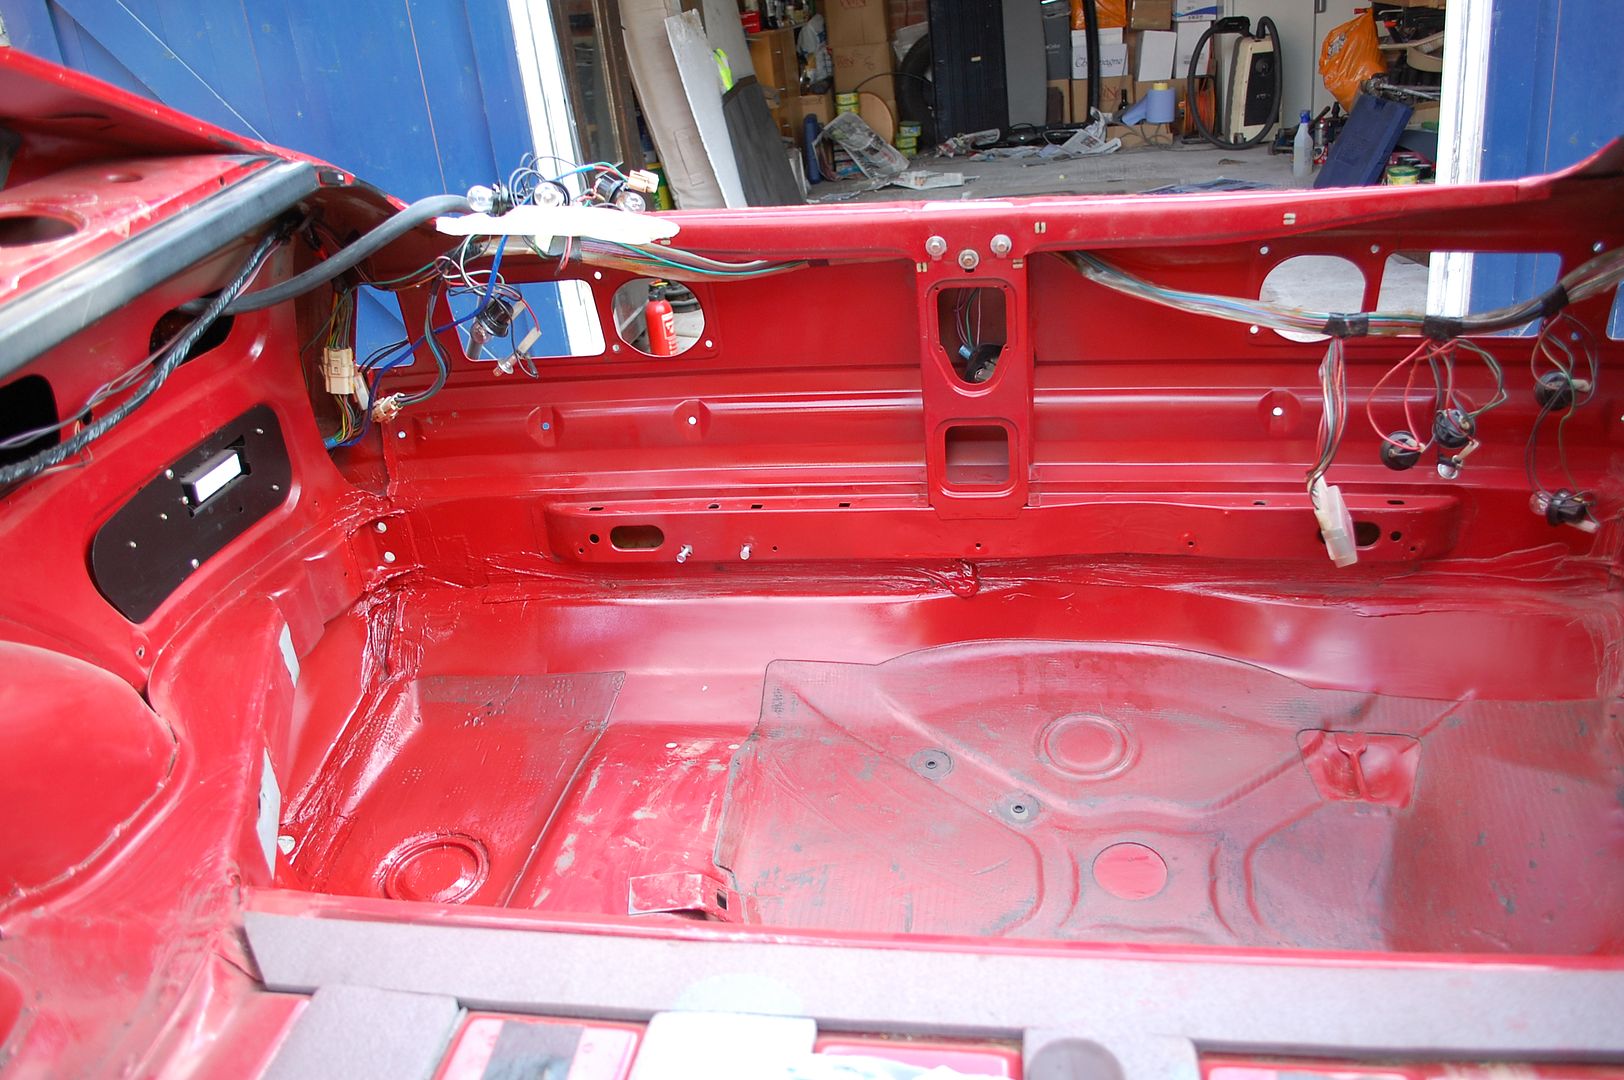
Up the car went, first thing to see is how disgusting the underside of this car is. Absolutely covered in a thick tar like underseal. Meaning everything you touch leaves you absolutely filthy.
But once I'd found it one 10mm bolt and hold down clamp later.
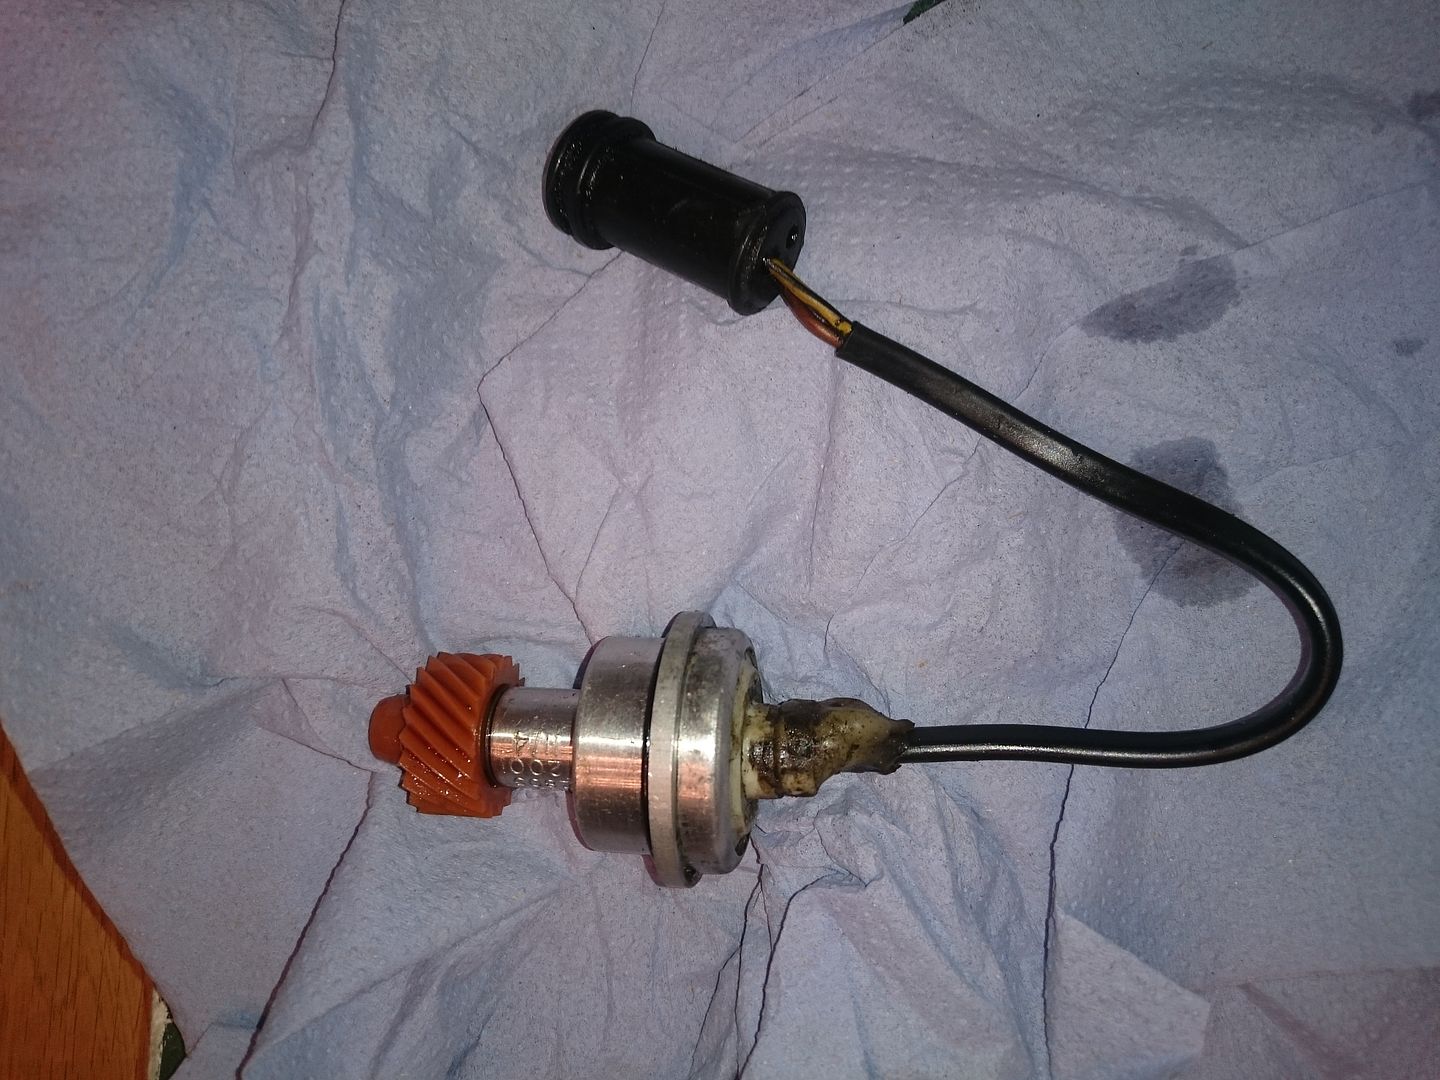
You can see the previous attempts to open it up and repair it. It did not work.
So a replacement was sourced.
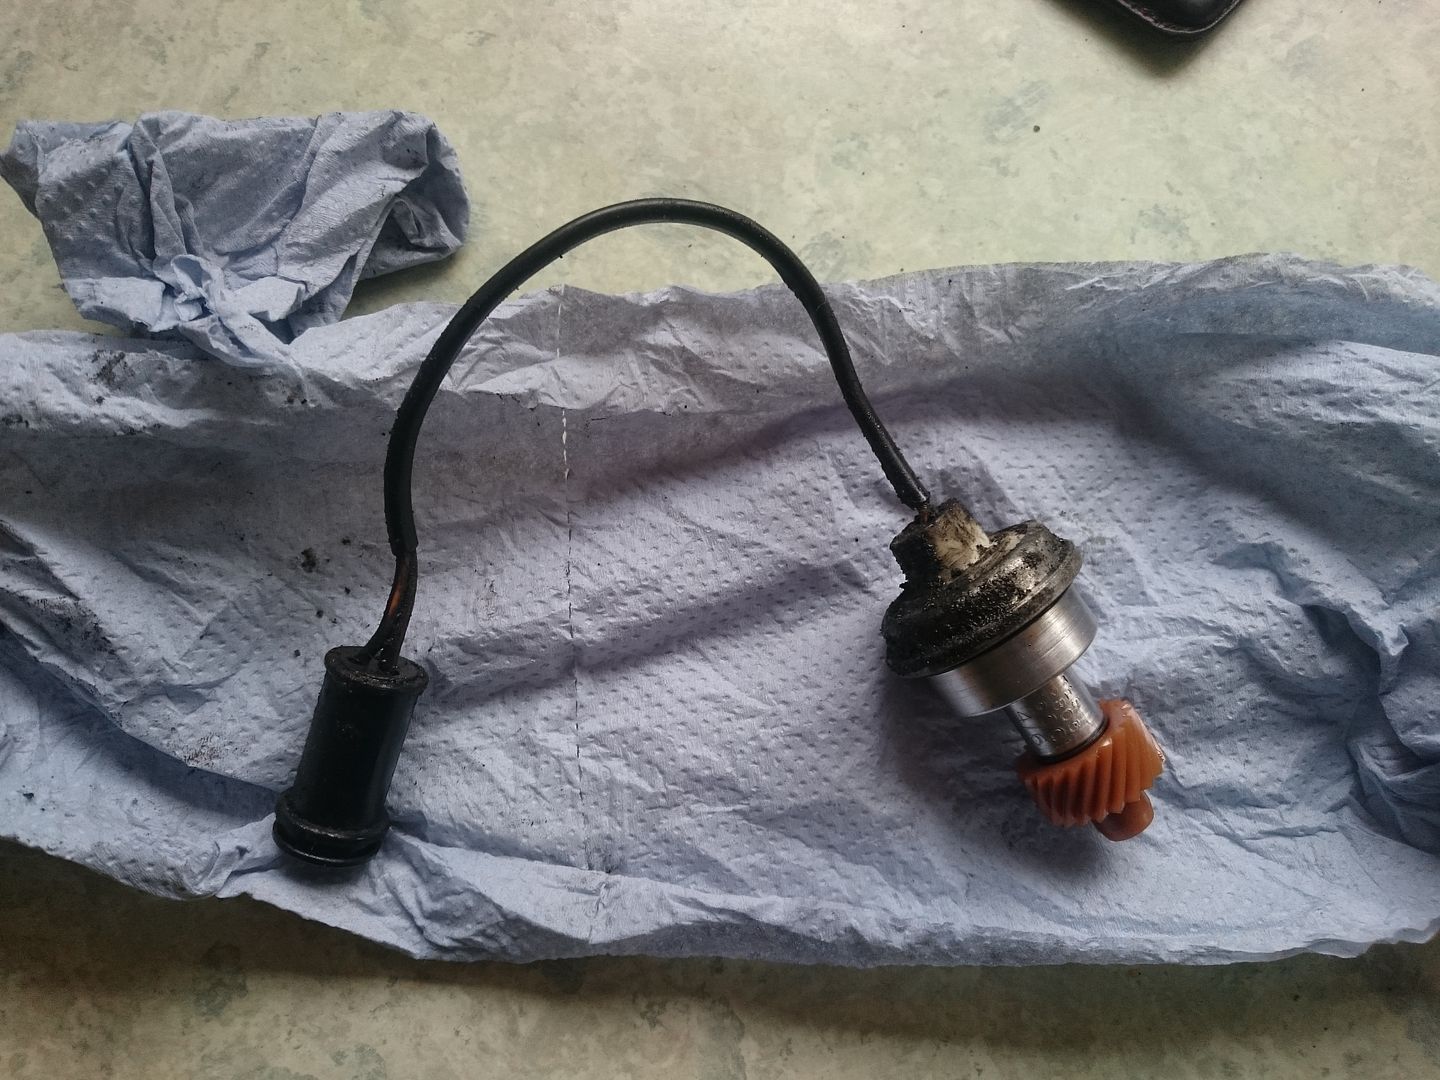
Hard to find yes, but when they do come up about £50 on ebay so not the end of the world like everyone made out. I had to try it out, so after cleaning it up and installing it it took about 10m after pulling off, the speedo jolted back into life. A very satisfying first fix.
Of course it still ran like a pig, and after shutting it off to inspect oil pouring out of the dipstick hole the starter died, I had to drag it back to the garage with the help of a neighbors Landrover.
I wouldn't say my first driving experiences were entirely positive...
Didn't stop me falling for it though.

I'd made a reasonable assessment of the bodywork, but with the weather being terrible I turned my attention to why it ran so poorly.
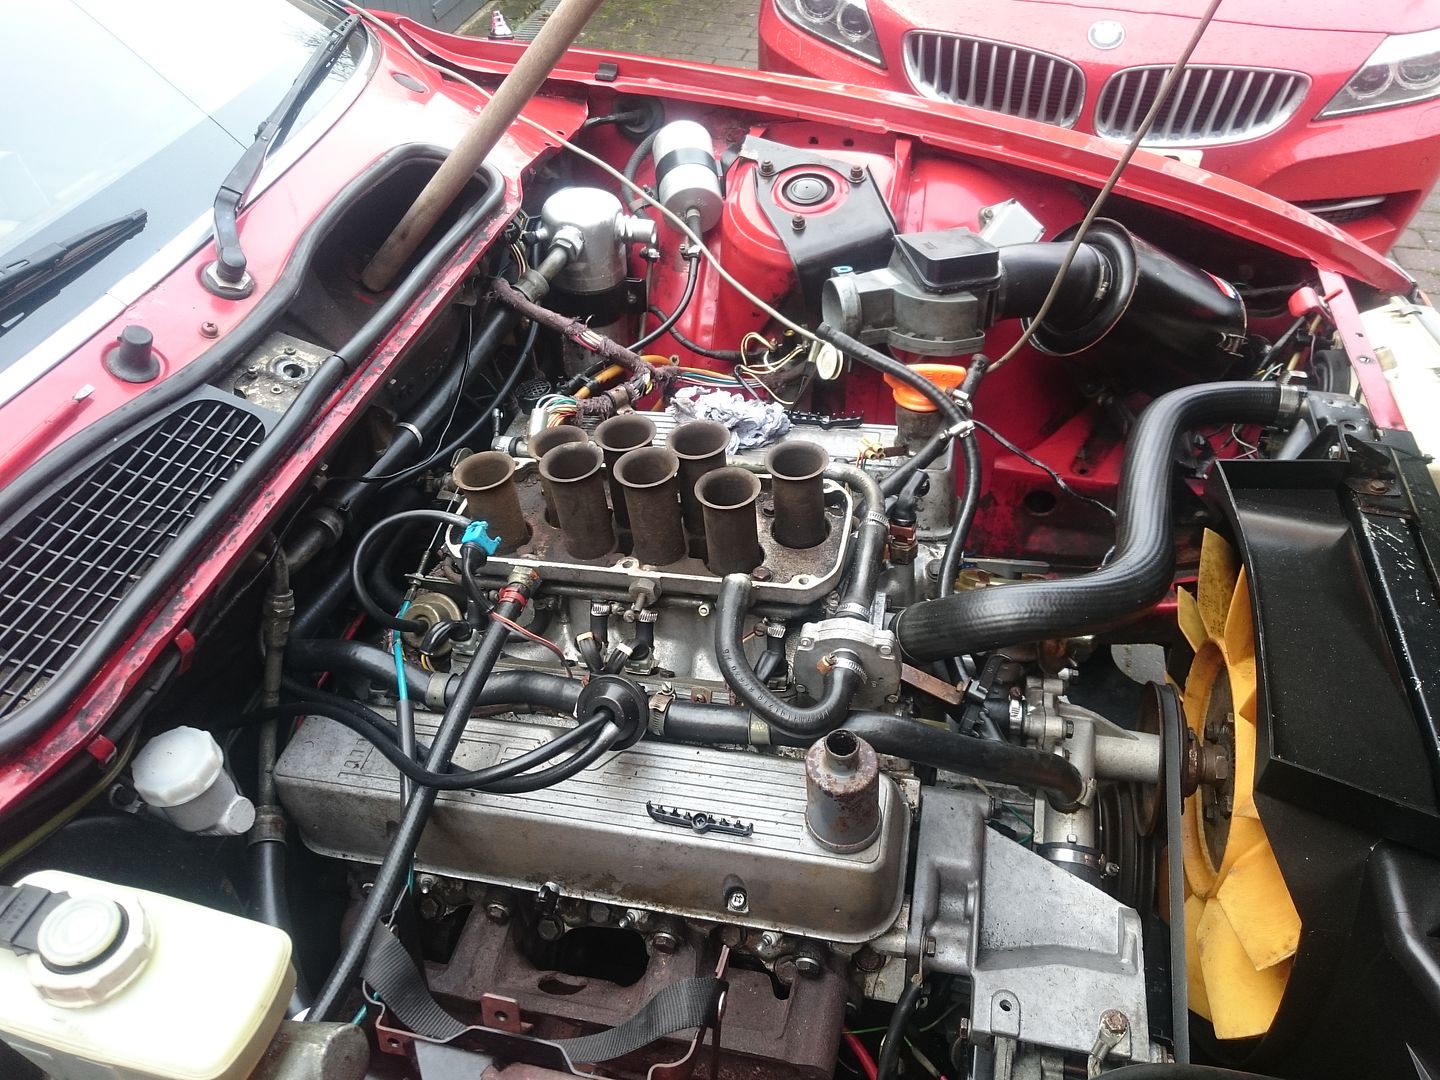
It had had a replacement '87 Range Rover 3.5 EFI V8 (9.35:1) installed by it's previous owner after the original detonated causing some rather serious damage.
I knew I'd rebuild the original engine eventually but I wanted to get it running with the replacement just to get it going.
With the plenum top removed it didn't look great...

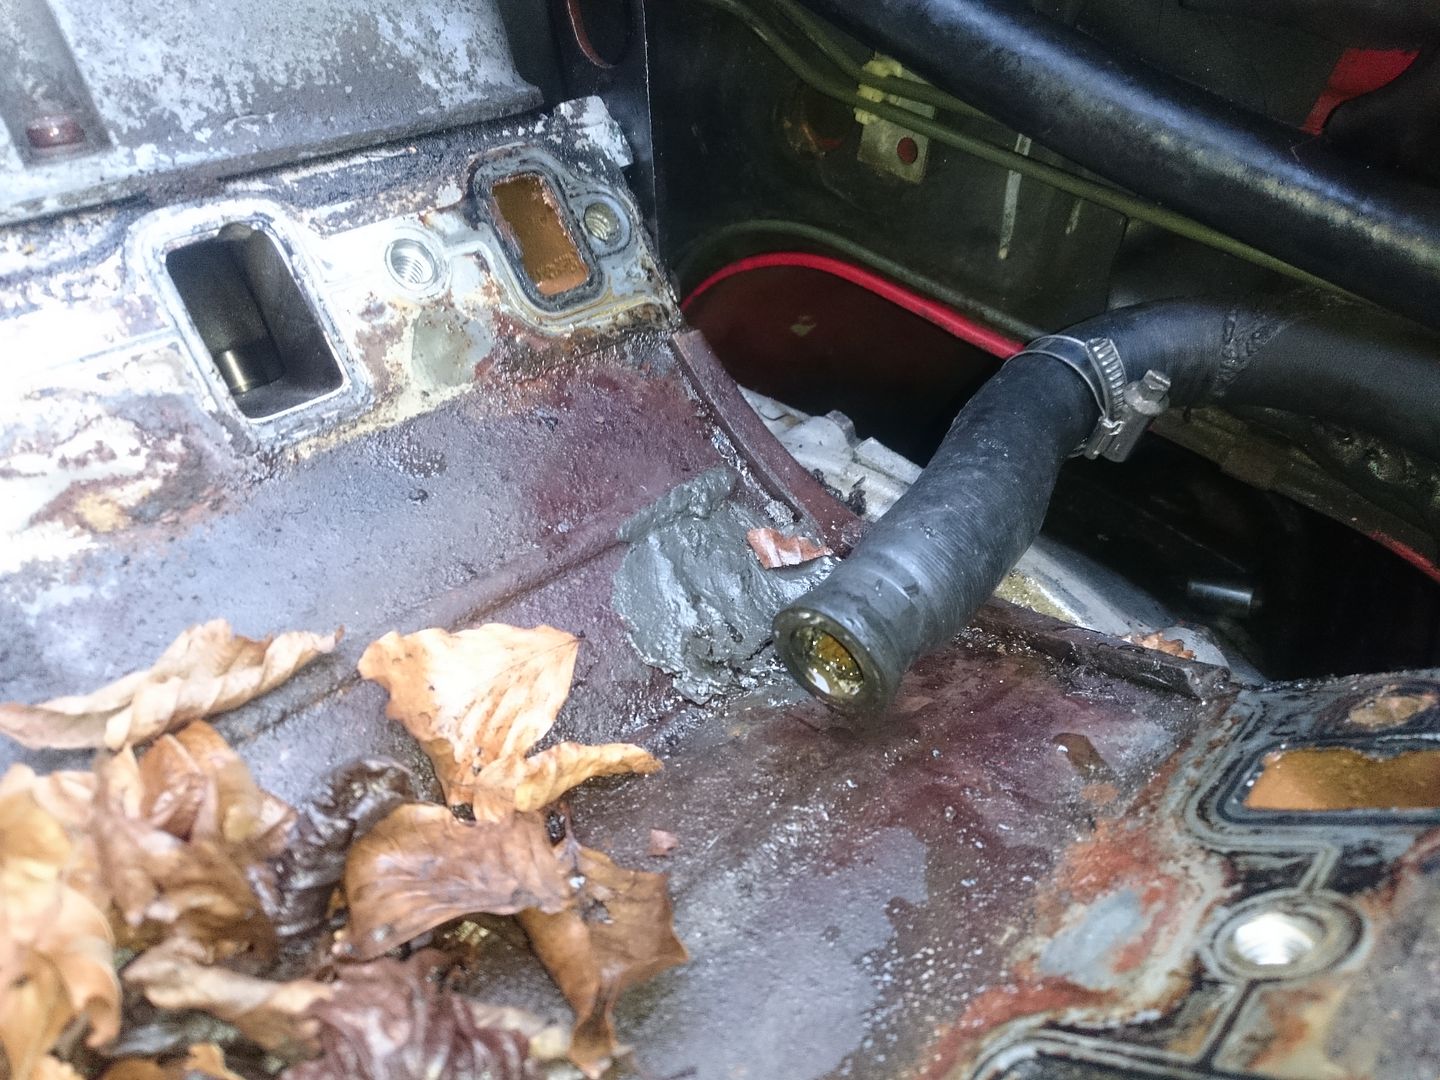
So off came the inlet manifold, worse still... Look at the leaves, and the liquid metal to repair a rotten valley gasket!

Removing the valley gasket you could see the distortion, assumed to be caused by crankcase pressure!
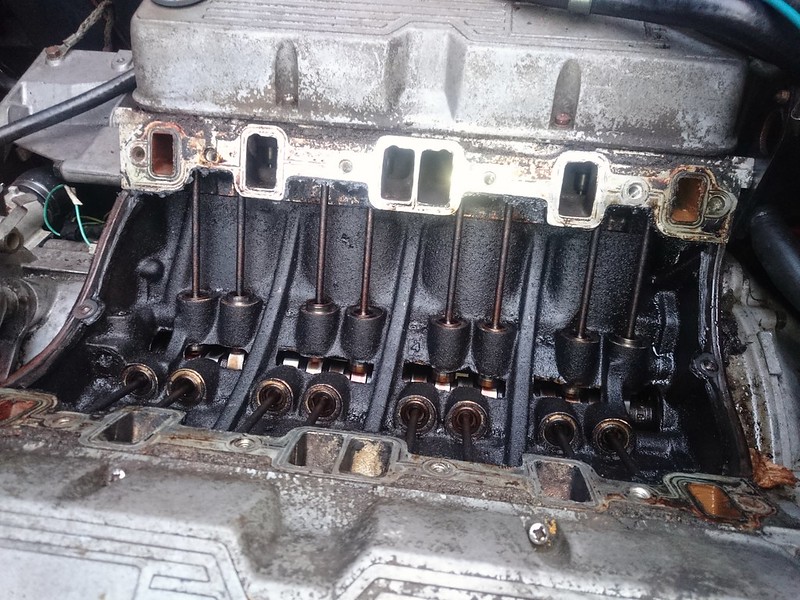
The Valley was also suitably disgusting, you can also see the condition of the cam.
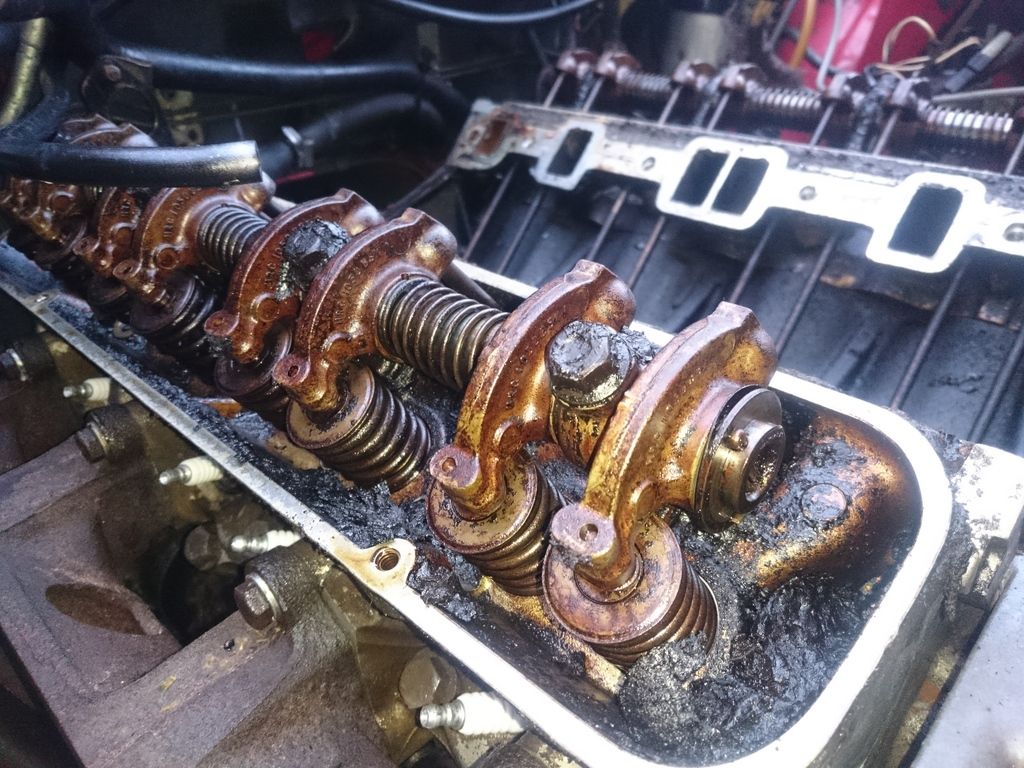
The rocker covers coming off was much worse though, that's one neglected V8! There's skimping on oil changes and then there's that! No wonder it developed so much crankcase pressure it was forcing oil out of the dip stick hole!
The previous owner assured me he'd been sold a "nice running V8" to drop in. He also paid 2 mechanics to install it for him who didn't raise any concerns during fitment. He really didn't have any luck with this car!
So not only was I preparing for other repairs, but 2 engine rebuilds where now on the cards!
Joe
I absolutely love it, so I'm very happy to see other people think that too.
MX6 said:
Very nice indeed, can't remember the last time I saw one of these out in the wild. It would be good to see some details of the resto. Any future plans fot it, or is it "finished", as it were?
It seems a lot of people want that too, so I'm happy to oblige. Its currently just missing bits of trim, its sunroof, and headlining. I'm currently working away to restore and refit this stuff. Aim for the car is to get it finished in the next few weeks and enjoy it as much as I can over the summer.
MarkwG said:
Lucky enough to see this one, I think - http://www.ukemergency.co.uk/a152-suw-metropolitan... - last Sunday, on the M3. Really funny watching all the lane 3 muppets diving for cover once they'd clocked it  !
!
What a brilliant sighting, I believe that one is still part of the metropolitan heritage collection, and was pressed back into use to attend an accident on the way to a show not too long ago. !Well you lot asked so here we go!
I realised quite quickly that I'd bought a car on the brink, If it had spent too much longer outside, it would have been ruined. What the car deserved was some real love. So we'll start with the nasty grotty parts of the car. I started stripping the interior out days after I got the car.
For a 33 year old British car it was remarkably good. Some bits of corrosion where inevitable but I'd found them when I viewed the car, so not unexpected.
As the boot was where I found corrosion that was the starting point.
Makes an excellent bench for stripping! My dad really enjoying being back in an SD1.
The rear speaker covers were original, but sadly completely shot.
Original Feb 1985.

The boot carpet was dirty but present, (apart from the incredibly rare under spare wheel bit!
You can also see some appalling after market stereo wiring. All Fixable though.

The boot was by far the worst area, with the bottom area of the inner arch both sides making up the most of the corrosion. All other surfaces where covered in a wax oil substance, which had saved the car.
The chassis legs are immaculate though, as are the rest of the inner arches, boot floor, and rear panel.
I wanted to make sure that the lower arch corrosion didn't intrude further into the structure of the car, so out came the boot carpet and rear bench.
I also wanted to inspect the inner rear wings. Easily done with the boot carpet removed.
Passenger side looked amazing, apart from the previous owners bashing to fit 6x9 speakers...
Drivers side has a weird repair, that is still a mystery. But the general condition was again amazing. Coming from minis this really is unprecedented!
Both absolutely covered in wax so no corrosion here!
With the trims removed I could also inspect the door steps.
The rear drivers side door step will need attention.
The rear seats come out easily, and again nice to see unmolested factory wiring. Weird to see it in a ribbon rather than taped up!
I did find a mouse nest under the rear bench, but luckily for me they hadn't use the seat material, or the foam supports!
Even found a spare tailgate vent! Really pleased to not find any further corrosion, and the carpet and body work I unearthed was in really good nick.
Looks like I stumbled onto a good car!

With the rear bench removed I did find that one of the folding rear seat brackets was severely bent, another item that I'd need to replace.
I had invested in a wet-vac, so I put it to good use to see how the velour would clean up. The answer was very well!
Another thing I found when removing all the seats was this.

The original dealer supplied Supercover Membership card, now that's a seriously cool find!
With no horrors found I started to develop a plan of action.
First was something that had come up when the car previously sold, the non-functioning speedo.
When the car sold previously it transpired that the speedo had stopped working. Some investigation by the previous owner revealed the speedo transducer had failed. These are one of the many rocking horse poop items on the Vitesse, and actually caused it to lose hundreds of pounds worth of bids when it sold. These are hard to find and are specific to the rear axle ratio. For a manual Vitesse it has to be the orange plastic gear.

Up the car went, first thing to see is how disgusting the underside of this car is. Absolutely covered in a thick tar like underseal. Meaning everything you touch leaves you absolutely filthy.
But once I'd found it one 10mm bolt and hold down clamp later.

You can see the previous attempts to open it up and repair it. It did not work.
So a replacement was sourced.

Hard to find yes, but when they do come up about £50 on ebay so not the end of the world like everyone made out. I had to try it out, so after cleaning it up and installing it it took about 10m after pulling off, the speedo jolted back into life. A very satisfying first fix.
Of course it still ran like a pig, and after shutting it off to inspect oil pouring out of the dipstick hole the starter died, I had to drag it back to the garage with the help of a neighbors Landrover.
I wouldn't say my first driving experiences were entirely positive...
Didn't stop me falling for it though.
I'd made a reasonable assessment of the bodywork, but with the weather being terrible I turned my attention to why it ran so poorly.
It had had a replacement '87 Range Rover 3.5 EFI V8 (9.35:1) installed by it's previous owner after the original detonated causing some rather serious damage.
I knew I'd rebuild the original engine eventually but I wanted to get it running with the replacement just to get it going.

With the plenum top removed it didn't look great...


So off came the inlet manifold, worse still... Look at the leaves, and the liquid metal to repair a rotten valley gasket!
Removing the valley gasket you could see the distortion, assumed to be caused by crankcase pressure!
The Valley was also suitably disgusting, you can also see the condition of the cam.

The rocker covers coming off was much worse though, that's one neglected V8! There's skimping on oil changes and then there's that! No wonder it developed so much crankcase pressure it was forcing oil out of the dip stick hole!
The previous owner assured me he'd been sold a "nice running V8" to drop in. He also paid 2 mechanics to install it for him who didn't raise any concerns during fitment. He really didn't have any luck with this car!
So not only was I preparing for other repairs, but 2 engine rebuilds where now on the cards!
Joe
Edited by 1275 GT on Sunday 13th December 17:03
CarlosV8 said:
Looking forward to more of this. I had a 3500 SE which I sold to fund a grotty TP Vitesse. Sunk loads of time and money into it but it was never quite right. Should have kept the first one!
Would still love a well sorted Vitesse one day though.
I really enjoyed reading your thread on the TP, a real credit that you got it back on the road, and a real shame you had to sell it in the end. I hope you enjoy my efforts! Would still love a well sorted Vitesse one day though.
I know what you mean, but the draw of the Vitesse is so strong, even over a better SE.
Joe

yellowstreak said:
To think that this survived to this standard amazing. What would happen without all those fastidious old blokes who know how to look after a car? I have happy memories of being carted round with a boot full of fishing tackle by my father in one of these.
It really is a credit to its previous owners, especially as I know the last two owners (and for at least 10 years) kept it outside too!Hopefully I can be it's next fastidious young owner!
The boot space really is incredible, especially with the extra space under the boot boards too.
So I really needed to make a decision on what to do with the engine. In reality it needed to come out. But I knew if this happened it wouldn't be going back in and I would rebuild the original engine. Something at the time I couldn't quite afford yet.
The RR engine was really looking decidedly grotty, and had at least one very noisy lifter.
After pondering this for some time I eventually decided that at least a top end refresh couldn't hurt.
After seeing how disgusting the oil ways in the heads were they had to come off.

The valley of the engine was also suitably gunged, and as some would have predicted the cam was showing some very odd colouring and signs of wear. A replacement cam is really needed, but as it's only planned to be a temporary engine it'll function fine.

No wonder it didn't run very well.

Hours where spent scraping and dissolving the solid oil gunge making sure none of it contaminated further down into the engine.
With a lot of time and effort I got this. Having worked on minis I was a lot more careful cleaning up the aluminum components, rather than the easy cast iron mini engine block and head.

Eventually I got it to a state I'd be happy to reassemble.
The heads also took a lot of effort to make usuable again, and spent some time in a degreaser bath.
These did not have any valve stem seals, so no risk of damage.


Ended up coming out very nicely, and were oiled up ready to be stored until it came time for rebuild time.

This brings us up to April 2017, so a few months of ownership and I've only really scratched the surface. At this point my attention switched back to minis as I'd bought a London to Brighton ticket and needed to get my 1275 GT fighting fit for the journey. After I got back I got stuck into the Rover properly.

Joe
Edited by 1275 GT on Sunday 13th December 17:07
silverfoxcc said:
Can i say a heartfelt thanks from a chap of very mature years!! to see cars like this being put back into original condition withut it nbeing tarted up slammed stanced massive wheels etc as a lot of them end up.
A, and dont get me wrong, bog standard rebuild is a true car lovers effort, and i can stand and admire them for hours!
looking forward to the diary
Thanks
It really is a passion of mine, and you're comments really are too kind. Hopefully my attention to detail is worthy of your admiration.A, and dont get me wrong, bog standard rebuild is a true car lovers effort, and i can stand and admire them for hours!
looking forward to the diary
Thanks
CarlosV8 said:
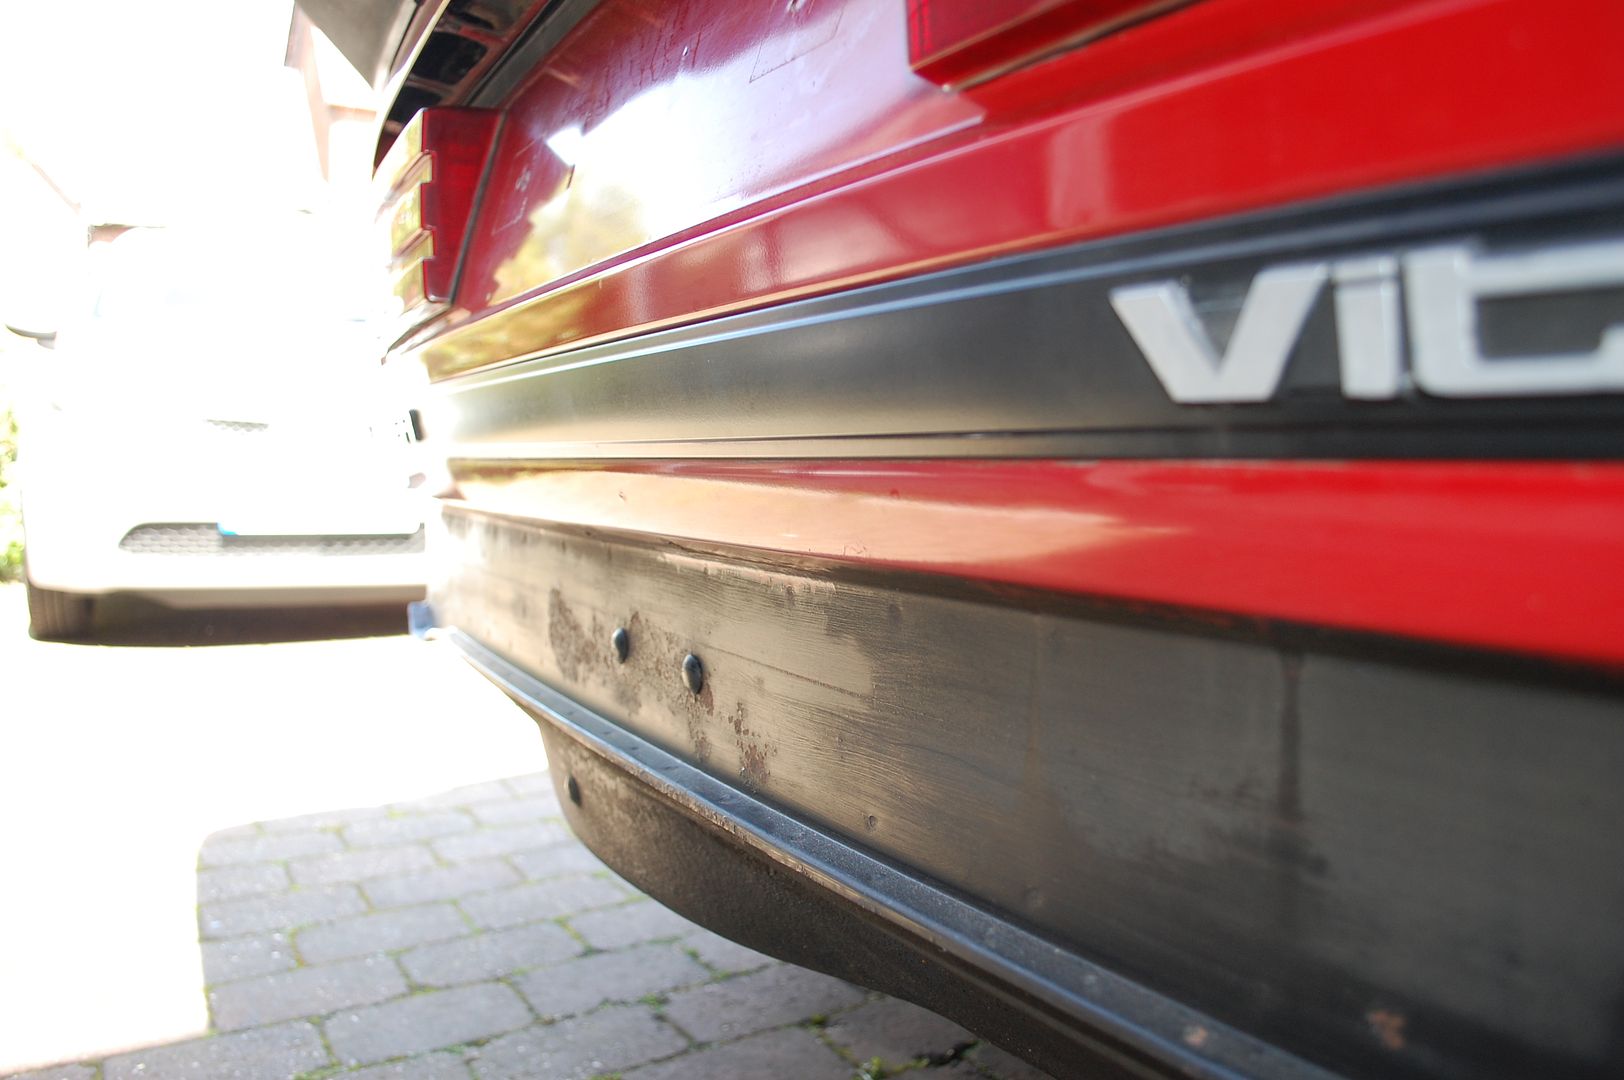
Thanks, unfortunately it's never been MOT'd since I put it through in 2010. Bit of a shame after all the effort to get it roadworthy! Still got the nasty after-market rear panel hanging in the garage though
And it was mainly that rear spoiler I wanted. Love it!!
Now that is a shame, I wonder what happened to it. Hanging onto it in case you find another one? And it was mainly that rear spoiler I wanted. Love it!!

Yeah the big rubber spoiler and deep chin is what does it for me, just gives it the perfect look.
Joe
This is where things get interesting. After a few months away from the Rover, I really got stuck in.
Main aim here was to really work out what needed doing.

Overall it was a lovely looking thing, but the devil is in the detail.
The drivers side is definitely the weakest, someone has tried to repair the bottoms of the doors, and made a right hash of it.


Front of the wheel arch also isn't great with corrosion to the door step. Plan is to remove some paint and find out what lurks beneath.

The rear quarter is a little bit better but still in need of a lot of work.

Passenger side is better, but still needs attention.
Interior stripping carried on with the seats and carpet out.

Such a weird steering wheel!

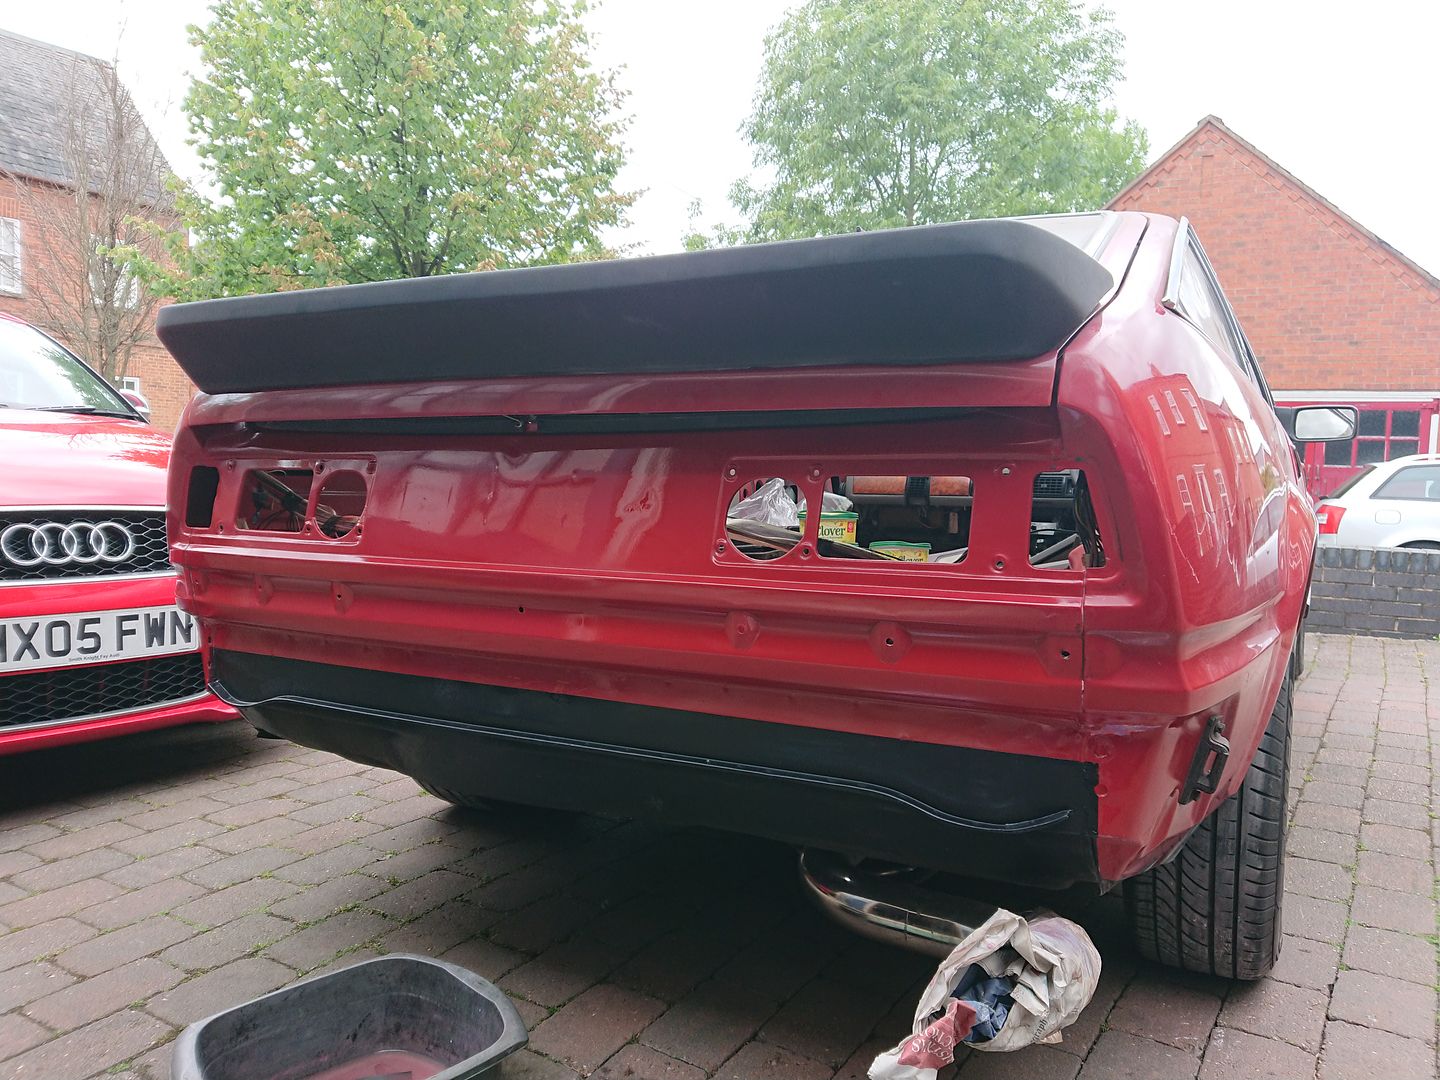
One area that also wasn't great was the rear panel behind the bumper. By having to remove the rear bumper to get it on the trailer it was more obvious than usual.
It had at some point in its life a tow bar fitted, one of my pet hates on these cars.


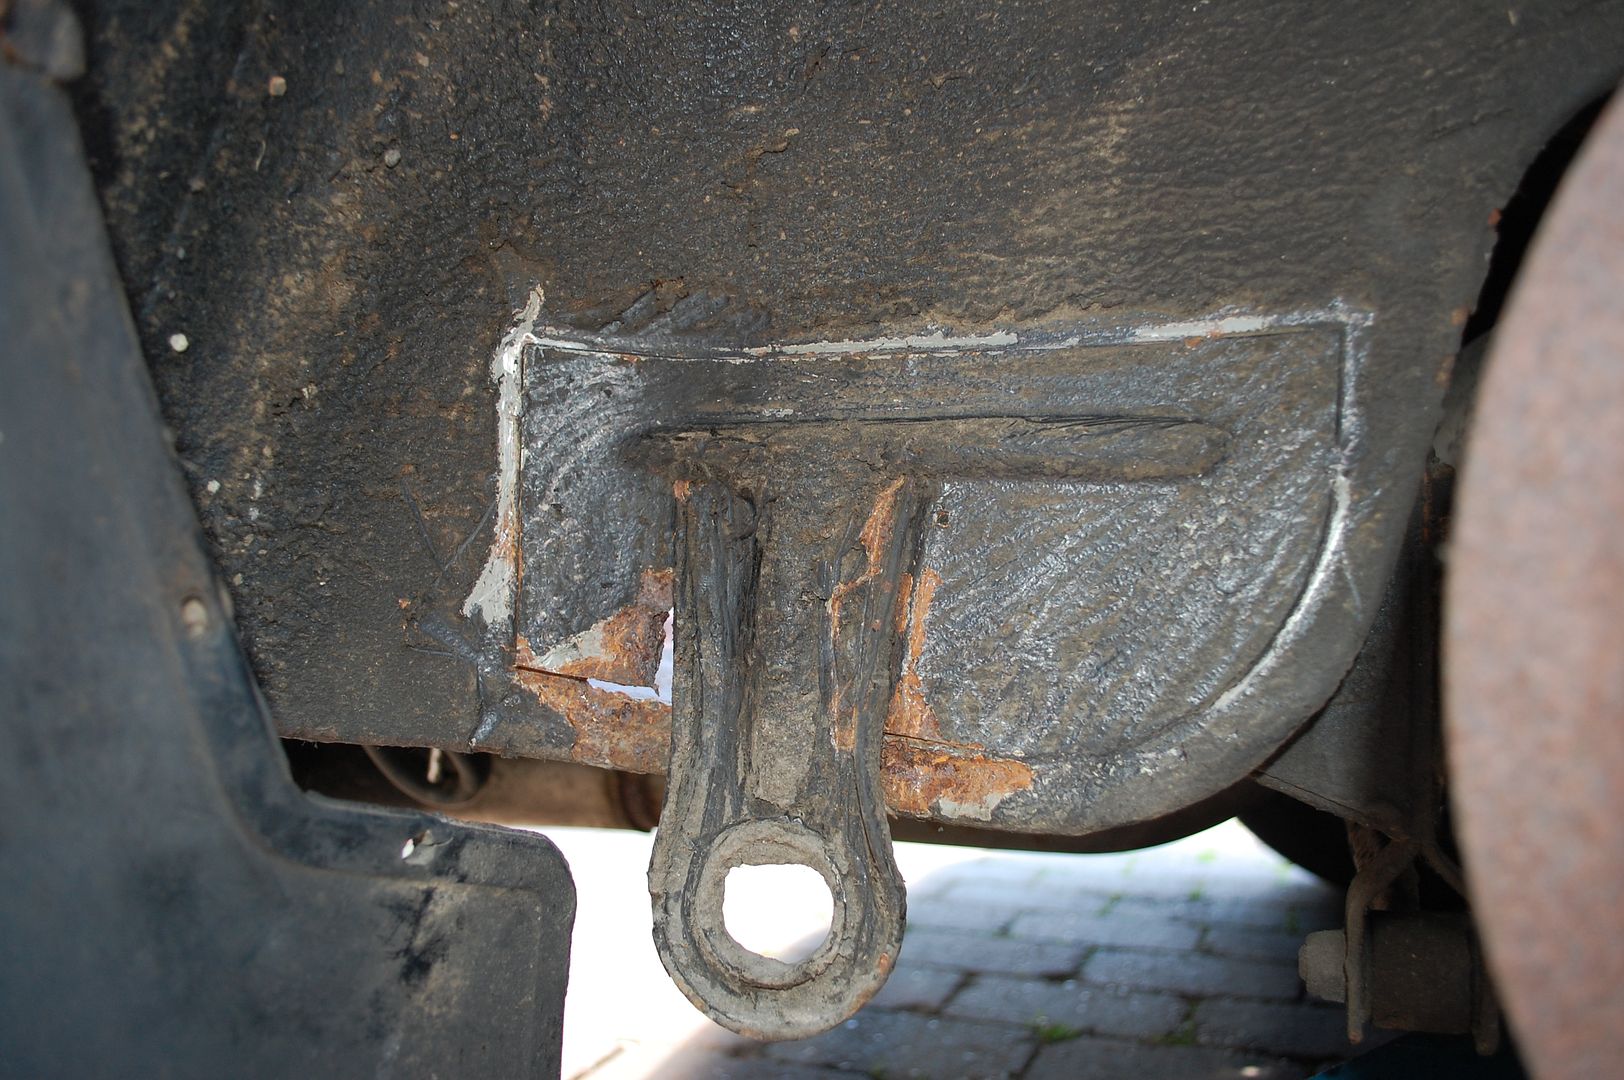
With the known nasty areas in the boot, I also decided to have a proper look as to why this happens.
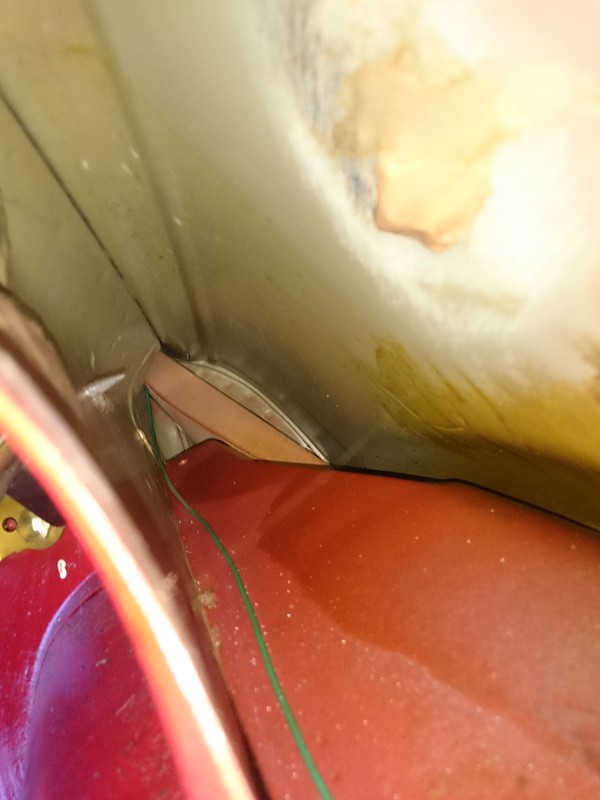
and on the other side, is the towing eye. with a water trap, rots from the outside in.
The paintwork was largely very nice, but it did have issues, mainly paint damage along the tops of the doors on the drivers side.
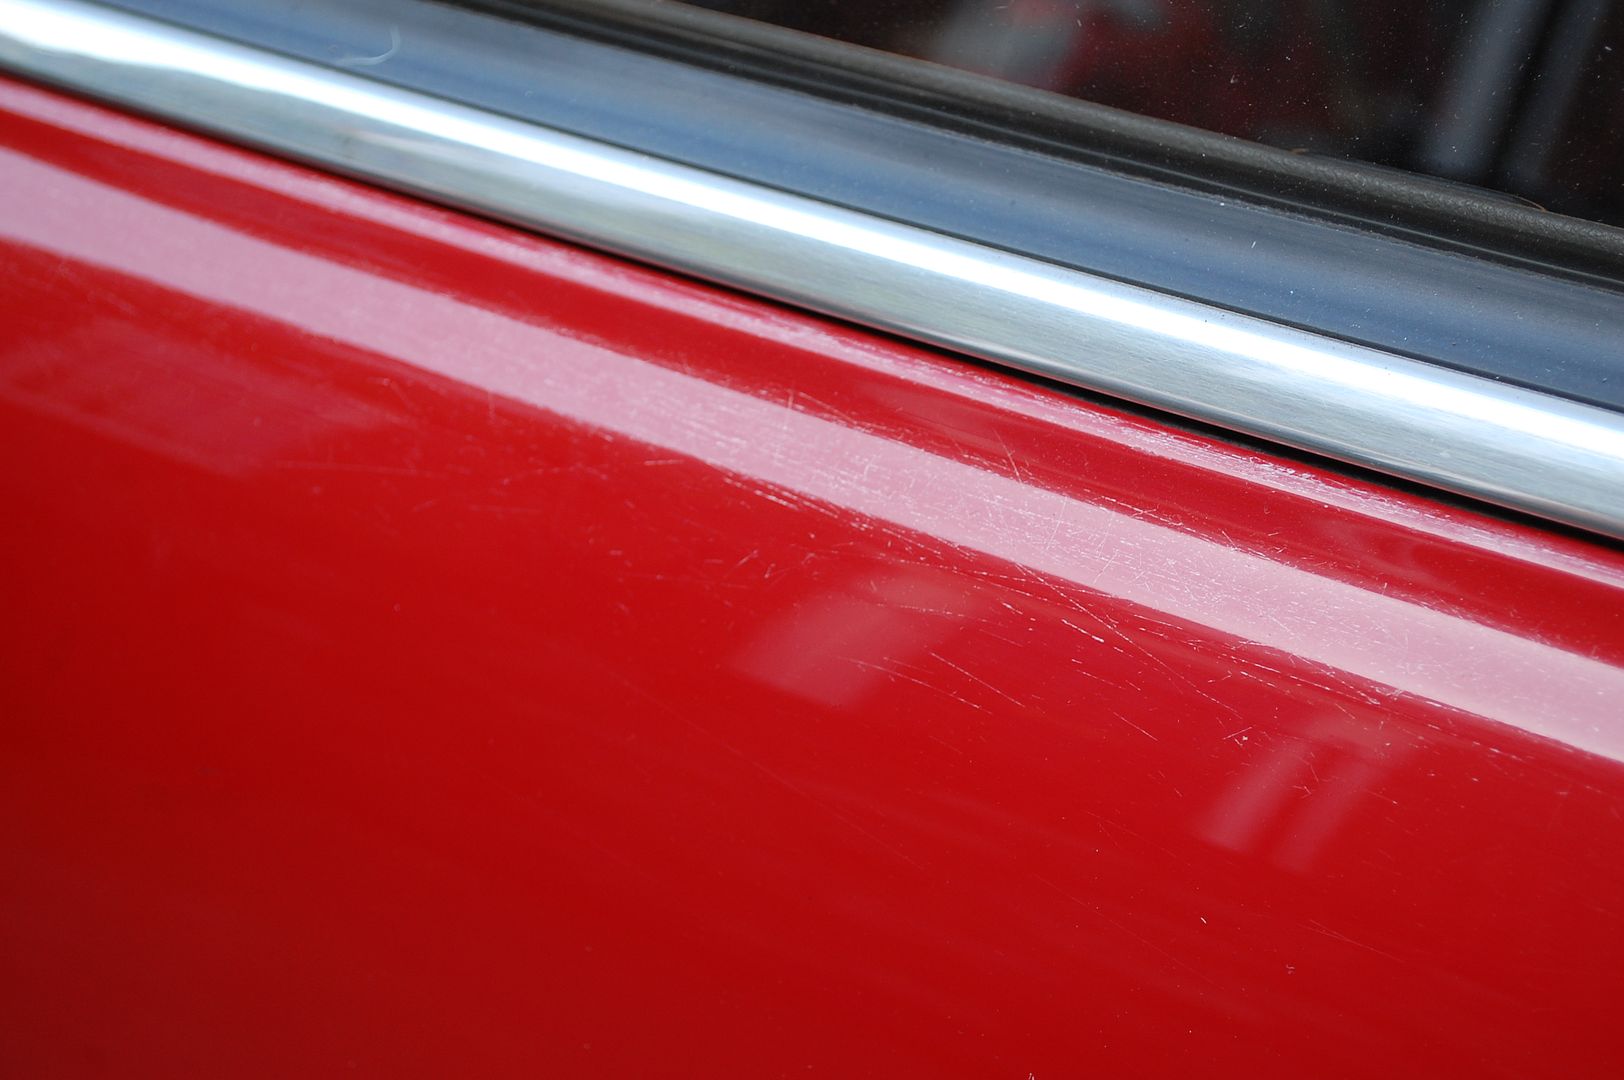
This is something I've largely left, and I reckon requires a re-paint to really sort. Something that I might do eventually, but not anytime soon.
The other big one was the sunroof. It had been replaced (a known item to rot out) and badly painted, flat as a pancake. So this definitely needed sorting!
So that's the majority of the problems I found, which on a 33 year old car I thought was pretty good! Once I knew what I needed to do I got cutting!
Joe
Main aim here was to really work out what needed doing.


Overall it was a lovely looking thing, but the devil is in the detail.
The drivers side is definitely the weakest, someone has tried to repair the bottoms of the doors, and made a right hash of it.
Front of the wheel arch also isn't great with corrosion to the door step. Plan is to remove some paint and find out what lurks beneath.
The rear quarter is a little bit better but still in need of a lot of work.
Passenger side is better, but still needs attention.
Interior stripping carried on with the seats and carpet out.
Such a weird steering wheel!
One area that also wasn't great was the rear panel behind the bumper. By having to remove the rear bumper to get it on the trailer it was more obvious than usual.
It had at some point in its life a tow bar fitted, one of my pet hates on these cars.

With the known nasty areas in the boot, I also decided to have a proper look as to why this happens.

and on the other side, is the towing eye. with a water trap, rots from the outside in.

The paintwork was largely very nice, but it did have issues, mainly paint damage along the tops of the doors on the drivers side.

This is something I've largely left, and I reckon requires a re-paint to really sort. Something that I might do eventually, but not anytime soon.
The other big one was the sunroof. It had been replaced (a known item to rot out) and badly painted, flat as a pancake. So this definitely needed sorting!

So that's the majority of the problems I found, which on a 33 year old car I thought was pretty good! Once I knew what I needed to do I got cutting!
Joe
Edited by 1275 GT on Sunday 13th December 20:13
Well I wasn't expecting such a positive reception, and to make readers car of the week!
Thankyou for all the positive messages about the Vitesse, and hearing your SD1 stories is so cool.
I'll get cracking with the next instalment, I'm just uploading the pictures.
Joe
Thankyou for all the positive messages about the Vitesse, and hearing your SD1 stories is so cool.
Northern.N said:
LOVELY thread Joe, good to see you on PH with this too!
All the best, Nick M.
Thanks Nick, I was intending on dropping you a message about your opinion on the paint defects, see if theres anything that could be done about them.All the best, Nick M.
corcoran said:
You can have any colour you like, as long as it's red, with silver door mirrors!
That did make me laugh, I hadn't noticed I'd gotten such a car type. cpreddy1 said:
Hi Everyone,
My first post (been a lurker for many years though).
Saw this at Lake Tekapo on the South Island a couple of years back.
I was amazed at the number of rust free old cars in NZ. They can't use salt on the roads there, surely?
Must be the case, and one of the few Vitesses to have made it over to NZ, very cool spot. My first post (been a lurker for many years though).
Saw this at Lake Tekapo on the South Island a couple of years back.
I was amazed at the number of rust free old cars in NZ. They can't use salt on the roads there, surely?
I'll get cracking with the next instalment, I'm just uploading the pictures.
Joe
This is where things get serious.
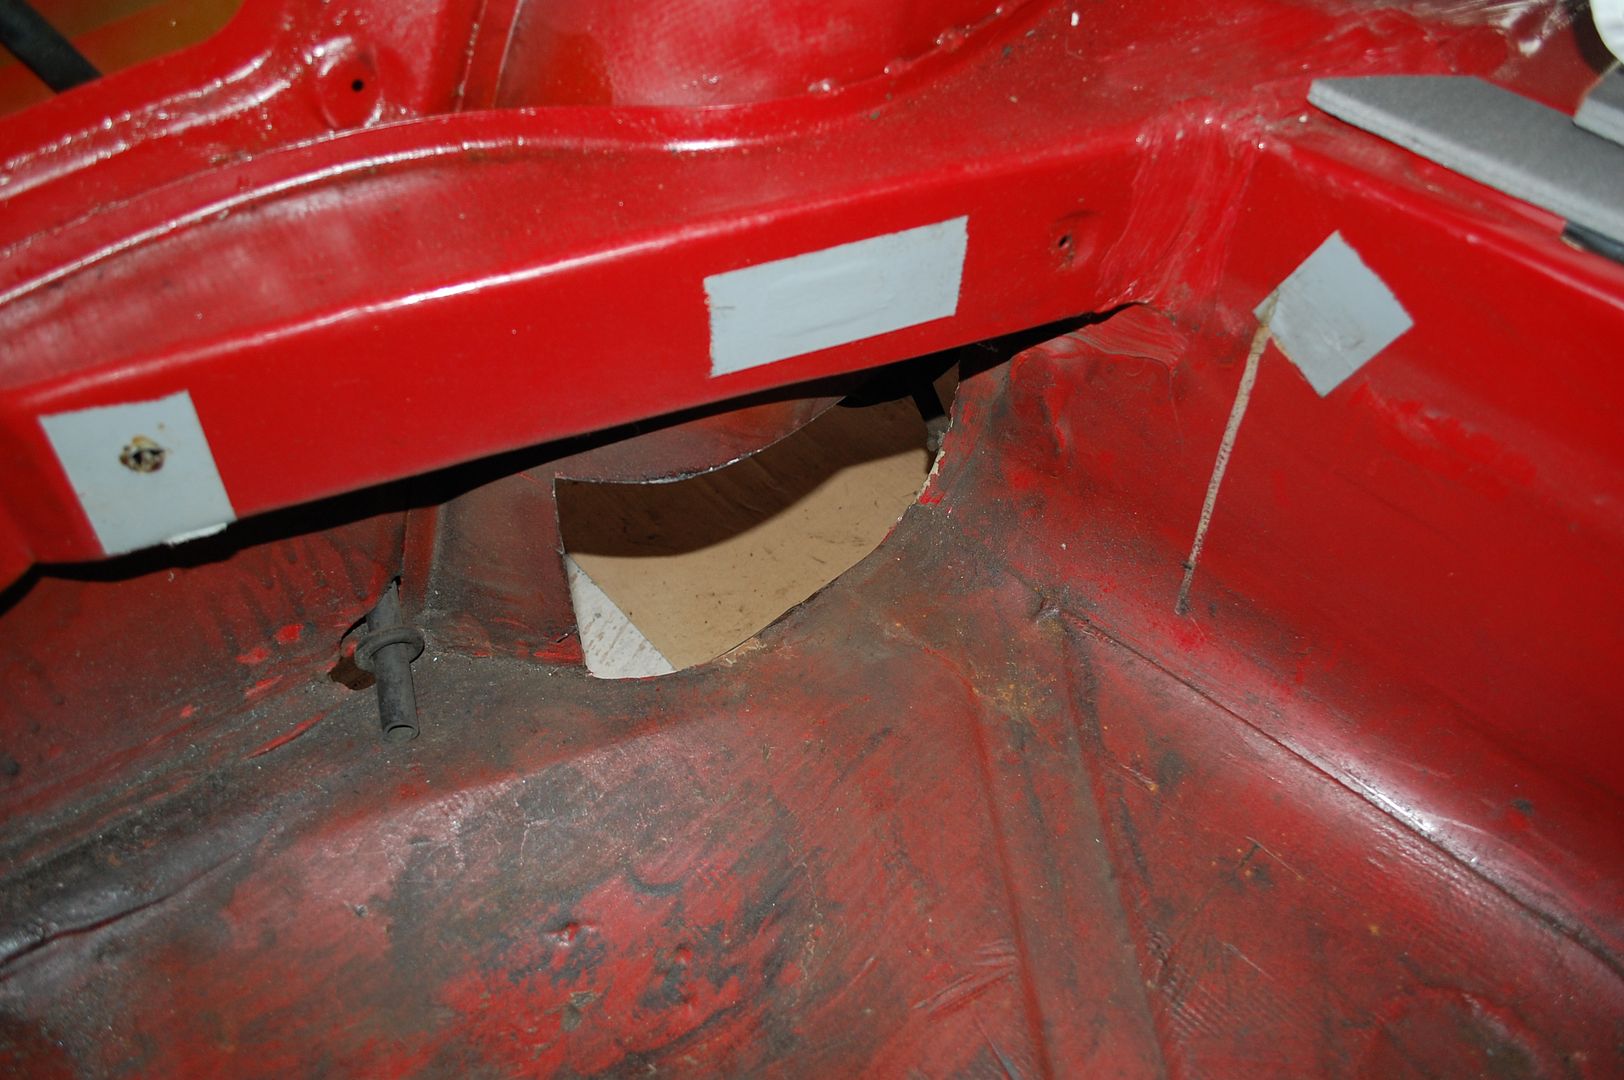
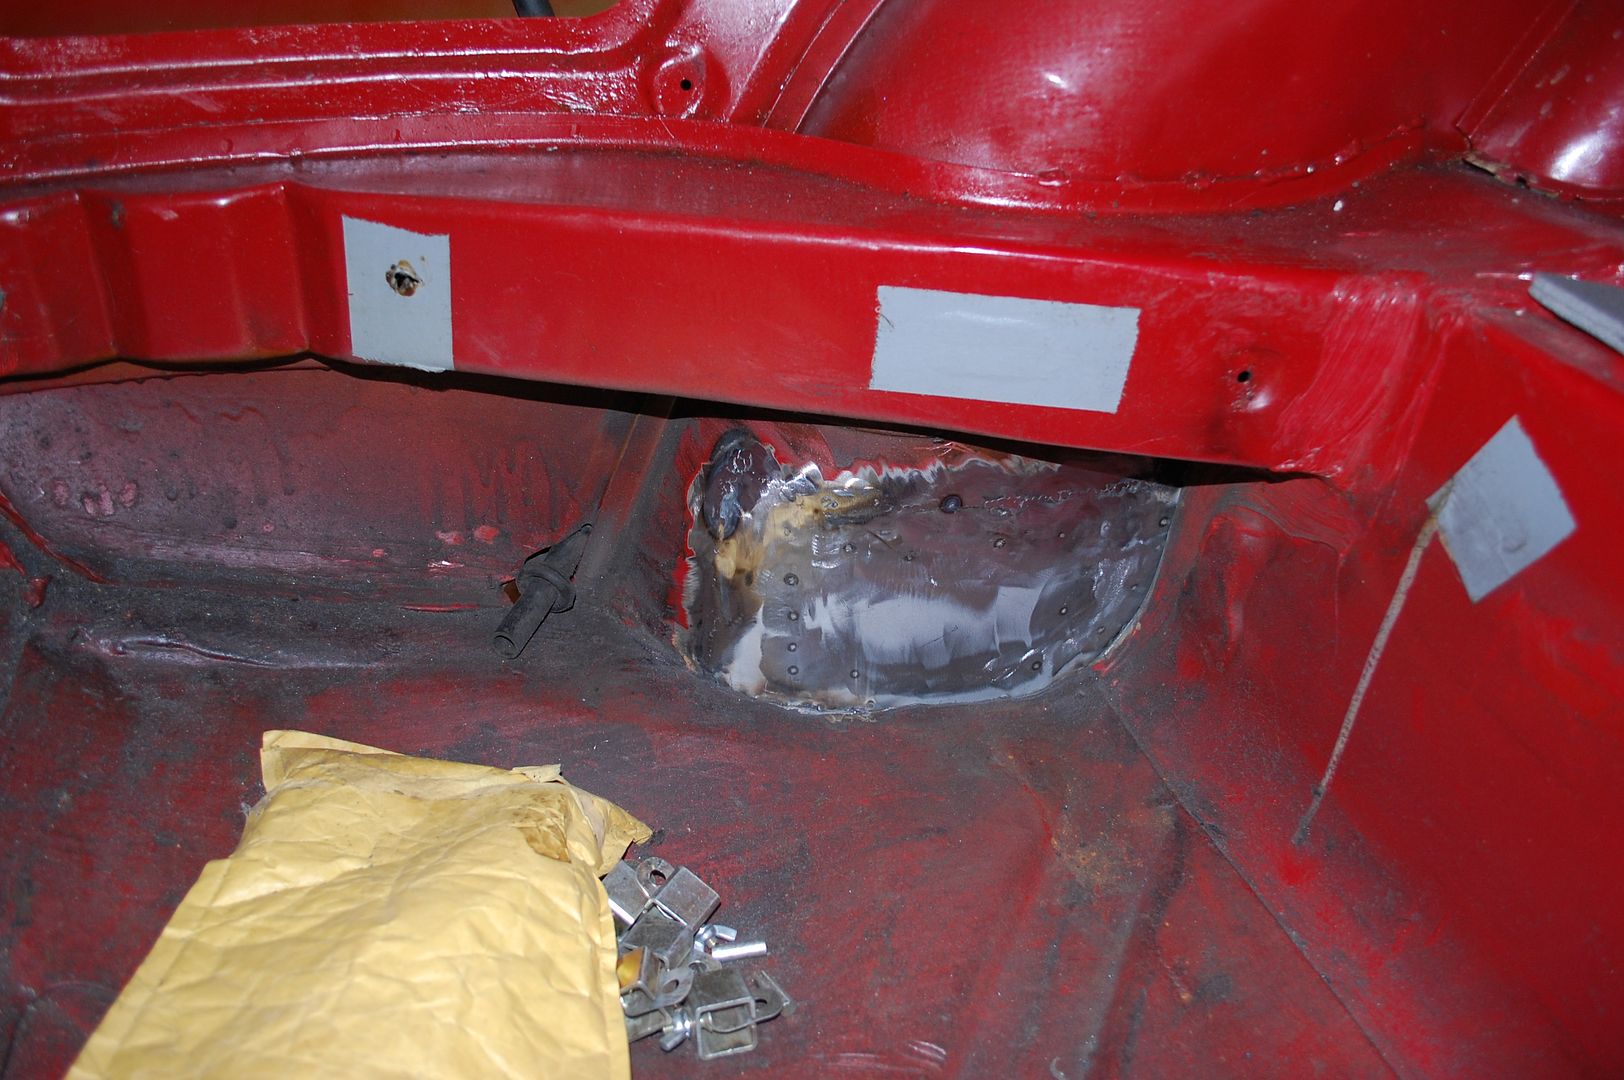
First on the agenda was the rust that I found in the boot. From the outside it's quite obvious as to why it happens.
The area is made up of the inner arch, and a strengthening panel with the towing eye welded onto it. I knew I'd have to save the towing eye, but the strengthening panel was an unknown.
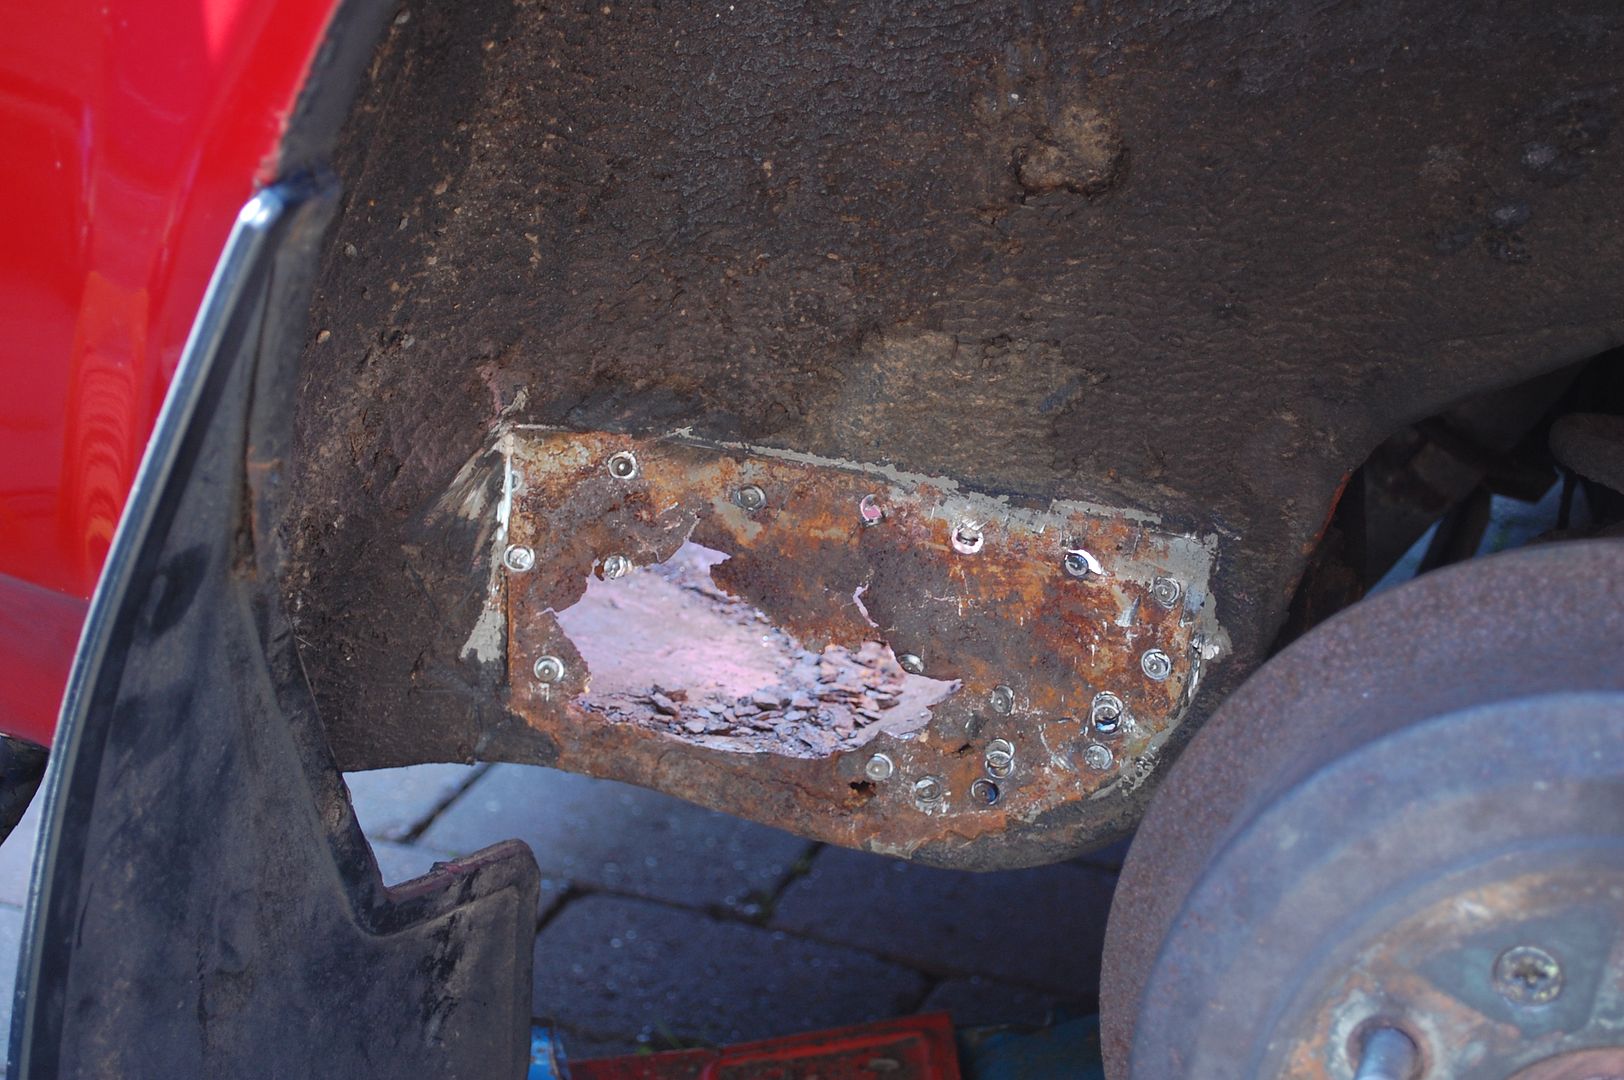
With the strengthening panel removed the damage was quite obvious.
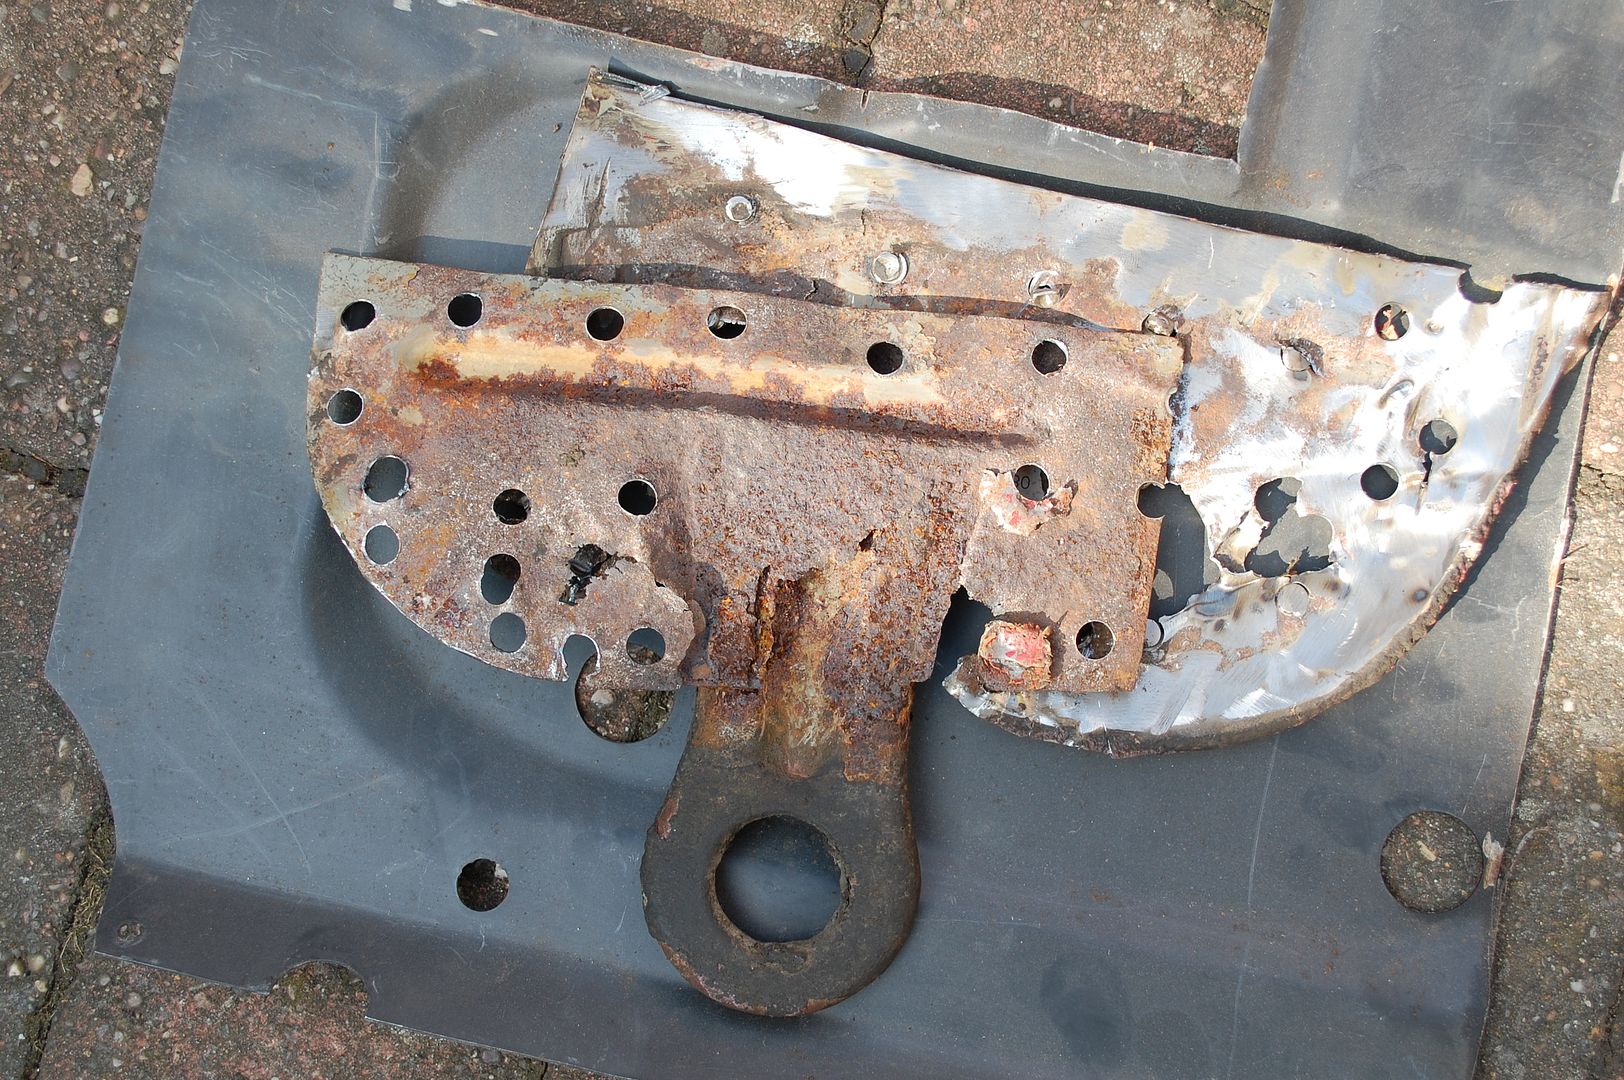
Sadly the stregthening panel was also toast! Lots to remake.
With what I needed to do outlined, out came my trusty plasma cutting disc on an angle grinder, goodbye rust.
With the drivers side investigation completed I decided it wasn't even worth removing the spot welds on the passenger side.
Using the removed panels as templates I started to make the inner arch repairs.
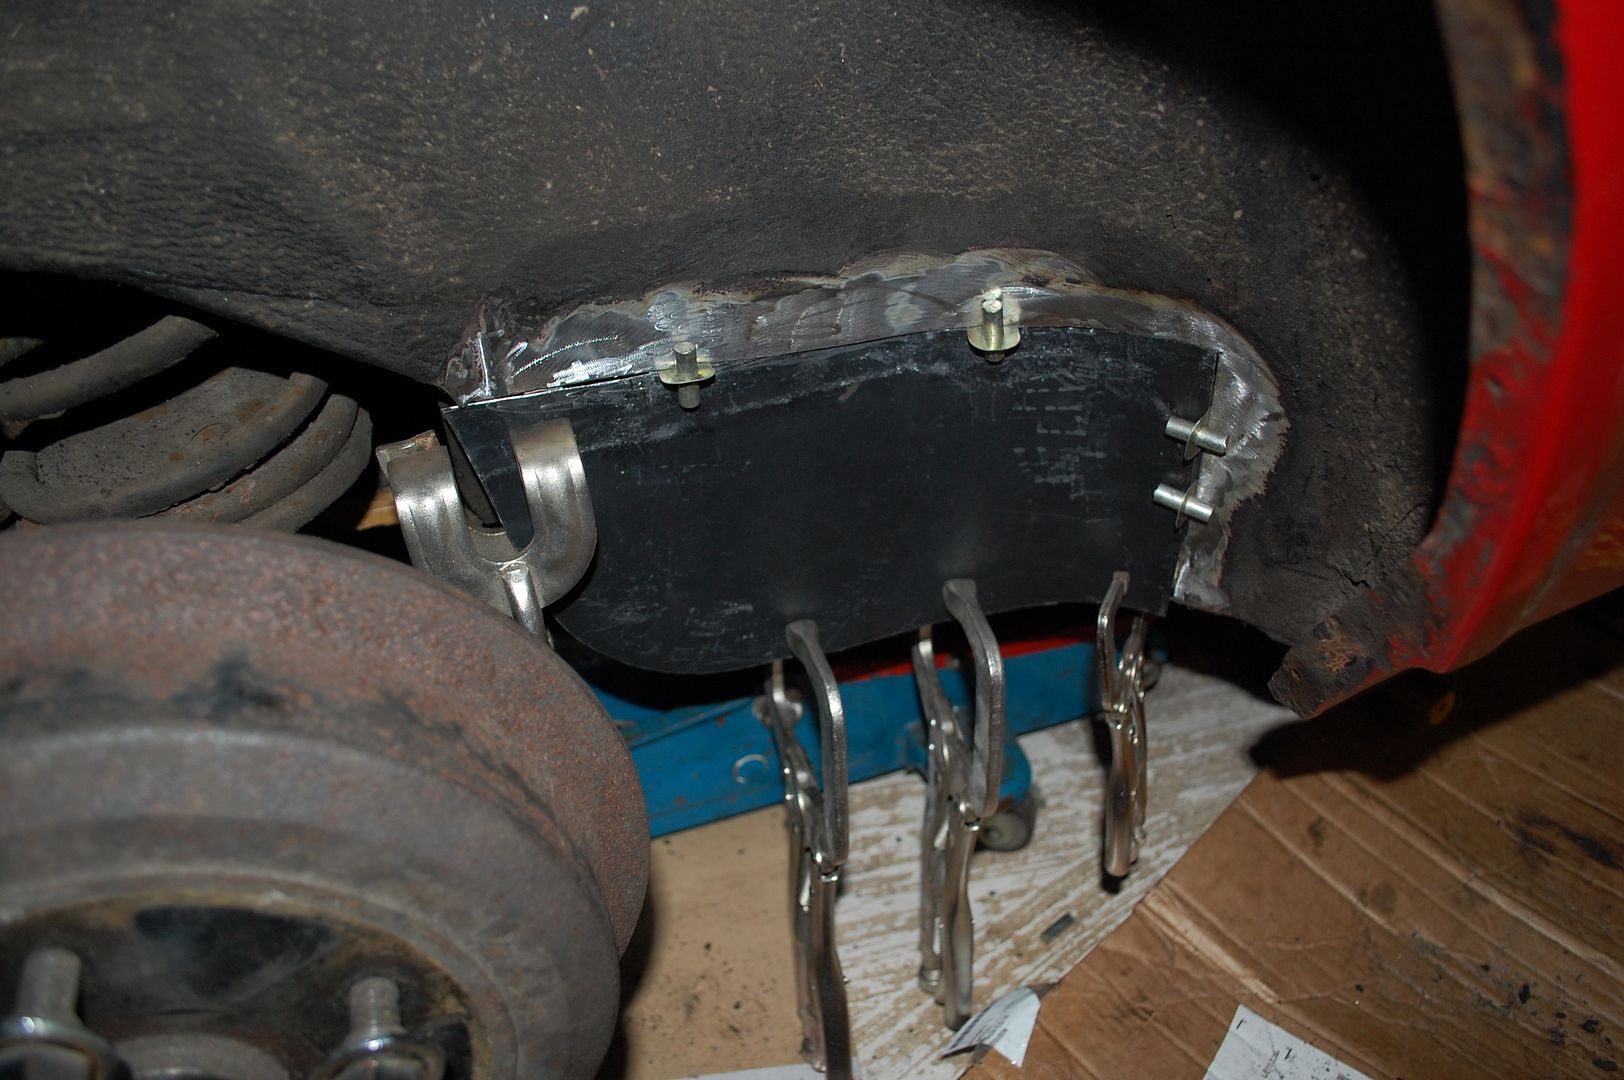
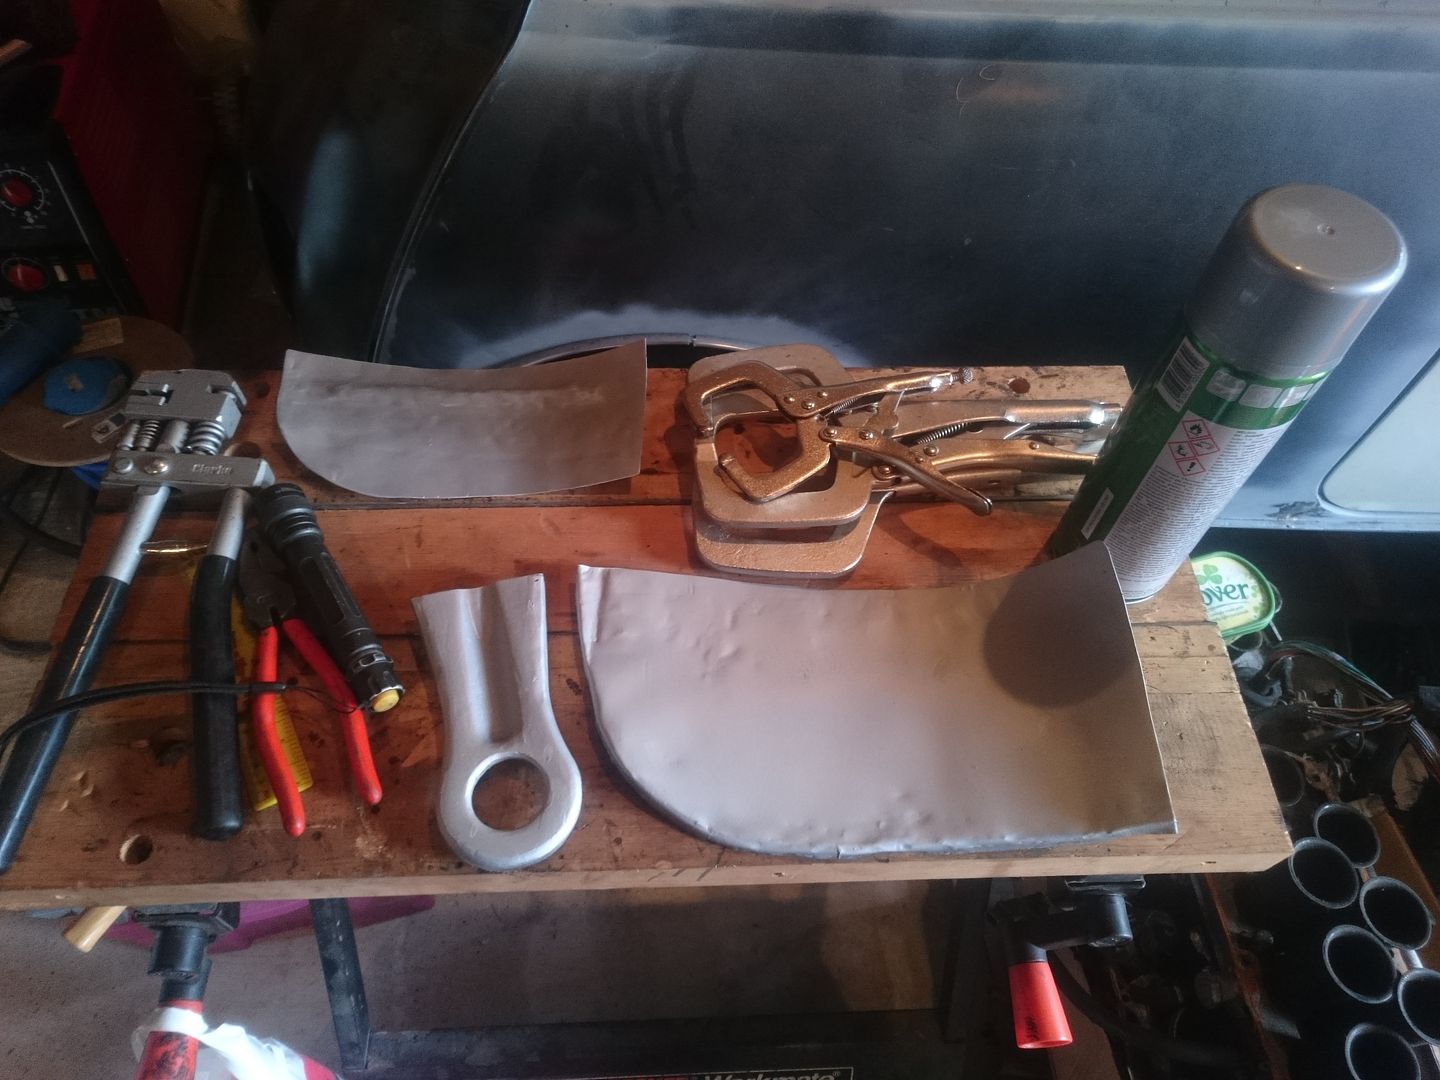
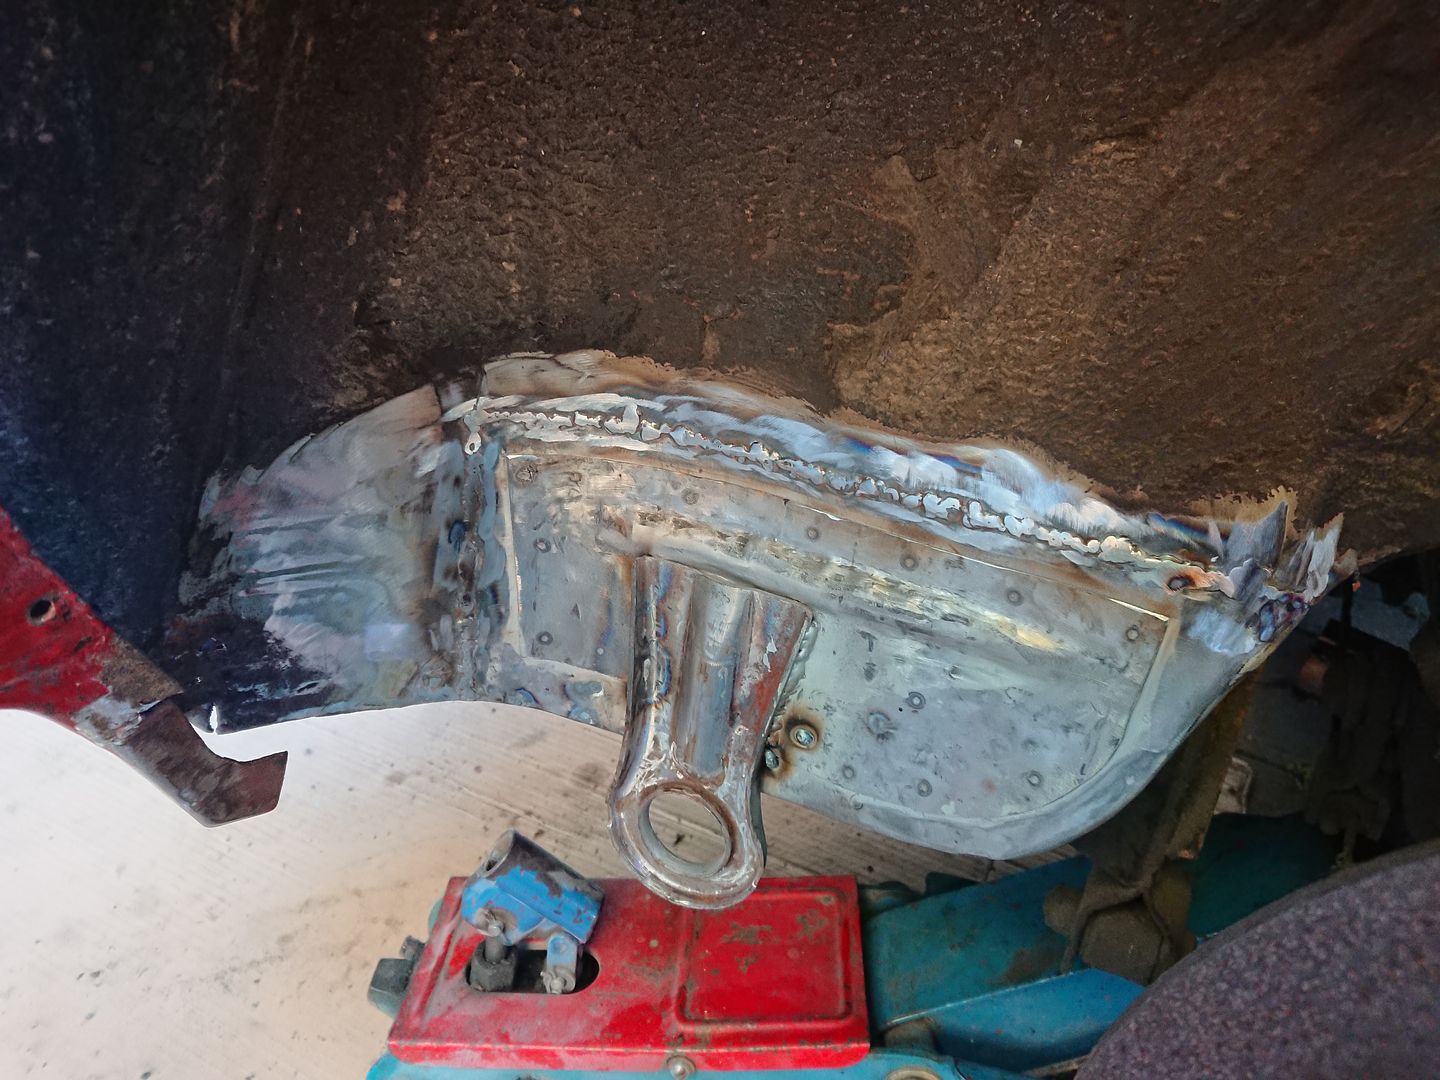
I also remade the strengthening panel, and cleaned the towing eye up. With all 3 panels ready I welded the towing eye onto the strengthening panel, and spot welded the panel onto the arch repair. So it'll be as close to factory as I can manage.
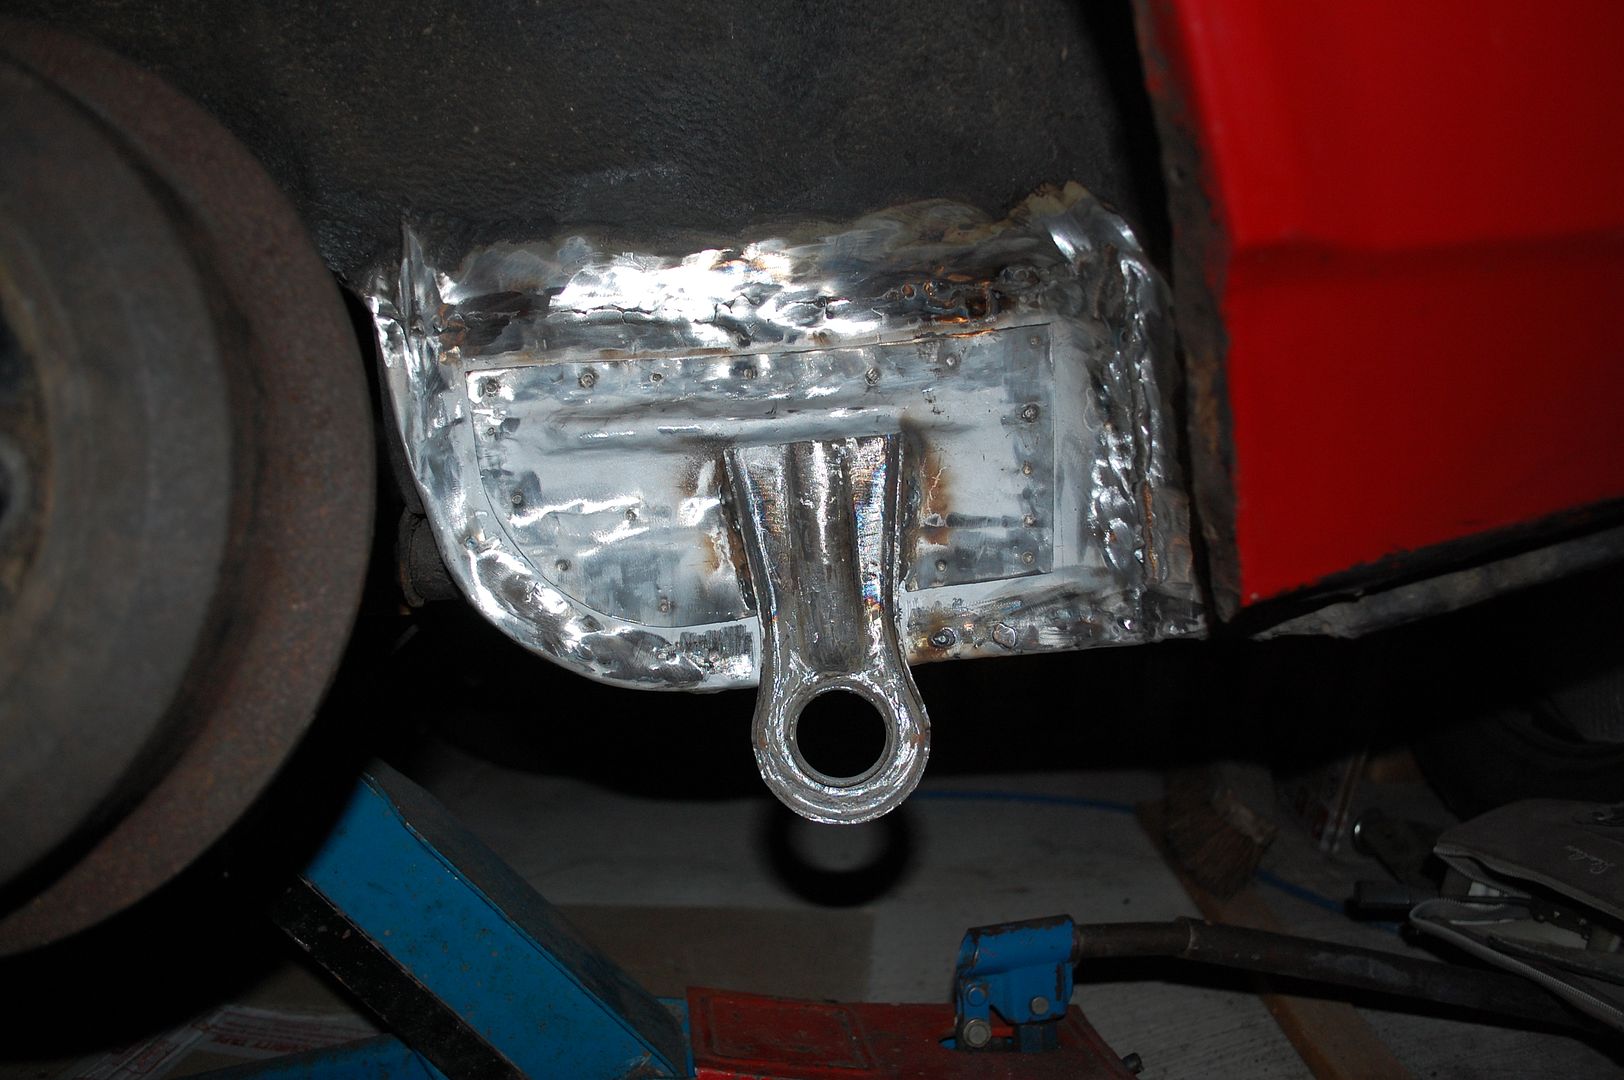
The drivers side followed an identical process, with equally satisfying results!
Sadly the last picture highlights a problem, poking around the sunroof drain on the right of the repair revealed some incredibly thin metal, and more than one hole...
Joe
First on the agenda was the rust that I found in the boot. From the outside it's quite obvious as to why it happens.

The area is made up of the inner arch, and a strengthening panel with the towing eye welded onto it. I knew I'd have to save the towing eye, but the strengthening panel was an unknown.

With the strengthening panel removed the damage was quite obvious.

Sadly the stregthening panel was also toast! Lots to remake.

With what I needed to do outlined, out came my trusty plasma cutting disc on an angle grinder, goodbye rust.
With the drivers side investigation completed I decided it wasn't even worth removing the spot welds on the passenger side.

Using the removed panels as templates I started to make the inner arch repairs.


I also remade the strengthening panel, and cleaned the towing eye up. With all 3 panels ready I welded the towing eye onto the strengthening panel, and spot welded the panel onto the arch repair. So it'll be as close to factory as I can manage.


The drivers side followed an identical process, with equally satisfying results!


Sadly the last picture highlights a problem, poking around the sunroof drain on the right of the repair revealed some incredibly thin metal, and more than one hole...
Joe
KelvinatorNZ said:
Regarding the OP, good work on the rust repair. That was a nasty little spot. Most people that repair that tend to remove the lashing loop instead of replacing it.
Thanks Kevin, hopefully you'll approve of all the little repairs. Well people want to see the project so lets get back into the body repairs.
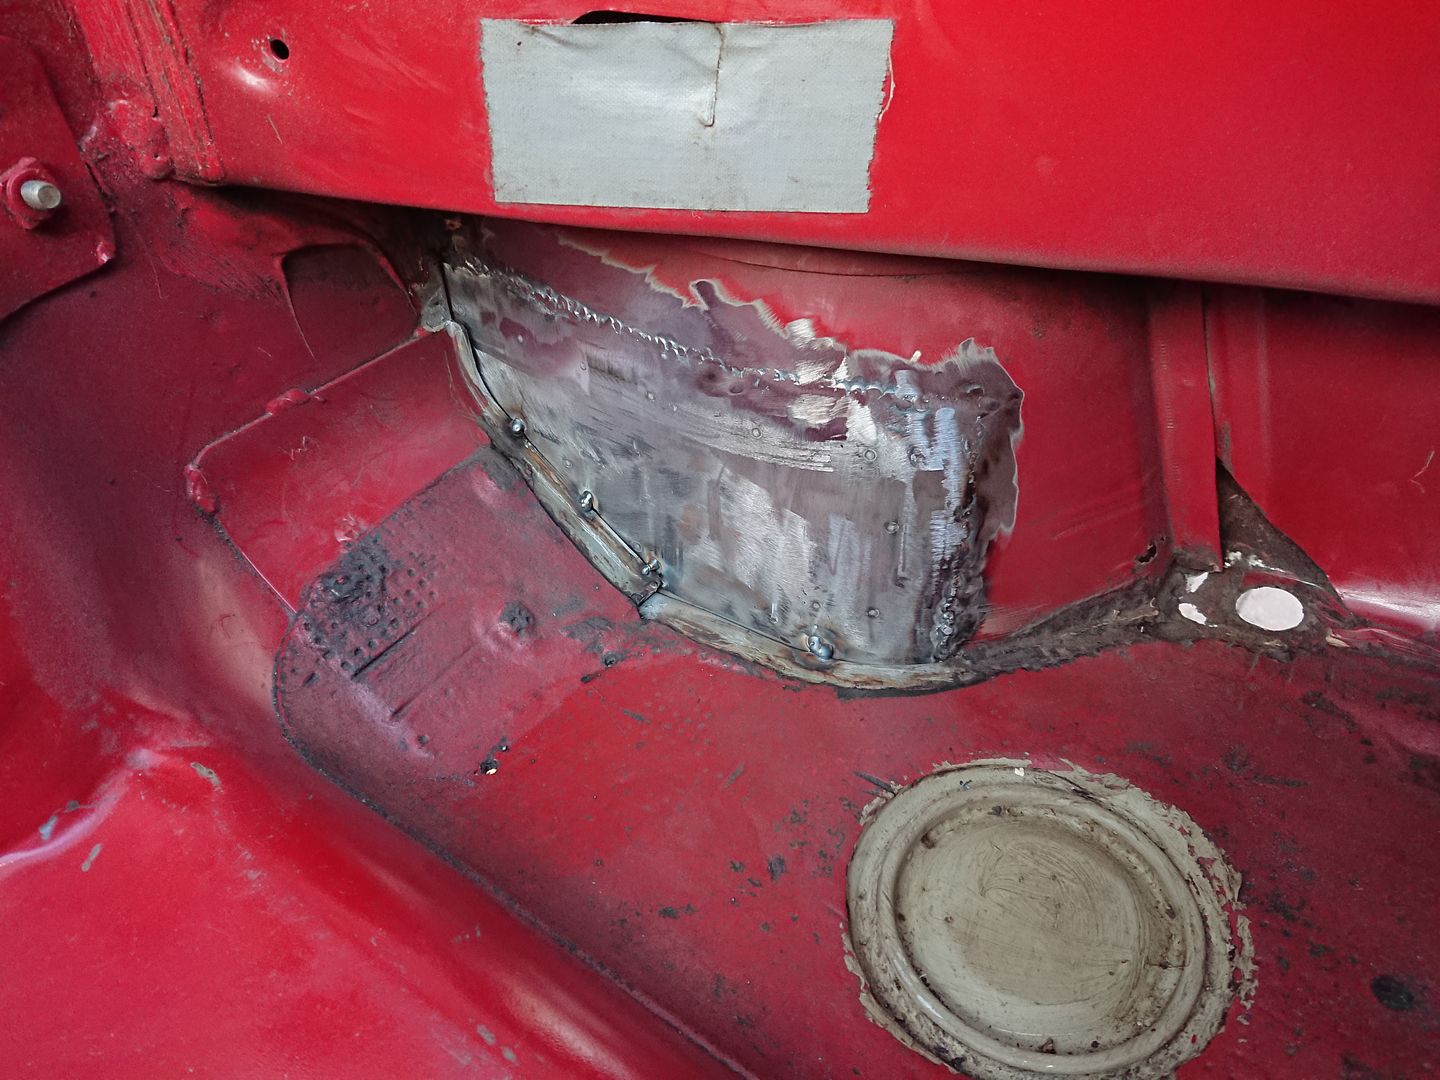
With the towing eye areas sorted I moved onto the sunroof drain area.
I wasn't the first person here!

It's quite clear that someone has been here before. The previous repair actually isn't that bad, and with the skim of filler pretty invisible. I debated leaving it and working around, but in the end I knew I could do much better.

A picture I managed to find of the car from 2009 shows slight scabbing in the area behind the mudflap, and was probably repaired around that time.

This picture really shows why cutting it off was a brilliant idea. Behind the repair is the inner wing closing panel, rusted and cut diagonally where the outer wing repair was done. This prevents the boot from sealing to the wheel arch area, and ultimately caused the area to rot again. This caused damage in the corner to the boot floor panel, outer wing panel, and both inner wing panels. The devil is in the detail so all repairs must be made!


A quick picture that shows days of work! Each repair carefully shaped to replicate what was damaged. Shown next to their rusted counterparts.

All carefully mounted up making sure the fit is good ready for welding.


The first panel to get welded in is the crucial and completely unseen inner wing closing panel. This will seal the boot area from the wheel arch and prevent it rotting again. This was coated in zinc paint to make sure it doesn't rot again. This also shows the boot floor repair welded in.


There we have a finished sunroof drain repair, not a single bit of nastiness remains, and all solid metal.
Joe
Edited by 1275 GT on Tuesday 12th June 10:13
Edited by 1275 GT on Friday 20th July 12:55
Thank you all for the kind words, it's always nice to have your work admired!
I think a lot these cars where lost to kit cars, I can completely understand why, but still a great shame so many where lost.
I think they've aged brilliantly, but then again its such a novelty seeing them, I've only ever seen 2 SD1s on the road in recent memory!
Well we've got a lot more metal work to go over, I hope you lot aren't bored yet!
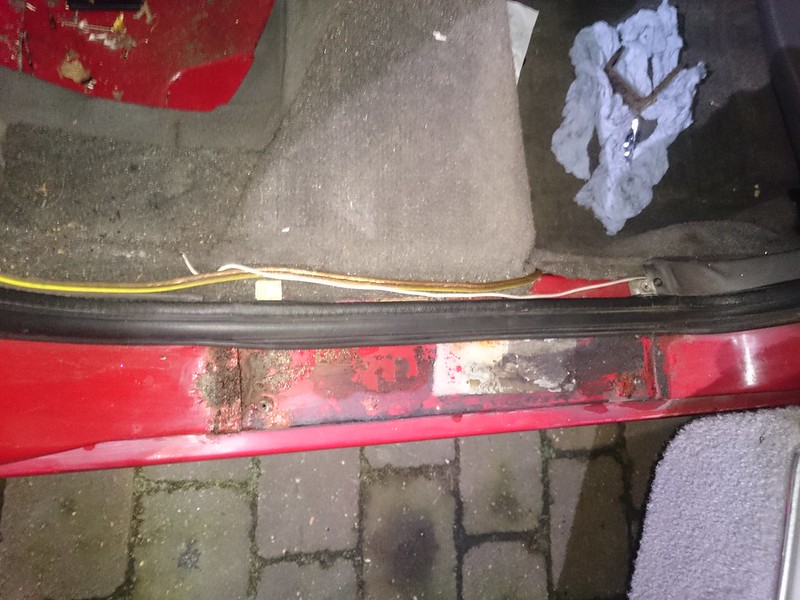
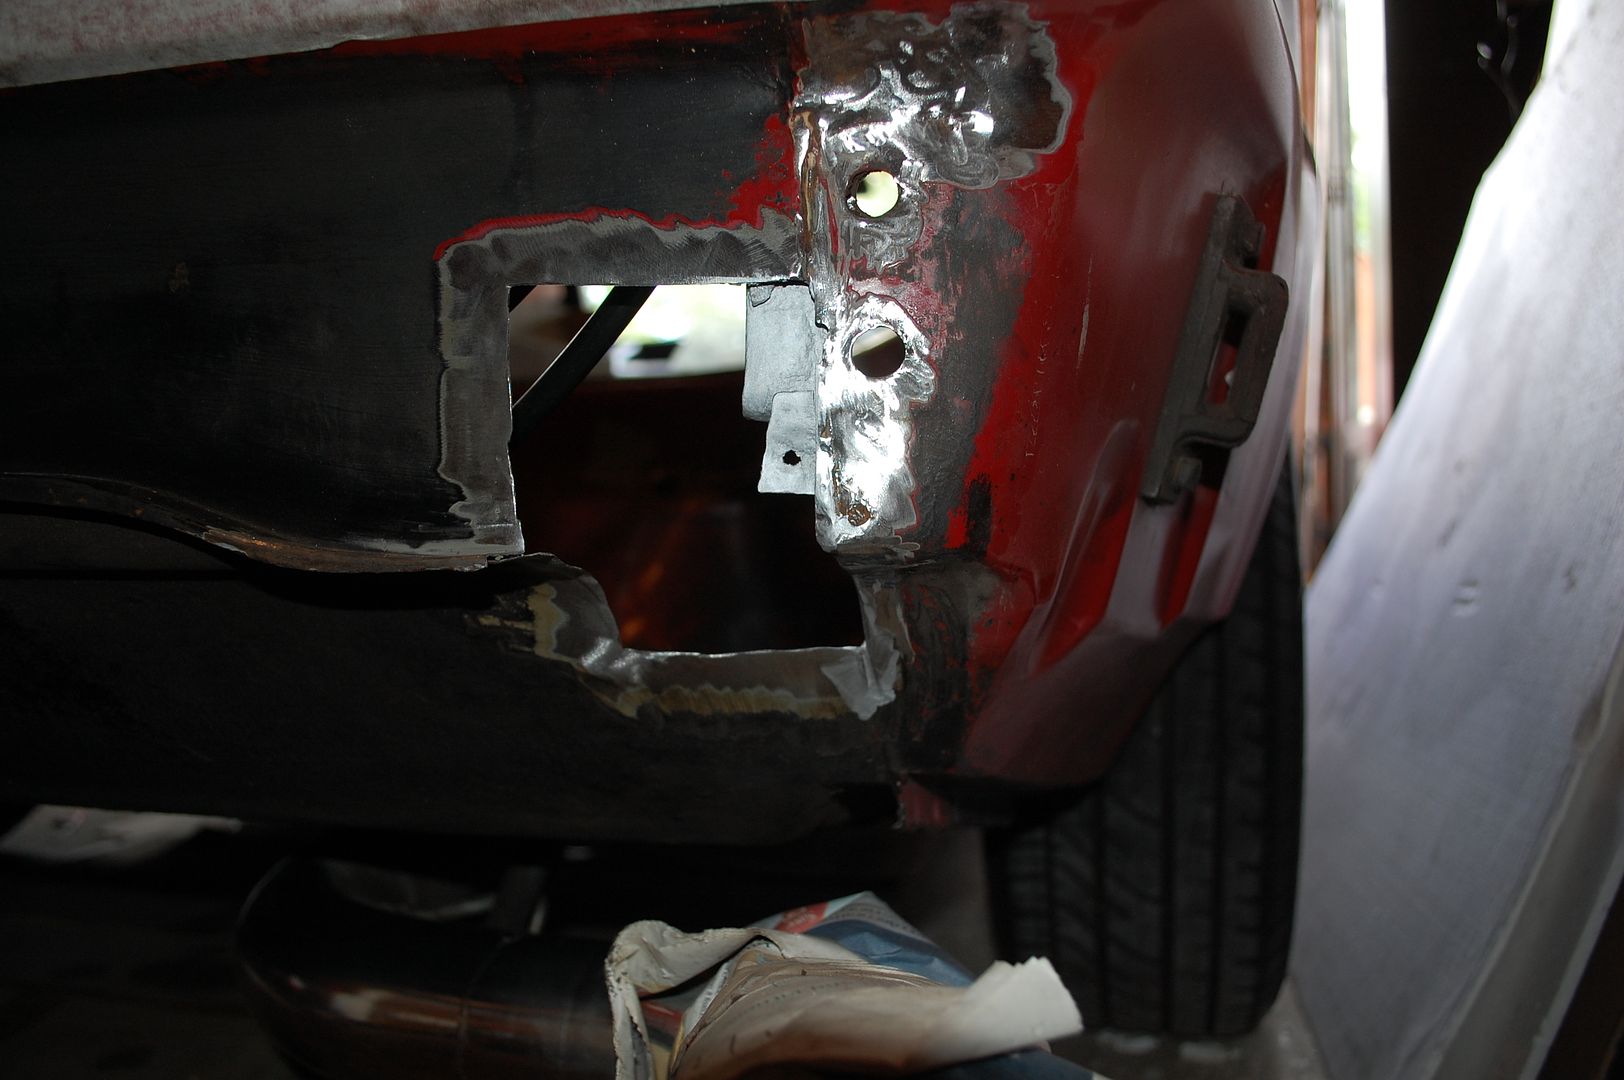
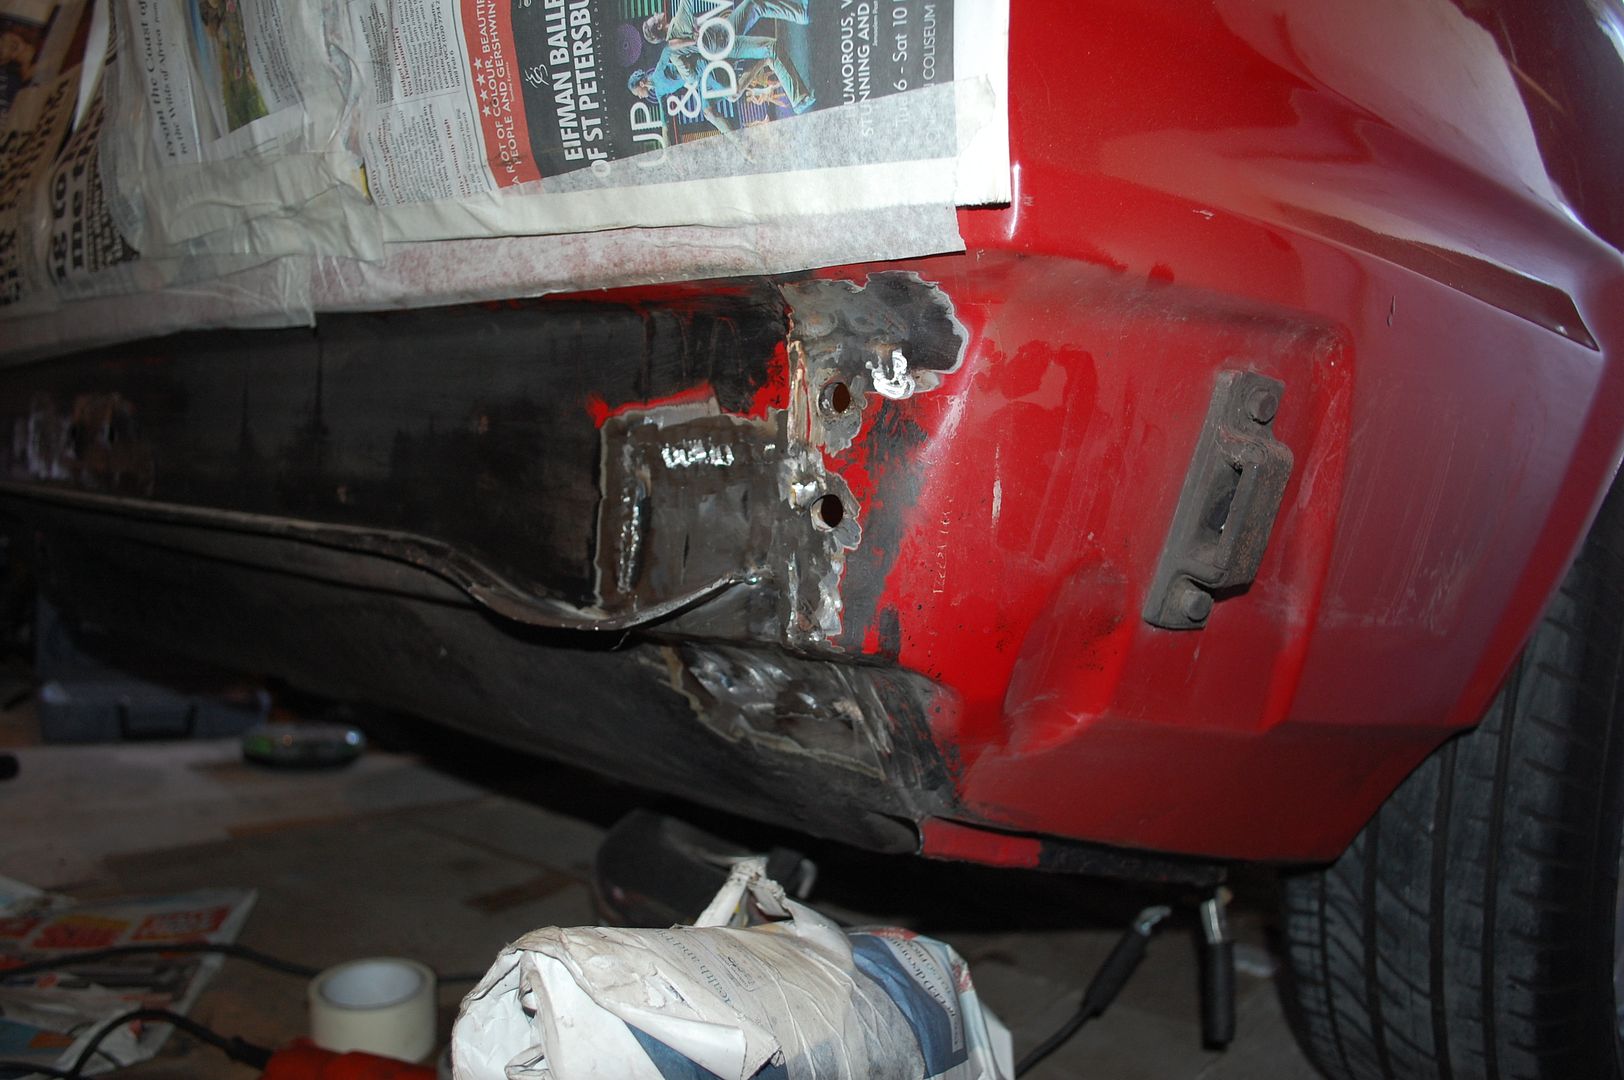
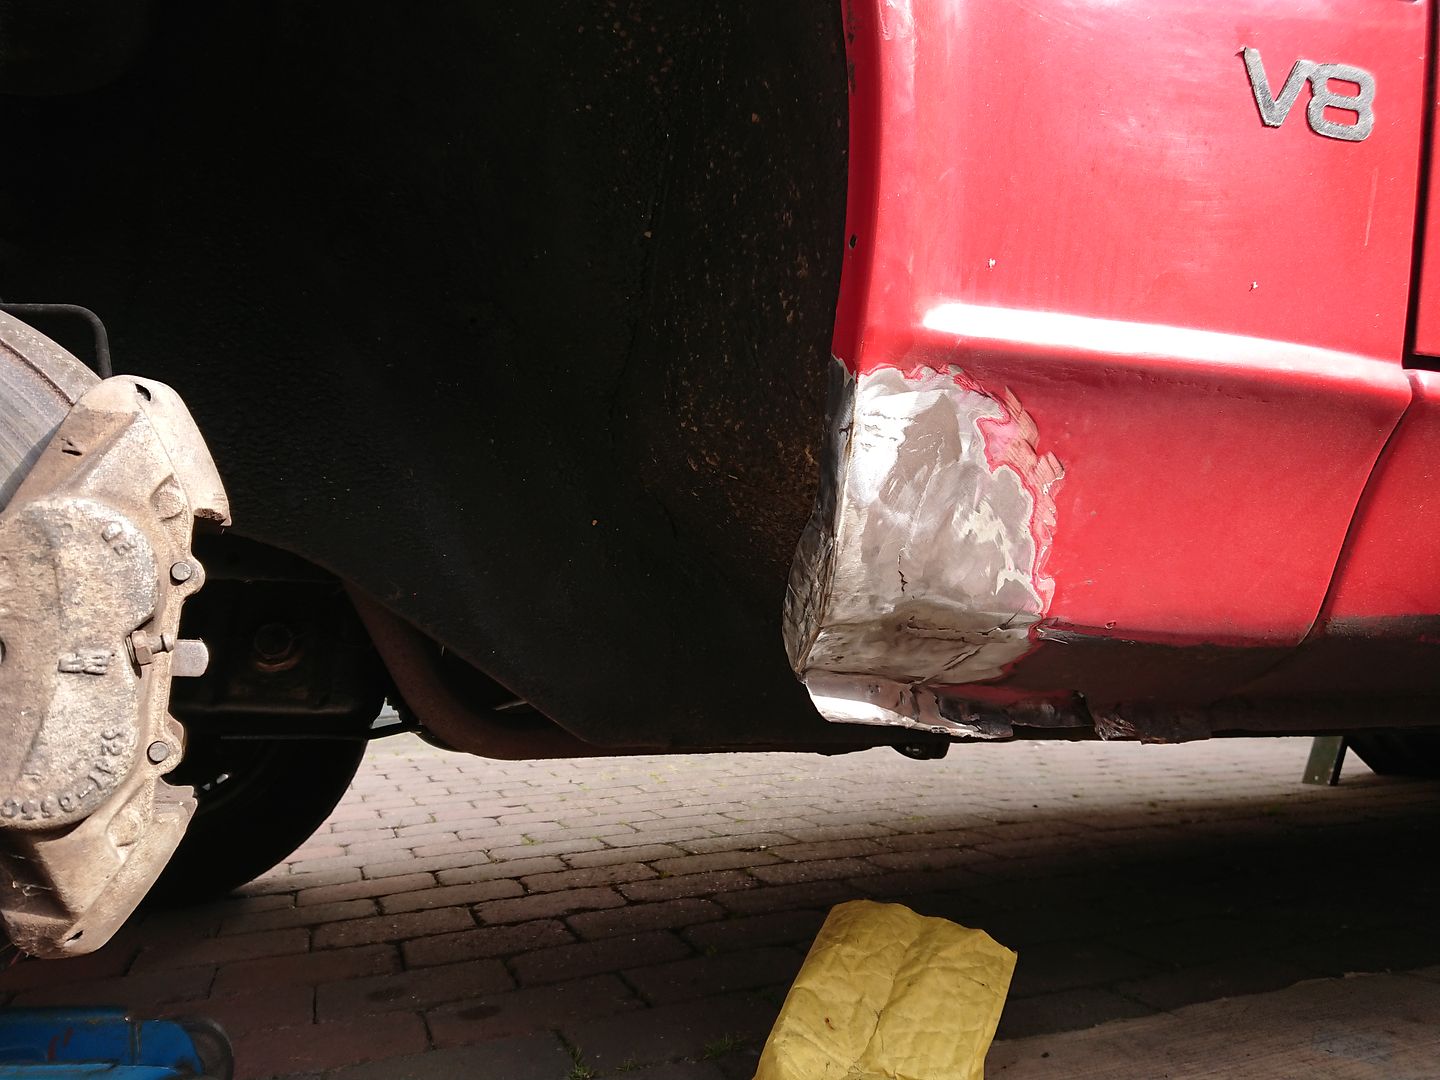
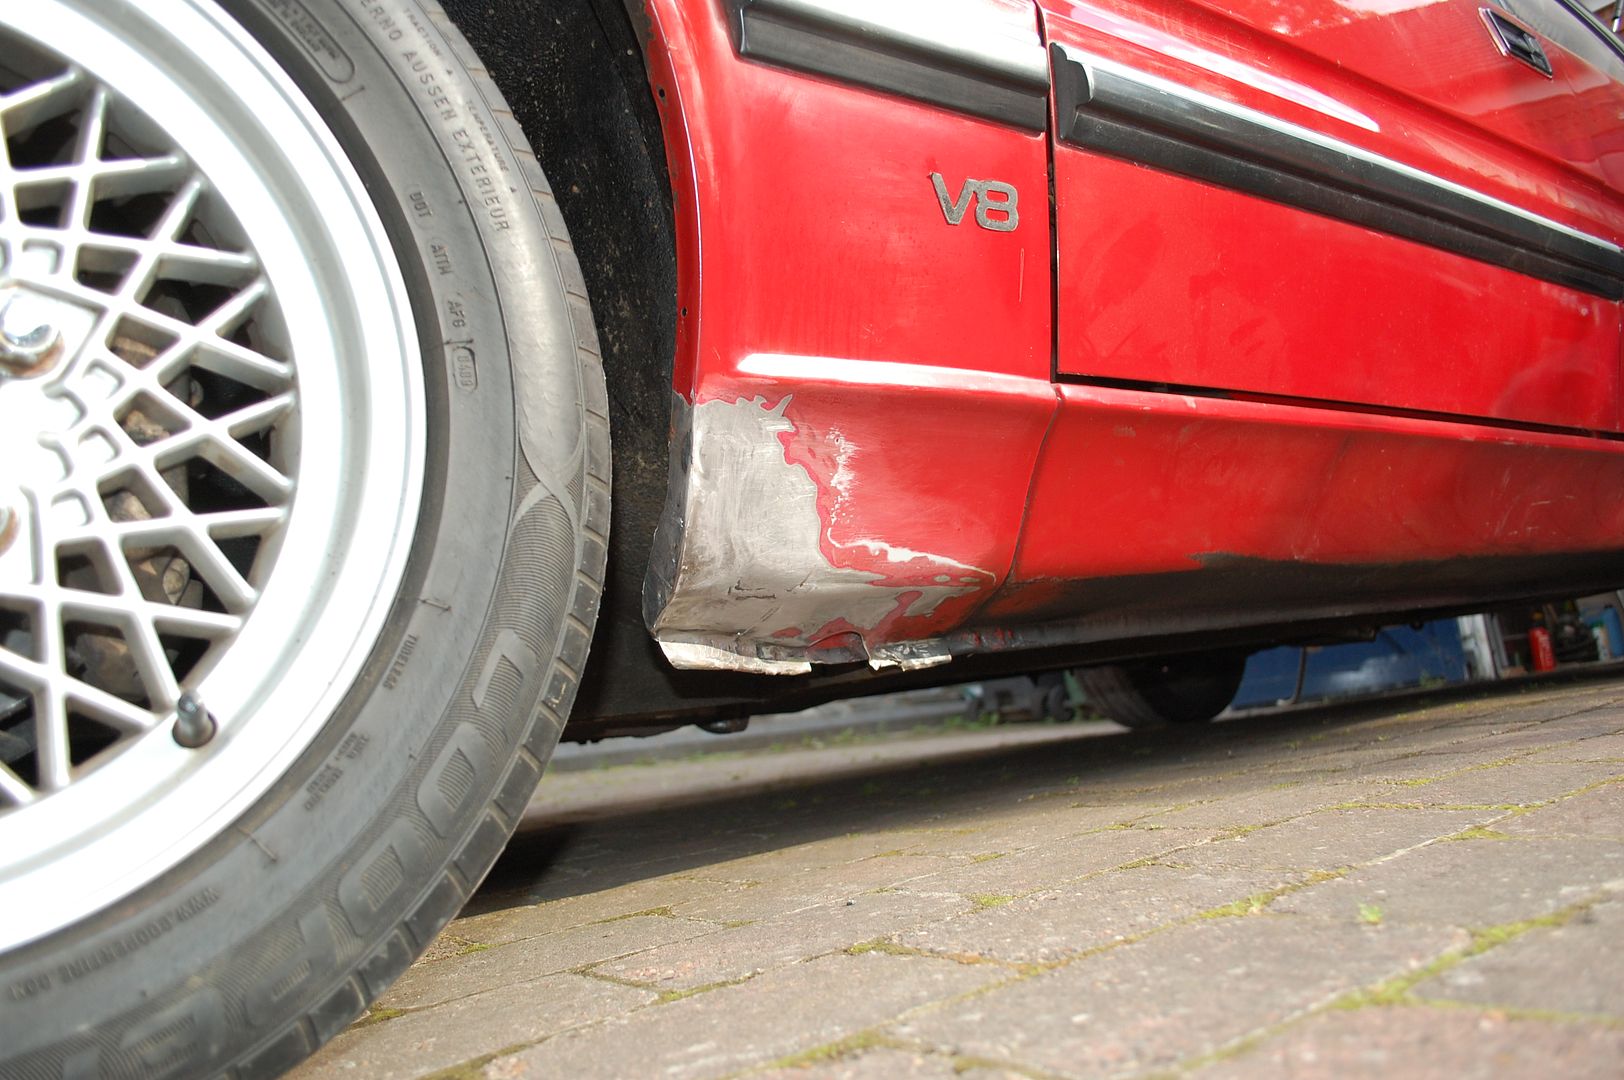
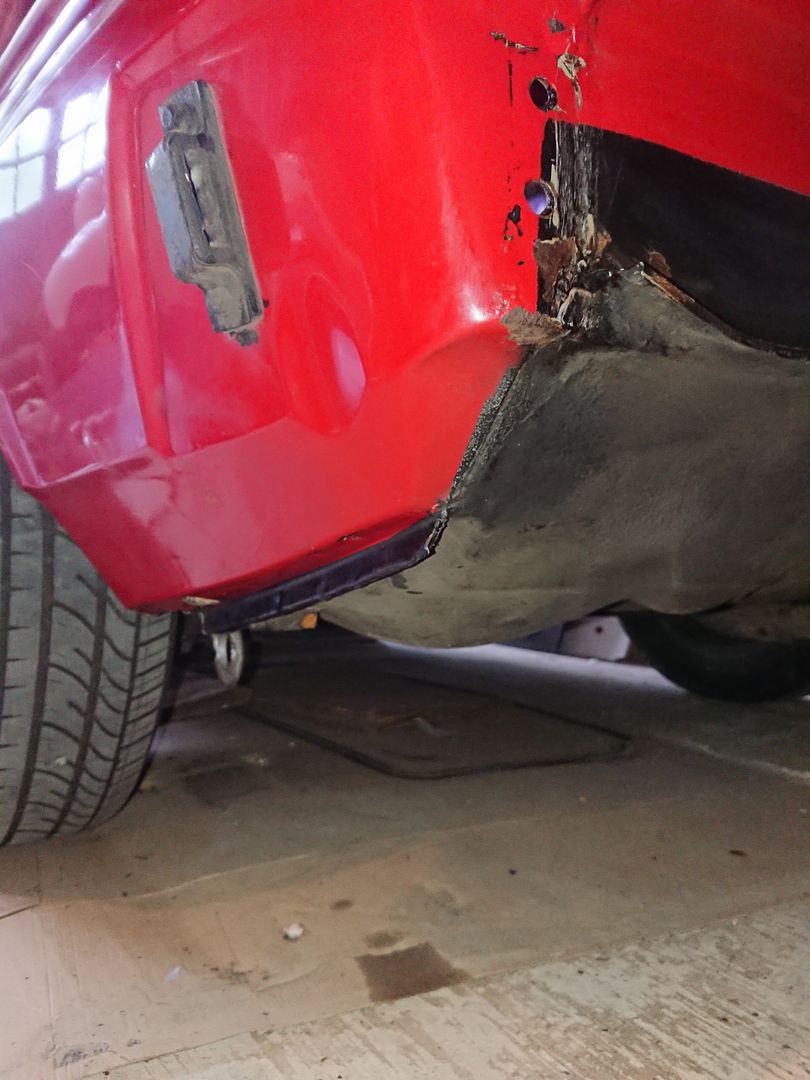
As I had to remove the bumper to get the Vitesse on the trailer the usually unseen rear end was exposed and made it more obvious that it needed some attention.
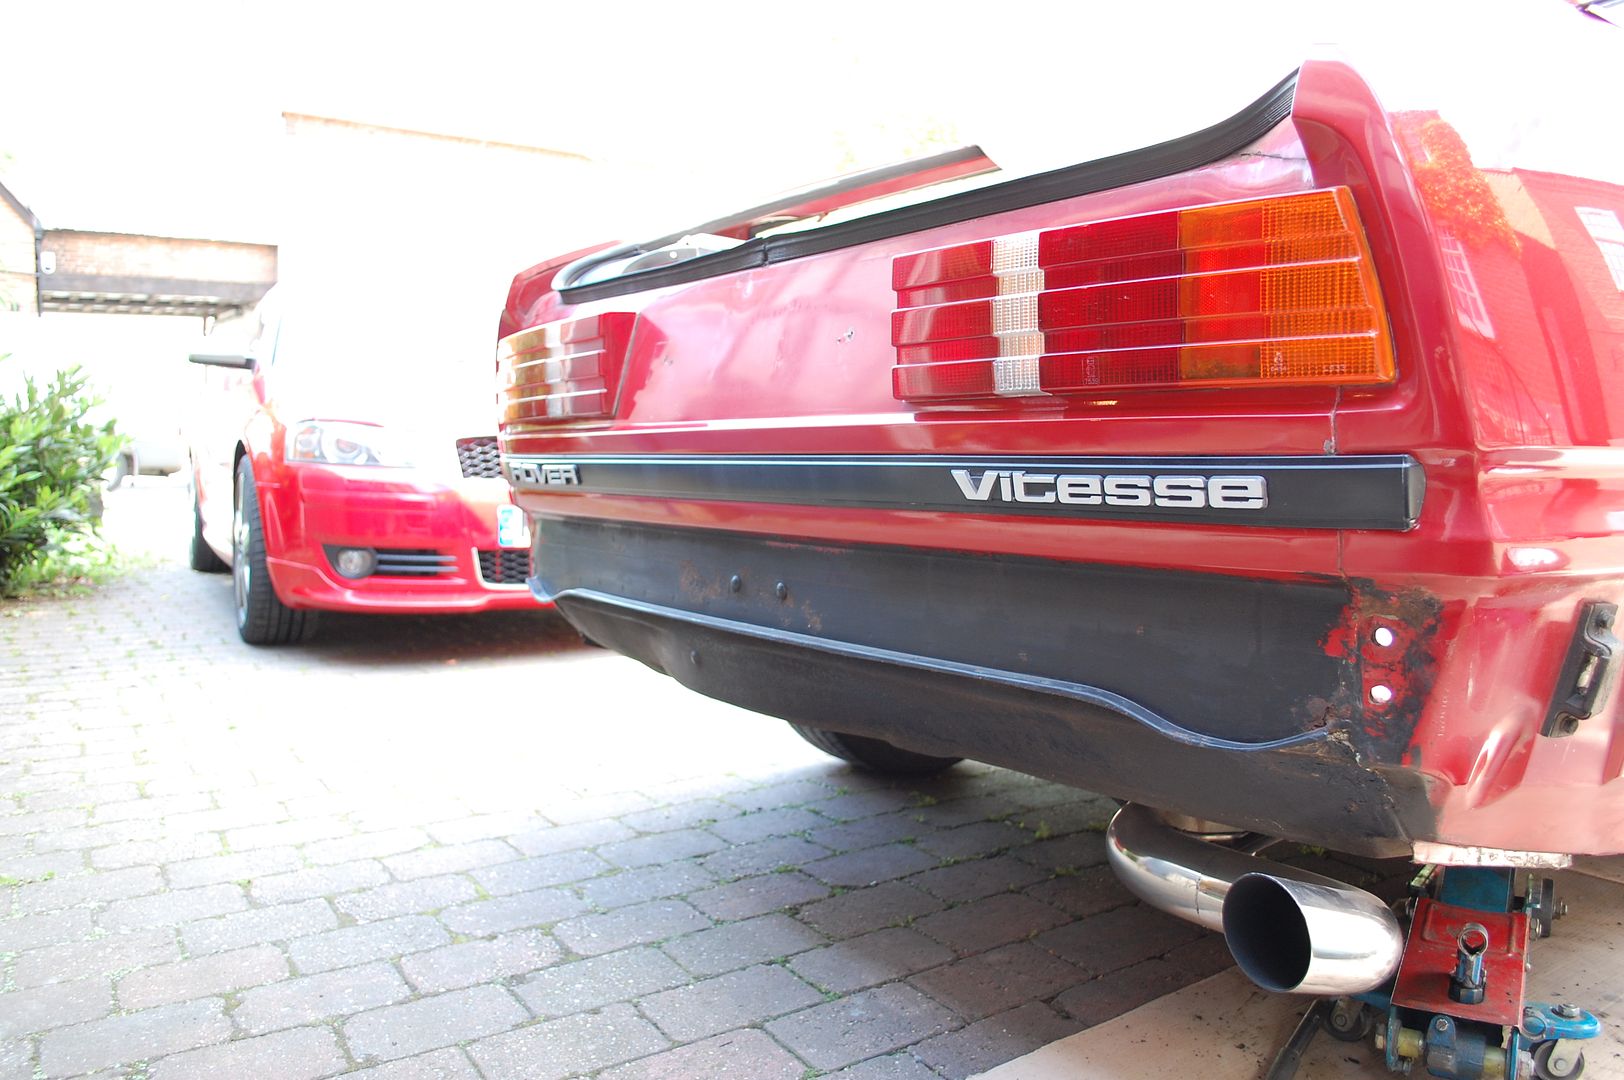
The area by the offside bumper mounting wasn't looking great either. I couldn't leave it so out came the poking screwdriver.
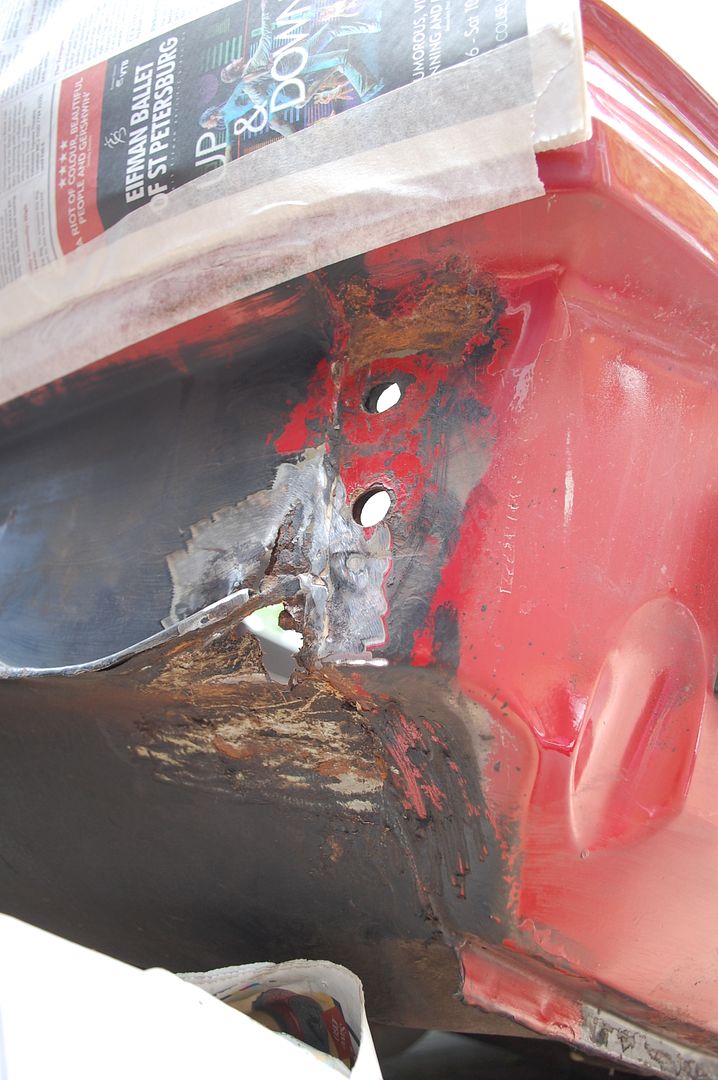
Straight through... bugger.
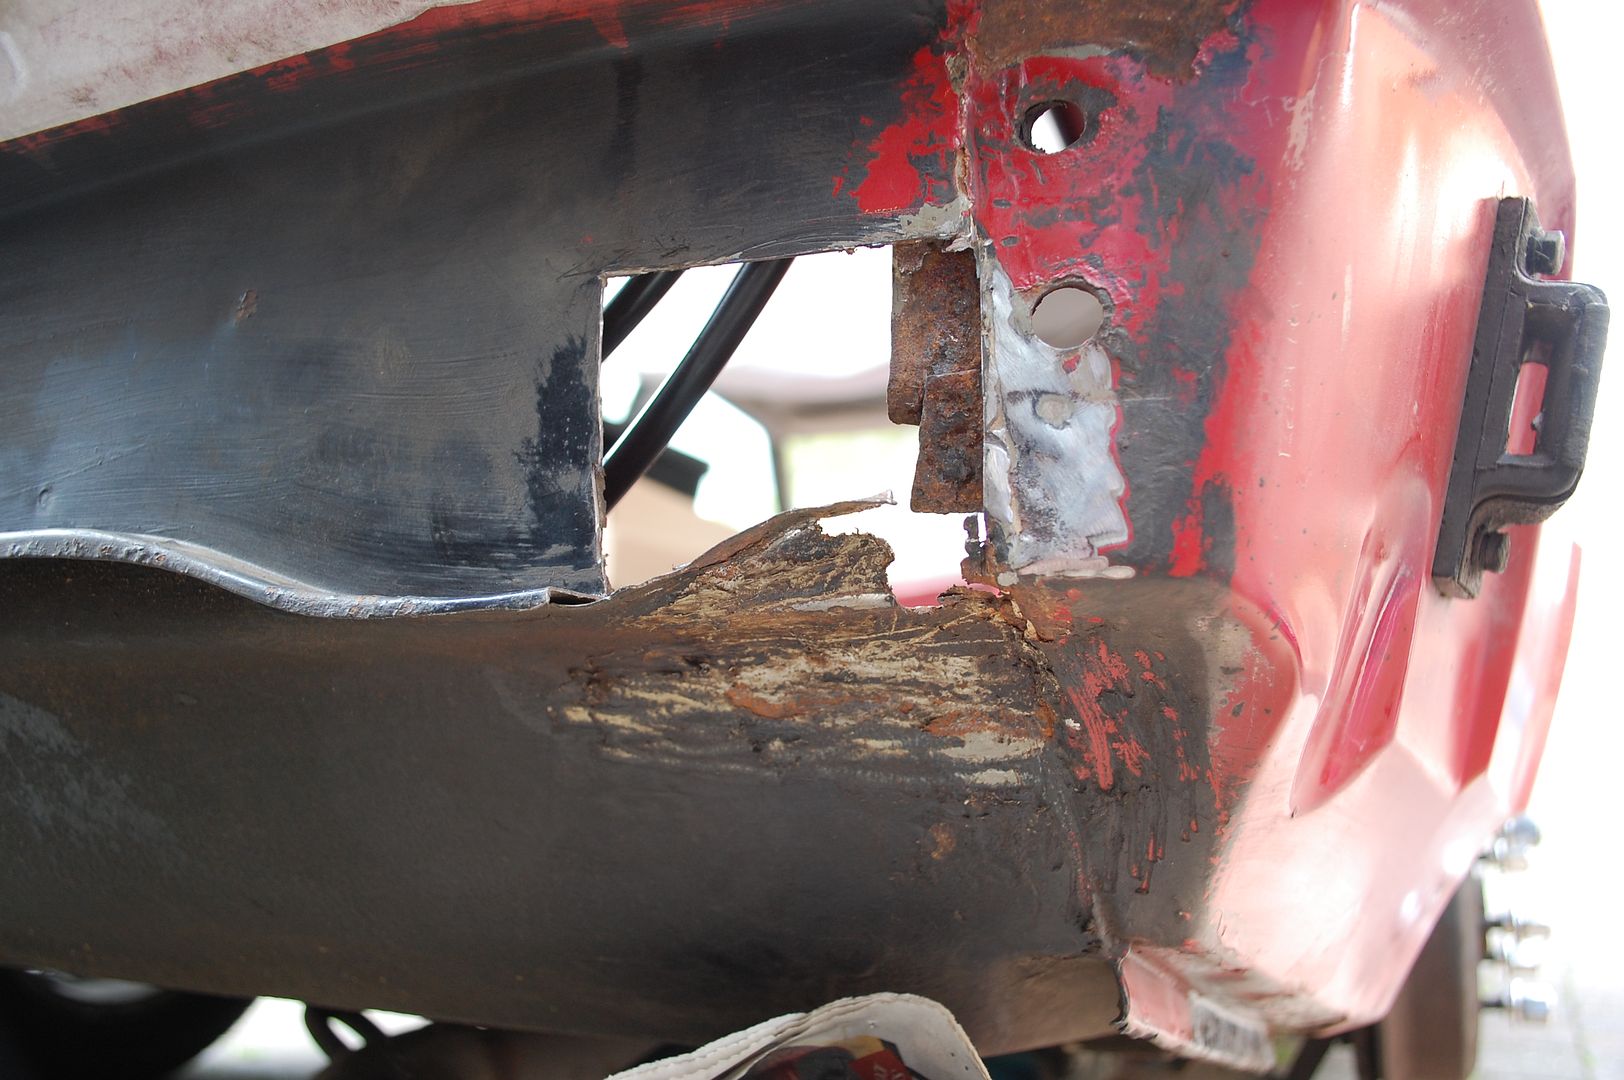
The area that has the damage is made up of the boot floor return, and the rear panel. These are then spot welded together along the curved seam.
With the rear panel section removed beyond the boot floor section I could make sure I stepped the welding so the seam was as strong as it could be.
I actually had bought a rear panel in preparation for a different project, and proved invaluable in creating the repair.
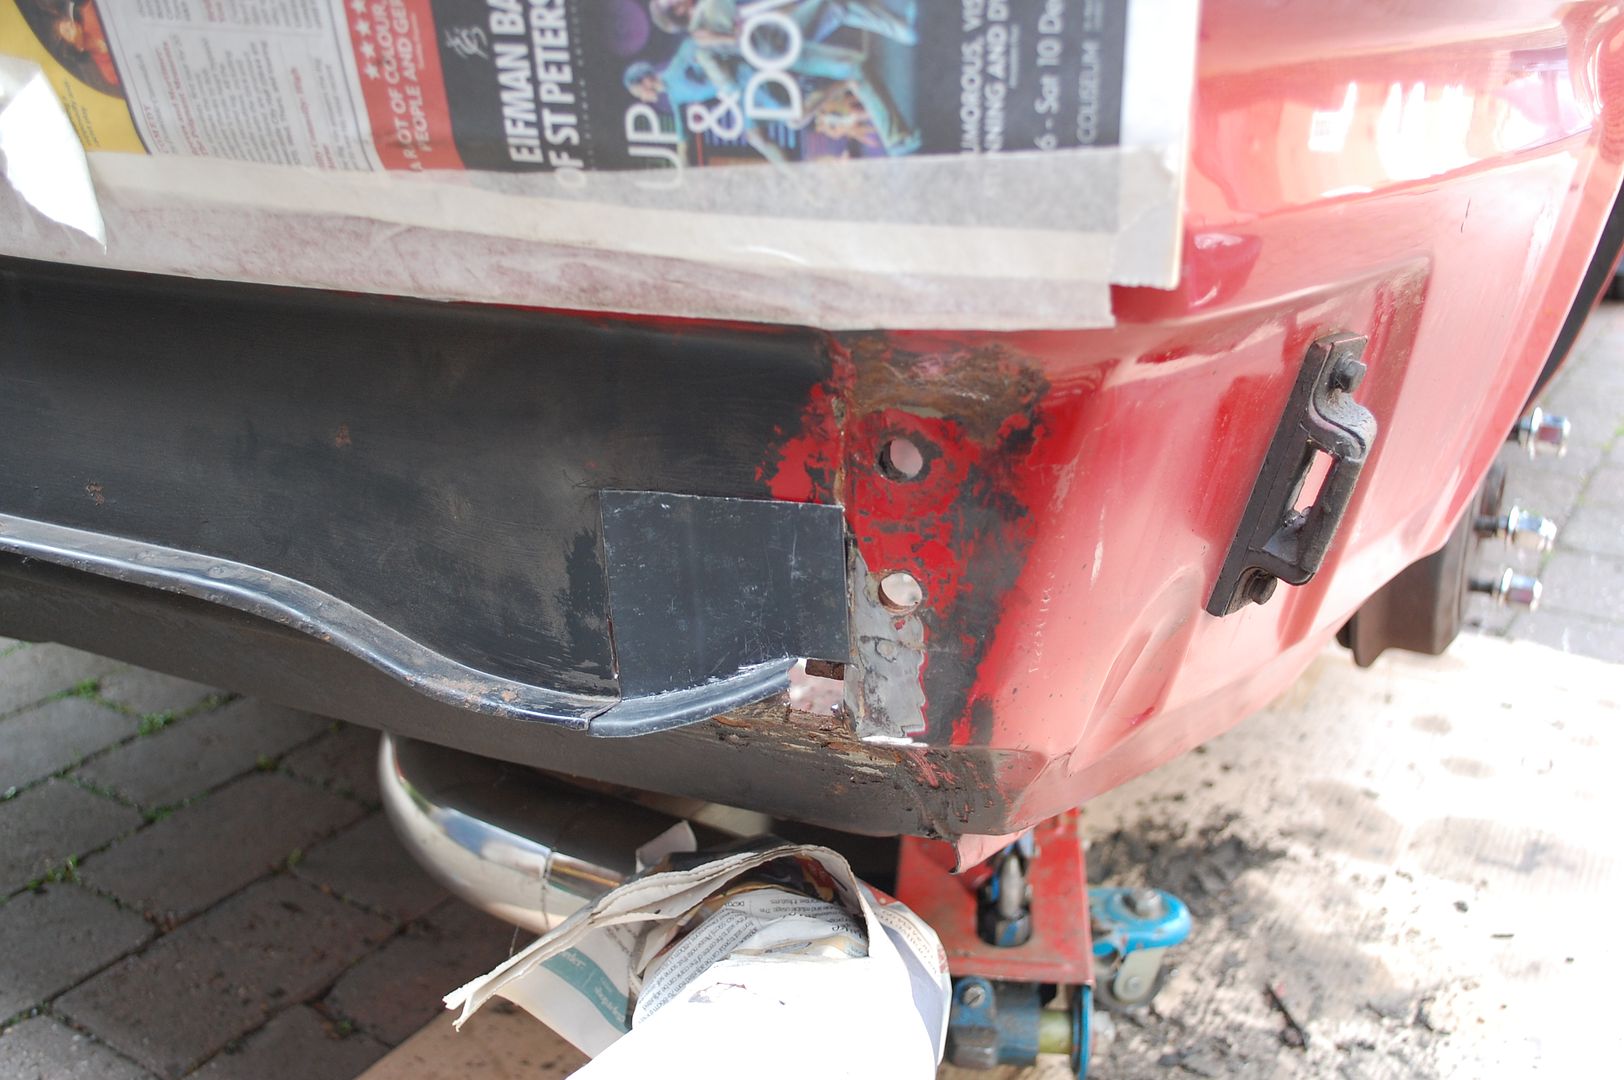
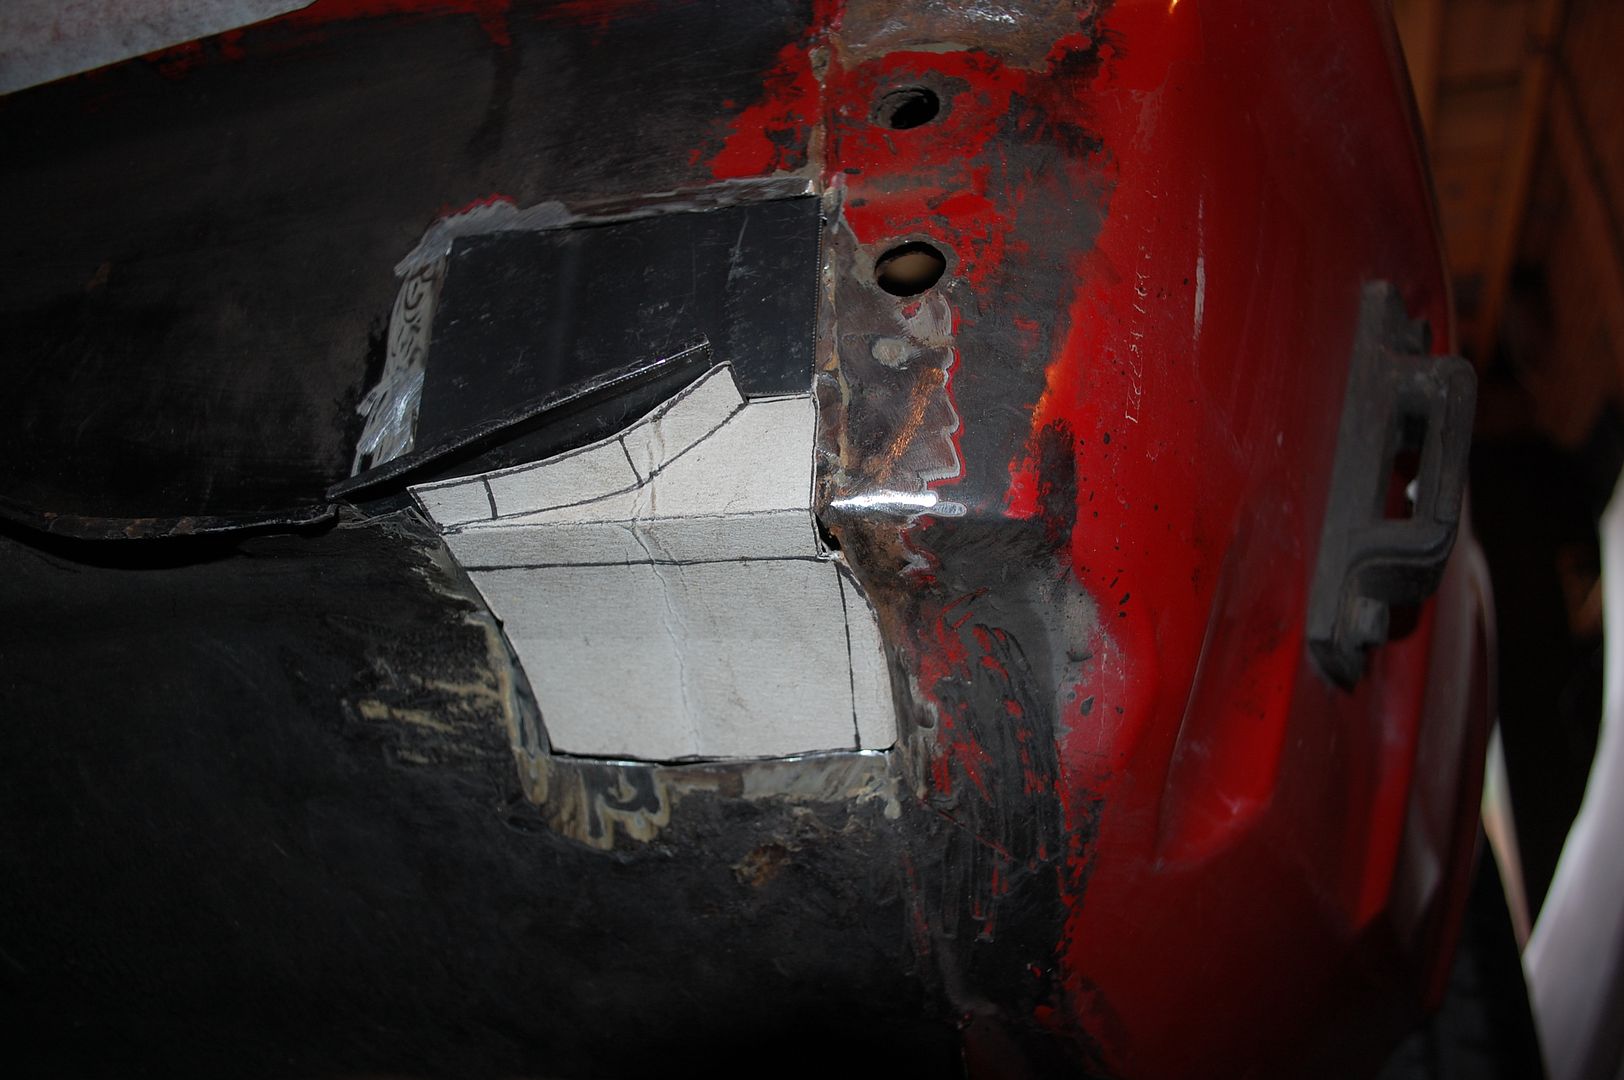
Luckily for me the damage stopped before the rear wing, that would have been a complete arse. As it is I was left with crafting the incredibly complicated boot floor section. For this I needed a cardboard template.
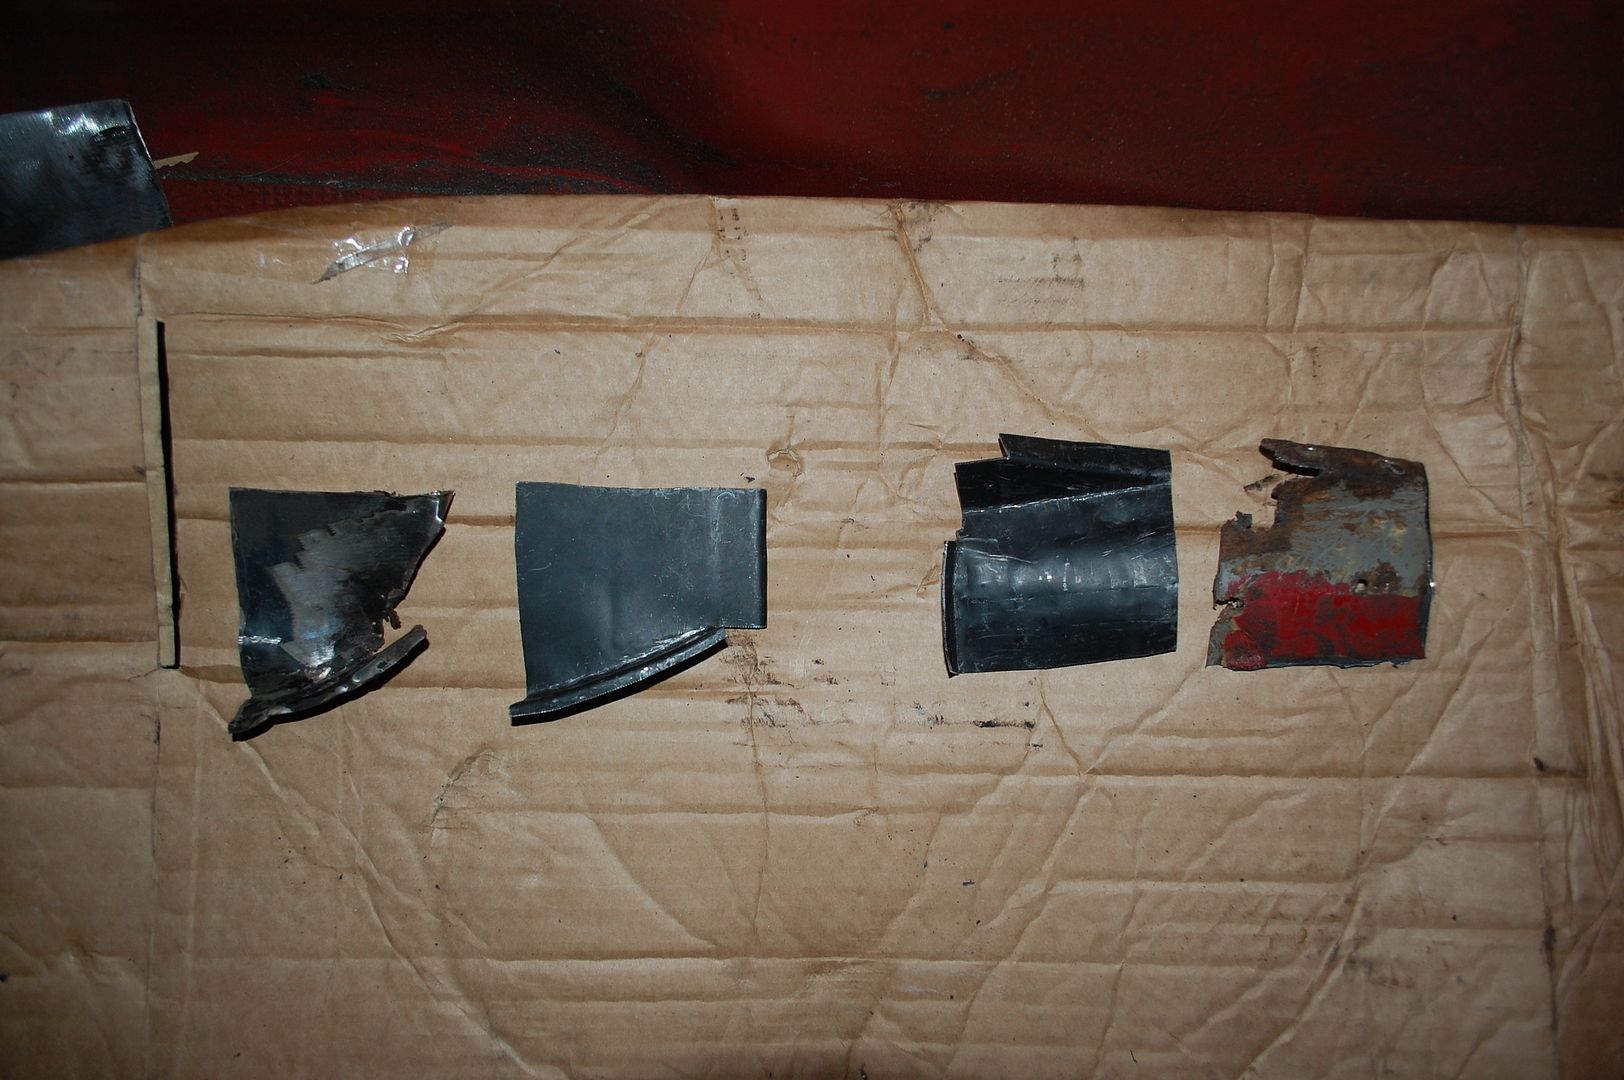
From this I remade it in steel. Lots of bending, crimping, and hammering!
I then prepped the area, and like all previous repairs, any seams or areas that then become difficult to get too are treated in weld through paint. Absolutely brilliant stuff.
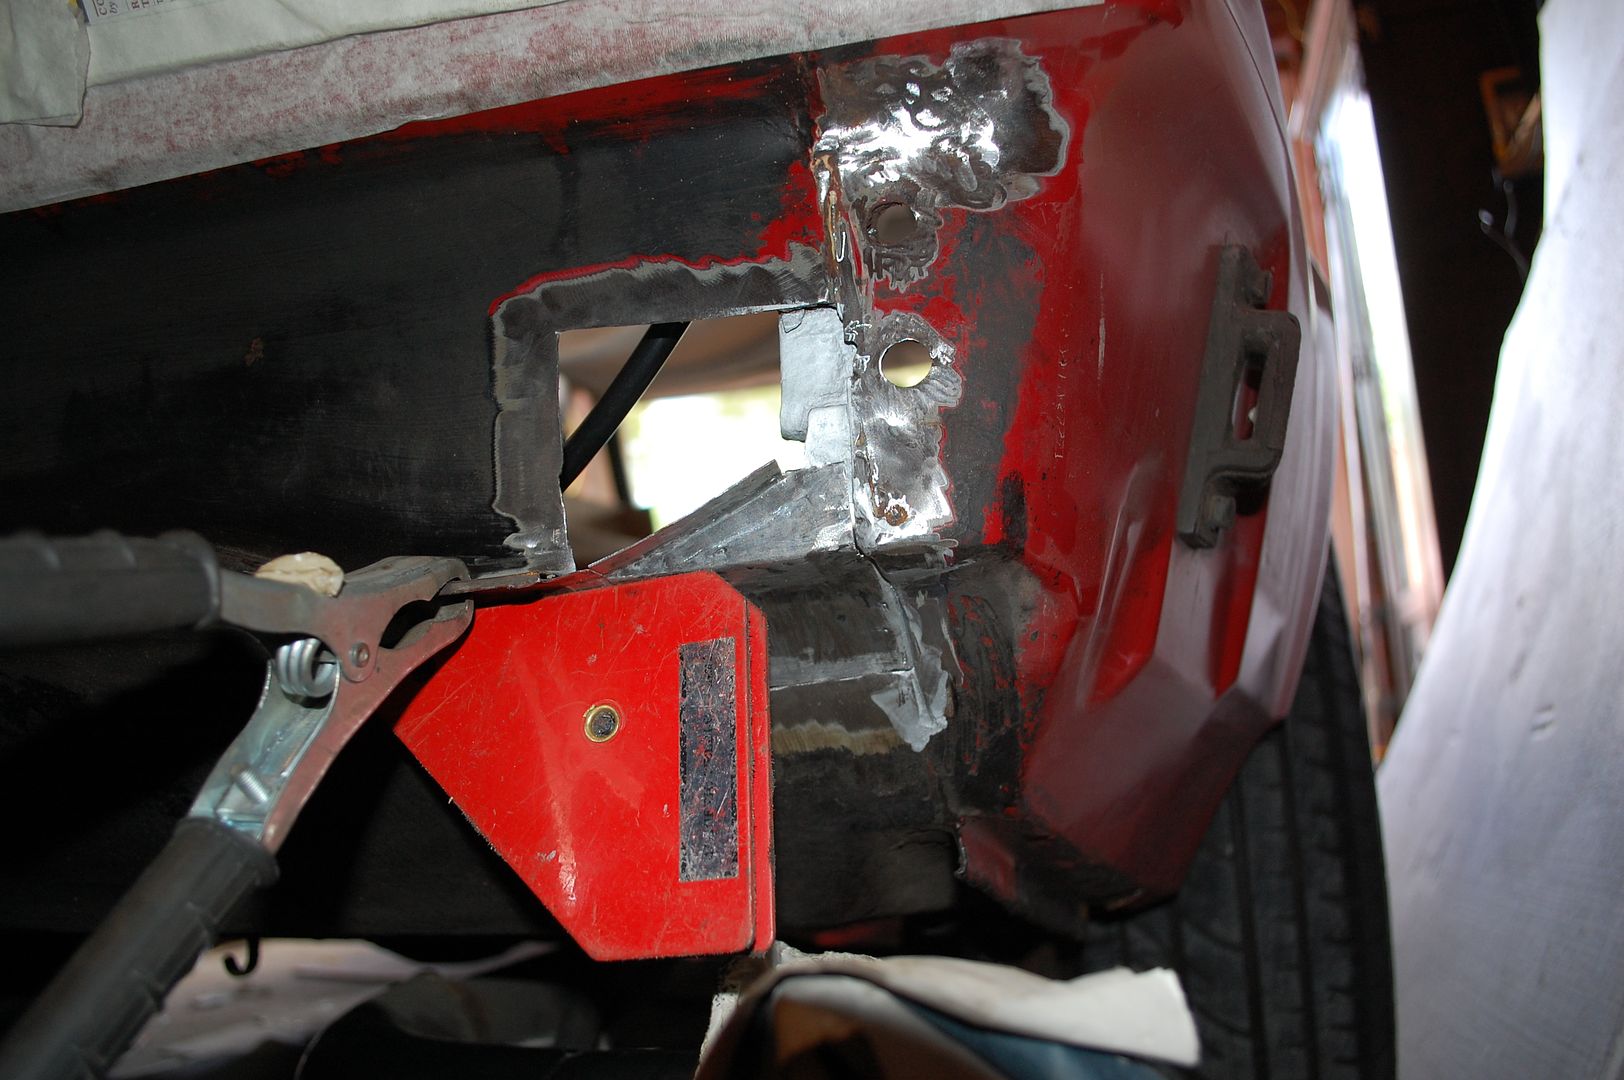
Boot floor repair held in place ready for welding.
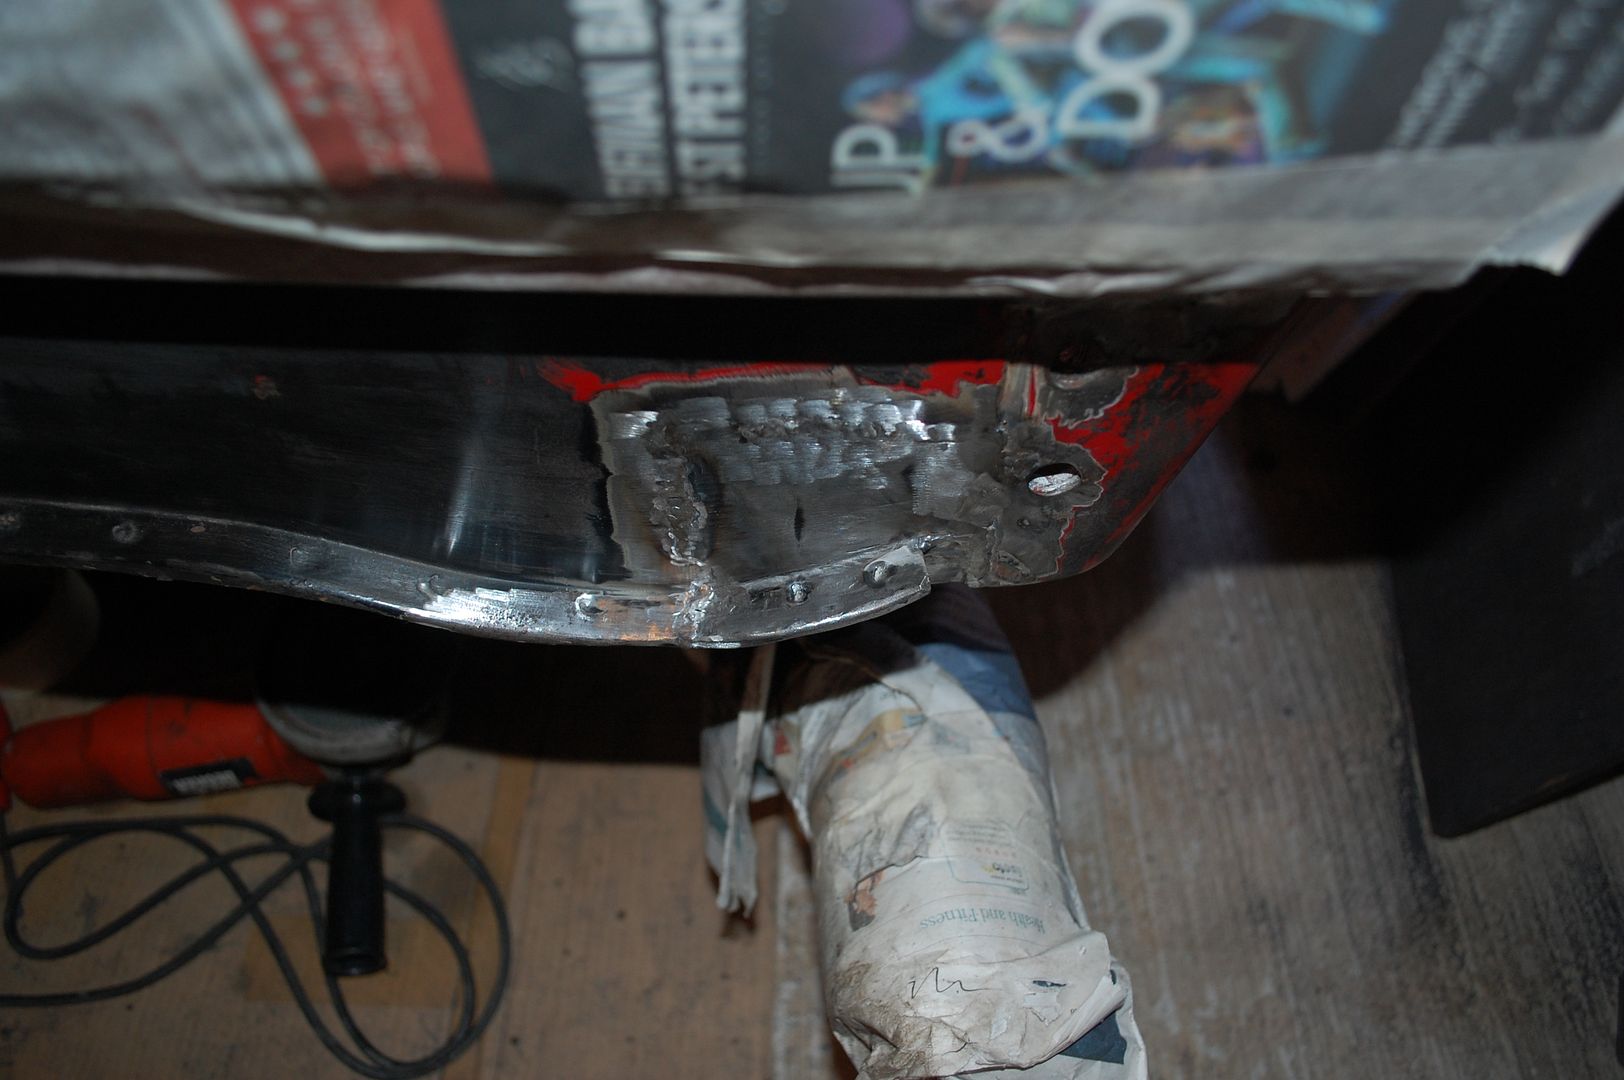
Final welded up picture with the factory spot welds replaced. (I knew buying a spot welder was a good idea.)
This repair was being done at the same time as the others, hence the time inconsistency.
I know some people are a keener on replacing panels rather than repairing but like all the rust I've found, its such localised damaged it seemed stupid to remove more than was necessary, and hopefully this is a little nicer than the usual patches people usually envisage.
Joe
I think a lot these cars where lost to kit cars, I can completely understand why, but still a great shame so many where lost.
I think they've aged brilliantly, but then again its such a novelty seeing them, I've only ever seen 2 SD1s on the road in recent memory!
Well we've got a lot more metal work to go over, I hope you lot aren't bored yet!
As I had to remove the bumper to get the Vitesse on the trailer the usually unseen rear end was exposed and made it more obvious that it needed some attention.

The area by the offside bumper mounting wasn't looking great either. I couldn't leave it so out came the poking screwdriver.

Straight through... bugger.

The area that has the damage is made up of the boot floor return, and the rear panel. These are then spot welded together along the curved seam.
With the rear panel section removed beyond the boot floor section I could make sure I stepped the welding so the seam was as strong as it could be.
I actually had bought a rear panel in preparation for a different project, and proved invaluable in creating the repair.


Luckily for me the damage stopped before the rear wing, that would have been a complete arse. As it is I was left with crafting the incredibly complicated boot floor section. For this I needed a cardboard template.

From this I remade it in steel. Lots of bending, crimping, and hammering!

I then prepped the area, and like all previous repairs, any seams or areas that then become difficult to get too are treated in weld through paint. Absolutely brilliant stuff.

Boot floor repair held in place ready for welding.


Final welded up picture with the factory spot welds replaced. (I knew buying a spot welder was a good idea.)
This repair was being done at the same time as the others, hence the time inconsistency.
I know some people are a keener on replacing panels rather than repairing but like all the rust I've found, its such localised damaged it seemed stupid to remove more than was necessary, and hopefully this is a little nicer than the usual patches people usually envisage.
Joe
Edited by 1275 GT on Tuesday 12th June 22:31
Earl of Petrol said:
Looks like you’re doing a great job on this. I like the fact that you’re doing the localised repairs rather than hacking off whole panels. Very interesting thread and I look forward to more.
Thank you, it really didn't take long to get back to solid metal, so I think the right option to take too.Right, last bit of the boot. Firstly it needed a damn good clean.

The before shot actually looks quite good, but up close it wasn't as good.

Covered in under-seal and grime.

Mid-Clean


And Immaculate.
With the boot clean it was time to address a pet hate of mine. Tow bars on SD1s. I understand the practicalities but they're so ugly!
At some point in its life my car was burdened with one, but now lives with some bungs hiding the holes of shame.
Cleaning the scabby paint around them reveals pitted but solid metal.

With matching holes through the strengthening panel, I needed 5 perfectly formed discs.

I also welded up the atrocious attempts to fit the rear number plate, each side had 3 different drilled holes!

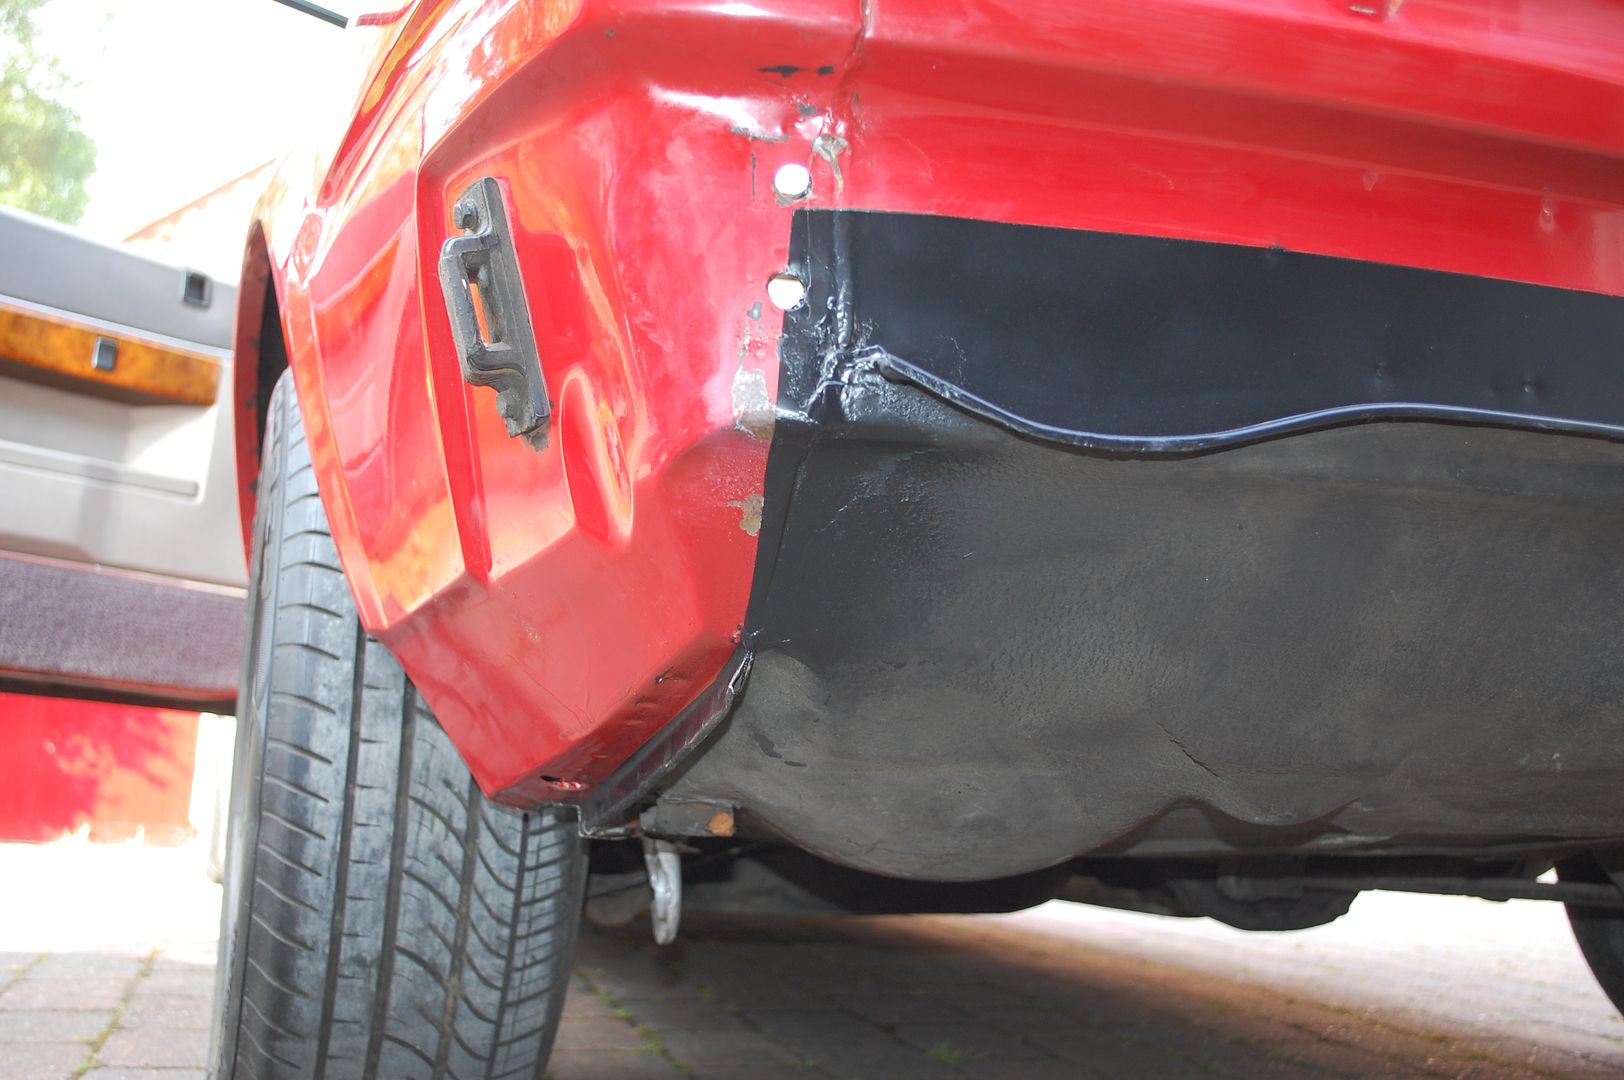
I also attacked the under sealed rear panel with panel wipe, revealing the most amazing factory paint line.


A Common mistake people make when restoring SD1s is to carry the body colour down to the seam, you never see it behind the bumper but I like to know its done correctly, and you can't argue with an unmolested car.
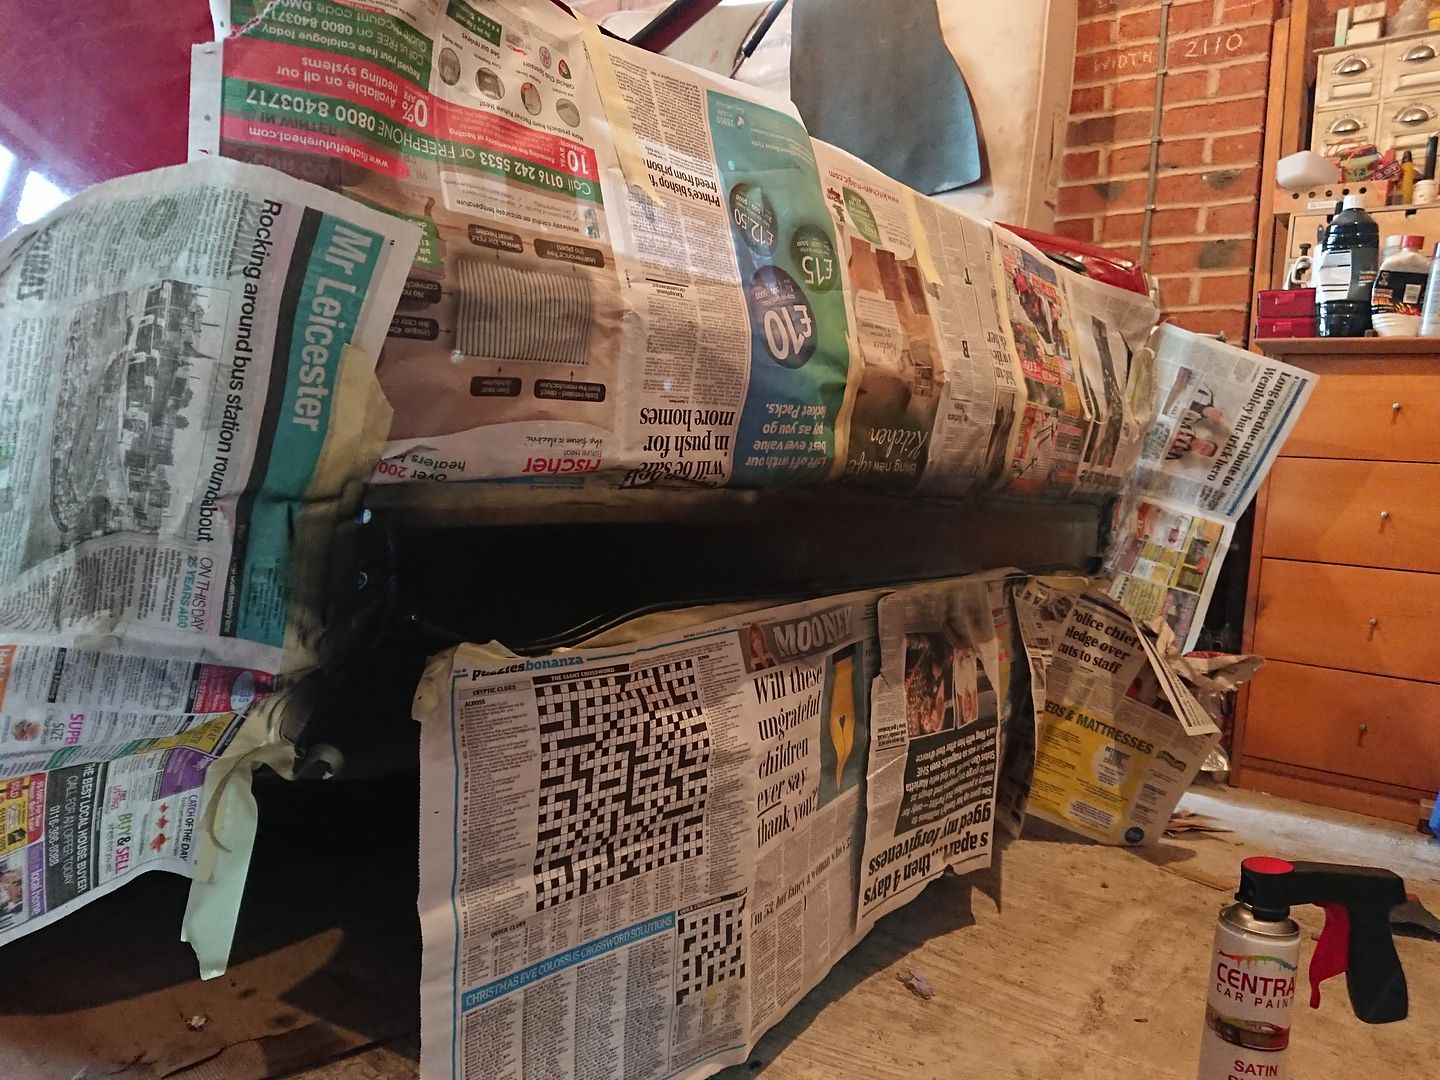
With the boot finally solid it was time for paint!
Joe
Watchman said:
 MORE
MORELove this. Dad had a 2600 straight 6 and hated it after the far superior Granada 2.8 but even he would have preferred the 3500 Rover.
Mate had a Vitesse in the late 80s. By then they had all but disappeared but when the rest of us were making more noise than motion in minis, Sambas, Renault 5s, MK1 Golfs and the like, he had this utterly awesome V8 and I've loved them since.
Edited by Watchman on Thursday 14th June 23:10
The 6 cylinder SD1s were a strange one, some people loved them, others not so much. It's got to be a v8 for me though.
That must have been quite a contrast to the hot hatches, and I do love my minis too.
Lets get back to the Rover then!
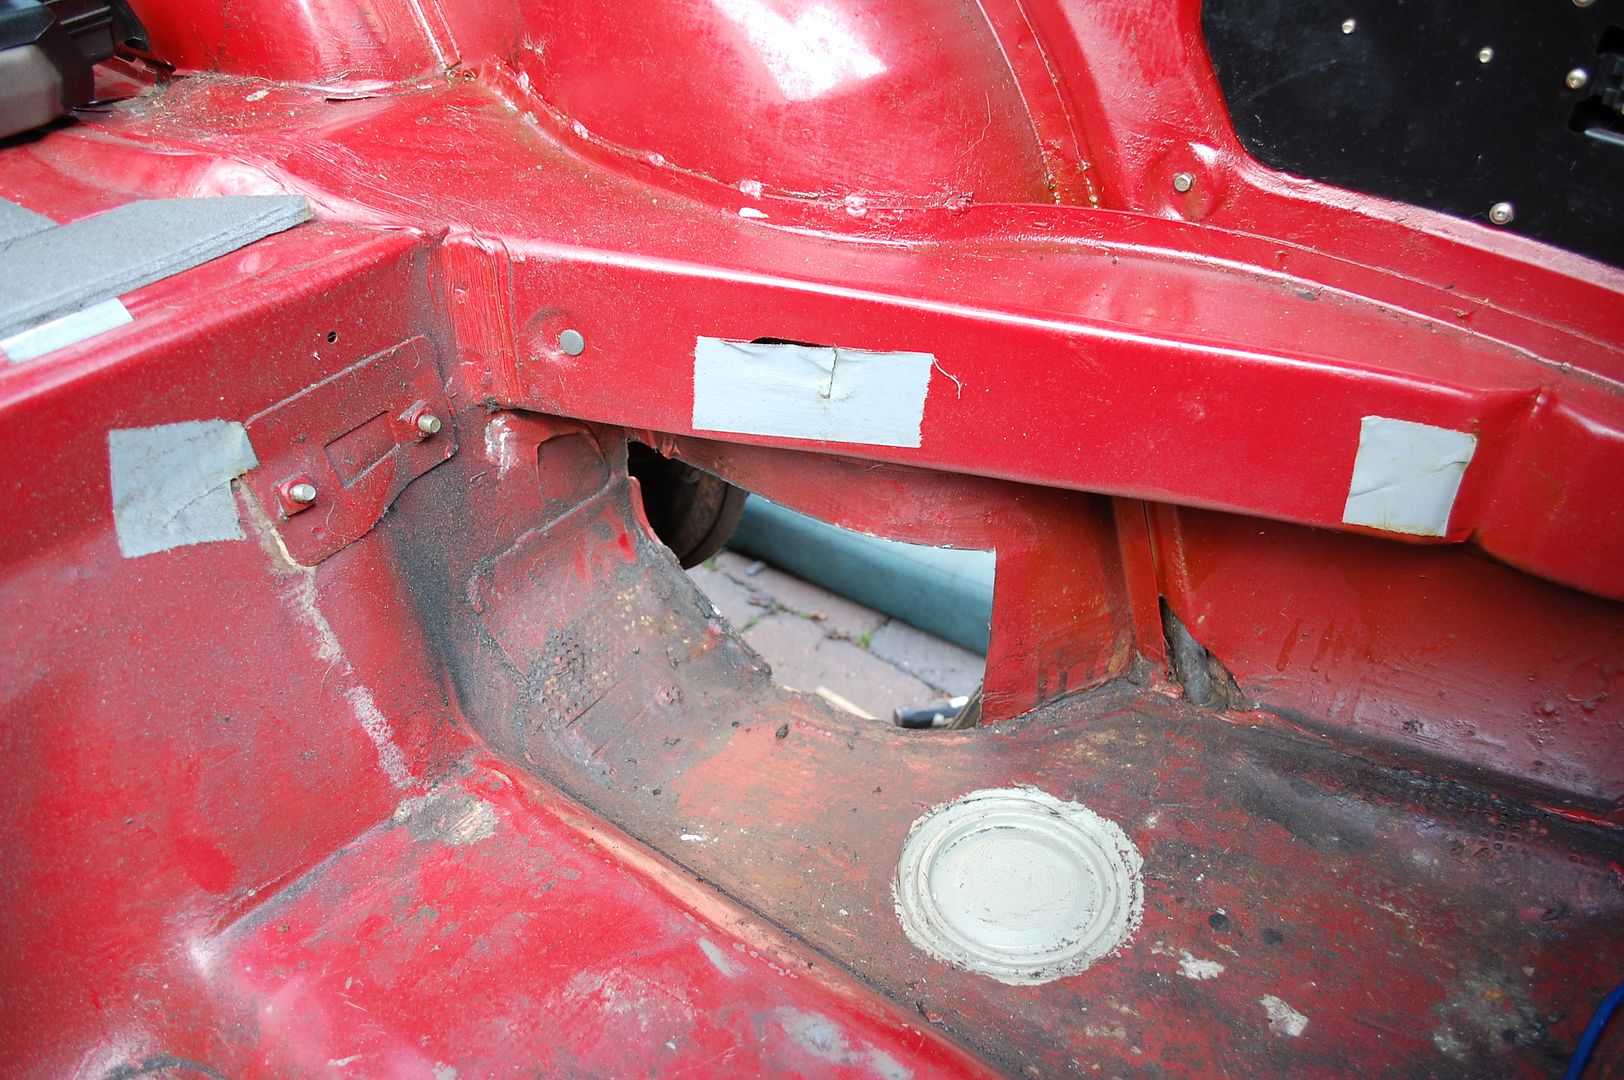
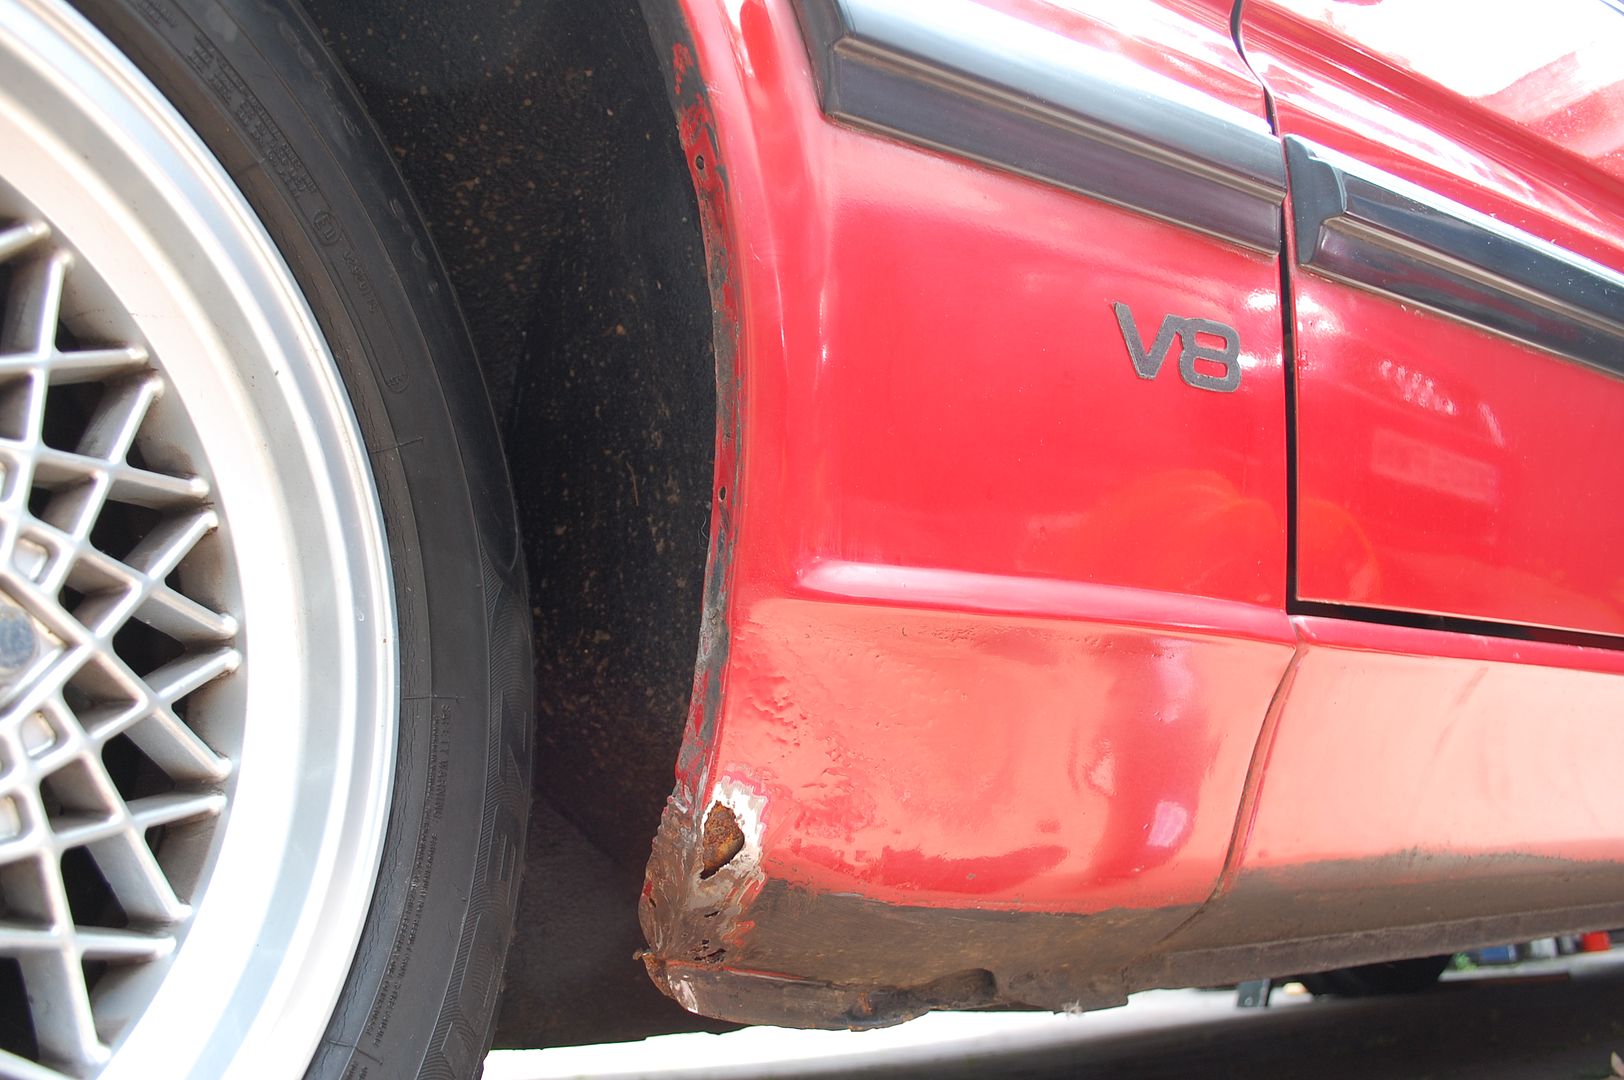
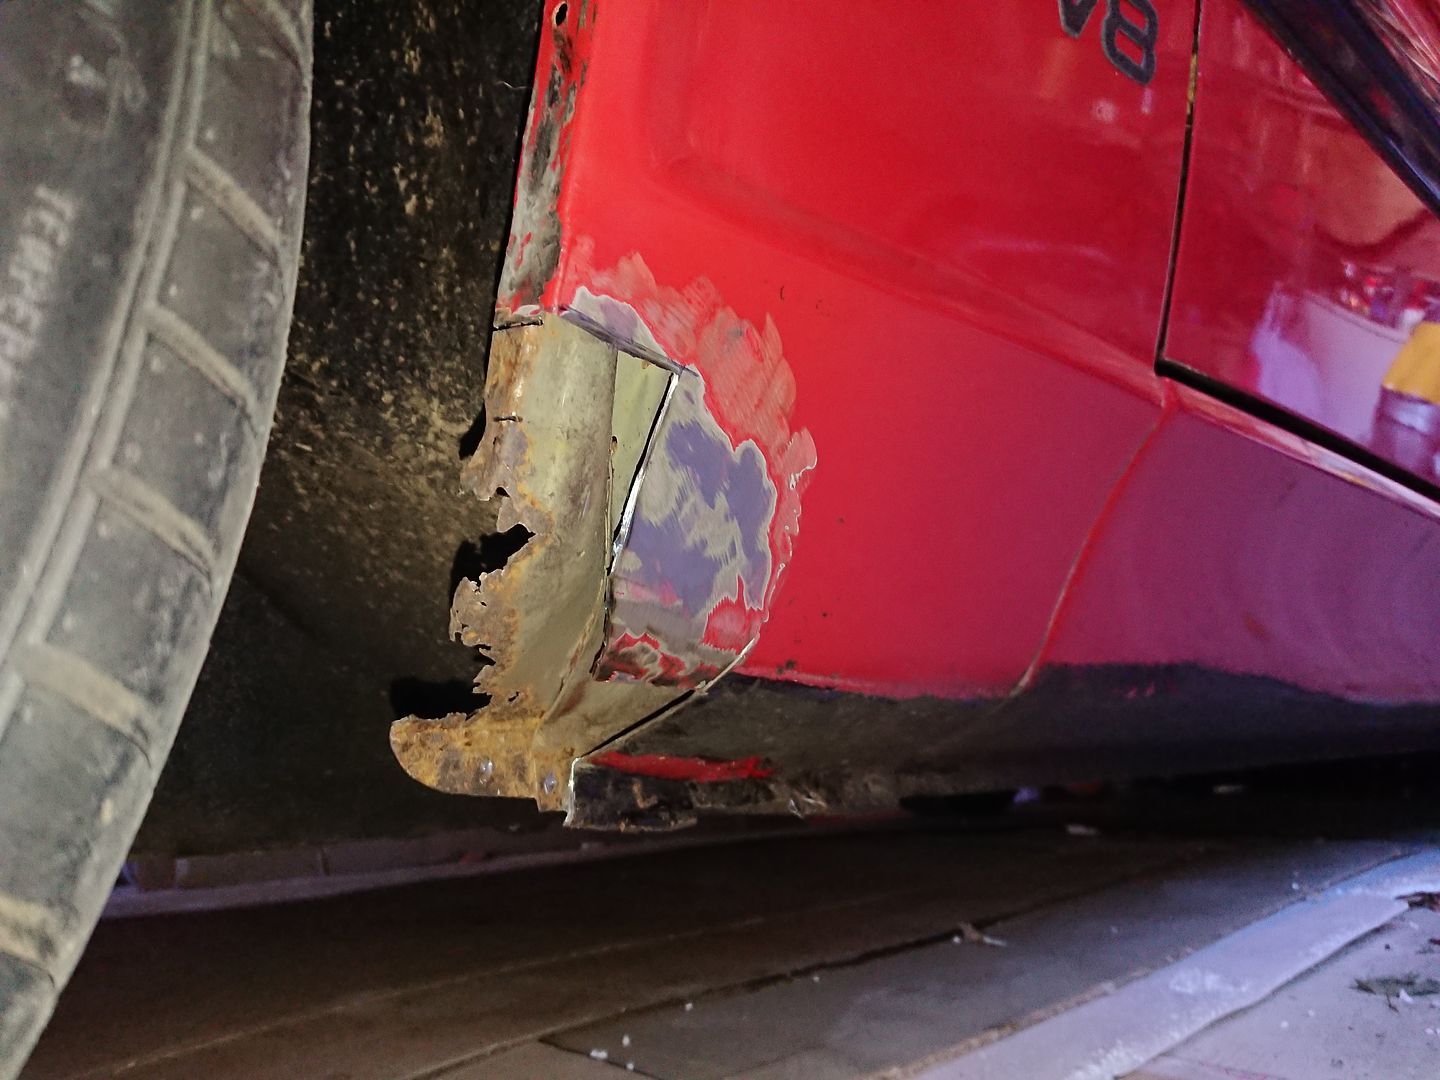
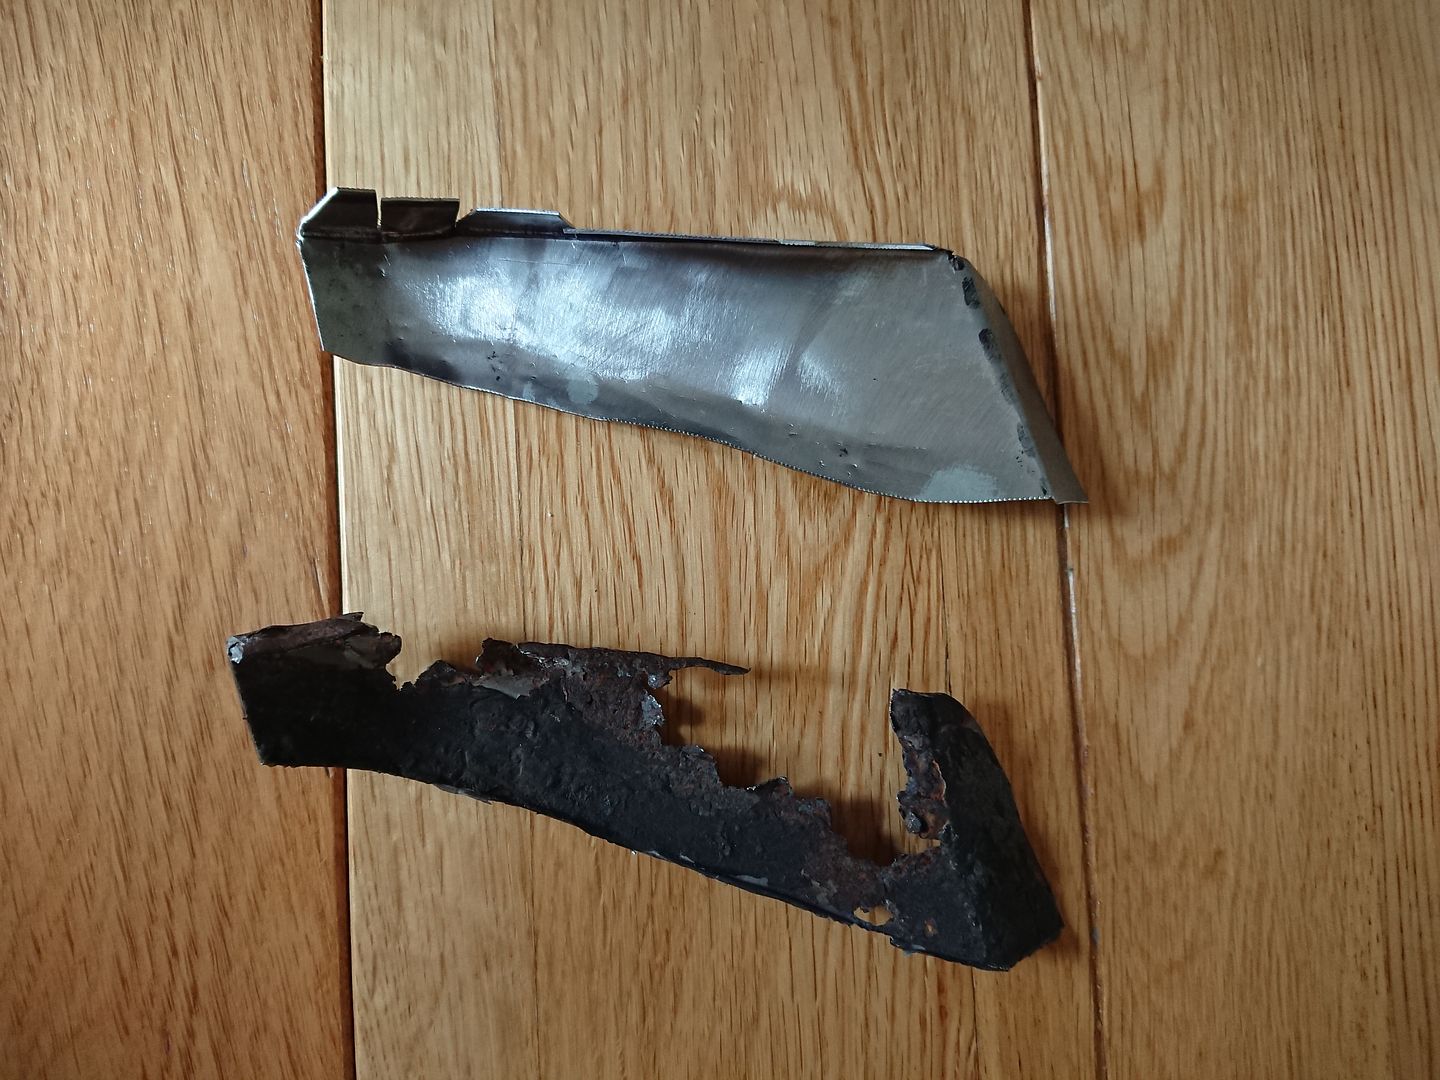
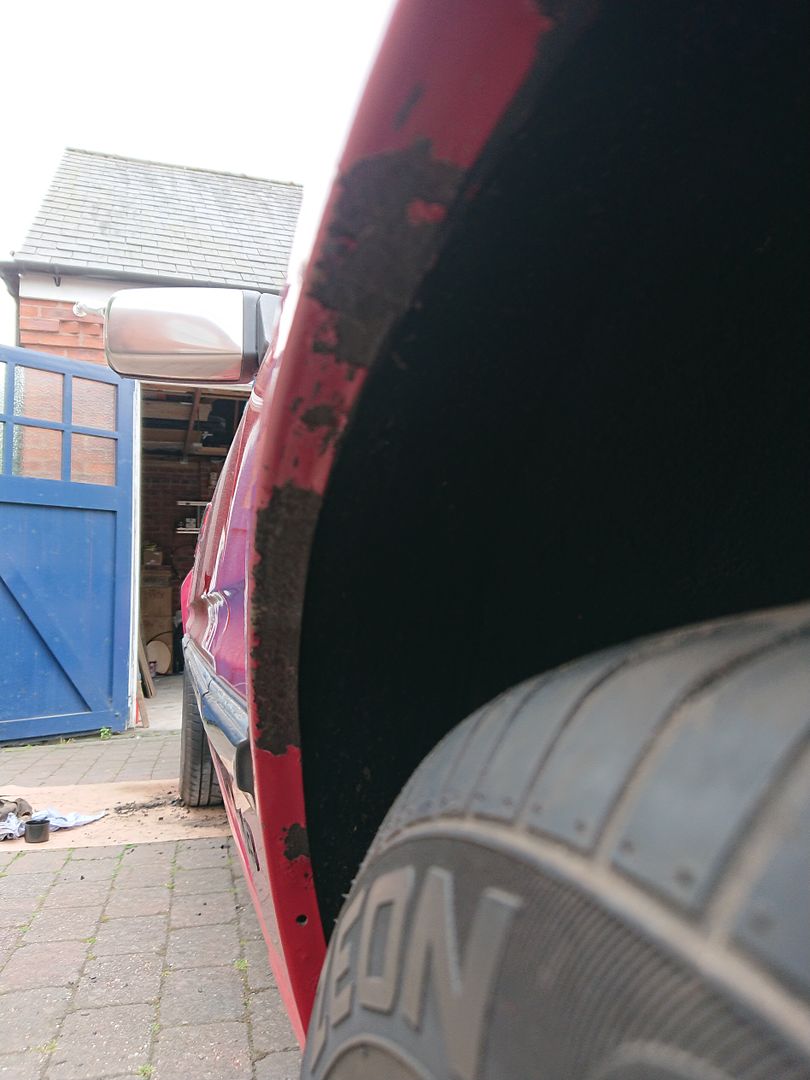
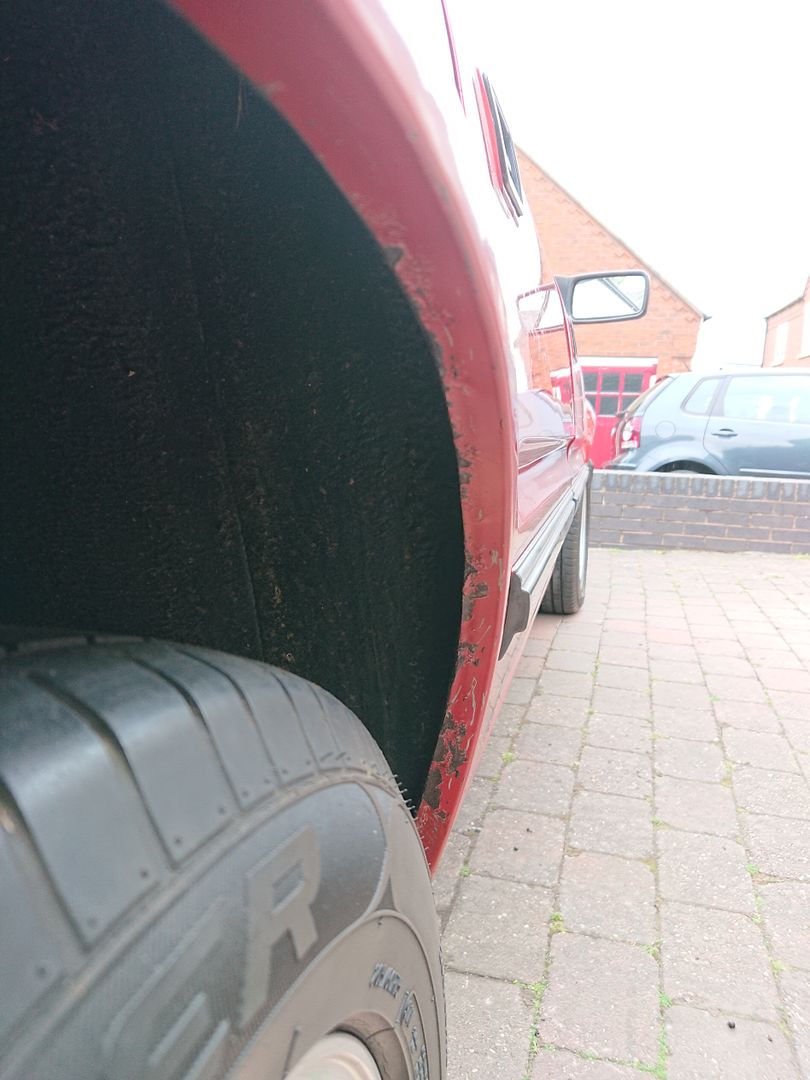
Another area that I wanted to address was the front of the drivers side rear arch.

We've got horrible cracking paint, and red overspray onto the bottom seam.

Inside the rear door we also have some nastiness underneath the chrome kick strip.

I'd read good things about Bilt Hammer products, so I put their Deox gel to use. I stripped off all the paint and slathered it on as per instruction, and left it to dissolve all the rust.

A previous repair, probably done at the same time as the rear edge of the arch and actually not as bad. Some pitting, but not bad enough to cut out.

The door step didn't survive the deox quite as well. The grey colour you can see is the factory paint of the panel underneath.

Nothing some precision cutting and shaping of new metal couldn't sort. Even replicated the lead in into the step.

A good layer of Rust preventing paint all over!


Ready for some colour now!
Joe
Edited by 1275 GT on Sunday 24th June 22:47
Being an 80's Rover I was bound to find a little more rust. With the rear arches presenting surprises the front mudflaps also had to go. The drivers side was unmarked. The passenger side not so much.
So the usual process began.
Unfortunately the inner arch behind was also attacked by the tinworm.
This was just as important to repair, so of course was cut back to solid metal and the repair let in.
The shape of the wing is quite odd here, so I needed a reference to go off. Luckily I've got a spare NOS wing.
They're not exactly the most perfectly shaped panels, so I was happy with my repair. I have no intention of replacing the mudflaps, so no holes in my new metal either.
Ground back and sanded smooth, wouldn't even know anything was there.
Next on the list was investigating the MOT advisory it had a few years back for corroded wings. The previous owner had slathered the return lip in black underseal to hide this.

They've lost some paint but I've seen a lot worse! It's still solid metal, time to break out the Bilt Hammer gel again!
Same on all the arches,looks like I've got a lot more work to do!
Joe
So the usual process began.


Unfortunately the inner arch behind was also attacked by the tinworm.

This was just as important to repair, so of course was cut back to solid metal and the repair let in.
The shape of the wing is quite odd here, so I needed a reference to go off. Luckily I've got a spare NOS wing.

They're not exactly the most perfectly shaped panels, so I was happy with my repair. I have no intention of replacing the mudflaps, so no holes in my new metal either.


Ground back and sanded smooth, wouldn't even know anything was there.
Next on the list was investigating the MOT advisory it had a few years back for corroded wings. The previous owner had slathered the return lip in black underseal to hide this.


They've lost some paint but I've seen a lot worse! It's still solid metal, time to break out the Bilt Hammer gel again!

Same on all the arches,looks like I've got a lot more work to do!
Joe
Edited by 1275 GT on Monday 18th June 20:42
Edited by 1275 GT on Monday 18th June 20:49
Coakers said:
Awesome fab skills, there is an sd1 police car on RR that has attracted quite a lot of attention (for good reason) and the repairs on this are on par with it. Bookmarked 
I've also been following Jim's Police car, the pictures from the NEC Classic and Restoration show were stunning. I'd love to strip the entire car and have it painted, but its so much work, and more importantly expense. CR6ZZ said:
Well done OP. I owned an '84 Vitesse for a number of years back in the early 90s. Loved it. Great cruising car and very rare on NZ roads. Sold it when I went back to uni to continue my studies. Only problem I ever had was when the car suddenly stopped the middle of nowhere. Turned out a rock had hit the fuel pump while travelling on a gravel road. A quick tap with a hammer to get the pump going again and we were on our way.
I bet a very rare sight in New Zealand, I'll remember that advice if it ever conks out on me! One thing I did miss out was how far I stripped the interior out! Obviously all the seats came out, carpet, centre console, pretty much everything apart from the dash. Sadly my car suffers from the tragic 80's sagging headlining. It's extra frustrating as its already had a replacement fibreglass headlining board, but who ever trimmed it skimped on the glue and it separated!

This is definitely a two man job, so my ever helpful father was roped in.


The entire sunroof cassette then came out. As the lid needed repainting, and I'd have to re-trim the sunroof aperture it just made sense.

The floors are actually really nice, someone's replaced the drain plugs, but not painted so another task .
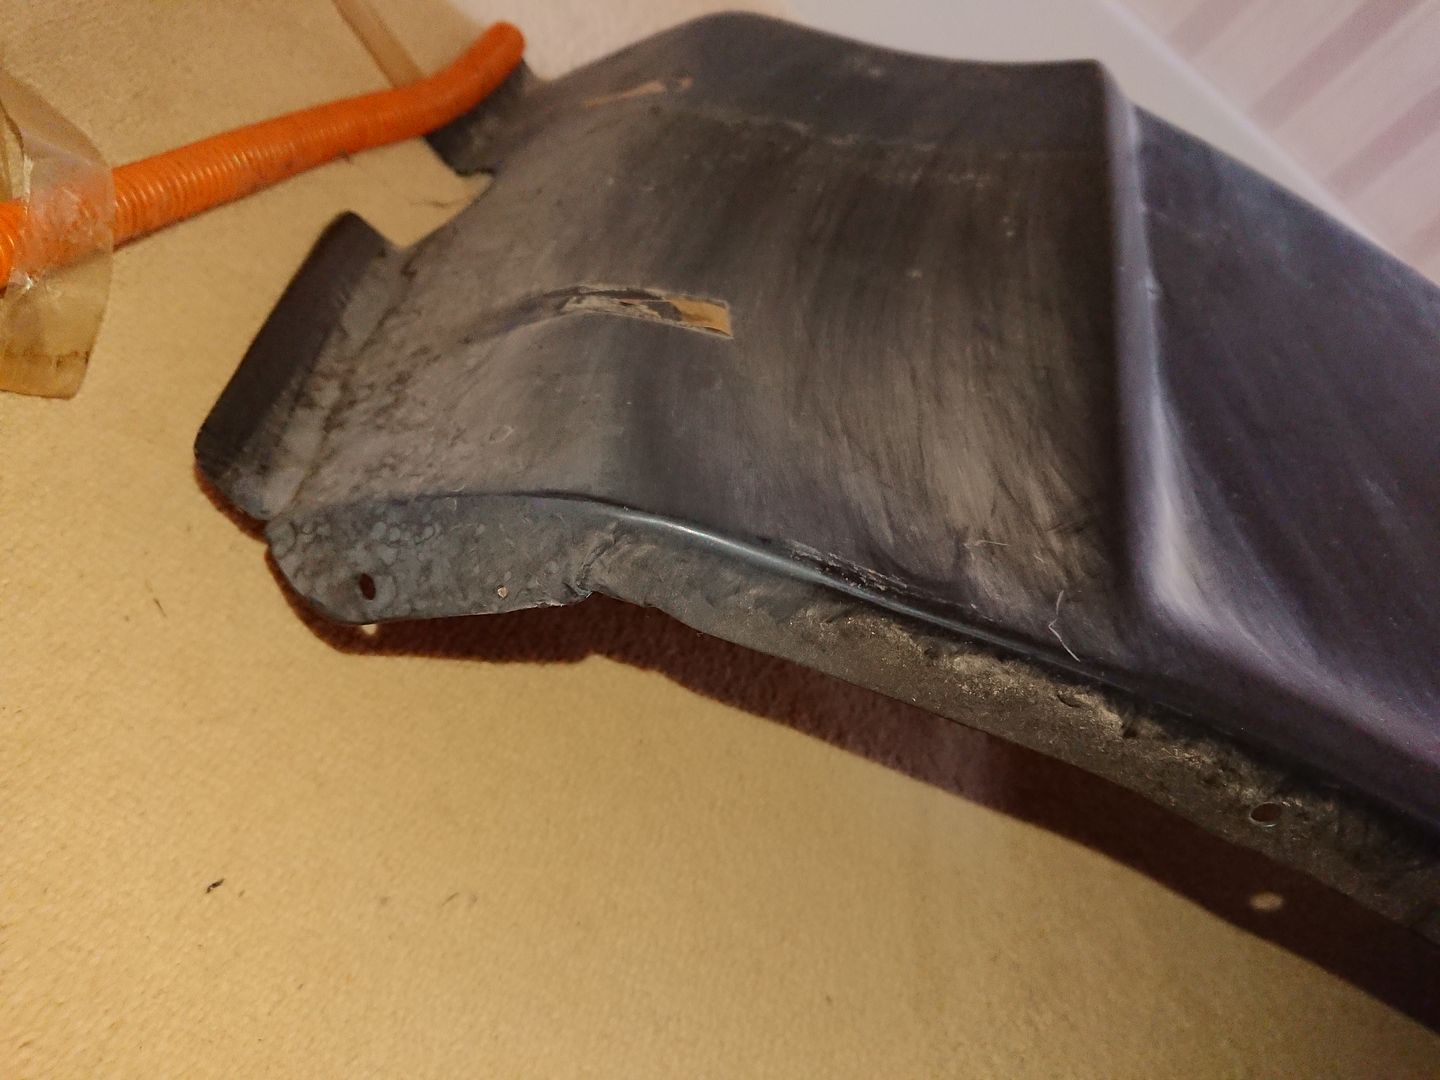
I also wanted to remove the deep chin spoiler and sort out the bottom lip.

It doesn't half take away its impact!

The deep chin is the original to the car and a weird rubber like material, in this picture its obvious where the paint should come up to, leaving the unpainted black material underneath.

I had hoped I could pick the overspray off to reveal the original finish, but what i actually revealed was big chunks of filler on the rear side,and some historic damage to one corner. More set backs!

I removed all the previous efforts, reinforced the rear properly with the correct plastic glues, and plastic fillered the damaged area properly.
Sanded everything down, plastic primed the area and refinished the black. The red wasn't perfect but I really didn't want to repaint the entire spoiler!


Just needs me to be brave and wet sand the red to smooth it out a bit.
Came out pretty damn well though!
Joe
Edited by 1275 GT on Sunday 24th June 22:48
Lets keep going with the updates!
This ones a good-un.
I was rather pleased with my repairs, but of course the proof it what they look like finished.
First was verifying where my paint line goes on the rear panel. The passenger side was untouched and factory finish. Perfect reference.
Exactly as late Vitesses should be, body colour down to all but the bottom seam.
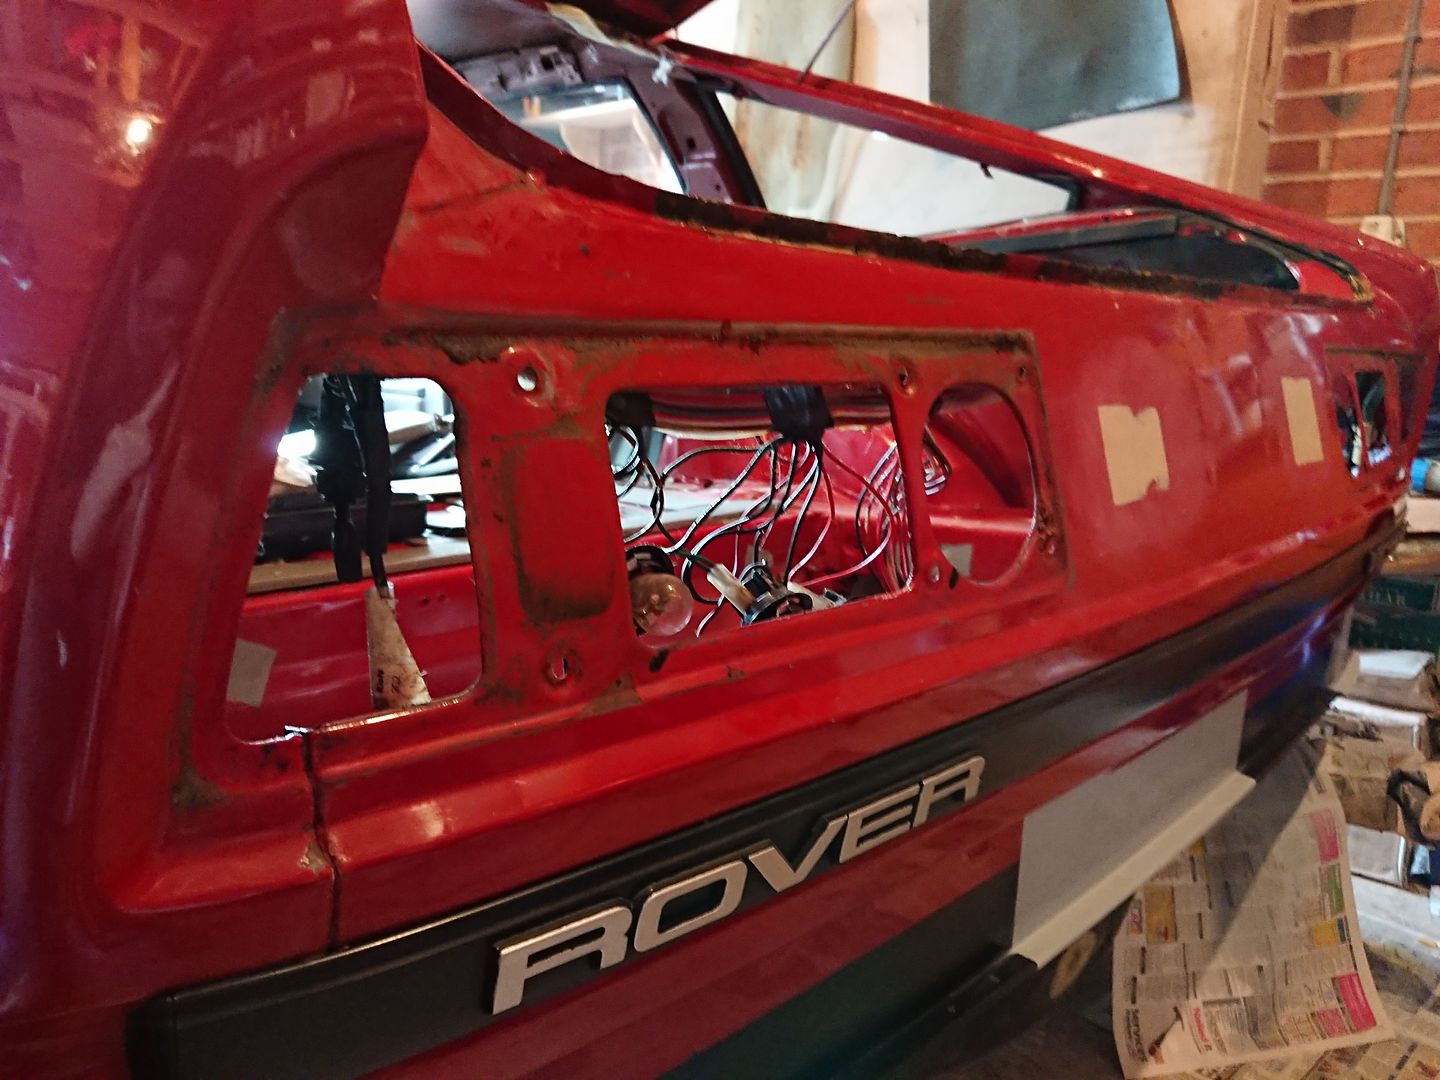
Next step was pulling all the rear lights and badge bar. Of course the areas were cleaned thoroughly before painting, I've got through a lot of panel wipe doing this work!
Looks like the original lights too!
First step is the satin black.

Very happy with that crisp line, just need to retouch the red now!
I didn't get any pictures of the during painting which is a shame, but fine line tape was used for the crisp edge, and painted using 2K coloured matched by a local paint supplier. I was very happy with the results!
The boot got the same treatment, completely rust free, Bilt Hammer electrox paint left to cure for 2 weeks, seam sealed, and top coated in 2k paint, I'm hoping its not going to rust again!
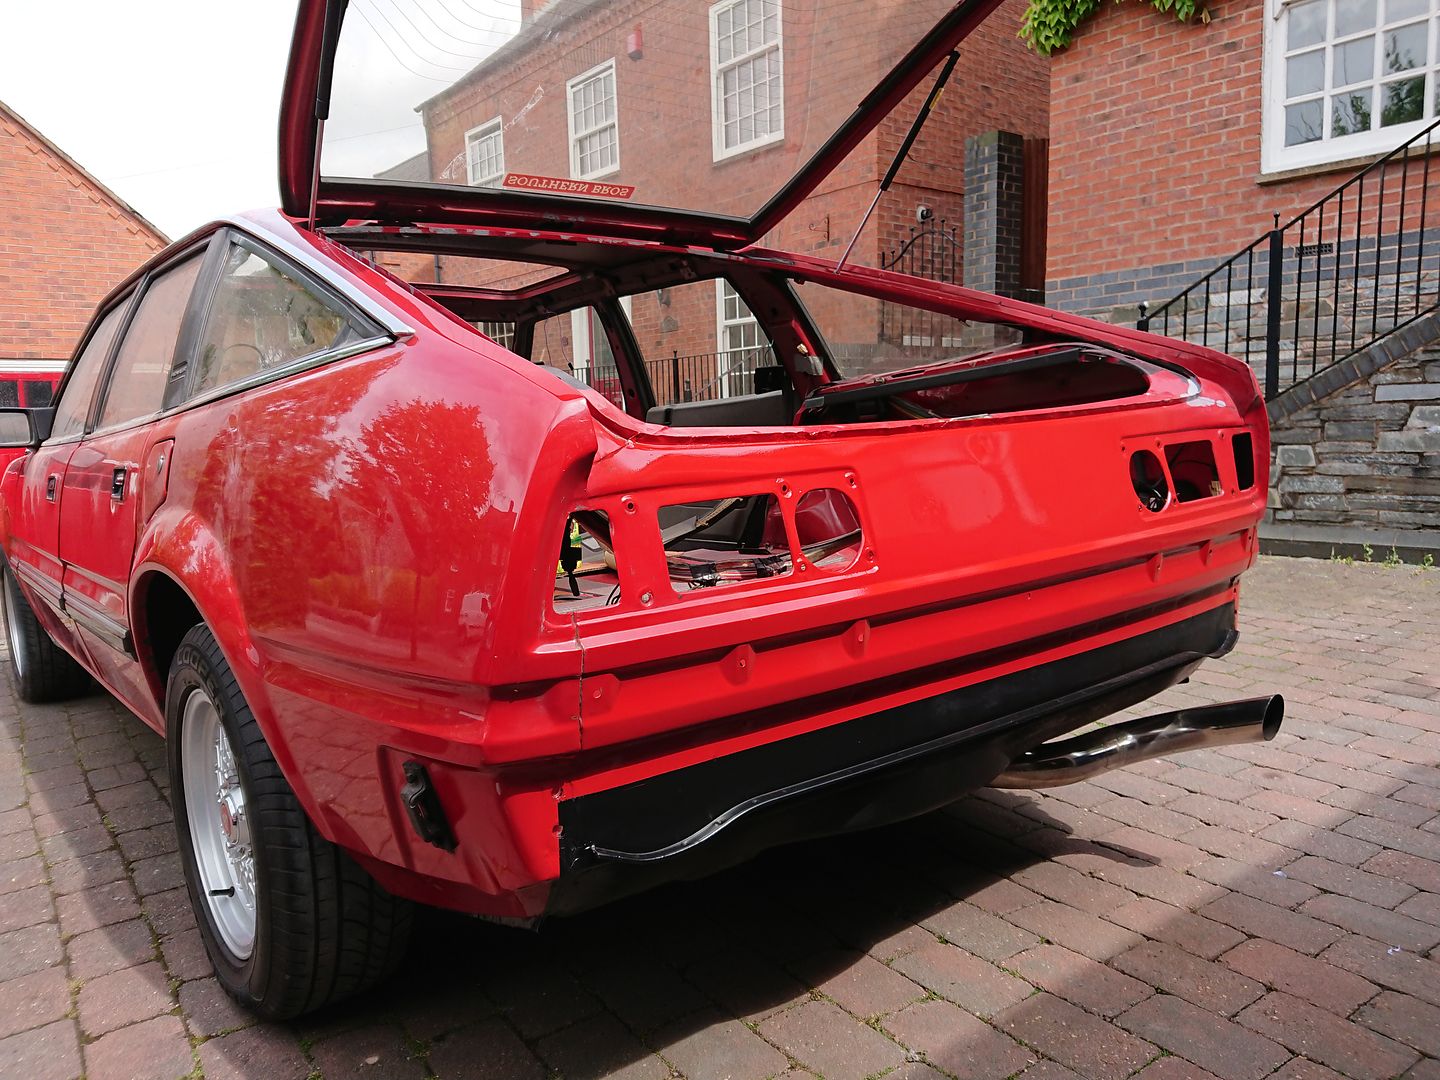
With the rear lights and badge bar refitted, can't beat a nice bit of paint. With the rear and boot all but finished I moved onto painting the rest of my repairs.
Joe
This ones a good-un.
I was rather pleased with my repairs, but of course the proof it what they look like finished.
First was verifying where my paint line goes on the rear panel. The passenger side was untouched and factory finish. Perfect reference.

Exactly as late Vitesses should be, body colour down to all but the bottom seam.

Next step was pulling all the rear lights and badge bar. Of course the areas were cleaned thoroughly before painting, I've got through a lot of panel wipe doing this work!

Looks like the original lights too!

First step is the satin black.


Very happy with that crisp line, just need to retouch the red now!

I didn't get any pictures of the during painting which is a shame, but fine line tape was used for the crisp edge, and painted using 2K coloured matched by a local paint supplier. I was very happy with the results!


The boot got the same treatment, completely rust free, Bilt Hammer electrox paint left to cure for 2 weeks, seam sealed, and top coated in 2k paint, I'm hoping its not going to rust again!


With the rear lights and badge bar refitted, can't beat a nice bit of paint. With the rear and boot all but finished I moved onto painting the rest of my repairs.
Joe
Edited by 1275 GT on Wednesday 20th June 20:13
Edited by 1275 GT on Sunday 24th June 22:49
sinbaddio said:
Brilliant work!
My Dad had an early v8 in 1977/78 and it was this car that got me hooked! The looks were sensational back then, proven by the fact they still look great today.
He used to let me sit in the boot which had a shelf in it of sorts (only on short journeys, jeez you'd get shot doing stuff like that today!)
Keep up the great work, looking forward to more updates!
I think they've aged really well too! My dad loves the earlier series 1 cars like your dads, I prefer the later series 2s though. I'm not surprised you used to fit in the boot, it's massive!My Dad had an early v8 in 1977/78 and it was this car that got me hooked! The looks were sensational back then, proven by the fact they still look great today.
He used to let me sit in the boot which had a shelf in it of sorts (only on short journeys, jeez you'd get shot doing stuff like that today!)
Keep up the great work, looking forward to more updates!
KelvinatorNZ said:
MX6 said:
Enjoying the thread, nice restoration.
I really like the originality of the car, the colour and wheels look the part. The purist probably won't like the suggestion but it looks like you could easily lose a couple of inches of ride height and it would still look "correct" for a road car and not slammed as it were, just saying...
The problem with lowering a Vitesse, as i found out, is that they are already slow slung as it is and you will be forever scraping and grinding your way places. My poor car has many scars from the time it spent lowered. The deep chin spoiler that was fixed half way up this page is the first to hit things, and doesnt fare well.I really like the originality of the car, the colour and wheels look the part. The purist probably won't like the suggestion but it looks like you could easily lose a couple of inches of ride height and it would still look "correct" for a road car and not slammed as it were, just saying...
They look great lowered though...
The SD1 suffers from a rather large arch gap but a very low sill line, and combined with the deep chin spoiler they've speed bump scraping fodder at standard ride height!
The deep chin spoiler even failed Rover's driveway entry requirements when it was new, but because it was for racing homologation they just included a warning when you bought one!

Joe
Gassing Station | Readers' Cars | Top of Page | What's New | My Stuff