Unibody Triumph Spitfire 6 (and friends!)
Discussion


Seeing as my old Triumph forum haunts are a little less active these days I thought it would be a good idea to broaden my horizons a little and share my project(s) with you lovely people 
We'll start with the big one. My Triumph Spitfire 6. AKA 'Patchwork' (alternatively titled: 'Project Scope Creep').
Back in 2012, just out of university, I thought 'man I want one of those classic car things' and promptly bought myself a bit of a rust-bucket Spitfire for the princely sum of £1000. Bear with me, this might be a bit of a long intro...
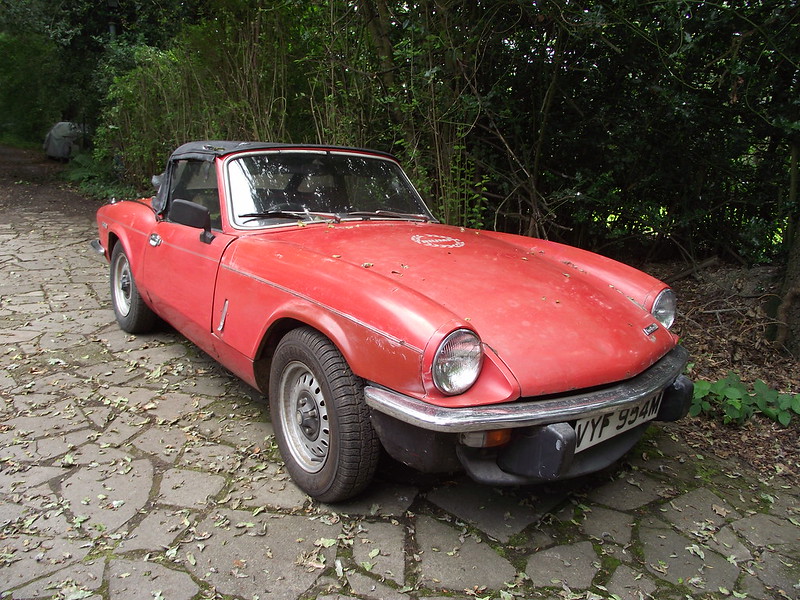
I intended to do a bit of a rolling resto, but it turned out to be a far cry from the 'light project' it was billed to be. A fair amount of rust, and the engine wouldn't rev past 3500 without backfiring through the carbs. A fortnight or so of fettling didn't improve this at all, and a quick glance over eBay heralded this:
And the scope creep begins...
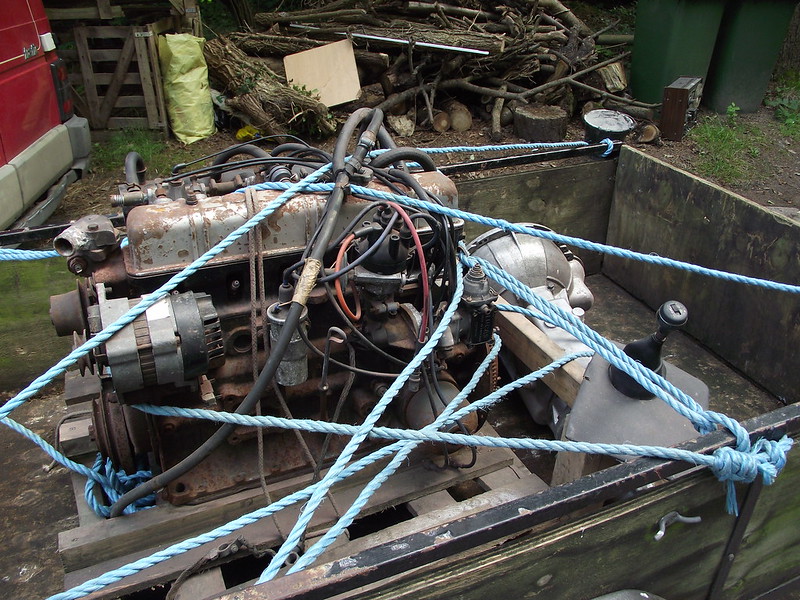
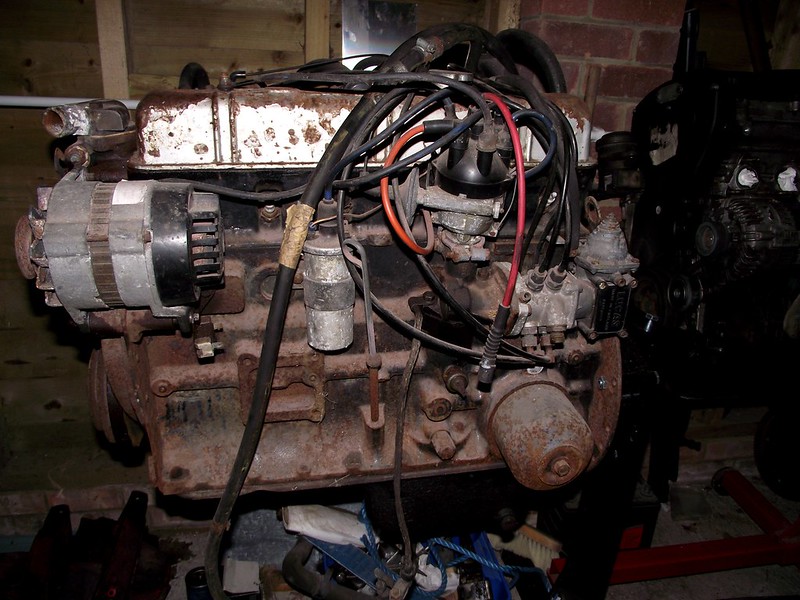
That's the mechanical fuel-injected I6 from a TR6 and associated overdrive gearbox. Rebuild, fix rust, swap in with GT6 bits, drive. Easy.
But hang on. I6-engined Spitfires are front-heavy beasts. Surely we can do something to fix that. The purchase of a £50 fibreglass bonnet turned out to be the tip of the iceberg we'll soon be uncovering. Might as well get a fibreglass hardtop too to replace the holed soft top.
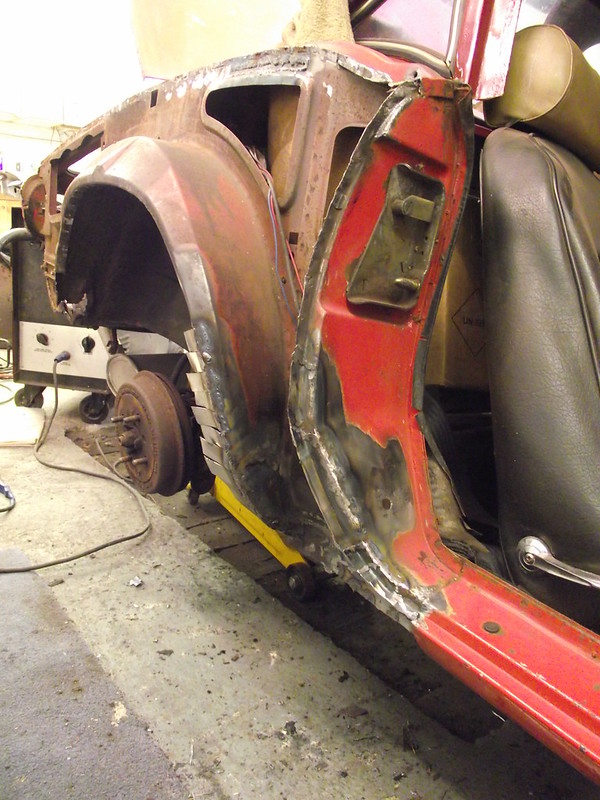
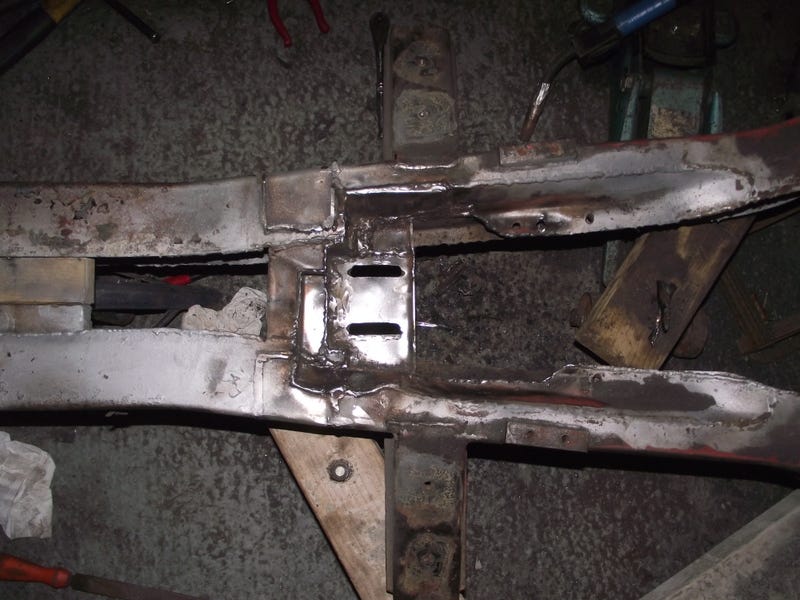
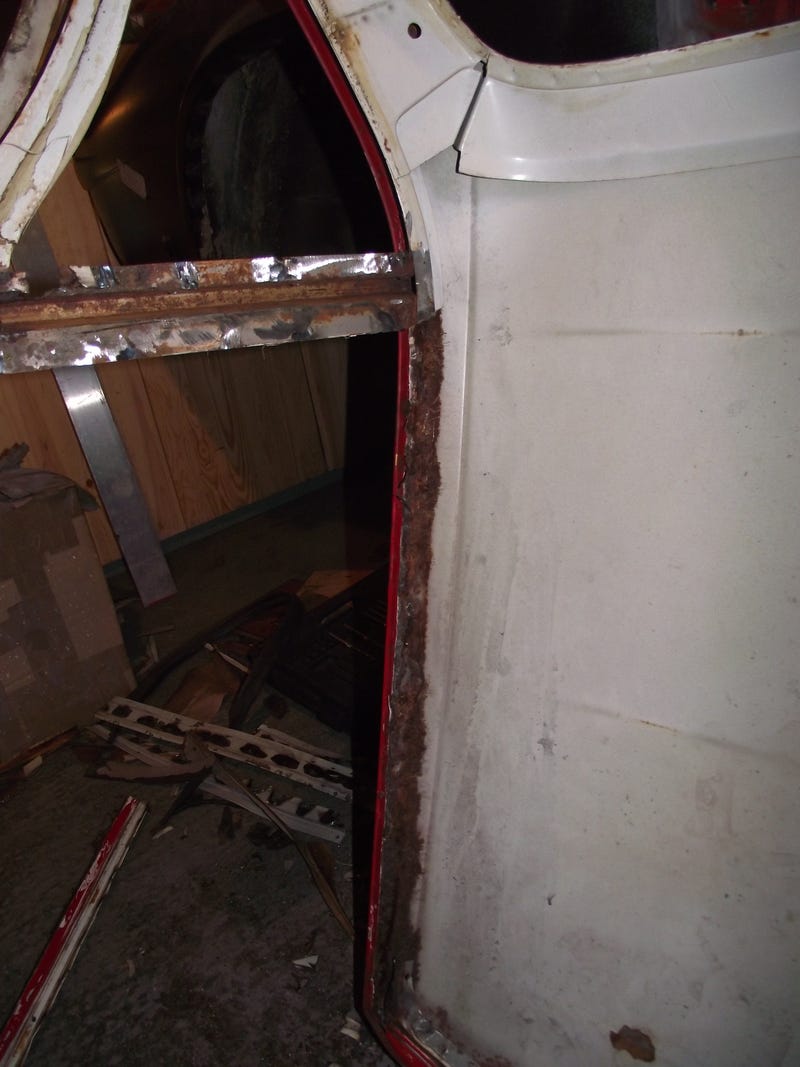
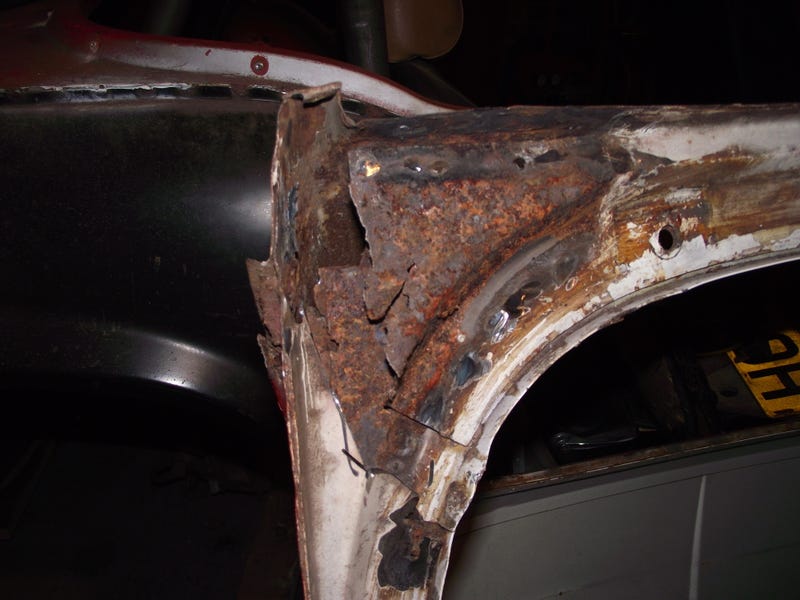
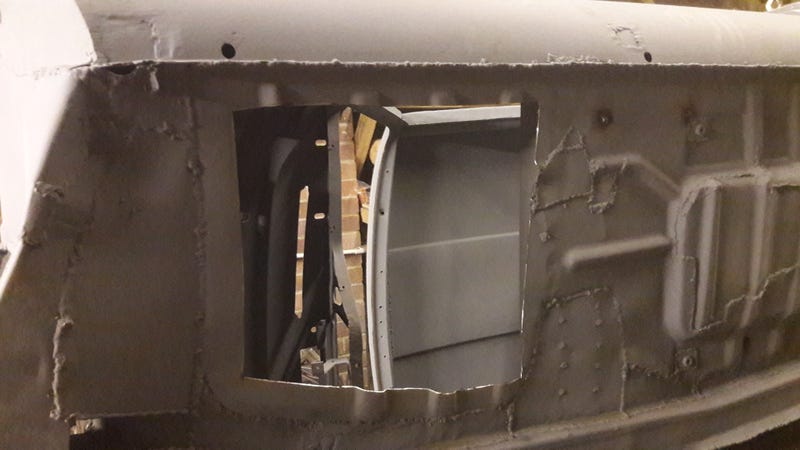
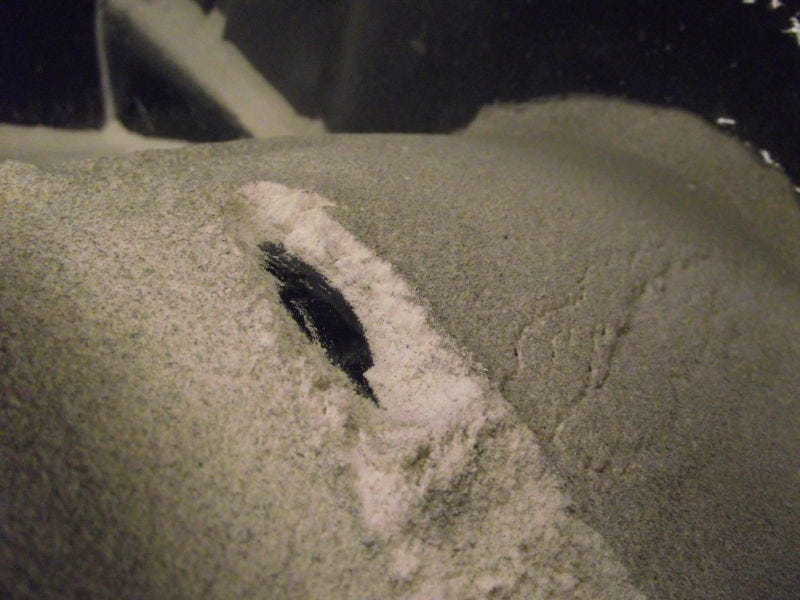
Okedoke. Lets have a poke around the rest of the body for rusty bits. Bit of rust we know about, but can't be that bad.
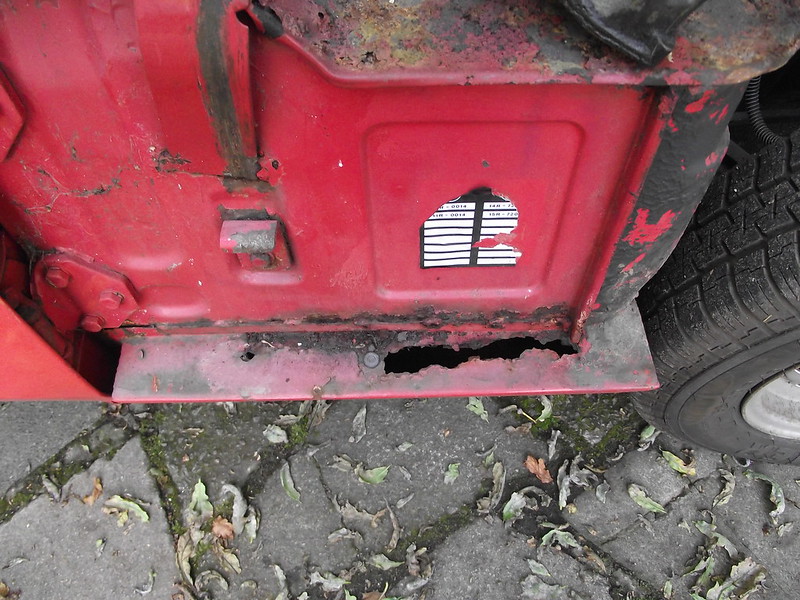
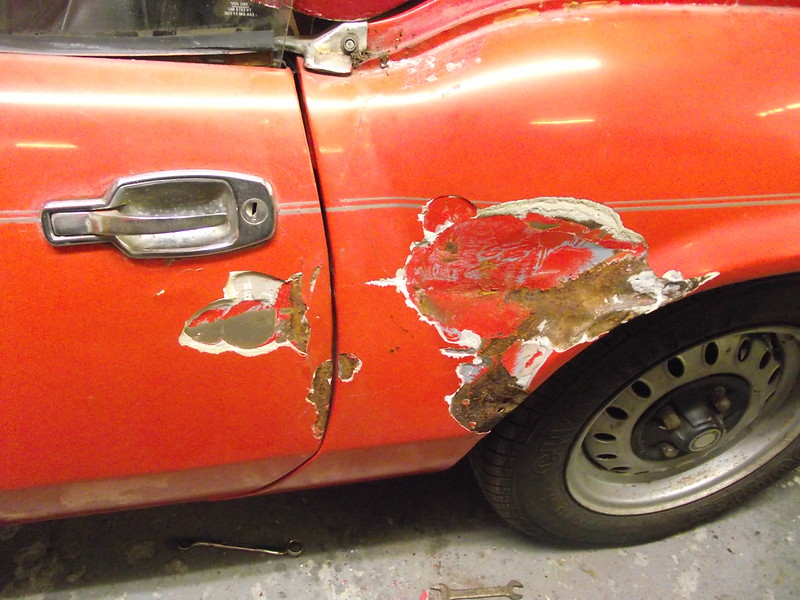
Oh...
Okedoke then. Better learn to weld
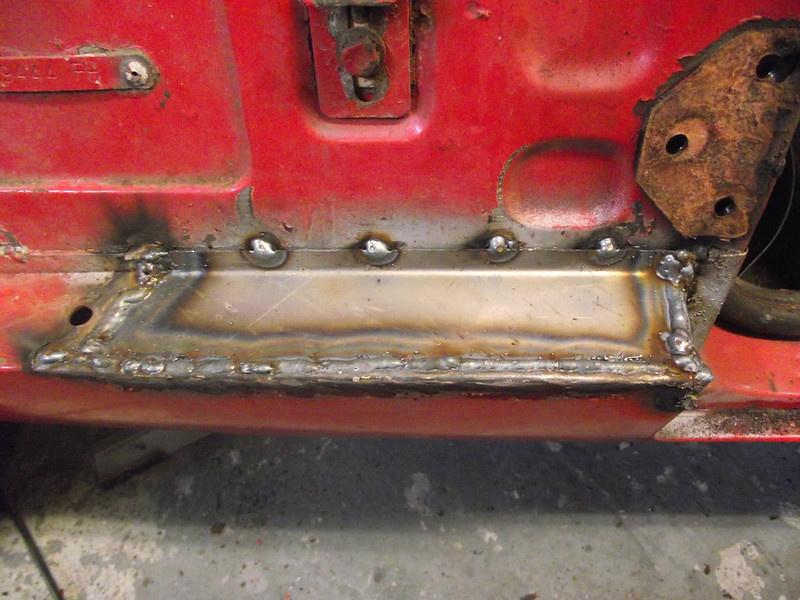

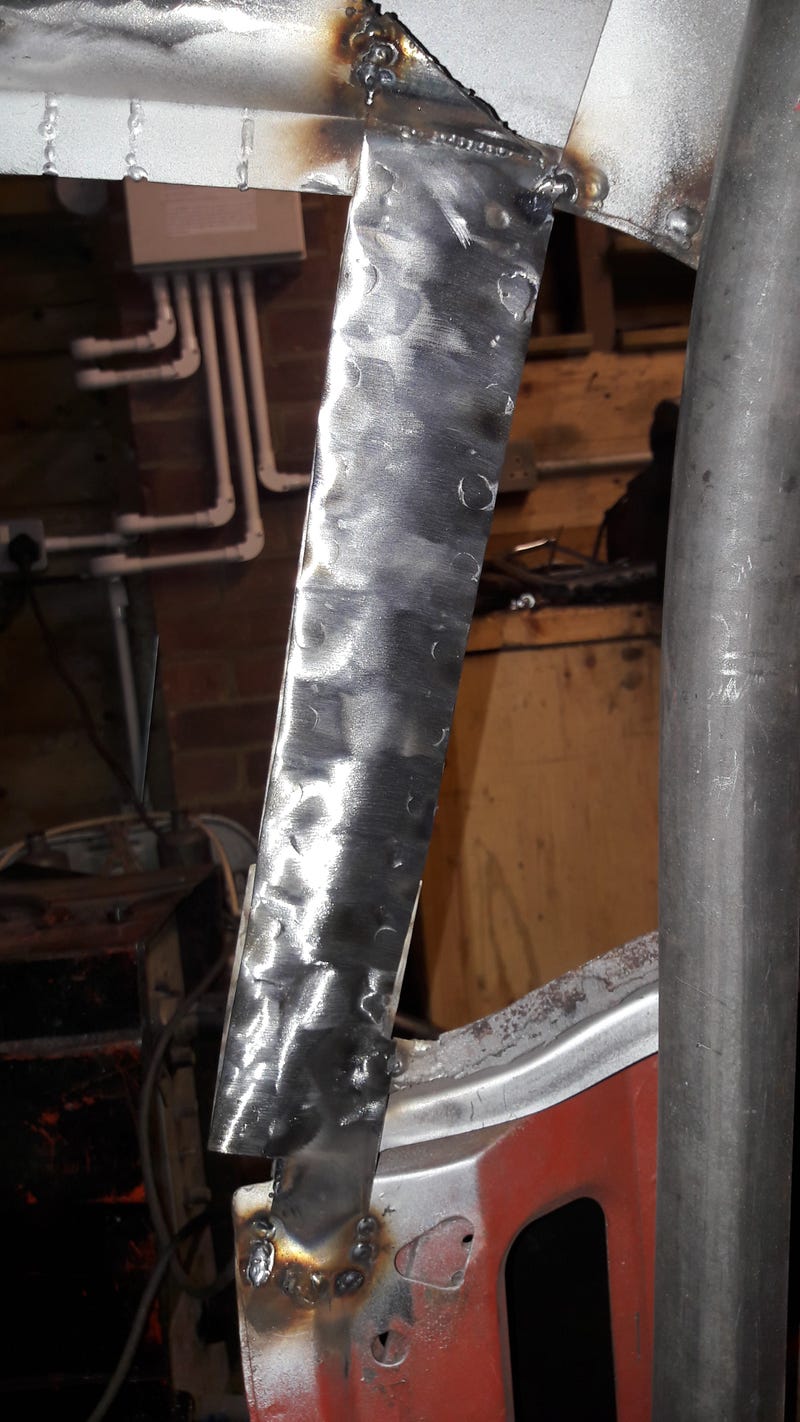
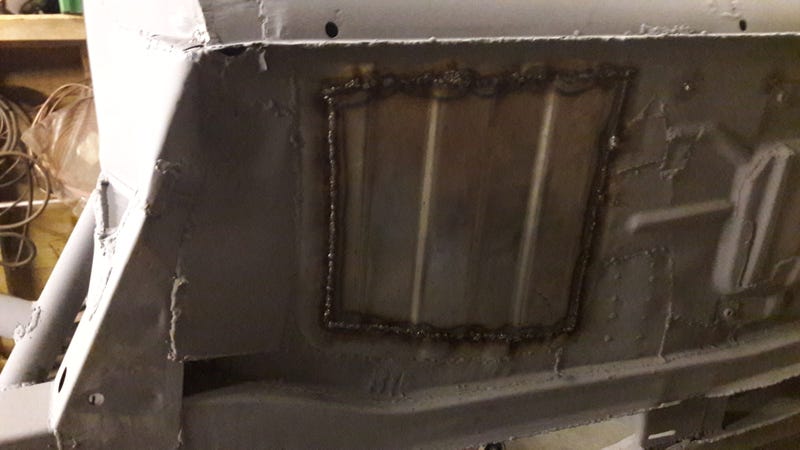
The other side was a similar story, although the wheel arch inner had gone as well. Discovered that compound curves are pretty tricky to bend out of sheet steel, but cutting lots of little tabs and then stitching them together once bent works quite nicely

At this point in my old thread, I coin the phrase 'I'd like to do as little welding as possible to fix the rust and get it on the road', which is probably the biggest lie I've told to date...
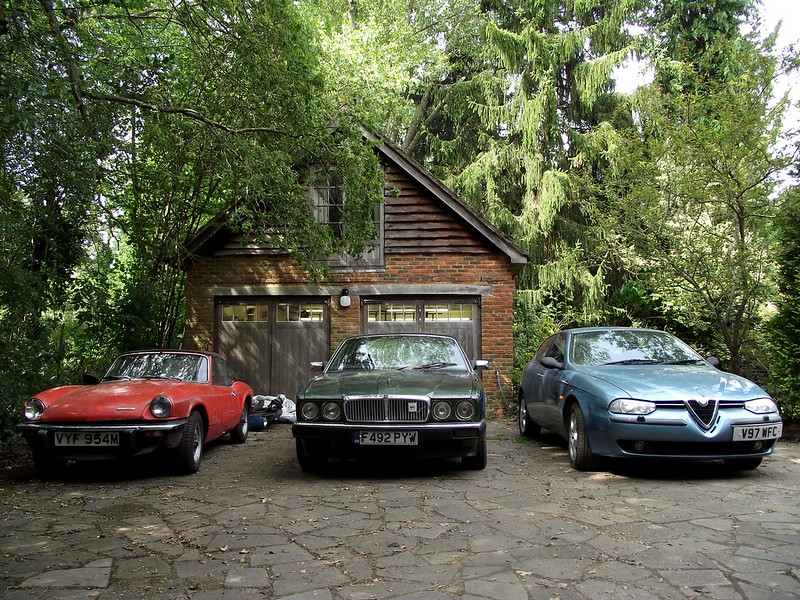
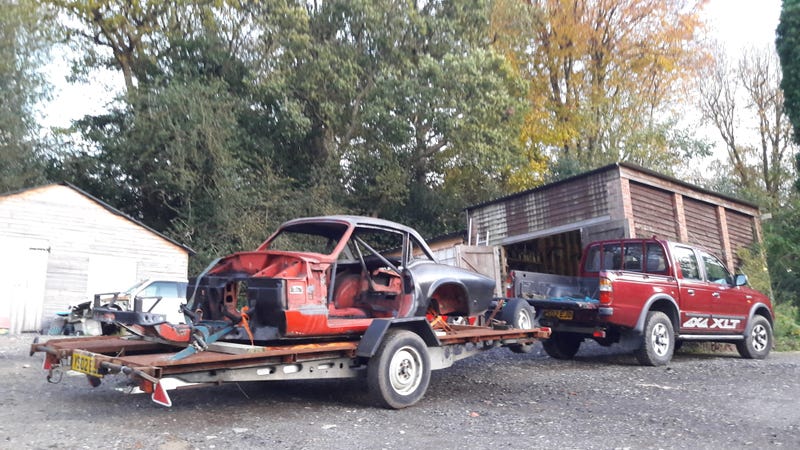
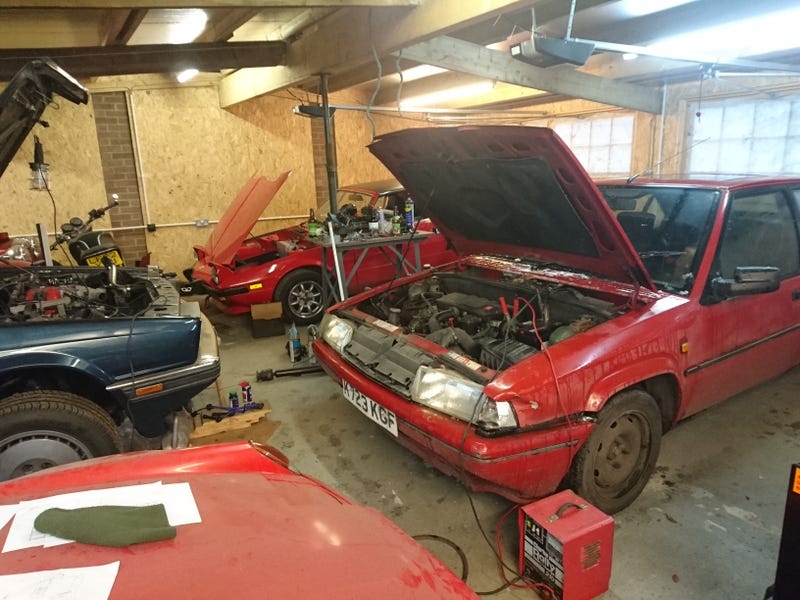
And a little glamour shot of the garage and stable at the time parents place, and dead lucky to have such a good working space. Alfa is a V6 and has been my on and off daily for donkey's years (GTA Sportwagon ARBs and a stainless exhaust but little else). The Jag I bought from my uncle for the princely sum of £60 and pulled it out of his field. It was running but not MoT'd at this point, but sadly meets a rather sticky end...
More chopping, more welding:
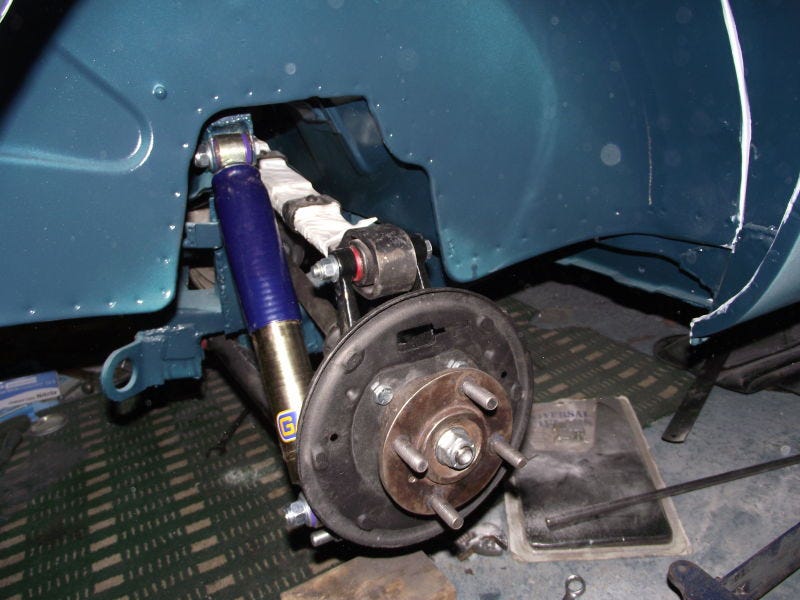
At this point, the members of Club Triumph inform me of all the various alloy and lightweight bits and pieces you can get for the Triumph I6, so the shopping list grows oncemore. Estimated that you can cut about 30kg from the front end with the bells and whistles, and 61kg from the front including the fibreglass bonnet, ditching the bumpers and relocating the battery.
Straightened out the fibreglass bonnet and looks like we might have a bit of a tweaked chassis. A bit of closer inspection showed a little crease just aft of the very front, so hopefully no damage to the suspension mounting points.

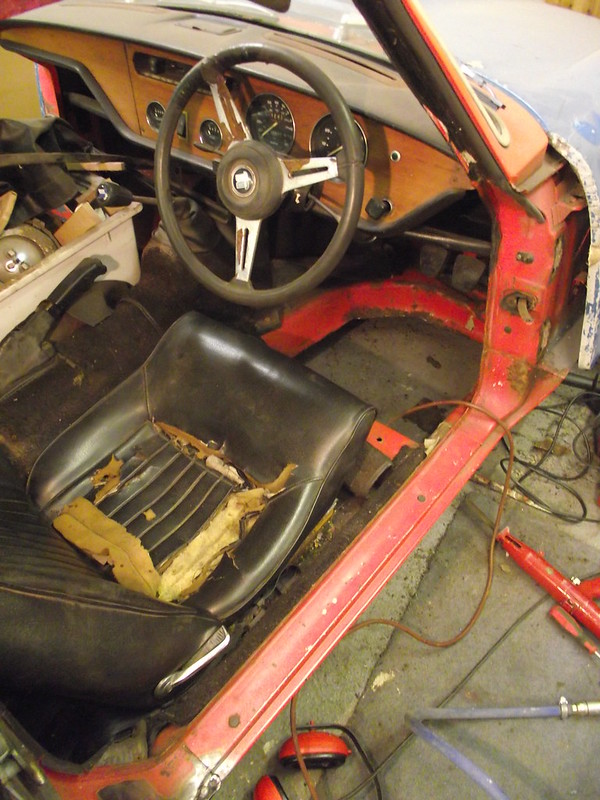
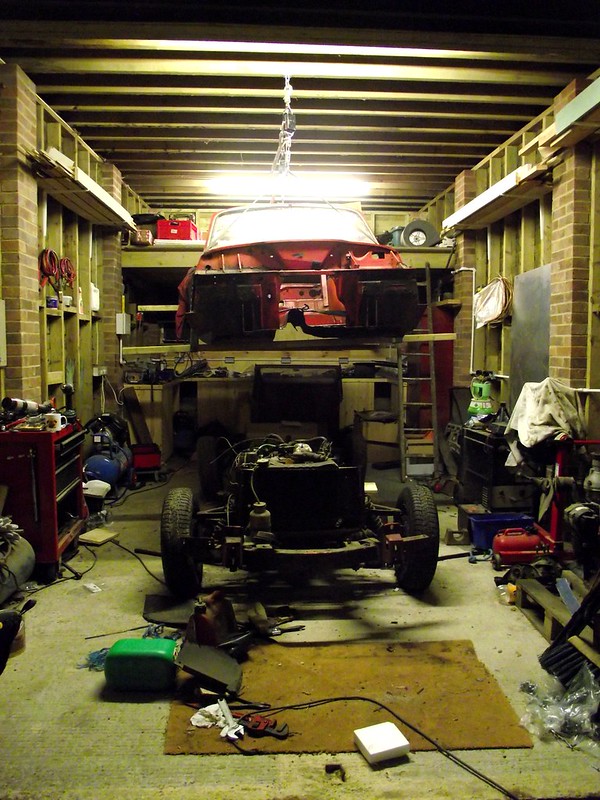
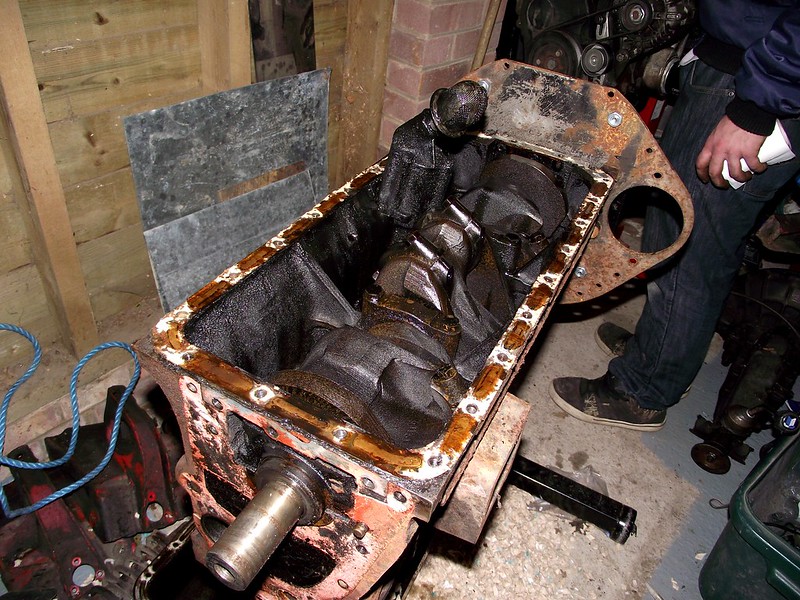
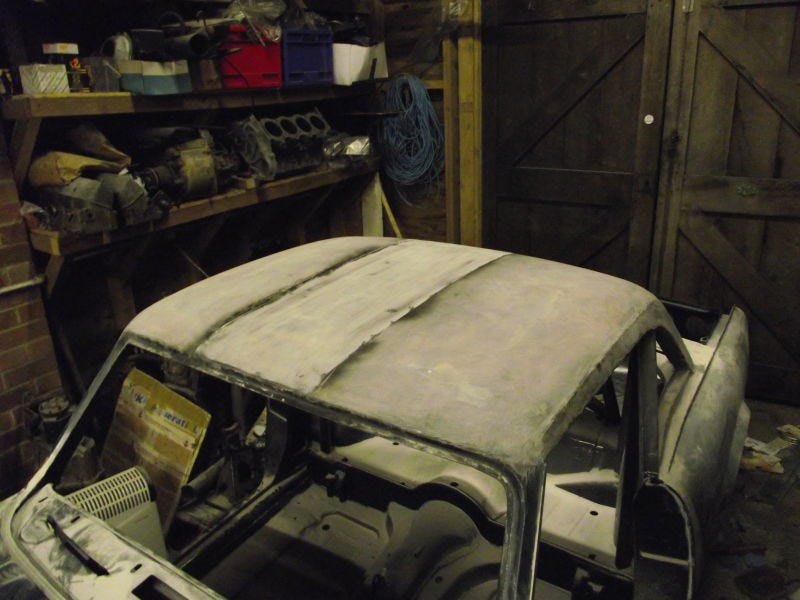
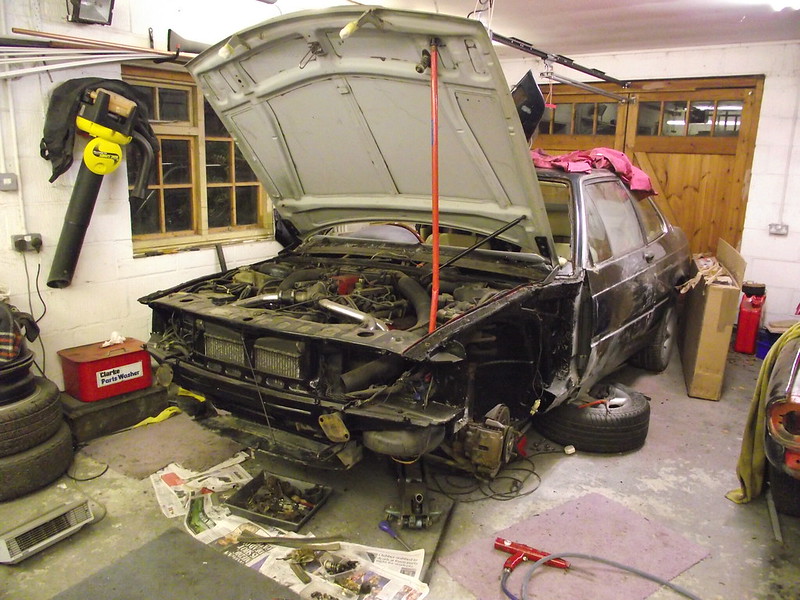
House moved, interior stripped, body winched to the roof of the garage, engine removed:


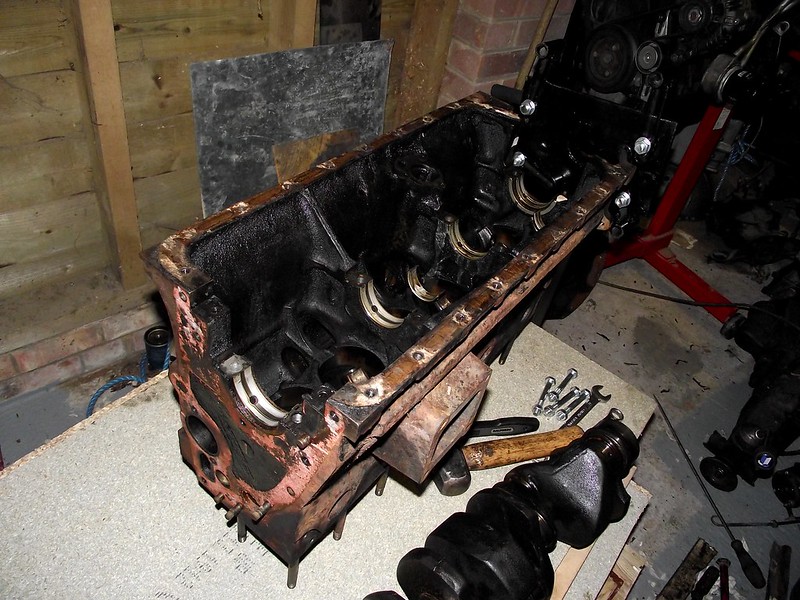
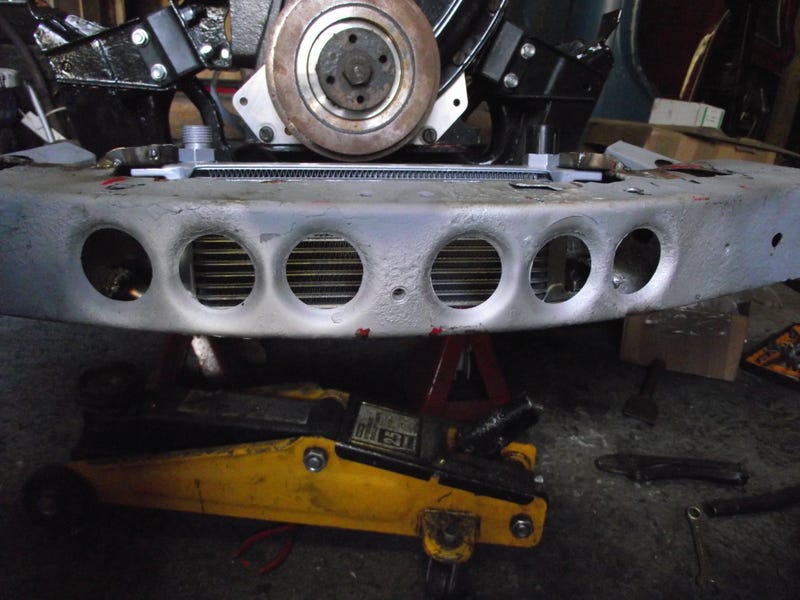
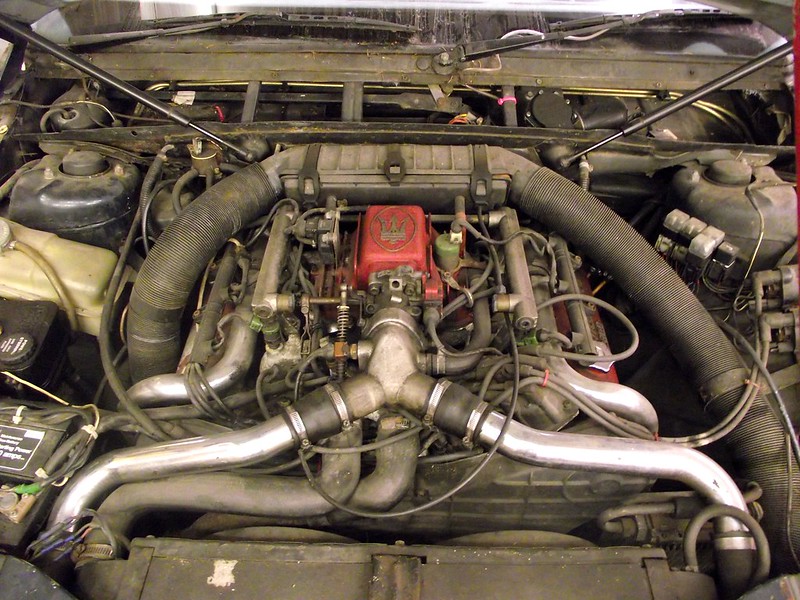
PI engine teardown...
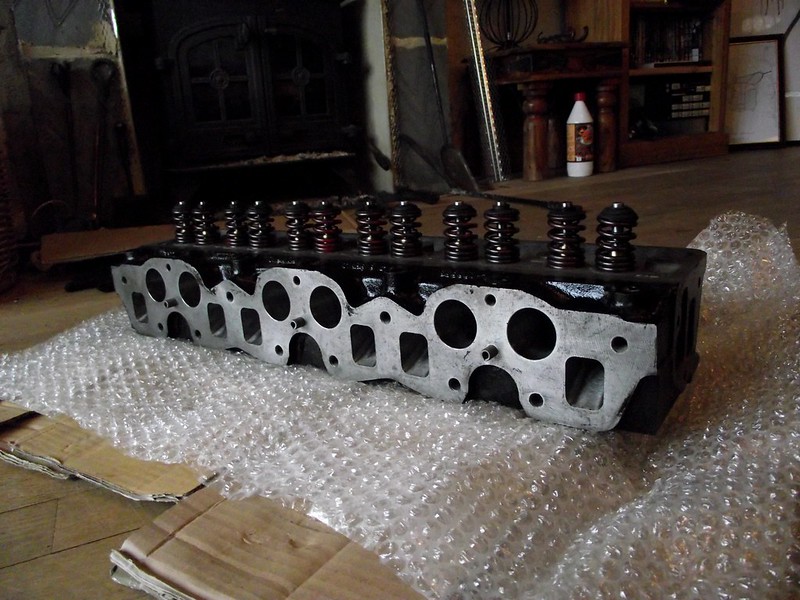
But 141bhp isn't particularly impressive in today's day and age, even with sod all weight to shift. Why not blow some money on a ported head?
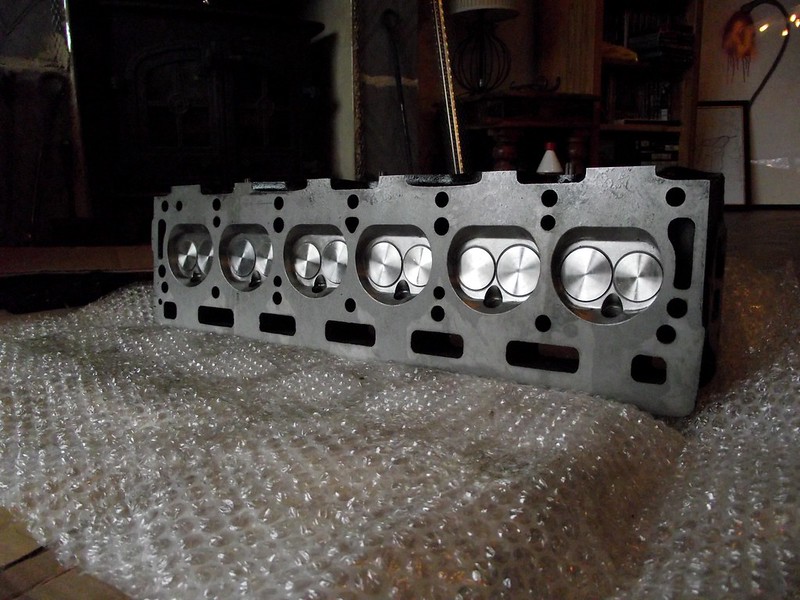
Purdy
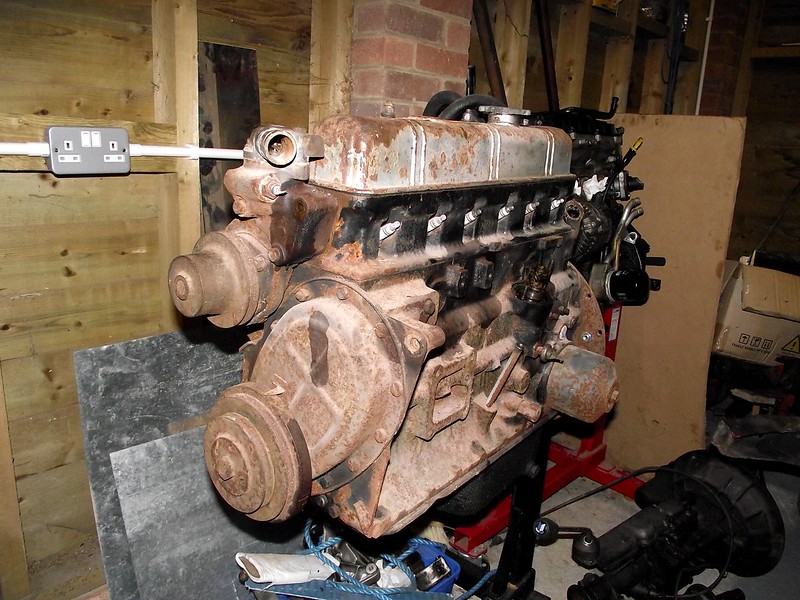
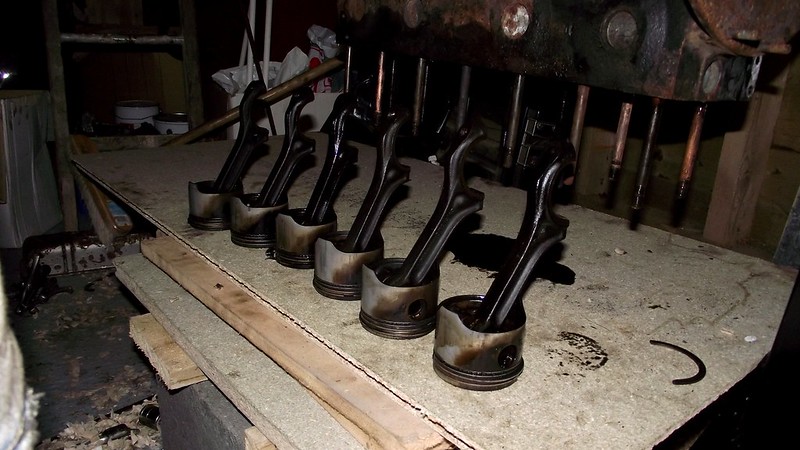
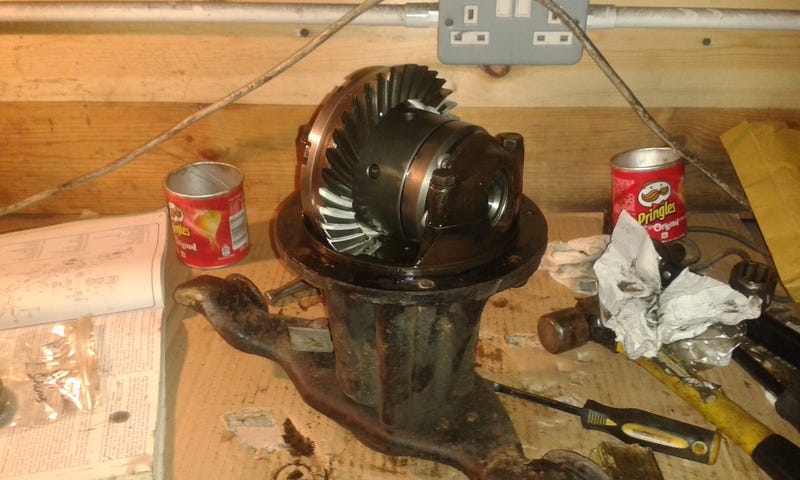
Balanced and reground crank...
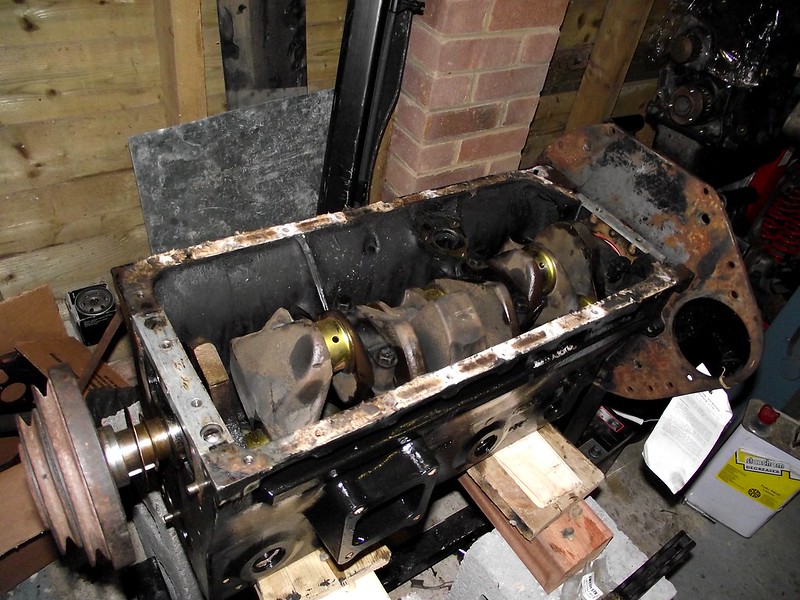
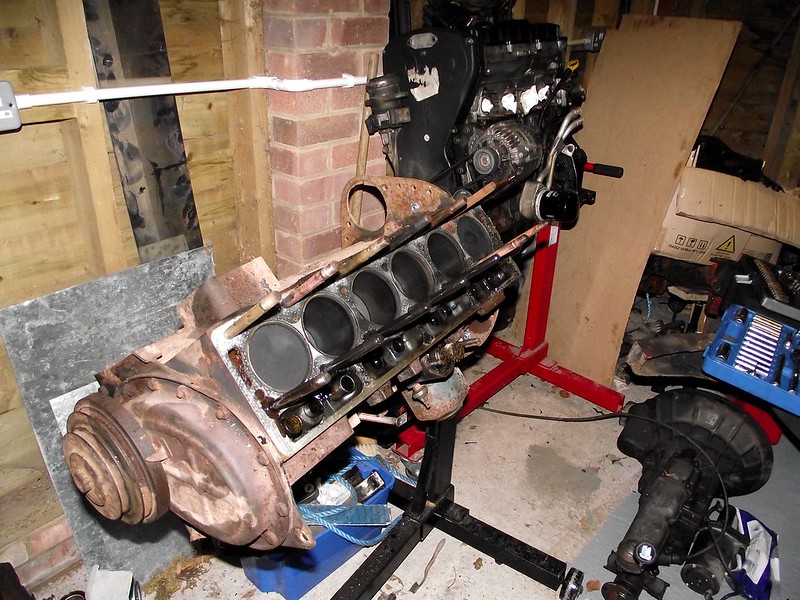
...honed bores as they were still in spec...
[img]https://c2.staticflickr.com/8/7453/13241972923_2feefb504d_c.jpg[img]
...alloy engine plates and rebuilt decided on a target weight of 750kg after the swap, which seems ambitious but doable

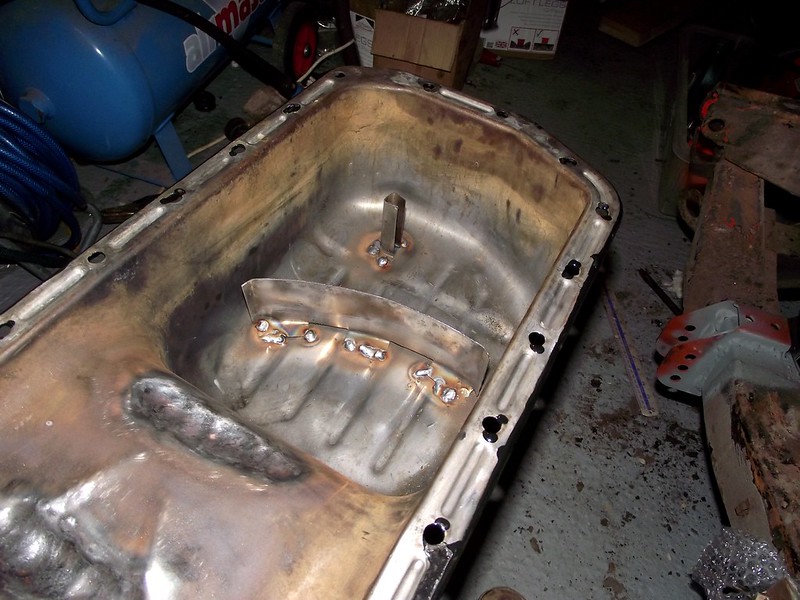
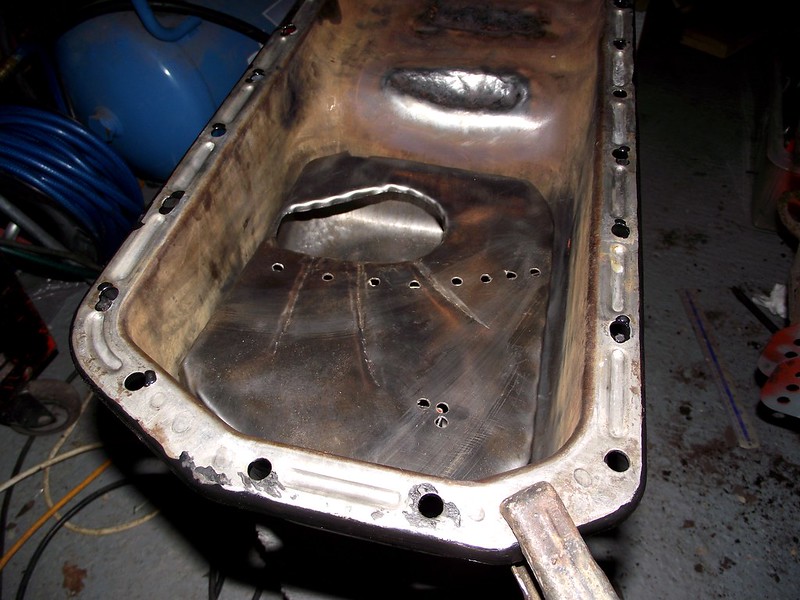
To clear the long-throw crank of the 2.5l using a GT6 sump you have to knock some channels into the shallow section. While I was there, I thought I might as well make a baffle to try and control the oil flow a little. Did a whole load of research into clever stuff like gated baffles, but having little fastening rattling around in the sump ready to come off and get stuck in moving bits didn't sound like a good idea to me. This is what I ended up with:
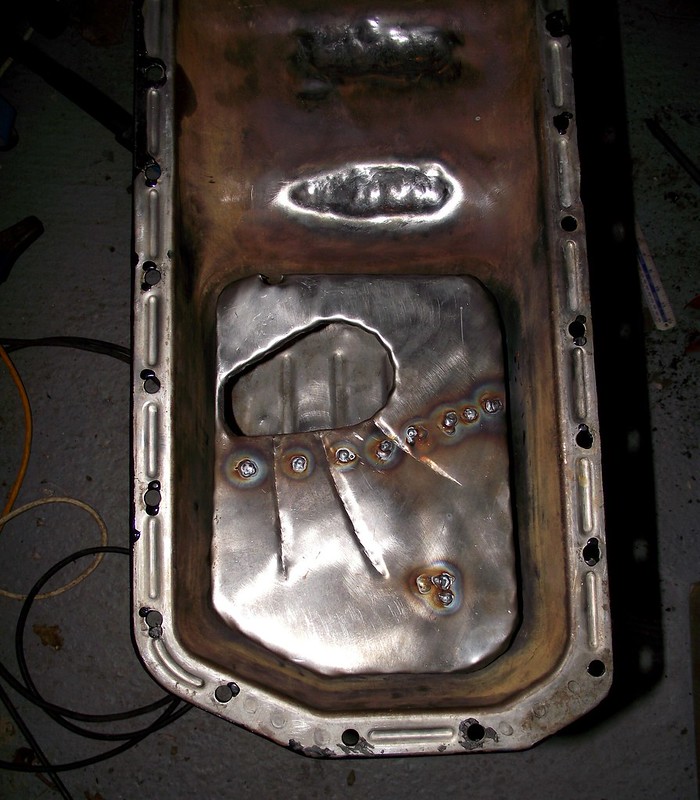
[img]https://c1.staticflickr.com/3/2897/13497433673_3e8894a82c_c.jpg/img]
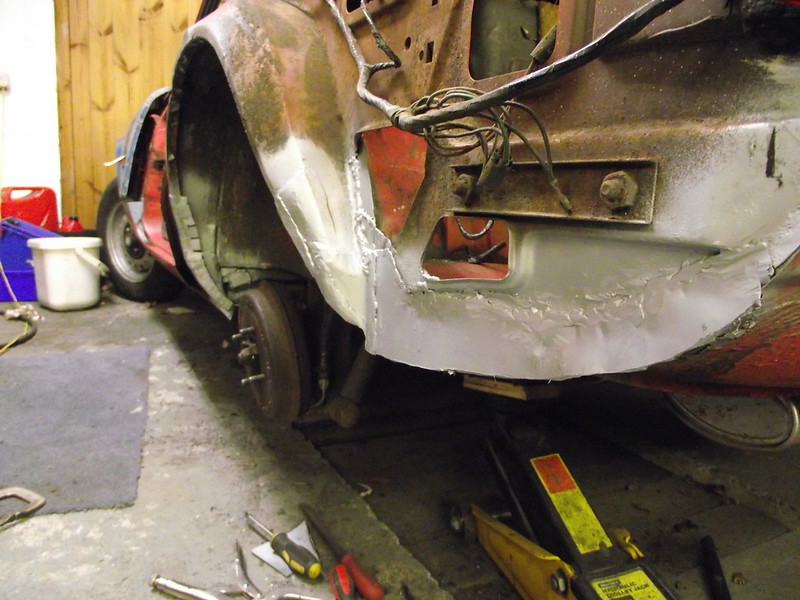
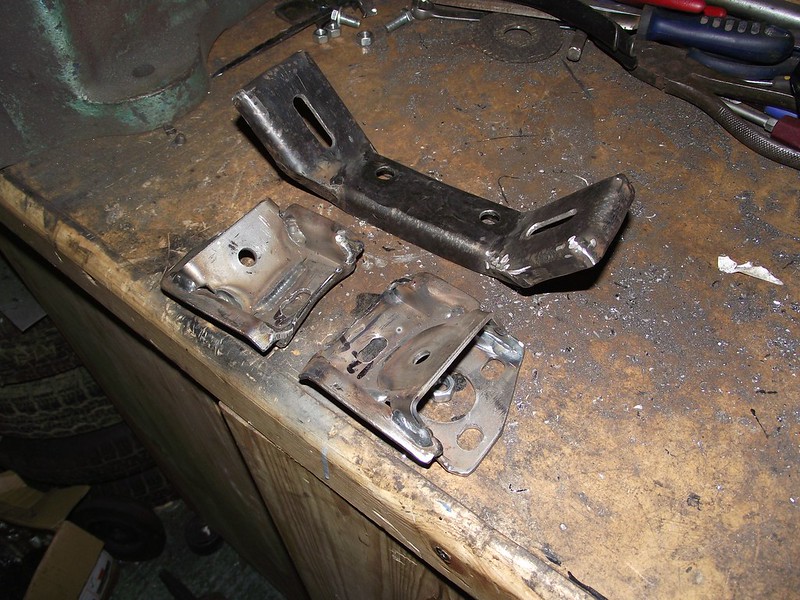
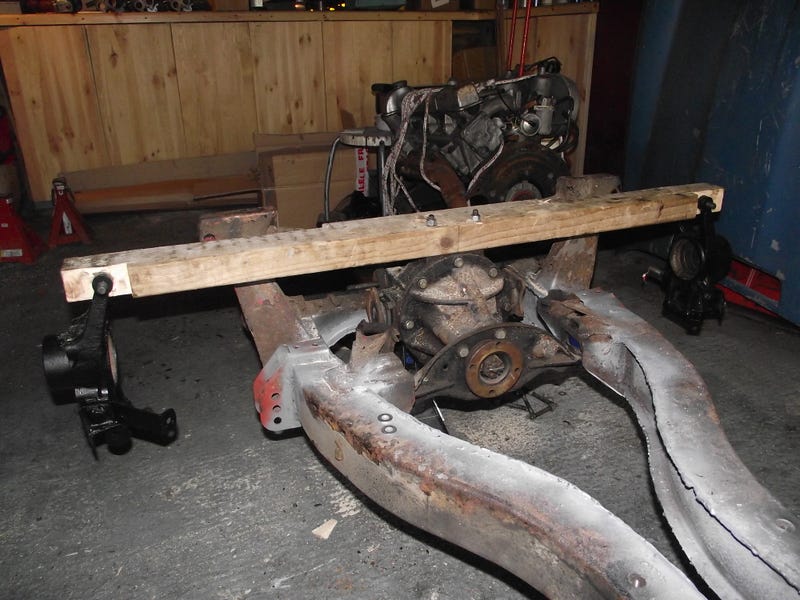
Outriggers off...
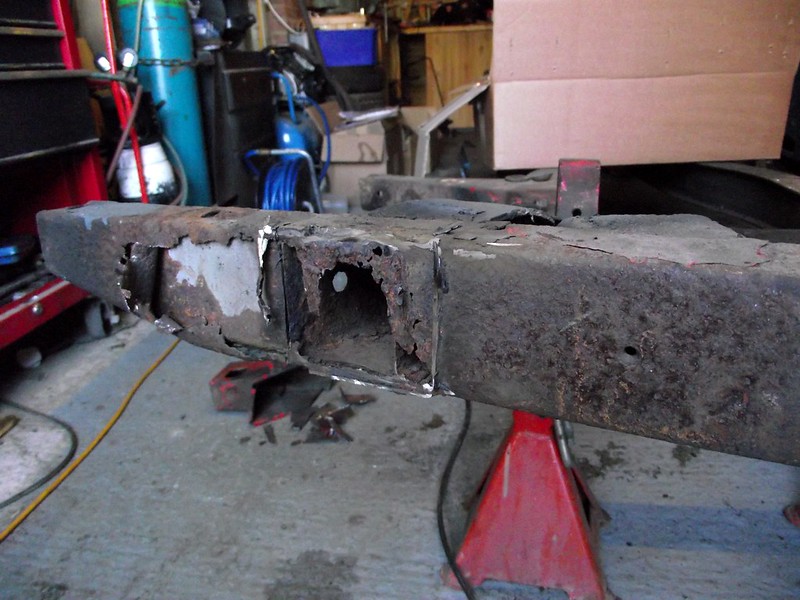
...rust fixed...
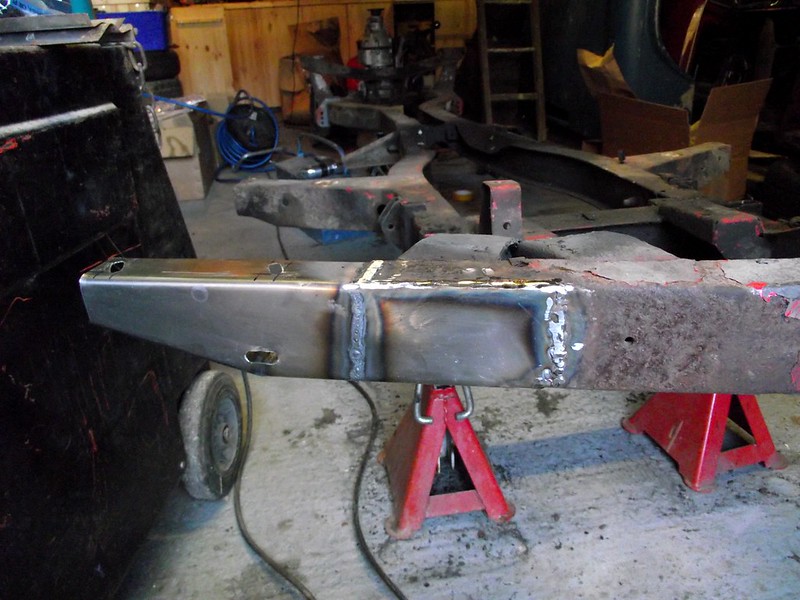
...and new outriggers on

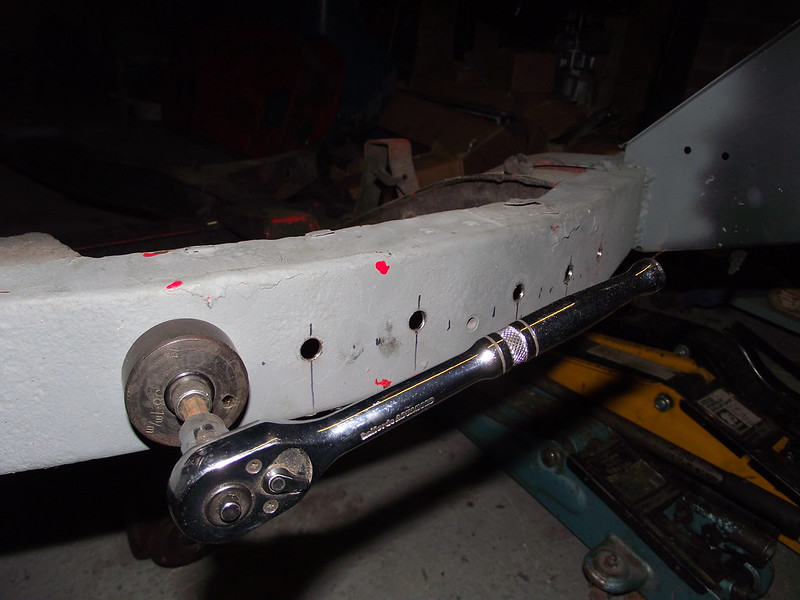
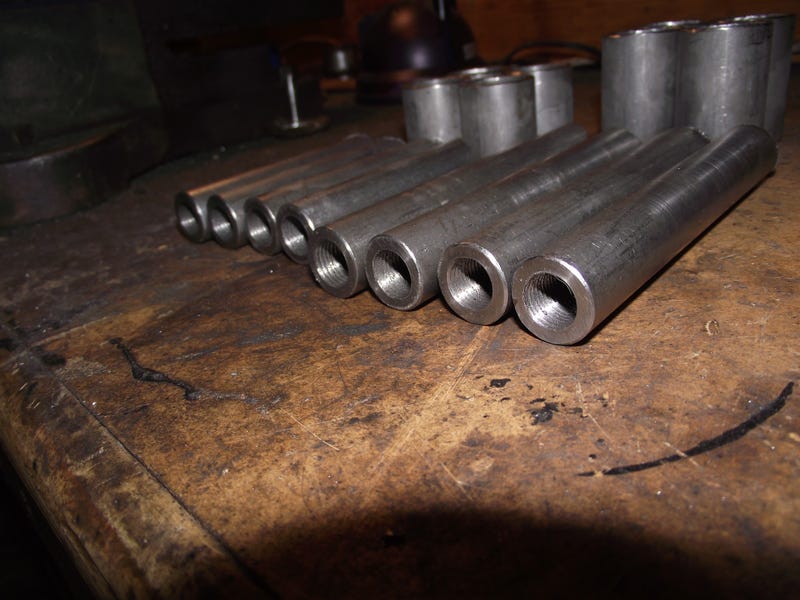
A little trip to eBay and hole punch all the things!
[img]https://c1.staticflickr.com/9/8625/16505505508_b2f84d6e8e_c.jpg/img]
[img]https://c1.staticflickr.com/9/8632/16693049135_dbc2900d74_c.jpg/img]
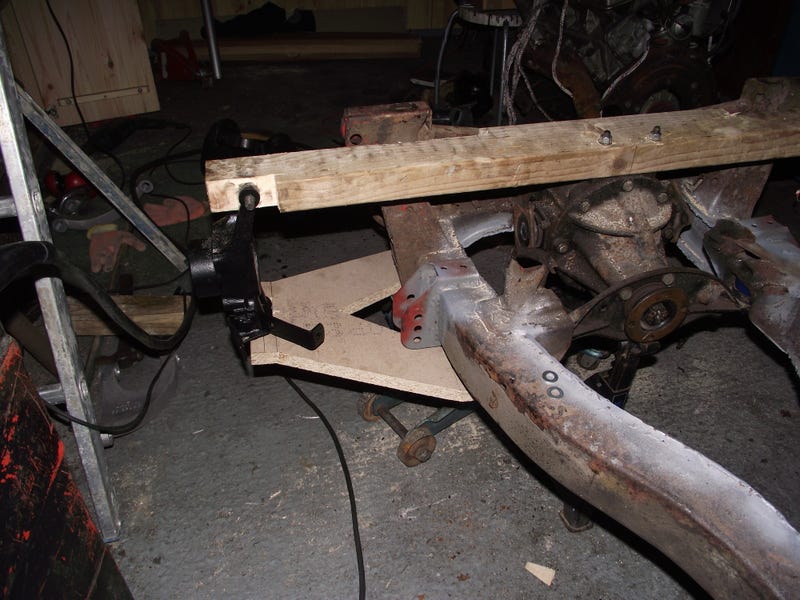
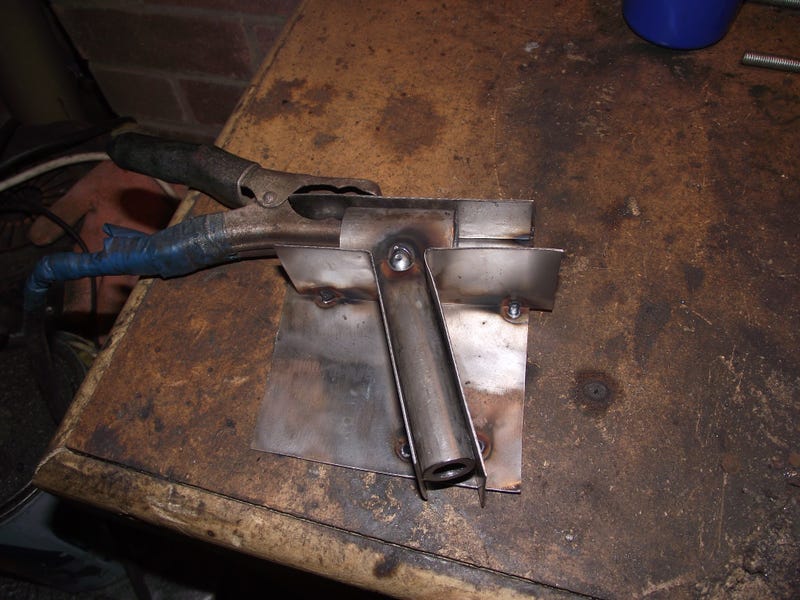
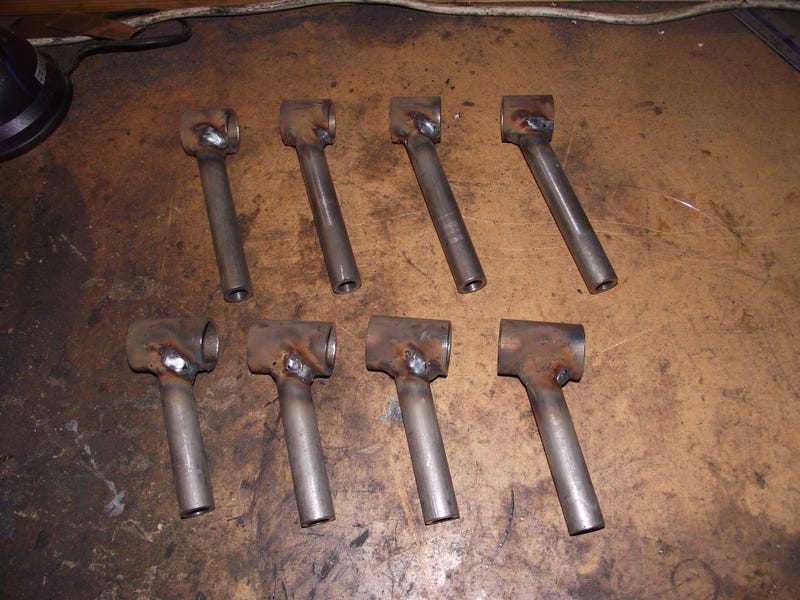
First proper fabrication job of making some gearbox mounts for the bigger saloon gearbox (if you're thinking of doing a similar thing, don't use this design. It fouled on the seats.)
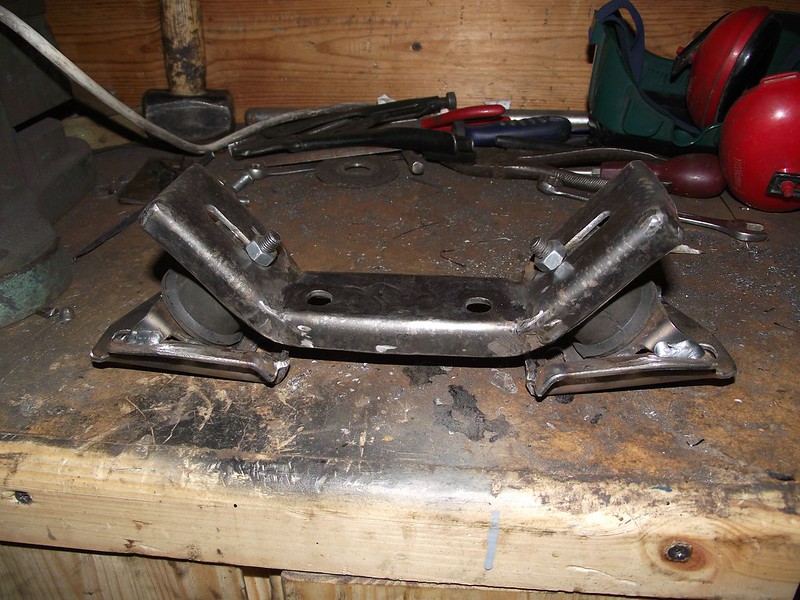
Looked good though
[img]https://c1.staticflickr.com/9/8568/16070832984_a0ce1462e9_c.jpg/img]
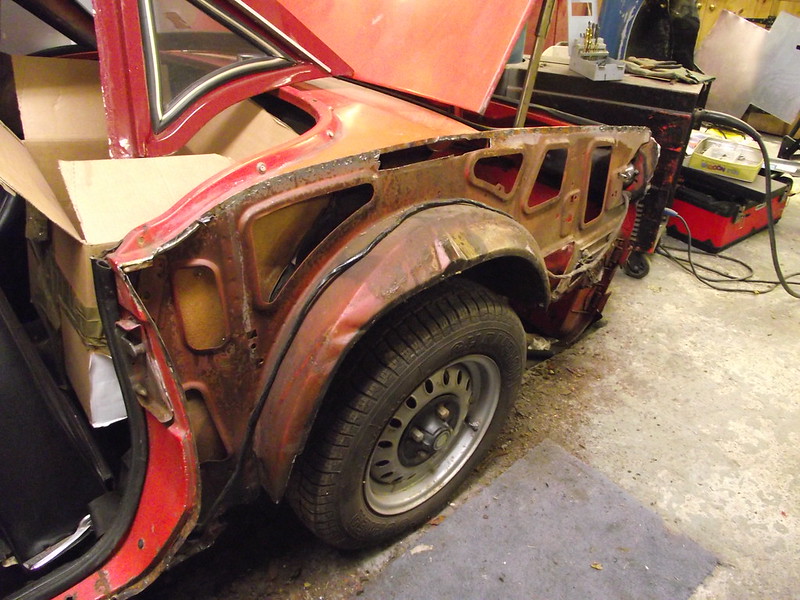
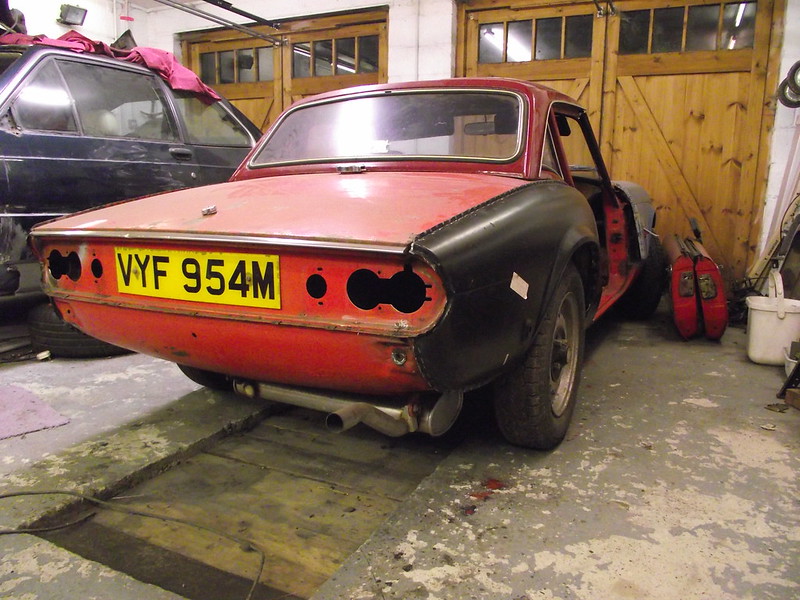
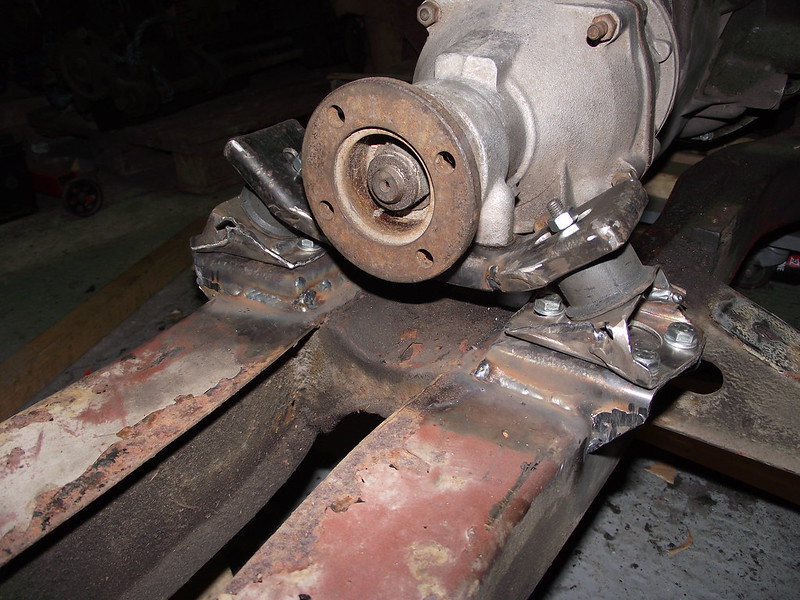
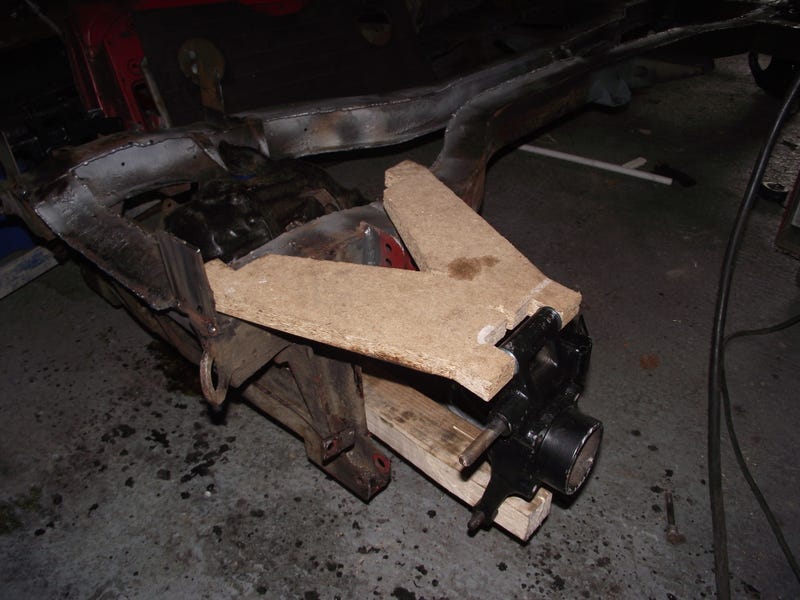
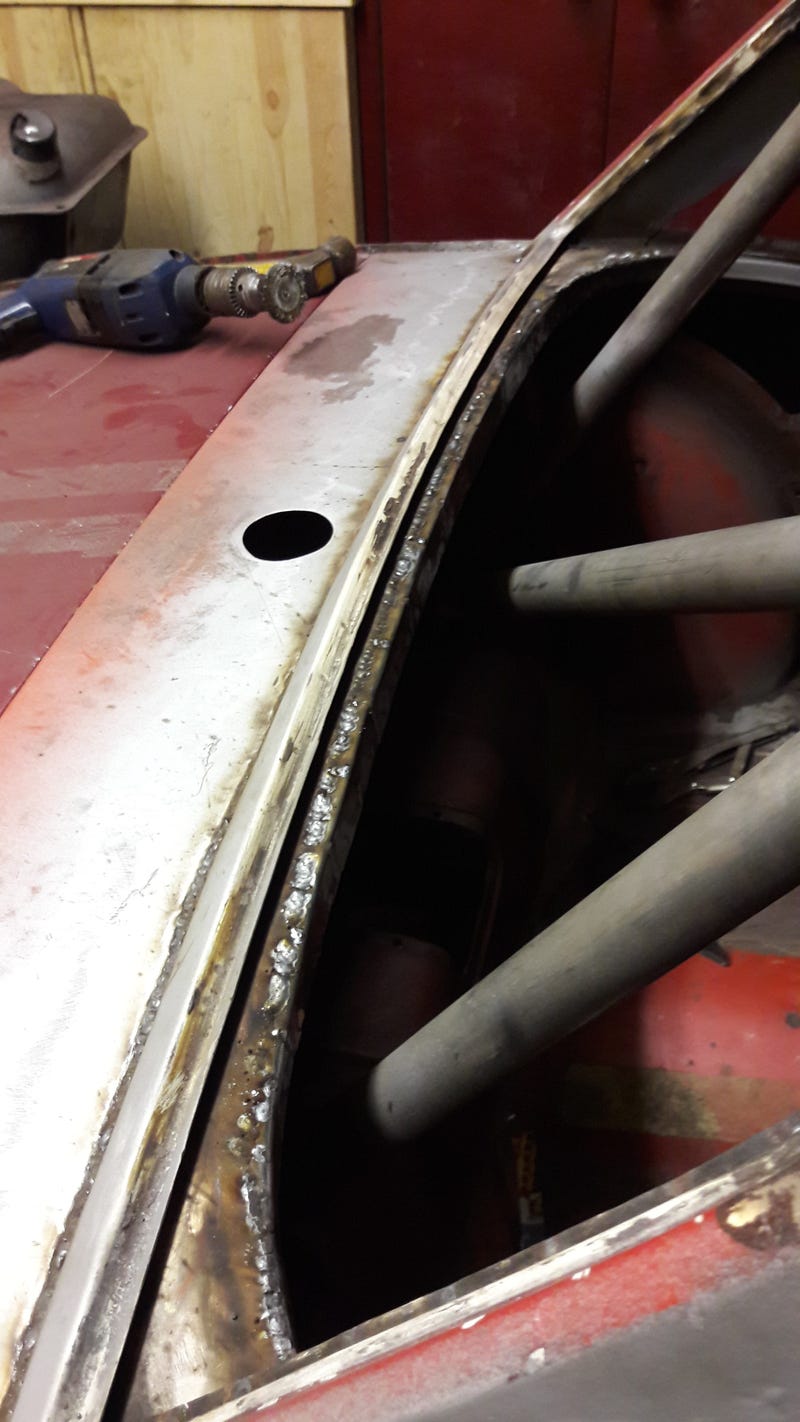
Bodyshell back down to check clearance (and some more rust discovered and repaired)

[img]https://i.kinja-img.com/gawker-media/image/upload/s--h_rlETG3--/c_scale,f_auto,fl_progressive,q_80,w_800/1511388031316113324.jpg/img]
[img]https://i.kinja-img.com/gawker-media/image/upload/s--kBa6vP3J--/c_scale,f_auto,fl_progressive,q_80,w_800/1513235189093109137.jpg/img]
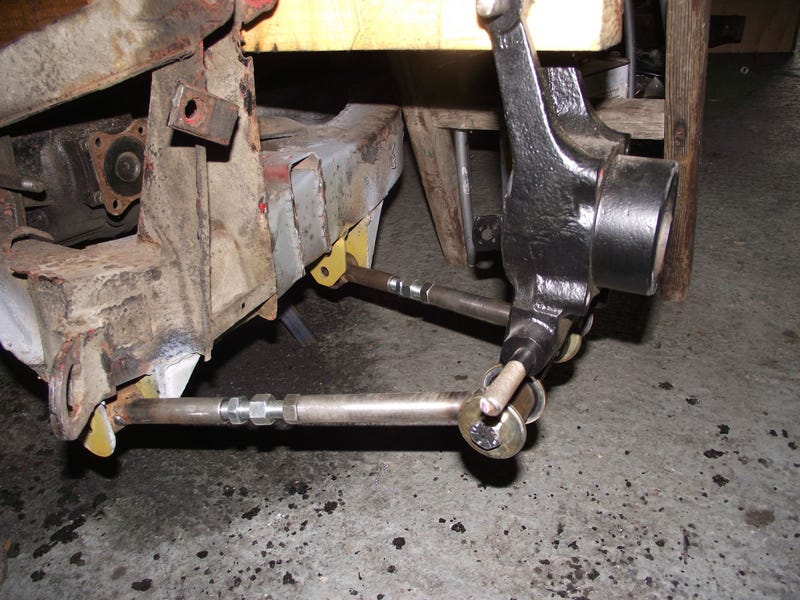
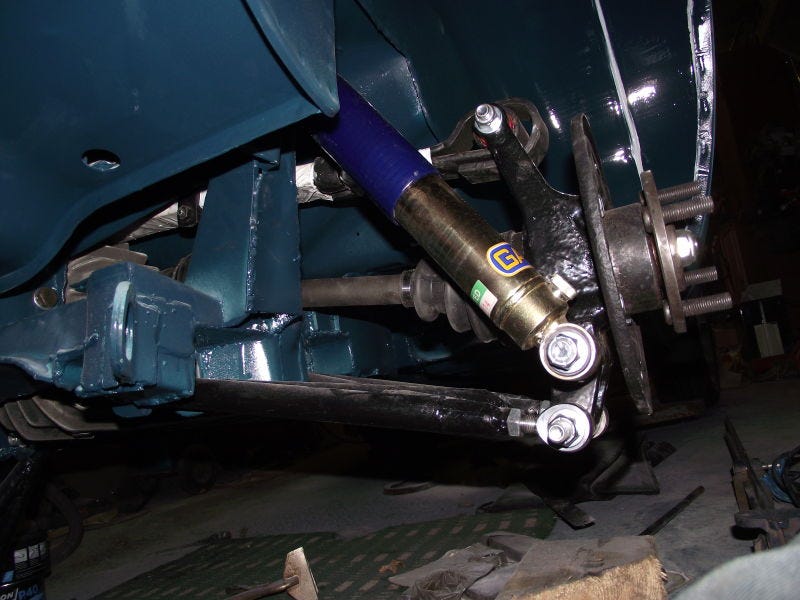
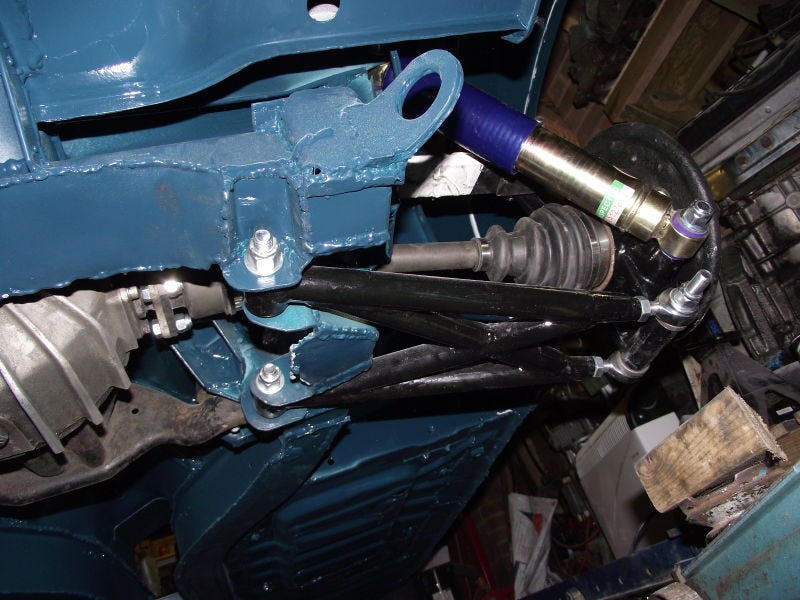
More weight reduction and spangly expensive bits oh, and decided I should probably do away with the swing axles and bought the bits for a rotoflex (GT6 mk2/early mk3 suspension) conversion GT6 fuel tank in the boot should help shift weight back too
[img]https://i.kinja-img.com/gawker-media/image/upload/s--Y2mW4mlY--/c_scale,f_auto,fl_progressive,q_80,w_800/1513235189012691345.jpg/img]
[img]https://i.kinja-img.com/gawker-media/image/upload/s--bZkLBwdp--/c_scale,f_auto,fl_progressive,q_80,w_800/wefjeuaiabhysjregoel.jpg/img]
[img]https://i.kinja-img.com/gawker-media/image/upload/s--q11H7JwN--/c_scale,f_auto,fl_progressive,q_80,w_800/wc3hfepyo3aws1zt0mpf.jpg/img]
This seems like as good a point as any to take a small break. Everything so far had been pretty straight forward as far as Spitfire 6 builds go.
You. Just. Wait.
We'll start with the big one. My Triumph Spitfire 6. AKA 'Patchwork' (alternatively titled: 'Project Scope Creep').
Back in 2012, just out of university, I thought 'man I want one of those classic car things' and promptly bought myself a bit of a rust-bucket Spitfire for the princely sum of £1000. Bear with me, this might be a bit of a long intro...
I intended to do a bit of a rolling resto, but it turned out to be a far cry from the 'light project' it was billed to be. A fair amount of rust, and the engine wouldn't rev past 3500 without backfiring through the carbs. A fortnight or so of fettling didn't improve this at all, and a quick glance over eBay heralded this:
And the scope creep begins...
That's the mechanical fuel-injected I6 from a TR6 and associated overdrive gearbox. Rebuild, fix rust, swap in with GT6 bits, drive. Easy.
But hang on. I6-engined Spitfires are front-heavy beasts. Surely we can do something to fix that. The purchase of a £50 fibreglass bonnet turned out to be the tip of the iceberg we'll soon be uncovering. Might as well get a fibreglass hardtop too to replace the holed soft top.
Okedoke. Lets have a poke around the rest of the body for rusty bits. Bit of rust we know about, but can't be that bad.
Oh...
Okedoke then. Better learn to weld
The other side was a similar story, although the wheel arch inner had gone as well. Discovered that compound curves are pretty tricky to bend out of sheet steel, but cutting lots of little tabs and then stitching them together once bent works quite nicely
At this point in my old thread, I coin the phrase 'I'd like to do as little welding as possible to fix the rust and get it on the road', which is probably the biggest lie I've told to date...
And a little glamour shot of the garage and stable at the time
parents place, and dead lucky to have such a good working space. Alfa is a V6 and has been my on and off daily for donkey's years (GTA Sportwagon ARBs and a stainless exhaust but little else). The Jag I bought from my uncle for the princely sum of £60 and pulled it out of his field. It was running but not MoT'd at this point, but sadly meets a rather sticky end...More chopping, more welding:
At this point, the members of Club Triumph inform me of all the various alloy and lightweight bits and pieces you can get for the Triumph I6, so the shopping list grows oncemore. Estimated that you can cut about 30kg from the front end with the bells and whistles, and 61kg from the front including the fibreglass bonnet, ditching the bumpers and relocating the battery.
Straightened out the fibreglass bonnet and looks like we might have a bit of a tweaked chassis. A bit of closer inspection showed a little crease just aft of the very front, so hopefully no damage to the suspension mounting points.
House moved, interior stripped, body winched to the roof of the garage, engine removed:
PI engine teardown...
But 141bhp isn't particularly impressive in today's day and age, even with sod all weight to shift. Why not blow some money on a ported head?
Purdy
Balanced and reground crank...
...honed bores as they were still in spec...
[img]https://c2.staticflickr.com/8/7453/13241972923_2feefb504d_c.jpg[img]
...alloy engine plates and rebuilt
decided on a target weight of 750kg after the swap, which seems ambitious but doable To clear the long-throw crank of the 2.5l using a GT6 sump you have to knock some channels into the shallow section. While I was there, I thought I might as well make a baffle to try and control the oil flow a little. Did a whole load of research into clever stuff like gated baffles, but having little fastening rattling around in the sump ready to come off and get stuck in moving bits didn't sound like a good idea to me. This is what I ended up with:
[img]https://c1.staticflickr.com/3/2897/13497433673_3e8894a82c_c.jpg/img]
Outriggers off...
...rust fixed...
...and new outriggers on
A little trip to eBay and hole punch all the things!
[img]https://c1.staticflickr.com/9/8625/16505505508_b2f84d6e8e_c.jpg/img]
[img]https://c1.staticflickr.com/9/8632/16693049135_dbc2900d74_c.jpg/img]
First proper fabrication job of making some gearbox mounts for the bigger saloon gearbox (if you're thinking of doing a similar thing, don't use this design. It fouled on the seats.)
Looked good though
[img]https://c1.staticflickr.com/9/8568/16070832984_a0ce1462e9_c.jpg/img]
Bodyshell back down to check clearance (and some more rust discovered and repaired)
[img]https://i.kinja-img.com/gawker-media/image/upload/s--h_rlETG3--/c_scale,f_auto,fl_progressive,q_80,w_800/1511388031316113324.jpg/img]
[img]https://i.kinja-img.com/gawker-media/image/upload/s--kBa6vP3J--/c_scale,f_auto,fl_progressive,q_80,w_800/1513235189093109137.jpg/img]
More weight reduction and spangly expensive bits
oh, and decided I should probably do away with the swing axles and bought the bits for a rotoflex (GT6 mk2/early mk3 suspension) conversion GT6 fuel tank in the boot should help shift weight back too [img]https://i.kinja-img.com/gawker-media/image/upload/s--Y2mW4mlY--/c_scale,f_auto,fl_progressive,q_80,w_800/1513235189012691345.jpg/img]
[img]https://i.kinja-img.com/gawker-media/image/upload/s--bZkLBwdp--/c_scale,f_auto,fl_progressive,q_80,w_800/wefjeuaiabhysjregoel.jpg/img]
[img]https://i.kinja-img.com/gawker-media/image/upload/s--q11H7JwN--/c_scale,f_auto,fl_progressive,q_80,w_800/wc3hfepyo3aws1zt0mpf.jpg/img]
This seems like as good a point as any to take a small break. Everything so far had been pretty straight forward as far as Spitfire 6 builds go.
You. Just. Wait.
Thanks Veeayt I absolutely will. We're only up to page 12 of the old forum (out of 29 so far). Plenty more to come
And yes shalmaneser. Of the patented variety next most popular British export after Lucas Wiring Smoke
Back to the story!
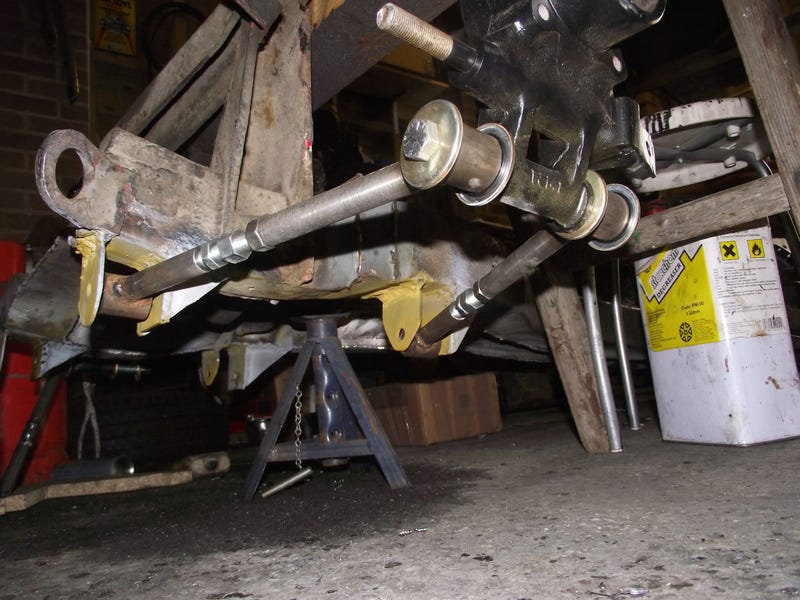
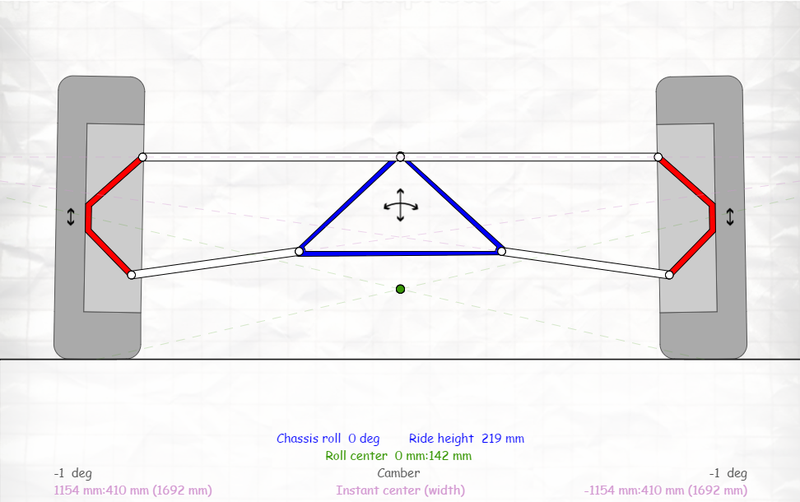
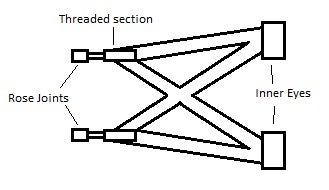
It was at this point that I lost the plot. The GT6 rotoflex system is actually pretty clever as far as early IRS systems go. This is it for reference:
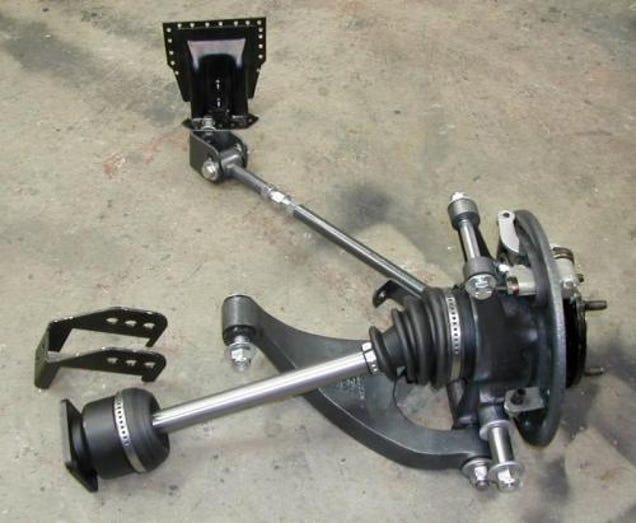
The only bit missing from that is the upper link being made from the transverse leaf spring. Its geometry is better than a lot of semi-trailing arm fudges which tend to give some pretty nasty toe change as the suspension compresses. Camber curve is pretty good as well, despite the short lower arm and long upper. The sharp angle of the lower arm means it gains effective length much faster than the upper link, meaning you get decent negative camber gain under compression at the expense of sharp positive camber in droop. There's something to be said for going positive in droop (tends to help stability during braking), but the amount it gains is significant. Plus, it does still retain some of the toe change which I wasn't keen on.
The clever bods at Triumph knew this, and for a planned iteration of their Le Mans Spitfires they came up with this, which gives zero toe change:
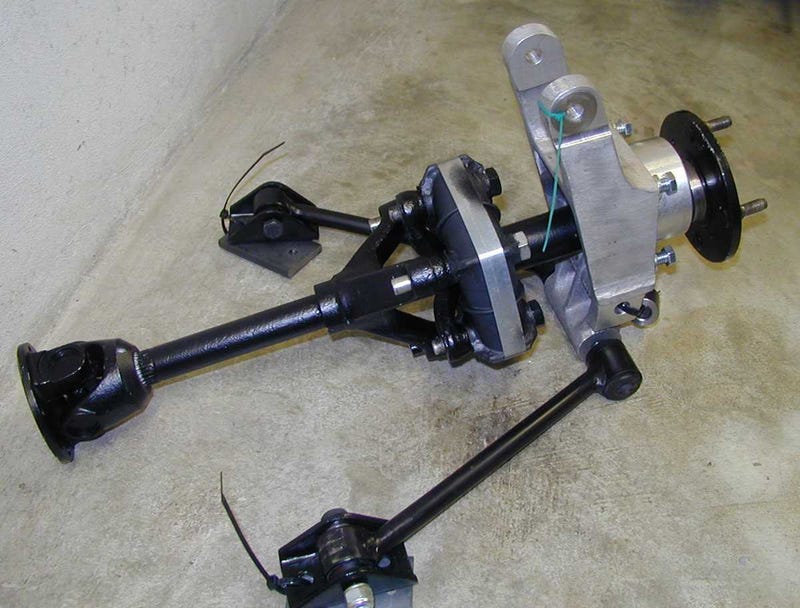
Now, another clever bod called GT6M over on the Triumph forums has made a modern iteration of this with slightly longer adjustable lower arms mounting beneath the chassis (made out of cut-down tie rods from the original suspension). Works out to better camber change
So, off comes the body and let's get started on my own iteration (don't worry, I learn my lesson about using wooden jigs)


And all hooked up
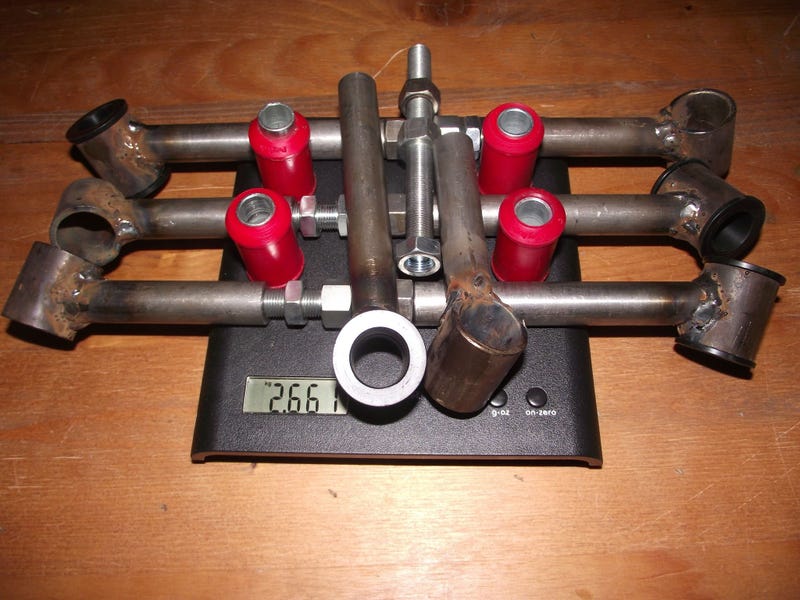
Nice and light too stock rotoflex wishbone setup weighs 6.452kg and alloy roto setup weighs 3.688kg.
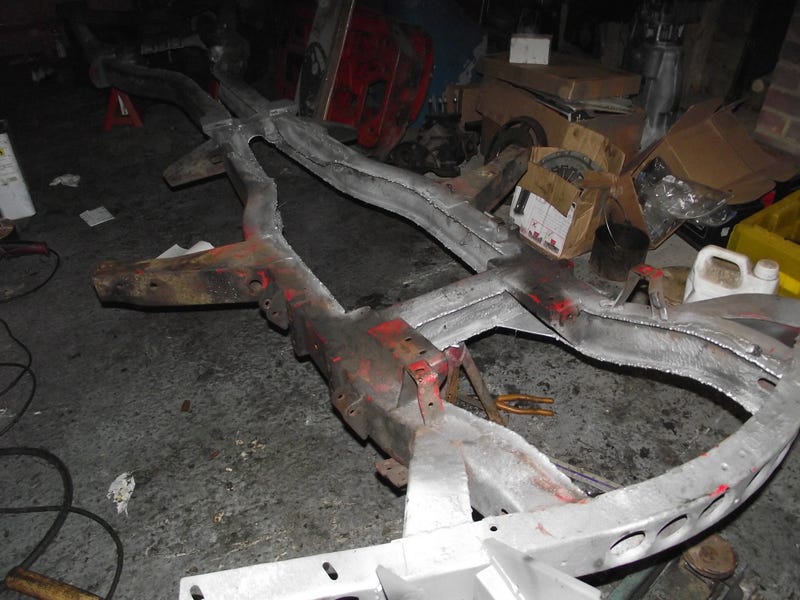
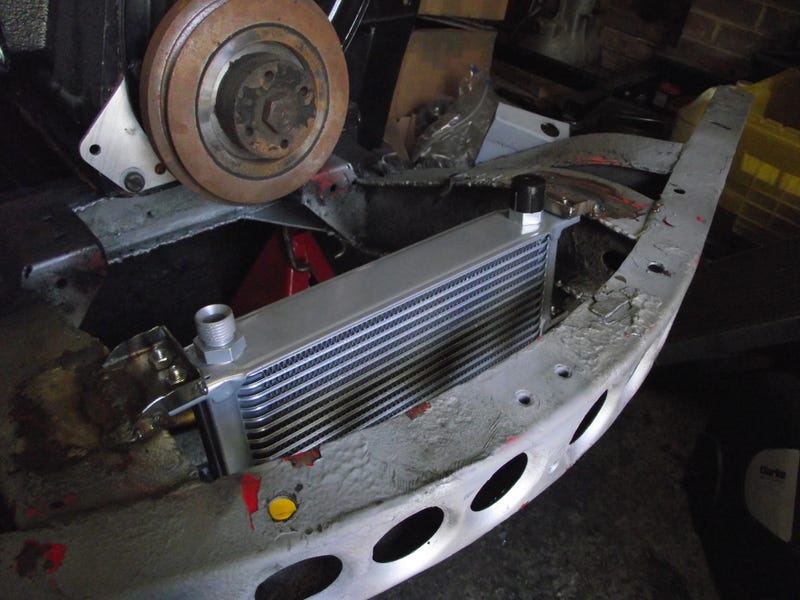
While the body was off again I might as well seam-weld the chassis and add an oil cooler (oil's pretty critical on these old 4-bearing cranks).
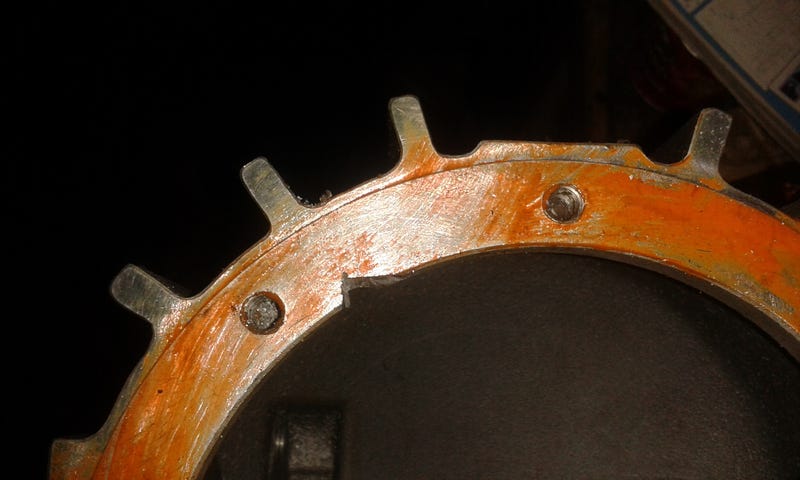
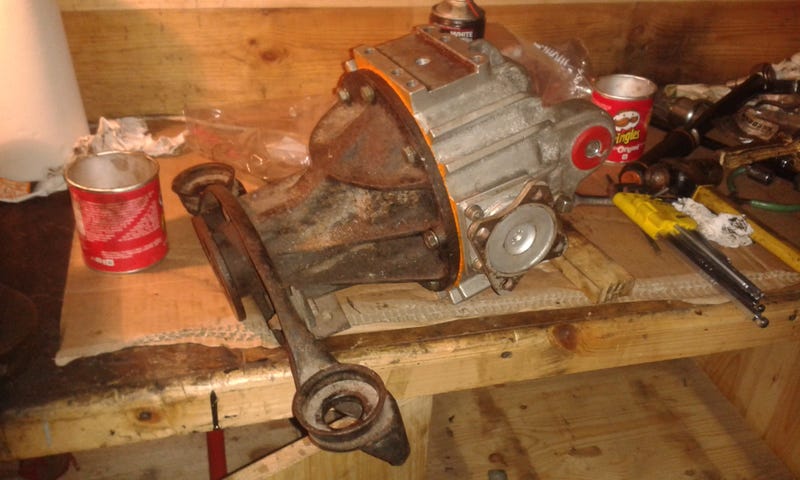
At this point I learn that the diffs for small-chassis Triumphs are a bit of a weak point. Early diffs have stronger bearings but the diff carrier isn't case-hardened so they crack, and later case-hardened diffs used weedy bearings from Morris Marina diffs thanks to the spiralling mess that was BL finances in the mid-70s. Of course, this means I should blow my savings on a Quaife LSD centre to fit in my big-bearinged early diff...
Little notch to clear the diff casing, and it's together
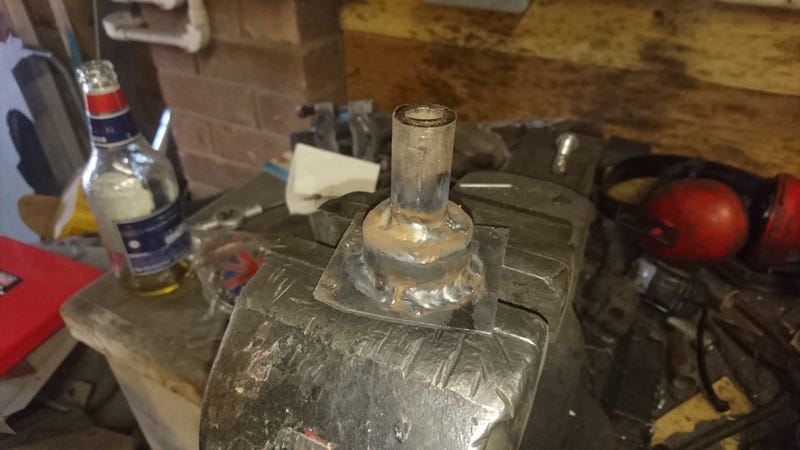
Originally I'd planned to use the GT6 fuel filler cap in the wing, but they're like hen's teeth (and the pressings for the wings even moreso). So relocating the filler neck seemed like a better option.
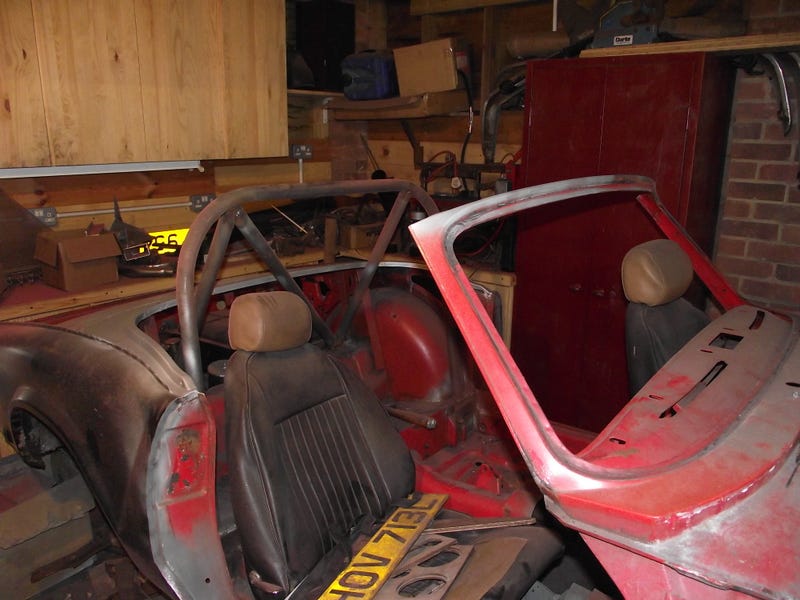
At this point, my dad had badgered me enough about when his mate had rolled his Spitfire when he was younger that I thought fabricating a roll cage would be a preferable alternative
38mm CDS tube bought after misreading the MSA Blue Book (I thought it was 38mm for cars older than x date to be legal, not cages built before x date). Looked for a tube bender but they're bloody expensive so ended up with a plumbing pipe bender instead. Lots of maths later and I found a tube of the right OD and thickness to make an insert into a pipe bender die to match a 38mm tube if people are interested I'll dig out the numbers
After 5 false starts and more bloody expensive CDS tube, I had my main hoop!
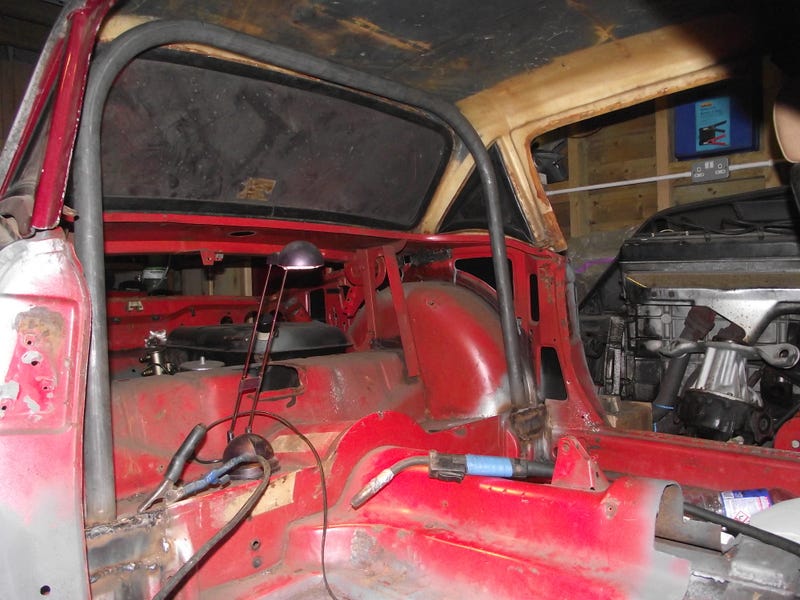
And cross-braces and backstays
It's at this point I discover that my gearbox mount won't fit, so back to the drawing board with that one to produce this:
I also started thinking that if I planned to have a bonded on fibreglass top as well I might as well weld a steel one on and tie the roll hoop into it with some boxes running forward to the windscreen surround. Off to eBay to find the cheapest (read rustiest) hardtop I could find, and weld it onto the bodyshell. We'll get to why this was a terrible idea at a later point...
Next up was stripping the underside of the body ready for paint I looked at a couple of rotisserie jigs and thought 'I can do better than that'. This is what I came up with
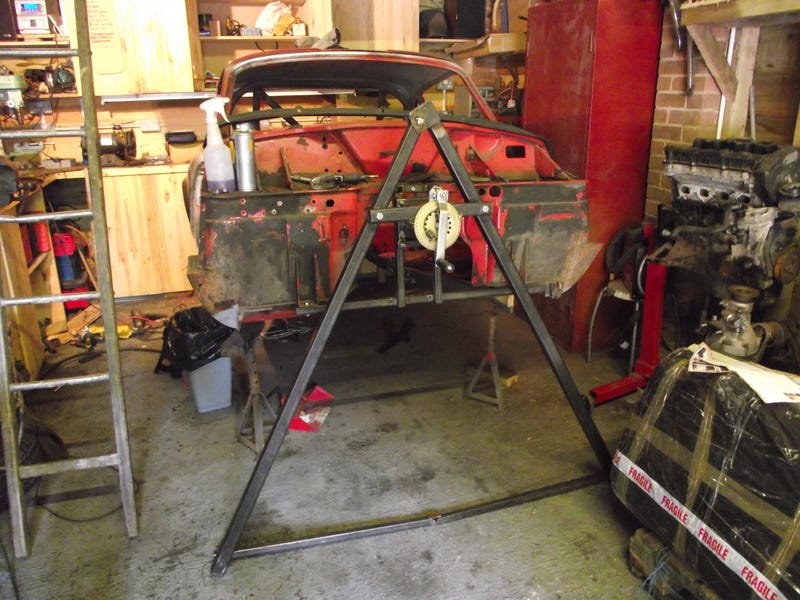

...and the best bit...
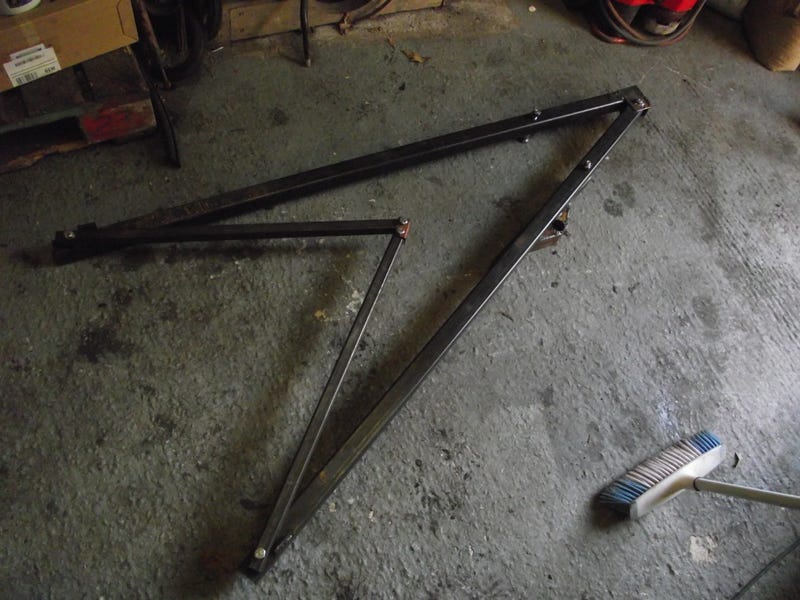
It folds!
After much stripping and painting of the body and chassis, I thought to myself 'I've added all this stiffness to the body and plan on using solid mounts to the body...why not just weld it together and make a proper monocoque?'.
Why not indeed? I don't think anyone's done that to a Spitfire before, and the only people I can find who have done it are a couple of guys on an old hot rod forum singing its praises with Model A Fords.
Some rather intense fag-packet calculations worked out that for a given section of chassis, solid-mounting the body to the chassis (essentially adding a thin piece of angle-iron to the chassis) stiffened it by 32% on any given section of box. Meanwhile, boxing in the chassis to the body stiffened that given section by 38%. That's just the floor panel area where it meets the chassis as well, not including the rest of the now-hardtop bodyshell.
I absolutely will. We're only up to page 12 of the old forum (out of 29 so far). Plenty more to come And yes shalmaneser. Of the patented variety
next most popular British export after Lucas Wiring Smoke Back to the story!
It was at this point that I lost the plot. The GT6 rotoflex system is actually pretty clever as far as early IRS systems go. This is it for reference:
The only bit missing from that is the upper link being made from the transverse leaf spring. Its geometry is better than a lot of semi-trailing arm fudges which tend to give some pretty nasty toe change as the suspension compresses. Camber curve is pretty good as well, despite the short lower arm and long upper. The sharp angle of the lower arm means it gains effective length much faster than the upper link, meaning you get decent negative camber gain under compression at the expense of sharp positive camber in droop. There's something to be said for going positive in droop (tends to help stability during braking), but the amount it gains is significant. Plus, it does still retain some of the toe change which I wasn't keen on.
The clever bods at Triumph knew this, and for a planned iteration of their Le Mans Spitfires they came up with this, which gives zero toe change:
Now, another clever bod called GT6M over on the Triumph forums has made a modern iteration of this with slightly longer adjustable lower arms mounting beneath the chassis (made out of cut-down tie rods from the original suspension). Works out to better camber change
So, off comes the body and let's get started on my own iteration
(don't worry, I learn my lesson about using wooden jigs)And all hooked up
Nice and light too
stock rotoflex wishbone setup weighs 6.452kg and alloy roto setup weighs 3.688kg.While the body was off again I might as well seam-weld the chassis and add an oil cooler (oil's pretty critical on these old 4-bearing cranks).
At this point I learn that the diffs for small-chassis Triumphs are a bit of a weak point. Early diffs have stronger bearings but the diff carrier isn't case-hardened so they crack, and later case-hardened diffs used weedy bearings from Morris Marina diffs thanks to the spiralling mess that was BL finances in the mid-70s. Of course, this means I should blow my savings on a Quaife LSD centre to fit in my big-bearinged early diff...
Little notch to clear the diff casing, and it's together
Originally I'd planned to use the GT6 fuel filler cap in the wing, but they're like hen's teeth (and the pressings for the wings even moreso). So relocating the filler neck seemed like a better option.
At this point, my dad had badgered me enough about when his mate had rolled his Spitfire when he was younger that I thought fabricating a roll cage would be a preferable alternative
38mm CDS tube bought after misreading the MSA Blue Book (I thought it was 38mm for cars older than x date to be legal, not cages built before x date). Looked for a tube bender but they're bloody expensive so ended up with a plumbing pipe bender instead. Lots of maths later and I found a tube of the right OD and thickness to make an insert into a pipe bender die to match a 38mm tube
if people are interested I'll dig out the numbers After 5 false starts and more bloody expensive CDS tube, I had my main hoop!
And cross-braces and backstays
It's at this point I discover that my gearbox mount won't fit, so back to the drawing board with that one to produce this:
I also started thinking that if I planned to have a bonded on fibreglass top as well I might as well weld a steel one on and tie the roll hoop into it with some boxes running forward to the windscreen surround. Off to eBay to find the cheapest (read rustiest) hardtop I could find, and weld it onto the bodyshell. We'll get to why this was a terrible idea at a later point...
Next up was stripping the underside of the body ready for paint
I looked at a couple of rotisserie jigs and thought 'I can do better than that'. This is what I came up with ...and the best bit...
It folds!
After much stripping and painting of the body and chassis, I thought to myself 'I've added all this stiffness to the body and plan on using solid mounts to the body...why not just weld it together and make a proper monocoque?'.
Why not indeed? I don't think anyone's done that to a Spitfire before, and the only people I can find who have done it are a couple of guys on an old hot rod forum singing its praises with Model A Fords.
Some rather intense fag-packet calculations worked out that for a given section of chassis, solid-mounting the body to the chassis (essentially adding a thin piece of angle-iron to the chassis) stiffened it by 32% on any given section of box. Meanwhile, boxing in the chassis to the body stiffened that given section by 38%. That's just the floor panel area where it meets the chassis as well, not including the rest of the now-hardtop bodyshell.
Edited by BiTurbo228 on Friday 17th August 23:33
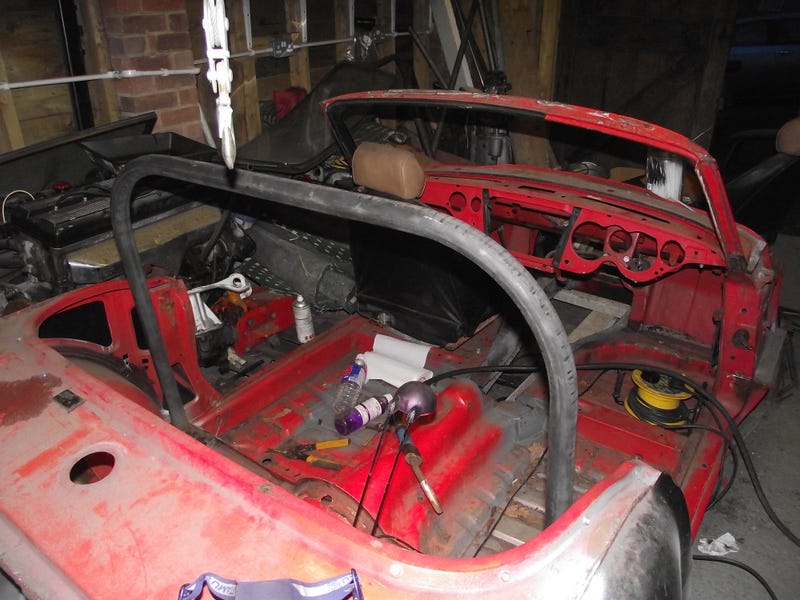
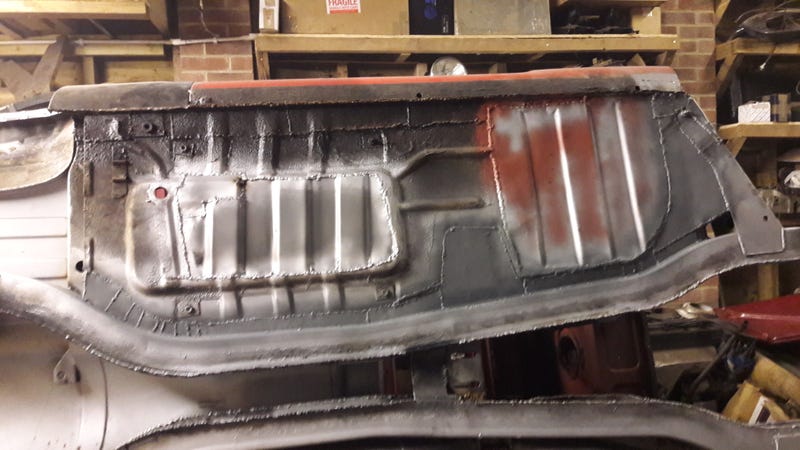
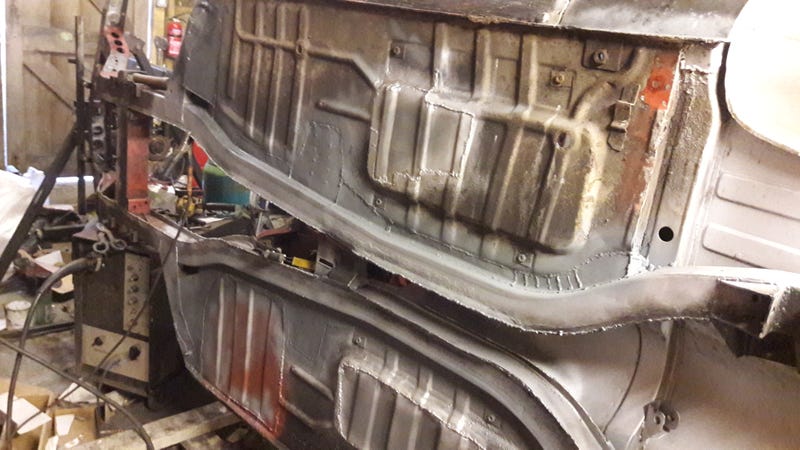
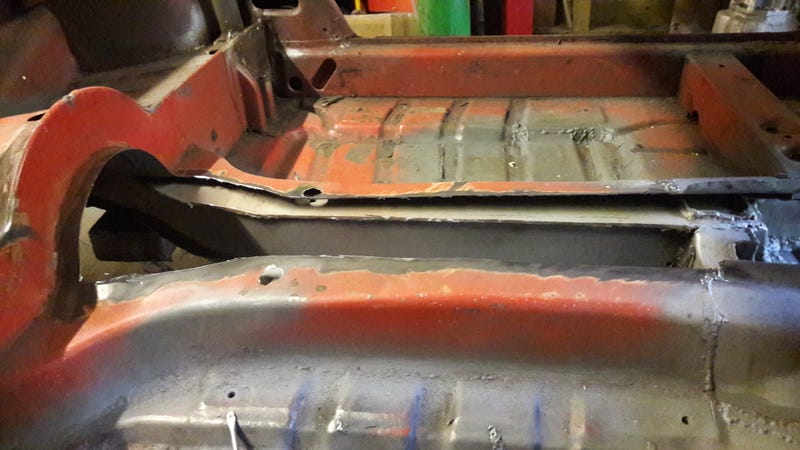
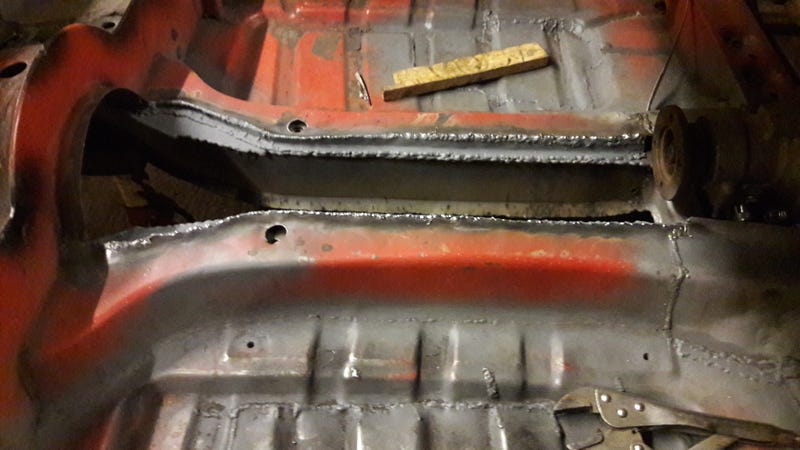
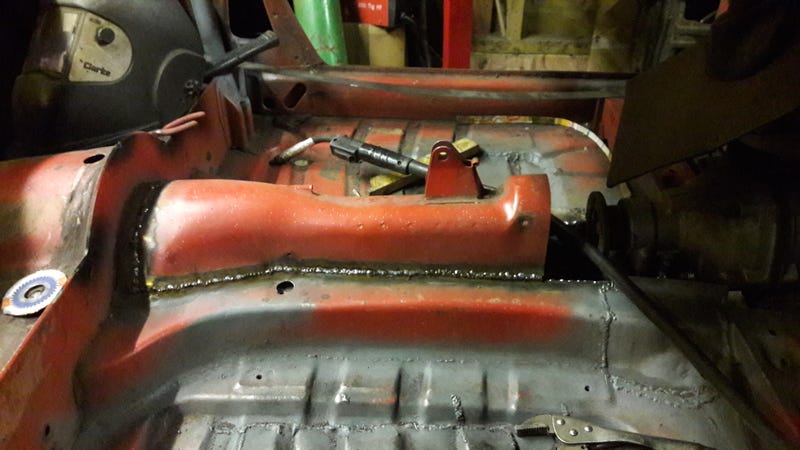
Off we go! First patch:
Up on the jig again to box in the underside (with a demonstration of why my Spit's called 'Patchwork')...
...prop tunnel off and on again so I can weld up the inside of that...
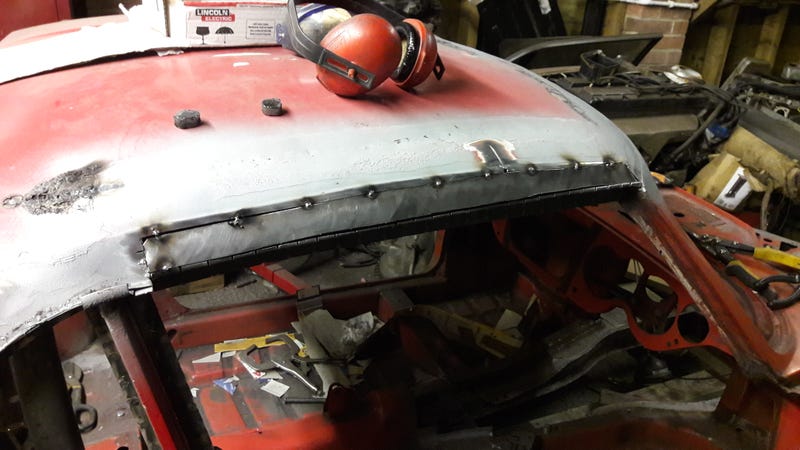
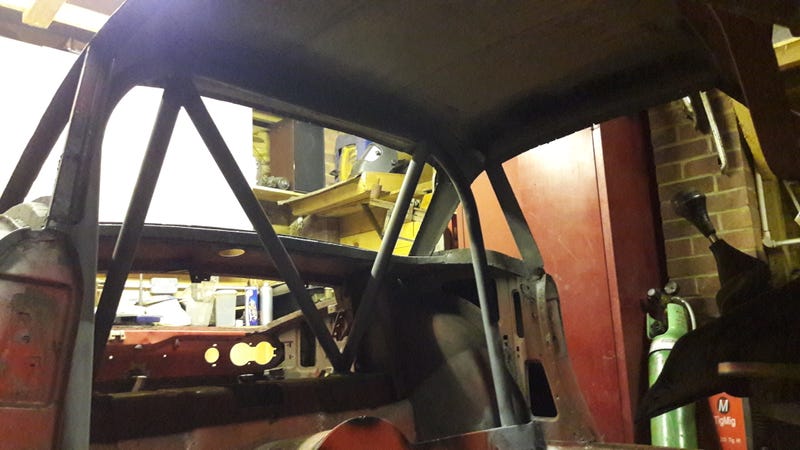
...and roll hoop stitched into the hardtop:
It was about this point that I discovered the issue with wooden jigs for suspension work. Turns out nothing's straight. Bugger.
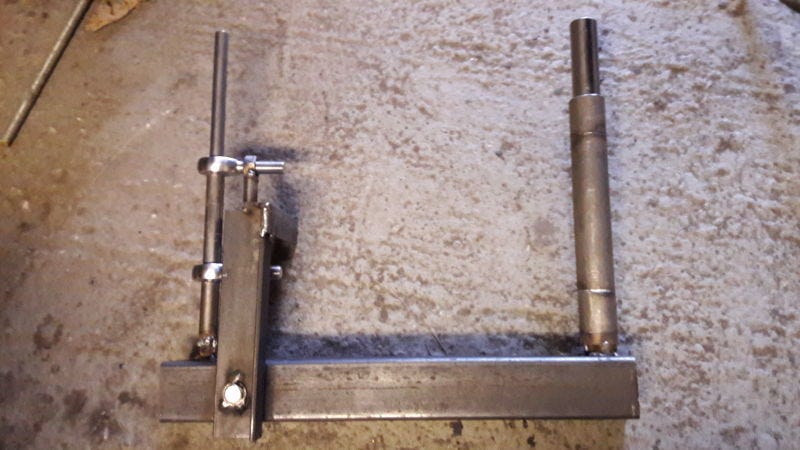
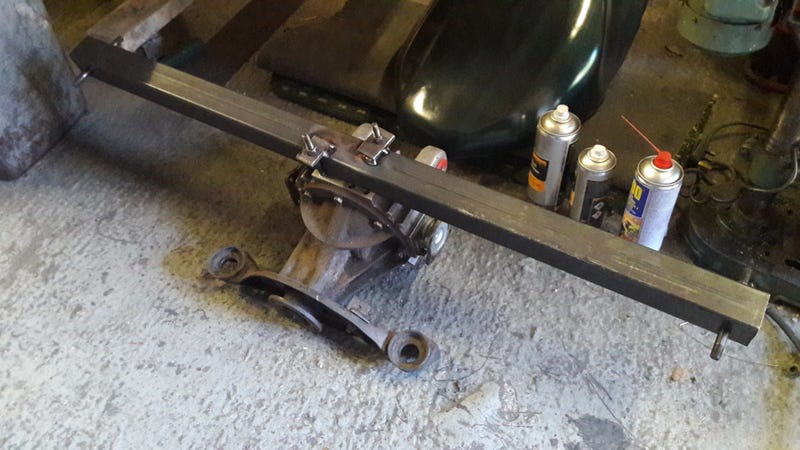
Ah well, I'd been having a play about with the suspension design in my head anyway and think I've come up with a better mounting location. To try and test out my ideas, I made a scale model of the rear suspension of a GT6 with various different options for lower wishbone location (and a mock leaf spring to try and account for the flex in that as the suspension compresses, shortening the effective upper arm).
May I introduce you to the Spitfire-Suspension-o-Matic!
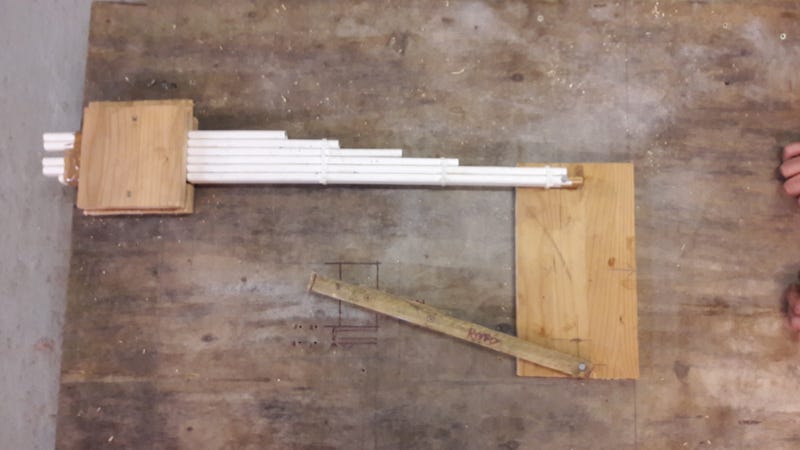
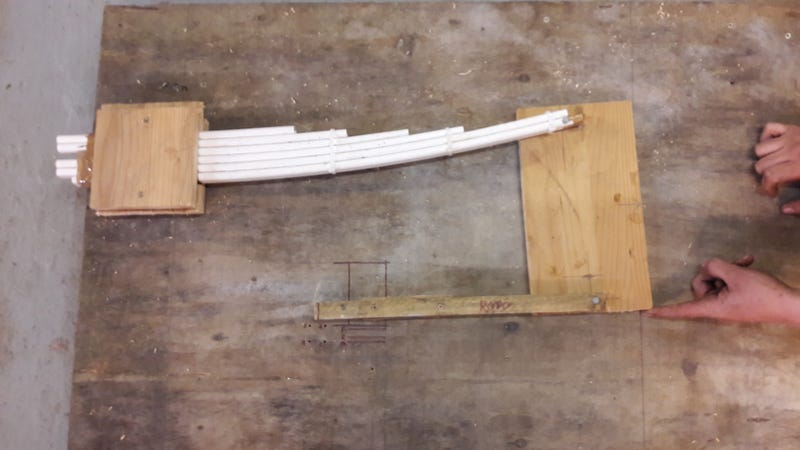
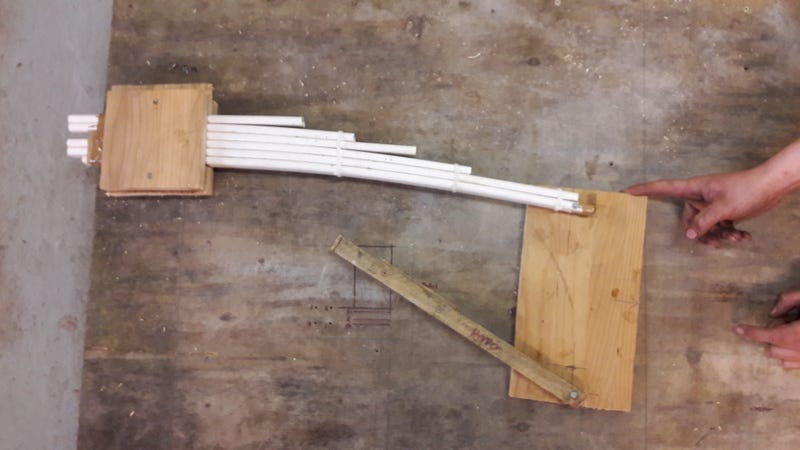
You can see the angle of the lower wishbone, and how it produces good negative camber change on bump, but a lot of positive on droop.
I made up lower wishbones for a number of different aftermarket suspension options (including lowering blocks that fit under the spring), GT6M's wishbones, and a few other potential locations.
From all of that, this is what I came up with:
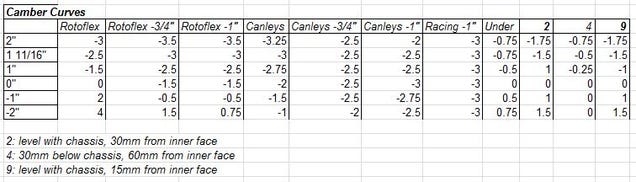
What we learn from this is pretty interesting actually to geeks like me anyway. For instance, the much-maligned stock setup actually seems to have quite a good camber setup for cornering (for a car with a decent amount of roll), but would likely suffer under braking or acceleration.
The aftermarket lowering blocks (represented by the -13/4" and -1" versions) reduce the high positive camber on droop, but replace it with negative camber so would likely be more stable under braking, but less grip in corners unless the added 0.5 degree negative camber on bump offsets that.
The aftermarket relocation brackets (Canleys) also reduces the sharpness of positive camber on droop, but replaces it all with negative camber. When you start lowering it, things start getting really weird. -3/4" is pretty much zero camber change, aside from full droop. -1" is all over the place.
Racing -1" is a location derived by a very clever individual to produce zero camber change over the whole of the suspension travel, so it’s reassuring that the same result is found using my model
The suspension design pioneered by GT6M produces very slight camber change (less than a degree either way), and in the right direction. Would work very nicely on a car with very little roll.
3 choice picks of my dozen or so experimental locations are interesting too. I liked option 2 and 9, although again would probably need to have very little roll if my understanding of optimal camber is correct. Option 4 is even more interesting for racing as you can have dead-flat wheels on droop meaning nice straight braking, but still have a little negative camber on corners.
Now I just had to take the favourites and work out where the roll centres are...
In the end I think I plumped for number 2. Stuck that into an online model and measured how stuff like the roll centre and camber changes in roll and compression. All of the compression stuff is near as damnit the same as my wooden mockup The dynamic roll centre looks pretty good too, as does the camber change in roll (a little in excess of the body roll right up to 2.5 degrees where it levels off to match body roll, roughly calculated via weight, roll stiffness and COG height).
At this point, it's probably useful to do a bit of a layman's guide to what I learnt about suspension geometry. Above is what my suspension looks like at rest (-1deg static camber). On bump, it gains a moderate amount of negative camber.
On droop, it gains a smaller amount of positive camber.
[img]On droop, it gains a smaller amount of positive camber.[/img]
So far so good. However, when subjected to roll, the loaded wheel (on the right) gains positive camber. This is not so great for cornering.
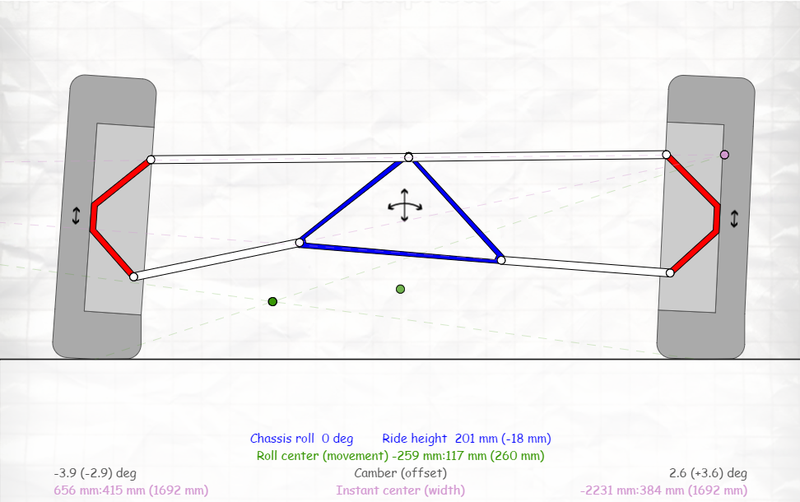
However, it’s only during a sweeping corner (and a fleeting moment in tighter corners) that you get roll in isolation. For the rear suspension on corner entry it’s accompanied by droop, and on corner exit it’s accompanied by bump.
Combining droop and roll basically combines the two effects, meaning for me I get more positive camber, which is also not so good of a thing, but pretty unavoidable with the existing compromises.
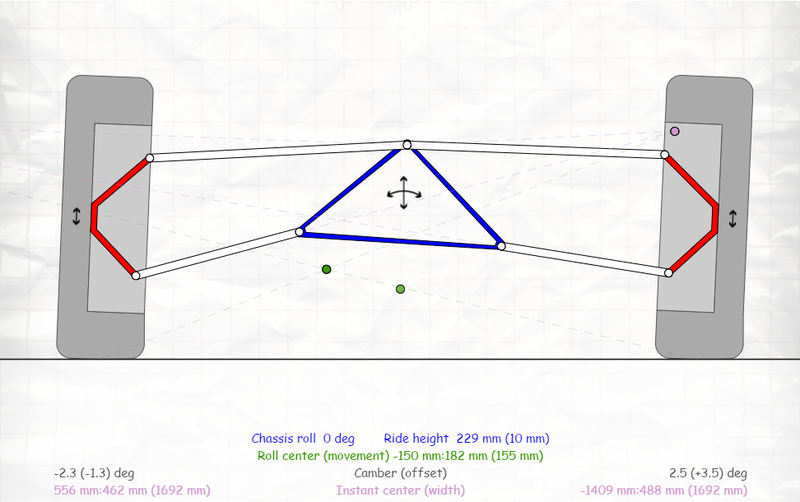
A similar combination happens for bump, but I gain less positive camber, which is a good thing.
So, what does all of this mean?
The easiest way is to describe the process of accelerating towards a corner from a standstill, braking and then going through the corner, roughly comparing my suspension design to another chap who’s very cleverly made a suspension design that remains at ~0.75 degrees of negative camber throughout the suspension travel.
So, we both nail it at the start. The rear ends of both cars squat down. His car gets more traction off the line due to the fact that his wheels stay more level with the surface of the road (-0.75 deg vs -2.3 deg).
Approaching the corner at full tilt, we both slam on the brakes. At this point, I can’t quite work out whose will be more stable. Mine transitions through neutral camber to slightly positive at full droop. His remains static at -0.75 degrees the whole way through. I want to say mine will end up with more grip overall so better braking from the rears, but I’m not certain if camber thrust will mean his is more stable throughout than mine which ends up twitchier. Lets call it a dead heat.
Entering the corner, we both tip it in. The rear end is still up in the air from braking, and the car starts to roll. Mine is definitely twitchier and has less overall grip at this point. The positive camber from droop combines with the positive camber from roll and the rear end starts to slip and slide a little. His rear end is a little more planted as his consistent negative camber on droop works to combat the positive camber from roll, allowing him to carry more speed through the turn.
Mid-corner, both cars level out in a steady state of roll. Here, mine starts to claw back some speed. Although it’s not really modelled above, my design winds up with less positive camber gain during roll. The roles are reversed and his rear wheels start to slip slightly.
Exiting the corner, we both plant it. Both cars squat again, but are still in a state of roll. Here, his car tends to positive as his slight negative camber isn’t enough to offset the positive camber from rolling. He’s forced to countersteer as he comes out of the corner slightly sideways, scrubbing speed for the straight ahead. My more aggressive camber curve does offset the positive camber from roll and I put the power down nicely for a good clean corner exit.
Who winds up ahead at the end of that I have no idea, but hopefully that makes a little sense for how all of these camber curves actually affect real-world driving dynamics
Seemed good enough for me anyway!
Sketched up a mock wishbone:
Took a leaf out of Project Binky's book and made my jigs out of metal this time...
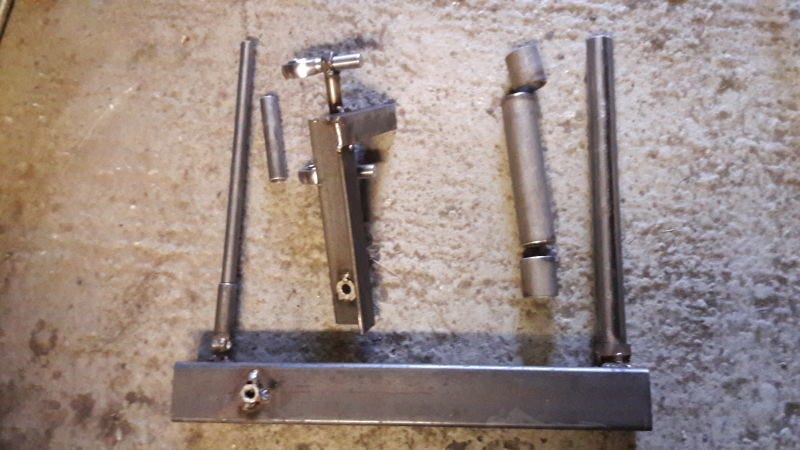
...and welded up some wishbones
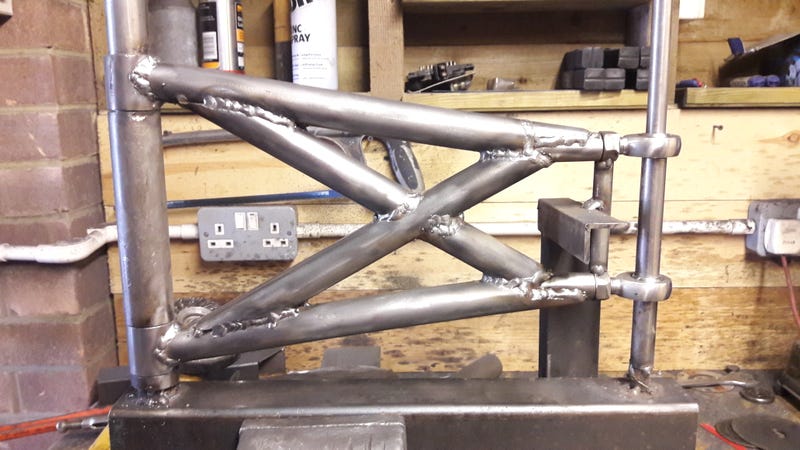
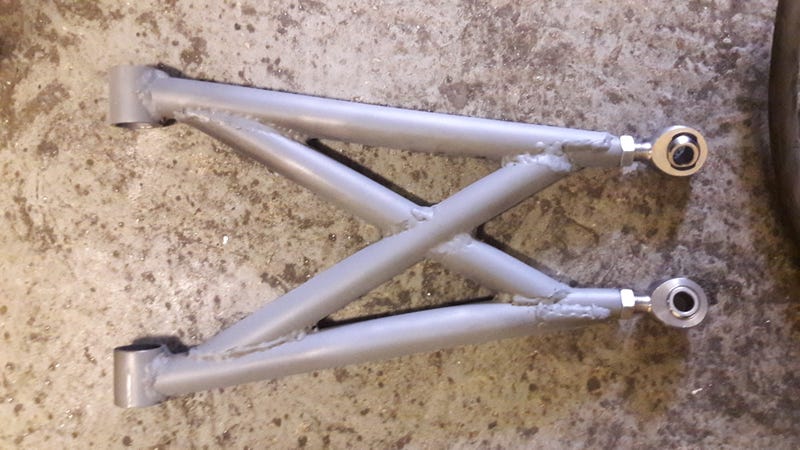
A little heavier than the previous iteration, but still in roughly the same ballpark as the alloy rotoflex wishbone
Chopped up the chassis again. Luckily for me with the unibody idea it didn't matter overly that the wishbones poked through the chassis a bit as that area's well braced.
Up on the jig again to box in the underside (with a demonstration of why my Spit's called 'Patchwork')...
...prop tunnel off and on again so I can weld up the inside of that...
...and roll hoop stitched into the hardtop:
It was about this point that I discovered the issue with wooden jigs for suspension work. Turns out nothing's straight. Bugger.
Ah well, I'd been having a play about with the suspension design in my head anyway and think I've come up with a better mounting location. To try and test out my ideas, I made a scale model of the rear suspension of a GT6 with various different options for lower wishbone location (and a mock leaf spring to try and account for the flex in that as the suspension compresses, shortening the effective upper arm).
May I introduce you to the Spitfire-Suspension-o-Matic!
You can see the angle of the lower wishbone, and how it produces good negative camber change on bump, but a lot of positive on droop.
I made up lower wishbones for a number of different aftermarket suspension options (including lowering blocks that fit under the spring), GT6M's wishbones, and a few other potential locations.
From all of that, this is what I came up with:
What we learn from this is pretty interesting actually
to geeks like me anyway. For instance, the much-maligned stock setup actually seems to have quite a good camber setup for cornering (for a car with a decent amount of roll), but would likely suffer under braking or acceleration.The aftermarket lowering blocks (represented by the -13/4" and -1" versions) reduce the high positive camber on droop, but replace it with negative camber so would likely be more stable under braking, but less grip in corners unless the added 0.5 degree negative camber on bump offsets that.
The aftermarket relocation brackets (Canleys) also reduces the sharpness of positive camber on droop, but replaces it all with negative camber. When you start lowering it, things start getting really weird. -3/4" is pretty much zero camber change, aside from full droop. -1" is all over the place.
Racing -1" is a location derived by a very clever individual to produce zero camber change over the whole of the suspension travel, so it’s reassuring that the same result is found using my model
The suspension design pioneered by GT6M produces very slight camber change (less than a degree either way), and in the right direction. Would work very nicely on a car with very little roll.
3 choice picks of my dozen or so experimental locations are interesting too. I liked option 2 and 9, although again would probably need to have very little roll if my understanding of optimal camber is correct. Option 4 is even more interesting for racing as you can have dead-flat wheels on droop meaning nice straight braking, but still have a little negative camber on corners.
Now I just had to take the favourites and work out where the roll centres are...
In the end I think I plumped for number 2. Stuck that into an online model and measured how stuff like the roll centre and camber changes in roll and compression. All of the compression stuff is near as damnit the same as my wooden mockup
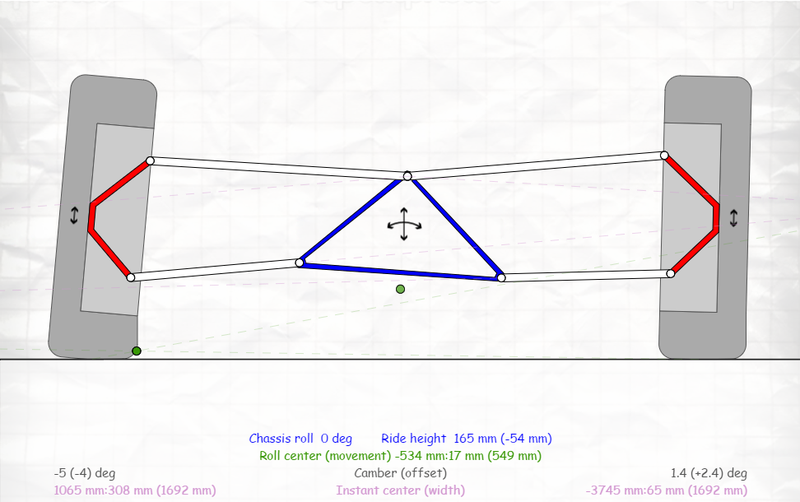
The dynamic roll centre looks pretty good too, as does the camber change in roll (a little in excess of the body roll right up to 2.5 degrees where it levels off to match body roll, roughly calculated via weight, roll stiffness and COG height).At this point, it's probably useful to do a bit of a layman's guide to what I learnt about suspension geometry. Above is what my suspension looks like at rest (-1deg static camber). On bump, it gains a moderate amount of negative camber.
On droop, it gains a smaller amount of positive camber.
[img]On droop, it gains a smaller amount of positive camber.[/img]
So far so good. However, when subjected to roll, the loaded wheel (on the right) gains positive camber. This is not so great for cornering.
However, it’s only during a sweeping corner (and a fleeting moment in tighter corners) that you get roll in isolation. For the rear suspension on corner entry it’s accompanied by droop, and on corner exit it’s accompanied by bump.
Combining droop and roll basically combines the two effects, meaning for me I get more positive camber, which is also not so good of a thing, but pretty unavoidable with the existing compromises.
A similar combination happens for bump, but I gain less positive camber, which is a good thing.
So, what does all of this mean?
The easiest way is to describe the process of accelerating towards a corner from a standstill, braking and then going through the corner, roughly comparing my suspension design to another chap who’s very cleverly made a suspension design that remains at ~0.75 degrees of negative camber throughout the suspension travel.
So, we both nail it at the start. The rear ends of both cars squat down. His car gets more traction off the line due to the fact that his wheels stay more level with the surface of the road (-0.75 deg vs -2.3 deg).
Approaching the corner at full tilt, we both slam on the brakes. At this point, I can’t quite work out whose will be more stable. Mine transitions through neutral camber to slightly positive at full droop. His remains static at -0.75 degrees the whole way through. I want to say mine will end up with more grip overall so better braking from the rears, but I’m not certain if camber thrust will mean his is more stable throughout than mine which ends up twitchier. Lets call it a dead heat.
Entering the corner, we both tip it in. The rear end is still up in the air from braking, and the car starts to roll. Mine is definitely twitchier and has less overall grip at this point. The positive camber from droop combines with the positive camber from roll and the rear end starts to slip and slide a little. His rear end is a little more planted as his consistent negative camber on droop works to combat the positive camber from roll, allowing him to carry more speed through the turn.
Mid-corner, both cars level out in a steady state of roll. Here, mine starts to claw back some speed. Although it’s not really modelled above, my design winds up with less positive camber gain during roll. The roles are reversed and his rear wheels start to slip slightly.
Exiting the corner, we both plant it. Both cars squat again, but are still in a state of roll. Here, his car tends to positive as his slight negative camber isn’t enough to offset the positive camber from rolling. He’s forced to countersteer as he comes out of the corner slightly sideways, scrubbing speed for the straight ahead. My more aggressive camber curve does offset the positive camber from roll and I put the power down nicely for a good clean corner exit.
Who winds up ahead at the end of that I have no idea, but hopefully that makes a little sense for how all of these camber curves actually affect real-world driving dynamics
Seemed good enough for me anyway!
Sketched up a mock wishbone:
Took a leaf out of Project Binky's book and made my jigs out of metal this time...
...and welded up some wishbones
A little heavier than the previous iteration, but still in roughly the same ballpark as the alloy rotoflex wishbone
Chopped up the chassis again. Luckily for me with the unibody idea it didn't matter overly that the wishbones poked through the chassis a bit as that area's well braced.
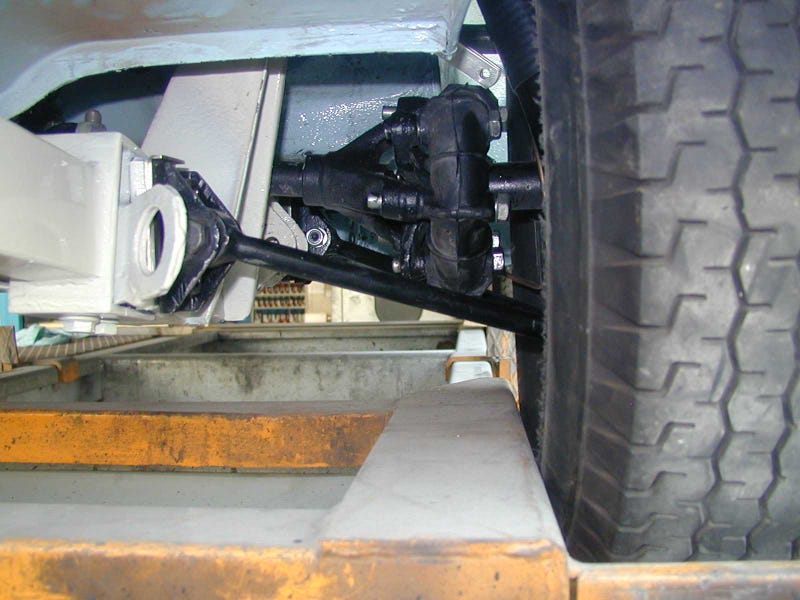
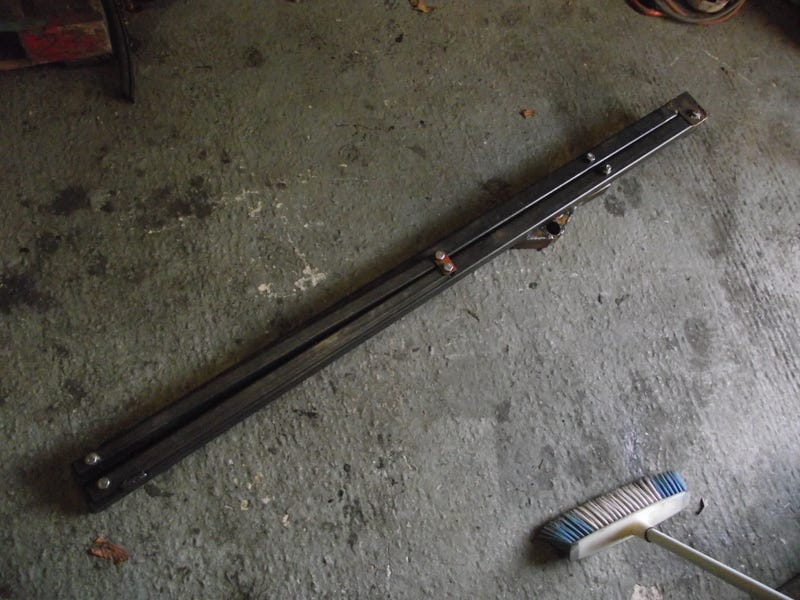
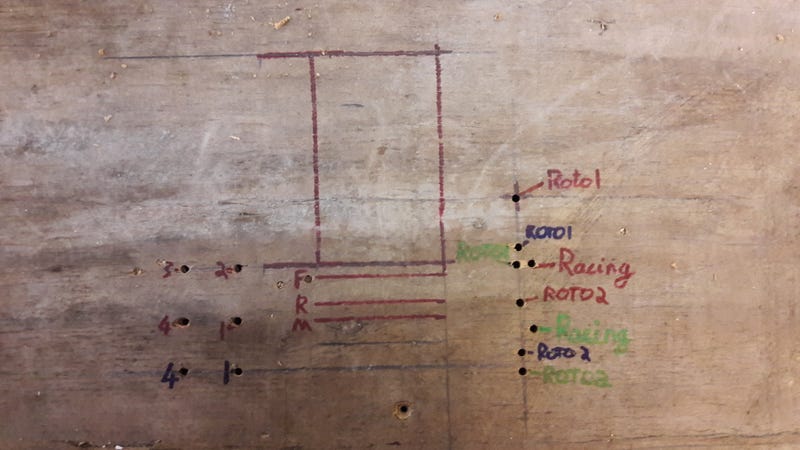
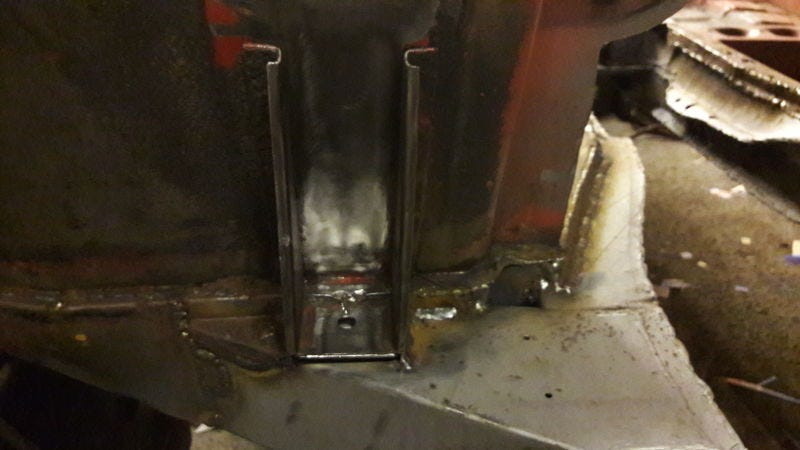
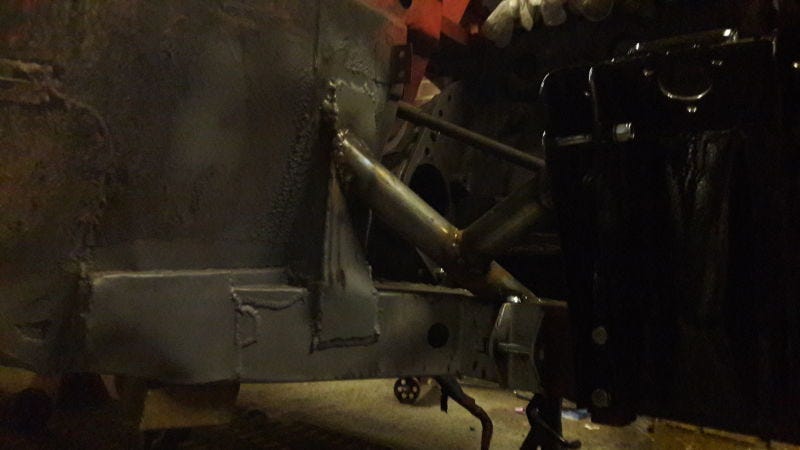
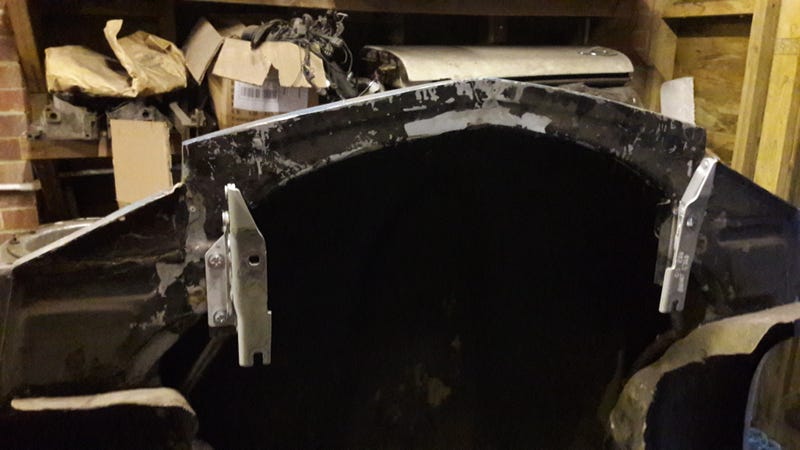
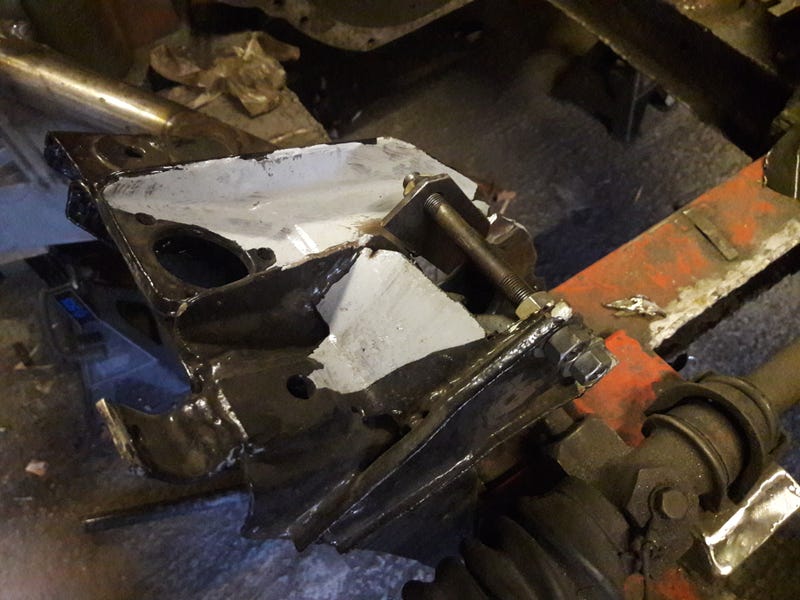
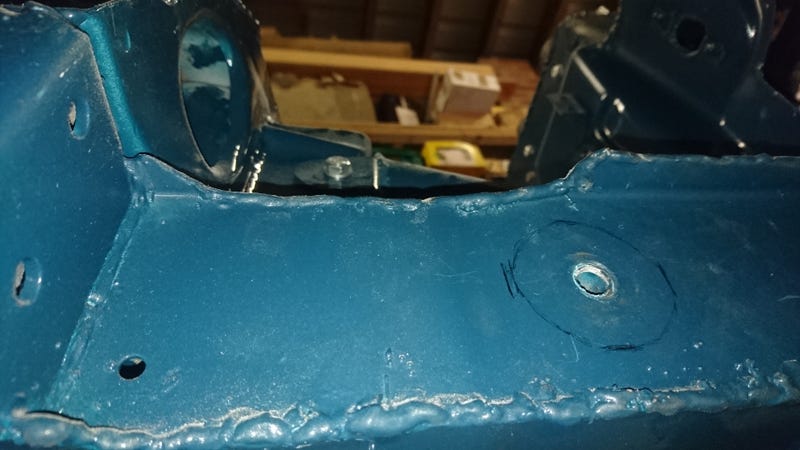
At this point, I have a bit of a wizzard wheeze about chassis bracing at the front. The issue is that Spitfire chassis' already use the bodyshell to brace them somewhat (the sills are structural), and a known weakpoint is where the body meets the chassis at the front (reference to the pic below will help at this point).
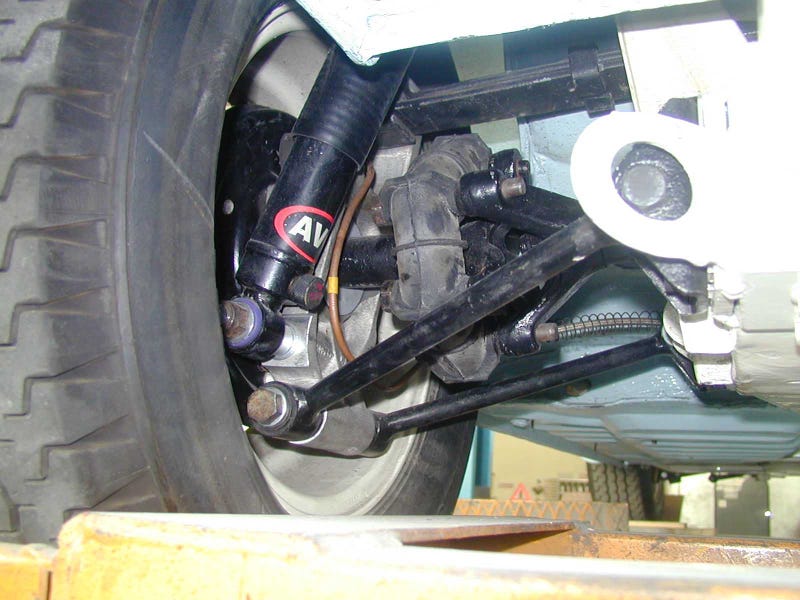
Most racers poke their roll cage through the front firewall to meet the front suspension towers (orange pic). Unfortunately, because I don't have a full cage (and don't really want one as the footwell's cramped enough), the next option is to brace it back to the bulkhead. Unfortunately, the bulkhead's a bit floppy at the best of times, and in a crash you'd just be spearing your feet with a weld-hardened spar of steel (red pic).
Option C would be a cross-brace against the chassis and the bulkhead, but I'm fairly certain that would jsut fold the bulkhead back towards you in a crash. Not good either (blue pic).
So, the idea I had was to build in a crumple zone of sorts by making something like the green pic. A stronger tube would meet a thinner walled tube in the middle, angled down away from the passenger compartment. It'd still brace the shock towers, but in the event of a crash should fold away from the occupants (and absorb a bit of the impact while they're at it).

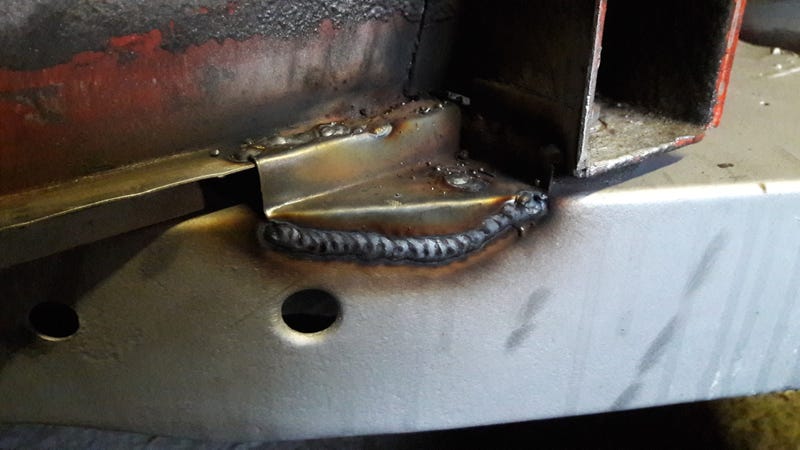
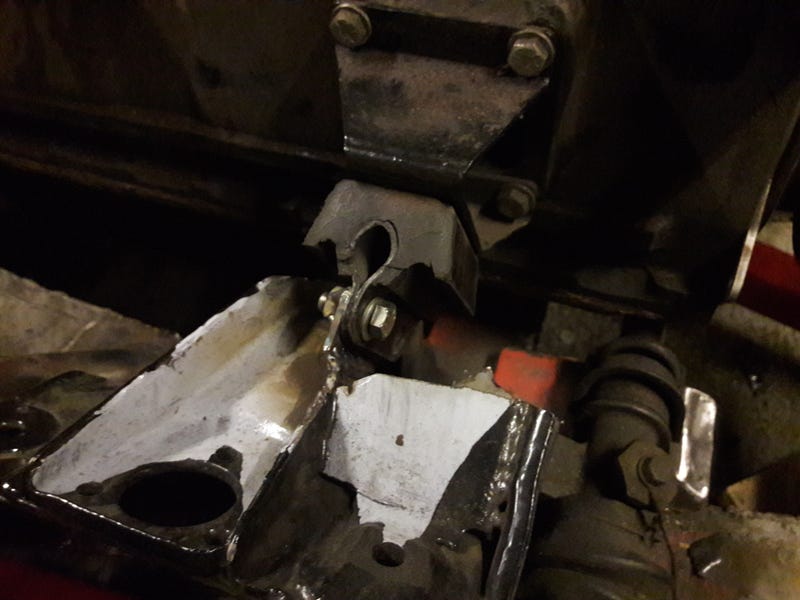
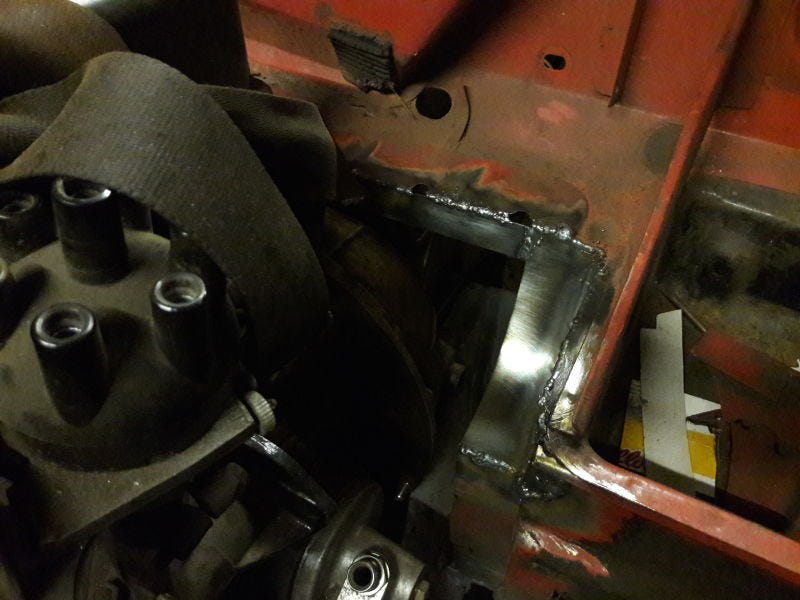
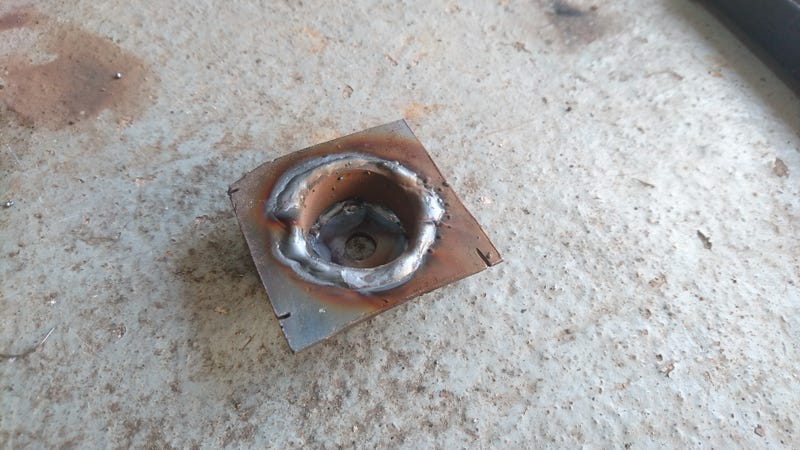
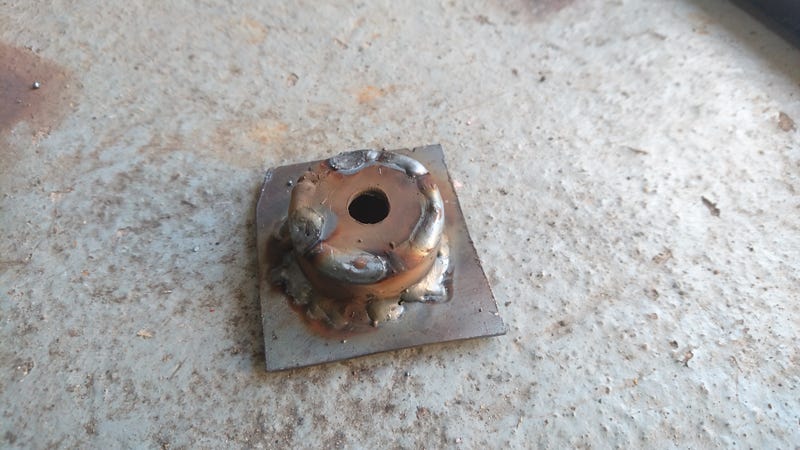
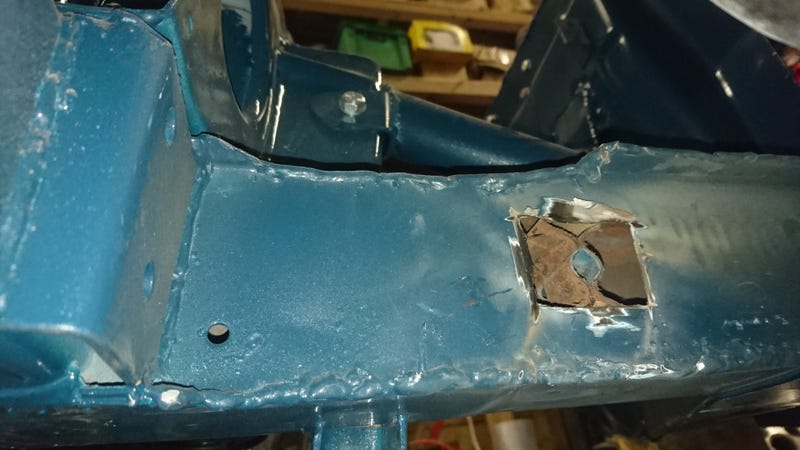
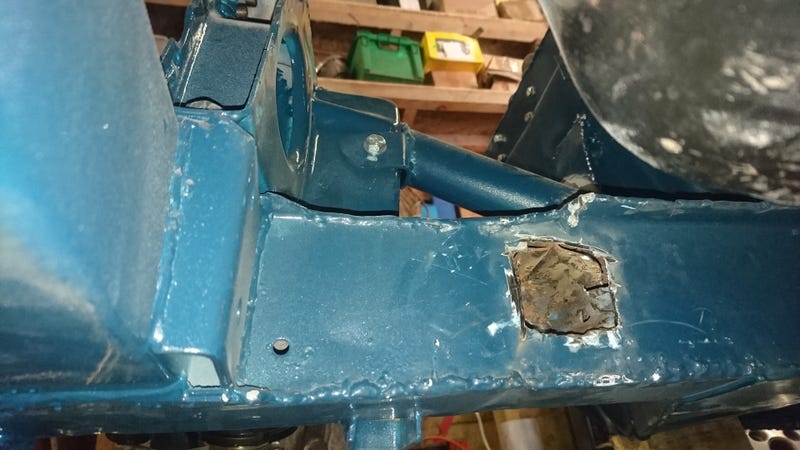
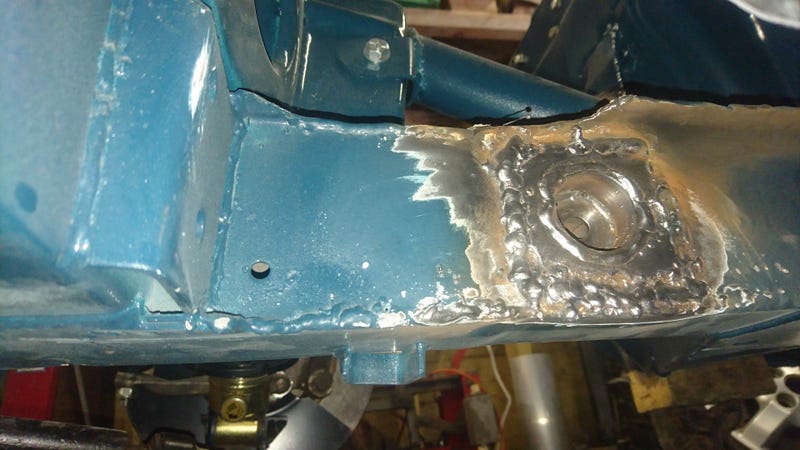
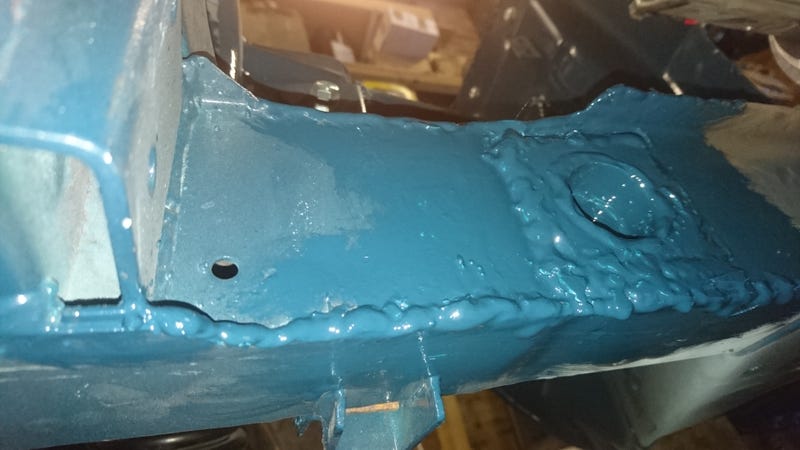
So, beef up the original chassis mounts with many plates of 3mm steel so they won't be going anywhere:
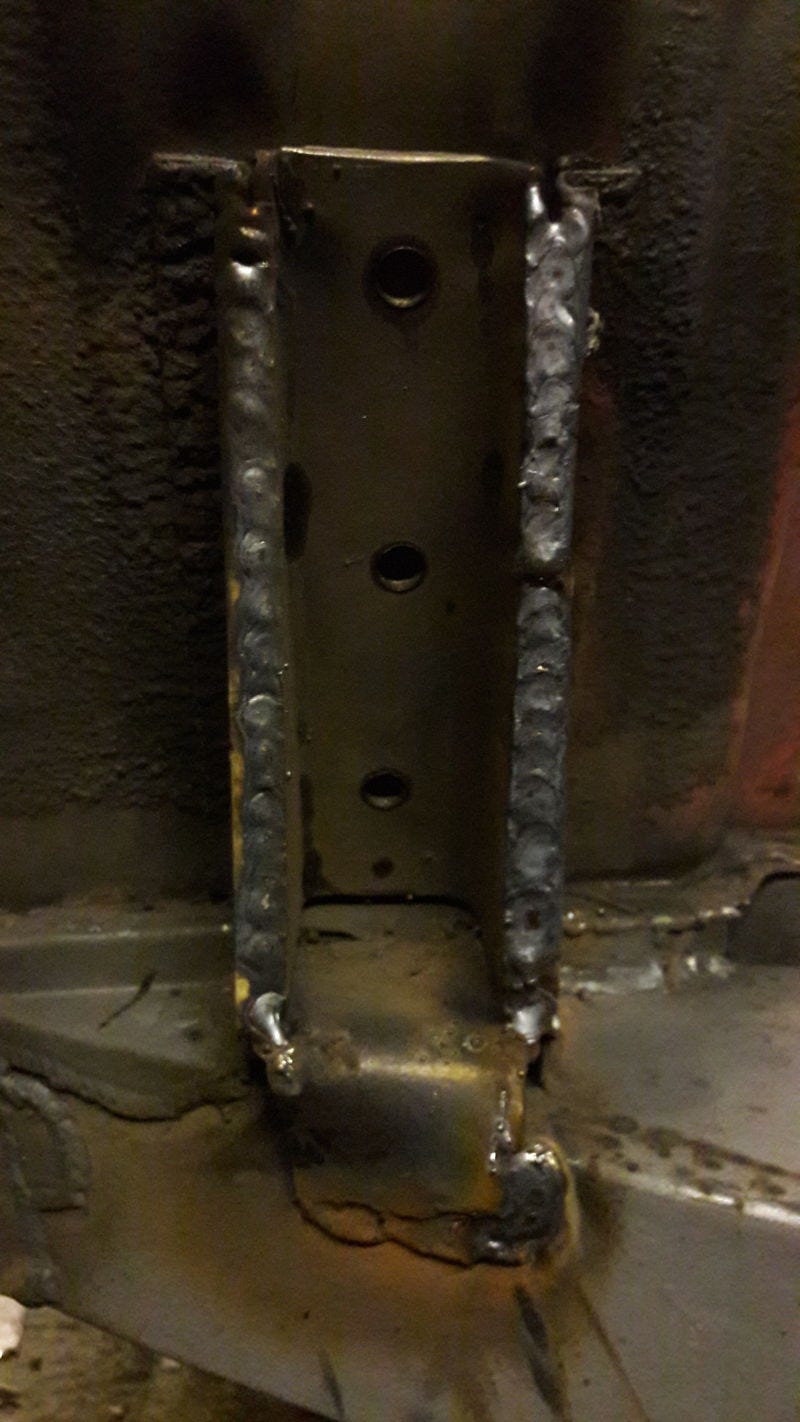
And weld in the supports:
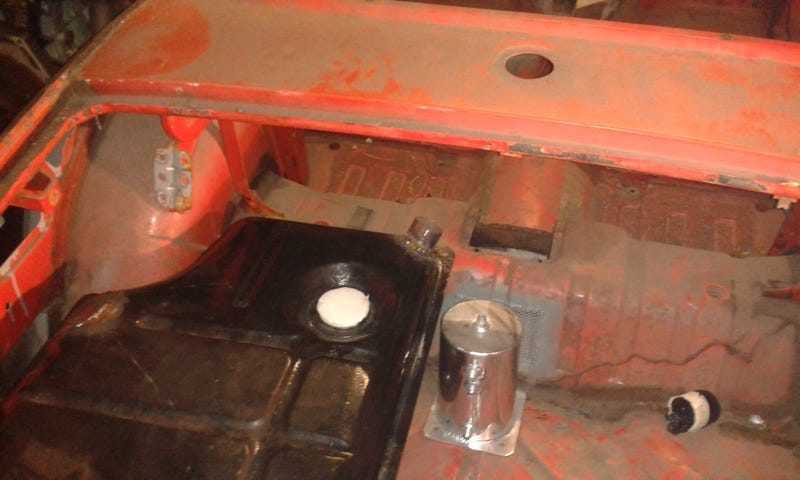
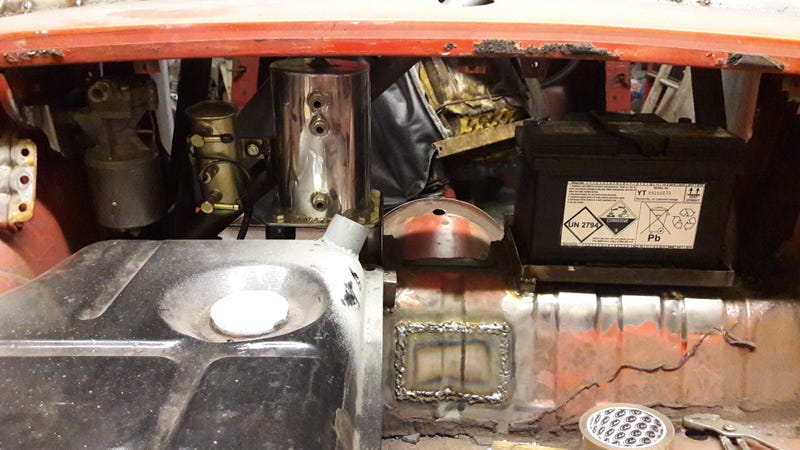
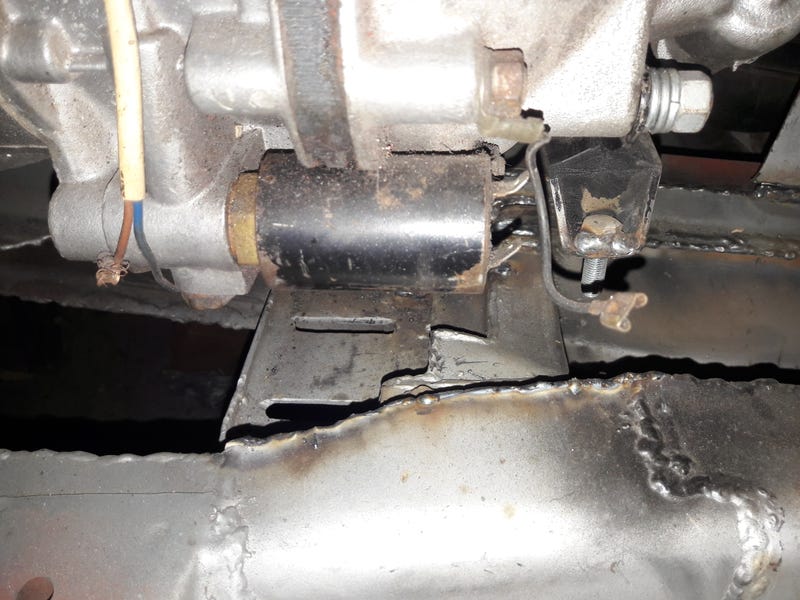
Fuel pump and swirl pot:
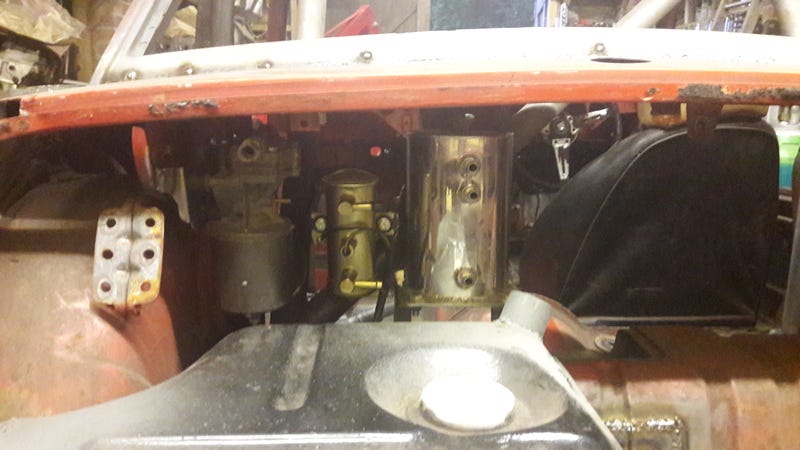
And battery tray:
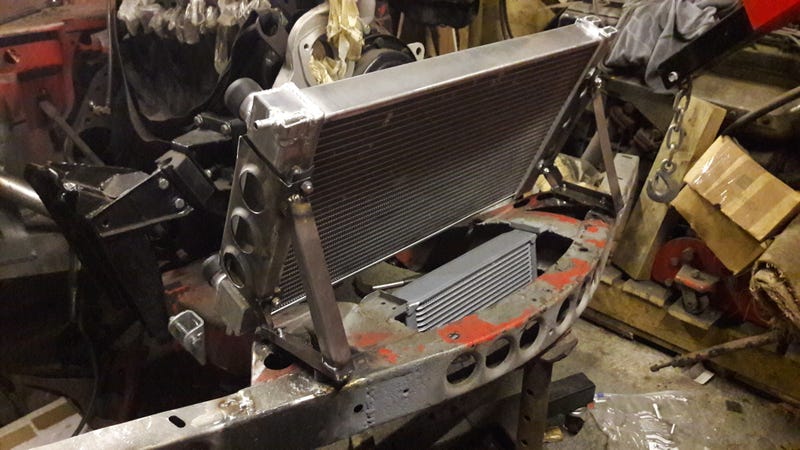
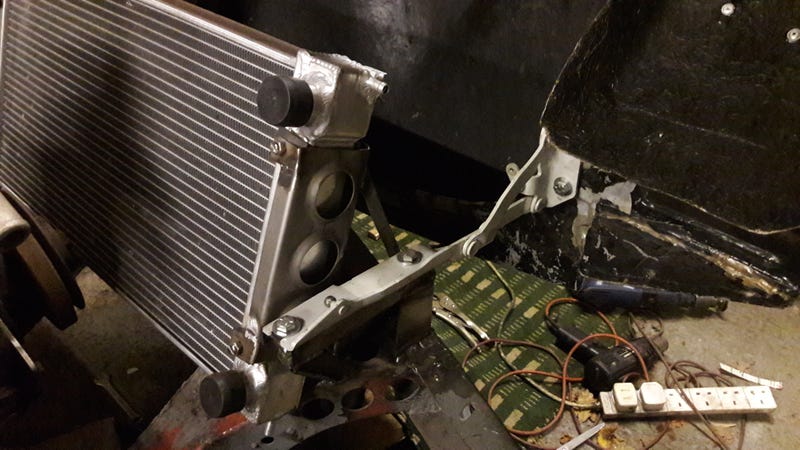
Mk1 Golf rads are a common enough alloy rad option for Spits and GT6s so made up some brackets to fit those. Of course, I've now decided that a Civic alloy rad that slots between the chassis rails is a better option, but that's by the by.
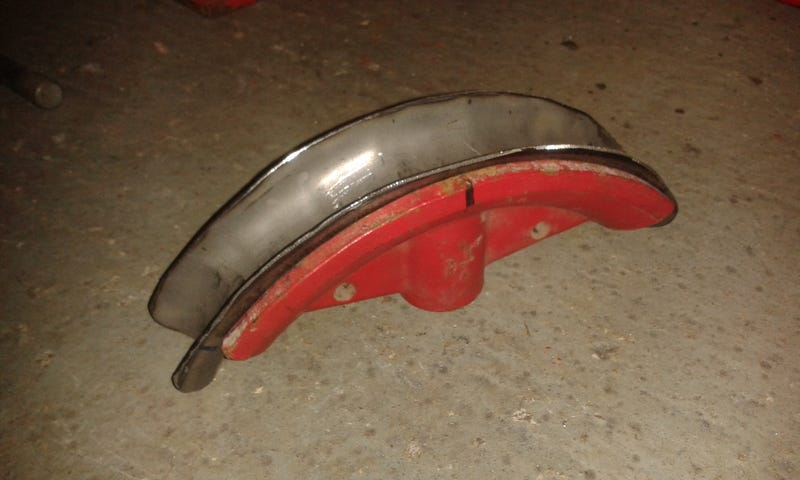
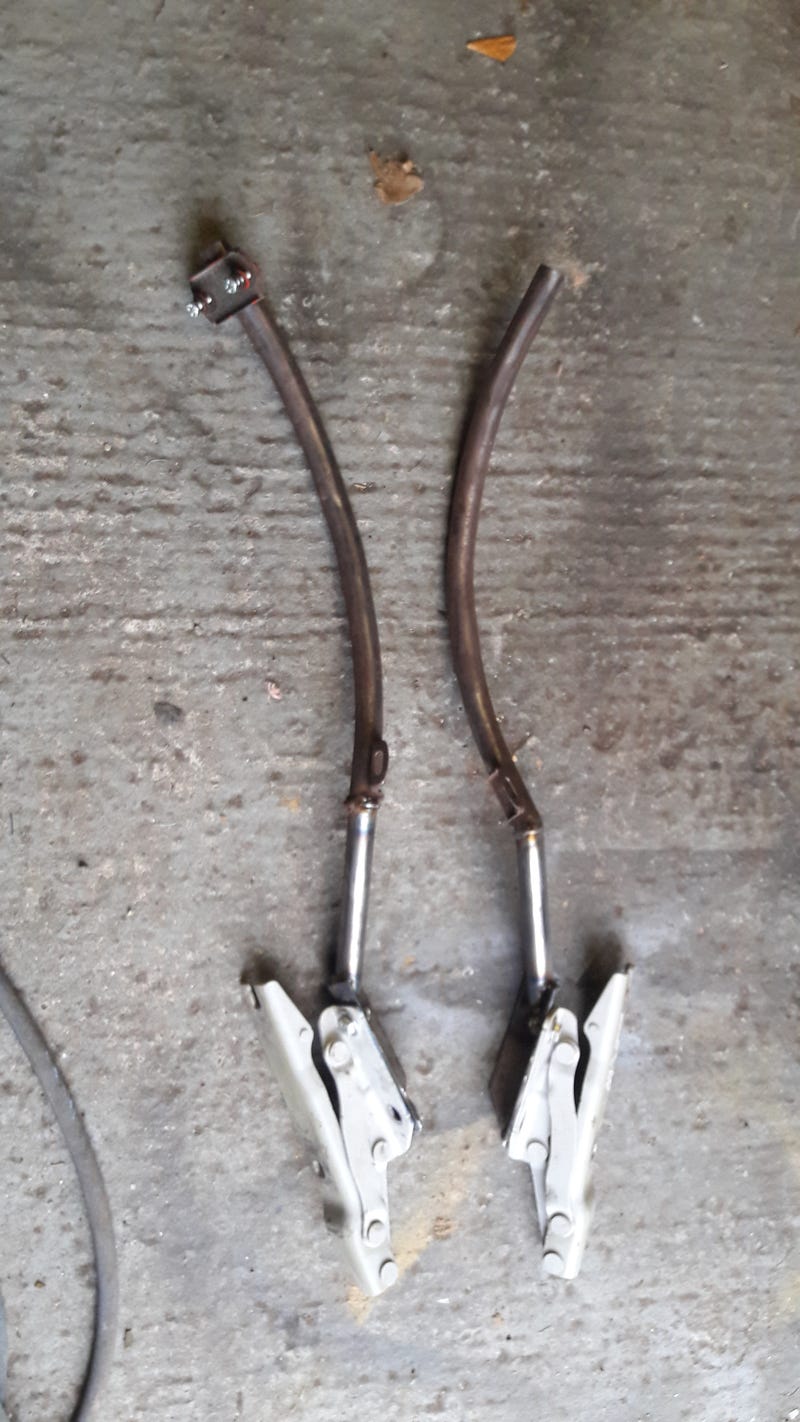
Next up I decided I really didn't like the stock bonnet mounts. They're heavy and ugly, especially without bumpers. So I cannibalised some fancy bonnet mounts that flip up and forwards (to clear the grille at the front) off a 5-series I think and made up some brackets to fit them to the GT6 bonnet

A video demonstration by yours truly: https://www.youtube.com/watch?v=dDl-NkJDZgU
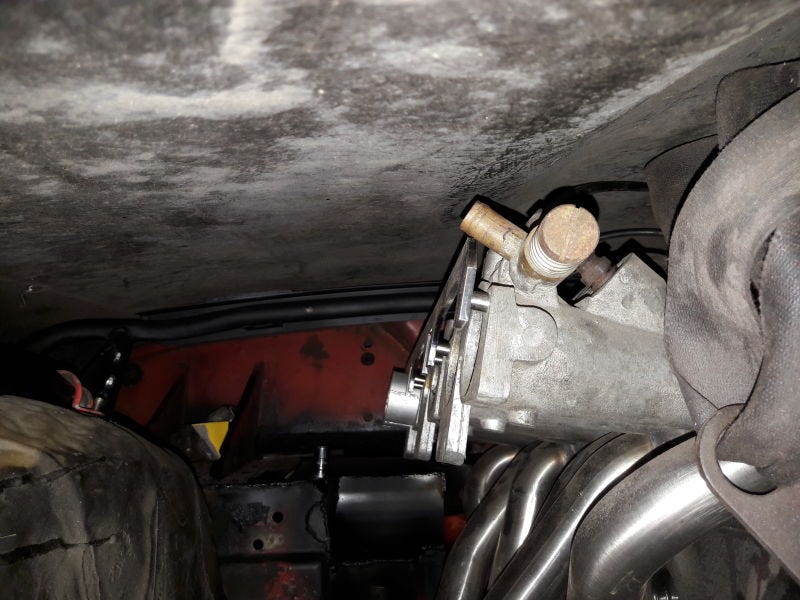
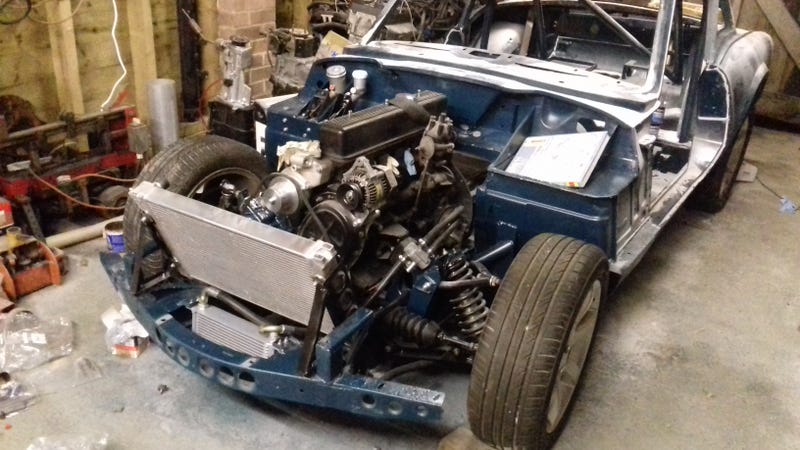
At this point I was feeling pretty smug with myself...right up until I tried to fit the TR6 exhaust I had read would fit if I shifted the engine back an inch. It really wouldn't. Not even close.
So, looks like I'll be moving the engine back 3"...
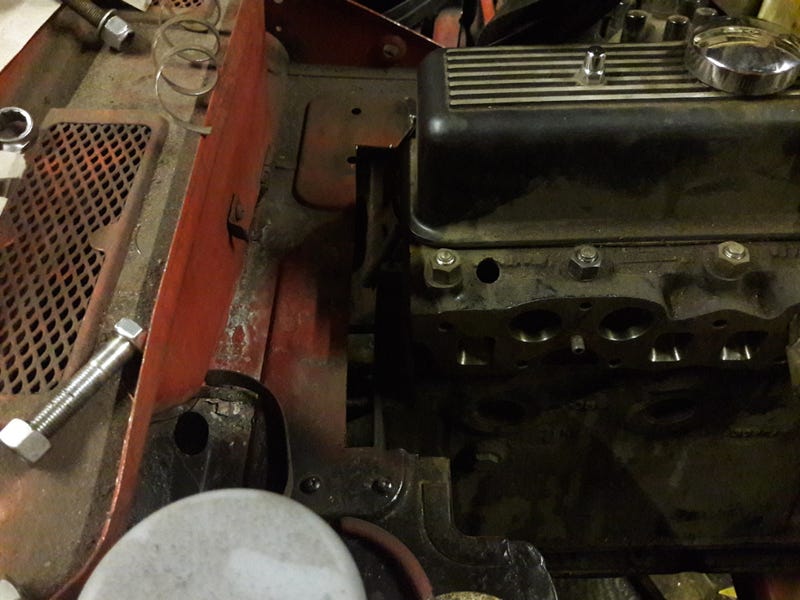
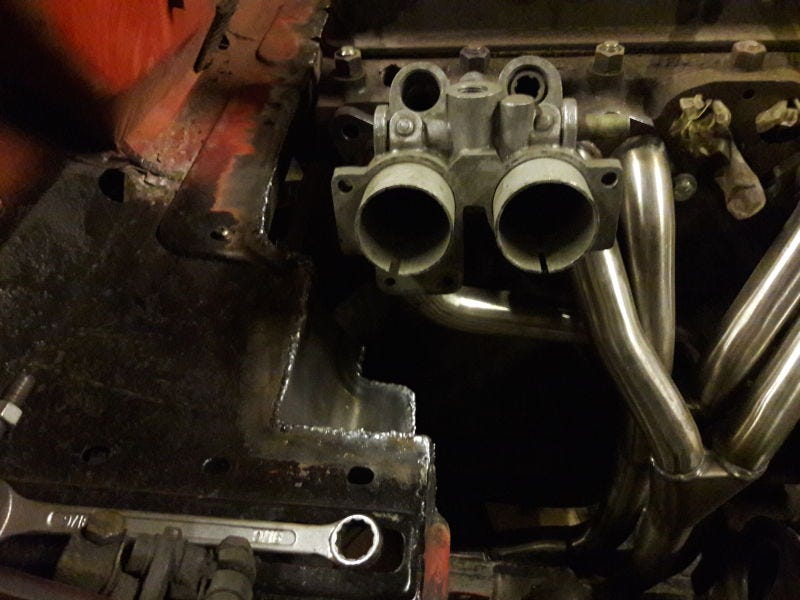
It fits! (another lie we'll discover later).
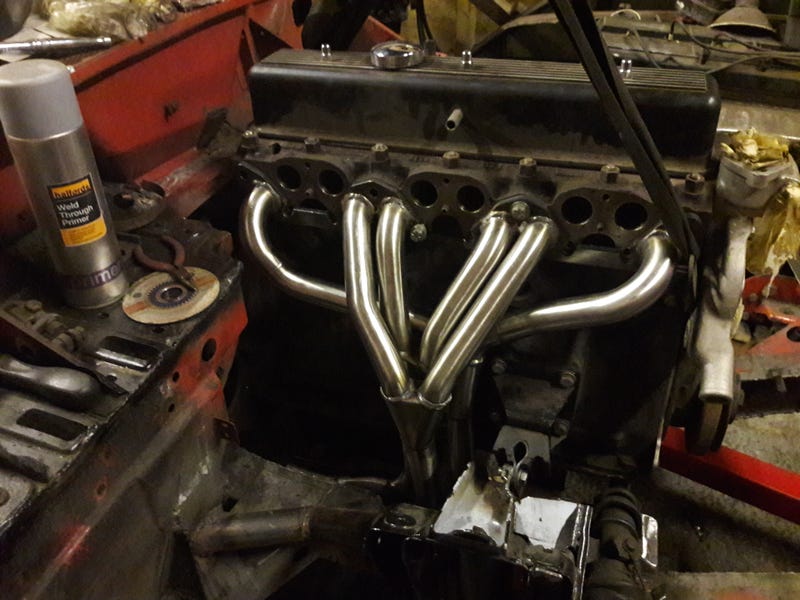
Gearbox mount will need redoing for the third time though. No pics of the finished article, but I ended up chopping the whole lot out and making up a new one out of 2" box section and 3mm plate.
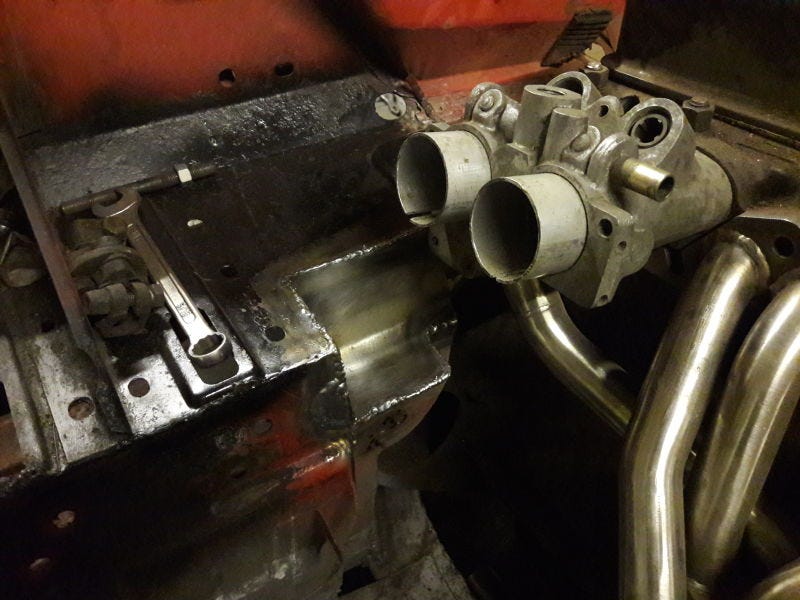
I should probably mention that this whole engine relocation was done in less than a week as I had it booked in for sand blasting :S still, it meant that my PI throttle bodies would now clear the bonnet meaning I wouldn't need to cut the flanges off and drop them level. Definitely a good thing
Most racers poke their roll cage through the front firewall to meet the front suspension towers (orange pic). Unfortunately, because I don't have a full cage (and don't really want one as the footwell's cramped enough), the next option is to brace it back to the bulkhead. Unfortunately, the bulkhead's a bit floppy at the best of times, and in a crash you'd just be spearing your feet with a weld-hardened spar of steel (red pic).
Option C would be a cross-brace against the chassis and the bulkhead, but I'm fairly certain that would jsut fold the bulkhead back towards you in a crash. Not good either (blue pic).
So, the idea I had was to build in a crumple zone of sorts by making something like the green pic. A stronger tube would meet a thinner walled tube in the middle, angled down away from the passenger compartment. It'd still brace the shock towers, but in the event of a crash should fold away from the occupants (and absorb a bit of the impact while they're at it).
So, beef up the original chassis mounts with many plates of 3mm steel so they won't be going anywhere:
And weld in the supports:
Fuel pump and swirl pot:
And battery tray:
Mk1 Golf rads are a common enough alloy rad option for Spits and GT6s so made up some brackets to fit those. Of course, I've now decided that a Civic alloy rad that slots between the chassis rails is a better option, but that's by the by.
Next up I decided I really didn't like the stock bonnet mounts. They're heavy and ugly, especially without bumpers. So I cannibalised some fancy bonnet mounts that flip up and forwards (to clear the grille at the front) off a 5-series I think and made up some brackets to fit them to the GT6 bonnet
A video demonstration by yours truly: https://www.youtube.com/watch?v=dDl-NkJDZgU
At this point I was feeling pretty smug with myself...right up until I tried to fit the TR6 exhaust I had read would fit if I shifted the engine back an inch. It really wouldn't. Not even close.
So, looks like I'll be moving the engine back 3"...
It fits! (another lie we'll discover later).
Gearbox mount will need redoing for the third time though. No pics of the finished article, but I ended up chopping the whole lot out and making up a new one out of 2" box section and 3mm plate.
I should probably mention that this whole engine relocation was done in less than a week as I had it booked in for sand blasting :S still, it meant that my PI throttle bodies would now clear the bonnet meaning I wouldn't need to cut the flanges off and drop them level. Definitely a good thing
@WilliamP Haha I absolutely love that video work of genius, and definitely offered a respite from all the work at times
Onward we roll though!
First time the shell saw daylight in 3 years!
So clean, so shiny

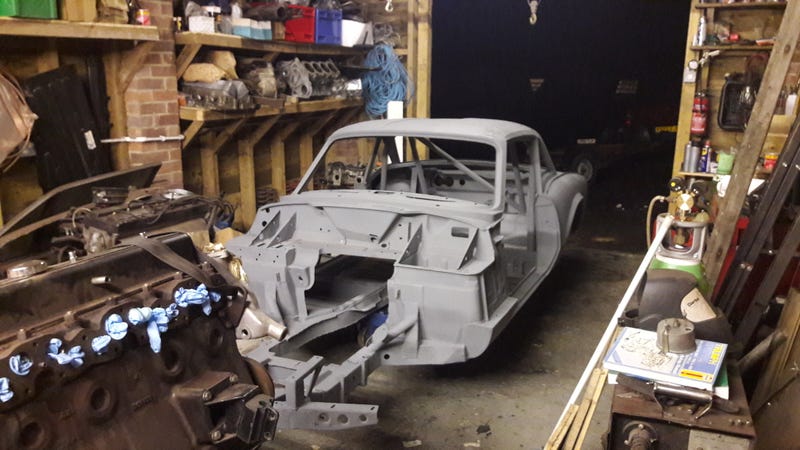
Did show up a few rust issues though:
And after making up a little spray-booth with plastic sheeting, paint!
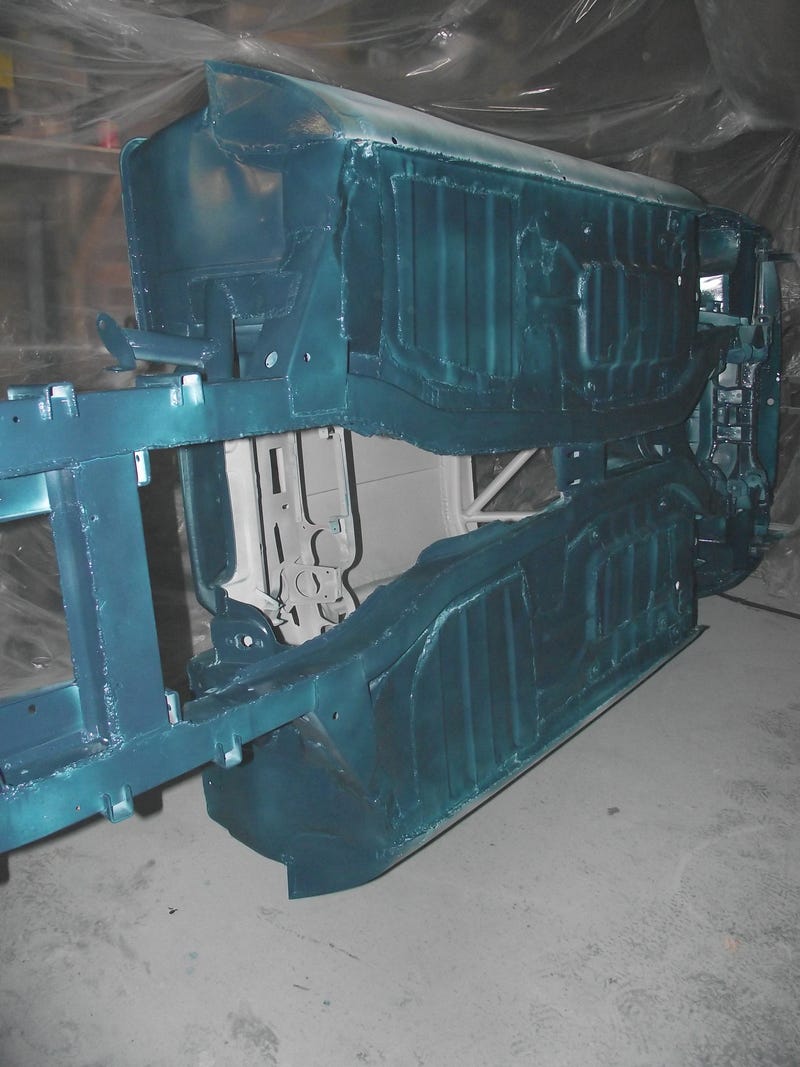

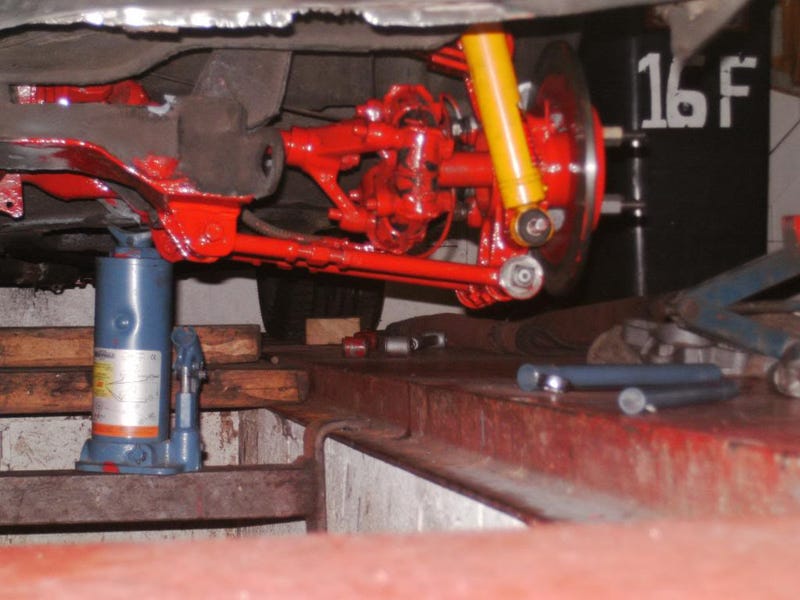
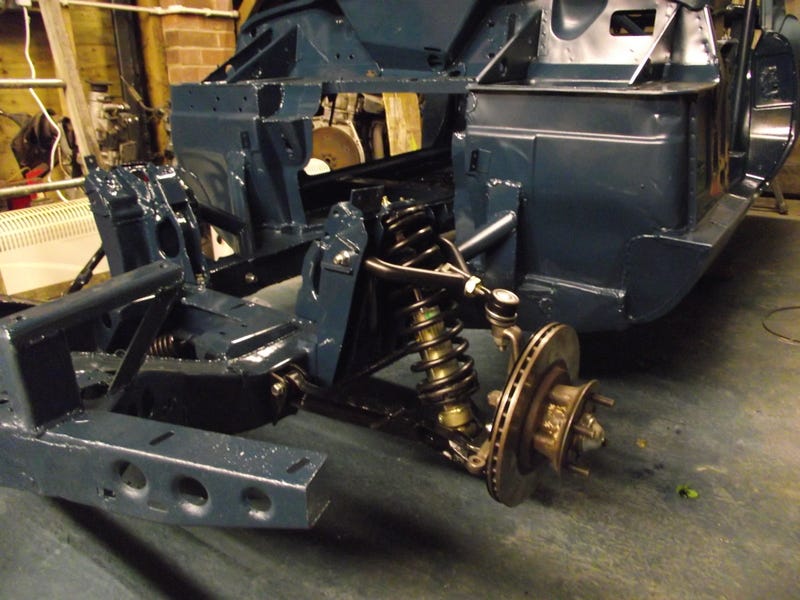
Front and rear suspension:
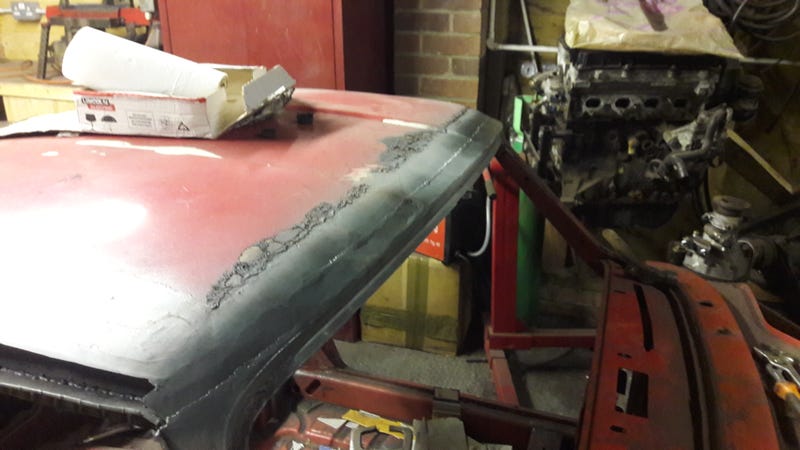
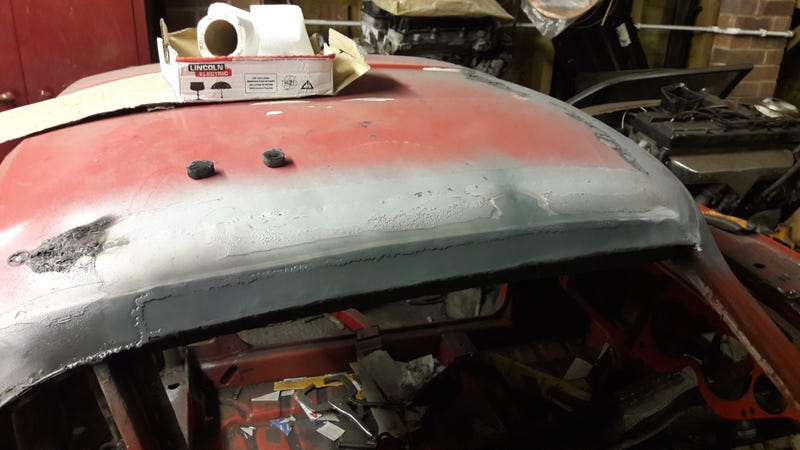
This was about December last year. Remember I mentioned that welding a hard top to the body was a terrible idea? This is why.
That's all filler to try and make the thoroughly heat-distorted roof flat. It's only a thin layer in the end, but the sheer amount you have to apply and then sand off to get it flat is mind-boggling. Here's an inch-thick layer of dust in the interior, which wasn't even a quarter of the way through.
Admittedly, I made it hard for myself by using waterproof P40 filler rather than P38 (it's harder to sand) and doing the sanding manually for most of it as I didn't trust the rotary sander not to sand flats into it too easily (I softened on that last opinion around the 6 month mark).
Everywhere I'd welded on the exterior pressed panels had significantly distorted with heat. To break the tedium of filling and sanding every single exterior panel I fitted the engine, shimmed the suspension bearings and got it down on its wheels.
Which at long last brings us to the present day! As of last Friday, I finally finished the filling and sanding!
[img]https://i.kinja-img.com/gawker-media/image/upload/s--wZ42futk--/c_scale,f_auto,fl_progressive,q_80,w_800/spbgcmbtfzodpf28eo3s.jpg[img]
Woohoo!
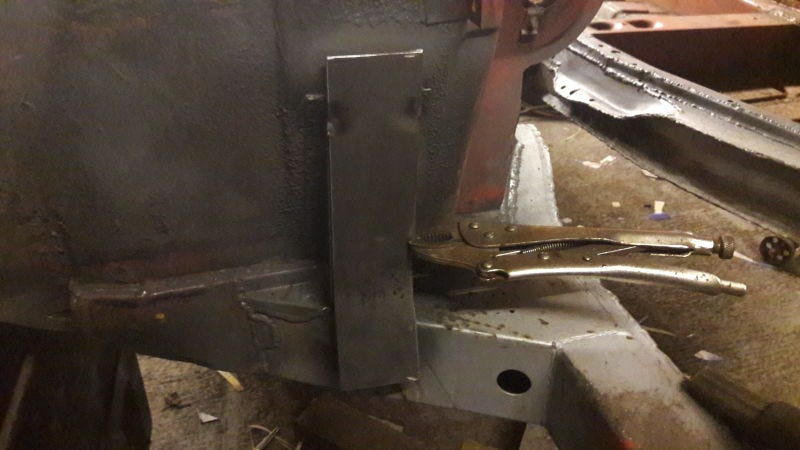
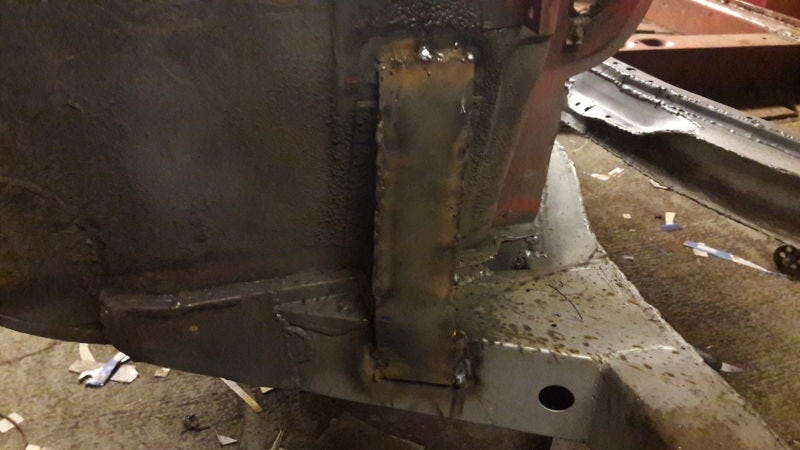
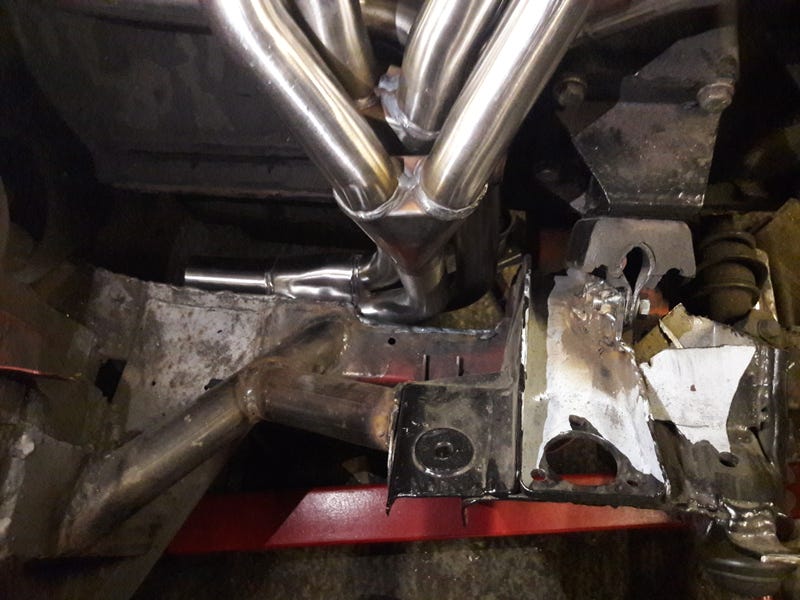
Try to fit the exhaust as a next step. Fouls on the lower wishbone mount as it pokes through the inside of the chassis. Not so woohoo, but to be honest I was still so elated I'd finished sanding I barely noticed
Came up with the idea of insetting the suspension mount into the chassis using this complicated little gubbins.
And that's where we are today!
Phew. What a mission :S hope at least one person's made it through all of that...
Next steps are to make up another little spray booth in the other garage (this one's not wide enough to paint it on its wheels) and paint the bodyshell
Before that happens though, I've got the green Jag we saw earlier to strip and scrap and my little Fiat X1/9 Uno Turbo to finish repairing after I put it through a hedge in Wales. Depending on the convention for multiple cars in one thread I'll be chronicling their rise and fall next
Hope you guys enjoyed it anyway!
work of genius, and definitely offered a respite from all the work at times Onward we roll though!
First time the shell saw daylight in 3 years!
So clean, so shiny
Did show up a few rust issues though:
And after making up a little spray-booth with plastic sheeting, paint!
Front and rear suspension:
This was about December last year. Remember I mentioned that welding a hard top to the body was a terrible idea? This is why.
That's all filler to try and make the thoroughly heat-distorted roof flat. It's only a thin layer in the end, but the sheer amount you have to apply and then sand off to get it flat is mind-boggling. Here's an inch-thick layer of dust in the interior, which wasn't even a quarter of the way through.
Admittedly, I made it hard for myself by using waterproof P40 filler rather than P38 (it's harder to sand) and doing the sanding manually for most of it as I didn't trust the rotary sander not to sand flats into it too easily (I softened on that last opinion around the 6 month mark).
Everywhere I'd welded on the exterior pressed panels had significantly distorted with heat. To break the tedium of filling and sanding every single exterior panel I fitted the engine, shimmed the suspension bearings and got it down on its wheels.
Which at long last brings us to the present day! As of last Friday, I finally finished the filling and sanding!
[img]https://i.kinja-img.com/gawker-media/image/upload/s--wZ42futk--/c_scale,f_auto,fl_progressive,q_80,w_800/spbgcmbtfzodpf28eo3s.jpg[img]
Woohoo!
Try to fit the exhaust as a next step. Fouls on the lower wishbone mount as it pokes through the inside of the chassis. Not so woohoo, but to be honest I was still so elated I'd finished sanding I barely noticed
Came up with the idea of insetting the suspension mount into the chassis using this complicated little gubbins.
And that's where we are today!
Phew. What a mission :S hope at least one person's made it through all of that...
Next steps are to make up another little spray booth in the other garage (this one's not wide enough to paint it on its wheels) and paint the bodyshell
Before that happens though, I've got the green Jag we saw earlier to strip and scrap and my little Fiat X1/9 Uno Turbo to finish repairing after I put it through a hedge in Wales. Depending on the convention for multiple cars in one thread I'll be chronicling their rise and fall next
Hope you guys enjoyed it anyway!
Thanks guys, glad you made it through
There will be more coming soon hopefully on the Spit. Paint and now a dual brake master setup (was originally going to have a bias valve, but dual masters are a bit safer than the single system I was planning and I can adjust them easier when I sort out some rear discs in phase 2 of the project).
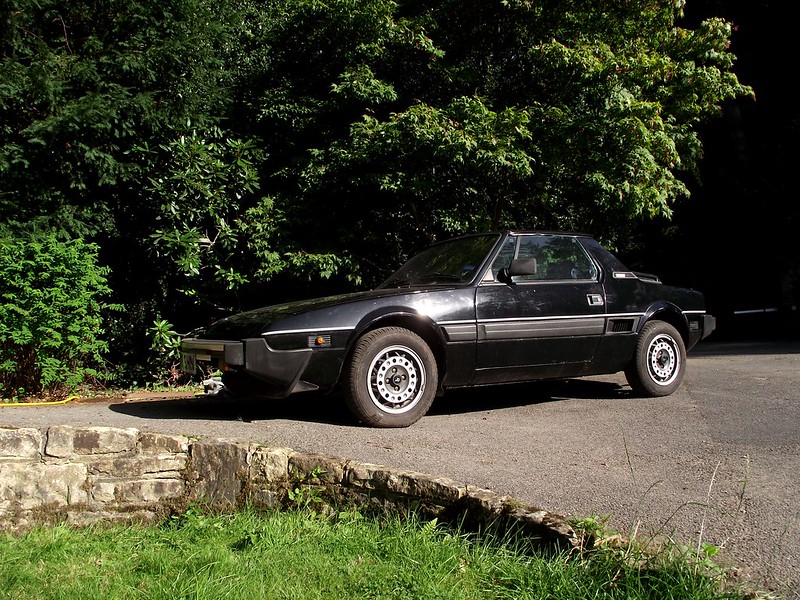
However, before that happens there's a few other things to fix. First of which is my X1/9, so I might as well start the story on that I'd start a new little plog, but everything interweaves so it's better here IMHO. Again, bear with me. This one meanders a bit...
Rewind back to January this year and me. some mates and a load of people from another forum (Oppositelock if anyone knows it) had a 'Europpomeet' trip planned where we'd head to Wales and spend a week bombing around the Brecon Beacons and Snowdonia. As I do every year, I said 'this is the year the Spit will be finished, I'll take it to Wales!'.
Meanwhile, January rolls around and the enormity of the filling job on the spitfire is starting to become apparent. Drat (or words to that effect). Meanwhile, something rather interesting pops up on eBay...

Sweet Mary Mother of Motors it's an X1/9 with an Uno Turbo engine! £3500 as well. I'd seen it sell for £5000 a week or so earlier but the guy was a timewaster and the seller needed it shifted for a house move. No time to lose.
No, to put this into context I bought an X1/9 way back in 2012 for the princely sum of £330...and it was worth about that at that point. Rust-bucket, non-runner. Still, it's a damn cool car. Got it running (fuel pump diaphragm dead and filter clogged), and pulled the bumpers off (20kg they weigh together!).

Then, Christmas Eve 2012 rolls around and brings with it a really nasty storm. No power for a week. Trees down everywhere...including this one:
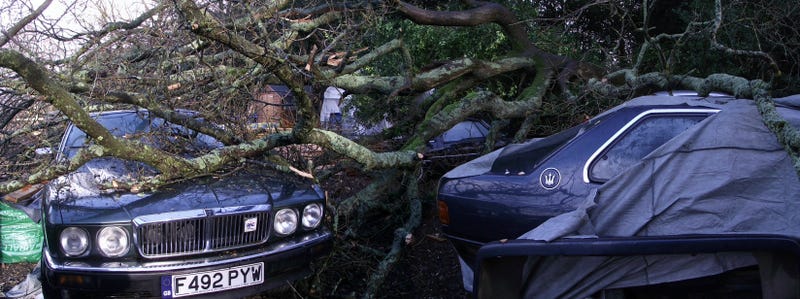
Ah.
That's not good.
You can just about see the poor little Fiat poking through the branches at the back. A little (lot) of hacking tree limbs out the way and we get close enough to see this:
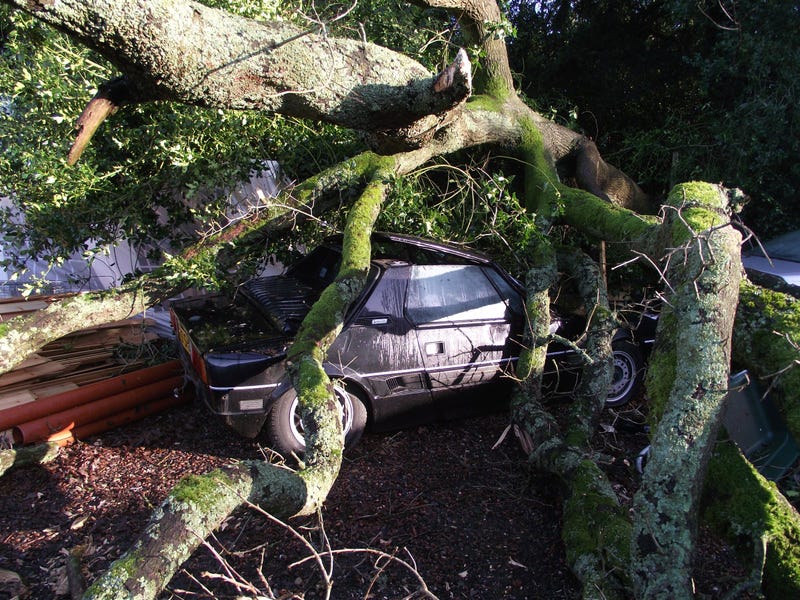
Yeah. That's not buffing out.
Strut's pushed through their towers on 3/4 corners. Windscreen and surround destroyed. Not a panel without a significant dent.
Drat.
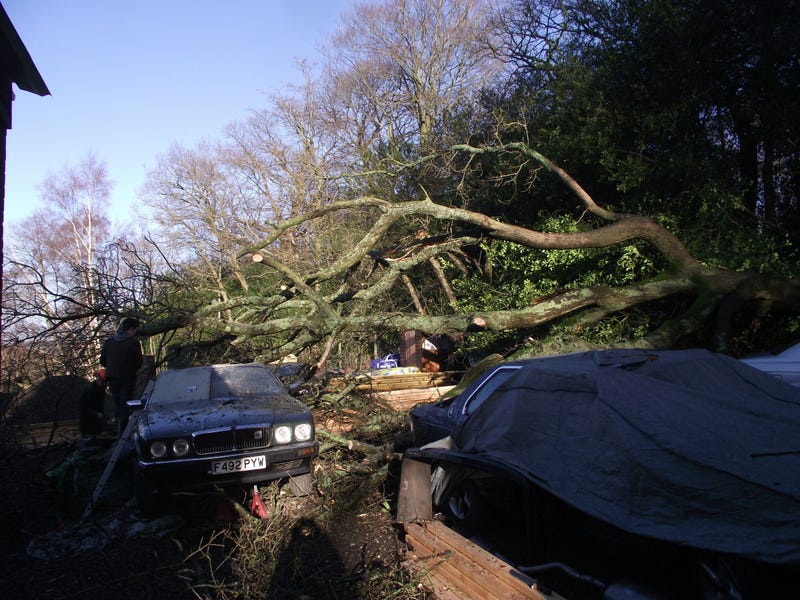
Here's a pic halfway through chainsawing it up that shows the sheer scale of the tree down.
So yeah, since then I've rather fancied another X1/9.
So, day before we're off on a ski holiday I flex what little financial muscle I have, reorganise some loans and scrape together £3500. Collar a mate to take me down to Worthing to pick it up, and buy it there and then. First time the planets have aligned properly to actually buy one of my dream cars, so yeah. Pretty pleased
Had a little trouble getting it back. Ran fine when the PO was giving me a run round the block, but halfway back it decided it wanted to run really badly. Bucked and stuttered under acceleration, and died if you weren’t keeping the revs up. This was compounded by a known starting issue where the starter motor clicks but doesn’t want to engage. Managed to get it back eventually though.
Pretty much sorted the running issues. Turns out a little sensor blank on the inlet manifold had come loose causing a boost leak, and replacing that (with some loctite this time) brought the idle back and improved running immensely. Still bucks very occasionally, which I think is a combination of the factory boost sensor cutting ignition at .7 bar and an aftermarket bleed valve causing it to exceed that on occasion. Disconnected the boost cut (a common and dead simple mod), tweaked the bleed valve so it wouldn't exceed 1 bar and it ran fine!
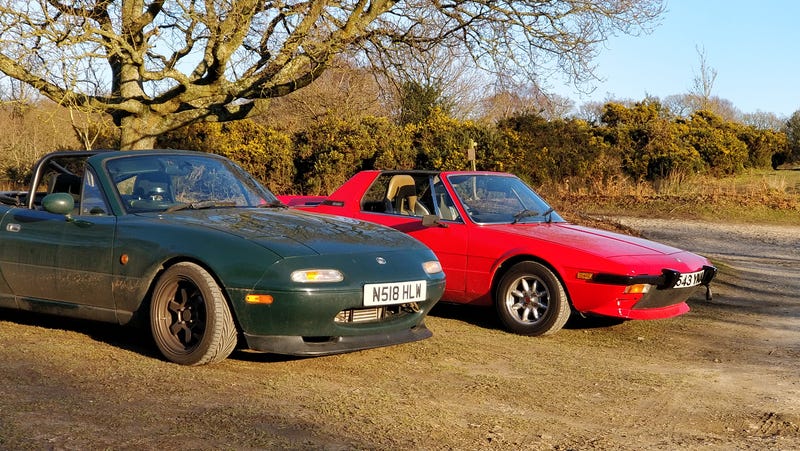
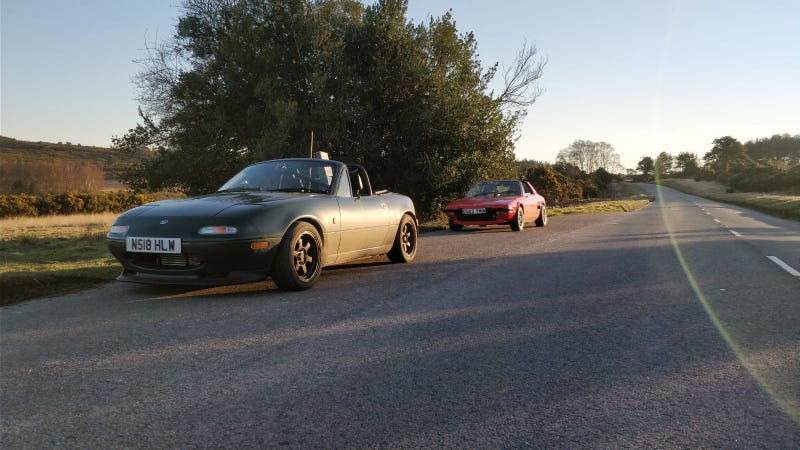
Took it out for a spin with my mate's turbo MX-5 for some glamour shots
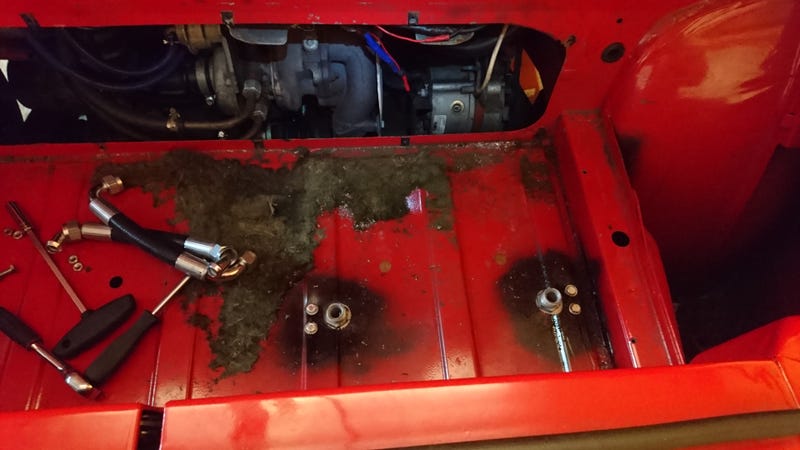
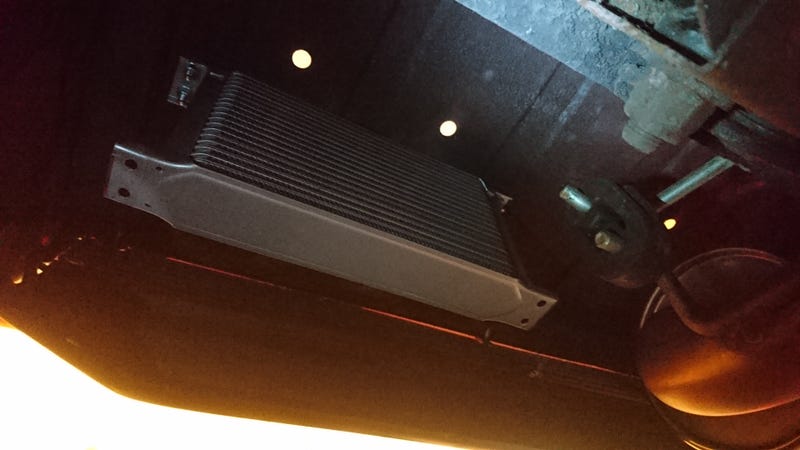
Couple of things I wanted done before the big trip to Wales. Standard seats and seatbelts went in to replace the godawful buckets and harnesses (in hindsight they weren't that bad, but the PO was much taller than I am so the adjustment was out of whack). Also fitted an oil cooler as a bit of research uncovered the fact that the oil temps in UT-swapped X1/9s are basically freely climbing as there's no airflow around the engine. Took a few trials and errors, but got there eventually.
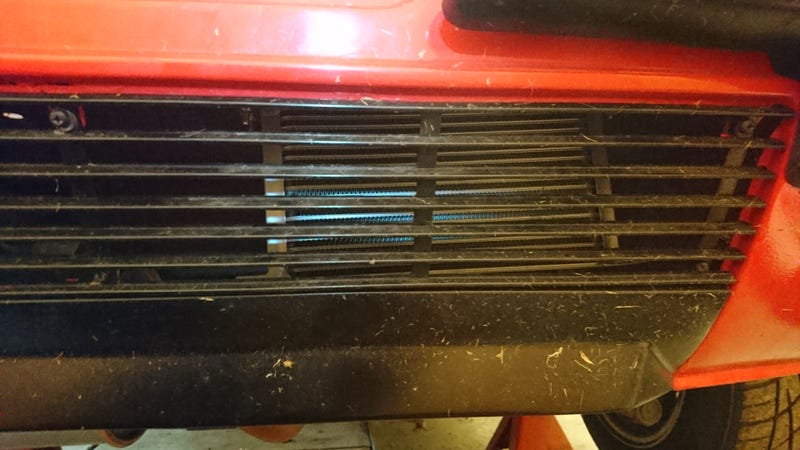
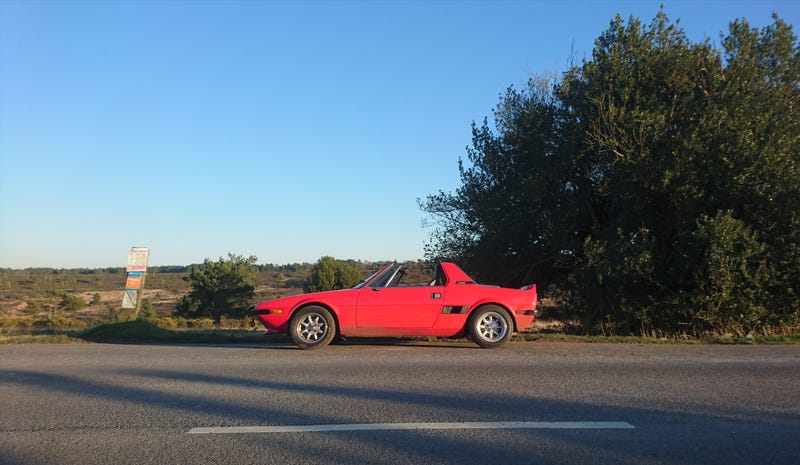
View through a grille at the back of the car

The Fiat filter wouldn't clear the bulkhead, but luckily I had a spare filter for the Alfa 156 lying around which is a tiny thing and fitted perfectly
Right! Two weeks to go til the Wales trip. List of things done:
- Full suspension bush change, all wheel bearings and coilovers changed on my sister’s MX-5 done.
- Bled the oil cooler and sorted some ill-fitting coolant hoses on the X1/9, discovering a water leak in the process.
- Oil change, ignition leads, fuel filter, delrin door bushes and a mirror blank plate for my mate’s turbo 5.
Oh, and did I mention I was also lending my Citroen BX NA Diesel I'd initially bought for £255 to a Dutch guy for the trip? That needed some work.
My mate managed to diagnose an issue with the fan transistor through the Citroen's barmy wiring (electricity's still largely witchcraft to me, but I'm getting better). By this point I'd pulled out the ding on the front wing caused by my own idiocy, frost and the aforementioned fan failure causing me to roll into a log splitter I'd made over winter.
Still to do:
-Replace some leaky coolant pipes and bleed the system on the X1/9, as well as perished fuel rail hose and injector o rings. Ideally a lower mount for the oil cooler too.
-Fix broken transistor on the Citroen, replace front wheel bearings, and fix anything else I’ve missed (turned out that I'd missed some knackered CV joints so driveshafts too).
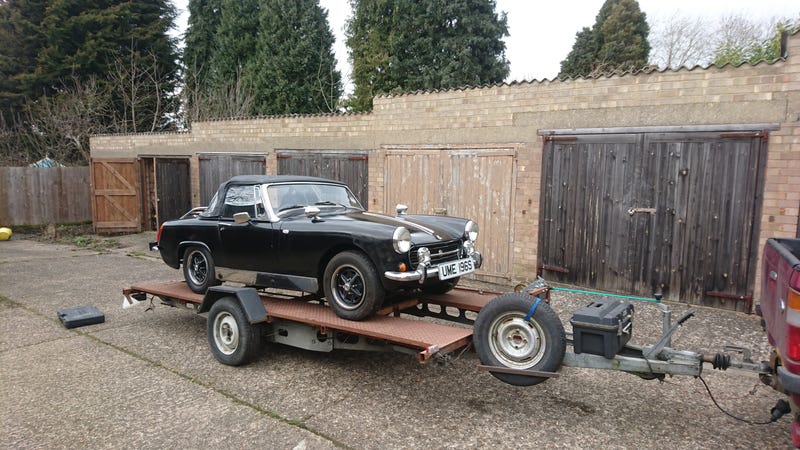
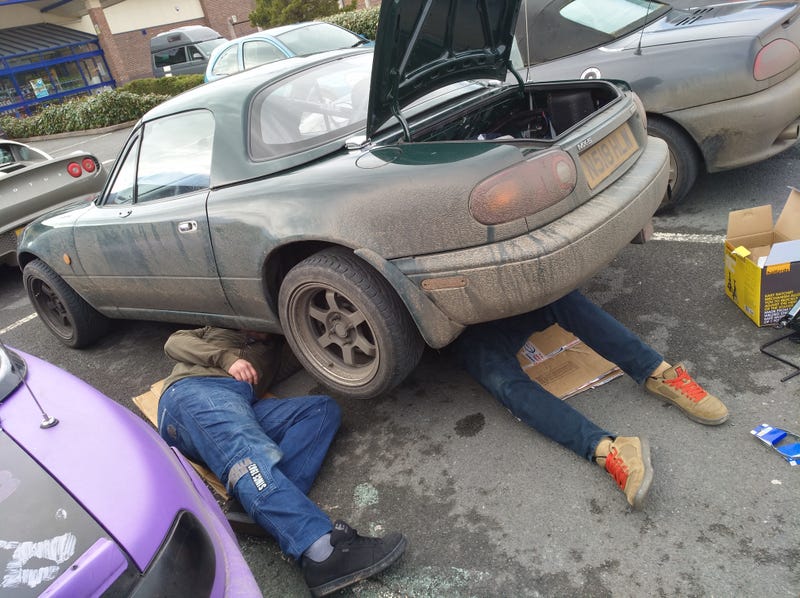
We also had a third mate who was planning on coming, but had the side seals blow on his RX8. What does he buy? A Midget that used to run! Went down to pick that up on my home-made caravan-chassis trailer.
Worked pretty much flat out on all of that. Replaced everything in the Citroen. Sorted the Fiat at 1am the night before we were planning to leave (except the lower bracket for the oil cooler). Nearly managed to get the Midget running. We narrowed the issue down to dodgy points, but the replacement set we had didn't fix it. We got halfway through installing a Lumenition kit I had for the Spitfire before we ran out of time (fixed it in the end). Luckily, I've also got an MG F so lent that to my mate now I had the Fiat sorted
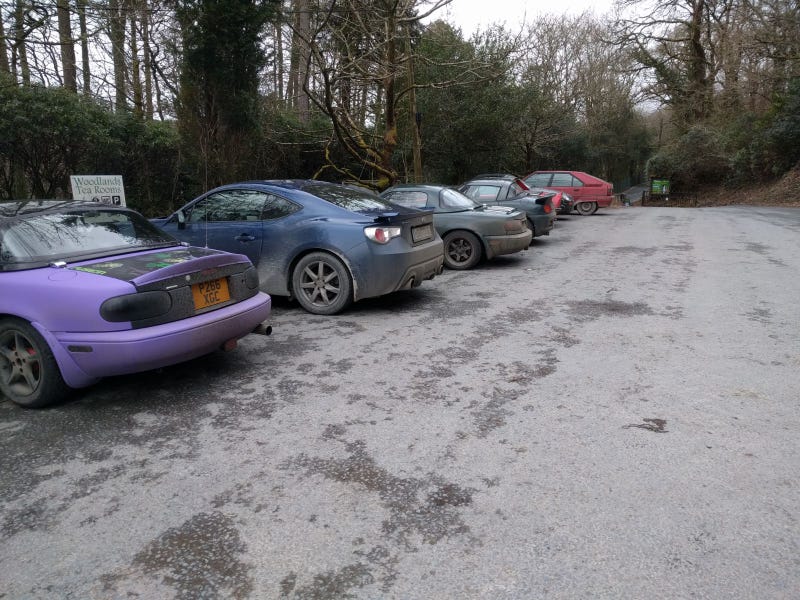
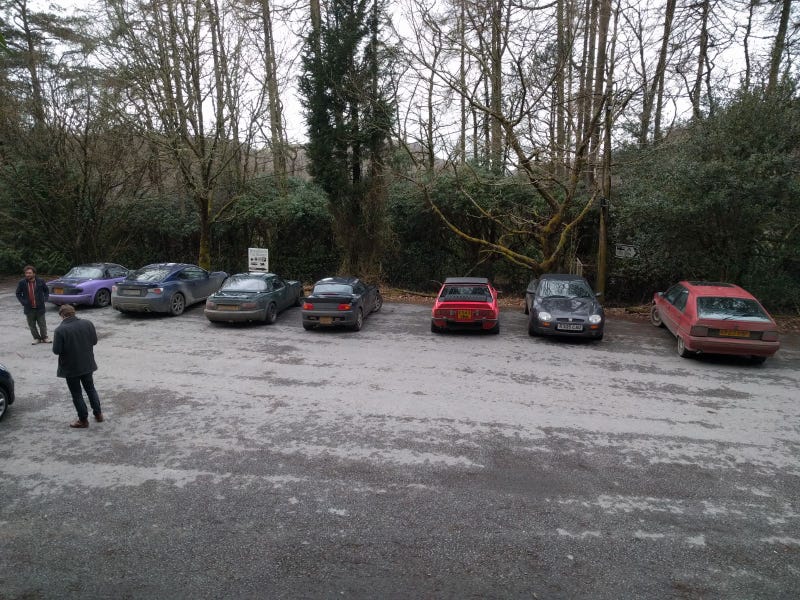
Here's the convoy as we left!
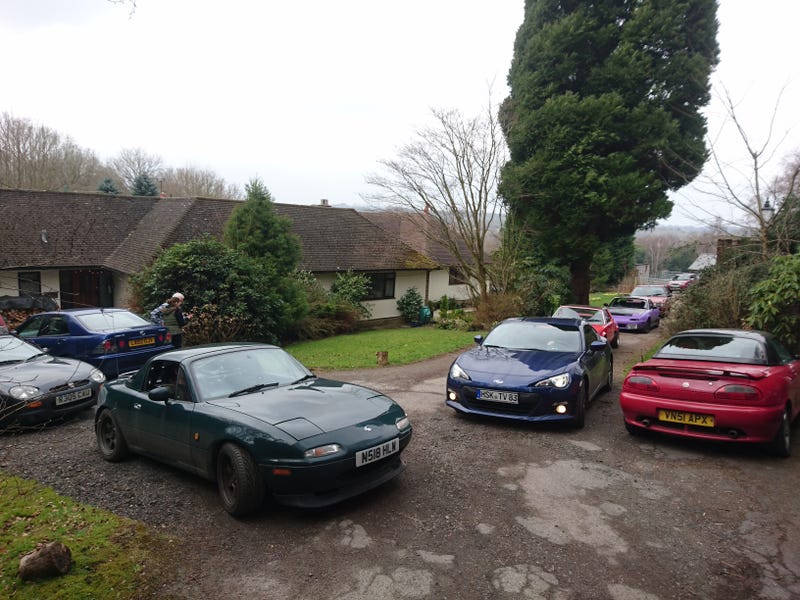
Mate's turbo 5 and my F off to the left, German chappy's BRZ, my X1/9, my sister's MX-5 and my little Citroen driven by a Dutchman off to the right!
That's probably enough for now, but stick with. The Wales trip was a proper adventure, and we'll soon learn that my luck with X1/9s doesn't change a great deal...
There will be more coming soon hopefully on the Spit. Paint and now a dual brake master setup (was originally going to have a bias valve, but dual masters are a bit safer than the single system I was planning and I can adjust them easier when I sort out some rear discs in phase 2 of the project).
However, before that happens there's a few other things to fix. First of which is my X1/9, so I might as well start the story on that
I'd start a new little plog, but everything interweaves so it's better here IMHO. Again, bear with me. This one meanders a bit...Rewind back to January this year and me. some mates and a load of people from another forum (Oppositelock if anyone knows it) had a 'Europpomeet' trip planned where we'd head to Wales and spend a week bombing around the Brecon Beacons and Snowdonia. As I do every year, I said 'this is the year the Spit will be finished, I'll take it to Wales!'.
Meanwhile, January rolls around and the enormity of the filling job on the spitfire is starting to become apparent. Drat (or words to that effect). Meanwhile, something rather interesting pops up on eBay...
Sweet Mary Mother of Motors it's an X1/9 with an Uno Turbo engine! £3500 as well. I'd seen it sell for £5000 a week or so earlier but the guy was a timewaster and the seller needed it shifted for a house move. No time to lose.
No, to put this into context I bought an X1/9 way back in 2012 for the princely sum of £330...and it was worth about that at that point. Rust-bucket, non-runner. Still, it's a damn cool car. Got it running (fuel pump diaphragm dead and filter clogged), and pulled the bumpers off (20kg they weigh together!).
Then, Christmas Eve 2012 rolls around and brings with it a really nasty storm. No power for a week. Trees down everywhere...including this one:
Ah.
That's not good.
You can just about see the poor little Fiat poking through the branches at the back. A little (lot) of hacking tree limbs out the way and we get close enough to see this:
Yeah. That's not buffing out.
Strut's pushed through their towers on 3/4 corners. Windscreen and surround destroyed. Not a panel without a significant dent.
Drat.
Here's a pic halfway through chainsawing it up that shows the sheer scale of the tree down.
So yeah, since then I've rather fancied another X1/9.
So, day before we're off on a ski holiday I flex what little financial muscle I have, reorganise some loans and scrape together £3500. Collar a mate to take me down to Worthing to pick it up, and buy it there and then. First time the planets have aligned properly to actually buy one of my dream cars, so yeah. Pretty pleased
Had a little trouble getting it back. Ran fine when the PO was giving me a run round the block, but halfway back it decided it wanted to run really badly. Bucked and stuttered under acceleration, and died if you weren’t keeping the revs up. This was compounded by a known starting issue where the starter motor clicks but doesn’t want to engage. Managed to get it back eventually though.
Pretty much sorted the running issues. Turns out a little sensor blank on the inlet manifold had come loose causing a boost leak, and replacing that (with some loctite this time) brought the idle back and improved running immensely. Still bucks very occasionally, which I think is a combination of the factory boost sensor cutting ignition at .7 bar and an aftermarket bleed valve causing it to exceed that on occasion. Disconnected the boost cut (a common and dead simple mod), tweaked the bleed valve so it wouldn't exceed 1 bar and it ran fine!
Took it out for a spin with my mate's turbo MX-5 for some glamour shots
Couple of things I wanted done before the big trip to Wales. Standard seats and seatbelts went in to replace the godawful buckets and harnesses (in hindsight they weren't that bad, but the PO was much taller than I am so the adjustment was out of whack). Also fitted an oil cooler as a bit of research uncovered the fact that the oil temps in UT-swapped X1/9s are basically freely climbing as there's no airflow around the engine. Took a few trials and errors, but got there eventually.
View through a grille at the back of the car
The Fiat filter wouldn't clear the bulkhead, but luckily I had a spare filter for the Alfa 156 lying around which is a tiny thing and fitted perfectly
Right! Two weeks to go til the Wales trip. List of things done:
- Full suspension bush change, all wheel bearings and coilovers changed on my sister’s MX-5 done.
- Bled the oil cooler and sorted some ill-fitting coolant hoses on the X1/9, discovering a water leak in the process.
- Oil change, ignition leads, fuel filter, delrin door bushes and a mirror blank plate for my mate’s turbo 5.
Oh, and did I mention I was also lending my Citroen BX NA Diesel I'd initially bought for £255 to a Dutch guy for the trip? That needed some work.
My mate managed to diagnose an issue with the fan transistor through the Citroen's barmy wiring (electricity's still largely witchcraft to me, but I'm getting better). By this point I'd pulled out the ding on the front wing caused by my own idiocy, frost and the aforementioned fan failure causing me to roll into a log splitter I'd made over winter.
Still to do:
-Replace some leaky coolant pipes and bleed the system on the X1/9, as well as perished fuel rail hose and injector o rings. Ideally a lower mount for the oil cooler too.
-Fix broken transistor on the Citroen, replace front wheel bearings, and fix anything else I’ve missed (turned out that I'd missed some knackered CV joints so driveshafts too).
We also had a third mate who was planning on coming, but had the side seals blow on his RX8. What does he buy? A Midget that used to run! Went down to pick that up on my home-made caravan-chassis trailer.
Worked pretty much flat out on all of that. Replaced everything in the Citroen. Sorted the Fiat at 1am the night before we were planning to leave (except the lower bracket for the oil cooler). Nearly managed to get the Midget running. We narrowed the issue down to dodgy points, but the replacement set we had didn't fix it. We got halfway through installing a Lumenition kit I had for the Spitfire before we ran out of time (fixed it in the end). Luckily, I've also got an MG F so lent that to my mate now I had the Fiat sorted
Here's the convoy as we left!
Mate's turbo 5 and my F off to the left, German chappy's BRZ, my X1/9, my sister's MX-5 and my little Citroen driven by a Dutchman off to the right!
That's probably enough for now, but stick with. The Wales trip was a proper adventure, and we'll soon learn that my luck with X1/9s doesn't change a great deal...
Oh yeah, forgot to mention. In the week before leaving we noticed that the turbo on my mate's 5 was vibrating a lot. A bit of investigation showed that the exhaust manifold had cracked nearly all the way around the flange!
Luckily, it was still in warranty down at Skuzzle Motorsort so we took it down there and they were really very good. Welded it up post-haste and fitted everything back together. Not the end of the saga with that, but we'll get to it later
Luckily, it was still in warranty down at Skuzzle Motorsort so we took it down there and they were really very good. Welded it up post-haste and fitted everything back together. Not the end of the saga with that, but we'll get to it later
Haha thanks guys glad you're enjoying it so far
I am cheating a little as I can quite neatly condense 6 years of work into a couple of posts, but it is amazing how much you can get done just doing a little bit each night.
And yeah, the last few posts are absolutely showboating it doesn't get much better once we get to Wales mind...
Thanks cb1965 and yeah I get it. Personally I've got no interest at all in most modern stuff. Nothing personal, there's just nothing really post-90s that floats my boat*. Doesn't stop me appreciating a properly done build thread though
Fingers crossed I'll have it done pretty soon. Been waiting quite some time to drive the thing!
*I tell a lie, I'd do awful things for a Sagaris...
glad you're enjoying it so far I am cheating a little as I can quite neatly condense 6 years of work into a couple of posts, but it is amazing how much you can get done just doing a little bit each night.
And yeah, the last few posts are absolutely showboating
it doesn't get much better once we get to Wales mind...Thanks cb1965
and yeah I get it. Personally I've got no interest at all in most modern stuff. Nothing personal, there's just nothing really post-90s that floats my boat*. Doesn't stop me appreciating a properly done build thread though Fingers crossed I'll have it done pretty soon. Been waiting quite some time to drive the thing!
*I tell a lie, I'd do awful things for a Sagaris...
I wish I had some more pics of it, given that it's my namesake.
Only ones I've really got are from before we moved when it was part-way through resto (my dad used to daily drive it for years, but alas it's the year before they started galvanising bodyshells so tinworm reared its ugly head).
Here's what I've got:
It's gone downhill a bit since then unfortunately. Moved halfway through the resto and didn't have a garage to put it in. It's awaiting a space in our big garage and then some much-needed work. He's since bought a rather nice 430 which just needed a little recommissioning. That's ticked off the list so it's only a matter of time before we get to the 228
I've got some pics of the 430 too, but not with me at the moment...
Midnight, but I thought I'd throw the briefest account of the first day in Wales
The BRZ and Citroen headed straight for Wales, but me and the rest of the gang had a concert in York to go to so we parted ways. The journey up to York was uneventful...which is about the only time I can use that word to describe anything during the trip.
Not bad for a motorway service station...
All goes swimmingly...until...
Bonnet up...that’s not usually a good sign on a diesel Citroen...
What’s that suspicious looking puddle Rob's just sent me?
And so it begins...
Our friend wisely left the BX at the cottage that day and hitched a ride in the BRZ for that day. Our little convoy arrived around 10pm-ish, and we’re straight under the Citroen. Hum. Looks like LHM to me (the hydraulic fluid Citroens use for suspension, brakes and power steering).
Over drinks that evening...we devise a plan.
Edited by BiTurbo228 on Sunday 12th August 00:38
@Hitch Now that I like! Has a nice poetic ring to it
@B'stard child and skatty Thanks guys! Hope I continue to entertain
@Spinakerr Not sure I've won just yet considering it hasn't turned a wheel in anger. I could get everything hooked up and throw a rod through the side of the block!
@e30m3Mark I know what you mean! Just scrolling through it to get to the latest comment seems to take a significant amount of time...
@hoppo4.2 Well isn't the world a small place? I remember reading about your swap somewhere when I was first deciding whether I should move my engine back in the chassis. I've still got those two pics in a little 'Spitfire Inspiration' folder (especially impressed with fitting the long M20 in with the original bonnet).
Where have you got up to? And @TonyRPH is right, we need another thread
Lunchtime at work, which means more Wales Trip!
We left our action on day one with an ominous puddle underneath the Citroen, and a plan to sort it devised over a night’s drinking.
Our cunning plan? Shall we see how much fluid it leaks in a day?
So, off we head into the Welsh countryside!

Wales truly is a stunning place, with some truly spectacular roads. Narrow and technical, but in a lot of places with good open sightlines off into the distance so barring rogue sheep you’re pretty free to enjoy them as far as your bravery will take you.
Now, our plan with the Citroen wasn’t as harebrained as it initially seems. Some clever bods at Citroen built in some safety features into the hydraulic system in the event of leaks. By taking feeds from different points in the reservoir, in the event of a leak the power steering goes first. Then the suspension drops. Then, preserved til last, is the braking system. We’d already worked out it wasn’t a brake leak as that’d be jetting the stuff out almost as fast as it could pump it. Not bad for a bunch of drunkards
...didn’t expect our Dutch friend to be catching 4-wheel air mind you, which he definitely did
But wait. Back up a minute. What’s that tiny red speck in the distance?
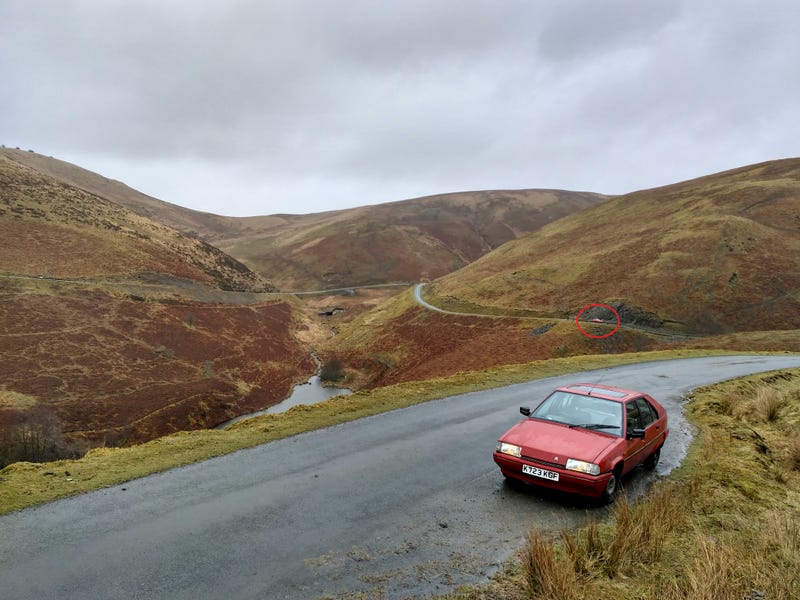
Can you zoom in on that?
Closer...

Enhance...
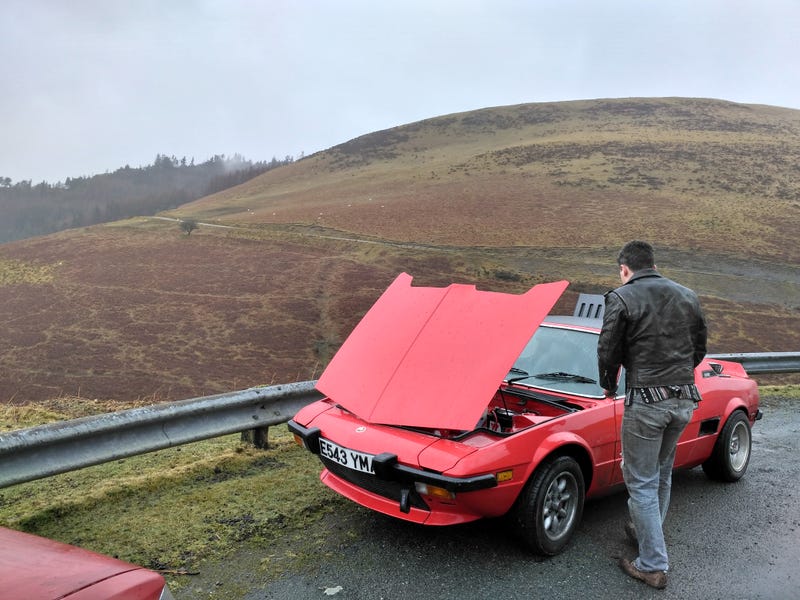
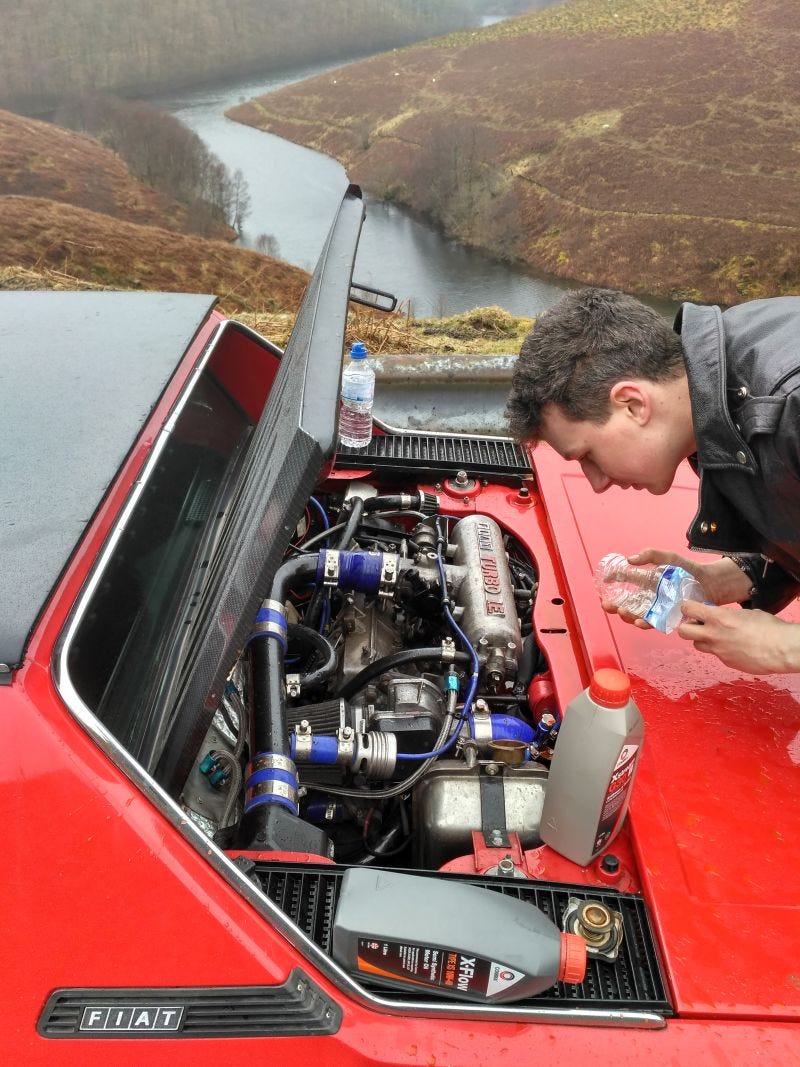
Oh look, it’s an overheating Fiat.
Turns out, my 2am coolant bleeding session wasn’t up to belting around the Brecon Beacons. Who would have guessed?
Still, hell of a scenic place to break down.
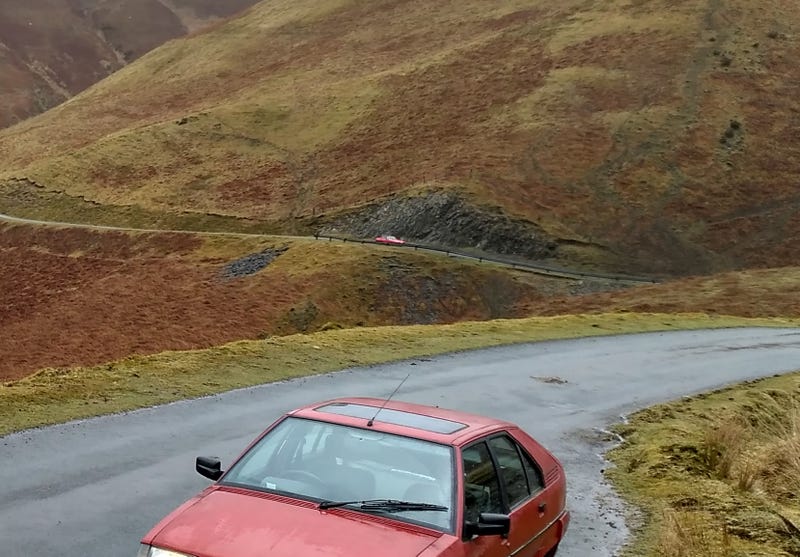
Unfortunately, as I shut it down it decided to belch the majority of its coolant over said scenic beauty. I had prepared for little top-ups, but nowhere near enough for this.
But luckily, this scenery’s not just for looking at...
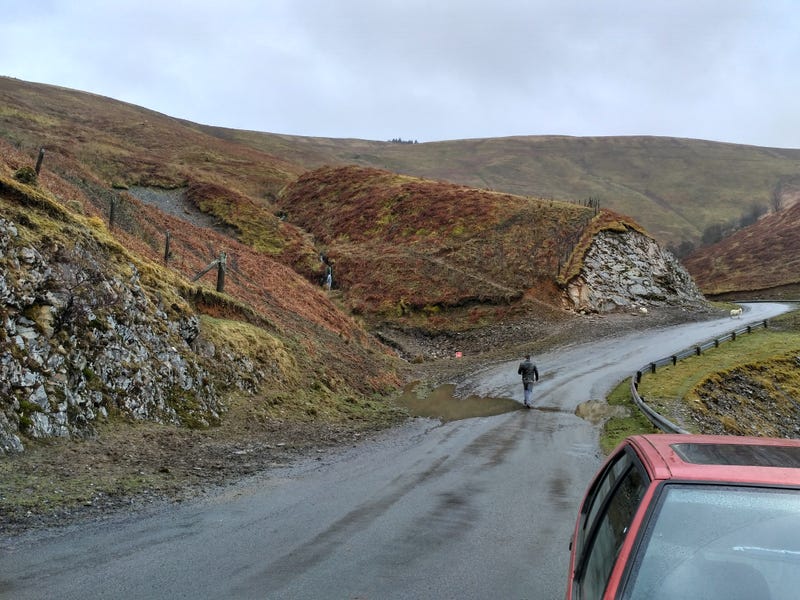
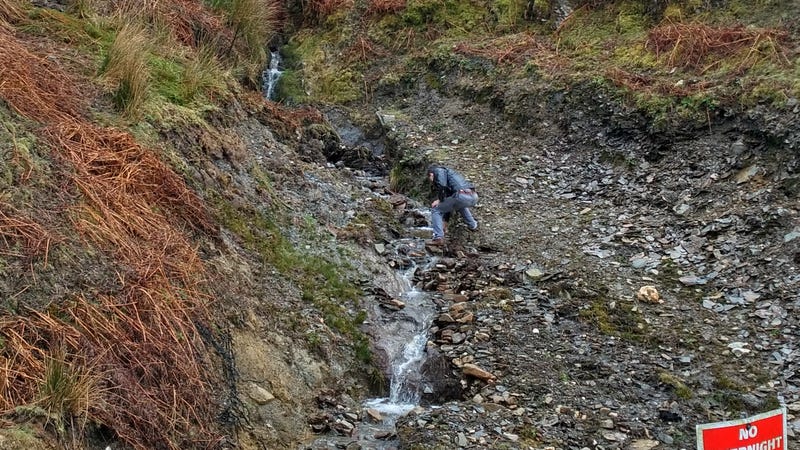
Spurred on by the 'no overnight parking' sign, we found a little stream that was pretty clean and after shuttling back and forth a litre at a time managed to refill the coolant system. Spent a lot of effort cleaning up the spilt coolant as well (seems ungrateful to poison the water source that’s just saved your bacon). After bleeding more thoroughly this time, we were on our way again!
Our destination after all this, Halfords in Aberystwyth (spelt from memory, lets see if it’s right...), where we could pick up some LHM for the Citroen and meet up with the rest of the gang. Only, after the delay setting off from Citroen research and the delay with the coolant, we were now running significantly behind schedule.
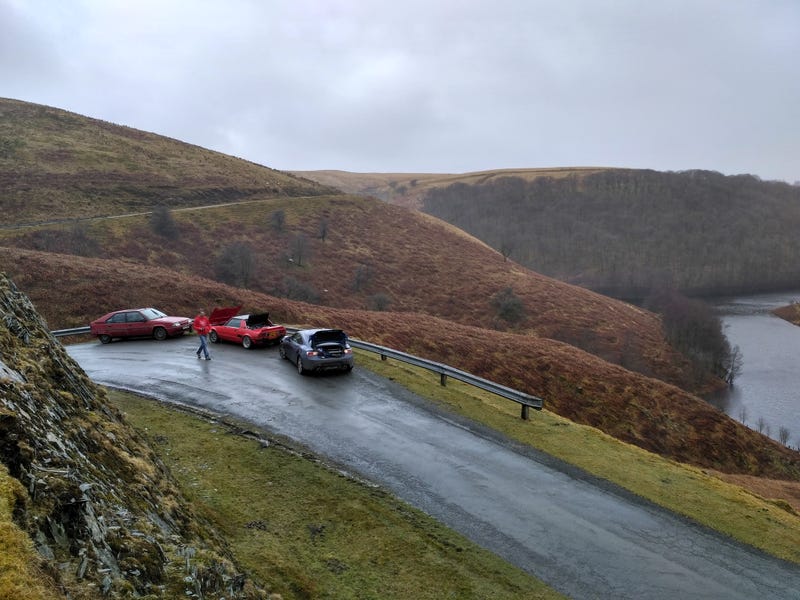
Still, we weren’t alone when we arrived...
Turns out some of the roads in Wales aren’t exactly kind on low-slung sports cars. Exhausts specifically.
Bit of Halfords’ finest exhaust repair, spot of lunch and the rearguard were back on the way! Again, not many photos. I think we were just happy to be driving
Thankfully the trip back went smoothly, although we’d discovered by now that the BX was going through about 1 litre of LHM a day. At £13 a bottle, we may actually have to fix this.
Later that evening we reunited with the group at a very pretty pub with a very pretty barmaid and hatched a new cunning plan for the Citroen...
@B'stard child and skatty Thanks guys! Hope I continue to entertain
@Spinakerr Not sure I've won just yet considering it hasn't turned a wheel in anger. I could get everything hooked up and throw a rod through the side of the block!
@e30m3Mark I know what you mean! Just scrolling through it to get to the latest comment seems to take a significant amount of time...
@hoppo4.2 Well isn't the world a small place? I remember reading about your swap somewhere when I was first deciding whether I should move my engine back in the chassis. I've still got those two pics in a little 'Spitfire Inspiration' folder (especially impressed with fitting the long M20 in with the original bonnet).
Where have you got up to? And @TonyRPH is right, we need another thread
Lunchtime at work, which means more Wales Trip!
We left our action on day one with an ominous puddle underneath the Citroen, and a plan to sort it devised over a night’s drinking.
Our cunning plan? Shall we see how much fluid it leaks in a day?
So, off we head into the Welsh countryside!
Wales truly is a stunning place, with some truly spectacular roads. Narrow and technical, but in a lot of places with good open sightlines off into the distance so barring rogue sheep you’re pretty free to enjoy them as far as your bravery will take you.
Now, our plan with the Citroen wasn’t as harebrained as it initially seems. Some clever bods at Citroen built in some safety features into the hydraulic system in the event of leaks. By taking feeds from different points in the reservoir, in the event of a leak the power steering goes first. Then the suspension drops. Then, preserved til last, is the braking system. We’d already worked out it wasn’t a brake leak as that’d be jetting the stuff out almost as fast as it could pump it. Not bad for a bunch of drunkards
...didn’t expect our Dutch friend to be catching 4-wheel air mind you, which he definitely did
But wait. Back up a minute. What’s that tiny red speck in the distance?
Can you zoom in on that?
Closer...
Enhance...
Oh look, it’s an overheating Fiat.
Turns out, my 2am coolant bleeding session wasn’t up to belting around the Brecon Beacons. Who would have guessed?
Still, hell of a scenic place to break down.
Unfortunately, as I shut it down it decided to belch the majority of its coolant over said scenic beauty. I had prepared for little top-ups, but nowhere near enough for this.
But luckily, this scenery’s not just for looking at...
Spurred on by the 'no overnight parking' sign, we found a little stream that was pretty clean and after shuttling back and forth a litre at a time managed to refill the coolant system. Spent a lot of effort cleaning up the spilt coolant as well (seems ungrateful to poison the water source that’s just saved your bacon). After bleeding more thoroughly this time, we were on our way again!
Our destination after all this, Halfords in Aberystwyth (spelt from memory, lets see if it’s right...), where we could pick up some LHM for the Citroen and meet up with the rest of the gang. Only, after the delay setting off from Citroen research and the delay with the coolant, we were now running significantly behind schedule.
Still, we weren’t alone when we arrived...
Turns out some of the roads in Wales aren’t exactly kind on low-slung sports cars. Exhausts specifically.
Bit of Halfords’ finest exhaust repair, spot of lunch and the rearguard were back on the way! Again, not many photos. I think we were just happy to be driving
Thankfully the trip back went smoothly, although we’d discovered by now that the BX was going through about 1 litre of LHM a day. At £13 a bottle, we may actually have to fix this.
Later that evening we reunited with the group at a very pretty pub with a very pretty barmaid and hatched a new cunning plan for the Citroen...
Yeah I kinda know what you mean. When I first started my Spit I calculated the power-to-weight to be just a smidge more than an E46 M3. At the time that was relatively near the sharper end of affordable performance which was neat you had your E90 M3s that could out drag it, but not by as much as you'd think.
Fast forward to now and the E46 is looking decidedly mid-field next to 500bhp hatches and super-saloons (even if they are fantastically porky).
Still, we got a proper lesson in just what sod-all weight can do at a Brands Hatch trackday last week. Everyone knows Caterhams are monstrously quick, but they've usually got some pretty immense power-to-weight ratios themselves so it's expected.
However, we went in my MG F, my mate's 300bhp turbo MX5 (torque limited to 200lb-ft until it gets rods, but still a bit of a missile), and another guy's Exocet (about 700-750kg, but bone-stock 1.8 MX5 drivetrain). My F on T1Rs, but the 5 and Exocet both on the same grippy Nankangs.
The MX-5 was predictably quicker than the F, but what really surprised us was how neck-and-neck the 5 and the Exocet were. Honestly, the 300bhp MX-5 was hitting 130mph down the back straight and the 130-ish bhp Exocet could barely crack 90...and yet they were absolutely inseparable regardless of who was leading.
Same tyres. Same suspension. One with less than half the horsepower, but ~400kg less weight.
That's got me really excited about the Spitfire's potential capabilities. With ~750kg and 170-200bhp (and 200lb-ft of torque) it should be pretty close to the Exocet...except with 40bhp/88lb-ft more. Certainly enough to spook some much more powerful machines at any rate
If all else fails, there's always the Saab B204 which I'm convinced shared a bolt pattern with a 4-cylinder LT77...
Here's some pics from the trackday as proof
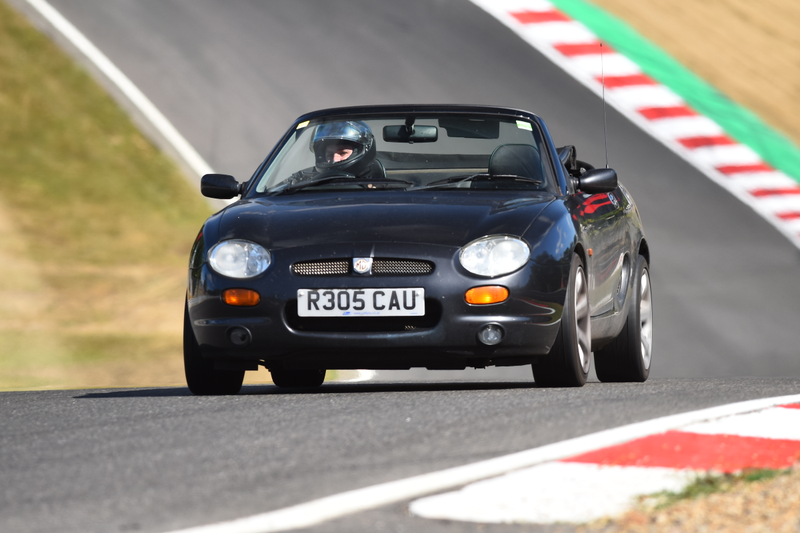
MG F
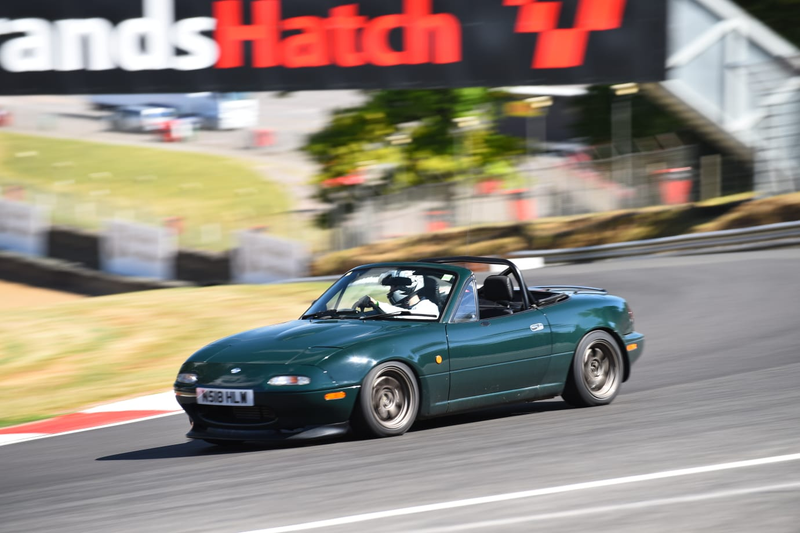
5

And the Exocet in its typical position, loitering behind the 5 waiting for it to finish getting through the corner.
Have you done anything to the rear end of yours? That'd be the only thing I was thinking if you were looking at 5-turbo engines. They need a fair bit of work back there to get them up to snuff.
you had your E90 M3s that could out drag it, but not by as much as you'd think.Fast forward to now and the E46 is looking decidedly mid-field next to 500bhp hatches and super-saloons (even if they are fantastically porky).
Still, we got a proper lesson in just what sod-all weight can do at a Brands Hatch trackday last week. Everyone knows Caterhams are monstrously quick, but they've usually got some pretty immense power-to-weight ratios themselves so it's expected.
However, we went in my MG F, my mate's 300bhp turbo MX5 (torque limited to 200lb-ft until it gets rods, but still a bit of a missile), and another guy's Exocet (about 700-750kg, but bone-stock 1.8 MX5 drivetrain). My F on T1Rs, but the 5 and Exocet both on the same grippy Nankangs.
The MX-5 was predictably quicker than the F, but what really surprised us was how neck-and-neck the 5 and the Exocet were. Honestly, the 300bhp MX-5 was hitting 130mph down the back straight and the 130-ish bhp Exocet could barely crack 90...and yet they were absolutely inseparable regardless of who was leading.
Same tyres. Same suspension. One with less than half the horsepower, but ~400kg less weight.
That's got me really excited about the Spitfire's potential capabilities. With ~750kg and 170-200bhp (and 200lb-ft of torque) it should be pretty close to the Exocet...except with 40bhp/88lb-ft more. Certainly enough to spook some much more powerful machines at any rate
If all else fails, there's always the Saab B204 which I'm convinced shared a bolt pattern with a 4-cylinder LT77...
Here's some pics from the trackday as proof
MG F
5
And the Exocet in its typical position, loitering behind the 5 waiting for it to finish getting through the corner.
Have you done anything to the rear end of yours? That'd be the only thing I was thinking if you were looking at 5-turbo engines. They need a fair bit of work back there to get them up to snuff.
Yeah I can imagine a 3.89 diff as it's probably got making it a bit short geared. You can get 3.63s (the strongest standard diff) or 3.27s if you want a bit more legs, but the 3.27s are known to be a bit weak if/when you start pushing power. Not sure what your M20 is making, but they get a bit marginal behind 141bhp TR6 lumps.
The most commonly done diff upgrade is a Subaru R160 (with subaru inner CVs, Metro R100 shafts and outer CVs which fit into the Subaru splines, rotoflex vertical links machined to take an MG F wheel bearing and MGF hubs). That's the plan for mine after I've got it up and running, but for now I've got all the bits for a Quaifed standard rear end so I'll stick with that for the moment.
It is a significant investment of time and money though, but with a 3.54 ratio and a bulletproof rear end you should be sorted for whatever you want to do with it
Will probably work for quite a while if you refrain from hard launches and one-wheel-peels still, it's nice to have a rock-solid drivetrain for that sort of hooligan stuff
Speaking of idiotic behaviour, here's the next part of my Welsh road trip. Caution though, it's not for the faint of heart :S
We left day 2 in much the same place as we left day 1: a leaking Citroen and a plan formulated over drinks on how to fix it (with the minor detour of an overheating Fiat).
Now, while our Dutch friend is clearly bonkers for catching air in the Citroen, he’s paradoxically also rather sensible. During the previous day he’d been scoping out garages near to where we were staying and we arranged some time on a lift to have a poke around.
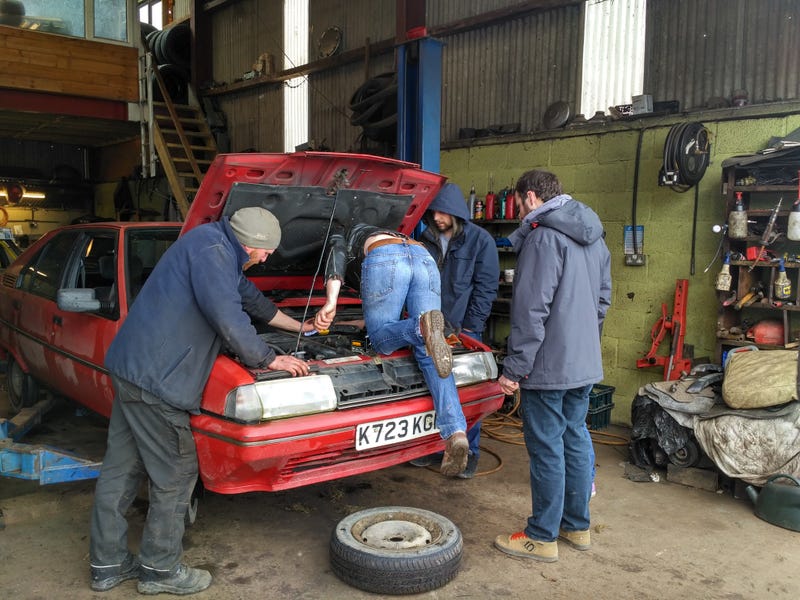
Genuine quote from the mechanics: What is this, work on your own car day?
Luckily, the very helpful mechanic chappy managed to spot what it was. Or, at least, he discovered a random little tube coming from the strut that wasn’t connected to anything. Unfortunately, it didn’t look like there was much around for it to connect to...
Hum. What to do?
Oh wait. Didn’t we see a BX in the hedge just outside the garage?
Lets have a look at that and see if we can find where that hose goes.
Turns out that the misc hose on mine was one of the return lines from the struts which went to an MIA t-piece connecting both struts to a line running back to the reservoir.
Luckily, this was one of the things I had foreseen and had brought a box of varied t-pieces with me. A little jiggery-pokery with some scrap diesel return line the mechanic had lying around and we had a fixed Citroen!
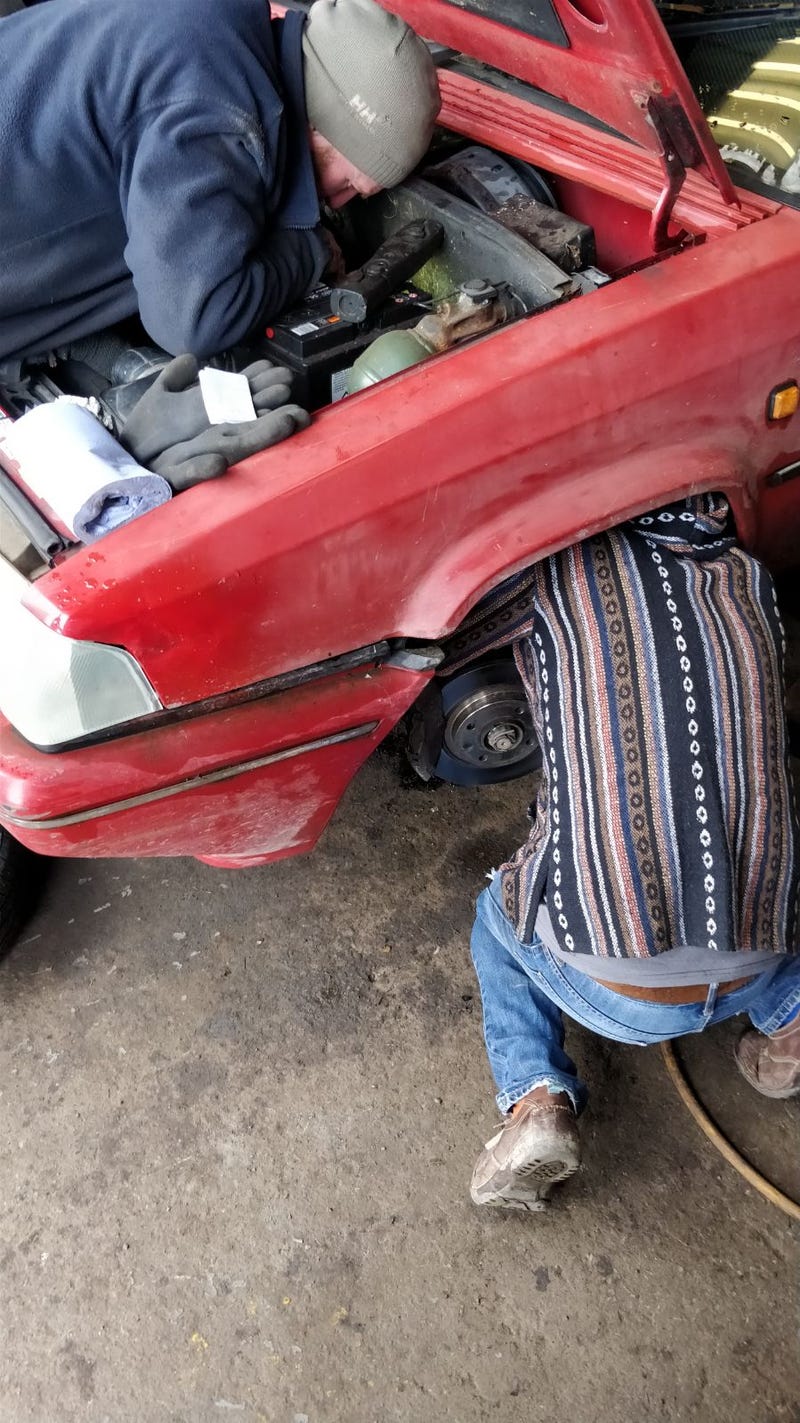
So off we go again! Late, as usual, but on our way with a fixed Citroen
Today was the day when we were leaving the Brecon Beacons and travelling up to the second cottage in Snowdonia. Still a brilliant drive set out for us by one of the guys. I’d been endlessly impressed by how well the little Fiat performed on these twisty Welsh roads next to the much more powerful MX5, the BRZ which handled like it was on rails, and the MGF which wasn’t far behind the first two.
Power: neck and neck with the MGF
Handling and roadholding: keeps up fine with the 5 and F, and only just behind the BRZ which stuck to the road like it was on rails...or had a bonkers driver...or both)
Brakes: Not quite so good.
Yeah. Definitely not quite so good.
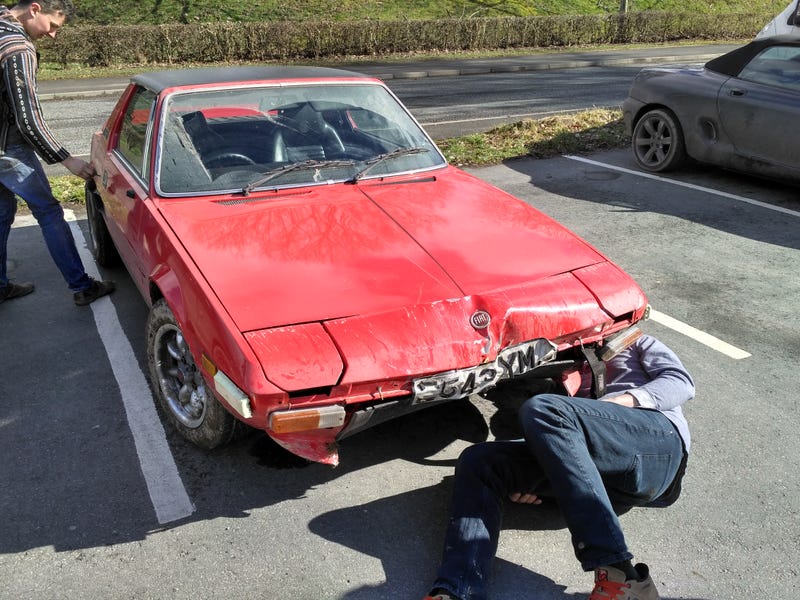
Moron.
What happened here is the BRZ, MX5, MGF and Fiat had all been sticking pretty close to each other down this brilliant winding country road. Up ahead there lay a really nasty little section. Three sweepers followed by a little crest then a sharp 90-degree left with some water runoff from the field it skirted.
The BRZ met this 90-degree corner, sharply put on its generously sized anchors, heaved left and made it round.
The MX5 met this 90-degree corner, sharply put on its big 4-pot brakes, heaved left and made it round. Just.
The MGF met this 90-degree corner, sharply put on its big 4-pot brakes, heaved left and made it round. Just.
The Fiat met this 90-degree corner, sharply put on its upspecced but not brilliant brakes, didn’t slow down enough before it hit the water runoff, locked the fronts and plowed straight ahead through the hedge and fence into a field the other side.
Sigh.
Moron
Negotiated it out of the field, paid the rather irritated farmer not to call the police (I gathered it wasn’t his first rodeo), mended the fence I broke with some rope we had, and limped it to the nearest town for a tea to calm the nerves and to assess the damage.
I reckon the left hand side took down one of the fence posts as the tie rod was bent fully 45-degrees, meaning I had some mad toe out. Like ‘right wheel pointing straight, left wheel halfway through its arc’ (see below pic). Not much we can do about that at the moment. Radiator pushed back 4" or so, but seemed to be intact. However, one of the coolant hoses under the car had been split and was leaking a fair amount of coolant.
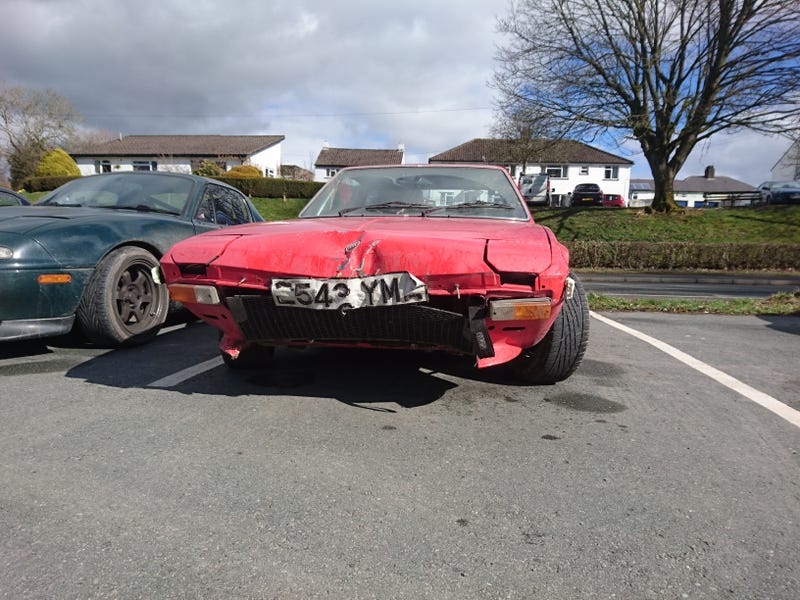
Ok, so first thing’s first let’s have a go at fixing the coolant leak.
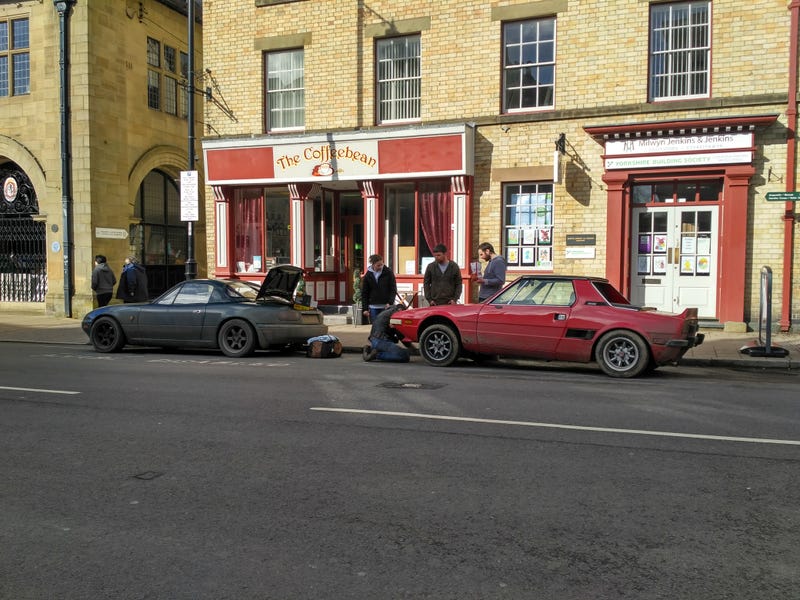
The leak itself was actually pretty straight forwards. Loosen the clamps and slide the hose up a little bit so a good section of hose was bridging the gap between the metal pipes. So far so good.
The real issue came when we went to bleed it. See, the bleed screw on the radiator is only accessible from under the bonnet...which we couldn’t open because the nose cone panel had been pushed up over it. I’d also bought a load of coolant after the near-overheat...which I’d sensibly put in the front boot.
Bugger.
We tried knocking it forwards with a hammer but it wouldn’t budge. Next up was to try prying it forwards with a hammer and later a crowbar a very friendly biker chap lent us, leading to this particularly distressing gif Mr Dutchman made:
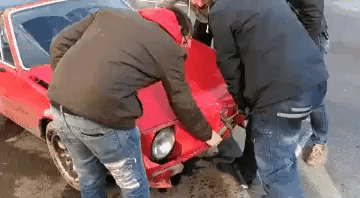
That got us precisely nowhere, so the next step was to punch a hole through the panel with a screwdriver, and use tin-snips to scissor along the front, allowing us to push the top of the panel down and pull the back of the panel forwards. That led to this even more distressing video: https://www.youtube.com/watch?v=cDLRC3W3_Is
That did, at last, allow us to get the bonnet open.
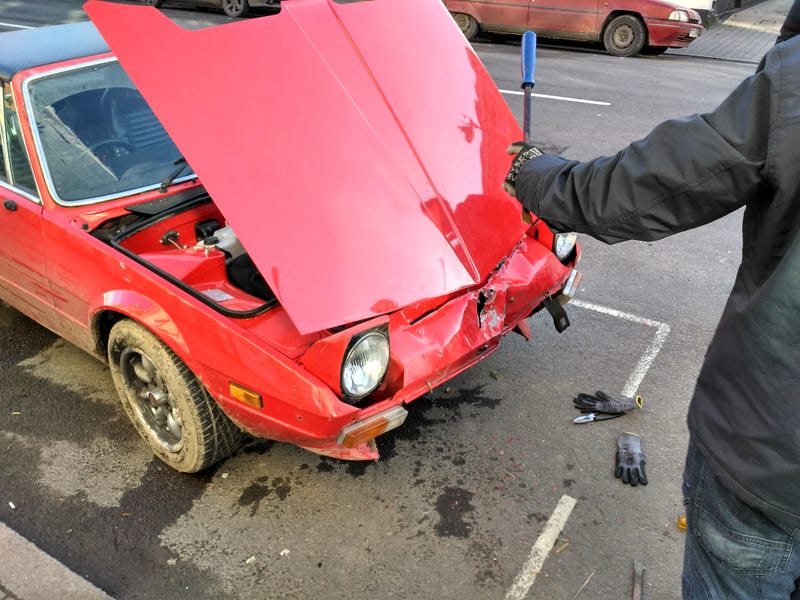
Unfortunately, because the rad was pushed back we needed more cutting to get to the bleed screw which was now 4" further back than it used to be. This, my friends decided, was the ideal time for some humour
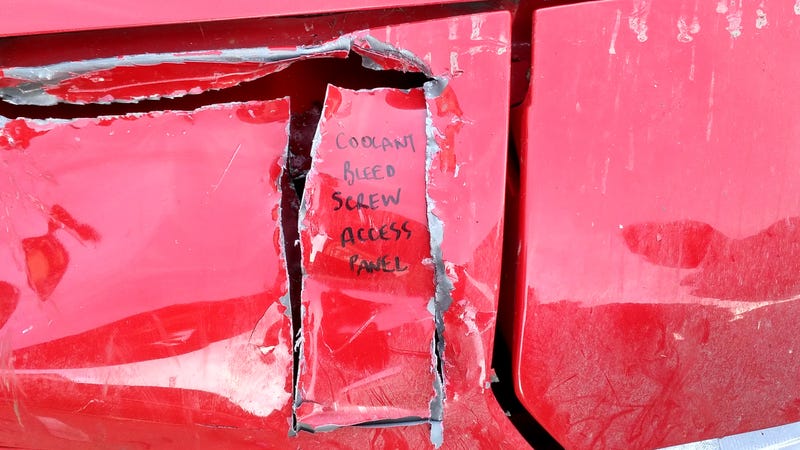
Some liberal application of duct tape later and we were finally ok to get on our way
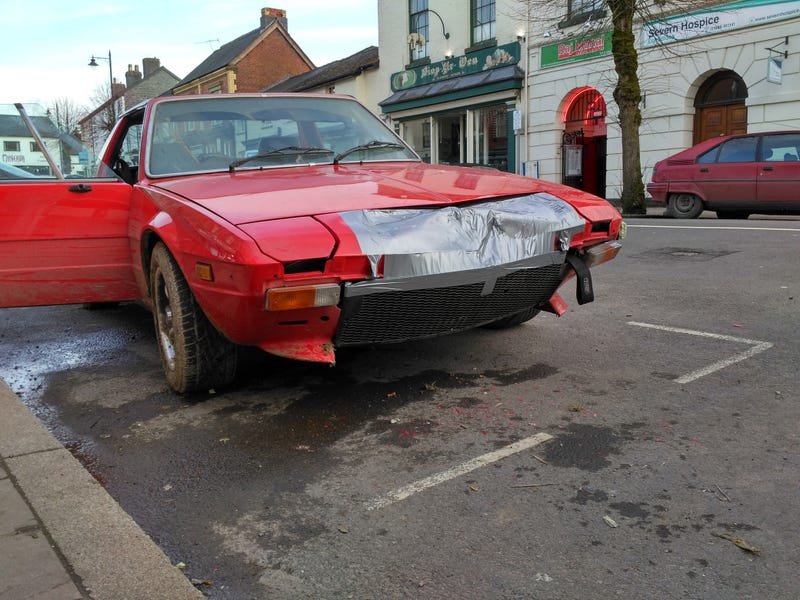
Before that though, coolant to clean up, curry across the road and some phone calls to make. Before I left for Wales I was speaking to some very helpful people at a company called Eurosport who specialise in X1/9 parts. I rang them up and explained the situation: road trip in Wales, put the fiat through a tree, bent a tie rod. Is there anything they can do to help?
I’d just caught them before their chap took their last batch of deliveries off to the post office that day, and asked if they could send it overnight. Brilliant people they are they got that sorted 9am the next day, we’d have a replacement tie rod!
Silver lining: I can now say I’ve overnighted parts from another country (Norwich to Wales, but it counts!).
Still had another 50 miles to go until we got to the cottage, but we got there. Managed to scrub off most of the inside tread of my tyre on the way (initially I thought it was wind noise...but no...it’s my tyre squealing along on the road).
11pm we arrived at the cottage and set to work. Fiat up in the air...
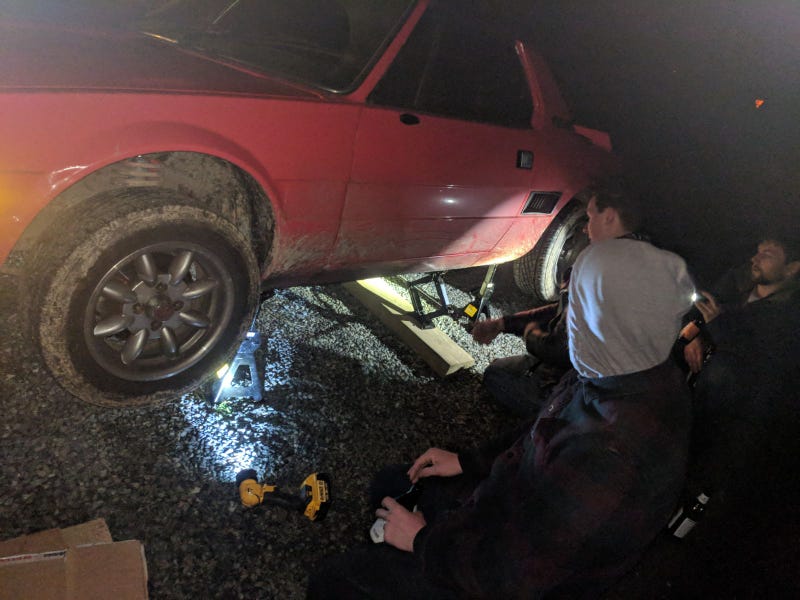
...and bent tie rod off, ready for when the new one arrived tomorrow.
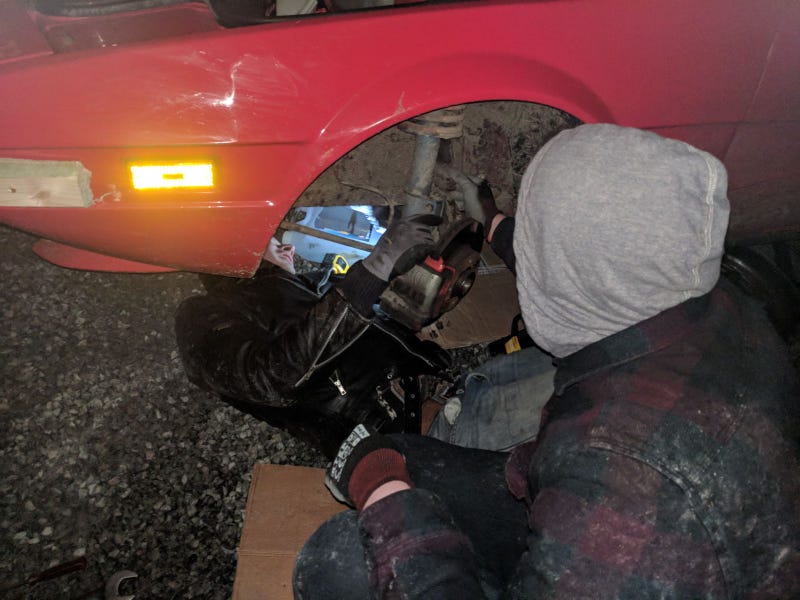
So yeah. Not my finest hour, but provided the evening's entertainment at least. Lots of the guys mentioned that it was quite refreshing for it not to be them stuck under their cars at 1am.
Oh, and I should also mention that the BX following shortly behind met that 90 degree corner, sharply put on its surprisingly incredible brakes, listed over 45-degrees and made it round.
Honestly the brakes on that things are phenomenal. The brake pressure isn't determined by how much force you can apply at the pedal but by what proportion of the 2000psi hydraulic system is fed to the brakes. Honestly with sticky tyres I reckon it could stop sharply enough to give you whiplash.
still, it's nice to have a rock-solid drivetrain for that sort of hooligan stuff Speaking of idiotic behaviour, here's the next part of my Welsh road trip. Caution though, it's not for the faint of heart :S
We left day 2 in much the same place as we left day 1: a leaking Citroen and a plan formulated over drinks on how to fix it (with the minor detour of an overheating Fiat).
Now, while our Dutch friend is clearly bonkers for catching air in the Citroen, he’s paradoxically also rather sensible. During the previous day he’d been scoping out garages near to where we were staying and we arranged some time on a lift to have a poke around.
Genuine quote from the mechanics: What is this, work on your own car day?
Luckily, the very helpful mechanic chappy managed to spot what it was. Or, at least, he discovered a random little tube coming from the strut that wasn’t connected to anything. Unfortunately, it didn’t look like there was much around for it to connect to...
Hum. What to do?
Oh wait. Didn’t we see a BX in the hedge just outside the garage?
Lets have a look at that and see if we can find where that hose goes.
Turns out that the misc hose on mine was one of the return lines from the struts which went to an MIA t-piece connecting both struts to a line running back to the reservoir.
Luckily, this was one of the things I had foreseen and had brought a box of varied t-pieces with me. A little jiggery-pokery with some scrap diesel return line the mechanic had lying around and we had a fixed Citroen!
So off we go again! Late, as usual, but on our way with a fixed Citroen
Today was the day when we were leaving the Brecon Beacons and travelling up to the second cottage in Snowdonia. Still a brilliant drive set out for us by one of the guys. I’d been endlessly impressed by how well the little Fiat performed on these twisty Welsh roads next to the much more powerful MX5, the BRZ which handled like it was on rails, and the MGF which wasn’t far behind the first two.
Power: neck and neck with the MGF
Handling and roadholding: keeps up fine with the 5 and F, and only just behind the BRZ which stuck to the road like it was on rails...or had a bonkers driver...or both)
Brakes: Not quite so good.
Yeah. Definitely not quite so good.
Moron.
What happened here is the BRZ, MX5, MGF and Fiat had all been sticking pretty close to each other down this brilliant winding country road. Up ahead there lay a really nasty little section. Three sweepers followed by a little crest then a sharp 90-degree left with some water runoff from the field it skirted.
The BRZ met this 90-degree corner, sharply put on its generously sized anchors, heaved left and made it round.
The MX5 met this 90-degree corner, sharply put on its big 4-pot brakes, heaved left and made it round. Just.
The MGF met this 90-degree corner, sharply put on its big 4-pot brakes, heaved left and made it round. Just.
The Fiat met this 90-degree corner, sharply put on its upspecced but not brilliant brakes, didn’t slow down enough before it hit the water runoff, locked the fronts and plowed straight ahead through the hedge and fence into a field the other side.
Sigh.
Moron
Negotiated it out of the field, paid the rather irritated farmer not to call the police (I gathered it wasn’t his first rodeo), mended the fence I broke with some rope we had, and limped it to the nearest town for a tea to calm the nerves and to assess the damage.
I reckon the left hand side took down one of the fence posts as the tie rod was bent fully 45-degrees, meaning I had some mad toe out. Like ‘right wheel pointing straight, left wheel halfway through its arc’ (see below pic). Not much we can do about that at the moment. Radiator pushed back 4" or so, but seemed to be intact. However, one of the coolant hoses under the car had been split and was leaking a fair amount of coolant.
Ok, so first thing’s first let’s have a go at fixing the coolant leak.
The leak itself was actually pretty straight forwards. Loosen the clamps and slide the hose up a little bit so a good section of hose was bridging the gap between the metal pipes. So far so good.
The real issue came when we went to bleed it. See, the bleed screw on the radiator is only accessible from under the bonnet...which we couldn’t open because the nose cone panel had been pushed up over it. I’d also bought a load of coolant after the near-overheat...which I’d sensibly put in the front boot.
Bugger.
We tried knocking it forwards with a hammer but it wouldn’t budge. Next up was to try prying it forwards with a hammer and later a crowbar a very friendly biker chap lent us, leading to this particularly distressing gif Mr Dutchman made:
That got us precisely nowhere, so the next step was to punch a hole through the panel with a screwdriver, and use tin-snips to scissor along the front, allowing us to push the top of the panel down and pull the back of the panel forwards. That led to this even more distressing video: https://www.youtube.com/watch?v=cDLRC3W3_Is
That did, at last, allow us to get the bonnet open.
Unfortunately, because the rad was pushed back we needed more cutting to get to the bleed screw which was now 4" further back than it used to be. This, my friends decided, was the ideal time for some humour
Some liberal application of duct tape later and we were finally ok to get on our way
Before that though, coolant to clean up, curry across the road and some phone calls to make. Before I left for Wales I was speaking to some very helpful people at a company called Eurosport who specialise in X1/9 parts. I rang them up and explained the situation: road trip in Wales, put the fiat through a tree, bent a tie rod. Is there anything they can do to help?
I’d just caught them before their chap took their last batch of deliveries off to the post office that day, and asked if they could send it overnight. Brilliant people they are they got that sorted
9am the next day, we’d have a replacement tie rod!Silver lining: I can now say I’ve overnighted parts from another country (Norwich to Wales, but it counts!).
Still had another 50 miles to go until we got to the cottage, but we got there. Managed to scrub off most of the inside tread of my tyre on the way (initially I thought it was wind noise...but no...it’s my tyre squealing along on the road).
11pm we arrived at the cottage and set to work. Fiat up in the air...
...and bent tie rod off, ready for when the new one arrived tomorrow.
So yeah. Not my finest hour, but provided the evening's entertainment at least. Lots of the guys mentioned that it was quite refreshing for it not to be them stuck under their cars at 1am.
Oh, and I should also mention that the BX following shortly behind met that 90 degree corner, sharply put on its surprisingly incredible brakes, listed over 45-degrees and made it round.
Honestly the brakes on that things are phenomenal. The brake pressure isn't determined by how much force you can apply at the pedal but by what proportion of the 2000psi hydraulic system is fed to the brakes. Honestly with sticky tyres I reckon it could stop sharply enough to give you whiplash.
Edited by BiTurbo228 on Saturday 25th August 09:54
We left day 3 in a rather sorry state. Fiat put through a hedge and significantly dinged up. Suspension bent. Tyres scrubbed from dragging them along for 50 miles. Still, the Citroen was fixed, and yet again we had a plan
Up bright and early for when the parts arrived (thanks again to Eurosport!). Sadly, I didn’t make many friends with this given that apparently I’m a heavy sleeper with a loud alarm (sorry guys!).

New tie rod next to the old busted one
While we were mucking about with that, one of our friends decided to give us a perfect example of stereotypical BMW parking
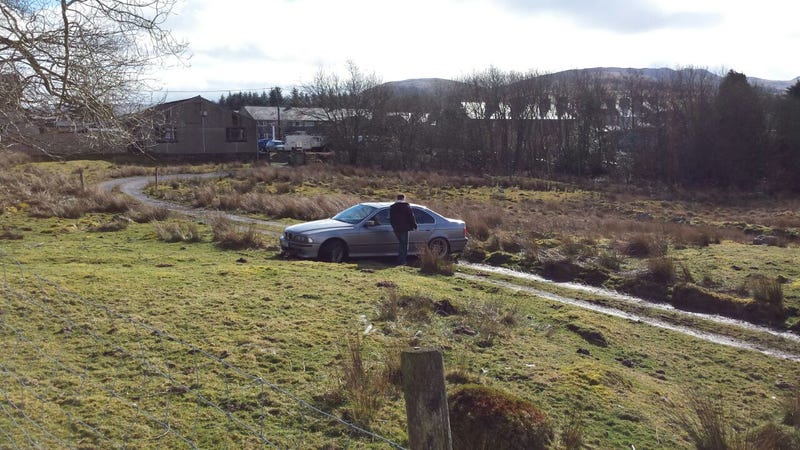
Took us a little while to get the tie rod on, but luckily there was a little local garage just outside where we were staying (whoever chose the locations for our accommodation did a stellar job!).
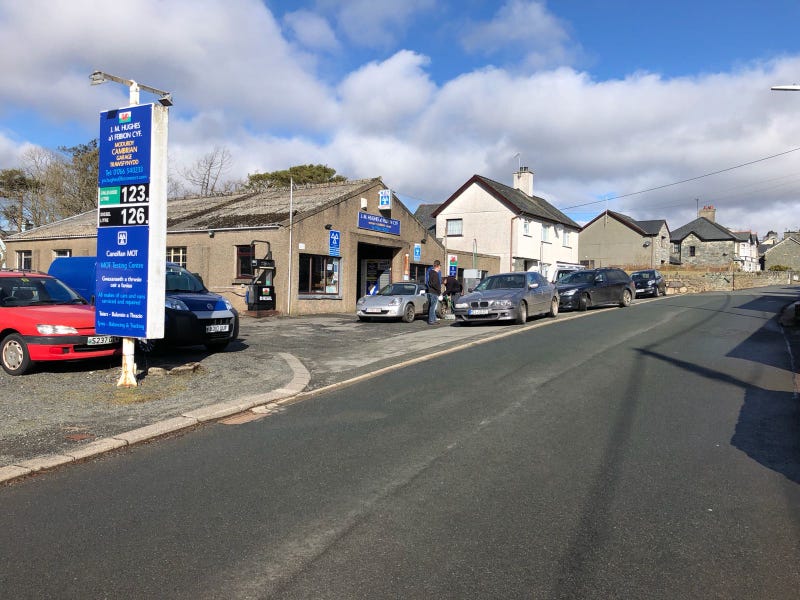
We hung back for a little while to have the Fiat tracked, the battery charged (a terminal on the alternator had worked itself loose so it wasn’t charging properly on the way back, easy fix), and inspect the diff seals on my sister’s 5 which were leaking (not enough to impede progress).
The rest of the gang set off earlier for the route while we went straight to the karting which we’d booked for 2pm (as our Dutch friend said, many great roads weren’t driven by our group).
Still, we can hardly call the direct route uninteresting...
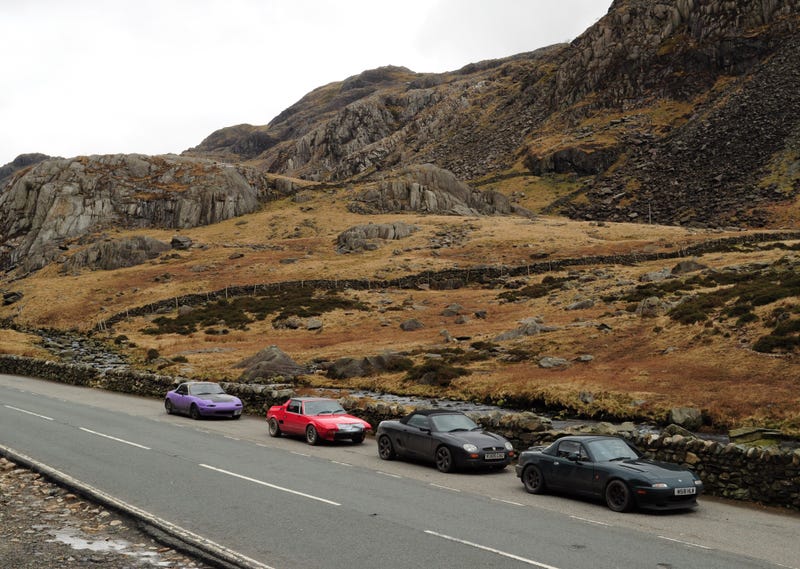
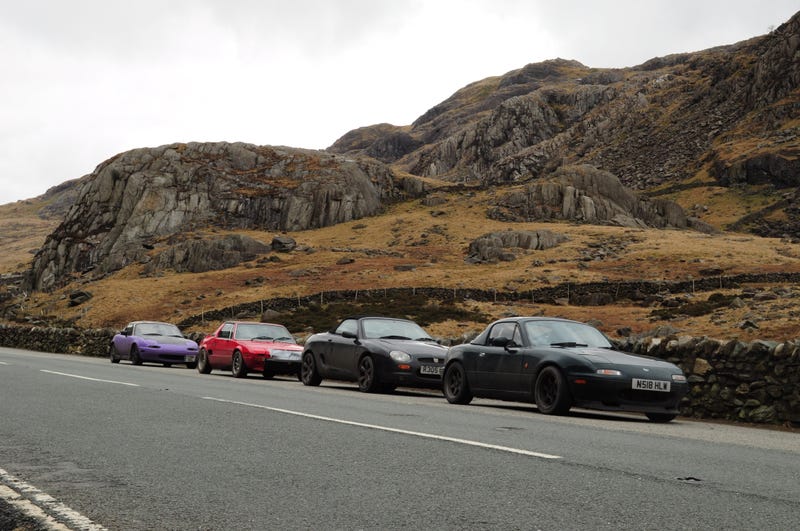
Looks like we weren’t the only ones to think so
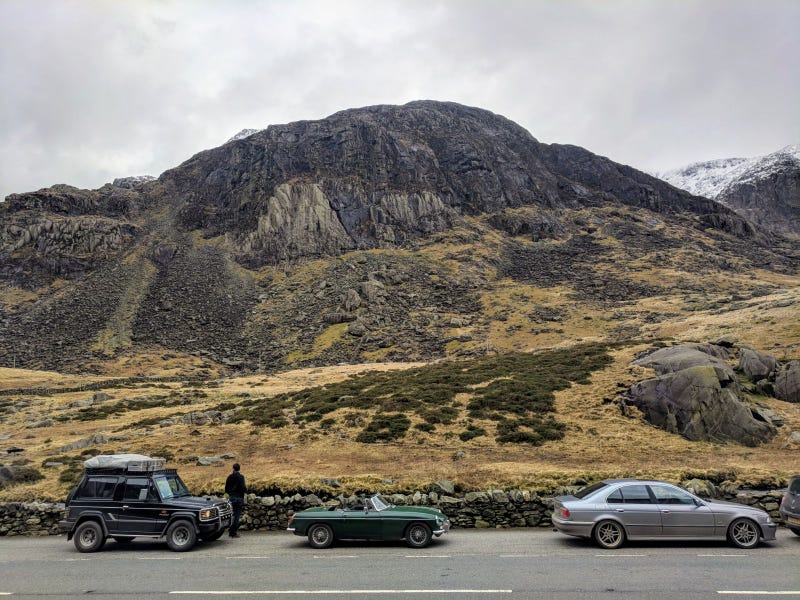
Three more from our bunch
All managed to meet up at karting fine pretty short track, but still buckets of fun. I always thought I was a bit of a hot-shoe at karting, but to save my ego I’m going to say that we have some very quick members of our group

Mr MGB almost didn’t make it to karting. In a refreshing change, it wasn’t actually one of our cars that managed to wound itself! In the next picture you can kind of see the issue the MGB faces with Welsh roads...

That’s...not a lot of ground clearance...
Some finest bodgery to get it going again (it was deafeningly loud with a hole in the exhaust), and he just managed to scrape through don't let the rusty exhaust fool you. Apart from that this car was probably in the best condition of any that were there.
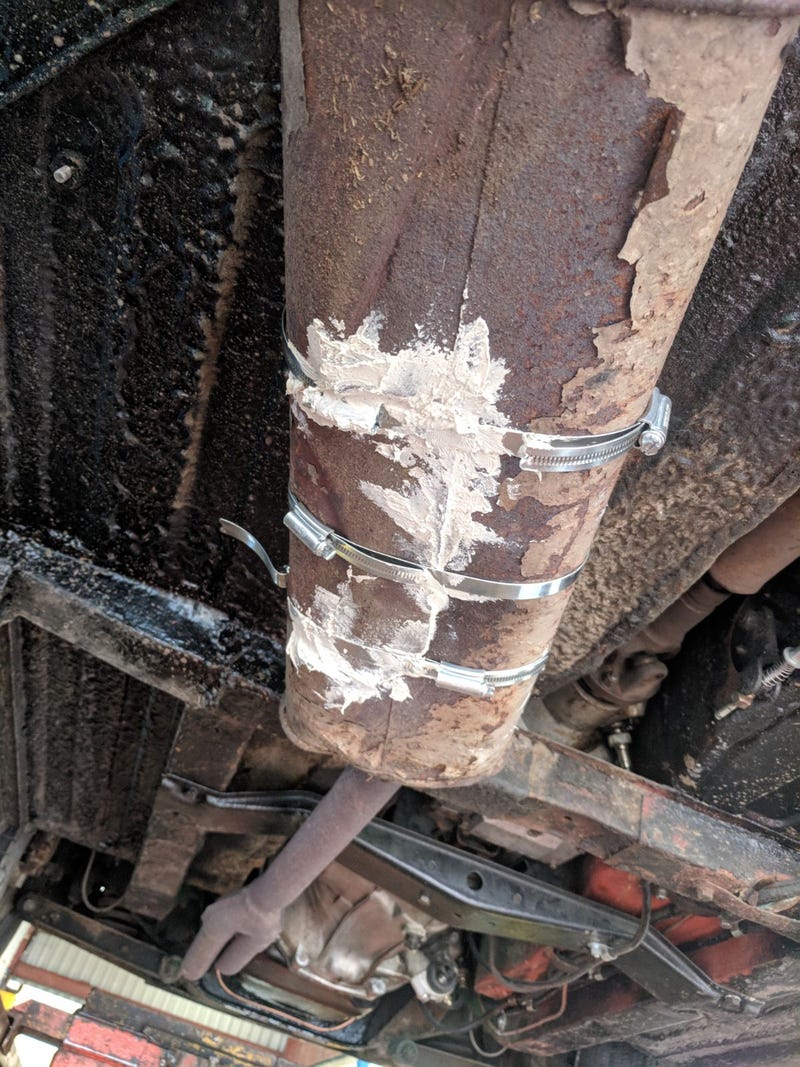
After a very pleasant meandering drive back (where nothing bad happened!), we arrived back at our cottage for a well deserved rest (and some well deserved beers). Honestly, it felt a little odd not to be fixing something, but definitely welcome!
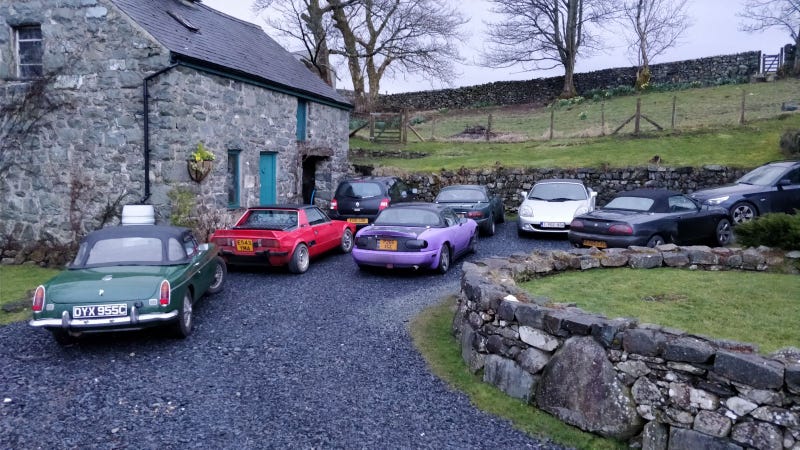
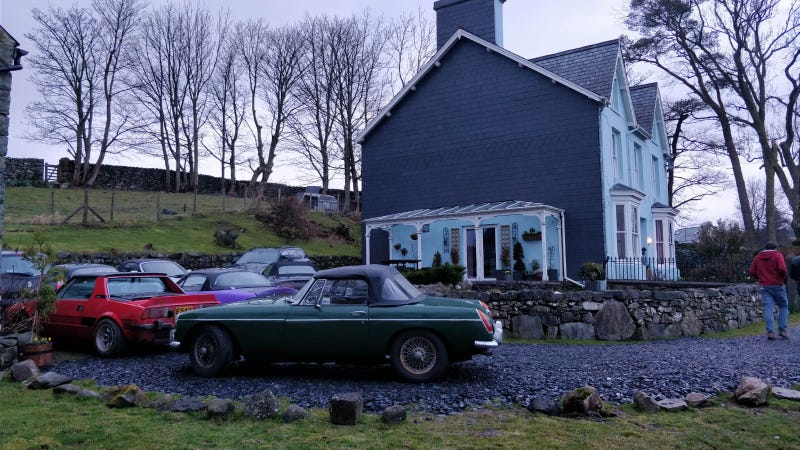
Up bright and early for when the parts arrived (thanks again to Eurosport!). Sadly, I didn’t make many friends with this given that apparently I’m a heavy sleeper with a loud alarm (sorry guys!).
New tie rod next to the old busted one
While we were mucking about with that, one of our friends decided to give us a perfect example of stereotypical BMW parking
Took us a little while to get the tie rod on, but luckily there was a little local garage just outside where we were staying (whoever chose the locations for our accommodation did a stellar job!).
We hung back for a little while to have the Fiat tracked, the battery charged (a terminal on the alternator had worked itself loose so it wasn’t charging properly on the way back, easy fix), and inspect the diff seals on my sister’s 5 which were leaking (not enough to impede progress).
The rest of the gang set off earlier for the route while we went straight to the karting which we’d booked for 2pm (as our Dutch friend said, many great roads weren’t driven by our group).
Still, we can hardly call the direct route uninteresting...
Looks like we weren’t the only ones to think so
Three more from our bunch
All managed to meet up at karting fine
pretty short track, but still buckets of fun. I always thought I was a bit of a hot-shoe at karting, but to save my ego I’m going to say that we have some very quick members of our group Mr MGB almost didn’t make it to karting. In a refreshing change, it wasn’t actually one of our cars that managed to wound itself! In the next picture you can kind of see the issue the MGB faces with Welsh roads...
That’s...not a lot of ground clearance...
Some finest bodgery to get it going again (it was deafeningly loud with a hole in the exhaust), and he just managed to scrape through
don't let the rusty exhaust fool you. Apart from that this car was probably in the best condition of any that were there.After a very pleasant meandering drive back (where nothing bad happened!), we arrived back at our cottage for a well deserved rest (and some well deserved beers). Honestly, it felt a little odd not to be fixing something, but definitely welcome!
Edited by BiTurbo228 on Monday 27th August 00:05
Day 5. Day 5 was special. For the first time in the Wales trip we actually set off as a proper convoy! Nothing (immediate) to fix. Wahey! Took until the last day to do it, but we got there
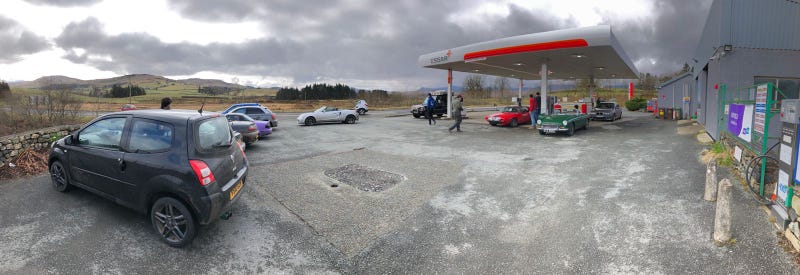
The previous night, Mr MGB presented awards! Mr Twingo won fastest at karting, Mr BRZ won...shall we say ‘bravest’ driver
I, however, humbly accepted the award for ‘most entertaining’ pride of place on the front of the Fiat:
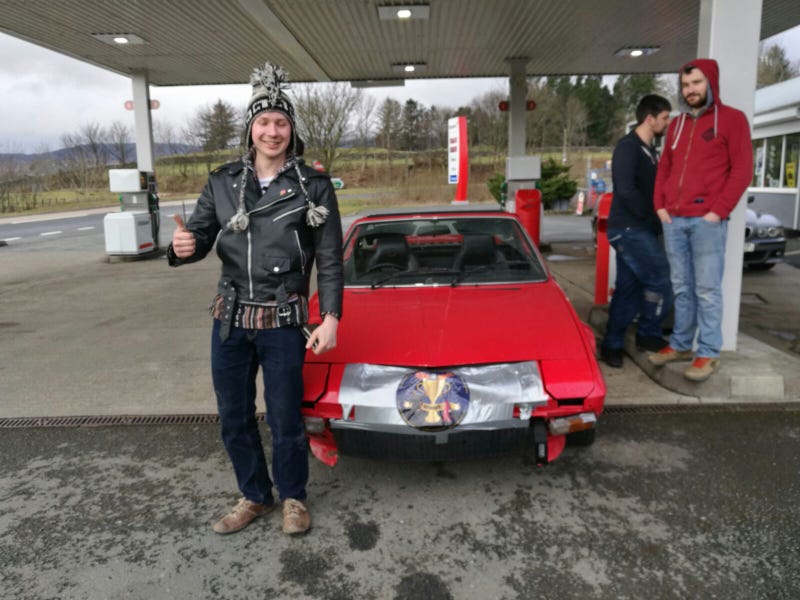
The end-result of this was that I got to drive around Wales with a sticker proudly claiming the fact that I am ‘definitely not a sheep-shagger’. The Welsh, true to the warmhearted nature we’d experienced so far, thought this was very entertaining
All went smoothly until Mr Dutchman was a little over-ambitious turning into a junction and clipped a kerb at quite some speed...
Still, let us test out the BX’s party piece of putting the suspension at the top of its travel, sticking an axle stand under the corner and lowering the suspension so it picked its own injured wheel off the ground
Once that was fixed, we managed to get the first and only photoshoot of (nearly) the whole gang! Managed to miss Mr Elise and Mr Cappuccino who could only make the first half, but still!
BX displaying its other party trick of rivalling the ground clearance of dedicated offroaders
After a day of convoying around some more lovely Welsh roads that was that what an absolute adventure.
Wasn’t quite over for us yet though. After stopping off in Shrewsbury overnight (some awesome pubs there), our little gang wended our way home. We very nearly got home without needing to work on a car every single day, but this last time we were pleased to help.
About 10 miles from home we came across an old boy in a cracking jacket and a 1920s Rolls Royce stranded on the side of the road.
All it needed was the spare wheel swapping over, but there’s a locking ring inside it that had got jammed trying to take it off. Little did he know that he’d met the perfect people for the job!
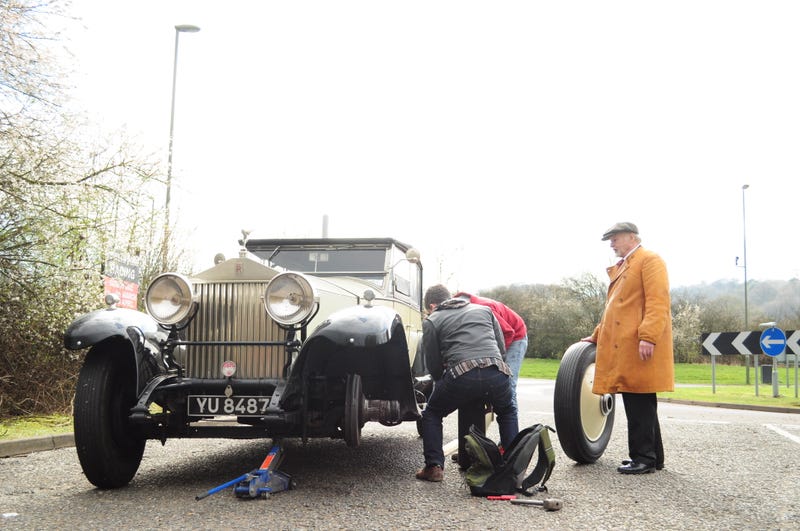
Tools out, old wheel off and new wheel on. All done in no time
There’s some serious engineering in one of these. You can tell the designers were involved in aircraft back in the ‘20s. Just check out the hub:
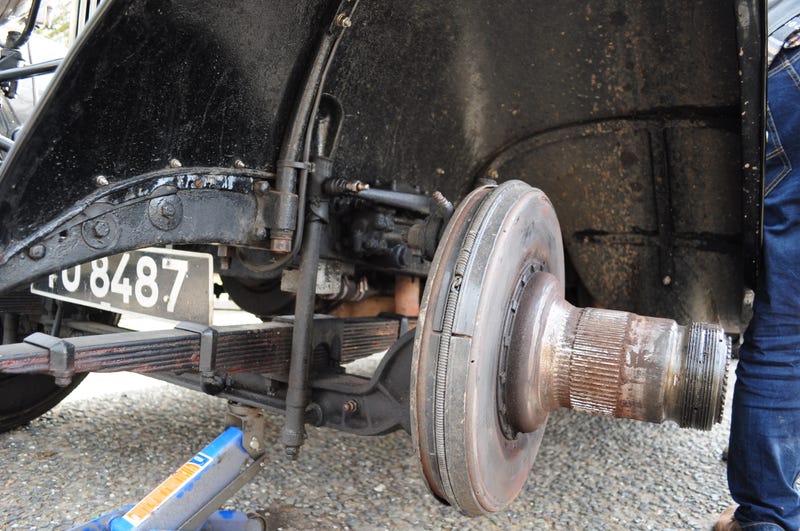
Monster splines locate the wheel, and there’s a funky single wheelnut with locking teeth to prevent it unwinding (it was the outer toothed section in the wheel that had got dislodged and stuck).
The engine’s a similar work of heavy-duty art:
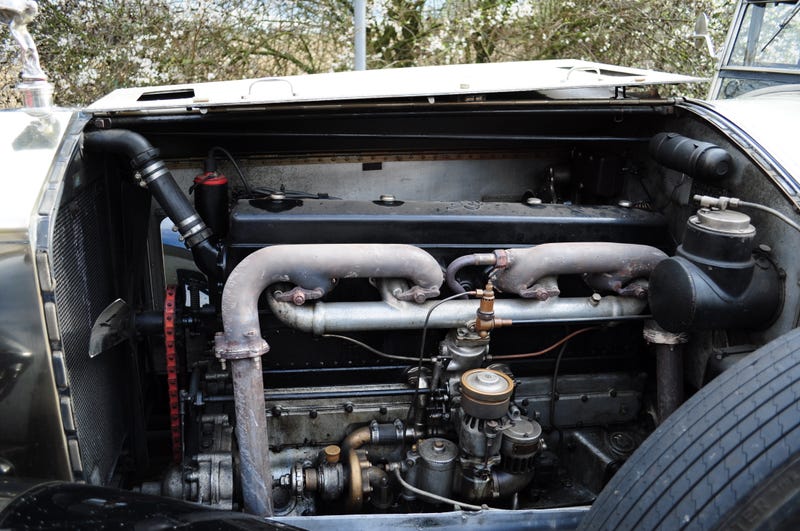
The chap was so grateful he let me have a little drive in it! The gearbox is unsynchro’d and the throttle’s a little tricky. The solution was to just stick it in fourth and lift the clutch (no throttle at all). All 5 metres of the thing just eased itself away...in top gear...without a single splutter or hesitation. I suppose a low-revving 7.7l I6 will do that.
And that, finally, was that a few of the guys crashed at my place before their various ferries and eurotunnels in the morning, but that was it.
So, what did we learn?
[*] I am either very good, or very very bad at road trips. Probably both.
[*] Wales is a stunning place full of the whole gamut of driving roads, great scenery, and friendly people.
[*]It really pays to bring tools along with you, and having at least a bit of experience to dive in and fix things. There’s at least four separate occasions we’d probably have been stranded if we hadn’t.
[*]I’ve got a lot of work to do on the Fiat (more on that next!).
The previous night, Mr MGB presented awards! Mr Twingo won fastest at karting, Mr BRZ won...shall we say ‘bravest’ driver
I, however, humbly accepted the award for ‘most entertaining’
pride of place on the front of the Fiat:The end-result of this was that I got to drive around Wales with a sticker proudly claiming the fact that I am ‘definitely not a sheep-shagger’. The Welsh, true to the warmhearted nature we’d experienced so far, thought this was very entertaining
All went smoothly until Mr Dutchman was a little over-ambitious turning into a junction and clipped a kerb at quite some speed...
Still, let us test out the BX’s party piece of putting the suspension at the top of its travel, sticking an axle stand under the corner and lowering the suspension so it picked its own injured wheel off the ground
Once that was fixed, we managed to get the first and only photoshoot of (nearly) the whole gang! Managed to miss Mr Elise and Mr Cappuccino who could only make the first half, but still!
BX displaying its other party trick of rivalling the ground clearance of dedicated offroaders
After a day of convoying around some more lovely Welsh roads that was that
what an absolute adventure.Wasn’t quite over for us yet though. After stopping off in Shrewsbury overnight (some awesome pubs there), our little gang wended our way home. We very nearly got home without needing to work on a car every single day, but this last time we were pleased to help.
About 10 miles from home we came across an old boy in a cracking jacket and a 1920s Rolls Royce stranded on the side of the road.
All it needed was the spare wheel swapping over, but there’s a locking ring inside it that had got jammed trying to take it off. Little did he know that he’d met the perfect people for the job!
Tools out, old wheel off and new wheel on. All done in no time
There’s some serious engineering in one of these. You can tell the designers were involved in aircraft back in the ‘20s. Just check out the hub:
Monster splines locate the wheel, and there’s a funky single wheelnut with locking teeth to prevent it unwinding (it was the outer toothed section in the wheel that had got dislodged and stuck).
The engine’s a similar work of heavy-duty art:
The chap was so grateful he let me have a little drive in it! The gearbox is unsynchro’d and the throttle’s a little tricky. The solution was to just stick it in fourth and lift the clutch (no throttle at all). All 5 metres of the thing just eased itself away...in top gear...without a single splutter or hesitation. I suppose a low-revving 7.7l I6 will do that.
And that, finally, was that
a few of the guys crashed at my place before their various ferries and eurotunnels in the morning, but that was it.So, what did we learn?
[*] I am either very good, or very very bad at road trips. Probably both.
[*] Wales is a stunning place full of the whole gamut of driving roads, great scenery, and friendly people.
[*]It really pays to bring tools along with you, and having at least a bit of experience to dive in and fix things. There’s at least four separate occasions we’d probably have been stranded if we hadn’t.
[*]I’ve got a lot of work to do on the Fiat (more on that next!).
Thanks guys! Glad you enjoyed it, and glad you made it through
And take note PHers. More people should put their cars through hedges!
As of now it's nearly fixed though only thing stopping an MoT is that the horn's inexplicably stopped working. Still some other bits and pieces to fix (tappy valves, bigger rear brake calipers from a Montecarlo, and a weak alternator), but nothing stopping it from getting back on the road more on that when I get the chance to write it up
And take note PHers. More people should put their cars through hedges!
As of now it's nearly fixed though
only thing stopping an MoT is that the horn's inexplicably stopped working. Still some other bits and pieces to fix (tappy valves, bigger rear brake calipers from a Montecarlo, and a weak alternator), but nothing stopping it from getting back on the road more on that when I get the chance to write it up So, the fiat's story doesn't end in Wales. We can rebuild it! We have the technology
First thing’s first, a damage assessment:
1. Front end pretty thoroughly mashed in and cut up to get the bonnet open
2. Various dings all over the body
3. Left-hand tie rod bent to 45-degrees (fixed in Wales)
4. Couldn’t quite get the tracking right in Wales which suggests something else is bent
5. Front left wheel which took the brunt of the force seems to rock back and forth on the strut (the rod of the shock moves in relation to the body)
6. Radiator pushed back 4", but otherwise intact
7. Lower lip spoiler pulled off
8. Bumpers wrecked
9. Wing mirror left behind in the field
10. Fuel pump whining and not able to keep up with fuelling above 4000rpm towards the end of the trip
Next up, lets strip everything down ready for repair (exposing just how thoroughly wrecked the nose panel is).
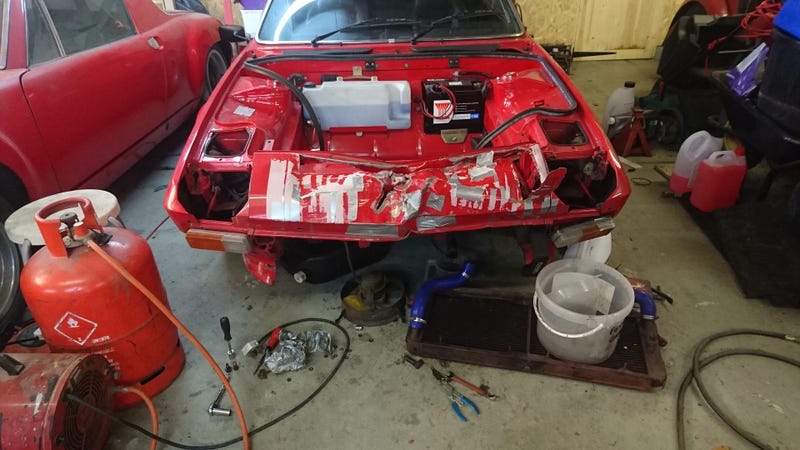
Then removing all of the mangled metal and welding it back up. Had to cut a slit along the top of the bent section to pull it down and forwards into shape, and re-make the leading lip.
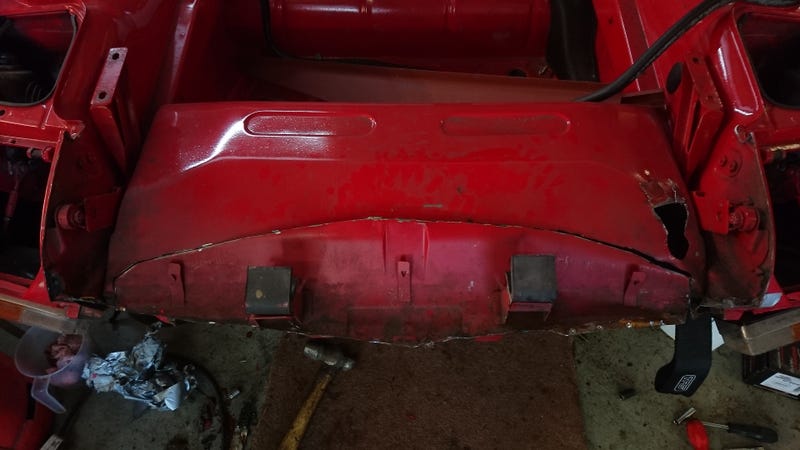
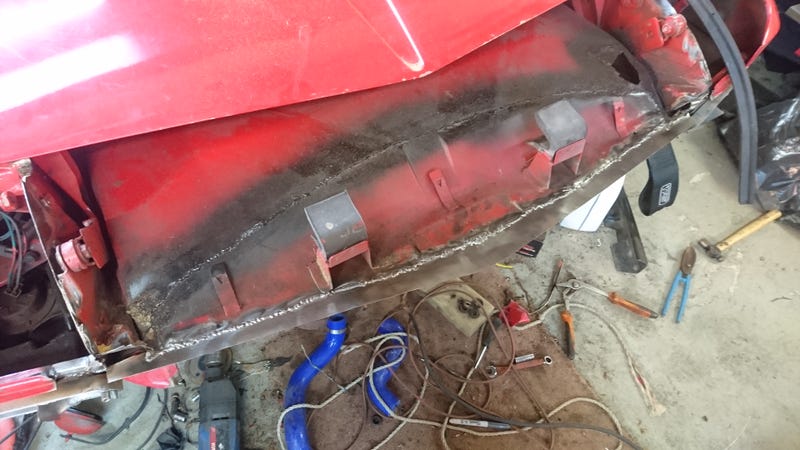
Apologies for the schizophrenic photo brightness. This was done over the course of a few days.
As a thankyou for borrowing the MG F, my mate bought me a fibreglass nosecone as you can’t really get steel ones anymore. Took a bit of fettling to get it into the right shape (slit down the middle and bent up slightly), but got there in the end.
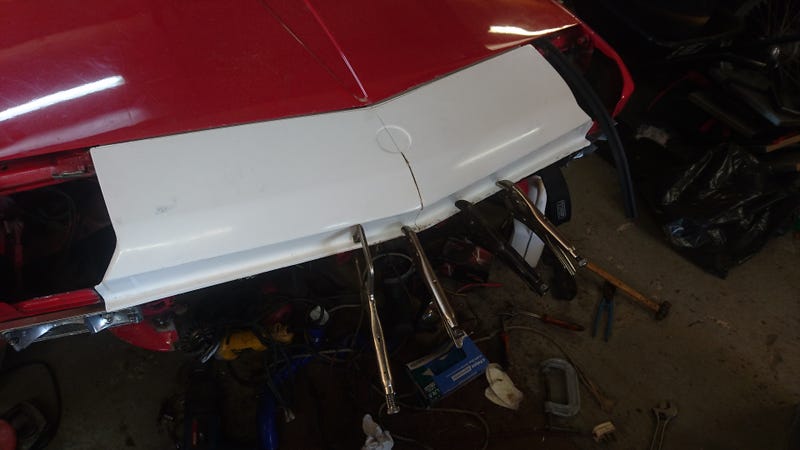
Before:
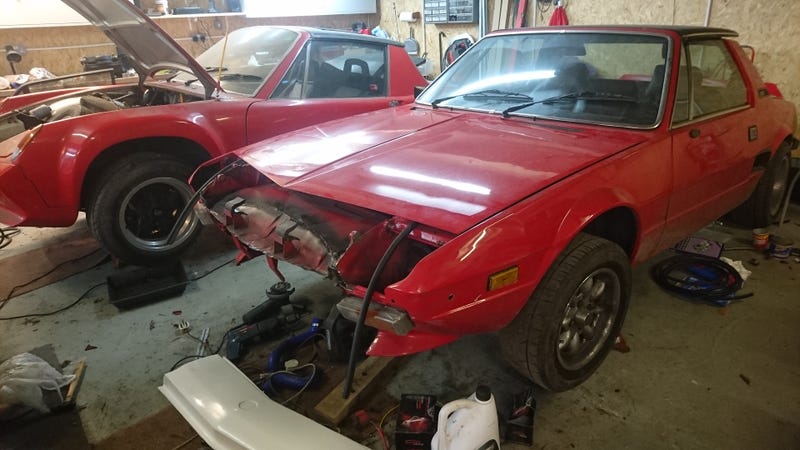
After:

Next step was to sort the rad. Not that it really needed extra cooling at the moment, but in the future I’d like to see if I can push the power up a little on this so an alloy rad would be a good investment
Difficult to find in the UK, but I found an outfit in the States selling some really nice ones. Trouble is they were quoting about £200 in shipping! Didn't want to send USPS for some reason.
Luckily, one of the forums I knock around has a big american presence, and a brilliant lady on there helped me ship it over for nearly £120 less than the original quote much better.
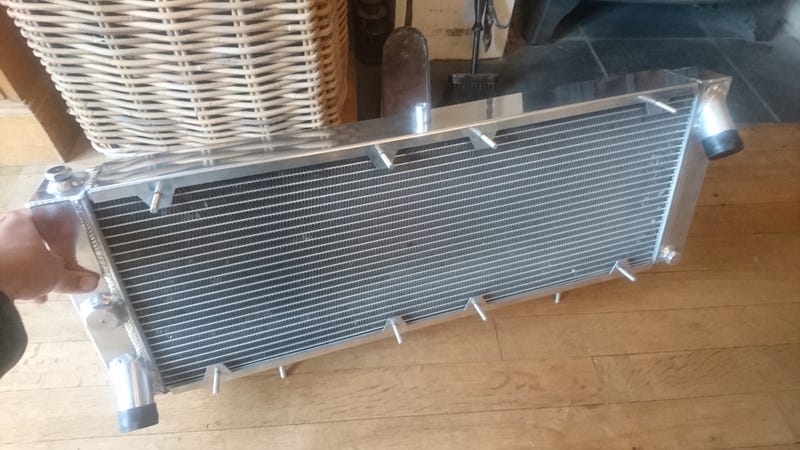
Supposed to be bolt-on, but it fouled the original radiator bracket so I took the opportunity to make a lightweight tubular one from my spit build I'm normally obsessed with weighing each weight reduction thing I do, but must have forgotten with this.
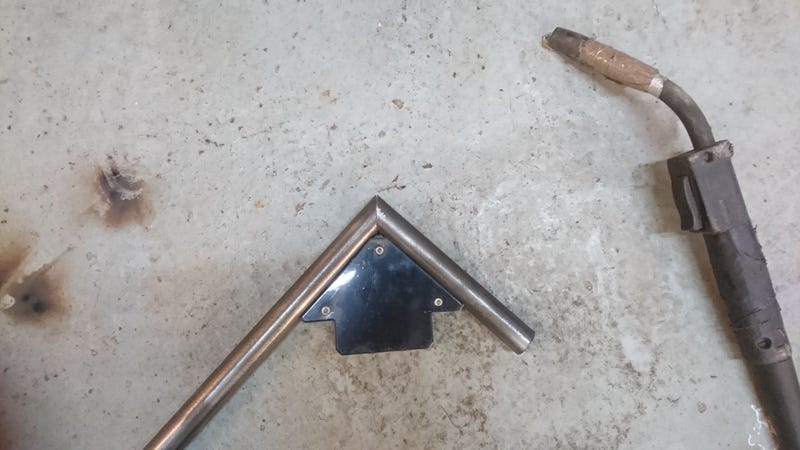
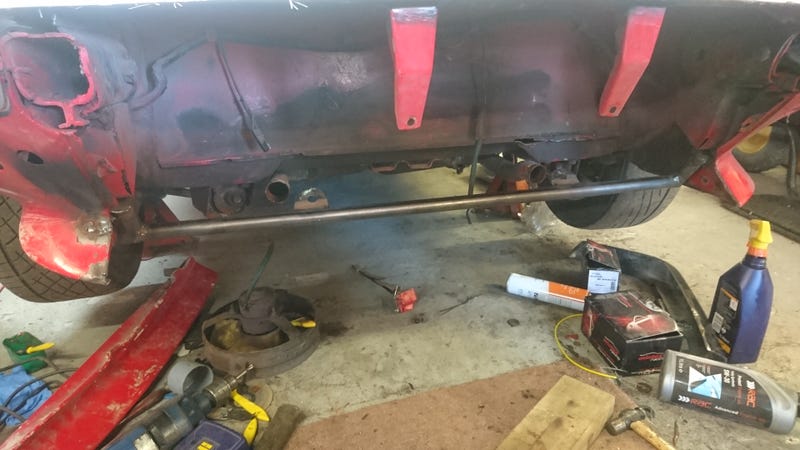
And fitted
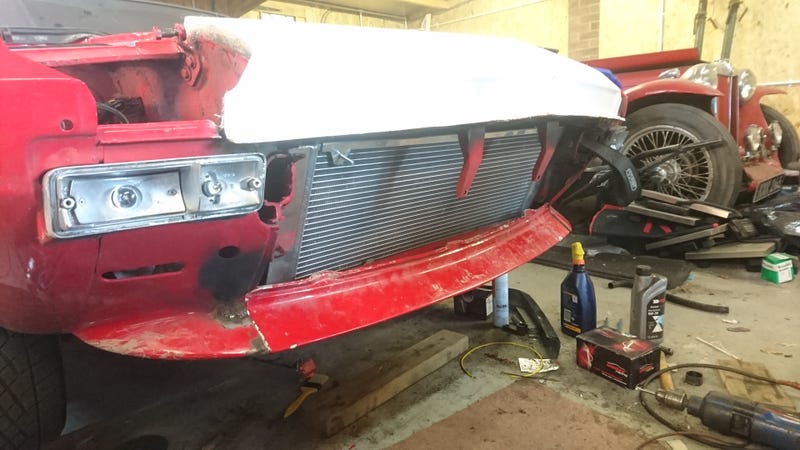
Ok, now for the dings and bent suspension. I was originally going to get some quotes for paintless dent repair, but then I thought ‘I’ve got a rubber mallet and a block of 4x2...how hard can it be?’.
Turns out, not that difficult.

Gutted I didn’t get a before pic, but there used to be a massive dent on the rear part of this wing. Pushed in a good half-inch over a dinner-plate-sized area. Just look at the reflection of the bin in it now. Flat as a pancake
There’s still some wrinkles at the back where I couldn’t get the mallet behind properly, and below where there’s a complicated little crease, but it’s about a billion times better than it used to be.
As for suspension, you can see in this pic on the lower right where the forward suspension link has been pulled downwards by the impact. The gap you can see at the back in between the two downward prongs and the radiator mount bar shouldn't be there.

Jacked that up and welded it back together. I also discovered the big ol’ cast steel transverse link was tweaked a bit. Expensive buggers to replace, so I carefully straightened it out in my pipe bender which worked a treat
The knocking shock/strut turned out to be the shock insert moving inside the strut. Further inspection showed that the big threaded section that clamps the shock in had been expanded slightly by the impact so that it would slip if you tried to screw it in tight enough to hold it steady.
After a bit of an abortive search for replacement struts I decided to fix that too. Stuck it in the vice with a big beefy socket beneath it (securing it on 3 sides) and the top bit screwed in. Then proceeded to ‘tap’ it with a big lump hammer progressively around and around the outside shrinking it until you could bolt it up ok. Again, worked a treat
Next thing I noticed was that the coolant pipes running along the front of the car were leaking a bit. Fair amount of faffing about to get them sealed, but eventually I made these
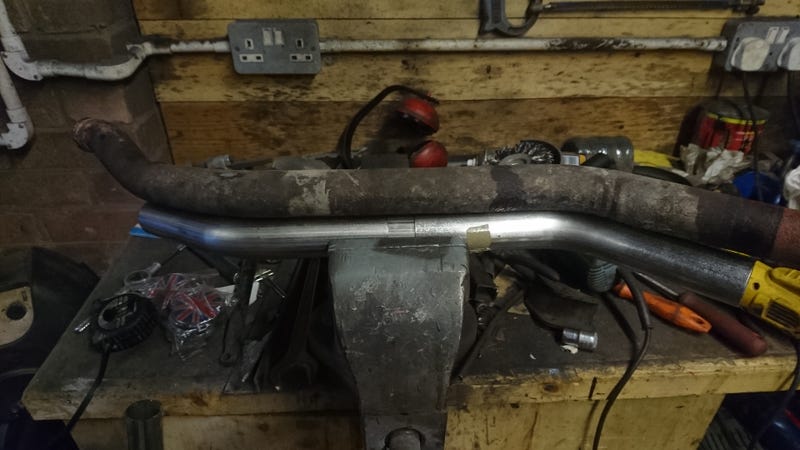
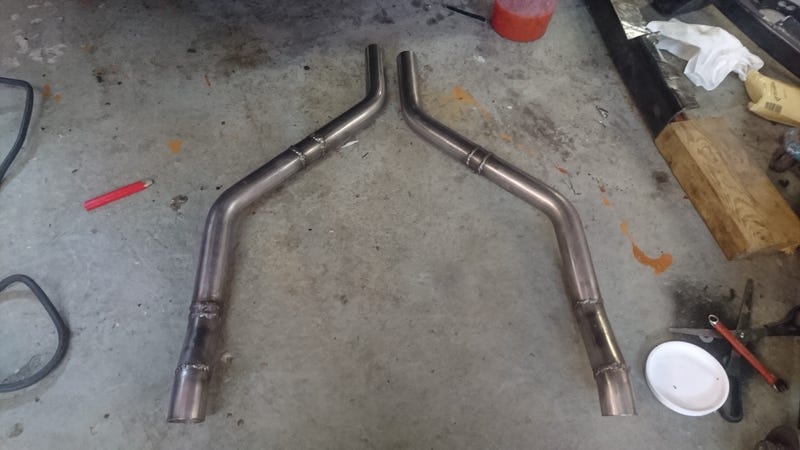
Hum, what was next? Oh yeah, bumpers. I’d picked up some fibreglass replacement ones but they came without mounting hardware so made up some little brackets and rubber mounts to fit them to the body and fibreglassed them in place.
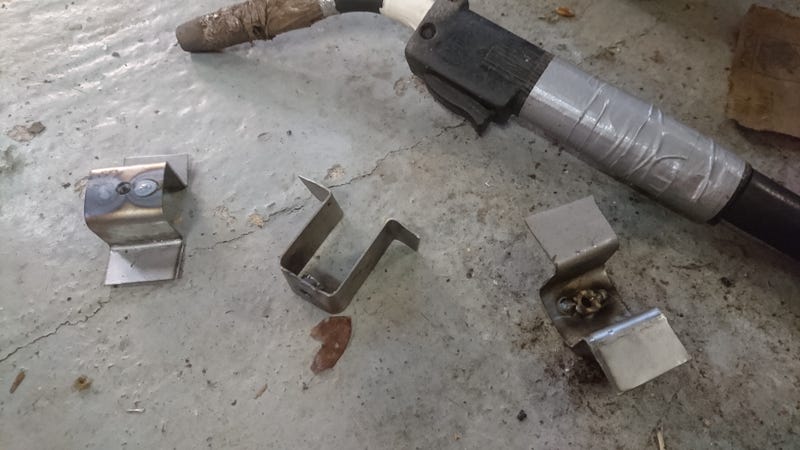
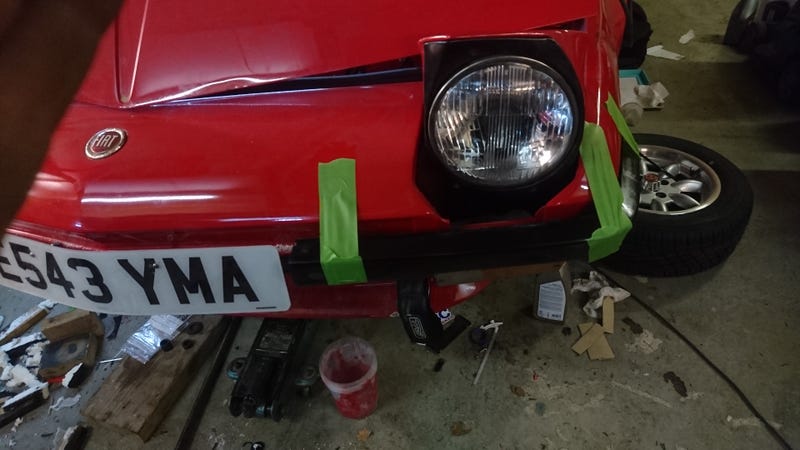
Discovered that the whining fuel pump was due to a thoroughly blocked filter. Replaced that (and the pump for good measure) and the running problems sorted themselves
Noticed that the handbrake probably wouldn’t pass MoT so set about adjusting that. Had to widen the access panel underneath the car as the new coolant hose routing at the back ran directly over the old access hole.
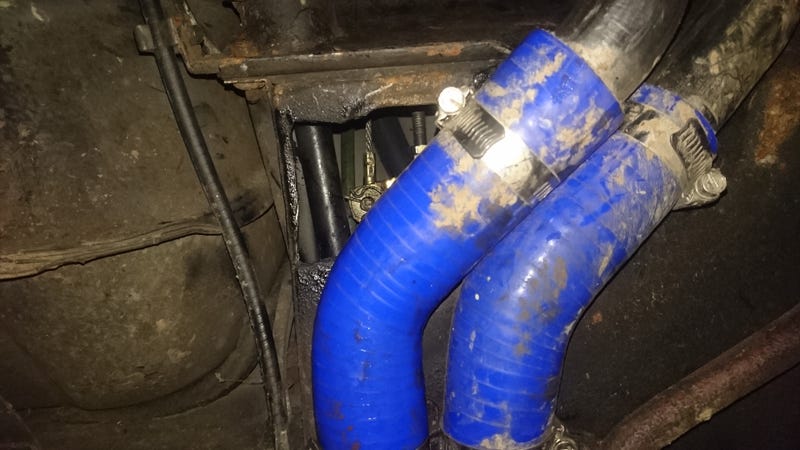
Adjustment didn’t really fix it as they didn’t seem to be releasing properly, so took the calipers apart to have a look why. Glad I did as this is what came out:
Some of those chunks of rust are a good few millimetres in diameter. Plenty enough to get stuck in brake pipes. We reckoned the master cylinder had probably gone rusty inside as it was pretty rusty outside so set about replacing that. Right pain in the backside job that. Who puts a brake master cylinder in the driver’s footwell?
Replaced that (somehow managing to avoid spilling brake fluid all over the footwell which was a minor miracle). Also resealed all the brakes while I was at it to check that they didn’t have buckets of rust inside them too. Bleeding them was a pain as one of the banjo fittings wasn’t sealing properly. The only way we found out is that when someone leant on the pedal quite hard it sent a jet of brake fluid across the garage. Some better quality copper washers fixed that.
And this is how she stands now!
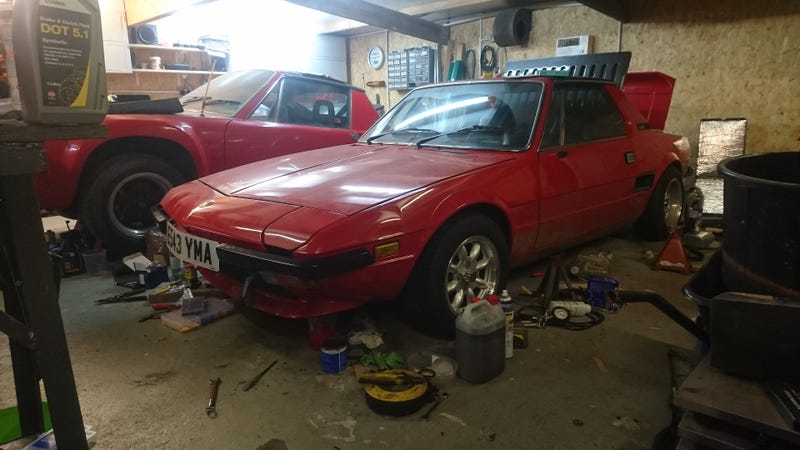
Since that pic the horn's stopped working (shoddy little tangs connecting to the button on the wheel) so I've just stuck a button in to do the horn. Still a couple of bits and pieces to fix (tappy valves, bigger rear calipers from a Lancia Montecarlo to balance the brakes better, and a weakly charging alternator), but nothing I can’t do as I’m driving
So yeah. Nearly there! I can’t wait
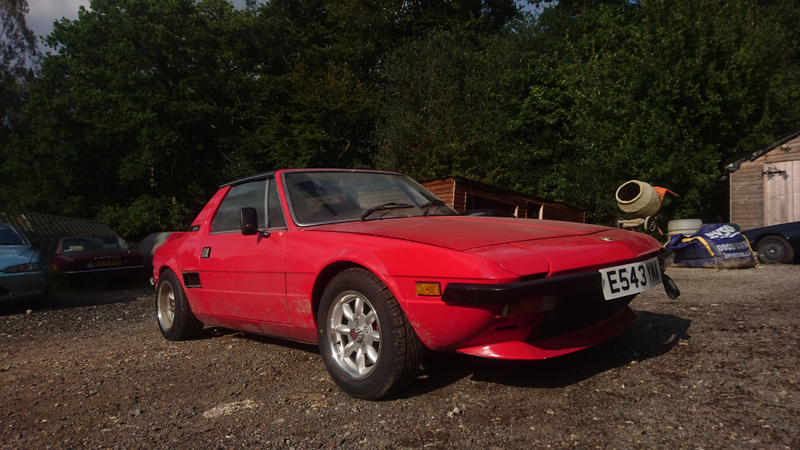
First thing’s first, a damage assessment:
1. Front end pretty thoroughly mashed in and cut up to get the bonnet open
2. Various dings all over the body
3. Left-hand tie rod bent to 45-degrees (fixed in Wales)
4. Couldn’t quite get the tracking right in Wales which suggests something else is bent
5. Front left wheel which took the brunt of the force seems to rock back and forth on the strut (the rod of the shock moves in relation to the body)
6. Radiator pushed back 4", but otherwise intact
7. Lower lip spoiler pulled off
8. Bumpers wrecked
9. Wing mirror left behind in the field
10. Fuel pump whining and not able to keep up with fuelling above 4000rpm towards the end of the trip
Next up, lets strip everything down ready for repair (exposing just how thoroughly wrecked the nose panel is).
Then removing all of the mangled metal and welding it back up. Had to cut a slit along the top of the bent section to pull it down and forwards into shape, and re-make the leading lip.
Apologies for the schizophrenic photo brightness. This was done over the course of a few days.
As a thankyou for borrowing the MG F, my mate bought me a fibreglass nosecone as you can’t really get steel ones anymore. Took a bit of fettling to get it into the right shape (slit down the middle and bent up slightly), but got there in the end.
Before:
After:
Next step was to sort the rad. Not that it really needed extra cooling at the moment, but in the future I’d like to see if I can push the power up a little on this so an alloy rad would be a good investment
Difficult to find in the UK, but I found an outfit in the States selling some really nice ones. Trouble is they were quoting about £200 in shipping! Didn't want to send USPS for some reason.
Luckily, one of the forums I knock around has a big american presence, and a brilliant lady on there helped me ship it over for nearly £120 less than the original quote
much better.Supposed to be bolt-on, but it fouled the original radiator bracket so I took the opportunity to make a lightweight tubular one
from my spit build I'm normally obsessed with weighing each weight reduction thing I do, but must have forgotten with this.And fitted
Ok, now for the dings and bent suspension. I was originally going to get some quotes for paintless dent repair, but then I thought ‘I’ve got a rubber mallet and a block of 4x2...how hard can it be?’.
Turns out, not that difficult.
Gutted I didn’t get a before pic, but there used to be a massive dent on the rear part of this wing. Pushed in a good half-inch over a dinner-plate-sized area. Just look at the reflection of the bin in it now. Flat as a pancake
There’s still some wrinkles at the back where I couldn’t get the mallet behind properly, and below where there’s a complicated little crease, but it’s about a billion times better than it used to be.
As for suspension, you can see in this pic on the lower right where the forward suspension link has been pulled downwards by the impact. The gap you can see at the back in between the two downward prongs and the radiator mount bar shouldn't be there.
Jacked that up and welded it back together. I also discovered the big ol’ cast steel transverse link was tweaked a bit. Expensive buggers to replace, so I carefully straightened it out in my pipe bender which worked a treat
The knocking shock/strut turned out to be the shock insert moving inside the strut. Further inspection showed that the big threaded section that clamps the shock in had been expanded slightly by the impact so that it would slip if you tried to screw it in tight enough to hold it steady.
After a bit of an abortive search for replacement struts I decided to fix that too. Stuck it in the vice with a big beefy socket beneath it (securing it on 3 sides) and the top bit screwed in. Then proceeded to ‘tap’ it with a big lump hammer progressively around and around the outside shrinking it until you could bolt it up ok. Again, worked a treat
Next thing I noticed was that the coolant pipes running along the front of the car were leaking a bit. Fair amount of faffing about to get them sealed, but eventually I made these
Hum, what was next? Oh yeah, bumpers. I’d picked up some fibreglass replacement ones but they came without mounting hardware so made up some little brackets and rubber mounts to fit them to the body and fibreglassed them in place.
Discovered that the whining fuel pump was due to a thoroughly blocked filter. Replaced that (and the pump for good measure) and the running problems sorted themselves
Noticed that the handbrake probably wouldn’t pass MoT so set about adjusting that. Had to widen the access panel underneath the car as the new coolant hose routing at the back ran directly over the old access hole.
Adjustment didn’t really fix it as they didn’t seem to be releasing properly, so took the calipers apart to have a look why. Glad I did as this is what came out:
Some of those chunks of rust are a good few millimetres in diameter. Plenty enough to get stuck in brake pipes. We reckoned the master cylinder had probably gone rusty inside as it was pretty rusty outside so set about replacing that. Right pain in the backside job that. Who puts a brake master cylinder in the driver’s footwell?
Replaced that (somehow managing to avoid spilling brake fluid all over the footwell which was a minor miracle). Also resealed all the brakes while I was at it to check that they didn’t have buckets of rust inside them too. Bleeding them was a pain as one of the banjo fittings wasn’t sealing properly. The only way we found out is that when someone leant on the pedal quite hard it sent a jet of brake fluid across the garage. Some better quality copper washers fixed that.
And this is how she stands now!
Since that pic the horn's stopped working (shoddy little tangs connecting to the button on the wheel) so I've just stuck a button in to do the horn. Still a couple of bits and pieces to fix (tappy valves, bigger rear calipers from a Lancia Montecarlo to balance the brakes better, and a weakly charging alternator), but nothing I can’t do as I’m driving
So yeah. Nearly there! I can’t wait
Thanks man
It's all just practice and getting stuck in. Wasn't too long ago I was chuffed at brake jobs as well (still am really).
Not motor trade, I just muck about in my spare time. My dad's always been into cars so I had a good start and decent facilities/tools. Once you work out that 9 times out of 10 everything goes back together the opposite of how it came off it's pretty straight forwards
Oh and I'd have loved to go on scrapheap challenge right up my street!
It's all just practice and getting stuck in. Wasn't too long ago I was chuffed at brake jobs as well (still am really).
Not motor trade, I just muck about in my spare time. My dad's always been into cars so I had a good start and decent facilities/tools. Once you work out that 9 times out of 10 everything goes back together the opposite of how it came off it's pretty straight forwards
Oh and I'd have loved to go on scrapheap challenge
right up my street!Gassing Station | Readers' Cars | Top of Page | What's New | My Stuff