BMW 330CI E46 Build thread
Discussion


Introduction
I've decided to move over onto PH after spending 3 years messing around with Clio's on the 197/200 pages and used to frequent ClioSport forum a little bit over the past few years but mainly reading rather than posting.
I've wanted to branch out onto here for 6-12 months especially now I'm well on with this new E46 Build. I thought these dark nights were a good opportunity to sit down and document the work I've done this summer on the new track car. The following first posts are all covering everything I've done on the BMW since buying it in May this year....
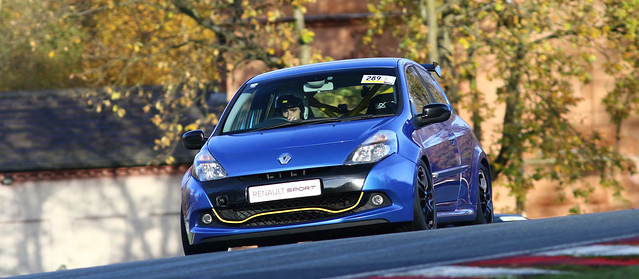
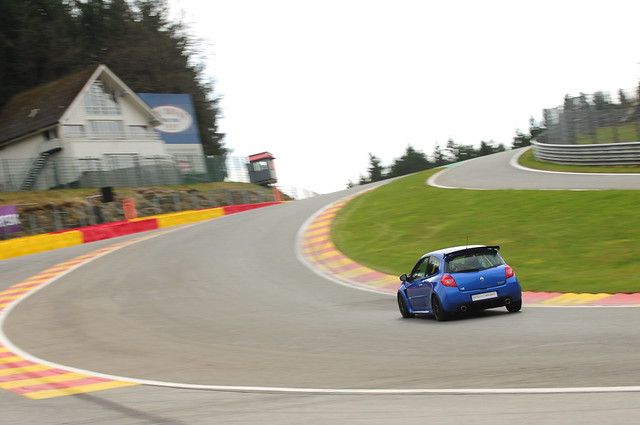
Before the purchase of the BMW E46 I used to run a Clio 200. Here's a few photos of the old car and a spec list...

Engine
Clio 2.0 F4R – 201.5 BHP 165 FTLB mapped at EFI Tuning
7750 RPM Limiter
ITG Panel filter
Clio 197 gearbox TL4 003
4.73 Shorter final drive (137mph @ 7750RPM)
Braided Clutch line – Solid to chassis leg – Braid from leg to box slave.
Genuine replacement Clutch and Slave.
Redline MT 90 Gearbox oil
Toyo manifold
Miltek resonated exhaust
AC Delete kit
Smaller lightweight pulley
Purple Polybush Torque mount
Purple Gearbox mount
Solid Lower Engine mount with custom PU Bushes.
Suspension/brakes
Black series Wishbone bushes
Purple ARB bushes
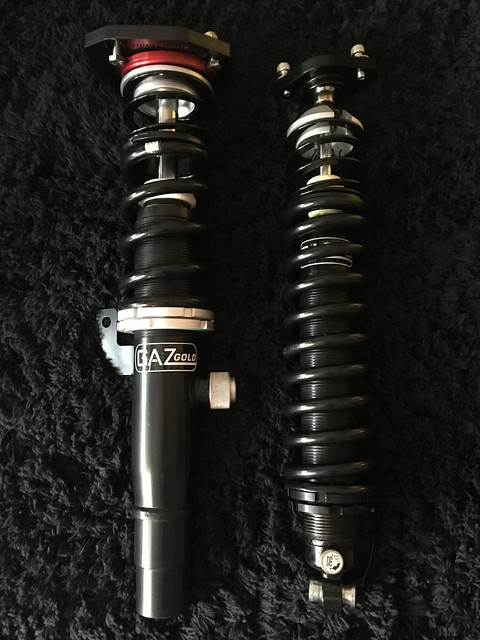
Gaz Gold adjustable Dampers 600F/350R Linear springs
Gaz Gold adjustable top mounts.
335mm Compbrake two piece rotors
DS1.11 Brake pads
Motel RBF600 Fluid
Hel Braided lines
Clio 200 Cup wheels 9.3KG
Federal RSR
Clio 197 Std wheels 10.4KG
Uniroyal Rainsports
Pure motorsport Toes and Camber shims
Interior
Safety devices R020 Cage – Double Rear Cross
Sparco EVO LF
L-TEC 6 Point harnesses
Arduino data logger
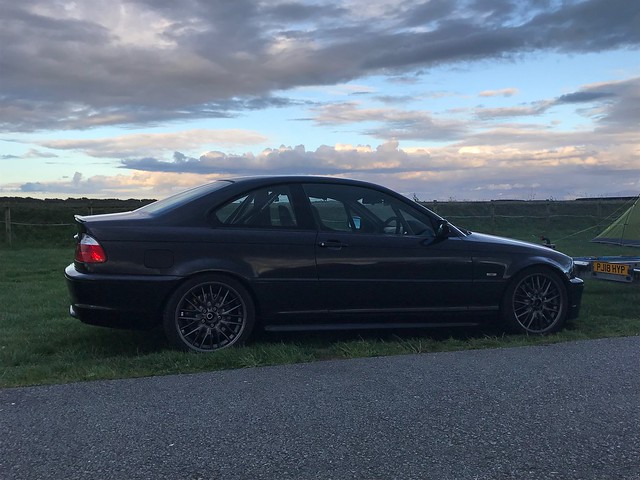
This is a car I used on the road and track days for 2.5 years, it was a fantastic car to learn to drive in and start of doing track days in but after that time I had become a little bored of it, I had bought and built a Megane turbo engine top go into it but before dropping it in I changed my mind and I decided I wanted to stay NA and build a different sort of car, something new which was going to be a new challenge and would require me to learn a lot more about driving, inevitably it had to be RWD.
The New Project
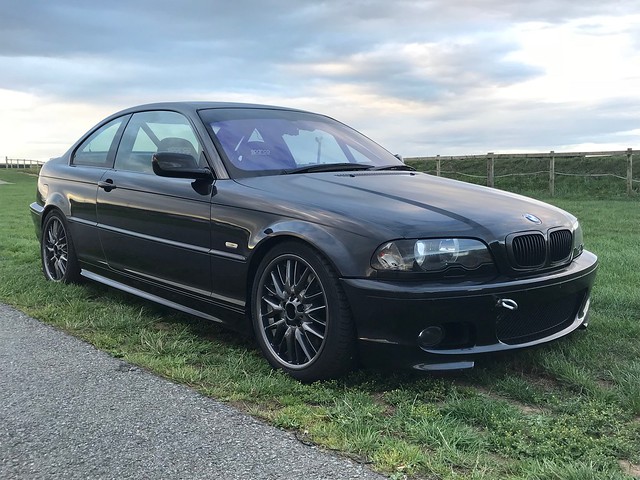
Not long after returning from Spa Francorchamps from two days on track there in the Easter 2018 I started looking at what I could change the car to. M3, MX5, S2000, 330's were the main cars I were looking at at the time. I saw this for sale on Autotrader and went down the Cannock to look at it, 15 minute test drive on the road. A quick auto scan with ISTA showing no major faults and a folder full of paper work to back up the service history of the car, the deal was done and I'd made the change the RWD.
I kept it standard on the road for a month, wanted to put some miles onto it, find out if there were any problems with it, anything that needed to be addressed while the car was off the road. The plan for this car was to do everything in the car from top to bottom in one hit over a couple of months.
The car was parked up on the drive and put onto axles stands for a little while
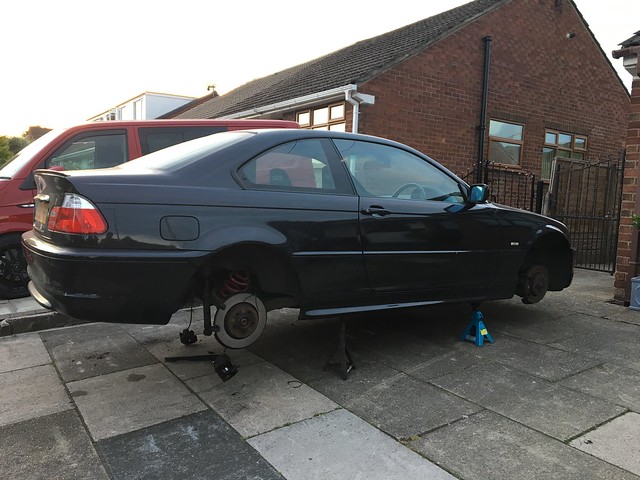
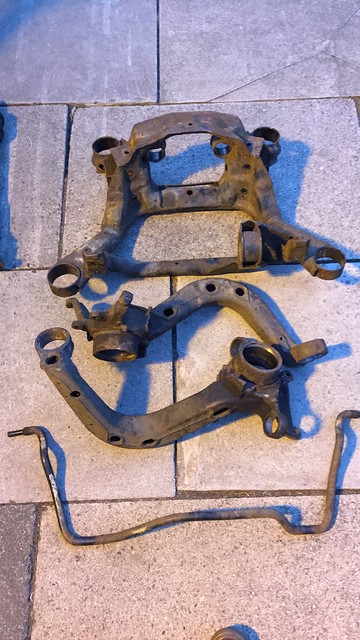
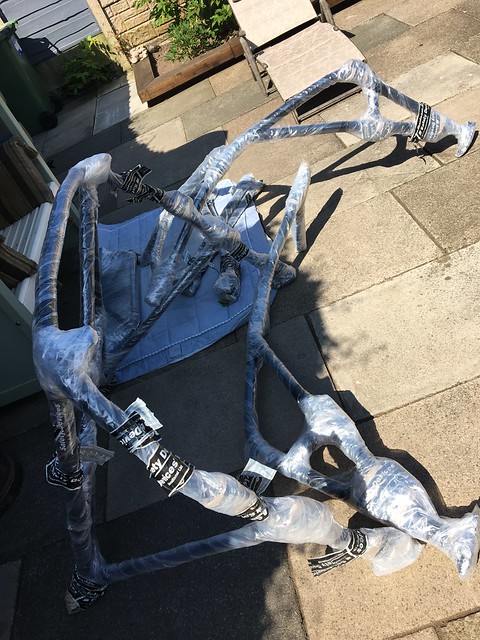
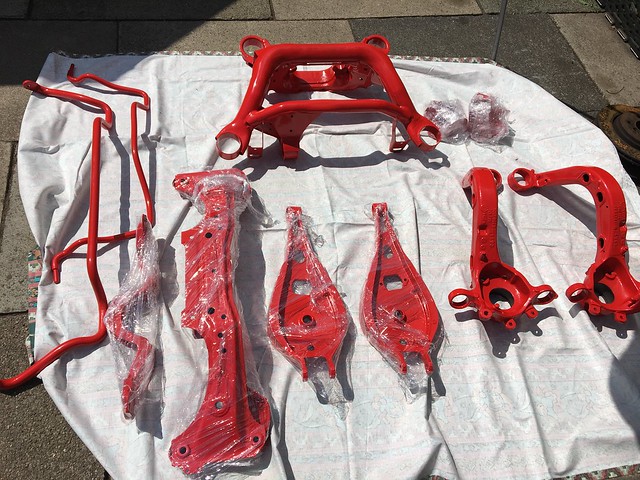
Started the strip down... Front and rear subframes removed and stripped down
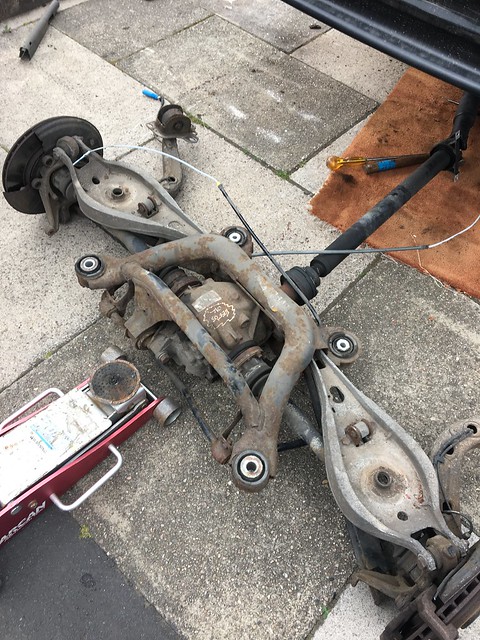

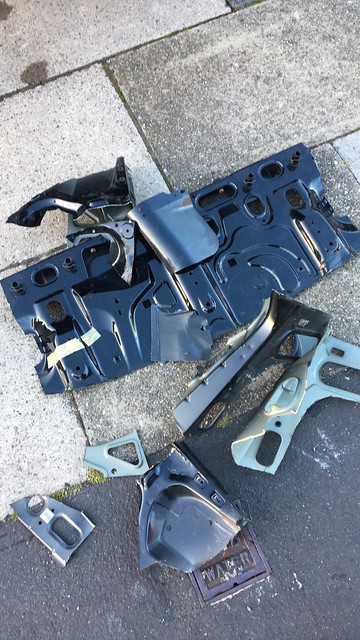
Everything was stripped down and sent away for blasting, dipping and powder coating.
While everything was away being made to look like it hadn't spent 20 years at the bottom of the channel it was time to start on the shell...
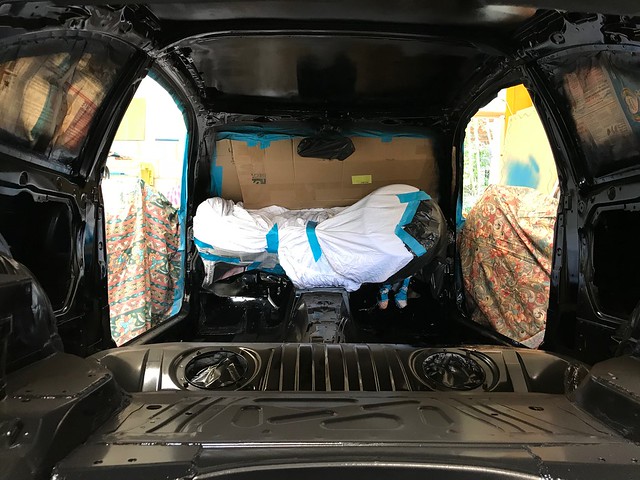
First to go was all the interior and dash
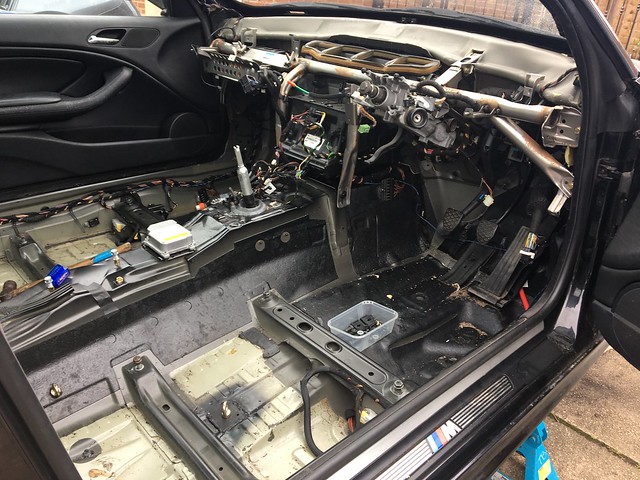
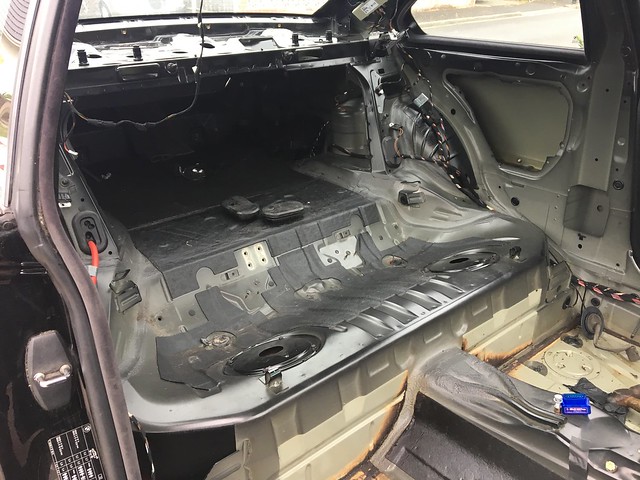
Any old brackets, sound deadening and the rear parcel shelf had to go too to make room the cage I planned on fitting.

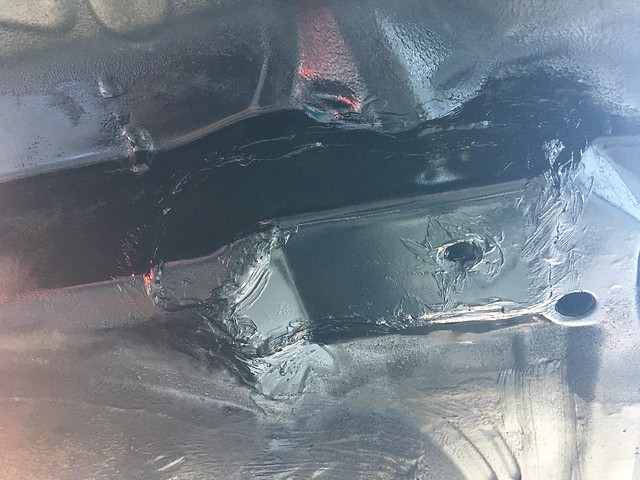
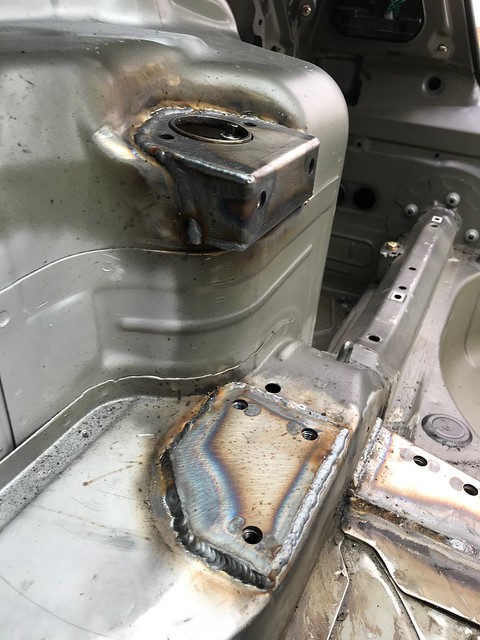
Once this was complete I started to turn my attention to the underside of the shell... Finding what is very common on these now is that the rear subframe mounts had started to crack.


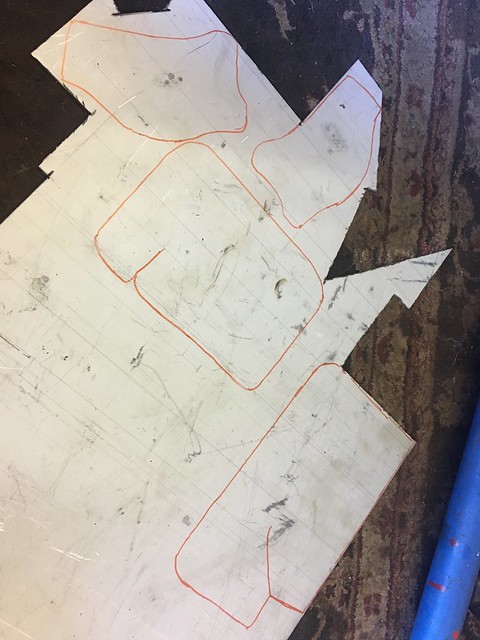
Templates there made out of steel, the cracks where drilled at the end, ground back and welded up.
The underside of the shell was Zinc primed along with the plates. Welded around the edges and through the plates, reprimed, painted and then sealed. This wasn't a job that was on the original plan but I'm glad i checked and found the problem and got it sorted while everything was stripped.
At this point it was time to prep for the cage, after following the 750MC Racing during the 2018 Season helping friends racing the Roads Sports and Club Enduro I had spent a bit of time looking around the 330 Challenge cars. After seeing the cages in those cars i had made my mind up, that is the cage I wanted to fit to the car.
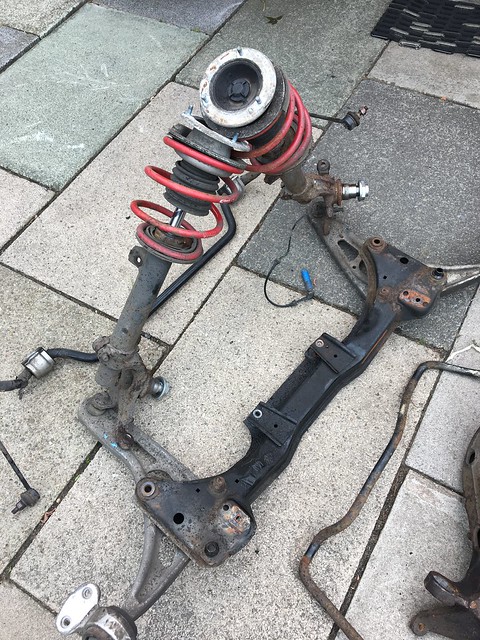
Also a set of Gaz Coilovers arrived, similar set up to what I had ran on the Clio
Along with that a full set of Strong Flex suspension bushes in 90ShA. However for the rear arms I was going to continue to the run ball joints top and bottom to keep everything solidly mounted rather than the bushes strong flex supply.
Engine mounts, Gearbox mounts, Gearbox oil, new backing plates for the rear discs, Carbon Loraine RC5+ pads all around, Driftworks stud and nut conversion for the car. The list of parts ordered was getting longer and longer

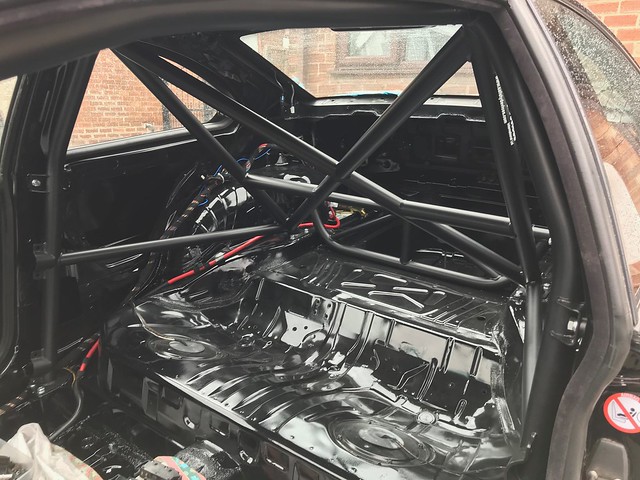
The fitting of the cage started with the rear strut brace which picks up the rear strut towards as well as being welded to the boot floor.
Everything was mounted up, wire wheeled and then tacked into position initially
The rear section went in and the same done with the foot plates.
Finally with the front section all test fitted and tacked all the foot plates could be welded in properly

For now that is all the major prep work done on the shell and all of the welding done... More to follow.
I've decided to move over onto PH after spending 3 years messing around with Clio's on the 197/200 pages and used to frequent ClioSport forum a little bit over the past few years but mainly reading rather than posting.
I've wanted to branch out onto here for 6-12 months especially now I'm well on with this new E46 Build. I thought these dark nights were a good opportunity to sit down and document the work I've done this summer on the new track car. The following first posts are all covering everything I've done on the BMW since buying it in May this year....
Before the purchase of the BMW E46 I used to run a Clio 200. Here's a few photos of the old car and a spec list...
Engine
Clio 2.0 F4R – 201.5 BHP 165 FTLB mapped at EFI Tuning
7750 RPM Limiter
ITG Panel filter
Clio 197 gearbox TL4 003
4.73 Shorter final drive (137mph @ 7750RPM)
Braided Clutch line – Solid to chassis leg – Braid from leg to box slave.
Genuine replacement Clutch and Slave.
Redline MT 90 Gearbox oil
Toyo manifold
Miltek resonated exhaust
AC Delete kit
Smaller lightweight pulley
Purple Polybush Torque mount
Purple Gearbox mount
Solid Lower Engine mount with custom PU Bushes.
Suspension/brakes
Black series Wishbone bushes
Purple ARB bushes
Gaz Gold adjustable Dampers 600F/350R Linear springs
Gaz Gold adjustable top mounts.
335mm Compbrake two piece rotors
DS1.11 Brake pads
Motel RBF600 Fluid
Hel Braided lines
Clio 200 Cup wheels 9.3KG
Federal RSR
Clio 197 Std wheels 10.4KG
Uniroyal Rainsports
Pure motorsport Toes and Camber shims
Interior
Safety devices R020 Cage – Double Rear Cross
Sparco EVO LF
L-TEC 6 Point harnesses
Arduino data logger
This is a car I used on the road and track days for 2.5 years, it was a fantastic car to learn to drive in and start of doing track days in but after that time I had become a little bored of it, I had bought and built a Megane turbo engine top go into it but before dropping it in I changed my mind and I decided I wanted to stay NA and build a different sort of car, something new which was going to be a new challenge and would require me to learn a lot more about driving, inevitably it had to be RWD.
The New Project
Not long after returning from Spa Francorchamps from two days on track there in the Easter 2018 I started looking at what I could change the car to. M3, MX5, S2000, 330's were the main cars I were looking at at the time. I saw this for sale on Autotrader and went down the Cannock to look at it, 15 minute test drive on the road. A quick auto scan with ISTA showing no major faults and a folder full of paper work to back up the service history of the car, the deal was done and I'd made the change the RWD.
I kept it standard on the road for a month, wanted to put some miles onto it, find out if there were any problems with it, anything that needed to be addressed while the car was off the road. The plan for this car was to do everything in the car from top to bottom in one hit over a couple of months.
The car was parked up on the drive and put onto axles stands for a little while
Started the strip down... Front and rear subframes removed and stripped down
Everything was stripped down and sent away for blasting, dipping and powder coating.
While everything was away being made to look like it hadn't spent 20 years at the bottom of the channel it was time to start on the shell...
First to go was all the interior and dash
Any old brackets, sound deadening and the rear parcel shelf had to go too to make room the cage I planned on fitting.
Once this was complete I started to turn my attention to the underside of the shell... Finding what is very common on these now is that the rear subframe mounts had started to crack.
Templates there made out of steel, the cracks where drilled at the end, ground back and welded up.
The underside of the shell was Zinc primed along with the plates. Welded around the edges and through the plates, reprimed, painted and then sealed. This wasn't a job that was on the original plan but I'm glad i checked and found the problem and got it sorted while everything was stripped.
At this point it was time to prep for the cage, after following the 750MC Racing during the 2018 Season helping friends racing the Roads Sports and Club Enduro I had spent a bit of time looking around the 330 Challenge cars. After seeing the cages in those cars i had made my mind up, that is the cage I wanted to fit to the car.
Also a set of Gaz Coilovers arrived, similar set up to what I had ran on the Clio
Along with that a full set of Strong Flex suspension bushes in 90ShA. However for the rear arms I was going to continue to the run ball joints top and bottom to keep everything solidly mounted rather than the bushes strong flex supply.
Engine mounts, Gearbox mounts, Gearbox oil, new backing plates for the rear discs, Carbon Loraine RC5+ pads all around, Driftworks stud and nut conversion for the car. The list of parts ordered was getting longer and longer
The fitting of the cage started with the rear strut brace which picks up the rear strut towards as well as being welded to the boot floor.
Everything was mounted up, wire wheeled and then tacked into position initially
The rear section went in and the same done with the foot plates.
Finally with the front section all test fitted and tacked all the foot plates could be welded in properly
For now that is all the major prep work done on the shell and all of the welding done... More to follow.
sparks_E46 said:
It’s quite rare for a 330ci of this age to have cracked subframe mounts. Most of the affected non M3 models were up to a certain point in 2001. My 2002 330ci is solid. Great write up, look forward to more!
Yeah it was a shock when I found it, I didn't go looking for it I just thought i'd tidy up some of the little bits of surface rust with a wire wheel and then it became apparent what was hiding under it. At least it was found early and sorted. Even though the car has a massive amount of service history with lots of parts already swapped and changed like SMF and clutch, Shorter 3.38 FD from an Auto but retaining manual shafts, Range of genuine engine sensors, Power steering rack and pumps, front and rear brake calipers I think the car has had tough life along the way and has been used properly or improperly. Mainly due to both rear drive shafts having play in the inner CV's which caused knocking when on and off the power which I originally put down to being knackered diff mounts. To try and solve the problem I've swapped the diff over to another 3.38FD diff and swapped the passenger side shaft. Still need to source a drivers side as the one I was sent was incorrect lengths...
The Build Continues
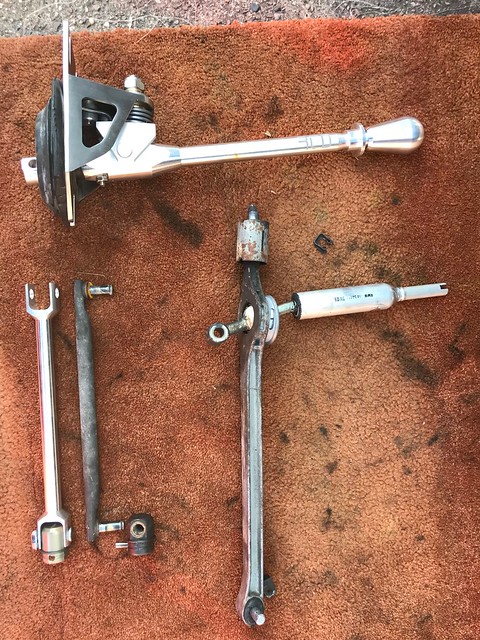
The focus on this car is to make it as track focused as possible and to give the best feedback and feel on track as possible. Anything that has a rubber mount on it was to be replaced. Out with the rubber steering mount and replaced with an aluminium steering bush.
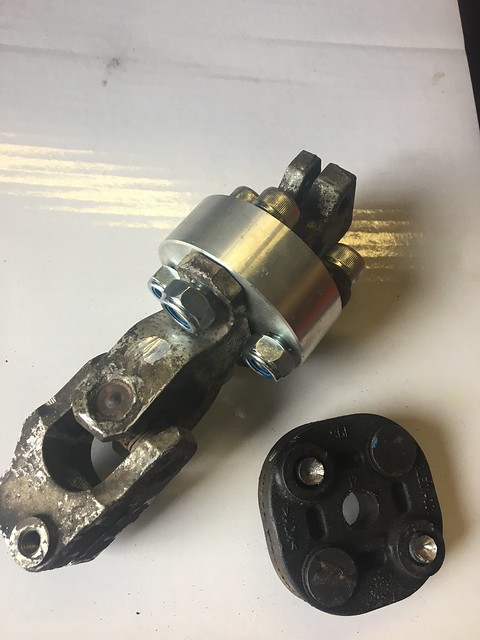
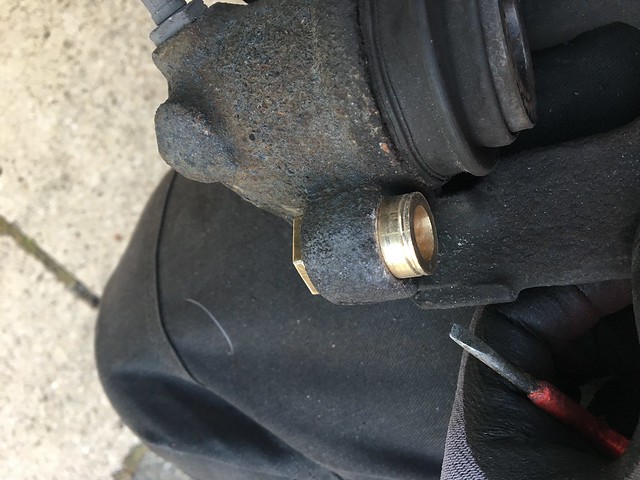
Made my self busy in work where i have access to Lathes and Milling machines and made up some brass sliders for the front and rear calipers. The standard rubber bushes have so much play and flex in them it's unreal, causing such a soft pedal as well as wearing the pads on an angle. Not good for expensive pads. This first version was a prototype I made in my break at work just to check the clearances and length of the bush before making 8 of them in the future.
Also found some drawings for the detent bush tools required for replacing the detent bushes on the gearbox, Made my self a set of these too for the future. Not a job I've got around to yet but will do in the future.

Onto some Engine Modifications
Started with basic things like the chain tensioner and crush washer. These can to weak over a period of time, I'm planning on reving the engine slightly higher in the future depending on further engine mods so always a good idea to replace as much as I can
Some goodies for the inside of the engine.
Vac motorsport oil pump shaft and pulley, some ARP Rod bolts and some new rod bearings too while I was doing the bolts
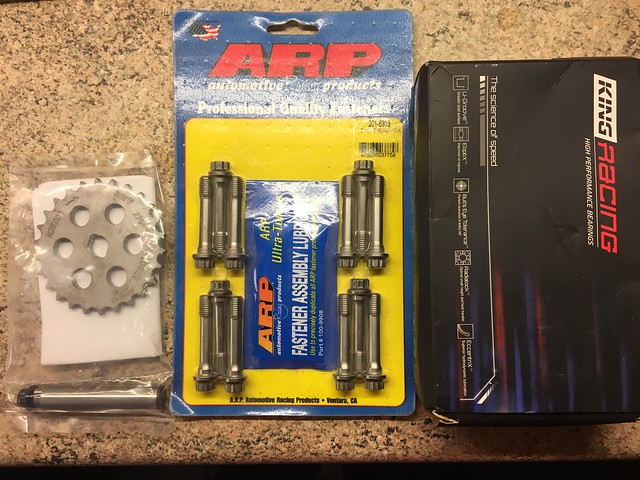
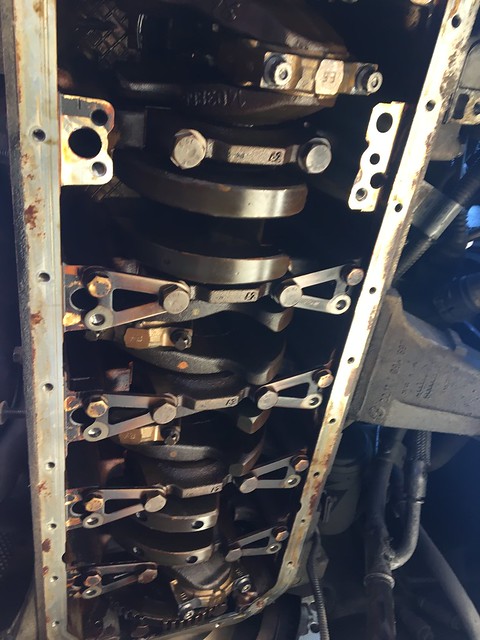
While the subframe was off it was a great time to get it done... Oil pump removed, New bearings going in and ARP's Torqued up
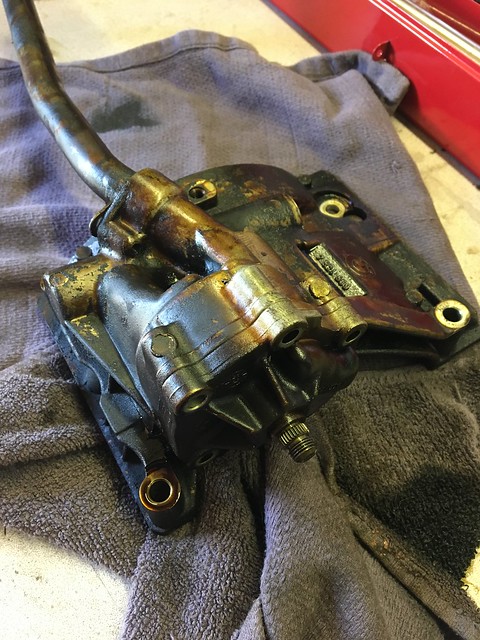
Oil pump split apart and cleaned

Shaft pressed out of the oil pump inner to be replaced.
Reassembled together with a new sump gasket and dip stick o ring too.
While going to all this effort it was only right that I found a way of monitoring what the oil was doing in the engine. With stand alone being something I wanted but a long way off into the future I decided on an Innovate combined oil temp and pressure gauge.
I set this up with alarms at 120 degrees for oil temp and less than 5psi oil pressure.
Knowing the standard manfolds were a rubbish design I started to look at options for the RHD M54 Engine. While I couldn't see anything that was really going to do the job that I wanted without spending a stupid amount of money I managed to find a set of S50 Manifolds for sale.
The problem with these is that each runner has 4 bolt holes the M54 Head only has 2 per runner except the ends which has a few more. To get around this I designed and had laser cut some adaptor plates that I could put some M7 studs in to in some locations and in other bolt through to the block, this second benefit of this adaptor was it allowed the manifolds to clear some of the webbing on the side of the block.
Laser cut and threaded for the studs
[pic]https://farm1.staticflickr.com/851/29750650708_1d9649ed62_z.jpg [/pic]

Now it was time to do something with the manifolds, I had removed the standard exhaust, which turned out to be an after market cat back system and sold it on the BMW forums with a view to make a new system front to back.
I order some swaged pipes, 2-1 collector and a V band and started to mock it up in the car, trying to make sure everything cleared the standard subframe and cross brace under the car and keep it tucked up under the car as much as possible. This was the final outcome after chopping the manifolds back slightly.
Test fitting the manifolds into position was a ball ache of a job that took a good couple of hours with different length studs, 4 gaskets but it all went together and worked perfectly.

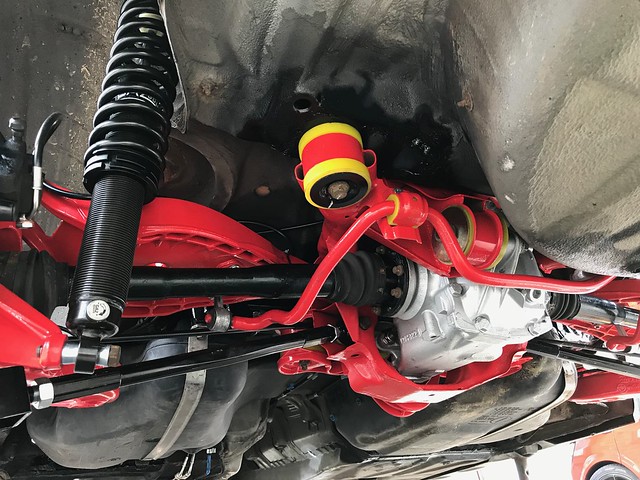
While all this was going on all the parts had come back from powder coating. I had obviously gone for a bright colour for the underside of the car while everything else was going to be black
Everything was rebuilt, repainted, new bushes fitted, I drilled out the threaded bosses in the diff housing so I could run a nut and bolt just in case the diff bolts ever did snap on track they could be knocked out and removed easily without having to remove the diff and then mess removing the snapped bolt in the casing
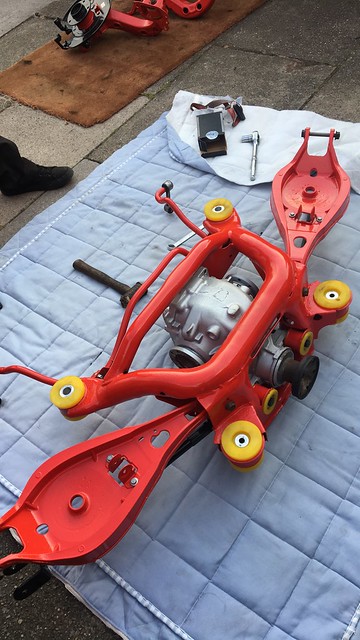
The front assembly built up with the new coilovers. Trying to limit putting any old parts back onto the car if possible.

Subframes could now be bolted back into position.
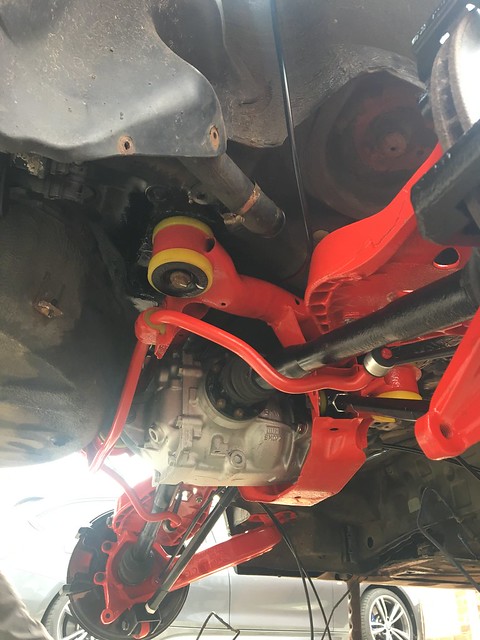
While this was done I ran new copper lines from the engine bay... That joined into new braided lines which then ran over the fuel tank into the rear subframe
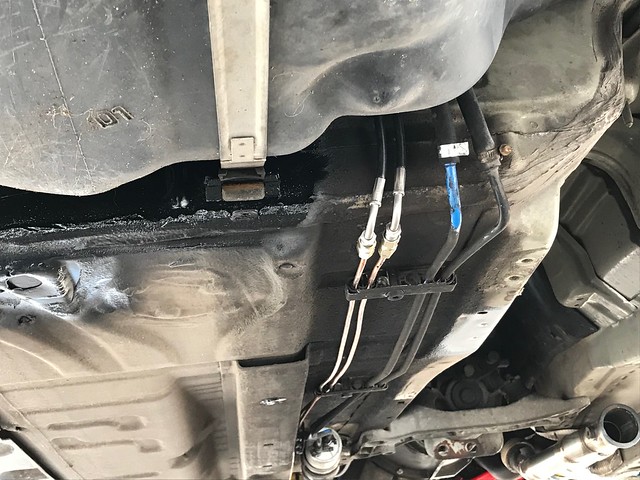
Clutch line was replaced with a small copper run and a braided line, removing the clutch delay valve while I was there

Everything coming together nicely on the underside of the car.
Time for some very important parts
Full brake rebuild on for the front and rear, fitting the brass bushes for all calipers, these were the final version I made after making the original prototypes.
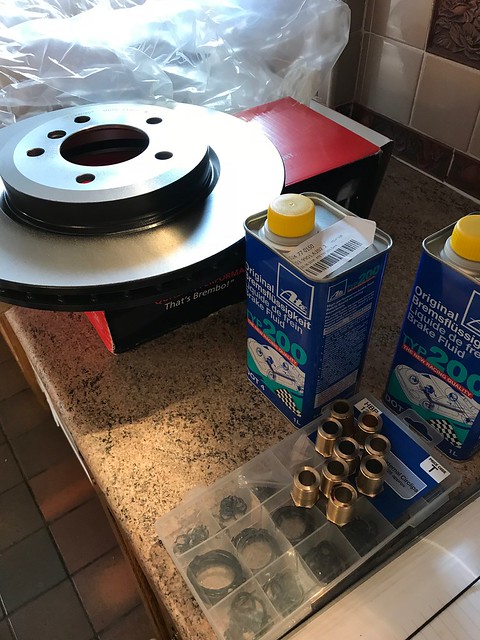
Front set up with drift works studs and nuts too
Same set up for the rear too,
With that done there were only a few jobs to do before the inside of the car could be prepped for paint.
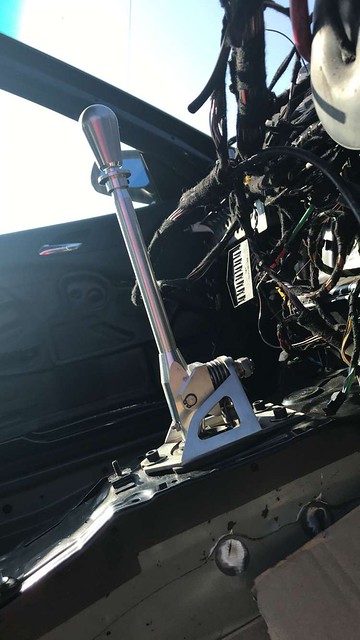
After seeing my friends car with a CAE shifter there was no way I was staying with the tiny BMW shifter so something had to be done.
Firstly, obviously as the theme goes the gearbox and engine mounts had to be swapped the PU mounts
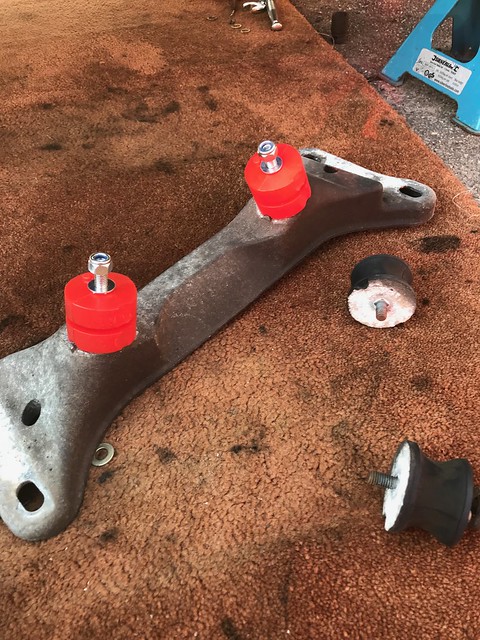
I'd ordered a new linkage, rush rod kit and bushes from BMW along with a new RTD shifter with Dual Shear linkage. This is going to feel amazing when driving on track! I obviously went with the longer race version of the shifter.
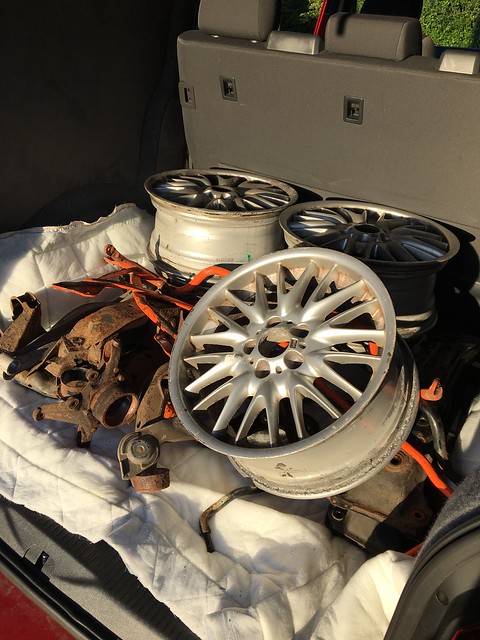
When I sent everything away for powder coating I sent two sets of wheels. One for wet tyres and one for semi slicks
Had them both done in a metallic anthracite
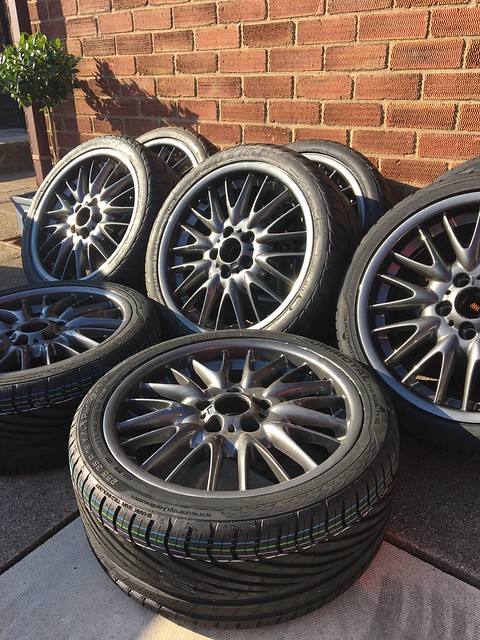
Test fitted the wheels ready to drop it down onto the floor, not a lot of droop in this set up.

Edited by tombate911 on Saturday 8th December 20:35
What's changed
So with the car dropped down onto it's wheels, I'd taken about 4/5 weeks to get to this point, working on it in the summer evenings from 4-10pm as well as full days on the weekends. From the outside it didn't look any different, except it had new tyres and freshly powder coated wheels.
The main goal for getting it rolling at this stage was to get it rolling so that I could take it for an exhaust. This is one of the the few jobs on the car I wouldn't be doing for myself.
Twin rolled tips tucked nice into the cut splitter at the rear
2.5" exhaust ran through the car from the manifolds, joined together with a V band. Two straight through silencers fitted to try and keep the noise levels at something sensible on track while still giving a great sound combined with the S50 manifolds. At this point i'm dying to get the car running.

Time to finish it off
Next job was to get the inside painted. I asked a few friends and no one really fancied it or wanted to do the job for a sensible price and I had set myself a budget for this build and didn't want to cut covers in other places so I decided to paint it myself, spent a week prepping the inside of the car, flatting and cleaning all of the panels, priming any sections which had be ground back of welded on. On a weekend I got the car into my friends unit and started the painting process on the Saturday morning.
Got the car masked off and gave the car a good wipe down ready to start the painting process. Decided to go with nice and simple gloss black in 2K paint
Over the years of modifying campervans... (I may post somethings about that at some point in the future) I've painted quite a lot of parts and wheels for my own project. I learnt more about painting though painting the inside of this shell in a couple of hours than I have in a few years painting! I didn't expect the car to come out with a show car finish but I just wanted it all to be the same colour throughout.
I left the car there for the remainder of the Saturday and Sunday inside were it was nice and warm waiting for the paint to start to harden.
I picked it up on the Sunday evening taking it back home on the trailer and left it for another 5 days before starting to do anymore work on the inside of the shell.
The first job was to run the loom back out to the rear of the car and start with fitting the roll cage back into the shell.
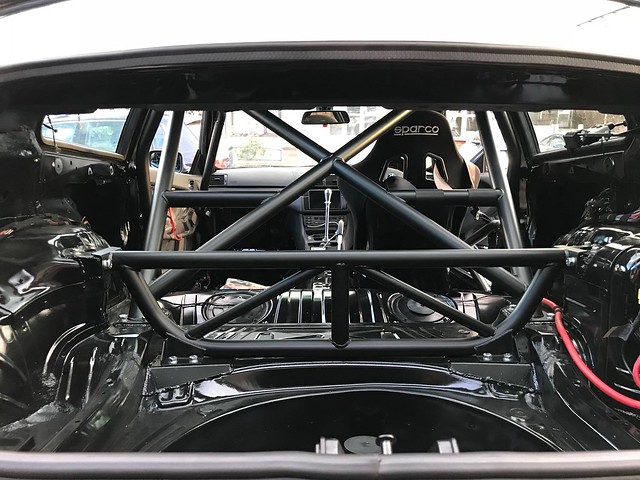
Fitted the front section of the cage into position during the evenings after work. The cage is such a tight fit inside the shell now. Obviously with the cage being a MSA cage that is used in the 330 Challenge Race cars it's a perfect fit and looks the absolute works.
In the past I've made my own seat bases but found some E36/E46 seat bases for sale which took into consideration of the offset seating position and were a straight bolt in solution
Cut the dash to fit around the cage and kept the centre console.. Will add more about this soon.
Also refitted the standard wheel for the time being just to get the car running and driving.
Cut the bottom of the door cars and removed all speakers and wiring from the doors. Also removed anything from the shell to do with the radio.
Airbags have also been completely removed. Airbag Computer gone including crash sensors, I didn't intend to ever use traction control in this car so it all went in the bin when the car was stripped back to a shell.
Finishing touches added to the floor on both sides, some grip tape, after driving the car without a false floor in i figured I quite liked the floor the way it was to decided against fitting the floor I had planned and just applied the tape directly to the floor,

With the car all together with seat mounted, harnesses and cage fitted it was time to get the alignment done.
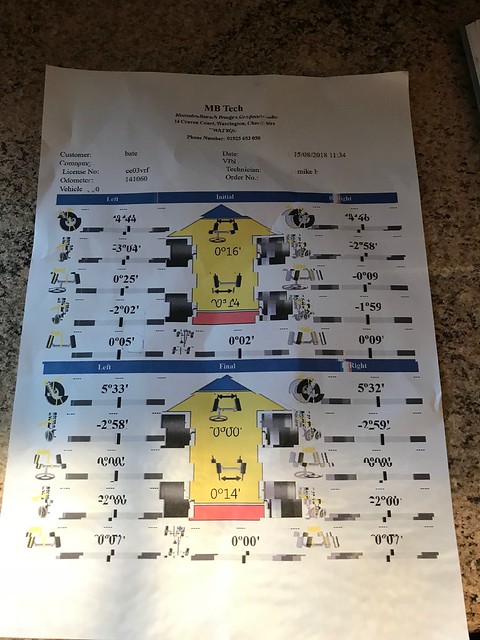
Kept the settings quite safe and neutral. Little bit less camber on the rear than the front. Parallel toe upfront but retaining a bit of a toe in on the rear to make learning to drive RWD in such a modified car straight away a little easier.
The none starter

So at the point of having the exhaust fitted I came around to getting the car running to be able to move it around for the exhaust and painting... Everything was plugged back in that I thought it would need to be able to run and turned the key... nothing...
Well that was a bit of a shock which took a few long nights fault finding. The main relay wasn't being powered by the ECU which meant there was no power to injectors, coils or fuel pump. In the end, all earths checked, wiring and fuses but still no luck.
In the end I thought I was an Immobiliser problem so cracked open the ECU. Completely flashed a new software version onto the ECU with a few tweeks like Immo delete to see if it fixed the issue. No change.
Sourced a spare ECU from 5 miles away and tried that still no change.
After a few hours going back to basics tracing wires from the relay back to the ECU and checking it against the ECU pin out. The culprit plug on the ECU wiring was found! It is possible that one of the plugs in the ECU can be plugged in backwards! Yes I know!
We'd had this part of the loop apart to figure out which of the 4 Lambda plugs we were going to use with the new manifolds as I was only going to run the precat lambda/
Swapped the plugs around and started first time. Just took a lot of problem solving and brain power to get to the bottom of it.
While we had the ECU out and new software flashed onto it a few changes have been made now. Immo Delete, top speed restriction removed which means there no lower Rev limiter if the ABS isn't plugged in or working. Also adjusting the drivers request map/table for the throttle to improve the throttle response but at this stage before it's been properly tested I'm leaving it at that
In the future I'll do some more experimentation with rev limiters and adjustment the Cam/Vanos tables to improve the mid range torque but want to get some miles driven in it before changing the maps and making too many changes.
At this point I could pretty much call the car done...
So with the car dropped down onto it's wheels, I'd taken about 4/5 weeks to get to this point, working on it in the summer evenings from 4-10pm as well as full days on the weekends. From the outside it didn't look any different, except it had new tyres and freshly powder coated wheels.
The main goal for getting it rolling at this stage was to get it rolling so that I could take it for an exhaust. This is one of the the few jobs on the car I wouldn't be doing for myself.
Twin rolled tips tucked nice into the cut splitter at the rear
2.5" exhaust ran through the car from the manifolds, joined together with a V band. Two straight through silencers fitted to try and keep the noise levels at something sensible on track while still giving a great sound combined with the S50 manifolds. At this point i'm dying to get the car running.
Time to finish it off
Next job was to get the inside painted. I asked a few friends and no one really fancied it or wanted to do the job for a sensible price and I had set myself a budget for this build and didn't want to cut covers in other places so I decided to paint it myself, spent a week prepping the inside of the car, flatting and cleaning all of the panels, priming any sections which had be ground back of welded on. On a weekend I got the car into my friends unit and started the painting process on the Saturday morning.
Got the car masked off and gave the car a good wipe down ready to start the painting process. Decided to go with nice and simple gloss black in 2K paint
Over the years of modifying campervans... (I may post somethings about that at some point in the future) I've painted quite a lot of parts and wheels for my own project. I learnt more about painting though painting the inside of this shell in a couple of hours than I have in a few years painting! I didn't expect the car to come out with a show car finish but I just wanted it all to be the same colour throughout.
I left the car there for the remainder of the Saturday and Sunday inside were it was nice and warm waiting for the paint to start to harden.
I picked it up on the Sunday evening taking it back home on the trailer and left it for another 5 days before starting to do anymore work on the inside of the shell.
The first job was to run the loom back out to the rear of the car and start with fitting the roll cage back into the shell.
Fitted the front section of the cage into position during the evenings after work. The cage is such a tight fit inside the shell now. Obviously with the cage being a MSA cage that is used in the 330 Challenge Race cars it's a perfect fit and looks the absolute works.
In the past I've made my own seat bases but found some E36/E46 seat bases for sale which took into consideration of the offset seating position and were a straight bolt in solution
Cut the dash to fit around the cage and kept the centre console.. Will add more about this soon.
Also refitted the standard wheel for the time being just to get the car running and driving.
Cut the bottom of the door cars and removed all speakers and wiring from the doors. Also removed anything from the shell to do with the radio.
Airbags have also been completely removed. Airbag Computer gone including crash sensors, I didn't intend to ever use traction control in this car so it all went in the bin when the car was stripped back to a shell.
Finishing touches added to the floor on both sides, some grip tape, after driving the car without a false floor in i figured I quite liked the floor the way it was to decided against fitting the floor I had planned and just applied the tape directly to the floor,
With the car all together with seat mounted, harnesses and cage fitted it was time to get the alignment done.
Kept the settings quite safe and neutral. Little bit less camber on the rear than the front. Parallel toe upfront but retaining a bit of a toe in on the rear to make learning to drive RWD in such a modified car straight away a little easier.
The none starter
So at the point of having the exhaust fitted I came around to getting the car running to be able to move it around for the exhaust and painting... Everything was plugged back in that I thought it would need to be able to run and turned the key... nothing...
Well that was a bit of a shock which took a few long nights fault finding. The main relay wasn't being powered by the ECU which meant there was no power to injectors, coils or fuel pump. In the end, all earths checked, wiring and fuses but still no luck.
In the end I thought I was an Immobiliser problem so cracked open the ECU. Completely flashed a new software version onto the ECU with a few tweeks like Immo delete to see if it fixed the issue. No change.
Sourced a spare ECU from 5 miles away and tried that still no change.
After a few hours going back to basics tracing wires from the relay back to the ECU and checking it against the ECU pin out. The culprit plug on the ECU wiring was found! It is possible that one of the plugs in the ECU can be plugged in backwards! Yes I know!
We'd had this part of the loop apart to figure out which of the 4 Lambda plugs we were going to use with the new manifolds as I was only going to run the precat lambda/
Swapped the plugs around and started first time. Just took a lot of problem solving and brain power to get to the bottom of it.
While we had the ECU out and new software flashed onto it a few changes have been made now. Immo Delete, top speed restriction removed which means there no lower Rev limiter if the ABS isn't plugged in or working. Also adjusting the drivers request map/table for the throttle to improve the throttle response but at this stage before it's been properly tested I'm leaving it at that
In the future I'll do some more experimentation with rev limiters and adjustment the Cam/Vanos tables to improve the mid range torque but want to get some miles driven in it before changing the maps and making too many changes.
At this point I could pretty much call the car done...
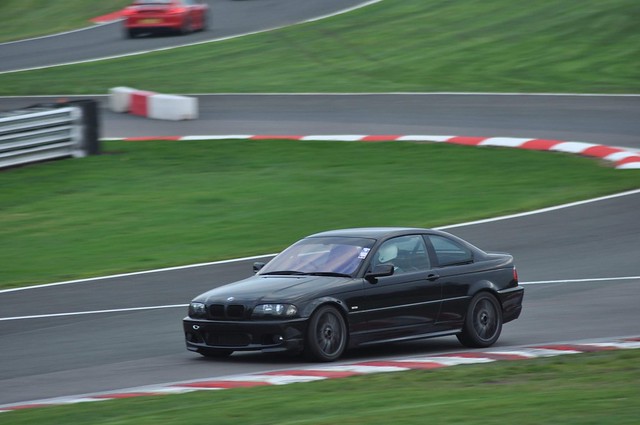
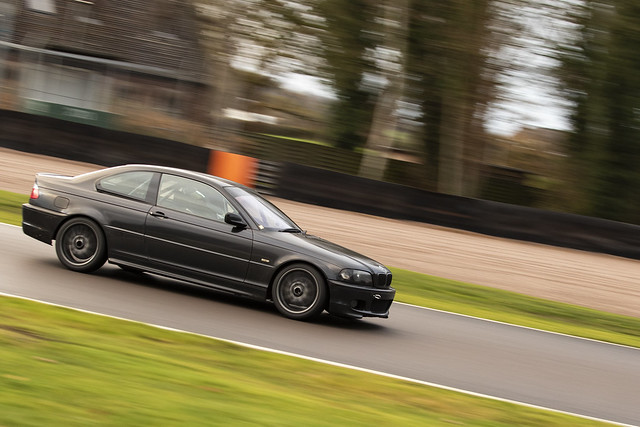
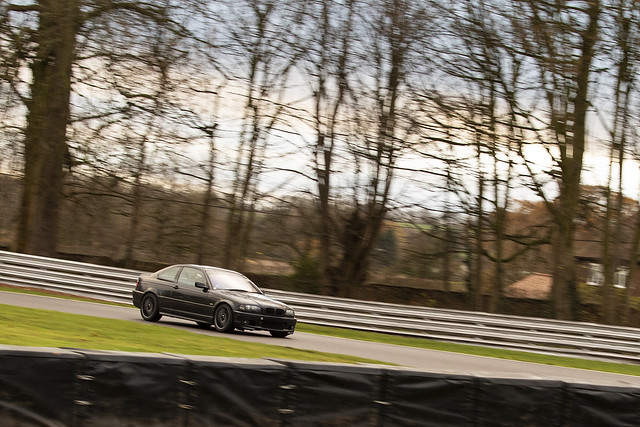
The first track day
All Loaded up on the Thursday evening we set off down to Anglesey ready to camp over the night before. BBQ's packed, enough food to feed an army from the Tesco at Bangor and we were set for two nights camping at the Circuit.
Unloaded from the trailer ready to drive into the garages the following morning. At this point the weather was holding dry, we set up tents, pulled the awning out from the side of the van, opened a beer and sat around talking for the evening.
Morning broke and it was still dry but overcast. Dry tyres fitted in the garage ready to scrub them in on sighting laps. At this point the car had done may 10-15 miles on the road, but hardly a proper test for the car that had been completely rebuilt.

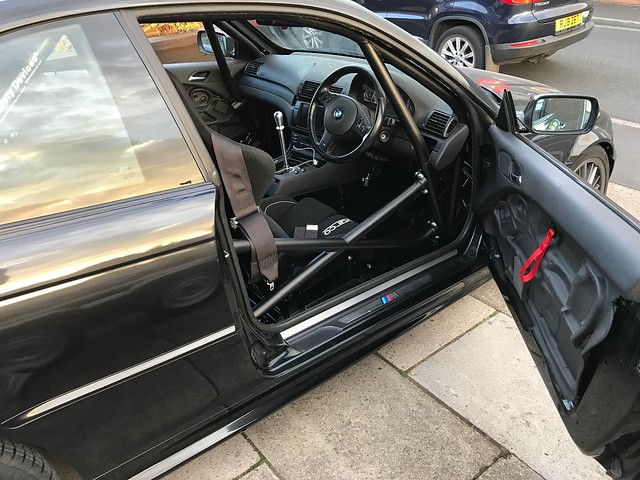
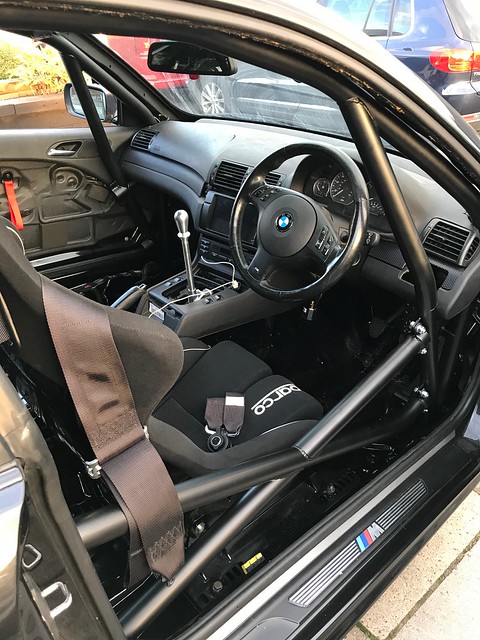
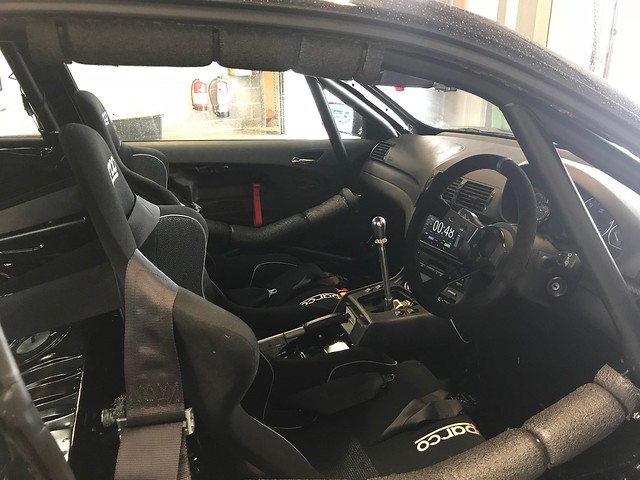
Photo of the finished interior, roll cage padding added to the cage, along the door bars and around the heads of the passenger and driver Even though all the radio wiring was removed I've kept the centre console with a tablet fitted to the centre console of the dash controlling Go Pro and also running Harry's Lap Timer. In the past I have run this set up with OBD logging but due to the limitations of the MS43 ECU it can only log at 1-0.25hz at this moment in time.
Videos
So the morning session started on the International Circuit which is a longer circuit with two straights out of fairly slow corners. It was nice and dry at this point, perfect to get to grips with the car.
Link to Video for dry Anglesey Laps
Made a few changes to the set up of the car, made the rear a little softer, lowered the rear ride height down by 15mm on the rear and spent as much time out there lapping and getting used to the car in the dry conditions.
The afternoon session was wet, very wet. Weirdly these are the conditions that I wanted in the afternoon to be able to learn to drive the E46. I would have felt short changed if it had been dry all day. After all I bought this car to learn more and challenge myself.
Here's a video of a smooth lap from the afternoon session, one of the faster laps.
Link to Video of Wet Lap
In the afternoon the track started to get damper and damper, normally in the past I'd just straight to wet tyres for the most grip but decided to go out in the wet on the RSR's to get a better feel for the car and driving RWD in wet conditions. After doing that for a session I flipped over to the Rainsports and set off again learning the car.
Some good bits from all of the sessions of the day. Yes I was trying to provoke the car and play with the limits of grip at times. Pointless staying in control of the car all the time. The only way to learn how to drive RWD is to slide it, spin it and develop the feel for the car.
Blooper Reel and fun bits.
Overall... From a driving perspective one of the best track days I've had. Made all the hard work and late nights over the past 8 weeks totally worth it. The car feels and sounds amazing on track and in my opinion looks the part too! Everyone's been asking me how it compares to the Clio. The Clio was so fun to drive and so chuckable on track and was great for 2.5 years. However this car is such a thrill, really does make you a little bit nervous. I've never concentrated as much on track as I did on Thursday but it is so rewarding to drive and the feel of the car is totally different.
All Loaded up on the Thursday evening we set off down to Anglesey ready to camp over the night before. BBQ's packed, enough food to feed an army from the Tesco at Bangor and we were set for two nights camping at the Circuit.
Unloaded from the trailer ready to drive into the garages the following morning. At this point the weather was holding dry, we set up tents, pulled the awning out from the side of the van, opened a beer and sat around talking for the evening.
Morning broke and it was still dry but overcast. Dry tyres fitted in the garage ready to scrub them in on sighting laps. At this point the car had done may 10-15 miles on the road, but hardly a proper test for the car that had been completely rebuilt.
Photo of the finished interior, roll cage padding added to the cage, along the door bars and around the heads of the passenger and driver Even though all the radio wiring was removed I've kept the centre console with a tablet fitted to the centre console of the dash controlling Go Pro and also running Harry's Lap Timer. In the past I have run this set up with OBD logging but due to the limitations of the MS43 ECU it can only log at 1-0.25hz at this moment in time.
Videos
So the morning session started on the International Circuit which is a longer circuit with two straights out of fairly slow corners. It was nice and dry at this point, perfect to get to grips with the car.
Link to Video for dry Anglesey Laps
Made a few changes to the set up of the car, made the rear a little softer, lowered the rear ride height down by 15mm on the rear and spent as much time out there lapping and getting used to the car in the dry conditions.
The afternoon session was wet, very wet. Weirdly these are the conditions that I wanted in the afternoon to be able to learn to drive the E46. I would have felt short changed if it had been dry all day. After all I bought this car to learn more and challenge myself.
Here's a video of a smooth lap from the afternoon session, one of the faster laps.
Link to Video of Wet Lap
In the afternoon the track started to get damper and damper, normally in the past I'd just straight to wet tyres for the most grip but decided to go out in the wet on the RSR's to get a better feel for the car and driving RWD in wet conditions. After doing that for a session I flipped over to the Rainsports and set off again learning the car.
Some good bits from all of the sessions of the day. Yes I was trying to provoke the car and play with the limits of grip at times. Pointless staying in control of the car all the time. The only way to learn how to drive RWD is to slide it, spin it and develop the feel for the car.
Blooper Reel and fun bits.
Overall... From a driving perspective one of the best track days I've had. Made all the hard work and late nights over the past 8 weeks totally worth it. The car feels and sounds amazing on track and in my opinion looks the part too! Everyone's been asking me how it compares to the Clio. The Clio was so fun to drive and so chuckable on track and was great for 2.5 years. However this car is such a thrill, really does make you a little bit nervous. I've never concentrated as much on track as I did on Thursday but it is so rewarding to drive and the feel of the car is totally different.
Montyjsr said:
Fantastic right up, really enjoyed reading this!
Hugely impressed at your skill and dedication to the car. Love the idea to powder coat everything underneath in a bright colour, keeps the purpose nicely hidden. What’s your plans for the car from here?
Future plans are to get some lighter weight wheels and fit a diff over winter... Still a couple of updates to follow to get up to how the car stands right now...Hugely impressed at your skill and dedication to the car. Love the idea to powder coat everything underneath in a bright colour, keeps the purpose nicely hidden. What’s your plans for the car from here?
Photos from the first track day...

Between Track Days
So since the first track day I didn't really touch the car for a few months. I'd worked so hard on it in the 8 weeks leading up to the track day mostly 12 hour weekends and then another 6 hours on it after work most evenings it was really rewarding to drive it on track but needed a little break away from it.
Aside from building my own car this year I've been helping two friends with racing this year in both Road Sports and Club Enduro with 750MC
So far this year we've had a lot of bad luck with the likes of a blown engine from fuel starvation, been crashed into under yellow flags at Rockingham, Gearbox shatting it's self at Cadwell and a number of smaller problems along the way meaning the car has only finished one race this season and only completed on average 35 mins on track each race.
With a freshly built gearbox with around £1400 worth of new parts the team raced at Anglesey in the Club Enduro which is a 3 hour race with two driver swaps and fueling each time too.
All the updates and write up's are online from the race but we were really happy to have completed the 3 hour race and also finish 4th in Class! Fantastic weekends away racing!
The rest of the racing season consisted of Road sports and Club enduro at Snetterton followed by= by the 12 hour Mission Motorsport Race of Remembrance at Anglesey in November.
The Final Race
Race of Remembrance was the last race of the year for us. It consists of a 12 hours endurance race through the day and night, split into two 6 hours sessions combined together to make 12 hours of track time. This was pushing what we had learnt this year as a time to unprecedented levels. Over this 12 hour period we were expecting to refuel the car between every 45-60 minutes, swapping drivers and tyres when required. Little did we know how challenging the race would actually be on the car and the team
During the race we had to take on a range of major fixes to the car which included removing the gearbox to replace a broken clutch 3 laps into the race, replacing sections of the wiring loom to fix broken wires due to fatigue, chasing fueling faults which ended up being caused by a slowly occurring blockage to the fuel pressure regulator and then finally limping the car across the line at the end after snapping a drive shaft clean off in the diff 20 minutes from the end of the race. We were able to remove the damage shaft and limp it across the line only running one shaft. There will be more updates to come on this on Facebook.
Amazing experience to be part of for the full weekends with a large marquee set up at the Anglesey Circuit for the weekend. Racing in both the day and night was an amazing experience.
Back to the BMW
Bit of maintenance before the next track day continues.
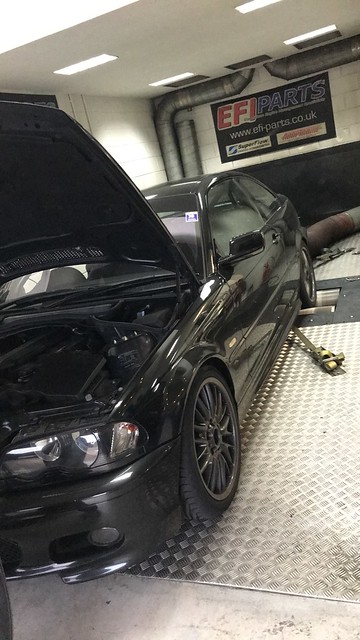
Put plates on the car and drove it over to EFI Tuning just to run it on the Dyno and log the AFR's to see how the car was running with the new manifold, exhaust and engine work and also to see what power it makes.
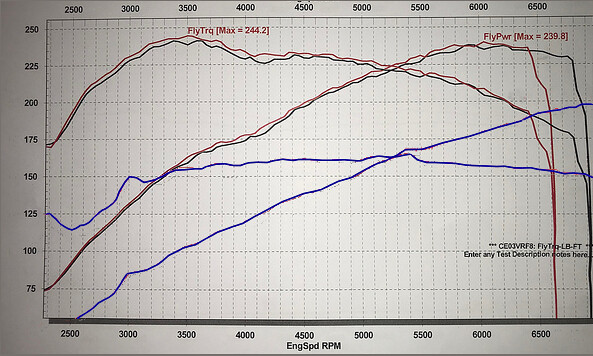
Ran on the Dyno 238bhp and 245ftlbs, changed to a slightly different map that had slightly safer fueling, happy with those results, wasn't really chasing power gains just interested in the safety of the map and how it was running.
Interesting to see that the cars power stops increasing at 6200rpm and holds it nicely to around 6500RPM much higher though than with the standard exhaust manifolds which started to tail off around 5500. So no need to start chasing a higher rev limiter as there's no extra power to be made. I have however left the limiter set at 6800 which gives a little more room on some tracks to rev it a little bit higher if needed instead of shifting up for a split second vs bouncing the limiter. Handy with the shorter FD Diff fitted.

Great torque curve additional 40bhp and 85ftlbs of torque over the Clio.
Blue line shows the Clio Power and Torque 201bhp and 160ftlb
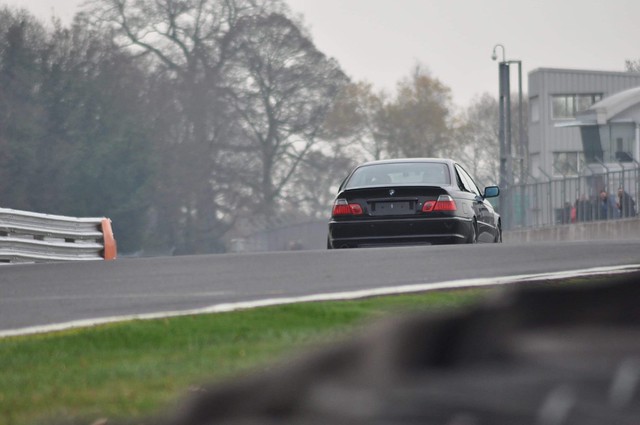
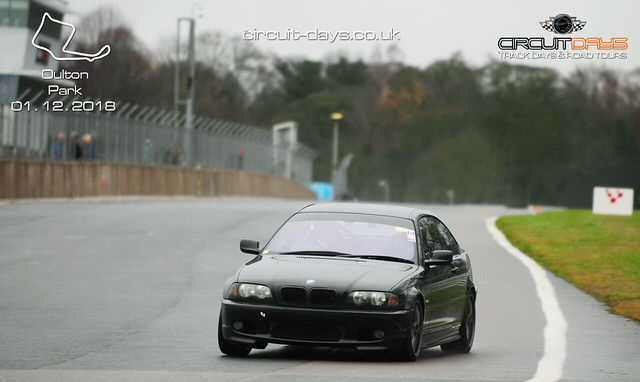
Oulton Park Round 1
The week before the track day I pulled the car out and took it for a test drive, checking basics over on the car, I still have the luxury of having the car on the road, taxed, MOT'd and insured to am able to test it.
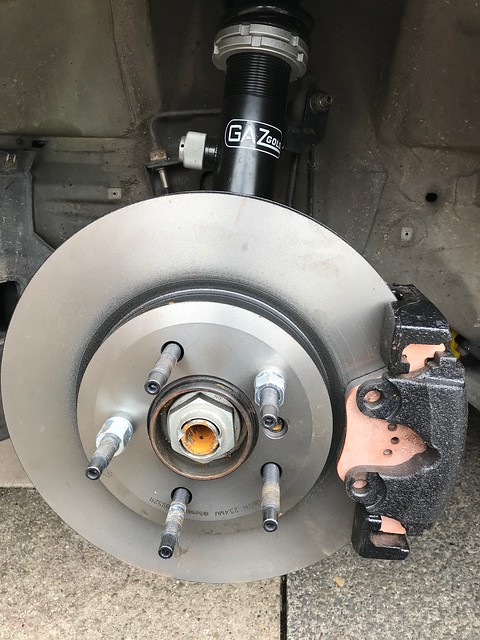
First thing I noticed was the grumbling front wheel bearings so ordered them the weekend before the track day and swapped them over, fresh front hubs fitted to the front and the studs transferred over.
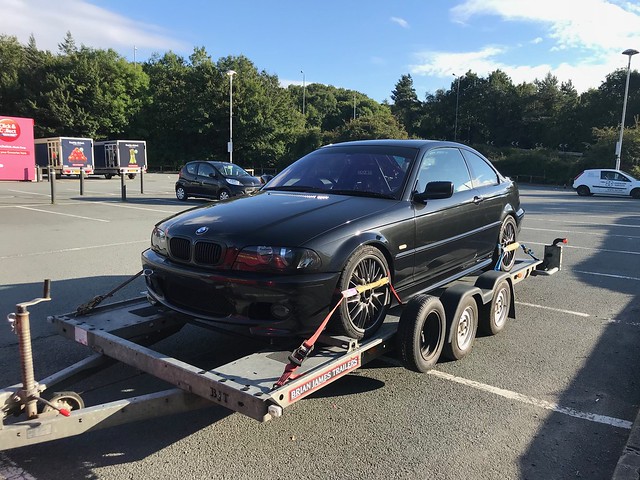
Other than that the car felt perfect. It was loaded up onto the trailer ready to take it down the Oulton Park.

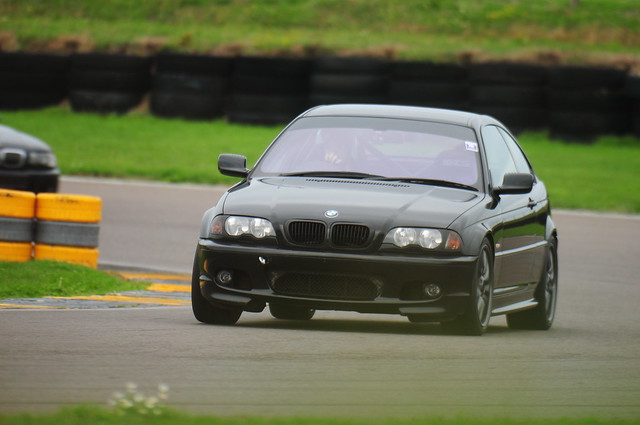
As usual we're/I'm the first person to turn up at the Circuit on a track day, normally also the last to leave after running the car right to the end of the last session of the day. Turning up to the circuit in the middle of November and the track being dry first thing in the morning was an unusual feeling. Fitting the dry tyres onto the car for sighting laps felt a little odd too but the conditions for the day were prime with warm weather and patchy skies.
The car was faultless again all day at Oulton. I'm still getting used to driving the BMW as this is only the second day out on track that I've driven it, also the first time at Oulton in this car having lapped it many times before in the Clio
During the first few sessions I took it really easy just driving around in some clear track getting used to the car again and the lines, weird to see a few Clios over taking me in the first few sessions as the car is a totally different machine to drive.
As the day progressed the lap times started to fall, by dinner time I had managed to get the lap times down lower than my fastest ever lap I managed at Oulton in the 2.5 years of owning the car. The BMW has so much more grip in the corners and the the way it's able to push it's self out of corners with the drive from the rear is incredible, combine that with 245ftlb of torque across most of the rev range it's a much quicker car with the potential to go a lot faster if I'm willing to push it!

The problem
With the track day only expected to run till about 4pm I had an amazing 30 minute session that ended at around 3:30, just before the fuel light came on I dove into the pits to call the day a success. Jumping out the car I pulled the laptop out and the SD card from the front facing camera which had been running connected to my phone call day via bluetooth. Only to find 30GB of photos from the sessions throughout the day!
Knowing I only had 30 minutes left and zero video footage from the track day. I quickly grabbed another SD card from the van, friends of mine grabbed 20L of fuel and threw that in the car, picking up a good friend as a passenger we set off to make the most of the final 30 minutes of day light left before the chequered flag. This turned out to be one of the best sessions of the day with hardly any cars on track and went on to be the fastest laps of the day. I'd managed to at least get 30 minutes of video footage from the BMW's first time out at Oulton.
I've used a little bit of that video footage to make a Clio 200 vs BMW E46 comparison video. This is the most common question I get at the moment is how do they compare? You can see for yourself.
Both of these are good clear laps around Oulton. Bearing mind I had 2.5 years of seat time in the Clio compared with 2 days on track so far in the BMW.
Click here for the link to the comparison video

Finally.
Click here for the link to a few bit of footage from the last session
Ready for Oulton Park Round 2...
Edited by tombate911 on Saturday 8th December 23:41
davepoth said:
Awesome build. The only thing I'm a bit surprised about is the oil pressure warning; The 5 PSI warning light on my car is known as the "the engine has exploded" light. If you can, I'd set it at 20 PSI which is more like the "switch off the engine now if you don't want it to explode" that you are probably looking for. 
if I'm honest it probably set closer to 10-12PSI, thinking back now, I tried to have look through all the photos from when I programmed the gauge. When I was at Anglesey on the first track day I looked at what oil pressure the car makes at idle with oil temps hot around 100 degrees which was just below 20PSI IIRC. Which is normal for these engines and set the pressure warning just below this. All this was set up after seeing a friend of mine lose a oil pump nut at Cadwell back in 2017 and end up doing half a lap of the circuit with zero oil pressure, learning from other peoples mistakes I've rebuilt the pump and set the warnings in the gauge.1st December
So will the car being so flawless over the last two track days I had a chance to go back to Oulton Park the following weekend. A friend of mine was taking his freshly built 182 down there for testing so it was a no brainer. Once I know the car had survived the track day. The following week the car was booked in. I left everything packed in the car and the van ready to go again the following weekend...
The night before the track day I gave the car a once over, quick bleed of the brakes just to make sure, swapped to wet tyres ready for the wet weather that was forecast. The conditions were completely the opposite to the previous weekend. Very wet track, lots of spray and as everyone knows Oulton is a very greasy place in the winter months. Turned the coil overs back 4 clicks on the front and 6 on the rear.
The car ran a dream throughout the day, with only one little off through Hislops on next to no throttle at all. Video doesn't show a reason for it either.
The track dried out as the day went on, there were a few forum members booked on to so it was good to have a good chat with friends between sessions.
Managed to get the dry tyres on for 2 hours at the end of the day just as about 50% of the circuit was showing a dry line except from the last couple of corners. Learnt so much over the past 3 track days in this car. Brings it a lot more attention and really proved it's self in the wet conditions at Oulton. Only passed by a total of 3 cars on circuit all day.
After 3 track days I'm at the point now where I'm going to take some time over winter to check the car over, make some improvements and iron out a couple of flaws. Only managing to put in 3/4 laps before the oil temps are reading 120 degrees, so must get around to finishing the oil cooler install, got a strange vibration through the whole car too which I just drove through over the afternoon sessions, found some play in the front left wheel bearing which was replaced 2 track days ago, something to investigate.
Finally, I learnt my lesson from the previous weekend and double checked the camera was in the right settings.
Put together a couple of Youtube videos....
Few laps from the last sessions before the chequered flag.
Video Link to a few laps from the last sessions before the chequered flag.
Video link to Interesting moments and Highlights
This now brings this thread up to date. Following on from this second date I have a few things I want to get worked out on the car. I have a vibration through the steering wheel and the whole chassis under braking which I have diagnosed at the moment as being a faulty wheel bearing. These were replaced just after Anglesey before the first Oulton date so ordered a replacement for that and will see if it cures it.
Will save the rest for the new update in the coming week.
Sf_Manta said:
Interesting to see how the S50 manifold's given you higher torque but lower peak power. Are you still running the stock cams?
Also great to see another 330i being saved, they really are underrated but quite capable cars.
Yes still running Stock Cams for the moment. I know some people have used stock cams to be able to get to 260's BHP with throttle bodies and stand alone. Also great to see another 330i being saved, they really are underrated but quite capable cars.
Interesting over stock it makes 25ftlb more torque and 10bhp. That's still running the standard map so purely breathing mods from the manifolds and exhaust. With so much compensation in the ECU and the fueling being spot on I don't think it's worth having the the standard ECU mapper for the time being.
Nunga said:
I really enjoyed the write-up, so thanks for going to the trouble. I’ll hahe a look at your Clip story, too.
Who did your cage? I’m impressed you did everything else; your fabrication and machining skills put my rudimentary efforts into maintaining my M3 to shame.
I suppose your reasoning for the 330ci comes down to a competitive purchase price and affordable/plentiful parts, compared to say the E46 M3? I imagine it’s probably only losing a couple of seconds over the course of a lap depending on the track, despite being some 100HP down. You’re a handy steer by the looks of it.
Looking forward to hearing more about this!!!
I did all the prep work with the cage and tack welded it in with a friends help, There is a guy that my friends have used who came down to my house and finished the welding of the cage off on the drive too. Really good job done with the benefit of not having the move the car anywhere.Who did your cage? I’m impressed you did everything else; your fabrication and machining skills put my rudimentary efforts into maintaining my M3 to shame.
I suppose your reasoning for the 330ci comes down to a competitive purchase price and affordable/plentiful parts, compared to say the E46 M3? I imagine it’s probably only losing a couple of seconds over the course of a lap depending on the track, despite being some 100HP down. You’re a handy steer by the looks of it.
Looking forward to hearing more about this!!!
The choice of the 330i was the initial outlay for this car was £2400 and the running costs are considerably lower and the overall build cost for the car is considerably lower as a knock on effect.
Interestingly if you compare the lap times from the M3 Challenge cars and the 330 Challenge car around Oulton Park the M3's are doing 1:52 and the 330's are doing 1:59 so actually according to those race times there's 7 seconds in it a lap. What you have got to take into consideration there though is the 330 challenge cars are limited to standard brakes a 225 tyres all around and standard engines where the M3's are able to run more modified cars within their regulations. Will be interesting to see how fast this can go over the new couple of years of modifications and driver improvement!
Thanks for all the comments guys, this thread appears to have been really well received so far. Much more than I had initially thought.
When I first got into car and vans a few years ago I didn't really know a lot about them, only the basics. Only thought starting to push the boundaries of what I knew and taking on new projects and challenges did I learn more and more about cars. I only know a tiny amount compared with some of the guys I've built cars with over the past few years. That was also another big reason for me moving from the Clio to the BMW was the mechanical challenge of taking a standard BMW from the early 2000's and making it fit for track rather than driving something that was really well set up out of the box as the clio is.
It really has made me realise how much work went building the E46 in such a short period of time writing this whole build thread from scratch over the weekend, with doing that I have now written a spec list which shows all the parts in detail that have been changed.
Engine
BMW E46 M54 – 240BHP 245FTLB Ran @ EFI
Custom M54 > S50 Exhaust adaptor plates
S50B32 Exhaust manifold
2.5” Custom Stainless Exhaust
Vac Motorsport M54 Oil Pump Kit
ARP Rod Bolts
New Rod bearings
New sump gasket
S54 Oil Filter housing with AN10 oil take off for cooler
AN10 lines with 19 Row Oil Cooler
Thermostat delete
New Cam Chain tensioner
Redline Shock Proof Gear oil in the Gearbox
Titan |Syn MC 10W40 Engine Oil
Poly bush Engine and Gearbox mounts
New Copper and Braided Clutch line
Single Mass Flywheel and Clutch.
3.38 Shorter FD Rear Diff
Suspension/brakes
All running gear front and back powder coated red
Full BMW E46 strong flex 90ShA
Gaz Gold adjustable Dampers 750F/400R Linear springs
Gaz Gold adjustable Front top mounts
BMW Strengthening Plates for the strut tops
Gaz Gold Solid Rear top mounts.
Carbon Loraine RC5+ Brake pads F+R
Custom Brass Bushes/Sliders
ATE TPY200 Brake Fluid
Hel Braided lines front a rear
New copper lines from engine bay to fuel tank
New pair of handbrake cables
Solid Aluminium Steering Bush
2 sets of BMW MV1’s Powdercoated Anthracite
Federal RSR & Uniroyal Rainsports Fronts -225/40/18 Rear- 255/35/18
Front and Rear wheel bearings replaced
Track rods and rod ends replaced
Upper and lower ball joints replaced in the rear arms
Rear subframe plated and painted.
Interior
Safety devices 330 Challenge Cage – 16 Point weld in cage with rear strut brace
Sparco EVO LF
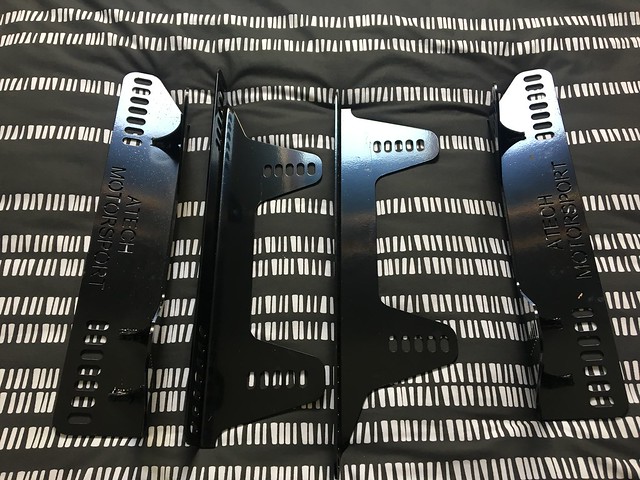
BMW E46 A-Tech Motorsport side mounts
L-TEC 6 Point harnesses
RTD Race 360mm
RTD Dual Shear Selector Rod Linkage
Innovate Oil Pressure and Temp Sensors and Gauges
OMP Steering wheel and boss
Geometry
Front Camber – 3 degrees
Front Toe – 0 degrees
Rear Camber – 2. degress
Rear Toe – 0.14” Total toe in
When I first got into car and vans a few years ago I didn't really know a lot about them, only the basics. Only thought starting to push the boundaries of what I knew and taking on new projects and challenges did I learn more and more about cars. I only know a tiny amount compared with some of the guys I've built cars with over the past few years. That was also another big reason for me moving from the Clio to the BMW was the mechanical challenge of taking a standard BMW from the early 2000's and making it fit for track rather than driving something that was really well set up out of the box as the clio is.
It really has made me realise how much work went building the E46 in such a short period of time writing this whole build thread from scratch over the weekend, with doing that I have now written a spec list which shows all the parts in detail that have been changed.
Engine
BMW E46 M54 – 240BHP 245FTLB Ran @ EFI
Custom M54 > S50 Exhaust adaptor plates
S50B32 Exhaust manifold
2.5” Custom Stainless Exhaust
Vac Motorsport M54 Oil Pump Kit
ARP Rod Bolts
New Rod bearings
New sump gasket
S54 Oil Filter housing with AN10 oil take off for cooler
AN10 lines with 19 Row Oil Cooler
Thermostat delete
New Cam Chain tensioner
Redline Shock Proof Gear oil in the Gearbox
Titan |Syn MC 10W40 Engine Oil
Poly bush Engine and Gearbox mounts
New Copper and Braided Clutch line
Single Mass Flywheel and Clutch.
3.38 Shorter FD Rear Diff
Suspension/brakes
All running gear front and back powder coated red
Full BMW E46 strong flex 90ShA
Gaz Gold adjustable Dampers 750F/400R Linear springs
Gaz Gold adjustable Front top mounts
BMW Strengthening Plates for the strut tops
Gaz Gold Solid Rear top mounts.
Carbon Loraine RC5+ Brake pads F+R
Custom Brass Bushes/Sliders
ATE TPY200 Brake Fluid
Hel Braided lines front a rear
New copper lines from engine bay to fuel tank
New pair of handbrake cables
Solid Aluminium Steering Bush
2 sets of BMW MV1’s Powdercoated Anthracite
Federal RSR & Uniroyal Rainsports Fronts -225/40/18 Rear- 255/35/18
Front and Rear wheel bearings replaced
Track rods and rod ends replaced
Upper and lower ball joints replaced in the rear arms
Rear subframe plated and painted.
Interior
Safety devices 330 Challenge Cage – 16 Point weld in cage with rear strut brace
Sparco EVO LF
BMW E46 A-Tech Motorsport side mounts
L-TEC 6 Point harnesses
RTD Race 360mm
RTD Dual Shear Selector Rod Linkage
Innovate Oil Pressure and Temp Sensors and Gauges
OMP Steering wheel and boss
Geometry
Front Camber – 3 degrees
Front Toe – 0 degrees
Rear Camber – 2. degress
Rear Toe – 0.14” Total toe in
So with the build up to the Christmas period and the darkest of nights after work I've only been doing an hour or so here and there on the car. I don't plan on running the car out on track until about the beginning of March so not in the major rush to get a few little jobs done.
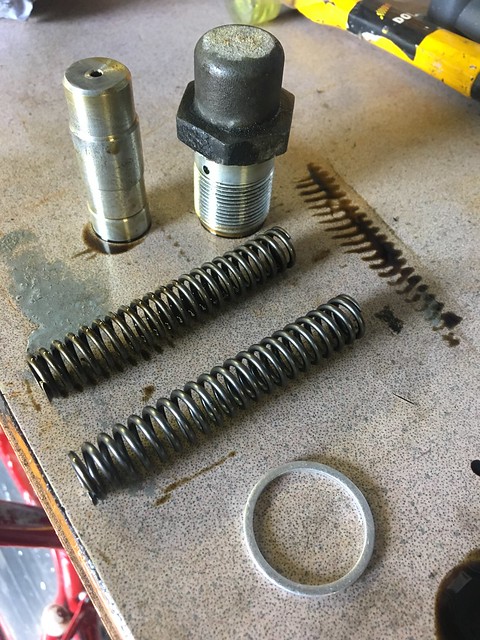
With the wet weather I've spent a little bit of time in the workshop working on making a few little parts for myself and friends. I like problem solving as well as making things from scratch especially when I can't buy something to do what I want off the shelf.
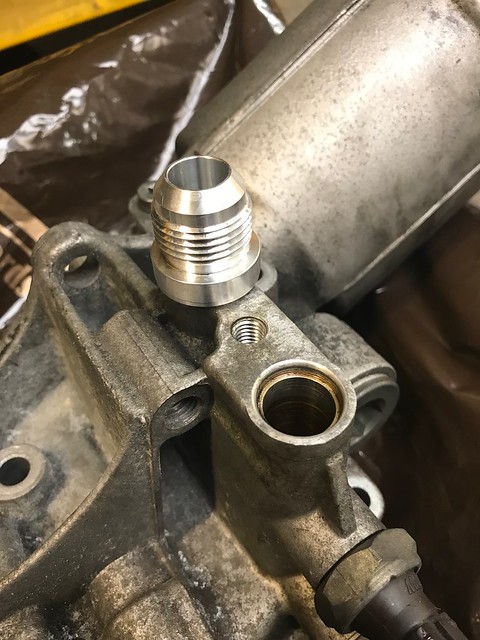
At the moment I am moving to a S54 Oil Filter housing to run an oil cooler, however with the filter housing only having two M12 take offs compared with the M54 housing which had 3 I've had to look at alternative locations for sensors. (ECU Temp & Vanos take off are already joined in a stainless adaptor with the Innovate Pressure going straight into the housing)
ECU Oil Temp
Innovate Gauge Temp
Innovate Gauge Pressure
Vanos take off
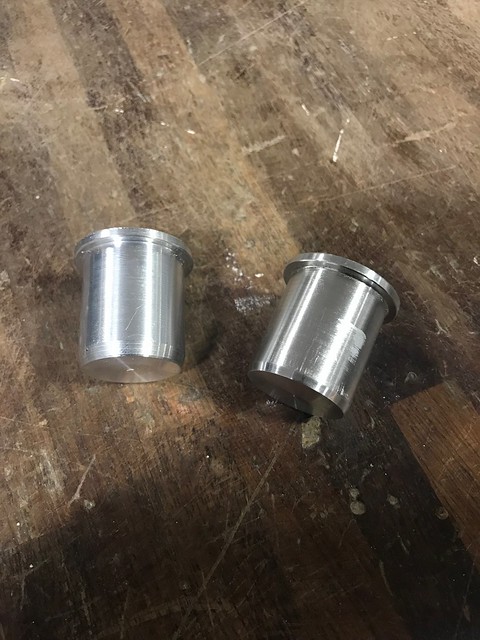
Because of the length of the probe below the thread (~20mm) on the Innovate Temp Sensor I have decided to move it into the oil cooler line pre cooler and make an inline housing for it.
Few minutes on CAD- AN10 on either end with flat on the top which will have an NPT or M12 Weld on fitting. This will give enough length to space the sensor up enough ensure the end of the Temp Sensor is just in the flow of oil without bottoming out on the other side. I've kept the ID of the whole fitting to be the same as the inside of the AN10 lines so now to reduce flow after going to the effort of blanking of the themostat, see below.

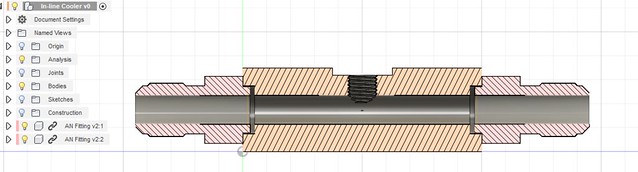

Finished product all welded together. Turned and bored on the lathe with a flat milled onto the top for the weld on fitting.
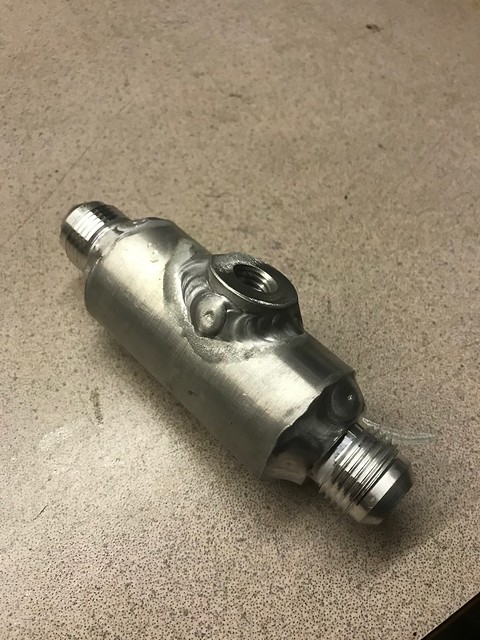
AN10 weld on fittings turned to the correct diameter of the S54 housing...
AN10 fittings all welded into place

Oil Thermostat blank turned on a lathe from Aluminium
Fitted into place with the standard snap ring

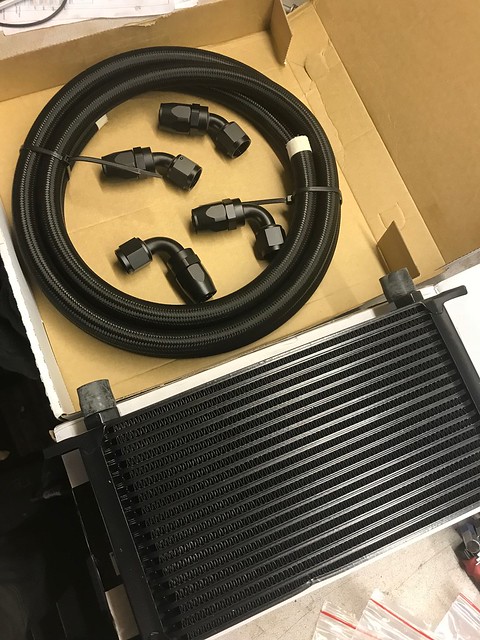
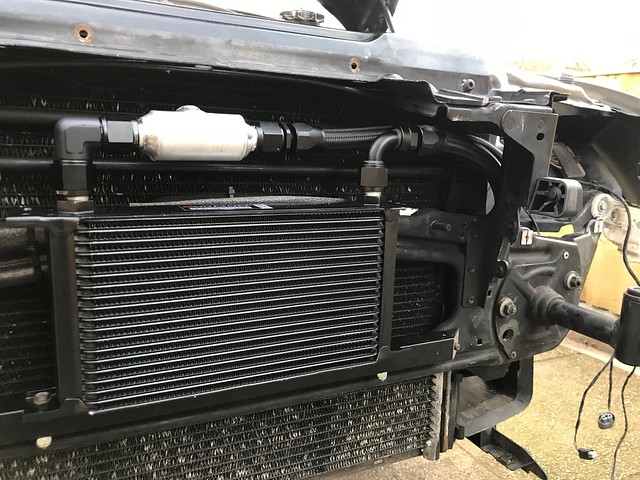
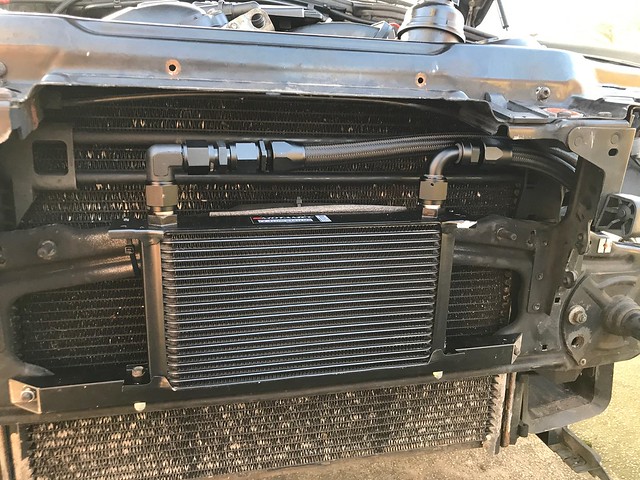
So with the oil temps hitting 120' within 3 hardish laps at Oulton Park with am ambient temp of 10 degrees the cooling side of things needed something substantial to keep the temps under control. Knowing someone with pretty much exactly the same set up as this I've opted for a 19 row cooler and AN10 lines.
Front end of the car removed ready to fit everything into position
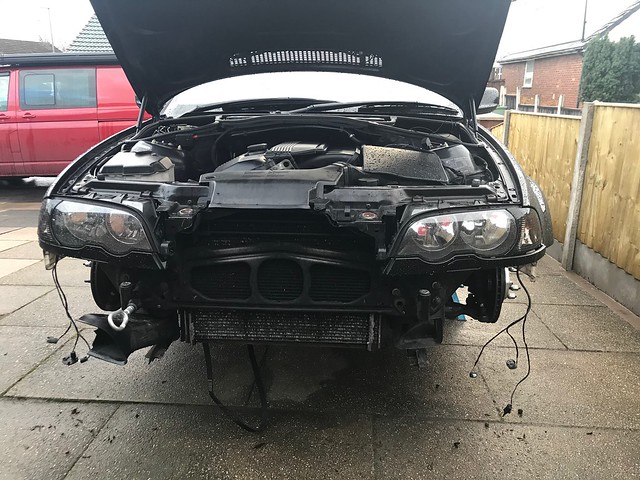
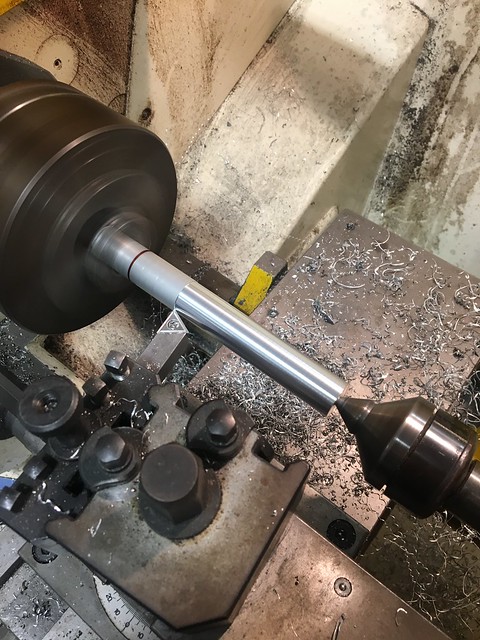
With the S54 filter housing being pretty much a bolt on solution to the M54 head the only major problem is that the offset on the power steering pump is different by 15mm. While I was at it I've made up some 15mm x 20mm OD spacers to bring the pump into the correct alignment. While I was at it I've also made some steering column spacers for my friends E36 steering column he's making.
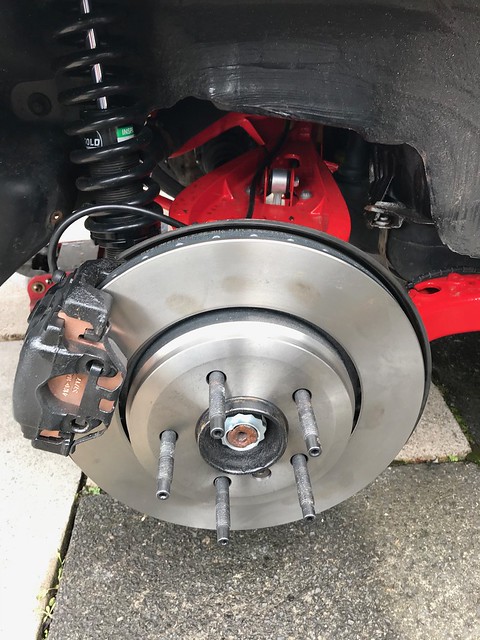
Finally one of the last jobs I got around to doing before Christmas was replacing the front left wheel bearing. This was replaced 1.5 track days ago but on the last day at Oulton I was suffering with judder under braking, the only thing I can find at the moment is noticeable play in the front left wheel bearing so that has been replaced and the old one send back under warranty. Will only be able to test it though when everything is put back together.

With the wet weather I've spent a little bit of time in the workshop working on making a few little parts for myself and friends. I like problem solving as well as making things from scratch especially when I can't buy something to do what I want off the shelf.
At the moment I am moving to a S54 Oil Filter housing to run an oil cooler, however with the filter housing only having two M12 take offs compared with the M54 housing which had 3 I've had to look at alternative locations for sensors. (ECU Temp & Vanos take off are already joined in a stainless adaptor with the Innovate Pressure going straight into the housing)
ECU Oil Temp
Innovate Gauge Temp
Innovate Gauge Pressure
Vanos take off
Because of the length of the probe below the thread (~20mm) on the Innovate Temp Sensor I have decided to move it into the oil cooler line pre cooler and make an inline housing for it.
Few minutes on CAD- AN10 on either end with flat on the top which will have an NPT or M12 Weld on fitting. This will give enough length to space the sensor up enough ensure the end of the Temp Sensor is just in the flow of oil without bottoming out on the other side. I've kept the ID of the whole fitting to be the same as the inside of the AN10 lines so now to reduce flow after going to the effort of blanking of the themostat, see below.
Finished product all welded together. Turned and bored on the lathe with a flat milled onto the top for the weld on fitting.
AN10 weld on fittings turned to the correct diameter of the S54 housing...
AN10 fittings all welded into place
Oil Thermostat blank turned on a lathe from Aluminium
Fitted into place with the standard snap ring
So with the oil temps hitting 120' within 3 hardish laps at Oulton Park with am ambient temp of 10 degrees the cooling side of things needed something substantial to keep the temps under control. Knowing someone with pretty much exactly the same set up as this I've opted for a 19 row cooler and AN10 lines.
Front end of the car removed ready to fit everything into position
With the S54 filter housing being pretty much a bolt on solution to the M54 head the only major problem is that the offset on the power steering pump is different by 15mm. While I was at it I've made up some 15mm x 20mm OD spacers to bring the pump into the correct alignment. While I was at it I've also made some steering column spacers for my friends E36 steering column he's making.
Finally one of the last jobs I got around to doing before Christmas was replacing the front left wheel bearing. This was replaced 1.5 track days ago but on the last day at Oulton I was suffering with judder under braking, the only thing I can find at the moment is noticeable play in the front left wheel bearing so that has been replaced and the old one send back under warranty. Will only be able to test it though when everything is put back together.
G600 said:
That was a good read and a nice set-up, I don't suppose you can remember the measurements for the brake bushes? I've got a Z4 with 330 brakes and access to a lathe so I've been meaning to make a set.
I've got the initial prototype I made knocking around in the garage so will measure that one tomorrow. Did a little more on the car today.
Finished making the lines to the correct length to run through to the cooler

Cooler mounted into position at the bottom to a solid piece of box section to support the weight of the cooler, You can see the inline temp sensor block mounted above the cooler in the feed line
Note - Still need to bend some steel to make the top cooler brackets to the two studs to the side, job for tomorrow.
However as always trying to make everything as reliable as possible I've made the line long enough to able to remove the inline temp sensor and run an AN10 in line fitting should anything ever happen on a track day which requires it to be removed. I can only see this happening if the sensor was broken off and unable to plug the hole in the line. I thought of it when i was making it so easily added a solution to the spares box.
Mounted the power steering pump back to the housing. Had to drill out the threads on the pump to be able to bolt it to the S54 filter housing and used the 15mm spacers I machined for the job.
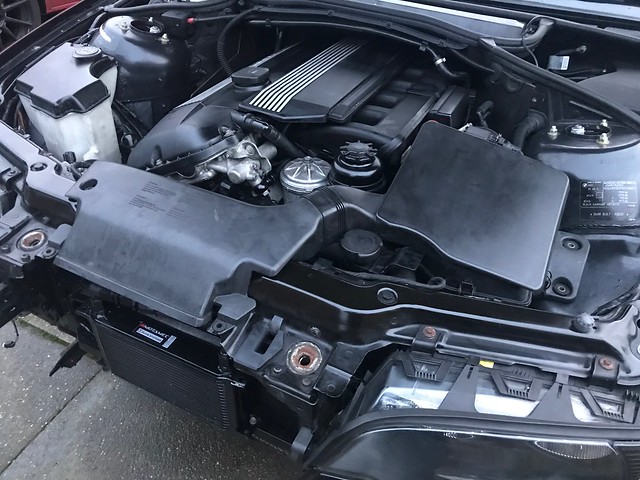
Modified the back of the headlight slightly to get more clearance on the oil lines where they run through and bolted the front end back together. Will run the car tomorrow and check all the fittings for leaks.
Also replaced the oil in their after the 3 track days, obviously needed to add more oil to take into consideration the extra volume in the lines and the cooler now so perfect time to do an oil change.
330ti said:
Nice build. Any thoughts of fitting a LSD ? I run a 325ti on track with 330 engine. It has good grip but feel a LSD would help it on tighter corners. You've also got me paranoid about oil temp. now ! I do 30-40 min stints on track with no apparent problems but have no oil temp gauge. If I use hidden dash functions coolant temp actually drops several degrees on track compared to on road. I know this might have little to do with oil temp. Keep up the good work and I'd be interested in your thoughts regarding a LSD ????
Well it's funny you should bring this up... When you get a minute look at the bottom of this update....Regarding oil temp I'd seriously get an oil temp gauge in there as soon as possible. My coolent temp doesn't get that high to be honest but the oil temp rockets to the point withing 3 hard laps it's hitting 120 degrees. The car doesn't show any sign of it other than the fact the alarm on the temp gauge is flashing away. Will be interesting to see how the 19 Row brings to oil temps down. hopefully to high 90's-100 degrees consistently would be great so I can go back to doing 30-40 minutes stints on track without worrying about temps or having to do cool down laps for the oil.
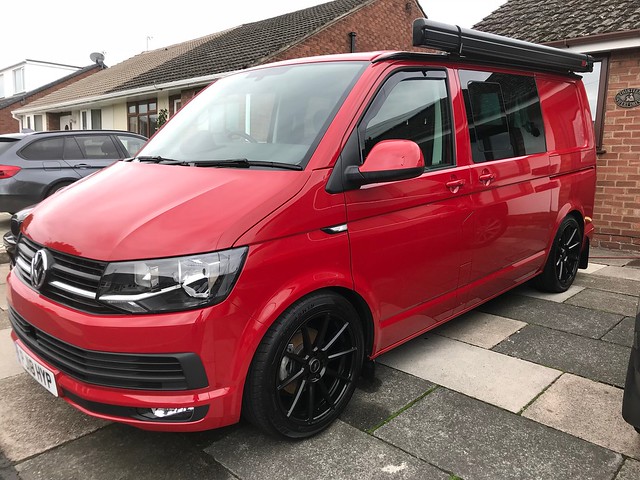
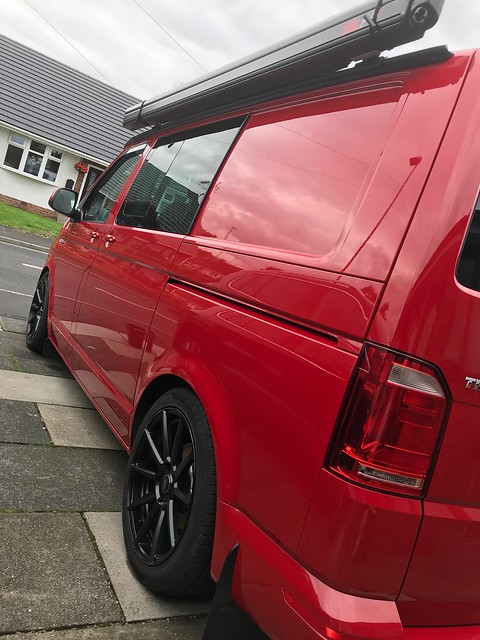
With a little bit of spare time on my hands today I decided to give my other project a good wash after doing a few thousand miles since it was last detailed and waxed/protected for winter, just about to hit 6000 miles on this now since I bought it and converted it
I may come back and add more information and photos about this if it's of interest to anyone..
Back to the progress on the BMW... Once the car was cleaned I popped out to the garage to start to strip down a spare 3.38 FD Medium case diff I had knocking around from when the car was built back in the summer. Standard ratio is 2.9 which is longggg, 3.38 feels great on track at the moment so going to build an LSD into that casing. I had already done half a job earlier in the year cleaning up the casing and painting it silver as a temporary measure

Just as I was draining the oil from the diff casing the pulling out the old seals I got a message that my new diff had arrived, quickly packed up what I was doing and popped to pick it up from a friends unit.

Now It's taken me a lot of debating with myself and writing down fores and against regarding going to a Quaife. In the past In the clio I had a Gripper with a shorter final drive and that was fantastic, I also got to compare it against a very similar set up car which had a Quaife in it so have managed to compare the styles of diff against each other all be it in different platforms. FWD rather than RWD.
I have friends running Kaaz in E36 which have been great but when looking into it is seemed more work to get one to fit into the E46 diff casings to work with the FD I wanted to use, one person at Kaaz said they did one that worked, another said they didn't and only did them for E36 casing. In the end I started looking at other plated diffs. Gripper prices where extortionate compared with the price I was able to get a Quaife for. M Factory was another option but I'm not overly big on the idea of their diff's due to the quality and they're not exactly cheaper either! One of the final points for making this decision was that fact that from my own experience with plated diffs as well as friends in BMW's, plated diffs require a pump and cooler set up to be able to manage the oil temps inside the diffs. Because of the gear designed of the Quaife I wouldn't expect that I would need to run any sort of cooling because there isn't the heat generated compared with the plated diffs. I may however put a sensor into the diff casing and log the temps anyway to see what they get to on track. Overall I know the Quaife isn't as good as plated diffs in some situations on track but I decided it's very uncommon for me to be lifting a driving wheel on track and the Quaife set up worked out roughly £1k cheaper than going down the plated diff route by the time I had factored in the cooling required to do it properly. If it need to change in the future I can see this diff on built and build a plated diff into another 3.38 diff I have. Finally the Quaife is what was mandatory on the 330 Challenge cars, but they had to use the 2.9 FD so we'll see how it goes. Obviously leaps ahead of the open diff as we know.
I've booked onto Oulton Park for the 2nd of March so looking forward to getting all these bits sorted and getting back to test them out in March
Edited by tombate911 on Monday 31st December 18:43
Edited by tombate911 on Monday 31st December 18:45
G600 said:
That was a good read and a nice set-up, I don't suppose you can remember the measurements for the brake bushes? I've got a Z4 with 330 brakes and access to a lathe so I've been meaning to make a set.
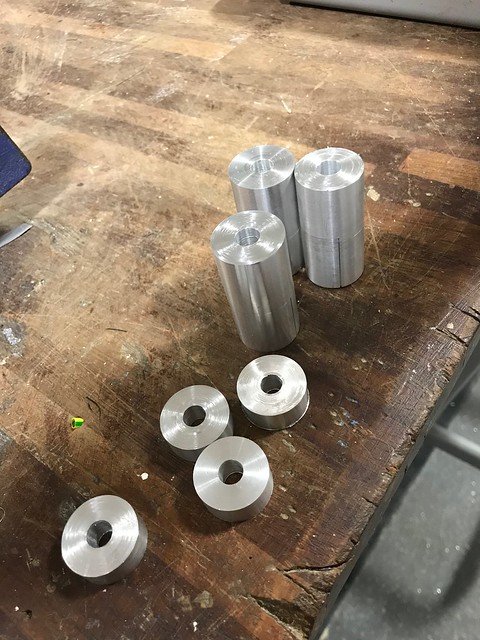
I've drawn up the spare bush I had knocking around. When I measured my slider pins they where on average 11.8, I made a version with 11.9mm holes but when fitted there was too much binding on two bushes so settled at 12mm. Worth measuring your pins and calipers before making your own though as I've only measured my prototype bush and never had these fitted to anyone else's car other than my own. They're a push/press fit in to the calipers at that diameter too but also put a groove in them for a circlip just in case
Another couple of hours spent on the car in the evenings this week.
Removed the diff from the casing and pulled/pressed the old bearings off the BMW diff.
Two diff units side by side. Really happy with the quality of the Quaife so far.

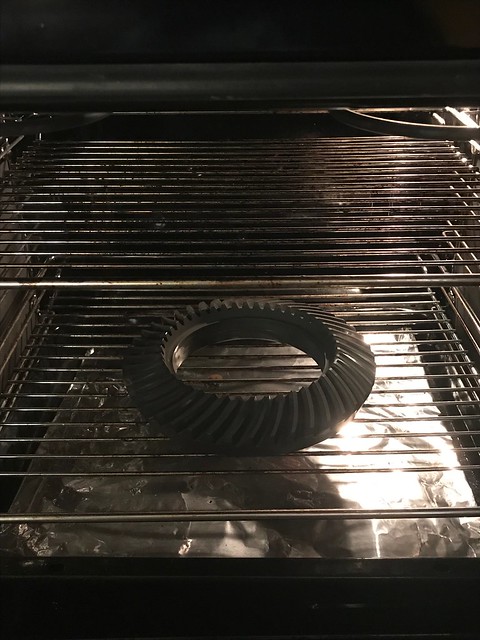
I then moved on to gripping the diff unit in the press to remove the crown wheel bolts.
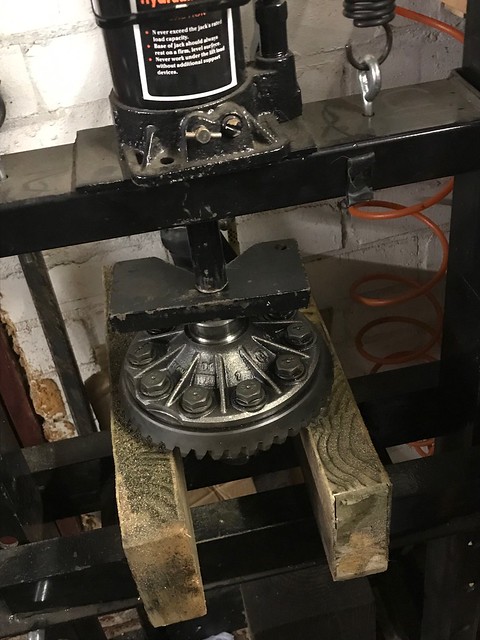
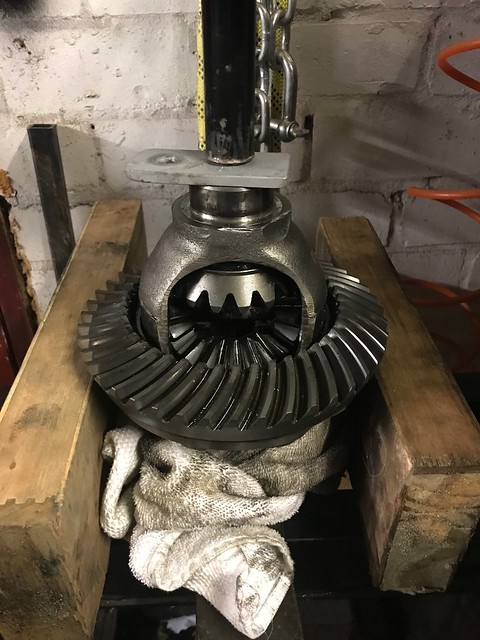
With the bolts undone the crown wheel was lightly pressed off the diff, it's a friction fit with the crown wheel being fitted after some heat has been applied to it to allow it to expand slightly.
Everything stripped apart and cleaned, degreased ready to be reassembled together.

I've ordered a brand new bottle of Lock Tite for this job just to make sure, when that arrives this week I'll get to building up the diff and removing the old one off the car but it's too cold the past few days for working on the car.
Carrying on with the building of the diff while it's been too cold outside.
Started off by cleaning up the casing and giving it a fresh coat of silver paint and also painting the input shaft flange with some black paint too,

While that was drying I started with fitting the crown wheel to the diff. Put it in the oven at about 120degrees for about 15 minutes. Before carrying it outside wrapped in some towels to keep the heat in it.
It was easier to rest the crown wheel on two blocks of wood and drop the diff through the centre hole so you could see easily where to align the bolt holes before it cooled. I dropped two bolts in to make sure it was correctly aligned before it cooled and gripped the diff housing
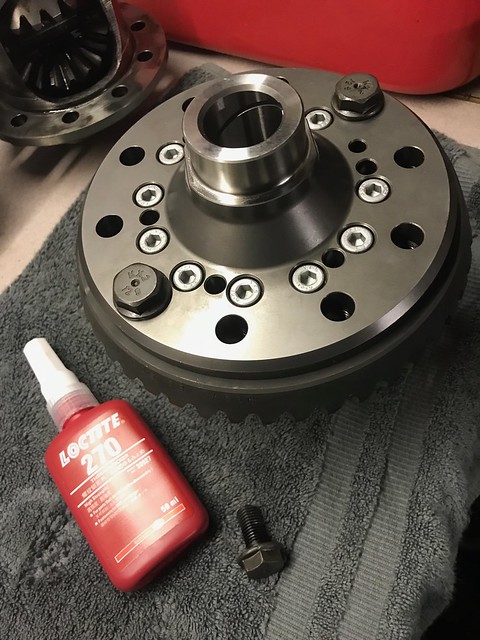
Strong Loctite 270 was applied to each of the bolts and torqued up to spec and marked ones then rechecked again when all the bolts were torqued to make sure they're all consistent and marked a second time.
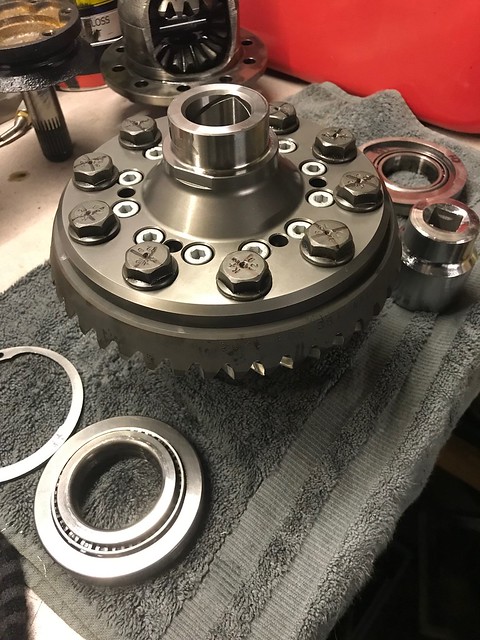
The first bearing being pressed onto to diff
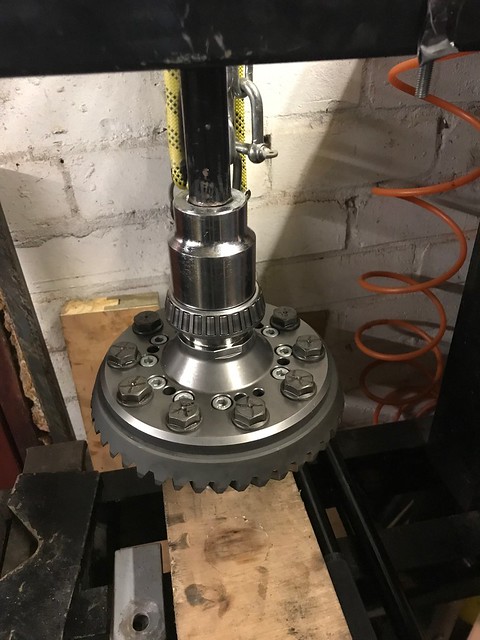
Little more rigging up in the press to make sure it was correctly supported when pressing on the second bearing.
I bought a 3/4" socket set 12 months ago and it is a god send for jobs like this using the press with up to ~60mm sockets.
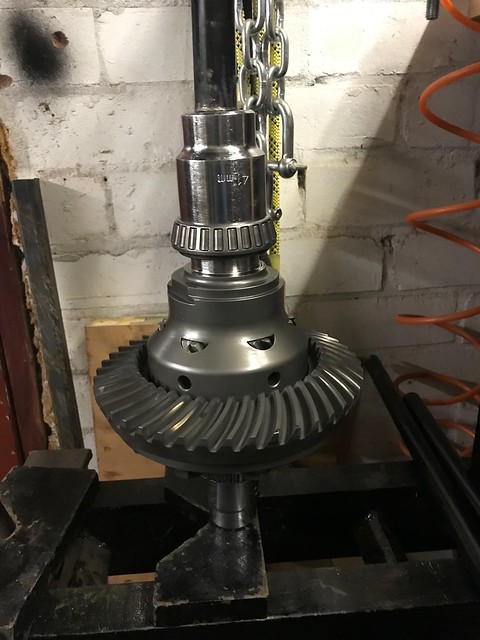
Finally the diff assembly all done and ready to be built up into the casing

When putting it back together I started by checking the preload on the input shaft bearing but because this hadn't been apart and it wasn't worn this was all fine and carried onto fitting the diff into the diff casing. Making sure when it was rebuilt that the same shims that came out of each side were fitting back into the same sides. Below you can see the circuit which acts as the preload spacer for the tapered bearings which hold the diff into position
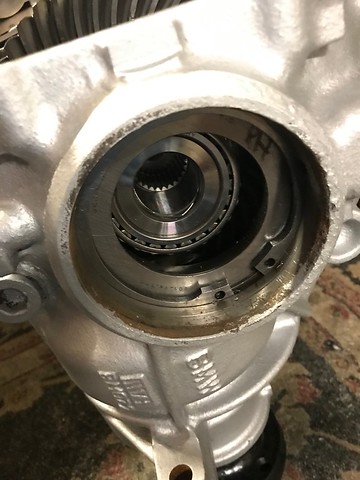
Repeating the same process on the left hand side with the circlip being refitted

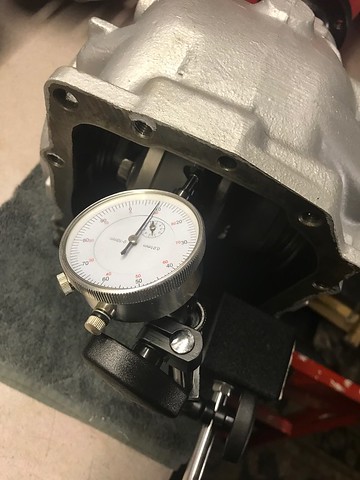
At this point now you can check the additional preload on the bearings added onto the initial preload on the input shaft as well as measuring the backlash in the crown wheel and pinion. Back last in the gears was measured with a DTI, set to zero in the following picture

Holding the input shaft completely still and moving the diff/crown wheel back and forwards you can measure the backlash. Here it was showing 0.08mm. That's within tolerance for this so there was no need to start adjusting any shims to adjust the position of the diff in the casing.
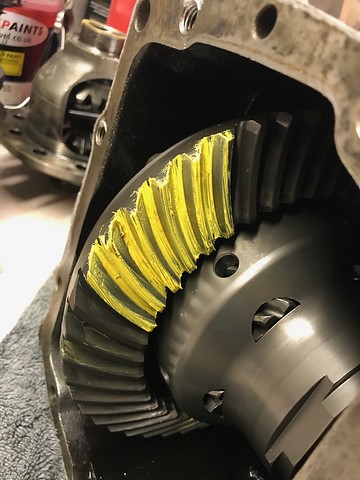
Gear paste added to the crown wheel to do a final check of the gear pattern
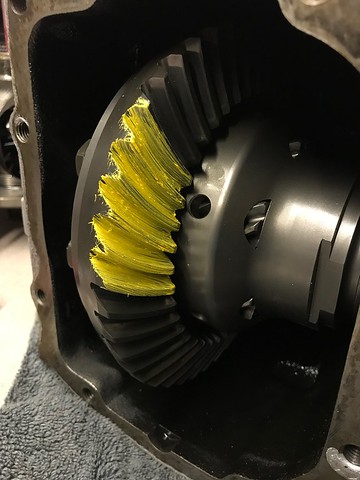
Nice and central gear pattern showing on the drive and coast side of the teeth. I then went on to keep running this around to check the pattern on all the teeth on the crown wheel
With all that checked and pretty happy with how it has gone so far, I could go ahead and seal on the back casing to the diff
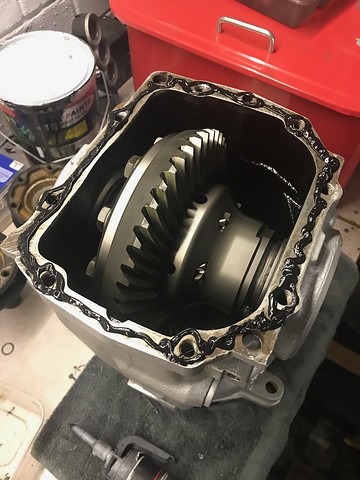
Done and dusted with new output flange seals fitted, ready to be fitted onto the car when I get time and some warmer weather.

When that's fitted I'll be able to get the car down off axle stands were it has been since the last track day and do a few miles in it on the road and check over everything that's been changed ready for the track day in March at Oulton Park. That's looking to be a great day with a large bunch of friends already booked on for it.
Started off by cleaning up the casing and giving it a fresh coat of silver paint and also painting the input shaft flange with some black paint too,
While that was drying I started with fitting the crown wheel to the diff. Put it in the oven at about 120degrees for about 15 minutes. Before carrying it outside wrapped in some towels to keep the heat in it.
It was easier to rest the crown wheel on two blocks of wood and drop the diff through the centre hole so you could see easily where to align the bolt holes before it cooled. I dropped two bolts in to make sure it was correctly aligned before it cooled and gripped the diff housing
Strong Loctite 270 was applied to each of the bolts and torqued up to spec and marked ones then rechecked again when all the bolts were torqued to make sure they're all consistent and marked a second time.
The first bearing being pressed onto to diff
Little more rigging up in the press to make sure it was correctly supported when pressing on the second bearing.
I bought a 3/4" socket set 12 months ago and it is a god send for jobs like this using the press with up to ~60mm sockets.
Finally the diff assembly all done and ready to be built up into the casing
When putting it back together I started by checking the preload on the input shaft bearing but because this hadn't been apart and it wasn't worn this was all fine and carried onto fitting the diff into the diff casing. Making sure when it was rebuilt that the same shims that came out of each side were fitting back into the same sides. Below you can see the circuit which acts as the preload spacer for the tapered bearings which hold the diff into position
Repeating the same process on the left hand side with the circlip being refitted
At this point now you can check the additional preload on the bearings added onto the initial preload on the input shaft as well as measuring the backlash in the crown wheel and pinion. Back last in the gears was measured with a DTI, set to zero in the following picture
Holding the input shaft completely still and moving the diff/crown wheel back and forwards you can measure the backlash. Here it was showing 0.08mm. That's within tolerance for this so there was no need to start adjusting any shims to adjust the position of the diff in the casing.
Gear paste added to the crown wheel to do a final check of the gear pattern
Nice and central gear pattern showing on the drive and coast side of the teeth. I then went on to keep running this around to check the pattern on all the teeth on the crown wheel
With all that checked and pretty happy with how it has gone so far, I could go ahead and seal on the back casing to the diff
Done and dusted with new output flange seals fitted, ready to be fitted onto the car when I get time and some warmer weather.
When that's fitted I'll be able to get the car down off axle stands were it has been since the last track day and do a few miles in it on the road and check over everything that's been changed ready for the track day in March at Oulton Park. That's looking to be a great day with a large bunch of friends already booked on for it.
helix402 said:
Proper job. Never done any gearbox or diff rebuilds so I respect those who do.
Thanks! 5-6 years ago I never thought i’d be in the position to build a car like this or have the skill to be able to do the build never mind the technical knowledge for some of the other tasks. Amazing what a bit of time and effort put into learning something can do over a period of a few years! I’m always looking for the next challenge. To learn something new! Hopefully try and get the diff fitted at weekend and that car back on it’s wheels so everything can be tested. I’ve not really fancied doing it at the moment in the cold dark and wet!
Vladikar said:
Can you tell me more about the painting prep process in detail and how you got it to look like that inside, I have a megane engine Clio and would love the interior to look like that in black!
I’ve really enjoyed your thread!
Regarding the painting process any bare metal was primed with zinc primer before welding then primed again once all the welding was done and any welding has been wire wheeled. With all bare surfaced primed the whole of the inside of the car was rubbed down with wet/dry paper but mainly using scotch pads to rough up the surfaces to give a good key for the paint. When the car was first stripped all sound deadening was removed from the car with a heat gun and a scraped and I found that Jizer was really good at removing any residue from the sound deadening as well as the horrible sticky back foam from the roof. With it all scotched ready for paint it was thoroughly hoovered multiple times and then panel wiped to remove any contaminants. Paint used was a very simple 2K gloss black paint applied using a compressor and a spray gun. It's by no means perfect but I just wanted the whole inside of the car to be consistent colour and cover up all the areas that had been welded.I’ve really enjoyed your thread!
Update
So finally yesterday I decided to get the diff fitted. I had been putting this off mainly due to the weather but also the annoyance of having to undo the drive shaft and propshaft bolts.
When I actually built the car up it was built using my spare diff which meant I could actually build the Quaife using the diff housing and gear set which came on the car when I bought it. Here with the open diff removed on the right and the freshly built diff on the left. I had to swap over the output flanges from the open diff to the new one as I've using manual shafts in the auto diff (3.38)
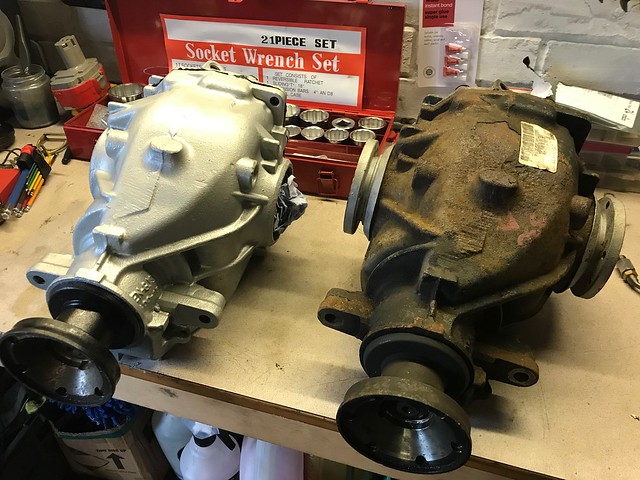
Not too bad of a job with a second pair of hands who sat in the car for me taking the car in and out of gear and holding the brake pedal while I cracked off the drive shaft/prop bolts and then torqued them back up when fitting. Saves a lot of time rather than getting from under the car all the time to lock everything into position.
Nice freshly painted and assembled diff all bolted up into the rear sub frame

With that done I could refit the wheels and get the car back onto it's wheels. It's been on axle stands since the start of the December, I'm sure the neighbours in the street haven't been too pleased looking at this 'ratty old' BMW on axle stands on my drive way once again.
When you see it in photos like this one you realise how subtle it actually looks compared with what it is like inside and underneath.
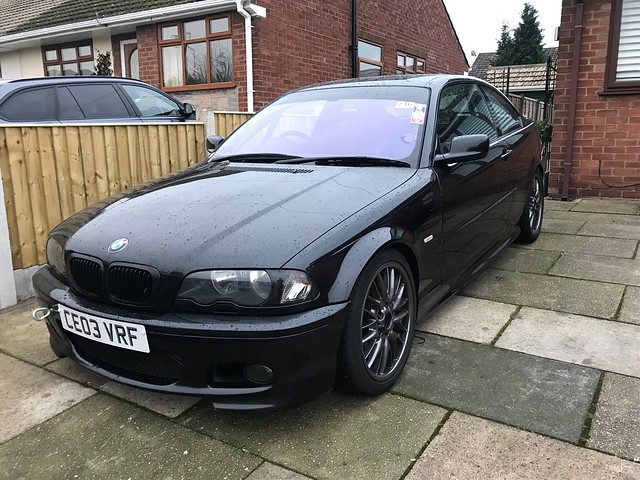
I will come back with an update with how the car drives after the first track day. At the moment I have done a little drive around the estate just as a basic check. It will get a small road test before the next track day but I'm waiting for a nice day with bone dry roads. Want to keep the car salt and dirt free as much as possible if i can by not driving it on the road when it's wet.
mwggriffiths said:
Interesting to see someone finally put some numbers on their brass bushes. I made mine to 12mm H8 fit (re-reamed after pressing them into the calipers) and fitted brand new sliding pins as mine had mushroomed slightly (previously overtightened by an ape...).
Incidentally I was at the first Oulton Park day you did, running in a silver 330Ti Compact (that'd be 3 of those cars owned by comenters on this thread!). It's a shame we were never out on track at the same time as I'd spotted your car in the pits and was intrigued to see how quick it was by comparison.
I'll be interested to see how this develops. As with yourself & '330Ti' an LSD was top of my wish list towards the end of last year too...
Cheers. As you say shame I didn't see you on track. However I'm still getting used to driving the car and no were near the full potential of the car, You can see that from the videos I've posted on previous pages, Hopefully bump into you at another day, I'm there the first weekend in March. Incidentally I was at the first Oulton Park day you did, running in a silver 330Ti Compact (that'd be 3 of those cars owned by comenters on this thread!). It's a shame we were never out on track at the same time as I'd spotted your car in the pits and was intrigued to see how quick it was by comparison.
I'll be interested to see how this develops. As with yourself & '330Ti' an LSD was top of my wish list towards the end of last year too...
Interesting to hear your experiences of the brake bushes. At the moment I'm having no issues with mine, checked the fronts when I swapped over the wheel bearing after two track days. The only thing I did differently was the bush was made so that it was only just an interference fit into the caliper and could be tapped into the caliper and the circlip acting as a back up should the bush move in the caliper for any reason, None of the 8 bushes have moved so far after 3 track days so far. As you say the brass bushes should be ovaling slightly when pressed into the calipers and binding up on the pins.
C70R said:
The LSD thing is interesting for me. I've never felt the need for one on either of my 330s, to be honest. But then they weren't track cars.
With a combination of 255-section rear tyres and 150bhp/ton, I can't ever remember breaking traction in anything other than monsoon conditions. Gut-feel is that you'll probably be fine for traction out of slow corners with decent tyres, but YMMV.
Yes I would never feel that one would ever need one for the road but on a track in a car like this it is very much needed in the wet and dry. In the wet it's so easy to spin up the inside tyre even with 255 wet tyres on and in turn makes the rear end more unpredictable with the open diff albeit easier to drive with then open diff. On dry days with a semi slick 2nd or 3rd gear corners the car easily spins the inside wheel and causes a loss of drive out of corners. I found this both at Anglesey and Oulton. The car is running 750F/400R springs so quite well springed and damped with coilover dampers. Looking forward to trying the car again at Oulton in March, quite nice to go back to the same circuit at the moment as I get used to the car and refine the set up of it and dial in some more base settings for wet and dry days. With a combination of 255-section rear tyres and 150bhp/ton, I can't ever remember breaking traction in anything other than monsoon conditions. Gut-feel is that you'll probably be fine for traction out of slow corners with decent tyres, but YMMV.
Been a few weeks since I had anything new to add to the build thread so here's a few photos and little updates to keep things ticking over.
Made a few bits for friends, one of which was a custom steering wheel switch panel to do exactly what he wanted it to with push buttons as well as locations for some rotary switches, cut from a piece of 3mm acrylic using a laser cutter
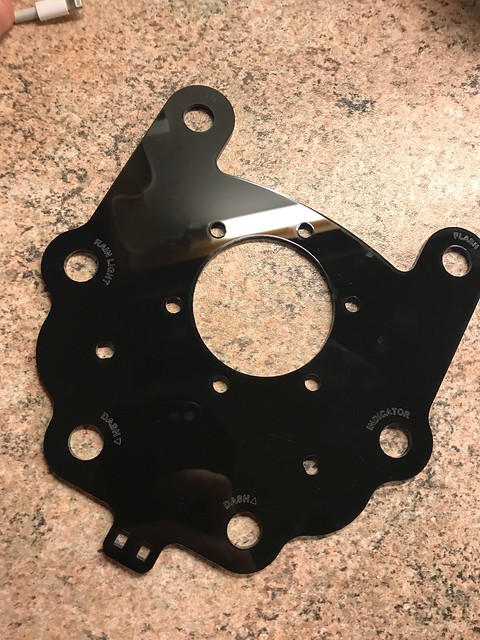
Rewelded the inline temp sensor. The previous version ended up with a M12x1.75 boss welded on not a M12x1.5 which was required for the temp sensor. Milled off the old boss on the milling machine at work and got a new boss welded on there ready to go on.
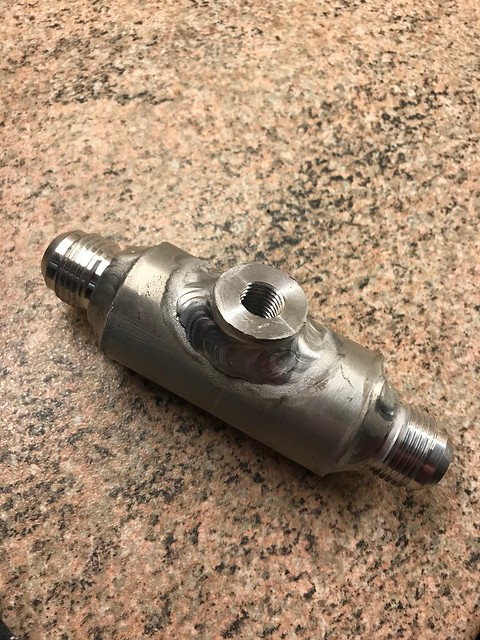
Mounted it up in place on the top of the oil cooler and ran the temp sensor wiring down to the oil cooler which feeds back to the gauge which is mounted just in front of the steering wheel nicely in the drivers eye line. Final job to do in the next week is to machine some upper mounts for the top of the oil cooler to hold it in it's final position. May even go down the route of 3D printing these angle brackets... Watch this space...
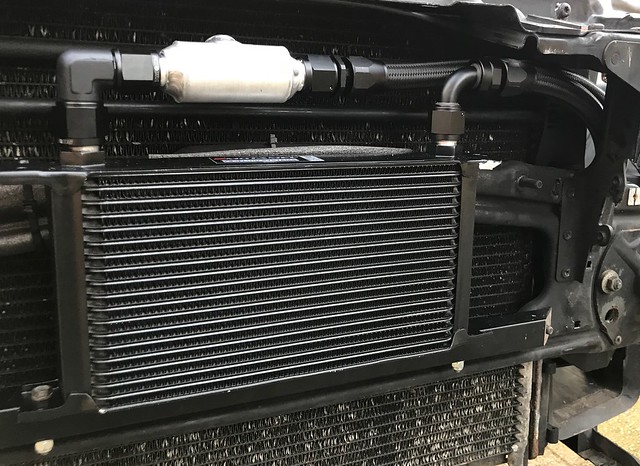
Little bit of a side note but at the beginning of last month I popped down the Autosport and while I was there managed to do something I've been meaning to do for a long time which was get my ears moulded for a proper set of ear plugs designed for motorsport use. The Clio used to have some horrific resonance at certain RPM on track but it was a job that was always put on the back burner, silly of me really but noticing a slight drop in how good my earing is over the past couple of years I decided it was silly not to get some made which could be used for work as well as in the car, the BMW is a totally different level of noise inside so certainly going to be needed for track days this year.

Edited by tombate911 on Saturday 2nd February 07:09
Prep for Oulton 2nd March 2019
Time for a little update, It's only a week now till the next Oulton Park track day so I've been working through some jobs trying to make sure everything is done in time and fix a couple of issues along the way.
I documented earlier on after the last track day that I was getting vibration through the wheel under braking and found the NSF wheel bearing had play in it after only 3 days on track. That was replaced and when I took the car out on a test drive I expected the vibration to have gone but it was weirdly still there. Obviously there must be something else causing it. I got the DTI onto the front discs and found there was a small amount of run out and waviness to the surface of the discs. I've now replaced both front discs and while I was there checked the condition of the brass slider pin bushes I made to check there was no binding after a few days use. I should add I'm using the CLRC5+ pads. But have always been a big advocate of DS1.11. I hope this is a one off problem with the brakes which can be prevented in the future
I'd forgotten to take any decent photos through this process so this will have to do.
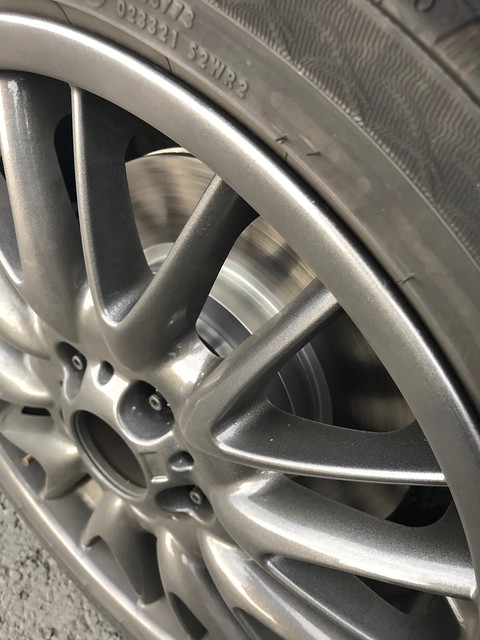
With the brake issue arising after only 3 days on track I've decided to improve on the standard BMW cooling and run some proper ducts to the inside of the disc on the front.
Using the two bolt holes in the front hubs which are normally used the mount the standard backing plates I've made up a quick paper template to make a bracket to hold the cooling duct in place.
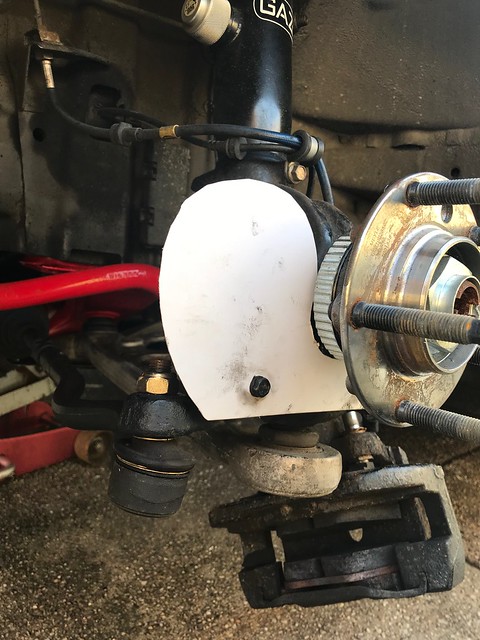
Ducting will run directly into the back of this plate into the centre of the disc evacuating the heat outwards through the disc.
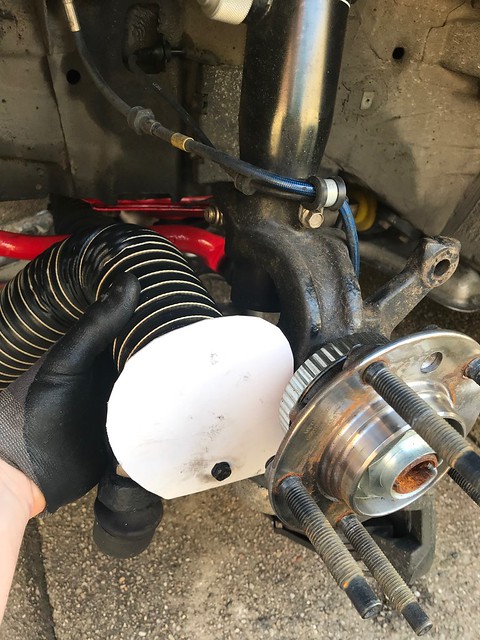
Quick mock up of where the ducts will run before making the plates up. Wanted to make sure there is clearance with the front wheel on full lock but also enough movement and slack in the ducting for it not to get ripped off or in the way.
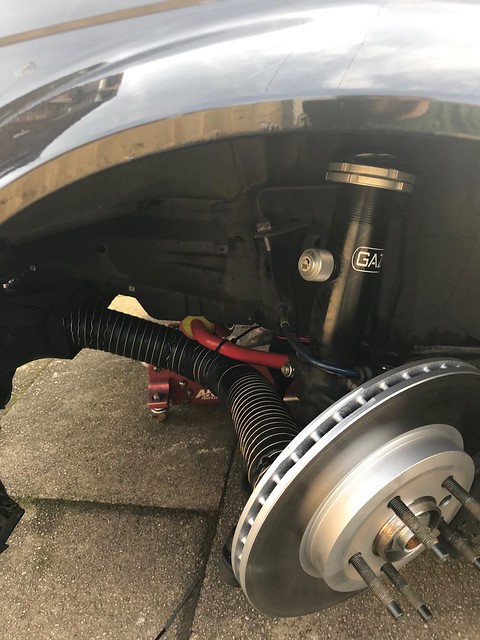
Working from the card template I have drawn up the brackets in CAD and will have them laser cut this week ready for fitting before the weekend. Just a case of popping the discs off, bolting them to the hubs and attaching the ducts which have already been ran through to the existing BMW cooling ducts.
The centre sections will be bent outwards to mount the ducting to.
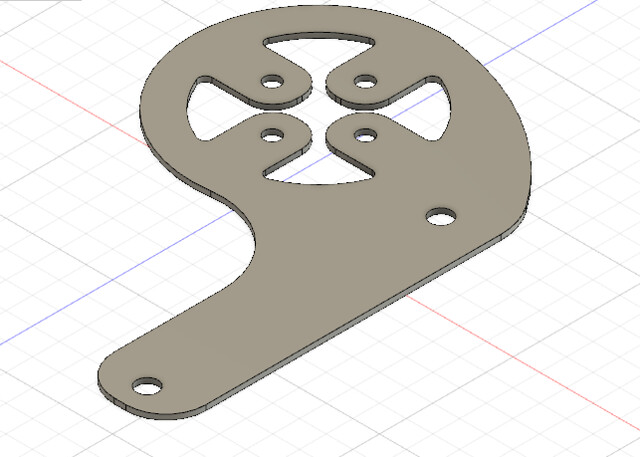
Little bit of prep. A job i should have done when I first serviced everything else on the car but didn't have them at the time which was swapping over the spark plugs. I didn't know what the previous owner had fitted for spark plugs or even how long they had been in there.

One of the final jobs I've been working on today is the throttle/ECU map. I noticed when driving on the last few track days how horrible the throttle felt, when applying the throttle it didn't do a great deal and then suddenly you got a hit of power. Not what I was looking for when trying to drive smoothly or even trying to balance the car through the corners or when it starts to slide. I can't help but notice this watching back over the track day footage. With a bit of help from a friend sorting out my laptop with the correct software for reading and writing to the MS43 ECU, I've been able to pull off the current map on the car and have a looking at the graph for the TPS
Here you can see the extent of how sharply the throttle changes. Feels great on the road and makes the car feel fast. But certainly not what I wanted.
With a little bit of experimenting with different throttle map Ideas I have settled with the following which I can test next weekend. I've ran this on the road today and it feels so much more smoother and easier to balance without the harsh increase in throttle. The eagle eyed people may notice how flat the bottom of the graph looks below 15% TPS. This is due to the fact that everything below 12% TPS and 4500RPM is controlled by the Idle Control valve until it reaches it's max duty cycle and then the throttle body starts to open at this point so I have had to adjust the table for the TPS accordingly.

Final car related job for today was to replace some of the grip tape on the floor and also wipe down the interior of the car after a wet track day and a slight off into the mud the underside of the car had to be jet washed, inevitably dirty water found it way into the car through a couple of tiny holes so I've spent a bit of time this evening tidying up inside the car. Will continue with the exterior tomorrow.
While I was at it I took a little interior photo...
Time for a little update, It's only a week now till the next Oulton Park track day so I've been working through some jobs trying to make sure everything is done in time and fix a couple of issues along the way.
I documented earlier on after the last track day that I was getting vibration through the wheel under braking and found the NSF wheel bearing had play in it after only 3 days on track. That was replaced and when I took the car out on a test drive I expected the vibration to have gone but it was weirdly still there. Obviously there must be something else causing it. I got the DTI onto the front discs and found there was a small amount of run out and waviness to the surface of the discs. I've now replaced both front discs and while I was there checked the condition of the brass slider pin bushes I made to check there was no binding after a few days use. I should add I'm using the CLRC5+ pads. But have always been a big advocate of DS1.11. I hope this is a one off problem with the brakes which can be prevented in the future
I'd forgotten to take any decent photos through this process so this will have to do.
With the brake issue arising after only 3 days on track I've decided to improve on the standard BMW cooling and run some proper ducts to the inside of the disc on the front.
Using the two bolt holes in the front hubs which are normally used the mount the standard backing plates I've made up a quick paper template to make a bracket to hold the cooling duct in place.
Ducting will run directly into the back of this plate into the centre of the disc evacuating the heat outwards through the disc.
Quick mock up of where the ducts will run before making the plates up. Wanted to make sure there is clearance with the front wheel on full lock but also enough movement and slack in the ducting for it not to get ripped off or in the way.
Working from the card template I have drawn up the brackets in CAD and will have them laser cut this week ready for fitting before the weekend. Just a case of popping the discs off, bolting them to the hubs and attaching the ducts which have already been ran through to the existing BMW cooling ducts.
The centre sections will be bent outwards to mount the ducting to.
Little bit of prep. A job i should have done when I first serviced everything else on the car but didn't have them at the time which was swapping over the spark plugs. I didn't know what the previous owner had fitted for spark plugs or even how long they had been in there.
One of the final jobs I've been working on today is the throttle/ECU map. I noticed when driving on the last few track days how horrible the throttle felt, when applying the throttle it didn't do a great deal and then suddenly you got a hit of power. Not what I was looking for when trying to drive smoothly or even trying to balance the car through the corners or when it starts to slide. I can't help but notice this watching back over the track day footage. With a bit of help from a friend sorting out my laptop with the correct software for reading and writing to the MS43 ECU, I've been able to pull off the current map on the car and have a looking at the graph for the TPS
Here you can see the extent of how sharply the throttle changes. Feels great on the road and makes the car feel fast. But certainly not what I wanted.
With a little bit of experimenting with different throttle map Ideas I have settled with the following which I can test next weekend. I've ran this on the road today and it feels so much more smoother and easier to balance without the harsh increase in throttle. The eagle eyed people may notice how flat the bottom of the graph looks below 15% TPS. This is due to the fact that everything below 12% TPS and 4500RPM is controlled by the Idle Control valve until it reaches it's max duty cycle and then the throttle body starts to open at this point so I have had to adjust the table for the TPS accordingly.
Final car related job for today was to replace some of the grip tape on the floor and also wipe down the interior of the car after a wet track day and a slight off into the mud the underside of the car had to be jet washed, inevitably dirty water found it way into the car through a couple of tiny holes so I've spent a bit of time this evening tidying up inside the car. Will continue with the exterior tomorrow.
While I was at it I took a little interior photo...
Darryl H said:
Great project thread. I've just read start to finish, some really good work in there 
Thanks, as long as people are interested in it that's the main thing. One of the main reasons for coming over to PH was to have more conversations about the car and document it for people to see.Sunday Progress
The paint work on this car has always been a little flat especially on the rear quarter where it's had some paint in the past. Wanted to give the car a bit of a clean up ready for next weekend. Couple of hours with the DA on a couple of panels, decontaminated the paint and added a coat of wax and taken some more detailed photos for this thread.
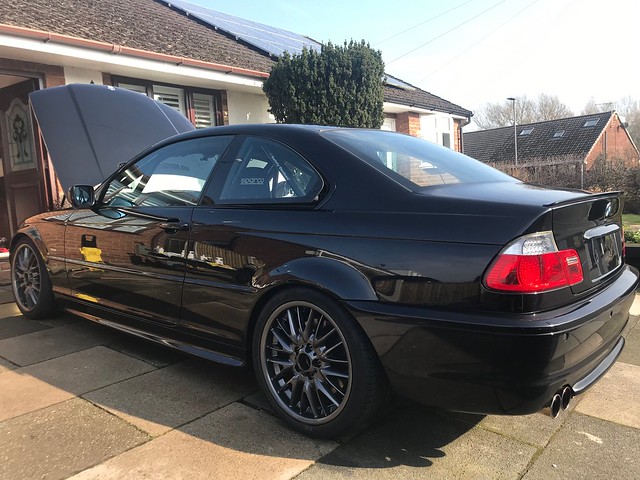
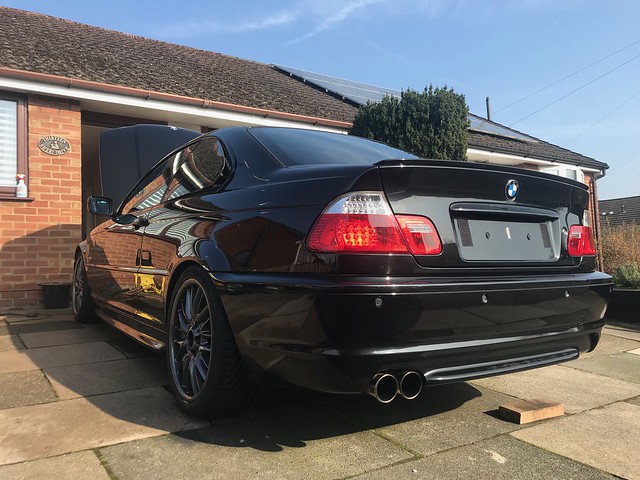
This angle shows off the interior of the car a lot more than usual photos.
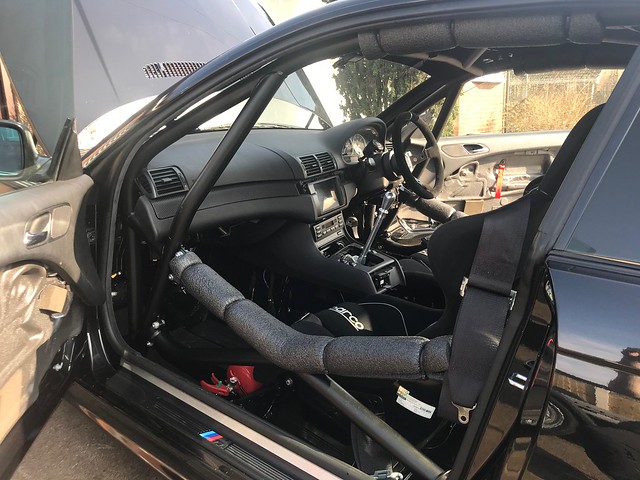
Spent a little while with some detailing products tiding up the engine bay and bringing the plastics back to life
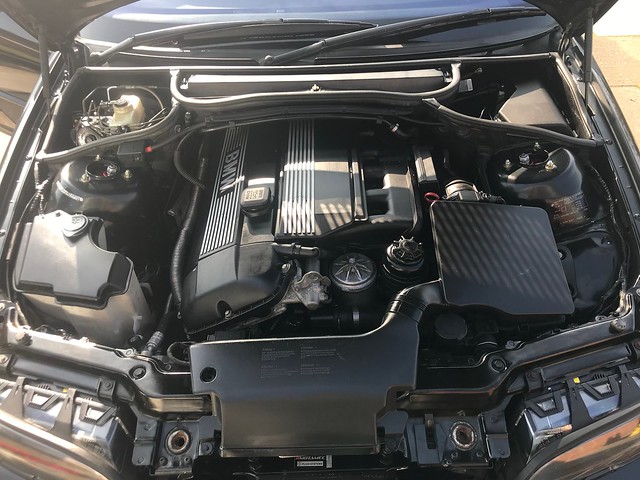
Also spent the afternoon doing a few maintenance jobs on the Brian James trailer I use for moving the car around. Paint added to the tyre rack, rebuilt the jockey wheel washed and painted a couple of bits of rust that had appeared on the wheels.
One final job I needed to do this weekend was to draw up some oil cooler top brackets. I could make these out of some piece of bent steel but i'd much rather design and make something a little more fancy. Designed these little brackets to support the top of the oil cooler. Will get these 3D printed in plastic this week and fitted to the car.
Designed to bolt to the standard cross brace that runs in front of the radiator. I have used the bottom posts to support the weight of it, the top ones will be there just to support the top from swaying, should keep everything in place nicely.

Progress before Oulton continues...
First one started out with a little bit of maintenance. Washer pump stopped working last week, little bit of testing pointed towards it being the pump. For 30 seconds I thought about removing it and making more space in the engine bay but I do like the functionality of being able to clear the windscreen of the car on track New pump ordered and fitted
Carrying on with the oil cooler mounting from the previous posts. I've printed off the two top cooler mounts in black plastics

Test fitted the top brackets and went together first time. The top bolts need replacing for some shorter ones but the bolt box is a little depleted after building this car, nice and simple design that's functional for the cooler mounting, much easier than making brackets from metal

Brake cooling duct brackets came back from water jet cutting
Bent the centre sections backwards to fit inside the ducting
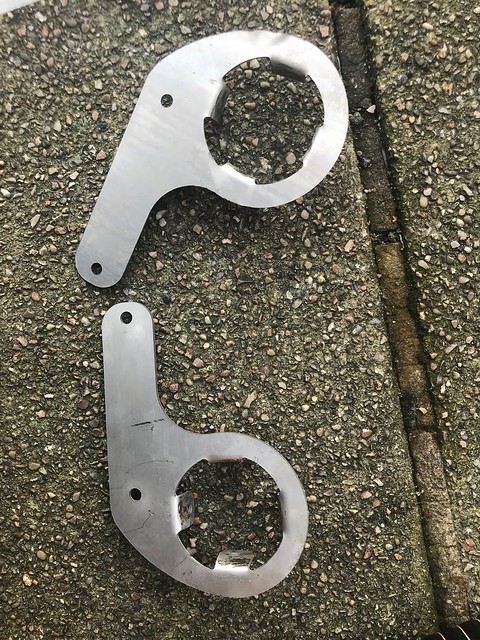
Bolted to the hubs making sure the duct isn't going anywhere when cornering putting force onto the ducting and pointing the air nicely in the centre of the disc.
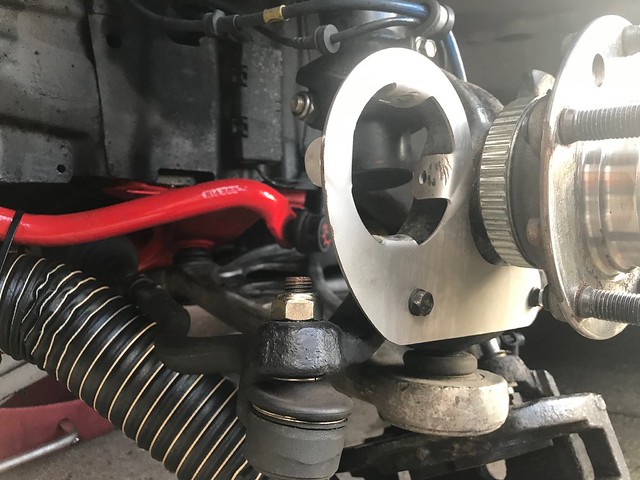
All done and clamped up. Enough clearance on the inside of the tyre too.
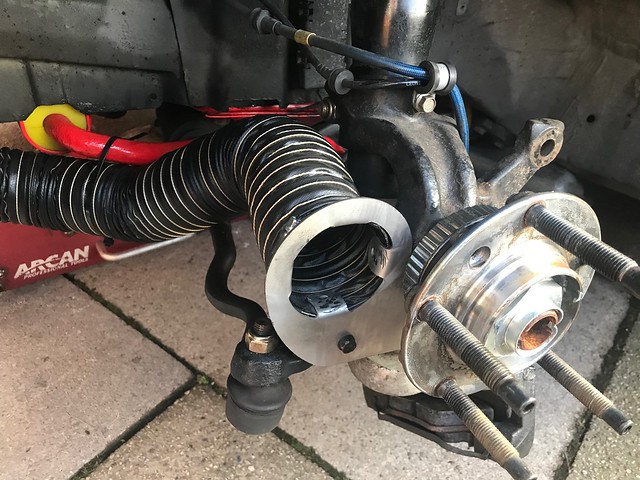
With those last few jobs done, time to get it loaded onto the trailer. Note, I never fitted these little blue side lights but couldn't resist taking a photo from that angle when loading it onto the trailer
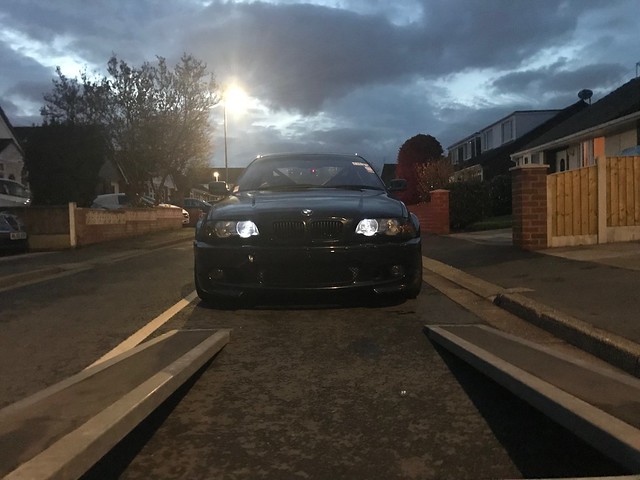
Finally.... Before I post the update about yesterdays track day I've picked these up as a little treat to myself.
Team Dynamics 1.2 18"x9J ET35. Weighing in nicely at 9kg. They're going to be a big saving over the MV1's which I estimate to weigh in the region of 12-13kg.

First one started out with a little bit of maintenance. Washer pump stopped working last week, little bit of testing pointed towards it being the pump. For 30 seconds I thought about removing it and making more space in the engine bay but I do like the functionality of being able to clear the windscreen of the car on track New pump ordered and fitted
Carrying on with the oil cooler mounting from the previous posts. I've printed off the two top cooler mounts in black plastics
Test fitted the top brackets and went together first time. The top bolts need replacing for some shorter ones but the bolt box is a little depleted after building this car, nice and simple design that's functional for the cooler mounting, much easier than making brackets from metal
Brake cooling duct brackets came back from water jet cutting
Bent the centre sections backwards to fit inside the ducting
Bolted to the hubs making sure the duct isn't going anywhere when cornering putting force onto the ducting and pointing the air nicely in the centre of the disc.
All done and clamped up. Enough clearance on the inside of the tyre too.
With those last few jobs done, time to get it loaded onto the trailer. Note, I never fitted these little blue side lights but couldn't resist taking a photo from that angle when loading it onto the trailer
Finally.... Before I post the update about yesterdays track day I've picked these up as a little treat to myself.
Team Dynamics 1.2 18"x9J ET35. Weighing in nicely at 9kg. They're going to be a big saving over the MV1's which I estimate to weigh in the region of 12-13kg.
Gassing Station | Readers' Cars | Top of Page | What's New | My Stuff