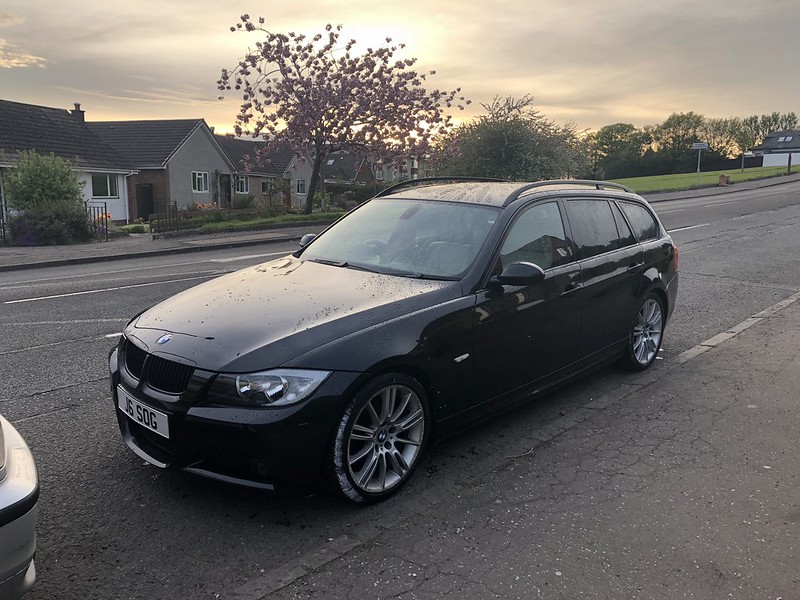
Back on the Wagon! 2005 BMW E91 3 Series Touring 325i
Discussion


Found myself enjoying a lot of the threads in this section and hanging about 'BMW General' like a bad smell lately so figured it was time to fire up my own journal in here. I have had a thread running on DW so will be copying across a series of posts to bring it up to date. Strap in...
After 4 years and 48k miles of somewhat problematic but faithful ownership, a private hire taxi rear-ended me whilst stationary at the beginning of August 2020.
Sadly, it was quickly written off but the valuation given to the car was more than complimentary so that was a plus. It was rusting a little here and there plus covered in a hellish amount of dents and scratches. Factoring in long-term running issues it was actually a relief to be shot of it as I would never have comfortably taken half of what the insurance paid out had I sold it to someone else. I guess I'm just too nice...
So, the search was on for a replacement. I was keen to find another more modern version touring but good ones for good money seemed to be in short supply in the COVID-moment. Several dealers lamented that COVID-19 was causing gaps in the market between quality stock and meeting demand but none of the cars I viewed floated my boat. I was either finding poor condition/high-spec cars or vice versa but did eventually stumble across a Gumtree advert when changing location to my hometown in the N.E of Scotland.

After 3-4 weeks of waiting for the car to be ready, it was finally in my possession and I was really happy with it. The delay was partly due to the seller's own search for a replacement as well as repair work being carried out. Around the time it was listed for sale, a stone thrown up from traffic smashed the panoramic sunroof leading to an insurance claim. The garage tasked with repairing this had difficulties with missing parts ordered from BMW but ultimately the frame was also replaced due to glass shards found in the greased runners.
The previous owner bought it as a Japanese import into the UK early 2019 at 45k miles, it now sits at 65k miles. Only a new tyre was required for September's pre-sale MOT and the car features Alcantara M sport interior with electric memory seats, Xenon headlights, panoramic sunroof and folding mirrors. A pretty good spec list for a 2005 BMW I feel! The colour is Titan Silver and the paintwork seems to be in very good condition apart from a small patch of lacquer peel on the bonnet.
It's a lovely car to drive and I have come to appreciate the idea of an automatic recently so the car suits me in that flavour. It is far superior in condition to its predecessor and I am looking forward to another few years of BMW ownership. The seller threw in BMW roof bars which will be great for transporting my mountain bike. I use the bike a lot for commuting now which will help reduce annual mileage. Since COVID-19 lockdown in March we have also taken to walking the dog TO places we'd normally drive to which should also help!
Some more images:


The car comes with a lot of service history but it is all in Japanese! I'm keen to maintain it well so will probably service it before the end of the year. Primarily, I am keen to just run the car gently and retrofit a few BMW options such as cruise control. I'd also like to fit a single din head unit featuring Apple Carplay but options are limited or too expensive for my liking just yet.
One of the priorities are to organise some rust proofing or protection for underneath the car as soon as possible. This hasn't been carried out since it arrived in the UK and the approximate cost was factored into the sale price.
:thumb:
(I think I'll do separate posts until up to date or at least combine some into a single post).
After 4 years and 48k miles of somewhat problematic but faithful ownership, a private hire taxi rear-ended me whilst stationary at the beginning of August 2020.
Sadly, it was quickly written off but the valuation given to the car was more than complimentary so that was a plus. It was rusting a little here and there plus covered in a hellish amount of dents and scratches. Factoring in long-term running issues it was actually a relief to be shot of it as I would never have comfortably taken half of what the insurance paid out had I sold it to someone else. I guess I'm just too nice...
So, the search was on for a replacement. I was keen to find another more modern version touring but good ones for good money seemed to be in short supply in the COVID-moment. Several dealers lamented that COVID-19 was causing gaps in the market between quality stock and meeting demand but none of the cars I viewed floated my boat. I was either finding poor condition/high-spec cars or vice versa but did eventually stumble across a Gumtree advert when changing location to my hometown in the N.E of Scotland.
After 3-4 weeks of waiting for the car to be ready, it was finally in my possession and I was really happy with it. The delay was partly due to the seller's own search for a replacement as well as repair work being carried out. Around the time it was listed for sale, a stone thrown up from traffic smashed the panoramic sunroof leading to an insurance claim. The garage tasked with repairing this had difficulties with missing parts ordered from BMW but ultimately the frame was also replaced due to glass shards found in the greased runners.
The previous owner bought it as a Japanese import into the UK early 2019 at 45k miles, it now sits at 65k miles. Only a new tyre was required for September's pre-sale MOT and the car features Alcantara M sport interior with electric memory seats, Xenon headlights, panoramic sunroof and folding mirrors. A pretty good spec list for a 2005 BMW I feel! The colour is Titan Silver and the paintwork seems to be in very good condition apart from a small patch of lacquer peel on the bonnet.
It's a lovely car to drive and I have come to appreciate the idea of an automatic recently so the car suits me in that flavour. It is far superior in condition to its predecessor and I am looking forward to another few years of BMW ownership. The seller threw in BMW roof bars which will be great for transporting my mountain bike. I use the bike a lot for commuting now which will help reduce annual mileage. Since COVID-19 lockdown in March we have also taken to walking the dog TO places we'd normally drive to which should also help!
Some more images:
The car comes with a lot of service history but it is all in Japanese! I'm keen to maintain it well so will probably service it before the end of the year. Primarily, I am keen to just run the car gently and retrofit a few BMW options such as cruise control. I'd also like to fit a single din head unit featuring Apple Carplay but options are limited or too expensive for my liking just yet.
One of the priorities are to organise some rust proofing or protection for underneath the car as soon as possible. This hasn't been carried out since it arrived in the UK and the approximate cost was factored into the sale price.
:thumb:
(I think I'll do separate posts until up to date or at least combine some into a single post).
Managed to cover a couple hundred miles in the first weekend and was really quite happy with it. I had no chance to clean it yet but I did quickly order some new gas struts to replace the ageing units that were struggling to lift the boot lid.


One of the easier maintenance jobs I've ever had to do on a car. Just prise off these clips above, dunt the top and bottom and they pop off! I found a useful YouTube guide beforehand and they waxed lyrical about OEM spec stabilus items, providing an affiliation link in the description which takes you to Amazon. Sadly, I didn't bother to check before and it was not the same items in the video being linked to... fitted and working now but lacking that touch of refinement which genuine BMW items excude. I also dug out the rubber floor mats I retained from the previous E91m sprucing them up somewhat prior to fitting:


I used a cheap hose brush normally reserved for my mountain bike to scrub them clean and shift the bulk of crud that had built. Once they dried outdoors I brought them in for some further cleaning and dressing using AutoGlym vinyl and rubber care they turned out alright!

It wasn't long before I swapped out the chrome grilles/bonnet trim to black ones, wiping down and cleaning normally unseen areas as I went along. There were also from my previous E91 and although genuine BMW items I wasn't sure until fitting them if I was going to like the contrast with a silver car. Pretty pleased overall, I think it sharpens up the front end a little bit and matches the black mirror base plates and roof rails nicely.


I only have one key for the car and have been noticing varying success with distance and height of hands when remote locking/unlocking the car. I think either the diversity antenna located beneath the rear spoiler or some of the wires in the boot lid hinge areas may need attention.

Been through this before with the last E91 and it's unlikely to be the diversity module or antenna since my radio signals are pretty good. With frequent use of the boot, the hinge wiring harness is a common problem with tourings (as pictured above) and I think I will deal with this as a preventative measure soon. I have found some helpful guides on how to remove the rubber tubing and grommets without cutting into them and making a pig's ear off it.
Talking of wiring... has anyone heard of Pioneer Carrozzeria? Stickered along the top of my windscreen are what look like thin wires for DAB and GPS as well as various modules down the pillars. I also have a remote and together it all corresponds to some type of pop out screen head unit from when the car resided in Japan. It's difficult to find much information or serial numbers to replace the head unit which I assume was removed prior to export so I think I will seek to remove all of this one day. The car also has a Clifford alarm installed and the remote is there too so if I can find a manual I'll look into using this as a backup should my wiring/antenna fail unexpected. The current BMW Professional head unit has some dead pixels on the display also so I may have a stab at repairing that if I can finesse my soldering skills!
One of the easier maintenance jobs I've ever had to do on a car. Just prise off these clips above, dunt the top and bottom and they pop off! I found a useful YouTube guide beforehand and they waxed lyrical about OEM spec stabilus items, providing an affiliation link in the description which takes you to Amazon. Sadly, I didn't bother to check before and it was not the same items in the video being linked to... fitted and working now but lacking that touch of refinement which genuine BMW items excude. I also dug out the rubber floor mats I retained from the previous E91m sprucing them up somewhat prior to fitting:
I used a cheap hose brush normally reserved for my mountain bike to scrub them clean and shift the bulk of crud that had built. Once they dried outdoors I brought them in for some further cleaning and dressing using AutoGlym vinyl and rubber care they turned out alright!
It wasn't long before I swapped out the chrome grilles/bonnet trim to black ones, wiping down and cleaning normally unseen areas as I went along. There were also from my previous E91 and although genuine BMW items I wasn't sure until fitting them if I was going to like the contrast with a silver car. Pretty pleased overall, I think it sharpens up the front end a little bit and matches the black mirror base plates and roof rails nicely.
I only have one key for the car and have been noticing varying success with distance and height of hands when remote locking/unlocking the car. I think either the diversity antenna located beneath the rear spoiler or some of the wires in the boot lid hinge areas may need attention.
Been through this before with the last E91 and it's unlikely to be the diversity module or antenna since my radio signals are pretty good. With frequent use of the boot, the hinge wiring harness is a common problem with tourings (as pictured above) and I think I will deal with this as a preventative measure soon. I have found some helpful guides on how to remove the rubber tubing and grommets without cutting into them and making a pig's ear off it.
Talking of wiring... has anyone heard of Pioneer Carrozzeria? Stickered along the top of my windscreen are what look like thin wires for DAB and GPS as well as various modules down the pillars. I also have a remote and together it all corresponds to some type of pop out screen head unit from when the car resided in Japan. It's difficult to find much information or serial numbers to replace the head unit which I assume was removed prior to export so I think I will seek to remove all of this one day. The car also has a Clifford alarm installed and the remote is there too so if I can find a manual I'll look into using this as a backup should my wiring/antenna fail unexpected. The current BMW Professional head unit has some dead pixels on the display also so I may have a stab at repairing that if I can finesse my soldering skills!
As mentioned in the last post, I may be right about suspected wiring issues. Towards the end of October 2020, I had the dog in and out of the car one weekend with various walks away from our usual spots and an intermittent light fault started throwing up on the dash before clearing itself again. Holding in the the OBC button displayed 'CC-ID 123 – Rear Light Right Failure' which originates from exactly where I thought my issues may be so made a note to tackle that ASAP.
Managed to finally spruce the car up with a wash around this time too. Pre-washed with Autoglym's pressure wash through a snowfoam lance twice over, rinsing off in-between:

A decent reaction from Autoglym Magma when sprayed across the wheels before second pre-wash dose:

Then a 2BM wash using Sonax "ocean fresh" car shampoo that I was getting to the end of. I like it but I'm sure there are better products for me out there:

Overall, I was really pleased with the condition of the car now that I'd gone over it whilst cleaning. I had a few errands to run and promised to wash my neighbour's car with him (colleague and a mate, as grim as it sounds haha) so ran out of time for much more during this session. The plan was to get back on it on a clear day with some new products from EZ's halloween sale. Tyres came up a treat and altering cleaning/dressing them though.
V5 finally arrived too allowing me to transfer my private plate. I wanted to fit a colour coded BMW number plate plinth I found on eBay first. The part needed a clean up but was going to look better than the plates that had been drilled into the front bumper as you will see in previous photos. Here's an image of the front without plates and the bumper tidied up, the drill holes for old plates are just about visible.

Frustratingly, there are two sets of holes but I was hoping that the BMW part would cover those areas, sitting flushly in place like this image I've pulled from a google image search:

I should be so lucky. Really annoyed by this as it's just carelessness but I guess they had no reference point or pre-existing plinth to use due to differences in Japanese plate size or placement.

As you can see, the holes remain on show if this part is fitted. I was reluctant to drill more holes and fit this part so decided to just fit my pressed plates in a good enough position for now. The boot has gone through a similar mishap even though BMW provide pre-drilled holes!

Private plate fitted. The wife's previous initials but she'll always be known as SOG to many so it's a keeper. Here's a shot of the previoust mentioned BMW rubber mats fitted too alongside a BMW flare clipped inside the passenger footwell! Turns out it is a legal requirement for Japanese car ownership.

Oh, and I managed to track down some mini discs to see if the OEM head unit worked. It does! When did you a) last see or use one and b) ever see an actual BMW one?! There are some dead pixels in the display that need sorting but I think I'll leave it fitted and get around to fitting my parrot kit again for audio streaming. Makes for a relatively neater and OEM look.

Managed to finally spruce the car up with a wash around this time too. Pre-washed with Autoglym's pressure wash through a snowfoam lance twice over, rinsing off in-between:
A decent reaction from Autoglym Magma when sprayed across the wheels before second pre-wash dose:
Then a 2BM wash using Sonax "ocean fresh" car shampoo that I was getting to the end of. I like it but I'm sure there are better products for me out there:
Overall, I was really pleased with the condition of the car now that I'd gone over it whilst cleaning. I had a few errands to run and promised to wash my neighbour's car with him (colleague and a mate, as grim as it sounds haha) so ran out of time for much more during this session. The plan was to get back on it on a clear day with some new products from EZ's halloween sale. Tyres came up a treat and altering cleaning/dressing them though.
V5 finally arrived too allowing me to transfer my private plate. I wanted to fit a colour coded BMW number plate plinth I found on eBay first. The part needed a clean up but was going to look better than the plates that had been drilled into the front bumper as you will see in previous photos. Here's an image of the front without plates and the bumper tidied up, the drill holes for old plates are just about visible.
Frustratingly, there are two sets of holes but I was hoping that the BMW part would cover those areas, sitting flushly in place like this image I've pulled from a google image search:
I should be so lucky. Really annoyed by this as it's just carelessness but I guess they had no reference point or pre-existing plinth to use due to differences in Japanese plate size or placement.
As you can see, the holes remain on show if this part is fitted. I was reluctant to drill more holes and fit this part so decided to just fit my pressed plates in a good enough position for now. The boot has gone through a similar mishap even though BMW provide pre-drilled holes!
Private plate fitted. The wife's previous initials but she'll always be known as SOG to many so it's a keeper. Here's a shot of the previoust mentioned BMW rubber mats fitted too alongside a BMW flare clipped inside the passenger footwell! Turns out it is a legal requirement for Japanese car ownership.
Oh, and I managed to track down some mini discs to see if the OEM head unit worked. It does! When did you a) last see or use one and b) ever see an actual BMW one?! There are some dead pixels in the display that need sorting but I think I'll leave it fitted and get around to fitting my parrot kit again for audio streaming. Makes for a relatively neater and OEM look.
Taking us into November 2020 now. I've made a few past/present tense changes in the posts but apologies for any confusion if I've missed some thus far!
Nice photo before I gave away the onboard bike!

With all my previous wiring/electric issues at the rear my default setting when I had a dodgy light at the back of the new steed was to chop into the wiring and fix. I had a few quiet evenings at work last week so decided to practice some soldering and fix up 12v fuse wiring required for the parrot kit I'm trying to fit. The Halfords item was too short so needed extending.


These are great little things for a ham-fisted git like myself and for those that have used them before you simply tidy up the wire ends, feed them through the tube and heat the ring of solder in the middle to create the desired connection. Easy!
Anyway, emboldened by my successful run-through I was assembling the bits needed to start working away on the boot hinge harness when I happened across a little spare bulb kit I always stow away in my car kit. Before I hacked away at anything I quickly unclipped the trims and bulb holders, swapping them round. Sure enough, it was the bulb that had blown. Felt a bit daft but the relief at not having to hack away at the wiring for now soon outweighed that. Just shows you sometimes need to step back and realise solutions can be simple and right in front of you! Sadly, I still haven't managed to get the Parrot kit up and running so will revisit that at a later date.
Wiring crisis averted I turned my attention to replacing a bit of missing trim on the windscreen washers. It's nothing major but I replaced and lost the same items on my last car it kept catching my eye whenever I crossed the front of the car. I was going to leave it but for only a few quid posted for a genuine item thought better of it. I realised this time that it takes a little force before it properly 'clicks' into position, sorted.


As previously mentioned I bought the car knowing that as a japanese import it would require some rustproofing/undersealing and ideally I'll get this done before winter really kicks in. The approximate cost of this was factored into the purchase price but I'm really pleased that preliminary quotes from a place that has been recommended to me several times is quite close to that figure. Furthermore, the work is far more extensive than I had understood but they provide a photographic documentation which I will hopefully share here when completed. I think it's worth paying out a little extra for that to help maintain the vehicle history should I ever sell it on.

Aside from a few random flat battery incidents, I enjoyed 1000 trouble free miles in the car between during this initial period so far and was thoroughly pleased with it. I gave it a quick wash about 400-500 miles ago but it wasn't looking too bad when I went over it again:


Rinsed it off gently first with the hozelock spray gun on shower setting before giving the window trims and other typical areas a skoosh of EZ citrus wash, agitating with a cheap Amazon detailing brush as I went along.

I haven't used this type of product in my pre-wash routine before but it made an easy job of shifting bug splatter from the front bumper and number plate so a thumbs up from me thus far. After a quick rinse with the pressure washer I then went round the wheels with some fallout remover, using up the last of a bottle of Autoglym Magma.


This is my third bottle of Magma and I must confess I liked it mostly due to the quite satisfying bleeding effect. So much so that it had me convinced I was doing a good job in the past when I simply sprayed then rinsed it off... Thankfully, I watched the detailing world YouTube review of fallout products recently and saw the error of my ways! This time I left the product to dwell a few moments before agitating and cleaning the wheel face throughly with a wheel brush. (Definitely need some better brushes for this job). What a difference. I gave the tyres a quick scrub too aided by EZ citrus wash again. Next time I hope to achieve a proper wheels off job of it, applying poorboys wheel sealant that I have too..
Rinsed the whole car off using the pressure washer then set about the car using EZ Sub Zero snowfoam. To be honest, I wasn't impressed with the foaming effect and it seemed to run off the car quickly. I went over the car again increasing the amount of product by 30% but I wasn't seeing any better performance than that re: foam. The snowfoam lance seems to run through product much faster than previously experienced with the likes of Autoglym Polar Blast, strange.

For the second application I actually added a capful of citrus wash as recommended on the bottle... the car seemed pretty clean afterwards but I'm not in the habit nor feel qualified to really assess the cleaning performance here. It did seem to shift a lot of the lower level grime but my previous car was black and I'm sensing silver paint can hide a multitude of sins compared to black so it's difficult to compare! I think it's wise to consider that as a lower level detailer I'm possibly bowled over easily with the snowfoam effect rather than actual cleaning performance! (Don't be fooled by the fact I've held an account here for over a decade, I'm a long time lurker!)

After rinsing off thoroughly I then set about the car with two buckets, a wash mitt and the last of some Sonax auto shampoo I've been using this year. It's been alright but looking forward to trying a new product once it's finished. I was fast running out of daylight here but was anxious to at least get one wash carried out on the car before I attacked it for a following decontamination, polishing and waxing session.
As I finished up I took the opportunity to clear out the contents of the car, removing various items of clothing, dog leads and crap I tend to hoard inside it. It needed a hoover but other than that it wasn't in a bad state so minimal work for now. Caught this final image of how she stands as I left her for the night, GoPro's night time mode works really well and I am quite pleased with how well the wheels look especially.

Got back on it the following afternoon. Not as many photos this session because I was conscious of time and losing sunlight.
Started off going around the car attacking any spots of tar with EZ Glue & Tar remover which worked but some spots were only tiny and took a couple of concentrated passes before clearing up. Rinsed off everything then went around the whole car with EX Reset but quite well diluted as I don't think there was much protection barring the polishing the previous owner carried out before selling. Reset was quite easy to use, foamed up nicely when used with a damp mitt. Quick shampoo wash of the car again and rinsed off.


During all the preparation for polish/wax I found two areas that require attention. The sill trim is quite easily replaced so will order one shortly but the weird mark is possibly due to duct tape. The previous owner had suffered a smashed sunroof when a lorry kicked up a stone so I'm guessing duct tape was used to cover the area before he got to a garage.

On to polishing with the auld faithful, Autoglym SRP. I'm loathe to buy anything else when I have such a large bottle but I think I've only ever used this stuff across all my cars! Once buffed off I then applied a layer of EZ ceramic wax extreme. Caught this in a sale for a tenner and it goes on/off easily but this is my first experience of ceramic products so I wonder how ceramic it can really be at that price point. The proof of the pudding will be in the tasting with frequent washes incoming.
Looked great after polishing:


Looked fantastic after waxing:


Only managed to grab a handful of photos with the iPhone before I had to run a few errands and walk the dog but I was thoroughly pleased with how it turned out. Due to the silver paint and fading light it was difficult to ensure maximum coverage with the wax so I may well apply another coat, just to be sure. Ordered some more double sided tape too because that front plate is annoying me...
Nice photo before I gave away the onboard bike!
With all my previous wiring/electric issues at the rear my default setting when I had a dodgy light at the back of the new steed was to chop into the wiring and fix. I had a few quiet evenings at work last week so decided to practice some soldering and fix up 12v fuse wiring required for the parrot kit I'm trying to fit. The Halfords item was too short so needed extending.
These are great little things for a ham-fisted git like myself and for those that have used them before you simply tidy up the wire ends, feed them through the tube and heat the ring of solder in the middle to create the desired connection. Easy!
Anyway, emboldened by my successful run-through I was assembling the bits needed to start working away on the boot hinge harness when I happened across a little spare bulb kit I always stow away in my car kit. Before I hacked away at anything I quickly unclipped the trims and bulb holders, swapping them round. Sure enough, it was the bulb that had blown. Felt a bit daft but the relief at not having to hack away at the wiring for now soon outweighed that. Just shows you sometimes need to step back and realise solutions can be simple and right in front of you! Sadly, I still haven't managed to get the Parrot kit up and running so will revisit that at a later date.
Wiring crisis averted I turned my attention to replacing a bit of missing trim on the windscreen washers. It's nothing major but I replaced and lost the same items on my last car it kept catching my eye whenever I crossed the front of the car. I was going to leave it but for only a few quid posted for a genuine item thought better of it. I realised this time that it takes a little force before it properly 'clicks' into position, sorted.
As previously mentioned I bought the car knowing that as a japanese import it would require some rustproofing/undersealing and ideally I'll get this done before winter really kicks in. The approximate cost of this was factored into the purchase price but I'm really pleased that preliminary quotes from a place that has been recommended to me several times is quite close to that figure. Furthermore, the work is far more extensive than I had understood but they provide a photographic documentation which I will hopefully share here when completed. I think it's worth paying out a little extra for that to help maintain the vehicle history should I ever sell it on.
Aside from a few random flat battery incidents, I enjoyed 1000 trouble free miles in the car between during this initial period so far and was thoroughly pleased with it. I gave it a quick wash about 400-500 miles ago but it wasn't looking too bad when I went over it again:
Rinsed it off gently first with the hozelock spray gun on shower setting before giving the window trims and other typical areas a skoosh of EZ citrus wash, agitating with a cheap Amazon detailing brush as I went along.
I haven't used this type of product in my pre-wash routine before but it made an easy job of shifting bug splatter from the front bumper and number plate so a thumbs up from me thus far. After a quick rinse with the pressure washer I then went round the wheels with some fallout remover, using up the last of a bottle of Autoglym Magma.
This is my third bottle of Magma and I must confess I liked it mostly due to the quite satisfying bleeding effect. So much so that it had me convinced I was doing a good job in the past when I simply sprayed then rinsed it off... Thankfully, I watched the detailing world YouTube review of fallout products recently and saw the error of my ways! This time I left the product to dwell a few moments before agitating and cleaning the wheel face throughly with a wheel brush. (Definitely need some better brushes for this job). What a difference. I gave the tyres a quick scrub too aided by EZ citrus wash again. Next time I hope to achieve a proper wheels off job of it, applying poorboys wheel sealant that I have too..
Rinsed the whole car off using the pressure washer then set about the car using EZ Sub Zero snowfoam. To be honest, I wasn't impressed with the foaming effect and it seemed to run off the car quickly. I went over the car again increasing the amount of product by 30% but I wasn't seeing any better performance than that re: foam. The snowfoam lance seems to run through product much faster than previously experienced with the likes of Autoglym Polar Blast, strange.
For the second application I actually added a capful of citrus wash as recommended on the bottle... the car seemed pretty clean afterwards but I'm not in the habit nor feel qualified to really assess the cleaning performance here. It did seem to shift a lot of the lower level grime but my previous car was black and I'm sensing silver paint can hide a multitude of sins compared to black so it's difficult to compare! I think it's wise to consider that as a lower level detailer I'm possibly bowled over easily with the snowfoam effect rather than actual cleaning performance! (Don't be fooled by the fact I've held an account here for over a decade, I'm a long time lurker!)
After rinsing off thoroughly I then set about the car with two buckets, a wash mitt and the last of some Sonax auto shampoo I've been using this year. It's been alright but looking forward to trying a new product once it's finished. I was fast running out of daylight here but was anxious to at least get one wash carried out on the car before I attacked it for a following decontamination, polishing and waxing session.
As I finished up I took the opportunity to clear out the contents of the car, removing various items of clothing, dog leads and crap I tend to hoard inside it. It needed a hoover but other than that it wasn't in a bad state so minimal work for now. Caught this final image of how she stands as I left her for the night, GoPro's night time mode works really well and I am quite pleased with how well the wheels look especially.
Got back on it the following afternoon. Not as many photos this session because I was conscious of time and losing sunlight.
Started off going around the car attacking any spots of tar with EZ Glue & Tar remover which worked but some spots were only tiny and took a couple of concentrated passes before clearing up. Rinsed off everything then went around the whole car with EX Reset but quite well diluted as I don't think there was much protection barring the polishing the previous owner carried out before selling. Reset was quite easy to use, foamed up nicely when used with a damp mitt. Quick shampoo wash of the car again and rinsed off.
During all the preparation for polish/wax I found two areas that require attention. The sill trim is quite easily replaced so will order one shortly but the weird mark is possibly due to duct tape. The previous owner had suffered a smashed sunroof when a lorry kicked up a stone so I'm guessing duct tape was used to cover the area before he got to a garage.
On to polishing with the auld faithful, Autoglym SRP. I'm loathe to buy anything else when I have such a large bottle but I think I've only ever used this stuff across all my cars! Once buffed off I then applied a layer of EZ ceramic wax extreme. Caught this in a sale for a tenner and it goes on/off easily but this is my first experience of ceramic products so I wonder how ceramic it can really be at that price point. The proof of the pudding will be in the tasting with frequent washes incoming.
Looked great after polishing:
Looked fantastic after waxing:
Only managed to grab a handful of photos with the iPhone before I had to run a few errands and walk the dog but I was thoroughly pleased with how it turned out. Due to the silver paint and fading light it was difficult to ensure maximum coverage with the wax so I may well apply another coat, just to be sure. Ordered some more double sided tape too because that front plate is annoying me...
Edited by beambeam1 on Thursday 10th December 02:55
Edited by beambeam1 on Friday 11th December 02:40
December 2020! So, time for some recent updates from the last week to bring this thread bang up to date. I'd stick a brew on first as it has the potential to be a bit text/pic heavy... but first, enjoy a wee bit beading off the back of last month's cleaning session:

First of all, couple of cosmetic things tidied up. The M Sport sill trims on driver's side of the car were broken in areas but good condition replacements were easy to come by. Here's how they looked beforehand, the plastic retaining clips are fiddly little bits that have a habit of flying off and disappearing into the depths of nowhere so best to have some spares handy. Thankfully the seller included most of them with the trims.

I also bought some simple numberplate holders off eBay to help address the untidy front end with all the additional and unnecessary screw holes. Easy to fit and can line them up easily with the OEM holes provided so I know they are straight. Need to correct the front a bit more still.


I still haven't managed to get the bluetooth parrot kit up and running but in the pursuit of some tunes/call options I decided to revisit the AUX facility. I never liked it in my previous touring as it was never loud enough for me when listening to podcasts. Small matter as I was born with moderate to severe hearing loss and have worn hearing aids all my life. I was browsing random threads about the E9X 3 Series and found someone talking about setting the AUX volume correctly and had a go myself.

Gamechanger. Within the AUX menu on the head unit is a volume adjuster setting that you can activate. Works great and the call quality is perfectly fine too so I'm well pleased with that as I hammer through some Audibles I've fallen behind on during commutes. It's the little things...
So, a handful of minor touches to the car to improve it. Grab a biscuit for that cup of tea and enjoy the next part.
On the very odd occasion during the first month or so of ownership, I encountered starting issues. Basically, the car would fire up and I'd drive away. However, no sooner had I dropped off my drive and turned down the street when the car would stall and refuse to start again. I'm talking total loss of power, no lights, nothing meaning I would coast 20-40 yards in front of my neighbours drive and have to jump start the car. It always ran well after this and didn't happen again for another fortnight... then weekly... then every few days... then all the time.
I contacted the previous owner and he informed me the battery was only a year old and provided receipts in case I needed to cash in the Halfords warranty for it. I charged the battery and even swapped it with a recent spare from my Mum and Dad's X3, no improvement. I remembered that a friend gave me his old laptop with BMW software on it after he sold his Z4M roadster so I had a play with that and found the following diagnostic codes:

2E77 Ignition, Votage Supply.

Not knowing what could be the issue behind this and finding very little useful information across various BMW forums I did what any eejit with no clue can do. I cleared the codes with that weird sense of optimism that doing so would cull my electric gremlins. Yeeeeaaahh... that didn't work.
Time to have a look.

Down the passenger side of the engine are parts I know all too well having dealt with failed DISA valves on my old touring which had the same engine. Removing the airbox showed me a weird oil residue on the underside of it which I was able to understand was due to the oil filter housing gasket and oil cooler gasket failure failing. (Replacement gaskets have been ordered alongside new filter and fresh oil).

Since I was poking around down there I pulled the first DISA valve out as it is easily accessible. I was pleased to discover it was fine as it is a £250 part.

The green edges are a sort of membrane that help form a seal when the flap closes. These can fray/split over time but the flap can also fail and get sucked into the intake if they break... worth checking if you're ever poking around that side of the engine investigating maf or throttle body issues.
The investigation continues...

On removing the engine cover it was clear that the gasket for the oil filler cap has failed. Mental note to address that soon.

I decided to check all the ignition coils and subsequently, the spark plugs. The coils looked fine and I knew from the previous owner that No.5 had been replaced within the last year alongside all 6 spark plugs. However, ignition chambers 3 and 4 looked like they had a little oil inside them. Difficult to take a clear picture of this at the time so I'll show you the spark plugs instead. The image of them all in a row is after I had given them a quick wipe.
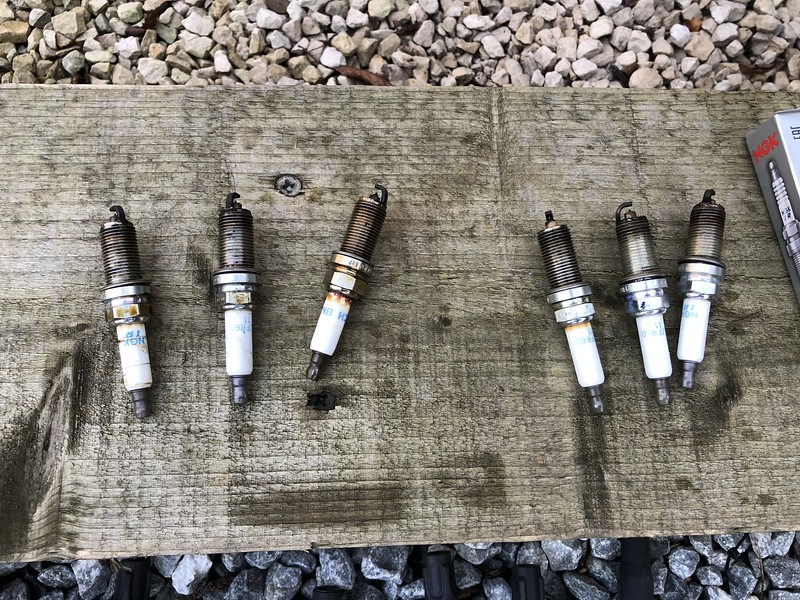

Not good. This sort of oil residue, backed up by feverish forum searching, convinced me that the valve cover gasket was failing and needing sorting out before the oil leaking gave me further headaches with the car. All necessary part and gasket part numbers acquired ahead of pay day and a dreaded phone call to BMW.
It seems uncanny that the oil filter gaskets and the valve cover gasket has gone around the same time but perhaps it is just bad luck. It can't have been happening for too long as I've not had to top up the oil and the oil misting evident on the underside of the bonnet was not there when I purchased the car. Anyway, I bolted everything back up but still none the wiser about what was really wrong and what '2E77 Ignition, Votage Supply' meant for the car and my wallet.

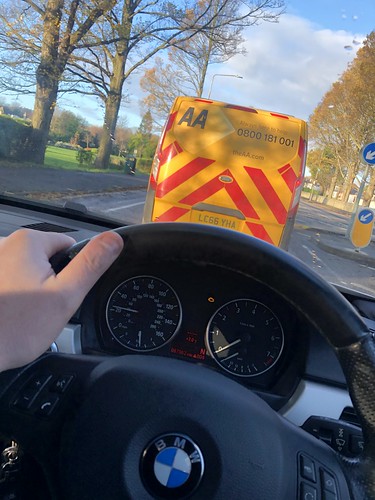
I drove to work that night and in the morning could not get the car to start at all. It was time to call the AA for roadside assistance and ultimately, a tow home. Sadly, in the process of getting me backed up on to the drive some damage to my front bumper was caused. I was fizzing but on the back of a night shift and frustrated by car troubles I just held my cool and said I'd make a claim for it through the AA. The AA guy took images for his report and I did file a claim but it has been two weeks almost and I haven't heard anything barring a missed call/voicemail.

A costly follow up to come in the next post regarding the starting trouble!
First of all, couple of cosmetic things tidied up. The M Sport sill trims on driver's side of the car were broken in areas but good condition replacements were easy to come by. Here's how they looked beforehand, the plastic retaining clips are fiddly little bits that have a habit of flying off and disappearing into the depths of nowhere so best to have some spares handy. Thankfully the seller included most of them with the trims.
I also bought some simple numberplate holders off eBay to help address the untidy front end with all the additional and unnecessary screw holes. Easy to fit and can line them up easily with the OEM holes provided so I know they are straight. Need to correct the front a bit more still.
I still haven't managed to get the bluetooth parrot kit up and running but in the pursuit of some tunes/call options I decided to revisit the AUX facility. I never liked it in my previous touring as it was never loud enough for me when listening to podcasts. Small matter as I was born with moderate to severe hearing loss and have worn hearing aids all my life. I was browsing random threads about the E9X 3 Series and found someone talking about setting the AUX volume correctly and had a go myself.
Gamechanger. Within the AUX menu on the head unit is a volume adjuster setting that you can activate. Works great and the call quality is perfectly fine too so I'm well pleased with that as I hammer through some Audibles I've fallen behind on during commutes. It's the little things...
So, a handful of minor touches to the car to improve it. Grab a biscuit for that cup of tea and enjoy the next part.
On the very odd occasion during the first month or so of ownership, I encountered starting issues. Basically, the car would fire up and I'd drive away. However, no sooner had I dropped off my drive and turned down the street when the car would stall and refuse to start again. I'm talking total loss of power, no lights, nothing meaning I would coast 20-40 yards in front of my neighbours drive and have to jump start the car. It always ran well after this and didn't happen again for another fortnight... then weekly... then every few days... then all the time.
I contacted the previous owner and he informed me the battery was only a year old and provided receipts in case I needed to cash in the Halfords warranty for it. I charged the battery and even swapped it with a recent spare from my Mum and Dad's X3, no improvement. I remembered that a friend gave me his old laptop with BMW software on it after he sold his Z4M roadster so I had a play with that and found the following diagnostic codes:
2E77 Ignition, Votage Supply.
Not knowing what could be the issue behind this and finding very little useful information across various BMW forums I did what any eejit with no clue can do. I cleared the codes with that weird sense of optimism that doing so would cull my electric gremlins. Yeeeeaaahh... that didn't work.
Time to have a look.
Down the passenger side of the engine are parts I know all too well having dealt with failed DISA valves on my old touring which had the same engine. Removing the airbox showed me a weird oil residue on the underside of it which I was able to understand was due to the oil filter housing gasket and oil cooler gasket failure failing. (Replacement gaskets have been ordered alongside new filter and fresh oil).
Since I was poking around down there I pulled the first DISA valve out as it is easily accessible. I was pleased to discover it was fine as it is a £250 part.
The green edges are a sort of membrane that help form a seal when the flap closes. These can fray/split over time but the flap can also fail and get sucked into the intake if they break... worth checking if you're ever poking around that side of the engine investigating maf or throttle body issues.
The investigation continues...
On removing the engine cover it was clear that the gasket for the oil filler cap has failed. Mental note to address that soon.
I decided to check all the ignition coils and subsequently, the spark plugs. The coils looked fine and I knew from the previous owner that No.5 had been replaced within the last year alongside all 6 spark plugs. However, ignition chambers 3 and 4 looked like they had a little oil inside them. Difficult to take a clear picture of this at the time so I'll show you the spark plugs instead. The image of them all in a row is after I had given them a quick wipe.
Not good. This sort of oil residue, backed up by feverish forum searching, convinced me that the valve cover gasket was failing and needing sorting out before the oil leaking gave me further headaches with the car. All necessary part and gasket part numbers acquired ahead of pay day and a dreaded phone call to BMW.
It seems uncanny that the oil filter gaskets and the valve cover gasket has gone around the same time but perhaps it is just bad luck. It can't have been happening for too long as I've not had to top up the oil and the oil misting evident on the underside of the bonnet was not there when I purchased the car. Anyway, I bolted everything back up but still none the wiser about what was really wrong and what '2E77 Ignition, Votage Supply' meant for the car and my wallet.
I drove to work that night and in the morning could not get the car to start at all. It was time to call the AA for roadside assistance and ultimately, a tow home. Sadly, in the process of getting me backed up on to the drive some damage to my front bumper was caused. I was fizzing but on the back of a night shift and frustrated by car troubles I just held my cool and said I'd make a claim for it through the AA. The AA guy took images for his report and I did file a claim but it has been two weeks almost and I haven't heard anything barring a missed call/voicemail.
A costly follow up to come in the next post regarding the starting trouble!
So, where were we?

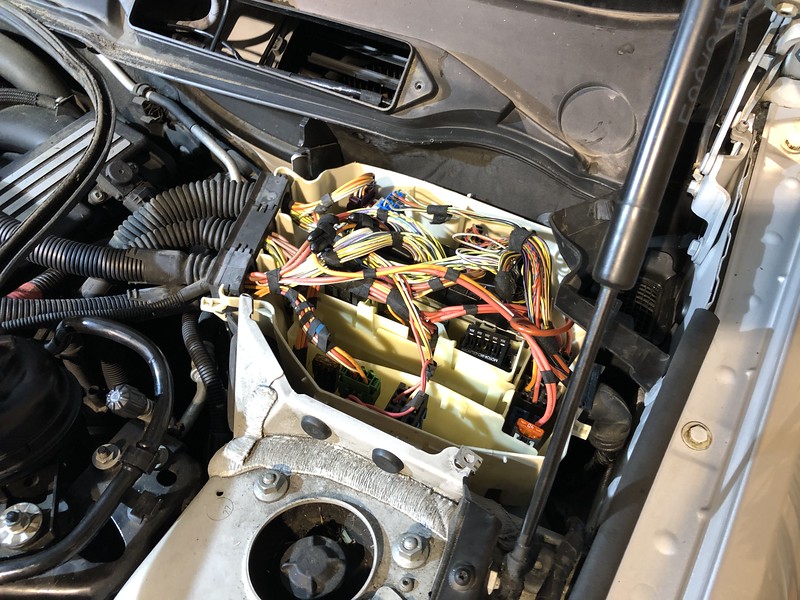
Ah yes, tackling '2E77 Ignition, Votage Supply' that resulted in me being towed home by the AA. Whilst the AA guy tackled the car it became apparent that the source of the issue was from the plethora of fuses and relays in the fuse box situated in the engine bay, as pictured above. He checked several fuses and relays but after 90 minutes gave up and relayed me to my choice of garage or home. I contacted a garage that specialises in BMW's first but they couldn't squeeze me in until the end of December. However, upon hearing that it was electrical/diagnostic work required they recommended a fella who happened to operate only a couple of miles from my address so I booked in with him for the following Monday and left the car parked up at home until then.
http://www.gfmdiagnostics.co.uk - absolutely delighted with the service. GFD is a proper nice chap who certainly knows what he is doing. By the end of Monday he had belled me up explaining that the ECU (aka the DME) had been waterlogged and needed replaced. He had already priced up a replacement but supplied me with part numbers knowing I'd want to hunt for a cheaper option.

Here's the offending item. It slots into the aforementioned fuse/relay box like a slice of toast which explains the water damage on the lower portion. The diagnostics fella said there was visible water at the bottom of the box containing all the fuses and relays but when he removed this unit loads of water came trickling out from inside it. Not good. Even worse was finding out that BMW would like approximately £1100 for a replacement.
Thankfully, I found a newly listed secondhand unit unit on eBay for for £180 and paid about the same again for my old one to be copied and cloned to this new unit by GFD. This involves all sorts of electronic trickery such as altering VIN and mileage information on the replacement unit but I am delighted to report that it all worked a treat. The eBay seller was an absolute gent and accommodated me by posting it via next day special delivery.
Here's the replacement against the waterlogged item:


The car has had no issues in this department since I got it back and I am delighted to have all-in paid say a third of the price BMW want for a new unit and that isn't factoring in labour costs for fitting and coding... I dread to think. Other options from a reputable independent in London was £550 for a refurbished unit which would still require fitting and coding by GDF!
I'm delighted to have resolved this fairly cheaply in the end and with the car back before the weekend, I was able to fetch my latest treat to myself with the money saved. An additional Halfords Advanced tool chest to go on top of my roll cab!

So, that brings us on approach to this weekend past. I got the car back on Friday morning but if you live in the central belt of Scotland you will know all about the atrocious snow/sleet/rain situation we had for a few days. Mindful that I had other issues to attend to and that I hadn't resolved the water issues damaging the previous ECU/DME unit, I arranged to use my brother's unit to work on the car under shelter for Saturday before the water issues cropped up again.
The plan for this session was to trace and tackle the water issues affecting the DME, replace the valve cover gasket, oil filter housing gasket and the oil cooler gasket. It was going to be a long shift and I popped round for 4pm armed with coffee and disappointing SCO v IRE rugby results.

Can you tell my brother is a welder? This fact comes in very handy later...
Knowing we had plenty to do I got stuck into removing various panels and bits to provide as much space in the engine bay as possible whilst my brother finished up a couple of welding jobs. Knowing I was in for the long haul I fired up Audible and took my time cleaning all the bits I removed as I went along.

So here's a top down view of the fuse box which the ECU/DME resides in:

Worryingly, I could see a significant amount of water had pooled up inside the box already following the heavy rain only 48 hours prior. I didn't want to move too much too soon but set about removing as much water as possible with the hose and trigger from a spare spray bottle I had in the car.

I thought this was quite clever! It took a solid 10 minutes of pumping to remove most of the water I could reach which helped me realise that there was even more water elsewhere in this area that was compounding the problem. Once I felt I had removed all the water I could I felt confident enough to lift and remove all the components safely.

Hopefully you can see in this next image the water remaining after I had removed approximately a litre of water from the fuse box already. You can see a sort of tide mark up the sides and the clean squiggle lines are from where the hose of my trigger was striking the bottom during the removal process. I have also circled what appeared to be a drain hole for the fuse box which was clearly not draining...

With plenty of space to operate, it was time to remove and investigate further. As with everything else, this was going to be cleaned thoroughly before reinstallation. This is the underside of the fuse box in the following images:


A sort of plastic grommet clips into this drain hole, look at the state of it!

It took me a lot longer than I'd like to admit to clean this out but assisted with my trusty pick, I well and truly gutted out all the crap and clipped it back in. I don't anticipate any more issues with this now but I'll be paying close attention in future, regardless! Looking clean when I reinstalled it towards the end of this garage session though!

However, that wasn't the end of my issues with water here! The fuse box resides in a cavity behind the front passenger wheel arch/suspension turret:

Upon removal I discovered another alarming amount of water. I've tried to use a bit of blue roll to indicate the volume here:

The small white plastic bit is just the filter from the end of the hose of the spray bottle trigger I had been using to remove water but just check out the amount of crap down there clearly blocking wherever the water is meant to drain from. At this stage I knew exactly where it was all coming from just not where the blockage was.

The above is an image of the drainage channels/gutters below the corner of the windscreen that we all often find leaves and other types of detritus in. The mesh cover had previously been found full of crap but the secondary channels that lead down into the fuse box and the area underneath were just full of what can only be described at this stage as organic sludge. Again, as with everything removed, this was all cleaned inside and out prior to refitting to prevent similar issues in the future.
It took a fair amount of water removal, wonder wipes and blue roll to clean this cavity beneath the box and figure out why water wasn't draining. I couldn't see any obviously plastic grommets, even ones that were missing but in the process of scraping out very fine areas of sludge with some wire I discovered a very slim channel - as indicated by said wire in the next image:
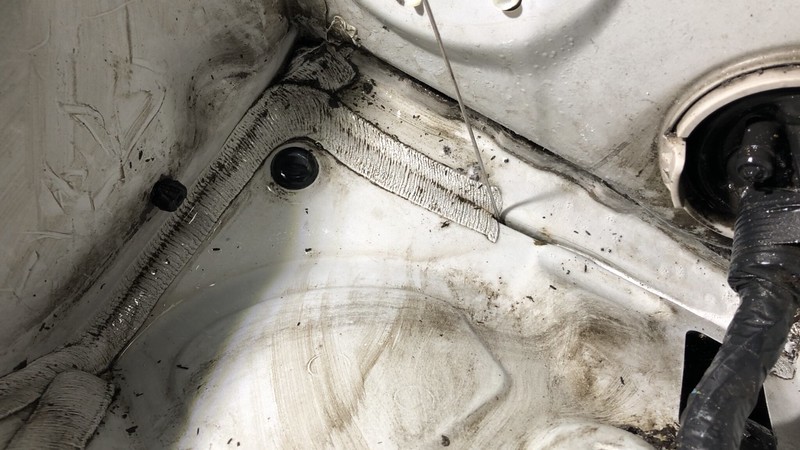
That's it. That's bloody it. My brother handed me another piece of wire about 1.5m long and with significant poking and scraping I was able to clear the channel completely, eventually poking through until I was tapping the engine undertray below the car. What a relief but also, what a disappointment. The channel must only be 2-3mm wide and 40-50mm long which makes it easy to understand how over time blockages can occur. In my opinion, this is poor design by BMW.
With that issue finally resolved and thorough measures of preventative cleaning carried out I set about reinstalling the fuse box and associated fuses, relays and the ECU/DME unit. This was a tad premature as I would need to shift some of this again whilst tackling the second job of the session which was the valve cover gasket.
Time to whip out my other Halfords Advanced purchase! This is actually my mate's kit that I purchased with a trade card for him but having transferred my kit to the roll cab and chest I had no option but to plunder his! :lol:

For the very amateur mechanic like myself, these things are worth their weight in gold!
So, on to replacing the valve cover gasket after discovering some oil in the ignition coil chambers of cylinder 3 and 4 previously. This is probably the most complex task I've ever undertaken on a car and I was glad for my brother's assistance at this stage as there was a lot of issues to navigate. The car is so bloody low for starters so we had to take it in turns bending over and working on it to give our backs some relief!

For the most part I relied on this useful guide: How To Replace The Valve Cover Gasket On A BMW N51/N52N (328i, X3, X5, & More)
This took us several hours with plenty of breaks and deliberation. We didn't actually put everything back together and get away until 5.30am. As such I didn't take too many photos along the way of things like the replacement parts and so on but I'm extremely satisfied and chuffed to have carried this job out with success.
It basically requires the removal of various covers and panels to get to the valve cover which is when you unscrew all the bolts holding it in place. There was visible leakage around some areas which indicated clearly this job was required. It was also clear that at some point in time someone has been carrying out work in this department as we found one bolt at the rear of the engine was barely hand tight whilst another bolt was found to be previously over-torqued and sheared completely. As seen when held up against a new bolt...

Nonetheless, we plodded on until we ran into difficulties removing the valvetronic motor located on the top of the valve cover. You need a 4mm hex key/socket to unwind the motor whilst you undo three tore bolts situated at 3, 6 and 9 o'clock if you were looking at it side on. The bolt underneath, in the 6 o'clock position is very difficult to get at and we found that the torx socket piece we were using had too large a profile, preventing adequate access to the bolt in question. In steps my useful brother, remember when I said he was a welder...
First of all, he grabbed a similar socket piece from his own toolkit and welded it to his workbench to hold it in situ:


Then it was out with the grinder to the socket piece in half and utilise the thinner portion:

This was then welded on to a spare extension bar before being ground down further to reduce the profile and provide us with the tool we needed to finish removing the valvetronic motor!
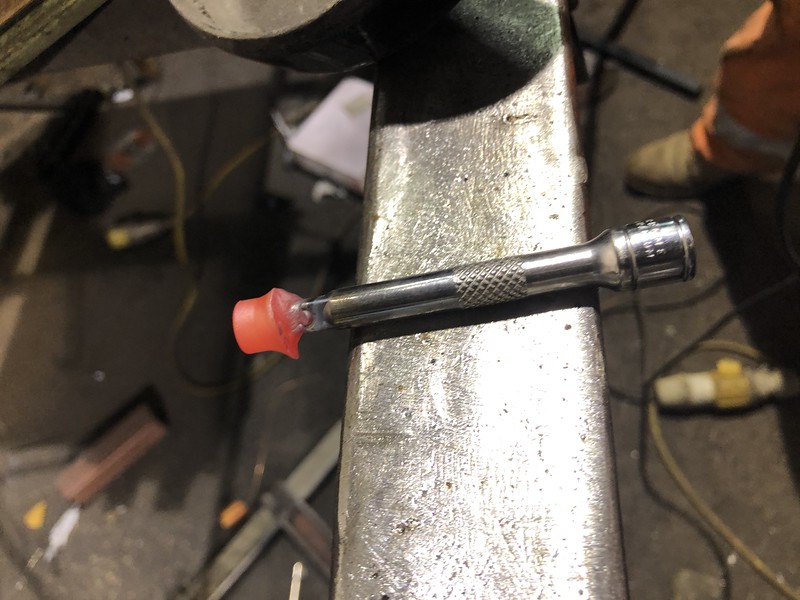
Bear in mind that it was about 1am Sunday morning so we couldn't nip out to Halfords or similar for this...

Removing the valve cover after this stage was an absolute pig and we twisted up the old gasket during the process. In the following image you will see some hazards such as the ignition wiring is present. We set about disconnecting and clearing all of this out the way before fitting the new gasket. With it being so tricky to remove we were under no illusion that reinstallation of the cover would be easy. We only had one gasket set to hand so I'm glad we took the time to properly disconnect and shift everything (which is beyond the instructions provided in the link previously) to avoid damaging it.

With it pushing past a 12 hour session in the workshop and the temperature dropping outside we decided to call it a day once the valve cover and everything was reinstalled. Unfortunately, we snapped a head bolt when my torque wrench failed so I need to get an extractor set and sort that out ASAP. I'm planning on tackling this soon alongside the oil filter housing and cooler gaskets that we didn't get around to.
Overall, I'm really really pleased to have gotten through this batch of issues/work and achieved successful outcomes. I'm not afraid to admit at the onset of all this I felt like a gallon of petrol and a zippo were my best solutions but I'm glad I persevered. The previous owner saw a couple of instagram posts I had made whilst documenting what I was up to and reached out to me. On the day of sale he thought the car had a starting issue. We've determined that this was likely very early signs of the waterlogged ECU/DME failing and he has very kindly insisted that he will pay for the replacement. This is very kind of him and I'm blown away by the gesture. It really has made the whole process feel that little bit more satisfactory and worthwhile. I didn't for one second think he had knowingly sold the car with issues but it's great to encounter a genuine and honest seller in a world of colourful private car sales.


With all that said, my Sunday was spent sleeping then treating myself to a cracking breakfast and even tastier beer! Well deserved I would say!
Thanks for reading if you managed to get this far. :thumb:
Ah yes, tackling '2E77 Ignition, Votage Supply' that resulted in me being towed home by the AA. Whilst the AA guy tackled the car it became apparent that the source of the issue was from the plethora of fuses and relays in the fuse box situated in the engine bay, as pictured above. He checked several fuses and relays but after 90 minutes gave up and relayed me to my choice of garage or home. I contacted a garage that specialises in BMW's first but they couldn't squeeze me in until the end of December. However, upon hearing that it was electrical/diagnostic work required they recommended a fella who happened to operate only a couple of miles from my address so I booked in with him for the following Monday and left the car parked up at home until then.
http://www.gfmdiagnostics.co.uk - absolutely delighted with the service. GFD is a proper nice chap who certainly knows what he is doing. By the end of Monday he had belled me up explaining that the ECU (aka the DME) had been waterlogged and needed replaced. He had already priced up a replacement but supplied me with part numbers knowing I'd want to hunt for a cheaper option.
Here's the offending item. It slots into the aforementioned fuse/relay box like a slice of toast which explains the water damage on the lower portion. The diagnostics fella said there was visible water at the bottom of the box containing all the fuses and relays but when he removed this unit loads of water came trickling out from inside it. Not good. Even worse was finding out that BMW would like approximately £1100 for a replacement.
Thankfully, I found a newly listed secondhand unit unit on eBay for for £180 and paid about the same again for my old one to be copied and cloned to this new unit by GFD. This involves all sorts of electronic trickery such as altering VIN and mileage information on the replacement unit but I am delighted to report that it all worked a treat. The eBay seller was an absolute gent and accommodated me by posting it via next day special delivery.
Here's the replacement against the waterlogged item:
The car has had no issues in this department since I got it back and I am delighted to have all-in paid say a third of the price BMW want for a new unit and that isn't factoring in labour costs for fitting and coding... I dread to think. Other options from a reputable independent in London was £550 for a refurbished unit which would still require fitting and coding by GDF!
I'm delighted to have resolved this fairly cheaply in the end and with the car back before the weekend, I was able to fetch my latest treat to myself with the money saved. An additional Halfords Advanced tool chest to go on top of my roll cab!
So, that brings us on approach to this weekend past. I got the car back on Friday morning but if you live in the central belt of Scotland you will know all about the atrocious snow/sleet/rain situation we had for a few days. Mindful that I had other issues to attend to and that I hadn't resolved the water issues damaging the previous ECU/DME unit, I arranged to use my brother's unit to work on the car under shelter for Saturday before the water issues cropped up again.
The plan for this session was to trace and tackle the water issues affecting the DME, replace the valve cover gasket, oil filter housing gasket and the oil cooler gasket. It was going to be a long shift and I popped round for 4pm armed with coffee and disappointing SCO v IRE rugby results.
Can you tell my brother is a welder? This fact comes in very handy later...
Knowing we had plenty to do I got stuck into removing various panels and bits to provide as much space in the engine bay as possible whilst my brother finished up a couple of welding jobs. Knowing I was in for the long haul I fired up Audible and took my time cleaning all the bits I removed as I went along.
So here's a top down view of the fuse box which the ECU/DME resides in:
Worryingly, I could see a significant amount of water had pooled up inside the box already following the heavy rain only 48 hours prior. I didn't want to move too much too soon but set about removing as much water as possible with the hose and trigger from a spare spray bottle I had in the car.
I thought this was quite clever! It took a solid 10 minutes of pumping to remove most of the water I could reach which helped me realise that there was even more water elsewhere in this area that was compounding the problem. Once I felt I had removed all the water I could I felt confident enough to lift and remove all the components safely.
Hopefully you can see in this next image the water remaining after I had removed approximately a litre of water from the fuse box already. You can see a sort of tide mark up the sides and the clean squiggle lines are from where the hose of my trigger was striking the bottom during the removal process. I have also circled what appeared to be a drain hole for the fuse box which was clearly not draining...
With plenty of space to operate, it was time to remove and investigate further. As with everything else, this was going to be cleaned thoroughly before reinstallation. This is the underside of the fuse box in the following images:
A sort of plastic grommet clips into this drain hole, look at the state of it!
It took me a lot longer than I'd like to admit to clean this out but assisted with my trusty pick, I well and truly gutted out all the crap and clipped it back in. I don't anticipate any more issues with this now but I'll be paying close attention in future, regardless! Looking clean when I reinstalled it towards the end of this garage session though!
However, that wasn't the end of my issues with water here! The fuse box resides in a cavity behind the front passenger wheel arch/suspension turret:
Upon removal I discovered another alarming amount of water. I've tried to use a bit of blue roll to indicate the volume here:
The small white plastic bit is just the filter from the end of the hose of the spray bottle trigger I had been using to remove water but just check out the amount of crap down there clearly blocking wherever the water is meant to drain from. At this stage I knew exactly where it was all coming from just not where the blockage was.
The above is an image of the drainage channels/gutters below the corner of the windscreen that we all often find leaves and other types of detritus in. The mesh cover had previously been found full of crap but the secondary channels that lead down into the fuse box and the area underneath were just full of what can only be described at this stage as organic sludge. Again, as with everything removed, this was all cleaned inside and out prior to refitting to prevent similar issues in the future.
It took a fair amount of water removal, wonder wipes and blue roll to clean this cavity beneath the box and figure out why water wasn't draining. I couldn't see any obviously plastic grommets, even ones that were missing but in the process of scraping out very fine areas of sludge with some wire I discovered a very slim channel - as indicated by said wire in the next image:
That's it. That's bloody it.
My brother handed me another piece of wire about 1.5m long and with significant poking and scraping I was able to clear the channel completely, eventually poking through until I was tapping the engine undertray below the car. What a relief but also, what a disappointment. The channel must only be 2-3mm wide and 40-50mm long which makes it easy to understand how over time blockages can occur. In my opinion, this is poor design by BMW.With that issue finally resolved and thorough measures of preventative cleaning carried out I set about reinstalling the fuse box and associated fuses, relays and the ECU/DME unit. This was a tad premature as I would need to shift some of this again whilst tackling the second job of the session which was the valve cover gasket.
Time to whip out my other Halfords Advanced purchase! This is actually my mate's kit that I purchased with a trade card for him but having transferred my kit to the roll cab and chest I had no option but to plunder his! :lol:
For the very amateur mechanic like myself, these things are worth their weight in gold!
So, on to replacing the valve cover gasket after discovering some oil in the ignition coil chambers of cylinder 3 and 4 previously. This is probably the most complex task I've ever undertaken on a car and I was glad for my brother's assistance at this stage as there was a lot of issues to navigate. The car is so bloody low for starters so we had to take it in turns bending over and working on it to give our backs some relief!
For the most part I relied on this useful guide: How To Replace The Valve Cover Gasket On A BMW N51/N52N (328i, X3, X5, & More)
This took us several hours with plenty of breaks and deliberation. We didn't actually put everything back together and get away until 5.30am. As such I didn't take too many photos along the way of things like the replacement parts and so on but I'm extremely satisfied and chuffed to have carried this job out with success.
It basically requires the removal of various covers and panels to get to the valve cover which is when you unscrew all the bolts holding it in place. There was visible leakage around some areas which indicated clearly this job was required. It was also clear that at some point in time someone has been carrying out work in this department as we found one bolt at the rear of the engine was barely hand tight whilst another bolt was found to be previously over-torqued and sheared completely. As seen when held up against a new bolt...
Nonetheless, we plodded on until we ran into difficulties removing the valvetronic motor located on the top of the valve cover. You need a 4mm hex key/socket to unwind the motor whilst you undo three tore bolts situated at 3, 6 and 9 o'clock if you were looking at it side on. The bolt underneath, in the 6 o'clock position is very difficult to get at and we found that the torx socket piece we were using had too large a profile, preventing adequate access to the bolt in question. In steps my useful brother, remember when I said he was a welder...
First of all, he grabbed a similar socket piece from his own toolkit and welded it to his workbench to hold it in situ:
Then it was out with the grinder to the socket piece in half and utilise the thinner portion:
This was then welded on to a spare extension bar before being ground down further to reduce the profile and provide us with the tool we needed to finish removing the valvetronic motor!
Bear in mind that it was about 1am Sunday morning so we couldn't nip out to Halfords or similar for this...
Removing the valve cover after this stage was an absolute pig and we twisted up the old gasket during the process. In the following image you will see some hazards such as the ignition wiring is present. We set about disconnecting and clearing all of this out the way before fitting the new gasket. With it being so tricky to remove we were under no illusion that reinstallation of the cover would be easy. We only had one gasket set to hand so I'm glad we took the time to properly disconnect and shift everything (which is beyond the instructions provided in the link previously) to avoid damaging it.
With it pushing past a 12 hour session in the workshop and the temperature dropping outside we decided to call it a day once the valve cover and everything was reinstalled. Unfortunately, we snapped a head bolt when my torque wrench failed so I need to get an extractor set and sort that out ASAP. I'm planning on tackling this soon alongside the oil filter housing and cooler gaskets that we didn't get around to.
Overall, I'm really really pleased to have gotten through this batch of issues/work and achieved successful outcomes. I'm not afraid to admit at the onset of all this I felt like a gallon of petrol and a zippo were my best solutions but I'm glad I persevered. The previous owner saw a couple of instagram posts I had made whilst documenting what I was up to and reached out to me. On the day of sale he thought the car had a starting issue. We've determined that this was likely very early signs of the waterlogged ECU/DME failing and he has very kindly insisted that he will pay for the replacement. This is very kind of him and I'm blown away by the gesture. It really has made the whole process feel that little bit more satisfactory and worthwhile. I didn't for one second think he had knowingly sold the car with issues but it's great to encounter a genuine and honest seller in a world of colourful private car sales.
With all that said, my Sunday was spent sleeping then treating myself to a cracking breakfast and even tastier beer! Well deserved I would say!
Thanks for reading if you managed to get this far. :thumb:
Edited by beambeam1 on Thursday 10th December 03:10
d_a_n1979 said:
What a great project and write-up; nice to see another Jap BMW touring on these pages (I'be got an E39 530i touring from Japan FYI) 
Mine, fortunately, hasn't had any niggles like yours, mines just been more of a full suspension, braking system overhauls and various bits of TLC along the way
Mine, fortunately, hasn't had any niggles like yours, mines just been more of a full suspension, braking system overhauls and various bits of TLC along the way
I'm actually well aware of your thread, really enjoyed it thus far and especially wanted to ask you how you got on with this oil catcher for oil changes. I've got one too but wary of using it.

d_a_n1979 said:
Re the Pioneer stuff; mine had all that crap fitted; it's useless here in the UK, so it all got ripped out and I fitted a Grom Audio BT3 Bluetooth kit to my car that does away with the CD changer (plugs into the wiring) and gives full Bluetooth hands-0free and A2DP playback.
Mine also had a crappy Clifford alarm system fitted to it; that got ripped out also by my auto-sparky pal for the price of a crate of decent ale
Mine also had a crappy Clifford alarm system fitted to it; that got ripped out also by my auto-sparky pal for the price of a crate of decent ale
Yeah, I've since learned very little extra about the Pioneer except that it is redundant for use in the UK. I'd like to remove it and the alarm but the whole lot has been very nicely wired in and taped up that I have no confidence in distinguishing OEM v aftermarket wiring!
d_a_n1979 said:
The electric issues remind me of the MG ZT/ZT-T niggles they have with the bulk head filling with water and drowning the ECU! They were built at the time of the BMW ownership; you'd have thought/hoped they'd have learned from those mistakes.
The cavity would fill with water and the drain tube, which was a crappy rubber style one, would get filled with cack and then block and then the cavity would fill with litres of water! Easy enough to fix, but no good if it's too late and the ECU has gone for a swim!
The cavity would fill with water and the drain tube, which was a crappy rubber style one, would get filled with cack and then block and then the cavity would fill with litres of water! Easy enough to fix, but no good if it's too late and the ECU has gone for a swim!
With my previous E91 I always spotted this small pool of water at the driver's side of the car when parking up at work (I have the CCTV aimed at it) but I never had this with the new E91... always wondered what was leaking. The other night after parking up at work I poured a small amount of water down the channel and sure enough a small trickle made it's way out from under the car on the driver's side! At least I know it is working for sure now!
Coin-Slot said:
Good read, and as above, how difficult is it come up with a better drainage system?!
tobinen said:
Great write-up and top spannering. That BMW (lack of) drainage idea is very poor.
Thanks, both, I'm not the handiest but in the last couple of years I've gotten better when armed with time, tools, forum wisdom and youtube guides. Agreed, such a very thin channel or gully just doesn't seem appropriate for drainage... especially in Scotland!pmorg4 said:
Is it just me or is the hinged oil cap on the N52 much more difficult to open than the old style twist-off that the M54 in the E46 had? Mine seems to have a real reluctance to turn. I might try to replace it with an older twist-off type, as it looks like the same fitment. It's not like I've ever lost an oil cap so I don't see any benefit in the hinged cap.
It is definitely more awkward to operate, my last E91 felt like it was locked on tight which was a pain as it called for a litre every 1200 miles. I was looking up the gasket for this area and think they may have an updated version much like you describe instead of the hinged version. If I do find out for sure I'll be sure to get it and update with part numbers in this thread.RS Grant said:
Nice car, good progress and a great write up.
I've got an E91 and a friend of mine with an E91 335d has just (in the last couple of days) had to fork out for a new ECU after his was drowned, so checking mine has rocketed to the top of the priority list this weekend. I keep an eye on the wee plastic mesh parts and clean that top area out regularly but I'm worried about what might be underneath that now.
It's worthwhile checking, for sure. The simplest way would be to use a spray bottle trigger and tube from inside said bottle like I did and see if there is anything to pump out. I do believe now with a decent bit of wire I could reach that drainage channel without removing everything but it really isn't that complicated to remove and check properly. I find a lot of the clips and fixtures in the engine area to be robust so don't hold back if you feel something won't give up.I've got an E91 and a friend of mine with an E91 335d has just (in the last couple of days) had to fork out for a new ECU after his was drowned, so checking mine has rocketed to the top of the priority list this weekend. I keep an eye on the wee plastic mesh parts and clean that top area out regularly but I'm worried about what might be underneath that now.
stichill99 said:
Really interesting and enjoyable write up. I will add GMF diagnostics into my diary for the future if needed as not too far away from Edinburgh!
Genuinely seems a good guy and definitely knows what he is doing. It's a small unit operation behind some houses where he seems to work away in peace. If you ever find the need for him and can't get a hold of him on the phone then it's likely because he is stuck down his pit under the car and isn't for dropping tools and climbing out just to answer it! pmorg4 said:
Just reading back through the post properly (it was a skim read earlier) I'm surprised at how challenging the valve cover gasket replacement is on the N52. I replaced mine on my E46 330 (M54 engine) and it was probably about an hour worth of work, with no instructions required, all pretty self explanatory really. The hardest part of the job was getting the old gasket off as it had solidified into the cover and disintegrated during removal.
I appreciate that the N52 has valvetronic to deal with, but even that aside the whole job seems to have become much more difficult than it was on the M54. I previously thought to myself that this is an easy afternoon job should mine require it (and it seems that all 6-pot BMWs need this gasket changed sooner or later) but now I'm not so sure!
Looking back on the job, it isn't THAT difficult but I tend to be methodical and take my sweet, sweet time which drags things out a bit. There are quite a few items to be removed or disconnected and moved out the way otherwise you run into some clearance issues. The valvetronic is a tricky item and definitely best tackled with a second pair of hands. The guide I used and linked to could do with some additional information if you ask me. Prior to reinstalling the valve cover we disconnected the ignition coil harnesses, ground wires and some other cables which allowed us much more room and freedom. Without that I don't really see how you can reinstall the cover without damaging/fouling the gasket you have just fitted.I appreciate that the N52 has valvetronic to deal with, but even that aside the whole job seems to have become much more difficult than it was on the M54. I previously thought to myself that this is an easy afternoon job should mine require it (and it seems that all 6-pot BMWs need this gasket changed sooner or later) but now I'm not so sure!
Barchettaman said:
Great work there - what a slog.
Bizarrely enough I still use MiniDisc, all the time in fact, for work (I make study discs to learn operatic roles). They’re really handy.
Interesting! I'm very fond of the unit there which is why I think I'll make a point of getting around to fixing the dead pixel situation. What is your setup for recording to MiniDisc then? I used to have a portable MiniDisc recording player for recording university lectures years ago. Sold it a few years ago which is a shame as I wouldn't mind recording a few DJ sets from YouTube to them and keeping them in the car. If you wouldn't mind sorting me out with some if I covered the cost of the MiniDiscs and some beer tokens, do let me know!Bizarrely enough I still use MiniDisc, all the time in fact, for work (I make study discs to learn operatic roles). They’re really handy.
It's mad. I was looking up the MiniDisc history when I got the car and found out that this sort of tech was announced in the early 1980s. The popularity for it stemmed from significantly improved anti-skipping as the audio files could buffer for approximately 40 seconds. Wife's cousin is married to a DJ who chucked some old mixes my way. I blessed him with some firewood in return and some cracking chat about N52 engines since he has a Z4.
Thanks for all the positives responses folks!
B'stard Child said:
When you buy those mats from BMW - they have a leaflet instructing you to cut of the tail edge which is used for hanging on display
Oh. Must admit I didn't even pay attention to that, I only had them in the previous car for a short while and hadn't even used the velcro tabs. Looking at them now I can see there is a giant pair of scissors embossed on to that tail edge! Thanks.Barchettaman said:
MiniDisc related answer:
Usually however I record from YouTube via the headphone jack on the computer. The quality isn’t perfect but it’s perfectly adequate. Editing them down for my opera roles is dead easy. Then I just sit in a comfy chair with the music and a remote control.
PM me if you want me to send a few over.
Recording from YouTube is exactly what I'm after! I've a handful of DJ sets that I would love to have on minidisc to keep in the car. Will definitely PM you shortly. Sounds like an interesting gig you have... no pun intended. Really need to see how I go about fixing the pixels/display on the head unit though.Usually however I record from YouTube via the headphone jack on the computer. The quality isn’t perfect but it’s perfectly adequate. Editing them down for my opera roles is dead easy. Then I just sit in a comfy chair with the music and a remote control.
PM me if you want me to send a few over.

Anyway, time for a wee update but first I just wanted to say that I am loving the lengthy E91 chat that has ensued and I'm pleased the write ups thus far have been well received. This has been a long week of trial and error via a slow and methodical process but pleased to report the E91 is running well.

Finally got around to tackling the oil filter gaskets that I never managed when doing the valve cover gasket. There are two, one for the oil filter housing and another for the oil cooler. There are plenty of guides and YouTube tutorials to assist so I got stuck in at the start of the week working from the driveway.

Funnily enough, at 5 o'clock on the oil filter cap you'll see a small pool of oil. If I had really stopped to consider the source this could have saved me a lot of hassle through the week but alas, it's done now and so are a handful of items that would need a refresh someday anyway.


Off with the oil cap. The rubber strap was bought in haste as I mistakenly thought my old GSXR oil filter socket was 86mm but it's not (65mm) and seems I've lost it anyway. I was going to do an oil and filter change but ECP have managed to give me the wrong items again so that will need to wait.

Drained and cleaned the oil filter housing as much as I could before removal and you can see the gasket isn't looking too fresh. Probably been faithful for the entire 67,000 miles thus far - new one popped in a real treat. What wasn't a treat was removing the oil filter housing in the first place! Three bolts. One at the top which is fairly easy, one underneath and one behind... it require wobble sockets and extensions to remove/replace and is an absolute ball ache. The guide I used advised the stressful procedure but I think for time and hassle I would sooner remove the intake in future, saves a lot of swearing and exasperation. I'll probably have to do that anyway next time as I'm pretty sure I've ruined the bolt head putting it back in! There won't be a next time...
Anyway, reinstalled and I set about tackling the oil cooler gasket. The guide I was using stated to use a 10mm socket to remove the three bolts for this part. This didn't work. It sorted of seated but when turning it was quickly rounding off the bolt head and I was a bit concerned that I would quickly make a pig's ear of these bolts, leaving me unable to reinstall the oil cooler with them. I took a break from that and set about reattaching the cylinder coolant pipe that required removal for access to the lower bolt to take off the oil filter housing previously.

Lost one of the bolts to the abyss that is my oil stained, pitch black engine under tray. I was raging within myself at this stage and it was getting dark so I decided to email my local BMW parts guy and order replacement bolts for the hose and the oil cooler, just in case. I know what you're thinking, the state of that engine! I'm really disappointed to see how grimy and oily it is now as it was definitely clean when I bought the car. I guess the valve cover gasket and subsequent oil filter gaskets perishing simultaneously quickly put paid to that.

It was a cracking day on Friday so I decided to cycle out to the dealership taking the long way home on my mountain bike. Keen to get the mileage up as I'm not far off 1000 miles on it since March!

Fresh bolts! Which were pretty much redundant following a call with my old man who advised I should try an E-Torx socket instead...

Success. And a bloody mess. I caught pretty much most of the oil with the assistance of multiple rags but I was too chuffed with the bolts being a non-issue to care too much at this point. It's interesting the little oversights that can be incredibly time-consuming when you're a very amateur mechanic and I can only imagine my old man is taking great delight at this.
Years ago, between getting my licence and heading off to university 200 miles from home my Dad had tried to show me a few things with the promise of "It's so simple and it'll save you a fortune just knowing these little things!". It ranged from helping him swap gearboxes in a MK2 Golf 1.3 (my first car) to sorting the cylinder head gaskets out on an E34 520i... it was extensive and varied!
Back then, I failed to realise the value of his wisdom and never paid enough attention. During one famous episode I asked if he wanted a cuppa and nipped back into the house to make it. He popped into the kitchen about an hour later to find nothing but a lukewarm kettle and asked my old dear where I was... "Oh, Jamie? He f***ed off to Elgin on the bus to go and see his mates." He still brings it up whenever I mention that I am having car trouble!
Anyway, I was able to get the new gasket fitted and bolted everything back together and in to its rightful place. With the replacement bolt for the coolant hose I squeezed large hands into the tiny space between the engine and radiator fan as best I could, finding great success. After wiping everything down and getting tired of patting myself on the back I topped up the expansion tank and started the car. No more oil leaks, sweet... coolant dribbling out from where I reconnected the hose, sour... this is where I ran into issues and much frustration. I unbolted and bolted this hose back into place several times but just could not get it to sit flush with the cylinder head. There was a rubber o ring that just wouldn't seat and even seemed to be too big for the job. It wasn't until one of my brothers swung by later that evening to assist that we realised I had snapped the hose connection when removing it. It was such a clean break that I hadn't realised the error of my rough ways.

How the cylinder head inlet for the hose should look.

And how mine actually looked. With the remnants of the old hose still in place. Using one of my trust picks (again, worth their weight in gold alongside a telescopic magnet) I was able to get it out before cleaning the area thoroughly.
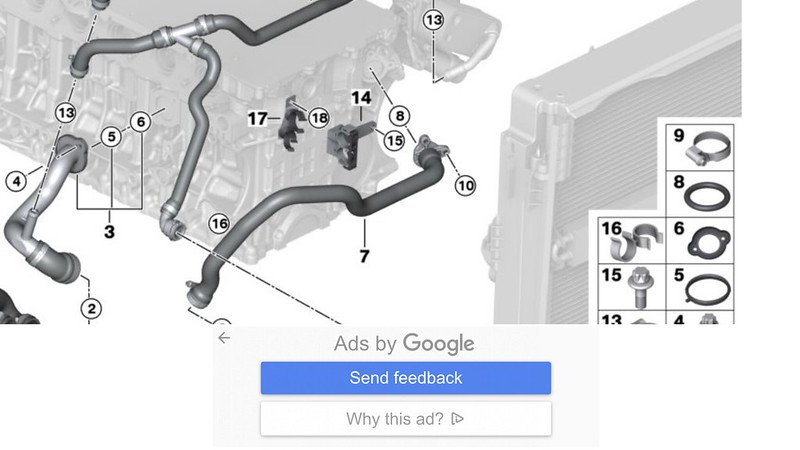
Part no. 10 is the hose I am talking about here. Replacement required which my other brother thankfully fetched for me alongside some coolant and de-ionised water on Saturday morning. ECP didn't stock and Pentland Components couldn't get one until Monday so I plumped for the more expensive but genuine BMW option.

This image allowed me to see what had broken off and why I was having such difficulty previously when trying to reattach the (unknown to me) broken hose. It's one of those things that in hindsight I should have been wiser to but it's all part of a process and with my working schedule I sort of have the time and resources to learn at this pace.

Checking new v old to make sure I had the right hose. The old one was a bugger to remove what with my large hands, small gaps below the engine and a tricky upside-down jubilee clip. I removed the expansion tank and a handful of associated pipes to create as much space as possible but try as I might I just couldn't find access to the screw in order to release the jubilee clip. Doing what I do best, I sought advice from a third party and belled up my other brother who explained it might be easier attaching a socket to it. I had no idea that the screw heads were also suitable for a 6mm socket piece. Great! Except for the fact that ratcheting this off involved what can only be described as nano-adjustments.

To get to this point required cutting off the old hose as close to the clip as possible in order to increase working space. This upgraded the nano-movement phase to micro-movements and still took me well over an hour of contorting myself into position and wiggling the ratchet a million times. Again. praise be the telescopic magnet as I lost count of how many times I dropped sockets or the ratchet into the undertray abyss. I celebrated with a cuppa and took only a short while fitting the new hose with the jubilee clip rotated upwards so I could access it easily.

Still had to harness the clip away from the lower end of the hose whilst I got it into place though but I'm afraid I didn't document much from the coolant bleeding stage as I was called in last minute for an overtime night shift and wanted to get it running ASAP so I could grab a nap and get organised. Bleeding the coolant is a pretty simple procedure which involves little more than turning the ignition on and pressing the accelerator for 10 seconds to activate the electronic water pump. It probably required an extra 500ml after this process which lasts about 10-12 minutes and has been running fine since as I managed 30 miles and monitored engine temps via Carly.

Parked up at work and looking swell. During one of my many delays this week I tried out my new Autoglym snow foam lance then gave the car a going over with Sonax BSD to top up the wax protection. I'll probably clean her again before Tuesday as that is when an engineer is coming to inspect the car on behalf of the AA's insurance.
After almost three weeks, repeated emails and even taking to social media I finally heard back from the AA who promptly instructed their insurance to contact me. The woman on the phone had very little information about the incident so I'm guessing the AA have just said "get this dealt with ASAP" without properly looking over my emails and description of the damage. She inferred that the car being 15 years old may warrant it being written off but she did comment on the low mileage when I quite sharply put her straight about the condition of the car.
When asked, I did say a courtesy car would be required but if this is going to impact on the insurance claim and risk the car being written off I'd rather avoid that. Honestly, I'd be happier if the AA just gave me a couple hundred quid so I could get it sorted at a bodyshop I've used before and be done with it but they've called in their insurance so I'll see what happens.
I then had a follow-up call from the engineer/assessor who is coming out and explained the situation better to him. I've stated simply that the damage is very minor but I don't see why I should have to fork out for any repairs on the back of someone else's clumsiness. Any advice or tales from experience would be very much appreciated here as I don't want to get done over here and risk losing the car over something minor.
Oooft, that was a lengthy post! Thanks for reading if you made it this far.
Edited to add the guide that I used for swapping out the gaskets.
Edited by beambeam1 on Sunday 20th December 02:17
Edited by beambeam1 on Sunday 20th December 02:27
Edited by beambeam1 on Sunday 20th December 03:31
B'stard Child said:
I love the work being done - I do similar with every new (to me) car.
I try and do the same. I have always erred on the side of caution by servicing most cars not long after I have bought them so that I at least know it has been done recently. My service books for the BMW are entirely written in japanese so I might have to ask BMW if they have an alternate language option for service history. It would make life a little easier knowing some more about the car prior to 2019 when the previous owner bought it.pmorg4 said:
Good work! This thread is becoming a great how-to of all those niggly little jobs that we will all have to do sooner or later on our N52 cars
It's turning out to be a checklist thread, isn't it!? I may transfer some old posts in here regarding the jobs I carried out on the previous E91 I had as it will useful to refer back to them in this journal. Dave Moore said:
I have enjoyed reading through that this evening. Lovely car you have.
With regards to the DME waterlog, I have never had an issue with either of my e91's over the last 6.5 years, the first one I owned for 5 years. Maybe it is more prevalent on cars that have lived under tree's and collected leaves and crud more often?
Either way, I will be checking them in the morning :haha:
Thanks, glad you enjoyed. I had another E91 for 4 years and put 50,000 on it but never encountered this issue at all. Tree theory could be a goer but given it's a japanese import I would have expected to find cherry blossoms if anything! With regards to the DME waterlog, I have never had an issue with either of my e91's over the last 6.5 years, the first one I owned for 5 years. Maybe it is more prevalent on cars that have lived under tree's and collected leaves and crud more often?
Either way, I will be checking them in the morning :haha:
Court_S said:
I think I probably enjoyed the update more than you did! 
Sounds like it’s been a bit of a ball ache getting to this point though.
Thanks, I just try and emulate the other threads that I also enjoy reading. It's nice to see it is well received. Yeah, it does feel a bit of a saga at the moment but barring the fact I have no garage it has been enjoyable figuring out things as I go along. I've just no real confidence in tackling jobs under the car yet but hopefully nothing to deal with here for a while yet!Sounds like it’s been a bit of a ball ache getting to this point though.
Edited by beambeam1 on Monday 21st December 00:11
Back once again for the water leak master, D4 damager, power... seems intermittent?
So the latest episode of repairs began with the car refusing to start reliably. Some days I could wake up for work, start her up and drive off. Other days it would be a case of key in, flash of power and dead... the key wouldn't even come out the ignition slot only for it to start up when trying again a few minutes later.
Out with Carly whenever it happened but very little information to be gleaned until a few days before NYE I pulled the following code: 00A0B2 or A0B2 with the description "Error CAS supply / Error CAS supply a0b2". This was similar language to the power supply issues identified alongside the waterlogged DME repair I documented last month so I had a hunch the situation was some sort of fluids again.
I decided to have a look in the boot where the battery is located in E91's - similar placement for all E9X cars I assume? The reason I decided to have a look at this is because I had previous fluid issues with my last E91. I had a progress journal for that car also so will copy/paste a snippet here but remarkably... I even mentioned the issue in this thread as recently as October!
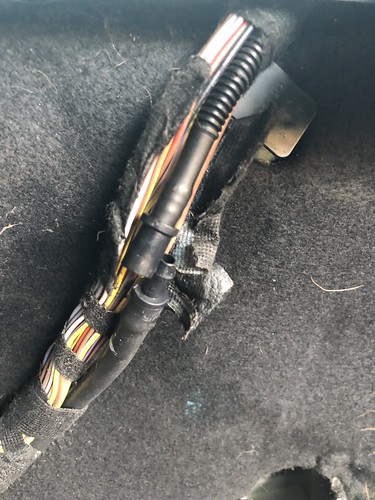
Situated just above where the battery is located, it had obviously been leaking every time I operated the rear window washer. It wasn't separated like the image displays, it was seated correctly but not pushed in tight to prevent such leaks. This annoyed me a bit as it was a simple fix I wish I had spotted sooner. The first time I realised there was an issue was when this happened:
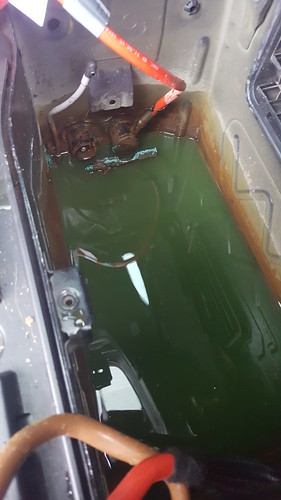
I cleaned the area up as best as I could but at some point down the line I'm going to poke about further, fully dry it out and treat if possible. The corroded wire terminals were cleaned up too and all has been good since. As you can imagine when someone was previously trying to create some slack and repair wiring in the bootlid hinge harness they probably yanked so hard that it caused the washer hose to separate. :roll:I was reminded of the potential for water to gather in this area when I swapped the battery out last month when trying to figure out the DME issue. On removal I found the smallest trace of water at the very bottom of this area so made a mental note to monitor it. I could not have imagined finding this only a month or so later:

Not only was there a decent amount of water in there but it was bloody frozen! (Temps the night before were as low as -4°C). It's difficult to indicate depth with the tip of my screwdriver here but the reflections should show clearly the amount I was dealing with here:
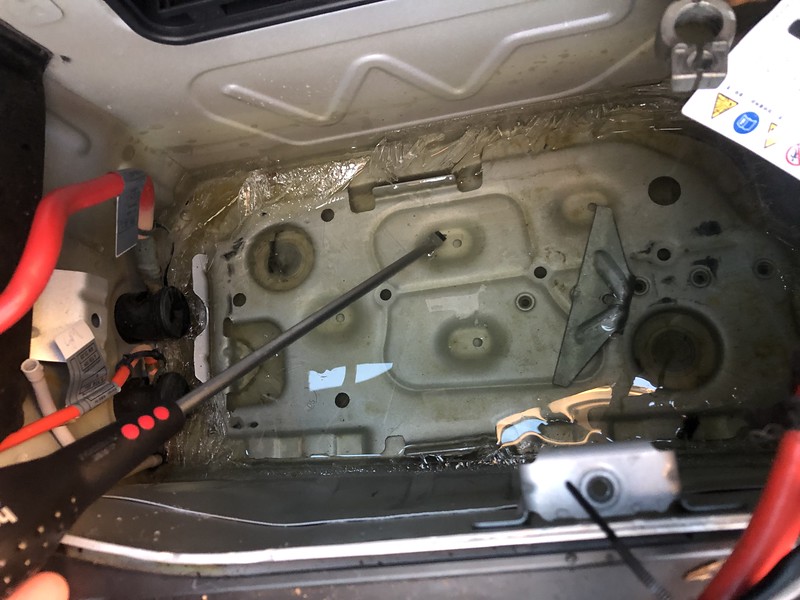
Soaked up as much as possible with clothes, towels and blue roll. Even whipped out my trusty pump system from the last repair:

I've left it for now after removing as much water as I could find. It was still below freezing temperatures when I was working on the car so I think I'll return to it with gentle applications of a hot air gun to thaw out any residual ice in this area. I need to try and identify where the water is coming in from and have read online about rubbish rubber seals in the tail lights. This might involve the wife camping in the boot with a torch whilst I hose the car but I'm working up the balls to ask her first! I'm curious about these channels near the roof and if they are blocked or meant to be? Just in case it is another source of blockage causing fluids to build up where they shouldn't!

Any input at this stage would be appreciated, I feel I'll be drawing on the experiences of others to deal with this effectively. I've ruled out the rear windscreen washer hose at least and I know from experience that drying this area out was a long-term solution.
Hopefully next post = result!
EDIT: A little googling over my Sunday breakfast has indicated that it is likely tail light seals and/or drainage channels from the sunroof downwards. Just going to order new tail light seals since they will likely be cheap and tackle that job when I clear the drainage channels. Went out to the car this morning and still had a touch of intermittent power supply which I can only describe as similar to playing about with broken wiring. One of the wires leading into the "BMW Intelligent Battery Sensor" wasn't quite seated and bolted down correctly. Out with the 13mm and once fastened down properly there has been no power issues - I'm wondering if this has been the source of my recent issues and finding the excess water is a bonus before it caused much worse problems for me.
So the latest episode of repairs began with the car refusing to start reliably. Some days I could wake up for work, start her up and drive off. Other days it would be a case of key in, flash of power and dead... the key wouldn't even come out the ignition slot only for it to start up when trying again a few minutes later.
Out with Carly whenever it happened but very little information to be gleaned until a few days before NYE I pulled the following code: 00A0B2 or A0B2 with the description "Error CAS supply / Error CAS supply a0b2". This was similar language to the power supply issues identified alongside the waterlogged DME repair I documented last month so I had a hunch the situation was some sort of fluids again.
I decided to have a look in the boot where the battery is located in E91's - similar placement for all E9X cars I assume? The reason I decided to have a look at this is because I had previous fluid issues with my last E91. I had a progress journal for that car also so will copy/paste a snippet here but remarkably... I even mentioned the issue in this thread as recently as October!
from another thread said:
Situated just above where the battery is located, it had obviously been leaking every time I operated the rear window washer. It wasn't separated like the image displays, it was seated correctly but not pushed in tight to prevent such leaks. This annoyed me a bit as it was a simple fix I wish I had spotted sooner. The first time I realised there was an issue was when this happened:
I cleaned the area up as best as I could but at some point down the line I'm going to poke about further, fully dry it out and treat if possible. The corroded wire terminals were cleaned up too and all has been good since. As you can imagine when someone was previously trying to create some slack and repair wiring in the bootlid hinge harness they probably yanked so hard that it caused the washer hose to separate. :roll:
Not only was there a decent amount of water in there but it was bloody frozen! (Temps the night before were as low as -4°C). It's difficult to indicate depth with the tip of my screwdriver here but the reflections should show clearly the amount I was dealing with here:
Soaked up as much as possible with clothes, towels and blue roll. Even whipped out my trusty pump system from the last repair:
I've left it for now after removing as much water as I could find. It was still below freezing temperatures when I was working on the car so I think I'll return to it with gentle applications of a hot air gun to thaw out any residual ice in this area. I need to try and identify where the water is coming in from and have read online about rubbish rubber seals in the tail lights. This might involve the wife camping in the boot with a torch whilst I hose the car but I'm working up the balls to ask her first! I'm curious about these channels near the roof and if they are blocked or meant to be? Just in case it is another source of blockage causing fluids to build up where they shouldn't!
Any input at this stage would be appreciated, I feel I'll be drawing on the experiences of others to deal with this effectively. I've ruled out the rear windscreen washer hose at least and I know from experience that drying this area out was a long-term solution.
Hopefully next post = result!
EDIT: A little googling over my Sunday breakfast has indicated that it is likely tail light seals and/or drainage channels from the sunroof downwards. Just going to order new tail light seals since they will likely be cheap and tackle that job when I clear the drainage channels. Went out to the car this morning and still had a touch of intermittent power supply which I can only describe as similar to playing about with broken wiring. One of the wires leading into the "BMW Intelligent Battery Sensor" wasn't quite seated and bolted down correctly. Out with the 13mm and once fastened down properly there has been no power issues - I'm wondering if this has been the source of my recent issues and finding the excess water is a bonus before it caused much worse problems for me.
Edited by beambeam1 on Sunday 3rd January 11:39
Sadly, no real result yet. Fired round to my brother's workshop yesterday but found it really is a job that requires a lot of trim removal, time and warmer/drier conditions! The underside of this car is protected from front to back by plastic coverings which I really haven't experienced before, my cars were always missing large sections! Tried clearing the sunroof drain channels with some welding wire and whilst they feel blocked I ought to read into it more and see how far they truly run into the vehicle first.

With the car raised on a jack and stands we got the oil and filter change carried out which completes the first full service on the car since I've bought it.

Annoyingly, the 86mm oil filter socket I purchased didn't fit. Brute force and some rubber coated gloves were required for removal/replacement as I had given away the oil filter rubber wrench to my other brother when the 86mm socket arrived.
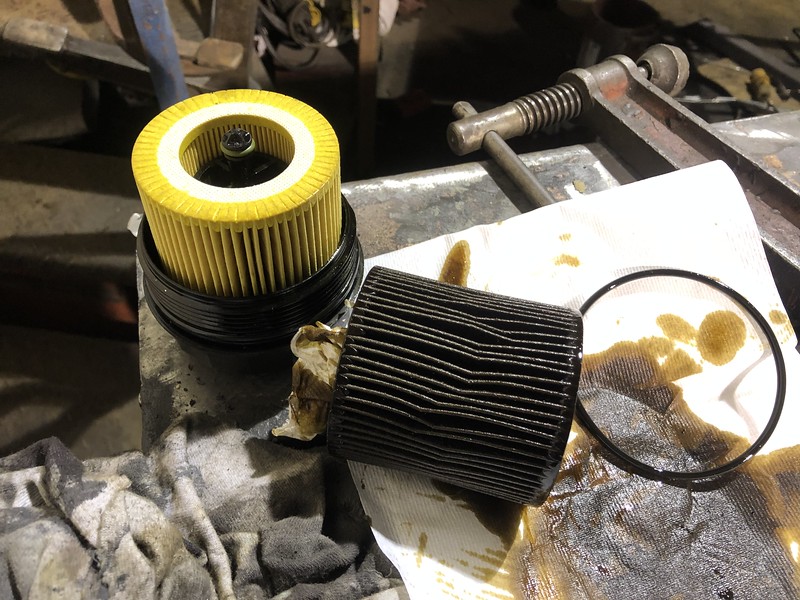

Last shot provided so as to facilitate "Ooh, when was the oil last changed?!" type remarks but it looked alright and I believe was last changed in April. I was concerned about disposal of the old oil since my local recycling centre doesn't seem to accept it but thankfully my brother is starting to dabble in other types of metalwork and wanted it for quenching steel. (Little sh*t still owes me a Sgian dubh as a wedding present actually...)
Back to work with a very quiet schedule tomorrow so I suspect I'll have time on my hands to research possible water issues further.
Cheers.
With the car raised on a jack and stands we got the oil and filter change carried out which completes the first full service on the car since I've bought it.
Annoyingly, the 86mm oil filter socket I purchased didn't fit. Brute force and some rubber coated gloves were required for removal/replacement as I had given away the oil filter rubber wrench to my other brother when the 86mm socket arrived.
Last shot provided so as to facilitate "Ooh, when was the oil last changed?!" type remarks but it looked alright and I believe was last changed in April. I was concerned about disposal of the old oil since my local recycling centre doesn't seem to accept it but thankfully my brother is starting to dabble in other types of metalwork and wanted it for quenching steel. (Little sh*t still owes me a Sgian dubh as a wedding present actually...)
Back to work with a very quiet schedule tomorrow so I suspect I'll have time on my hands to research possible water issues further.
Cheers.
Edited by beambeam1 on Monday 4th January 04:38
Court_S said:
Shame to hear that there is still water ingress. Hope you get it sorted soon.
Thankfully, I haven't seen any more water since drying it out. However, it has been too cold to wash the car a few times and see if it returns since I have a frozen hosepipe. I've left the surrounding trim out of the car so I can give check with a quick glance.peetee7 said:
Nice thread. I will look at picking up rubber moulded floor mats like yours when mine have seen better days
FWIW I only bought the front mats. I seldom have passengers in the back and the only one that gets muddy is the pup but she's in the boot!Small update:
Firstly, car hasn't skipped a beat since I tightened down the bolt on the Intelligent Battery Sensor, delighted. With another lockdown the quiet roads have also allowed me to stretch the BMW's legs a little by extending the commute after night shifts and taking the very long way home. No issues at all.
Secondly, I had to chase this up far too much for my liking but I finally heard back from the AA's insurance company dealing with my claim for the bumper damage when I was recovered home near the end of November.

The engineer's report was quite favourable regarding condition and valuation of the car at £5650, £2000 more than I paid for it but that factored in required rustproofing costs. They are happy to proceed with organising a repair at an estimated cost of just over a grand but have offered me a cash transfer of that amount sans VAT. I'll take the cash option as I can live with the damage for now and want to get the rustproofing carried out as soon as possible. It also allows me to use a preferred bodyshop who fixed a bootlid for me a few years ago to a very high standard, that's if I can't find a great condition bumper in titan silver on the Bay of e. Preferably one without daft bloody holes drilled into it!
In other good news, the previous owner kindly transferred me the cost of the replacement DME which lead to me being towed home in the first place. Unreal gesture that I didn't ask for nor press when suggested it but he remained firm in his assertion that on the day we exchanged there was a suddenly new starting issue which he had said he would cover the repair costs of if required.
So, I'll contact the guy I'm using for rustproofing but with a couple of advisories regarding brake lines I think I'll use that as an opportunity to have braided ones fitted all round and get his assessment of the pads and discs whilst poking around there. Knowing the car is not going to be written off or imminently heading off to a bodyshop for repair means I can also contact BMW and get the heater blower recall carried out ASAP. I also think the diversity antenna module may need looking at due to the range and consistency of remote locking/unlock getting a bit ropey at times - easy fix if it is, been there before!
I'll sign off the latest post with a few photos from the For Sale advert when the car was first imported into the UK by Valley Cars and Classics at 45,000 miles and subsequently bought by the previous owner to me. I thought it may be of interest to some of you:


And finally...

Hopefully it's not too far off the same condition when I get a look at it prior to rustproofing. The guy carrying out this work is a strong acquaintance who my brother does a bit of welding for now so I am hoping I'll be able to get some photos of the process to document it. If I do I'll be taking any chance I get to clean the undertrays as well after the recent oil leaks.
Have a good weekend!
Undersealing complete! Had the car back over a week now but just been too busy to update this WIP thread! But, better late than never...
Car was dropped off at Dickson's Automotive just outside Edinburgh on what turned out to be a pretty snowy January morning.

I knew the car was going to be in good hands when one of the mechanics rocked up in his own E91 330d.

With no car I spent the rest of the week cycling back and forth to work in these conditions. Immediately after this photo was taken I realised I had lost my GoPro riding home. Thankfully, the power of FB, some luck and a lovely little girl finding it on her way to school saw me get it back!

Anyway, as I had hoped, the lads at the garage documented the condition of the car and work carried out with plenty of photos for me.

Once up on the ramps and undertrays removed I was sent this. I was delighted to find out that the car was in such good condition underneath as it satisfied the curiosity as to whether all this work would be worth doing.
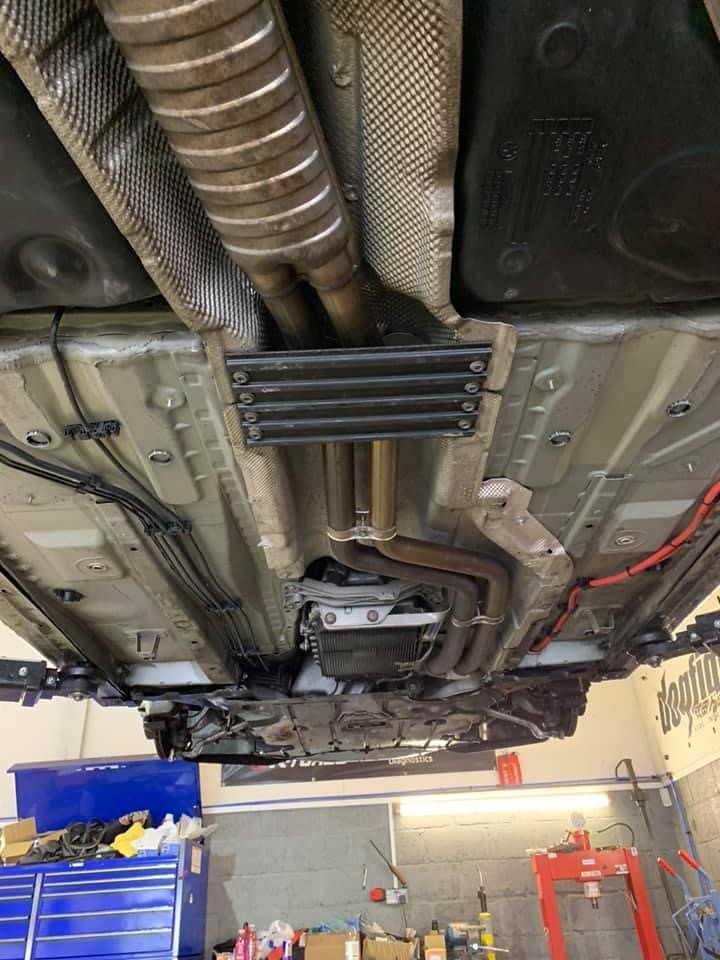
I believe they used something like 3M Body Schutz Coating and carried out a double application. All plastics including the wheel arches were steam cleaned and dried out prior to refitting. Rather than post like for like before and after photos, I will just throw up a handful of interesting ones. They sent me so many images that it is difficult to figure out the orientation from where many were taken when underneath the car.
Before:


After:


Really glad that piece of work has been carried out now. It was a bargaining point when I purchased the car as I did not know if 18 months in the Scottish highlands since being imported to the UK had taken its toll but delighted to find everything was well.
They carried out the work for a great price and they also reassured me that there is nothing wrong with the brake hoses so they didn't change them. Both mechanics are MOT testers so this is good enough for me. I had supplied replacement hoses all round so they could have done it anyway and I would never have known. I think I will save that task for later when I need to replace brakes and pads too. Rear shocks are on their way out which explains the weird clearance/rubbing issues I have had when going over speed bumps so that's what I'm hunting for now.
Interior LED bulb swaps and replacement headlight xenon/HID bulbs are also on the agenda this week. Then I am maybe on the hunt for a new head unit as the dying pixels and cost of LCD replacement are putting me off attempting a repair job.
Cheers.
Car was dropped off at Dickson's Automotive just outside Edinburgh on what turned out to be a pretty snowy January morning.
I knew the car was going to be in good hands when one of the mechanics rocked up in his own E91 330d.
With no car I spent the rest of the week cycling back and forth to work in these conditions. Immediately after this photo was taken I realised I had lost my GoPro riding home. Thankfully, the power of FB, some luck and a lovely little girl finding it on her way to school saw me get it back!
Anyway, as I had hoped, the lads at the garage documented the condition of the car and work carried out with plenty of photos for me.
Once up on the ramps and undertrays removed I was sent this. I was delighted to find out that the car was in such good condition underneath as it satisfied the curiosity as to whether all this work would be worth doing.
I believe they used something like 3M Body Schutz Coating and carried out a double application. All plastics including the wheel arches were steam cleaned and dried out prior to refitting. Rather than post like for like before and after photos, I will just throw up a handful of interesting ones. They sent me so many images that it is difficult to figure out the orientation from where many were taken when underneath the car.
Before:
After:
Really glad that piece of work has been carried out now. It was a bargaining point when I purchased the car as I did not know if 18 months in the Scottish highlands since being imported to the UK had taken its toll but delighted to find everything was well.
They carried out the work for a great price and they also reassured me that there is nothing wrong with the brake hoses so they didn't change them. Both mechanics are MOT testers so this is good enough for me. I had supplied replacement hoses all round so they could have done it anyway and I would never have known. I think I will save that task for later when I need to replace brakes and pads too. Rear shocks are on their way out which explains the weird clearance/rubbing issues I have had when going over speed bumps so that's what I'm hunting for now.
Interior LED bulb swaps and replacement headlight xenon/HID bulbs are also on the agenda this week. Then I am maybe on the hunt for a new head unit as the dying pixels and cost of LCD replacement are putting me off attempting a repair job.
Cheers.
Ouch, I'd want no part in scraping that stuff off! As long as great care was taken to make sure it was dry before application thus preventing moisture being trapped could you not just go over it?
Rear shocks ordered tonight. Old folks have are moving down closer to us in 6 weeks and new gaff comes with a nice-sized garage so should hopefully get a chance at tackling this job myself!
Rear shocks ordered tonight. Old folks have are moving down closer to us in 6 weeks and new gaff comes with a nice-sized garage so should hopefully get a chance at tackling this job myself!
Court_S said:
That does look remarkably clean underneath before they even started.
The LED interior bulb upgrade is worth it. My other half’s 125i feels way more modern with LED interior lights than the old halogen.
Well worth it, totally agree that it modernises the interior. Finally swapped all the bulbs to LED items during the week. Up late watching Super Bowl tonight so nipped out whilst dark and grabbed a photo of how good they are compared to the old halogen bulbs. Cost around £18 and threw up no errors, delighted! Will try get better images soon using the night mode on my GoPro.The LED interior bulb upgrade is worth it. My other half’s 125i feels way more modern with LED interior lights than the old halogen.

pmorg4 said:
That does look great. Did you replace the luggage compartment lights? Not long after I got mine I noticed how useless those lights are so I considered replacing those for LEDs.
I'd consider replacing all of the interior bulbs too as long as they fade in/out properly and they're not too white if that makes sense. I prefer that the car doesn't feel like a kitchen and bathroom showroom
Links to the bulbs that you bought would be appreciated
Link and inspiration by @Court_S in his 125i thread: https://www.lightec-autostyle.co.uk/I'd consider replacing all of the interior bulbs too as long as they fade in/out properly and they're not too white if that makes sense. I prefer that the car doesn't feel like a kitchen and bathroom showroom
Links to the bulbs that you bought would be appreciated
I ordered from their E9x page but I had to buy a couple more LED's after so that I could complete the job. The interior light setups vary between E90/E92/E93, for example.
Replaced ALL interior bulbs from front to back, a good trim tool will see you right for removal.
No errors thrown up and they all fade in/out properly. I will try and get a night node video thrown up on YouTube so people can see how it truly looks but I'm a fan. They are all a nice bright glow that isn't too harsh on the eyes but I went for slightly stronger LED's for the puddle lights, much brighter as you can see.
A series of small updates from the last fortnight:


Caught an eBay discount code that actually worked and bought a Mishimoto Silicone Intake Boot (item no: 332524572506) for £42.94 instead of £50.40 which I was pleased about as I feel this is more of a vanity mod than a performance one. Changes are a more audible bark when you give the throttle a stamp but the missus remains unimpressed. Claims she will sit beside me and make the same noise for £40, I said I'd pay her double for silence!
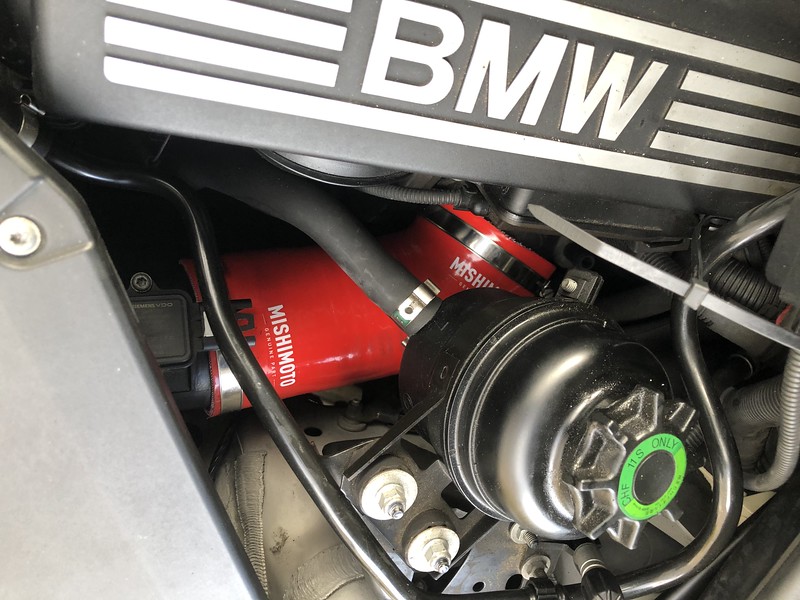
Reversing on to the drive most days meant that whenever I came out the house this caught my eye; rear passenger door sticking out just a little too much. After ignoring it as best as I could I eventually realised through forum searches that it was a very simple fix so set about it like a kebab after a few beers. Probably took me just as long to complete too.

Much better. All it tooks was a Torx bit and some fiddling with the striker plate.
Something else that is always at the back of my mind is the small leak/drainage issue I have within the battery compartment in boot. With the weather improving all the time and the need to clean the interior I had a cautious inspection of the space a few days ago:

Difficult to see but the battery was again bathing in mineral properties of an unknown spring. I suspect it is the tail light gasket seals. I find it odd that the water doesn't drain away from this area though so decided to have a poke around underneath the car.
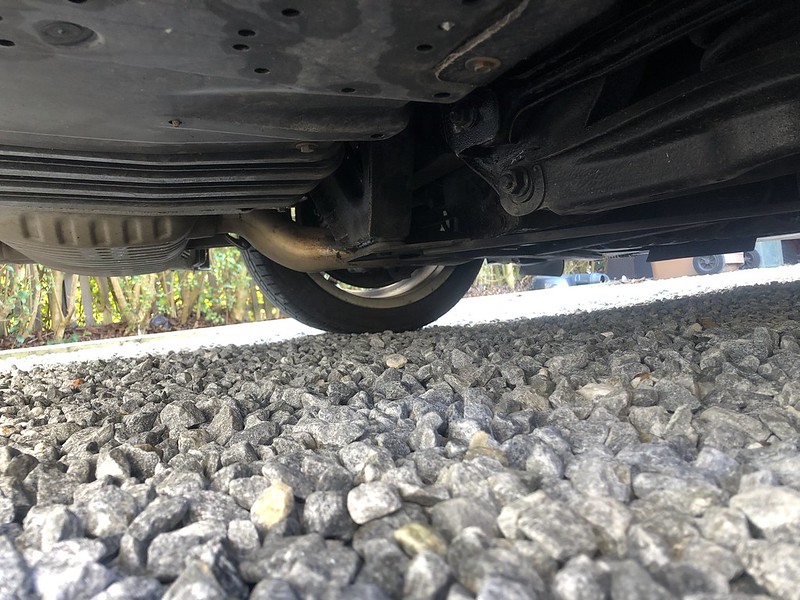
I was looking for visible or obvious drainage hoses like the AC evaporator one you would find. Some YouTube clips will show you how to find ones at the front of the car tucked in behind the front wheel arch but other searches for information will only yield results such as do/don't drill a hole under the battery compartment.
I selected "DO".

Very poor quality image as it is a still from a video I recorded - car jacked up, wheel off and arch liner removed to gain access to this area between the body of the car and the rear bumper. I poked around for a while but couldn't find anything that didn't already seem like it was meant to be there. There was a plastic grommet or some type of fastening sticking out the bottom of one corner of the battery compartment area so I resolved to try and remove it. No joy, not even with pliers which caused the brittle plastic to break apart so in the end it was out with my Makita to gently drill a hole through the grommet. A significant amount of water poured out as soon as I broke through and probably continued to pour at a hypnotic but steady state for 2-3 minutes which is a lot more water than should be in there for sure! (I hadn't drilled through the battery!)
Quick inspection of the battery area and all was good for now. I'm happy with this being a bit of a short-term bodge as I'd like to make sure water drains until I can determine where it's coming from. The car being recently undersealed plus the protection of wheel arch/rear bumper protection in layers means I am not at all concerned about this tiny hole being an issue. Will revisit and resolve the water ingress soon.

Next on the to-do list: CC-ID 132. This code has been thrown up on my dashboard since December which is when I bought some OSRAM Ice Blue replacements. It was simply a case of waiting for better weather before tackling it, figured I would swap all the bulbs simultaneously so everything was matchy matchy and I would be reassured that another bulb wouldn't go soon.

All this to change some bloody lightbulbs. Yes, forum legends and internet folklore will have you convinced that you can do this from the engine bay quite easily but I reckon bks to that. I've been blessed with fingers that lesbians would call well-hung so jacking the car up and removing wheels and arches was the easier option for me. JFC, what a load of hassle that was. And all for nothing!
The Xenon units themselves are easy enough to replace, just press in the metal clip and nudge left or right to unhook it from the plastic hook and repeat in reverse fashion to fasten it back in. There is an awful lot of forum chatter about this process when brevity would be more useful. The other bulbs... I don't really want to go into it but I'd describe it like trying to get your fingers down a toilet tube to retrieve something you can't see or feel. In the end I had to use long-nose pliers to withdraw the plastic fixture that attaches to the rear of the bulb then repeat the process to pull out the bulb itself. A lot more difficult than it needs to be and putting it all back together is just as much grief.
Of course, I checked all was well before reinstalling any covers, wheel arch liners and wheels. And of course, error code CC-ID 132 still present. I poked around some more and was pretty hacked off to realise I had made an oversight and that it was the angel eye bulb that had failed. This PH thread in "BMW General" makes it clearer and I now have some replacements on their way to me. An unnecessary expense but a worthwhile one in end because compared to the OEM units, the OSRAM replacements make a massive difference. I might try and punt the OEM ones on eBay since I have a good set going spare now.
Fortunately, I feel like I am a dab hand at wheel and wheel arch removal now so I'll fit the angel eye bulbs as soon as they arrive.
As always, car washed after a batch of jobs and because we had some quality weather:

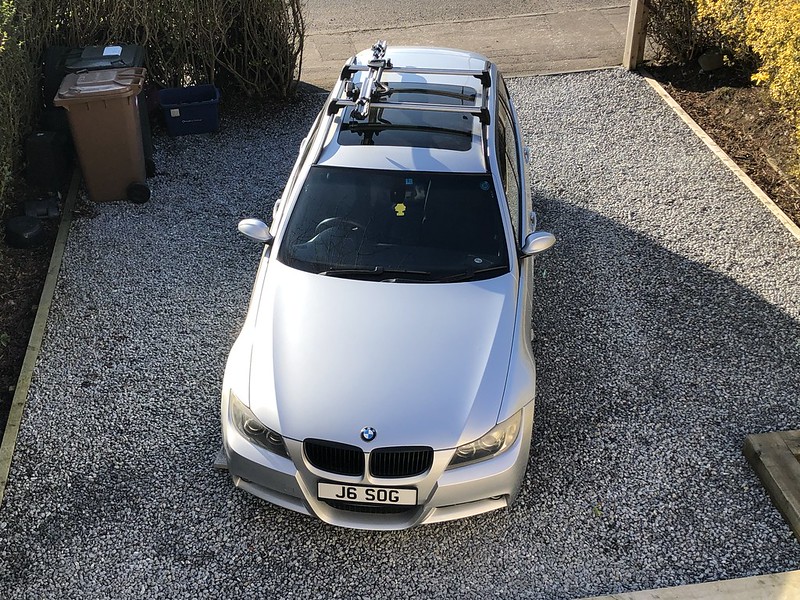

Caught an eBay discount code that actually worked and bought a Mishimoto Silicone Intake Boot (item no: 332524572506) for £42.94 instead of £50.40 which I was pleased about as I feel this is more of a vanity mod than a performance one. Changes are a more audible bark when you give the throttle a stamp but the missus remains unimpressed. Claims she will sit beside me and make the same noise for £40, I said I'd pay her double for silence!
Reversing on to the drive most days meant that whenever I came out the house this caught my eye; rear passenger door sticking out just a little too much. After ignoring it as best as I could I eventually realised through forum searches that it was a very simple fix so set about it like a kebab after a few beers. Probably took me just as long to complete too.
Much better. All it tooks was a Torx bit and some fiddling with the striker plate.
Something else that is always at the back of my mind is the small leak/drainage issue I have within the battery compartment in boot. With the weather improving all the time and the need to clean the interior I had a cautious inspection of the space a few days ago:
Difficult to see but the battery was again bathing in mineral properties of an unknown spring. I suspect it is the tail light gasket seals. I find it odd that the water doesn't drain away from this area though so decided to have a poke around underneath the car.
I was looking for visible or obvious drainage hoses like the AC evaporator one you would find. Some YouTube clips will show you how to find ones at the front of the car tucked in behind the front wheel arch but other searches for information will only yield results such as do/don't drill a hole under the battery compartment.
I selected "DO".
Very poor quality image as it is a still from a video I recorded - car jacked up, wheel off and arch liner removed to gain access to this area between the body of the car and the rear bumper. I poked around for a while but couldn't find anything that didn't already seem like it was meant to be there. There was a plastic grommet or some type of fastening sticking out the bottom of one corner of the battery compartment area so I resolved to try and remove it. No joy, not even with pliers which caused the brittle plastic to break apart so in the end it was out with my Makita to gently drill a hole through the grommet. A significant amount of water poured out as soon as I broke through and probably continued to pour at a hypnotic but steady state for 2-3 minutes which is a lot more water than should be in there for sure! (I hadn't drilled through the battery!)
Quick inspection of the battery area and all was good for now. I'm happy with this being a bit of a short-term bodge as I'd like to make sure water drains until I can determine where it's coming from. The car being recently undersealed plus the protection of wheel arch/rear bumper protection in layers means I am not at all concerned about this tiny hole being an issue. Will revisit and resolve the water ingress soon.
Next on the to-do list: CC-ID 132. This code has been thrown up on my dashboard since December which is when I bought some OSRAM Ice Blue replacements. It was simply a case of waiting for better weather before tackling it, figured I would swap all the bulbs simultaneously so everything was matchy matchy and I would be reassured that another bulb wouldn't go soon.
All this to change some bloody lightbulbs. Yes, forum legends and internet folklore will have you convinced that you can do this from the engine bay quite easily but I reckon b
ks to that. I've been blessed with fingers that lesbians would call well-hung so jacking the car up and removing wheels and arches was the easier option for me. JFC, what a load of hassle that was. And all for nothing!The Xenon units themselves are easy enough to replace, just press in the metal clip and nudge left or right to unhook it from the plastic hook and repeat in reverse fashion to fasten it back in. There is an awful lot of forum chatter about this process when brevity would be more useful. The other bulbs... I don't really want to go into it but I'd describe it like trying to get your fingers down a toilet tube to retrieve something you can't see or feel. In the end I had to use long-nose pliers to withdraw the plastic fixture that attaches to the rear of the bulb then repeat the process to pull out the bulb itself. A lot more difficult than it needs to be and putting it all back together is just as much grief.
Of course, I checked all was well before reinstalling any covers, wheel arch liners and wheels. And of course, error code CC-ID 132 still present. I poked around some more and was pretty hacked off to realise I had made an oversight and that it was the angel eye bulb that had failed. This PH thread in "BMW General" makes it clearer and I now have some replacements on their way to me. An unnecessary expense but a worthwhile one in end because compared to the OEM units, the OSRAM replacements make a massive difference. I might try and punt the OEM ones on eBay since I have a good set going spare now.
Fortunately, I feel like I am a dab hand at wheel and wheel arch removal now so I'll fit the angel eye bulbs as soon as they arrive.
As always, car washed after a batch of jobs and because we had some quality weather:
d_a_n1979 said:
Looks really well pal Deffo a good project you've taken on there
That's a cracking endorsement from yourself, thanks! Deffo a good project you've taken on therepmorg4 said:
I have some bi-xenon headlights sitting in the garage ready to be fitted to replace my candle power headlights. I'm thinking that I should just replace all the bulbs while the headlights are outside the car as I don't fancy having to do it when they're fitted.
What angel eye bulbs did you go for?
I would definitely switch then now if they need it, saves some hassle. As for angel eye bulbs, check out the thread I linked in my last post for more info as I found it very useful. Ended up buying from Xenons4U but you need to check the top of your headlights and find out if they are ZKW or Valeo units before ordering. Mine, pre-LCI and 2005, are ZKW and I bought "BMW E91 E90 Pre-Facelift & Facelift H10W CREE LED Angel Eyes Upgrade Bulbs". What angel eye bulbs did you go for?
From my last update when I swapped all the xenon bulbs:
ABC - 37 - Ordered a replacement from Eastern BMW via the VIN number and collected next day. Of course, I didn't think to check it before driving 6 miles home to find out it was the incorrect locking nut for my car.
ABC 32.1 - After much squinting of the eyes and counting of splines, I rang BMW to see if they had locking wheel nut "ABC 32 - Type 16 Spline" as I believed that was the one I needed and I could I come in and swap. "Yeah". Turned up and they didn't actually have it, in fact they had about 1/3 of a complete set so I left, rather annoyed whilst they said a new set was on order and pop back in during the week.
ABC - 32.2 - Stuff BMW, I'll order it off eBay instead. I was that annoyed with the previous visit that I had it in my head I wouldn't return to BMW again. Two weeks later the eBay locking nut hadn't arrived and I moaned at the seller who promised a replacement or refund. Nothing again this week so I got my money back, made peace with my pettiness and popped out to BMW again. Parts guy went through all the nuts and it was actually "ABC 31 Type 15 Spline" I had needed all along, sorted! Got home, the (wrong) locking nut from eBay had finally arrived but whatever.
So, it took a few weeks longer than it should have due to incorrect ordering, useless eBay sellers and some stubbornness but I've finally swapped out all the front end lights barring the fogs.

Left headlight has replacement angel eye bulb fitted, right is still OEM before replacement.

Both fitted. Difficult to capture the separate lights with just an iPhone in low light conditions. I'll try get better images eventually, gone extremely lazy with photographs these days!
Anyway, that's the faults re: lights all cleared but over the last week I've been getting an airbag/seatbelt fault popping up on my dashboard which I think is related to this issue discussed in the linked thread: https://www.e90post.com/forums/showthread.php?t=10... will address that tomorrow.
beambeam1 said:
...I checked all was well before reinstalling any covers, wheel arch liners and wheels. And of course, error code CC-ID 132 still present. I poked around some more and was pretty hacked off to realise I had made an oversight and that it was the angel eye bulb that had failed. This PH thread in "BMW General" makes it clearer and I now have some replacements on their way to me. An unnecessary expense but a worthwhile one in end because compared to the OEM units, the OSRAM replacements make a massive difference. I might try and punt the OEM ones on eBay since I have a good set going spare now.
Fortunately, I feel like I am a dab hand at wheel and wheel arch removal now so I'll fit the angel eye bulbs as soon as they arrive.
Well, the angel eye units arrived swiftly but guess who lost their BMW locking wheel nut? Yep, me. Couldn't find it for love nor money on the drive but I reckon I left it attached to the wheel and drove off next day so it has flung itself off into oblivion somewhere in Edinburgh.Fortunately, I feel like I am a dab hand at wheel and wheel arch removal now so I'll fit the angel eye bulbs as soon as they arrive.
ABC - 37 - Ordered a replacement from Eastern BMW via the VIN number and collected next day. Of course, I didn't think to check it before driving 6 miles home to find out it was the incorrect locking nut for my car.
ABC 32.1 - After much squinting of the eyes and counting of splines, I rang BMW to see if they had locking wheel nut "ABC 32 - Type 16 Spline" as I believed that was the one I needed and I could I come in and swap. "Yeah". Turned up and they didn't actually have it, in fact they had about 1/3 of a complete set so I left, rather annoyed whilst they said a new set was on order and pop back in during the week.
ABC - 32.2 - Stuff BMW, I'll order it off eBay instead. I was that annoyed with the previous visit that I had it in my head I wouldn't return to BMW again. Two weeks later the eBay locking nut hadn't arrived and I moaned at the seller who promised a replacement or refund. Nothing again this week so I got my money back, made peace with my pettiness and popped out to BMW again. Parts guy went through all the nuts and it was actually "ABC 31 Type 15 Spline" I had needed all along, sorted! Got home, the (wrong) locking nut from eBay had finally arrived but whatever.
So, it took a few weeks longer than it should have due to incorrect ordering, useless eBay sellers and some stubbornness but I've finally swapped out all the front end lights barring the fogs.
Left headlight has replacement angel eye bulb fitted, right is still OEM before replacement.
Both fitted. Difficult to capture the separate lights with just an iPhone in low light conditions. I'll try get better images eventually, gone extremely lazy with photographs these days!
Anyway, that's the faults re: lights all cleared but over the last week I've been getting an airbag/seatbelt fault popping up on my dashboard which I think is related to this issue discussed in the linked thread: https://www.e90post.com/forums/showthread.php?t=10... will address that tomorrow.
Gassing Station | Readers' Cars | Top of Page | What's New | My Stuff