1932 Rolls-Royce 20/25HP Park Ward Saloon - barnfind project
Discussion


Hi all,
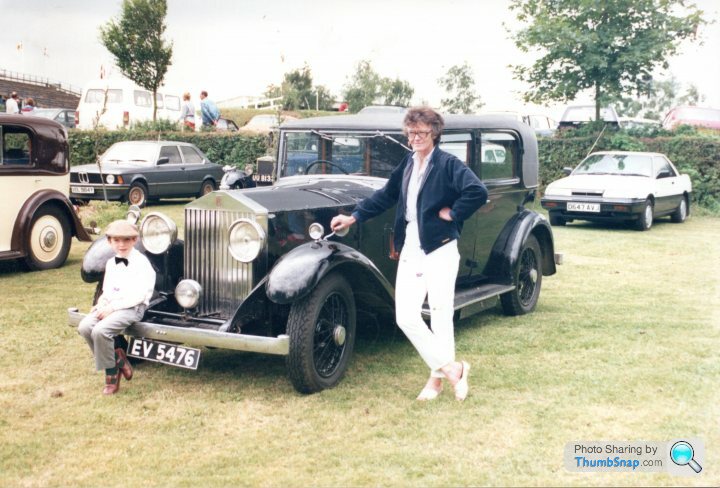
I thought I'd like to record and share the experiences of buying and restoring a 1932 Rolls-Royce 20/25HP saloon. I have always had a passion for these vehicles, probably fired by the trips out in a family friend's 20/25 (chassis no. GBT25) many years ago. The image below is of a 7 year old me sat on the bumper of GBT25, with my mother leaning on the wing.
During the 2020 - 2021 lockdowns I thought about this car a lot and wondered if it still existed. Sure enough, after quite a lot of searching I found it and was able to trace the owner. Late last year I finally met up with the car's current owner and saw the car from my childhood.
I started thinking that maybe a 20/25 (or at least some sort of pre-war car) would be a nice addition to the fleet. I went to see a number of great pre-war Rolls-Royces and Bentleys around the country, but none of them seemed "right". Then I saw a car very similar to the one from my childhood up for sale at auction in Buxton in December 2021. I went simply "just to have a look", but one thing led to another and I found myself bidding for it and.....well, it didn't reach it's reserve, so it was sold to me provisionally. A long wait ensued while the auction house talked to the seller and in the end I was told it was mine! What had I done?
Hello all,
Many thanks for the positive comments. I have been following Lord Flashheart's R-R 20/25 thread on here with great interest - the history and family connections on that car are brilliant. If you haven't read it, I recommend checking it out!
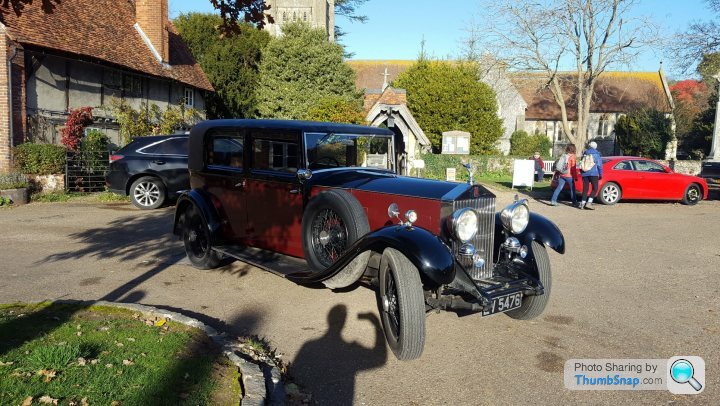
The car from my childhood - EV 5476 / GBT25 - remains a dream car for me. "EVie" (as she is known) has a true petrolhead as her current owner - if he ever wished to sell, I would love to make him an offer!
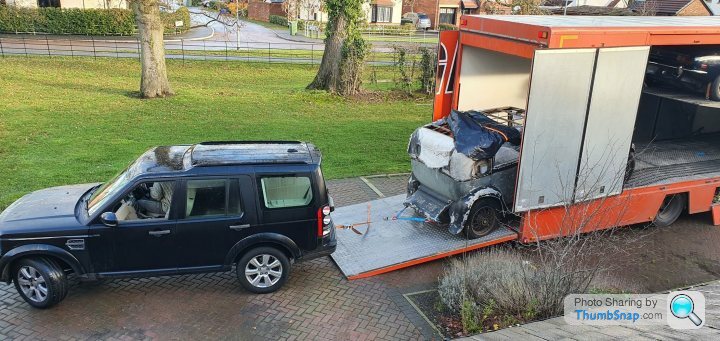
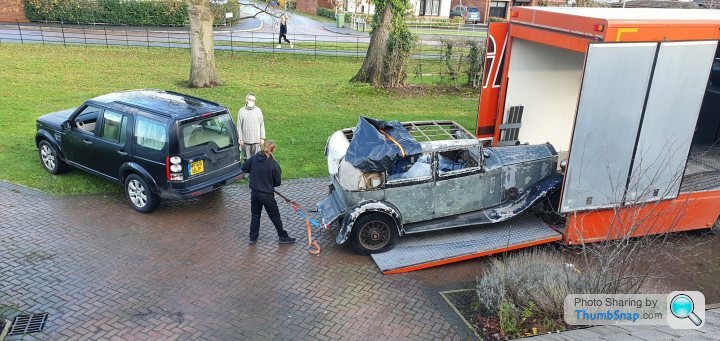
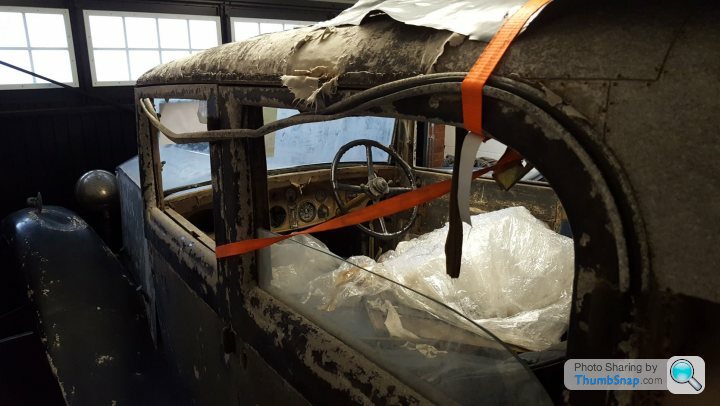
So, time for an update -Arrival!!
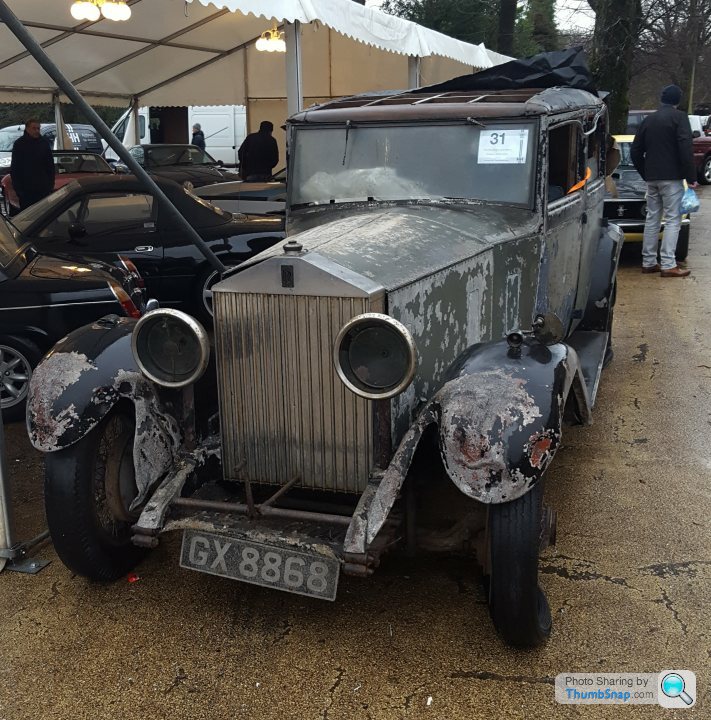
The week between the auction and the car's delivery was like being an expectant father..... a heady mix of excitement, tempered by a feeling that I may not have really understood what I had got myself into. To recap, I had seen the car - in the metal - for all of 10 minutes, outside the Buxton Pavilion prior to the auction, in the middle of a snow storm. I compared it to the photos in the catalogue and the information I had pulled together on its history, but it was hardly the "full and detailed" old car pre-auction inspection which you would have wished for. The cold and snow defeated me (I couldn't feel my hands or feet!) and had retreated into the warmth of the sale room to register my interest.......
So, when the day of arrival came, I was more than a little apprehensive about what exactly would be turning up. Would it roll, especially as the tyres were flat? Did it steer? Had anything fallen off during transport?! The optimist in me kept saying... "how hard can it be?" Well, the answer was pretty hard.
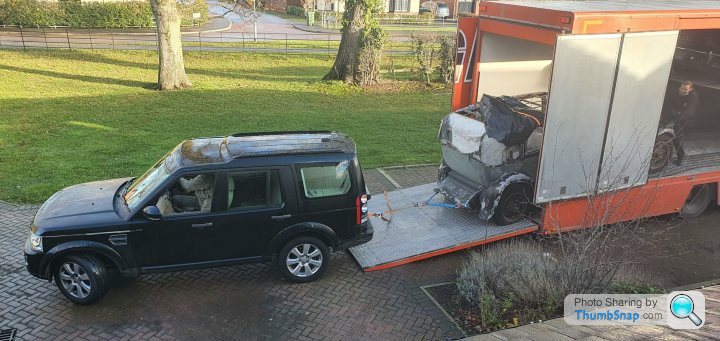
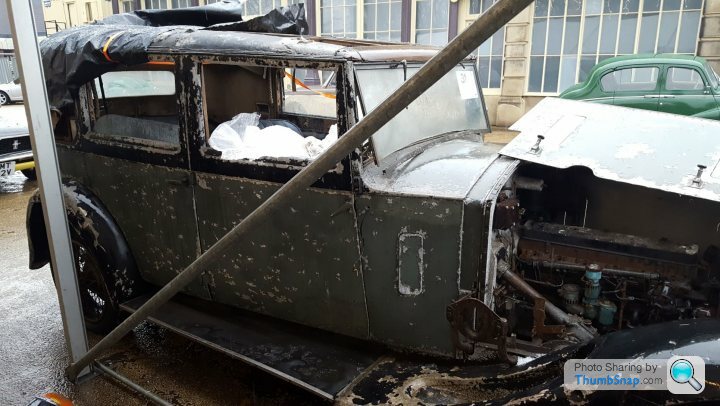
I had to drag it off the lorry with my Disco 4..... and no, the wheels don't turn! Aaargh! The rear axle seemed to be locked solid and the front wheels barely moved either. Cue lots of sweat and tears just to get it onto the drive!
But, in the end we made it!
So now it was there, all I had to do was to get it into the garage.... which took some time....

The problem of getting it to move was solved by 4 wheel dollies.
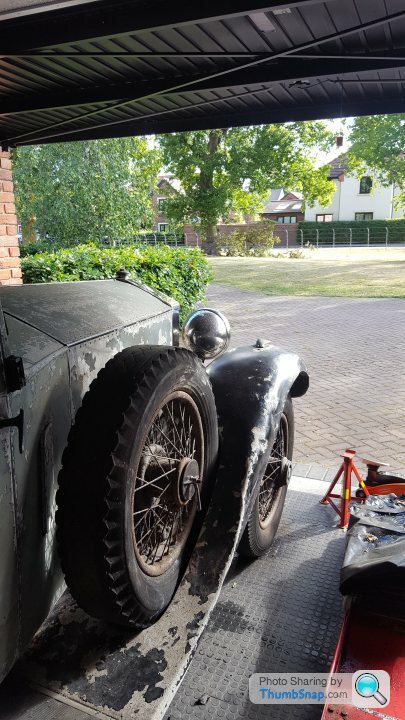
After some very kind help from 3 neighbours, we managed to manhandle it into the garage. To my enormous relief, it actually fitted! And it dwarfs the XJS which currently lives along side it!
Once the euphoria of getting the car home had died down, maybe I could finally get a handle on what on earth I had bought!
Take care,
AF
Many thanks for the positive comments. I have been following Lord Flashheart's R-R 20/25 thread on here with great interest - the history and family connections on that car are brilliant. If you haven't read it, I recommend checking it out!
The car from my childhood - EV 5476 / GBT25 - remains a dream car for me. "EVie" (as she is known) has a true petrolhead as her current owner - if he ever wished to sell, I would love to make him an offer!
So, time for an update -Arrival!!
The week between the auction and the car's delivery was like being an expectant father..... a heady mix of excitement, tempered by a feeling that I may not have really understood what I had got myself into. To recap, I had seen the car - in the metal - for all of 10 minutes, outside the Buxton Pavilion prior to the auction, in the middle of a snow storm. I compared it to the photos in the catalogue and the information I had pulled together on its history, but it was hardly the "full and detailed" old car pre-auction inspection which you would have wished for. The cold and snow defeated me (I couldn't feel my hands or feet!) and had retreated into the warmth of the sale room to register my interest.......
So, when the day of arrival came, I was more than a little apprehensive about what exactly would be turning up. Would it roll, especially as the tyres were flat? Did it steer? Had anything fallen off during transport?! The optimist in me kept saying... "how hard can it be?" Well, the answer was pretty hard.
I had to drag it off the lorry with my Disco 4..... and no, the wheels don't turn! Aaargh! The rear axle seemed to be locked solid and the front wheels barely moved either. Cue lots of sweat and tears just to get it onto the drive!
But, in the end we made it!
So now it was there, all I had to do was to get it into the garage.... which took some time....
The problem of getting it to move was solved by 4 wheel dollies.
After some very kind help from 3 neighbours, we managed to manhandle it into the garage. To my enormous relief, it actually fitted! And it dwarfs the XJS which currently lives along side it!
Once the euphoria of getting the car home had died down, maybe I could finally get a handle on what on earth I had bought!
Take care,
AF
Edited by andyfeaver on Friday 4th March 10:02
gary71 said:
Great project Andy, Guess the XJS might have to depart now to make space to take it apart?
Would be good to see it in person, and always happy to lend a hand to an old colleague
Many thanks Gary! I do really need to move the XJS on to give myself a bit more space...... but it would be a real shame to see it go. I have really enjoyed it over the last 7 years or so, getting it running right and enjoying the delights of the 6.0 V12! The Jaguar world has been very kind and welcoming - with most of its adventures recorded over on the Jaguar Enthusiast Club forum. Like you have with the 911 crowd, there is little that isn't understood by someone out there!Would be good to see it in person, and always happy to lend a hand to an old colleague
And you are always welcome for a visit - a cuppa and some tyre kicking. Would be a bit like the old days in the office, talking project cars over a brew!
If anyone hasn't seen Gary's restoration thread on his 911, I urge you to check it out. That car has been with him through thick and thin and he takes excellent photos!
Happy 90th Birthday!
Earlier this week, my barnfind project Rolls-Royce 20/25 celebrated her 90th birthday. With this in mind, I went back to have a look at some of the history that I have been able to uncover.
I started by contacting the Rolls-Royce Enthusiasts Club, who were able to furnish me with a full set of chassis build records. The Archive team at the RREC are excellent and I hope to visit them in due course to delve deeper into the car's history.
The chassis cards tell us that the car was supplied (presumably as a stock car) to Jack Barclay's in 1932 and then sold to Mr E I Bruce Harvey, Esq (of The Bath Club, Dover Street, W1). Bruce Harvey's given address provides a few clues to the man's background and situation. Wikipedia tells us that "The Bath Club was a sports-themed London gentlemen's club in the 20th century. It was established in 1894 at 34 Dover Street. Its swimming pool was a noted feature, and... It was one of the few gentleman's clubs that admitted women. The club building was hit by bombs during the Blitz in 1941, and the club never wholly recovered. After the bombing, it was housed by the struggling Conservative Club at 74 St James's Street... and it finally closed in 1981."
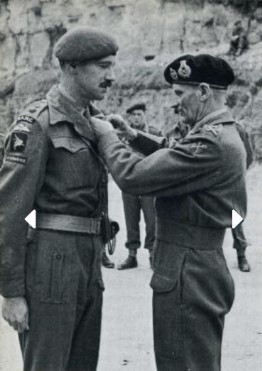
From my research so far, I believe this to be the same man who became Col. E I Bruce Harvey DSO MB of the 225th Parachute Field Ambulance, assigned to the 5th Parachute Brigade, which was part of the 6th Airborne Division. A decorated war hero, landing on D Day (6th June 1944) and serving with distinction both in France and finally in Norway at the end of the war.
Below is an image of Bruce Harvey receiving his DSO from General Montgomery in 1944.
He is the first of the 9 previous owners of the car - and there are a few real characters in the line up!
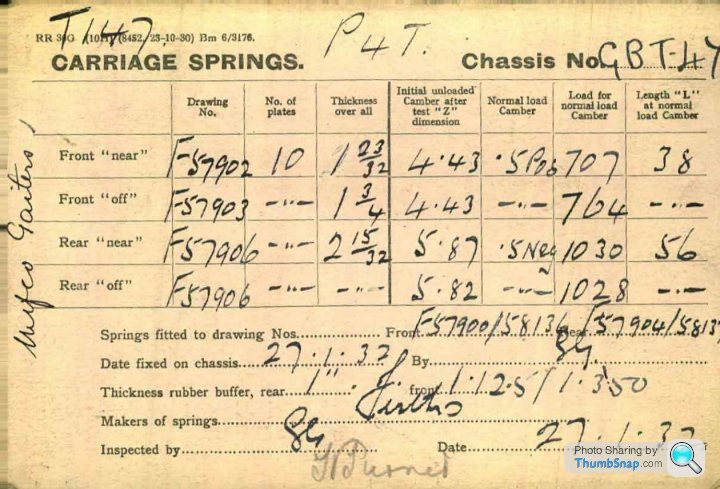
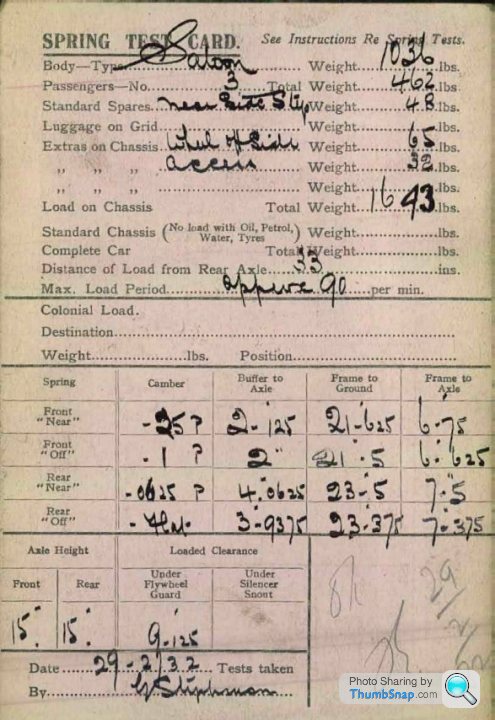
If we have a closer look at the car that Bruce Harvey bought in 1932, we can see that he had bought a 20/25HP chassis (chassis no. GBT47, engine P2T), fitted with a four light Park Ward saloon body (SO3563). It is interesting to note that Park Ward was the coach builder with very close links to Rolls-Royce - so much so, that these "small horsepower" cars (as the 20HP, 20/25HP, 25/30HP etc were known) were considered for fitment of "standard" bodies, in an effort to streamline the production process. You could, of course, order a chassis and then commission a coachbuilder to make a body to your design, but in Bruce Harvey's case he clearly wanted something a little more "off the peg". I am sure I'll return to the details of 20/25 chassis and body development in due course, but this update is all about the car as it left the dealer in 1932.
The car is listed as being finished in Blue and Black, with Blue Celestra leather and "untarnishable" fixtures. In the original order, modifications were requested to the bonnet to be 3 inches longer than standard, with the body modified to suit. However, this request was withdrawn on 27th May 1932 - clearly something had changed, perhaps Jack Barclay's simply wanted the car in stock a little quicker.
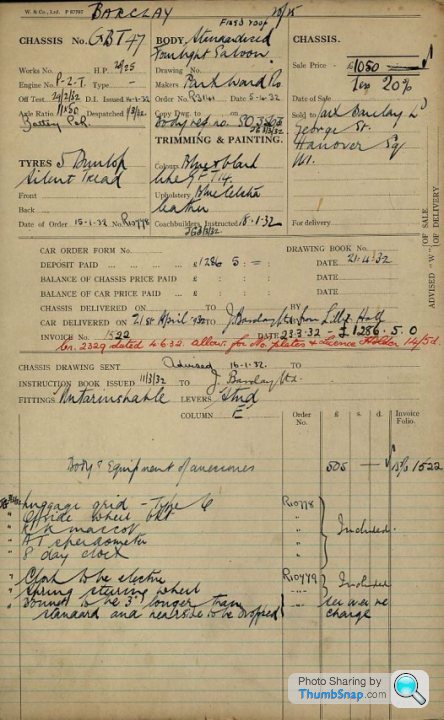
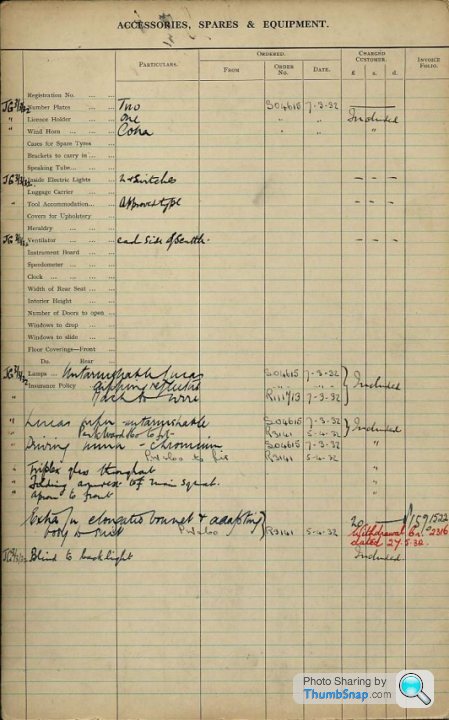
There were a couple of notable features requested - the first is a sprung steering wheel, the other is for the fitment of an electric clock. There is some confusion here, as the build sheets also call for an 8 day clock (typically a Smiths mechanical clock with a winding bezel), so perhaps 2 clocks were to be fitted here. One nice detail is that the electric clock was to be packaged up with the tool kit for onwards transportation to Park Ward for final fitment. With a luggage rack fitted to the rear, Dunlop Silent Tread tyres fitted all round and a blind to the rear window, Mr Bruce Harvey had a fine motor car to conduct himself around the streets of London.
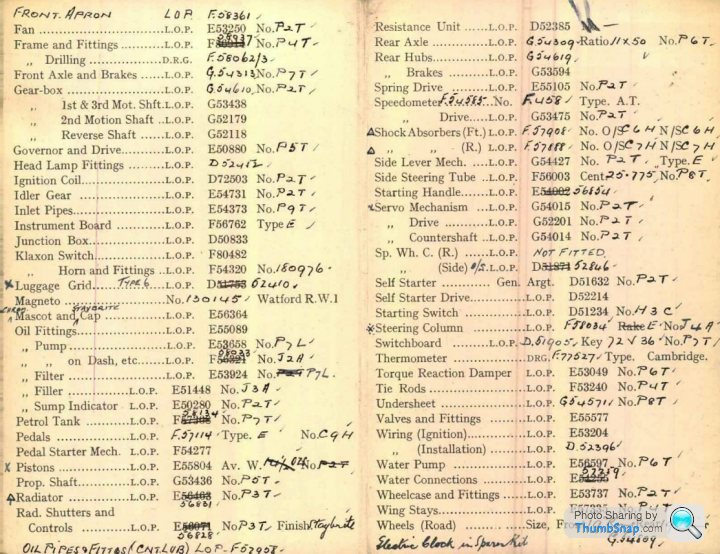
The chassis build cards provide a very detailed picture of the car as it left the dealer. On record we have every part number of the key assemblies, as fitted in the factory:

Spring rates and chassis geometry:
and even a power curve for the engine on the chassis dyno as it was signed off at the factory!:
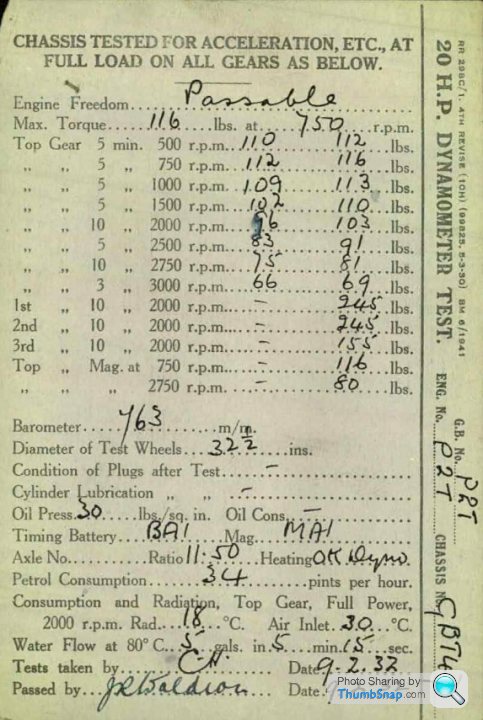
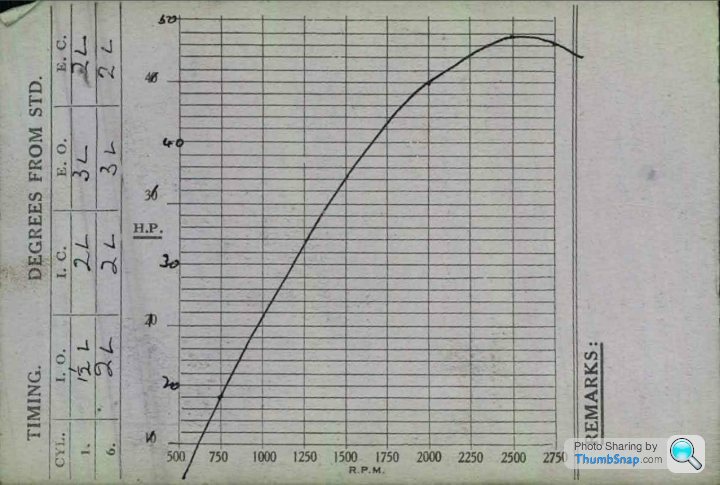
These details will be invaluable as I go over the car to establish its degree of originality and what might be missing! I have been amazed at the level of information that is available from the original build of the car. I still have much to find, especially on the body and its original specification, but this has been a great start.
Finally, I started this post talking about birthdays, and the chassis cards tell us that the chassis was "Off Test: 29/2/32". As there was often some delay between finishing the chassis and fitting the body, let alone shipping it to the dealer for retail, I understand that most consider the "Off Test" date as the day the car was "born". So there it is, the car is now 90! Happy Birthday old girl!
Thank you for all your positive comments so far.
Take care
AF
Earlier this week, my barnfind project Rolls-Royce 20/25 celebrated her 90th birthday. With this in mind, I went back to have a look at some of the history that I have been able to uncover.
I started by contacting the Rolls-Royce Enthusiasts Club, who were able to furnish me with a full set of chassis build records. The Archive team at the RREC are excellent and I hope to visit them in due course to delve deeper into the car's history.
The chassis cards tell us that the car was supplied (presumably as a stock car) to Jack Barclay's in 1932 and then sold to Mr E I Bruce Harvey, Esq (of The Bath Club, Dover Street, W1). Bruce Harvey's given address provides a few clues to the man's background and situation. Wikipedia tells us that "The Bath Club was a sports-themed London gentlemen's club in the 20th century. It was established in 1894 at 34 Dover Street. Its swimming pool was a noted feature, and... It was one of the few gentleman's clubs that admitted women. The club building was hit by bombs during the Blitz in 1941, and the club never wholly recovered. After the bombing, it was housed by the struggling Conservative Club at 74 St James's Street... and it finally closed in 1981."
From my research so far, I believe this to be the same man who became Col. E I Bruce Harvey DSO MB of the 225th Parachute Field Ambulance, assigned to the 5th Parachute Brigade, which was part of the 6th Airborne Division. A decorated war hero, landing on D Day (6th June 1944) and serving with distinction both in France and finally in Norway at the end of the war.
Below is an image of Bruce Harvey receiving his DSO from General Montgomery in 1944.
He is the first of the 9 previous owners of the car - and there are a few real characters in the line up!
If we have a closer look at the car that Bruce Harvey bought in 1932, we can see that he had bought a 20/25HP chassis (chassis no. GBT47, engine P2T), fitted with a four light Park Ward saloon body (SO3563). It is interesting to note that Park Ward was the coach builder with very close links to Rolls-Royce - so much so, that these "small horsepower" cars (as the 20HP, 20/25HP, 25/30HP etc were known) were considered for fitment of "standard" bodies, in an effort to streamline the production process. You could, of course, order a chassis and then commission a coachbuilder to make a body to your design, but in Bruce Harvey's case he clearly wanted something a little more "off the peg". I am sure I'll return to the details of 20/25 chassis and body development in due course, but this update is all about the car as it left the dealer in 1932.
The car is listed as being finished in Blue and Black, with Blue Celestra leather and "untarnishable" fixtures. In the original order, modifications were requested to the bonnet to be 3 inches longer than standard, with the body modified to suit. However, this request was withdrawn on 27th May 1932 - clearly something had changed, perhaps Jack Barclay's simply wanted the car in stock a little quicker.
There were a couple of notable features requested - the first is a sprung steering wheel, the other is for the fitment of an electric clock. There is some confusion here, as the build sheets also call for an 8 day clock (typically a Smiths mechanical clock with a winding bezel), so perhaps 2 clocks were to be fitted here. One nice detail is that the electric clock was to be packaged up with the tool kit for onwards transportation to Park Ward for final fitment. With a luggage rack fitted to the rear, Dunlop Silent Tread tyres fitted all round and a blind to the rear window, Mr Bruce Harvey had a fine motor car to conduct himself around the streets of London.
The chassis build cards provide a very detailed picture of the car as it left the dealer. On record we have every part number of the key assemblies, as fitted in the factory:
Spring rates and chassis geometry:
and even a power curve for the engine on the chassis dyno as it was signed off at the factory!:
These details will be invaluable as I go over the car to establish its degree of originality and what might be missing! I have been amazed at the level of information that is available from the original build of the car. I still have much to find, especially on the body and its original specification, but this has been a great start.
Finally, I started this post talking about birthdays, and the chassis cards tell us that the chassis was "Off Test: 29/2/32". As there was often some delay between finishing the chassis and fitting the body, let alone shipping it to the dealer for retail, I understand that most consider the "Off Test" date as the day the car was "born". So there it is, the car is now 90! Happy Birthday old girl!
Thank you for all your positive comments so far.
Take care
AF
Hello all,
Many thanks for the positive comments - it really encourages me!
With some free time this morning, I thought it would be time for another update - this week's update is titled "Automotive Archaeology!"
Before starting on any restoration work, I felt that I needed to really understand where the car was starting from. I wanted to try to identify what was present, what was missing / damaged etc and so make a start on a parts list of "things to find" as well as the restoration items. In many ways, it was going to be like trying to complete a complex jigsaw puzzle - except without a picture to guide you or even all of the parts! It can be quite tricky to work out what was fitted somewhere, when all you have are some holes and a tatty bit of wiring loom!
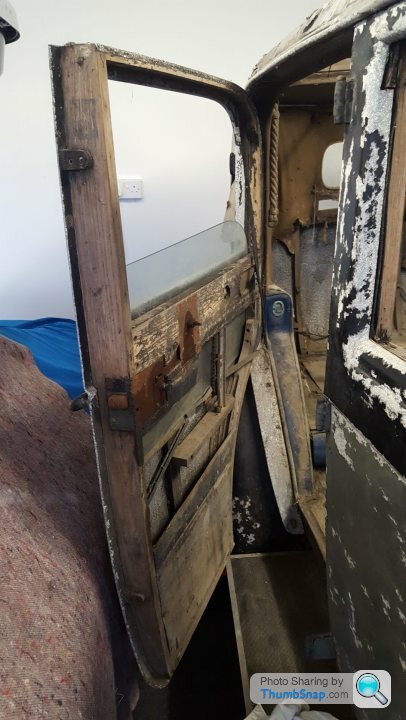
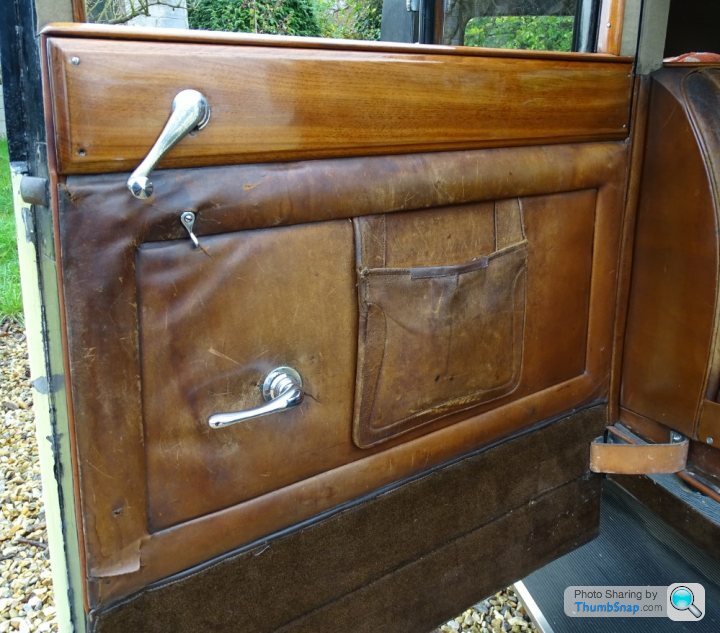
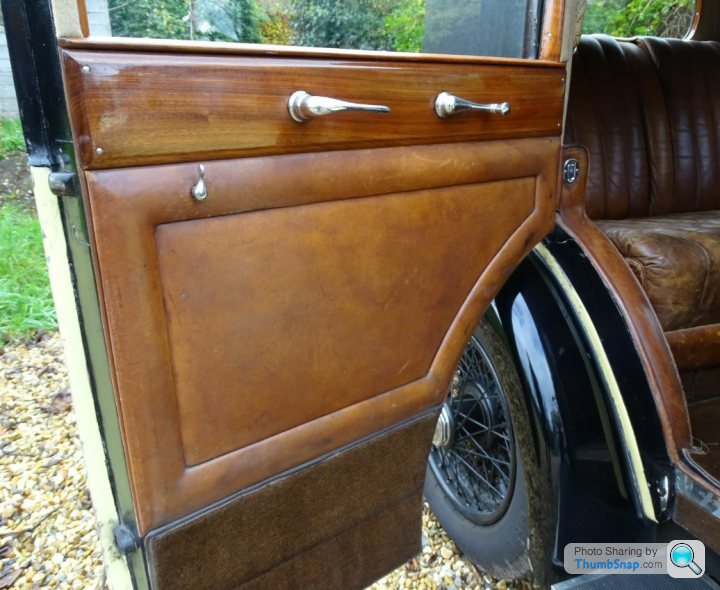
The first step was to empty the interior of the car and work through the jumble of seats, trim and parts which had been piled inside. Challenge no. 1? I couldn't get any of the doors to open. 2 were missing all door handles, 1 was bent and one simply wouldn't turn! So out came the parts through the windows...
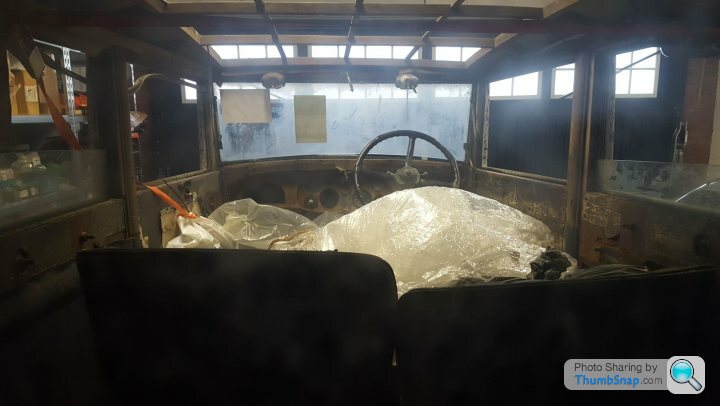
As the car had no functioning roof and had sat outside in a snowstorm, the interior had got rather wet. This gave the garage a rather odd smell of damp wood and leather.
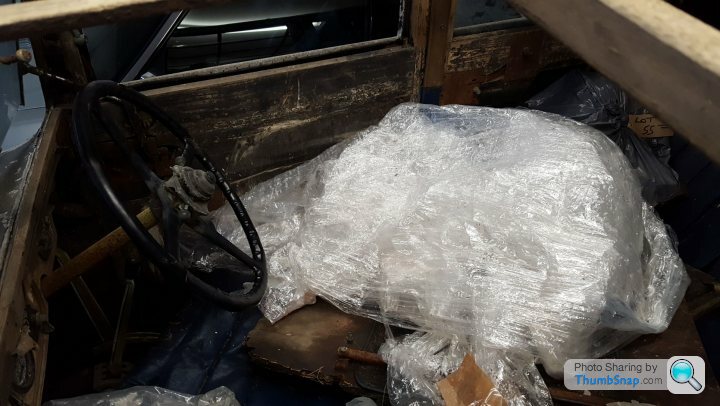
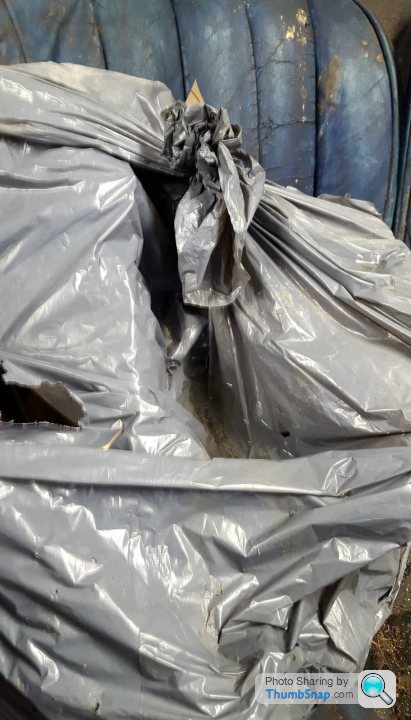
Some of the items piled inside the car the obvious - I think I could see 2 front seats, maybe something of the rear bench seat, but then there were plastic bags of unknown content! Note the puddle of water sitting in this one!

In this bag I found the remains of the car's Wefco gaiters. These leather covers went over the leaf springs on the front and rear axle, with the aim of keeping dirt and water out and the lubrication in! It's a very good example of how 1930's technology worked differently to today's approaches for lubrication and sealing. The leather was in remarkably good condition considering it had been in the bag for a long time. As well as the gaiters, I found the door pad leather trim for the driver's door - whether it can be saved, or only used as a pattern for a new part, remains to be seen. I will do my very best to reuse as much of the original as I can. I am certainly not looking to create some sort of Pebble Beach Concours car here as I feel that this removes too much of the car's history. Only where things can't be reused will I look for replacements.

The next layer of "stuff" (hence the comment about archaeology - it really was like a dig!), were two nondescript bits of plywood with bars attached. They were soaked through and had begun to delaminate. After some head scratching, it was clear that these were the floor boards for the area under the front seats - the bars being the seat runners. The level of preservation was excellent - the paint on the boards, the flocking around the edges of the board to stop them from squeaking etc - all these details will help when replacing them.

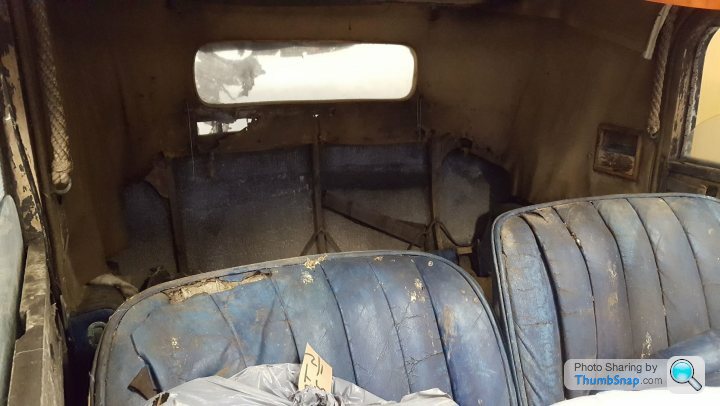
The next layer were the seats - the front seats were pushed rearwards to be inline with the rear doors, the rear seat squab where the front seats should be and the rear seat cushion buried under this!
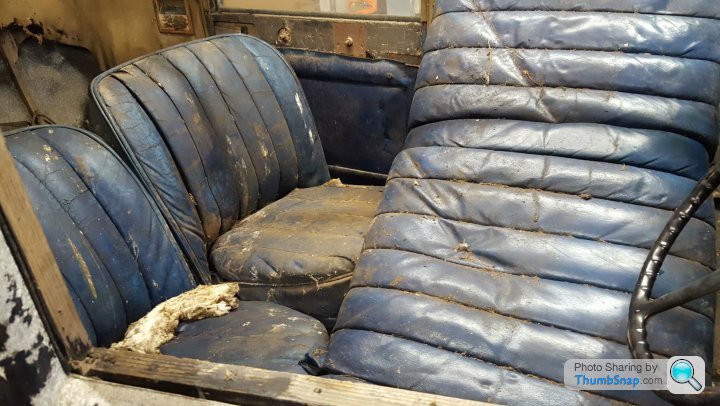
As the doors didn't open, these had to be manhandled out of the driver and passenger door windows..... and now I wonder why my back is playing up!
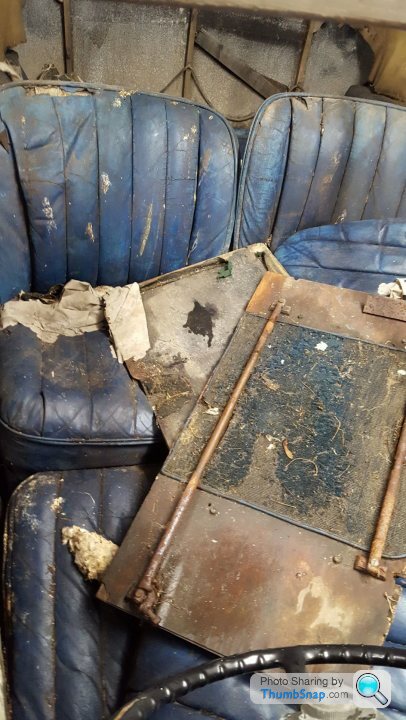
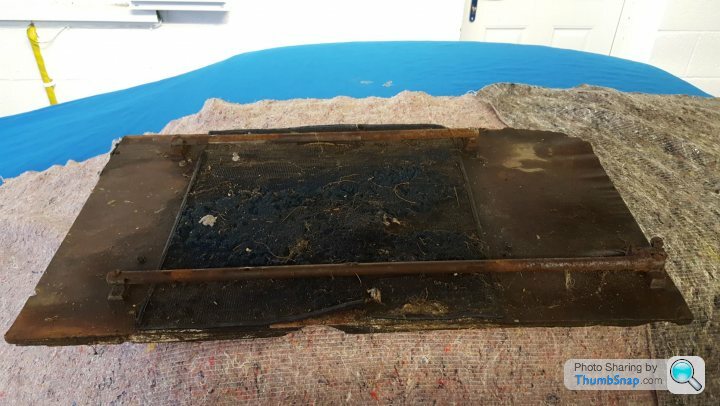
In the rear of the car, once the seats were removed were this little group - namely, another bag containing what looked like wood trim, a very faded and corroded rear number plate and lamp and ..... a disposable coffee cup. Which had mould in. Nice.
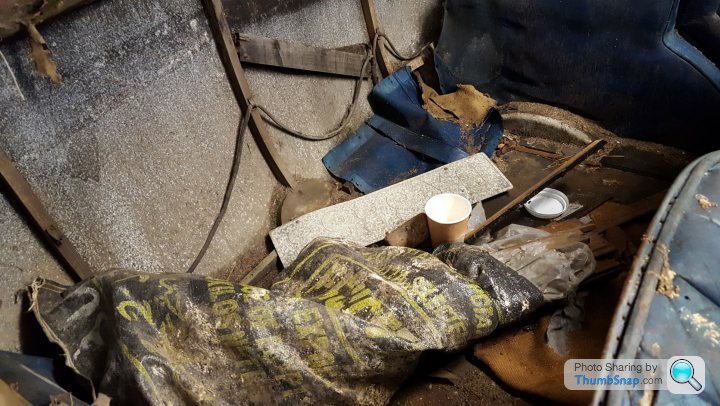
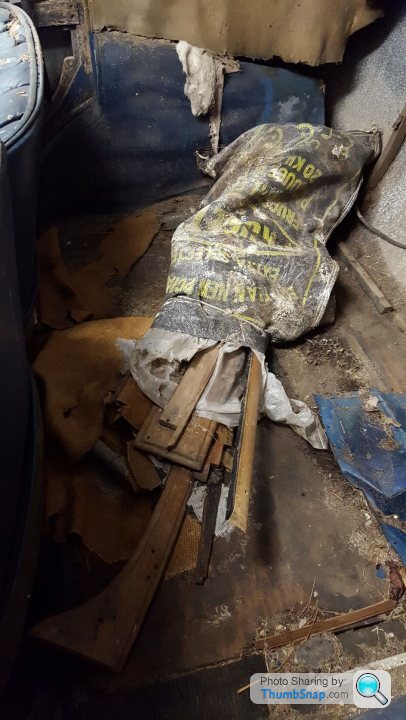
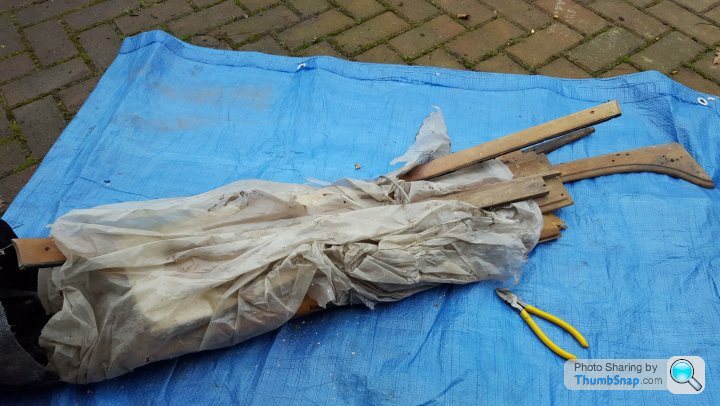
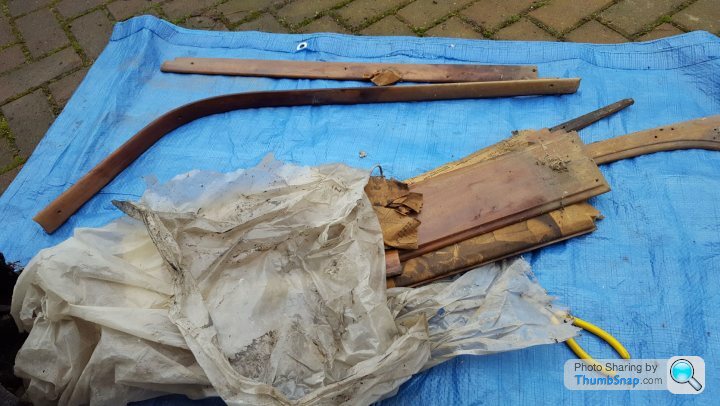
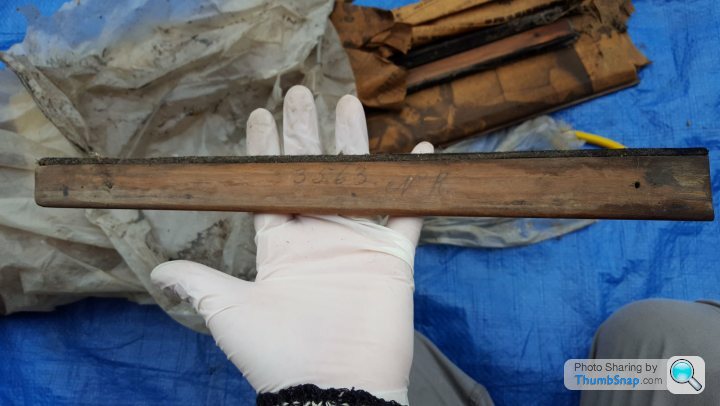
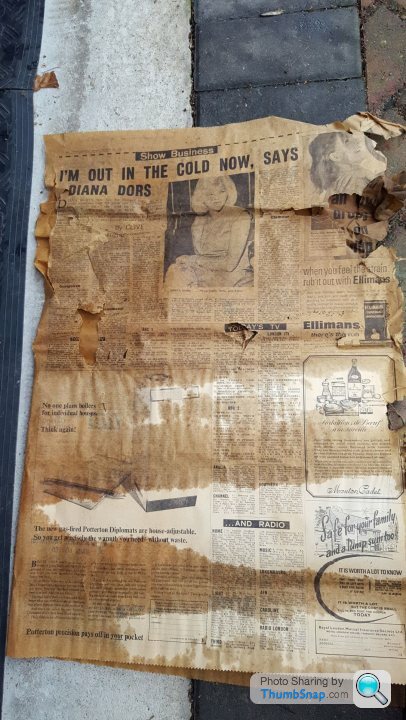
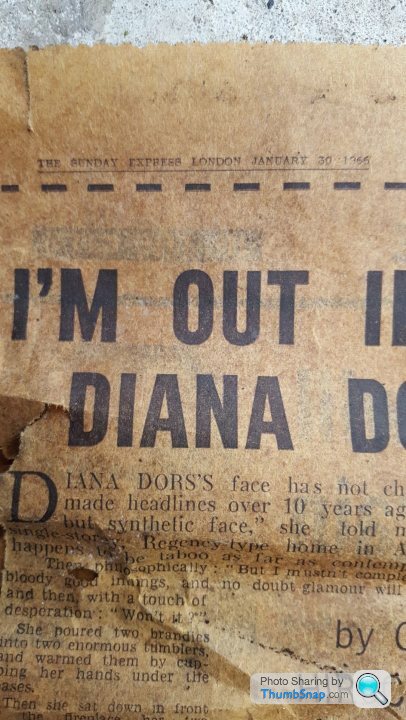
The first bag I tackled was the one containing the wood trim..... and what a great bundle it was. It had clearly been carefully wrapped as part of perhaps a plan to start a refurbishment. A couple of lovely details came out of this - firstly each piece of wood had the car's Park Ward body number (SO3563) hand written (in a lovely copperplate script) on them and the wood itself was wrapped in newspaper - dated to 30th January 1966 and part of an old calendar - dated to 1969. This all ties in really well with the story of the car being found by the previous owner's father in a scrap yard in Barking in 1968.... presumably he started the restoration job when he got the car home, but sadly never finished it.


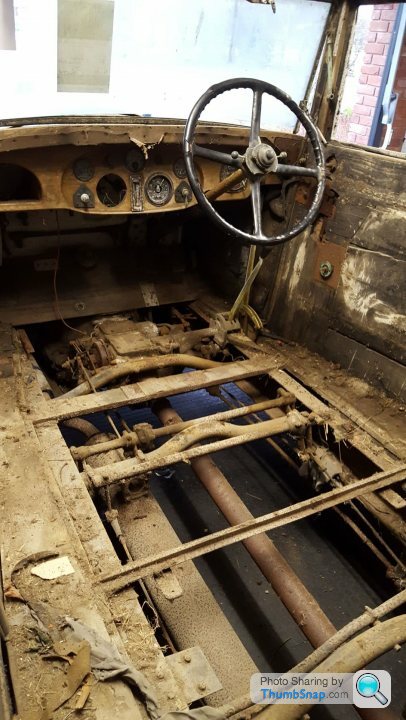
Finally, once all the interior had been removed, it was possible to see a little more of the condition of the body and the chassis. It was filthy dirty but all seemed to be in remarkably good condition.

The next job would be cleaning it out... but to do that I would need to get the doors open.
I am sorry that I can't get the photos orientated correctly - any guidance gratefully received!
(Edit - 31/03/22 - all sorted)
Take care,
Andy
Many thanks for the positive comments - it really encourages me!
With some free time this morning, I thought it would be time for another update - this week's update is titled "Automotive Archaeology!"
Before starting on any restoration work, I felt that I needed to really understand where the car was starting from. I wanted to try to identify what was present, what was missing / damaged etc and so make a start on a parts list of "things to find" as well as the restoration items. In many ways, it was going to be like trying to complete a complex jigsaw puzzle - except without a picture to guide you or even all of the parts! It can be quite tricky to work out what was fitted somewhere, when all you have are some holes and a tatty bit of wiring loom!
The first step was to empty the interior of the car and work through the jumble of seats, trim and parts which had been piled inside. Challenge no. 1? I couldn't get any of the doors to open. 2 were missing all door handles, 1 was bent and one simply wouldn't turn! So out came the parts through the windows...
As the car had no functioning roof and had sat outside in a snowstorm, the interior had got rather wet. This gave the garage a rather odd smell of damp wood and leather.
Some of the items piled inside the car the obvious - I think I could see 2 front seats, maybe something of the rear bench seat, but then there were plastic bags of unknown content! Note the puddle of water sitting in this one!
In this bag I found the remains of the car's Wefco gaiters. These leather covers went over the leaf springs on the front and rear axle, with the aim of keeping dirt and water out and the lubrication in! It's a very good example of how 1930's technology worked differently to today's approaches for lubrication and sealing. The leather was in remarkably good condition considering it had been in the bag for a long time. As well as the gaiters, I found the door pad leather trim for the driver's door - whether it can be saved, or only used as a pattern for a new part, remains to be seen. I will do my very best to reuse as much of the original as I can. I am certainly not looking to create some sort of Pebble Beach Concours car here as I feel that this removes too much of the car's history. Only where things can't be reused will I look for replacements.
The next layer of "stuff" (hence the comment about archaeology - it really was like a dig!), were two nondescript bits of plywood with bars attached. They were soaked through and had begun to delaminate. After some head scratching, it was clear that these were the floor boards for the area under the front seats - the bars being the seat runners. The level of preservation was excellent - the paint on the boards, the flocking around the edges of the board to stop them from squeaking etc - all these details will help when replacing them.
The next layer were the seats - the front seats were pushed rearwards to be inline with the rear doors, the rear seat squab where the front seats should be and the rear seat cushion buried under this!
As the doors didn't open, these had to be manhandled out of the driver and passenger door windows..... and now I wonder why my back is playing up!
In the rear of the car, once the seats were removed were this little group - namely, another bag containing what looked like wood trim, a very faded and corroded rear number plate and lamp and ..... a disposable coffee cup. Which had mould in. Nice.
The first bag I tackled was the one containing the wood trim..... and what a great bundle it was. It had clearly been carefully wrapped as part of perhaps a plan to start a refurbishment. A couple of lovely details came out of this - firstly each piece of wood had the car's Park Ward body number (SO3563) hand written (in a lovely copperplate script) on them and the wood itself was wrapped in newspaper - dated to 30th January 1966 and part of an old calendar - dated to 1969. This all ties in really well with the story of the car being found by the previous owner's father in a scrap yard in Barking in 1968.... presumably he started the restoration job when he got the car home, but sadly never finished it.
Finally, once all the interior had been removed, it was possible to see a little more of the condition of the body and the chassis. It was filthy dirty but all seemed to be in remarkably good condition.
The next job would be cleaning it out... but to do that I would need to get the doors open.
I am sorry that I can't get the photos orientated correctly - any guidance gratefully received!
(Edit - 31/03/22 - all sorted)
Take care,
Andy
Edited by andyfeaver on Thursday 31st March 10:20
Hi all,
Many thanks for the comments! @ Lord Flashheart – I fully understand about the need for family support when taking on a project like this! My wife Sarah is very supportive of my automotive projects – even to the extend of lending a hand in the repair work. And point noted re: missing parts information – that is a very kind offer!
As it is cold and damp here this morning, I have a chance to write up the next instalment – Doors!
The next stage was to get the doors open so that I could access the interior, get it and the exposed areas of the chassis cleaned up a bit and begin to look in detail at the condition of different parts and continue to list out what was missing / broken etc. The challenge was that none of the doors would open! From the start of this project, I have told myself that I need to assume that everything is seized and will need very careful attention to get anything to move/open again, for fear of damaging / shearing something off that I find to be irreplaceable! So soaking everything in lots of WD40/penetrating oil and gentle persuasion over a number of days has been the method.
Of the 4 doors on the car, 2 had no interior or exterior handles, 1 had a badly bent exterior handle that would not turn and the last did at least have an exterior handle that turned a little. I decided to focus my efforts on this one (rear right door) and, with good access to the latch mechanism, I proceeded to soak it in WD40 over a number of days. Things looked good, movement increased and I felt sure that it was all about to unlatch. But would it open? No! After much jiggling, I came to the conclusion that the door must be locked! But how on earth do you unlock it – there is no exterior key hole? After much searching, I recognised that one of the unmarked shafts that stuck out of the door interior must be a sort of door latch – so with much WD40 and a spanner, I managed to get it to move about 45 deg. Deep breath and twist the door handle – it popped open! Huzzah! I was beaming… silly really, such a small step forwards, but at this stage everything seems like a massive battle.

I soaked the hinges and the check arm and then proceeded to very gently work the door backwards and forwards until it was fully open! Primed with the knowledge from this first door, I could then replicate the procedure on the remaining 3 doors. Once complete I could sit back and contemplate what I had learnt.

Firstly, the approach of taking it very slowly and soaking things in WD40/penetrating oil seems to be a good one. Secondly, there were more of the detailed interior fittings missing that I had original noticed. Once you added up the missing interior and exterior handles, the thumb operated locks, the window winder handles etc, it was beginning to look like quite a lot.
From the research that I am doing to support the restoration, it seems that spares and new parts for engine, chassis, brakes etc (i.e. parts common to all versions of the 20/25) seem to be available from a range of suppliers. Indeed, there is a network of companies who can do an excellent job at machining parts to the original drawings. It is a very different story when it comes to body or coach work specific items. Due to the range of coachbuilders who bodied the 20/25 in period, parts supply for a specific coachbuilder / design is very very small. James Taylor, in his excellent new book “Coachwork on Rolls-Royce Twenty, 20/25, 25/30 and Wraith 1922 – 1939” lists some 78 different coachbuilders for the 3830 20/25s built between 1928 and 1936. So trying to hunt down some spare Park Ward door handles, window winders and thumb latches for my car has proved to be incredibly difficult. So, a new direction is needed.
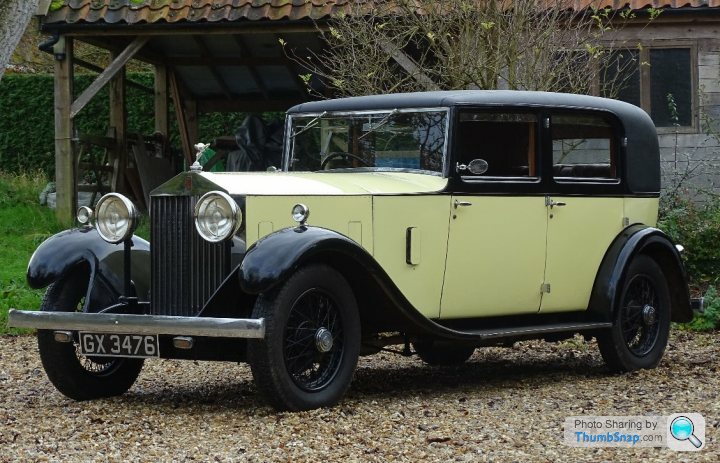
I have been lucky enough to identify 2 Park Ward bodied cars which still exist which are very close in age / build sequence to mine. GBT25 / EV 5476 (the car from my childhood) wears body number SO3559 and GKT6 / GX 3476 wears body number SO3561 – so 4 bodies and 2 bodies earlier than mine respectively!
GKT6 still survives and has been advertised for sale at auction in November 2020. My hope is that I might be able to approach the owners of both of these cars to allow me to use theirs as references and then reverse engineer new parts. I have had some success in doing this with my XJS – where I 3D printed some replacement parts and have had headlamp lenses scanned and CAD models created to replicate what I was missing. Again, there are some good firms out there who can help with this, and these reverse engineering jobs will become mini projects in their own right.
This is what I hope to achieve (GKT6 examples) with the reverse engineered handles etc.... some way to go to get here!
But for now, it is all about cleaning and working out what is missing. The interior of the car cleaned up pretty well – once I had removed 50 years worth of hay, dust, bird poo and general muck! There seemed to be little in the way of water damage where the car had been caught out in the snow storm in Buxton and generally the chassis and body seemed sound. I could identify some areas of the ash frame which were rotten and also had been attacked by wood worm, but nothing too serious.
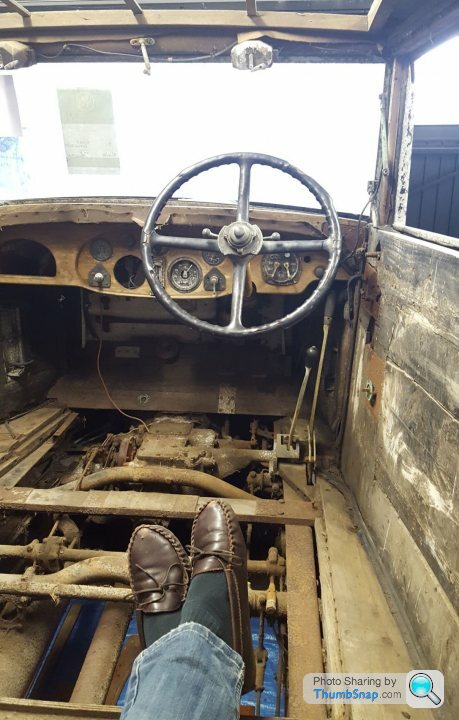
All was left for me to do was to have a cuppa and enjoy the view from where the back seat would be! And to consider where to go next….
And I cannot for the life of me work out why the pictures keep coming out the wrong way up. I will have to investigate alternative photo hosting options which allow more control. (Edit 31/03/22 - all sorted)
Take care,
AF
Many thanks for the comments! @ Lord Flashheart – I fully understand about the need for family support when taking on a project like this! My wife Sarah is very supportive of my automotive projects – even to the extend of lending a hand in the repair work. And point noted re: missing parts information – that is a very kind offer!
As it is cold and damp here this morning, I have a chance to write up the next instalment – Doors!
The next stage was to get the doors open so that I could access the interior, get it and the exposed areas of the chassis cleaned up a bit and begin to look in detail at the condition of different parts and continue to list out what was missing / broken etc. The challenge was that none of the doors would open! From the start of this project, I have told myself that I need to assume that everything is seized and will need very careful attention to get anything to move/open again, for fear of damaging / shearing something off that I find to be irreplaceable! So soaking everything in lots of WD40/penetrating oil and gentle persuasion over a number of days has been the method.
Of the 4 doors on the car, 2 had no interior or exterior handles, 1 had a badly bent exterior handle that would not turn and the last did at least have an exterior handle that turned a little. I decided to focus my efforts on this one (rear right door) and, with good access to the latch mechanism, I proceeded to soak it in WD40 over a number of days. Things looked good, movement increased and I felt sure that it was all about to unlatch. But would it open? No! After much jiggling, I came to the conclusion that the door must be locked! But how on earth do you unlock it – there is no exterior key hole? After much searching, I recognised that one of the unmarked shafts that stuck out of the door interior must be a sort of door latch – so with much WD40 and a spanner, I managed to get it to move about 45 deg. Deep breath and twist the door handle – it popped open! Huzzah! I was beaming… silly really, such a small step forwards, but at this stage everything seems like a massive battle.
I soaked the hinges and the check arm and then proceeded to very gently work the door backwards and forwards until it was fully open! Primed with the knowledge from this first door, I could then replicate the procedure on the remaining 3 doors. Once complete I could sit back and contemplate what I had learnt.
Firstly, the approach of taking it very slowly and soaking things in WD40/penetrating oil seems to be a good one. Secondly, there were more of the detailed interior fittings missing that I had original noticed. Once you added up the missing interior and exterior handles, the thumb operated locks, the window winder handles etc, it was beginning to look like quite a lot.
From the research that I am doing to support the restoration, it seems that spares and new parts for engine, chassis, brakes etc (i.e. parts common to all versions of the 20/25) seem to be available from a range of suppliers. Indeed, there is a network of companies who can do an excellent job at machining parts to the original drawings. It is a very different story when it comes to body or coach work specific items. Due to the range of coachbuilders who bodied the 20/25 in period, parts supply for a specific coachbuilder / design is very very small. James Taylor, in his excellent new book “Coachwork on Rolls-Royce Twenty, 20/25, 25/30 and Wraith 1922 – 1939” lists some 78 different coachbuilders for the 3830 20/25s built between 1928 and 1936. So trying to hunt down some spare Park Ward door handles, window winders and thumb latches for my car has proved to be incredibly difficult. So, a new direction is needed.
I have been lucky enough to identify 2 Park Ward bodied cars which still exist which are very close in age / build sequence to mine. GBT25 / EV 5476 (the car from my childhood) wears body number SO3559 and GKT6 / GX 3476 wears body number SO3561 – so 4 bodies and 2 bodies earlier than mine respectively!
GKT6 still survives and has been advertised for sale at auction in November 2020. My hope is that I might be able to approach the owners of both of these cars to allow me to use theirs as references and then reverse engineer new parts. I have had some success in doing this with my XJS – where I 3D printed some replacement parts and have had headlamp lenses scanned and CAD models created to replicate what I was missing. Again, there are some good firms out there who can help with this, and these reverse engineering jobs will become mini projects in their own right.
This is what I hope to achieve (GKT6 examples) with the reverse engineered handles etc.... some way to go to get here!
But for now, it is all about cleaning and working out what is missing. The interior of the car cleaned up pretty well – once I had removed 50 years worth of hay, dust, bird poo and general muck! There seemed to be little in the way of water damage where the car had been caught out in the snow storm in Buxton and generally the chassis and body seemed sound. I could identify some areas of the ash frame which were rotten and also had been attacked by wood worm, but nothing too serious.
All was left for me to do was to have a cuppa and enjoy the view from where the back seat would be! And to consider where to go next….
And I cannot for the life of me work out why the pictures keep coming out the wrong way up. I will have to investigate alternative photo hosting options which allow more control. (Edit 31/03/22 - all sorted)
Take care,
AF
Edited by andyfeaver on Thursday 31st March 10:29
Hello all,
Many thanks for the positive comments - I think I am making slow and steady progress in what will be the first phase of this restoration project - the scoping of the scale of the project and working out which parts are missing.
So, to that end, this update is entitled - Leather and a dry build!
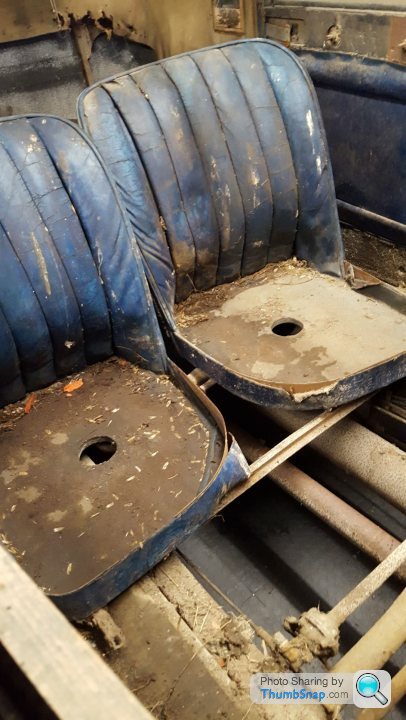
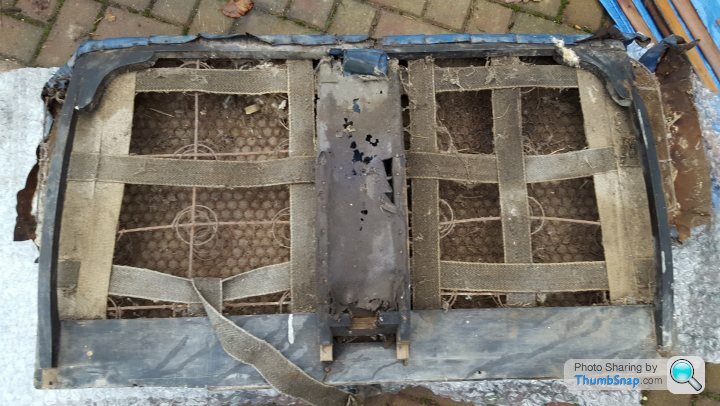
Once I had cleaned the interior of the car out, it was time to turn my attention to the seats and interior fittings that had been removed. They were in a pretty poor cosmetic state and smelt pretty appalling. Here is the rear seat squab, as an example.

The wooden frame of the squab is cracked, the webbing falling apart and the springs are badly corroded. One positive point is that the integrated arm rest, as originally specified on the Rolls-Royce factory build sheets, is still in place.
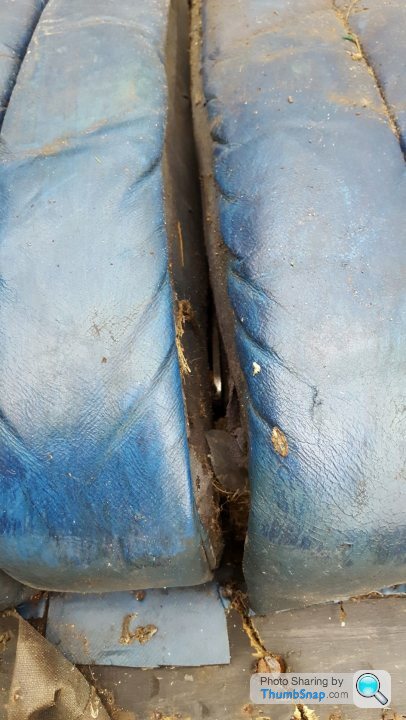
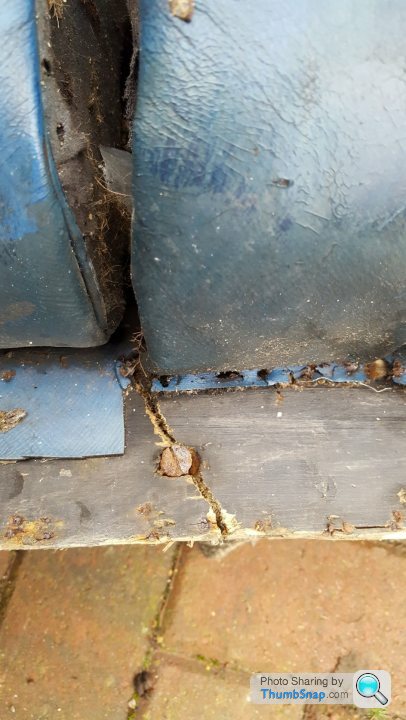
The rear seat cushion is in a similarly bad state!
The front seats, now removed, seem to have lots of sycamore seeds in them (?)
In order to get a proper feeling for their condition, the only route was to clean them up and see what still existed under all the dirt. At this stage, all I was interested to achieve was some degree of "preservation", so at least I could keep the leather as a pattern for any new leatherwork. In an ideal world, I'd like to keep all the leather which is still present, but that may not be possible. I would be interested to hear how other people have tackled bringing back to life very old, dry and dirty leather. Was it salvageable or was it too far gone? What materials did you use?
Considering the age of the leather, I planned to use a fairly traditional approach to cleaning - using the same method as I would use if I was cleaning horse tack (ah, my farm boy youth coming back to me!). The logic being that the leather would have been tanned and dyed using 1930's technology, so modern chemical cleaners may not work so well on them.
I cleaned and fed the leather in a 3 stage process:
1) Clean with Carr & Day & Martin Belvoir Tack Cleaner - spray on, work into leather and wipe off
2) Clean and feed with Belvoir Tack Conditioner - Glycerine Saddle Soap - apply with a damp cloth and then buff up
3) Feed with Connolly Hide Care - work into the leather with a cloth and then buff off
Sadly I ran out of Belvoir Tack Cleaner towards the end, and ended up cleaning the front seat squabs with Autoglym Leather Cleaner, before applying the saddle soap and hide food. It is only an impression, but it seemed that the Autoglym cleaner stripped more of the oils out of the leather and left a drier and rougher finish. While it works fine on the newer leathers in my Disco 4 or XJS, it doesn't seem to work so well on the older leather. So - lesson learnt, I will stick with the old fashioned approach!
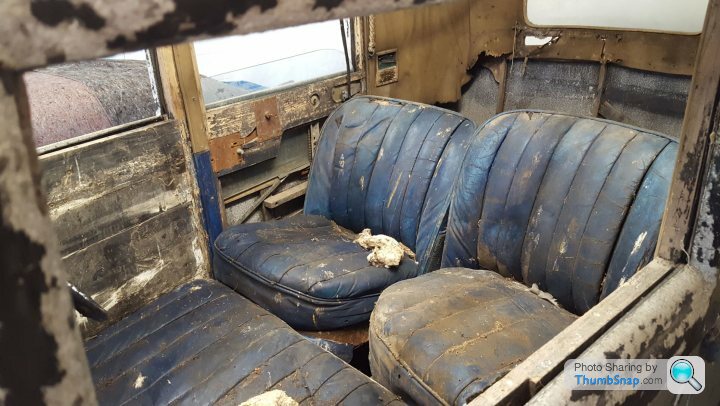
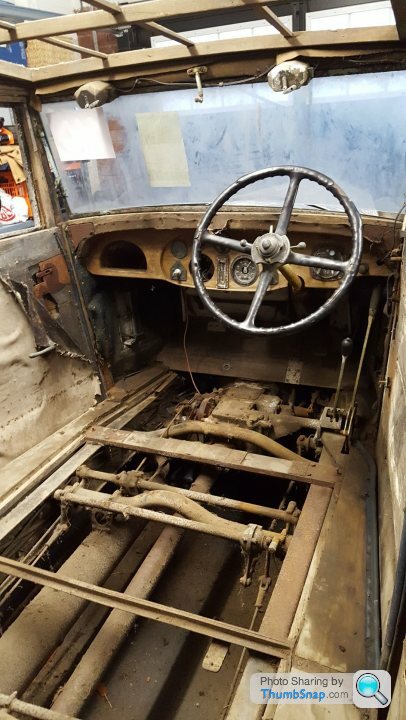
With the seats now clean, I was able to start a dry build of the interior, as much as anything to help visualise what was missing. So in went the front seat floorboards - note the wood worm on the driver's side!

Front passenger seat goes in!
Rear seat squab, followed by cushion.
All fully in place!

It was very encouraging to see the car back in one piece and actually looking like a car again! From having everything now back in the right place, I was able to make a much more detailed list of missing components on the interior.
Small steps, but slowly getting through this first stage.
Take care!
AF
Many thanks for the positive comments - I think I am making slow and steady progress in what will be the first phase of this restoration project - the scoping of the scale of the project and working out which parts are missing.
So, to that end, this update is entitled - Leather and a dry build!
Once I had cleaned the interior of the car out, it was time to turn my attention to the seats and interior fittings that had been removed. They were in a pretty poor cosmetic state and smelt pretty appalling. Here is the rear seat squab, as an example.
The wooden frame of the squab is cracked, the webbing falling apart and the springs are badly corroded. One positive point is that the integrated arm rest, as originally specified on the Rolls-Royce factory build sheets, is still in place.
The rear seat cushion is in a similarly bad state!
The front seats, now removed, seem to have lots of sycamore seeds in them (?)
In order to get a proper feeling for their condition, the only route was to clean them up and see what still existed under all the dirt. At this stage, all I was interested to achieve was some degree of "preservation", so at least I could keep the leather as a pattern for any new leatherwork. In an ideal world, I'd like to keep all the leather which is still present, but that may not be possible. I would be interested to hear how other people have tackled bringing back to life very old, dry and dirty leather. Was it salvageable or was it too far gone? What materials did you use?
Considering the age of the leather, I planned to use a fairly traditional approach to cleaning - using the same method as I would use if I was cleaning horse tack (ah, my farm boy youth coming back to me!). The logic being that the leather would have been tanned and dyed using 1930's technology, so modern chemical cleaners may not work so well on them.
I cleaned and fed the leather in a 3 stage process:
1) Clean with Carr & Day & Martin Belvoir Tack Cleaner - spray on, work into leather and wipe off
2) Clean and feed with Belvoir Tack Conditioner - Glycerine Saddle Soap - apply with a damp cloth and then buff up
3) Feed with Connolly Hide Care - work into the leather with a cloth and then buff off
Sadly I ran out of Belvoir Tack Cleaner towards the end, and ended up cleaning the front seat squabs with Autoglym Leather Cleaner, before applying the saddle soap and hide food. It is only an impression, but it seemed that the Autoglym cleaner stripped more of the oils out of the leather and left a drier and rougher finish. While it works fine on the newer leathers in my Disco 4 or XJS, it doesn't seem to work so well on the older leather. So - lesson learnt, I will stick with the old fashioned approach!
With the seats now clean, I was able to start a dry build of the interior, as much as anything to help visualise what was missing. So in went the front seat floorboards - note the wood worm on the driver's side!
Front passenger seat goes in!
Rear seat squab, followed by cushion.
All fully in place!
It was very encouraging to see the car back in one piece and actually looking like a car again! From having everything now back in the right place, I was able to make a much more detailed list of missing components on the interior.
Small steps, but slowly getting through this first stage.
Take care!
AF
Hello all,
Many thanks for the positive comments and suggestions - both about the leather and part replacements via 3D scanning and additive manufacturing.
I finally have a chance to sit down and update the thread - so here we have the Big Post-Easter Update!
Inspired by your comments, I have given the leather another complete clean and feed and we are now getting somewhere. It no longer smells and you are unlikely to catch anything nasty from it! I have been in contact with Steve Merrett at Leathercare Ltd in Knutsford on the subject - he is ex-Connolly and has been very generous with his information about the challenges of old leather. While I might get to a position where the current leather is stable, it may well not be strong enough anymore to take the loads associated with restitching etc. But time will tell. In other positive interior news, I have got the rear arm rest to move (!) and given it a clean.... so that is the leather "saved" for now.
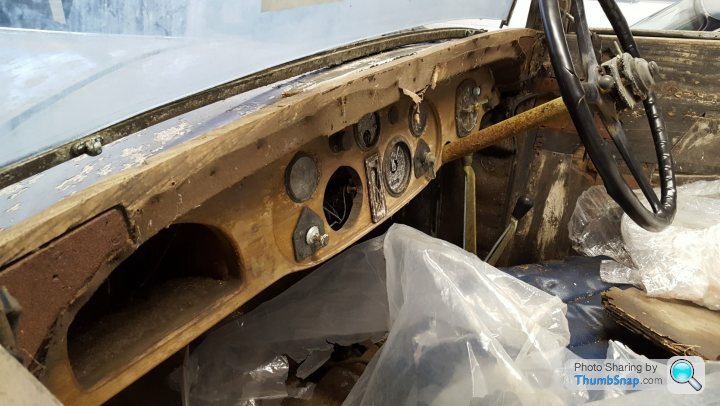
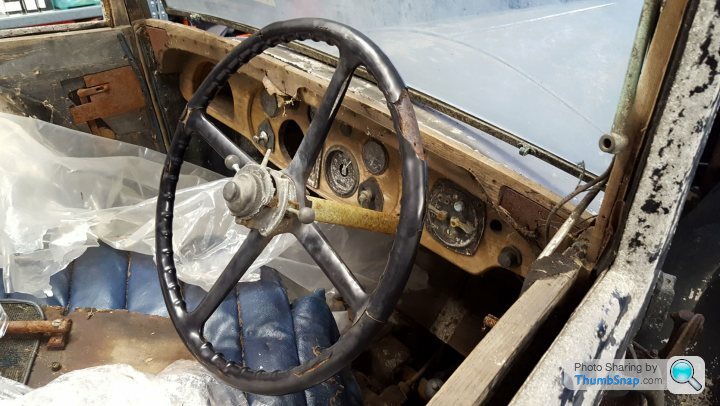
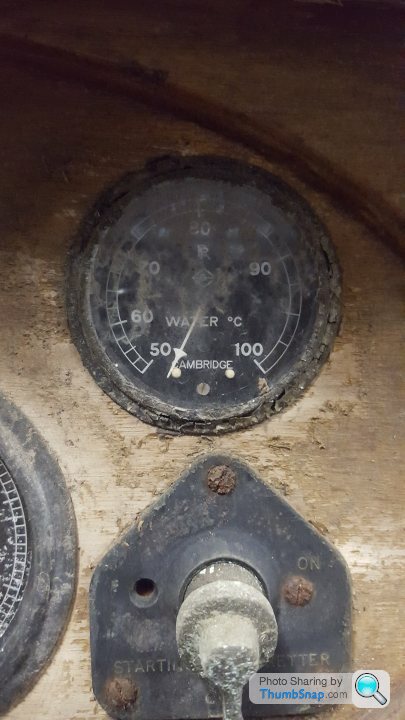
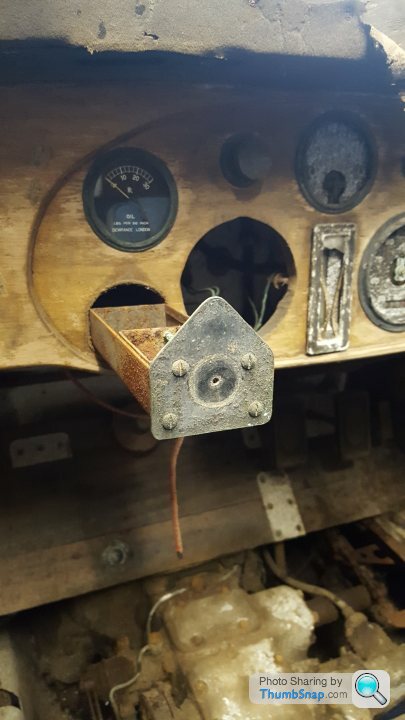
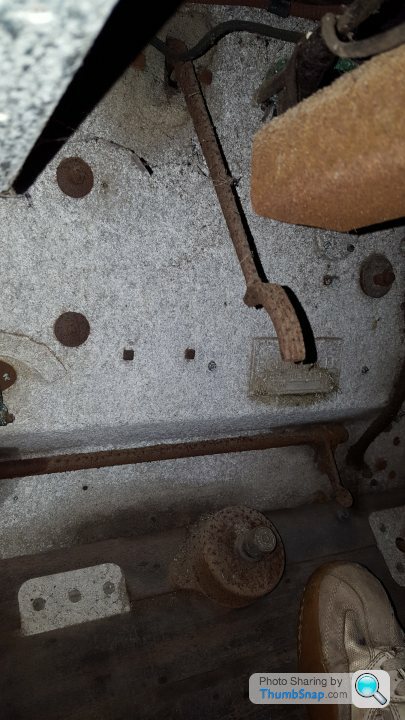
Having got the leather sorted, I have turned my attention to the rest of the interior - notably the dash, pedalbox and front bulkhead. Again it has been a process of gentle cleaning.... the pictures below are the "before" / "after" the clean!
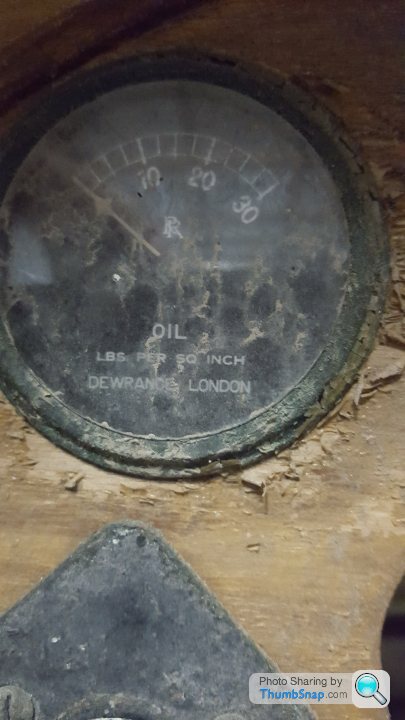
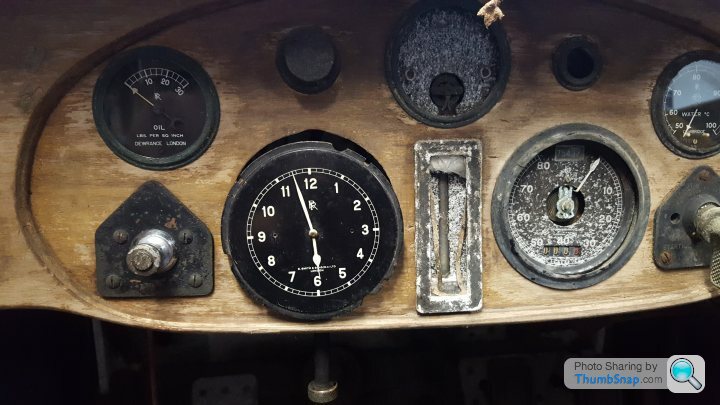
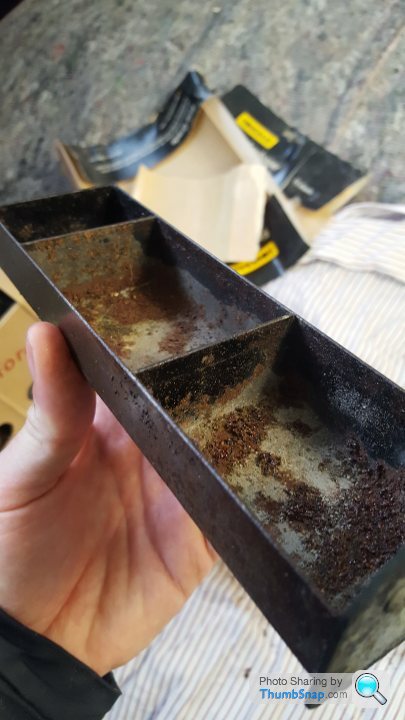
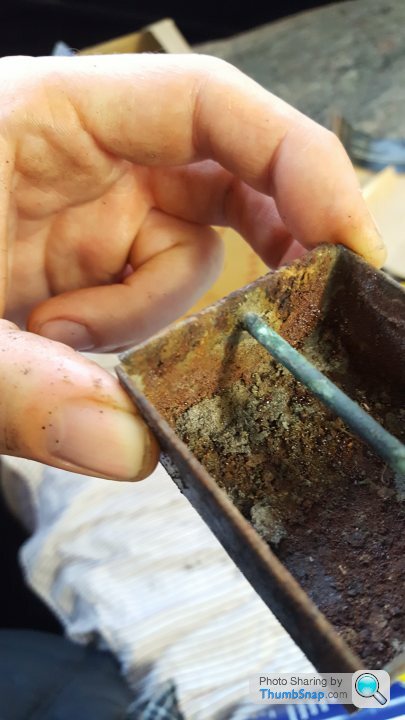
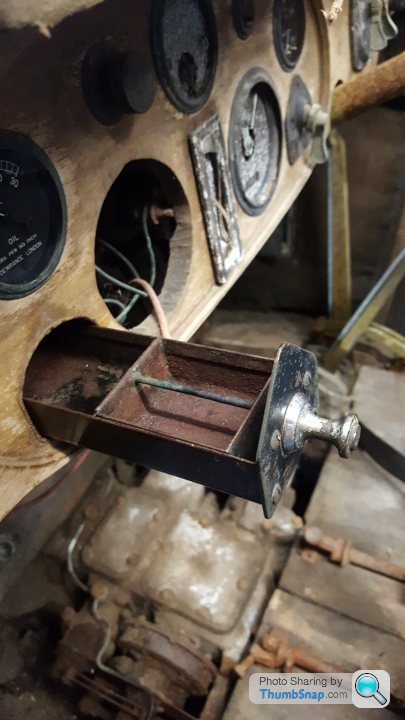
One element of the dashboard which puzzled me was the black "house" shaped object on the left side. After some struggling with it, I managed to get it to move and low and behold - a cigar ashtray! After some prodding and cleaning, I was surprised to find it still had ash in it from all those years ago..... !!! It all now moves freely and will be restored in due course.
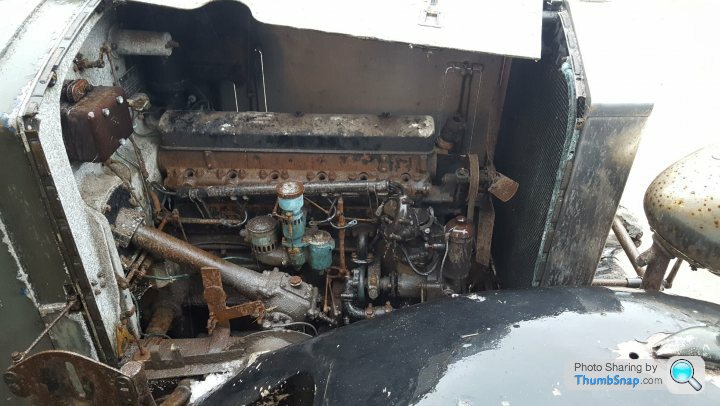
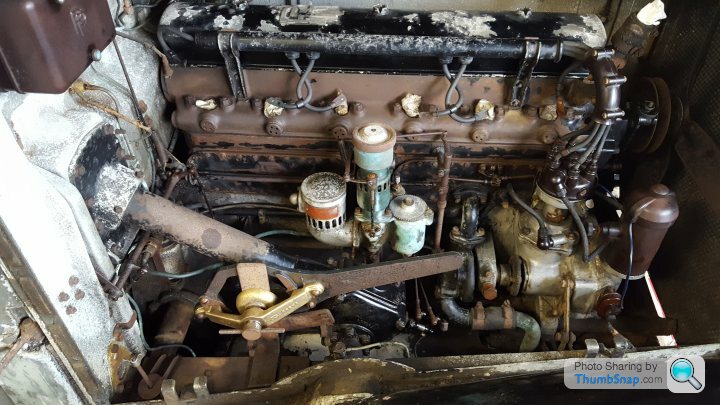
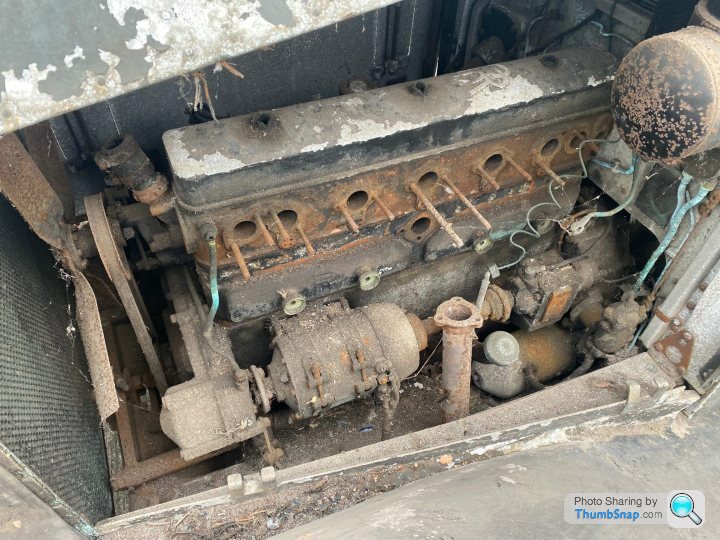
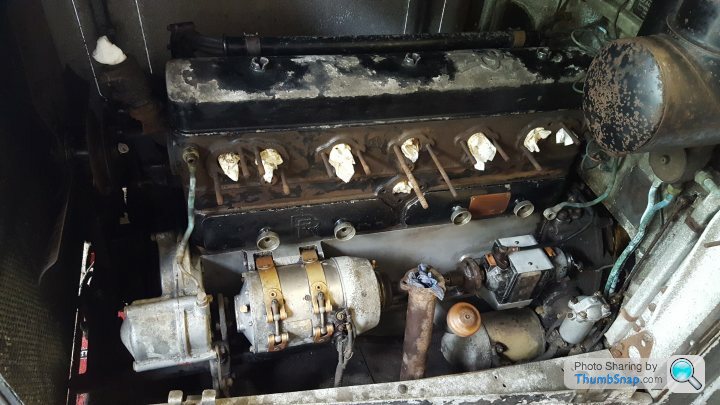
The dash now looked ok, so I moved on to getting the engine bay shipshape. Lots and lots of degreaser, paper towel, wire brush, cotton buds (and cups of tea!) later, we had a decent looking unrestored engine bay. Many little details have come to light - small missing brackets, mis-adjusted hand throttle linkage, missing tools - but nothing fatal. If we do a "before" and "after" image of both sides of the engine, I think you'd have to agree that it looks much better!

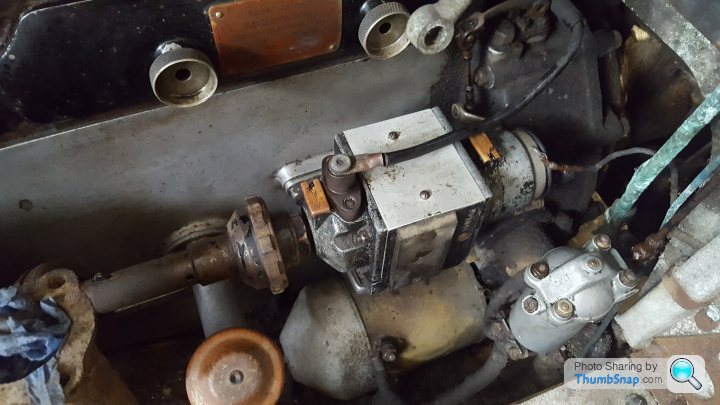
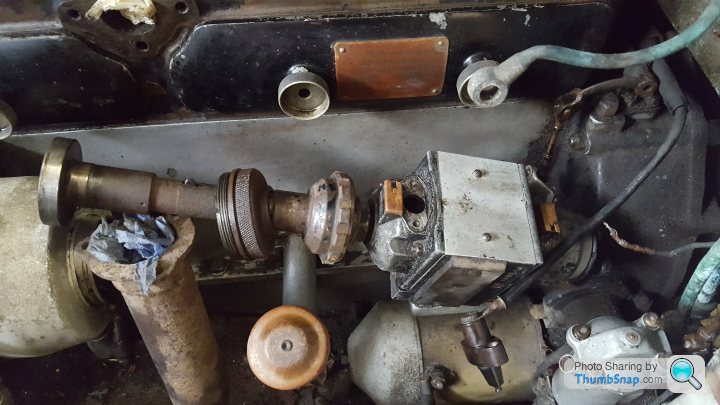
As I continued my battle to get everything moving again, the next items to tackle were the hand controls on the steering. These are for throttle, ignition timing and mixture enrichment. The levers in the middle of the wheel connect to rods running down the centre of the column and connect via complex linkages to their relevant controls. The throttle and mixture controls were easy to sort - the ignition was not. It controls the 2 (yes 2!) ignition systems (main is dynamo / coil - back up is magneto) via the most complex of linkages running down one side of the engine and then a second behind the engine over to the magneto on the other side!
I managed to get the side connected to the distributor to work ok, but the magneto would not budge. So there was nothing else for it but to remove it from the car and try to free it up. After much effort, it was all clean, but still refusing to adjust. By this point, my normally very forgiving wife had had enough of me stinking the house out with solvents from my office, so I had to admit defeat for now and refit the cleaned but still jammed part. Another one to add to the list, when the engine comes out.....
Now that the interior is stable and the engine bay clean, it was time to focus on axles and brakes... but that is for the next update.
Take care,
AF
Many thanks for the positive comments and suggestions - both about the leather and part replacements via 3D scanning and additive manufacturing.
I finally have a chance to sit down and update the thread - so here we have the Big Post-Easter Update!
Inspired by your comments, I have given the leather another complete clean and feed and we are now getting somewhere. It no longer smells and you are unlikely to catch anything nasty from it! I have been in contact with Steve Merrett at Leathercare Ltd in Knutsford on the subject - he is ex-Connolly and has been very generous with his information about the challenges of old leather. While I might get to a position where the current leather is stable, it may well not be strong enough anymore to take the loads associated with restitching etc. But time will tell. In other positive interior news, I have got the rear arm rest to move (!) and given it a clean.... so that is the leather "saved" for now.
Having got the leather sorted, I have turned my attention to the rest of the interior - notably the dash, pedalbox and front bulkhead. Again it has been a process of gentle cleaning.... the pictures below are the "before" / "after" the clean!
One element of the dashboard which puzzled me was the black "house" shaped object on the left side. After some struggling with it, I managed to get it to move and low and behold - a cigar ashtray! After some prodding and cleaning, I was surprised to find it still had ash in it from all those years ago..... !!! It all now moves freely and will be restored in due course.
The dash now looked ok, so I moved on to getting the engine bay shipshape. Lots and lots of degreaser, paper towel, wire brush, cotton buds (and cups of tea!) later, we had a decent looking unrestored engine bay. Many little details have come to light - small missing brackets, mis-adjusted hand throttle linkage, missing tools - but nothing fatal. If we do a "before" and "after" image of both sides of the engine, I think you'd have to agree that it looks much better!
As I continued my battle to get everything moving again, the next items to tackle were the hand controls on the steering. These are for throttle, ignition timing and mixture enrichment. The levers in the middle of the wheel connect to rods running down the centre of the column and connect via complex linkages to their relevant controls. The throttle and mixture controls were easy to sort - the ignition was not. It controls the 2 (yes 2!) ignition systems (main is dynamo / coil - back up is magneto) via the most complex of linkages running down one side of the engine and then a second behind the engine over to the magneto on the other side!
I managed to get the side connected to the distributor to work ok, but the magneto would not budge. So there was nothing else for it but to remove it from the car and try to free it up. After much effort, it was all clean, but still refusing to adjust. By this point, my normally very forgiving wife had had enough of me stinking the house out with solvents from my office, so I had to admit defeat for now and refit the cleaned but still jammed part. Another one to add to the list, when the engine comes out.....
Now that the interior is stable and the engine bay clean, it was time to focus on axles and brakes... but that is for the next update.
Take care,
AF
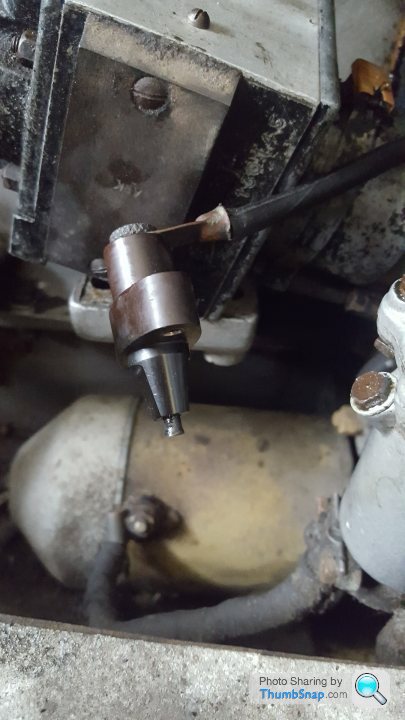
The large bomb shaped object under the magneto in the last pictures is the starter motor.... it also has handle for starting. It does have a lot of things which you can identify on modern vehicles - and some obvious differences. One being how to handle the switching of high electrical current loads. Just above the starter is a small silver upright box - this is the starter motor "relay" - but in this case it is a switch in an oil bath (like you would have on industrial switch gear in the 1960's), rather than a lightweight relay in modern applications. Only a year or so later R-R swapped to a relay system.....
It has been great fun working out the logic and operation of each of these items.
AF
It has been great fun working out the logic and operation of each of these items.
AF
gary71 said:
Coming on well Andy, does the engine turn over at all?
Hi Gary - that's one of the next challenges! I am regularly soaking the bores to try to free them up. The sump seems to be full of treacle (though showing "full") and I might try to get a breaker bar on the crank pulley to see if it will move at all. Before doing any of that though, I want to have a poke around inside the inspection plates (of which there are many!) to see the general state of the internal surfaces. If they are at all corroded, then I won't chance it and just go straight to a full strip down. PS - loving the images of the restored 911 out in the wild! Excellent work!
AF :-)
Hi all,
Just to respond to some of the great comments above.
I am very much still in the "forensic" stage of working out where the car is starting from. The cleaning and freeing up of things is as much about assessing condition as anything else. It has been fascinating to see how varied the degradation is - some items look like they did when they came out of the factory in 1932, others like they have spent 50 years at the bottom of the sea!
It will need to come apart completely in the end - the wiring is not safe - though some looks ok (on the outside), other parts (having been exposed to oil, petrol or UV light) are in a very bad state. It would be a massive fire risk to reconnect anything.
The end result of the restoration is still very much open in my mind - do I take it back to completely original spec (as in 1932) - so original colour, no rear lights mounted on the wings, only trafficators for direction - or see the changes as part of the car's history and view it as a continuation? As others have said, it is only original once, so I am currently on the "continuation" (with quite a lot of repair work) side of the argument.
Freeing the engine up is all part of the assessment process - and to make the eventual disassembly a little easier. I have no idea on the condition of the head (one of the main weaknesses of this engine) and, while it is apart, should I get hardened valve seats fitted etc to allow for modern petrol? Some 20/25 R-R owners I have spoken to have not done so, relying on fuel tank additives to protect their engines.
All good problems to solve! :-)
Take care,
AF
Lord Flashheart said:
This is interesting. I was led to believe, somewhere down the line, that these engines are too lazy to require hardened valve seats. That lead free petrol wouldn't be a concern. Now I'd better look a bit further into it!
Lord Flashheart - just to allay your concerns re fuel. From the reading I have done this afternoon (beer in hand, sat in the sunshine in the garden!), it seems that you are quite right. Key things are:- Keep an eye on the valve clearances
- Use 97/98 octane fuel (E5 protection grade) - to avoid the effects of E10 on cars which are not run everyday
- Additives can help - Castrol Valvemaster was tested by the FBHVC as being fit for purpose.
For some more detailed reading, here is the former head of engines at Rolls Royce on the effects of lead in fuel:
https://rroc.org.au/library/unleaded/kelee.html
It will be many months before this becomes an issue for me... but in a roundabout way, it has clarified some aspects of the engine rebuild re: valve seats for modern fuel. :-)
AF
Hello all,
After a bit of a pause, it is certainly time to update the thread. This one is entitled "Take your first estimate and double it".
I'd got to the point where most things were now superficially clean and I was able to work out what was missing and what wasn't. One of the main tasks had been to tidy up the engine bay and identify if anything more was missing than the horn, the spark plugs and the intake and exhaust manifolds. While cleaning the side of the block, I felt something move under my hand - to my dismay it was the rocker cover. On removal of the rocker cover - which was missing its fixing nuts, the scale of the challenge just got a lot bigger. Can you see what is missing in the picture below?

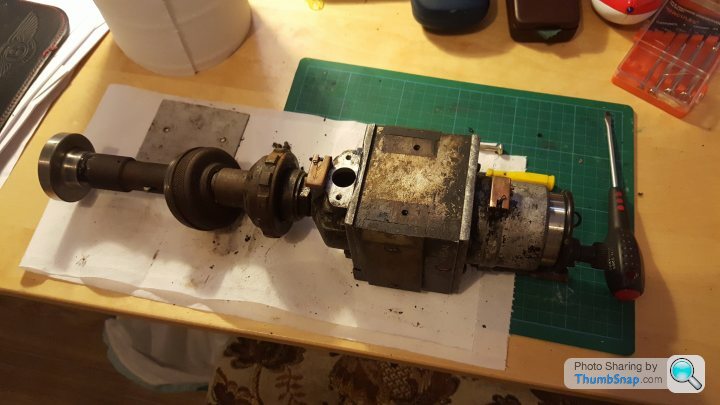
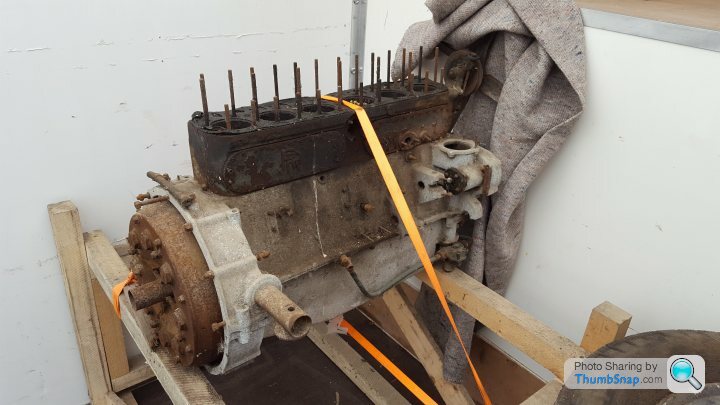
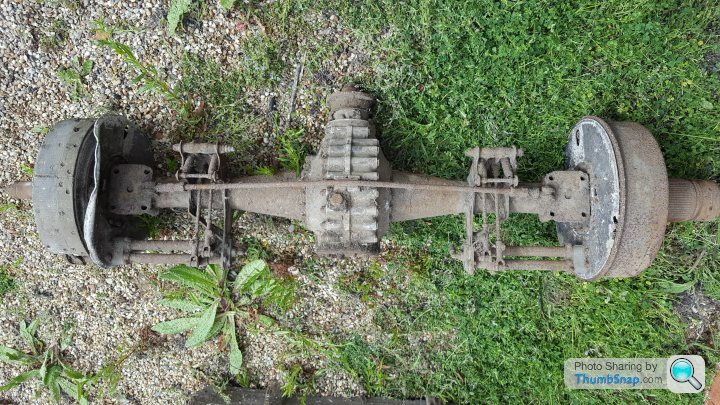
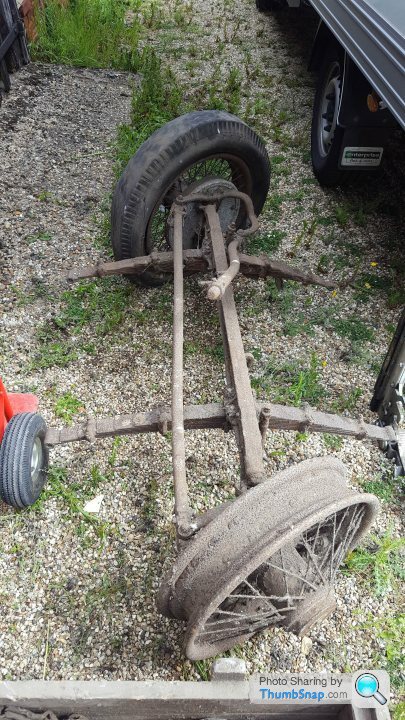
So that was the rocker shaft, rockers and pushrods which appeared to be AWOL - just to add to the list. Whilst I was more than a touch frustrated, I held out hope that these parts were still in the pile of "spares" which had been listed in the original sale listing. After some to-ing and fro-ing, I eventually got the chance to go down to collect the spares and negotiate the purchase of a spare engine, axles and other assorted parts from the previous owner.
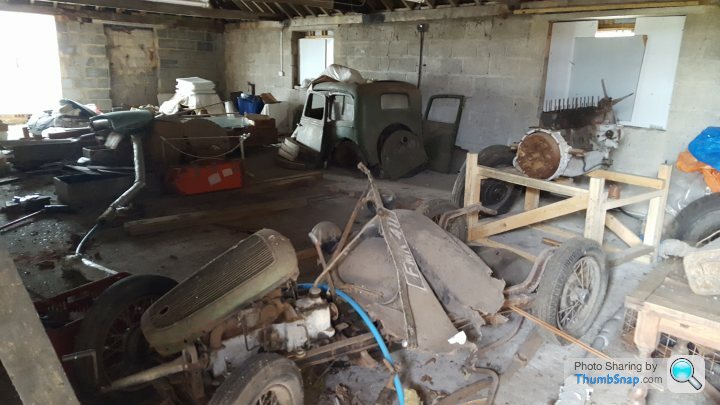
The hunt for the spares was in a range of barns where the Rolls-Royce has sat languishing for the best part of 50 years. Spread over 3 different buildings, I was able to find quite a bit of the missing original trim - again suitable for making patterns, as well as a number of important and difficult to find chromed parts. The spare engine was on a makeshift wooden stand and the front and rear axles needed dragging out into the sunlight. Overall, it was very worthwhile and I have to admit that it was a great day out!


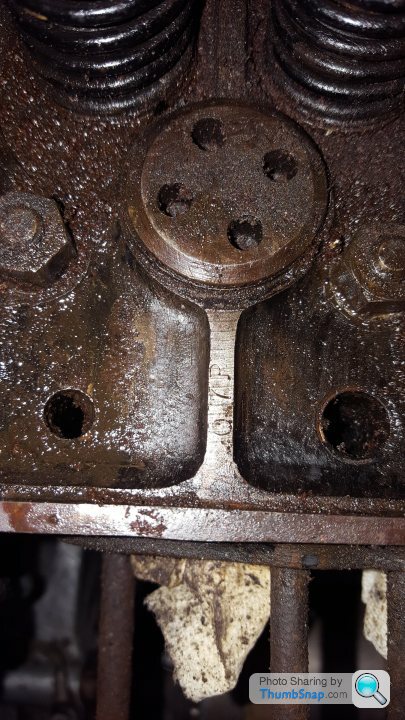
When I got home I set about working out exactly what I had recovered. I started with the engine and cleaned off the engine number stamping on the block - was that Q7P or O7P? I consulted the books and worked out that the likely 20/25 candidate was a car - chassis number GDP68 - which had last been seen in 1976. The RREC forum were extremely helpful in guiding me to find other ways of identifying the parts, and one idea raised was that the engine stamp was in fact O7P - and this related to an earlier 1929 20HP Rolls-Royce - GLN76. This car was deemed to be a "lost" car by the RREC 20HP register, as they had no record of it all in the post war era.
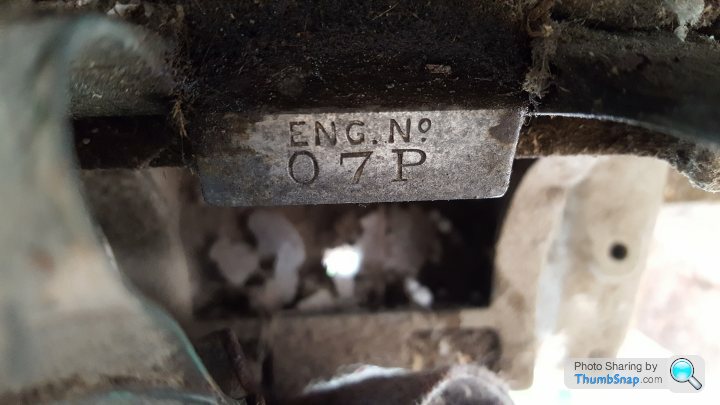
After much cleaning and checking, and with the help of the Archive team at the RREC, as well as RREC forum members, I was able to confirm that the engine and steering column recovered were definitely from the "lost" 20HP car - to give it it's full details, from the factory chassis cards:
- a 1929 20HP, chassis number GLN76, "NB" series, engine number 07P, registration UR3633, off test 01.03.1929, originally fitted with a 4 door Hooper saloon body (dark blue and black, with fine blue line and blue leather, with division).
- It was sold new to Mr W N Watson by the Aylesbury Motor Co. It returned to the works on a number of occasions before being sold as a "complete car, as it stands, the whole in used condition" to a Mr J Compton in June 1937 for £170. Mr W N Watson was allowed £150 in part payment for GRO35 (25/30HP).
- the last entry in the works records is for the sale of a decarbonising kit in November 1937 to Mr Compton... the trail goes cold beyond here, for now.
So it would seem that I had bought the mortal remains of a 20HP car which had not been heard of for 85 years! This was very exciting, but it posed a couple of major questions. So these spares which had been bought were not actually suitable for my 20/25 AND where was the head of the spare engine? - had this been part fitted to my own car, perhaps in error, when the spares were bought by the previous owner's father?
More digging ensued - and yes - the 20HP cylinder head (O7P) had been fitted to my 20/25!!!!!!!!!
Taking stock, the last couple of months have given:
- a whole "new" project - the restoration of a previously unknown 1929 20HP - but this is a major challenge as I only have the engine, axles and some of the smaller items for the chassis - no chassis itself or any bodywork. If anyone knows of a standard short 20HP chassis in need of a home - please let me know!
- a significant increase in the scope of the rebuild of the 20/25. It will need a new cylinder head - which are available, in aluminium, for a cool ~ £6550, as well as many of the other missing internal parts.
One small positive step forwards has been the agreement for the sale of my beloved XJS - this will free up much needed space to allow the rebuild of the 20/25 to really get beyond the cleaning up/sorting out stage. I will be sad to see it go, but it looks like it is going to a very good home.
As I said at the start of this thread update, with any project such as this, you always have to take your first estimate (of cost, time - or now in this case - number of vehicles involved) and double it!
:-)
Take care,
AF
After a bit of a pause, it is certainly time to update the thread. This one is entitled "Take your first estimate and double it".
I'd got to the point where most things were now superficially clean and I was able to work out what was missing and what wasn't. One of the main tasks had been to tidy up the engine bay and identify if anything more was missing than the horn, the spark plugs and the intake and exhaust manifolds. While cleaning the side of the block, I felt something move under my hand - to my dismay it was the rocker cover. On removal of the rocker cover - which was missing its fixing nuts, the scale of the challenge just got a lot bigger. Can you see what is missing in the picture below?
So that was the rocker shaft, rockers and pushrods which appeared to be AWOL - just to add to the list. Whilst I was more than a touch frustrated, I held out hope that these parts were still in the pile of "spares" which had been listed in the original sale listing. After some to-ing and fro-ing, I eventually got the chance to go down to collect the spares and negotiate the purchase of a spare engine, axles and other assorted parts from the previous owner.
The hunt for the spares was in a range of barns where the Rolls-Royce has sat languishing for the best part of 50 years. Spread over 3 different buildings, I was able to find quite a bit of the missing original trim - again suitable for making patterns, as well as a number of important and difficult to find chromed parts. The spare engine was on a makeshift wooden stand and the front and rear axles needed dragging out into the sunlight. Overall, it was very worthwhile and I have to admit that it was a great day out!
When I got home I set about working out exactly what I had recovered. I started with the engine and cleaned off the engine number stamping on the block - was that Q7P or O7P? I consulted the books and worked out that the likely 20/25 candidate was a car - chassis number GDP68 - which had last been seen in 1976. The RREC forum were extremely helpful in guiding me to find other ways of identifying the parts, and one idea raised was that the engine stamp was in fact O7P - and this related to an earlier 1929 20HP Rolls-Royce - GLN76. This car was deemed to be a "lost" car by the RREC 20HP register, as they had no record of it all in the post war era.
After much cleaning and checking, and with the help of the Archive team at the RREC, as well as RREC forum members, I was able to confirm that the engine and steering column recovered were definitely from the "lost" 20HP car - to give it it's full details, from the factory chassis cards:
- a 1929 20HP, chassis number GLN76, "NB" series, engine number 07P, registration UR3633, off test 01.03.1929, originally fitted with a 4 door Hooper saloon body (dark blue and black, with fine blue line and blue leather, with division).
- It was sold new to Mr W N Watson by the Aylesbury Motor Co. It returned to the works on a number of occasions before being sold as a "complete car, as it stands, the whole in used condition" to a Mr J Compton in June 1937 for £170. Mr W N Watson was allowed £150 in part payment for GRO35 (25/30HP).
- the last entry in the works records is for the sale of a decarbonising kit in November 1937 to Mr Compton... the trail goes cold beyond here, for now.
So it would seem that I had bought the mortal remains of a 20HP car which had not been heard of for 85 years! This was very exciting, but it posed a couple of major questions. So these spares which had been bought were not actually suitable for my 20/25 AND where was the head of the spare engine? - had this been part fitted to my own car, perhaps in error, when the spares were bought by the previous owner's father?
More digging ensued - and yes - the 20HP cylinder head (O7P) had been fitted to my 20/25!!!!!!!!!
Taking stock, the last couple of months have given:
- a whole "new" project - the restoration of a previously unknown 1929 20HP - but this is a major challenge as I only have the engine, axles and some of the smaller items for the chassis - no chassis itself or any bodywork. If anyone knows of a standard short 20HP chassis in need of a home - please let me know!
- a significant increase in the scope of the rebuild of the 20/25. It will need a new cylinder head - which are available, in aluminium, for a cool ~ £6550, as well as many of the other missing internal parts.
One small positive step forwards has been the agreement for the sale of my beloved XJS - this will free up much needed space to allow the rebuild of the 20/25 to really get beyond the cleaning up/sorting out stage. I will be sad to see it go, but it looks like it is going to a very good home.
As I said at the start of this thread update, with any project such as this, you always have to take your first estimate (of cost, time - or now in this case - number of vehicles involved) and double it!
:-)
Take care,
AF
Edited by andyfeaver on Thursday 9th June 13:42
Hello all,
Time for another update, following a successful couple of weeks. This one is entitled "End of the Beginning..."
The last post focussed on the haul of spares which I had recovered from a number of barns in Essex, which were hopefully going to solve some of the missing parts issues on the car. As I found out, it was very much a mixed bag - as well as lots of small and important parts of the 20/25, I also collected the mortal remains of an earlier 20HP car. This is now its own project and has its own thread.... but as you can imagine, the challenge of sifting through boxes of parts trying to determine what belongs to what! I now have 3 piles of parts - those that are definitely 20/25, those that are definitely 20HP and then a small pile in the middle, where I can't work out what they are!
Using what I had for the 20/25, I was now in a position to finish off the assessment stage of the project. Anything which was now missing was genuinely "lost" and would need to be added to the missing parts list. I also wanted to ensure that the car was as well preserved as possible, so that it can be safely stored without any further deterioration while different aspects of the restoration are underway.
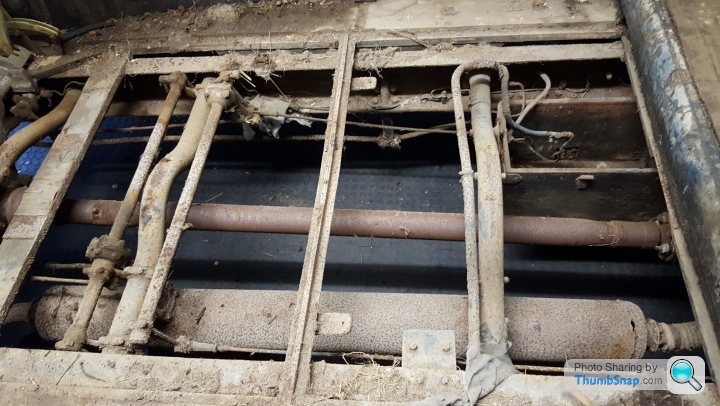
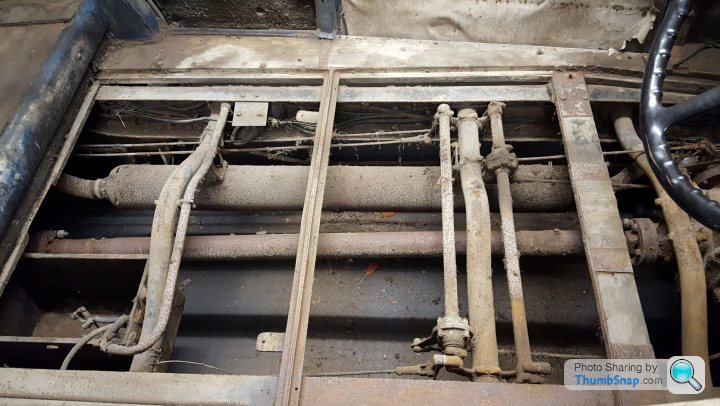
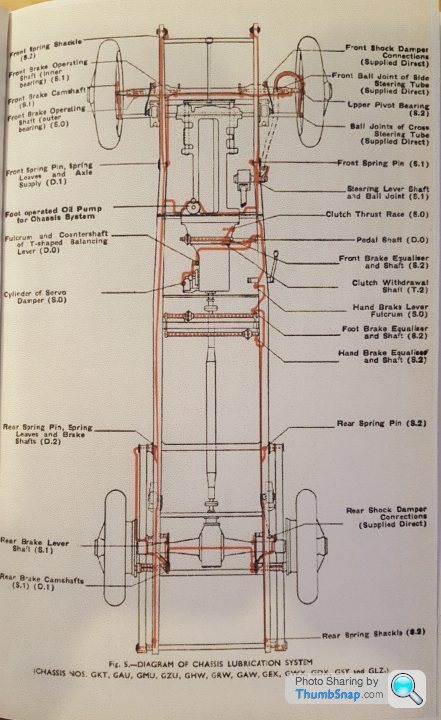
One of the key ways of ensuring this, my learned vintage Rolls-Royce experts tell me, is to ensure that the "Luvax Bijur Chassis Lubrication System" is working. To those of us more used to more modern classics, this system is an oddity. It comes from a time where most sliding joints were oil, rather than grease, lubricated and worked on a "total loss" principle. Modern sealing and the desire to stop oil dropping onto the road were not yet in fashion. The lovely colour diagram below shows how oil is pumped around the chassis to all of the major systems, via the operation of the foot operated pump.
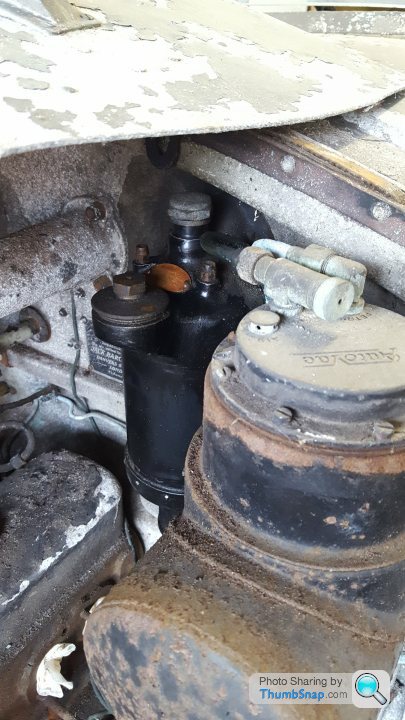
I cleaned up the oil tank mounted on the engine bay side of the front bulkhead, soaked the filter to make it presentable and tentatively filled the tank with oil. Amazingly the pump appeared to seal and after a dozen or so pumps I was getting the tell-tale drop-drop and weep of oil at a number of the oiling points. This was real progress and felt like I had almost got the car's blood pumping again. More cleaning and working on stuck components showed oil now reaching pretty much all of the chassis - the main exception being the front axle.
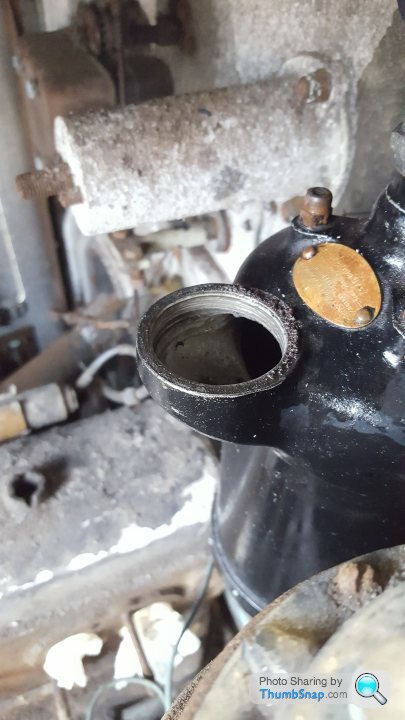
Here it was clear something was missing - there was an exposed oil fitting, but no oil pipe to feed it. Reading more about the system, it seemed that the oil supply pipe should have run down the inside of the LH front road spring. I searched through my piles of spares and, sure enough, I found the oil pipe, complete with banjo fitting on the end. The only downside was that the pipe was incomplete.... The team at Fiennes (who I cannot speak highly enough of) were excellent at helping me to work out what was missing and I made up a new brass oil supply pipe to replace the damaged one. On removing the original, it would appear that one of the previous owners had some issue with it and simply crushed it closed to prevent unwanted leaks!
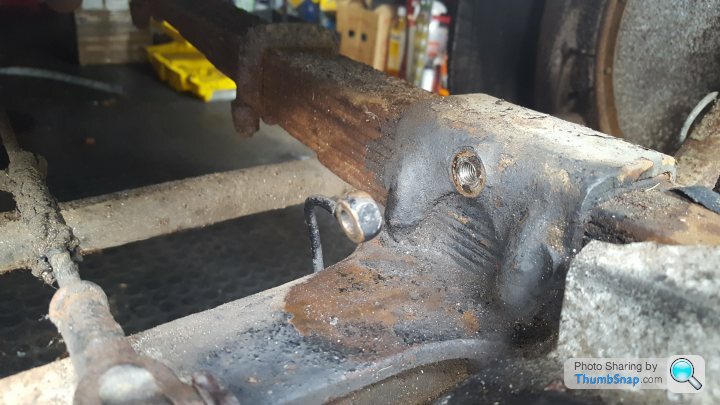


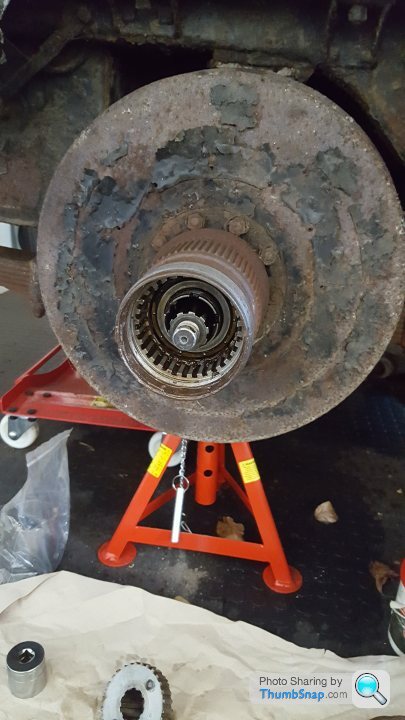
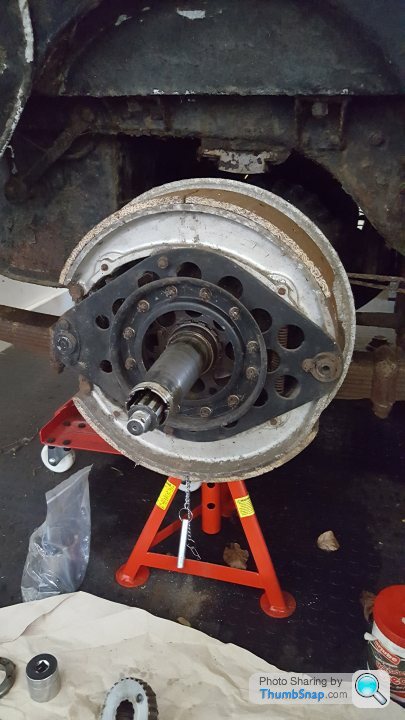
With the oil supply pipe reinstalled, a few more pumps got oil flowing to the front axle - now were were getting somewhere. So I turned my attention to the rear axle, rear brakes and propshaft - with the germ of an idea forming to get the car back onto its wheels and moveable as a rolling chassis. The differential was easy enough - drain out the dregs of treacle coloured oil, flush with non EP SAE90 gear oil and then refill. It turned over beautifully smoothly. For the propshaft, oiling of both the upper and lower joints freed this off nicely too. The rear brakes (both foot and handbrake) were a bit more stubborn, but the same principles applied - remove, clean, relube where required - and they were operational again.
To complete the plan of getting the car back onto its wheels, I would need to invest in some more inner tubes and hope that I could get the very ancient tyres off the rims. After much sweat and tears (and some choice bad language), 2 new inner tubes were in place and all five tyres (inc the spare) had air in them.
Sunday morning arrived bright and sunny and seemed like the perfect day for getting the car outside. It would also provide a great opportunity to clean the garage out too - it was now filthy from the clean up process on the car so far. The added bonus was that the car's previous owner was also coming round to drop off a couple more parts which had been found, and I hoped that it would be a nice surprise for him to see his father's car back on its wheels again.
I lowered the car off the axle stands and with my wife kindly volunteering to be the driver, I pushed the car out into the sunshine. It rolled very easily and both the foot and handbrake worked a treat.


The car's previous owner was very pleased to see the progress to date and it gives an opportunity to reflect a bit on what has been achieved so far. The car has been thoroughly cleaned and I have gone through it to check its history and condition. Everything now opens / closes / works and is protected for future work and restoration. The list of missing and required replacement parts is pretty much complete, as is the list of sensible upgrades which I will add to it to make it more useable in modern traffic. From here, it will be a detailed strip, restore and rebuild plan, along with some sizeable budget planning. But all that is for tomorrow, now it is just about admiring the view.....

Take care,
AF
Time for another update, following a successful couple of weeks. This one is entitled "End of the Beginning..."
The last post focussed on the haul of spares which I had recovered from a number of barns in Essex, which were hopefully going to solve some of the missing parts issues on the car. As I found out, it was very much a mixed bag - as well as lots of small and important parts of the 20/25, I also collected the mortal remains of an earlier 20HP car. This is now its own project and has its own thread.... but as you can imagine, the challenge of sifting through boxes of parts trying to determine what belongs to what! I now have 3 piles of parts - those that are definitely 20/25, those that are definitely 20HP and then a small pile in the middle, where I can't work out what they are!
Using what I had for the 20/25, I was now in a position to finish off the assessment stage of the project. Anything which was now missing was genuinely "lost" and would need to be added to the missing parts list. I also wanted to ensure that the car was as well preserved as possible, so that it can be safely stored without any further deterioration while different aspects of the restoration are underway.
One of the key ways of ensuring this, my learned vintage Rolls-Royce experts tell me, is to ensure that the "Luvax Bijur Chassis Lubrication System" is working. To those of us more used to more modern classics, this system is an oddity. It comes from a time where most sliding joints were oil, rather than grease, lubricated and worked on a "total loss" principle. Modern sealing and the desire to stop oil dropping onto the road were not yet in fashion. The lovely colour diagram below shows how oil is pumped around the chassis to all of the major systems, via the operation of the foot operated pump.
I cleaned up the oil tank mounted on the engine bay side of the front bulkhead, soaked the filter to make it presentable and tentatively filled the tank with oil. Amazingly the pump appeared to seal and after a dozen or so pumps I was getting the tell-tale drop-drop and weep of oil at a number of the oiling points. This was real progress and felt like I had almost got the car's blood pumping again. More cleaning and working on stuck components showed oil now reaching pretty much all of the chassis - the main exception being the front axle.
Here it was clear something was missing - there was an exposed oil fitting, but no oil pipe to feed it. Reading more about the system, it seemed that the oil supply pipe should have run down the inside of the LH front road spring. I searched through my piles of spares and, sure enough, I found the oil pipe, complete with banjo fitting on the end. The only downside was that the pipe was incomplete.... The team at Fiennes (who I cannot speak highly enough of) were excellent at helping me to work out what was missing and I made up a new brass oil supply pipe to replace the damaged one. On removing the original, it would appear that one of the previous owners had some issue with it and simply crushed it closed to prevent unwanted leaks!
With the oil supply pipe reinstalled, a few more pumps got oil flowing to the front axle - now were were getting somewhere. So I turned my attention to the rear axle, rear brakes and propshaft - with the germ of an idea forming to get the car back onto its wheels and moveable as a rolling chassis. The differential was easy enough - drain out the dregs of treacle coloured oil, flush with non EP SAE90 gear oil and then refill. It turned over beautifully smoothly. For the propshaft, oiling of both the upper and lower joints freed this off nicely too. The rear brakes (both foot and handbrake) were a bit more stubborn, but the same principles applied - remove, clean, relube where required - and they were operational again.
To complete the plan of getting the car back onto its wheels, I would need to invest in some more inner tubes and hope that I could get the very ancient tyres off the rims. After much sweat and tears (and some choice bad language), 2 new inner tubes were in place and all five tyres (inc the spare) had air in them.
Sunday morning arrived bright and sunny and seemed like the perfect day for getting the car outside. It would also provide a great opportunity to clean the garage out too - it was now filthy from the clean up process on the car so far. The added bonus was that the car's previous owner was also coming round to drop off a couple more parts which had been found, and I hoped that it would be a nice surprise for him to see his father's car back on its wheels again.
I lowered the car off the axle stands and with my wife kindly volunteering to be the driver, I pushed the car out into the sunshine. It rolled very easily and both the foot and handbrake worked a treat.
The car's previous owner was very pleased to see the progress to date and it gives an opportunity to reflect a bit on what has been achieved so far. The car has been thoroughly cleaned and I have gone through it to check its history and condition. Everything now opens / closes / works and is protected for future work and restoration. The list of missing and required replacement parts is pretty much complete, as is the list of sensible upgrades which I will add to it to make it more useable in modern traffic. From here, it will be a detailed strip, restore and rebuild plan, along with some sizeable budget planning. But all that is for tomorrow, now it is just about admiring the view.....
Take care,
AF
Hello all,
Now that the children are back at school (hooray!), I have a moment to update the 20/25 thread. Some progress has been made over the summer, but not all of it good! So, for this update, I shall work with the title “Engine woes….”
In the July update, I’d got to a point where the car was a rolling chassis again, with most parts having been assessed and a list made of the missing/damaged/seized (delete as appropriate) parts. I’d identified that the engine had an earlier 20HP cylinder head fitted, which I needed to remove. Firstly I wanted to collate all the 20HP parts in one place, secondly so that I could make a better assessment of the condition of the 20/25 engine, which would in turn inform the budgeting and costing part of the restoration.
Having cleaned and soaked each fitting, the cylinder head nuts came off easily enough. As per many other parts on the car, I am finding lots of little indications of the life the car has led, plus the tinkering of previous owners. So here I found some less than perfect nuts, as well as a washer or two missing. I soaked the engine studs with penetrating oil, but I could not get the head to shift, even with some gentle blows with a rubber mallet. Stuck for the moment, and not wishing to damage what appears to be a lovely intact (and rather rare) 20HP cast iron head, I turned my attention back to the cylinder bores.

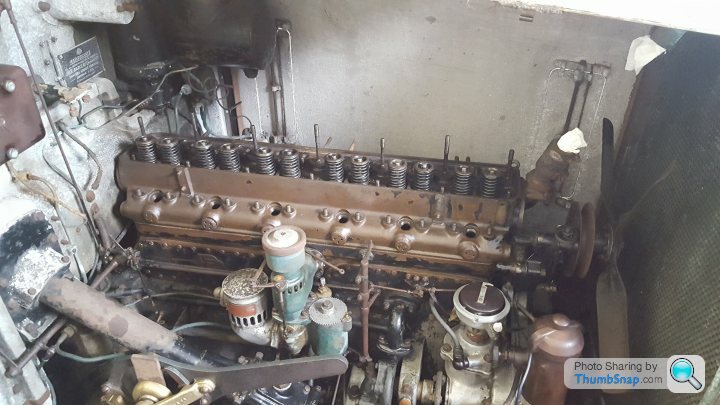
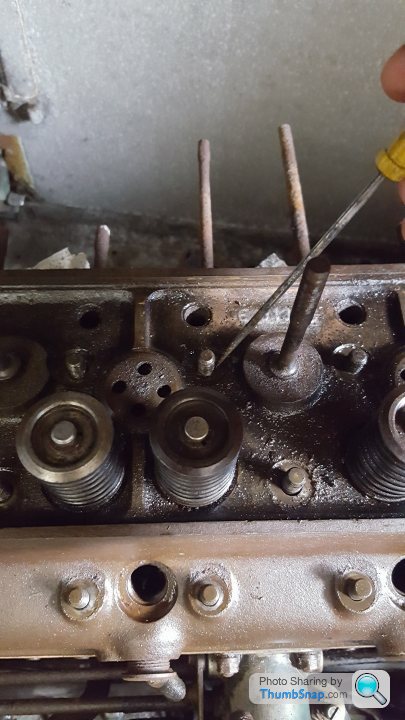
I had managed to clean up each of the cylinders to some degree but they remained pretty mucky and I was concerned that I had not done anything to unstick the piston rings. Having read around the subject a bit, opinions seemed to vary about the best fluids to use – my own preference in the end was diesel, being both light enough to penetrate even the smallest gaps and coming with a lubricating element too. So I dutifully filled each cylinder with diesel via the plug hole, gave each a gentle stir and allowed it to do its job.
After a week or so, it seemed that no. 1 and no. 6 cylinders seemed to be dropping in level – this was encouraging, I thought, as perhaps the diesel was making its was down through the piston rings and into the sump – the first glimmer of hope for getting the rings unstuck. I added some more diesel and excitedly began to daydream about the possibility of getting the engine turn over. Since the “clean & lubricate” method had worked on every other item on the chassis and powertrain so far (even the clutch now engages and disengages), could I complete the set? Strangely, on adding diesel this time, I could have sworn that I heard a gently trickling noise – maybe this was just diesel making its way down into the sump via the piston rings. On checking the LH side of the engine, it was clear that diesel was weeping out from the headgasket joint and running down the side of the block. Again encouraged that this was all helping to free things up, I set about wiping up the LH side of the block, including the tappet chest covers.
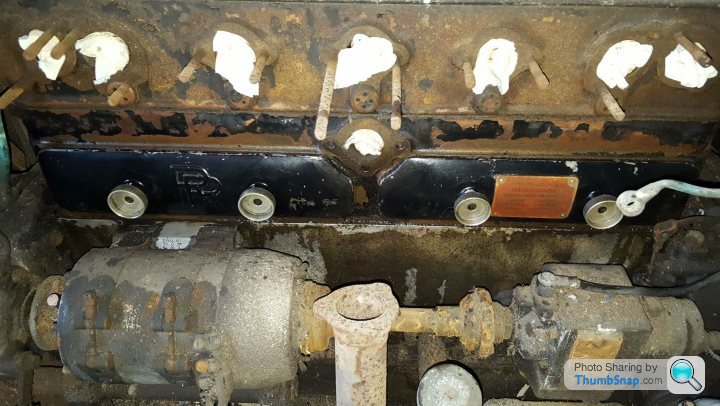
These covers, with their beautiful RR embossing in the cast aluminium, cover the location in the side of block where the camshaft (single side camshaft on this engine) followers feed up to push on the bottom of the pushrods. The adjustment of the valve clearances is made by small adjustments to the pushrod lengths, all accessed via these neat tappet chest covers in the side of the block. While cleaning these covers, I was tempted to remove them and clean what I could of the inside of the tappet chest and assess the condition of the ends of the cam followers.
I cleaned back the first part of the rear tappet chest opening when disaster struck – my fingers touched upon a rough edge. On inspection, I thought I could see a line in the oily muck caked onto the block. More cleaning followed and it was like my world falling apart around me… the lines were the start of a huge spiders web of cracks in the material of the side of the cylinder block. I hurriedly cleaned the front chest, which too revealed a huge “burst” in the side of the block. I simply sat down on the floor of the garage and shook my head. The project had gone from “difficult” to “off the scale difficult”. For the first time, I began to doubt whether it could be completed.
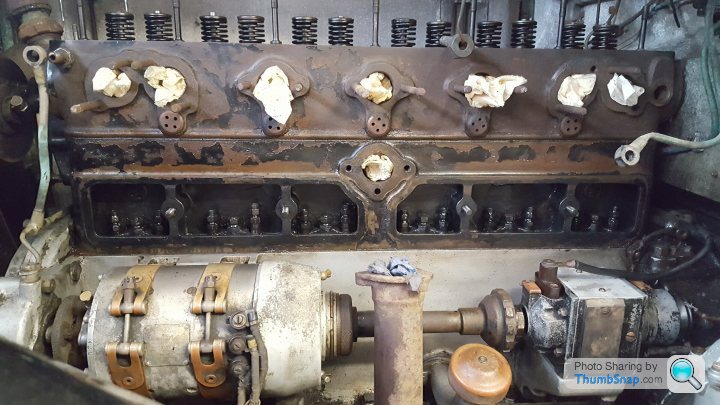
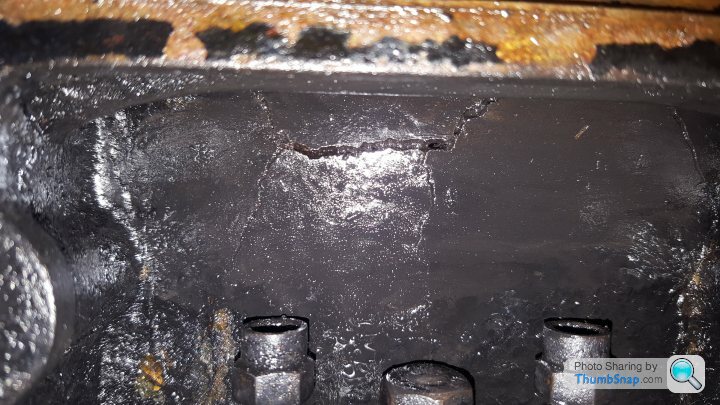
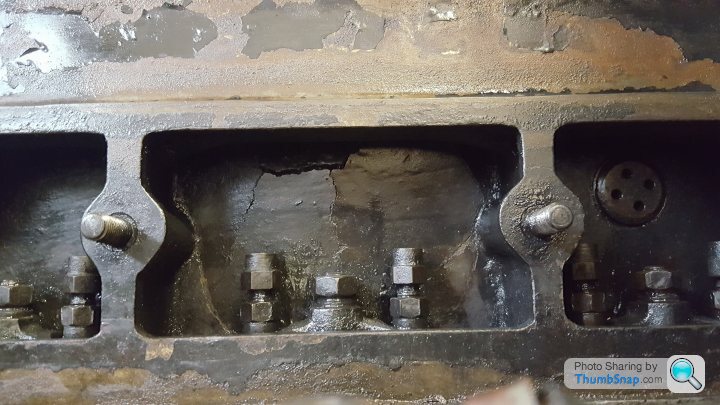
A replacement cylinder head on a 20/25 is one thing – I had budgeted for such a thing in my plans when I bought the car. So many of them have new heads that it is almost a given. But a wrecked block is another order of magnitude of a problem. Given that the car already has oversized pistons (+45 thou), a new block would probably mean new (original dimension) pistons too. I could see the £ signs spiralling upwards. So I did the only thing possible – I had another cup of tea.
I decided that I needed to get to the bottom of the implications of what I had found. If I did need a new engine, I needed to understand a) if it was possible to get the parts required and b) how much would it cost. I contacted the 2 main companies in the UK who are capable of supplying what I needed, Ristes and Fiennes. I worked out a specification of what I thought I needed, with fingers crossed that I could keep and reuse as much of the original engine as possible. The key item that I wanted to reuse was the crankcase, thus being able to preserve the original engine number, which is stamped into the casting just above the dynamo.
The ”new” engine would need to be as follows:
• New head, including valves (assume that rocker cover, rocker shaft and rockers were reused)
• New block, fitted with new original dimension pistons (to the 5.25:1 compression ratio spec, as per original), new little and big end bearings for original con rods.
• Cleaned, crack detected and reground crankshaft, with new main bearings.
• Cleaned and inspected crankcase, including oilways
• Reconditioned torsional damper (on front of the engine), new rollers, pins and springs on cam followers, cleaned and reused camshaft, new bushes/bearings for timing gears
• New clutch
• Dynamic balancing of rotating crankshaft/clutch assembly
• Assemble all the above with new seals and gaskets (as needed) and clean/refit sump and front timing casing.
Once I had the above engine in place, I would then be able to complete the engine build by “dressing” it with all the ancillary components (dynamo, magneto, distributor, carburettor etc) which I would restore myself. The spec above would give a “sealed” engine assembly too – thus preventing ingress of dirt etc.
When contacting Fiennes, I was lucky enough to be helped with my enquiry by Will Fiennes, who founded the company in 1976. His knowledge and experience are well known in Rolls-Royce and Bentley circles and it was a pleasure to work with him. The final quote was detailed and covered everything we had discussed. While it is a lot of money (the block alone costs £6033.50 +VAT), if I consider that the rebuild of the car as a whole would be over a ~10 year period, the engine cost when spread over that timeframe, is little more than I spent on keeping my XJS in fine fettle on an annual basis….
The engine will be the most expensive item in the restoration plan and, with that key piece of information in place, I was now able to plan out the overall timing and sequencing of what I could do and when. It all felt a little better than when I had discovered the cracked block, but the project would now be very much for the long haul!
I hope you enjoyed the update, take care.
AF
Now that the children are back at school (hooray!), I have a moment to update the 20/25 thread. Some progress has been made over the summer, but not all of it good! So, for this update, I shall work with the title “Engine woes….”
In the July update, I’d got to a point where the car was a rolling chassis again, with most parts having been assessed and a list made of the missing/damaged/seized (delete as appropriate) parts. I’d identified that the engine had an earlier 20HP cylinder head fitted, which I needed to remove. Firstly I wanted to collate all the 20HP parts in one place, secondly so that I could make a better assessment of the condition of the 20/25 engine, which would in turn inform the budgeting and costing part of the restoration.
Having cleaned and soaked each fitting, the cylinder head nuts came off easily enough. As per many other parts on the car, I am finding lots of little indications of the life the car has led, plus the tinkering of previous owners. So here I found some less than perfect nuts, as well as a washer or two missing. I soaked the engine studs with penetrating oil, but I could not get the head to shift, even with some gentle blows with a rubber mallet. Stuck for the moment, and not wishing to damage what appears to be a lovely intact (and rather rare) 20HP cast iron head, I turned my attention back to the cylinder bores.
I had managed to clean up each of the cylinders to some degree but they remained pretty mucky and I was concerned that I had not done anything to unstick the piston rings. Having read around the subject a bit, opinions seemed to vary about the best fluids to use – my own preference in the end was diesel, being both light enough to penetrate even the smallest gaps and coming with a lubricating element too. So I dutifully filled each cylinder with diesel via the plug hole, gave each a gentle stir and allowed it to do its job.
After a week or so, it seemed that no. 1 and no. 6 cylinders seemed to be dropping in level – this was encouraging, I thought, as perhaps the diesel was making its was down through the piston rings and into the sump – the first glimmer of hope for getting the rings unstuck. I added some more diesel and excitedly began to daydream about the possibility of getting the engine turn over. Since the “clean & lubricate” method had worked on every other item on the chassis and powertrain so far (even the clutch now engages and disengages), could I complete the set? Strangely, on adding diesel this time, I could have sworn that I heard a gently trickling noise – maybe this was just diesel making its way down into the sump via the piston rings. On checking the LH side of the engine, it was clear that diesel was weeping out from the headgasket joint and running down the side of the block. Again encouraged that this was all helping to free things up, I set about wiping up the LH side of the block, including the tappet chest covers.
These covers, with their beautiful RR embossing in the cast aluminium, cover the location in the side of block where the camshaft (single side camshaft on this engine) followers feed up to push on the bottom of the pushrods. The adjustment of the valve clearances is made by small adjustments to the pushrod lengths, all accessed via these neat tappet chest covers in the side of the block. While cleaning these covers, I was tempted to remove them and clean what I could of the inside of the tappet chest and assess the condition of the ends of the cam followers.
I cleaned back the first part of the rear tappet chest opening when disaster struck – my fingers touched upon a rough edge. On inspection, I thought I could see a line in the oily muck caked onto the block. More cleaning followed and it was like my world falling apart around me… the lines were the start of a huge spiders web of cracks in the material of the side of the cylinder block. I hurriedly cleaned the front chest, which too revealed a huge “burst” in the side of the block. I simply sat down on the floor of the garage and shook my head. The project had gone from “difficult” to “off the scale difficult”. For the first time, I began to doubt whether it could be completed.
A replacement cylinder head on a 20/25 is one thing – I had budgeted for such a thing in my plans when I bought the car. So many of them have new heads that it is almost a given. But a wrecked block is another order of magnitude of a problem. Given that the car already has oversized pistons (+45 thou), a new block would probably mean new (original dimension) pistons too. I could see the £ signs spiralling upwards. So I did the only thing possible – I had another cup of tea.
I decided that I needed to get to the bottom of the implications of what I had found. If I did need a new engine, I needed to understand a) if it was possible to get the parts required and b) how much would it cost. I contacted the 2 main companies in the UK who are capable of supplying what I needed, Ristes and Fiennes. I worked out a specification of what I thought I needed, with fingers crossed that I could keep and reuse as much of the original engine as possible. The key item that I wanted to reuse was the crankcase, thus being able to preserve the original engine number, which is stamped into the casting just above the dynamo.
The ”new” engine would need to be as follows:
• New head, including valves (assume that rocker cover, rocker shaft and rockers were reused)
• New block, fitted with new original dimension pistons (to the 5.25:1 compression ratio spec, as per original), new little and big end bearings for original con rods.
• Cleaned, crack detected and reground crankshaft, with new main bearings.
• Cleaned and inspected crankcase, including oilways
• Reconditioned torsional damper (on front of the engine), new rollers, pins and springs on cam followers, cleaned and reused camshaft, new bushes/bearings for timing gears
• New clutch
• Dynamic balancing of rotating crankshaft/clutch assembly
• Assemble all the above with new seals and gaskets (as needed) and clean/refit sump and front timing casing.
Once I had the above engine in place, I would then be able to complete the engine build by “dressing” it with all the ancillary components (dynamo, magneto, distributor, carburettor etc) which I would restore myself. The spec above would give a “sealed” engine assembly too – thus preventing ingress of dirt etc.
When contacting Fiennes, I was lucky enough to be helped with my enquiry by Will Fiennes, who founded the company in 1976. His knowledge and experience are well known in Rolls-Royce and Bentley circles and it was a pleasure to work with him. The final quote was detailed and covered everything we had discussed. While it is a lot of money (the block alone costs £6033.50 +VAT), if I consider that the rebuild of the car as a whole would be over a ~10 year period, the engine cost when spread over that timeframe, is little more than I spent on keeping my XJS in fine fettle on an annual basis….
The engine will be the most expensive item in the restoration plan and, with that key piece of information in place, I was now able to plan out the overall timing and sequencing of what I could do and when. It all felt a little better than when I had discovered the cracked block, but the project would now be very much for the long haul!
I hope you enjoyed the update, take care.
AF

Thank you all for the supportive comments - they really do help!
@ classicaholic - yes, man maths is a very powerful thing! However, the geek in me means I keep a detailed spreadsheet of costs for all my cars, so I know what I've spent and when.... somehow, the number at the bottom of the page always seems much bigger than I think it should be... No idea why! But I don't yet have such a spreadsheet running for GBT47. Perhaps this is a good thing!
@ InitialDave - PB blaster does get a good write up, doesn't it? I will try some and I like the ideas of a top and bottom soak of diesel to help loosen things off, as well as the nylon rope inside the cylinder on the compression stroke to help with shifting a stuck head.
@bucksmanuk - I like the 3D printing idea. In fact I have explored this with the fittings I need to complete doors etc (missing door handles, window winders, door latches) - as these are all Park Ward specific, some reverse engineering of the originals will be needed. Alistair at A2P2 Specialist Reverse Engineering has been extremely helpful with sourcing potential parts to copy and coming up with quotes and lead times for scanning and CAD of new parts. As you perhaps know, it is one thing to scan a part, it is very different to then engineer and develop it into a proper functioning part. Many firms offer the scanning capability, but not all can do the engineering side. Fortunately that is my old life coming back to me, so this should be fine. Specifically for the engine issue on GBT47, I don't think I will need to do this for the block. The small horsepower Rolls-Royces are very well supported by the specialists and almost all parts for the original Rolls-Royce supplied chassis (powertrain, chassis etc) can still be procured, at a price. The Voisin example you quote (and I love the design ethos of Voisin - in my mind an interesting alternative to the mainstream, a little like Bugatti) does not surprise me - I doff my cap to the owner that went to those lengths to get their car running again. I hope my challenges come in slightly smaller than that!
@ R56Cooper - LS3 lump? That would certainly be interesting! In much the same vein as friend who suggested putting the internals from a Nissan Leaf into it.... I think I'll try to stick with the original method for now!
Take care.
AF
Hello all,
It has been a bit quiet on the restoration front for the last month or so, as a number of small parallel parts of the project have been underway. But I have now some more progress to share! This update is called – Key, V5C and original registration number...
When you buy a “normal” car in the UK, some things are expected at every transaction. You would expect, on receipt of your hard-earned money, to receive the car, its keys and the new owner's part of the V5C registration document, which in time would produce the full V5C registration document in your name. In short, you would have a “proper” car – one which you could insure, tax, MOT (if needed). When I bought GBT47, quite a number of these things were missing – so much so, that the DVLA did not have any record of the car! So, aside from the physical restoration, a significant amount of work has gone into getting keys, V5C and the car’s registration number sorted.
The key was the first element to be resolved. On a 20/25 you do not need a key necessarily to start the car. The main switchpack, located to the right of the steering wheel, contains to the master switches for the car – one for side, tail and head lamps, the other for ignition and charge. To start, you would simply move the ignition thumb switch to the desired position, set the hand controls (maybe turning on the starting carburettor – more on this when we get to the fuel system!) and press the foot operated starter switch. The key, from a security perspective, simply locks the overall switch pack mechanism, so once it is turned, neither the ignition nor the light master switch will move. Fortunately for me, GBT47 had been delivered “unlocked” – with the switch pack free to move. On the downside, there was no sign of the key!

From a study of the original chassis cards, it was clear that the key profile was recorded when the car was built. If, and it was a big if, no one had changed the locks in the last 90 years, it would in theory be possible to get the key recut to this original key profile. The ever helpful team at the Rolls-Royce Enthusiasts Club run a service where, for a fee, they will get a new key cut for you to the original chassis specification.
As an aside, the wealth of information collated by Rolls-Royce owners and enthusiasts over the years never ceases to amaze me. For this key project, the “definitive” work on Rolls-Royce keys was complete by Gil Fuqua in the USA and published in “The Flying Lady” March / April 2000. If you need any more information about keys for your Rolls-Royce, track down a copy of this article!
After a short wait for the key to be delivered, I was able to find out if my gamble had paid off – was the ignition key barrel original and would the new key work? I dosed with lock with plenty of WD40 and tentatively inserted the new key. I gave it a gentle tweak and it began to turn…. And fully rotated, locking the switchpack, on the 2nd attempt. A few more cycles and it was working perfectly.
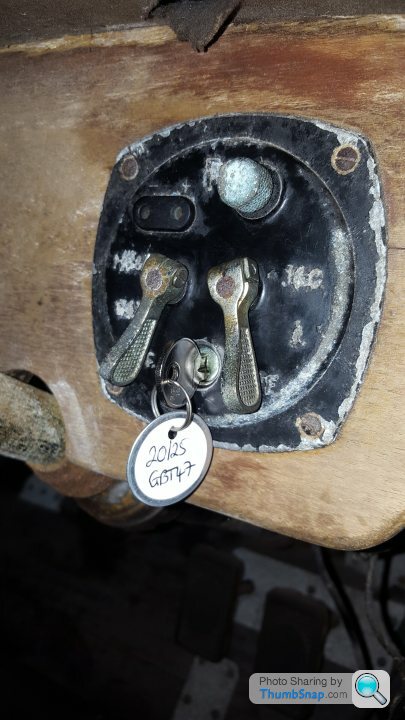
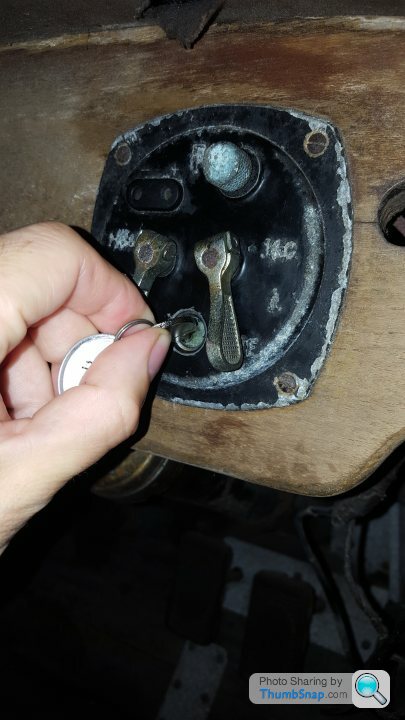
Feeling flushed with success, I moved on to the only exterior door lock on the car, fitted to the nearside passenger door. Again, dose with lots of WD40, clean it all up a bit and then try the key – same result, the key worked perfectly. I was very pleased that GBT47 had a car key again – another step closer to actually working.

To complete the key part of the story, I wanted to have something special as the key ring for the car. During the cleaning process, I have uncovered a number of small clues and signs from the car’s previous owners. 2 such items have been a 1943 George VI three pence coin (found in the bottom of the rear right door case) and a 1957 silver Elizabeth II six pence (underneath the rear left ashtray in the C post). Both small coins must have been lost by the car’s previous owners (or companions), so they provide a lovely direct link to the car’s past. I cleaned both coins up, using lemon juice and metal polish, drilled some holes and popped them on a spare key ring. I hope you all approve!
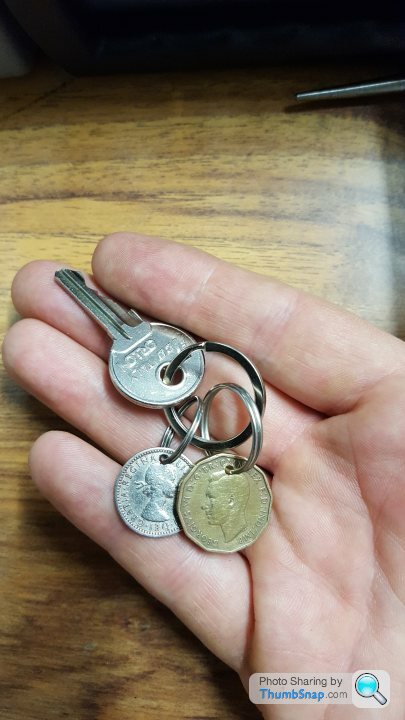

If the key was relatively simple task, the challenge of obtaining a V5C for the car and retaining the car’s original registration number (GX 8868) was far harder. It all hinged around the fact that the car had been off the road since 1963 and had never been included in the various updates to the DVLA database over the years. As far as the DVLA were concerned, the car did not exist. Secondly, though I had images of the original buff continuation logbook – covering the period 1945 to 1963, I didn’t have the physical document to hand.
The DVLA have a scheme whereby you can apply to register your car, if it has been off the road since the digitalisation of records in the early 1980’s, which is supported by the many owners clubs in the UK. The bar set by the DVLA is high, when it comes to the evidence that they require to grant a new V5C and register a car under its original registration mark. Through my previous posts on GBT47, I have given a glimpse of the documentation that I have put together on the car and it felt pretty compelling that I could prove that the car was what I said it was. I bundled up the evidence, made my application, but the DVLA were not able to issue a V5C. That said, the case worker who looked at the mountain of information that I had sent was very supportive and suggested a repeat application with some changes – if only I could track down some certified evidence which linked the chassis number to the registration number, in period!
Several months passed, with regular discussions with Abbie, the Archivist at the Rolls-Royce Enthusiasts Club. Through her efforts, she contacted the respected Rolls-Royce historian Bernard King, who was able to identify where he and Tom Clarke had been able to verify GBT47’s chassis and registration number for their book – “The Rolls-Royce 20/25H.P.” – which is the definitive list of chassis numbers and build information for the model.
Buried deep in the archives at the RREC was a sales ledger, dating from 1952, from “Paddon Brothers Ltd” – a respected dealer in Rolls-Royce and Bentley motor cars in both the pre and post war eras. The sale ledger identified that GBT47 had been sold in December 1952 via Paddons to the car’s third owner J.M.F May AND critically, it showed the car’s chassis number (GBT47) alongside the car’s registration number (GX 8868). Eureka! Here was primary evidence that could be certified as being authentic by the RREC and would satisfy the DVLA. A second application was posted off to DVLA and in late October I received an envelope containing the new V5C, confirming that the original registration number had been retained.
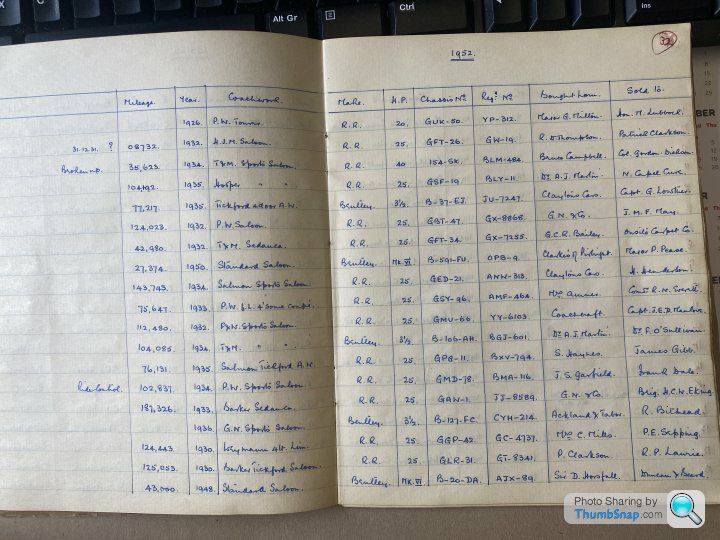
So now GBT47 is a step closer to being a proper car – with a key, a V5C document and the original registration number. One final little gem came to light during the V5C research – if you look carefully on the 1952 sales ledger, it shows that the car’s mileage is 124,023… so the current mileage of 75,432 is more likely to be 175,432! The odometer only has 5 digits, so there will always be some uncertainty. In some ways I hope that the 175k mileage is correct – it would equate to around 5,500 miles per year, including during the war, for the 31 years that the car was on the road. It has certainly been well used by the 9 previous owners!
Take care,
AF
It has been a bit quiet on the restoration front for the last month or so, as a number of small parallel parts of the project have been underway. But I have now some more progress to share! This update is called – Key, V5C and original registration number...
When you buy a “normal” car in the UK, some things are expected at every transaction. You would expect, on receipt of your hard-earned money, to receive the car, its keys and the new owner's part of the V5C registration document, which in time would produce the full V5C registration document in your name. In short, you would have a “proper” car – one which you could insure, tax, MOT (if needed). When I bought GBT47, quite a number of these things were missing – so much so, that the DVLA did not have any record of the car! So, aside from the physical restoration, a significant amount of work has gone into getting keys, V5C and the car’s registration number sorted.
The key was the first element to be resolved. On a 20/25 you do not need a key necessarily to start the car. The main switchpack, located to the right of the steering wheel, contains to the master switches for the car – one for side, tail and head lamps, the other for ignition and charge. To start, you would simply move the ignition thumb switch to the desired position, set the hand controls (maybe turning on the starting carburettor – more on this when we get to the fuel system!) and press the foot operated starter switch. The key, from a security perspective, simply locks the overall switch pack mechanism, so once it is turned, neither the ignition nor the light master switch will move. Fortunately for me, GBT47 had been delivered “unlocked” – with the switch pack free to move. On the downside, there was no sign of the key!
From a study of the original chassis cards, it was clear that the key profile was recorded when the car was built. If, and it was a big if, no one had changed the locks in the last 90 years, it would in theory be possible to get the key recut to this original key profile. The ever helpful team at the Rolls-Royce Enthusiasts Club run a service where, for a fee, they will get a new key cut for you to the original chassis specification.
As an aside, the wealth of information collated by Rolls-Royce owners and enthusiasts over the years never ceases to amaze me. For this key project, the “definitive” work on Rolls-Royce keys was complete by Gil Fuqua in the USA and published in “The Flying Lady” March / April 2000. If you need any more information about keys for your Rolls-Royce, track down a copy of this article!
After a short wait for the key to be delivered, I was able to find out if my gamble had paid off – was the ignition key barrel original and would the new key work? I dosed with lock with plenty of WD40 and tentatively inserted the new key. I gave it a gentle tweak and it began to turn…. And fully rotated, locking the switchpack, on the 2nd attempt. A few more cycles and it was working perfectly.
Feeling flushed with success, I moved on to the only exterior door lock on the car, fitted to the nearside passenger door. Again, dose with lots of WD40, clean it all up a bit and then try the key – same result, the key worked perfectly. I was very pleased that GBT47 had a car key again – another step closer to actually working.
To complete the key part of the story, I wanted to have something special as the key ring for the car. During the cleaning process, I have uncovered a number of small clues and signs from the car’s previous owners. 2 such items have been a 1943 George VI three pence coin (found in the bottom of the rear right door case) and a 1957 silver Elizabeth II six pence (underneath the rear left ashtray in the C post). Both small coins must have been lost by the car’s previous owners (or companions), so they provide a lovely direct link to the car’s past. I cleaned both coins up, using lemon juice and metal polish, drilled some holes and popped them on a spare key ring. I hope you all approve!
If the key was relatively simple task, the challenge of obtaining a V5C for the car and retaining the car’s original registration number (GX 8868) was far harder. It all hinged around the fact that the car had been off the road since 1963 and had never been included in the various updates to the DVLA database over the years. As far as the DVLA were concerned, the car did not exist. Secondly, though I had images of the original buff continuation logbook – covering the period 1945 to 1963, I didn’t have the physical document to hand.
The DVLA have a scheme whereby you can apply to register your car, if it has been off the road since the digitalisation of records in the early 1980’s, which is supported by the many owners clubs in the UK. The bar set by the DVLA is high, when it comes to the evidence that they require to grant a new V5C and register a car under its original registration mark. Through my previous posts on GBT47, I have given a glimpse of the documentation that I have put together on the car and it felt pretty compelling that I could prove that the car was what I said it was. I bundled up the evidence, made my application, but the DVLA were not able to issue a V5C. That said, the case worker who looked at the mountain of information that I had sent was very supportive and suggested a repeat application with some changes – if only I could track down some certified evidence which linked the chassis number to the registration number, in period!
Several months passed, with regular discussions with Abbie, the Archivist at the Rolls-Royce Enthusiasts Club. Through her efforts, she contacted the respected Rolls-Royce historian Bernard King, who was able to identify where he and Tom Clarke had been able to verify GBT47’s chassis and registration number for their book – “The Rolls-Royce 20/25H.P.” – which is the definitive list of chassis numbers and build information for the model.
Buried deep in the archives at the RREC was a sales ledger, dating from 1952, from “Paddon Brothers Ltd” – a respected dealer in Rolls-Royce and Bentley motor cars in both the pre and post war eras. The sale ledger identified that GBT47 had been sold in December 1952 via Paddons to the car’s third owner J.M.F May AND critically, it showed the car’s chassis number (GBT47) alongside the car’s registration number (GX 8868). Eureka! Here was primary evidence that could be certified as being authentic by the RREC and would satisfy the DVLA. A second application was posted off to DVLA and in late October I received an envelope containing the new V5C, confirming that the original registration number had been retained.
So now GBT47 is a step closer to being a proper car – with a key, a V5C document and the original registration number. One final little gem came to light during the V5C research – if you look carefully on the 1952 sales ledger, it shows that the car’s mileage is 124,023… so the current mileage of 75,432 is more likely to be 175,432! The odometer only has 5 digits, so there will always be some uncertainty. In some ways I hope that the 175k mileage is correct – it would equate to around 5,500 miles per year, including during the war, for the 31 years that the car was on the road. It has certainly been well used by the 9 previous owners!
Take care,
AF
Hello all,
I have found some time to write a much needed updated to my thread on the restoration of my 1932 Rolls-Royce 20/25. Looking back, it seems I have made lots of small steps forwards, but nothing yet is finished! So, this update will be Winter 2022 – 2023 – Part 1!
The first task was a temporary fitment of rear number plate now we had a V5C document and the car could rightly call itself “GX8868”. This was a relatively simple task of removing the rear valance, cutting off the old P bracket fixings, cleaning everything up and refitting the number plate (which if you remember from the original blog post, was found chucked inside the cabin, about where the rear seat should have been!).
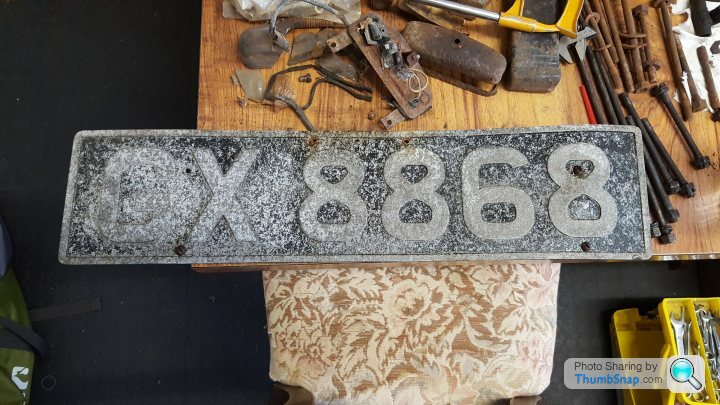


While I have the rear valance off, I took the chance to inspect inside rear chassis legs, which showed the remains of luggage rack fixings and some damage to the chassis lubrication system but fortunately little in the way of serious corrosion. I cleaned everything up and refitted the chassis cover plates with new stainless fixings.

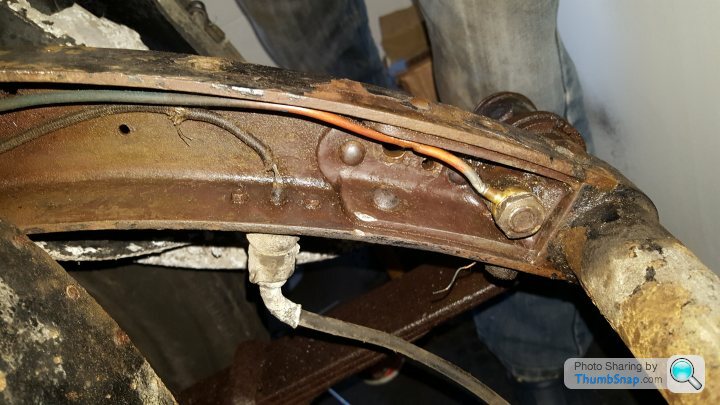
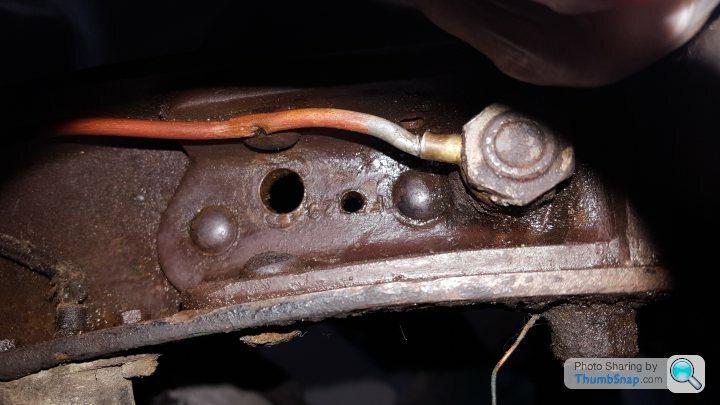
It was all going too well! – and, as usual, something else then jumped out at me. Having cleaned up the chassis at the rear, it was clear that the rear spring hangers sat differently between left and right sides. On closer inspection, it showed that the bent rear cross member had actually caused damage to the rear left chassis longitudinal, pushing it outboard by about 5mm at the end and preventing the rear left spring shackle fixing from being done up. My guess is that this was damage when the car was being recovered – perhaps in the scrap yard in the 1960s – but it now meant that there would need to be some significant cutting and welding done to straighten it all out!
While I digested this news of another large obstacle in the restoration, I consoled myself with setting to work on some further investigations of different “systems” on the car, starting with the fuel system.
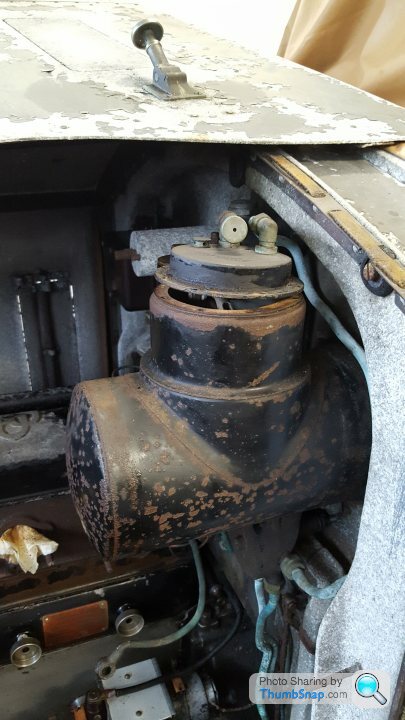
The fuel system on the 20/25 differs significantly from the modern practice, where fuel is fed to the engine bay by in-tank fuel pumps and then fed to the engine via a high pressure injection system. Here fuel is pulled from the tank by an Autovac – an ingenious contraption which is a cross between a vacuum pump and your bathroom toilet cistern! These mechanical pumps are still used in various applications today and are brilliant examples of simple sound engineering. What is even better is that the Autovac company still exists, and they are able to support you with parts and restoration services.
The autovac draws fuel from the fuel tank via intake vacuum, filling the inner tank inside the unit. As the tank fills, the float inside the inner tank raises up until it reaches the top, at which point the vacuum is released / vented to atmosphere and the fuel flows out of the inner tank into the outer tank. This outer tanks then acts as a small reservoir to fuel the car via the filter and carburettor, while the inner tank begins to fill on the next cycle – so no electronics, pumps or circuits here. Provided you had a sealed system and the engine turning over, the system will work!


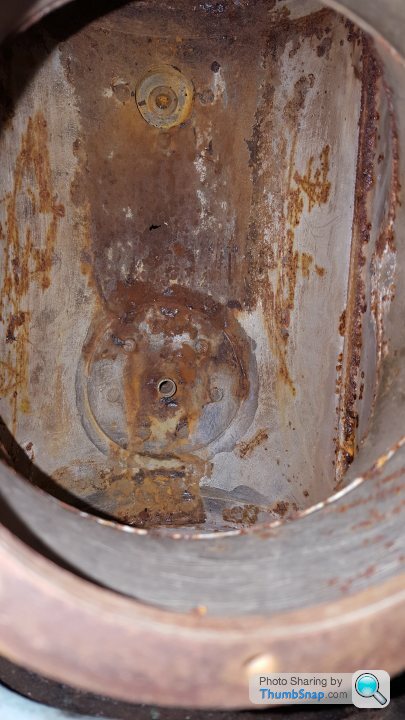
Having disassembled my autovac, the positives were that the mechanism was in good condition and only needed a gentle clean. The less good news was that the old fuel had turned to varnish in the outer tank and had also caused extensive corrosion – you could see daylight through the bottom of the tank! I cleaned it all up and checked with Robin at Autovac – all was repairable and some modifications could be incorporated to make the unit work better with modern fuels.
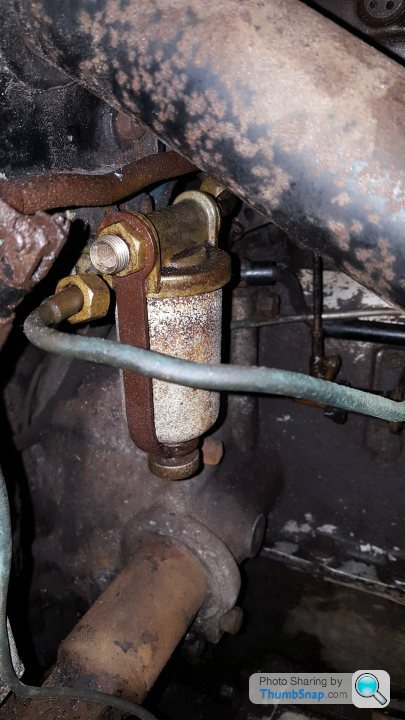
The next part of the fuel system was the bulkhead mounted Enots fuel filter. After much resistance, the filter finally came undone and I had read many wise words about how critical it was to get this clean, to ensure good running. The filter itself it rather different to our modern micro gauze type filters – here a series of plates are held tightly together, the plates themselves having tiny ridges on them. As a result, this creates a labyrinth for the fuel to pass through and collects any dirt in the voids created between the plates. The “wise old heads” of the R-R world informed me that the best way to clean the filter was lemon juice – the acidic action being a great way to cut through the old petrol varnish and muck. I was sceptical, but it worked like a charm! So one nicely cleaned filter!
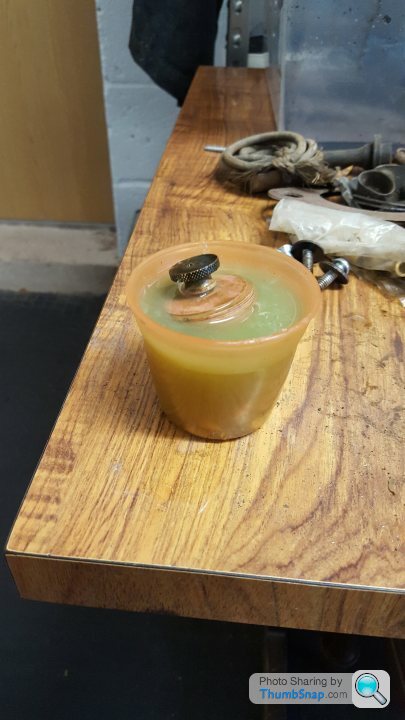
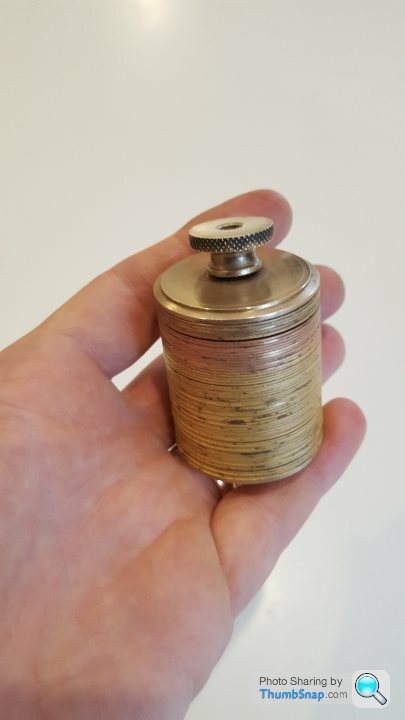
While thinking about filters, I turned my attention to the 2 filters located in the fuel tank. Once removed, it was clear that the car had been laid up almost empty of fuel – you could see the brown remains of the fuel in the bottom of the tank, along with a lot of crud and varnish. The filters needed some cleaning, but came up quite well – but it did add to the picture that the car had not been cared for very well in its final running years in the early 1960s, as the filters were filthy and had clearly not been cleaned for some time!
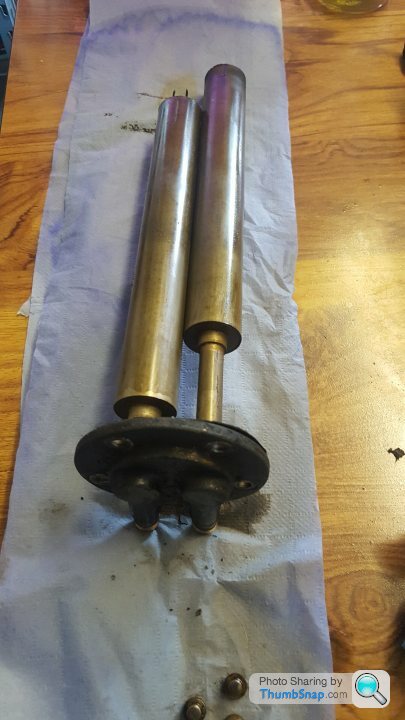
Moving back to the engine bay, the last key component of the fuel system – the carburettor. On GBT47, the car proudly carries the “Royce Carburettor” – a R-R in-house design, which originated on the earlier 20HP car. Later versions of the 20/25 use R-R versions of Zenith and SU carbs. The Royce carburettor is a beautiful item – a twin jet (low and high speed) up draft design, with an automatic compensation of air/fuel ratio at higher throttle openings / engine speeds, via a vacuum controlled piston. Added to this is a secondary starting carburettor, which provides the car with a rich air/fuel ratio for use when starting – much more complicated than at normal choke!
Removing the carburettor was something of a fiddle, where it was evident that it had been apart previously (noting the mismatched nuts and washers in places), but not “that” recently, as it was absolutely caked in carbon deposits, old fuel and general grime! I have been lucky so far that almost everything on the car has come undone ok, without any damage – the carburettor is where my luck ran out! The dissimilar metals used in the unit meant that galvanic corrosion had seized much of the main body of the unit. Soaking the unit in penetrating fluid and eventually the use of oil filter spanners resulted in the item coming apart, but with the addition of some tell tale marks on the knurled areas of the carburettor. Frustrating, but it would not come apart any other way. Adding to my frustrations was my breakage of the last section of fuel pipe, as it goes from the Enots fuel filter to the carburettor. However, it will be possible to replace the fuel pipe without too much drama.

Once I had got the carburettor apart and cleaned up, it became clear that the spring which controls the position of the low speed jet had broken – the remains being still inside the carb. Now, even the excellent pre-war Rolls-Royce suppliers couldn’t come up with a direct replacement – some people even suggesting using the spring from a ball point pen as an alternative. In the end, with help from the R-R enthusiasts world, I was able to define the specifications for the original spring and had a company in Nottingham make them for me! As I only needed 1 and they had a minimum order quantity of 10, if anyone else needs a spring for their low speed jet, please let me know! Finally, I put the carburettor back together, and was even able to find the original jet setting marks on the parts to give at least a nominal start point for when we get to running things.
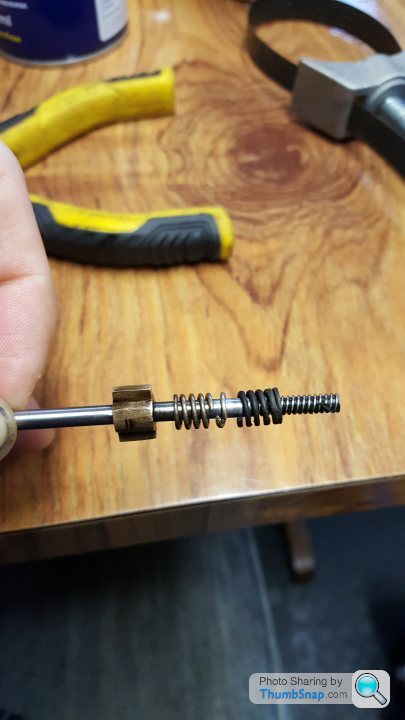
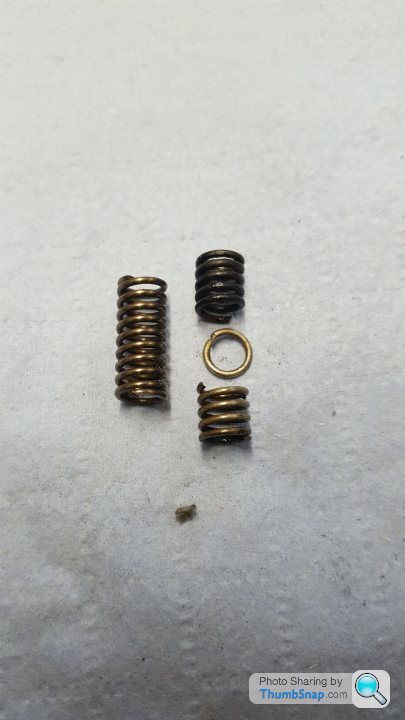

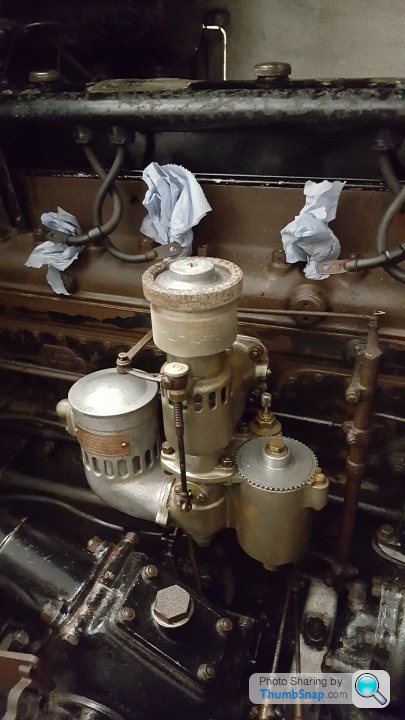
Next up for an inspection and identification of condition was the cooling system. I flushed the radiator with a mixture of hot water and vinegar in an attempt to get rid of some of the corrosion which was clearly visible inside the neck of the radiator. After many cycles of hot water, vinegar, rinsing water with bicarbonate of soda (to neutralise the acid), the radiator did at least have clean water running free from the drain point at the bottom. The less good news was that the radiator clearly had a number of leaks – the two most obvious being the pin holes at the bottom which sprayed out all over the engine. On the plus side, having given the radiator vanes and the controlling calorstat (think of a normal car thermostat but linked to radiator vanes) a clean and some lubrication, it was good to see the vanes beginning to move open and closed as the water temperature was changed.
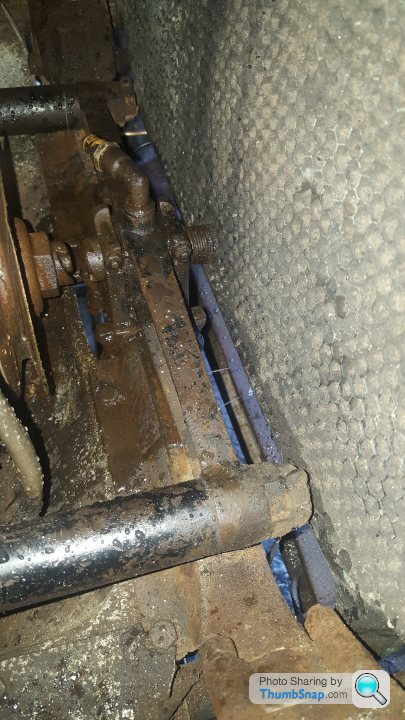
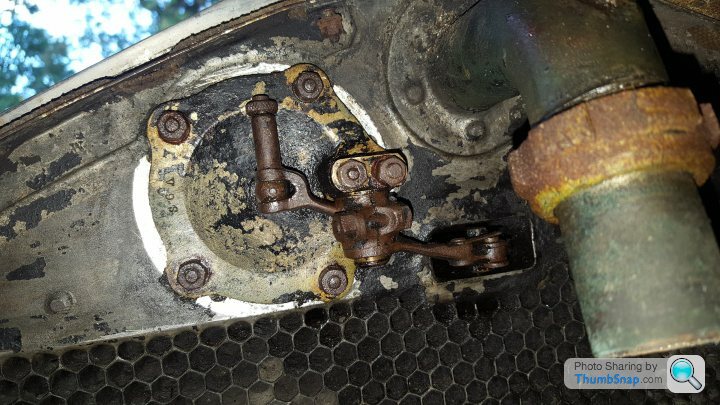
While working on the radiator, my attention was drawn to the bonnet and bonnet latches. With a little work – again vinegar being an excellent way of cutting through lots of grime and corrosion – I was able to get the bonnet latches to work again. I also found a small brass plaque on the bonnet confirming that it was original to the car, which was a nice touch. The final step was removing and straightening the radiator brace rod, which sits under the bonnet and had become bent over the years. Cleaned and straightened, with a nice stainless steel R clip to hold the rear pivot in place, the bonnet now fitted with something like its original design intent!
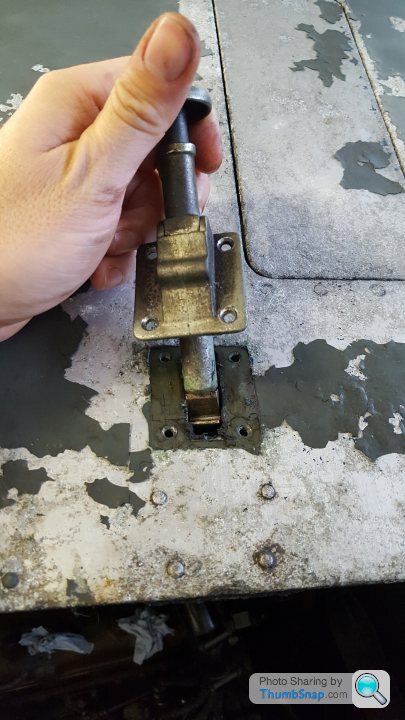
So, as I said at the beginning, some small progress. If you've managed to follow this so far, part 2 coming in a bit,
:-)
AF
I have found some time to write a much needed updated to my thread on the restoration of my 1932 Rolls-Royce 20/25. Looking back, it seems I have made lots of small steps forwards, but nothing yet is finished! So, this update will be Winter 2022 – 2023 – Part 1!
The first task was a temporary fitment of rear number plate now we had a V5C document and the car could rightly call itself “GX8868”. This was a relatively simple task of removing the rear valance, cutting off the old P bracket fixings, cleaning everything up and refitting the number plate (which if you remember from the original blog post, was found chucked inside the cabin, about where the rear seat should have been!).
While I have the rear valance off, I took the chance to inspect inside rear chassis legs, which showed the remains of luggage rack fixings and some damage to the chassis lubrication system but fortunately little in the way of serious corrosion. I cleaned everything up and refitted the chassis cover plates with new stainless fixings.
It was all going too well! – and, as usual, something else then jumped out at me. Having cleaned up the chassis at the rear, it was clear that the rear spring hangers sat differently between left and right sides. On closer inspection, it showed that the bent rear cross member had actually caused damage to the rear left chassis longitudinal, pushing it outboard by about 5mm at the end and preventing the rear left spring shackle fixing from being done up. My guess is that this was damage when the car was being recovered – perhaps in the scrap yard in the 1960s – but it now meant that there would need to be some significant cutting and welding done to straighten it all out!
While I digested this news of another large obstacle in the restoration, I consoled myself with setting to work on some further investigations of different “systems” on the car, starting with the fuel system.
The fuel system on the 20/25 differs significantly from the modern practice, where fuel is fed to the engine bay by in-tank fuel pumps and then fed to the engine via a high pressure injection system. Here fuel is pulled from the tank by an Autovac – an ingenious contraption which is a cross between a vacuum pump and your bathroom toilet cistern! These mechanical pumps are still used in various applications today and are brilliant examples of simple sound engineering. What is even better is that the Autovac company still exists, and they are able to support you with parts and restoration services.
The autovac draws fuel from the fuel tank via intake vacuum, filling the inner tank inside the unit. As the tank fills, the float inside the inner tank raises up until it reaches the top, at which point the vacuum is released / vented to atmosphere and the fuel flows out of the inner tank into the outer tank. This outer tanks then acts as a small reservoir to fuel the car via the filter and carburettor, while the inner tank begins to fill on the next cycle – so no electronics, pumps or circuits here. Provided you had a sealed system and the engine turning over, the system will work!
Having disassembled my autovac, the positives were that the mechanism was in good condition and only needed a gentle clean. The less good news was that the old fuel had turned to varnish in the outer tank and had also caused extensive corrosion – you could see daylight through the bottom of the tank! I cleaned it all up and checked with Robin at Autovac – all was repairable and some modifications could be incorporated to make the unit work better with modern fuels.
The next part of the fuel system was the bulkhead mounted Enots fuel filter. After much resistance, the filter finally came undone and I had read many wise words about how critical it was to get this clean, to ensure good running. The filter itself it rather different to our modern micro gauze type filters – here a series of plates are held tightly together, the plates themselves having tiny ridges on them. As a result, this creates a labyrinth for the fuel to pass through and collects any dirt in the voids created between the plates. The “wise old heads” of the R-R world informed me that the best way to clean the filter was lemon juice – the acidic action being a great way to cut through the old petrol varnish and muck. I was sceptical, but it worked like a charm! So one nicely cleaned filter!
While thinking about filters, I turned my attention to the 2 filters located in the fuel tank. Once removed, it was clear that the car had been laid up almost empty of fuel – you could see the brown remains of the fuel in the bottom of the tank, along with a lot of crud and varnish. The filters needed some cleaning, but came up quite well – but it did add to the picture that the car had not been cared for very well in its final running years in the early 1960s, as the filters were filthy and had clearly not been cleaned for some time!
Moving back to the engine bay, the last key component of the fuel system – the carburettor. On GBT47, the car proudly carries the “Royce Carburettor” – a R-R in-house design, which originated on the earlier 20HP car. Later versions of the 20/25 use R-R versions of Zenith and SU carbs. The Royce carburettor is a beautiful item – a twin jet (low and high speed) up draft design, with an automatic compensation of air/fuel ratio at higher throttle openings / engine speeds, via a vacuum controlled piston. Added to this is a secondary starting carburettor, which provides the car with a rich air/fuel ratio for use when starting – much more complicated than at normal choke!
Removing the carburettor was something of a fiddle, where it was evident that it had been apart previously (noting the mismatched nuts and washers in places), but not “that” recently, as it was absolutely caked in carbon deposits, old fuel and general grime! I have been lucky so far that almost everything on the car has come undone ok, without any damage – the carburettor is where my luck ran out! The dissimilar metals used in the unit meant that galvanic corrosion had seized much of the main body of the unit. Soaking the unit in penetrating fluid and eventually the use of oil filter spanners resulted in the item coming apart, but with the addition of some tell tale marks on the knurled areas of the carburettor. Frustrating, but it would not come apart any other way. Adding to my frustrations was my breakage of the last section of fuel pipe, as it goes from the Enots fuel filter to the carburettor. However, it will be possible to replace the fuel pipe without too much drama.
Once I had got the carburettor apart and cleaned up, it became clear that the spring which controls the position of the low speed jet had broken – the remains being still inside the carb. Now, even the excellent pre-war Rolls-Royce suppliers couldn’t come up with a direct replacement – some people even suggesting using the spring from a ball point pen as an alternative. In the end, with help from the R-R enthusiasts world, I was able to define the specifications for the original spring and had a company in Nottingham make them for me! As I only needed 1 and they had a minimum order quantity of 10, if anyone else needs a spring for their low speed jet, please let me know! Finally, I put the carburettor back together, and was even able to find the original jet setting marks on the parts to give at least a nominal start point for when we get to running things.
Next up for an inspection and identification of condition was the cooling system. I flushed the radiator with a mixture of hot water and vinegar in an attempt to get rid of some of the corrosion which was clearly visible inside the neck of the radiator. After many cycles of hot water, vinegar, rinsing water with bicarbonate of soda (to neutralise the acid), the radiator did at least have clean water running free from the drain point at the bottom. The less good news was that the radiator clearly had a number of leaks – the two most obvious being the pin holes at the bottom which sprayed out all over the engine. On the plus side, having given the radiator vanes and the controlling calorstat (think of a normal car thermostat but linked to radiator vanes) a clean and some lubrication, it was good to see the vanes beginning to move open and closed as the water temperature was changed.
While working on the radiator, my attention was drawn to the bonnet and bonnet latches. With a little work – again vinegar being an excellent way of cutting through lots of grime and corrosion – I was able to get the bonnet latches to work again. I also found a small brass plaque on the bonnet confirming that it was original to the car, which was a nice touch. The final step was removing and straightening the radiator brace rod, which sits under the bonnet and had become bent over the years. Cleaned and straightened, with a nice stainless steel R clip to hold the rear pivot in place, the bonnet now fitted with something like its original design intent!
So, as I said at the beginning, some small progress. If you've managed to follow this so far, part 2 coming in a bit,
:-)
AF
Gassing Station | Readers' Cars | Top of Page | What's New | My Stuff