1969 Lotus Elan S4 SE Basket case revival
Discussion


Hi All
Welcome to my Elan project thread. I am afraid this might seem to some to be a little bit controversial.
So what is it?
It’s a little red 1969 Lotus Elan S4 SE Drop Head Coupe which has had one previous owner but has been off the road since 1985. It is only just older than I am and in worse condition than me.
The body is an orchestra of stress cracks and splitting gel coat with a partially and badly repaired bump on one corner. It has been two different shades or red in its time on the road, one of which the car is trying to shed like a snake losing its old skin!
The chassis appears solid but with plenty of surface rust and peeling powder coat.
Steering is good, suspension and braking is knackered.
Interior is not too bad, seats are intact but need new foams. Dash veneer is cracked, carpet is tired and both will be replaced.
There is no soft top frame but 2 soft top skins in the boot, and the hard top roof lining needs replacing.
Knock off steel wheels are rusty and the tyres are museum pieces.
Electrics - who knows at this point!
The gearbox and bell housing is a rusty mass outside the car, I have cleaned and painted the bell housing as I had this for a while for measuring up..
The engine is a collection of bits in assorted cardboard boxes.
Perfect!
So what is the plan?
Body off, strip and paint chassis.
Strip and paint suspension and refresh all suspension and brakes.
Send off gearbox and diff of for overhaul and fit an LSD, then refit with solid UJ driveshafts
Replace engine with Hyper9 120hp 173ftlb electric motor bolted to the bellhousing with a lightened flywheel and clutch.
Refit body and go through the electrics (I fear a full rewire is needed - to be honest 2 fuses seems to be a little spartan).
Strip dash and modify for updated gauges.
Peel off the rest of the dark red paint, sand down to the gel coat and grind out and fill the spider army’s cracks. Then send off for paint to a pro. Mrs and Junior Spunagains have decreed it will be yellow with silver numbers (I agree but put up a small fight to show how generous I am!)
Refit all the cleaned up trim.
Buy and fit a hood frame.
Replace headlamp mechanism with Spyder electric one and new headlamp bowls.
Fit 5 Tesla batteries - 3 in front over the motor, two in boot in place of tank and spare wheel. They will need safely boxing up.
Fit Charger, DC-DC converter to replace the alternator and battery manager.
Convert heater to 120V electric power.
Fit cooling system to stop batteries exploding.
Close eyes block ears and turn the key….
This is of course a bit of an oversimplification It will take me years. (I told Mrs Spunagain a year or so!)
The changes I make will all be easily reversible and I will keep the engine carbs and fuel tank at least until it is up and running.
The plan is that it will weigh exactly the same as the petrol version - 688g so should be pretty nippy and have a sensible range.
The original plan was for the mechanicals and paint all to be done by a Lotus specialist leaving me to buy and fit the motor, batteries and electronics. But once I got the quote for £25k I decided to do it myself (apart from the paint) The savings will pay for all of the electrical gubbins and hopefully leave some change.
This is actually not an original idea - it has been done already but without the clutch by a gent on the south coast - google “Lotus Elon” for more details. I have been in touch with him through the Elan forum and he has been extremely helpful.
Here are some photos of the transplant patient!
As it arrived yesterday:

Some idea of the crustyness

Damage to offside rear quarter

Crusty bum

Interior

Random switches in the glove box - I am guessing one is immobiliser and one is for the hardtop heated rear screen (which dissolved a long time ago)

Underneath


I have given the car a quick wipe down and have made a start on the body-off preparation and pulled out the petrol tank and seats and oil cooler and disconnected the hydraulic brakes.I have given all the bolts I can see a good dowsing in penetrating oil.
The tank is in good condition and is now in the garage eaves. The 25 year old 4* petrol is doing a good impression of Irn Bru and will be used for cleaning or taken to the tip for disposal.

I will try and post as I go along, but this is in real time so posts will be few and far between, but I will try and answer any questions.
I appreciate people may not like what I am planning but this car was for sale for months before I bought it, so you had your chance!
My plan is to map the motor’s torque curve to look like beefy twin cam so it can be driven through the gears like a normal twink powered Elan and will not destroy the drive-train (possibly with a boost mode which releases all the torque for the full EV experience).
I am afraid that I have been interested in the idea of electric cars since the mid 2000s when I saw on line the work done by AC Propulsion – the company Tesla took on to develop their drivetrain. In fact I was saving to buy one of their drivetrains to build my own car when Tesla took over and took them off the market. I would have loved a Roadster but the cost was too high and second hand they are still very expensive with less than 100 on UK roads today. No one else makes a proper open top electric car yet. Making my own I hope will be a lot more fun!
Welcome to my Elan project thread. I am afraid this might seem to some to be a little bit controversial.
So what is it?
It’s a little red 1969 Lotus Elan S4 SE Drop Head Coupe which has had one previous owner but has been off the road since 1985. It is only just older than I am and in worse condition than me.
The body is an orchestra of stress cracks and splitting gel coat with a partially and badly repaired bump on one corner. It has been two different shades or red in its time on the road, one of which the car is trying to shed like a snake losing its old skin!
The chassis appears solid but with plenty of surface rust and peeling powder coat.
Steering is good, suspension and braking is knackered.
Interior is not too bad, seats are intact but need new foams. Dash veneer is cracked, carpet is tired and both will be replaced.
There is no soft top frame but 2 soft top skins in the boot, and the hard top roof lining needs replacing.
Knock off steel wheels are rusty and the tyres are museum pieces.
Electrics - who knows at this point!
The gearbox and bell housing is a rusty mass outside the car, I have cleaned and painted the bell housing as I had this for a while for measuring up..
The engine is a collection of bits in assorted cardboard boxes.
Perfect!
So what is the plan?
Body off, strip and paint chassis.
Strip and paint suspension and refresh all suspension and brakes.
Send off gearbox and diff of for overhaul and fit an LSD, then refit with solid UJ driveshafts
Replace engine with Hyper9 120hp 173ftlb electric motor bolted to the bellhousing with a lightened flywheel and clutch.
Refit body and go through the electrics (I fear a full rewire is needed - to be honest 2 fuses seems to be a little spartan).
Strip dash and modify for updated gauges.
Peel off the rest of the dark red paint, sand down to the gel coat and grind out and fill the spider army’s cracks. Then send off for paint to a pro. Mrs and Junior Spunagains have decreed it will be yellow with silver numbers (I agree but put up a small fight to show how generous I am!)
Refit all the cleaned up trim.
Buy and fit a hood frame.
Replace headlamp mechanism with Spyder electric one and new headlamp bowls.
Fit 5 Tesla batteries - 3 in front over the motor, two in boot in place of tank and spare wheel. They will need safely boxing up.
Fit Charger, DC-DC converter to replace the alternator and battery manager.
Convert heater to 120V electric power.
Fit cooling system to stop batteries exploding.
Close eyes block ears and turn the key….
This is of course a bit of an oversimplification
It will take me years. (I told Mrs Spunagain a year or so!)The changes I make will all be easily reversible and I will keep the engine carbs and fuel tank at least until it is up and running.
The plan is that it will weigh exactly the same as the petrol version - 688g so should be pretty nippy and have a sensible range.
The original plan was for the mechanicals and paint all to be done by a Lotus specialist leaving me to buy and fit the motor, batteries and electronics. But once I got the quote for £25k I decided to do it myself (apart from the paint) The savings will pay for all of the electrical gubbins and hopefully leave some change.
This is actually not an original idea - it has been done already but without the clutch by a gent on the south coast - google “Lotus Elon” for more details. I have been in touch with him through the Elan forum and he has been extremely helpful.
Here are some photos of the transplant patient!
As it arrived yesterday:
Some idea of the crustyness
Damage to offside rear quarter
Crusty bum
Interior
Random switches in the glove box - I am guessing one is immobiliser and one is for the hardtop heated rear screen (which dissolved a long time ago)
Underneath
I have given the car a quick wipe down and have made a start on the body-off preparation and pulled out the petrol tank and seats and oil cooler and disconnected the hydraulic brakes.I have given all the bolts I can see a good dowsing in penetrating oil.
The tank is in good condition and is now in the garage eaves. The 25 year old 4* petrol is doing a good impression of Irn Bru and will be used for cleaning or taken to the tip for disposal.
I will try and post as I go along, but this is in real time so posts will be few and far between, but I will try and answer any questions.
I appreciate people may not like what I am planning but this car was for sale for months before I bought it, so you had your chance!
My plan is to map the motor’s torque curve to look like beefy twin cam so it can be driven through the gears like a normal twink powered Elan and will not destroy the drive-train (possibly with a boost mode which releases all the torque for the full EV experience).
I am afraid that I have been interested in the idea of electric cars since the mid 2000s when I saw on line the work done by AC Propulsion – the company Tesla took on to develop their drivetrain. In fact I was saving to buy one of their drivetrains to build my own car when Tesla took over and took them off the market. I would have loved a Roadster but the cost was too high and second hand they are still very expensive with less than 100 on UK roads today. No one else makes a proper open top electric car yet. Making my own I hope will be a lot more fun!
Cheers all!
Hi HawthornBowTie, the hard top is really nice with a glass rear screen but sagging roof lining. it seems to have been Tigersealed to the top of the windscreen surround so will be interesting to get off once I figure out where to store it! The car was assembled by the 1st owner so it may note have ever had a folding roof fitted!
I do plan to keep is as I plan to try and drive the car as much as possible all year round and the hard top will make that much nicer in the winter.
Based on what I am removing and then adding back the rough weight is close - based on a few bits I have weighed and guessed.
It does not include everything but gives a good idea:
So now 32kg over original
I may have to lose a few kilos - I could ditch the battery boxes but my work safety history will stop me doing that, that and Mrs Spunagain got rear-ended 3 times in her Midget through no fault of her own!
In terms of what I have done before - I admit this is a big stretch for me. Back in the 90s I restored a basket case Reliant Scimitar so I have some experience of the mechanics. Re the electrics I have a degree in Electrical and Electronic engineering and the various drive and charging components are pretty well documented.
Lots to do!
It does not include everything but gives a good idea:
| Boot Before | Weight in kg |
|---|---|
| Spare wheel | 12 |
| Exhaust | 5 |
| 45.5L fuel | 35 |
| Fuel Tank (guess) | 6.0 |
| Total | 58 |
| Boot after | Weight in kg |
|---|---|
| Battery 2x Tesla 5.6kWh bricks | 50 |
| Charger | 7 |
| Battery box | 16 |
| Dc-DC | 1 |
| Total | 74 |
| Front before | Weight in kg |
|---|---|
| Radiator | 4.7 |
| Ancillaries | 25.5 |
| Oil and water | 12 |
| Engine head | 22.8 |
| Engine Block | 41.5 |
| Iron bell housing | 10 |
| Crankshaft | 10.8 |
| Exhaust manifold and down pipe (guess) | 20 |
| Total | 147.3 |
| Front after | Weight in kg |
|---|---|
| Battery 3x Tesla 5.6kWh bricks | 75 |
| Motor | 60 |
| Battery box | 18 |
| Adapter plate | 5 |
| Aluminium bell-housing | 5 |
| Total | 163 |
So now 32kg over original
I may have to lose a few kilos - I could ditch the battery boxes but my work safety history will stop me doing that, that and Mrs Spunagain got rear-ended 3 times in her Midget through no fault of her own!
In terms of what I have done before - I admit this is a big stretch for me. Back in the 90s I restored a basket case Reliant Scimitar so I have some experience of the mechanics. Re the electrics I have a degree in Electrical and Electronic engineering and the various drive and charging components are pretty well documented.
Lots to do!
Edited by Spunagain on Sunday 15th May 11:53 to update with latest weights
Edited by Spunagain on Sunday 15th May 11:54
I have spent a bit more time preparing for the body off since last time
The hardtop came off - just 4 bolts, oh and the PO had fixed it it onto the windscreen header rail with a devil's mix of Tiger seal and black silicone sealant so that was a bit of a pain.
Removing Tigerseal.

Roof off for 1st time in 35 years!

The vacuum headlamp lifters came off with help from the impact driver which were both rusted through. All the vacuum piping came out too - oddly the pipes to the valve switch on the dash were completely worn through-I have no idea how they could have ever worked.
The Spyder lifter kit has arrived and looks fairly straightforward to fix although some of the instructions are comically vague with instructions like “Fit mounting bracket to car” but no clue as to where to drill holes and fit it - do I use one of the holes from the old vacuum system? Hopefully it will become clearer once I get into it! The headlamps and lamp pods came out without a fight.
The brake servo was a complete pig to remove which needed all 3 nuts in the front wheel arch to be Dremelled through to get them out.
Fuel filter, and solenoid came out with no problems.
I intended to remove just the handbrake cable but could not figure out how to disconnect it from the handle so pulled the lot out. The handbrake cables seem to be hard to get in the right size so I will clean up the handle and patch up the flaking sleeving, the cable itself seems to be ok.
The ignition coil was another impact driver job to unbolt.
Rear lights- the chrome is a bit pitted on them so need to decide clean or replace but they are rare and over £200 each! Front indicator lamps, again these look pretty ropey and will probably replace them.
Horn - motor stripped and cleaned and pump section cleaned up but not a sausage - it draws current but not movement. I think I will buy a new air horn - they are not expensive and swap over the old trumpets to get the original tone.
The wing indicator lamps are putting up a bit of a fight - this is what I am dealing with!

Washer bottle and motor - stipped and cleaned up and ready to go back in, but once tested the motor drew current but again no movement. One of the list of parts to buy!
Various brackets will be sent off to the powder coaters once I get the suspension out.
I also have removed all the carpets, the rear firewall and sill covers, and have been pleased to find the steel zig zag reinforcements in the sills are all solid. I have also learned to wear a mask when removing 52 year old carpets.

All the body bolts and seat belt bolts are out, some needing many days soaking with WD40 and two needing the rattle gun. A friend recommended the Ryobi ¼ inch battery impact driver and it has been fantastic, unlocking seized nuts without excess torque - it is like magic!
So a big pile of freshly removed bits - most of the parts on the front left are not going back in my pile of ancillaries to Ebay/chuck is now 25.5kg!

I have been following the body removal guide from LotusElan.net and have got through all the preparations apart from one which is to disconnect the steering rack from the steering column. This is proving tricky, I have unbolted the steering column mount under the dash and unbolted both spline clamps on the coupling attaching the column to the rack but they are both stuck fast in car. The rear one looks like it is also welded! I drowned the front one in WD40 for a week and tried again with no luck. Ice water followed by boiling water also failed. I will try unbolting the next coupling up next.
I also removed the boot lid and headlight pods to save a little more weight. I will leave the doors on to give the body a bit more structural rigidity during the lift.
Finally I made up the dolly. I cut up some old timber left from our loft conversion and bolted some castors on with some M8 bolts.
And a much emptier engine bay, you can see the dolly in the background.

The gearbox and prop-shaft have arrived but no sign of the keys yet - the dealer has promised me a new lock set if he can’t find them. Also I seem to be missing a gearstick and gearknob so I have set up an ebay search up along with a search for the roof frame.
The paint for the chassis has arrived - Jotamastic 90 Aluminum 2k epoxy mastic paint used for oil rigs so should last a while on the Elan. Not original but I have ordered it in white, partly as a nod to my old Chimaera and also to make it easy to see everything else going on and any rust appearing in the future. I also ordered some acetone to clean up the old carpet glue from the cabin and a couple of litres of Noxudol 3100 Sound Deadening Compound to roller on in the cabin to help with road noise and vibration.
So, last thing to do before the lift is to disconnect the steering rack and finally invite the boys over for the body lift and BBQ!
On the EV side I have got a source for the battery boxes and the batteries - I am going for the 5.6kWh ones to balance cost and range and the ability to buy boxes to house them. The 100d packs (£2500 more expensive for a total of 2.1kWh more) are a different design so the off-the-shelf boxes don’t fit.
I was going to modify an old PC power supply to use as a DC-DC converter but opening it up revealed a rash of bulging capacitors so that was binned. I will order a 500W Elcon DC-DC converter.
Finally I ordered some seat warmer elements and will drop the seats off for refurbishing tomorrow.
The hardtop came off - just 4 bolts, oh and the PO had fixed it it onto the windscreen header rail with a devil's mix of Tiger seal and black silicone sealant so that was a bit of a pain.
Removing Tigerseal.
Roof off for 1st time in 35 years!
The vacuum headlamp lifters came off with help from the impact driver which were both rusted through. All the vacuum piping came out too - oddly the pipes to the valve switch on the dash were completely worn through-I have no idea how they could have ever worked.
The Spyder lifter kit has arrived and looks fairly straightforward to fix although some of the instructions are comically vague with instructions like “Fit mounting bracket to car” but no clue as to where to drill holes and fit it - do I use one of the holes from the old vacuum system? Hopefully it will become clearer once I get into it! The headlamps and lamp pods came out without a fight.
The brake servo was a complete pig to remove which needed all 3 nuts in the front wheel arch to be Dremelled through to get them out.
Fuel filter, and solenoid came out with no problems.
I intended to remove just the handbrake cable but could not figure out how to disconnect it from the handle so pulled the lot out. The handbrake cables seem to be hard to get in the right size so I will clean up the handle and patch up the flaking sleeving, the cable itself seems to be ok.
The ignition coil was another impact driver job to unbolt.
Rear lights- the chrome is a bit pitted on them so need to decide clean or replace but they are rare and over £200 each! Front indicator lamps, again these look pretty ropey and will probably replace them.
Horn - motor stripped and cleaned and pump section cleaned up but not a sausage - it draws current but not movement. I think I will buy a new air horn - they are not expensive and swap over the old trumpets to get the original tone.
The wing indicator lamps are putting up a bit of a fight - this is what I am dealing with!
Washer bottle and motor - stipped and cleaned up and ready to go back in, but once tested the motor drew current but again no movement. One of the list of parts to buy!
Various brackets will be sent off to the powder coaters once I get the suspension out.
I also have removed all the carpets, the rear firewall and sill covers, and have been pleased to find the steel zig zag reinforcements in the sills are all solid. I have also learned to wear a mask when removing 52 year old carpets.
All the body bolts and seat belt bolts are out, some needing many days soaking with WD40 and two needing the rattle gun. A friend recommended the Ryobi ¼ inch battery impact driver and it has been fantastic, unlocking seized nuts without excess torque - it is like magic!
So a big pile of freshly removed bits - most of the parts on the front left are not going back in my pile of ancillaries to Ebay/chuck is now 25.5kg!
I have been following the body removal guide from LotusElan.net and have got through all the preparations apart from one which is to disconnect the steering rack from the steering column. This is proving tricky, I have unbolted the steering column mount under the dash and unbolted both spline clamps on the coupling attaching the column to the rack but they are both stuck fast in car. The rear one looks like it is also welded! I drowned the front one in WD40 for a week and tried again with no luck. Ice water followed by boiling water also failed. I will try unbolting the next coupling up next.
I also removed the boot lid and headlight pods to save a little more weight. I will leave the doors on to give the body a bit more structural rigidity during the lift.
Finally I made up the dolly. I cut up some old timber left from our loft conversion and bolted some castors on with some M8 bolts.
And a much emptier engine bay, you can see the dolly in the background.
The gearbox and prop-shaft have arrived but no sign of the keys yet - the dealer has promised me a new lock set if he can’t find them. Also I seem to be missing a gearstick and gearknob so I have set up an ebay search up along with a search for the roof frame.
The paint for the chassis has arrived - Jotamastic 90 Aluminum 2k epoxy mastic paint used for oil rigs so should last a while on the Elan. Not original but I have ordered it in white, partly as a nod to my old Chimaera and also to make it easy to see everything else going on and any rust appearing in the future. I also ordered some acetone to clean up the old carpet glue from the cabin and a couple of litres of Noxudol 3100 Sound Deadening Compound to roller on in the cabin to help with road noise and vibration.
So, last thing to do before the lift is to disconnect the steering rack and finally invite the boys over for the body lift and BBQ!
On the EV side I have got a source for the battery boxes and the batteries - I am going for the 5.6kWh ones to balance cost and range and the ability to buy boxes to house them. The 100d packs (£2500 more expensive for a total of 2.1kWh more) are a different design so the off-the-shelf boxes don’t fit.
I was going to modify an old PC power supply to use as a DC-DC converter but opening it up revealed a rash of bulging capacitors so that was binned. I will order a 500W Elcon DC-DC converter.
Finally I ordered some seat warmer elements and will drop the seats off for refurbishing tomorrow.
Edited by Spunagain on Sunday 15th May 11:57
Edited by Spunagain on Monday 16th May 08:56
After a lot of hammering with a drift and purchase of a ball joint separator from ebay, I finally got the steering rack off the steering column.
And today the big day happened - the Lotus lift and barbecue!
Six of my friends and their patient other-halves came round to help me out and eat overcooked meats.
It took a couple of attempts, but once we realised the body needed to be lifted rear end first, it lifted off easily.

The chassis does not look too bad and before putting it away I wire brushed off the loose under-seal and rust, hoovered and it looks very solid underneath.

Next step is to get all the suspension off and get it sent off to be sand-blasted and then paint it.
Talking with one of the Lotus car part suppliers, she suggested I send the body off to be painted while it was off the chassis so I shall start looking into that as apparently there are some long waiting lists.
This week I also ordered a new horn compressor, washer pump and replacements for all the knackered lights, as well as LED replacement bulbs which worked well in the TVR.
I also ordered these LED headlamps which should reduce current, increase light output and reduce weight.
While working on labelling up the headlight and horn relays (also knackered and replacements ordered) I saw some cracks in the wiring insulation, so I need to also replace the loom - I was fooling myself that I could keep the original, but another one for the list to buy!
While dropping off the seats I got another quote for the body work to do all the stripping and painting - £11k! So I plan to order a DA5 6 Pro and some sanding pads to start the stripping myself.
I have cleaned up and painted the insides of the rear lamps for the Elan - and ordered a new lens to replace the cracked one. The lights all work perfectly but chrome is pretty badly pitted so I will think of the best approach to tidy it up. Possibly sand and fill it flat and respray either black or try one of these Chrome paints.

And today the big day happened - the Lotus lift and barbecue!
Six of my friends and their patient other-halves came round to help me out and eat overcooked meats.
It took a couple of attempts, but once we realised the body needed to be lifted rear end first, it lifted off easily.
The chassis does not look too bad and before putting it away I wire brushed off the loose under-seal and rust, hoovered and it looks very solid underneath.
Next step is to get all the suspension off and get it sent off to be sand-blasted and then paint it.
Talking with one of the Lotus car part suppliers, she suggested I send the body off to be painted while it was off the chassis so I shall start looking into that as apparently there are some long waiting lists.
This week I also ordered a new horn compressor, washer pump and replacements for all the knackered lights, as well as LED replacement bulbs which worked well in the TVR.
I also ordered these LED headlamps which should reduce current, increase light output and reduce weight.
While working on labelling up the headlight and horn relays (also knackered and replacements ordered) I saw some cracks in the wiring insulation, so I need to also replace the loom - I was fooling myself that I could keep the original, but another one for the list to buy!
While dropping off the seats I got another quote for the body work to do all the stripping and painting - £11k! So I plan to order a DA5 6 Pro and some sanding pads to start the stripping myself.
I have cleaned up and painted the insides of the rear lamps for the Elan - and ordered a new lens to replace the cracked one. The lights all work perfectly but chrome is pretty badly pitted so I will think of the best approach to tidy it up. Possibly sand and fill it flat and respray either black or try one of these Chrome paints.
I am aiming to keep it all pretty stock. The weight should be pretty much the same so I will go with standard (but new) springs and dampers.
For brakes I will probably upgrade the disks and pads but with standard calipers as there are quite a few people seem to are happy to race with them on original calipers. While this is going to be predominantly a road car, I will try nearby a track day if the circuits allow it, as quite a few certainly were nervous about electric cars.
For brakes I will probably upgrade the disks and pads but with standard calipers as there are quite a few people seem to are happy to race with them on original calipers. While this is going to be predominantly a road car, I will try nearby a track day if the circuits allow it, as quite a few certainly were nervous about electric cars.
Not without butchering the car. I will not be modifying the chassis in any way so the car can be returned to petrol power if needed in the future. The whole conversion will be "bolt on". The aim is to keep it handling as much as possible like an Elan.
I do plan to map the motor to behave much like a twink, though a veteran of EV conversions has promised me that will last right up until I try it at full torque across the rev range and then it will stay set like that!
I do plan to map the motor to behave much like a twink, though a veteran of EV conversions has promised me that will last right up until I try it at full torque across the rev range and then it will stay set like that!
June 2022
Small change of plan! My original plan of attack was to remove body -> clean up the chassis -> put the body back on -> paint.
However after speaking to Sue Miller - one of the Lotus Elan parts suppliers, she strongly recommended that I get the body painted while it was off the chassis. Around the same time a friend of mine recommended a fibreglass specialist who had a slot available to do the body starting late July, but would like to pick up the body in late June so the team can get started as they finish their current job, so after that call I had 3 weeks to strip the body (now 2 weeks!).
So I have cracked on and got going!
Boot locks came out easily. The electric antenna came out with a little drilling, some quality electrics going on!

I will replace it with a simple whip antenna to save a few grams- it weighed over half a kilo!
The windscreen came out easily by prising out the beading and gently pushing it out. While it is delaminating a bit, I will not get a new one yet, as first I will see a screen with a heating element is needed once things are up and running.
Bumpers next, which was a pig! One bolt on each bumper rounded off and only freed after many soakings in plusgas and delicate persuasion with mole grips. The front bumper is badly cracked and it will be cheaper to buy a new one than repair so I will get a lightweight one.

Door trim pads next, followed by locks and door handles. The locking mechanism is horribly complicated and I am sure I have not taken enough photos. Here’s one:

The locks’ fixing nuts were rusted solid and it took several days of soaking in Plusgas and big mole grips to get them out.
Next up: window motors, I bought a battery for the car and tried them out before removing them and miracle of miracles, both sets of windows worked! The motor fixings were less co-operative with one of the bolts needing to be drilled out.
Next up we’re the window frames which lifted out fairly easily once I had undone all of the bolts including the inset ones not mentioned in the service manual! They will need cleaning, greasing and the inside de-rusting and painting. The chrome is quite pitted so I will look at getting a quote to re-chrome them.
This is what is left!

The garage is getting a bit cluttered now!

So next up is: dashboard and heater out, clean the remains of the soundproofing from the cabin, remove the clutch and brake master cylinders and strip out the old wiring loom. Oh and drill out the roof mounting strips and gutters on the windscreen surround.
Small change of plan! My original plan of attack was to remove body -> clean up the chassis -> put the body back on -> paint.
However after speaking to Sue Miller - one of the Lotus Elan parts suppliers, she strongly recommended that I get the body painted while it was off the chassis. Around the same time a friend of mine recommended a fibreglass specialist who had a slot available to do the body starting late July, but would like to pick up the body in late June so the team can get started as they finish their current job, so after that call I had 3 weeks to strip the body (now 2 weeks!).
So I have cracked on and got going!
Boot locks came out easily. The electric antenna came out with a little drilling, some quality electrics going on!
I will replace it with a simple whip antenna to save a few grams- it weighed over half a kilo!
The windscreen came out easily by prising out the beading and gently pushing it out. While it is delaminating a bit, I will not get a new one yet, as first I will see a screen with a heating element is needed once things are up and running.
Bumpers next, which was a pig! One bolt on each bumper rounded off and only freed after many soakings in plusgas and delicate persuasion with mole grips. The front bumper is badly cracked and it will be cheaper to buy a new one than repair so I will get a lightweight one.
Door trim pads next, followed by locks and door handles. The locking mechanism is horribly complicated and I am sure I have not taken enough photos. Here’s one:
The locks’ fixing nuts were rusted solid and it took several days of soaking in Plusgas and big mole grips to get them out.
Next up: window motors, I bought a battery for the car and tried them out before removing them and miracle of miracles, both sets of windows worked! The motor fixings were less co-operative with one of the bolts needing to be drilled out.
Next up we’re the window frames which lifted out fairly easily once I had undone all of the bolts including the inset ones not mentioned in the service manual! They will need cleaning, greasing and the inside de-rusting and painting. The chrome is quite pitted so I will look at getting a quote to re-chrome them.
This is what is left!
The garage is getting a bit cluttered now!
So next up is: dashboard and heater out, clean the remains of the soundproofing from the cabin, remove the clutch and brake master cylinders and strip out the old wiring loom. Oh and drill out the roof mounting strips and gutters on the windscreen surround.
So a few more bits got added to the remove list and ticked off. I removed the door check straps, their mounting plates and the door switches, both of which needed screws drilling out. I then unscrewed the windscreen gutters and drilled out the aluminium strip used to hold on the roof, which was made easier by grinding down the tops of the rivets with a dremel grinding stone.
The clutch and brake master cylinders unbolted easily enough but they look pretty bad, new ones I think, along with new sidelights!

The dashboard was a pig to remove and some worrying surprises like horn switch cables worn to the copper next to the steering columns, and lots more twisted together wiring! Also found a new mystery switch - a 3 position standard rocker switch on the dashboard to the right of the washer switch - any ideas? I will trace the wiring to find out!
The bonnet release catch on mine is on the dashboard, which means every time I want to remove the dashboard I have to remove the whole bonnet release assembly . To avoid this I have cut a slot to allow the bonnet pull to be removed without pulling out everything else - I suspect I will be pulling the dashboard out a few times in the future!
Part way out

I labelled each wire as I unplugged it to use as a reference when I get the new looms.
Free at last

The rats nest beneath
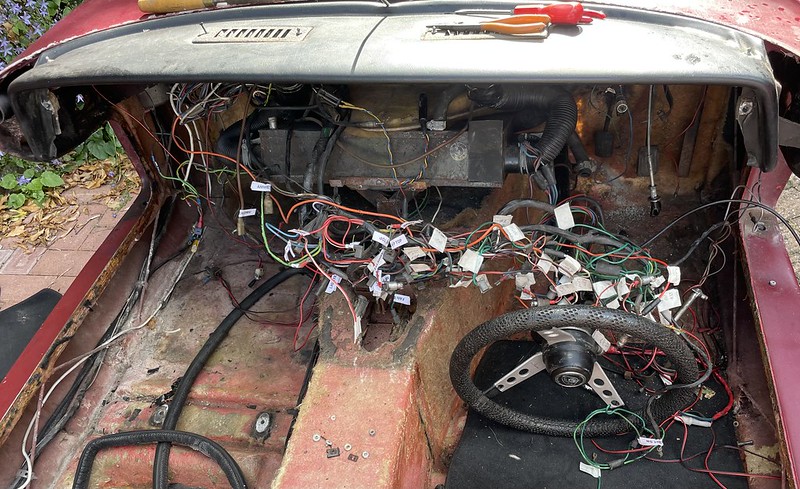
The wiring has been pretty badly butchered to wire in an alternator, radio, radiator fan, rear heated window, battery ammeter and more stuff I have not figured out yet, so a new loom is definitely the way forward.
I have ordered a pair of Focal 13cm speakers to put in the doors so I can drill them before painting.
I also ordered the charging connector which I also want to use to widen the filler cap hole before painting.
The clutch and brake master cylinders unbolted easily enough but they look pretty bad, new ones I think, along with new sidelights!
The dashboard was a pig to remove and some worrying surprises like horn switch cables worn to the copper next to the steering columns, and lots more twisted together wiring! Also found a new mystery switch - a 3 position standard rocker switch on the dashboard to the right of the washer switch - any ideas? I will trace the wiring to find out!
The bonnet release catch on mine is on the dashboard, which means every time I want to remove the dashboard I have to remove the whole bonnet release assembly . To avoid this I have cut a slot to allow the bonnet pull to be removed without pulling out everything else - I suspect I will be pulling the dashboard out a few times in the future!
Part way out
I labelled each wire as I unplugged it to use as a reference when I get the new looms.
Free at last
The rats nest beneath
The wiring has been pretty badly butchered to wire in an alternator, radio, radiator fan, rear heated window, battery ammeter and more stuff I have not figured out yet, so a new loom is definitely the way forward.
I have ordered a pair of Focal 13cm speakers to put in the doors so I can drill them before painting.
I also ordered the charging connector which I also want to use to widen the filler cap hole before painting.
Car wheels are now off and the old tyres removed and wheels delivered to the powder coaters - they actually have inner-tubes!
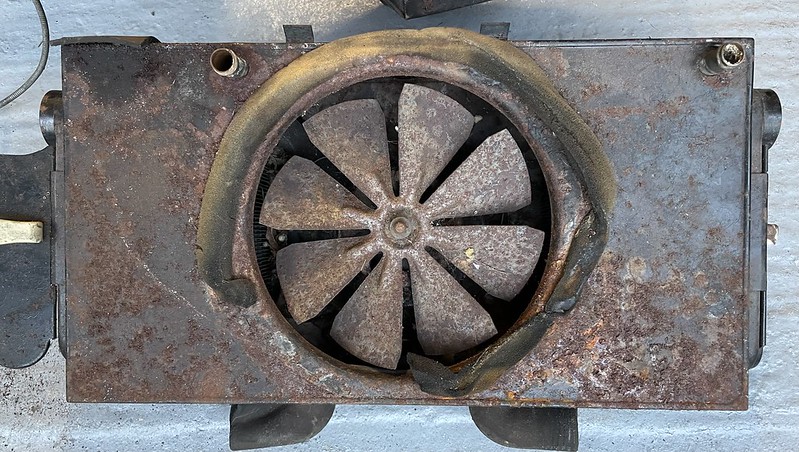
Heater is out and the fan sort of works but seems to be making the sound of suffering souls in purgatory, so there will be more on the fan later on when I get to it!
Removed the front and dash wiring looms, some of the bullet connectors really did not want to let go - they were really very secure!.

Some of the front looms are not just cracked but are looking worryingly crispy, looks like it was getting close to catching fire! These are some of the headlamp wires:

Also removed the screen-wash pipes and jets,and the dash vents for powder coating (another battle using lots of WD40 - all the Plusgas is gone - need to get more!). I also removed the speedo cable and seatbelts completely so I can clean them up when the body is away. And the last of the poppers on the top of the windscreen needed to be drilled out.
I tested the wiper motor and that is locked solid, so the whole wiper assembly was taken out. I will strip and clean the spindle boxes and the bowden cable later and see if that helps but it does look like more shopping is needed!
I removed the whole steering column to get the bulkhead seal off and the plate for that will go for powder coating too. And finally removed the vinyl trim around the windscreen. - that will be fun to glue back!
Oh and I mentioned last week I bought some Focal speakers for the doors - 13cm is the diameter of the hole and not the outside diameter of the speaker! Idiot - I should have checked the speaker drawings! Oh well - they will do nicely for the rears on the rear firewall - I don’t want anything massive there. I have now ordered some 10cm Focal 100AC speakers which will definitely fit.
Just need to clean up inside the cabin with some acetone and we are ready to have the body picked up!
Heater is out and the fan sort of works but seems to be making the sound of suffering souls in purgatory, so there will be more on the fan later on when I get to it!
Removed the front and dash wiring looms, some of the bullet connectors really did not want to let go - they were really very secure!.
Some of the front looms are not just cracked but are looking worryingly crispy, looks like it was getting close to catching fire! These are some of the headlamp wires:
Also removed the screen-wash pipes and jets,and the dash vents for powder coating (another battle using lots of WD40 - all the Plusgas is gone - need to get more!). I also removed the speedo cable and seatbelts completely so I can clean them up when the body is away. And the last of the poppers on the top of the windscreen needed to be drilled out.
I tested the wiper motor and that is locked solid, so the whole wiper assembly was taken out. I will strip and clean the spindle boxes and the bowden cable later and see if that helps but it does look like more shopping is needed!
I removed the whole steering column to get the bulkhead seal off and the plate for that will go for powder coating too. And finally removed the vinyl trim around the windscreen. - that will be fun to glue back!
Oh and I mentioned last week I bought some Focal speakers for the doors - 13cm is the diameter of the hole and not the outside diameter of the speaker! Idiot - I should have checked the speaker drawings! Oh well - they will do nicely for the rears on the rear firewall - I don’t want anything massive there. I have now ordered some 10cm Focal 100AC speakers which will definitely fit.
Just need to clean up inside the cabin with some acetone and we are ready to have the body picked up!
Edited by Spunagain on Monday 20th June 13:58
While looking at the wiring, the mystery unmarked rocker switch was connected to a flasher unit and turned out to be the hazard warning switch - probably a late addition by Lotus to meet new regulations.
Before the car went I popped the dash back on and measured the clearance behind the radio which was much more than 20cm, this allowed me to order the radio. I went with a Classic Caliber unit: https://www.calibereurope.com/en/product/RMD120BT-... with BT USB SD card and FW. I chose it as it delivered 35W rms per channel. Much better than the cheap chinese option which when checking the specced power amp only gave 6W per channel into 4 channels!
While doing a last tidy up of the body - I found a couple of odd plates on the outside of the body behind the seats. No mention of them in either the parts list or the workshop manual. Possibly a sketchy mount for a harness? I checked with the Elan facebook group and no-one else with a 69 Elan has anything like it. I removed them and will get the holes patched.

I also pulled out the pedals and throttle cable. And the car was booked for pickup and departed on Friday. The dolly wheelbase was a bit narrow for the ramps so Steve and I lifted the body manually onto the trailer, it really is very light once everything is removed!

So a tidy up of the garage and then move on to the chassis.
Next step was to get the diff out for a refurb. The left hand side of the rear suspension needed to come off for the diff to slide out (Ha!) and unfortunately I rounded off the forward bolt - it has stuck fast into the aluminium hub. I soaked it in plusgas and took off the off side strut and wishbone. As the near side wishbone bolt was not going to shift, I removed the chassis bolts istead and removed the whole assembly. I will try soaking the corner in cola to see if it helps to free it.
The diff was a pig to get out, someone in the past has jacked the car up on the diff carrier so the hole is smaller than the diff! Even removing the strengthening plate on top of the diff which was very tricky to do behind the chassis plate did not do it. So a combination of crowbar, block of wood and mallet finally birthed it!

Next up was to clean up the diff and gearbox before I drop them off. The gearbox is going for a straightforward refurb, whereas the diff will get refurbed plus a Quaife automatic torque biassing diff and billet drive shafts. I am taking a risk with the gearbox, but I know of two standard Elan/Cortina boxes coping with the Hyper9 at full power so far, and I am not planning to race the car. If it fails I will have to look at a different box.
I cleaned the diff and gearbox with de-greaser and then attacked them with wire brushes and finally cleaned off with white spirit. I finished off with a bit of Curust as you could see the rust blooming in real time! The cases will get painted during the refurbs.

Unfortunately the dealer could not find the keys to the car so he has agreed to get his locksmith to cut some new ones so the starter lock and the boot lock got a quick clean up and posted to him. The door locks did not survive removal and the glove box does still have a key.

So a big road trip tomorrow to visit the paint shop and to drop off the gearbox and diff.
Before the car went I popped the dash back on and measured the clearance behind the radio which was much more than 20cm, this allowed me to order the radio. I went with a Classic Caliber unit: https://www.calibereurope.com/en/product/RMD120BT-... with BT USB SD card and FW. I chose it as it delivered 35W rms per channel. Much better than the cheap chinese option which when checking the specced power amp only gave 6W per channel into 4 channels!
While doing a last tidy up of the body - I found a couple of odd plates on the outside of the body behind the seats. No mention of them in either the parts list or the workshop manual. Possibly a sketchy mount for a harness? I checked with the Elan facebook group and no-one else with a 69 Elan has anything like it. I removed them and will get the holes patched.
I also pulled out the pedals and throttle cable. And the car was booked for pickup and departed on Friday. The dolly wheelbase was a bit narrow for the ramps so Steve and I lifted the body manually onto the trailer, it really is very light once everything is removed!
So a tidy up of the garage and then move on to the chassis.
Next step was to get the diff out for a refurb. The left hand side of the rear suspension needed to come off for the diff to slide out (Ha!) and unfortunately I rounded off the forward bolt - it has stuck fast into the aluminium hub. I soaked it in plusgas and took off the off side strut and wishbone. As the near side wishbone bolt was not going to shift, I removed the chassis bolts istead and removed the whole assembly. I will try soaking the corner in cola to see if it helps to free it.
The diff was a pig to get out, someone in the past has jacked the car up on the diff carrier so the hole is smaller than the diff! Even removing the strengthening plate on top of the diff which was very tricky to do behind the chassis plate did not do it. So a combination of crowbar, block of wood and mallet finally birthed it!
Next up was to clean up the diff and gearbox before I drop them off. The gearbox is going for a straightforward refurb, whereas the diff will get refurbed plus a Quaife automatic torque biassing diff and billet drive shafts. I am taking a risk with the gearbox, but I know of two standard Elan/Cortina boxes coping with the Hyper9 at full power so far, and I am not planning to race the car. If it fails I will have to look at a different box.
I cleaned the diff and gearbox with de-greaser and then attacked them with wire brushes and finally cleaned off with white spirit. I finished off with a bit of Curust as you could see the rust blooming in real time! The cases will get painted during the refurbs.
Unfortunately the dealer could not find the keys to the car so he has agreed to get his locksmith to cut some new ones so the starter lock and the boot lock got a quick clean up and posted to him. The door locks did not survive removal and the glove box does still have a key.
So a big road trip tomorrow to visit the paint shop and to drop off the gearbox and diff.
I made a 550 mile road trip to visit the guys who are sorting out the Elan bodywork in Norfolk and the guy rebuilding the gearbox in Mansfield.
Both meetings were very helpful and great to meet the guys doing the work and go through the things to be done. On the bodywork side I have ordered a Tony Thompson rollover bar for safety which will be delivered direct to the Bodywork shop.
The Gearbox guy helpfully noted that I should check the motor mount for the flywheel as there are 2 different flywheels, a 4-bolt and 6-bolt one which are very different! He will also grind some spare meat off the tail of the diff to make it easier to get back in the car. He also noted that the gearbox is not original and is of 1972 vintage. Damn, so it’s not a matching numbers car!
The gearbox internals have shown it is a low mileage box but water has got in and the main shaft is pretty badly corroded so I have asked Al to replace the main shaft with the good one shown in the picture below:

The input shaft is also pitted

The input shaft is trickier as none of the available ones run quietly with my gear set. So we are looking to add a bronze bush to use instead of the roller bearing on the clutch side.
The diff is not looking too happy either one ear which attaches to the torque rods (2 of the 4 gearbox mounts) is worn:

This is going to get re-welded and re-machined.
And the crown wheel is borked.

I have ordered a new crown wheel and pinion set from Burton, with the same ratio or match the original (which was not OEM anyway).
Things the took a bit of a halt for family holidays followed by a nasty bout of Covid which I have just tested negative for after being positive and feeling pretty sorry for myself for 10 days!
So carrying on stripping the chassis, one of the nuts into the rear Chapman strut has seized and I have rounded the bolt head, it is now sitting in a bath of coke hoping that will help.

After a lot of swearing the chassis is now stripped which feels like my 2nd major milestone completed!.

There were a couple of bent bits:

I had a go at it with some mole grips and it is better and having seen Father Ted decided to stop there:

Next up was the wishbone bushes. I thought I was being clever making up a tool with some M10 studding, some nuts, some washers and some old 1/2 inch sockets, and did manage to get one bush out. Then this happened:

At this point I will take the wishbones to the local garage and get them to press them out with grown ups tools.
I will also call up the powder coaters to come and pick up the chassis for blasting, inspection and hopefully powder coating.
Both meetings were very helpful and great to meet the guys doing the work and go through the things to be done. On the bodywork side I have ordered a Tony Thompson rollover bar for safety which will be delivered direct to the Bodywork shop.
The Gearbox guy helpfully noted that I should check the motor mount for the flywheel as there are 2 different flywheels, a 4-bolt and 6-bolt one which are very different! He will also grind some spare meat off the tail of the diff to make it easier to get back in the car. He also noted that the gearbox is not original and is of 1972 vintage. Damn, so it’s not a matching numbers car!
The gearbox internals have shown it is a low mileage box but water has got in and the main shaft is pretty badly corroded so I have asked Al to replace the main shaft with the good one shown in the picture below:
The input shaft is also pitted
The input shaft is trickier as none of the available ones run quietly with my gear set. So we are looking to add a bronze bush to use instead of the roller bearing on the clutch side.
The diff is not looking too happy either one ear which attaches to the torque rods (2 of the 4 gearbox mounts) is worn:
This is going to get re-welded and re-machined.
And the crown wheel is borked.
I have ordered a new crown wheel and pinion set from Burton, with the same ratio or match the original (which was not OEM anyway).
Things the took a bit of a halt for family holidays followed by a nasty bout of Covid which I have just tested negative for after being positive and feeling pretty sorry for myself for 10 days!
So carrying on stripping the chassis, one of the nuts into the rear Chapman strut has seized and I have rounded the bolt head, it is now sitting in a bath of coke hoping that will help.
After a lot of swearing the chassis is now stripped which feels like my 2nd major milestone completed!.
There were a couple of bent bits:
I had a go at it with some mole grips and it is better and having seen Father Ted decided to stop there:
Next up was the wishbone bushes. I thought I was being clever making up a tool with some M10 studding, some nuts, some washers and some old 1/2 inch sockets, and did manage to get one bush out. Then this happened:
At this point I will take the wishbones to the local garage and get them to press them out with grown ups tools.
I will also call up the powder coaters to come and pick up the chassis for blasting, inspection and hopefully powder coating.
Edited by Spunagain on Monday 18th July 08:23
Thanks for all the support! I am coming to the obviously a bit slow realisation that I am building a car from scratch which when you say it out loud is a bit scary! It may tickle some of you to hear there has been some pain for this progress. I have been kneeling on the garage floor to pull a lot of the stuff out of the car and my knee has swelled up - my GP rather too gleefully diagnosed it as housemaids knee. You may spot the cushioned kneeler my daughter bought me in the photos!
Expensive update!
So the Chassis got picked up on Wednesday 20th. It is super light and easily picked up by just two of us to load onto the truck. I also stripped the brake callipers and sent them off to Kelvedon Lotus for refurb. And the wheels are back from the powder coater's and Uniroyal Rain Expert tyres put on ( a balance between road noise and grip), the wheels came up so well we did not need inner tubes!
The Chassis was back 6 days later all naked for me to check over:
The Powder coater felt we had got to the chassis just in time. Any more rust and pitting and we would have been in new chassis territory.
After checking over, the powder coater then picked it up again for powder coating with a layer of Zinc powder part baked to bond to the chassis followed by a coat of white powder fully baked to bond the zinc to the colour coat.
In the mean time got a call from Al the diff man to let me know that the rear diff casing mounts for the output bearings are also shagged so I have ordered a new one from Tony Thompons, who also recommended that I added billet steel hub shafts to avoid my wheels from falling off! But on 1st glance it looks like I already have them
The wishbone bearings also defeated my stainless studding and I dropped them off at my local garage who also got the wishbone separated from the rear hub without knackering it. Another 2 hours of garage labour extracted from my wallet.
So onto preparing the various hubs.
I split the ball joints off the front hubs with much hammering.
Next step is to splitting the hubs so I could clean them up and paint them and brake shields ready for the new wheel bearings handbrake discs. Urghh more bushes on the trunnions to remove!
I have also ordered a UNF/UNC tap and die set to clean up the chassis threaded holes for the body mounting and seat belt mounting points. I have also got some brake pipe straightening pliers to make a nice job of routing the new copper brake pipes.
Edited by Spunagain on Tuesday 31st January 13:44
The chassis arrived back a couple of weeks ago along with a big box of powder coated chassis bits.

Getting near the end of disassembling and cleaning - I have split the front hubs and of course one of the brake disc bolts rounded…but I was helped out again by my local Speen Garage who have some special grippy sockets for these eventualities. Thankfully the bolt did not snap and I ordered more from Tony Thompson.
Front brake discs seem to be on back-order so I took the old ones for skimming at a machine shop in Maidenhead near work, there is loads of meat on them (around 12mm and the minimum spec 8 ana bit mm!)
I have scraped, wirebushed, sanded, Ku-rusted and hammerited all the bits apart from the brake shields which I got the same treatment but finished with very high temperature paint. I tapped all of the crud out of the holes and reassembled them with the new brake discs bolts.
Knowing my limits I asked my local garage to swap over the new wheel bearings on the front hubs and press in the 8 wishbone bushes and the 2 trunnion bushes. The rear A-frame ones were easy for me to do as the bushes were split. I then assembled front hubs with new wheel bearings bolts and brake discs. Just as I finished the battle with the split pins I realised I had forgotten to fit the trunnions so it all needs to come apart again.

I also popped up to Sheffield and picked up the gearbox and helped with the final assembly of the diff.
Nice new diff with ATB and new crown and pinion gears.

Al needed to use 2 blowlamps to heat the bearing carrier enough to sizzle water off if and then tapped in the frozen bearings which were already on the drive shafts. They went in pretty easily, but the circlips were a pig to fit with the 4 bolt drive shafts as there is very poor access under the driveshaft flange to the circlips.
Here is the nice refurbished diff with ATB and new crown and pinion gear now nestling in the chassis waiting for the mounting washers to dry after a quick coat of hammerite.
However another issue arisen… I am missing a some of the bits to connect the speedo drive into the gearbox. Adding up just the cost of bits I can find so far and a new speedo cable will cost over £230 to get it up and running, and it won’t ever be accurate as the CWP is not standard and will probably leak oil from the gearbox.
Or for a “bit” more I have ordered Smiths part no. SN6207-10CB, a GPS sender and a gearbox blanking plug to give me an accurate and reliable speedo without the oil leaks.

Looks pretty good to me and I am not exactly going for perfect originality! I have also ordered a gauge for battery temperature - it’s an electronic 52mm Smiths -10 to 60°C air temperature gauge and sender with custom text.
Next I had a look at the steering rack, cleaned it up cleaned the threads with a die, greased it up and fitted new boots, but while there is no play in the steering arms they are floppy where they should take the weight of a spanner without drooping, so they are off for a rebuild at Kiley - Clinton Engineering in Birmingham. - Floppy dirty rack:

In the hot weather I have been doing some indoors work and thinking about wiring. I have decided to make my own looms as I am making so many changes, buying a new Elan one would be an expensive mistake. To make maintenance easier, I am making the dashboard a wired standalone unit with a smallish number of Universal MATE-N-LOK https://www.te.com/usa-en/products/brands/mate-n-l... connectors:
Left door
Right door
Rear 12V loom
Rear Drive loom
Steering column
Wiper motor
Heater fan
Engine bay 12V loom
Engine bay drive loom
In this way I can easily unplug and remove the dashboard for maintenance, repairs and upgrades. Note for high current connections I will use multiple pins. Still deciding whether to put the 12V fuse and relay boxes in the glove box or on the firewall under the bonnet. But the fuse box from the XK8 looks like a good donor. It has 2 sets of fuses one from the battery supply and one from a big relay switched by the ignition switch.
I have also chosen and ordered the SimpBMS battery management system (to look after the 5 Tesla drive battery packs) from here: https://www.secondlife-evbatteries.com/products/si...
I chose it as it will let me choose charge current (10A or 32A) so I can charge from a 3 pin 13 Amp plug or by using a 32Amp Type 2 charger. It is easy to implement as it piggybacks off the existing battery control boards fitted to the Tesla battery modules and simply daisy chains off Can bus connections, power and ground between each cell and avoids the need to route individual high voltage wires for each cell voltage around the car. I also got its sister SimpCharge board which links the charge socket to the car and tells the car it is connected (and also disable drive) and allows charging to start when a powered charger is connected.
I also ordered a 3.2” touch screen display which will go in the ashtray space on the dash and a simple bezel, and then I ordered another custom one which was made symmetrical to cure my itching teeth.

As a slight aside I have been thinking about my dashboard. My original plan was to modify my existing dash, fill in some of the holes and re-veneer it myself. But adding cost of veneer glue and time and my general cack handedness I have decided to get the grown ups involved (again). I contacted a wooden dashboard specialist with a diagram showing what I wanted different from their standard S4 Dashboard, and Ian suggested I pop over to look at options. I popped over with my dash and came up with a nice compromise of Olive Ash Burr. It is much less gloomy than the standard one but not so light that it is jarringly unoriginal. It also works with the original white lettering and has some nice detail in the grain.

The specialist knows his Elans and my dash is a strange mix of S4 sprint and US designs. The last decision I need to make is whether to keep the bonnet release on the dashboard.
Getting near the end of disassembling and cleaning - I have split the front hubs and of course one of the brake disc bolts rounded…but I was helped out again by my local Speen Garage who have some special grippy sockets for these eventualities. Thankfully the bolt did not snap and I ordered more from Tony Thompson.
Front brake discs seem to be on back-order so I took the old ones for skimming at a machine shop in Maidenhead near work, there is loads of meat on them (around 12mm and the minimum spec 8 ana bit mm!)
I have scraped, wirebushed, sanded, Ku-rusted and hammerited all the bits apart from the brake shields which I got the same treatment but finished with very high temperature paint. I tapped all of the crud out of the holes and reassembled them with the new brake discs bolts.
Knowing my limits I asked my local garage to swap over the new wheel bearings on the front hubs and press in the 8 wishbone bushes and the 2 trunnion bushes. The rear A-frame ones were easy for me to do as the bushes were split. I then assembled front hubs with new wheel bearings bolts and brake discs. Just as I finished the battle with the split pins I realised I had forgotten to fit the trunnions so it all needs to come apart again.
I also popped up to Sheffield and picked up the gearbox and helped with the final assembly of the diff.
Nice new diff with ATB and new crown and pinion gears.
Al needed to use 2 blowlamps to heat the bearing carrier enough to sizzle water off if and then tapped in the frozen bearings which were already on the drive shafts. They went in pretty easily, but the circlips were a pig to fit with the 4 bolt drive shafts as there is very poor access under the driveshaft flange to the circlips.
Here is the nice refurbished diff with ATB and new crown and pinion gear now nestling in the chassis waiting for the mounting washers to dry after a quick coat of hammerite.
However another issue arisen… I am missing a some of the bits to connect the speedo drive into the gearbox. Adding up just the cost of bits I can find so far and a new speedo cable will cost over £230 to get it up and running, and it won’t ever be accurate as the CWP is not standard and will probably leak oil from the gearbox.
Or for a “bit” more I have ordered Smiths part no. SN6207-10CB, a GPS sender and a gearbox blanking plug to give me an accurate and reliable speedo without the oil leaks.
Looks pretty good to me and I am not exactly going for perfect originality! I have also ordered a gauge for battery temperature - it’s an electronic 52mm Smiths -10 to 60°C air temperature gauge and sender with custom text.
Next I had a look at the steering rack, cleaned it up cleaned the threads with a die, greased it up and fitted new boots, but while there is no play in the steering arms they are floppy where they should take the weight of a spanner without drooping, so they are off for a rebuild at Kiley - Clinton Engineering in Birmingham. - Floppy dirty rack:
In the hot weather I have been doing some indoors work and thinking about wiring. I have decided to make my own looms as I am making so many changes, buying a new Elan one would be an expensive mistake. To make maintenance easier, I am making the dashboard a wired standalone unit with a smallish number of Universal MATE-N-LOK https://www.te.com/usa-en/products/brands/mate-n-l... connectors:
Left door
Right door
Rear 12V loom
Rear Drive loom
Steering column
Wiper motor
Heater fan
Engine bay 12V loom
Engine bay drive loom
In this way I can easily unplug and remove the dashboard for maintenance, repairs and upgrades. Note for high current connections I will use multiple pins. Still deciding whether to put the 12V fuse and relay boxes in the glove box or on the firewall under the bonnet. But the fuse box from the XK8 looks like a good donor. It has 2 sets of fuses one from the battery supply and one from a big relay switched by the ignition switch.
I have also chosen and ordered the SimpBMS battery management system (to look after the 5 Tesla drive battery packs) from here: https://www.secondlife-evbatteries.com/products/si...
I chose it as it will let me choose charge current (10A or 32A) so I can charge from a 3 pin 13 Amp plug or by using a 32Amp Type 2 charger. It is easy to implement as it piggybacks off the existing battery control boards fitted to the Tesla battery modules and simply daisy chains off Can bus connections, power and ground between each cell and avoids the need to route individual high voltage wires for each cell voltage around the car. I also got its sister SimpCharge board which links the charge socket to the car and tells the car it is connected (and also disable drive) and allows charging to start when a powered charger is connected.
I also ordered a 3.2” touch screen display which will go in the ashtray space on the dash and a simple bezel, and then I ordered another custom one which was made symmetrical to cure my itching teeth.
As a slight aside I have been thinking about my dashboard. My original plan was to modify my existing dash, fill in some of the holes and re-veneer it myself. But adding cost of veneer glue and time and my general cack handedness I have decided to get the grown ups involved (again). I contacted a wooden dashboard specialist with a diagram showing what I wanted different from their standard S4 Dashboard, and Ian suggested I pop over to look at options. I popped over with my dash and came up with a nice compromise of Olive Ash Burr. It is much less gloomy than the standard one but not so light that it is jarringly unoriginal. It also works with the original white lettering and has some nice detail in the grain.
The specialist knows his Elans and my dash is a strange mix of S4 sprint and US designs. The last decision I need to make is whether to keep the bonnet release on the dashboard.
Edited by Spunagain on Friday 5th May 09:13
Hi Lotusgone, re: the greying rocker switches - Paul at UKsport cars recommended brake fluid! I will try to polish them using some "Curator Clock Case Restorer" which can be used for restoring Bakelite and plastics. I have some ready for a 1930s valve radio project I have planned for the far future!
Hi Cambs_Stuart, the Body work has started, after 2 guys spent 3 days battling with sanding they gave up - the paint was rock hard and constantly clogging the sandpaper, so it went for soda blasting. Apparently it is pretty good underneath and only one new repair was found at the front, but this one has been well repaired so does not need further work. Here is a taster of the car coming back from the blasters- I will get some more photos later this week,

Hi Cambs_Stuart, the Body work has started, after 2 guys spent 3 days battling with sanding they gave up - the paint was rock hard and constantly clogging the sandpaper, so it went for soda blasting. Apparently it is pretty good underneath and only one new repair was found at the front, but this one has been well repaired so does not need further work. Here is a taster of the car coming back from the blasters- I will get some more photos later this week,
ReverendCounter said:
Regarding the chroming on the inside of the lamps, I've had decent enough results with adhesive silver foil tape. If it's applied carefully, without creases, you can smooth it down so it gets a good reflective finish.
It's easy to form over curves etc and you can trim it to the size you need for awkward places. Once the lens/diffuser is in place and you've got decent bulbs in, it's a good improvement and a low cost fix.
Cheers Reverend. My original comments were about the external chrome trim on the lamps, but looking back at them after reading your post, some silver foil may well help on the inside too. I have a roll from when I applied it to the back lit number plate on my old TVR.It's easy to form over curves etc and you can trim it to the size you need for awkward places. Once the lens/diffuser is in place and you've got decent bulbs in, it's a good improvement and a low cost fix.
Here is the Chimaera number plate lighting before

And here is the difference with some foil and LED bulbs!

Edited by Spunagain on Wednesday 31st August 08:30
williamp said:
Regarding the inner tubes, worth checking. On my Aston, even though the tyres were new, the wheels were of such a design that they needed inner tubes to be safe. Worth asking if Lotus wheels need them..
Cheers for this, I asked teh question on the Elan FB page and I got a lot of different answers and so then did what I should have done and checked the workshop manual which states:Lotus Elan Workshop Manual said:
Tyres — Type — All models:
Firestone F.100 tubeless
Goodyear G.800 with tubes
Dunlop SP.Sport with tubes
So I will stick with tubeless for now!Firestone F.100 tubeless
Goodyear G.800 with tubes
Dunlop SP.Sport with tubes
I also got some more pictures of the body as it is today - body tub:

Doors, lids and bumpers - the front bumper will be replaced I think:

Edited by Spunagain on Thursday 1st September 13:40
Hi Reverend,
The camera is making it look much brighter than it is, but I was very careful in the TVR which has gone now to pay for the Lotus!
I have been making slow but steady progress so time for some updates:
Front Suspension
I got the refurbished front hubs dismantled again and reassembled with the trunnions and mounted on the wishbones. The rear wishbones were also hung after cleaning out the powder coat from the chassis mounts.
I fitted the anti-roll bar bushes which were challenging - one went in fine, pressed in with with plank of plywood drilled with a notch to make a “pusher” and a good dose of WD40- the other did not want to play and I confess that I got help from the local garage.
The steering rack arrived back and it needed a new rack and pinion, so was more expensive than I had planned - a recurring theme This is now fitted with new track rod ends. I added the anti roll bar and the front suspension is done bar the brake callipers!
While doing all of these bits I found I was missing a number of nuts, bolts and lock washers so ordered them in, which allowed fitting of the front shocks to the hubs and final hanging of the diff.

Rear hubs
I got the old rear shock inserts out of the rear hubs and cleaned them up and dropped off at the local garage to press out the wheel bearings. But even with 5 tonnes of pressure they were in danger of damaging the garages press tools, so I ordered a hub removal tool from SJ Sportscars even with a blow torch and my long torque wrench I could not undo it so back to Speen garage and with their big boy toys and the correct tool the hubs are finally split!

The Workshop manual is a bit vague about assembling the rear drive shafts and hubs and there is some good advice on the Elan forums but I was still a little unsure. I put together how I think everything goes together and got some more guidance from the Facebook group to come up with this which worked for me with this updated diagram:

1) Outer Bearing (closest to the spider) to shaft
Freeze Drive-shafts in a plastic bag in the domestic freezer overnight.
Warm the bearing and spacer in the oven to 130°C (Fan!) (I tried 100°C which was not hot enough) and using a heat gun, get your wife to keep them warm while you grab the drive shafts out of the freezer.
Give the driveshafts a quick squirt with WD40.
Then “simply” (and I really mean simply) drop the spacer onto the drive shaft followed by the bearing.
Press only on the inner race of the outer bearing if needed. (I didn’t).
Fit smaller Circlip ‘A’ to hold the bearing onto the shaft. (Make sure tapers in the circlip's plier holes are small side outwards!) And make sure the space is central.
2) Inner Bearing (closest to wheel)
Freeze the Inner bearing.
Warm the aluminium bearing housing until spit boils off – I used a blowtorch.
Then fit Inner bearing into aluminium bearing housing.
Press only on the outer race of the inner bearing if needed.
Loctite the bearing in place - careful not to get any into the bearing.
Fit the large Circlip ‘B’ (ensuring the ones supplied are not too big before you start!)
![]()
3) Fit the shaft into the Bearing housing
Freeze the Shaft and bearing assembly
Warm the Bearing housing and the hub again hot enough to boil off water drops
Install the shaft and bearing assembly into the Bearing housing from the rear whilst supporting the inner bearing on the inner race with a tube long enough to accept the drive taper - I used some plastic plumbing tube I had lying around.
Fit the hub according to instructions that came with the drive shafts, fit the bolt and torque up.
This did the trick and the hubs are both turning nice and smoothly.
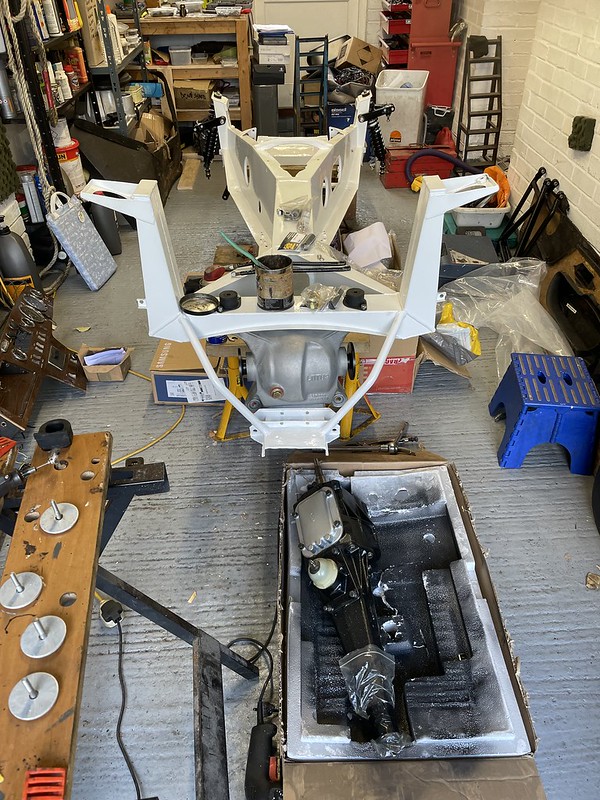
I then bolted the hub assemblies to the rear A frames and fitted the new shockers into the shock tubes in a bath of gear oil. Then fitted the powder coated springs and spring mounts and with a new set of spring compressors fitted them to the hubs.
I then bolted in the new driveshafts but the bolts at the diff end touch the diff housing so I have ordered some 7/16 spring washers to set them back a bit. Still a bit of a milestone:

Propshaft
The propshaft UJs resisted my hammering and so also got dropped off for pressing out. I cleaned and painted them and got the local garage to fit the new UJs.
The nose of the UJ was badly pitted so I replaced it and am using the old one to plug the gearbox for now as hammerite is not a good seal surface!
Some dashboard bits
I also dismantled the Dashboard, pressing out the mounting bolt bushes with a vice and some small sockets and removing the glove box hinges for fitting to the new woodwork from Classical Dash. I also cleaned up and painted the glove box brackets.
I also cleaned up the tacho - removing some stray plastic from behind the glass - a mounting for one of the connections has broken and I will replace it with a rubber grommet, and I ordered some new seals for it. The front bezel was of course bonded in with some sort of sealant which made it so much harder to remove.
On closer inspection the fuel gauge display was very scabby with peeling paint and decided to try a quick tidy up. First, lift the bezel tabs and remove the front glass, prise out the flaky top part of the display, then unscrew the mechanism from the back and then remove it from the front along with the scale panel. I checked the mechanism was ok with a multimeter.

Stripped the flakey panel and wire brushed and masked the casing:

Primed it -the photo is taken straight after I sprayed it - it was flat after it had dried:

Matt black paint on the dial and spray Hammerite on the case, plus a new seal:

I then applied a new sticker for my fuel gauge. Unfortunately I lost the “Smiths” logo, but I think it looks ok.

I also had a crack at the rocker switches and Curator Clock Case Restorer and Autoglym polish did not make a dent, but the PCB soldering heat gun at work set to 450C did! I have ordered some dielectric grease and will dismantle, clean and re-grease them all as well.
Edit: I don't recommend you do this, it looks like it caused the surface to ripple a bit and possible bake in some fading. See a later post for a better way!

I also stripped the pedal box, cleaned and painted it and put it back together with some new rubbers. I also dismantled, cleaned and re-greased the brake pedal switch which tested ok but best to do while it is easy to get at.

I was also missing the gear stick and knob. I photographed one at a classic show and made a few measurements and a drawing and my boss's dad turned this up on his lathe in stainless steel. I added a cheap wooden gear knob from Ebay while I keep an eye out for an original one..

The Brake callipers arrived back so I could start fitting them, but the copper hard lines I ordered are way too long! So I borrowed a friend's brake pipe cutting and flaring kit and will do them next.
The rear callipers came back without the handbrake mechanism so I have chased that up and that should arrive soon!
And I have got the wrong front brake pads - I need larger ones - it is possible I have +2 brake callipers!
Other updates - it appears that the DVLA are taking a harder line on EV conversions and now insisting on getting an inspection done by a third party at the DVLA’s expense. A guy doing a Mini drilled six 8mm holes in the boot of his car to mount batteries and this has counted as a modification to the chassis/monocoque and he has been told to do an IVA! While it is technically ok to modify the body of a chassis based car, I think I will try and avoid it so I will route the HV cables from the boot through the sills and out of the old heater hose holes through the firewall bit in some solid trunking to avoid any new holes.
Still no news or replies to email or voice messages on the adapter plate - it looks like I may have to find another supplier.
The body is now prepped for paint and should be ready in 3-4 weeks. I need to get a wriggle on!


The camera is making it look much brighter than it is, but I was very careful in the TVR which has gone now to pay for the Lotus!
I have been making slow but steady progress so time for some updates:
Front Suspension
I got the refurbished front hubs dismantled again and reassembled with the trunnions and mounted on the wishbones. The rear wishbones were also hung after cleaning out the powder coat from the chassis mounts.
I fitted the anti-roll bar bushes which were challenging - one went in fine, pressed in with with plank of plywood drilled with a notch to make a “pusher” and a good dose of WD40- the other did not want to play and I confess that I got help from the local garage.
The steering rack arrived back and it needed a new rack and pinion, so was more expensive than I had planned - a recurring theme
This is now fitted with new track rod ends. I added the anti roll bar and the front suspension is done bar the brake callipers!While doing all of these bits I found I was missing a number of nuts, bolts and lock washers so ordered them in, which allowed fitting of the front shocks to the hubs and final hanging of the diff.
Rear hubs
I got the old rear shock inserts out of the rear hubs and cleaned them up and dropped off at the local garage to press out the wheel bearings. But even with 5 tonnes of pressure they were in danger of damaging the garages press tools, so I ordered a hub removal tool from SJ Sportscars even with a blow torch and my long torque wrench I could not undo it so back to Speen garage and with their big boy toys and the correct tool the hubs are finally split!
The Workshop manual is a bit vague about assembling the rear drive shafts and hubs and there is some good advice on the Elan forums but I was still a little unsure. I put together how I think everything goes together and got some more guidance from the Facebook group to come up with this which worked for me with this updated diagram:
1) Outer Bearing (closest to the spider) to shaft
Freeze Drive-shafts in a plastic bag in the domestic freezer overnight.
Warm the bearing and spacer in the oven to 130°C (Fan!) (I tried 100°C which was not hot enough) and using a heat gun, get your wife to keep them warm while you grab the drive shafts out of the freezer.
Give the driveshafts a quick squirt with WD40.
Then “simply” (and I really mean simply) drop the spacer onto the drive shaft followed by the bearing.
Press only on the inner race of the outer bearing if needed. (I didn’t).
Fit smaller Circlip ‘A’ to hold the bearing onto the shaft. (Make sure tapers in the circlip's plier holes are small side outwards!) And make sure the space is central.
2) Inner Bearing (closest to wheel)
Freeze the Inner bearing.
Warm the aluminium bearing housing until spit boils off – I used a blowtorch.
Then fit Inner bearing into aluminium bearing housing.
Press only on the outer race of the inner bearing if needed.
Loctite the bearing in place - careful not to get any into the bearing.
Fit the large Circlip ‘B’ (ensuring the ones supplied are not too big before you start!)
3) Fit the shaft into the Bearing housing
Freeze the Shaft and bearing assembly
Warm the Bearing housing and the hub again hot enough to boil off water drops
Install the shaft and bearing assembly into the Bearing housing from the rear whilst supporting the inner bearing on the inner race with a tube long enough to accept the drive taper - I used some plastic plumbing tube I had lying around.
Fit the hub according to instructions that came with the drive shafts, fit the bolt and torque up.
This did the trick and the hubs are both turning nice and smoothly.
I then bolted the hub assemblies to the rear A frames and fitted the new shockers into the shock tubes in a bath of gear oil. Then fitted the powder coated springs and spring mounts and with a new set of spring compressors fitted them to the hubs.
I then bolted in the new driveshafts but the bolts at the diff end touch the diff housing so I have ordered some 7/16 spring washers to set them back a bit. Still a bit of a milestone:
Propshaft
The propshaft UJs resisted my hammering and so also got dropped off for pressing out. I cleaned and painted them and got the local garage to fit the new UJs.
The nose of the UJ was badly pitted so I replaced it and am using the old one to plug the gearbox for now as hammerite is not a good seal surface!
Some dashboard bits
I also dismantled the Dashboard, pressing out the mounting bolt bushes with a vice and some small sockets and removing the glove box hinges for fitting to the new woodwork from Classical Dash. I also cleaned up and painted the glove box brackets.
I also cleaned up the tacho - removing some stray plastic from behind the glass - a mounting for one of the connections has broken and I will replace it with a rubber grommet, and I ordered some new seals for it. The front bezel was of course bonded in with some sort of sealant which made it so much harder to remove.
On closer inspection the fuel gauge display was very scabby with peeling paint and decided to try a quick tidy up. First, lift the bezel tabs and remove the front glass, prise out the flaky top part of the display, then unscrew the mechanism from the back and then remove it from the front along with the scale panel. I checked the mechanism was ok with a multimeter.
Stripped the flakey panel and wire brushed and masked the casing:
Primed it -the photo is taken straight after I sprayed it - it was flat after it had dried:
Matt black paint on the dial and spray Hammerite on the case, plus a new seal:
I then applied a new sticker for my fuel gauge. Unfortunately I lost the “Smiths” logo, but I think it looks ok.
I also had a crack at the rocker switches and Curator Clock Case Restorer and Autoglym polish did not make a dent, but the PCB soldering heat gun at work set to 450C did! I have ordered some dielectric grease and will dismantle, clean and re-grease them all as well.
Edit: I don't recommend you do this, it looks like it caused the surface to ripple a bit and possible bake in some fading. See a later post for a better way!
I also stripped the pedal box, cleaned and painted it and put it back together with some new rubbers. I also dismantled, cleaned and re-greased the brake pedal switch which tested ok but best to do while it is easy to get at.
I was also missing the gear stick and knob. I photographed one at a classic show and made a few measurements and a drawing and my boss's dad turned this up on his lathe in stainless steel. I added a cheap wooden gear knob from Ebay while I keep an eye out for an original one..
The Brake callipers arrived back so I could start fitting them, but the copper hard lines I ordered are way too long! So I borrowed a friend's brake pipe cutting and flaring kit and will do them next.
The rear callipers came back without the handbrake mechanism so I have chased that up and that should arrive soon!
And I have got the wrong front brake pads - I need larger ones - it is possible I have +2 brake callipers!
Other updates - it appears that the DVLA are taking a harder line on EV conversions and now insisting on getting an inspection done by a third party at the DVLA’s expense. A guy doing a Mini drilled six 8mm holes in the boot of his car to mount batteries and this has counted as a modification to the chassis/monocoque and he has been told to do an IVA! While it is technically ok to modify the body of a chassis based car, I think I will try and avoid it so I will route the HV cables from the boot through the sills and out of the old heater hose holes through the firewall bit in some solid trunking to avoid any new holes.
Still no news or replies to email or voice messages on the adapter plate - it looks like I may have to find another supplier.
The body is now prepped for paint and should be ready in 3-4 weeks. I need to get a wriggle on!
Edited by Spunagain on Tuesday 17th January 08:39
Gassing Station | Readers' Cars | Top of Page | What's New | My Stuff