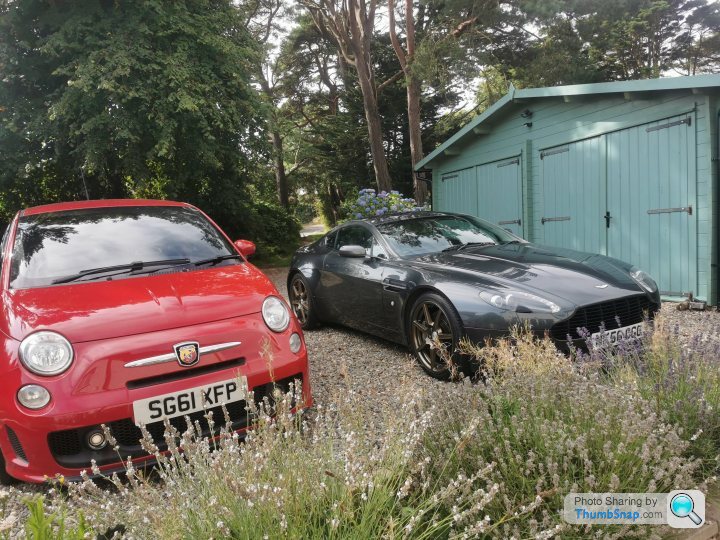
Aston martin V8 Vantage club sport type thing
Discussion


I was a bit divided on writing this one out for a few reasons, primarily being lazy but also because i have never built a project by committee and im not about to start now and there tend to be a lot of opinions on what should or shouldn't be done with an Aston Martin. This will likely be incredibly nerdy as well, so you have been warned
Never the less here we are.
I bought this car about 9 months ago sight unseen having asked my best mate to have a look at it while he was racing Knockhill. frankly i may as well have sent Mr Magoo to look at it as other than tenuring the car existed and was actually a Vantage and not say, a turnip in "inspection revealed little.
I had bought it as i just wanted something different, a number of deals on 996 gt3's had fallen through (i dont know why i was trying to buy one being that i dont actually like how they drive, and dont really want to wear a porsche hat, jacket, tracksuit) and i was getting impatient. I started looking at other options on copart to do something interesting and spotted a tired looking Vantage, i bid on it but did not win as frankly the sale price didnt stack once you took into account the purchase, repair and buyers premium. Never the less the seed was sown. and i set about finding the cheapest not smashed one on the internet.
This was corona covid time and prices were a bit inflated, so i probably could ave paid a little less today, or maybe just got a better car for the same money.
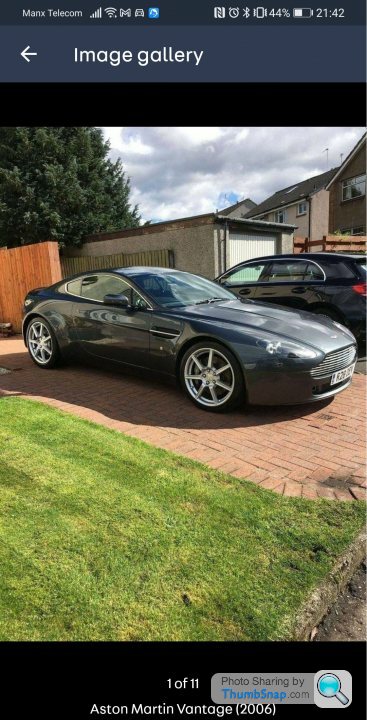
This was the original advert picture
The man who owned it, lets call him Allan (may or may not be his real name) liked to make things up about parts being serviced and changed and no paint etc so should he ever read this, f k you Allan.
Anyway having struck a deal with Allan the teller of stories that have only a passing resemblance to fact i sent some money to my blind mate to buy the car and then get a senior individual (Nigel Mosley of Mosely motorsport) to trundle it down to Telford.
Here it is on on of its many toilet stops back from Mordor (Scotland)
From here Mr Magoo kindly stored if for me until i was eventually able to get off the island and pick it up.
Amazingly during this time, despite being quite close to Birmingham, it was not stolen
Never the less here we are.
I bought this car about 9 months ago sight unseen having asked my best mate to have a look at it while he was racing Knockhill. frankly i may as well have sent Mr Magoo to look at it as other than tenuring the car existed and was actually a Vantage and not say, a turnip in "inspection revealed little.
I had bought it as i just wanted something different, a number of deals on 996 gt3's had fallen through (i dont know why i was trying to buy one being that i dont actually like how they drive, and dont really want to wear a porsche hat, jacket, tracksuit) and i was getting impatient. I started looking at other options on copart to do something interesting and spotted a tired looking Vantage, i bid on it but did not win as frankly the sale price didnt stack once you took into account the purchase, repair and buyers premium. Never the less the seed was sown. and i set about finding the cheapest not smashed one on the internet.
This was corona covid time and prices were a bit inflated, so i probably could ave paid a little less today, or maybe just got a better car for the same money.
This was the original advert picture
The man who owned it, lets call him Allan (may or may not be his real name) liked to make things up about parts being serviced and changed and no paint etc so should he ever read this, f
k you Allan.Anyway having struck a deal with Allan the teller of stories that have only a passing resemblance to fact i sent some money to my blind mate to buy the car and then get a senior individual (Nigel Mosley of Mosely motorsport) to trundle it down to Telford.
Here it is on on of its many toilet stops back from Mordor (Scotland)
From here Mr Magoo kindly stored if for me until i was eventually able to get off the island and pick it up.
Amazingly during this time, despite being quite close to Birmingham, it was not stolen
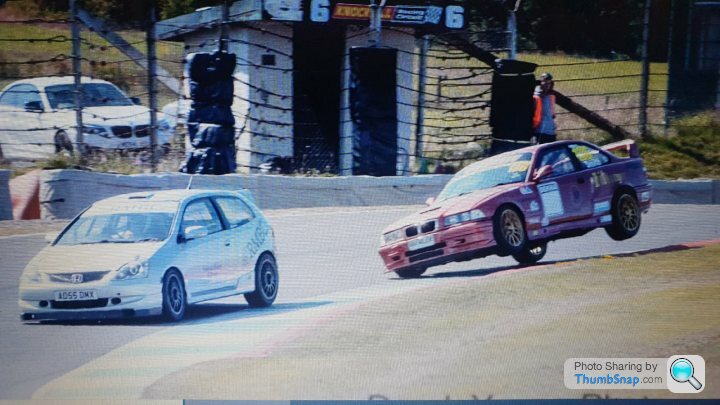
Incidentally Ollie (mr magoo) won all of his races at knockhill, which in no way compensated me for the blind mans buff vehicle inspection service 

Upon arriving to collect it from my long suffering best mate a few things became apparent:
All the tyres were rooted,
The passenger side window control module was deeply dubious
the door handle lights had been painted over
the grill looked tired
the brake pads were as old as my mum
the bonnet had been blown over more often than Jordan
the side skirt had a bit snapped off from it because axle stand
the indicators were green
The thermostat was buggered
the clutch was unpleasant
the wheels were meh condition wise
some of the under bonnet bits were tired
the air bag rattled when you went over a bump
In an effort to knock some of the "golf club" (i really really hate golf) off the car i yanked the grille off the car (two of the fittings needed to be drilled out this is about 2 hours into collecting it) took the wheels and a few bits off the engine and dropped the whole lot down to birmingham city wheels to powdercoat.
I was pretty sure from the description that the car didn't seem to run very warm and the fact that these cars have an endemic thermostat failure problem that i would be needing to replace this as such i had prepared by ordering a jaguar one from the fabulously named "Rimmer Bros" and had it delivered to my mate house in advance along with a set of rear tyres given one of mine had an egg in the sidewall the size of a brick.
So two hours or so after collecting the car, it had no wheels, no grille, i had drilled holes in it and flooded my mates garage is sticky pink organic coolant.
i then collected all the bits, threw them back on the car and drove it to the Jurassic coast to undertake best man duties at Mr Magoo's wedding before driving it back to the isle of man looking like this (to be fair, nothing fell off and it did drive pretty well
There followed quite a lengthy period of not really doing anything on the car, this was for a few reasons.
1.I'm quite lazy
2. I needed to figure out what i was doing
3.You need to register the car in the IOM and to get it booked in takes ages, i didn't want to make changes to it that potentially could make that assessment more complicated
4. The car failed its assessment the first time on a front tyre so had to go in for a re test (i had chucked a set of used hankooks on it because I am tight.
During this time I did some planning and preparation and bought some stuff.
I knew what i wanted to do, i wanted to make the car a bit like a club sport, so i could drive it to a track, use it and hopefully drive home, this sounds easy but its not.
Its not easy for a few reasons. firstly its never easy to strike the correct balance, its always a huge compromise, i have two cars with plastic windows, no carpet a full cage etc, this is not what i want to replicate, it need adequate comfort for road use over a long distance but still needs to work on the track in terms of braking, grip weight and safety.
The other problems are that the car is heavy, at 1600Kgs its too heavy and that means stripping weight, not an easy thing on this car as the cabin is not that expansive
Finally and most importantly. this is not an e92 M3, most owners do not spanner their own car, those that do tend to do it for maintenance, of the very very few who do modify them for performance, they either don't really talk about it or they do it as a business and as such resist giving away information for free.
The standard car is fine, genuinely its not bad, but its not sharp enough for me even if i didnt intend to track it. the brakes will give up the ghost after a few minutes of spirited use, the clutch is from a tractor and makes your knee ache with slow gear response and the suspension is inconsistent in terms of cornering control and has unpleasant high speed low speed response where it wallows in a corner (low speed) and crashes over bumps (high speed). This may just be that my dampers have 60k on them, but they are in good condition with no leaks so i think its mostly the valving.
Now, as there is little going on in the aftermarket in this respect there was only one really viable route, which was to raid Aston Martins GT4 racing parts bin (also willing to raid the gt3 bin and any other bins containing old race parts that fit or can be made to fit.
Many words, not enough pictures.
So with the car having passed its inspection and getting its all important manx reg, it was time to ruin it properly and take it to bits.
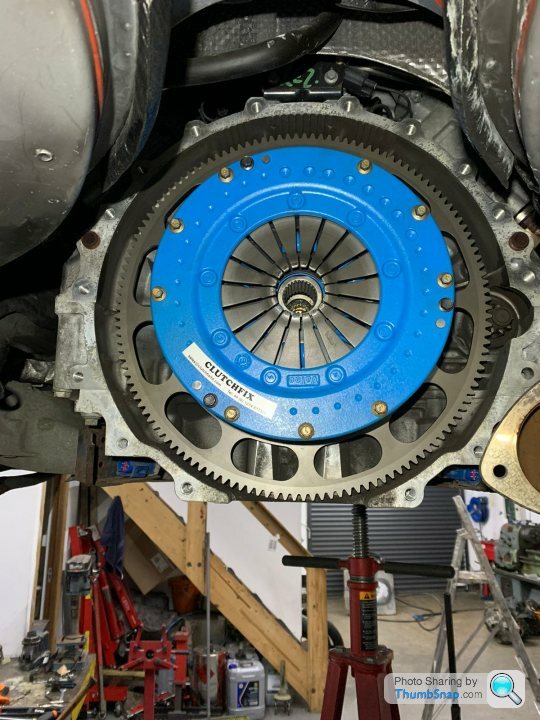
First up, the clutch.
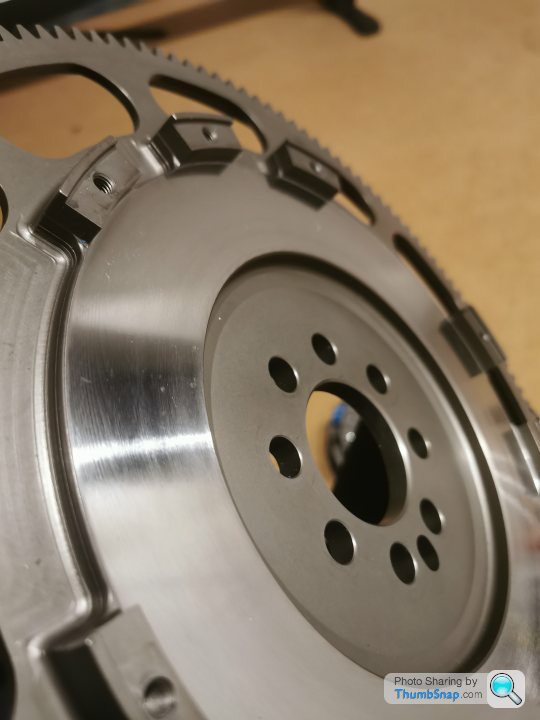
I had managed to get my hands on a used AMR (aston martin racing) clutch this is lighter than the usual v12 clutch conversion and the appropriate flywheel and spacer for the concentric thrust. Nerd note here is that i am using the v8 concentric, not the v12 and it works fine, there may be some element of modulation benefit to the v12 concentric but at 5/600 quid, it would need to tug me off every time i pressed it.
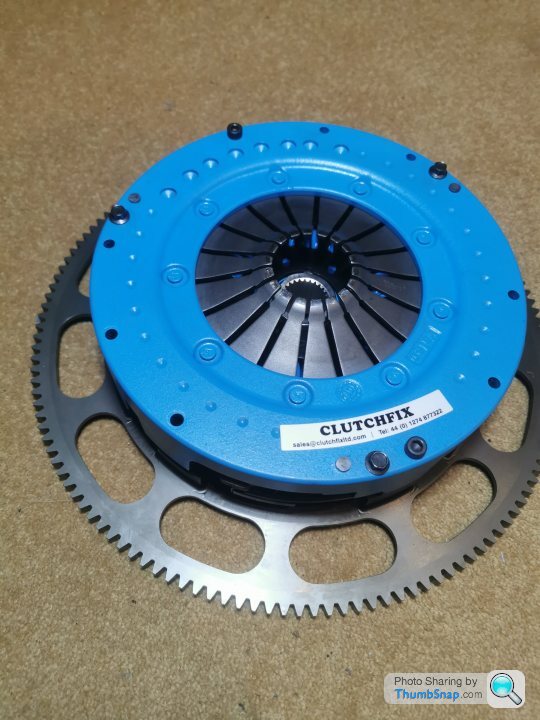
Now the clutch kit cost me 450 quid but had ceramic pucks on it and these were doing the usual number on the friction faces, it would also be horrid to use on the road.


I knew there would be a solution to this so having spoken to a few places i send the clutch off the the sensibly named "clutch fix" who did a fabulous job reconditioning and fitting their own HD1 compound organic lining (lots and lots of copper but still nice to slip). This was an extensive job involving lazer cutting new backing plates and bonding it all in and machining all the friction places (very nicely i may add).
All that needed to happen now was to put it on the car.....
1.I'm quite lazy
2. I needed to figure out what i was doing
3.You need to register the car in the IOM and to get it booked in takes ages, i didn't want to make changes to it that potentially could make that assessment more complicated
4. The car failed its assessment the first time on a front tyre so had to go in for a re test (i had chucked a set of used hankooks on it because I am tight.
During this time I did some planning and preparation and bought some stuff.
I knew what i wanted to do, i wanted to make the car a bit like a club sport, so i could drive it to a track, use it and hopefully drive home, this sounds easy but its not.
Its not easy for a few reasons. firstly its never easy to strike the correct balance, its always a huge compromise, i have two cars with plastic windows, no carpet a full cage etc, this is not what i want to replicate, it need adequate comfort for road use over a long distance but still needs to work on the track in terms of braking, grip weight and safety.
The other problems are that the car is heavy, at 1600Kgs its too heavy and that means stripping weight, not an easy thing on this car as the cabin is not that expansive
Finally and most importantly. this is not an e92 M3, most owners do not spanner their own car, those that do tend to do it for maintenance, of the very very few who do modify them for performance, they either don't really talk about it or they do it as a business and as such resist giving away information for free.
The standard car is fine, genuinely its not bad, but its not sharp enough for me even if i didnt intend to track it. the brakes will give up the ghost after a few minutes of spirited use, the clutch is from a tractor and makes your knee ache with slow gear response and the suspension is inconsistent in terms of cornering control and has unpleasant high speed low speed response where it wallows in a corner (low speed) and crashes over bumps (high speed). This may just be that my dampers have 60k on them, but they are in good condition with no leaks so i think its mostly the valving.
Now, as there is little going on in the aftermarket in this respect there was only one really viable route, which was to raid Aston Martins GT4 racing parts bin (also willing to raid the gt3 bin and any other bins containing old race parts that fit or can be made to fit.
Many words, not enough pictures.
So with the car having passed its inspection and getting its all important manx reg, it was time to ruin it properly and take it to bits.
First up, the clutch.
I had managed to get my hands on a used AMR (aston martin racing) clutch this is lighter than the usual v12 clutch conversion and the appropriate flywheel and spacer for the concentric thrust. Nerd note here is that i am using the v8 concentric, not the v12 and it works fine, there may be some element of modulation benefit to the v12 concentric but at 5/600 quid, it would need to tug me off every time i pressed it.
Now the clutch kit cost me 450 quid but had ceramic pucks on it and these were doing the usual number on the friction faces, it would also be horrid to use on the road.
I knew there would be a solution to this so having spoken to a few places i send the clutch off the the sensibly named "clutch fix" who did a fabulous job reconditioning and fitting their own HD1 compound organic lining (lots and lots of copper but still nice to slip). This was an extensive job involving lazer cutting new backing plates and bonding it all in and machining all the friction places (very nicely i may add).
All that needed to happen now was to put it on the car.....

Nice to see that there is some interest in this! keeps the motivation up for writing it all out.
Brave Fart said:
Agreed, it is unusual for Aston owners to modify their cars, apart from replacing the factory clutch with a twin plate jobby with a lighter flywheel. Things like the interior, bodywork and wheels tend to be regarded as sacred, with a prevailing view of 'it's perfect from the factory so don't change a thing'.
Mine is a 2015 4.7 V8 Vantage and it's had Bamford Rose manifolds and secondary cats fitted (along with the twin plate clutch + flywheel), which are a major improvement in both noise and performance. And yet, a couple of fellow Aston owners have said "oh, it's modified. Hmm, not sure I'd do that".
Anyway OP, good luck with your plan and keep us updated.
Yea, I little interest in other peoples hand wringing over what i do with my bought and paid for possessions, its being adjusted to do the job I require of it so will be going a fair way out from its standard form. Mine is a 2015 4.7 V8 Vantage and it's had Bamford Rose manifolds and secondary cats fitted (along with the twin plate clutch + flywheel), which are a major improvement in both noise and performance. And yet, a couple of fellow Aston owners have said "oh, it's modified. Hmm, not sure I'd do that".
Anyway OP, good luck with your plan and keep us updated.
Because my shed is full off immobile race car (as it has been for about 11 months so far)....
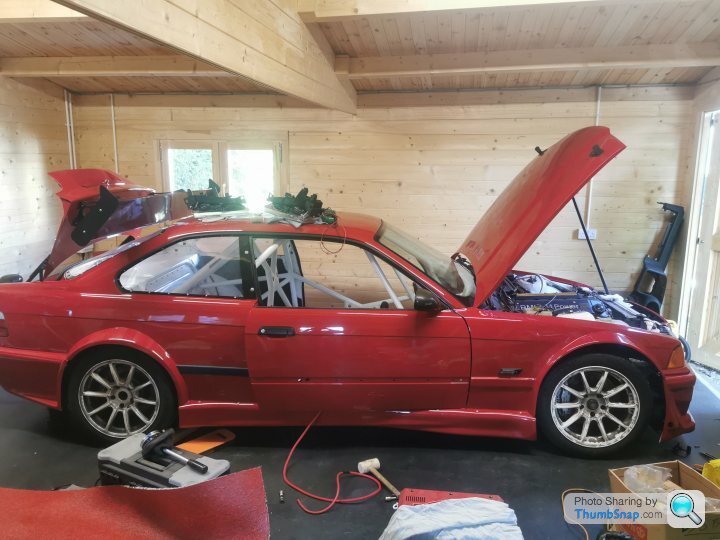
I had to beg some time from a good mate so that i could clog up his busy workshop with my junk for likely 3 to 4 times as long as as i had estimated.
Fitting the clutch to an aston martin vantage is a bit different
Its a right old faff, which is why its usually so expensive. i think for a twin plate conversion your looking at the thick end of 4/5k if you want someone to supply and fit one to your car.
To do the job its,
Exhaust mid section off, underbody shielding off, half shafts off, linkage off, gearbox out (its very heavy being a transaxle) Nerd notes, its the same gearbox in both sport shift and maunal and the same as the one in the v12, so either its very over speced for the v8 or v12 owners are going to get an unpleasant surprise at some point.

you know its me doing it as there is $hit everywhere

and a pry bar

At this point, pictures started to dry up as i was fighting to remove the Cats and getting pissed off, anyway from here, you need to remove the cats, pull the carbon prop out of the torque tube, then remove the front arch liner so that you can access the manifold studs so you can remove the manifold to get the torque tube out.
Once you have done all that crap, you can throw your new clutch at it and see if it sticks on.
I had to beg some time from a good mate so that i could clog up his busy workshop with my junk for likely 3 to 4 times as long as as i had estimated.
Fitting the clutch to an aston martin vantage is a bit different
Its a right old faff, which is why its usually so expensive. i think for a twin plate conversion your looking at the thick end of 4/5k if you want someone to supply and fit one to your car.
To do the job its,
Exhaust mid section off, underbody shielding off, half shafts off, linkage off, gearbox out (its very heavy being a transaxle) Nerd notes, its the same gearbox in both sport shift and maunal and the same as the one in the v12, so either its very over speced for the v8 or v12 owners are going to get an unpleasant surprise at some point.
you know its me doing it as there is $hit everywhere
and a pry bar
At this point, pictures started to dry up as i was fighting to remove the Cats and getting pissed off, anyway from here, you need to remove the cats, pull the carbon prop out of the torque tube, then remove the front arch liner so that you can access the manifold studs so you can remove the manifold to get the torque tube out.
Once you have done all that crap, you can throw your new clutch at it and see if it sticks on.
Shazam
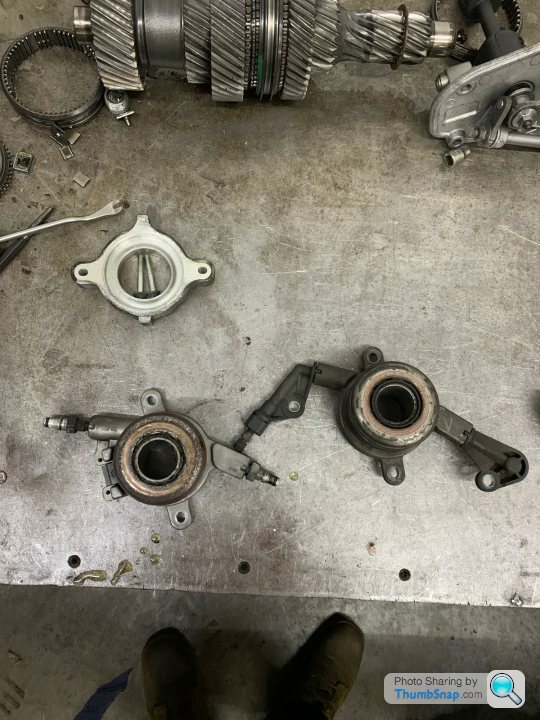
point of note is that the concentric seems to be the same one from a merc sprinter, so if i ever have a problem with mine i think i will be getting one for about £80 thanks mr Aston (aston on the left, sprinter on the right)
At this point the car started to all go back together, however during removal many things were found to be screwed. (some pictured some not) All the exhaust heat shield spire clips were shot and all the heat shielding was jut flapping about and banging under the car most of the clamps were rotten and leaking as well. the bonded on fixings for the wheel arch liners mostly snapped off so had to be bonded back onto the plastic wings with epoxy (simple to do), the spire clips were all cut off and replaced with nice new ones and stainless fittings and all the shagged claps were cut away and replaced with quality stainless mikalor items
 [url]
[url]
 |https://thumbsnap.com/zppkFCPm[/url][url]
 |https://thumbsnap.com/64yShrb6[/url]
Naturally as the car was in bits and in the air, it seemed like a good time to make some other changes before Matts good will was completely exhausted.....
point of note is that the concentric seems to be the same one from a merc sprinter, so if i ever have a problem with mine i think i will be getting one for about £80 thanks mr Aston (aston on the left, sprinter on the right)
At this point the car started to all go back together, however during removal many things were found to be screwed. (some pictured some not) All the exhaust heat shield spire clips were shot and all the heat shielding was jut flapping about and banging under the car most of the clamps were rotten and leaking as well. the bonded on fixings for the wheel arch liners mostly snapped off so had to be bonded back onto the plastic wings with epoxy (simple to do), the spire clips were all cut off and replaced with nice new ones and stainless fittings and all the shagged claps were cut away and replaced with quality stainless mikalor items
[url]|https://thumbsnap.com/zppkFCPm[/url][url]|https://thumbsnap.com/64yShrb6[/url]Naturally as the car was in bits and in the air, it seemed like a good time to make some other changes before Matts good will was completely exhausted.....
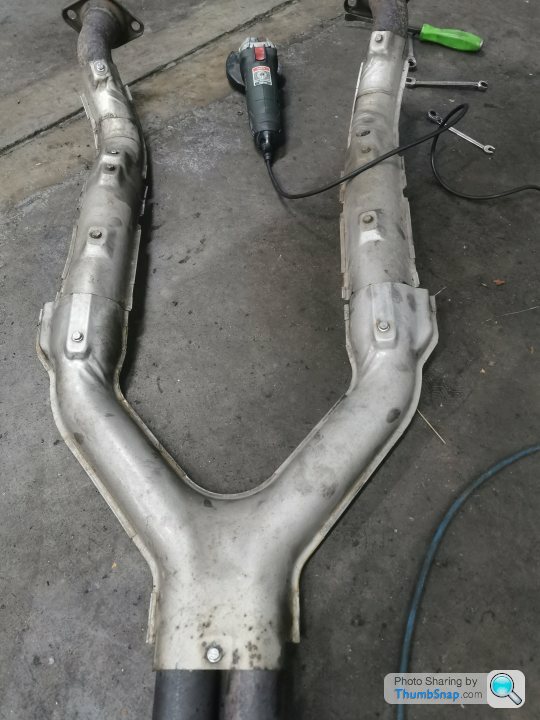
o, while it was in bits it made sense to see what else could be fitted in, or in this case on. since buying the car i had also been accumulating parts and components. one of which was a v12 backbox. my reasoning was as simple as it was perfect, as it was also slightly wrong and went like this: they put a v12 in this thing right, so most of the bits probably fit right? so with this in mind, we put the backbox on the car.
It did sort of fit, clanged the gearbox oil cooler a bit but i figured i could just hand that out the back bosozuku style and call it done but the problem became larger as the mid pipe was now hitting the half shafts, this was not something that could be resolved the Japanese way.
As this point i was thinking of calling it and looking for another solution, but matt being the man his is uttered the words of power "fk that noise Ted, get the grinder"
the below shows the two boxes together (this is not my image), the smaller of the two is the v12 box

Choppy
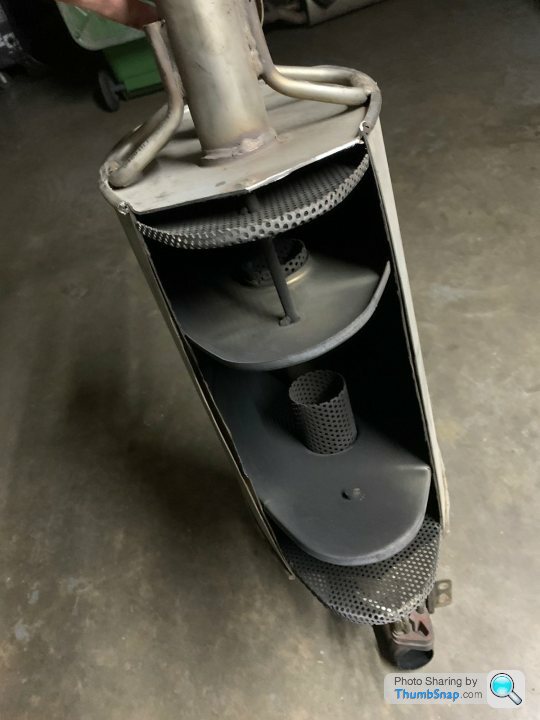
And fitted like a glove.

Why have i done this? well two reasons.
1 it sounds better (with the cabin doors to manual (open flaps) entirely unhinged and absolutely certain to get me kicked off a track day)
2 (more important) the original backbox weighs in at 30kg alone this one now weighs 16.8kg that i a lot of weight saving for £225
It did sort of fit, clanged the gearbox oil cooler a bit but i figured i could just hand that out the back bosozuku style and call it done but the problem became larger as the mid pipe was now hitting the half shafts, this was not something that could be resolved the Japanese way.
As this point i was thinking of calling it and looking for another solution, but matt being the man his is uttered the words of power "f
k that noise Ted, get the grinder"the below shows the two boxes together (this is not my image), the smaller of the two is the v12 box
Choppy
And fitted like a glove.
Why have i done this? well two reasons.
1 it sounds better (with the cabin doors to manual (open flaps) entirely unhinged and absolutely certain to get me kicked off a track day)
2 (more important) the original backbox weighs in at 30kg alone this one now weighs 16.8kg that i a lot of weight saving for £225
Its great that there is so much interest in this, gives me hope that there may be others taking up the challenge. my thinking on this was pretty simple in that an upscaled lotus Elise floor plan with 2/3 times the power couldn't be a bad thing and that this was borne out by the cars success at a GT4 level and above. It is however a hard road, information is thin on the ground and owner base is of a certain disposition (huge generalization) that does not perfectly align with this type of endeavor  .
.
Maintenance wise, i would suggest that you don't believe the hype, these cars are hand built, what that means in reality (in my experience) is that they come apart by hand without too much drama. Parts are frequently interchangeable, maintenance can be undertaken DIY with little issue. If of course you are looking to get the maintenance done for you, this will be expensive as unfortunately there is a general view that anything for an aston is ten times the price of a regular car, you only need to look at the price of a de-cat where people are trying to pedal a 30cm length of tube with a ball flair on for 1k to realise the level of legging over that can occur, the answer to this is to refuse to engage with it and simply make your own or get it made wile avoiding mentioning the words "aston martin" before you have paid the invoice
.Maintenance wise, i would suggest that you don't believe the hype, these cars are hand built, what that means in reality (in my experience) is that they come apart by hand without too much drama. Parts are frequently interchangeable, maintenance can be undertaken DIY with little issue. If of course you are looking to get the maintenance done for you, this will be expensive as unfortunately there is a general view that anything for an aston is ten times the price of a regular car, you only need to look at the price of a de-cat where people are trying to pedal a 30cm length of tube with a ball flair on for 1k to realise the level of legging over that can occur, the answer to this is to refuse to engage with it and simply make your own or get it made wile avoiding mentioning the words "aston martin" before you have paid the invoice
Having changed the exhaust , i had created another problem (this is slightly out of sequence so bear with)
It sounded mega, but was also too much for all the time use and would rapidly get me ejected from a track day, so i partially fixed my new problem by putting fuse 22 back in.
The problem that left me with, was that Aston martin have setup the flaps so that the fat bald guy with aspirations to be james bond (original owner profile) could rumble up and down the high street of their local market town impressing 16 year old girls.
What the above means in practice is that the valves are open at idle until about 2k ish rpm, then close from 2k to 4, then open again from 4k to the 7500 redline this is pretty naff as standard but when you make it louder it makes the problem bigger essentially it makes it sound like you pull away at full chat, then get shy and then vigorously telegraph that your speeding.
On the plus side the modified box was truely brilliant, almost silent with the flaps closed, unhinged with the cabin doors to manual
What i wanted was for the car to be nice and quiet when required and loud and stupid when i was in the mood. there was a smattering of information about but mostly DB9 and some vague talk that it could be done.
So to clarify, here is how you can do it for the price of some wire,a double pole switch and a bit of wear on a drill bit
you need to intercept the ECU line, the ecu controls the exhaust valves by controlling a compressor, the compressor is switched by the earth line.
So with earth discontented its loud, with earth applied its quiet.
This means your 3 way switch can give you 3 options, factory teenage girl mode (connected) Yob mode (disconnected) and covert mode, permanently to earth.
the connector that was alluded to in the interwebs was here, down next to the accelerator on the drivers side

In this horrible crevice you find this, the black connector next to the green one is the one you want.
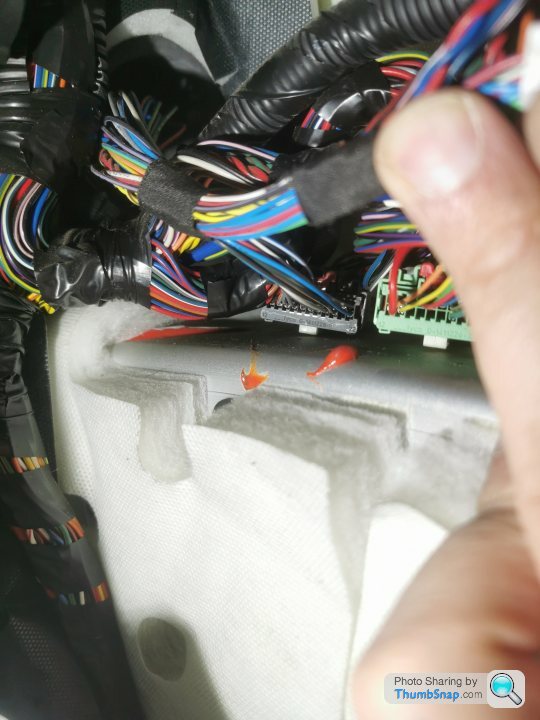
The white wire is the one to intercept, not as easy as it looks as access sucks to get crimping tools in etc
So make up a switch with the ecu out line to the middle pin and the receive line on the other and ground on the other to give you your three options

splice it into the connection
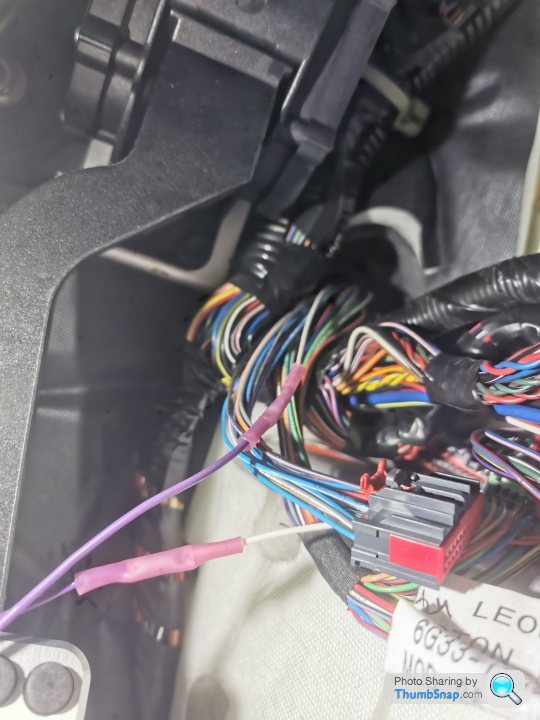
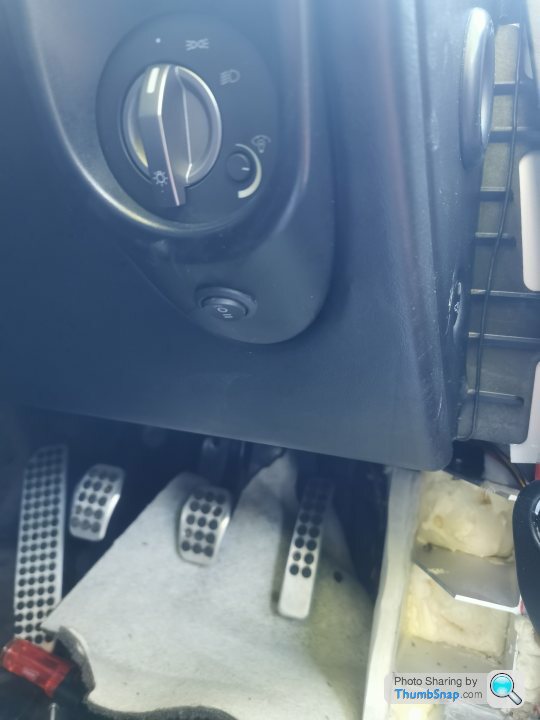
and mount your switch, i decided to tuck it under the headlamp switch cover to make it as unobtrusive as possible and keep black plastic on black plastic (i.e. not drill through leather)
To be clear this is very simple stuff, the middl pin is from the compressor, side pin one is from the ecu and side pin two is wired to ground.
the switch either connects the compressor to nothing, the ecu or ground giving you loud, factory, or quiet in that order
And there you have it, one user controllable exhaust allowing you to be as obnoxious or otherwise as you choose and hopefully not get kicked off circuit.....
It sounded mega, but was also too much for all the time use and would rapidly get me ejected from a track day, so i partially fixed my new problem by putting fuse 22 back in.
The problem that left me with, was that Aston martin have setup the flaps so that the fat bald guy with aspirations to be james bond (original owner profile) could rumble up and down the high street of their local market town impressing 16 year old girls.
What the above means in practice is that the valves are open at idle until about 2k ish rpm, then close from 2k to 4, then open again from 4k to the 7500 redline this is pretty naff as standard but when you make it louder it makes the problem bigger essentially it makes it sound like you pull away at full chat, then get shy and then vigorously telegraph that your speeding.
On the plus side the modified box was truely brilliant, almost silent with the flaps closed, unhinged with the cabin doors to manual
What i wanted was for the car to be nice and quiet when required and loud and stupid when i was in the mood. there was a smattering of information about but mostly DB9 and some vague talk that it could be done.
So to clarify, here is how you can do it for the price of some wire,a double pole switch and a bit of wear on a drill bit
you need to intercept the ECU line, the ecu controls the exhaust valves by controlling a compressor, the compressor is switched by the earth line.
So with earth discontented its loud, with earth applied its quiet.
This means your 3 way switch can give you 3 options, factory teenage girl mode (connected) Yob mode (disconnected) and covert mode, permanently to earth.
the connector that was alluded to in the interwebs was here, down next to the accelerator on the drivers side
In this horrible crevice you find this, the black connector next to the green one is the one you want.
The white wire is the one to intercept, not as easy as it looks as access sucks to get crimping tools in etc
So make up a switch with the ecu out line to the middle pin and the receive line on the other and ground on the other to give you your three options
splice it into the connection
and mount your switch, i decided to tuck it under the headlamp switch cover to make it as unobtrusive as possible and keep black plastic on black plastic (i.e. not drill through leather)
To be clear this is very simple stuff, the middl pin is from the compressor, side pin one is from the ecu and side pin two is wired to ground.
the switch either connects the compressor to nothing, the ecu or ground giving you loud, factory, or quiet in that order
And there you have it, one user controllable exhaust allowing you to be as obnoxious or otherwise as you choose and hopefully not get kicked off circuit.....
SturdyHSV said:
Just chipping in to say a resounding smurf yeah to modifying your Aston.
Doesn't surprise me that an Aston owner's club is full of a very dreary sort. Utter piffle.
Thoroughly look forward to seeing what you get up to, and will also agree with others that I enjoy your writing style so please do keep us informed.
Now that you've improved the clutch, will it do a burnout without the car disintegrating? Childish indeed, but I for one would like to see / hear a V8 Vantage with a load of smoke pouring off the rears.
This is a bit of a quandary, in not really a burnout guy, but at the same time I am beholden to say "of course it can do it" but then i would have to prove it. quite the pickle. I think once TT is over and the hordes have left i will see what can be done before I take the horrible bridgestones off the back and put something with actual grip on. Doesn't surprise me that an Aston owner's club is full of a very dreary sort. Utter piffle.
Thoroughly look forward to seeing what you get up to, and will also agree with others that I enjoy your writing style so please do keep us informed.
Now that you've improved the clutch, will it do a burnout without the car disintegrating? Childish indeed, but I for one would like to see / hear a V8 Vantage with a load of smoke pouring off the rears.
Court_S said:
This is brilliant, looking foot seeing where you end up going with this.
I drive past a chap last week who had is Vantage up on axle stands and was doing something op under it and I thought there can’t be many Vantage owners who get stuck into working on their car themselves.
It wasn't me as I only do this kind of thing in the privacy of my own environs but provided he wasn't cleaning the wheel arch liners i am very pleased to hear it.I drive past a chap last week who had is Vantage up on axle stands and was doing something op under it and I thought there can’t be many Vantage owners who get stuck into working on their car themselves.
RicksAlfas said:
Great thread, thanks.
(Also discovered Mr Clutchfix is about two minutes away from my work)!
(Also discovered Mr Clutchfix is about two minutes away from my work)!
Honestly, i rarely rave about anyones service, but i was really pleased with the care and attention to detail that had been taken with the work they did for me.
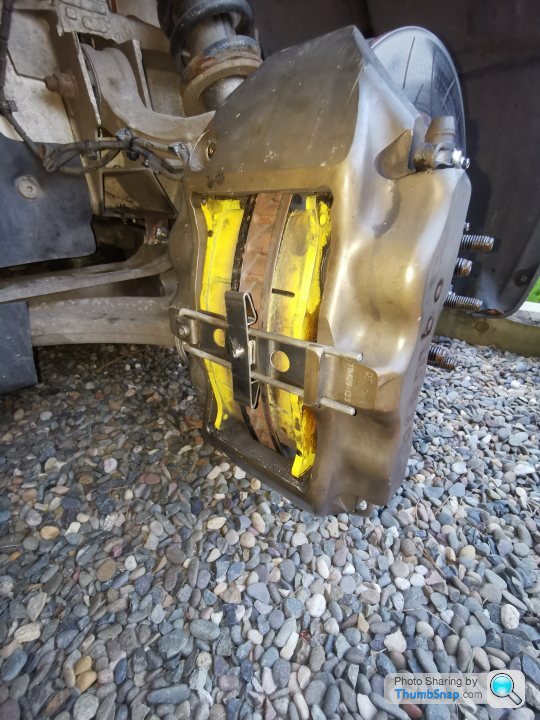
So, onto the next thing, the brakes in the car are rubbish. I strongly suspect that the factory four pots, with really good fluid, a much much better pad (something like a ferodo DS1.11 or 3.11) and some cooling ducting would make it work, this was of course my initial thinking. by plans turned out a little differently.
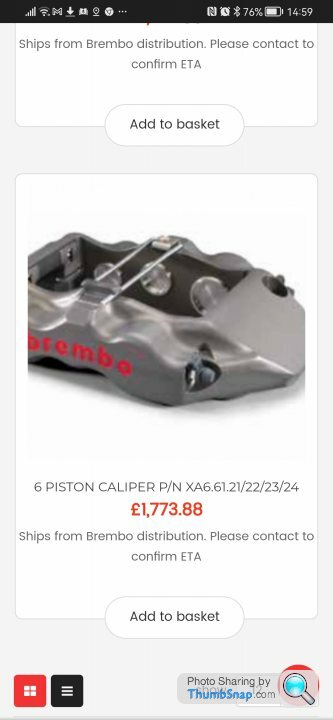
There is one place in particular that advocates fitting CCB's which as anyone who uses their car on a track and is not a funded race team knows is a stupid idea, not only are they not very well modulated but they are simply ruinous to maintain in those conditions, so if you see that kind of suggestion i would file it under "fantasist bull$hit" the next and simplest option is to look at the 4.7 option where you went from 355mm with four pots to 380mm with 6 pots, the issue so to speak with the 4.7 conversion is that you also need to change the upright as the calipers are a radial mount without an adaptor. I than had a look at putting a huge set of alcons i have sat on the shelf doing nothing that will run a 400mm disk (i have used the same calipers on an e46 in the past and they are now fitted to phil morisons v10 if you were to take a look) but the lug positions were supposedly a bit marginal.
Again, many words not enough action, I was dithering, anyway a bit of nerding turned up a guy who had a gt4 kit, so ling story short, i bought it.
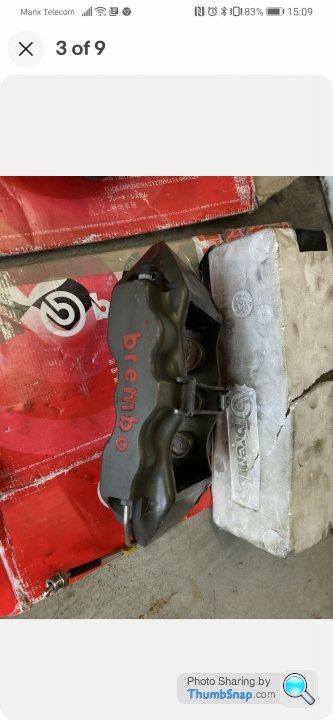
This is very fancy stuff and for a niche pursuit, anyone with half a brain knows its not really road car stuff, no rattle clips un restrained floating disks, endurance racing pad compounds, as such he was struggling to shift it, so we agreed a small price, and everything arrived as agreed, which was nice.
Now when i say fancy, this stuff is fancy, its unpainted anodised stainless heat buttons blah blah blah each caliper is pretty eyewatering
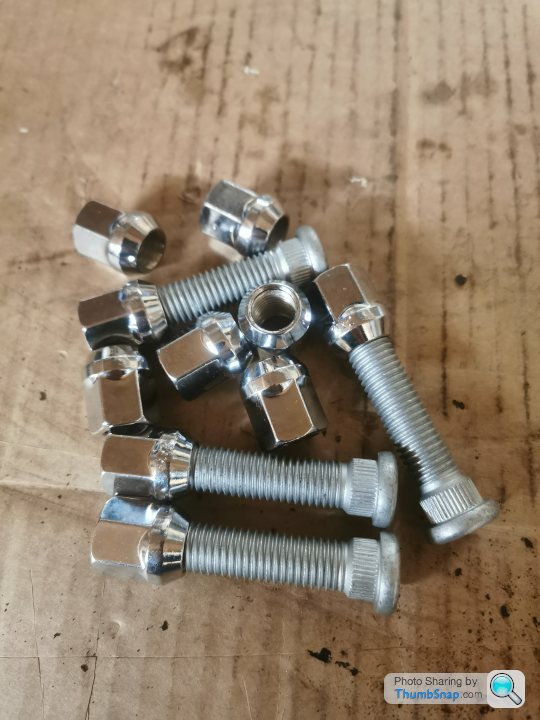
In the spirit of careful planing i slapped them on the car, but then the oem wheel didn't fkn fit, so a put a spacer on, and then the nuts wouldnt do up because aston martin use a ford transit wheel nut which has an un-threaded section (nerd moment, an vantage uses as a ford transit 60mm twin axle knock in wheel stud, so if you need them, they are pennies, just not from aston martin of course) anyway, i ordered some fully threaded transit wheel nuts and the car sat about immobile with no front wheels for a bit
Tranny nuts and studs (definitely a joke in there somewhere but certainly not one I intend to find........)
Brakes on, to be covered by a wheel, finally

Looks ace right?
There is one place in particular that advocates fitting CCB's which as anyone who uses their car on a track and is not a funded race team knows is a stupid idea, not only are they not very well modulated but they are simply ruinous to maintain in those conditions, so if you see that kind of suggestion i would file it under "fantasist bull$hit" the next and simplest option is to look at the 4.7 option where you went from 355mm with four pots to 380mm with 6 pots, the issue so to speak with the 4.7 conversion is that you also need to change the upright as the calipers are a radial mount without an adaptor. I than had a look at putting a huge set of alcons i have sat on the shelf doing nothing that will run a 400mm disk (i have used the same calipers on an e46 in the past and they are now fitted to phil morisons v10 if you were to take a look) but the lug positions were supposedly a bit marginal.
Again, many words not enough action, I was dithering, anyway a bit of nerding turned up a guy who had a gt4 kit, so ling story short, i bought it.
This is very fancy stuff and for a niche pursuit, anyone with half a brain knows its not really road car stuff, no rattle clips un restrained floating disks, endurance racing pad compounds, as such he was struggling to shift it, so we agreed a small price, and everything arrived as agreed, which was nice.
Now when i say fancy, this stuff is fancy, its unpainted anodised stainless heat buttons blah blah blah each caliper is pretty eyewatering
In the spirit of careful planing i slapped them on the car, but then the oem wheel didn't fkn fit, so a put a spacer on, and then the nuts wouldnt do up because aston martin use a ford transit wheel nut which has an un-threaded section (nerd moment, an vantage uses as a ford transit 60mm twin axle knock in wheel stud, so if you need them, they are pennies, just not from aston martin of course) anyway, i ordered some fully threaded transit wheel nuts and the car sat about immobile with no front wheels for a bit
Tranny nuts and studs (definitely a joke in there somewhere but certainly not one I intend to find........)
Brakes on, to be covered by a wheel, finally
Looks ace right?


So, time to sort this brake saga
Sorry for the long pause, i takes quite a long time to actually write this up and find the corresponding image thats not a picture of my wifes backside or similar.
NERD WARNING, this is hugely nerdy content, so if thats not your thing, your probably reading the wrong journal.
ok, so, how were the brakes? terrible, really terrible. i knew they would be noisy, its not my first rodeo, but jesus christ, this was another level. the bells had wear in so the disk noise was truly something else, think the kind of sound you would get if you had only done up 2 wheel nuts loosely, then add in the clack of the pad rattle it was dire, and completely at odds with the idea of "arrive and track" that the car was aimed at, i dont need something else that should be trailered.
So problem solving hat on again. I could get new discs and hats (expensive), time consuming as they would need a custom hat offset to match the calipers etc etc or try and sort out the ones i had.
I went with the latter, the brake discs were currently fitted with Brembo T type fully floating fittings which were horrible, and were causing some really notable wear on the alloy hats thus creating an ever increasing racket, the wear is also really annoying as it could be mitigated or likely eliminated by running an abutment fitting, but i guess thats not how you sell hats at 500 quid each. The guys at track formula were selling a disk kit for £80 per disc for full h type brempo fittings complete with the abutments, screw, tension spring and bobbin. i chanced my arm and hoped it would all fit. The ones cleverer that me will already be getting ready to point out that this would in effect change the disc offset, i knew this, but figured there was enough slop between the pad, and the disc with the pistons fully retracted. by figured i mean, hoped, i didn't actually measure anything....
You can see the wear on the hats
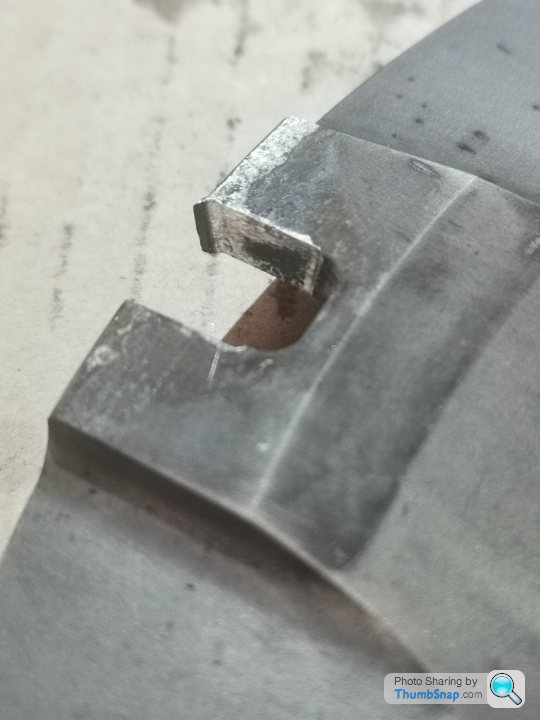
differences between the T and H type bobbins
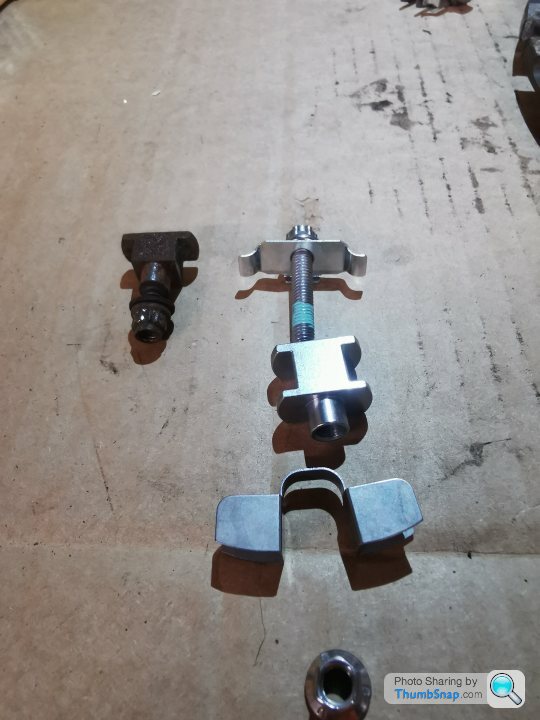
Anyway, they didn't fit, firstly because the existing Brembo discs used a oblong hole not a round one so the bobbin was too big by about 0.3mm and secondly the wear on the hats meant the abutment plate would no longer seat in the hat, FFS.
So, out with the grinder, air spot grinder, file, micrometer and sandpaper
corrected hat
Modified bobbin

Quite a long time later.....
Did it work? Absolutely! now only the pad rattle could be heard and that only happened every time a disc groove went past the pad, or i turned a corner or went over a bump, so really only 8 or 9 times a second really........, still, small victories and all that.
Sorry for the long pause, i takes quite a long time to actually write this up and find the corresponding image thats not a picture of my wifes backside or similar.
NERD WARNING, this is hugely nerdy content, so if thats not your thing, your probably reading the wrong journal.
ok, so, how were the brakes? terrible, really terrible. i knew they would be noisy, its not my first rodeo, but jesus christ, this was another level. the bells had wear in so the disk noise was truly something else, think the kind of sound you would get if you had only done up 2 wheel nuts loosely, then add in the clack of the pad rattle it was dire, and completely at odds with the idea of "arrive and track" that the car was aimed at, i dont need something else that should be trailered.
So problem solving hat on again. I could get new discs and hats (expensive), time consuming as they would need a custom hat offset to match the calipers etc etc or try and sort out the ones i had.
I went with the latter, the brake discs were currently fitted with Brembo T type fully floating fittings which were horrible, and were causing some really notable wear on the alloy hats thus creating an ever increasing racket, the wear is also really annoying as it could be mitigated or likely eliminated by running an abutment fitting, but i guess thats not how you sell hats at 500 quid each. The guys at track formula were selling a disk kit for £80 per disc for full h type brempo fittings complete with the abutments, screw, tension spring and bobbin. i chanced my arm and hoped it would all fit. The ones cleverer that me will already be getting ready to point out that this would in effect change the disc offset, i knew this, but figured there was enough slop between the pad, and the disc with the pistons fully retracted. by figured i mean, hoped, i didn't actually measure anything....
You can see the wear on the hats
differences between the T and H type bobbins
Anyway, they didn't fit, firstly because the existing Brembo discs used a oblong hole not a round one so the bobbin was too big by about 0.3mm and secondly the wear on the hats meant the abutment plate would no longer seat in the hat, FFS.
So, out with the grinder, air spot grinder, file, micrometer and sandpaper
corrected hat
Modified bobbin
Quite a long time later.....
Did it work? Absolutely! now only the pad rattle could be heard and that only happened every time a disc groove went past the pad, or i turned a corner or went over a bump, so really only 8 or 9 times a second really........, still, small victories and all that.
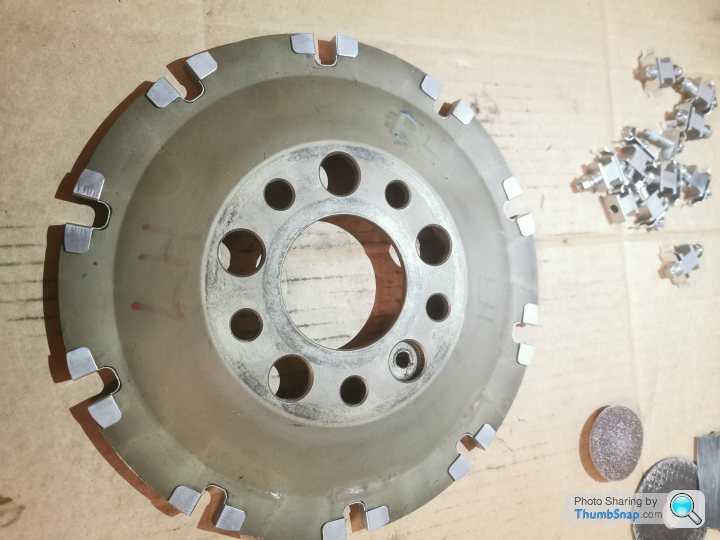
Fast forward a little So onto problem number 2(0000000) stop the stupid pad rattle.
Couple of cheap brembo rattle springs (£7.75 from brakes international if your interested)
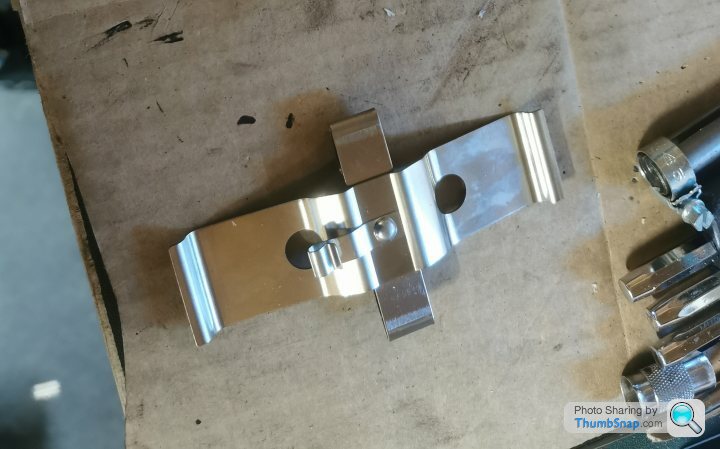
Drilled the rivets out, made up some spacers and cut down the primary spring to match the annular width of the caliper and shaved out the middle of the spring to allow space for the pad retention bars then dug out some stainless rivets to pull it all back together.
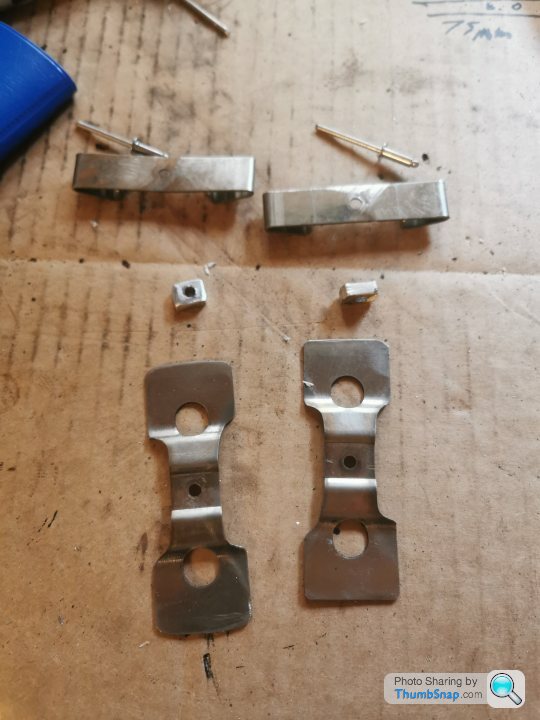
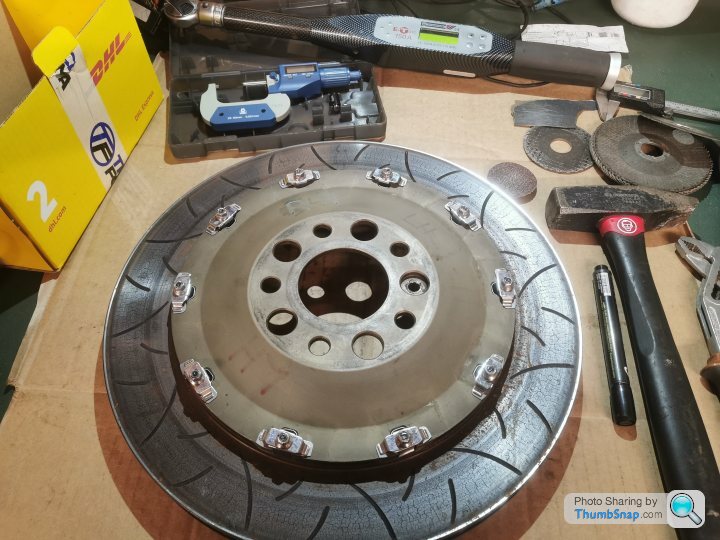
these fit into the calipers as such...
then to add in some additional safety, i broke out the lockwire and pliers to get everything secured
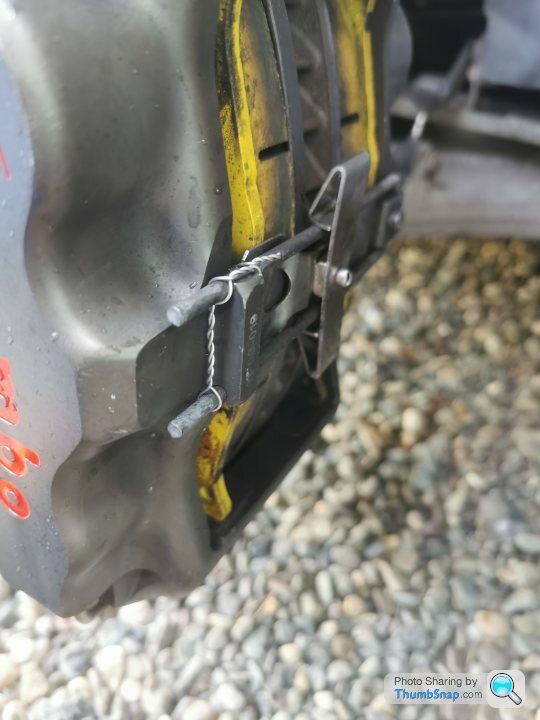
Does it, work, ahh, pretty much, it would be better if it spanned the pad length ways to spport them better, but its 80% there, so for now, i am calling that done.
Obviously running Pagid RSL1 world endurance pads is never going to be a silent option, but they are less squeaky than I had expected and cold bite is good with the traditionally flat pagid torque curve (that i don't really like, ferodo are nicer to use IMO). but stopping power is huge, they are fade proof as far as i can currently tell, though more ventilation is still on the radar.
Ultimately,i am happy, i am "confident" that the car will be able to do plenty of laps without losing pedal (famous last words)
Couple of cheap brembo rattle springs (£7.75 from brakes international if your interested)
Drilled the rivets out, made up some spacers and cut down the primary spring to match the annular width of the caliper and shaved out the middle of the spring to allow space for the pad retention bars then dug out some stainless rivets to pull it all back together.
these fit into the calipers as such...
then to add in some additional safety, i broke out the lockwire and pliers to get everything secured
Does it, work, ahh, pretty much, it would be better if it spanned the pad length ways to spport them better, but its 80% there, so for now, i am calling that done.
Obviously running Pagid RSL1 world endurance pads is never going to be a silent option, but they are less squeaky than I had expected and cold bite is good with the traditionally flat pagid torque curve (that i don't really like, ferodo are nicer to use IMO). but stopping power is huge, they are fade proof as far as i can currently tell, though more ventilation is still on the radar.
Ultimately,i am happy, i am "confident" that the car will be able to do plenty of laps without losing pedal (famous last words)
Edited by IainWhy on Tuesday 14th June 10:35
Chunkychucky said:
Awesome project, would probably rather have had this than the 996 GT3s mentioned in the opening post anyway 
Also good to read Nigel's name, haven't seen him for years - I still like to chastise my dad for not buying Nigel's Inka Orange 3.0CSL he had in his garage for years... Cracking work so far OP, look forward to further updates!
Ah, Nigel has had some cool stuff over the years, I wish i had bought his e31 when that was available, but really i was practically sill a foetus and so would have likely ruined it.Also good to read Nigel's name, haven't seen him for years - I still like to chastise my dad for not buying Nigel's Inka Orange 3.0CSL he had in his garage for years... Cracking work so far OP, look forward to further updates!
I am not sure sure my bank account enjoys this choice as I suspect my residual value may be somewhat less appetizing, still means i dont have to wear a porsche hat and park my car in a line in the pits so i can do group photos, every cloud...
Fishy Dave said:
Enjoying this one, nice to see you not afraid to make changes and modifications. When are you hoping to take the car on track? Make sure you post video, we want to hear it.
Very good question, I need to test it more, than i can get away with even on derestricted roads. I was hoping tom get it up to the local track but the 9th of July i think is clashing with my Mrs buggering off and the kids are too young to be left unrestrained in a pit without getting flattened. I have 2 days booked at Spa in Septemebr with RMA, so thats the backstop, but i really would like to get the car out and trouble shot before its throwing up problems in Belgium.Thanks all for the kind words and encouragement.
Bit long in the tooth for an update really, but i am kind of telling a story here rather than entirely sticking to the chronological order strictly as otherwise it would be loads of "i spent 3 days drawing little pictures of suspension components and thinking about spring rates, or looking at vacuum bagging carbon etc" There is always so much more pricking about thinking about things Vs the time spent actually doing it.
There may be another hiatus for a period on the horizon once its in sort of correct shape as the fact i am constantly working on a gravel driveway on jacks is stupid, and annoying as the green shed i al working next to is a pretty well equipped workshop, welders, hydraulic lift, headed floored etc etc, but has a car that doesn't run in it. so really i need to make that run so i can switch the cars around when i am working on them. Its almost like you should do things in some sort of logical order....
Anyway, seat time
So, there is essentially only one company that does a bolt in kit for these cars, and thats cobra, however the seats they supply are not FIA and as such in my mind not approved. being that i am attached to my spine and the seats will form part of the safety structure (particularly once i can get a harness in) i wanted an FIA seat, and the support that it offered. In no way am i suggesting that the other alternatives are not good enough, but i wanted a classified seat and that was that.
Being that "YOLOing" (i think i have heard that on youtube) can get expensive with seats when you discover they dont fit and never will. I took the easy way initially and through a friend of a friend of a friend ordered the full kit but with FIA Imola's. I also asked for them to have the Aston wings, however Cobra have had their collar felt by the Aston legal department in the past about use of the badge (I do find this pathetic, a brand that constantly tries to associate it's self, embarrassingly in my opinion with James bond then spends it time sending threatening letters to a man for drawing some wings in a seat, I mean, get a grip) so.........they turned up completely blank, which was fine, apart from they looked like something off Aliexpress, which was not quite the look i was aiming at.
I didnt take any pictures of the seats with no logo's, and in all honesty i have done a piss poor job of documenting this change for a number of reasons.
It was a bit of a d1ck
it took ages
i was distracted and there were a lot of pauses for contemplation.
Anyway, having got the seats, i stripped all the covers off (hats off to cobra on this one, they are a doddle to strip down) and ran them down to the local work wear embroidery place who promptly and with no fuss put the wings on in silver and green for £12.75 for the pair, winner.

I then went on to start the install, and really did a bad job with the pictures.
Initially i just went to put the kit in as intended, so base plate, then runners, belt mounts side mounts and finally the seat. Frankly, its a prick, partly because the seats i am using are not intended for the job, and partly because access on the tunnel side is very tight meaning the usual faff of seat fitting where you slowly turn the inside bolts one flat at a time, blind with a tiny spanner. (if you have fitted many bucket seats, this will be familiar, its that moment when your arm is so contorted you want to cry, but you cant because your a fking grown man and it would just be silly.......
Seat out, (i tidied all the crap looking stock wiring up with proper loom tape hence the change in the subsequent pictures)

Base plate in

Base plate, runners, extenders, side mounts etc etc (i an retaining the oeM buckle which allows me the retain the oem seatbelt reminder without fudging it)
at this point, i fitted the seat, jumped in, and hated it, please note, this is not a problem with the kit, this is an issue with me not using the complete kit (ie.e. the wrong seats) and my particular requirements. It wasnt reclined enough, was nice and low but didnt feel quite natural, and i didn't really like the iperation of the sliders or the many layers of bits bolted together to make it all work.
I faffed about with this a few more times moving the seat about and did improve it (i definitely didn't cry when i put the seat in for the 5th time) and it was kind of not bad, but ultimately the high sides of the seats created a fitting issue and the upright nature would be ok for pure track use but not combined duties, but it was probably just about livable.
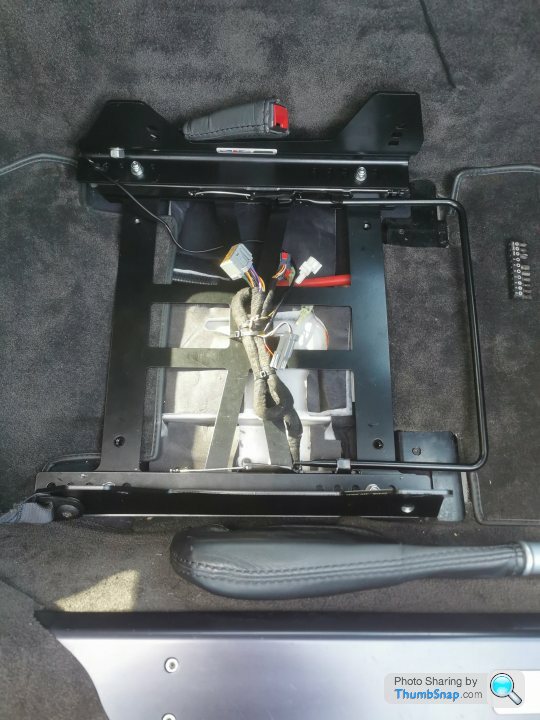
At this point i went and sat in the shed for a bit, and while looking dejectedly at the oeM Recaro's i found myself thinking that extruded aluminum motorised runner mechanisms were pretty fancy really, and that the way they bolted to the seat was very much like an steel frame base mount, or even, a base plate.
It took some time to summon up the desire to strip down and cut the oem loom, i had vaguely harbored desires to sell the seats and turning them into half a seat would of course fk that right in the bumpipes. Never the less, the more i looked the more i liked it. So allowing a good tail to allow for re-attachment i split the seats and clipped the looms

Long story short, with some minor adjustment, (cutting a pair of locating tabs off the seat subframes and drilling a hole extra you can mount a standard racing seat sidemount onto the Vantage electric part alloy sub frame. The frames are light too, so the weight penalty is minimal, if not possibly in your favor.
I took very very few pictures of this process, but did take a picture of it installed so you can get the idea

I dont know why its Hovis bakery sepia toned, it just is. At some point i will remove them again and strip back all the seat loom wiring i am not using and add in some dummy loads for the side airbags so will take some more pictures then if there is any interest in the "how does that work element".
Ultimately, what i now have is fully electric tilting buckets, they do sit a little higher, but i am 182cm and there is still adequate room for my lid, so all good. the seat belt receptacle is tight to the tunnel due to the bolster height, but works well and hopefully future developments will improve that further.
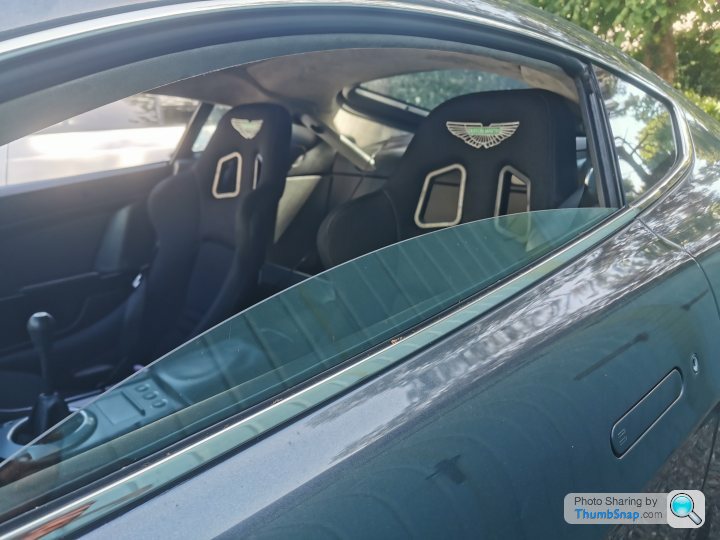


I also as can be seen above replaced my shabby looking door bars with some nice piano black ones (came up cheap on ebay and i have plans for the originals)
Serviced it (with a genuine filter, thank you very much)

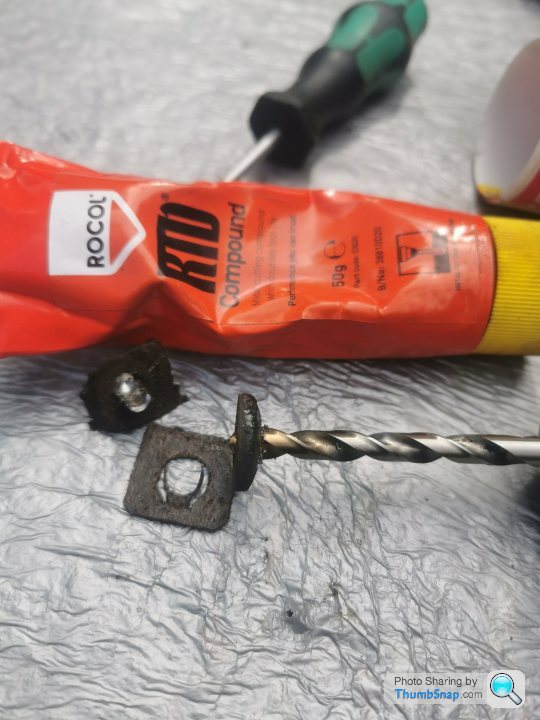
Removed all the rusty rear mesh, (people constantly paint these on the car, which is a st job as it paints the oil cooler and doesn't remove all the rust, as such mine did not look all that fresh . They will be blasted and powdercoated at some point but for now can just be off (weightsaving) To do this requires you to remove the back of the car and the factory manual is quite frankly a joke in terms of its description of the process.
Feels excessive to have to do this to remove some bumper trim really

In doing so i also removed some defunct electronics and cleaned up and greased all the subframe bolts under the liners for when that inevitably comes out at some point.

Then all back together with the mesh removed, looks a bit odd with the v12 exhaust but not outlandish in my opinion
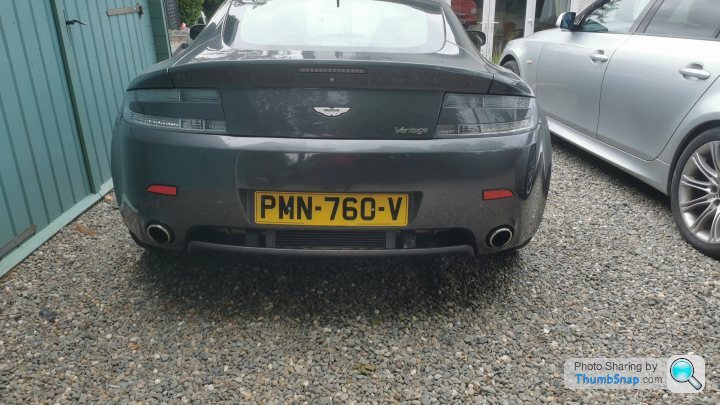
As usual, this job involved lots of duff fasteners needing to be replaced which was a faff, but now at least with all of these replaced and greased, it will be a doddle to get apart should i need to again.
Get used to this type of thing if you have an older vantage....
Bit long in the tooth for an update really, but i am kind of telling a story here rather than entirely sticking to the chronological order strictly as otherwise it would be loads of "i spent 3 days drawing little pictures of suspension components and thinking about spring rates, or looking at vacuum bagging carbon etc" There is always so much more pricking about thinking about things Vs the time spent actually doing it.
There may be another hiatus for a period on the horizon once its in sort of correct shape as the fact i am constantly working on a gravel driveway on jacks is stupid, and annoying as the green shed i al working next to is a pretty well equipped workshop, welders, hydraulic lift, headed floored etc etc, but has a car that doesn't run in it. so really i need to make that run so i can switch the cars around when i am working on them. Its almost like you should do things in some sort of logical order....
Anyway, seat time
So, there is essentially only one company that does a bolt in kit for these cars, and thats cobra, however the seats they supply are not FIA and as such in my mind not approved. being that i am attached to my spine and the seats will form part of the safety structure (particularly once i can get a harness in) i wanted an FIA seat, and the support that it offered. In no way am i suggesting that the other alternatives are not good enough, but i wanted a classified seat and that was that.
Being that "YOLOing" (i think i have heard that on youtube) can get expensive with seats when you discover they dont fit and never will. I took the easy way initially and through a friend of a friend of a friend ordered the full kit but with FIA Imola's. I also asked for them to have the Aston wings, however Cobra have had their collar felt by the Aston legal department in the past about use of the badge (I do find this pathetic, a brand that constantly tries to associate it's self, embarrassingly in my opinion with James bond then spends it time sending threatening letters to a man for drawing some wings in a seat, I mean, get a grip) so.........they turned up completely blank, which was fine, apart from they looked like something off Aliexpress, which was not quite the look i was aiming at.
I didnt take any pictures of the seats with no logo's, and in all honesty i have done a piss poor job of documenting this change for a number of reasons.
It was a bit of a d1ck
it took ages
i was distracted and there were a lot of pauses for contemplation.
Anyway, having got the seats, i stripped all the covers off (hats off to cobra on this one, they are a doddle to strip down) and ran them down to the local work wear embroidery place who promptly and with no fuss put the wings on in silver and green for £12.75 for the pair, winner.
I then went on to start the install, and really did a bad job with the pictures.
Initially i just went to put the kit in as intended, so base plate, then runners, belt mounts side mounts and finally the seat. Frankly, its a prick, partly because the seats i am using are not intended for the job, and partly because access on the tunnel side is very tight meaning the usual faff of seat fitting where you slowly turn the inside bolts one flat at a time, blind with a tiny spanner. (if you have fitted many bucket seats, this will be familiar, its that moment when your arm is so contorted you want to cry, but you cant because your a f
king grown man and it would just be silly.......Seat out, (i tidied all the crap looking stock wiring up with proper loom tape hence the change in the subsequent pictures)
Base plate in
Base plate, runners, extenders, side mounts etc etc (i an retaining the oeM buckle which allows me the retain the oem seatbelt reminder without fudging it)
at this point, i fitted the seat, jumped in, and hated it, please note, this is not a problem with the kit, this is an issue with me not using the complete kit (ie.e. the wrong seats) and my particular requirements. It wasnt reclined enough, was nice and low but didnt feel quite natural, and i didn't really like the iperation of the sliders or the many layers of bits bolted together to make it all work.
I faffed about with this a few more times moving the seat about and did improve it (i definitely didn't cry when i put the seat in for the 5th time) and it was kind of not bad, but ultimately the high sides of the seats created a fitting issue and the upright nature would be ok for pure track use but not combined duties, but it was probably just about livable.
At this point i went and sat in the shed for a bit, and while looking dejectedly at the oeM Recaro's i found myself thinking that extruded aluminum motorised runner mechanisms were pretty fancy really, and that the way they bolted to the seat was very much like an steel frame base mount, or even, a base plate.
It took some time to summon up the desire to strip down and cut the oem loom, i had vaguely harbored desires to sell the seats and turning them into half a seat would of course f
k that right in the bumpipes. Never the less, the more i looked the more i liked it. So allowing a good tail to allow for re-attachment i split the seats and clipped the loomsLong story short, with some minor adjustment, (cutting a pair of locating tabs off the seat subframes and drilling a hole extra you can mount a standard racing seat sidemount onto the Vantage electric part alloy sub frame. The frames are light too, so the weight penalty is minimal, if not possibly in your favor.
I took very very few pictures of this process, but did take a picture of it installed so you can get the idea
I dont know why its Hovis bakery sepia toned, it just is. At some point i will remove them again and strip back all the seat loom wiring i am not using and add in some dummy loads for the side airbags so will take some more pictures then if there is any interest in the "how does that work element".
Ultimately, what i now have is fully electric tilting buckets, they do sit a little higher, but i am 182cm and there is still adequate room for my lid, so all good. the seat belt receptacle is tight to the tunnel due to the bolster height, but works well and hopefully future developments will improve that further.
I also as can be seen above replaced my shabby looking door bars with some nice piano black ones (came up cheap on ebay and i have plans for the originals)
Serviced it (with a genuine filter, thank you very much)
Removed all the rusty rear mesh, (people constantly paint these on the car, which is a s
t job as it paints the oil cooler and doesn't remove all the rust, as such mine did not look all that fresh . They will be blasted and powdercoated at some point but for now can just be off (weightsaving) To do this requires you to remove the back of the car and the factory manual is quite frankly a joke in terms of its description of the process.Feels excessive to have to do this to remove some bumper trim really
In doing so i also removed some defunct electronics and cleaned up and greased all the subframe bolts under the liners for when that inevitably comes out at some point.
Then all back together with the mesh removed, looks a bit odd with the v12 exhaust but not outlandish in my opinion
As usual, this job involved lots of duff fasteners needing to be replaced which was a faff, but now at least with all of these replaced and greased, it will be a doddle to get apart should i need to again.
Get used to this type of thing if you have an older vantage....
Edited by IainWhy on Tuesday 21st June 11:09
BrettMRC said:
I wonder how much extra it would cost to just have good quality stainless fastners on a car?
Back on topic - looking good OP.
Looks like the exhaust trims are part of the bumper then?
Pennies, the bolts themselves are not bad, its the spire clips that are junk, most manufacturers seem to love speed clips and spire clips in these locations despite the fact that they dont last. on the plus side, once drilled out they can be easily replaced. Still as you suggest, a stainless clip would prevent all this faff, as would frankly a bit of grease....Back on topic - looking good OP.
Looks like the exhaust trims are part of the bumper then?
Exhaust finishers are as you suggest mounted to the bumper, though not part of it, the are bolted to a steel place then to some ceramic bobbins and mounted to the bumper. I think i will remove them next time i am in that area and see what it looks like.
olv said:
Really interesting post thank you. I have been looking at the Cobra kit (hence my interest in which seats you'd gone with earlier in the thread) and the idea of retaining the OEM electric mount is great, nice work.
Does retaining the OEM electric subframe allow you to retain the original seatbelt buckle mount or did you have to use the seatbelt bracket from the the Cobra kit (as in the Cobra diagram)? Could you complete this without the Cobra Vantage mounting kit and just a pair of bucket seat side mounts and the electric subframe or did you use any other bits from the Cobra kit?

When you say "with some minor adjustment, (fitting a pair of locating tabs off the seat subframes and drilling a hole extra you can mount a standard racing seat sidemount onto the Vantage electric part alloy sub frame", does that mean you took the locating tabs off the Cobra mounts and added them to the electric frame or have I misunderstood?
Is the airbag warning light easy to bypass with a resistor?
Thanks and keep it up, what a cool project.
So on the first point, yes I used primarily one other part, which was part 7 on the diagram, this is to allow the buckle to sit much higher, all other mounting remain as per oem into the base. i also used the hardware particularly the oblong washers, but this is of course all easy to source. Does retaining the OEM electric subframe allow you to retain the original seatbelt buckle mount or did you have to use the seatbelt bracket from the the Cobra kit (as in the Cobra diagram)? Could you complete this without the Cobra Vantage mounting kit and just a pair of bucket seat side mounts and the electric subframe or did you use any other bits from the Cobra kit?
When you say "with some minor adjustment, (fitting a pair of locating tabs off the seat subframes and drilling a hole extra you can mount a standard racing seat sidemount onto the Vantage electric part alloy sub frame", does that mean you took the locating tabs off the Cobra mounts and added them to the electric frame or have I misunderstood?
Is the airbag warning light easy to bypass with a resistor?
Thanks and keep it up, what a cool project.
Edited by olv on Monday 20th June 16:54
In terms of the second question, i have mislead you with my spakky typing, i cut two alignment pins off the oem mount than added a hole or two to get everything aligned.
Other than that its just the side mounts and the seat. As to if this would work for other depends on how you would like it positioned really.
Air bag wise, not sorted that, i need to look at the wiring diagram and measure the resistance of the bags, but i don't see why this will present an issue, though of course i cant in any way actually substantiate that .
SturdyHSV said:
I've replaced the seats in my Monaro (and interestingly originally went your way of putting the seats on the factory electronic bases, before ultimately going to manual runners on a proper mounting bracket).
Anyway, side airbags, hopefully the Aston service manual or whatever posh equivalent they call it (bespoke preservation compendium?) will be as thorough as the Holden one, whereby it explains what the conditions are to set the various airbag codes. My actual point is, it's quite common as I understand it that the system is looking for a resistance and a capacitance.
In my case, it was 4.7 ohm resistance and 0.47uF capacitance. It was actually a range with those values at the centre of the range, which makes sense.
I was told by quite a few people I'd have a hard time trying to measure capacitance across an airbag, not least because a tool to measure capacitance isn't standard workshop fodder, but also because putting voltage across an airbag has its inherent *bangy* risks...
As you'll no doubt know, but just in case, typically once you 'fix' the airbag fault condition it needs an actual 'clear codes' command sent to it, it won't clear itself.
Thanks dude, If i am honest i am slightly putting it off, for three reasons.Anyway, side airbags, hopefully the Aston service manual or whatever posh equivalent they call it (bespoke preservation compendium?) will be as thorough as the Holden one, whereby it explains what the conditions are to set the various airbag codes. My actual point is, it's quite common as I understand it that the system is looking for a resistance and a capacitance.
In my case, it was 4.7 ohm resistance and 0.47uF capacitance. It was actually a range with those values at the centre of the range, which makes sense.
I was told by quite a few people I'd have a hard time trying to measure capacitance across an airbag, not least because a tool to measure capacitance isn't standard workshop fodder, but also because putting voltage across an airbag has its inherent *bangy* risks...
As you'll no doubt know, but just in case, typically once you 'fix' the airbag fault condition it needs an actual 'clear codes' command sent to it, it won't clear itself.
1 the aston martin workshop manual is $h1t at wiring diagrams and labeling i.e not only do the diagrams look like something i have drawn but the colour code is stupid and they do things like call the instrument cluster a "DIM" driver information module i mean, wtf
2 i need to ring Aston martin care? could be, cant recall and ask them if they can just turn them off, i am going to see them on my way to Spa to get the egr coded out and a few other items turned off
3 No MOT's over here so no one will care about it other than i have to keep telling the warning to p
s off.I Think i will brave the workshop manual and then shove one of those dummy loads in from ebay and see what happens once i have bought a foxwell (aston martin have two obd ports one for plebs and the other for the initiated, i need to access the private members area.
Gassing Station | Readers' Cars | Top of Page | What's New | My Stuff