Band & Olufsen tweeter retrofit
Discussion


I thought I'd give this a go and it ended up working out quite well so I thought I'd share it.
I always fancied the B&O tweeters in the car. Why? well I'm a geek so tweeters that rise up out of the dash are just the coolest thing
There were a few issues with this little project which meant it didn't happen until now. Mainly is sourcing the tweeters. They are stupidly expensive. add to that the new leather 'hockey sticks' that will be needed made it an expensive job.
Fortunately, it seems all dashboards have the hole cut in them ready for the B&O, so no worries there.
Once I got hold of them, I found they dont do the party trick all by themselves. The amplifier is supposed to do all the electrickery. Not wanting to have to change out all the hifi system, I had to find another solution. Anyway, it's too much moneys worth of kit to let it beat me!
I didn't expect it would be a non-starter, designing some electronics shouldn't be a problem for me if required.
So, the tweeters.

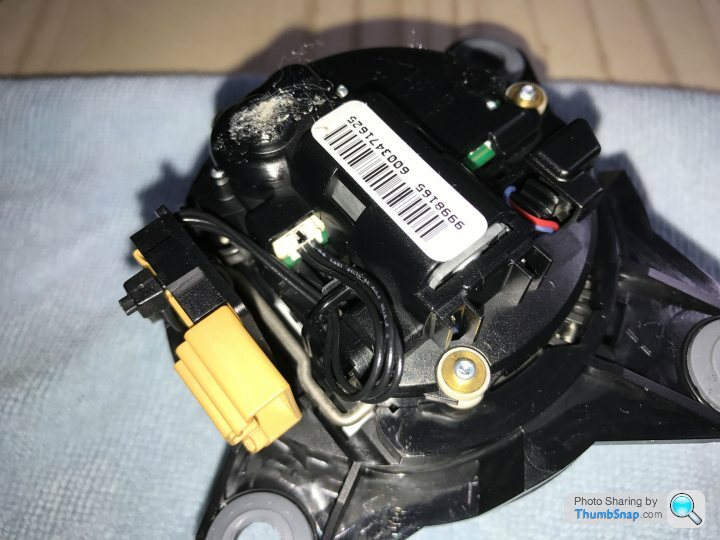

As you can see, there are 5 wire contacts on the unit. Guessing two must be for the tweeter driver, that leaves three for the motor function. Guessing there would be one up, one down and a common was too much to hope for. Cutting to the chase, they operate much like a DC servo. Two contacts are for the motor, one is a pulse encoder. Obviously to tell the amp when they have travelled to the top or bottom.


Hmm. Much chin scratching ensued....
Choices were either build a bespoke controller board (possible, I can do that) or find a simpler way. I didn't fancy a switch to drive them up and down, a manual option just seems like half a job so it needed to be automated.
I decided that because the speed of the rise and fall was constant, I'd go for a simple actuated timer system. Basically, two multifunction timers. One triggers on power on, the other on power off. For those that know, leading edge trigger and trailing edge trigger. All you need is a 12v source that stays on from key insertion and stays on a little after shutdown. Then a trigger when the engine or hifi is on.
Aston kindly have both built in.
The principle is simple. The system is powered up when the key is partially inserted. When the engine cranks, the second input triggers the 'up' relay for a pre-programmed time. When the engine is shut down, the removal of that input triggers the 'down' relay. Simple!
A quick check of this logic with a power supply to prove it.
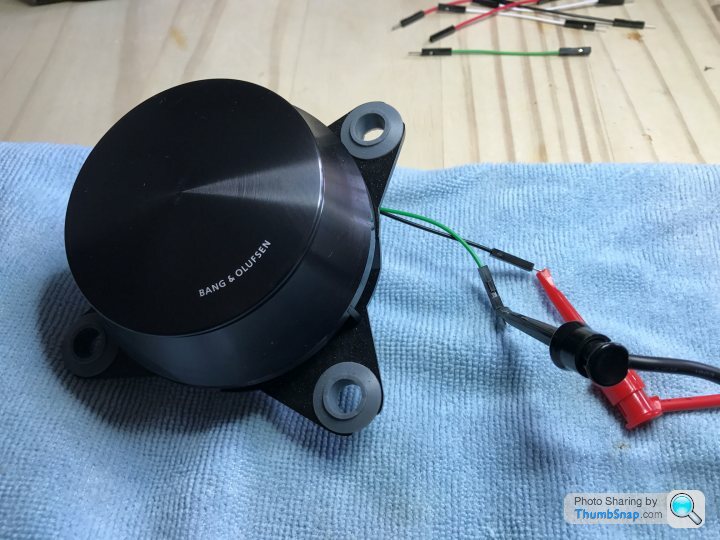
The function test revealed the time for rise and fall and the important fact that the motor runs off 5VDC. I used a little 12v to USB power circuit. Yup, 5 volts. 12v will damage them. Be warned.
https://www.youtube.com/watch?v=jfK1qTZBDyg
Yup, works great!
So, automation.
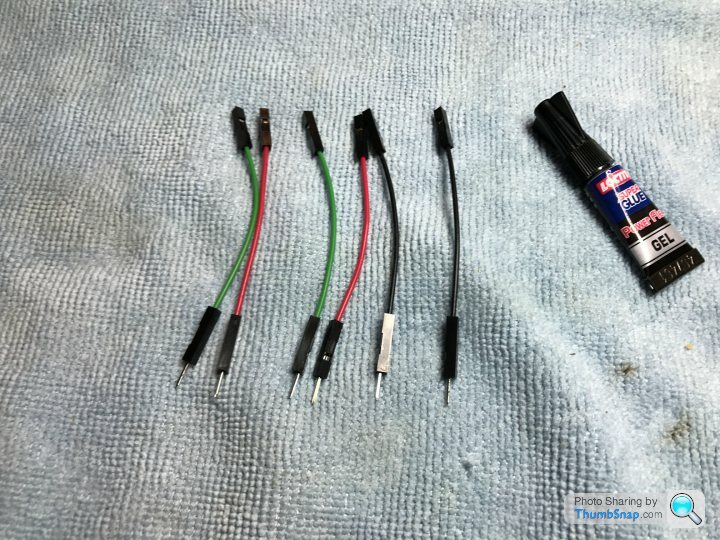
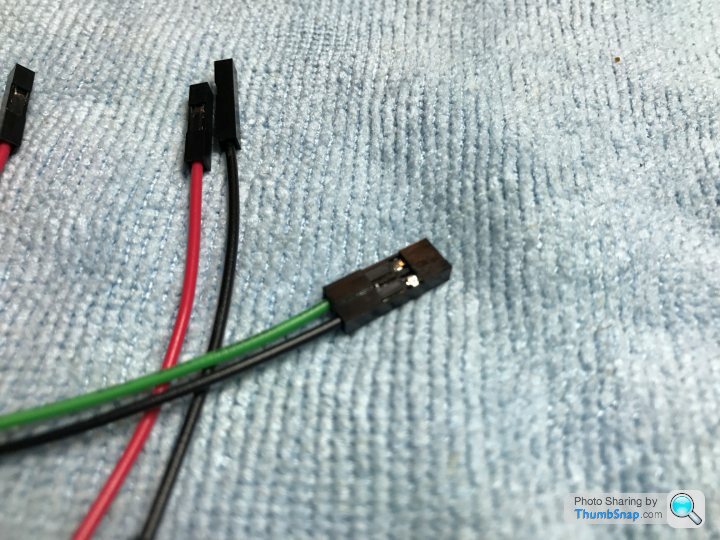
Multifunction timers are handy little things. The circuit ended up quite simple. and you'll see it at the end of this post. Connecting to the tweeter in a neat and tidy manner is also important. I got some single pin molex connectors that worked great. Being individual pins means that when you have to do work on your car, disconnecting them will be a effing nightmare.
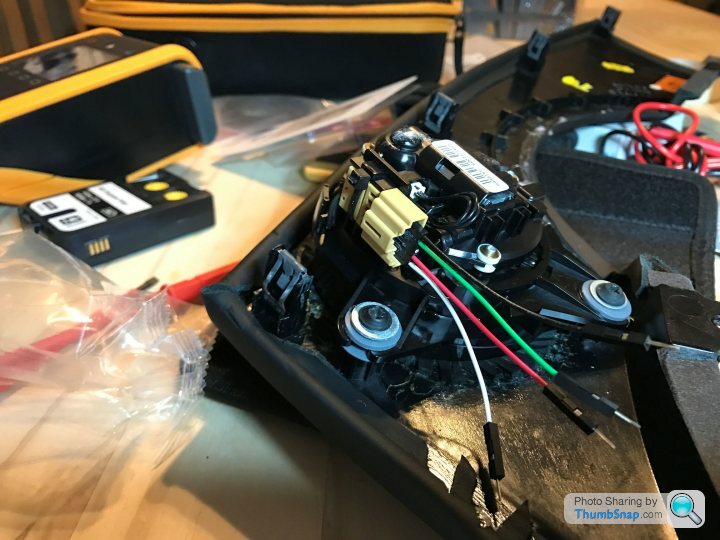
Supergluing the connectors together makes it nice, neat and plug and play when removing them in the future. You could always buy a 5 pin molex socket, but I had these handy from a developer board in the 'drawer of many bits'.
Once that was all wired in, it was time to test my little franken-tweeter.
https://www.youtube.com/watch?v=2SnGWYLIJ7s
Coolski!
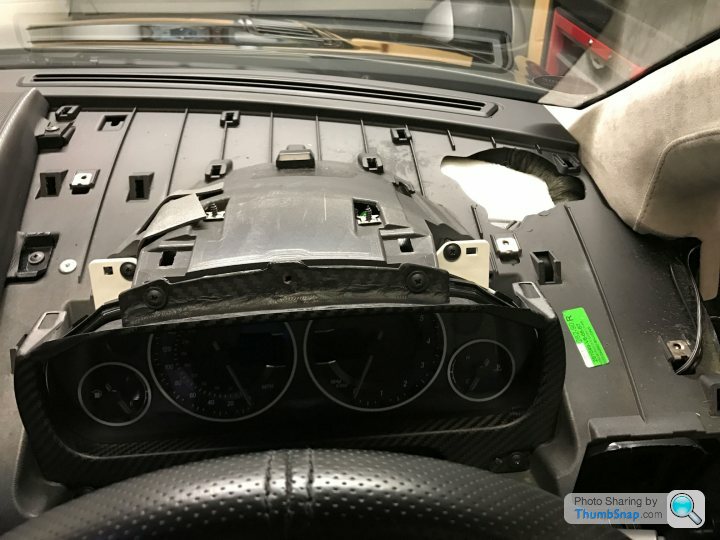
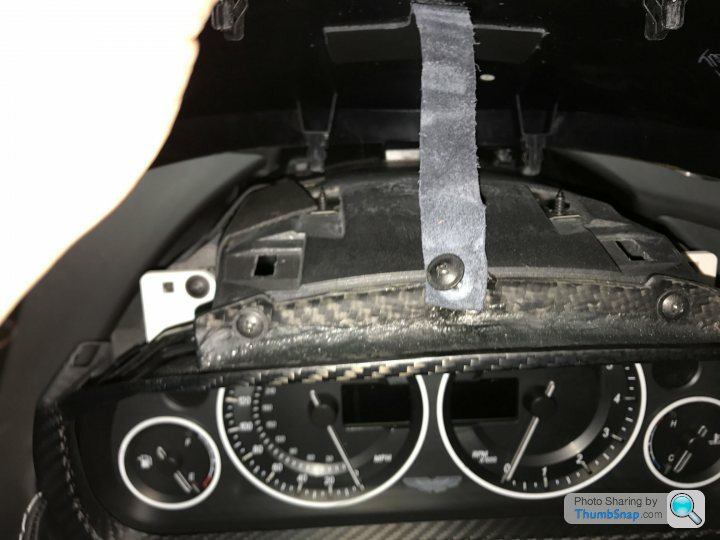
Now put it all back in the car. The hockey stick is held in by three posidrive screws.

Refit the instrument cowl, don't forget the little retaining strap held at the front.
Here's the all important bit, the schematic.
For the geeks that want to know the way it works, here it is;
The motor is connected to the common terminals of both relays. The N/C contacts are both connected to -ve (negative). This basically locks the motor in position with both sides of the motor connected to -ve.
Changing one relay over will put power on one side of the motor and it will run. Change over the other relay, and it will run the other way.
So we have an 'up' relay and a 'down' relay. both relays at rest means no motion.
Having one relay (up) actuated by a leading edge pulse (Ignition on) for the required rise time will lift the tweeter. When the trigger (Ignition off) is released, the second relay will run for the down cycle and then stop.
That's it!
Apart from the tweeters and hockey sticks, parts were less than £50.
Enjoy and sorry for the pic heavy post.

I always fancied the B&O tweeters in the car. Why? well I'm a geek so tweeters that rise up out of the dash are just the coolest thing
There were a few issues with this little project which meant it didn't happen until now. Mainly is sourcing the tweeters. They are stupidly expensive. add to that the new leather 'hockey sticks' that will be needed made it an expensive job.
Fortunately, it seems all dashboards have the hole cut in them ready for the B&O, so no worries there.
Once I got hold of them, I found they dont do the party trick all by themselves. The amplifier is supposed to do all the electrickery. Not wanting to have to change out all the hifi system, I had to find another solution. Anyway, it's too much moneys worth of kit to let it beat me!
I didn't expect it would be a non-starter, designing some electronics shouldn't be a problem for me if required.
So, the tweeters.
As you can see, there are 5 wire contacts on the unit. Guessing two must be for the tweeter driver, that leaves three for the motor function. Guessing there would be one up, one down and a common was too much to hope for. Cutting to the chase, they operate much like a DC servo. Two contacts are for the motor, one is a pulse encoder. Obviously to tell the amp when they have travelled to the top or bottom.
Hmm. Much chin scratching ensued....
Choices were either build a bespoke controller board (possible, I can do that) or find a simpler way. I didn't fancy a switch to drive them up and down, a manual option just seems like half a job so it needed to be automated.
I decided that because the speed of the rise and fall was constant, I'd go for a simple actuated timer system. Basically, two multifunction timers. One triggers on power on, the other on power off. For those that know, leading edge trigger and trailing edge trigger. All you need is a 12v source that stays on from key insertion and stays on a little after shutdown. Then a trigger when the engine or hifi is on.
Aston kindly have both built in.
The principle is simple. The system is powered up when the key is partially inserted. When the engine cranks, the second input triggers the 'up' relay for a pre-programmed time. When the engine is shut down, the removal of that input triggers the 'down' relay. Simple!
A quick check of this logic with a power supply to prove it.
The function test revealed the time for rise and fall and the important fact that the motor runs off 5VDC. I used a little 12v to USB power circuit. Yup, 5 volts. 12v will damage them. Be warned.
https://www.youtube.com/watch?v=jfK1qTZBDyg
Yup, works great!
So, automation.
Multifunction timers are handy little things. The circuit ended up quite simple. and you'll see it at the end of this post. Connecting to the tweeter in a neat and tidy manner is also important. I got some single pin molex connectors that worked great. Being individual pins means that when you have to do work on your car, disconnecting them will be a effing nightmare.
Supergluing the connectors together makes it nice, neat and plug and play when removing them in the future. You could always buy a 5 pin molex socket, but I had these handy from a developer board in the 'drawer of many bits'.
Once that was all wired in, it was time to test my little franken-tweeter.
https://www.youtube.com/watch?v=2SnGWYLIJ7s
Coolski!
Now put it all back in the car. The hockey stick is held in by three posidrive screws.
Refit the instrument cowl, don't forget the little retaining strap held at the front.
Here's the all important bit, the schematic.
For the geeks that want to know the way it works, here it is;
The motor is connected to the common terminals of both relays. The N/C contacts are both connected to -ve (negative). This basically locks the motor in position with both sides of the motor connected to -ve.
Changing one relay over will put power on one side of the motor and it will run. Change over the other relay, and it will run the other way.
So we have an 'up' relay and a 'down' relay. both relays at rest means no motion.
Having one relay (up) actuated by a leading edge pulse (Ignition on) for the required rise time will lift the tweeter. When the trigger (Ignition off) is released, the second relay will run for the down cycle and then stop.
That's it!
Apart from the tweeters and hockey sticks, parts were less than £50.
Enjoy and sorry for the pic heavy post.
JohnG1 said:
Do you have a fancy carbon fibre surround for the instrument binnacle? Photos please!
I know, it's really pretty. A b h to make, great in matt.
 wotnoburgers said:
Brilliant!! Love it!! Well done!!
Do you fancy doing the same in my car?
Thanks for the kind words.Do you fancy doing the same in my car?
Well, I'd be glad to help. It would be easy enough for me to make up the controller and plugs ready to go. Find yourself the tweeters and hockey-sticks.
If your'e happy to replace the hardware and connect up three wires, you'd be done.
Ken,
Astonbits have them, but you only have two kidney's You might be wise to keep your eyes out for a breakers or fleabay advert.
If yours fail, don't panic. They aren't that complicated inside. If its electronics that fail, this system will sort it. If its mechanical, it's possible to repair or 3D print the parts.
Gerry (8tech),
The sound isn't that much better, but the soundstage is lifted and more defined. The original crossovers are spot on for them. The frequency response is almost exactly the same. If you leave the original tweeters connected, you might want to attenuate the originals with a resistor. I normally use a variable resistor on a flying lead and sit and listen. Turning up and down until it's balanced, then measure the resistor and put a fixed one in.
I just wanted them because they look uber-cool!
Dave,
Incoming email shortly buddy.
Tim, Nick, et all,
If you guys are ever in Northants, you're welcome to come in for a cuppa and fondle our bits
I'm not punting stuff on here, just joining in with the usual banter until Haymarket sort us out a good deal. We want to play fair and all that. But what I can say is that we refuse to disappoint anyone.
Astonbits have them, but you only have two kidney's
You might be wise to keep your eyes out for a breakers or fleabay advert.If yours fail, don't panic. They aren't that complicated inside. If its electronics that fail, this system will sort it. If its mechanical, it's possible to repair or 3D print the parts.
Gerry (8tech),
The sound isn't that much better, but the soundstage is lifted and more defined. The original crossovers are spot on for them. The frequency response is almost exactly the same. If you leave the original tweeters connected, you might want to attenuate the originals with a resistor. I normally use a variable resistor on a flying lead and sit and listen. Turning up and down until it's balanced, then measure the resistor and put a fixed one in.
I just wanted them because they look uber-cool!
Dave,
Incoming email shortly buddy.
Tim, Nick, et all,
If you guys are ever in Northants, you're welcome to come in for a cuppa and fondle our bits
I'm not punting stuff on here, just joining in with the usual banter until Haymarket sort us out a good deal. We want to play fair and all that. But what I can say is that we refuse to disappoint anyone.
Gassing Station | Aston Martin | Top of Page | What's New | My Stuff