DB9 headlight vent kit DIY
Discussion


My DB9 headlights have always suffered from condensation. I have previously used 50g dessicant bags in each headlight to combat the issue but I find they need to be dried out every few weeks.
Venting seems to be the most logical solution and I know that kits are available for various cars (especially new cars with LED headlights) but I do like to do my own tweaking . I will not be offering this as a kit, it is purely for information.
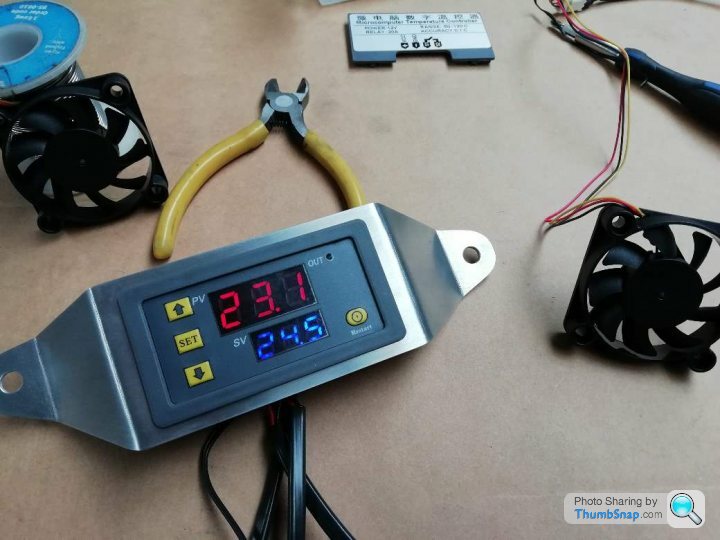
This system has 3 main components, namely a temperature controller and 2 x 50mm 12V fans:
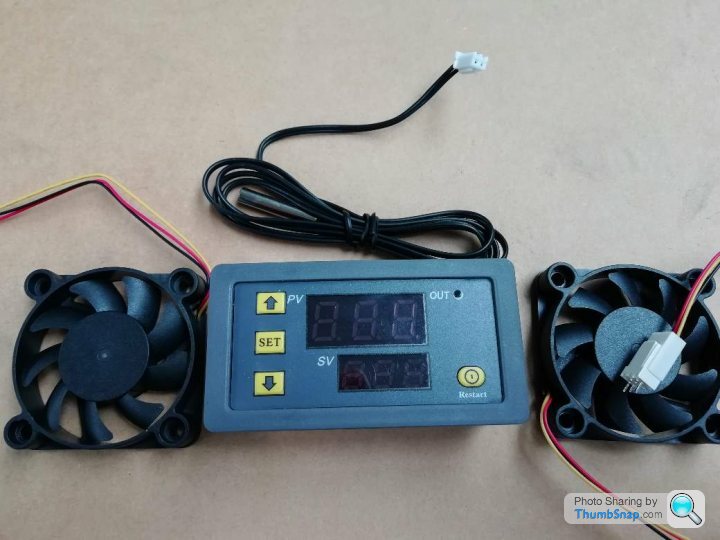
The temperature controller is fully programmable for heating or cooling functions and comes complete with a thermocouple. The ON/OFF switching temperature is programmable and there is also an option of up to 10 minutes of delay once the set temperature has been reached. I found this little gem on eBay for £3.82 delivered.
The two 50mm fans also from ebay (there's a theme here ) cost £5 / pair
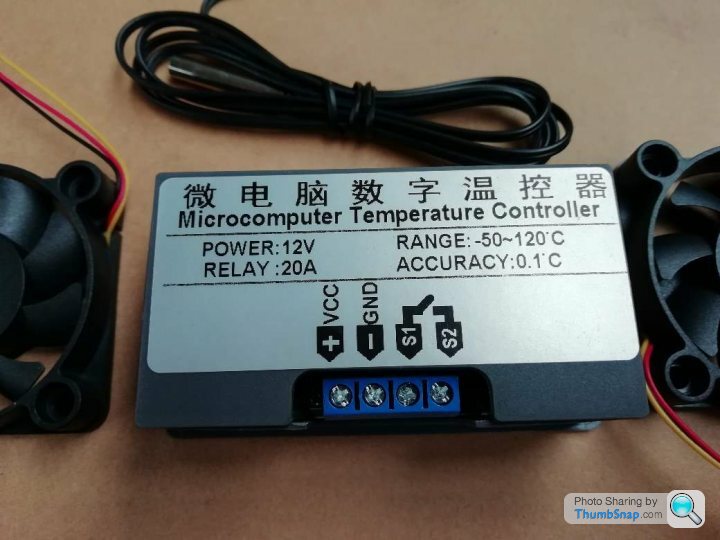
Rear view of controller:
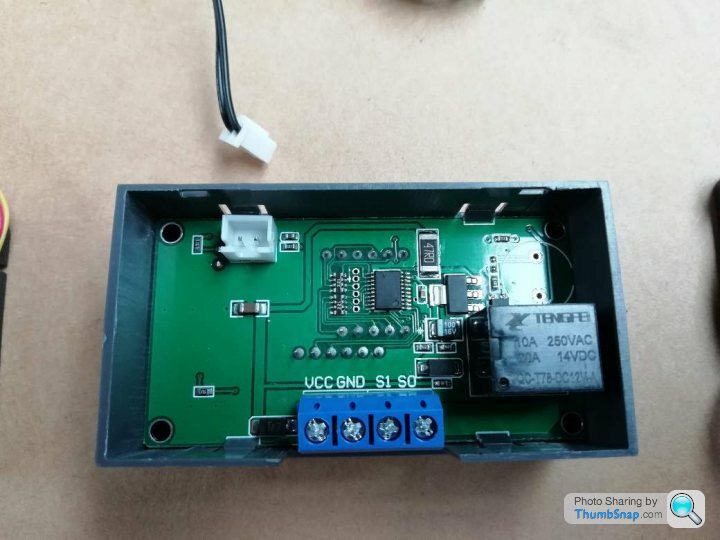
Internal view:
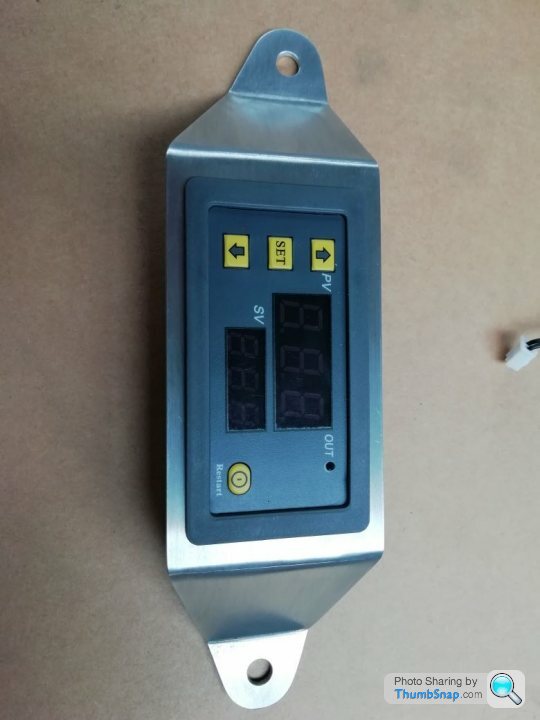
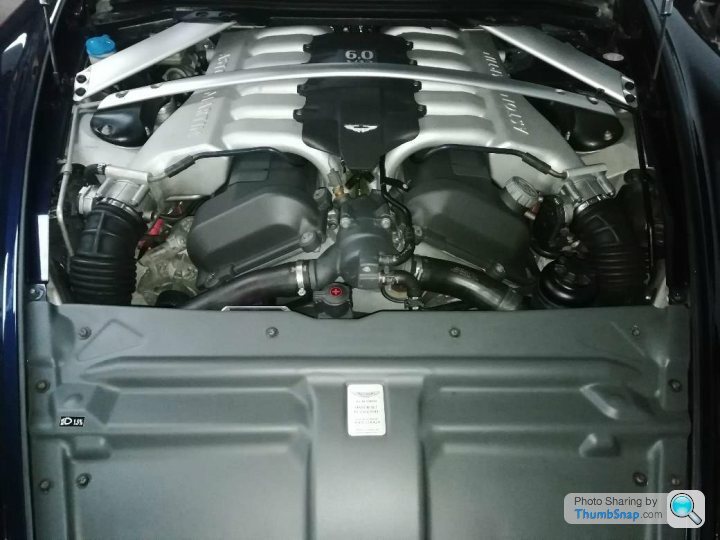
I decided for the DB9 that the best place to mount the controller was at the front of the engine bay, slightly OS form center, using a bolt from the +ve jumpstart terminal and one from a reinforcing strut (see photograph on down the thread). So I made an aluminium mounting bracket to suit:
Connections for the controller are straight forward. For compactness, I added a 5A fuse directly to the +ve VCC input of the controller which is fed from the +ve 'jump start' post. The fused input is then jumped across to the switched S1 terminal. The -ve GND terminal is attached to the chassis and also to the black wires of the fans. The red wires of the fans are the connected to the switched +ve output S2 (or S0, spot the inconsistency). The other twin black wire with white connector is the thermocouple input.
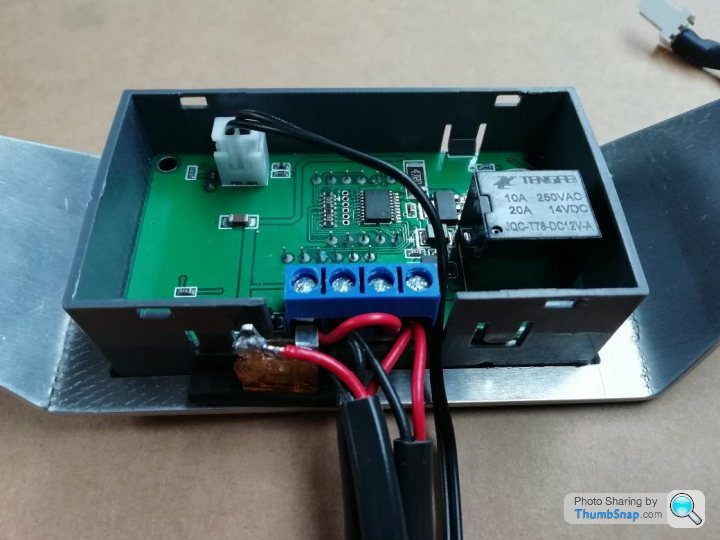
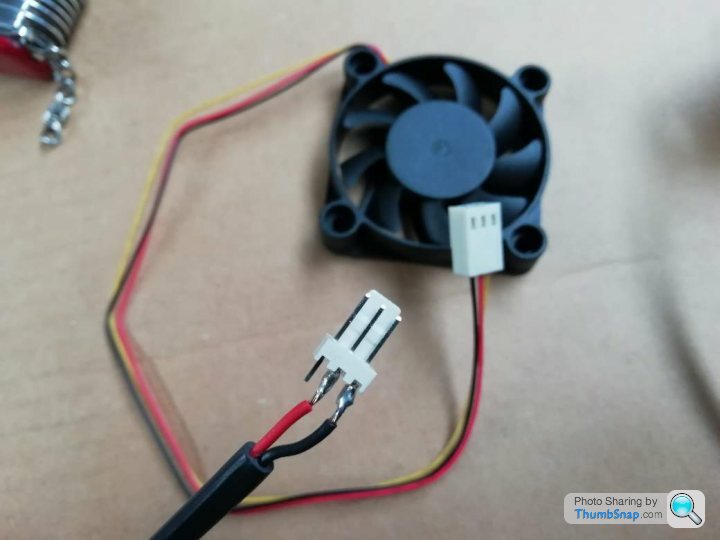
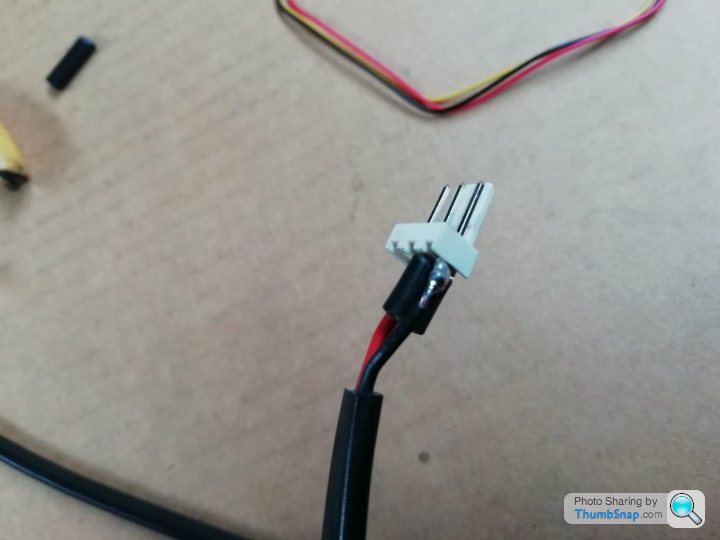
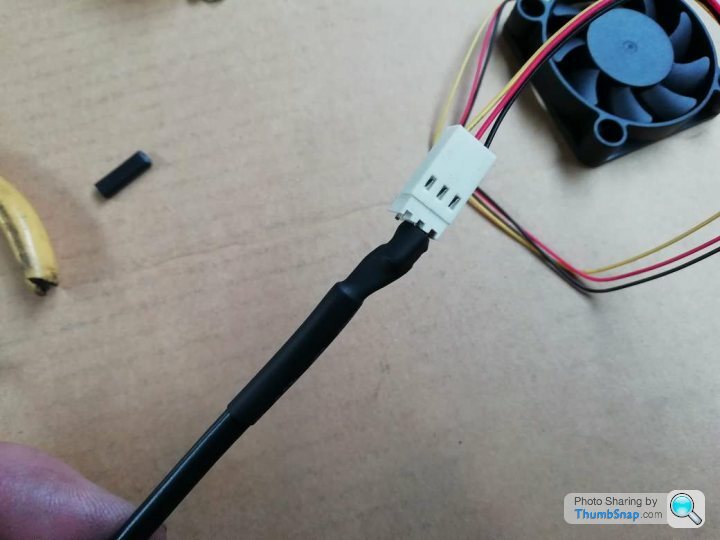
To connect the fans I decided to use standard Molex connectors for ease of change of the fans if required in the future. Not waterproof I know but a smear of silicone grease should keep the contacts good. I personally think that any water will affect the fans first and I would rather have them as a 5 minute 'plug & play' replacement job rather than having to fit new connectors each time. 3-way Molex connectors, £1.49 for 10!
The yellow wire is not required, so it is a case of soldering 2 terminals (you can see I added a piece of the wire insulator that I cut off between the +ve and -ve terminals just incase they may get crushed together) and a bit of heat shrink finishes the job:
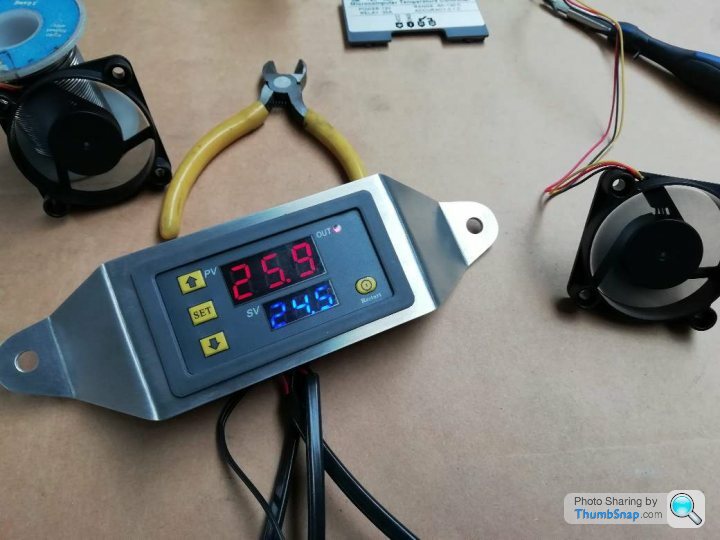
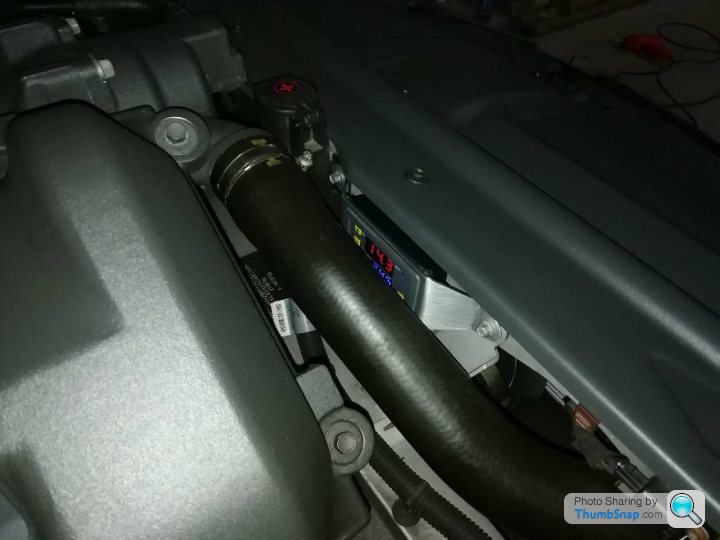
A quick test with power:
The red reading is the actual thermocouple temperature and the blue is the target 'switch on' temperature:
Next, to fit to the car in the location described earlier (front panel removed and controller with a plastic rear housing that I cut down to suit):
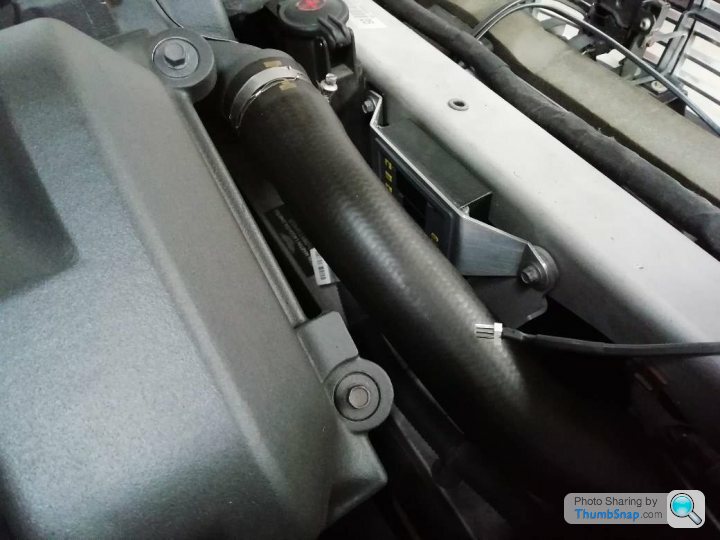
I then ran the fan power cables to each headlight following the original wiring loom. The power is supplied via a wire feeding up into the +ve jump start post and the earth is connected to the chassis on the far OS of the radiator mount. At this point I decided to push the thermocouple in behind the foam at the top of the radiator so as no wires of the entire installation are visible. I should be able to do this as I can then calibrate the switching temperature to run the fans for as long as required:
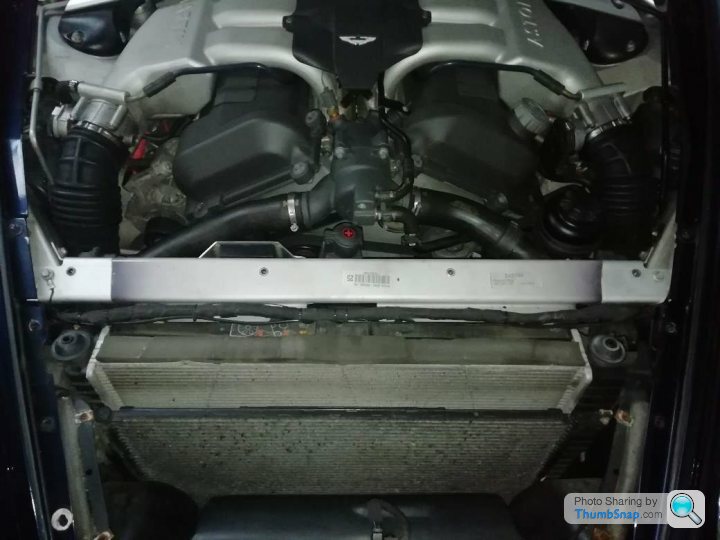
Not very noticeable from the front:
Can be seen from the rear:
I don't know yet what the current draw of the controller is in standby but I would imagine it will be fairly insignificant. However if the car is in storage the controller can be turned off using the restart button.
I am still waiting for the four fan filters to arrive . As soon as I receive them I will cover my planned fitment of the fans to the headlights themselves.
Complete cost for the components, including the filters, has come to less than £17. Yes, you will have to make a few mounting pieces
Venting seems to be the most logical solution and I know that kits are available for various cars (especially new cars with LED headlights) but I do like to do my own tweaking
. I will not be offering this as a kit, it is purely for information.This system has 3 main components, namely a temperature controller and 2 x 50mm 12V fans:
The temperature controller is fully programmable for heating or cooling functions and comes complete with a thermocouple. The ON/OFF switching temperature is programmable and there is also an option of up to 10 minutes of delay once the set temperature has been reached. I found this little gem on eBay for £3.82 delivered.
The two 50mm fans also from ebay (there's a theme here
) cost £5 / pairRear view of controller:
Internal view:
I decided for the DB9 that the best place to mount the controller was at the front of the engine bay, slightly OS form center, using a bolt from the +ve jumpstart terminal and one from a reinforcing strut (see photograph on down the thread). So I made an aluminium mounting bracket to suit:
Connections for the controller are straight forward. For compactness, I added a 5A fuse directly to the +ve VCC input of the controller which is fed from the +ve 'jump start' post. The fused input is then jumped across to the switched S1 terminal. The -ve GND terminal is attached to the chassis and also to the black wires of the fans. The red wires of the fans are the connected to the switched +ve output S2 (or S0, spot the inconsistency). The other twin black wire with white connector is the thermocouple input.
To connect the fans I decided to use standard Molex connectors for ease of change of the fans if required in the future. Not waterproof I know but a smear of silicone grease should keep the contacts good. I personally think that any water will affect the fans first and I would rather have them as a 5 minute 'plug & play' replacement job rather than having to fit new connectors each time. 3-way Molex connectors, £1.49 for 10!
The yellow wire is not required, so it is a case of soldering 2 terminals (you can see I added a piece of the wire insulator that I cut off between the +ve and -ve terminals just incase they may get crushed together) and a bit of heat shrink finishes the job:
A quick test with power:
The red reading is the actual thermocouple temperature and the blue is the target 'switch on' temperature:
Next, to fit to the car in the location described earlier (front panel removed and controller with a plastic rear housing that I cut down to suit):
I then ran the fan power cables to each headlight following the original wiring loom. The power is supplied via a wire feeding up into the +ve jump start post and the earth is connected to the chassis on the far OS of the radiator mount. At this point I decided to push the thermocouple in behind the foam at the top of the radiator so as no wires of the entire installation are visible. I should be able to do this as I can then calibrate the switching temperature to run the fans for as long as required:
Not very noticeable from the front:
Can be seen from the rear:
I don't know yet what the current draw of the controller is in standby but I would imagine it will be fairly insignificant. However if the car is in storage the controller can be turned off using the restart button.
I am still waiting for the four fan filters to arrive
. As soon as I receive them I will cover my planned fitment of the fans to the headlights themselves.Complete cost for the components, including the filters, has come to less than £17. Yes, you will have to make a few mounting pieces
Thanks for the replies 
The filters on order are purely to filter out dust. Agreed, some kind of material that would prevent moisture entering but maintain flow would be nice.
I discovered on weighing the dessicant bags was that each headlight had 30g/30ml of water absorbed in about 4 weeks. At this point there was also significant water on the inside of the cover. Either water is collecting along a joint line and is being drawn in when the internal air is contracting as the interior of the light cools, or the moist air being sucked in on each cooling cycle is condensing out on the interior and is building up over time. What I hope to acheive using forced ventilation will be to prevent the build up of mositure within, reducing to similar levels when we open & reseal the standard light covers with moist air within. If there is standing water currently being sucked in through a joint line then the pressure loss of the added fans, stationary or not, should help prevent this. The ventilation will also lower the internal temperature to be similar to the outer cover and should therefore reduce the chance of condensation appearing.
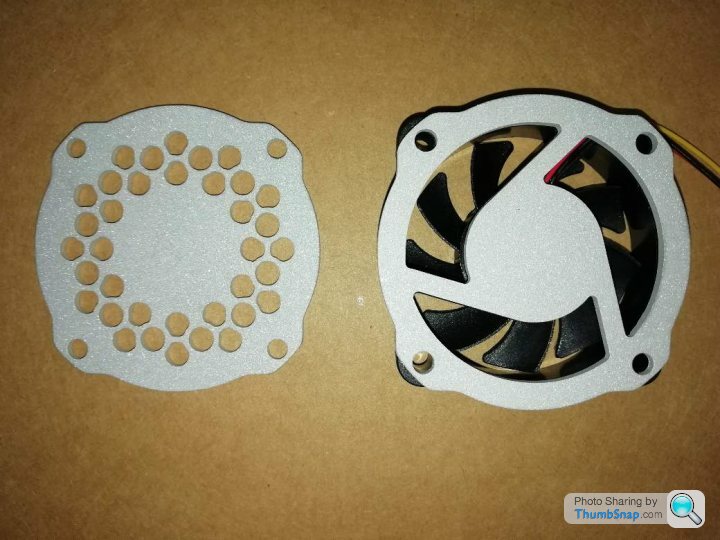
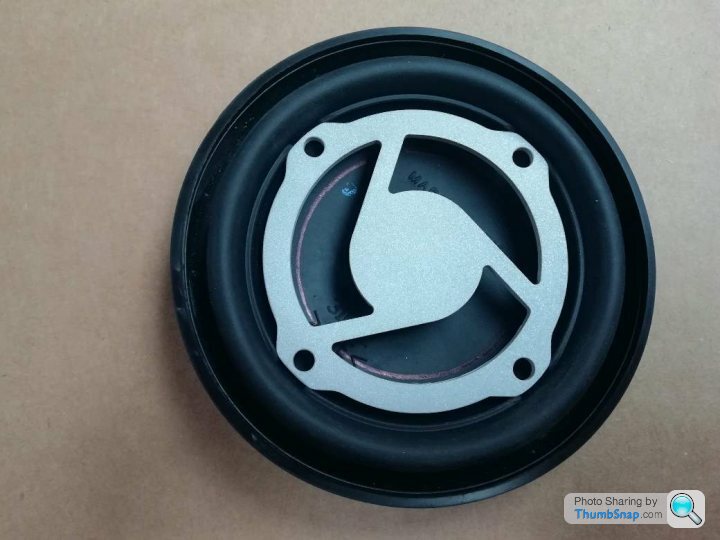
To try and prevent airflow dead zones within the headlight and prevent flow via the path of least resistance, I am reducing the exhaust flow to around 65%. Hopefully this will be enough but time will tell. Below is a set of mounts for one headlight: On the right is the fan blowing into the housing and on the left the resistricting exhaust baffle. A dust filter will be mounted on each.
The filters on order are purely to filter out dust. Agreed, some kind of material that would prevent moisture entering but maintain flow would be nice.
I discovered on weighing the dessicant bags was that each headlight had 30g/30ml of water absorbed in about 4 weeks. At this point there was also significant water on the inside of the cover. Either water is collecting along a joint line and is being drawn in when the internal air is contracting as the interior of the light cools, or the moist air being sucked in on each cooling cycle is condensing out on the interior and is building up over time. What I hope to acheive using forced ventilation will be to prevent the build up of mositure within, reducing to similar levels when we open & reseal the standard light covers with moist air within. If there is standing water currently being sucked in through a joint line then the pressure loss of the added fans, stationary or not, should help prevent this. The ventilation will also lower the internal temperature to be similar to the outer cover and should therefore reduce the chance of condensation appearing.
To try and prevent airflow dead zones within the headlight and prevent flow via the path of least resistance, I am reducing the exhaust flow to around 65%. Hopefully this will be enough but time will tell. Below is a set of mounts for one headlight: On the right is the fan blowing into the housing and on the left the resistricting exhaust baffle. A dust filter will be mounted on each.
Yes, the temperature controller could be end up being replaced with a simple thermal switch if it proves troublesome. At the moment it is a great way of letting me fine tune the system to work out the best switch on/off temperature is. Once I am happy with the system then I could purchase a temperature switch with the relevant value. I do want to run the system after the ignition is turned off and I did think about mounting the thermocouple inside one of the light units, but I fear that on hot sunny days the fans could run constantly. Apart from that, locating it within the headlight could be good as it could cool down as required and then re-cool any heat soak from the engine bay as and when required.
Whilst replacing the coils I too was thinking of making a new set of covers to aid cooling. I was considering venting front & rear to gain air flow, but when stationary and once parked the heat would build up again. It certainly would be a tough environment for a set of fans at 90+ deg C. A tricky one plus I don't know if attempting to cool this area would have a negative effect on the engine.
Still no filters yet
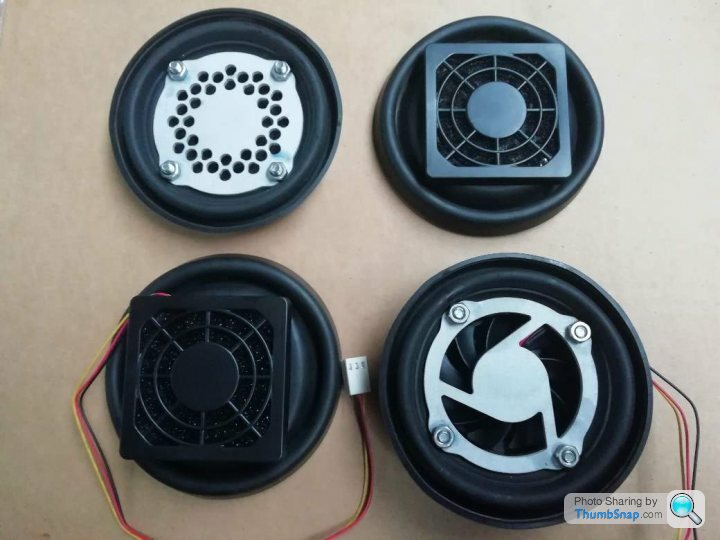
The filters arrived today!
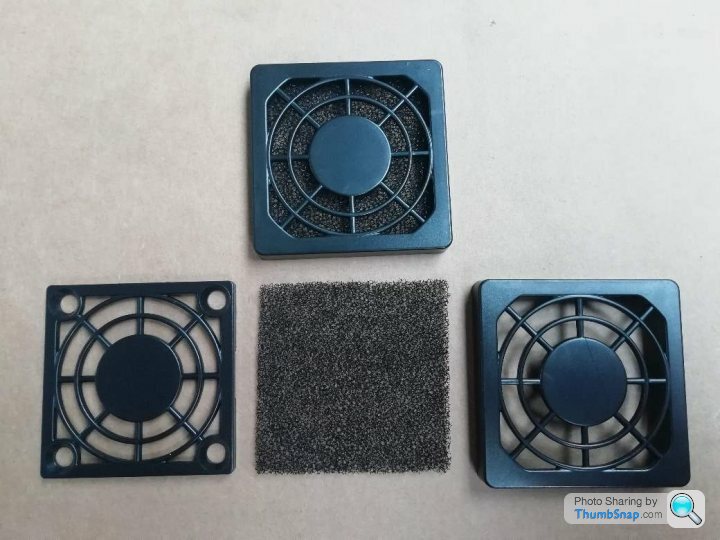
They are a sandwich of plastic parts with a foam filter in between. I treated the inlet filters with some air filter oil which aids dust catching and helps to repel water.
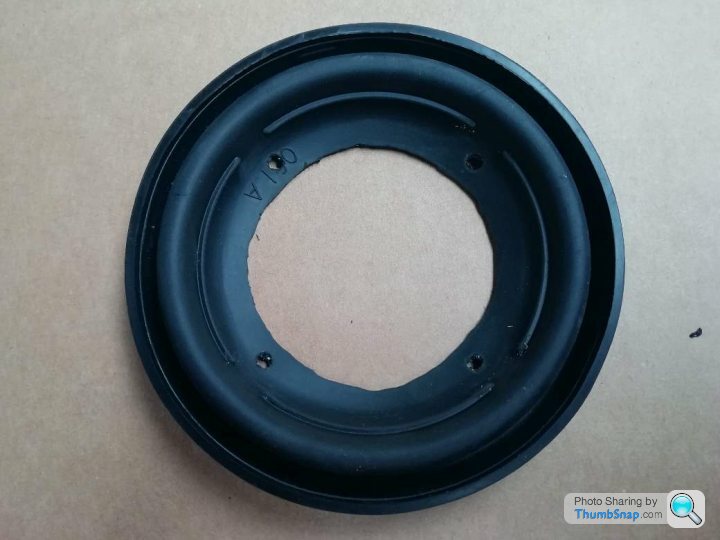
My method of mounting is quite simple: Modify the existing rubber plugs. Finding center:

Cut out with scissors and drill:
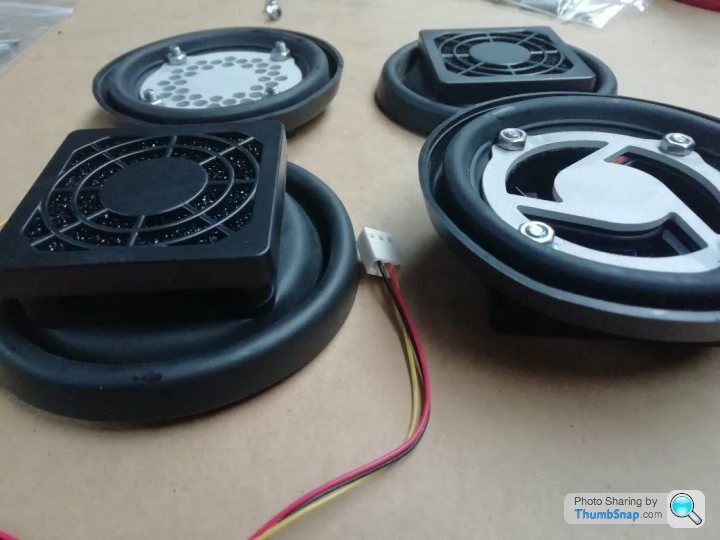
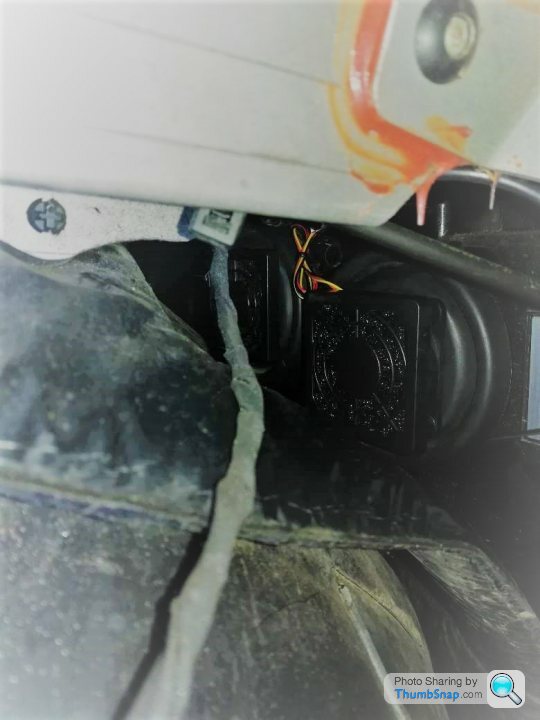
Then it is a simple case of bolting the assemblies together with M4 stainless steel screws. Clear inlet and 2/3 restricted exhaust:
Just pop them onto the back of the headlights and connect to the leads that I installed previously:
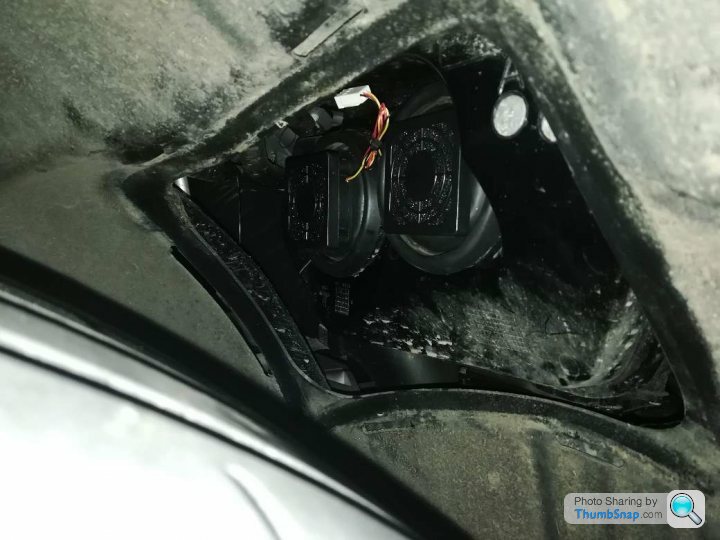
Using the original rubber plugs allowed me to install without having to remove the road wheels for access so it will be a quick job if I ever have to replace a fan unit. The system is now fully functional but will need tested over time, although how quickly depends on how well I can avoid the gritter lorries. I will update with the results.
They are a sandwich of plastic parts with a foam filter in between. I treated the inlet filters with some air filter oil which aids dust catching and helps to repel water.
My method of mounting is quite simple: Modify the existing rubber plugs. Finding center:
Cut out with scissors and drill:
Then it is a simple case of bolting the assemblies together with M4 stainless steel screws. Clear inlet and 2/3 restricted exhaust:
Just pop them onto the back of the headlights and connect to the leads that I installed previously:
Using the original rubber plugs allowed me to install without having to remove the road wheels for access so it will be a quick job if I ever have to replace a fan unit. The system is now fully functional but will need tested over time, although how quickly depends on how well I can avoid the gritter lorries. I will update with the results.
Hi Jonny,
I included a filter on the exhaust purely to stop insects & such entering the headlight housing and I didn't oil the exhaust as I didn't see much point. The only reason why I oiled the inlet was because the foam looked pretty open to me and I want to prevent dust. I had the same thought as you about the oil misting, but I'm hoping that the product does what it says it does: The oil semi dries so it is tacky and I did ensure that I squeezed all excess out. Hopefully the fans won't be too powerful for it. The option is there to replace the foam with another filter product anyway.
Changing or cleaning the filters is no problem at all on the DB9 from within the wheelarch. I will pull the bungs off to service off the car. To remove & replace both sides would be a matter of minutes, no need to remove the wheels. Actually thinking about cleaning, I think I will just replace the filter foam for all the size of the squares. Handily. you can see the condition of them from under the bonnet:
The filter & motor mounts were CNC'd by myself. Sure, I could help you out with these
I would be interested in following your build. If you are going for a fixed thermostatic switch, I think 70degC would be a good start
Gavin
I included a filter on the exhaust purely to stop insects & such entering the headlight housing and I didn't oil the exhaust as I didn't see much point. The only reason why I oiled the inlet was because the foam looked pretty open to me and I want to prevent dust. I had the same thought as you about the oil misting, but I'm hoping that the product does what it says it does: The oil semi dries so it is tacky and I did ensure that I squeezed all excess out. Hopefully the fans won't be too powerful for it
. The option is there to replace the foam with another filter product anyway.Changing or cleaning the filters is no problem at all on the DB9 from within the wheelarch. I will pull the bungs off to service off the car. To remove & replace both sides would be a matter of minutes, no need to remove the wheels. Actually thinking about cleaning, I think I will just replace the filter foam for all the size of the squares. Handily. you can see the condition of them from under the bonnet:
The filter & motor mounts were CNC'd by myself. Sure, I could help you out with these
I would be interested in following your build. If you are going for a fixed thermostatic switch, I think 70degC would be a good start
Gavin
It didn't take too long to test the system!
I was slaloming it through a muddy quarry today spectating at an offroad event, so I got lots of mud & moisture up into the arches. I forgot to look at the lights until I got home but they were clear, though I did notice that I need to drop the switching temperature. Where I have the thermostat mounted on the radiator, it only activates as the radiator temperature increases to 70degC whilst stationary. I think I will try 65deg to get it to run some of the time whilst driving.
On arriving home I hosed the mud from the arches and condensation appeared in one headlight. As soon as the fans started the headlight started to clear quite quickly but it did slow up a lot towards the front of the headlight. It only took about 15 minutes to totally clear the light
PS Jonny, no pm yet or I just can't find it!
I have my fans blowing into the headlight light unit with a slightly restrictive exhaust to try and prevent dead air spots. I haven't seen the AMupgrades chimney vent, but from the description, you'll definitely want to blow air in with the fan. Do make sure the chimney vent has a filter also to prevent bugs entering the headlight.
Gassing Station | Aston Martin | Top of Page | What's New | My Stuff