Drowned V8 Vantage
Discussion


Hey everyone!
I originally posted this in another forum but it is shutting down, so copying over here. I am going to dump what I have so far, and update as I continue.
A mate and I have been talking for a few years now about buying a project car for us to work on, that would be fun to drive, easy to learn the tools on and relatively cheap.
With the unfortunate flooding at the beginning of the year meaning a glut of cars with no appreciable mechanical damage coming up for auction, as stat write offs, we thought this might be a good time to buy something for cheap, that we could fix up and take to the track on weekends.
There were many choices for which parts would be relatively cheap and available, Toyota 86's, fast hatches, we even thought a family sedan stripped out and put on better suspension might be fun!
This.... did not pan out.
Between us we have changed a radiator on a Kia Cerato, completed a pre-apprenticeship certification and installed an oil cooler on a 370z.
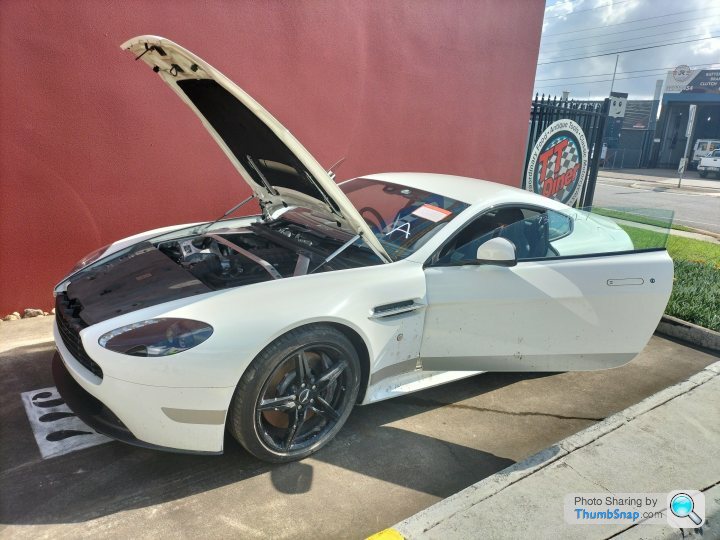
Introducing..... a flooded, no keys, stat write off... 2015 Aston Martin Vantage v8 GT.
What have I done.
I originally posted this in another forum but it is shutting down, so copying over here. I am going to dump what I have so far, and update as I continue.
A mate and I have been talking for a few years now about buying a project car for us to work on, that would be fun to drive, easy to learn the tools on and relatively cheap.
With the unfortunate flooding at the beginning of the year meaning a glut of cars with no appreciable mechanical damage coming up for auction, as stat write offs, we thought this might be a good time to buy something for cheap, that we could fix up and take to the track on weekends.
There were many choices for which parts would be relatively cheap and available, Toyota 86's, fast hatches, we even thought a family sedan stripped out and put on better suspension might be fun!
This.... did not pan out.
Between us we have changed a radiator on a Kia Cerato, completed a pre-apprenticeship certification and installed an oil cooler on a 370z.
Introducing..... a flooded, no keys, stat write off... 2015 Aston Martin Vantage v8 GT.
What have I done.
Edited by Dbeat16 on Monday 1st August 05:36
So far I have two issues:
One, the seats will not move. When power is connected the lights in the doors turn on, computer boots up but nothing from the seats. Anyone know if there is a manual way to move power seats?
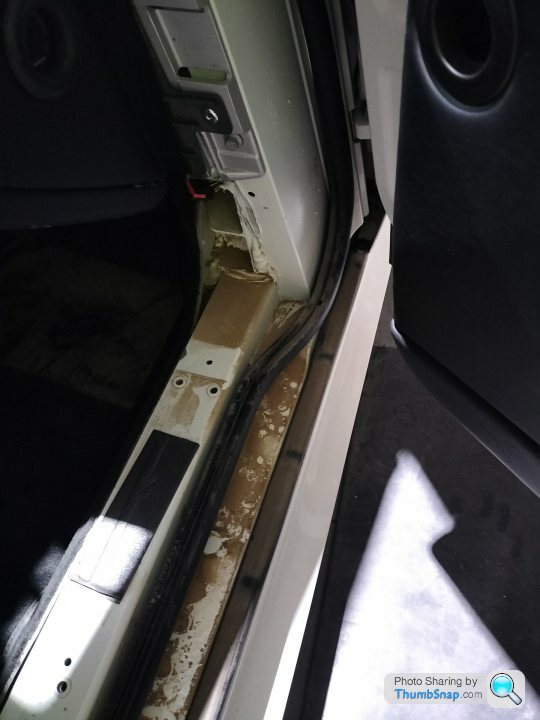
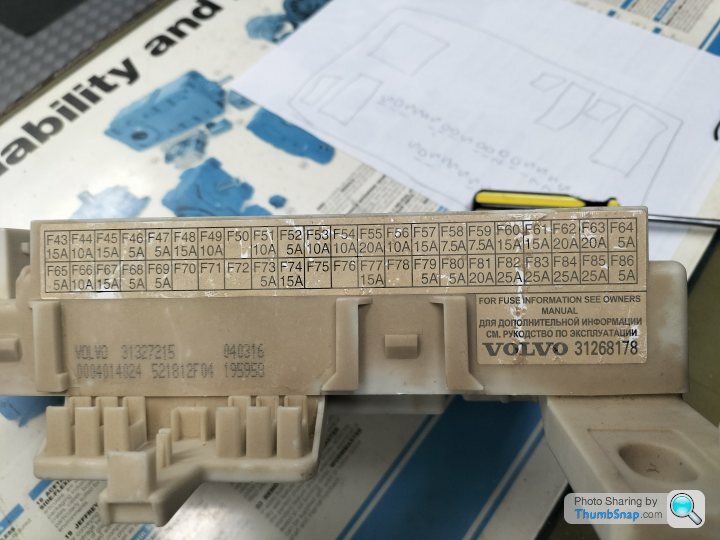
Two, the fusebox that houses the fuses for the seats has obviously taken water damage and all the fuses have corrosion. I have reached the fusebox (behind two plates, in the passenger footwell but cannot remove it due to a broken mechanism that would ordinarily let me disconnect all the wires.
Oh, almost forgot. There's also mold. A fair whack of mold.
One, the seats will not move. When power is connected the lights in the doors turn on, computer boots up but nothing from the seats. Anyone know if there is a manual way to move power seats?
Two, the fusebox that houses the fuses for the seats has obviously taken water damage and all the fuses have corrosion. I have reached the fusebox (behind two plates, in the passenger footwell but cannot remove it due to a broken mechanism that would ordinarily let me disconnect all the wires.
Oh, almost forgot. There's also mold. A fair whack of mold.
Well, the last couple nights have been fairly fruitful. Interior has had a good going over with vinegar and a rag to get the most obvious mold out, and smells and feels much better.
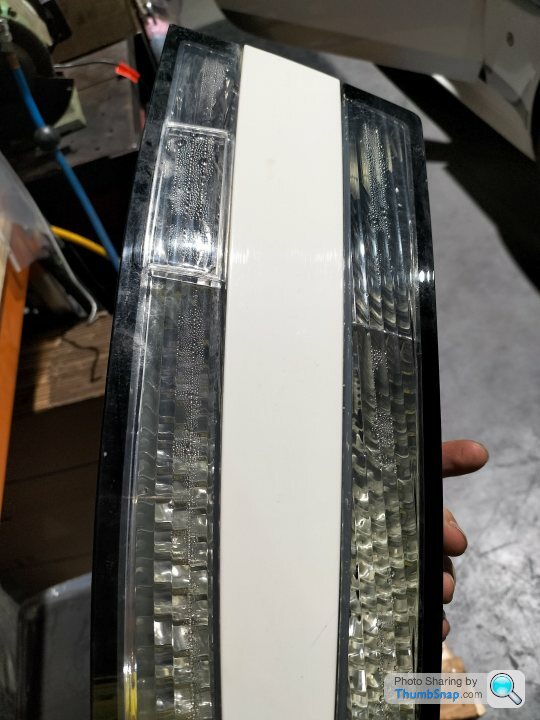
Both rear lights have a bit of a condensation leak so they have been taken out, three bolts each. They will be taken home for drying and safekeeping.
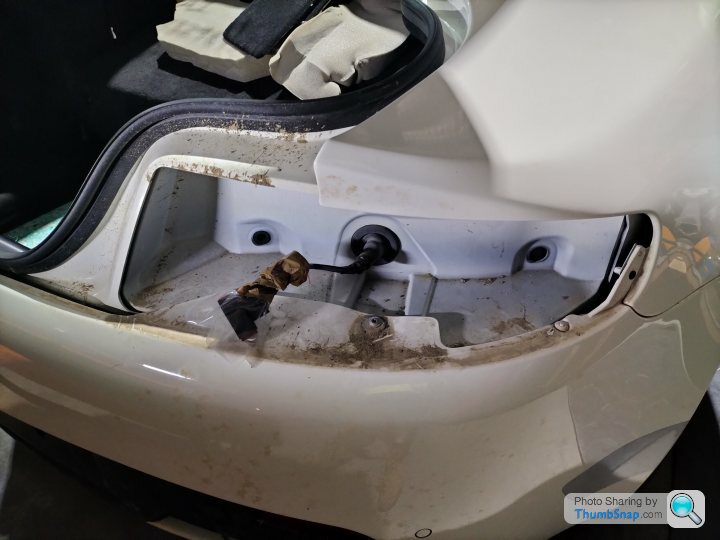
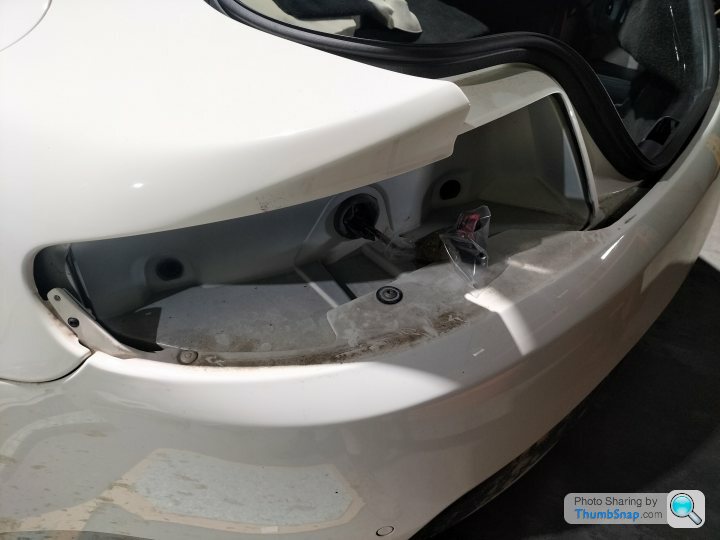
Taking the lights out has uncovered a lot more dirt and mud, which will be cleaned in the near future. This has also happened when i've removed the end-cap interior, for want of a better term, from both ends of the dash. you can see where the mud has flowed along the rail here, but not gone higher, so i am hoping the majority of electricals have survived nicely.
Speaking of, I am picking up a bunch of new fuses tomorrow which will hopefully fix the power seats issue and let me remove them for cleaning, also letting me get the battery out from behind the drivers side seat for charging and assessing.
Onwards!
Both rear lights have a bit of a condensation leak so they have been taken out, three bolts each. They will be taken home for drying and safekeeping.
Taking the lights out has uncovered a lot more dirt and mud, which will be cleaned in the near future. This has also happened when i've removed the end-cap interior, for want of a better term, from both ends of the dash. you can see where the mud has flowed along the rail here, but not gone higher, so i am hoping the majority of electricals have survived nicely.
Speaking of, I am picking up a bunch of new fuses tomorrow which will hopefully fix the power seats issue and let me remove them for cleaning, also letting me get the battery out from behind the drivers side seat for charging and assessing.
Onwards!
Fair bit of progress over the weekend, managed to get the fusebox out of the passenger side footwell and take it apart. it went from looking like this:


To this:
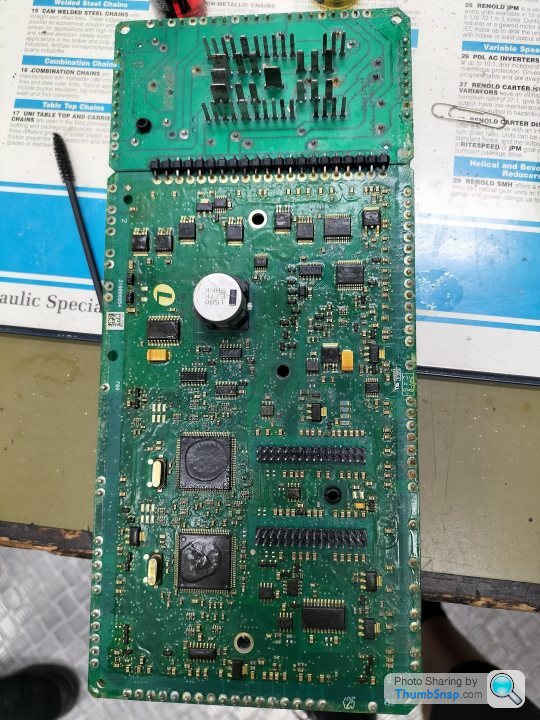
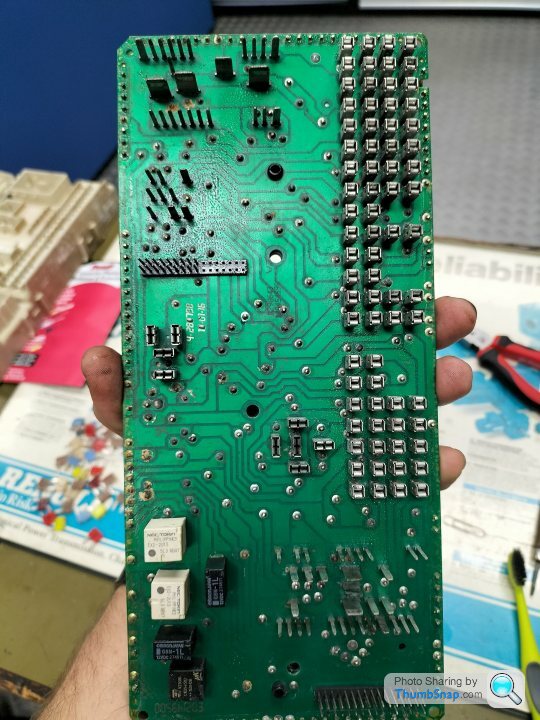
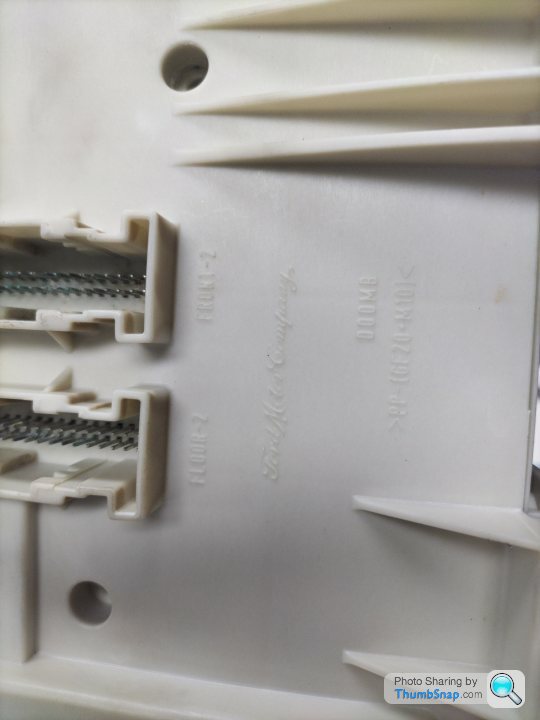
Using a combination of an air gun, iso alcohol spray and a toothbrush. I then used a connection cleaning solution on all the pins and fuse sockets, and installed new fuses all round. While doing all this I discovered some evidence of the parts bin they used for this car:
Finally I wanted to see if I could upgrade the wheels on my Z with my new asset, sadly:

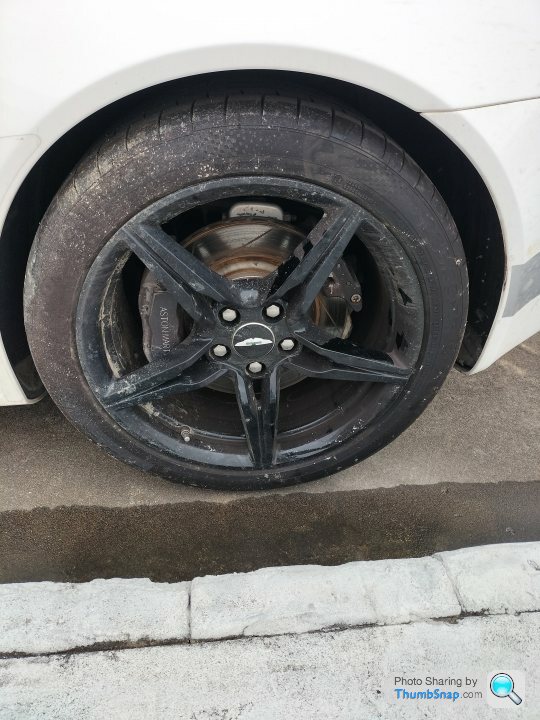
Decided to actually start the cleaning process on the exterior of the car, so started with the wheels today. The amount of clay that came off was absurd! Before and after was night and day, as you can see.

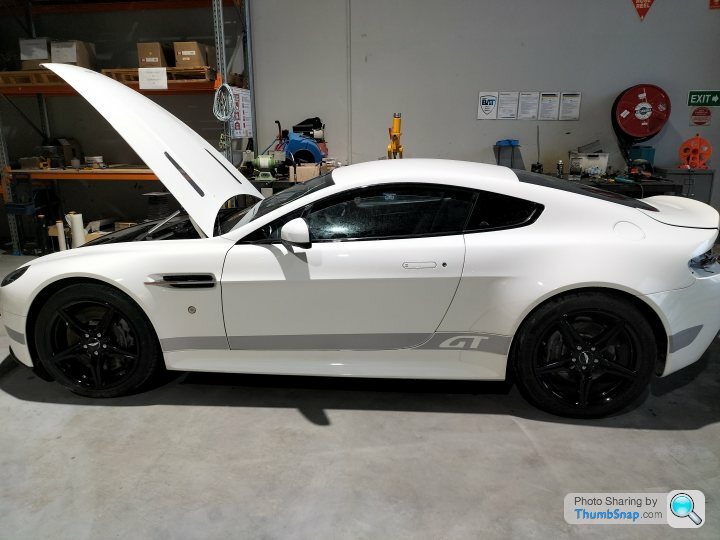
Gave the rest of the car as much of a bath as I could, what with the windows not yet able to close. Found a whole new shade of white underneath, she's much prettier now!
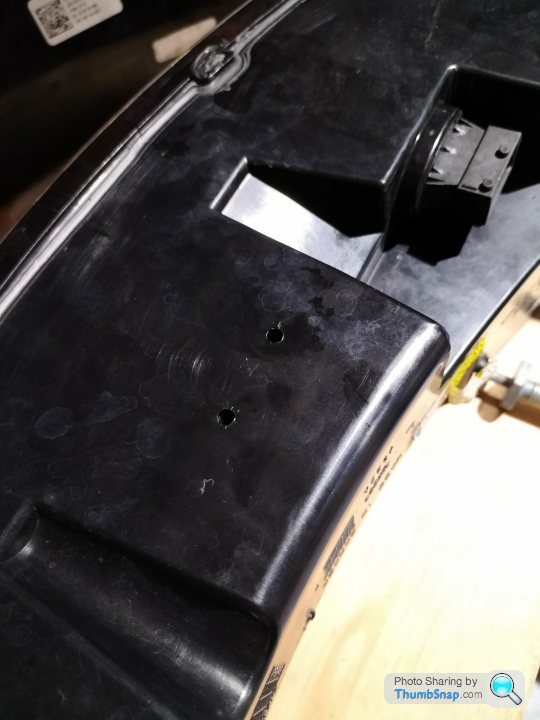
Finally, one of the scariest things I have to do, drill a hole (or two) in the rear lights to get the condensation out of them. I will need to reseal the entire outside of them but have to wait till they dry.
To this:
Using a combination of an air gun, iso alcohol spray and a toothbrush. I then used a connection cleaning solution on all the pins and fuse sockets, and installed new fuses all round. While doing all this I discovered some evidence of the parts bin they used for this car:
Finally I wanted to see if I could upgrade the wheels on my Z with my new asset, sadly:
Decided to actually start the cleaning process on the exterior of the car, so started with the wheels today. The amount of clay that came off was absurd! Before and after was night and day, as you can see.
Gave the rest of the car as much of a bath as I could, what with the windows not yet able to close. Found a whole new shade of white underneath, she's much prettier now!
Finally, one of the scariest things I have to do, drill a hole (or two) in the rear lights to get the condensation out of them. I will need to reseal the entire outside of them but have to wait till they dry.
Bit of work last night, started working on the body to pull it apart. Finally got the wheel liners out, of COURSE they had a single bolt that was under the rear bash plate, so I took that off too. Amazing to see the covering of mud on EVERYTHING, going to be a lot of cleaning in the future I think...

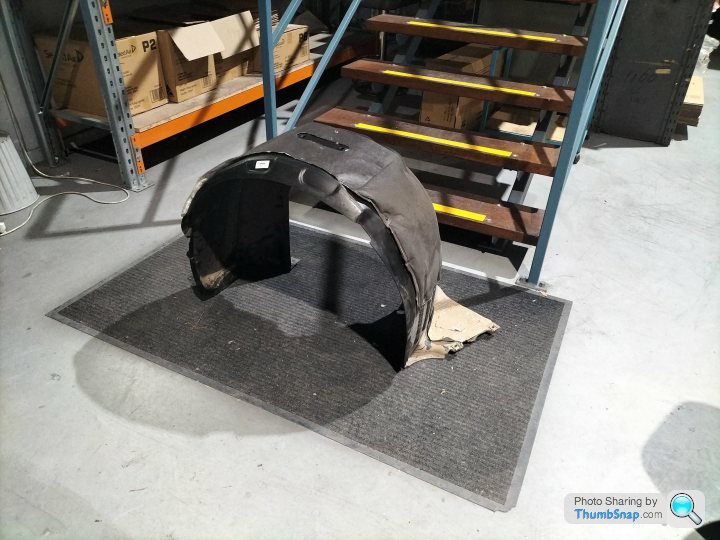
Note to self... BUY POWER TOOLS! spent a good half hour getting all these bolts from the bash plate with hand tools, never again.

Finally, check out how stiff the body is! This is with the car only jacked in front of the rear tyre, and have a look at the front, off the ground!
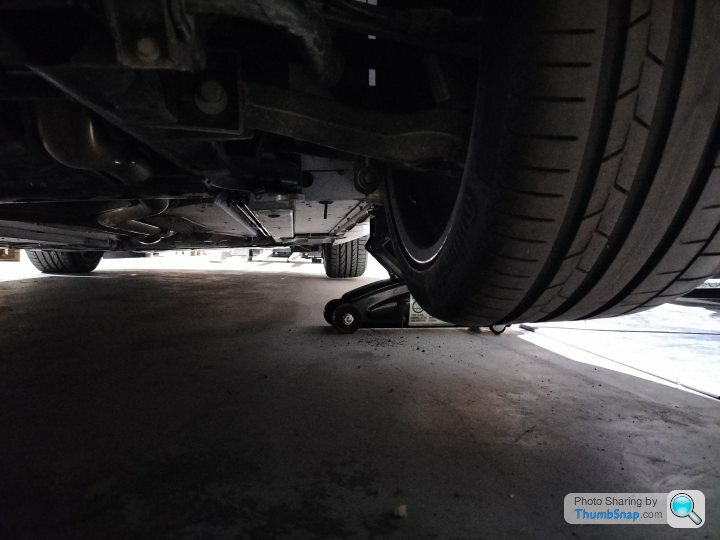
Note to self... BUY POWER TOOLS! spent a good half hour getting all these bolts from the bash plate with hand tools, never again.
Finally, check out how stiff the body is! This is with the car only jacked in front of the rear tyre, and have a look at the front, off the ground!
Pulled out the center console and found more dirt / mold, yay. I'll be pulling it apart completely to make sure I get it all, don't need a recurrence of blooms:
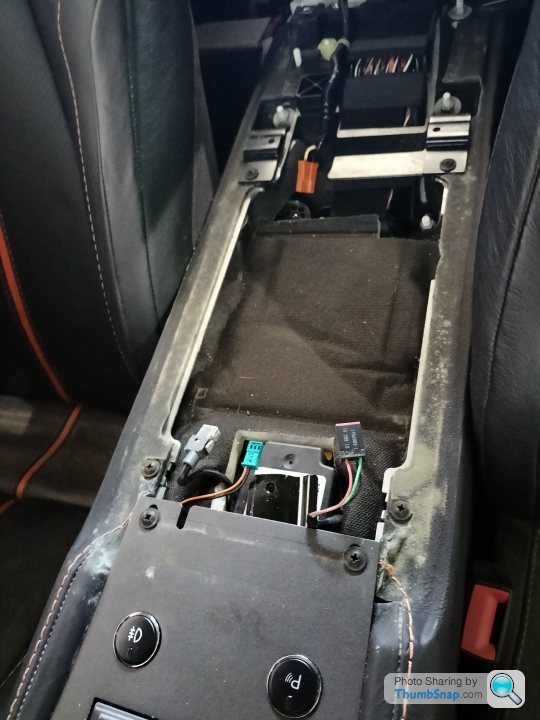

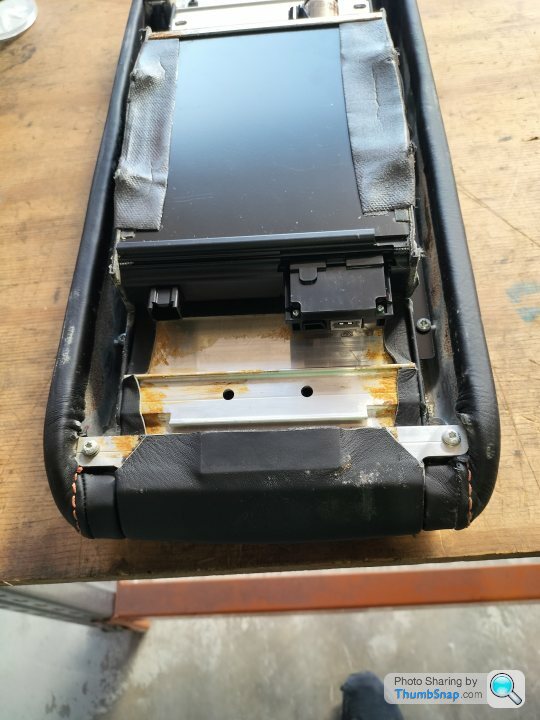
While on the interior, if anyone can confirm my hunch that this is the same controls as a Ford Fiesta?

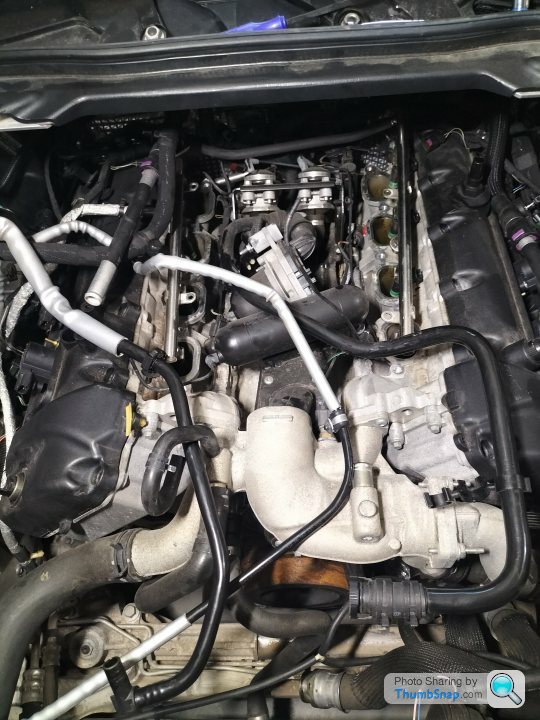
Pulled off the covers for the spark plugs, they seem easy enough to get to with the use of a wobble joint, may paint the covers before putting them back on. Still tossing up colour combinations as I will be painting the calipers at some point as well.


Took the car outside and pressure washed the bottom of it with the wheel liners off, down along the insides of the skirt and selectively on the engine bay, a bunch of muck came off and it's looking a lot better.
Finally I've pulled off the intake filters and box, they are located under the headlights so you can guess their condition. I'll be cleaning out the box and replacing the filters soon, hopefully can find some reusable ones.

While on the interior, if anyone can confirm my hunch that this is the same controls as a Ford Fiesta?
Pulled off the covers for the spark plugs, they seem easy enough to get to with the use of a wobble joint, may paint the covers before putting them back on. Still tossing up colour combinations as I will be painting the calipers at some point as well.
Took the car outside and pressure washed the bottom of it with the wheel liners off, down along the insides of the skirt and selectively on the engine bay, a bunch of muck came off and it's looking a lot better.
Finally I've pulled off the intake filters and box, they are located under the headlights so you can guess their condition. I'll be cleaning out the box and replacing the filters soon, hopefully can find some reusable ones.
romeodelta said:
Brave, but I admire your enthusiasm!
I'm no expert, but wouldn't it be wise to get all the electronic stuff working before tackling the cosmetics? I imagine there are a fair few ECUs on these that will need attention?
How are you going to tackle sourcing parts? I guess this is where a project like this will ultimately succeed or fail.
Best of luck
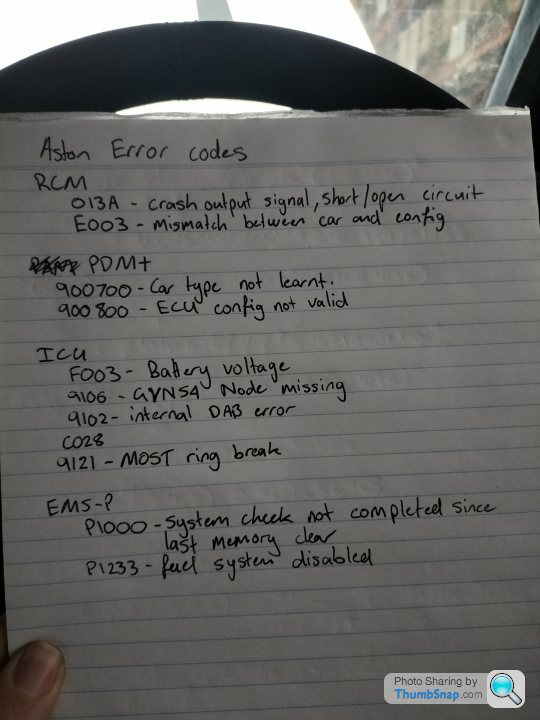
Hey Romeo, cheers for the input! At the point I was up to i didn't actually have the key as yet, so couldn't test a lot of the electronics. Since then I have acquired the key and set about doing so with a ThinkDiag 2 gadget, which has pulled up the following errors:I'm no expert, but wouldn't it be wise to get all the electronic stuff working before tackling the cosmetics? I imagine there are a fair few ECUs on these that will need attention?
How are you going to tackle sourcing parts? I guess this is where a project like this will ultimately succeed or fail.
Best of luck
I have pulled the RCM out and given it a clean, the board itself is fine but the bracket holding it was pretty powdery. After pulling it out I accidentally nudged the key in a little too far and the engine turned over, which it had not done previously, so I believe the RCM had been shorting.
As far as parts, luckily there is quite a bit of exchangeability between these and Ford, Land Rover etc. so non-cosmetic items will hopefully not be an issue. There does not seem to be any mechanical damage so suspension and other mechanical parts aren't a concern.
Catching up to the present, I have drained the oil and removed the filter while also taking out the thread, oops! looks like I need a bigger allen key.

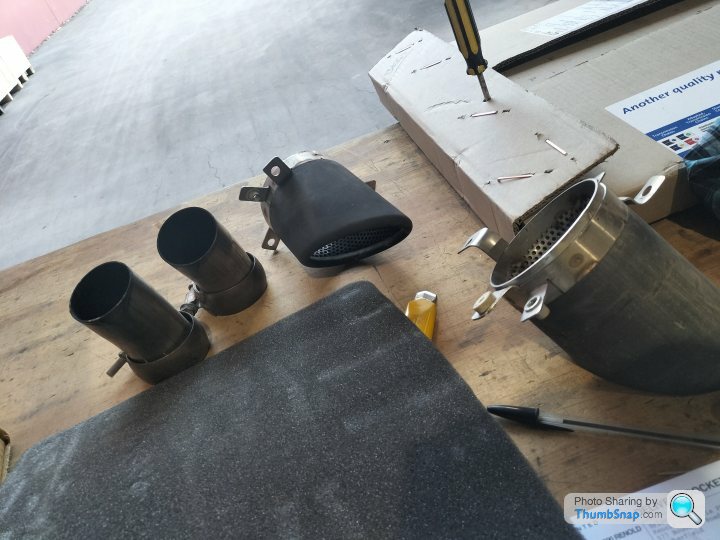
Exhaust has been removed as well, and spent the last few weeks drying out as the muffler was still sloshing clay laced water. It all looks to be in good condition though so can be safely set aside.

After this I have started pulling the front of the engine apart, taking off the oil sump, thermostat (I think) and the tensioner, along with the belt. Another Ford part!
Finally, after disconnecting everything i can (so many hoses/pipes/sensors) the RHS valve cover has come off, and luckily the interior of the engine looks clean, with only an oily residue. This is huge as if the seals had leaked into the engine it would have meant a rebuild. Sadly when checking the spark plugs I have bought the wrong ones, so hopefully will have the correct ones coming soon.
Cheers for reading, will update whenever I can, all feedback is welcomed! I am aware I have fully jumped in the deep end but so far it has been fun, and the goal to have my second dream car before 25 is keeping me motivated. TIA!
Exhaust has been removed as well, and spent the last few weeks drying out as the muffler was still sloshing clay laced water. It all looks to be in good condition though so can be safely set aside.
After this I have started pulling the front of the engine apart, taking off the oil sump, thermostat (I think) and the tensioner, along with the belt. Another Ford part!
Finally, after disconnecting everything i can (so many hoses/pipes/sensors) the RHS valve cover has come off, and luckily the interior of the engine looks clean, with only an oily residue. This is huge as if the seals had leaked into the engine it would have meant a rebuild. Sadly when checking the spark plugs I have bought the wrong ones, so hopefully will have the correct ones coming soon.
Cheers for reading, will update whenever I can, all feedback is welcomed! I am aware I have fully jumped in the deep end but so far it has been fun, and the goal to have my second dream car before 25 is keeping me motivated. TIA!
mike74 said:
It's the mold that would be the real no no for me with a car like that, it's likely taken hold in all sorts of places that are impossible to get at no matter how much you strip the car down, the seat internals etc.
Luckily everything above the seat bottoms has escaped this, the seats themselves (once i work out how to take them out without the motors working) will be sent off for new foam and the upholstery will have a thorough cleaning. Cheers everyone!
Neil, I have been hearing that a lot, I certainly have already used the FAQ already which has been a big help along with the service manual.
Graze, thanks for the interest! I'm in Brisbane, working out near the Archerfield Airport.
Iain, it certainly will be a track car as it is a stat write off, so can no longer be registered for the road again. i was hoping for it to have been misfiled but no such luck as it turns out! As is, I believe the brakes and suspension should suffice for the meantime, with some cooling ducts routed and higher DOT fluid. They are at least the standard of my 370z which I track so we will see.
Romeo, thanks for the confidence, I will be honest but I am winging it for the most part, learning as I go! They say hands on experience is the best route so looking to put that to the test.
jfdi, definitely all of the above!
LTP and Canoe, I guess time (and sanity) will tell.
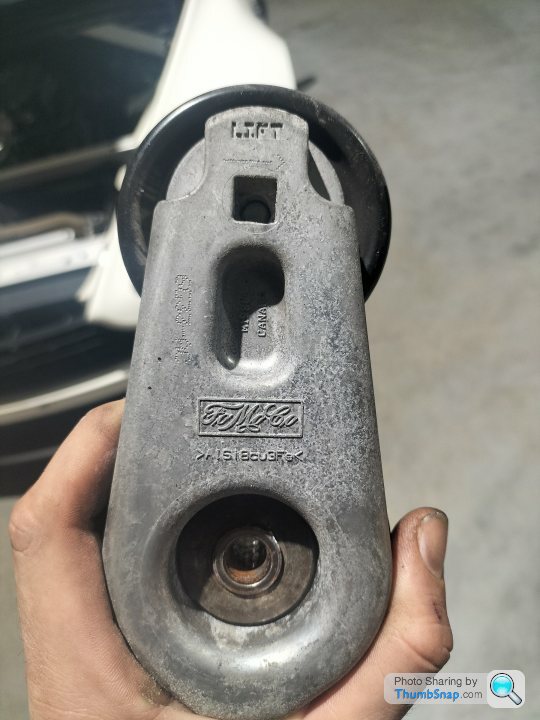
Some good news, after extricating the alternator and getting it tested, it is in perfect condition.
If anyone needs to do this, it is a matter of undoing the front bolt until it fouls on the front subframe, then levering the alternator towards the front of the car so the bushes around said bolt come forward. Pull these out with some vice grips and everything should come loose, there is only one more bolt on the underside.
Once everything is loose, unhook the electrics from the back and pull it out from the top, front of the engine, I needed to jack the engine itself up about 2mm to get it past.
Cheers everyone for the luck!
Working on the left hand valve cover now, in order to remove the intake manifold, and there is one single bolt that is giving me trouble. It is located just out of sight, and sits close (almost flush) with the cover itself, on an angle, under the brake lines. Now i can get a long sock onto it, but then the ratchet cannot be attached due to the brake lines. I could get a shorter socket but then that would not clear the valve cover. Seems my options are:
Drain the brakes > Remove brake lines > remove valve cover > remove intake manifold
Buy a flexible drill bit > hope it is flexible enough > remove valve cover > remove intake manifold
Certainly didn't think an intake manifold would have the brakes interfere with it!
As far as the electronics go, next time I have a free day and helping pair of hands I will be removing the LHS front quarter panel to access the ECM and give it a good going over. This means taking the door off to remove the panel which I have already had a test run of, so should come off pretty quickly. To anyone needing to do this for any reason, the hinge is fairly straightforward but the wire bundle for the electronics gave me a bit of pain. The rubber cap on the outside of the panel needs to be removed, this is easily done, but the connector is situated a good few inches in, so you need to pull the wires out until you reach it. This we only found out after a solid 15 minutes of looking at the service manual, swapping turns holding the door (which at this point was completely off the hinges) and generally being frustrated!
I am also still stuck on the seating side of things, and on the verge of jury-rigging a battery and wires to get the seat motors going as opposed to relying on the car controls as these just will not cooperate. If anyone has any ideas on this point let me know, I am willing to give everything a try.
Thanks for reading again, hopefully have a few more photos for the next update. Uni has started again so have a little less time to work on the car these days sadly.
BGB autosport said:
Great project and I wish you the best of luck.
My other advice is tbe leave the battery off until you've stripped, checked and cleaned EVERY electrical module below the flood line. The seat motors are likely on, but the modules are likely dead.
Stick a small sharp chisel through the seat mounting bolt heads and lift the seats out. ...
On your first point, that's the plan from now, I'm thinking this Saturday I will finally get to the ECM.My other advice is tbe leave the battery off until you've stripped, checked and cleaned EVERY electrical module below the flood line. The seat motors are likely on, but the modules are likely dead.
Stick a small sharp chisel through the seat mounting bolt heads and lift the seats out. ...
As to your second, well...

Scrump said:
That could be a big project!
If it is going to be a track car then why bother fixing and re trimming the seats? Would it not be easier, cheaper and better to fit some track oriented seats?
Good luck with it and keep us updated.
Definitely a big one!If it is going to be a track car then why bother fixing and re trimming the seats? Would it not be easier, cheaper and better to fit some track oriented seats?
Good luck with it and keep us updated.
It might just be cheaper, but I am trying to keep this as true to form as I can. The actual leather seems to be fine, so just the foam will need replacing, which should keep the cost down a fair bit!
Good news, neither or or the project are dead!
Have finished off my diploma so onto the fun things in life for a few months.
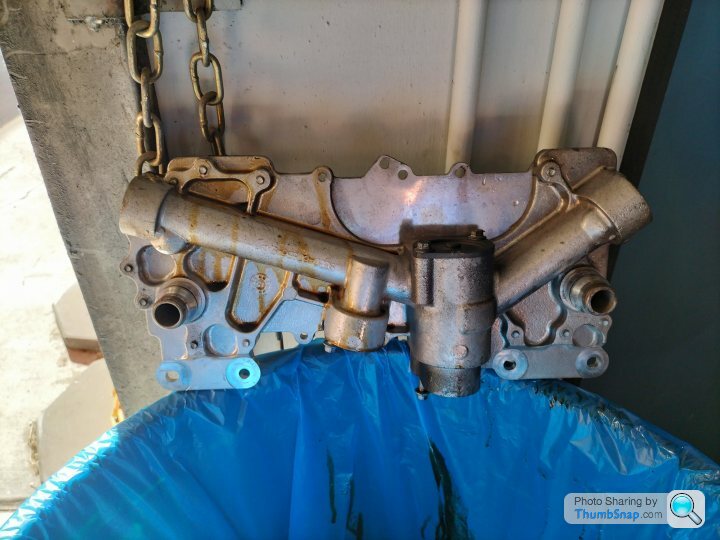
As an excellent start to this, I have finally removed the intake manifold, after scratching my head (and hands) for a few weeks. After unbolting the manifold from the block, I thought I would be good to go, but alas no. There is a plate bolted to the back of the engine that routes cables and pipes behind it, it was this that prevented the removal. By treating the engine as a bed I was able to get my hand around the back, and proceeded to act like a boy working a bra for the first time... feeling around without comprehension until it finally clicked! There are two 8mm bolts holding said plate on, so with a bit of cussing, a spanner (and spare ratchet after the spanner was dropped into the abyss) they finally released my prize:

I was rather surprised that there is nothing on the top or bottom plates, does anyone have any info as to their purpose?

Now, I have access to the proper guts of her and will be flushing and cleaning the engine, in prep for putting everything back.
As it goes, it all looks fairly clean, not too much crud so fingers crossed it all comes good.

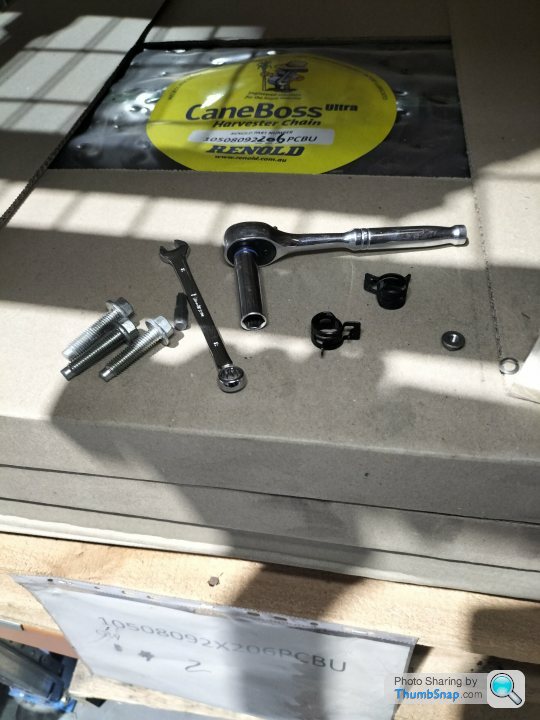
Final picture, of the rather remarkable collection of dropped items that I have now reclaimed; surprised I haven't found anyone else's 10mm!
For now, that's the end of the update, and the plan going forward is:
Replace spark plugs (at this point why not) -> Flush engine pipes -> Get new gaskets -> Bolt her back up -> Replace coolant and oil
Thanks all who read, and bye for now!
Have finished off my diploma so onto the fun things in life for a few months.
As an excellent start to this, I have finally removed the intake manifold, after scratching my head (and hands) for a few weeks. After unbolting the manifold from the block, I thought I would be good to go, but alas no. There is a plate bolted to the back of the engine that routes cables and pipes behind it, it was this that prevented the removal. By treating the engine as a bed I was able to get my hand around the back, and proceeded to act like a boy working a bra for the first time... feeling around without comprehension until it finally clicked! There are two 8mm bolts holding said plate on, so with a bit of cussing, a spanner (and spare ratchet after the spanner was dropped into the abyss) they finally released my prize:
I was rather surprised that there is nothing on the top or bottom plates, does anyone have any info as to their purpose?
Now, I have access to the proper guts of her and will be flushing and cleaning the engine, in prep for putting everything back.
As it goes, it all looks fairly clean, not too much crud so fingers crossed it all comes good.
Final picture, of the rather remarkable collection of dropped items that I have now reclaimed; surprised I haven't found anyone else's 10mm!
For now, that's the end of the update, and the plan going forward is:
Replace spark plugs (at this point why not) -> Flush engine pipes -> Get new gaskets -> Bolt her back up -> Replace coolant and oil
Thanks all who read, and bye for now!
Edited by Dbeat16 on Wednesday 16th November 01:35
Graze01 said:
Declan
congrats on the Diploma
good to hear its progressing - would love to see the photos if you get to upload them
Graeme
Cheers Graeme! I have uploaded them now for viewing pleasure.congrats on the Diploma
good to hear its progressing - would love to see the photos if you get to upload them
Graeme
As far as I know it hasn't run since it was recovered, it was simply put on a tow truck, immediately assessed as a write off then sent to an auction yard. This coming from AM themselves so would tend to believe them.
Hi All
Back again, mental few months. Broke up with the gf, removed an engine, retooled my garage into a workshop / storage area, and have a significantly different Aston than before.
On reading the comments, I did as Spider suggested and threw a camera down the cylinders to test my luck, aaaaand drum roll please:
Yeah, rust.
After evaluating my choices, I decided there was only one real avenue, and bit the bullet. That weekend I organised a hoist and with a few mates, pulled the heart from the girl. This went very smoothly, for all that they are these cars come apart pretty well. Only real sticking point was removing the gear linkages from the top of the box, obviously the torque tube is in the way but with an assortment of mirrors, lights, patience and small hands, the job was done. We pulled the front subframe down with the engine and tube attached, removed the engine and put it safely on a pallet, then bolted the frame back under the car, revealing the new rally spec height the car would ride at.
With an unrestricted engine, I pulled everything off in preparation to deliver to an engine shop. Luckily, the engine has a very flat bottom so sat great while i worked on it, no engine stand required. Everything comes off easily, only sticking points were really the header bolts (rusted) and the the singular sensor located on the bottom of the engine, luckily a mate rocked up to help roll the engine over to access it. All this done, the long engine block as I believe it is called was delivered to an engine shop around the corner.
Around this time, while waiting for an update on the engine, I gave the seats another crack, and with success! I could JUST reach the little screws holding the underseat motor covers on and once pulled off, revealed the rotor. Spinning this for around 20 minutes PER DIRECTION, by hand, got me the revealed rail bolts and after a fair bit of fiddling with the wiring (Why they decided to have 3 different connection types in one area is beyond me), the seats were pulled from the car. Following them was the carpet and padding, which revealed a very dusty, yet thankfully dry and not mouldy, stripped interior.
Rails were pulled from the seats and are awaiting a trip up north to be reconditioned and have their motors replaced, while the seats themselves languish in my bedroom as a talking piece and trip hazard. They were brought to an upholstery shop for appraisal, where I was told that after a little work on the foam and stitching they could be brought fully back to the beautiful seats they once were. While this is a good thing for sure I am leaning towards a bucket seat as befits a track car, and while saying THAT, there are more pressing matters that need money thrown at them.
SO, the engine. After a teardown, the following was deduced: 2 pistons are seized in their sleeves, meaning both will need to be replaced, while the other 6 linings have only very minimal rust showing and a simple shave of 0.02" would be enough to save them. Obviously as part of a teardown all gaskets will need to be replaced, new bolts brought in, bearings to be thrown away (never reuse), etc. Which brings me to my current state as of tonight, with an excel sheet full of PN's and prices, enough schematics and identifying procedures to drown in and a choice to make.
I can source all the parts for this exclusive, powerful engine, for ~4600 AUD including delivery, minus the pistons, then another 8k for labour to fit everything to spec. It would seem that asking for oversize pistons creates a general riot as everyone discovers that while there are in fact 3 different grades of piston for this car, none of them seemed to know what the differences were and old, dusty tomes needed to be consulted. As it turns out, they are simply grades of exactly how precise a fitment the engine needs, and can be found on the LHS of the bloc, on the bottom. 8? I believe number in a row will show either 1, 2 or 3 which denotes the grade. The other items to look out for are the Main and Conrod Bearing sets, as these have colour options that change depending on the engine year, maiden name of the worker who signed off on the car and which direction the sun was relative to the engine when it was made. In all seriousness, it was only through the help of AM Works that all of this was worked out so huge thanks to them, if they ever read this.
Finally, the pistons. Grade 2 is needed for my engine and of course they are the most expensive option of the 3, coming to around 6500 AUD which includes the extra 6 liners that will be needed in addition to the 2 already priced into labour cost above. Therefore, my new goal in life (apart from staying on top of uni through all this) is to find some custom pistons available in Brisbane for cheaper than this, which I do not believe is an impossibility.
I will try and get the photos I have taken over this time up but my computer no longer likes photobucket it seems. Regardless, I will also be trying to update this more as I go. Any questions on parts while they are out of the car, let me know, as well as any about the engine PN's I have amassed. Until next time!
LTP said:
Stupid question. Won't shaving (honing?) 20 thou out of the bores completely invalidate any original piston fit and mandate unique oversized pistons being required? I find it difficult to believe that the original 3 grades of pistons (required, I believe, to achieve optimal clearance to the bores and an established practice back to the days of BMC 'A' and 'B' series engines) would accommodate a 020" increase in diameter.
I appreciate that you're injecting humour into your posts and probably understand the various colour options for the main bearings better than you imply, but in case not there was a thread a good few months ago created by someone rebuilding an Aston V8 that included the AML chart showing the various combinations of bearing housing bores and crank journal diameters which allowed the selection of the correct colour bearings (and these didn't need to be used as matched colour pairs, if memory serves correct) to give the required clearance. If I recall correctly achieving the measurement resolution necessary required the use of CMM-type levels of accuracy.
Hey LTP, you're correct in that assessment, the choice WAS between either 8 new sleeves and 8 new, OEM pistons OR 2 new sleeves and 8 new, oversize pistons. The choice was made for me though as the shop called and let me know that we can reuse 6 pistons, so the list is now 2 new piston assemblies, 6 sets of piston rings, spacers and oil control. I will be ordering everything tomorrow all things going well.I appreciate that you're injecting humour into your posts and probably understand the various colour options for the main bearings better than you imply, but in case not there was a thread a good few months ago created by someone rebuilding an Aston V8 that included the AML chart showing the various combinations of bearing housing bores and crank journal diameters which allowed the selection of the correct colour bearings (and these didn't need to be used as matched colour pairs, if memory serves correct) to give the required clearance. If I recall correctly achieving the measurement resolution necessary required the use of CMM-type levels of accuracy.
Edited by LTP on Tuesday 28th March 10:13
Thank you for the thread advice, I will try and find it. I am 99 percent sure on the colours after input from the shop and AM themselves but a little more confirmation is always nice!
Cheers,
Declan
Gassing Station | Aston Martin | Top of Page | What's New | My Stuff